octopus usb controlleroctopususbcontroller.com/assets/ouc_user_guide-1.34.pdfoctopus usb controller...
TRANSCRIPT

Octopus USB Controller User Guide (version 1.34)
Contents Introduction .................................................................................................................................... 2
Compatibility ................................................................................................................................... 2
Installation/Licensing/Activation .................................................................................................... 3
General Instructions for Use: .......................................................................................................... 4
General Set-up and Usage: .......................................................................................................... 4
Launching Dragon NaturallySpeaking: ........................................................................................ 5
Programming a key on your USB Microphone, SpeechMike or Foot Pedal (see separate instructions for programming a USB keypad): ............................................................................ 5
Programming a key on your On-Board Keyboard or USB KeyPad: ............................................. 6
Programming a Device Not Recognized by OUC ......................................................................... 7
Details on Assigning Functions to Buttons: .................................................................................... 8
Boilerplate Text: .......................................................................................................................... 8
Dragon Commands: ..................................................................................................................... 9
Dragon HotKeys: .......................................................................................................................... 9
Keyboard Emulation: ................................................................................................................. 10
Launch: ...................................................................................................................................... 11
Windows: ................................................................................................................................... 12
Custom Script: ........................................................................................................................... 12
Advanced: .................................................................................................................................. 13
Altering Octopus USB Controller Desktop Appearance and Start-up .......................................... 15
Exporting and Importing User Device Configuration Profiles ....................................................... 16
Dragon Template/Field Navigation Functionality ......................................................................... 16
Utilizing the Dragon Microphone Indicator Functionality ............................................................ 17
Appendix ....................................................................................................................................... 18
Compatible Devices: .................................................................................................................. 18
Non-Compatible Devices: .......................................................................................................... 19
Windows Shortcuts: .................................................................................................................. 19
Working with Microsoft Excel: .................................................................................................. 19
Location of Common Programs/Executable Files ..................................................................... 19
Opening Browser with Pre-specified Search ............................................................................. 20
Sources of Additional Information: ........................................................................................... 20
2
Caveats on Using Octopus USB Controller ................................................................................ 20
Introduction The Octopus USB Controller (OUC) is designed to allow interfacing of a variety USB control devices with a Windows-based computer. This application has many unique features including:
Compatibility with most commonly used USB Human Interface Devices (HID) with user selectable buttons or pedals, including those listed below (see full list of compatible devices at the end of this guide):
o all SpeechWare devices (TableMikes, hand-held keyboard, and single and triple USB foot pedals)
o a variety of hand-held USB microphones, including those made by Dictaphone/Nuance, Grundig, Olympus and Philips
o most commonly available USB foot pedals o all commonly marketed USB keypads
Ability to simultaneously support multiple USB devices (multi-device awareness)
Support for “hot swapping”; i.e. connection or exchange of peripherals on the fly without restarting the application
Extremely intuitive user interface facilitating ease of use
Exporting and importing of device profile to facilitate sharing of device settings
Advantage of having a single interface with multiple devices to facilitate ease of use across large organizations
Using this control application, you can initiate a variety of actions with applications on virtually all recent vintage Windows operating system, including:
Inserting blocks of predefined “boilerplate” text
Pressing a keyboard key or key combination with your hand-held USB microphones and/or USB foot pedals
Emulating a variety of native Dragon NaturallySpeaking commands
Emulating any user-defined Dragon NaturallySpeaking command
Initiating a variety of Dragon hot-keys
Opening any application, document, folder or web page
Initiating a number of operating system functions such as opening Task Manager, moving through applications on the desktop, clearing the desktop and more.
Programming separate functions to the pressing and releasing of a key, button or lever
Executing sequential repetitive custom scripts involving consecutive steps involving any of the above functions
Compatibility Operating Systems: Octopus Control Utility is compatible with most common Windows operating systems, including Windows XP, Vista,7, & 8. USB Devices Compatibility: A list of currently compatible devices shows up in the “Active USB HID Device ..” drop-down in the main OUC window. Also see a list of currently compatible devices in the

3
appendix of this User Gide. Realize, however, that this list is constantly growing. For an updated list of currently compatible devices, also visit http://www.tablemike.com/en/download-applications.php or http://www.USBController.com Keypad Compatibility: to date, all commonly marketed USB keypads have been found to be compatible with OUC.
Installation/Licensing/Activation
Installation: Octopus Control Utility is installed by download from the Internet. Installation is straightforward and involves the following steps:
Unzip the downloaded file by right-clicking on it and selecting “Extract Files”
Click on the icon labeled “Setup”
Follow all subsequent instructions (installation takes less than 1 minute)
Activation: OCU can be used on a trial basis for 3 instances before formal licensing and activation is
required.
Entering an activation code: if you purchased your copy of OUC it should have been accompanied by an activation code. This code can be entered as follows: Navigate to Help > License activation …. On the window that shows up, enter your activation and other requested information.
If you downloaded a trial version of OUC, you will need to purchase an activation code to use the product after the initial 3 free uses have ended. If you obtained the download from the Octopus USB Controller website, you can find a list of current OUC resellers on this site (www.OctopusUSBController.com) If your trial download came from a certified reseller, you will see a link to your reseller on both the activation screen and on the product splash screen. Once you purchase an activation code, enter it using the method described above.
Upgrading: During the period during which you are eligible for free upgrades, when upgrades become available you will be automatically notified of this upon opening OUC and will be given the option of downloading the update immediately. Alternatively, you can check for the availability of updates by navigating to Help > Update. Either way, you will be walked through the updating process. If an update cannot be accomplished this may be a result of not having administrative privileges on your computer. In such cases, we recommend that you follow this procedure:
Click the “cancel” button to end the update process
Close OUC
Find OUC from the Windows Start menu (All Programs > SpeechWare > Octopus USB Controller
Right click on Octopus USB Controller and select “Properties” and go to the “Compatibility” tab.
Check the box “Run this program as an administrator” and click the “Apply” button
Re-launch OUC and re-start the update procedure
Licensing: Standard OUC licensing allows use on two computers without limit. Use is accompanied by free upgrades and support for a period of 1 year. After this one-year period it shall be necessary to

4
purchase a new activation code in order to allow continued product upgrades and support. To view the End User Licensing Agreement (EULA) please visit www.OctopusUSBController.com .
Support: Support of OUC is provided on a complimentary basis for one-year following your purchase. Initial support is provided by the reseller from which you purchased your activation code. SpeechWare is very interested in knowing if you identify an incompatibility or bug and such issues can be reported directly to SpeechWare by means of the functionality reached at Tools > Report incompatibility or problem …
General Instructions for Use:
General Set-up and Usage:
Complete installation as detailed above
Plug in your compatible USB device either before or after starting the utility. Actual programming for your specific device cannot take place until after the USB device is attached and recognized by Windows and OUC.
Launch OCU from the Windows Start Menu or from a desktop icon; by default it will appear only in the tool bar – show the full application control window by right clicking on the toolbar icon and selecting View > Floating Window
Device Detection:
USB microphones, foot pedals, TableMikes: Assuming you have a compatible device connected, it will be automatically detected and will show up as an active device on the “Active USB HID Device to configure” dropdown on the main OUC screen. Connected active devices will be shown in the upper area of the drop-down and in bold font, while the list of non-detected devices is grayed-out and listed below.
If you select your device from the drop-down menu, you will see a visual representation of your device (see image below which demonstrates appearance of connected Nuance/Dictaphone PowerMic II). If you have multiple devices attached, they will all be sensed by OUC and will work, although you will need to select your device from the “Select Device” drop-down menu in order to program behavior for that device. Until you program your own behavior for each button or pedal on each device it will follow the default behavior chosen by SpeechWare.

5
Keypads: Keypads are seen and programmed by selecting “Active Keyboard & External Keypads” from the Active USB HID Device menu. Until you actually program a key (described in detail below) you will not see a representation of the individual keys on the device. Non-recognized devices: If your device is not one which is pre-programmed by SpeechWare
it will not show up on the drop-down menu and will need to be “learned” by OUC using the “AutoLearn” functionality described below.
Launching Dragon NaturallySpeaking: If you are planning to use OCU with Dragon, you can launch it at any time, using the normal method for launching Dragon from the Start Menu, desktop shortcut, etc. If Dragon isn’t launched when you launch OUC the only consequence is that any buttons on your device programmed for Dragon-related functions will be grayed out and will not work until you launch Dragon.
Programming a key on your USB Microphone, SpeechMike or Foot Pedal (see separate instructions for programming a USB keypad): Once your USB device is selected from the Active USB HID Device drop-down menu you will see that each button on your connected device is assigned a name on the left-hand column of the main OCU application window. Directly to the right of the name column is the list of currently assigned actions for each button. If you are uncertain of where a specific button on your device shows up on the list, simply push the button on your hand-held device or foot pedal and the associated line will be highlighted. Follow these basic steps to program a button (more detailed information on each programming function is shown later in the User Guide):
Double click on the line associated with the button you wish to program. This will open the “USB Device Settings” window shown below.

6
You will see there are 8 categories of button assignment:
o Boilerplate Text: add text into the area and then with a single press of a button or pedal
it will be inserted at the cursor location in any word processing application or text window.
o Dragon Commands: this is the area where you can assign a number of pre-configured or user-defined dragon commands to a button push.
o Dragon hotkeys: this is a series of functions which can typically be assigned from the Dragon Options > hotkeys menu and include programming a button to turn the microphone on/off, open the dictation box, etc.
o Keyboard Emulation: this area allows you to program a key depression on your USB device to emulate a single key or key combination. It includes the modifiers alt, shift and ctrl
o Launch: this allows you to assign opening of a program, document, folder or web-page to a button push/pedal push.
o Windows: Use this tab to access programming of a series of Windows related activities, including resizing windows, opening the Task Manger, opening the Control Panel, etc.
o Custom Script: this is a series of actions that you can execute sequentially. Add or remove from the list as you wish.
o Advanced: this tab allows assignment of separate functions to the depression and release of a button, lever or key.
Select the tab/category based on your preference
Select the specific function your desire to assign to a button
Click OK
Programming a key on your On-Board Keyboard or USB KeyPad: This process is slightly different from programming other USB devices.

7
If using an external keypad, it should be connected and you must wait until all drivers are installed by the operating system (not necessary if programming a key on the on-board keyboard)
If not already selected, from the Active USB HID Device drop down on OUC select “Active Keyboard & External Keypads”. You will see a representation of a keypad, as shown below. Before any programming is initiated you will not see any keys or actions listed.
Program a key as follows, using the image below as both a guide and example of how programming will appear:
Click “add” to initiate programming. You will see the dialog box shown below to indicate the next step.
Depress the key on your on-board keyboard or external keypad you wish to program. As soon as you do, the full “USB Device Setting” window will appear, from which you can choose the desired programming, just as with other external USB devices described above. Once keys are programmed, your device may look as shown below.
Previously created behavior for a key on a keypad can be modified by double-clicking on the line associated with the button or highlighting the line and clicking “Edit”
Programming a Device Not Recognized by OUC

8
If you are attempting to use a USB device which is not recognized by Octopus USB Controller, it is necessary to manually add the device. This works as follows:
Attach the device to an available USB port and be sure all drivers are installed
Navigate to Tools > Options and select the “AutoLearn” tab
Click on the “Start Configuration” button
Sequentially press on each button or lever on your attached device, looking to see that the small red indicator briefly flashes green with each press to indicate that the event was recognized
After each of the buttons have been pushed, click on the “finish configuration” button.
Details on Assigning Functions to Buttons: Boilerplate Text: Assigning a button or lever on a USB device to insert boilerplate text is a useful function if there are certain chunks of text (single words, phrases, or longer passages) that you use regularly and may want to insert into a word processing document or text entry window on a regular basis. Examples include a signature line, an email address, or perhaps a password.
Setting up boilerplate text entry is as easy as choosing the Boilerplate text tab and by any means you choose entering this text into the main window – see below:

9
Note: At this time it is not possible to add formatting to text used in the boilerplate command. This is a functionality expected during a future upgrade.
Dragon Commands: This series of choices allows you to program your USB device to activate specific commands for users of Dragon NaturallySpeaking, including both intrinsic (built in) commands and personalized commands you have created. It comes with a series of common commands which can be directly chosen. Alternatively you can select the top choice (“Type below the exact name of the Dragon Voice Command …) and enter the exact command name below, and this will initiate the command as if it was enunciated aloud.
Note: When assigning a “user defined” command, it is important that you enter the word or words with the proper case (capitalization). If in doubt about what Dragon is expecting, issue the command by voice and then go to the Words menu and select “View Recognition History …” to see exactly how the word or words are formatted. Copy this when entering the command name into OUC. Notice that many of the Dragon commands are for specific events that you probably won’t want to continue indefinitely, such as “all caps on”, “number mode on”, etc. For these types of commands you may want assign separate functions to a key depression and release, for example assign the depression to “numbers mode on” and the release to “numbers mode off”. In this way, you can have dragon enter a specific mode only during the depression of a key, button or lever and that action or mode will end with the release of key.
Dragon HotKeys: These are a series of Dragon functions which can traditionally be assigned to a keyboard key from Dragon’s Options > HotKeys menu. Included within this category are all the functionalities provided in the Dragon Hotkeys menu, including:
Microphone on/off
Fast forward
Force command recognition

10
Force dictation recognition
DragonBar menu
Microphone sleep/on
Press-to-talk
Dictation Box
Playback
Next field
Keyboard Emulation: This is a very helpful functionality useful if the application you are using (an electronic medical record, for instance) allows for certain functions to be initiated with a keystroke or key combination. Follow this procedure to assign a key combination to your USB device:
Select the Keyboard Emulation tab
Click on the “Change keys …” button. This will cause the Change Keys options box to open.
Type the key or key combination using your actual keyboard and it will show-up in the text box in the Change Keys options box
If the key or key combination is not available on your actual keyboards, you can click on the small virtual keyboard shown above and it will open a much larger virtual keyboard from which you can choose addition keys and key combinations.
As needed, click the boxes next to “Control”, “Shift”, and “Alt” for key combinations. These boxes will be check automatically if you use these actual keys when assigning a key combination.
11
When done, click OK Note on Assigning Keys and Key Combination: If you are running a program running via Citrix, you might find some keys and key combinations created through OUC will not transmit to the application on the Citrix server. In such a situation you may want to experiment with other methods of doing so. We have found, for instance, the F2 or shift + F2 combination to move through “wildcard” navigation points in Epic won’t work with Keyboard emulation. Rather, we create a step-by-step command in Dragon and then initiate this command with OUC. It works perfectly.
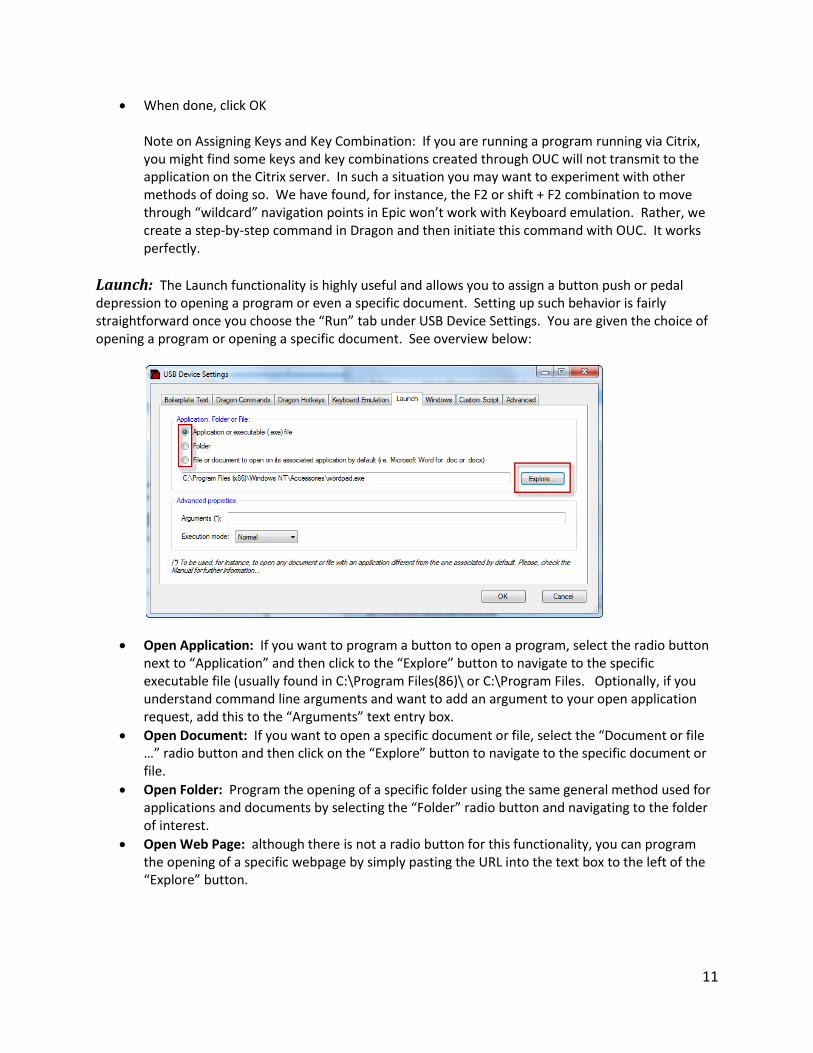
Launch: The Launch functionality is highly useful and allows you to assign a button push or pedal depression to opening a program or even a specific document. Setting up such behavior is fairly straightforward once you choose the “Run” tab under USB Device Settings. You are given the choice of opening a program or opening a specific document. See overview below:
Open Application: If you want to program a button to open a program, select the radio button next to “Application” and then click to the “Explore” button to navigate to the specific executable file (usually found in C:\Program Files(86)\ or C:\Program Files. Optionally, if you understand command line arguments and want to add an argument to your open application request, add this to the “Arguments” text entry box.
Open Document: If you want to open a specific document or file, select the “Document or file …” radio button and then click on the “Explore” button to navigate to the specific document or file.
Open Folder: Program the opening of a specific folder using the same general method used for applications and documents by selecting the “Folder” radio button and navigating to the folder of interest.
Open Web Page: although there is not a radio button for this functionality, you can program the opening of a specific webpage by simply pasting the URL into the text box to the left of the “Explore” button.

12
With any of the above methods, you can select an “Execution Mode” from the dropdown and have the choice of Normal, Hidden, Minimized and Maximized. Note on the Run functionality: as with the insertion of a web page, if you know the exact location of the application, document, or folder, you can enter this directly into window to the left of the Explore button.
Windows: OUC offers the ability to assign to a key or button push any of a series of Windows operating system functions, including:
Switch Window (next)
Switch Window (previous)
Open Control Panel
Open Task Manager
Open Calculator
Open Power Options
Open Windows Explorer
Open Devices and Printers
Maximize Window
Restore Window
Clear Desktop
Hint: if there are other Window functions you want to assign to a button, there are a series of “keyboard shortcuts” built into every Windows operating system to allow this. You can use the “Keyboard Emulation” function of OUC to create such behavior by programming the key combination. Please refer to the references in the appendix of this guide for more information on Windows shortcuts.
Custom Script: This is useful if you desire to set in motion a series of steps with a single button push or pedal depression. The possibilities are endless and each individual step can include any of the actions programmable with OUC. It is possible, for instance, for a single button push to open Microsoft Word, insert specific boilerplate text, to open the print menu and to press enter key and then to close the document.
Creating a custom script is as simple as opening the custom script tab, clicking “Add” to create your first step, adding steps sequentially, reordering them as needed using the up and down arrows, and then clicking OK. See example of the script described above in the figure below:

13
A few caveats on creating scripts: o Sometimes it is necessary to add a slight delay after one entered step to allow it to
complete before firing the next step. Opening a program, for instance, might require a second or two. In such cases you should enter a short “Wait” command to effect a slight pause as the script is running.
o Once a script is designed, you can alter the order of the steps within the script by selecting a specific step and then pressing the up or down arrow key to alter the position of the step.
Advanced: the “advanced” tab provides you the ability to assign separate programming to the depression and release of any button, key or lever. Adding this type of behavior to a button, key or lever press is similar to all other OUC programming. The appearance of the Advanced tab is shown below.
Programming of separate press and release behavior is particularly useful if you want something to happen only transiently (while pushing a button for instance) and then ended when the button is released. This type of behavior is especially suited to Dragon users who wish to temporarily put Dragon into certain “modes” such as:
14
Numbers mode
Spelling Mode
Caps mode
All Caps mode
Please refer to the example shown below for a more detailed look at programming transient Dragon modes to a TableMike button.
This type of programming is not limited to use with Dragon. In fact, you can assign ANY function programmable with OUC separately to a button press or release. You could, for instance, assign a press of a button to open a program or document and the release to close it, if you wanted to simply gaze at the document briefly for a reference.
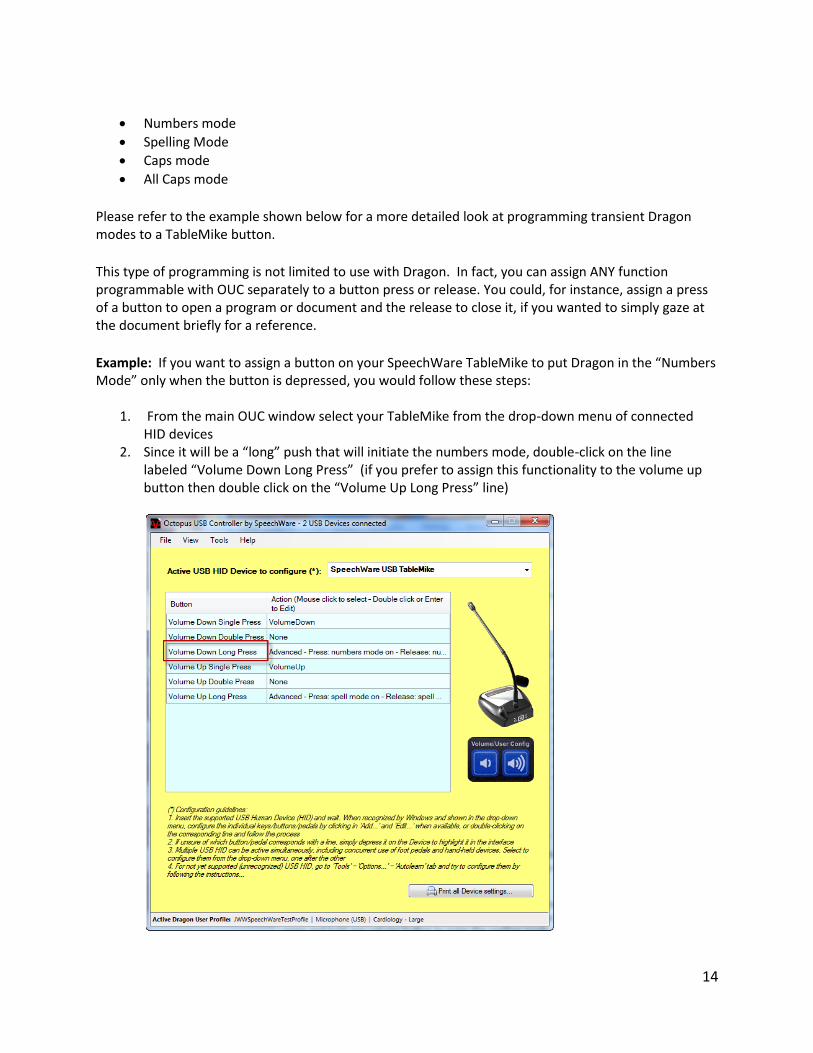
Example: If you want to assign a button on your SpeechWare TableMike to put Dragon in the “Numbers Mode” only when the button is depressed, you would follow these steps:
1. From the main OUC window select your TableMike from the drop-down menu of connected HID devices
2. Since it will be a “long” push that will initiate the numbers mode, double-click on the line labeled “Volume Down Long Press” (if you prefer to assign this functionality to the volume up button then double click on the “Volume Up Long Press” line)

15
3. Click on the “Advanced” tab 4. Click on the “Press Event” button to assign a function to the button press 5. Click on the “Dragon Commands” tab 6. Select “Number Mode On” from the drop-down menu 7. Click OK 8. Repeat steps 4-7 but use the “Release Event” button and program it for “Numbers Mode Off” 9. When done, click “OK” to exit the programming mode and to return to the main OUC window
When the above steps are completed your advanced tab settings should appear as shown in the image above and the SpeechWare TableMike configuration appears as shown in the graphic at the top of this section.
Notes:
1. The “Double Press event” and “Long Press event” shown on the advanced tabs are for planned future functionality and are not currently available.
2. When programming a TableMike you will notice that three choices are available for the volume down and volume up buttons: 1) Single Press 2) Double Press and 3) Long Press. If you plan to assign an advanced function to one of these buttons you should always assign this programming to the “Long Press” function of the button. Programming which does not involve advanced (separate press and release functions) can be assigned to any of the three button behaviors. The beauty of the 3 programming modes for each of the two buttons is that you can assign a total of 6 functions to the TableMike buttons, thus offering an abundance of programming options to the TableMike.
Altering Octopus USB Controller Desktop Appearance and Start-up By selecting one or more options from the OUC “View” menu, you can alter the appearance and behavior of the application on your desktop.
Start-up: On initial installation, an icon to start OUC will be placed both on your desktop and Start menu. In this scenario you must start each session of OUC by selecting it from one of these locations. If you prefer to have OUC start automatically each time you boot-up your computer, this can be accomplished by navigating to Tools > Options and placing a check-box next to “Run on Windows startup”
View: You can also alter the behavior and placement of the main UOC controller window from the view menu. Options include:
o Floating Bar: This will show OUC as a full-sized window on your desktop

16
o Tray Icon Only: This places an icon for OUC in the Windows Taskbar. While in this mode you can right click on the icon to access the Profile, View and Help menus
o Always on Top: If you choose this mode, the OUC window will remain on top of all other active windows. Most users will probably NOT want to select this mode since it takes up space on your desktop.
Exporting and Importing User Device Configuration Profiles In many ways, the details of the programming you have set up for your devices with Octopus USB Controller become a valuable asset. Consequently, you may want to archive your current device configuration profiles for reference, or transfer (import/export) for back-up, transfer to another PC or sharing with a colleague. For an institution or group of users, the ability to set up a new OUC user with a complete set of customized device profiles can be huge time saver. To facilitate these functions, OUC includes the ability to perform the following:
Export all device settings
Import all Device settings
Print all device setting
All of these functions are accessed through the OUC “File” menu as shown below:
Dragon Template/Field Navigation Functionality The ability to navigate through a document by voice and the creation of “Dragon templates” or “variable fields” is a highly useful functionality seen in Dragon Professional, Legal and Medical. This functionality works by navigating to the next instance of a pair of field delimiters which, by default are a left and right squared bracket (“*“ and “+”). Navigation through a series of Dragon templates can be done in a forward or backwards manner and are accomplished by saying “next field” or “previous field” and this command

17
can also be initiated by a button push by assignment of a Dragon “hotkey” from the Tools > Options menu. Use of this functionality is highly useful when creating letters, notes, and other documents that share common regions and in which you simply want to navigate to different locations for dictation of specific variable text. Octopus USB controller offers two means of extending the use of Dragon Templates:
1. OUC can be used to program the command “next field” or “previous field” to any button, key or lever by choosing this from the “Dragon Commands” tab on OUC. It should be noted that this native function is operational only in Dragon Professional, Legal and Medical versions.
2. OUC extends the use of “next field” and “previous field” commands to the Premium version of Dragon when used in Microsoft Word.
Utilizing the Dragon Microphone Indicator Functionality As an added feature for Dragon NaturallySpeaking users, SpeechWare has added functionality to Octopus USB Controller to assist in microphone management. This feature provides you with the option of placing a “microphone status indicator” on the desktop to provide a more obvious indicator of the microphone on/off/standby status. It can be configured to vary its size and can be moved anywhere on the desktop. See figures below to see the appearance of the indicators and the Options menu used to program the size of the indicator. Moving the indicator involves dragging it across the desktop. Appearance of Microphone Status Indicator buttons:
Size Options for Microphone Status Indicators: Sizes between 1 and 10 can be chosen and representative sizes are shown below:
Size 1 Size 5 Size 10
Microphone Status behavior is controlled from the Options menu depicted below:

18
Appendix
Compatible Devices: The following USB foot pedals, hand-held microphones and other devices are know to be compatible with the Octopus USB Controller and will provide device specific information when programming:
USB Foot Pedals
Buddy/Insync FootSwitch 7G
Buddy/Insync ElbowSwitch 7G
Certified Transcription Aid Pedal
Grundig Digta Foot Control 538 USB
Grundig Digta Foot Control 540 USB
Grundig SoundBox 830 USB
Infinity IN-USB1*
Infinity Foot Control IN-USB-2
Infinity Foot Control IN-SRW
Olympus Foot Switch RS27
Olympus Foot Switch RS28
Olympus Foot Switch RS31
Philips Foot Control LFH 2320
Philips Foot Control LFH 2330
SpeechWare USB Single Foot Pedal (under development)
SpeechWare USB Triple Foot Pedal (under development)
Xkeys USB
Hand-held USB Microphones:
Buddy StylusMic
Nuance/Dictaphone PowerMic II
Olympus DR-1200
Philips Speechmike Air LFH3000
Philips Speechmike Classic 6264
Philips Speechmike Pro 5276
Philips Speechmike LFH3500/00
Philips Speechmike Classic 6264
Philips SpeechMike 6274
Philips Speechmike Pro 5276
Desktop USB Microphones (Volume
Up/Down buttons):
SpeechWare USB 3-in-1 TableMike
SpeechWare USB 6-in-1 TableMike
SpeechWare USB 9-in-1 TableMike
USB KeyPads: All tested keypads have been found to be compatible with OUC. Specific button functionality is not seen until a button is programmed.
19
*Recognized as an Infinity IN USB2 but programs normally.
Non-Compatible Devices:
Octopus USB Controller has been programmed to be compatible with virtually every commonly used USB hand-held microphone and foot pedal. If you have a device which is not compatible, it can still be used employing the “AutoLearn” methodology described above. SpeechWare is interested in adding new devices to OUC upgrades, so please employ the “Report incompatibility or problem..” from the tools menu to report an incompatible device.
Windows Shortcuts:
Additional behavior can be assigned to a button by using the Keyboard Emulation tab and use of standard “Windows Shortcuts” which are keyboard shortcuts built into Windows operating systems to allow simplified access to commonly employed functions. Information on shortcuts can by found by searching “Windows keyboard shortcuts” or visiting an extensive table of shortcuts on Wikipedia at: http://en.wikipedia.org/wiki/Table_of_keyboard_shortcuts
Working with Microsoft Excel:
As with Windows in general, there are many shortcuts which allow navigation and functioning within an Excel spreadsheet with hotkeys. This becomes an easy process to emulate with a button, key or lever push using OUC. For a list of common shortcuts, we recommend you visit any of the links below:
http://office.microsoft.com/en-us/excel-help/excel-shortcut-and-function-keys-HP010073848.aspx
http://www.stanford.edu/dept/EHS/prod/general/ergo/documents/Excel_Specific_keyboard_shortcuts.pdf
For example, one might need to repeatedly open a specific Excel document and navigate to a specific cell within the document. This can be accomplished using a “Script” in which the following actions take place:
1. Run command opening the document you desire 2. Optional short “Wait” 3. Key emulation of F5 (opens the Excel “Go To” dialog box) 4. Boilerplate text to enter the cell location (column followed by row, i.e. A5, F33, etc.) 5. Key emulation of a “Return” or “Enter” key
Location of Common Programs/Executable Files
20
If you are seeking to initiate the opening of a specific program with functionality facilitated by the Run tab, you will need to navigate to the executable file for the application. Most of these are contained in the C:\Program Files (x86)\ folder which is shown by default when you “explore” for a program for OUC. Not so obvious is where some programs are located within this folder. Here are locations for some common applications:
Google Chrome: C:\Program Files (x86)\Google\Chrome\Application\chrome.exe Internet Explorer: C:\Program Files\Internet Explorer\iexplore.exe Microsoft Excel 2007: C:\Program Files (x86)\Microsoft Office\Office12\EXCEL.EXE Microsoft PowerPoint 2007: C:\Program Files (x86)\Microsoft Office\Office12\POWERPNT.EXE Microsoft Word 2007: C:\Program Files (x86)\Microsoft Office\Office12\WINWORD.EXE NaturallySpeaking 12: C:\Program Files (x86)\Nuance\NaturallySpeaking12\Program\natspeak.exe WordPad: C:\Program Files (x86)\Windows NT\Accessories\wordpad.exe
A simple way to find the location of a program is to enter the name in the “Search programs and file” of the Start Menu and if you see the program, rather than clicking on it, right click on the program and select “Open File Location”
Opening Browser with Pre-specified Search
If you have a reason to open a browser very regularly and with a pre-defined search topic, this can be programmed into a “Run” behavior assigned using OUC. Bing: www.bing.com/Search?q=term1+term2 Google: https://google.com/#q= term1+term2+term3
Sources of Additional Information:
http://www.tablemike.com/en/download-applications.php
http://OctopusUSBController.com
Caveats on Using Octopus USB Controller
If your USB device has dedicated controlling software which is also running, you may find erratic behavior since button pushes may be initiating action through both OUC and the other controlling software. In such a situation we recommend that you either turn off or uninstall the other device controlling software. If you absolutely need that software, then you should be sure to configure the other software not to control any buttons you desire to control with OUC.
When using the Octopus USB Controller with the Philips SpeechMike Premium (LFH3500) keep in mind that this microphone has an onboard gyroscope/position sensor and may provide input which may be recognized by OUC simply by picking it up or laying it down. As of this time we are not aware of a method to disable this functionality, so we recommend

21
using a key other than the record button to control the microphone on/off function.
The Buddy/Insync StylusMic has two buttons which can be programmed. The top-most button (nearest the microphone) is programmed by default to turn the microphone off and on. If you wish to have the behavior defined by OUC and not the default behavior, we recommend that you use the Insync “MyBuddy” software to turn off the default behavior of the device.
Revision: 12.15.13