obstetric and gynaecological database application s health
TRANSCRIPT

astraia software for women’s health
obstetric and gynaecological database application
1.27
astraia short instructions
astraia software gmbh Occamstr. 20, 80802 Munich, Germany
Tel: +49 89 / 127 114 7-0 Fax: +49 89 / 127 114 7-17
www.astraia.com

astraia software gmbh
17-Dec-2019Published on: astraia short instructions 1.27 - Page of 1 38
astraia short instructions 1.27
1 Product end of life _________________________________________________________ 32 Intended Use _____________________________________________________________ 43 Logging in _______________________________________________________________ 64 The Desktop _____________________________________________________________ 75 Creating or selecting a patient _______________________________________________ 86 Cases vs. examinations and navigating with the Navigator ________________________ 107 Printing a report and exiting a patient ________________________________________ 138 Navigation with multiple windows ____________________________________________ 149 Example 1: First trimester screening _________________________________________ 1510 Example 2: Biometric Examination with the same patient 3 months later ____________ 2311 Example 3: PE Screening with the same patient _______________________________ 2712 Other functionalities _____________________________________________________ 3013 Customizing astraia ______________________________________________________ 31
13.1 Editing Popup Lists __________________________________________________ 3213.2 Editing Lookup Tables ________________________________________________ 3413.3 Screen Configuration _________________________________________________ 35
13.3.1 Editing Labels _________________________________________________ 3513.3.2 Adding user-defined fields ________________________________________ 35
13.4 Properties __________________________________________________________ 3714 Safety Hints ____________________________________________________________ 38

astraia software gmbh
17-Dec-2019Published on: astraia short instructions 1.27 - Page of 2 38
Thank you for choosing as your documentation systemastraia - software for women's healthfor obstetrical and gynaecological examinations. astraia provides a modern system that wasdeveloped in close cooperation with Prof. Kypros Nicolaides and other renowned internationalspecialists in gynaecology and antenatal diagnosis.
was developed in accordance with our certified quality astraia - software for women's healthmanagement system (EN ISO 13485 and MDSAP requirements). astraia fulfills all legalrequirements for medical devices as specified by the Medical Device Directive (MDD EuropeanCouncil Directive 93/42/ECC) and IVDD (European Council Directive 98/79/ECC). The riskmanagement has been carried out according to EN ISO 14971.
astraia software gmbh cannot take any responsibility for your data security andintegrity.
We advise you to keep regular backups of the database (we recommend twice a dayor every 10 examinations) and other important files, which should be storedseparately from the machine(s) on which you are running astraia. We recommenddoing additional backups to an external storage medium (external hard disk, USB, vianetwork to another PC, DVD/CD, SAN, NAS).
Please read this manual very carefully and in case of any question please contact our technicalsupport.
This manual covers all available standard modules in the astraia - software for women's healthpackage, though the modules a customer has bought and licensed within the full package maybe less and some modules described in this manual will therefore not be available to all users.Please check your order confirmation / invoice for information on which modules you havebought.

astraia software gmbh
17-Dec-2019Published on: astraia short instructions 1.27 - Page of 3 38
1 Product end of lifeeaseFor information about the end of life of the current and previous versions of astraia, pl
refer to our website at .https://www.astraia.com/en/support

astraia software gmbh
17-Dec-2019Published on: astraia short instructions 1.27 - Page of 4 38
2 Intended Use is a modular software system. Use of these modulesastraia - software for women's health
depends on the purchased license(s). The functionality and purpose of these modules isoutlined below:
Obstetrics (includes IVD: risk calculation for Trisomy 21 in the First Trimester),Gynaecology, Colposcopy, Fetal Echocardiography, Fetal Neurosonography, BreastClinic modules
These modules serve the purpose of
collecting patient data as well as report data (including measurements and conclusions)in a predefined amount. This amount is defined by the input screenssaving the entered data in a database in order to document the course of the therapycreating structured reports (referral letters) performing queries to the database and statistical evaluationscreating and listing remindersstoring external documents for easier and more convenient access from the application.Please note that this is not meant to replace a safe data storage solution for the originaldatamanaging appointments with patientslimiting access to data and features based on a user management systemtracking changes to patient data with timestamp and the responsible user Obstetrics only: monitoring fetal development and maternal healthObstetrics only: calculating the risks of several pregnancy complicationsGynaecology only: calculating the risks of malignancy for adnexal masses according toseveral different guidelines
These modules are and must not be used to automatically createnot a diagnosis systemtreatment recommendations.
Image Viewer module
This module serves the purpose of as well as using thesemanaging and displaying imagesimages on printouts. These images are associated with a certain examination.
Worklist, Worklist SCU, Image Server and Measurement Data Transfer (MDT)modules
These modules are used to connect ultrasound machines with astraia software for transfer ofimages and measurement data.

astraia software gmbh
17-Dec-2019Published on: astraia short instructions 1.27 - Page of 5 38
Only may set uptechnical personnel that have been sufficiently trained by astraiathese modules or change their configuration or settings with assistance from astraia
. Data transfer between third-party systems (normally an ultrasoundtechnical supportmachine) and the astraia system should be thoroughly tested and verified prior to using it as alive system. Any changes to the system configuration, including that of third party systemsconnected to astraia, require further quality inspections of all transfer functions. These "system configuration changes" include but are not limited to: network configurationchanges; software updates of third-party systems; software updates, reconfiguration andre-licensing of the astraia system.
All terms of the national regulations for users of medical devices apply, as well as those ofother relevant legal regulations.
First Trimester risk assessment for chromosomal anomalies [IVD]
Only sonographers who have been certified by the Fetal Medicine Foundation, London (FMF)according to its directives and those who possess a valid FMF license may use the firsttrimester risk module. This module calculates the risk for Trisomy 21 [IVD], 18 and 13 usingthe algorithm provided by the FMF (see the 11-13+6 Weeks Scan Book on
). This probability alone does not give a diagnosis.www.fetalmedicine.org
All custom software modules which have been developed to customers' individualrequirements, such as interfaces to hospital information systems or other third-party systems,are limited to the intended use agreed by both parties.
If national or international laws, directives or regulations are limiting the intended use of theproduct, they have absolute priority over the statements above.
The group of permitted users is defined by the precise definition of the intended use. Thecustomer must ensure that all relevant regulations concerning data protection are met andthat the necessary data security procedures are in place. astraia provides you with acomprehensive user access management, enabling you to define who is allowed to use astraiafeatures and to access or change some data. Access to the astraia system is protected by usernames and passwords.
Please ensure that the system is operated by sufficiently trained personnel only.
We wish you all the best for your future work with .astraia - software for women's healthastraia software gmbh
Copyright 2019 astraia software gmbh Munich
For the internal use of licensed customers only. Publication or distribution of this information inany form is strictly prohibited without the express written consent of astraia software gmbh.

astraia software gmbh
17-Dec-2019Published on: astraia short instructions 1.27 - Page of 6 38
3 Logging inOn starting the program you will see the login screen. Please select your user name and enteryour password.
Make sure that you log in with your own user-profile. If you do not have a user name,please contact your clinical administrator so that he/she can create one for you. Ifsomebody else is already logged in (you can see the current user on the right side ofthe menu bar), please log them out first.

astraia software gmbh
17-Dec-2019Published on: astraia short instructions 1.27 - Page of 7 38
4 The DesktopThe program desktop offers buttons which give you access to the main programfunctionalities: you can search for existing or book new ones, run statistics in Patients Q
, run an on your First Trimester and Biometry data, access and bookueries Auditappointments in the , look at existing , change the system settings in Diary Reminders O
or the program.ptions Exit

astraia software gmbh
17-Dec-2019Published on: astraia short instructions 1.27 - Page of 8 38
5 Creating or selecting a patientIn order to find a patient's record in the database or to book a new patient, click on Patientson the desktop. The patient lookup window will open.
You can enter a new patient ( , and are required fields toname other names date of birthbook a new patient).
You can also select an existing patient by entering at least the first 2 letters of her name in thefields or .name other names
After having a new patient, you will need to choose which case (Pregnancy,bookedGynaecology, Colposcopy, etc. depending on your license) you want to create.
Please remember, double-booking a patient causes a lot of problems: Proceed verycarefully while entering patient data. If your entered details match a patient in the list,you will need to uniquely identify the new patient; in case all known patient datamatches an already booked patient, you could use the field hospital number todistinguish the new patient, even if you do not normally use a hospital number.
In case you have a patient with an existing astraia record, you can:selected
open the current case (e.g. a pregnancy) and do a new examination (e.g. a biometricexamination two months after the first trimester scan);
astraia software gmbh
17-Dec-2019Published on: astraia short instructions 1.27 - Page of 9 38
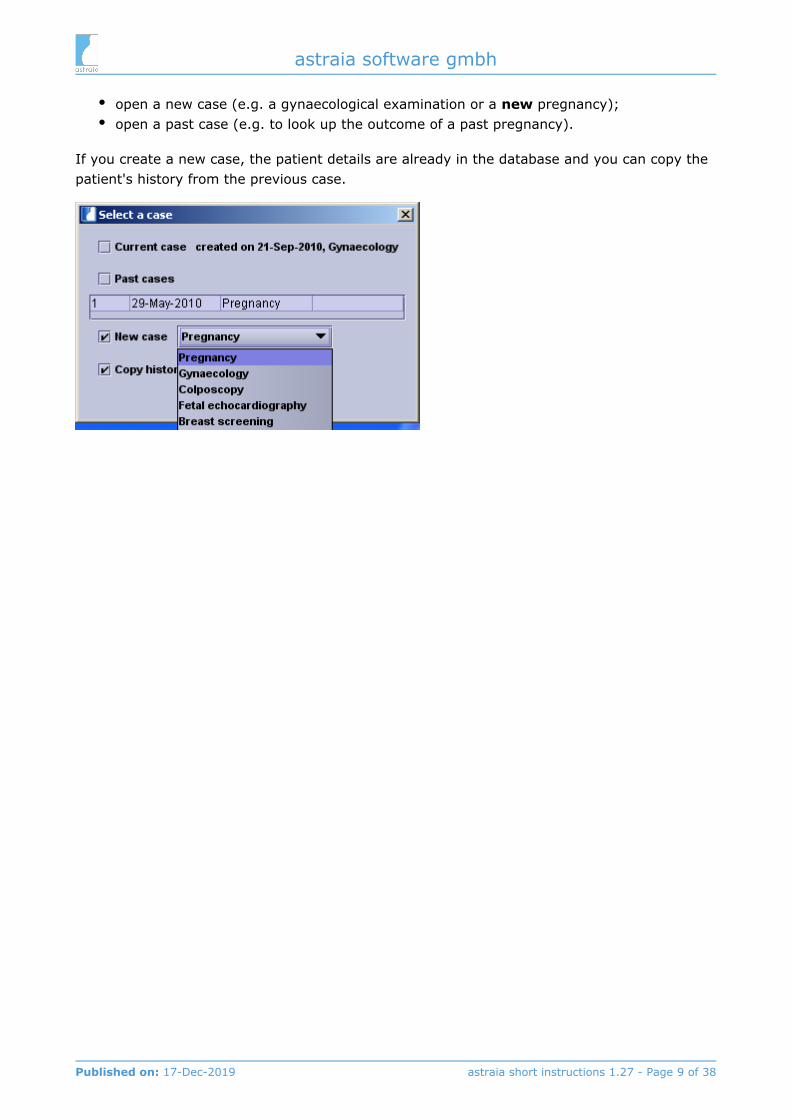
open a new case (e.g. a gynaecological examination or a pregnancy);newopen a past case (e.g. to look up the outcome of a past pregnancy).
If you create a new case, the patient details are already in the database and you can copy thepatient's history from the previous case.

astraia software gmbh
17-Dec-2019Published on: astraia short instructions 1.27 - Page of 10 38
6 Cases vs. examinations and navigatingwith the NavigatorIn astraia, patient data is handled in cases and examinations. A case is for example apregnancy, which can consist of multiple examinations (e.g. Early pregnancy, First trimester,Biometry scan, Growth scan,...). Every time a patient comes for a new examination within onepregnancy, you should create a new examination. Only if a pregnancy has ended and a newone has started, you should create a 'Pregnancy'.new case
Each examination has an assigned date (mandatory), time, department and referring doctor(optional).
You can navigate to any screen within one case without having to quit the patient. In order tonavigate to a different screen within one examination, simply click on the field for the screen inthe navigator. Navigator items are collapsible. By clicking on an item you can collapse orexpand its content.

astraia software gmbh
17-Dec-2019Published on: astraia short instructions 1.27 - Page of 11 38
In order to get to a screen from a different examination, you will need to go to the .SummaryHere you can take a look at a selection of the most important data for each examination withinone case. You can switch between the different examinations by clicking on the column of theexamination or you can create a .New examination (Ins)
In order to switch between different cases (e.g. different pregnancies), go to and then Data. The current case will be displayed with a tick. In order to change cases, click onChange case
the case you want to review.

astraia software gmbh
17-Dec-2019Published on: astraia short instructions 1.27 - Page of 12 38

astraia software gmbh
17-Dec-2019Published on: astraia short instructions 1.27 - Page of 13 38
7 Printing a report and exiting a patientIn order to create a printout for an examination, select the examination you want to print andgo to and or use the shortcut . In the following window you can select oneFile Print Ctrl + Por more reports, add charts to the report and add correspondents to the printout header. Youcan select the copies you want to print by activating the checkboxes in the lower part of thePrint selection window. If you select the referring doctor and patient it will print 2 copies of thereport, one with the referring doctor's address on top and one with the patient's address ontop.
Once you have made your selection you can choose to the report or it directly.Preview PrintYou can also save the report as file.PDF
You can also use the Quick print and Quick print preview buttons (see below) at the lower partof the patient file, which will print or preview automatically the by default selected report.
After having printed a report you can exit the patient ( and or or click on the File Close F10in the upper right corner of the patient window). The program will ask you automatically if youwant to save all changes. If you want to save your work without exiting the patient, click on F
and or .ile Save Ctrl + S

astraia software gmbh
17-Dec-2019Published on: astraia short instructions 1.27 - Page of 14 38
8 Navigation with multiple windowsYou can open as many windows as you like, move them around and minimize the ones you arenot currently using. Each window has a title bar. The patient title bar includes the patient'sId-number, name, date of birth and age.
The three icons on the right hand side are used to minimize, maximize and close the window.The currently-selected window is displayed with a coloured title bar, as shown in the picture.
When a window is minimized, it is automatically placed at the bottom of the desktop andappears as:
To restore a minimized window, click on it with the mouse. You can also select and restore awindow from the menu at the top of the screen.Window

astraia software gmbh
17-Dec-2019Published on: astraia short instructions 1.27 - Page of 15 38
9 Example 1: First trimester screeningLet's assume a new patient arrives for a first trimester ultrasound examination.
In order to book the patient, click on on the desktop. Next, enter the name, firstPatientsname and date of birth of the patient. Now click on (shortcut: ) and choose a Book F2 New
. You can now enter administrative details of the patient and those of hercase: Pregnancypartner in the patient data screen. Define your own lists for recurring entries (e.g. Town).
(e.g. name, other names, DOB) are mandatory and need to be entered Blue labeled fieldsbefore exiting the current screen.

astraia software gmbh
17-Dec-2019Published on: astraia short instructions 1.27 - Page of 16 38
Select in the navigator. In this screen you can enter pregnancy-specific data such asHistorythe first day of the . Since the last period is known in most cases, this list entry isLast perioddisplayed as the default. If you click on you can also select a different set of data.Last periodYou can also enter different aspects of patient history like an obstetric history, chronicdiseases, the family history or the maternal medication by clicking on the correspondingscreens in the navigator.
To start the examination, click for example on in the navigator, the current dateIndicationand time will automatically be inserted for the examination and a screen enabling you to enterthe indication for the current examination will appear. You can also select a referring doctorfrom the list or create a new referring doctor.
The next step in our example is the ultrasound examination. Click on the field andultrasoundenter all relevant data. You will need to select your name from the list of or createOperatorsa new list entry for this field.

astraia software gmbh
17-Dec-2019Published on: astraia short instructions 1.27 - Page of 17 38
Since our patient has come for a first trimester screening, we will need to enter the First data - the First Trimester screen is a subscreen of the ultrasound examinationTrimester
because the first trimester examination is only one of many possible ultrasound examinationsduring a pregnancy. In order to calculate a risk for chromosomal abnormalities, please enterdata in all (e.g. CRL). Please note: a risk in the first trimester can onlygreen labelled fields be calculated if the sonographer is certified with the Fetal Medicine Foundation London and avalid license has been imported into astraia ( -> ).Options FMF Risks
After you have entered your data, you can calculate the . You will have theGestational Agechoice between calculating it from dates (based on the last period) or ultrasound data (basedon CRL) or entering it in manually. After having selected a method to calculate the gestationalage, growth bars will appear next to the measurements and the values will be displayed on thegraphs - to view a graph press in the respective field.F7
Please note that the gestational age will not be automatically adjusted if you havechosen to calculate the GA by measurements and afterwards change yourmeasurement data. In that case, please re-open the gestational age calculator anddate the gestational age one more time in order to receive the correct GA.

astraia software gmbh
17-Dec-2019Published on: astraia short instructions 1.27 - Page of 18 38
For some measurements, you can access additional information and an explanatory
text on how these are obtained by clicking on .
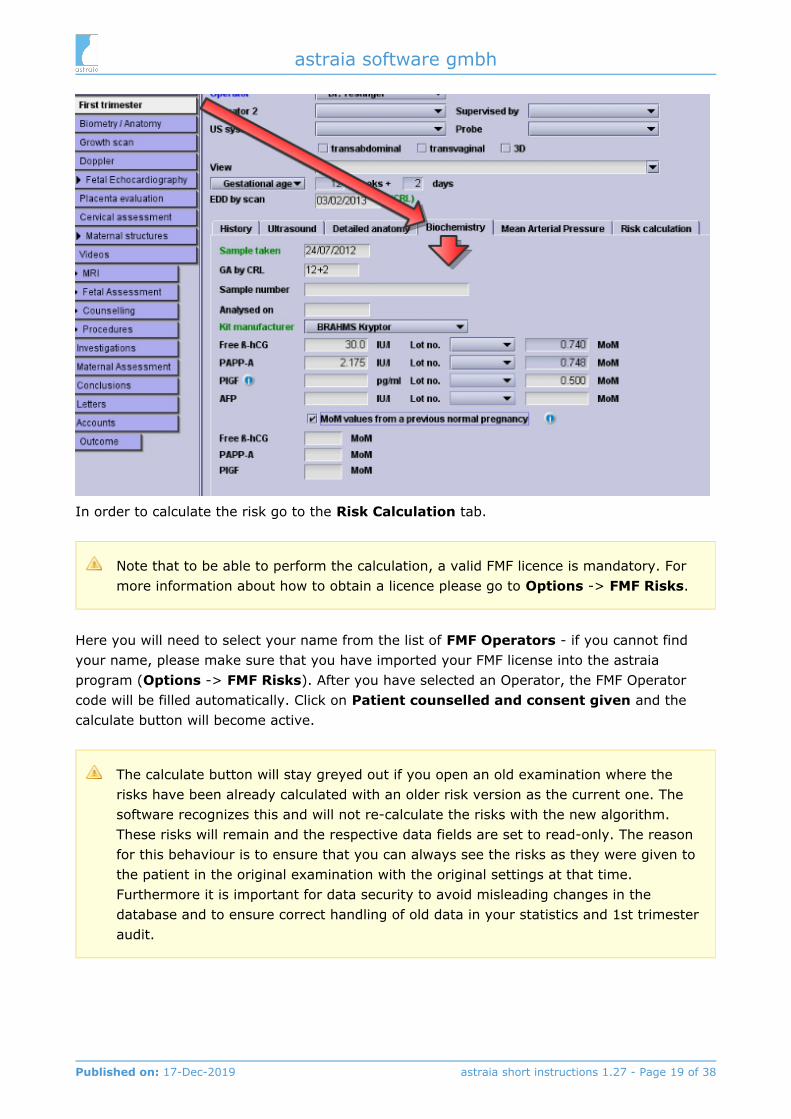
After you have entered all relevant fields in the section, you canFirst Trimester Ultrasoundclick on the screen. Here you can enter all data for a biochemical analysis.BiochemistrySome fields (e.g. ethnic group) will already be filled in if you have already entered theinformation in the patient history.
Biochemical MoMs are only calculated if all green fields have been filled in and alicensed biochemical analyser has been selected.
astraia software gmbh
17-Dec-2019Published on: astraia short instructions 1.27 - Page of 19 38
In order to calculate the risk go to the tab.Risk Calculation
Note that to be able to perform the calculation, a valid FMF licence is mandatory. Formore information about how to obtain a licence please go to -> .Options FMF Risks
Here you will need to select your name from the list of - if you cannot findFMF Operatorsyour name, please make sure that you have imported your FMF license into the astraiaprogram ( -> ). After you have selected an Operator, the FMF OperatorOptions FMF Riskscode will be filled automatically. Click on and thePatient counselled and consent givencalculate button will become active.
The calculate button will stay greyed out if you open an old examination where therisks have been already calculated with an older risk version as the current one. Thesoftware recognizes this and will not re-calculate the risks with the new algorithm.These risks will remain and the respective data fields are set to read-only. The reasonfor this behaviour is to ensure that you can always see the risks as they were given tothe patient in the original examination with the original settings at that time.Furthermore it is important for data security to avoid misleading changes in thedatabase and to ensure correct handling of old data in your statistics and 1st trimesteraudit.
astraia software gmbh
17-Dec-2019Published on: astraia short instructions 1.27 - Page of 20 38
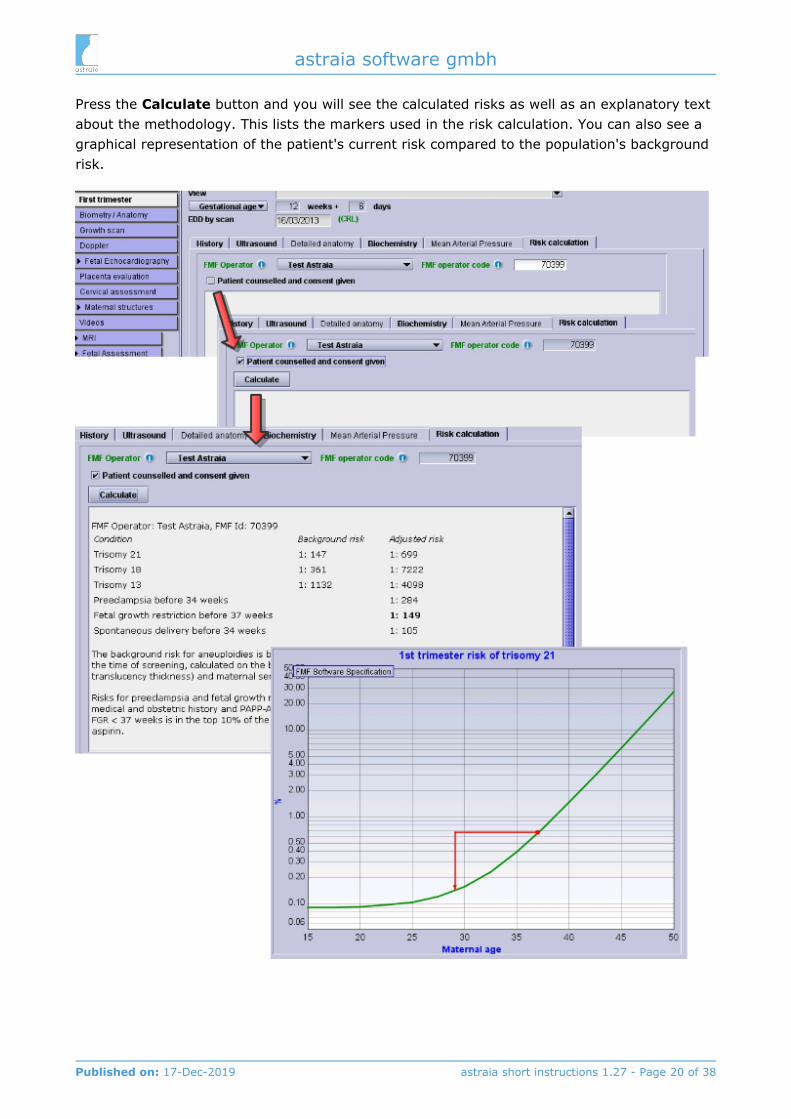
Press the button and you will see the calculated risks as well as an explanatory textCalculateabout the methodology. This lists the markers used in the risk calculation. You can also see agraphical representation of the patient's current risk compared to the population's backgroundrisk.

astraia software gmbh
17-Dec-2019Published on: astraia short instructions 1.27 - Page of 21 38
If you change any examination data after having calculated the risks please return tothe risk calculation screen and press in order to adjust the risk to theRe-calculatenew data. If you try to exit the program or print a report without re-calculating therisks, a warning message will appear.
Now you can proceed to the screen by clicking on it in the navigator. Here youConclusionscan enter the diagnosis, procedure codes and an additional free text summary of theexamination for the patient or the referring doctor.
When you have finished entering data, you can print a report by clicking on and ( File Print). Select the from the list and yourshortcut Ctrl + P First Trimester Screening Report
correspondents. Then click on and select the printer.Print

astraia software gmbh
17-Dec-2019Published on: astraia short instructions 1.27 - Page of 22 38
To finish, close the patient record and save the changes ( and , or ).File Close F10

astraia software gmbh
17-Dec-2019Published on: astraia short instructions 1.27 - Page of 23 38
10 Example 2: Biometric Examination withthe same patient 3 months laterNow let's assume that the same patient arrives three months later for a biometry/anatomyexamination.
Access the Patient lookup screen and type in the patient's last name. You should see at leastone patient that matches the patient we entered before. If there are other patients with thesame last name in the database they will be displayed as well. Select the correct patient andpress . Leave the checkbox selected and click (only in theSelect (Enter) Current case OKcase of a new pregnancy would we need to create a new case). In the next screen you will findthe summary of the previous first trimester examination. Click on ; aNew Examination (Ins)new examination will be created with the new current date and time - the patient history anddemographic data are automatically linked to the two examinations.

astraia software gmbh
17-Dec-2019Published on: astraia short instructions 1.27 - Page of 24 38
Please note that the currently active examination is highlighted in white, the otherexamination has a grey background.
Now you can enter the data for this new examination. By clicking on on theIndicationnavigator you can enter the indication for the examination. The next step is the biometricultrasound examination. Select which is another subscreen of theBiometry / AnatomyUltrasound screen.

astraia software gmbh
17-Dec-2019Published on: astraia short instructions 1.27 - Page of 25 38
The date and time are again automatically filled in but can be modified. The gestational age isautomatically calculated according to the new examination date. It is calculated using datafrom the first trimester examination (if you click on , a warning message willGestational ageappear).
If you change the examination date, click on Gestational age again in order to refreshthe calculation.
Now you can enter your measurements in the section. Ratios (e.g.Biometry / AnatomyBPD/OFD) will be calculated automatically. You will be able to display graphs by clicking on ameasurement and afterwards going to and or pressing .Data Chart F7
After having entered all measurement data, you can continue to complete the Detailed tab pages. If you select , or in one of the tab pages,Anatomy normal not seen not visible
the cursor will automatically jump to the next tab page. If you select in a tab page,normalthe tab label turns . If you select or , the tab label turns . If green not seen not visible blackyou select any , the tab label will turn .abnormalities red

astraia software gmbh
17-Dec-2019Published on: astraia short instructions 1.27 - Page of 26 38
After you have finished entering the data from your ultrasound examination, you can onceagain fill in the page, save the case, print a report and close the patient asConclusionsdescribed in the first example.

astraia software gmbh
17-Dec-2019Published on: astraia short instructions 1.27 - Page of 27 38
11 Example 3: PE Screening with the samepatientNow let's assume that the same patient arrives in the second and third trimester for thecalculation of preeclampsia (PE) risks.
Select the patient and create a new Examination as explained in the above section. As for thefirst trimester risk calculation, a license from the Fetal Medicine Foundation (FMF) whichincludes the permission to calculate preeclampsia risks is needed to perform the calculationson this screen.
For more information about how to obtain a licence please go to -> Options FMF.Risks
In the three gestational age ranges, the following risks for developing preeclampsia arecalculated:
Gestational age range Risk of preeclampsia before
Second trimester: 19+0 to 24+6 weeks32 weeks36 weeks
Third trimester: 30+0 to 34+6 weeks36 weeks
Third trimester: 35+0 to 37+6 weeks41+3 weeks
Please note: The risk of preeclampsia in the can be calculated on thefirst trimesterFirst trimester screen only. If the current gestational age corresponds to the firsttrimester, a message on the screen will inform you accordingly. This screen and theFirst trimester screen are mutually exclusive, meaning that if the current examinationis a First trimester examination, the screen PE Screening will be disabled in theNavigator.
The GA can be calculated based on measurements that were entered on theBiometry/Anatomy screen, or it can be entered manually. Based on the gestational ageentered on this screen, the label above it will indicate which of the screening ranges thegestational age corresponds to. A blue information label will inform you if the currentgestational age is out of range.

astraia software gmbh
17-Dec-2019Published on: astraia short instructions 1.27 - Page of 28 38
Risk calculation
In order to calculate the preeclampsia risk, fill in the fields in the sections - Maternalcharacteristics and history, Biochemical markers and Biophysical markers.
All input fields listed in are required for the calculationMaternal characteristics and historyof the for developing preeclampsia.a priori risk
Please note: At 35+0 weeks and above the UtPI MoM will be calculated but it will not be usedfor risk calculation.
astraia software gmbh
17-Dec-2019Published on: astraia short instructions 1.27 - Page of 29 38
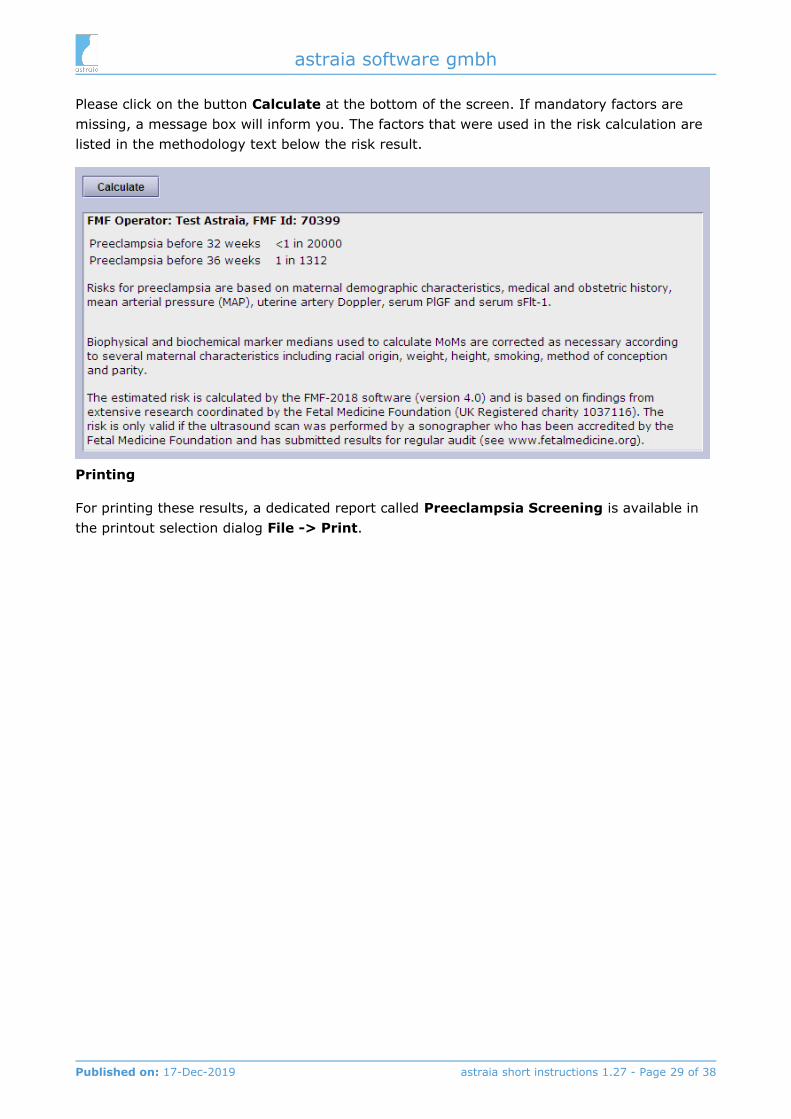
Please click on the button at the bottom of the screen. If mandatory factors areCalculatemissing, a message box will inform you. The factors that were used in the risk calculation arelisted in the methodology text below the risk result.
Printing
For printing these results, a dedicated report called is available inPreeclampsia Screeningthe printout selection dialog .File -> Print

astraia software gmbh
17-Dec-2019Published on: astraia short instructions 1.27 - Page of 30 38
12 Other functionalitiesAll other functionalities of the program are explained in the astraia manual or the programhelp ( and or shortcut ).Help Index F1

astraia software gmbh
17-Dec-2019Published on: astraia short instructions 1.27 - Page of 31 38
13 Customizing astraiaastraia provides multiple options to customize screen content to adapt the workflow to yourindividual needs. Many of these have to be performed with great care in order to ensure dataintegrity and usability of the system.

astraia software gmbh
17-Dec-2019Published on: astraia short instructions 1.27 - Page of 32 38
13.1 Editing Popup Lists
Popup lists are used whenever a small number of possible options are available (e.g. yes / no /not known / positive / negative) in order to ensure a consistent set of medical terms. Onlythen, a statistical evaluation is possible.
To edit a fixed list, click on or hold down the key and press .Change this list Alt Enter
On the right-hand side of the editor you will see three buttons and four checkboxes. Thefunctions of these are:
Move up: moves the selected entry up in the list (this button is grayed when theselected entry is at the top of the list).Move down: moves the selected entry down in the list (this button is grayed when theselected entry is at the bottom of the list).New item: Use this when you want to add a new list item. The Id column will show avalue greater than or equal to 10 000, and you can type your text into the list.
Please note that list entries thereforecannot be deleted from the database,we recommend to choose new list entries carefully.
Hide: If you click on this checkbox, or the checkbox is ticked, this list entry will not beshown in future, unless it was used in a previously-entered examination being reviewed.The list entry has not been deleted from the database, it is invisible.Show hidden items: If this checkbox is deselected, all hidden items will also beinvisible in the editor.

astraia software gmbh
17-Dec-2019Published on: astraia short instructions 1.27 - Page of 33 38
Default: This options fills out the list entry with the default entry, as soon as you openthe respective screen.
We recommend caution when using this option: for example, if the defaultoption for a particular examination is changed from 'not examined' to 'normal'and the window is opened but the automatically created entries are notreviewed, there could be medico-legal implications.
Highlight: This list entry will be highlighted red when chosen. Additionally, on printoutsthe highlighted entry will be displayed bold. This option is used for important findings orabnormalities.

astraia software gmbh
17-Dec-2019Published on: astraia short instructions 1.27 - Page of 34 38
13.2 Editing Lookup Tables
A Lookup table is a list displayed by clicking on a list field with a symbol on the left side of...the field. Lookup tables are used where the selection of one or more entries of a list should bepossible.
To open the lookup table press the bar or click with the on the Space left mouse button ...symbol, the list is shown. The data for a Lookup table is entered in a separate screen, whichcontains different data depending on the table.
The functions in an opened list are:
Search: You can search the list for a name; useful for long lists.Select: In order to choose a list entry, select the entry with your mouse and pressSelect ( ). Alt + L
With the edit function, details can be changed or completed. For this click on theEdit:entry you want to edit and press the button ( ).Edit Alt + E
All changes you do to existing lookup table entries will also affect theinformation in previous cases and examinations - please be very careful editingexisting entries..
New: When you start using the program, the list of referring doctors will be empty. Theoption ( ) allows you to add new list entries.New Alt + NCancel: You can leave the open list without making or changing the selection using the
button ( ). Saved entries within separate fields will not be discarded.Cancel Alt + CDelete: New entries can be deleted from the database as long as they have not beenused.

astraia software gmbh
17-Dec-2019Published on: astraia short instructions 1.27 - Page of 35 38
13.3 Screen Configuration
This utility is available only to the admin user. Select from the menu bar, then Edit Screen and select the module which you want to change:configuration
13.3.1 Editing Labels
All labels and astraia list entries displayed in the data entry screens can be edited. The Englishastraia original will be displayed in the read-only field below/next to each label for reference.
We recommend that you use great care when modifying these labels - if the meaningof any label or checkbox is changed, will take no responsibility for theastraiainconsistency of the database. The text changes are stored in a user table in thedatabase and will be correctly preserved after a database update.
Note that some labels are used in more than one screen - the program will ask you ifyou want to change that label on all screens or only on the currently selected screen.
13.3.2 Adding user-defined fields
You can add user-defined fields for each screen in the navigator by pressing the button Add in the section User-defined values. The following mask will appear, and a dialog willnew...
guide you through the creation of the field.

astraia software gmbh
17-Dec-2019Published on: astraia short instructions 1.27 - Page of 36 38
After confirming your entries with , the user-defined fields cannot be modifiedOKanymore (except for deleting and the modifications which are available for all fields).
We recommend that you use great care when creating user-defined fields - astraiawill take no responsibility for the inconsistency of the database which can result fromcreating user-defined fields. These fields are stored as separate table in the databaseand will be correctly preserved after a database update

astraia software gmbh
17-Dec-2019Published on: astraia short instructions 1.27 - Page of 37 38
13.4 Properties
In the menu any of the astraia program settings can beHelp -> About -> Properties, viewed and modified.
Incorrect use of this tool could lead to serious problems in the operation of thesoftware. We recommend that you export your settings so that you can restore themin case any problems should occur. In most cases, you will be asked by your supportcontact to add one or more property values. This course of action cannot cause anytroubles, not even by mistaken entries. Problems only could arise if you modify ordelete existing properties. In most cases you can correct problems using the programOptions screen. By pressing Accept below, you confirm that any resulting malfunctionof your astraia system is in your own responsibility.

astraia software gmbh
17-Dec-2019Published on: astraia short instructions 1.27 - Page of 38 38
14 Safety Hints
Please ensure that the system is operated by sufficiently trained personnel only.
astraia software gmbh cannot take any responsibility for your data security andintegrity. We advise you to keep regular backups of the database (we recommendtwice a day or every 10 examinations) and other important files, which should bestored separately from the machine(s) on which you are running astraia. Werecommend doing additional backups to an external storage medium (external harddisk, USB, via network to another PC, DVD/CD, SAN, NAS).
The customer is responsible for verifying that the backup is being performed andusable.
It is possible to import measurements from a connected ultrasound machine using themenu or the shortcut .Data -> Read measurement F9
These measurements are only imported into the currently opened screen and thecurrently selected fetus tab. If you have performed measurements for values of otherscreens or fetuses than the currently opened one, you need to open them and importthe measurement data there too. This is to make sure that no data is added to thepatient record without the explicit request by a user. Therefore you are also requiredto make sure that the measurements that were imported into the current screen arecorrect and that they should be stored in the patient record. If imported values shouldnot be stored in the patient record, they must be removed by the user.

