objectives - vanderbilt university medical center · objectives to provide a high ... dos preop...
TRANSCRIPT

Objectives
To provide a high level overview of Vanderbilt’s Perioperative Charting system before your first clinical day
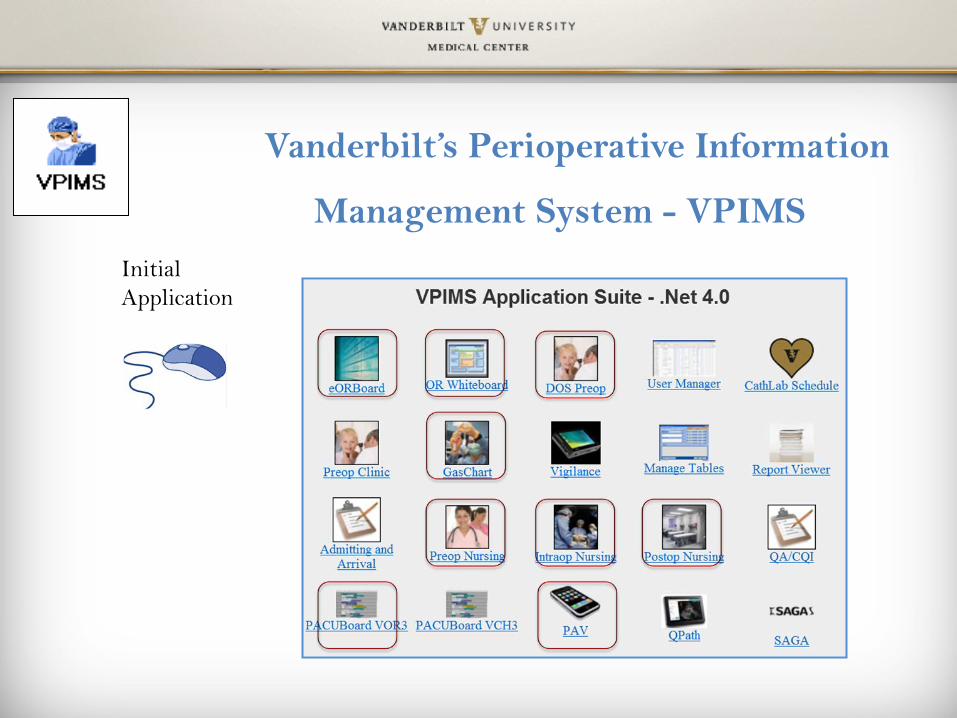
Vanderbilt’s Perioperative Information
Management System - VPIMS Initial Application

eORBoard Scheduled Cases
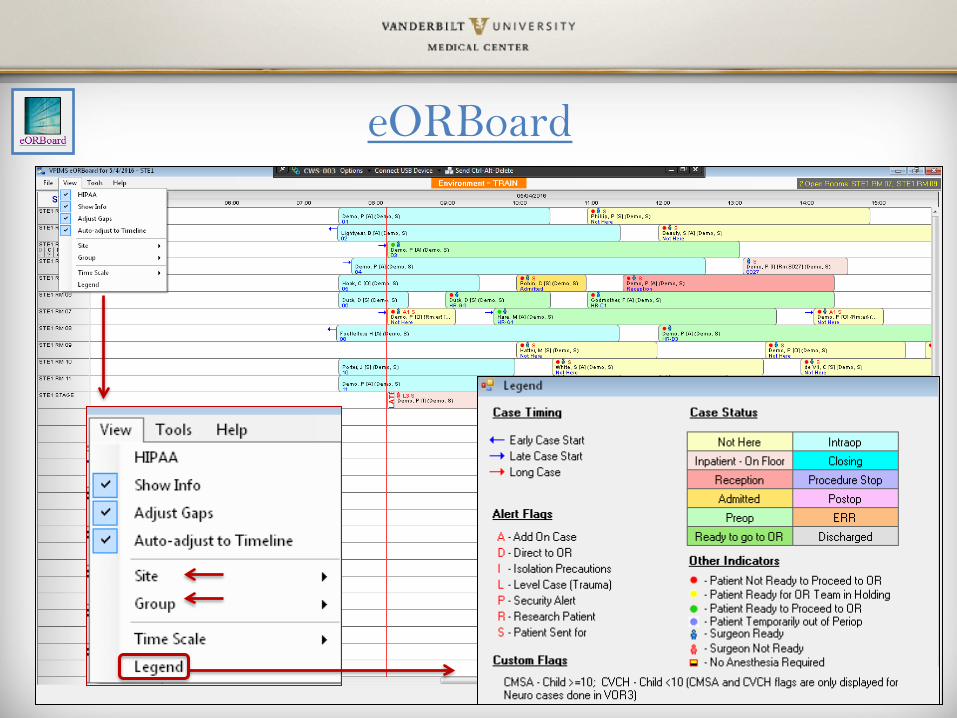
eORBoard
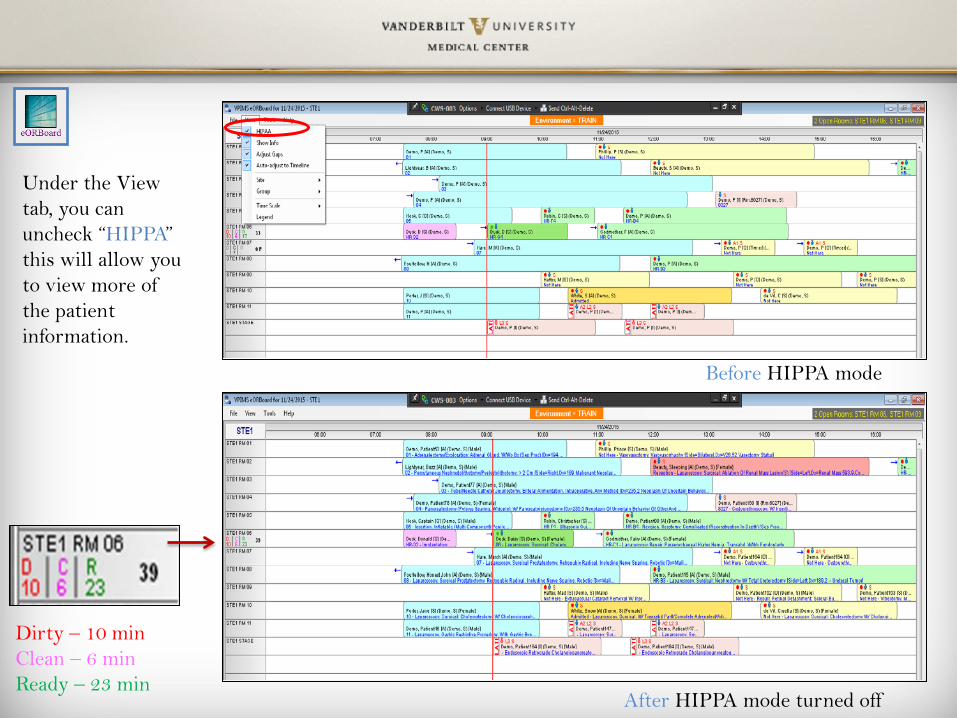
Under the View tab, you can uncheck “HIPPA” this will allow you to view more of the patient information.
Before HIPPA mode
After HIPPA mode turned off
Dirty – 10 min Clean – 6 min Ready – 23 min
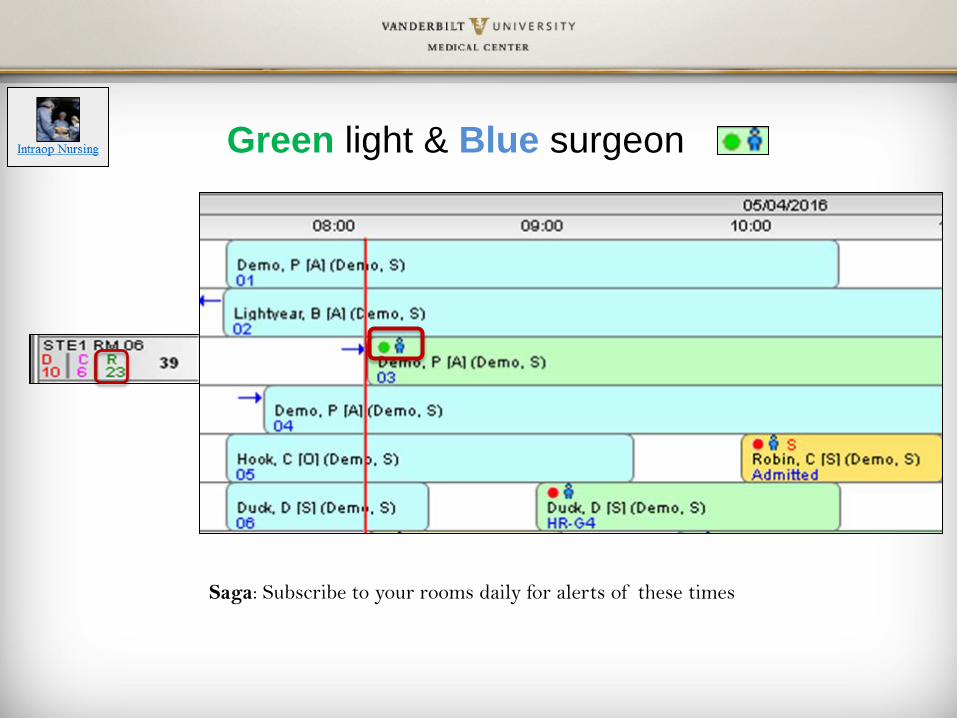
Green light & Blue surgeon
Saga: Subscribe to your rooms daily for alerts of these times
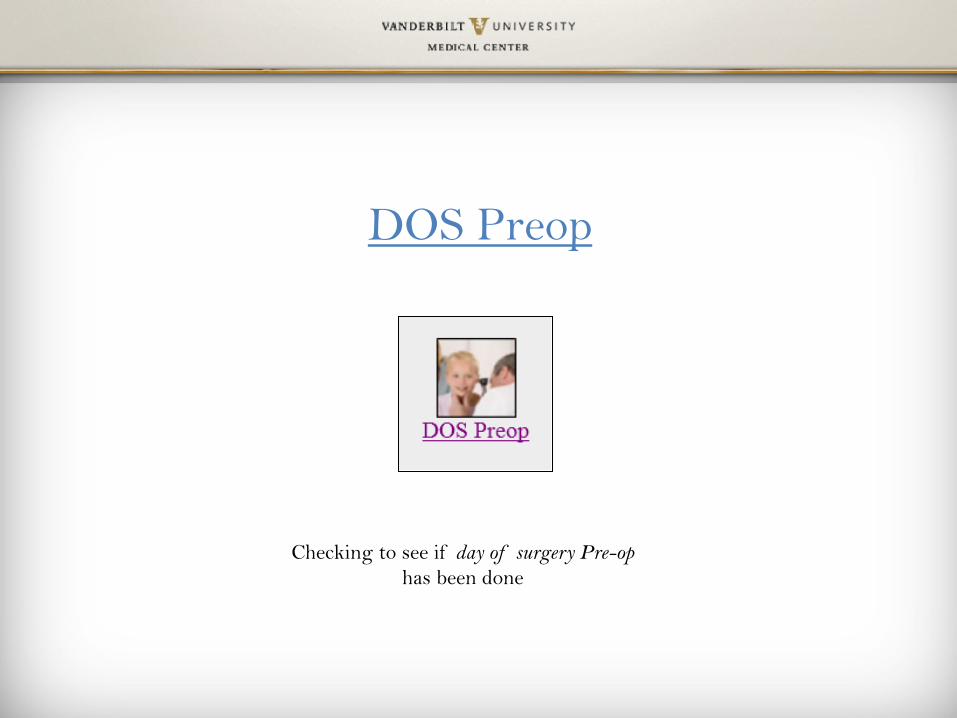
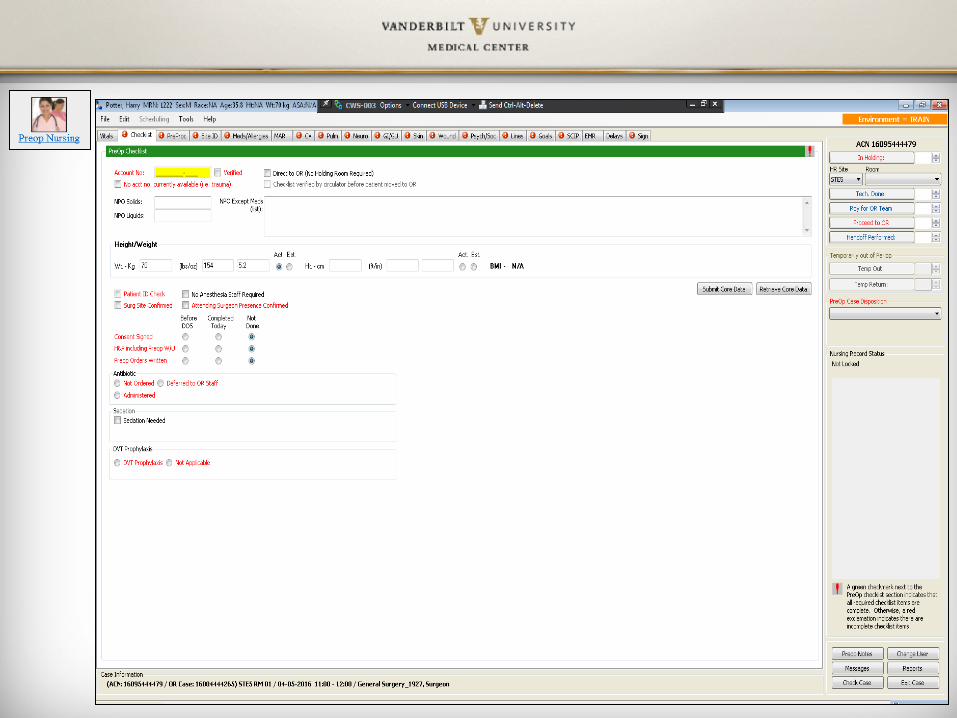
DOS Preop
Checking to see if day of surgery Pre-op has been done

DOS Preop
Customize
None: No Preop done VPEC/Patch: Done by NP or RN phone call DOS: Preop that’s not in VPEC mode (not as complete - but there)

VPIMS web
Pre-Op Evaluation Form
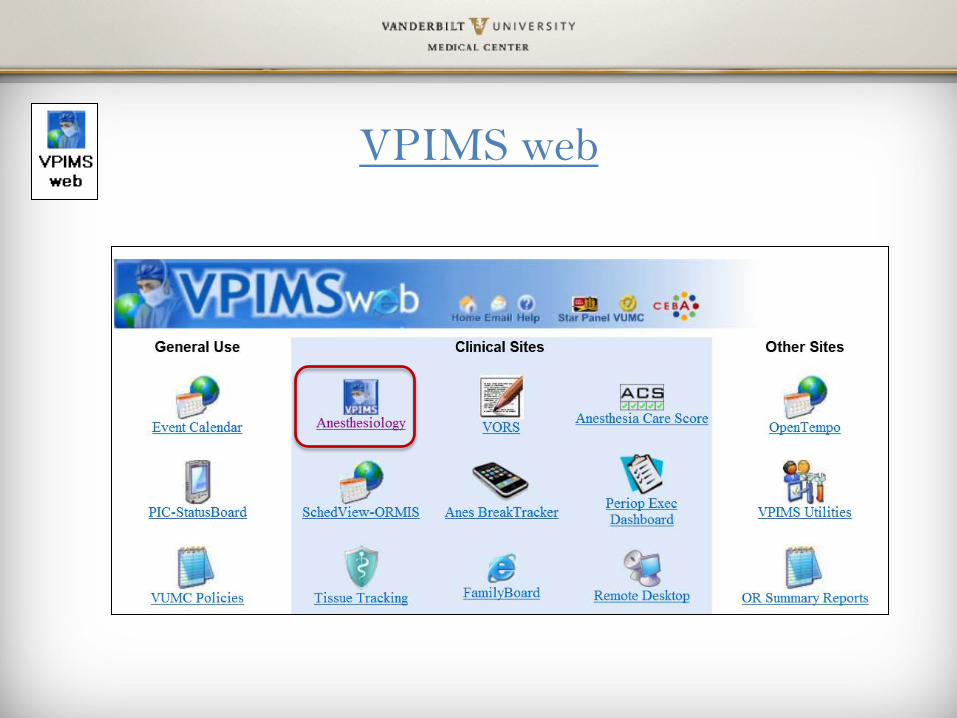
VPIMS web
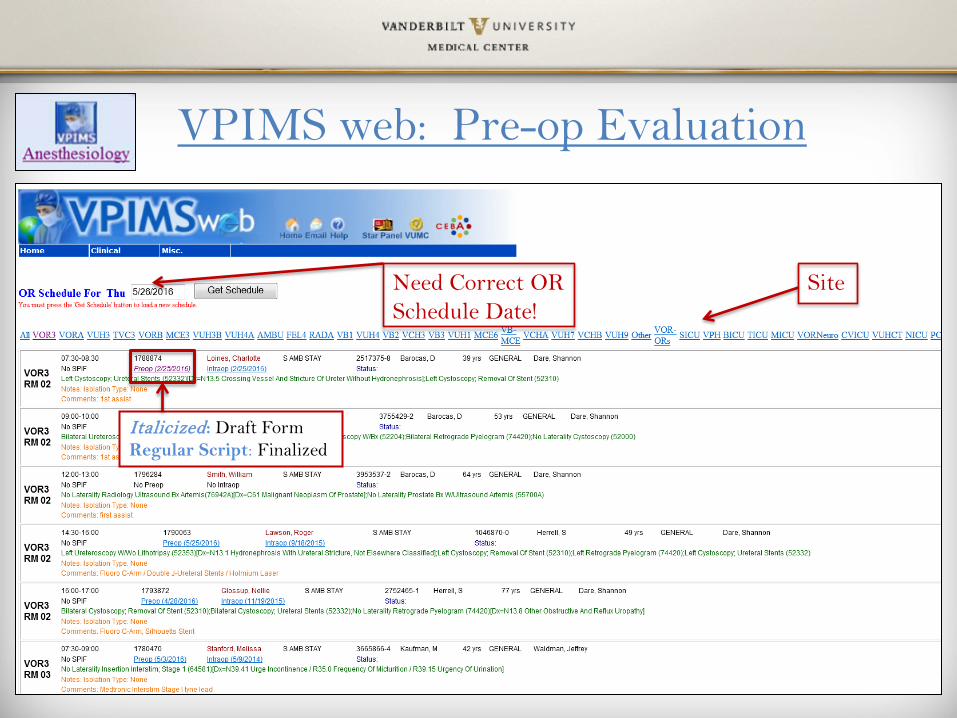
VPIMS web: Pre-op Evaluation
Need Correct OR Schedule Date!
Site
Italicized: Draft Form Regular Script: Finalized
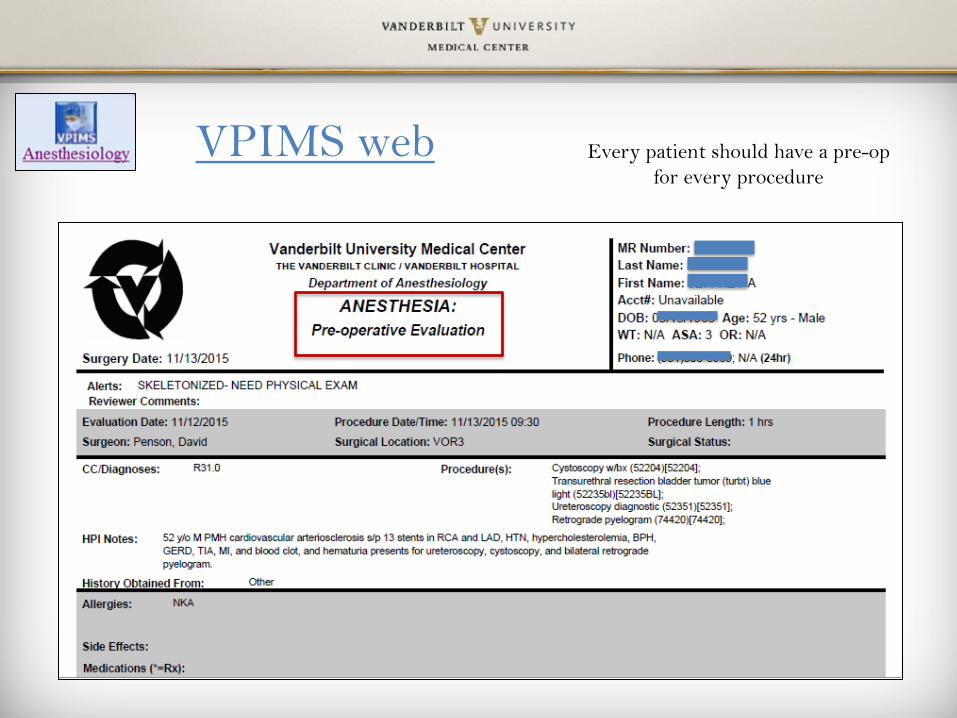
VPIMS web Every patient should have a pre-op for every procedure
Gas Chart
Anesthesia Charting
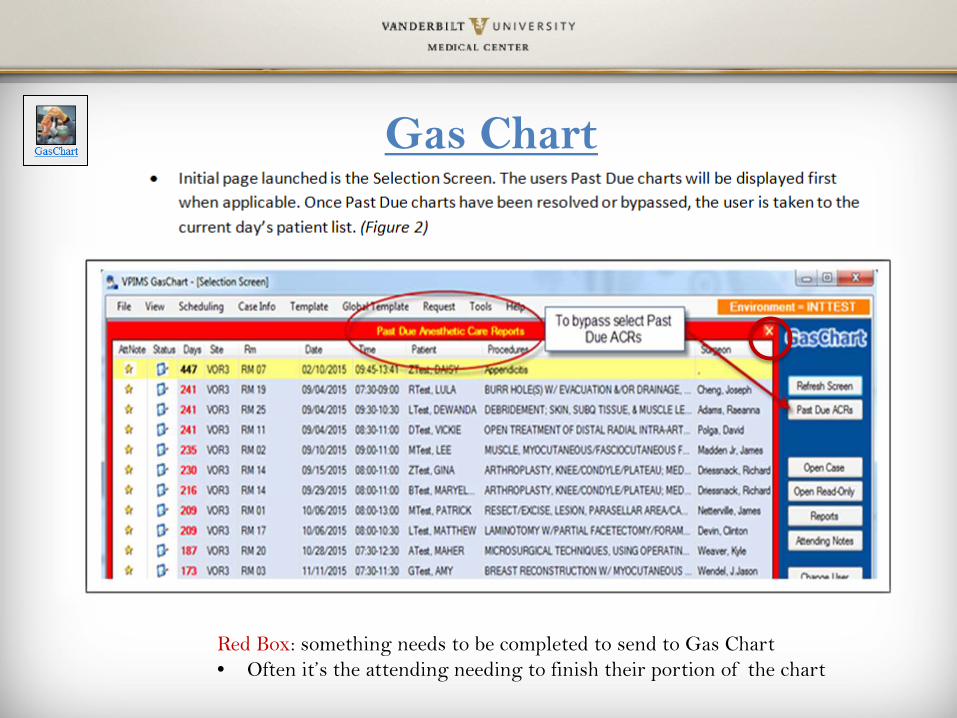
Gas Chart
Red Box: something needs to be completed to send to Gas Chart • Often it’s the attending needing to finish their portion of the chart
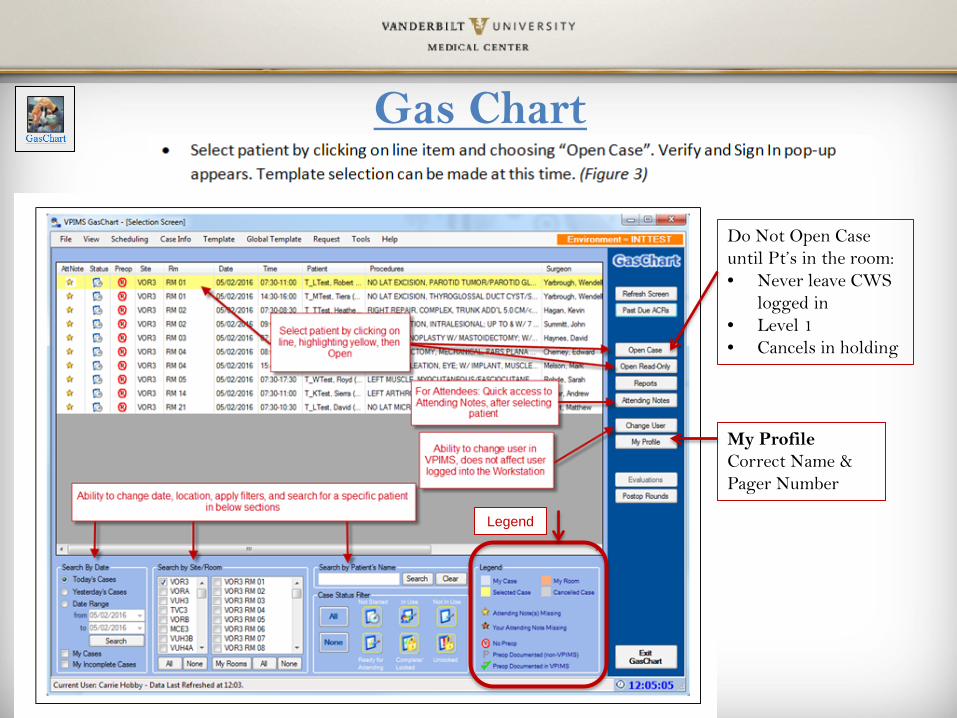
Gas Chart
Legend
My Profile Correct Name & Pager Number
Do Not Open Case until Pt’s in the room: • Never leave CWS
logged in • Level 1 • Cancels in holding
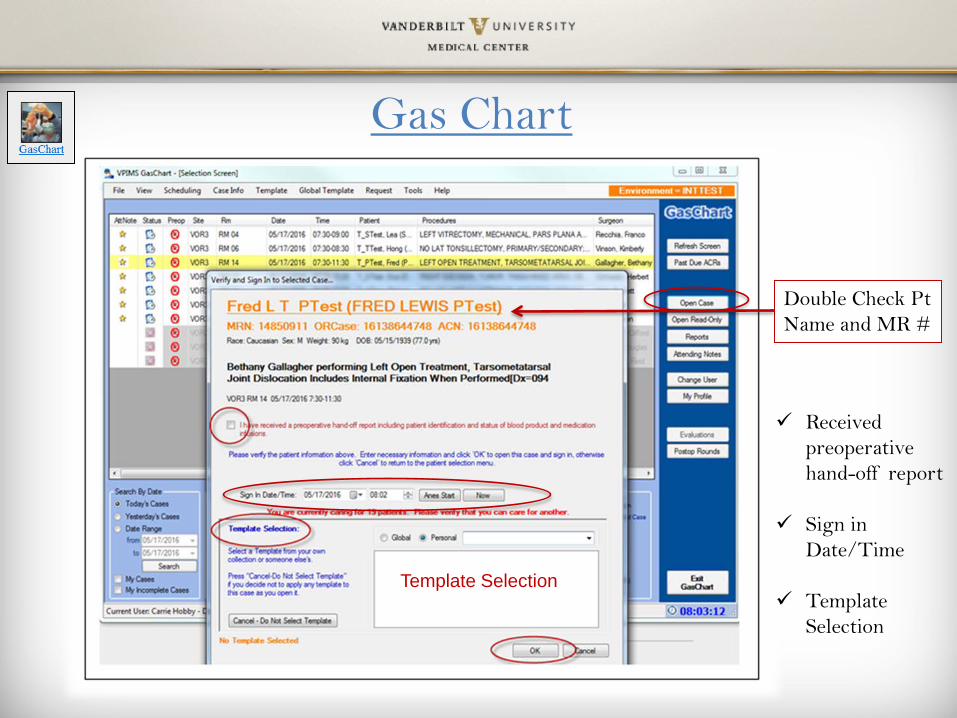
Gas Chart
Double Check Pt Name and MR #
Received preoperative hand-off report
Sign in Date/Time
Template Selection
Template Selection
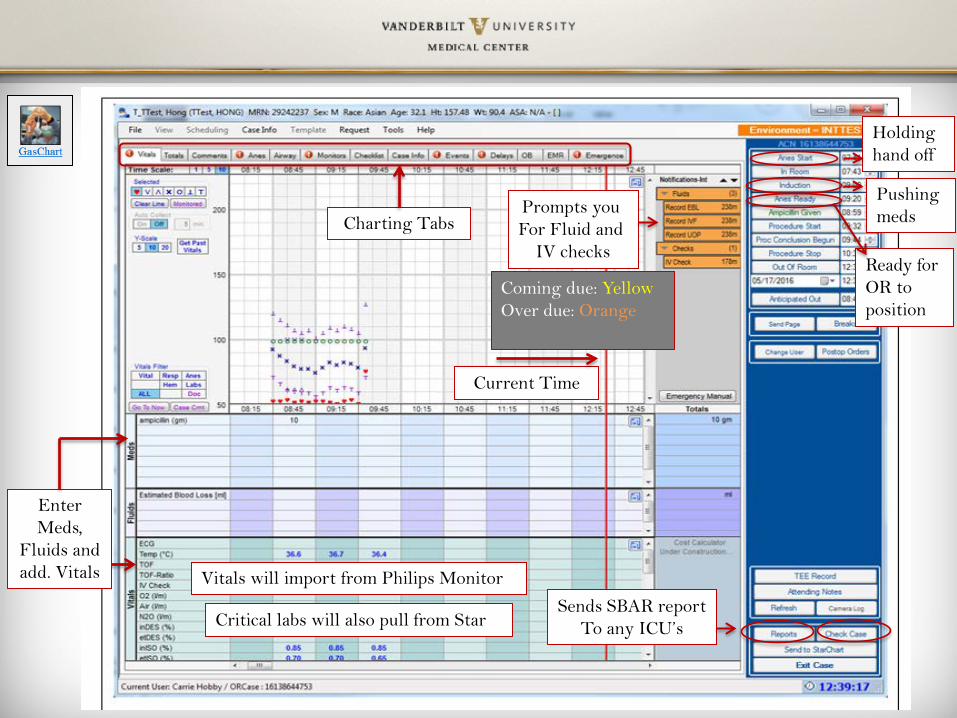
Vitals will import from Philips Monitor
Charting Tabs
Current Time
Critical labs will also pull from Star
Enter Meds,
Fluids and add. Vitals
Holding hand off
Pushing meds
Ready for OR to position
Prompts you For Fluid and
IV checks
Sends SBAR report To any ICU’s
Coming due: Yellow Over due: Orange
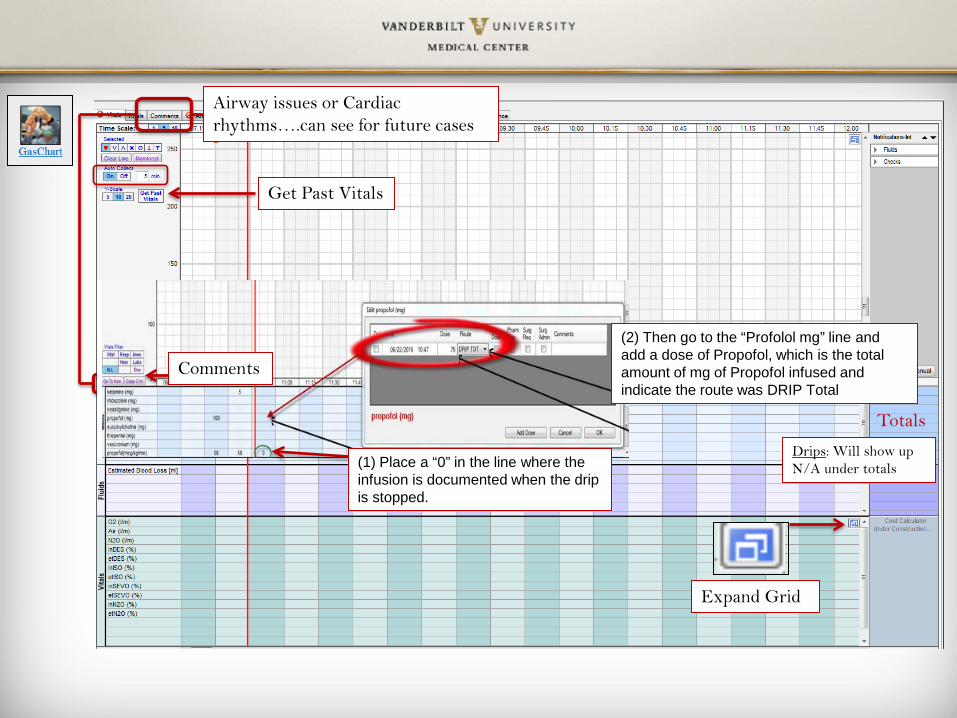
Get Past Vitals
Expand Grid
Totals
Airway issues or Cardiac rhythms….can see for future cases
Drips: Will show up N/A under totals
Comments
(1) Place a “0” in the line where the infusion is documented when the drip is stopped.
(2) Then go to the “Profolol mg” line and add a dose of Propofol, which is the total amount of mg of Propofol infused and indicate the route was DRIP Total
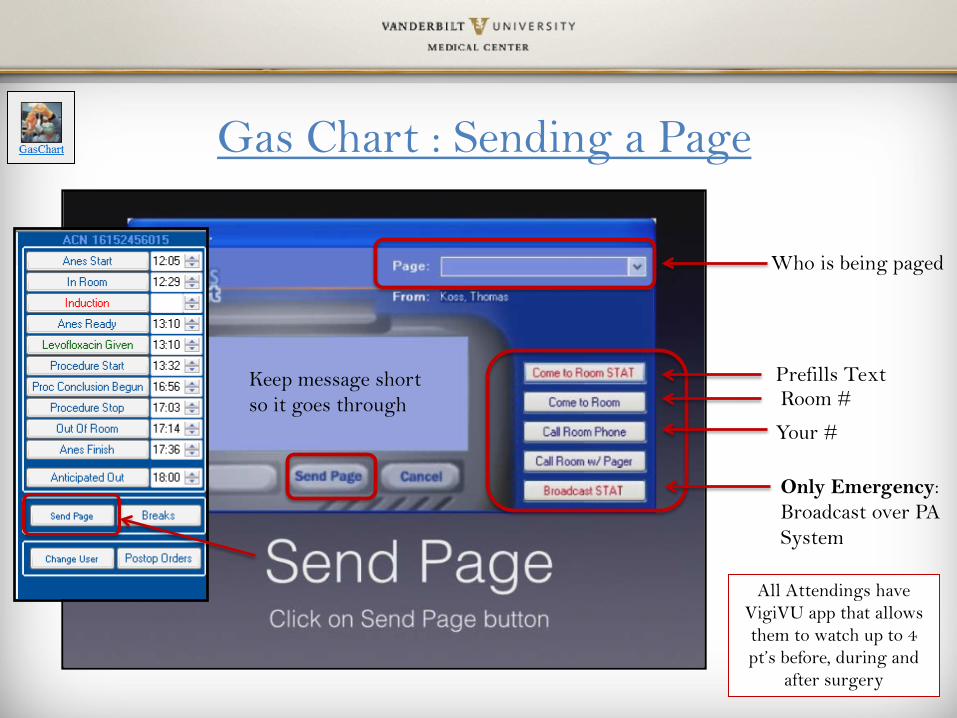
Gas Chart : Sending a Page
Keep message short so it goes through
Who is being paged
Prefills Text
Your #
Only Emergency: Broadcast over PA System
Room #
All Attendings have VigiVU app that allows them to watch up to 4 pt’s before, during and
after surgery
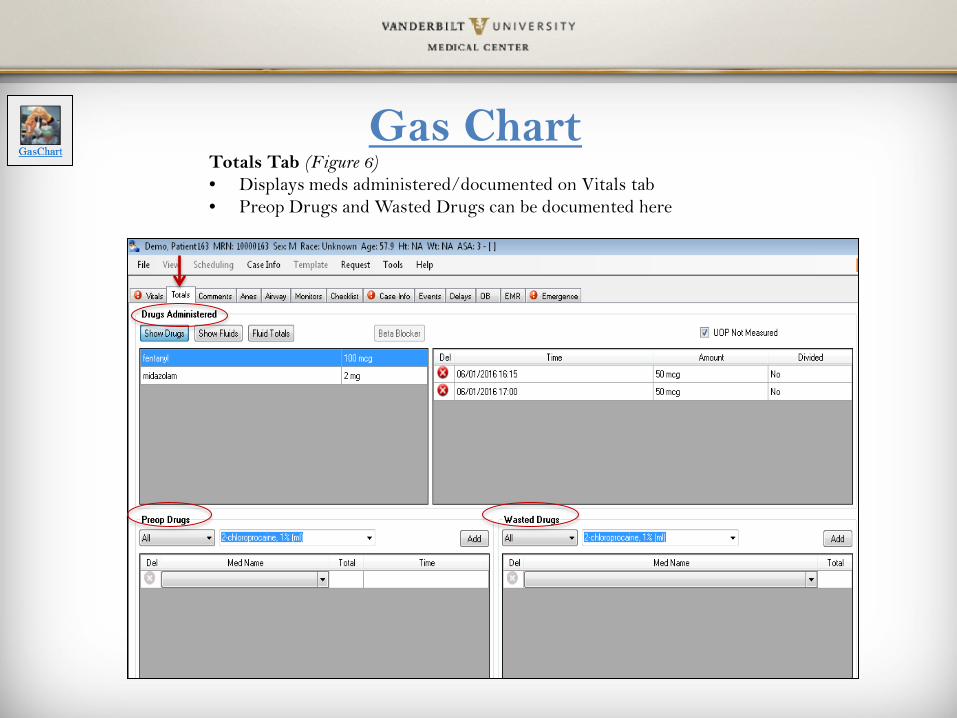
Gas Chart Totals Tab (Figure 6) • Displays meds administered/documented on Vitals tab • Preop Drugs and Wasted Drugs can be documented here
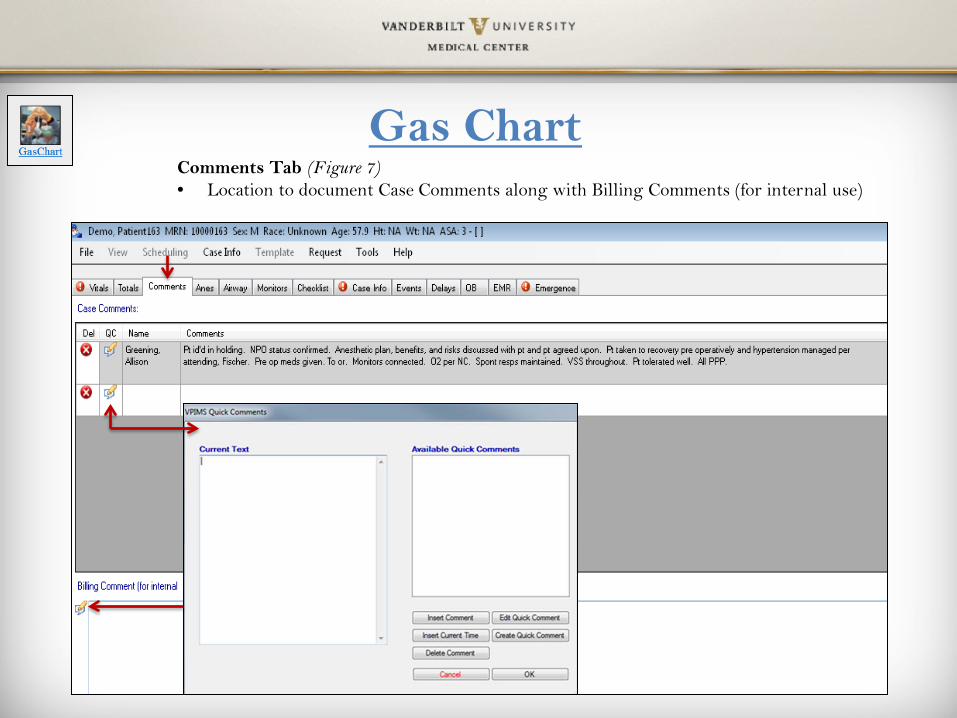
Gas Chart Comments Tab (Figure 7) • Location to document Case Comments along with Billing Comments (for internal use)
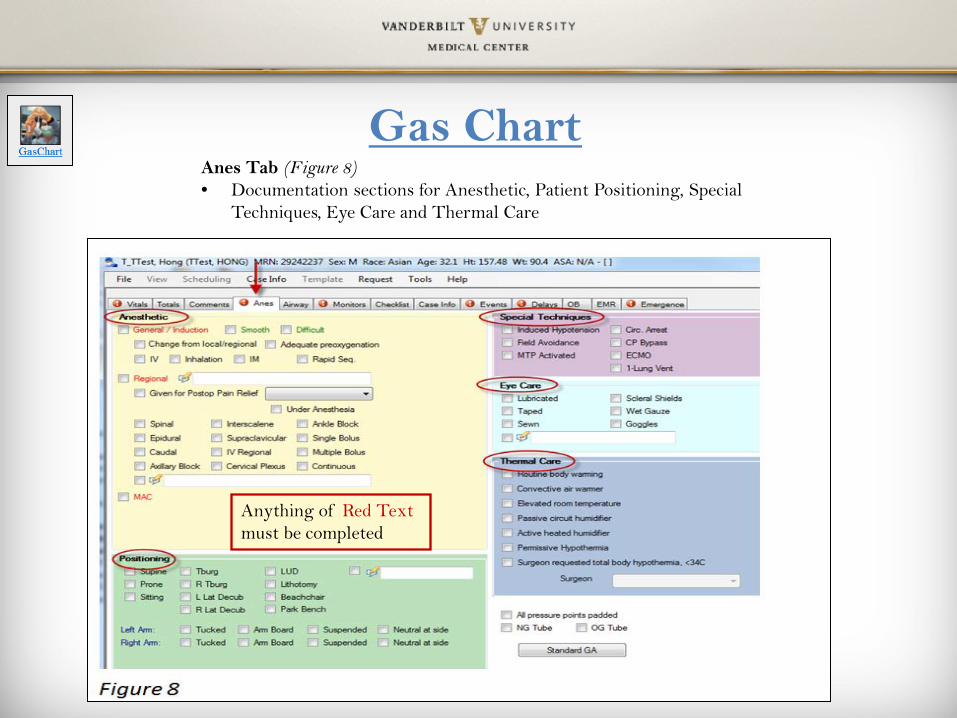
Gas Chart Anes Tab (Figure 8) • Documentation sections for Anesthetic, Patient Positioning, Special
Techniques, Eye Care and Thermal Care
Anything of Red Text must be completed
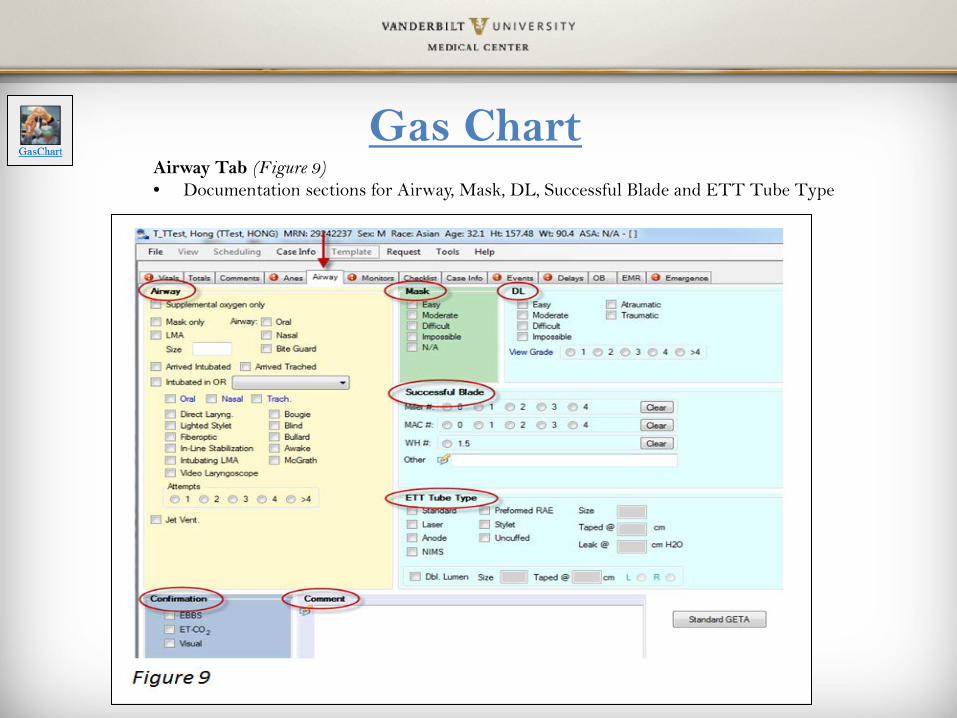
Gas Chart Airway Tab (Figure 9) • Documentation sections for Airway, Mask, DL, Successful Blade and ETT Tube Type
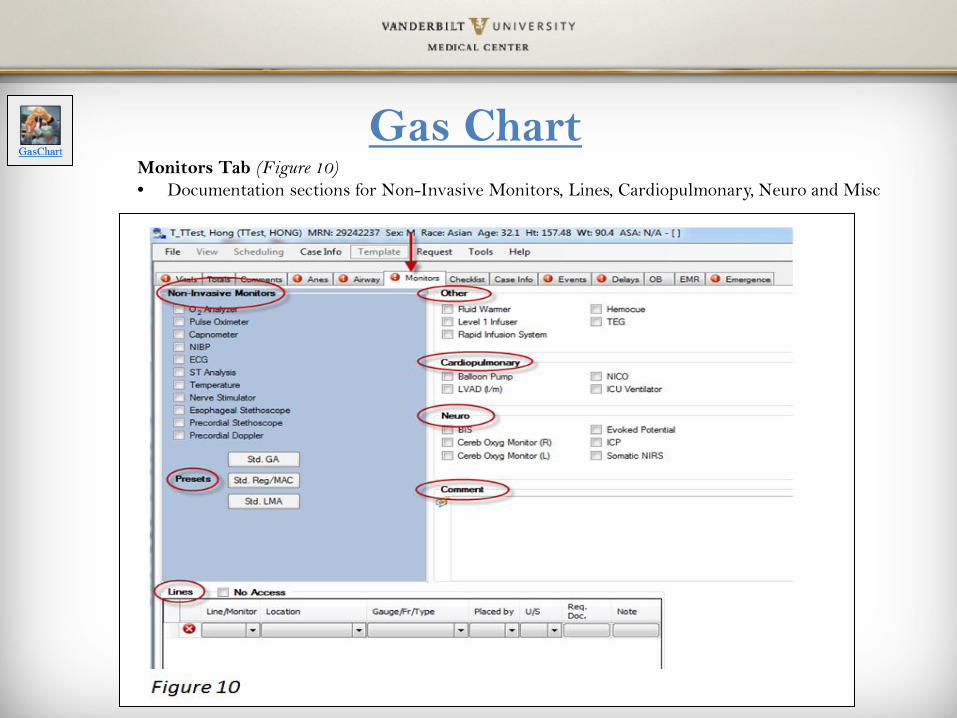
Gas Chart Monitors Tab (Figure 10) • Documentation sections for Non-Invasive Monitors, Lines, Cardiopulmonary, Neuro and Misc
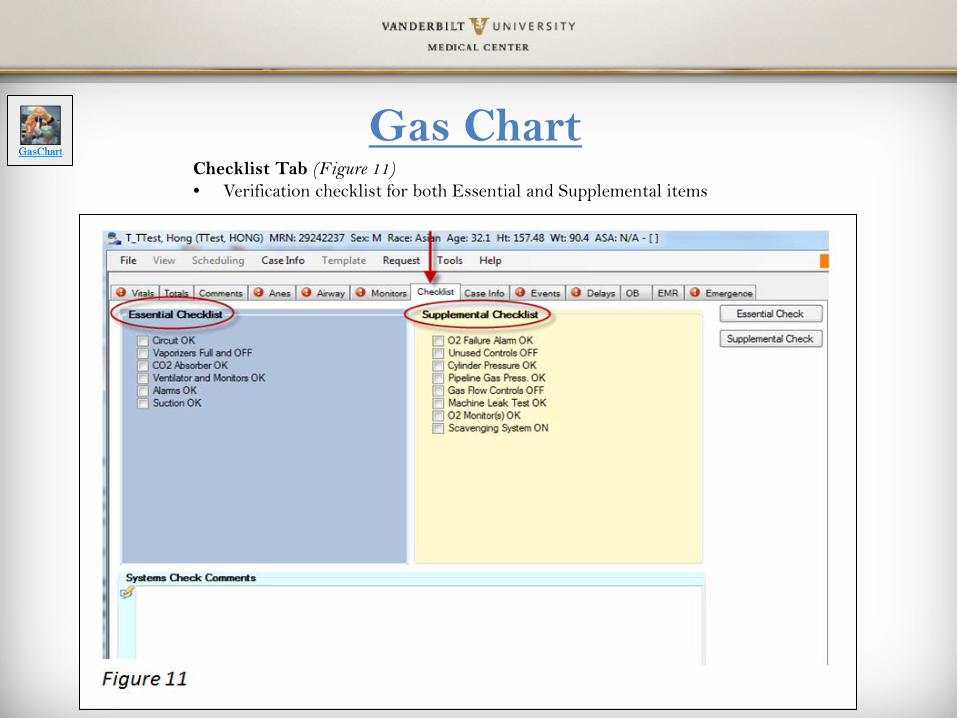
Gas Chart Checklist Tab (Figure 11) • Verification checklist for both Essential and Supplemental items
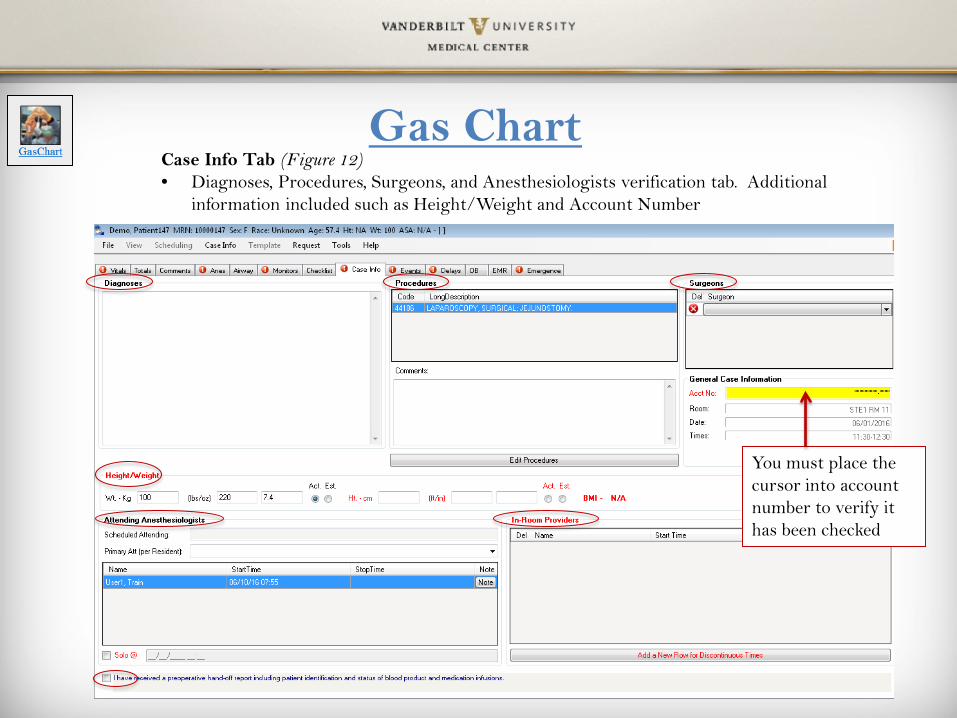
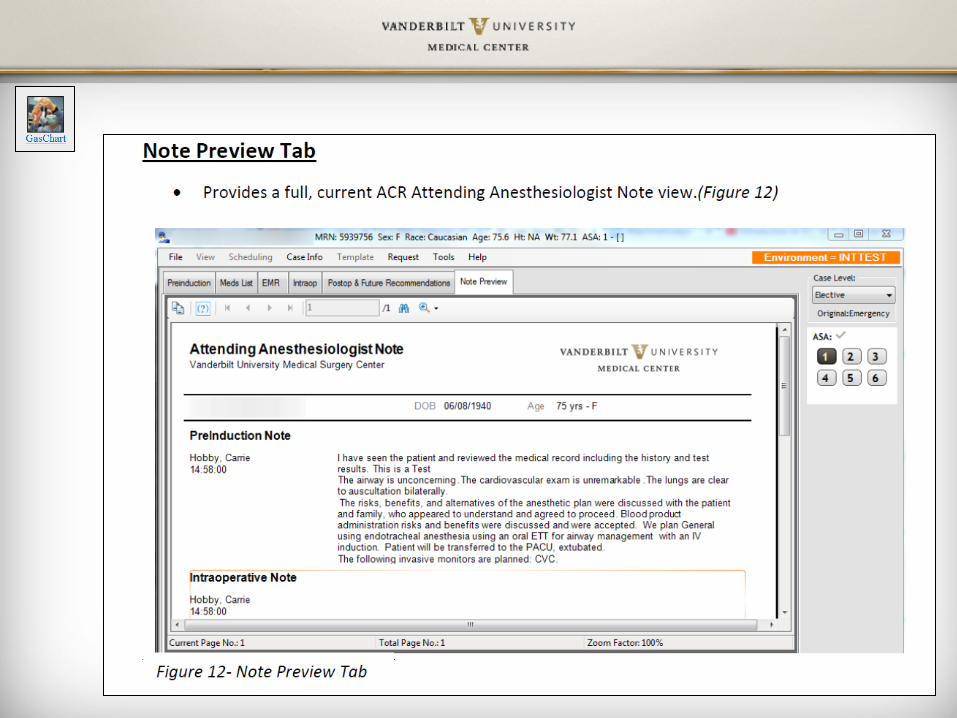
Gas Chart Case Info Tab (Figure 12) • Diagnoses, Procedures, Surgeons, and Anesthesiologists verification tab. Additional
information included such as Height/Weight and Account Number
You must place the cursor into account number to verify it has been checked
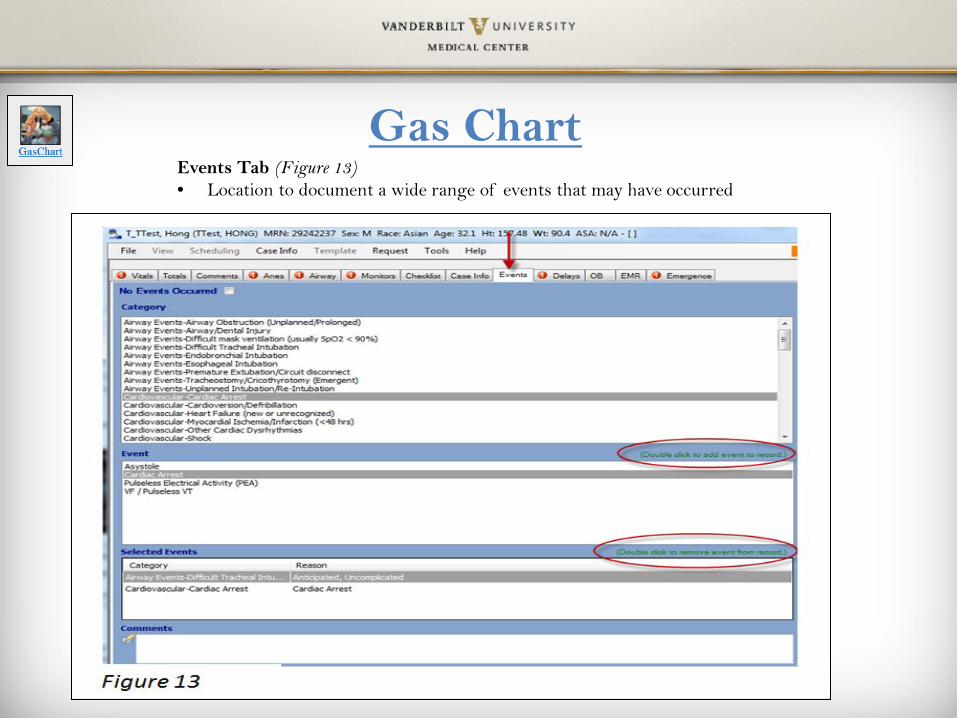
Gas Chart Events Tab (Figure 13) • Location to document a wide range of events that may have occurred
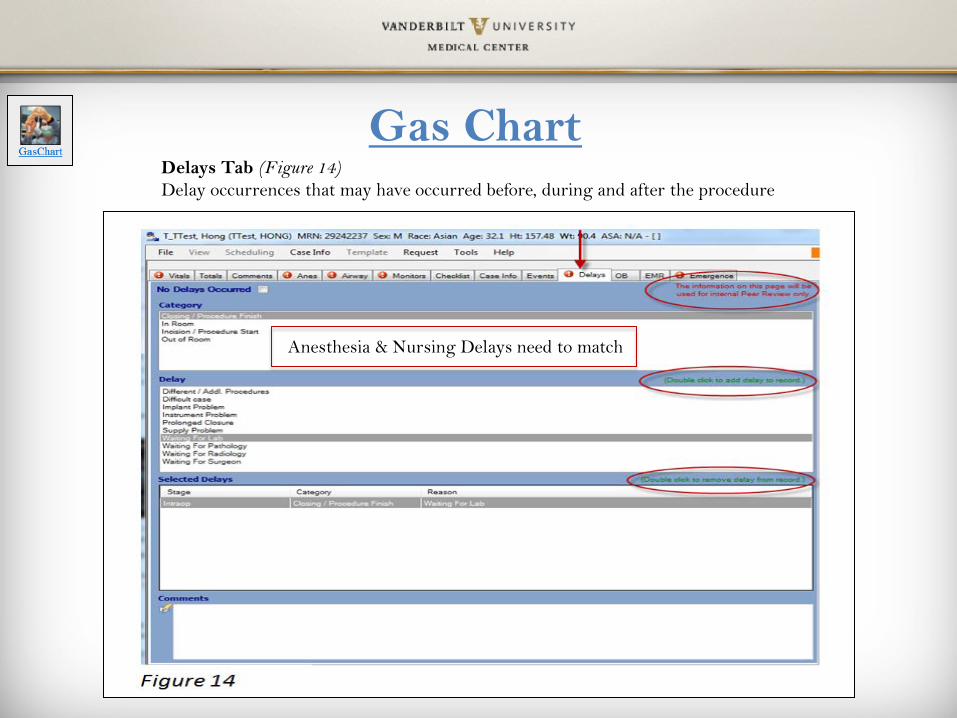
Gas Chart Delays Tab (Figure 14) Delay occurrences that may have occurred before, during and after the procedure
Anesthesia & Nursing Delays need to match
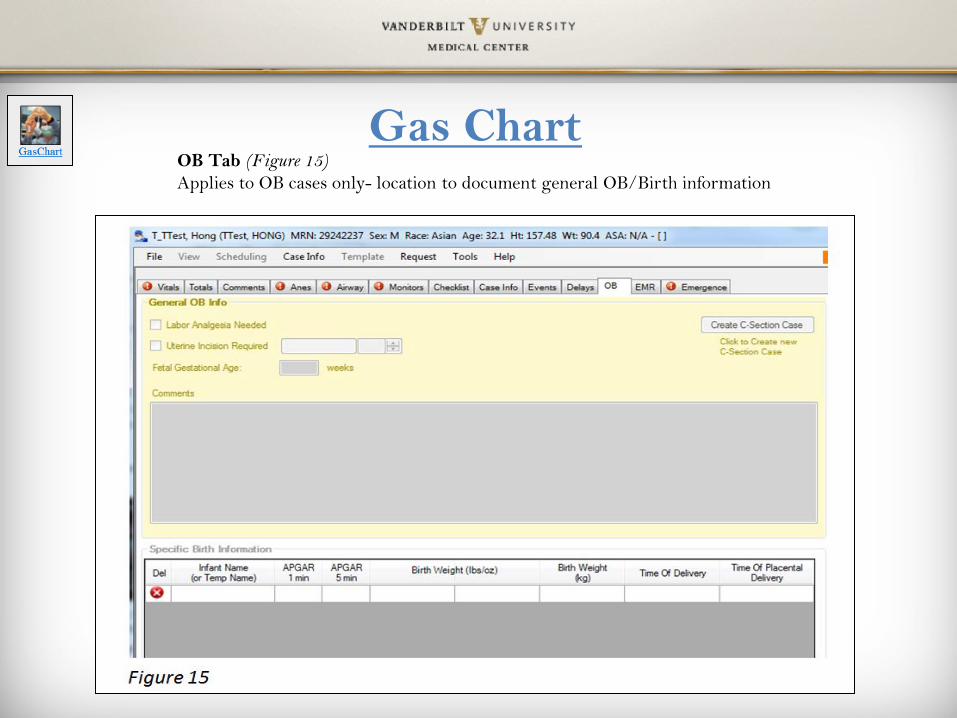
Gas Chart OB Tab (Figure 15) Applies to OB cases only- location to document general OB/Birth information
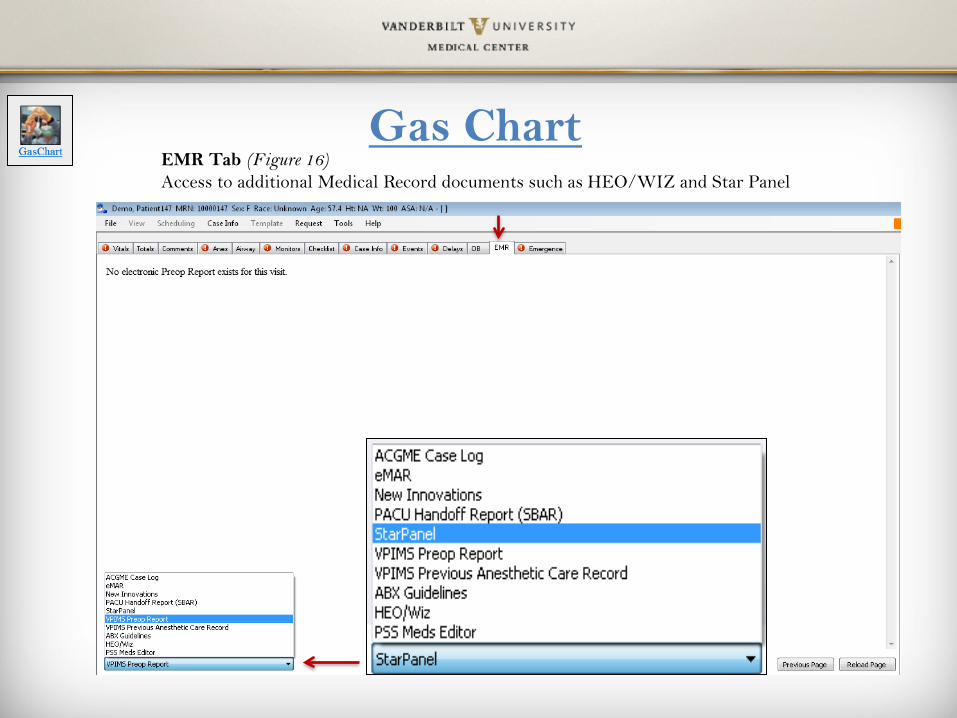
Gas Chart EMR Tab (Figure 16) Access to additional Medical Record documents such as HEO/WIZ and Star Panel
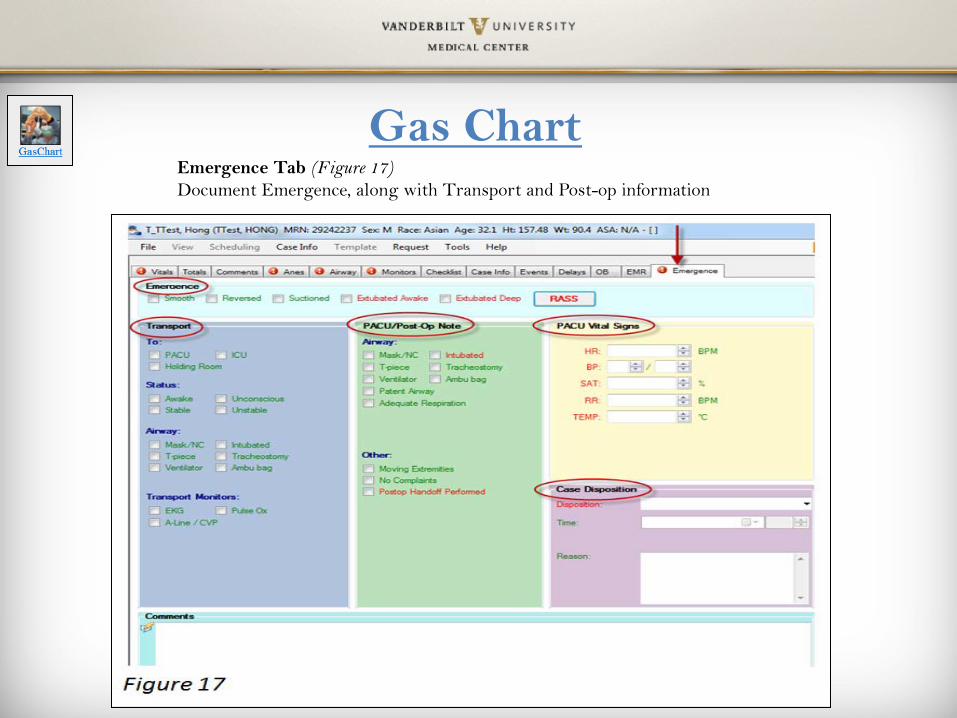
Gas Chart Emergence Tab (Figure 17) Document Emergence, along with Transport and Post-op information
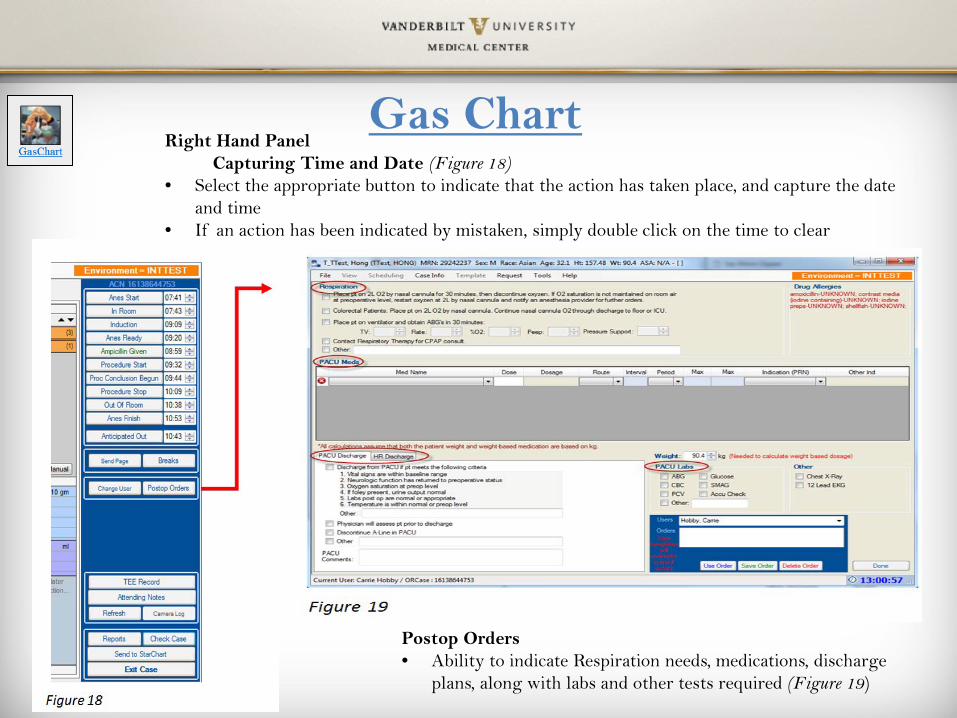
Gas Chart Right Hand Panel Capturing Time and Date (Figure 18) • Select the appropriate button to indicate that the action has taken place, and capture the date
and time • If an action has been indicated by mistaken, simply double click on the time to clear
Postop Orders • Ability to indicate Respiration needs, medications, discharge
plans, along with labs and other tests required (Figure 19)
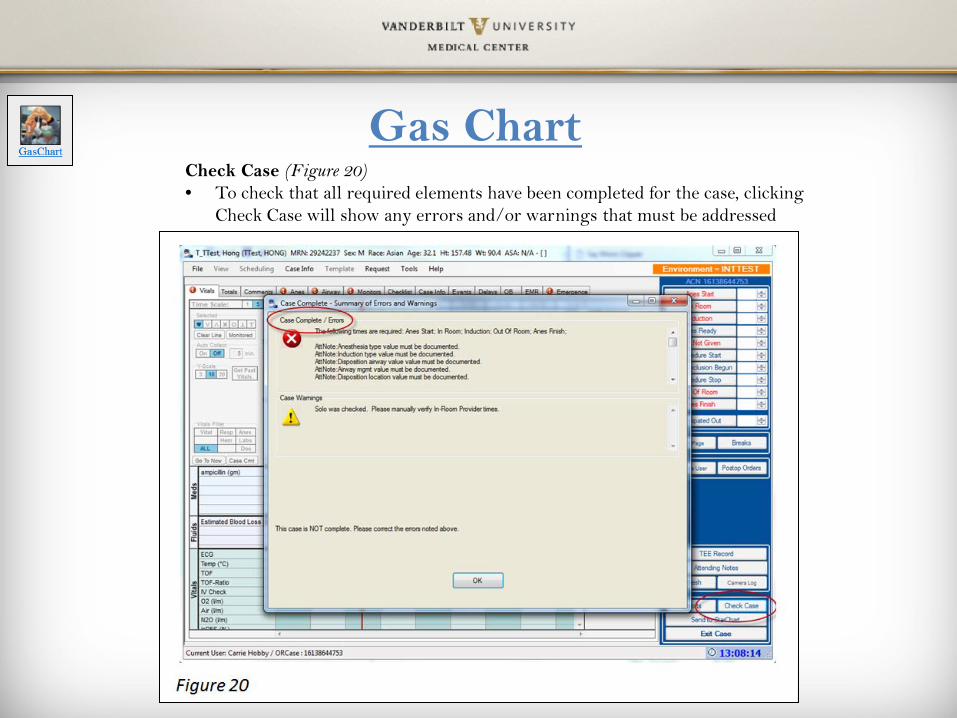
Gas Chart Check Case (Figure 20) • To check that all required elements have been completed for the case, clicking
Check Case will show any errors and/or warnings that must be addressed
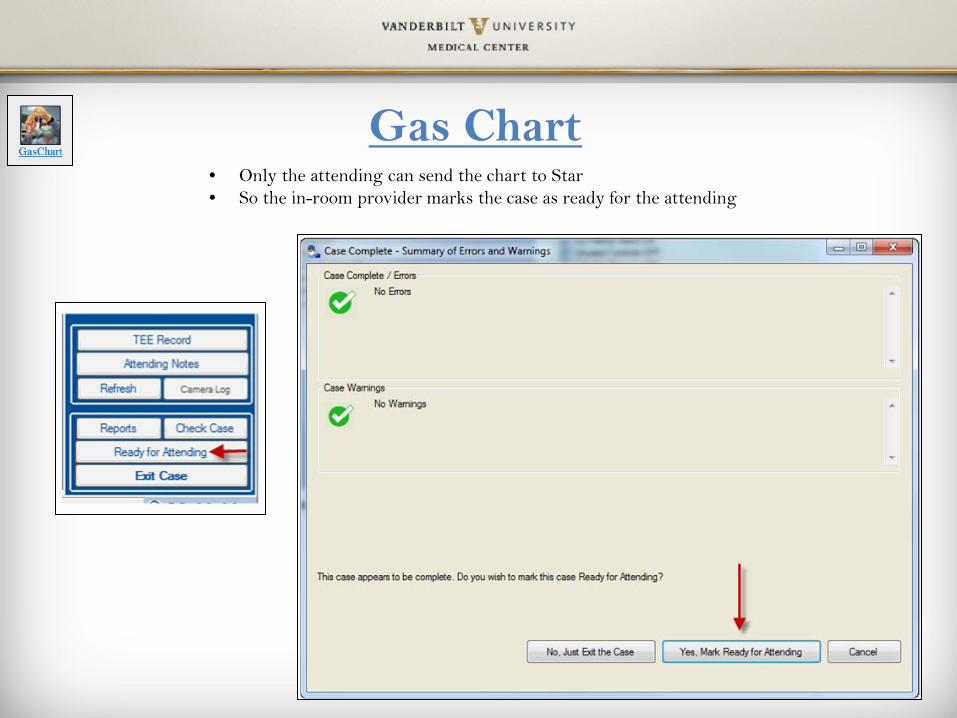
• Only the attending can send the chart to Star • So the in-room provider marks the case as ready for the attending
Gas Chart
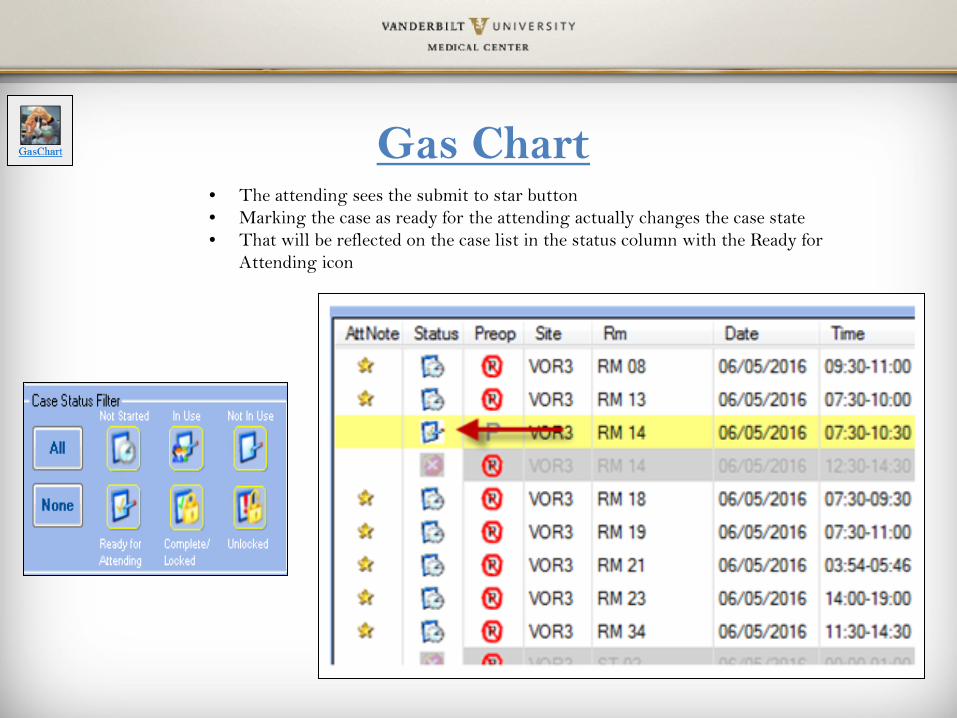
• The attending sees the submit to star button • Marking the case as ready for the attending actually changes the case state • That will be reflected on the case list in the status column with the Ready for
Attending icon
Gas Chart
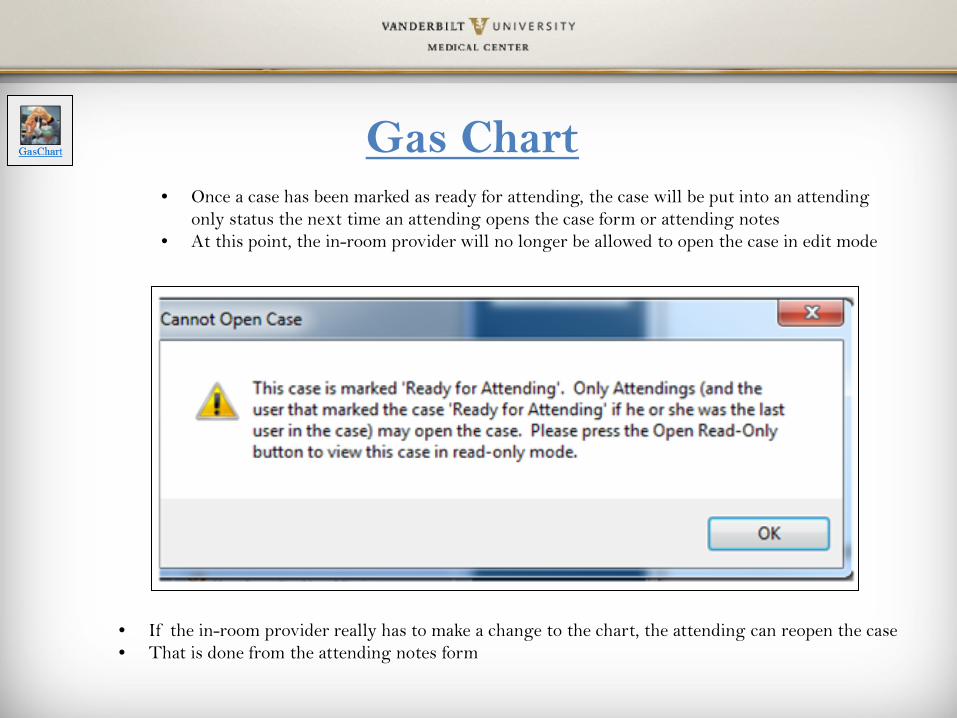
• Once a case has been marked as ready for attending, the case will be put into an attending only status the next time an attending opens the case form or attending notes
• At this point, the in-room provider will no longer be allowed to open the case in edit mode
• If the in-room provider really has to make a change to the chart, the attending can reopen the case • That is done from the attending notes form
Gas Chart

Preop Nursing
Pre-op Charting
Intraop Nursing
Intra-op Charting
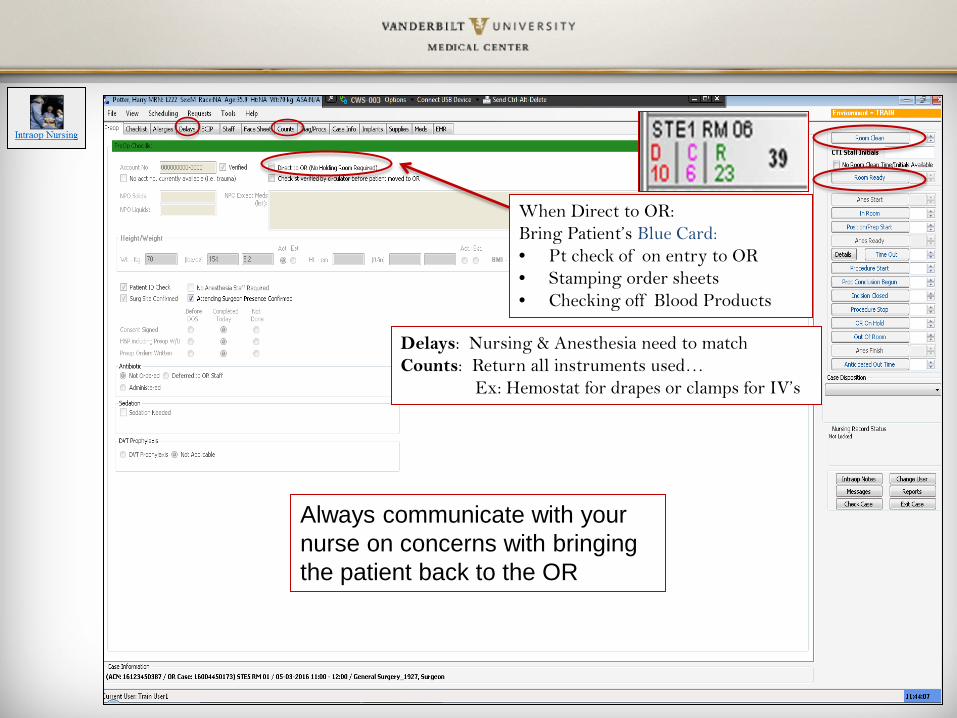
Delays: Nursing & Anesthesia need to match Counts: Return all instruments used… Ex: Hemostat for drapes or clamps for IV’s
When Direct to OR: Bring Patient’s Blue Card: • Pt check of on entry to OR • Stamping order sheets • Checking off Blood Products
Always communicate with your nurse on concerns with bringing the patient back to the OR
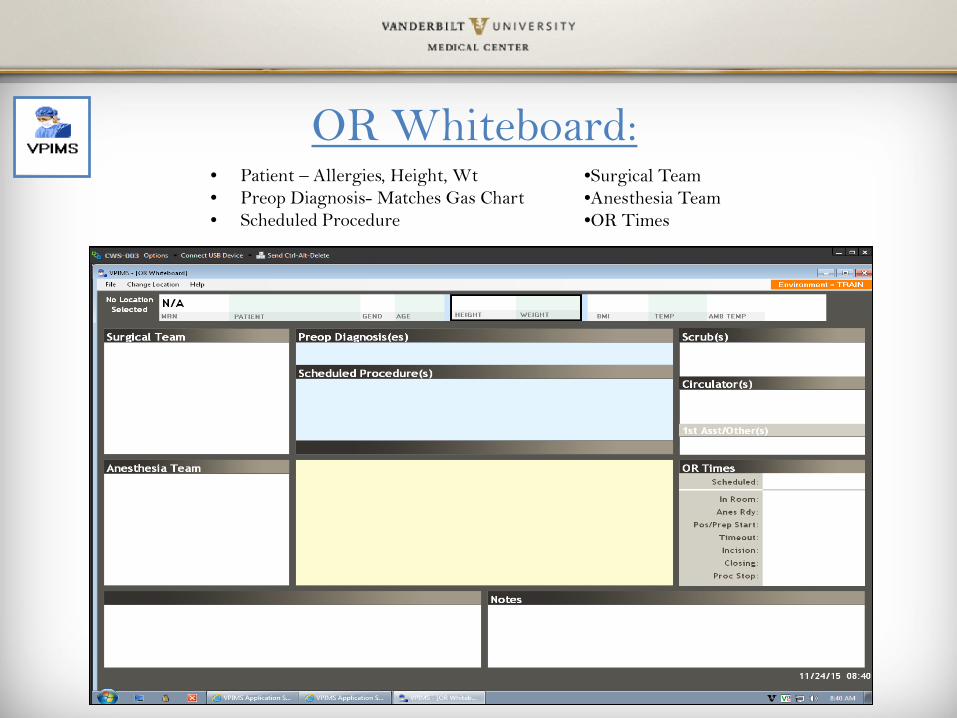
• Patient – Allergies, Height, Wt • Preop Diagnosis- Matches Gas Chart • Scheduled Procedure
OR Whiteboard: •Surgical Team •Anesthesia Team •OR Times
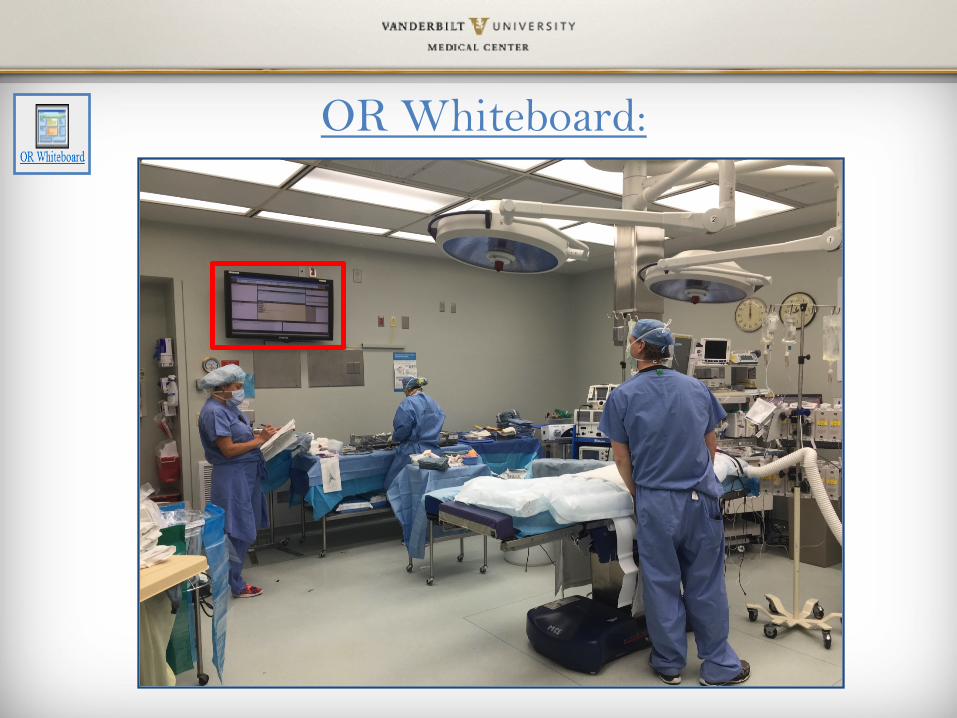
OR Whiteboard:
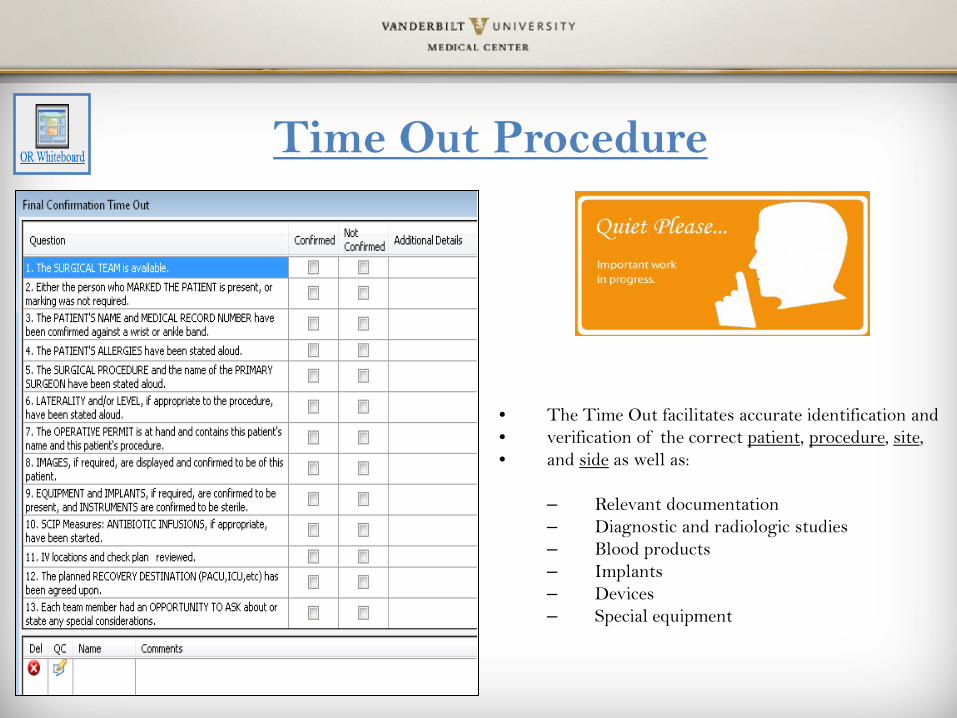
Time Out Procedure
• The Time Out facilitates accurate identification and • verification of the correct patient, procedure, site, • and side as well as:
– Relevant documentation – Diagnostic and radiologic studies – Blood products – Implants – Devices – Special equipment
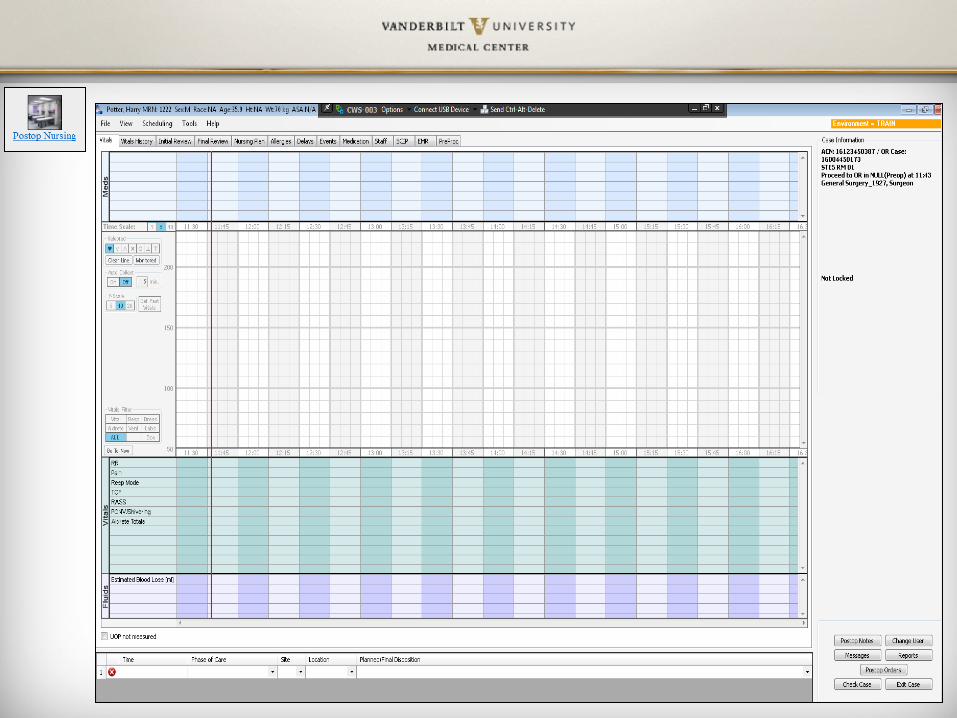
Postop Nursing
Post-op Charting
PACU Board VOR3
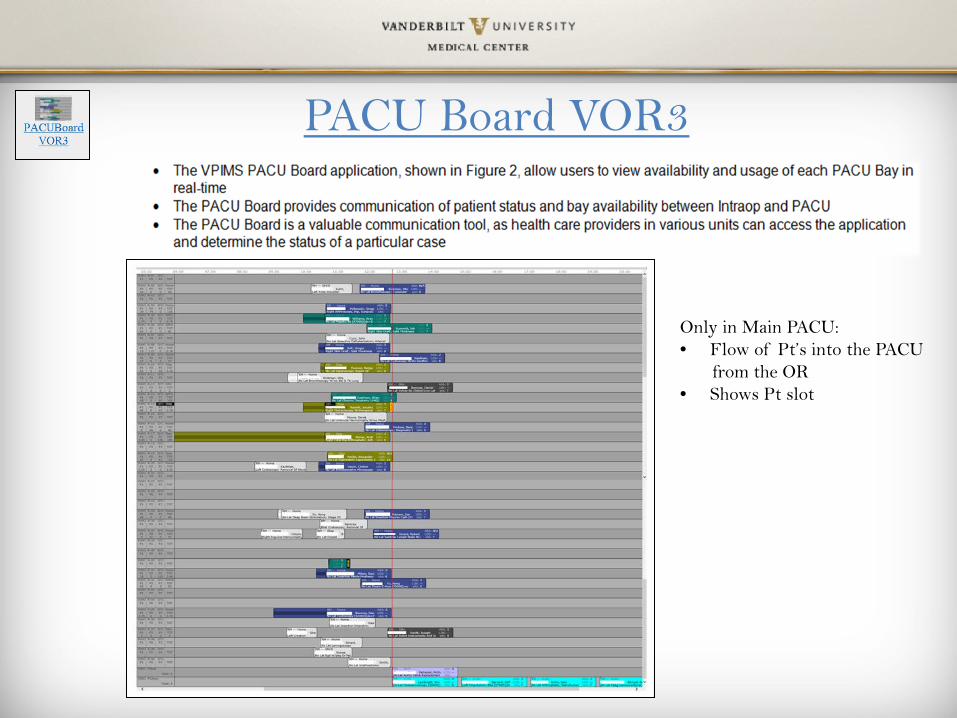
PACU Board VOR3
Only in Main PACU: • Flow of Pt’s into the PACU from the OR • Shows Pt slot
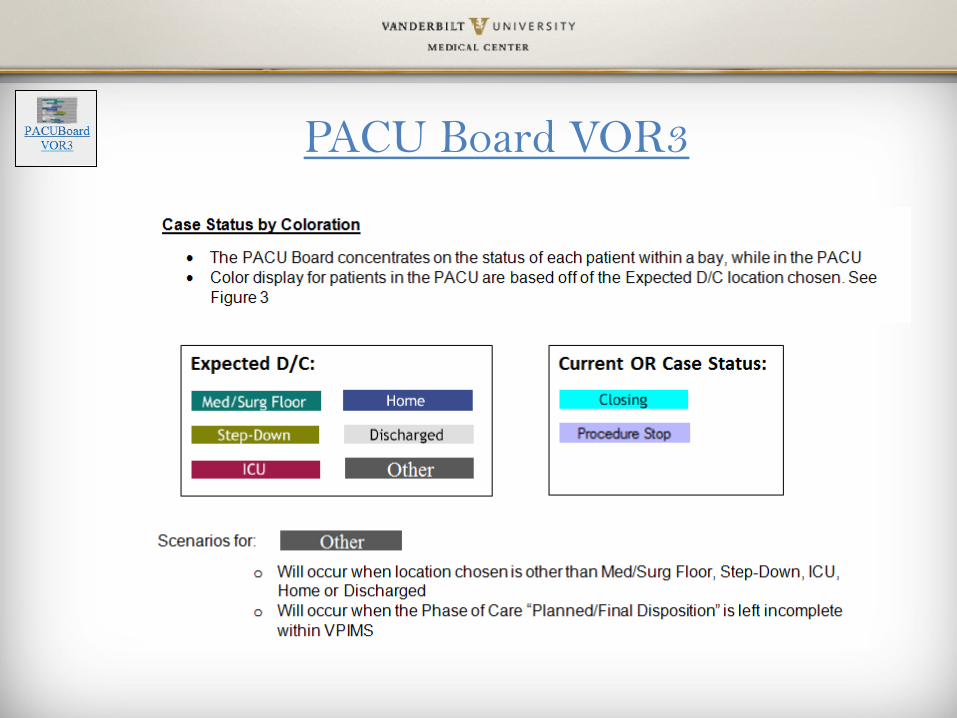
PACU Board VOR3
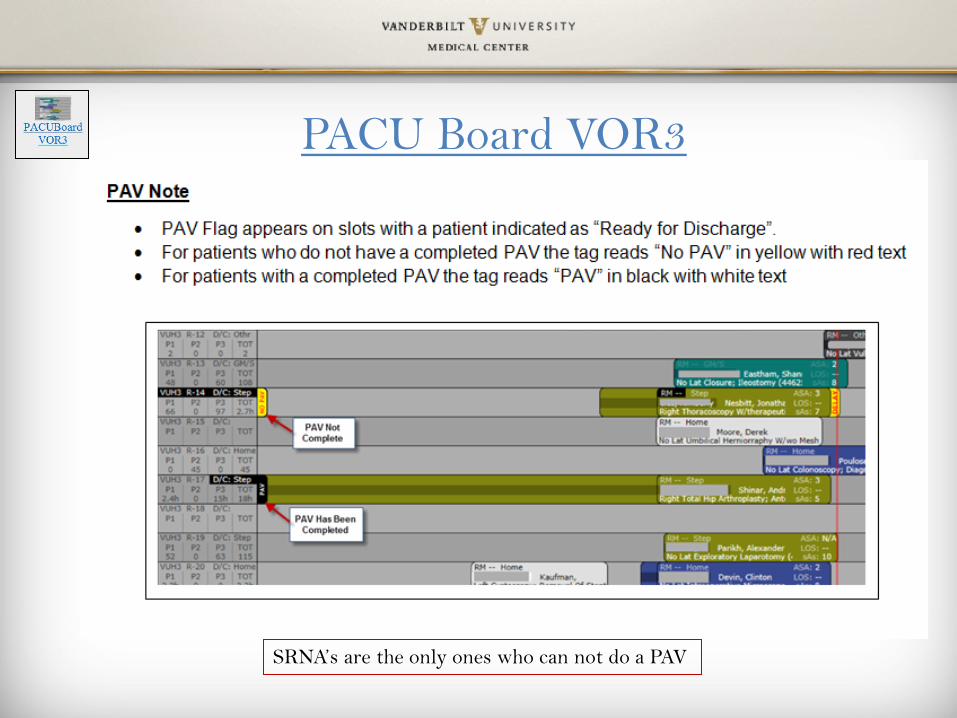
PACU Board VOR3
SRNA’s are the only ones who can not do a PAV
Post Anesthesia Visit

Good Luck in Your Clinical Practice
• You will be assigned to a preceptor at clinical to start
• Preceptors will be able to help walk through areas that are not clear
• Specifics of documentation will be taught by your Preceptors

Attending Notes: Gas Chart

Post Anesthesia Visit After accessing the application, log in using your VUNed ID and passord:

Post Anesthesia Visit To begin a postop evaluation, click/tap on the bar displaying the patient’s name:
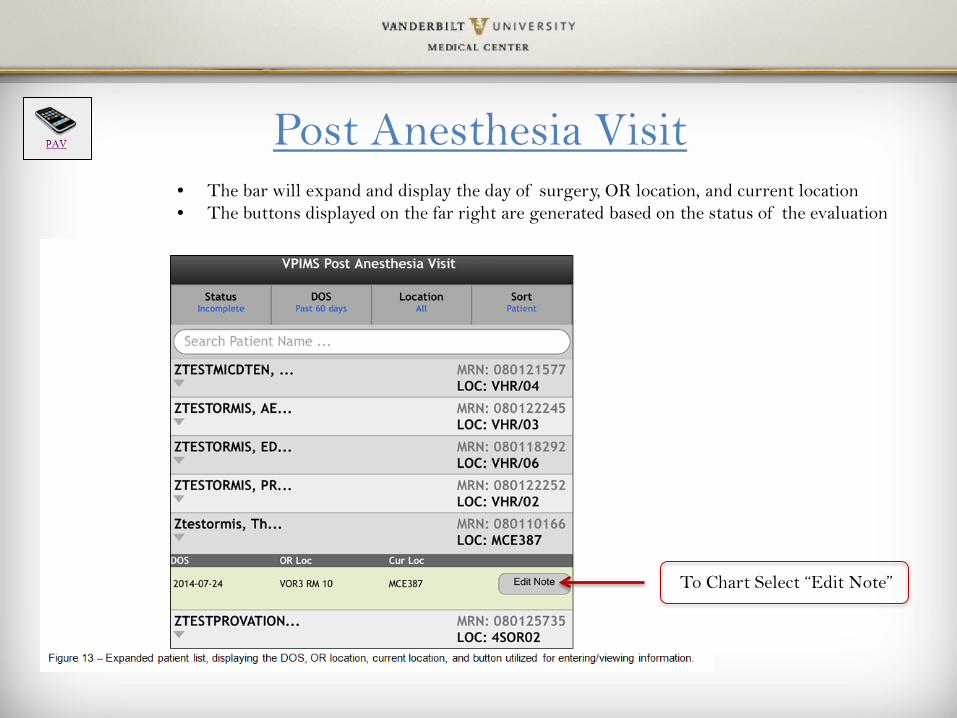
Post Anesthesia Visit
To Chart Select “Edit Note”
• The bar will expand and display the day of surgery, OR location, and current location • The buttons displayed on the far right are generated based on the status of the evaluation
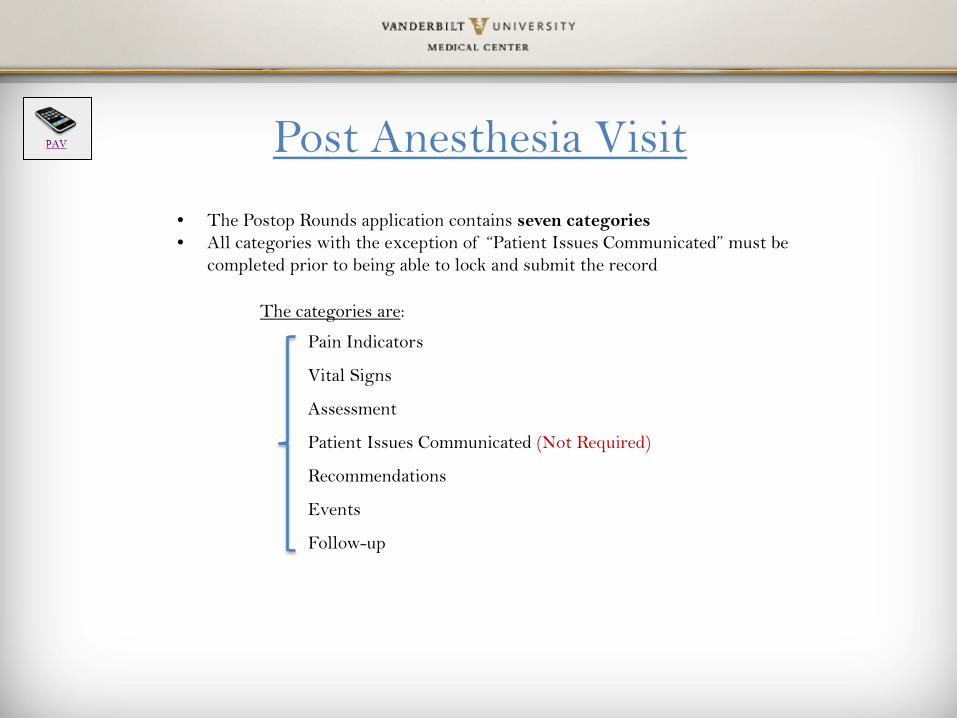
Post Anesthesia Visit
• The Postop Rounds application contains seven categories • All categories with the exception of “Patient Issues Communicated” must be
completed prior to being able to lock and submit the record
The categories are:
Pain Indicators
Vital Signs
Assessment
Patient Issues Communicated (Not Required)
Recommendations
Events
Follow-up
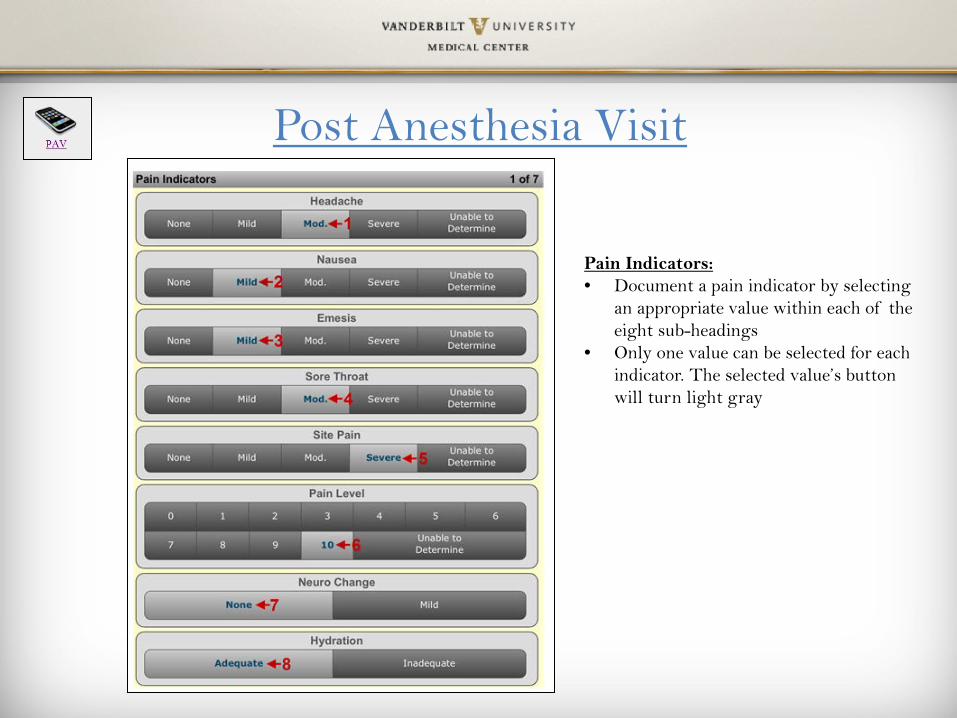
Post Anesthesia Visit
Pain Indicators: • Document a pain indicator by selecting
an appropriate value within each of the eight sub-headings
• Only one value can be selected for each indicator. The selected value’s button will turn light gray
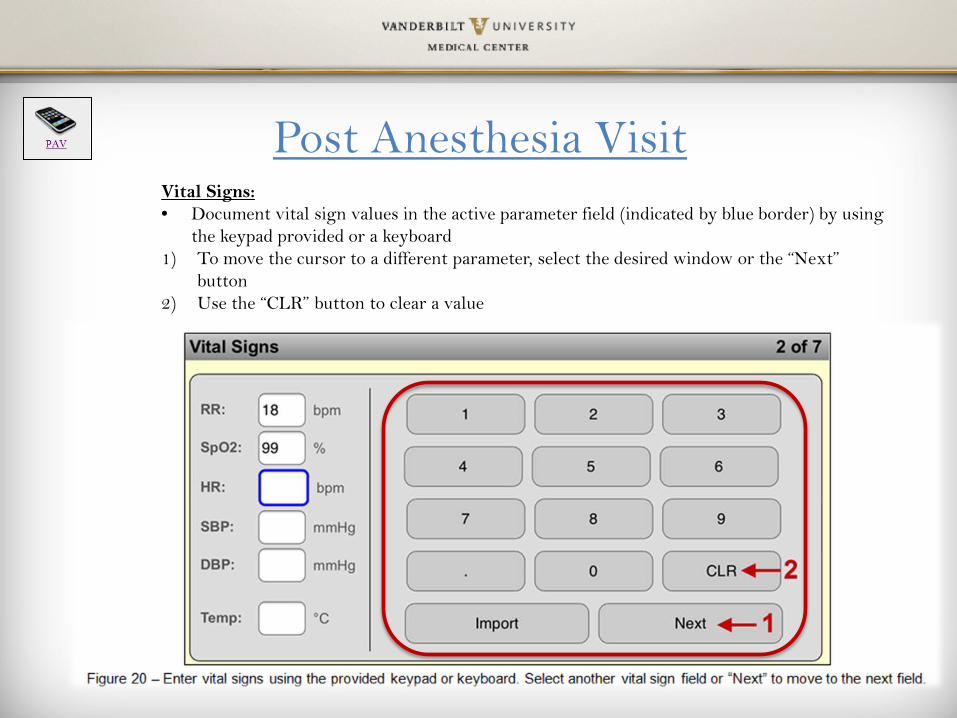
Post Anesthesia Visit Vital Signs: • Document vital sign values in the active parameter field (indicated by blue border) by using
the keypad provided or a keyboard 1) To move the cursor to a different parameter, select the desired window or the “Next”
button 2) Use the “CLR” button to clear a value
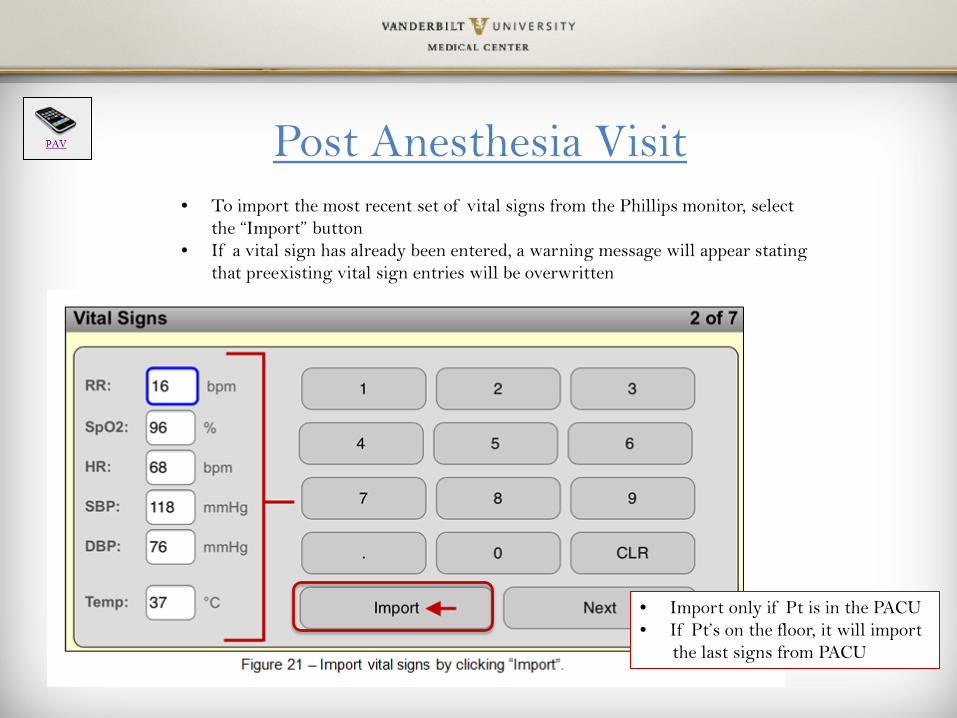
Post Anesthesia Visit • To import the most recent set of vital signs from the Phillips monitor, select
the “Import” button • If a vital sign has already been entered, a warning message will appear stating
that preexisting vital sign entries will be overwritten
• Import only if Pt is in the PACU • If Pt’s on the floor, it will import the last signs from PACU
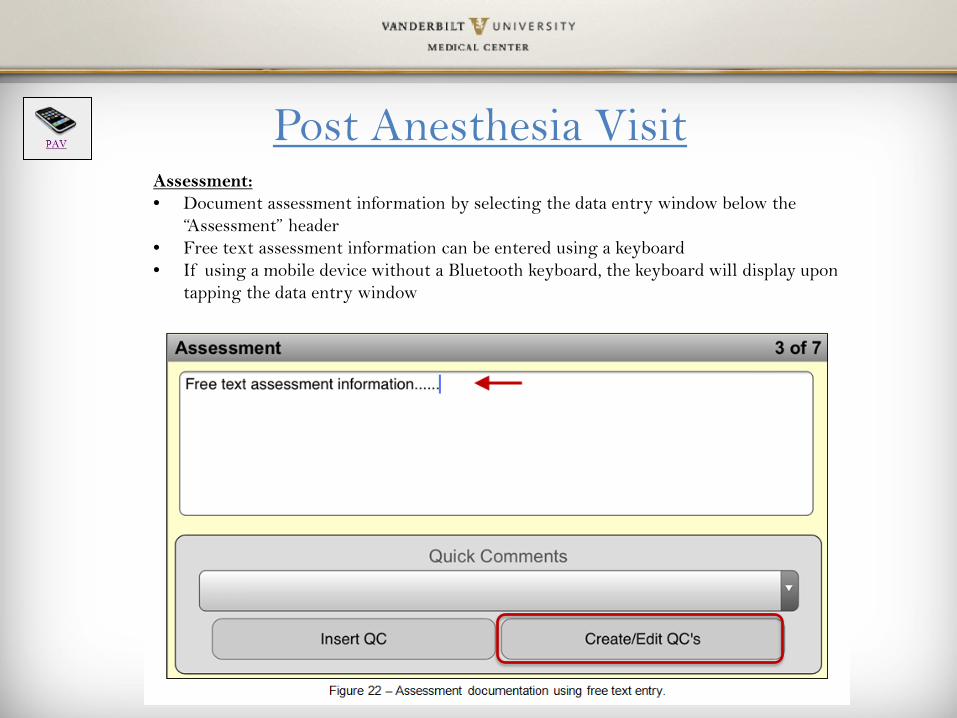
Post Anesthesia Visit Assessment: • Document assessment information by selecting the data entry window below the
“Assessment” header • Free text assessment information can be entered using a keyboard • If using a mobile device without a Bluetooth keyboard, the keyboard will display upon
tapping the data entry window

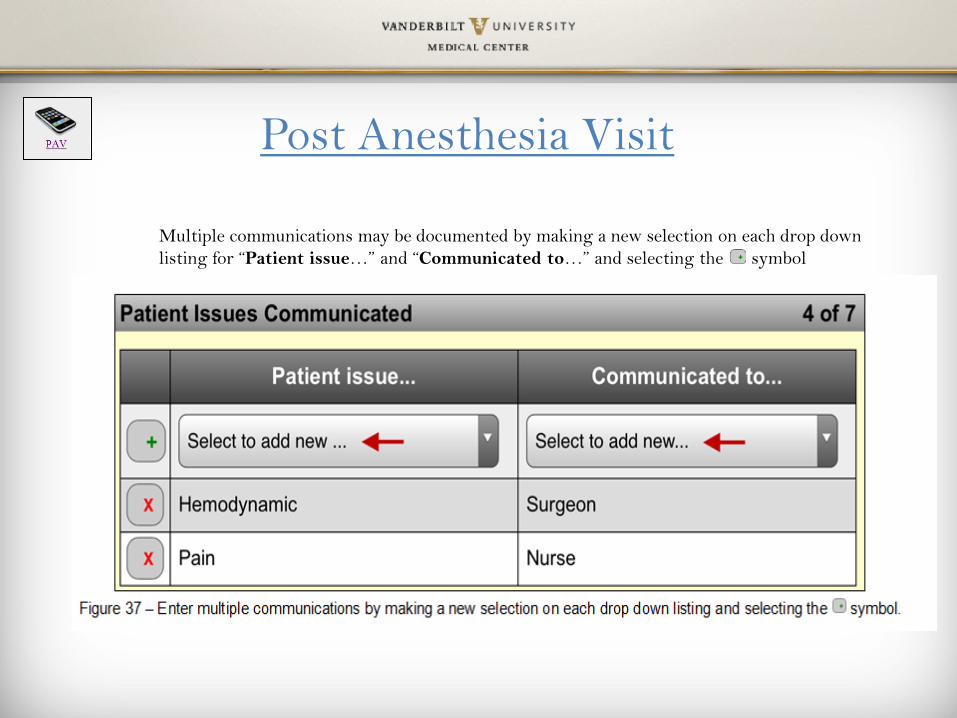
Post Anesthesia Visit Patient Issues Communicated: • This portion of the Postop Rounds application allows you to document that a provider
notification occurred for a particular patient issue • Multiple notifications may be documented
• Important: The application does not notify the provider for you
1) Document a communication by using the “Patient Issue…” drop down listing
2) select the patient issue 3) Use drop down menu to choose
the provider that was notified
These are only issues that occurred in the PACU
Post Anesthesia Visit
Multiple communications may be documented by making a new selection on each drop down listing for “Patient issue…” and “Communicated to…” and selecting the symbol
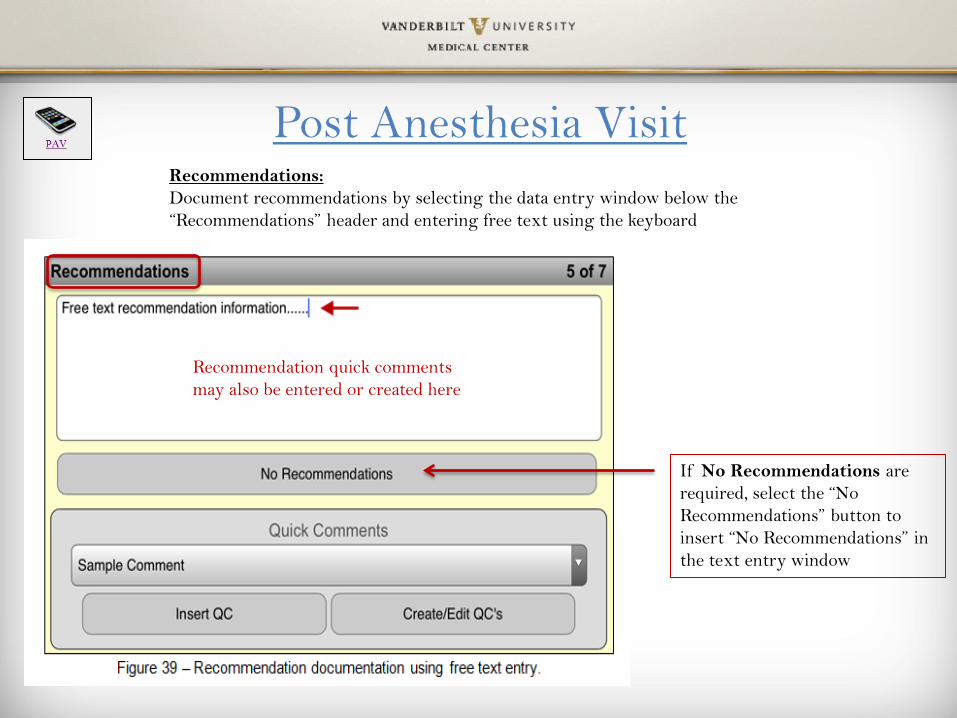
Post Anesthesia Visit Recommendations: Document recommendations by selecting the data entry window below the “Recommendations” header and entering free text using the keyboard
Recommendation quick comments may also be entered or created here
If No Recommendations are required, select the “No Recommendations” button to insert “No Recommendations” in the text entry window
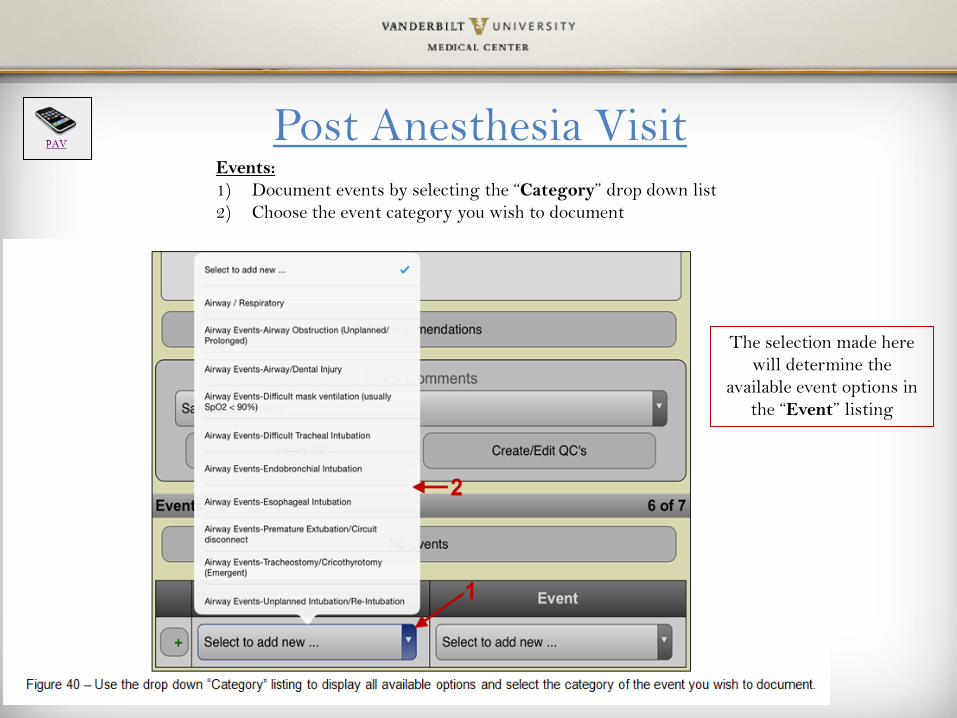
Post Anesthesia Visit Events: 1) Document events by selecting the “Category” drop down list 2) Choose the event category you wish to document
The selection made here will determine the
available event options in the “Event” listing
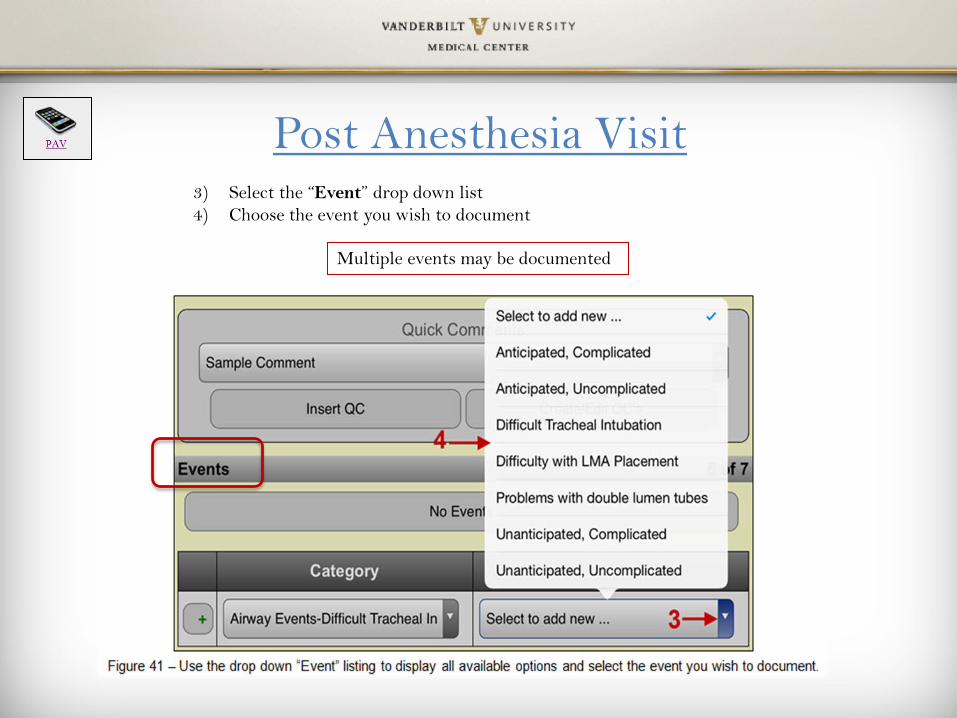
Post Anesthesia Visit 3) Select the “Event” drop down list 4) Choose the event you wish to document
Multiple events may be documented
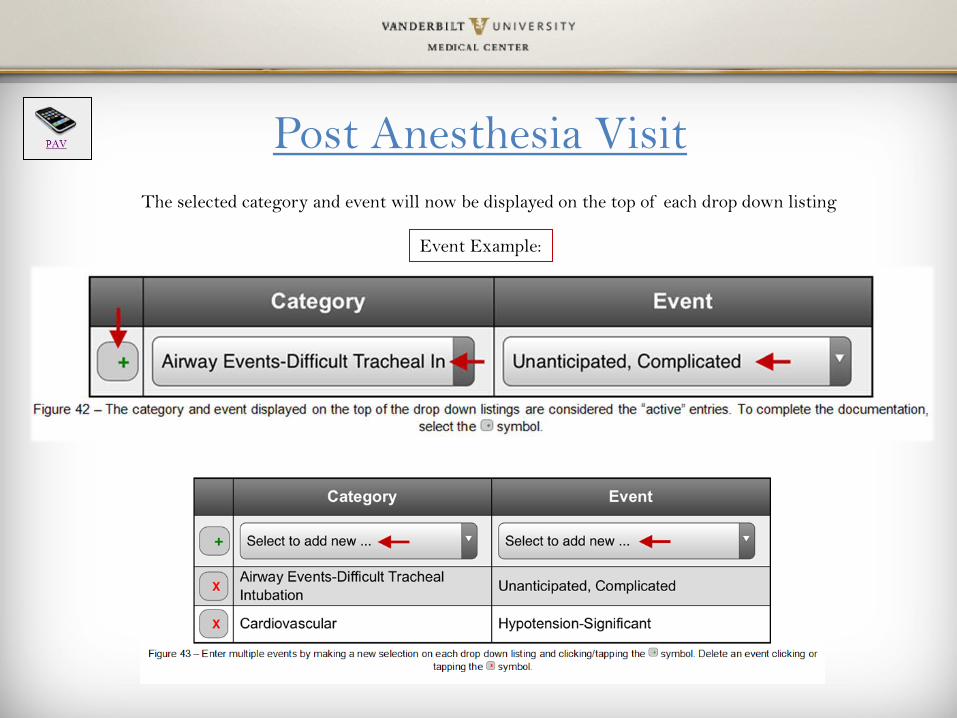
Post Anesthesia Visit The selected category and event will now be displayed on the top of each drop down listing
Event Example:
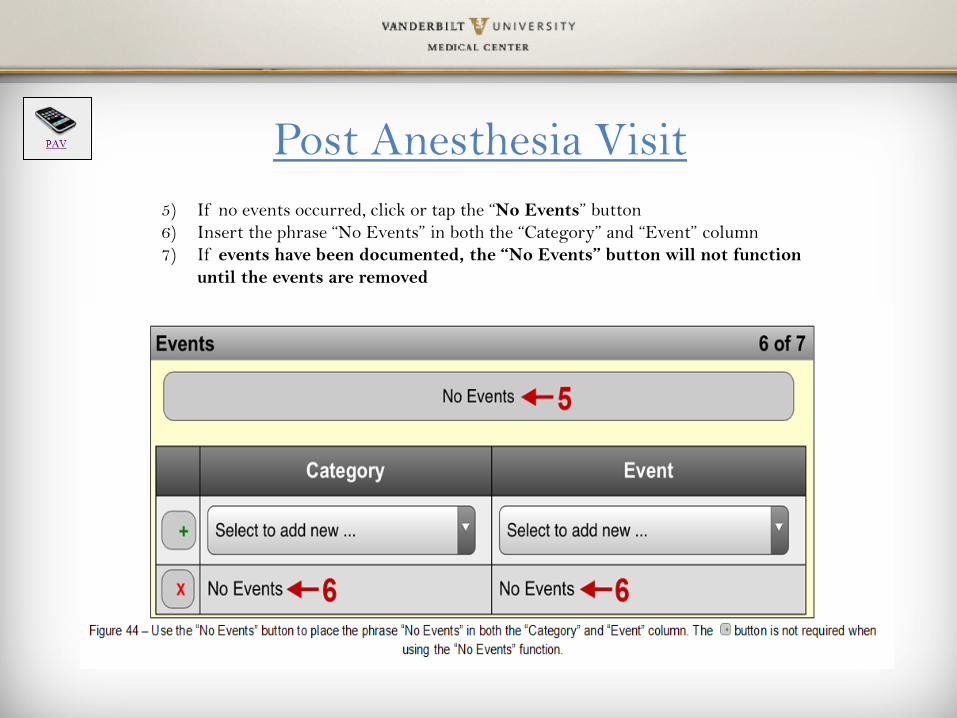
Post Anesthesia Visit 5) If no events occurred, click or tap the “No Events” button 6) Insert the phrase “No Events” in both the “Category” and “Event” column 7) If events have been documented, the “No Events” button will not function
until the events are removed
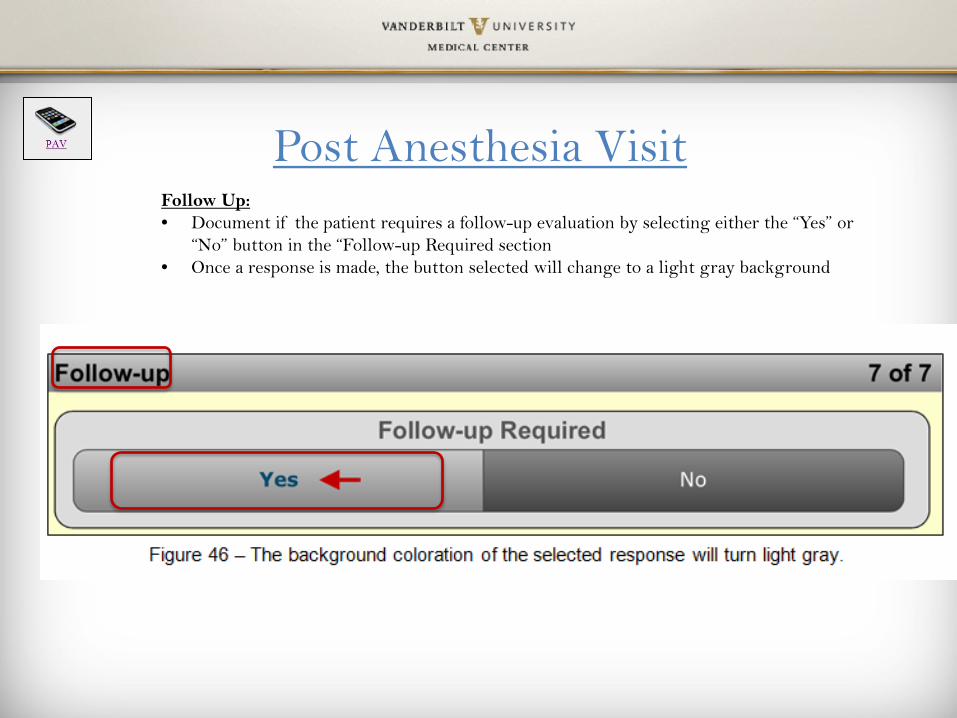
Post Anesthesia Visit Follow Up: • Document if the patient requires a follow-up evaluation by selecting either the “Yes” or
“No” button in the “Follow-up Required section • Once a response is made, the button selected will change to a light gray background
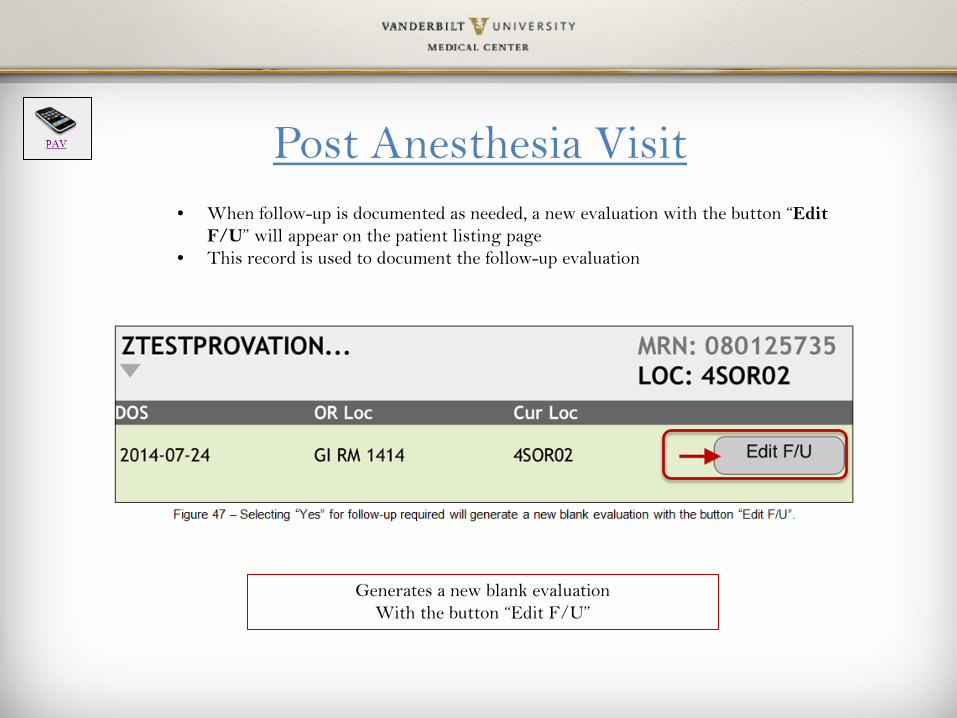
Post Anesthesia Visit • When follow-up is documented as needed, a new evaluation with the button “Edit
F/U” will appear on the patient listing page • This record is used to document the follow-up evaluation
Generates a new blank evaluation With the button “Edit F/U”
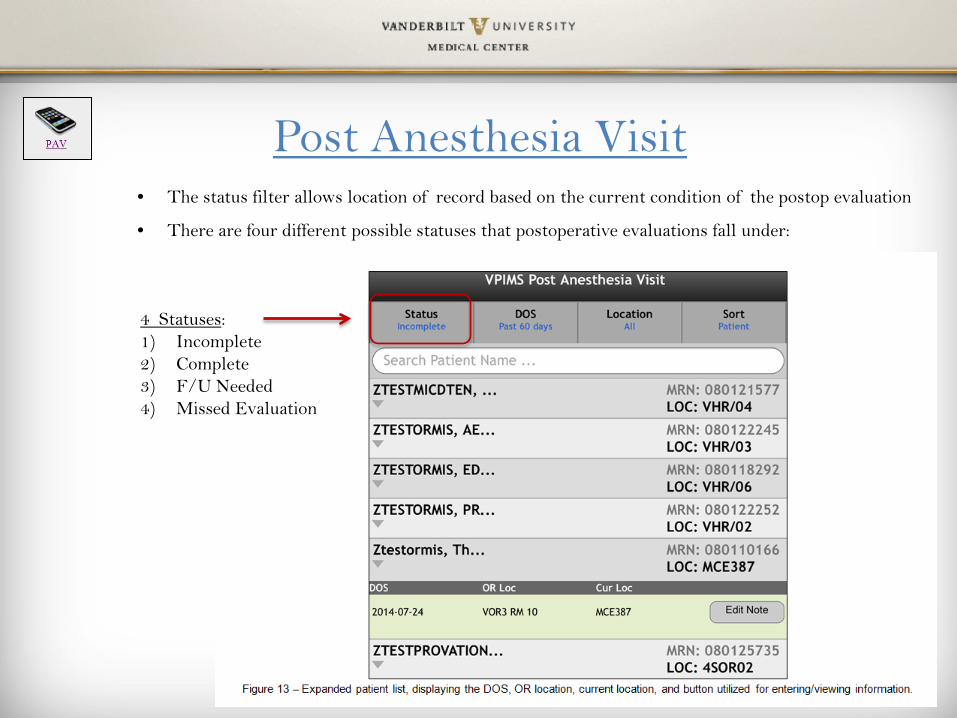
Post Anesthesia Visit • The status filter allows location of record based on the current condition of the postop evaluation
• There are four different possible statuses that postoperative evaluations fall under:
4 Statuses: 1) Incomplete 2) Complete 3) F/U Needed 4) Missed Evaluation
Post Anesthesia Visit
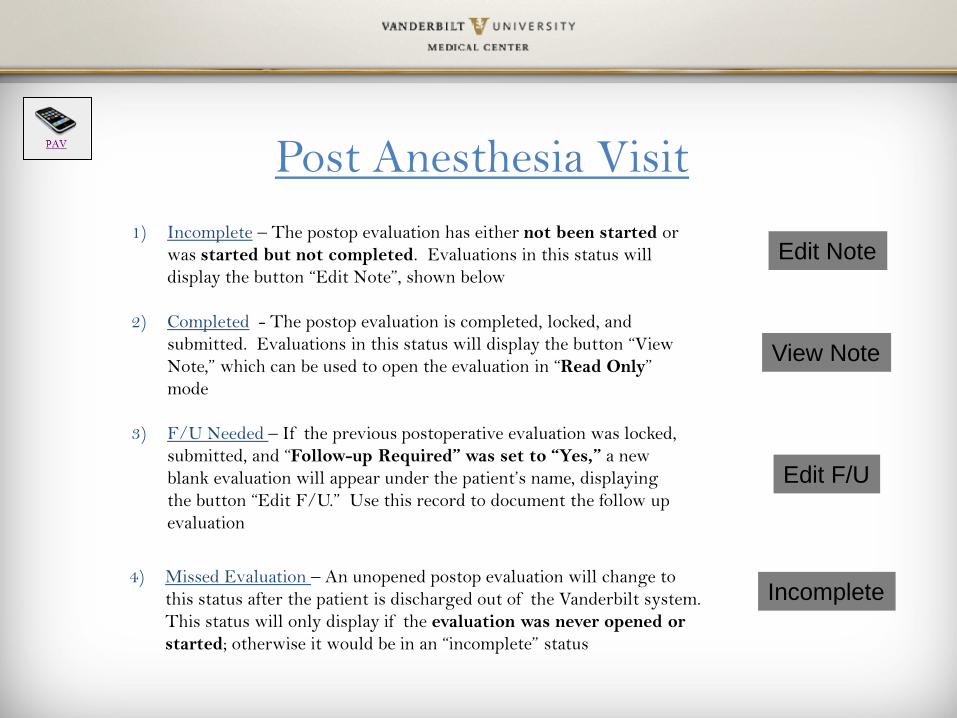
1) Incomplete – The postop evaluation has either not been started or was started but not completed. Evaluations in this status will display the button “Edit Note”, shown below
2) Completed - The postop evaluation is completed, locked, and
submitted. Evaluations in this status will display the button “View Note,” which can be used to open the evaluation in “Read Only” mode
3) F/U Needed – If the previous postoperative evaluation was locked, submitted, and “Follow-up Required” was set to “Yes,” a new blank evaluation will appear under the patient’s name, displaying the button “Edit F/U.” Use this record to document the follow up evaluation
4) Missed Evaluation – An unopened postop evaluation will change to this status after the patient is discharged out of the Vanderbilt system. This status will only display if the evaluation was never opened or started; otherwise it would be in an “incomplete” status
Edit Note
View Note
Edit F/U
Incomplete
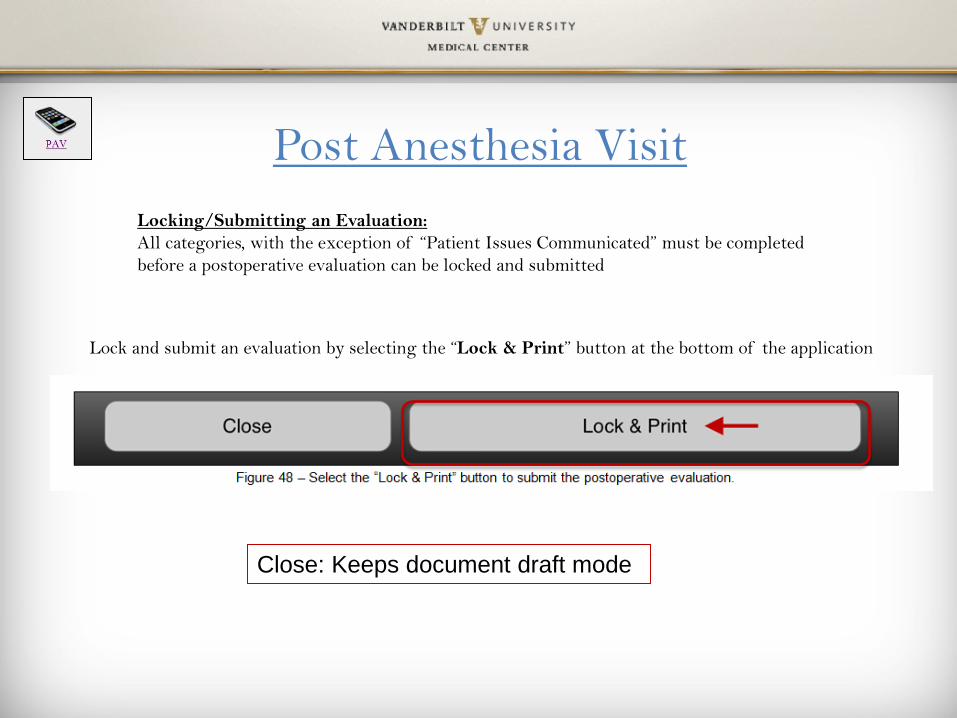
Post Anesthesia Visit Locking/Submitting an Evaluation: All categories, with the exception of “Patient Issues Communicated” must be completed before a postoperative evaluation can be locked and submitted
Lock and submit an evaluation by selecting the “Lock & Print” button at the bottom of the application
Close: Keeps document draft mode
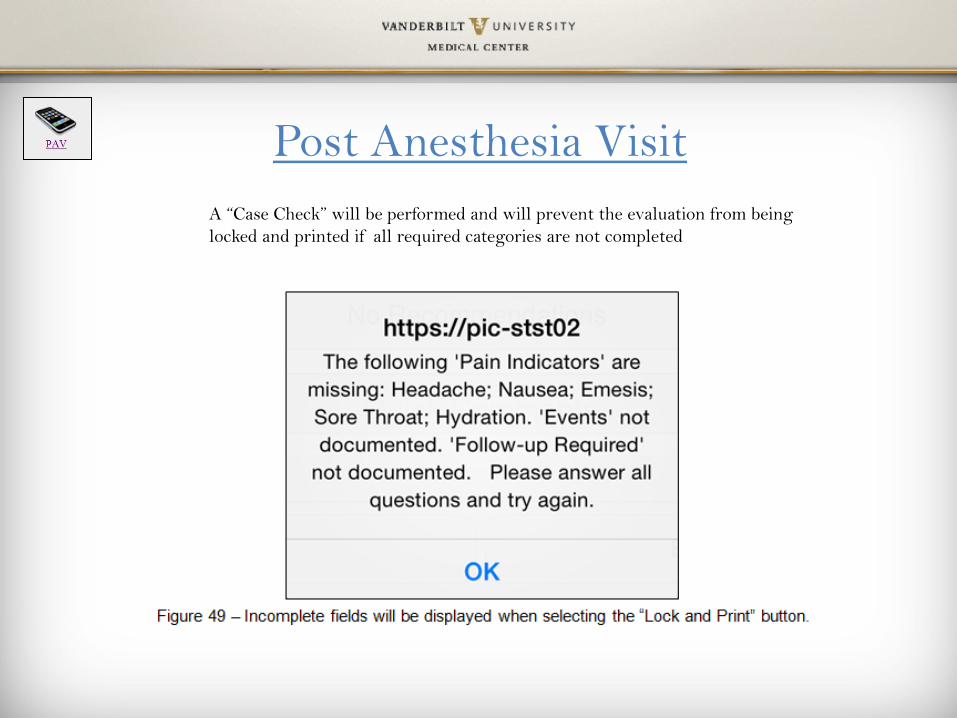
Post Anesthesia Visit A “Case Check” will be performed and will prevent the evaluation from being locked and printed if all required categories are not completed
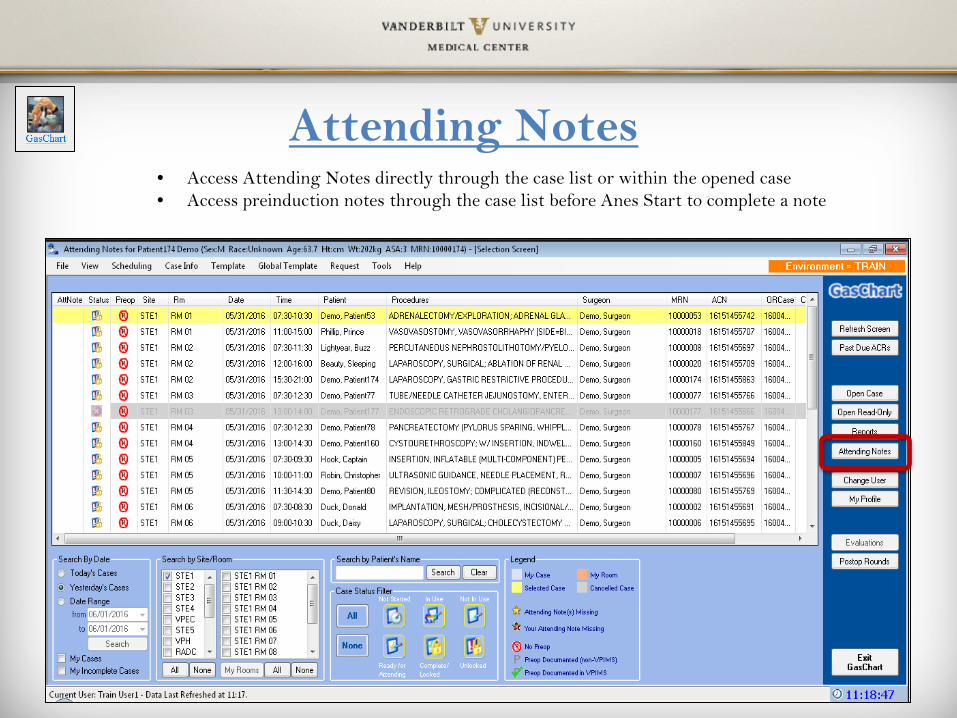
Attending Notes • Access Attending Notes directly through the case list or within the opened case • Access preinduction notes through the case list before Anes Start to complete a note
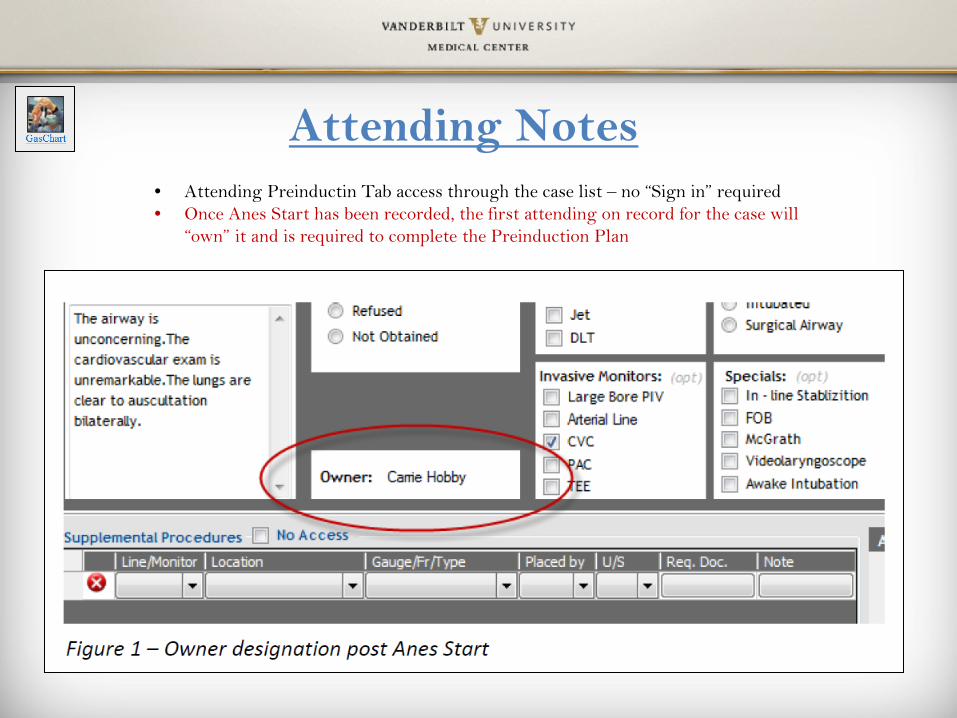
Attending Notes • Attending Preinductin Tab access through the case list – no “Sign in” required • Once Anes Start has been recorded, the first attending on record for the case will
“own” it and is required to complete the Preinduction Plan
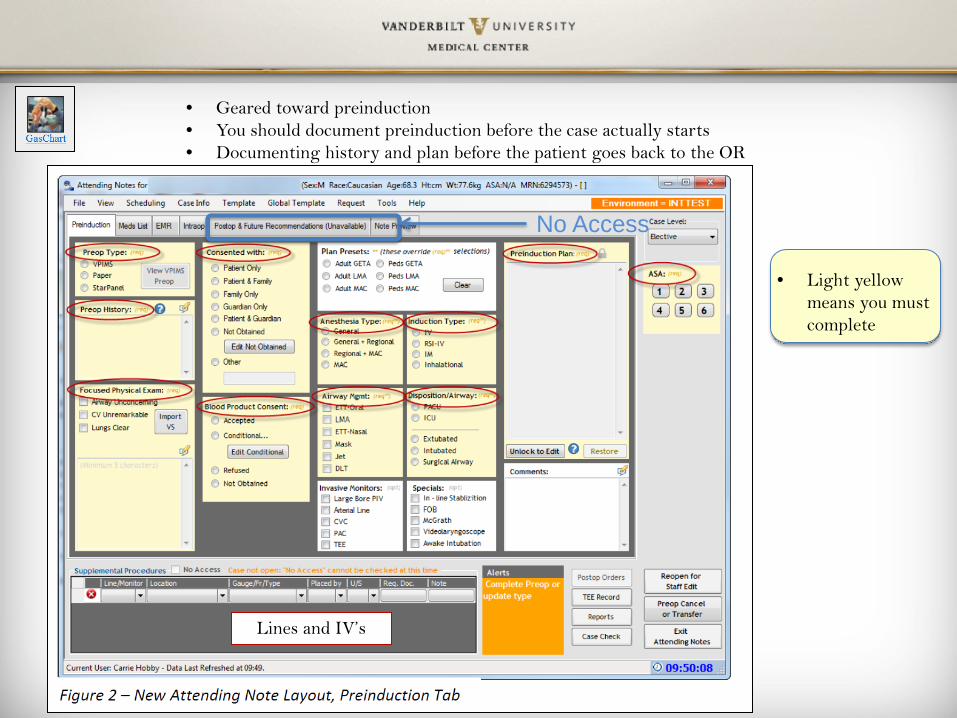
• Geared toward preinduction • You should document preinduction before the case actually starts • Documenting history and plan before the patient goes back to the OR
No Access
• Light yellow means you must complete
Lines and IV’s
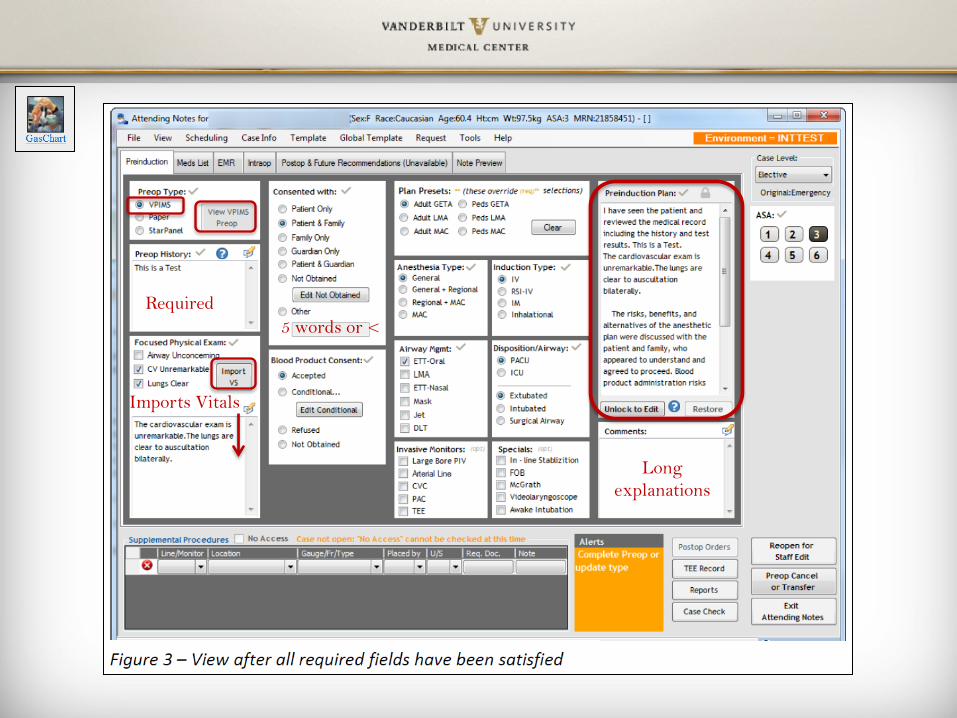
Required
Imports Vitals
5 words or <
Long explanations
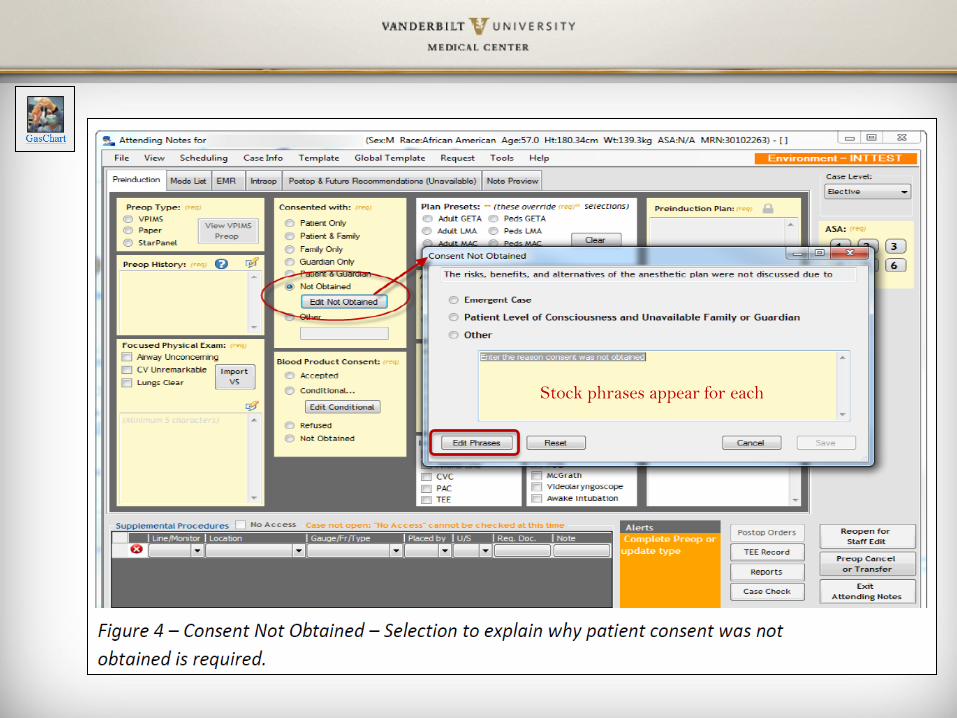
Stock phrases appear for each
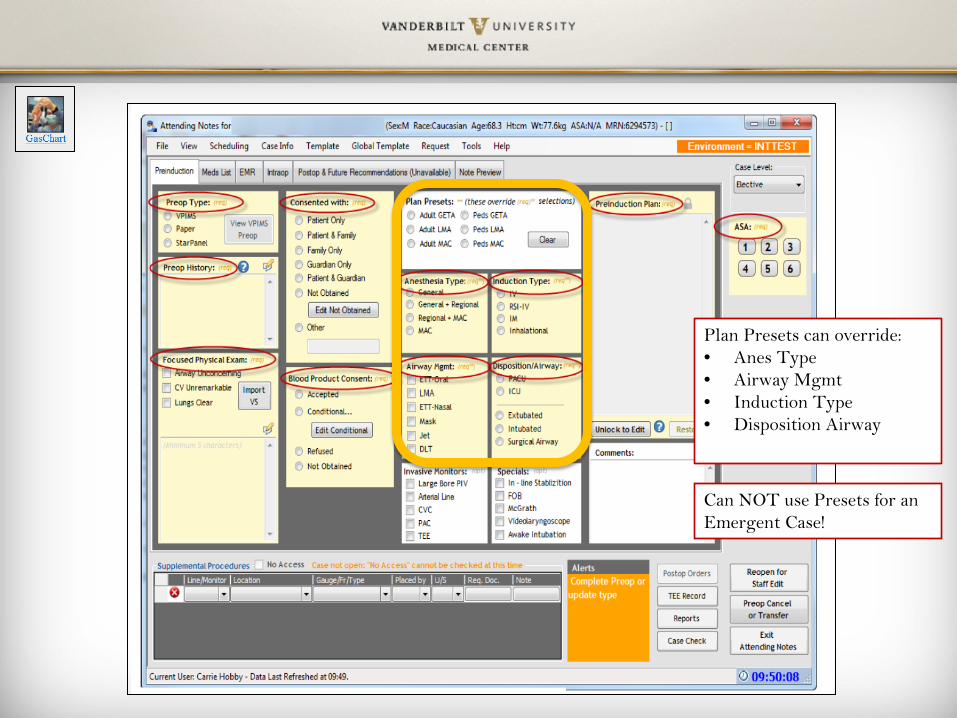
Plan Presets can override: • Anes Type • Airway Mgmt • Induction Type • Disposition Airway
Can NOT use Presets for an Emergent Case!
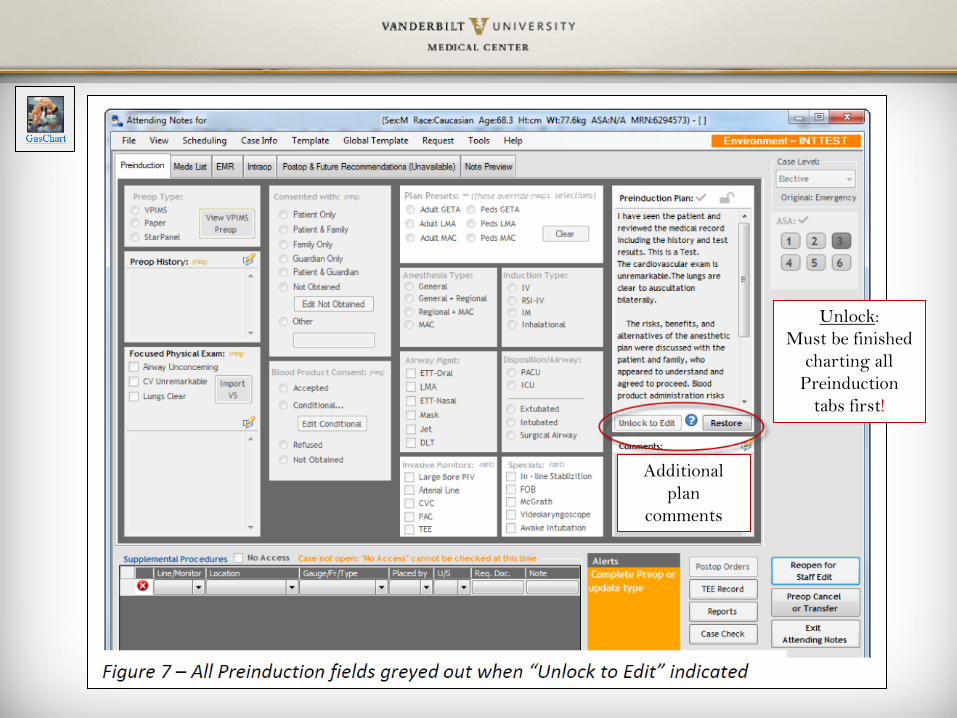
Unlock: Must be finished
charting all Preinduction
tabs first!
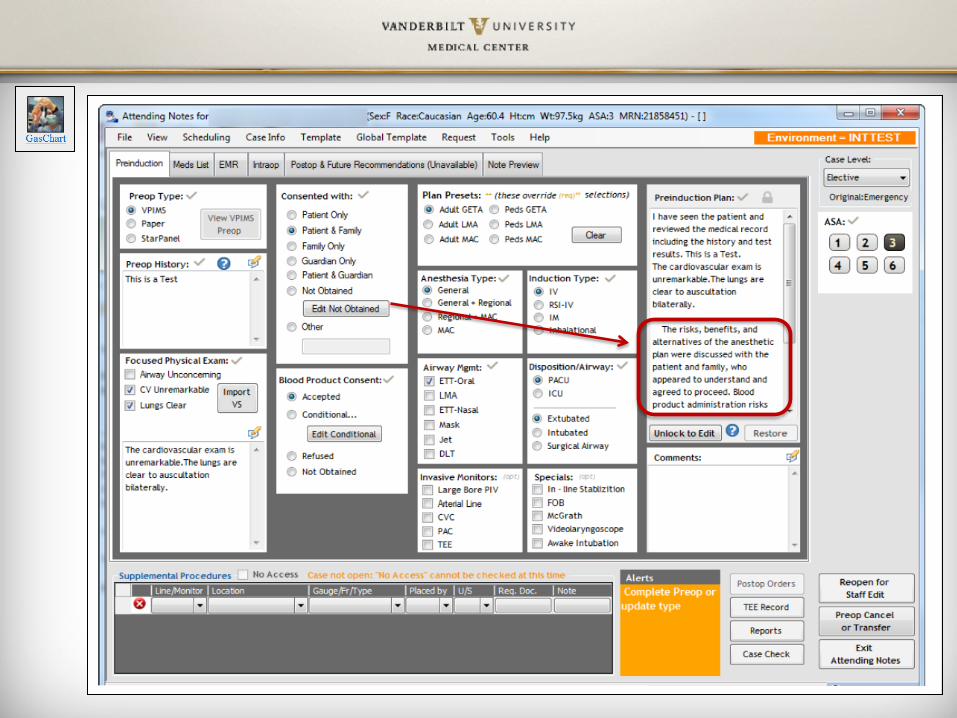
Additional plan
comments

Must give a reason
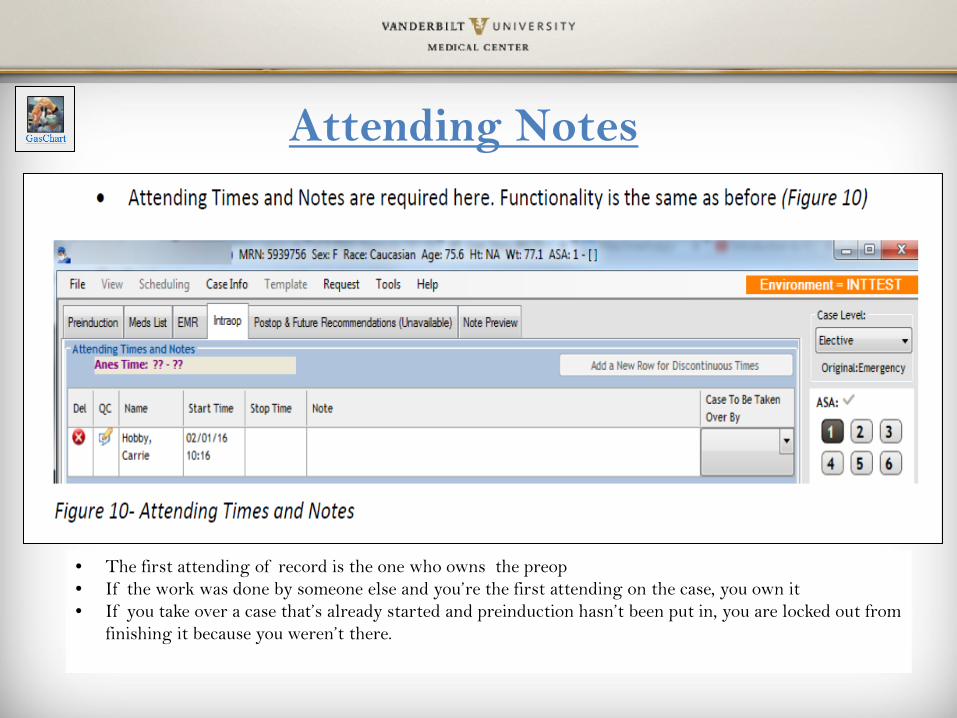
• The first attending of record is the one who owns the preop • If the work was done by someone else and you’re the first attending on the case, you own it • If you take over a case that’s already started and preinduction hasn’t been put in, you are locked out from
finishing it because you weren’t there.
Attending Notes
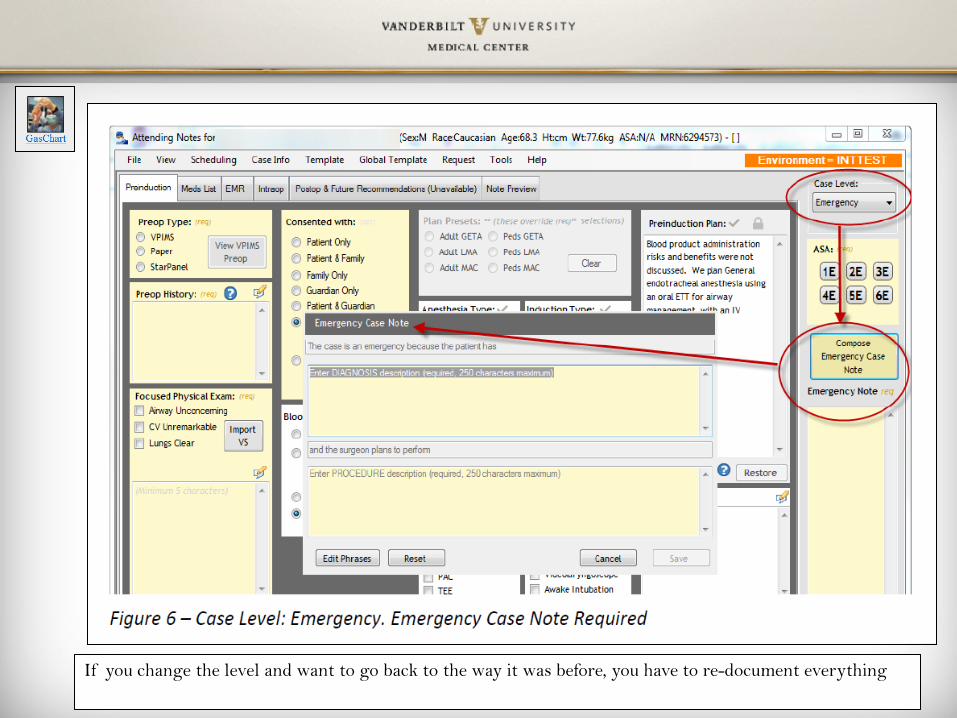
If you change the level and want to go back to the way it was before, you have to re-document everything
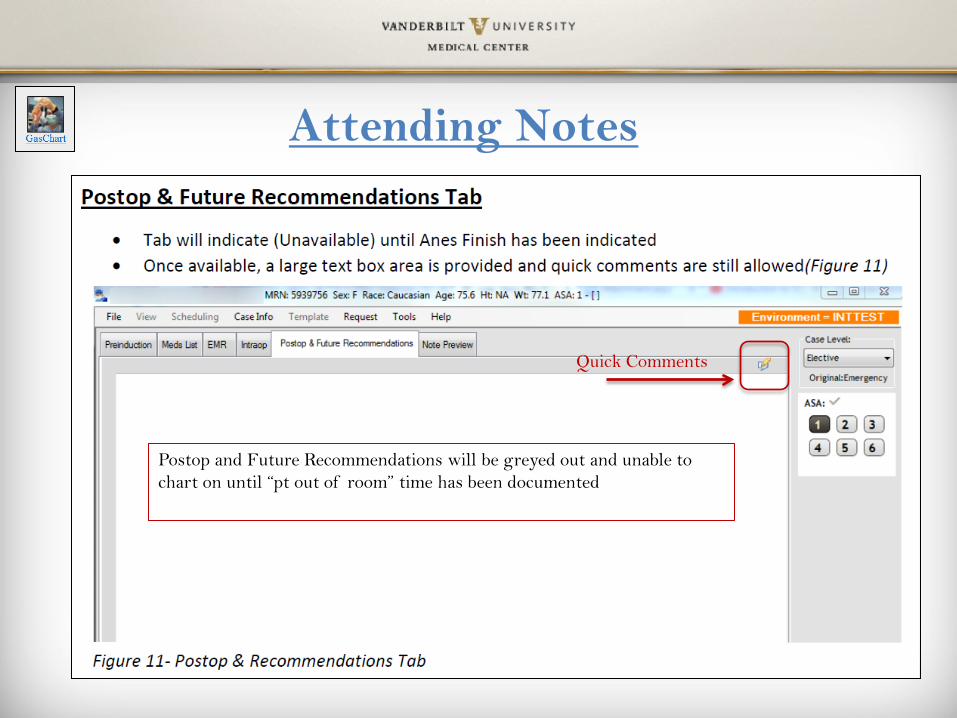
Postop and Future Recommendations will be greyed out and unable to chart on until “pt out of room” time has been documented
Quick Comments
Attending Notes
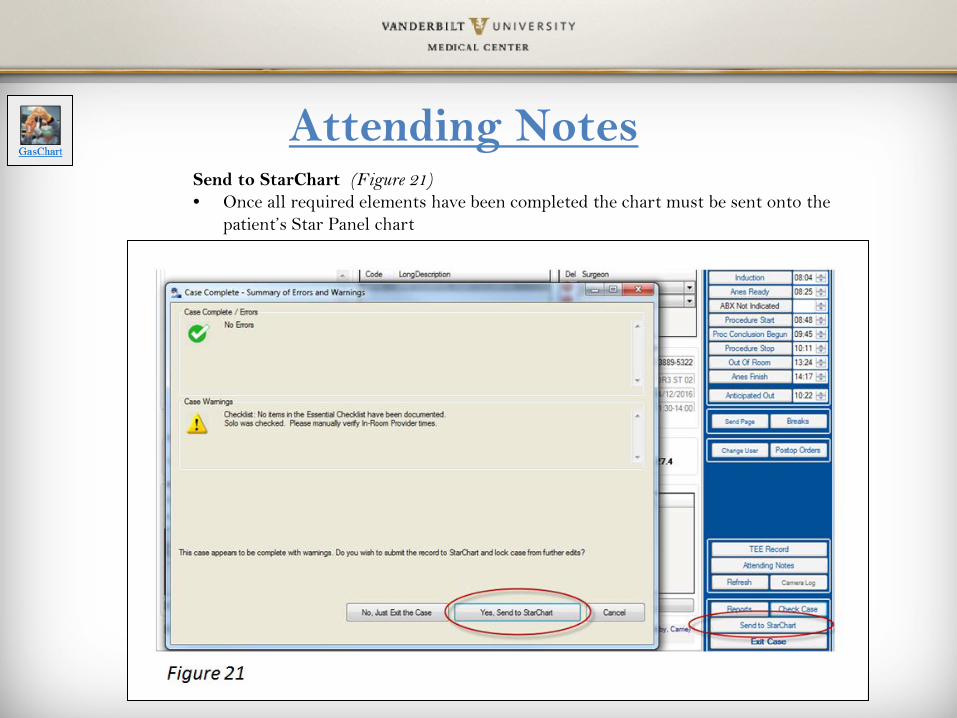
Send to StarChart (Figure 21) • Once all required elements have been completed the chart must be sent onto the
patient’s Star Panel chart
Attending Notes

Good Luck in Your Clinical Practice
• You will be assigned to a preceptor at clinical to start
• Preceptors will be able to help walk through areas that are not clear
• Specifics of documentation will be taught by your Preceptors