objectives
DESCRIPTION
Objectives. Chapter 2: Formatting Characters Performance Objectives. Change Fonts Choose a Font Effect Format with the Mini Toolbar Change Fonts at the Font Dialog Box CHECKPOINT 1 Display Nonprinting Characters Apply Styles from a Style Set Change the Style Set Apply a Theme - PowerPoint PPT PresentationTRANSCRIPT

Objectives© Paradigm Publishing, Inc. 1 Objectives

© Paradigm Publishing, Inc. 2 Objectives
Chapter 2: Formatting CharactersPerformance Objectives
Change Fonts Choose a Font Effect Format with the Mini Toolbar Change Fonts at the Font Dialog Box CHECKPOINT 1 Display Nonprinting Characters Apply Styles from a Style Set Change the Style Set Apply a Theme Customize Themes CHECKPOINT 2

© Paradigm Publishing, Inc. 3 Objectives
Change Fonts
Font Font Size
Increase Font Size
Decrease Font SizeChange Case
Clear All Formatting
Font Color
Text Highlight Color
Text Effects and Typography
Superscript
Subscript
StrikethroughUnderline
Italic
Bold

© Paradigm Publishing, Inc. 4 Objectives
Change Fonts - continued
A font consists of three elements—typeface, type size, and typestyle. A typeface is a set of characters with a common design and shape. A
monospaced typeface allots the same amount of horizontal space for each character; a proportional typeface allots a varying amount of space for each character and is divided into two main categories: serif and sans serif.
Type size is generally set in proportional size. The size of proportional type is measured vertically in units called points.
Typestyles are divided into four main categories: regular, bold, italic, and bold italic.

© Paradigm Publishing, Inc. 5 Objectives
Change Fonts - continued
To change the font:1. Select the desired text.2. Click the Font button
arrow.3. Click the desired font at
the drop-down gallery.
Font button arrow

© Paradigm Publishing, Inc. 6 Objectives
Change Fonts - continued
To change the font size:1. Select the desired text.2. Click the Font Size button
arrow.3. Click the desired font size
at the drop-down gallery.OR4. Select the desired text.5. Click the Increase Font Size
button or the Decrease Font Size button the desired number of times.
Increase Font Size button
Decrease Font Size button
Font Size button arrow

© Paradigm Publishing, Inc. 7 Objectives
Change Fonts - continued
To apply a typestyle as you type:1. Click the desired typestyle button(s).2. Type the desired text.3. Turn off each typestyle by clicking the button you clicked to
turn it on.
typestyle buttons

© Paradigm Publishing, Inc. 8 Objectives
Change Fonts - continued
To change the underlining:1. Select the desired text.2. Click the Underline button arrow.3. Click the desired underline option
from the drop-down gallery.4. Click the Underline button arrow.5. Point to the Underline Color
option.6. Click the desired color.
Underline button arrow

© Paradigm Publishing, Inc. 9 Objectives
Choose a Font Effect
To change the case of text:1. Select the desired text.2. Click the Change Case
button.3. Click the desired option at
the drop-down list.
Change Case button

© Paradigm Publishing, Inc. 10 Objectives
Choose a Font Effect - continued
To apply a text effect:1. Select the desired text.2. Click the Text Effects
and Typography button.3. Click the desired option
at the drop-down gallery.
Text Effects and Typography button

© Paradigm Publishing, Inc. 11 Objectives
Choose a Font Effect - continued
To strike through text:1. Select the desired text.2. Click the Strikethrough button.
Strikethrough button

© Paradigm Publishing, Inc. 12 Objectives
Choose a Font Effect - continued
To change the font color:1. Select the desired text.2. Click the Font Color button
arrow.3. Click the desired color at
the drop-down gallery.
Font Color button arrow

© Paradigm Publishing, Inc. 13 Objectives
Choose a Font Effect - continued
To highlight text:1. Click the Text Highlight
Color button arrow.2. Click the desired color at
the drop-down palette.3. Select the desired text.
Text Highlight Color button

© Paradigm Publishing, Inc. 14 Objectives
Choose a Font Effect - continued
To use subscript:1. Select the desired text.2. Click the Subscript
button.
To use superscript:3. Select the desired text.4. Click the Superscript
button.
Subscript button
Superscript button

© Paradigm Publishing, Inc. 15 Objectives
Choose a Font Effect - continued
Font Group Button Keyboard ShortcutFont Ctrl + Shift + FFont Size Ctrl + Shift + PIncrease Font Size Ctrl + Shift + >Decrease Font Size Ctrl + Shift + <Bold Ctrl + BItalic Ctrl + IUnderline Ctrl + USubscript Ctrl + =Superscript Ctrl + Shift + +Change Case Shift + F3

© Paradigm Publishing, Inc. 16 Objectives
Format with the Mini Toolbar
To format with the Mini toolbar:1. Select the desired text.2. Click the desired button on the Mini toolbar.
Mini toolbar

© Paradigm Publishing, Inc. 17 Objectives
Change Fonts at the Font Dialog Box
To change fonts at the Font dialog box:1. Select the desired text.2. Click the Font group dialog box launcher.3. Choose the desired options at the Font dialog box.4. Click OK.
Font group dialog box launcher

© Paradigm Publishing, Inc. 18 Objectives
Change Fonts at the Font Dialog Box - continued
Font style list box
type size list box
Font list box
change default
text effects
font color

Objectives© Paradigm Publishing, Inc. 19
CHECKPOINT 11) This is a small line at the end of a
character stroke.a. strikeb. siloc. serifd. stet
3) Use this button to create text that is lowered slightly below the line.a. Superscriptb. Subscriptc. Grow Fontd. Shrink Font
2) You can change the case of selected text with this keyboard shortcut.a. Shift + F1b. Shift + F3c. Ctrl + F1d. Ctrl + F3
4) When you select text, this displays in a dimmed fashion.a. Mini toolbarb. Font dialog boxc. Font effectsd. Maxi toolbar
Next Question
Next Question
Next Question
Next Slide
Answer
Answer
Answer
Answer

© Paradigm Publishing, Inc. 20 Objectives
Display Nonprinting Characters
To display nonprinting characters:1. Click the Show/Hide ¶ button
in the Paragraph group on the HOME tab.
Show/Hide ¶ button

© Paradigm Publishing, Inc. 21 Objectives
Apply Styles from a Style Set
To apply a style:1. Position the insertion point in the desired paragraph of text.2. Click the More button in the Styles group on the HOME tab.3. Click the desired style.
styles

© Paradigm Publishing, Inc. 22 Objectives
Change the Style Set
To change the Quick Styles set:1. Click the More Styles button in the Styles group on the
HOME tab.2. Click the desired Style Set.
more styles

© Paradigm Publishing, Inc. 23 Objectives
Apply a Theme
Word provides a number of themes you can use to format text in your document.
A theme is a set of formatting choices that includes a color theme (a set of colors), a font theme (a set of heading and body text fonts), and an effects theme (a set of lines and fill effects).
Applying a theme can give your documents a professional look.
You can hover the mouse pointer over a theme and the live preview feature will display your document with the theme formatting applied.
© Paradigm Publishing, Inc. 24 Objectives
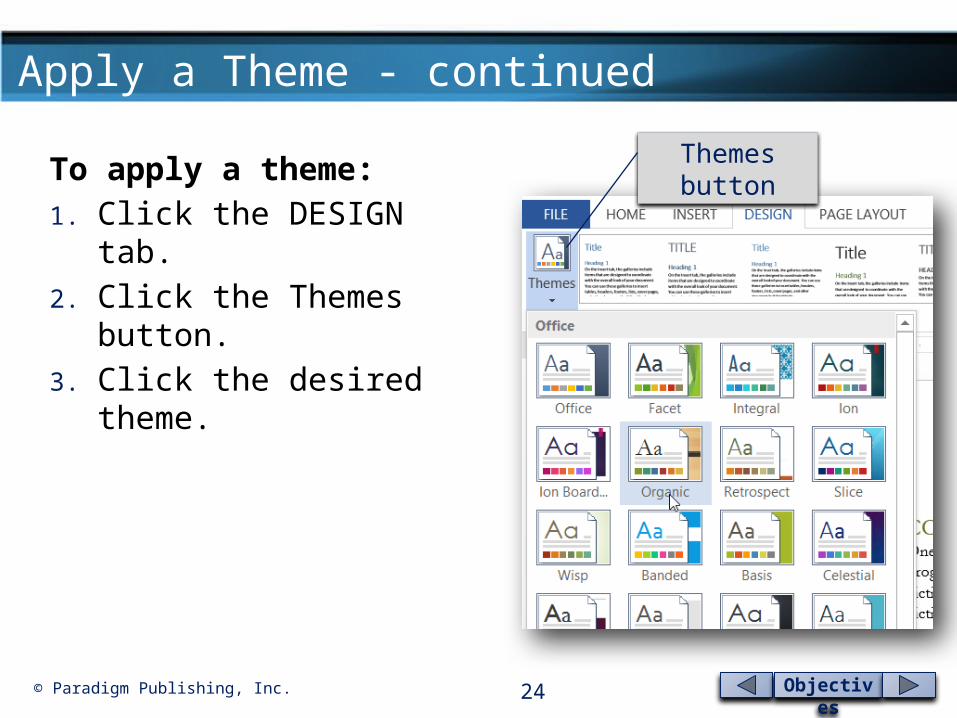
Apply a Theme - continued
To apply a theme:1. Click the DESIGN tab.2. Click the Themes button.3. Click the desired theme.
Themes button

© Paradigm Publishing, Inc. 25 Objectives
Customize Themes
To change the theme color:1. Click the DESIGN tab.2. Click the Theme Colors button.3. Click the desired theme color.
Theme Colors button

© Paradigm Publishing, Inc. 26 Objectives
Customize Themes - continued
To change the theme fonts:1. Click the DESIGN tab.2. Click the Theme Fonts button.3. Click the desired theme font.
Theme Fonts button

© Paradigm Publishing, Inc. 27 Objectives
Customize Themes - continued
To change the theme effect:1. Click the DESIGN tab.2. Click the Theme Effects button.3. Click the desired theme effect.
Theme Effects button

Objectives© Paradigm Publishing, Inc. 28
CHECKPOINT 21) Display nonprinting characters by
clicking this button.a. Change Caseb. Change Stylesc. Text Effectsd. Show/Hide 
3) This is a set of formatting choices that includes colors, fonts, and effects.a. stylesb. fontsc. effectsd. themes
2) Click this style to remove the default formatting as well as any character formatting.a. No Spacingb. Remove Spacingc. Remove Formattingd. No Formatting
4) The Themes button is located on this tab.a. DESIGNb. HOMEc. INSERTd. VIEW
Next Question
Next Question
Next Question
Next Slide
Answer
Answer
Answer
Answer