obdi tune kit quick start guide - tunercattunercat.com/docs/obdi_tune_quick_start.pdf · there are...
TRANSCRIPT

Computer Automotive Tuning Systems
Page 1
OBDI Tune Kit Quick Start Guide
Revision A

Computer Automotive Tuning Systems
Page 2
Table of Contents
Introduction................................................................................................................................................. 3 Contents ...................................................................................................................................................... 3
Early ECM Kits:...................................................................................................................................... 3 Late ECM Kits:....................................................................................................................................... 3
Minimum PC Requirements ....................................................................................................................... 3 Program Installation.................................................................................................................................... 4 Registering the Program.............................................................................................................................. 4 Select the Desired ECM Definition Files.................................................................................................... 6 Installing the Burn2 Programmer USB Drivers .......................................................................................... 7 Reading the Calibration .............................................................................................................................. 7
Early ECMs............................................................................................................................................. 8 Later ECMs........................................................................................................................................... 10
Programming a New Calibration .............................................................................................................. 13 Programming the Flash Chip ................................................................................................................ 13 Flash Chip Installation.......................................................................................................................... 14
Early ECMs....................................................................................................................................... 14 Late ECMs ........................................................................................................................................ 17
Saving A Calibration File ......................................................................................................................... 18 Opening a Calibration File ........................................................................................................................ 19 Calibration Tuning .................................................................................................................................... 20
Switch Type Calibration Table ............................................................................................................. 21 Constant Type Calibration Table .......................................................................................................... 21 2D and 3D Calibration Tables .............................................................................................................. 22

Computer Automotive Tuning Systems
Page 3
Introduction The C.A.T.S. OBDI Tune kits are intended to provide everything you’ll need to tune your GM vehicle. The kits allow you to read the current calibration information stored in the vehicle’s computer (ECM), view the information in clear, meaningful engineering units in both tabular and graphic form and edit this information as desired. These kits are based on the powerful C.A.T.S. Tuner program, a Windows based utility developed to easily make changes to GM ECM/PCM engine and transmission control parameters. The program is designed to run on Windows 98 or later operating systems. The C.A.T.S. OBDI Tuner program presents all the important tuning parameters in clear easy to understand tables that can be directly edited via keyboard and mouse commands. Once you have made the desired changes, the program rebuilds a valid ECM/PCM file that can be used to program the ECM/PCM. Contents There are two basic versions of the OBDI Tune Kits; one for the earlier ECMs that used a type 2732 EPROM such as the 1227747 ECM and one for the later ECMs which had the EPROM installed in a removable Memcal module. Early ECM Kits: C.A.T.S. OBDI Tuner program ECM Definition File Burn2 Programmer G2 Memory Adapter 24-pin IC Socket SST27S512 Flash chip Late ECM Kits: C.A.T.S. OBDI Tuner program ECM Definition File Burn2 Programmer G1 Memory Adapter HDR1 Memcal Adapter Minimum PC Requirements While the Tuner program will run on virtually any PC running Windows 98 or later, we recommend the following minimum PC specifications:
Pentium 266 Windows 98 64 MB RAM 600 x 800 display resolution 20 MB free hard drive space

Computer Automotive Tuning Systems
Page 4
Program Installation To install the Tuner program, insert the OBDI Tuner CD into your CD ROM drive. The OBDI Tuner setup program should run automatically and the main setup screen will appear.
Click on the ‘Install OBDI Tuner Program’ selection to begin the installation. Then follow the on-screen instructions to complete the installation. If the The OBDI Tuner setup program does not start automatically, navigate to your CD ROM drive and locate the file named ‘autorun.exe’ on the CD. Double click on this file to start the setup program. Note: If you are installng the OBDI Tuner program on a PC running Microsoft Vista or Windows 7 the installation process is a little different. Click on the ‘Vista Installation Instructions’ selection on the CD to view detailed instructions for installing the program under Vista and Windows 7. Registering the Program Once the program installation is complete you should have an icon on your desktop for the Tuner program. Double click on the icon to run the Tuner program. Sselect 'Register' from the 'Help' menu.

Computer Automotive Tuning Systems
Page 5
When the registration form appears, enter your Customer ID and Serial Number into the appropriate boxes. Your registration information was included in the letter enclosed in your OBDI Tuner kit and can also be found on a label on the back of the CD case. Both the Customer ID and Serial Number are case sensitive and should be entered exactly as received. Enter your Customer ID and Serial Number carefully. Note that your Customer ID is all lower case and all the letters in your Serial Number are all upper case.
. After entering your registration information click on the ‘Register’ button to complete the registration. If you entered the information correctly you will receive a message saying the registration was successful.

Computer Automotive Tuning Systems
Page 6
Click on the ‘OK’ button and the main OBDI Tuner screen will appear.
Select the Desired ECM Definition Files To display a list of all the installed ECM Definition Files, click on the ‘ECM’ menu on the main display.

Computer Automotive Tuning Systems
Page 7
Select the desired ECM Definition File from the drop-down list. This tells the Tuner program what type of vehicle you will be working on. For example selecting ‘ECM_8D’ from the drop-down list tells the Tuner program that you will be working on a 1990 – 1992 F or Y- Body car. Installing the Burn2 Programmer USB Drivers Before using the Burn2 Programmer you need to install the necessary drivers. To install these drivers, exit the Tuner program and return to the the OBDI Tuner setup program screen. (If it’s not still running, put the OBDI Tuner CD back in your CD ROM drive.) Click on the ‘USB Driver Installation’ selection to start the installation program. Follow the on-screen instructions to complete the driver installation. Reading the Calibration The vehicle’s calibration information is stored in an EPROM in the car’s computer (ECM). To begin the tuning process you’ll typically start with the original calibration information stored in the EPROM as the baseline for your custom tune so you’ll need to read this information from the EPROM. To read the EPROM you need to remove it from the ECM. To access the EPROM remove the two screws attaching the access panel on top of the ECM case and remove the panel.

Computer Automotive Tuning Systems
Page 8
Early ECMs In the early ECMs that used a type 2732 24-pin EPROM the EPROM is installed in a plastic frame called a PROM carrier. Before removing the EPROM note the orientation of the EPROM and place a mark on the circuit board at the end with the notch in the EPROM.
To remove the PROM carrier with the EPROM from the ECM grab the ends of the PROM carrier and gently pull up. To read the EPROM you need to remove the EPROM from the PROM carrier. To do this, press on the sides of the PROM carrier and then gently push the EPROM out of the bottom of the PROM carrier. Connect the Burn2 programmer to your PC and run the Tuner program. Place the EPROM into the Burn2 socket with the notch in the EPROM up (toward the lever on the Burn2 socket) and the EPROM at the bottom of the socket so that the upper part of the socket near the lever is empty.
To read the calibration from the EPROM click on the Read Calibration button or select 'Read Calibration' from the 'Tools' menu.

Computer Automotive Tuning Systems
Page 9
This will display the Read Calibration screen.
Now click on the '2732 Type EPROM' calibration source and click the ‘Read’ button. The Tuner program will read the calibration information from the EPROM and load it into the Tuner program. When this process is complete The Status on the Read Calibration screen will show 'Calibration Loaded'
Click on the Exit button to close the Read Calib ration screen.
Computer Automotive Tuning Systems
Page 10
The calibration will now be loaded into the Tuner program and the 'Tables' menu will be active allowing you to view and edit the various parameters.
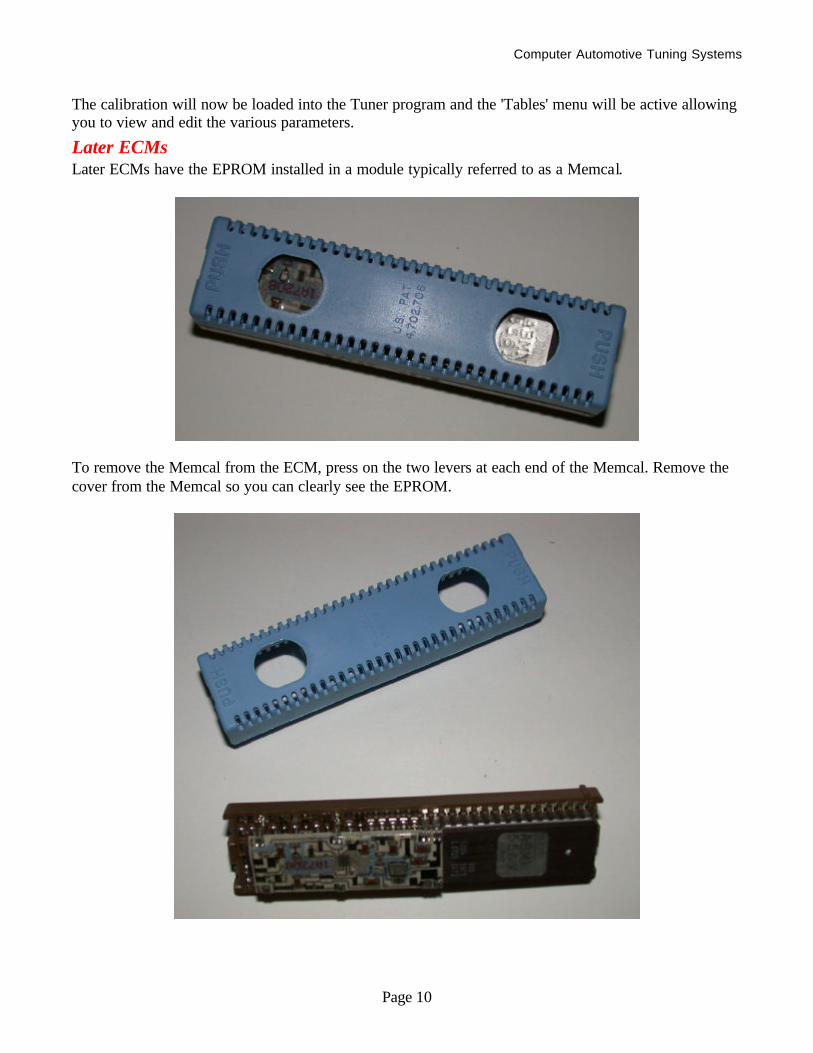
Later ECMs Later ECMs have the EPROM installed in a module typically referred to as a Memcal.
To remove the Memcal from the ECM, press on the two levers at each end of the Memcal. Remove the cover from the Memcal so you can clearly see the EPROM.

Computer Automotive Tuning Systems
Page 11
Locate the EPROM on the Memcal and insert the HDR1 pins into the Memcal socket so the HDR1 pins align with the EPROM pins.
Note the notch on the EPROM and insert the HDR1 into the Burn2 so that the notch in the EPROM is facing up (toward the Burn2 lever) and at the bottom of the Burn2 connector so that the upper part of the socket near the lever is empty.
To read the calibration from the EPROM click on the Read Calibration button or select 'Read Calibration' from the 'Tools' menu.

Computer Automotive Tuning Systems
Page 12
This will display the Read Calibration screen.
Leave the ‘Memcal/EPROM/Flash’ calibration source selected and click the ‘Read’ button. The Tuner program will read the calibration information from the EPROM and load it into the Tuner program. When this process is complete The Status on the Read Calibration screen will show 'Calibration Loaded'
Click on the Exit button to close the Read Calibration screen.

Computer Automotive Tuning Systems
Page 13
The calibration will now be loaded into the Tuner program and the 'Tables' menu will be active allowing you to view and edit the various parameters.
Programming a New Calibration The OBDI Tune Kits include a SST27SF512 Flash chip to replace the original EPROM in the ECM. The Flash chip can be quickly erased electrically with the Burn2 programmer so you don’t need a separate EPROM eraser to erase an EPROM before reprogramming. The kits also include the necessary adapters to allow the use of this Flash chip.
Programming the Flash Chip Connect the Burn2 programmer to your PC and run the Tuner program. Place the Flash chip into the Burn2 socket with the notch in the chip up (toward the lever on the Burn2 socket) and the chip at the bottom of the socket so that the upper part of the socket near the lever is empty.
Run the Tuner program and open the calibration file you wish to use to program the Flash. To program the Flash chip click on the ‘Tools’ menu and select ‘Write Calibration’ from the drop-down list of click
on the ‘Write Calibration’ button.
Computer Automotive Tuning Systems
Page 14
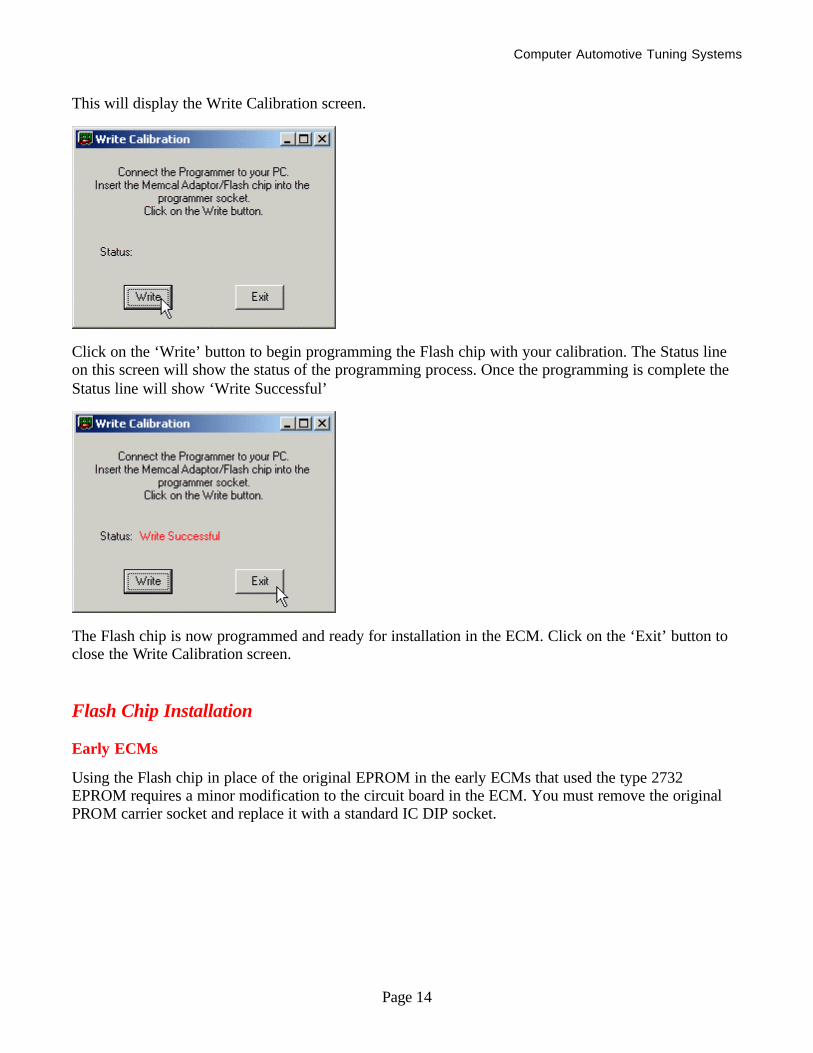
This will display the Write Calibration screen.
Click on the ‘Write’ button to begin programming the Flash chip with your calibration. The Status line on this screen will show the status of the programming process. Once the programming is complete the Status line will show ‘Write Successful’
The Flash chip is now programmed and ready for installation in the ECM. Click on the ‘Exit’ button to close the Write Calibration screen.
Flash Chip Installation
Early ECMs
Using the Flash chip in place of the original EPROM in the early ECMs that used the type 2732 EPROM requires a minor modification to the circuit board in the ECM. You must remove the original PROM carrier socket and replace it with a standard IC DIP socket.

Computer Automotive Tuning Systems
Page 15
To remove the PROM carrier socket first carefully pry off the plastic housing of the socket using a small flat blade screwdriver.
This will expose the pins from the PROM carrier socket.
Unsolder and remove all the pins from the PROM carrier socket and clean out the holes in the circuit board with a solder sucker.
Insert the 24-pin DIP socket that was included in the kit into the holes in the circuit board making sure that the notch in the socket is pointed in the same direction as the original EPROM.

Computer Automotive Tuning Systems
Page 16
Solder the socket pins to the circuit board. Next insert the G2 Flash chip adapter into the DIP socket. Make sure that the G2 adapter is oriented correctly so that the notch in the socket on the G2 adapter is facing the same direction as the notch in the original EPROM.
Insert the Flash chip into the G2 adapter verifying that all the pins on the Flash chip are correctly inserted into the socket on the adapter. The notch in the Flash chip must face in the same direction as the notch in the socket.
Computer Automotive Tuning Systems
Page 17
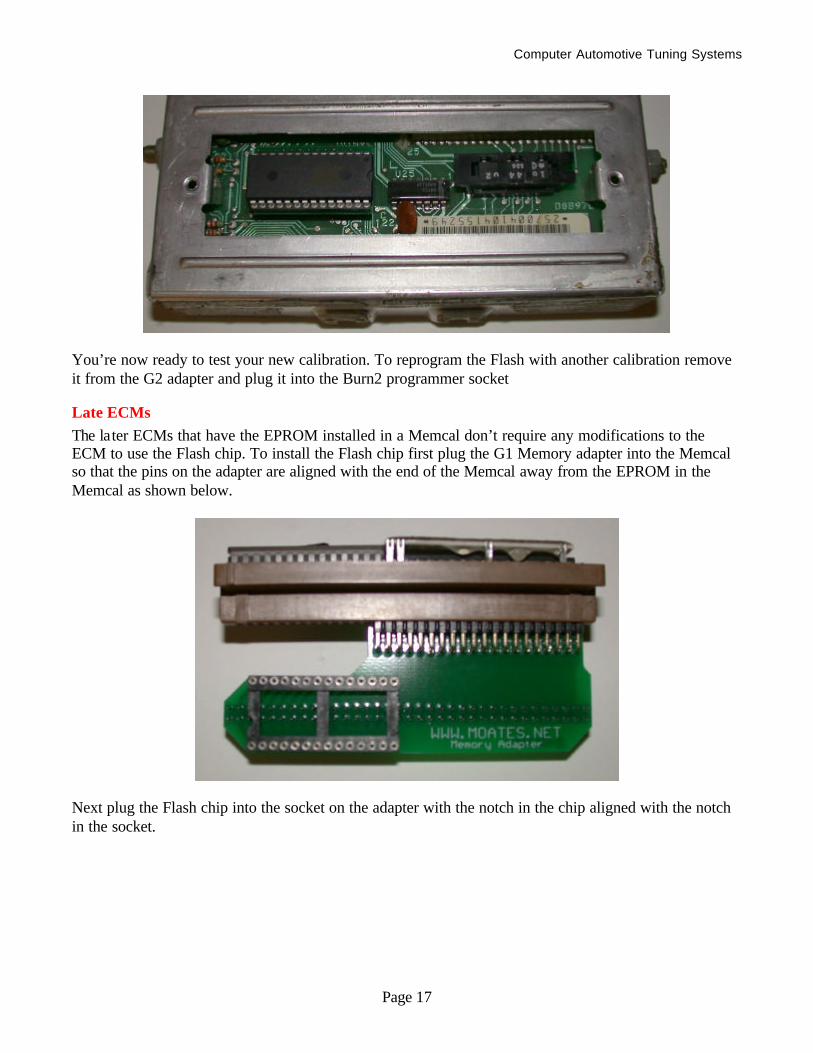
You’re now ready to test your new calibration. To reprogram the Flash with another calibration remove it from the G2 adapter and plug it into the Burn2 programmer socket
Late ECMs The later ECMs that have the EPROM installed in a Memcal don’t require any modifications to the ECM to use the Flash chip. To install the Flash chip first plug the G1 Memory adapter into the Memcal so that the pins on the adapter are aligned with the end of the Memcal away from the EPROM in the Memcal as shown below.
Next plug the Flash chip into the socket on the adapter with the notch in the chip aligned with the notch in the socket.

Computer Automotive Tuning Systems
Page 18
Finally plug the entire assembly into the ECM in place of the original Memcal. Saving A Calibration File It’s a good idea to save a copy of the original stock calibration to your hard disk before making any changes. This way, you'll have a baseline to return to if necessary. To save a calibration file select 'Save As' from the 'File' menu.
This will display the 'Save As' dialog box. Type in a file name for the calibration file in the ‘File name’ box and click the 'Save' button.

Computer Automotive Tuning Systems
Page 19
Once you have read the EPROM and saved the resulting binary file you now have a file that you can open in the Tuner program. Opening a Calibration File To open an ECM Calibration (binary) file select 'Open File' from the File menu or click on the Open
File button on the tool bar at the top of the screen.

Computer Automotive Tuning Systems
Page 20
This will display the 'Open File' dialog box. Select the desired file and click the 'OK' button.
When you select a calibration file and click on the ‘Open’ button, the program will verify that it is a valid calibration file and that the correct ECM Definition File has been selected. If an incorrect ECM Definition File has been selected an error message will be displayed. If possible, the program will indicate which ECM Definition File is required for the selected calibration. Calibration Tuning Once you have opened a calibration file you can view and edit the various calibration parameters. To view and edit these parameters click on the Tables menu and then select the desired table from the drop-down list.
This list will contain all the tables available for the selected ECM Definition File. When you select a table it will be displayed so you can view and edit the calibration values. The calibration parameters are grouped into three type of tables; a Switch Table, a Constant Table and 2D and 3D tables.

Computer Automotive Tuning Systems
Page 21
Switch Type Calibration Table The switch type calibration table will contain all the calibration items that can only have two values or states such as ‘on’ or ‘off’, or ‘Enabled’ or ‘Disabled’. This type of table will contain calibration items such as V.A.T.S. enabled/disabled.
Constant Type Calibration Table The Constant Table is used to present calibration values that represent single values or calibration constants such as the fuel cutoff RPM or injector flow rate.

Computer Automotive Tuning Systems
Page 22
2D and 3D Calibration Tables The majority of the ECM Calibration Tables will be either 2D or 3D tables. These tables are used to display a series of values that depend on one (2D tables) or 2 other parameters (3D tables). An example of a 2D table is the ‘Initial Startup AFR Enrichment Vs. Coolant Temp.’.
A good example of a common 3D table would be the Main Spark Advance Vs. RPM Vs. MAP.

Computer Automotive Tuning Systems
Page 23
Document Version 1.00 Updated: 5/19/10 Computer Automotive Tuning Systems 14327 Dogwood Lane Belle Haven, VA 23306 www.tunercat.com [email protected]