oauth passport
TRANSCRIPT
8/18/2019 OAuth Passport
http://slidepdf.com/reader/full/oauth-passport 1/23
OAuth Passport
Overview
Passport is authentication middleware for Node. It is designed to serve a singular purpose:authenticate requests. When writing modules, encapsulation is a virtue, so Passport delegates allother functionality to the application. This separation of concerns keeps code clean and
maintainable, and makes Passport extremely easy to integrate into an application.In modern web applications, authentication can take a variety of forms. Traditionally, users log inby providing a username and password. With the rise of social networking, single sign-on using anOAuth provider such as Facebook or Twitter has become a popular authentication method.Services that expose an API often require token-based credentials to protect access.
Passport recognizes that each application has unique authentication requirements. Authenticationmechanisms, known as strategies, are packaged as individual modules. Applications can choosewhich strategies to employ, without creating unnecessary dependencies.
Despite the complexities involved in authentication, code does not have to be complicated.
app.post('/login', passport.authenticate('local', { successRedirect: '/',
failureRedirect: '/login' }));
Install$ npm install passport
Authenticate Authenticating requests is as simple as calling passport.authenticate() and specifying which strategy toemploy. authenticate() 's function signature is standard Connect middleware, which makes it convenientto use as route middleware in Express applications.
app.post('/login',
passport.authenticate('local'),
function(req, res) {
// If this function gets called, authentication was successful.
// `req.user` contains the authenticated user.
res.redirect('/users/' + req.user.username);
});
By default, if authentication fails, Passport will respond with a 401 Unauthorized status, and anyadditional route handlers will not be invoked. If authentication succeeds, the next handler will be
invoked and the req.user property will be set to the authenticated user.
Note: Strategies must be configured prior to using them in a route. Continue reading the chapteron configuration for details.
Redirects
A redirect is commonly issued after authenticating a request.
app.post('/login',
passport.authenticate('local', { successRedirect: '/',
failureRedirect: '/login' }));
In this case, the redirect options override the default behavior. Upon successful authentication, theuser will be redirected to the home page. If authentication fails, the user will be redirected back tothe login page for another attempt.
Flash Messages
8/18/2019 OAuth Passport
http://slidepdf.com/reader/full/oauth-passport 2/23
Redirects are often combined with flash messages in order to display status information to theuser.
app.post('/login',
passport.authenticate('local', { successRedirect: '/',
failureRedirect: '/login',
failureFlash: true })
);Setting the failureFlash option to true instructs Passport to flash an error message using the messagegiven by the strategy's verify callback, if any. This is often the best approach, because the verifycallback can make the most accurate determination of why authentication failed.
Alternatively, the flash message can be set specifically.
passport.authenticate('local', { failureFlash: 'Invalid username or password.' });
A successFlash option is available which flashes a success message when authentication succeeds.
passport.authenticate('local', { successFlash: 'Welcome!' });
Note: Using flash messages requires a req.flash() function. Express 2.x provided this functionality,
however it was removed from Express 3.x. Use of connect-flash middleware is recommended toprovide this functionality when using Express 3.x.
Disable Sessions
After successful authentication, Passport will establish a persistent login session. This is useful forthe common scenario of users accessing a web application via a browser. However, in somecases, session support is not necessary. For example, API servers typically require credentials tobe supplied with each request. When this is the case, session support can be safely disabled bysetting the session option to false.
app.get('/api/users/me',
passport.authenticate('basic', { session: false }),
function(req, res) {
res.json({ id: req.user.id, username: req.user.username });
});
Custom Callback
If the built-in options are not sufficient for handling an authentication request, a custom callbackcan be provided to allow the application to handle success or failure.
app.get('/login', function(req, res, next) {
passport.authenticate('local', function(err, user, info) {if (err) { return next(err); }
if (!user) { return res.redirect('/login'); }
req.logIn(user, function(err) {
if (err) { return next(err); }
return res.redirect('/users/' + user.username);
});
})(req, res, next);
});
In this example, note that authenticate() is called from within the route handler, rather than being usedas route middleware. This gives the callback access to the req and res objects through closure.
If authentication failed, user will be set to false. If an exception occurred, err will be set. An optional info argument will be passed, containing additional details provided by the strategy's verify callback.
8/18/2019 OAuth Passport
http://slidepdf.com/reader/full/oauth-passport 3/23
The callback can use the arguments supplied to handle the authentication result as desired. Notethat when using a custom callback, it becomes the application's responsibility to establish asession (by calling req.login()) and send a response.
Configure Three pieces need to be configured to use Passport for authentication:
1. Authentication strategies
2. Application middleware
3. Sessions (optional )
Strategies
Passport uses what are termed strategies to authenticate requests. Strategies range from verifyinga username and password, delegated authentication using OAuth or federated authenticationusing OpenID.
Before asking Passport to authenticate a request, the strategy (or strategies) used by anapplication must be configured.
Strategies, and their configuration, are supplied via the use() function. For example, the followinguses the LocalStrategy for username/password authentication.
var passport = require('passport')
, LocalStrategy = require('passport-local').Strategy;
passport.use(new LocalStrategy(
function(username, password, done) {
User.findOne({ username: username }, function (err, user) {
if (err) { return done(err); }if (!user) {
return done(null, false, { message: 'Incorrect username.' });
}
if (!user.validPassword(password)) {
return done(null, false, { message: 'Incorrect password.' });
}
return done(null, user);
});
}
));
Verify Callback
This example introduces an important concept. Strategies require what is known as a verifycallback . The purpose of a verify callback is to find the user that possesses a set of credentials.
When Passport authenticates a request, it parses the credentials contained in the request. It theninvokes the verify callback with those credentials as arguments, in this case username and password. Ifthe credentials are valid, the verify callback invokes done to supply Passport with the user thatauthenticated.
return done(null, user);
If the credentials are not valid (for example, if the password is incorrect), done should be invokedwith false instead of a user to indicate an authentication failure.
8/18/2019 OAuth Passport
http://slidepdf.com/reader/full/oauth-passport 4/23
return done(null, false);
An additional info message can be supplied to indicate the reason for the failure. This is useful fordisplaying a flash message prompting the user to try again.
return done(null, false, { message: 'Incorrect password.' });
Finally, if an exception occurred while verifying the credentials (for example, if the database is notavailable), done should be invoked with an error, in conventional Node style.
return done(err);
Note that it is important to distinguish the two failure cases that can occur. The latter is a serverexception, in which err is set to a non-null value. Authentication failures are natural conditions, inwhich the server is operating normally. Ensure that err remains null, and use the final argument topass additional details.
By delegating in this manner, the verify callback keeps Passport database agnostic. Applicationsare free to choose how user information is stored, without any assumptions imposed by theauthentication layer.
Middleware
In a Connect or Express-based application, passport.initialize() middleware is required to initializePassport. If your application uses persistent login sessions, passport.session() middleware must also beused.
app.configure(function() {
app.use(express.static('public'));
app.use(express.cookieParser());
app.use(express.bodyParser());
app.use(express.session({ secret: 'keyboard cat' }));
app.use(passport.initialize());
app.use(passport.session());app.use(app.router);
});
Note that enabling session support is entirely optional, though it is recommended for mostapplications. If enabled, be sure to use express.session() before passport.session() to ensure that the loginsession is restored in the correct order.
Sessions
In a typical web application, the credentials used to authenticate a user will only be transmittedduring the login request. If authentication succeeds, a session will be established and maintained
via a cookie set in the user's browser.Each subsequent request will not contain credentials, but rather the unique cookie that identifiesthe session. In order to support login sessions, Passport will serialize and deserialize user instancesto and from the session.
passport.serializeUser(function(user, done) {
done(null, user.id);
});
passport.deserializeUser(function(id, done) {
User.findById(id, function(err, user) {done(err, user);
});
});

8/18/2019 OAuth Passport
http://slidepdf.com/reader/full/oauth-passport 5/23
In this example, only the user ID is serialized to the session, keeping the amount of data storedwithin the session small. When subsequent requests are received, this ID is used to find the user,which will be restored to req.user .
The serialization and deserialization logic is supplied by the application, allowing the application tochoose an appropriate database and/or object mapper, without imposition by the authenticationlayer.
Username & Password The most widely used way for websites to authenticate users is via a username and password.Support for this mechanism is provided by the passport-local module.
Install$ npm install passport-local
Configurationvar passport = require('passport')
, LocalStrategy = require('passport-local').Strategy;
passport.use(new LocalStrategy(
function(username, password, done) {
User.findOne({ username: username }, function(err, user) {
if (err) { return done(err); }
if (!user) {
return done(null, false, { message: 'Incorrect username.' });
}
if (!user.validPassword(password)) {return done(null, false, { message: 'Incorrect password.' });
}
return done(null, user);
});
}
));
The verify callback for local authentication accepts username and password arguments, which aresubmitted to the application via a login form.
Form
A form is placed on a web page, allowing the user to enter their credentials and log in.
<form action="/login" method="post">
<div>
<label>Username:</label>
<input type="text" name="username"/>
</div>
<div>
<label>Password:</label>
<input type="password" name="password"/>
</div>
<div>
8/18/2019 OAuth Passport
http://slidepdf.com/reader/full/oauth-passport 6/23
<input type="submit" value="Log In"/>
</div>
</form >
Route
The login form is submitted to the server via the POST method. Using authenticate() with the local strategywill handle the login request.
app.post('/login',
passport.authenticate('local', { successRedirect: '/',
failureRedirect: '/login',
failureFlash: true })
);
Setting the failureFlash option to true instructs Passport to flash an error message using the message optionset by the verify callback above. This is helpful when prompting the user to try again.
Parameters
By default, LocalStrategy expects to find credentials in parameters named username and password. If yoursite prefers to name these fields differently, options are available to change the defaults.
passport.use(new LocalStrategy({
usernameField: 'email',
passwordField: 'passwd'
},
function(username, password, done) {
// ...
}
));
OpenID OpenID is an open standard for federated authentication. When visiting a website, users presenttheir OpenID to sign in. The user then authenticates with their chosen OpenID provider, whichissues an assertion to confirm the user's identity. The website verifies this assertion in order tosign the user in.
Support for OpenID is provided by the passport-openid module.
Install$ npm install passport-openid
Configuration
When using OpenID, a return URL and realm must be specified. The returnURL is the URL to whichthe user will be redirected after authenticating with their OpenID provider. realm indicates the part ofURL-space for which authentication is valid. Typically this will be the root URL of the website.
var passport = require('passport')
, OpenIDStrategy = require('passport-openid').Strategy;
passport.use(new OpenIDStrategy({
returnURL: 'http://www.example.com/auth/openid/return' ,
realm: 'http://www.example.com/'
8/18/2019 OAuth Passport
http://slidepdf.com/reader/full/oauth-passport 7/23
},
function(identifier, done) {
User.findOrCreate({ openId: identifier }, function(err, user) {
done(err, user);
});
}
));
The verify callback for OpenID authentication accepts an identifier argument containing the user'sclaimed identifier.
Form
A form is placed on a web page, allowing the user to enter their OpenID and sign in.
<form action="/auth/openid" method="post">
<div>
<label>OpenID:</label>
<input type="text" name="openid_identifier"/>< br/> </div>
<div>
<input type="submit" value="Sign In"/>
</div>
</form >
Routes
Two routes are required for OpenID authentication. The first route accepts the form submissioncontaining an OpenID identifier. During authentication, the user will be redirected to their OpenIDprovider. The second route is the URL to which the user will be returned after authenticating withtheir OpenID provider.
// Accept the OpenID identifier and redirect the user to their OpenID
// provider for authentication. When complete, the provider will redirect
// the user back to the application at:
// /auth/openid/return
app.post('/auth/openid', passport.authenticate('openid'));
// The OpenID provider has redirected the user back to the application.
// Finish the authentication process by verifying the assertion. If valid,
// the user will be logged in. Otherwise, authentication has failed.
app.get('/auth/openid/return',
passport.authenticate('openid', { successRedirect: '/',
failureRedirect: '/login' }));
Profile Exchange
OpenID can optionally be configured to retrieve profile information about the user beingauthenticated. Profile exchange is enabled by setting the profile option to true.
passport.use(new OpenIDStrategy({
returnURL: 'http://www.example.com/auth/openid/return' ,
realm: 'http://www.example.com/',
8/18/2019 OAuth Passport
http://slidepdf.com/reader/full/oauth-passport 8/23
profile: true
},
function(identifier, profile, done) {
// ...
}
));
When profile exchange is enabled, the function signature of the verify callback accepts anadditional profile argument containing user profile information provided by the OpenID provider;refer to User Profile for further information.
OAuth OAuth is a standard protocol that allows users to authorize API access to web and desktop ormobile applications. Once access has been granted, the authorized application can utilize the APIon behalf of the user. OAuth has also emerged as a popular mechanism for delegatedauthentication.
OAuth comes in two primary flavors, both of which are widely deployed.
The initial version of OAuth was developed as an open standard by a loosely organized collectiveof web developers. Their work resulted in OAuth 1.0, which was superseded by OAuth 1.0a. Thiswork has now been standardized by the IETF as RFC 5849.
Recent efforts undertaken by the Web Authorization Protocol Working Group have focused ondefining OAuth 2.0. Due to the lengthy standardization effort, providers have proceeded to deployimplementations conforming to various drafts, each with slightly different semantics.
Thankfully, Passport shields an application from the complexities of dealing with OAuth variants. Inmany cases, a provider-specific strategy can be used instead of the generic OAuth strategiesdescribed below. This cuts down on the necessary configuration, and accommodates any
provider-specific quirks. See Facebook, Twitter or the list of providers for preferred usage.Support for OAuth is provided by the passport-oauth module.
Install$ npm install passport-oauth
OAuth 1.0
OAuth 1.0 is a delegated authentication strategy that involves multiple steps. First, a request tokenmust be obtained. Next, the user is redirected to the service provider to authorize access. Finally,after authorization has been granted, the user is redirected back to the application and the request
token can be exchanged for an access token. The application requesting access, known as aconsumer , is identified by a consumer key and consumer secret.
Configuration
When using the generic OAuth strategy, the key, secret, and endpoints are specified as options.
var passport = require('passport')
, OAuthStrategy = require('passport-oauth').OAuthStrategy;
passport.use('provider', new OAuthStrategy({
requestTokenURL: 'https://www.provider.com/oauth/request_token' ,
accessTokenURL: 'https://www.provider.com/oauth/access_token' ,
userAuthorizationURL: 'https://www.provider.com/oauth/authorize' ,
consumerKey: '123-456-789',
8/18/2019 OAuth Passport
http://slidepdf.com/reader/full/oauth-passport 9/23
consumerSecret: 'shhh-its-a-secret'
callbackURL: 'https://www.example.com/auth/provider/callback'
},
function(token, tokenSecret, profile, done) {
User.findOrCreate(..., function(err, user) {
done(err, user);
});}
));
The verify callback for OAuth-based strategies accepts token, tokenSecret, and profile arguments. token isthe access token and tokenSecret is its corresponding secret. profile will contain user profile informationprovided by the service provider; refer to User Profile for additional information.
Routes
Two routes are required for OAuth authentication. The first route initiates an OAuth transactionand redirects the user to the service provider. The second route is the URL to which the user will
be redirected after authenticating with the provider.// Redirect the user to the OAuth provider for authentication. When
// complete, the provider will redirect the user back to the application at
// /auth/provider/callback
app.get('/auth/provider', passport.authenticate('provider'));
// The OAuth provider has redirected the user back to the application.
// Finish the authentication process by attempting to obtain an access
// token. If authorization was granted, the user will be logged in.
// Otherwise, authentication has failed.
app.get('/auth/provider/callback',
passport.authenticate('provider', { successRedirect: '/',
failureRedirect: '/login' }));
Link
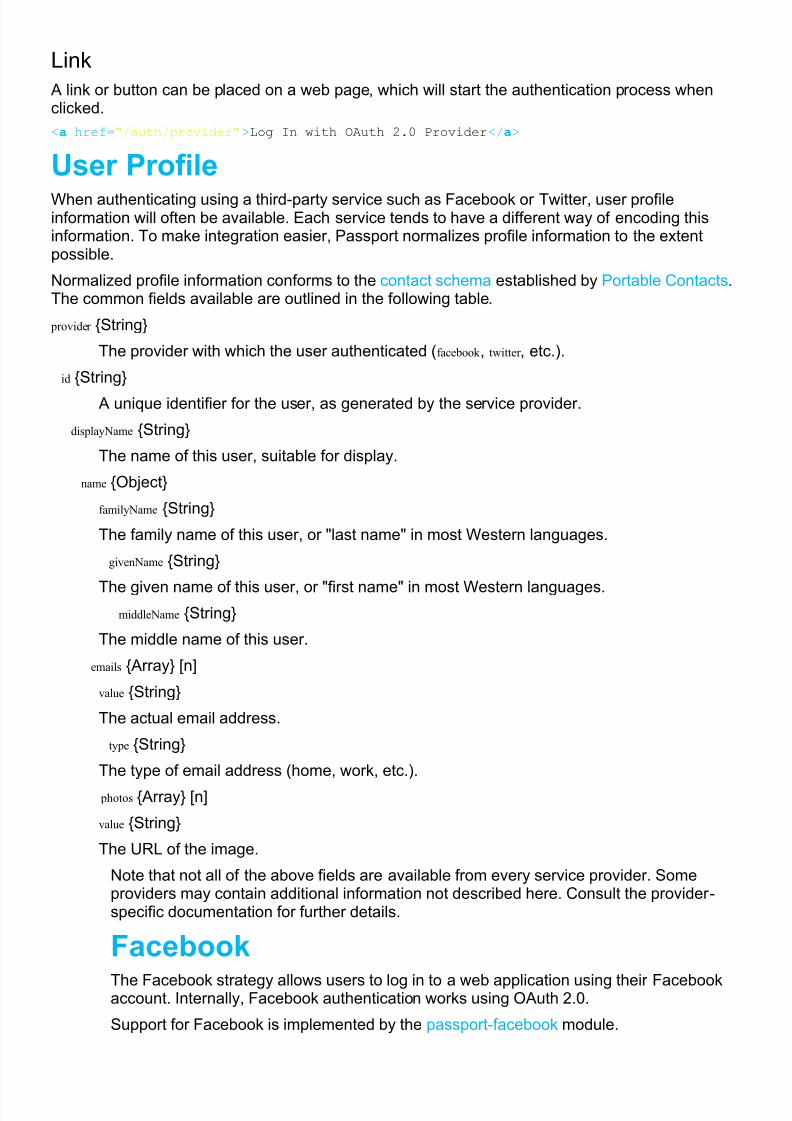
A link or button can be placed on a web page, which will start the authentication process whenclicked.
<a href="/auth/provider">Log In with OAuth Provider</a>
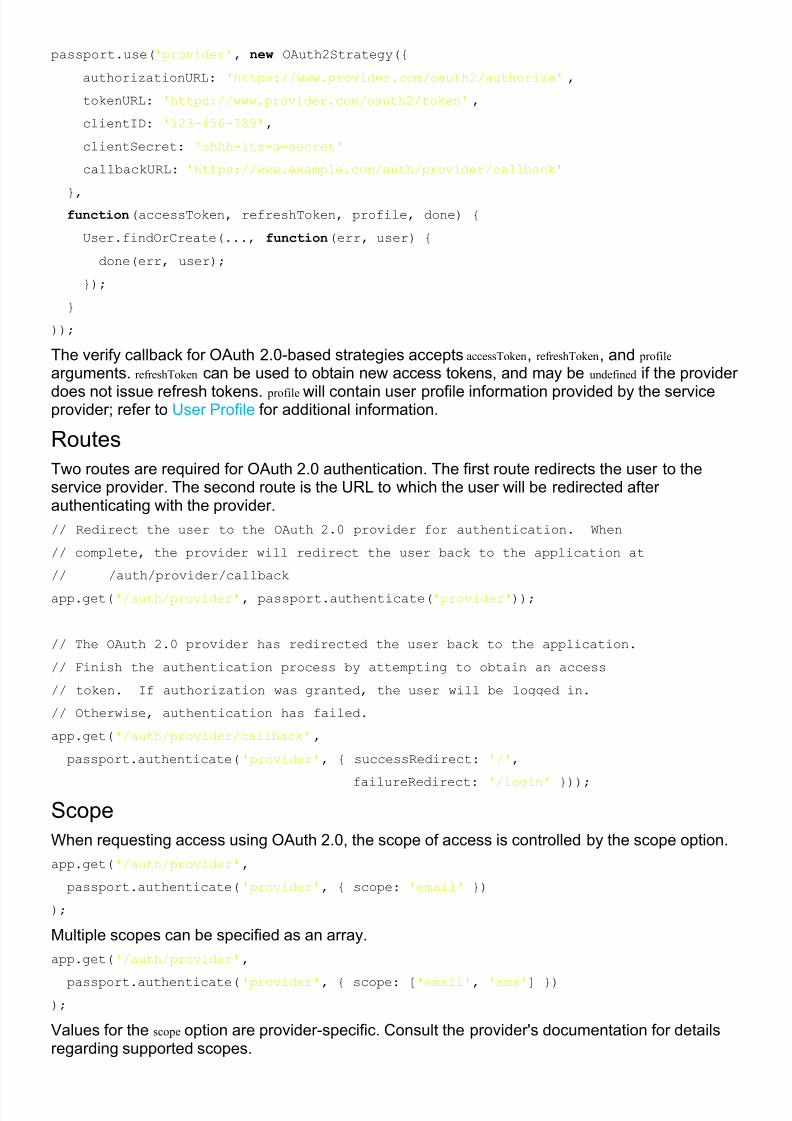
OAuth 2.0
OAuth 2.0 is the successor to OAuth 1.0, and is designed to overcome perceived shortcomings inthe earlier version. The authentication flow is essentially the same. The user is first redirected tothe service provider to authorize access. After authorization has been granted, the user isredirected back to the application with a code that can be exchanged for an access token. Theapplication requesting access, known as a client , is identified by an ID and secret.
Configuration
When using the generic OAuth 2.0 strategy, the client ID, client secret, and endpoints are
specified as options.var passport = require('passport')
, OAuth2Strategy = require('passport-oauth').OAuth2Strategy;
8/18/2019 OAuth Passport
http://slidepdf.com/reader/full/oauth-passport 10/23
passport.use('provider', new OAuth2Strategy({
authorizationURL: 'https://www.provider.com/oauth2/authorize' ,
tokenURL: 'https://www.provider.com/oauth2/token' ,
clientID: '123-456-789',
clientSecret: 'shhh-its-a-secret'
callbackURL: 'https://www.example.com/auth/provider/callback'
},function(accessToken, refreshToken, profile, done) {
User.findOrCreate(..., function(err, user) {
done(err, user);
});
}
));
The verify callback for OAuth 2.0-based strategies accepts accessToken, refreshToken, and profile arguments. refreshToken can be used to obtain new access tokens, and may be undefined if the provider
does not issue refresh tokens. profile will contain user profile information provided by the serviceprovider; refer to User Profile for additional information.
Routes
Two routes are required for OAuth 2.0 authentication. The first route redirects the user to theservice provider. The second route is the URL to which the user will be redirected afterauthenticating with the provider.
// Redirect the user to the OAuth 2.0 provider for authentication. When
// complete, the provider will redirect the user back to the application at
// /auth/provider/callback
app.get('/auth/provider', passport.authenticate('provider'));
// The OAuth 2.0 provider has redirected the user back to the application.
// Finish the authentication process by attempting to obtain an access
// token. If authorization was granted, the user will be logged in.
// Otherwise, authentication has failed.
app.get('/auth/provider/callback',
passport.authenticate('provider', { successRedirect: '/',
failureRedirect: '/login' }));
Scope
When requesting access using OAuth 2.0, the scope of access is controlled by the scope option.
app.get('/auth/provider',
passport.authenticate('provider', { scope: 'email' })
);
Multiple scopes can be specified as an array.
app.get('/auth/provider',
passport.authenticate('provider', { scope: ['email', 'sms'] })
);
Values for the scope option are provider-specific. Consult the provider's documentation for detailsregarding supported scopes.
8/18/2019 OAuth Passport
http://slidepdf.com/reader/full/oauth-passport 11/23
Link
A link or button can be placed on a web page, which will start the authentication process whenclicked.
<a href="/auth/provider">Log In with OAuth 2.0 Provider</a>
User Profile When authenticating using a third-party service such as Facebook or Twitter, user profileinformation will often be available. Each service tends to have a different way of encoding thisinformation. To make integration easier, Passport normalizes profile information to the extentpossible.
Normalized profile information conforms to the contact schema established by Portable Contacts. The common fields available are outlined in the following table.
provider {String}
The provider with which the user authenticated (facebook , twitter , etc.).
id {String}
A unique identifier for the user, as generated by the service provider.
displayName {String}
The name of this user, suitable for display.
name {Object}
familyName {String}
The family name of this user, or "last name" in most Western languages.
givenName {String}
The given name of this user, or "first name" in most Western languages.middleName {String}
The middle name of this user.
emails {Array} [n]
value {String}
The actual email address.
type {String}
The type of email address (home, work, etc.).
photos {Array} [n]
value {String}
The URL of the image.
Note that not all of the above fields are available from every service provider. Someproviders may contain additional information not described here. Consult the provider-specific documentation for further details.
The Facebook strategy allows users to log in to a web application using their Facebookaccount. Internally, Facebook authentication works using OAuth 2.0.
Support for Facebook is implemented by the passport-facebook module.
8/18/2019 OAuth Passport
http://slidepdf.com/reader/full/oauth-passport 12/23
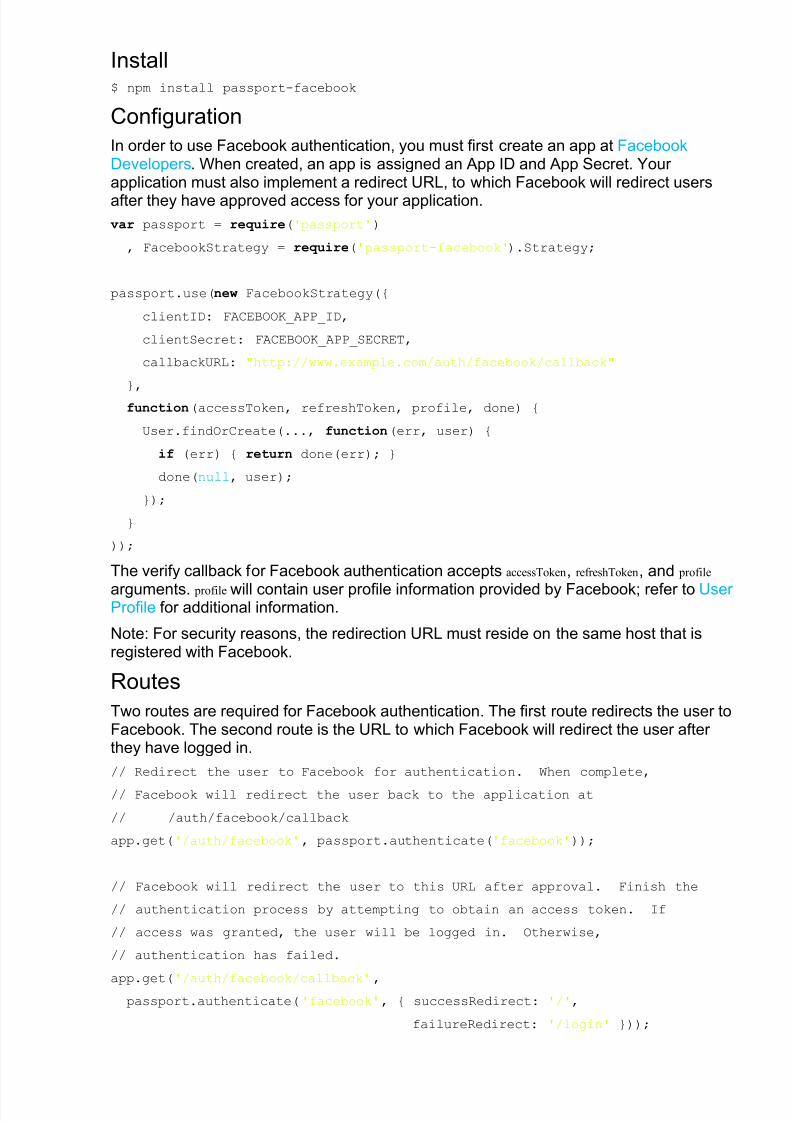
Install$ npm install passport-facebook
Configuration
In order to use Facebook authentication, you must first create an app at FacebookDevelopers. When created, an app is assigned an App ID and App Secret. Yourapplication must also implement a redirect URL, to which Facebook will redirect users
after they have approved access for your application.
var passport = require('passport')
, FacebookStrategy = require('passport-facebook').Strategy;
passport.use(new FacebookStrategy({
clientID: FACEBOOK_APP_ID,
clientSecret: FACEBOOK_APP_SECRET,
callbackURL: "http://www.example.com/auth/facebook/callback"
},
function(accessToken, refreshToken, profile, done) {
User.findOrCreate(..., function(err, user) {
if (err) { return done(err); }
done(null, user);
});
}
));
The verify callback for Facebook authentication accepts accessToken, refreshToken, and profile
arguments. profile will contain user profile information provided by Facebook; refer to UserProfile for additional information.
Note: For security reasons, the redirection URL must reside on the same host that isregistered with Facebook.
Routes
Two routes are required for Facebook authentication. The first route redirects the user toFacebook. The second route is the URL to which Facebook will redirect the user afterthey have logged in.
// Redirect the user to Facebook for authentication. When complete,
// Facebook will redirect the user back to the application at
// /auth/facebook/callback
app.get('/auth/facebook', passport.authenticate('facebook'));
// Facebook will redirect the user to this URL after approval. Finish the
// authentication process by attempting to obtain an access token. If
// access was granted, the user will be logged in. Otherwise,
// authentication has failed.
app.get('/auth/facebook/callback',passport.authenticate('facebook', { successRedirect: '/',
failureRedirect: '/login' }));
8/18/2019 OAuth Passport
http://slidepdf.com/reader/full/oauth-passport 13/23
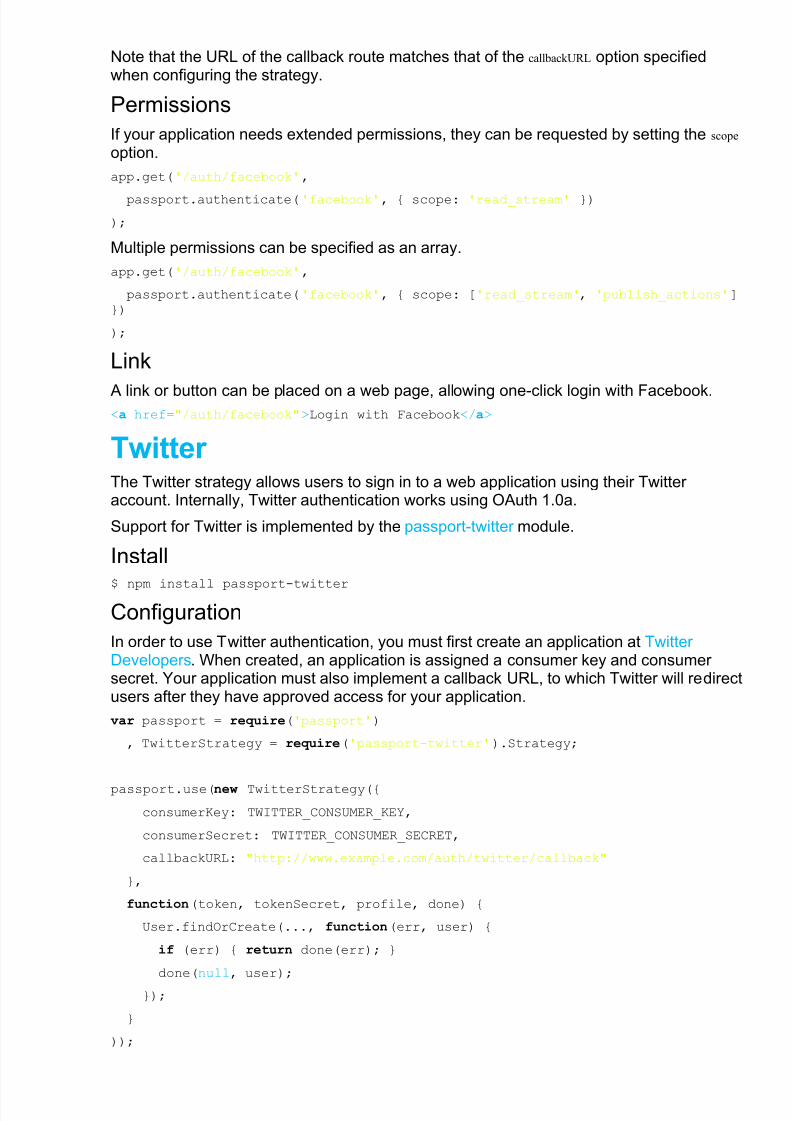
Note that the URL of the callback route matches that of the callbackURL option specifiedwhen configuring the strategy.
Permissions
If your application needs extended permissions, they can be requested by setting the scope option.
app.get('/auth/facebook',
passport.authenticate('facebook', { scope: 'read_stream' })
);
Multiple permissions can be specified as an array.
app.get('/auth/facebook',
passport.authenticate('facebook', { scope: ['read_stream', 'publish_actions']})
);
Link
A link or button can be placed on a web page, allowing one-click login with Facebook.<a href="/auth/facebook">Login with Facebook</a>
Twitter The Twitter strategy allows users to sign in to a web application using their Twitteraccount. Internally, Twitter authentication works using OAuth 1.0a.
Support for Twitter is implemented by the passport-twitter module.
Install
$ npm install passport-twitter
Configuration
In order to use Twitter authentication, you must first create an application at TwitterDevelopers. When created, an application is assigned a consumer key and consumersecret. Your application must also implement a callback URL, to which Twitter will redirectusers after they have approved access for your application.
var passport = require('passport')
, TwitterStrategy = require('passport-twitter').Strategy;
passport.use(new TwitterStrategy({
consumerKey: TWITTER_CONSUMER_KEY,
consumerSecret: TWITTER_CONSUMER_SECRET,
callbackURL: "http://www.example.com/auth/twitter/callback"
},
function(token, tokenSecret, profile, done) {
User.findOrCreate(..., function(err, user) {
if (err) { return done(err); }
done(null, user);
});
}
));
8/18/2019 OAuth Passport
http://slidepdf.com/reader/full/oauth-passport 14/23
The verify callback for Twitter authentication accepts token, tokenSecret, and profile arguments. profile will contain user profile information provided by Twitter; refer to User Profile foradditional information.
Routes
Two routes are required for Twitter authentication. The first route initiates an OAuthtransaction and redirects the user to Twitter. The second route is the URL to which Twitter
will redirect the user after they have signed in.// Redirect the user to Twitter for authentication. When complete, Twitter
// will redirect the user back to the application at
// /auth/twitter/callback
app.get('/auth/twitter', passport.authenticate('twitter'));
// Twitter will redirect the user to this URL after approval. Finish the
// authentication process by attempting to obtain an access token. If
// access was granted, the user will be logged in. Otherwise,
// authentication has failed.
app.get('/auth/twitter/callback',
passport.authenticate('twitter', { successRedirect: '/',
failureRedirect: '/login' }));
Note that the URL of the callback route matches that of the callbackURL option specifiedwhen configuring the strategy.
Link
A link or button can be placed on a web page, allowing one-click sign in with Twitter.
<a href="/auth/twitter">Sign in with Twitter</a>
Google The Google strategy allows users to sign in to a web application using their Googleaccount. Internally, Google authentication works using OpenID.
Using this strategy directly, as opposed to the general-purpose OpenID strategy, allows asite to offer one-click sign in. The user does not have to enter an identifier, whichimproves usability, albeit at the expense of limiting choice of provider.
Support for Google is implemented by the passport-google module.
Install$ npm install passport-google
Configuration
When using Google for sign in, your application must implement a return URL, to whichGoogle will redirect users after they have authenticated. The realm indicates the part ofURL-space for which authentication is valid. Typically this will be the root URL of yourwebsite.
var passport = require('passport')
, GoogleStrategy = require('passport-google').Strategy;
passport.use(new GoogleStrategy({
returnURL: 'http://www.example.com/auth/google/return' ,
8/18/2019 OAuth Passport
http://slidepdf.com/reader/full/oauth-passport 15/23
realm: 'http://www.example.com/'
},
function(identifier, profile, done) {
User.findOrCreate({ openId: identifier }, function(err, user) {
done(err, user);
});
}));
The verify callback for Google authentication accepts identifier and profile arguments. profile will contain user profile information provided by Google; refer to User Profile for additionalinformation.
Routes
Two routes are required for Google authentication. The first route redirects the user toGoogle. The second route is the URL to which Google will return the user after they havesigned in.
// Redirect the user to Google for authentication. When complete, Google
// will redirect the user back to the application at
// /auth/google/return
app.get('/auth/google', passport.authenticate('google'));
// Google will redirect the user to this URL after authentication. Finish
// the process by verifying the assertion. If valid, the user will be
// logged in. Otherwise, authentication has failed.
app.get('/auth/google/return',
passport.authenticate('google', { successRedirect: '/',
failureRedirect: '/login' }));
Note that the URL of the return route matches that of the returnURL option specified whenconfiguring the strategy.
Link
A link or button can be placed on a web page, allowing one-click sign in with Google.
<a href="/auth/google">Sign In with Google</a>
Basic & Digest Along with defining HTTP's authentication framework, RFC 2617 also defined the Basicand Digest authentications schemes. These two schemes both use usernames andpasswords as credentials to authenticate users, and are often used to protect APIendpoints.
It should be noted that relying on username and password creditials can have adversesecurity impacts, especially in scenarios where there is not a high degree of trust betweenthe server and client. In these situations, it is recommended to use an authorizationframework such as OAuth 2.0.
Support for Basic and Digest schemes is provided by the passport-http module.
Install$ npm install passport-http
8/18/2019 OAuth Passport
http://slidepdf.com/reader/full/oauth-passport 16/23
Basic
The Basic scheme uses a username and password to authenticate a user. Thesecredentials are transported in plain text, so it is advised to use HTTPS when implementingthis scheme.
Configurationpassport.use(new BasicStrategy(
function(username, password, done) {
User.findOne({ username: username }, function (err, user) {
if (err) { return done(err); }
if (!user) { return done(null, false); }
if (!user.validPassword(password)) { return done(null, false); }
return done(null, user);
});
}
));
The verify callback for Basic authentication accepts username and password arguments.
Protect Endpointsapp.get('/api/me',
passport.authenticate('basic', { session: false }),
function(req, res) {
res.json(req.user);
});
Specify passport.authenticate() with the basic strategy to protect API endpoints. Sessions are nottypically needed by APIs, so they can be disabled.
Digest
The Digest scheme uses a username and password to authenticate a user. Its primarybenefit over Basic is that it uses a challenge-response paradigm to avoid sending thepassword in the clear.
Configurationpassport.use(new DigestStrategy({ qop: 'auth' },
function(username, done) {
User.findOne({ username: username }, function (err, user) {
if (err) { return done(err); }
if (!user) { return done(null, false); }
return done(null, user, user.password);
});
},
function(params, done) {
// validate nonces as necessary
done(null, true)}
));
The Digest strategy utilizes two callbacks, the second of which is optional.
8/18/2019 OAuth Passport
http://slidepdf.com/reader/full/oauth-passport 17/23
The first callback, known as the "secret callback" accepts the username and calls done supplying a user and the corresponding secret password. The password is used tocompute a hash, and authentication fails if it does not match that contained in the request.
The second "validate callback" accepts nonce related params, which can be checked toavoid replay attacks.
Protect Endpoints
app.get('/api/me',
passport.authenticate('digest', { session: false }),
function(req, res) {
res.json(req.user);
});
Specify passport.authenticate() with the digest strategy to protect API endpoints. Sessions are nottypically needed by APIs, so they can be disabled.
OAuth OAuth (formally specified by RFC 5849) provides a means for users to grant third-partyapplications access to their data without exposing their password to those applications.
The protocol greatly improves the security of web applications, in particular, and OAuthhas been important in bringing attention to the potential dangers of exposing passwordsto external services.
While OAuth 1.0 is still widely used, it has been superseded by OAuth 2.0. It isrecommended to base new implementations on OAuth 2.0.
When using OAuth to protect API endpoints, there are three distinct steps that that mustbe performed:
1. The application requests permission from the user for access to protectedresources.
2. A token is issued to the application, if permission is granted by the user.
3. The application authenticates using the token to access protected resources.
Issuing Tokens
OAuthorize, a sibling project to Passport, provides a toolkit for implementing OAuthservice providers.
The authorization process is a complex sequence that involves authenticating both the
requesting application and the user, as well as prompting the user for permission,ensuring that enough detail is provided for the user to make an informed decision.
Additionally, it is up to the implementor to determine what limits can be placed on theapplication regarding scope of access, as well as subsequently enforcing those limits.
As a toolkit, OAuthorize does not attempt to make implementation decisions. This guidedoes not cover these issues, but does highly recommend that services deploying OAuthhave a complete understanding of the security considerations involved.
Authenticating Tokens
Once issued, OAuth tokens can be authenticated using the passport-http-oauth module.
Install$ npm install passport-http-oauth
8/18/2019 OAuth Passport
http://slidepdf.com/reader/full/oauth-passport 18/23
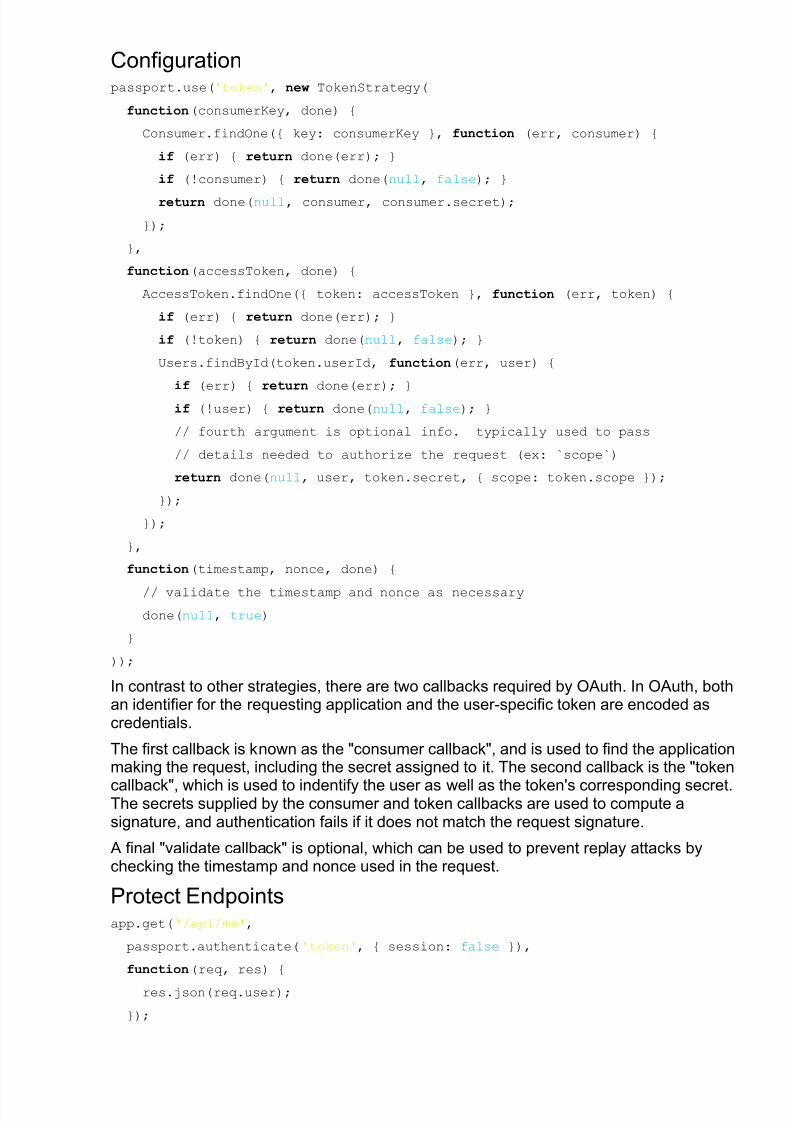
Configurationpassport.use('token', new TokenStrategy(
function(consumerKey, done) {
Consumer.findOne({ key: consumerKey }, function (err, consumer) {
if (err) { return done(err); }
if (!consumer) { return done(null, false); }
return done(null, consumer, consumer.secret);
});
},
function(accessToken, done) {
AccessToken.findOne({ token: accessToken }, function (err, token) {
if (err) { return done(err); }
if (!token) { return done(null, false); }
Users.findById(token.userId, function(err, user) {
if (err) { return done(err); }
if (!user) { return done(null, false); }
// fourth argument is optional info. typically used to pass
// details needed to authorize the request (ex: `scope`)
return done(null, user, token.secret, { scope: token.scope });
});
});
},
function(timestamp, nonce, done) {
// validate the timestamp and nonce as necessary
done(null, true)
}
));
In contrast to other strategies, there are two callbacks required by OAuth. In OAuth, bothan identifier for the requesting application and the user-specific token are encoded ascredentials.
The first callback is known as the "consumer callback", and is used to find the applicationmaking the request, including the secret assigned to it. The second callback is the "token
callback", which is used to indentify the user as well as the token's corresponding secret.The secrets supplied by the consumer and token callbacks are used to compute asignature, and authentication fails if it does not match the request signature.
A final "validate callback" is optional, which can be used to prevent replay attacks bychecking the timestamp and nonce used in the request.
Protect Endpointsapp.get('/api/me',
passport.authenticate('token', { session: false }),
function(req, res) {
res.json(req.user);
});
8/18/2019 OAuth Passport
http://slidepdf.com/reader/full/oauth-passport 19/23
Specify passport.authenticate() with the token strategy to protect API endpoints. Sessions are nottypically needed by APIs, so they can be disabled.
OAuth 2.0 OAuth 2.0 (formally specified by RFC 6749) provides an authorization framework whichallows users to authorize access to third-party applications. When authorized, theapplication is issued a token to use as an authentication credential. This has two primary
security benefits:
1. The application does not need to store the user's username and password.
2. The token can have a restricted scope (for example: read-only access).
These benefits are particularly important for ensuring the security of web applications,making OAuth 2.0 the predominant standard for API authentication.
When using OAuth 2.0 to protect API endpoints, there are three distinct steps that mustbe performed:
1. The application requests permission from the user for access to protectedresources.
2. A token is issued to the application, if permission is granted by the user.
3. The application authenticates using the token to access protected resources.
Issuing Tokens
OAuth2orize, a sibling project to Passport, provides a toolkit for implementing OAuth 2.0authorization servers.
The authorization process is a complex sequence that involves authenticating both therequesting application and the user, as well as prompting the user for permission,ensuring that enough detail is provided for the user to make an informed decision.
Additionally, it is up to the implementor to determine what limits can be placed on theapplication regarding scope of access, as well as subsequently enforcing those limits.
As a toolkit, OAuth2orize does not attempt to make implementation decisions. This guidedoes not cover these issues, but does highly recommend that services deploying OAuth2.0 have a complete understanding of the security considerations involved.
Authenticating Tokens
OAuth 2.0 provides a framework, in which an arbitrarily extensible set of token types canbe issued. In practice, only specific token types have gained widespread use.
Bearer TokensBearer tokens are the most widely issued type of token in OAuth 2.0. So much so, in fact,that many implementations assume that bearer tokens are the only type of token issued.
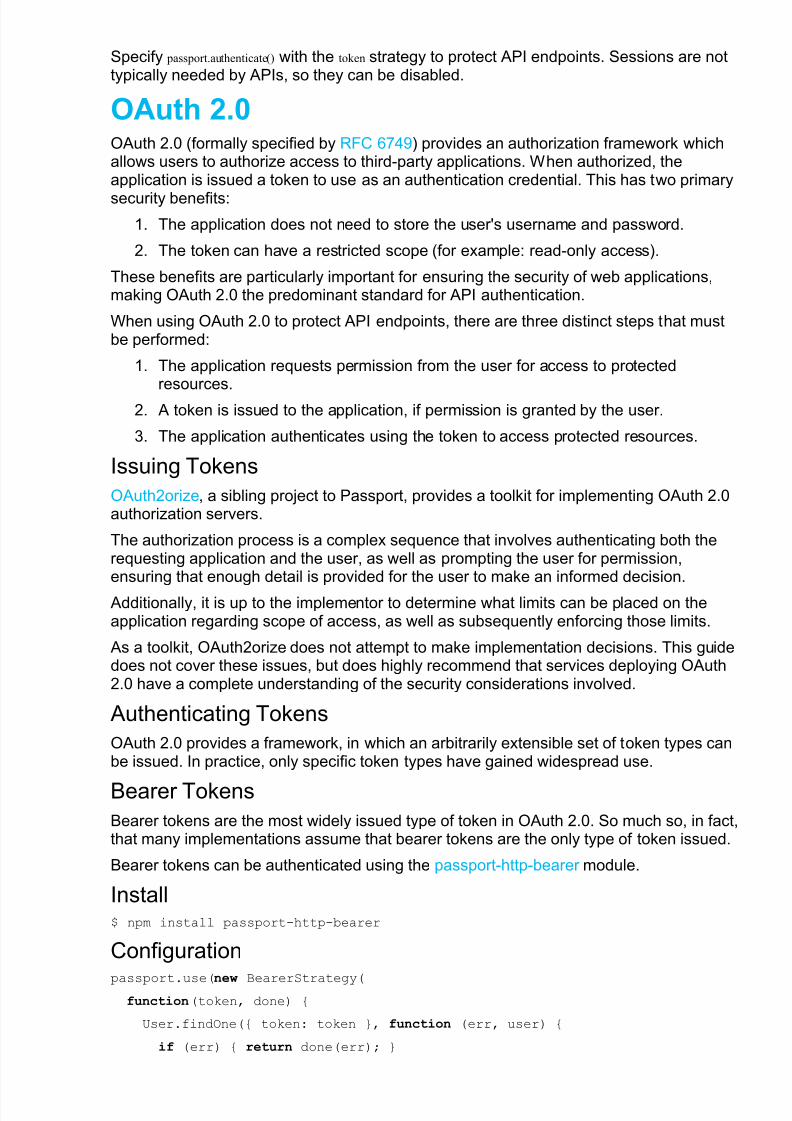
Bearer tokens can be authenticated using the passport-http-bearer module.
Install$ npm install passport-http-bearer
Configuration
passport.use(new BearerStrategy(function(token, done) {
User.findOne({ token: token }, function (err, user) {
if (err) { return done(err); }

8/18/2019 OAuth Passport
http://slidepdf.com/reader/full/oauth-passport 20/23
if (!user) { return done(null, false); }
return done(null, user, { scope: 'read' });
});
}
));
The verify callback for bearer tokens accepts the token as an argument. When invoking done,
optional info can be passed, which will be set by Passport at req.authInfo. This is typicallyused to convey the scope of the token, and can be used when making access controlchecks.
Protect Endpointsapp.get('/api/me',
passport.authenticate('bearer', { session: false }),
function(req, res) {
res.json(req.user);
});
Specify passport.authenticate() with the bearer strategy to protect API endpoints. Sessions are nottypically needed by APIs, so they can be disabled.
API Schemes The following is a list of strategies that implement authentication schemes used whenprotecting API endpoints.
Scheme Specification Developer
Anonymous N/A Jared Hanson
Bearer
RFC 6750
Jared Hanson
Basic RFC 2617 Jared Hanson
Digest RFC 2617 Jared Hanson
Hash N/A Yuri Karadzhov
Hawk hueniverse/hawk José F. Romaniello
Local API Key N/A Sudhakar Mani
OAuth RFC 5849 Jared Hanson
OAuth 2.0 Client Password RFC 6749 Jared Hanson
OAuth 2.0 JWT Client Assertion draft-jones-oauth-jwt-bearer xTuple
OAuth 2.0 Public Client RFC 6749 Tim Shadel
Log In Passport exposes a login() function on req (also aliased as logIn()) that can be used toestablish a login session.
req.login(user, function(err) {
if (err) { return next(err); }return res.redirect('/users/' + req.user.username);
});
When the login operation completes, user will be assigned to req.user .
8/18/2019 OAuth Passport
http://slidepdf.com/reader/full/oauth-passport 21/23
Note: passport.authenticate() middleware invokes req.login() automatically. This function is primarilyused when users sign up, during which req.login() can be invoked to automatically log in thenewly registered user.
Log Out Passport exposes a logout() function on req (also aliased as logOut()) that can be called fromany route handler which needs to terminate a login session. Invoking logout() will remove
the req.user property and clear the login session (if any).app.get('/logout', function(req, res){
req.logout();
res.redirect('/');
});
Authorize An application may need to incorporate information from multiple third-party services. Inthis case, the application will request the user to "connect", for example, both their
Facebook and Twitter accounts.
When this occurs, a user will already be authenticated with the application, and anysubsequent third-party accounts merely need to be authorized and associated with theuser. Because authentication and authorization in this situation are similar, Passportprovides a means to accommodate both.
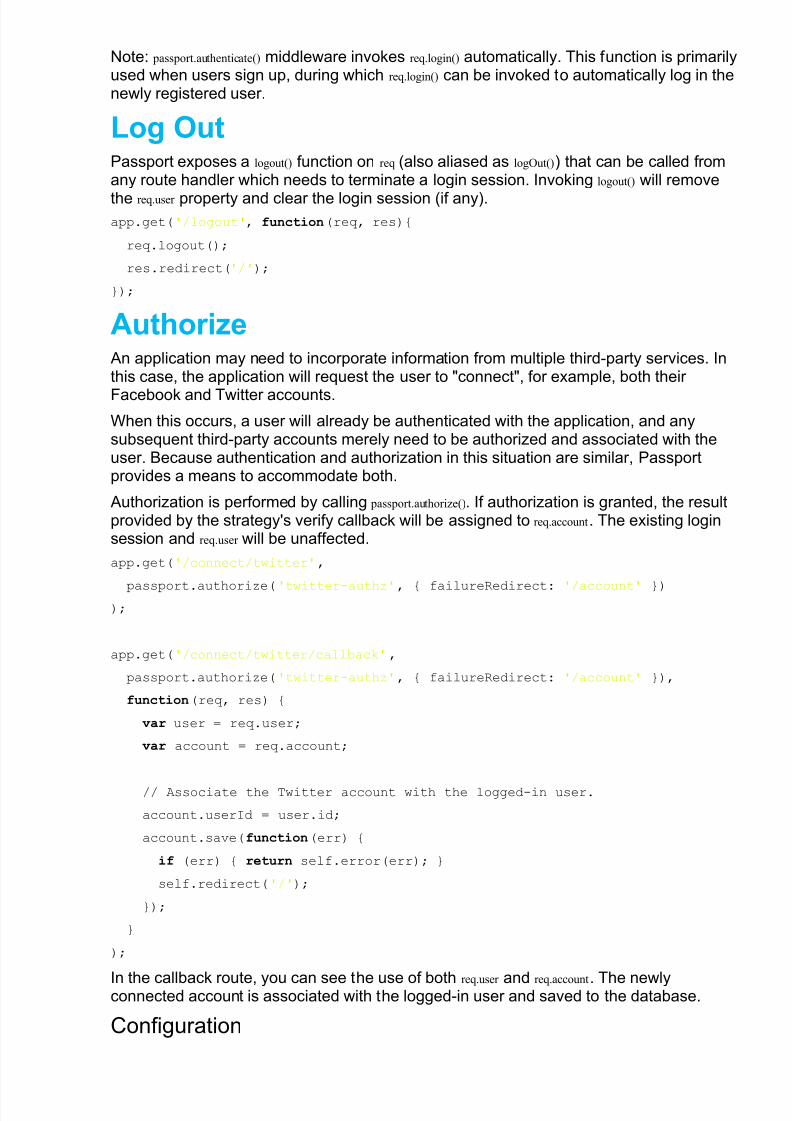
Authorization is performed by calling passport.authorize(). If authorization is granted, the resultprovided by the strategy's verify callback will be assigned to req.account. The existing loginsession and req.user will be unaffected.
app.get('/connect/twitter',
passport.authorize('twitter-authz', { failureRedirect: '/account' }));
app.get('/connect/twitter/callback',
passport.authorize('twitter-authz', { failureRedirect: '/account' }),
function(req, res) {
var user = req.user;
var account = req.account;
// Associate the Twitter account with the logged-in user.
account.userId = user.id;
account.save(function(err) {
if (err) { return self.error(err); }
self.redirect('/');
});
}
);
In the callback route, you can see the use of both req.user and req.account. The newlyconnected account is associated with the logged-in user and saved to the database.
Configuration
8/18/2019 OAuth Passport
http://slidepdf.com/reader/full/oauth-passport 22/23
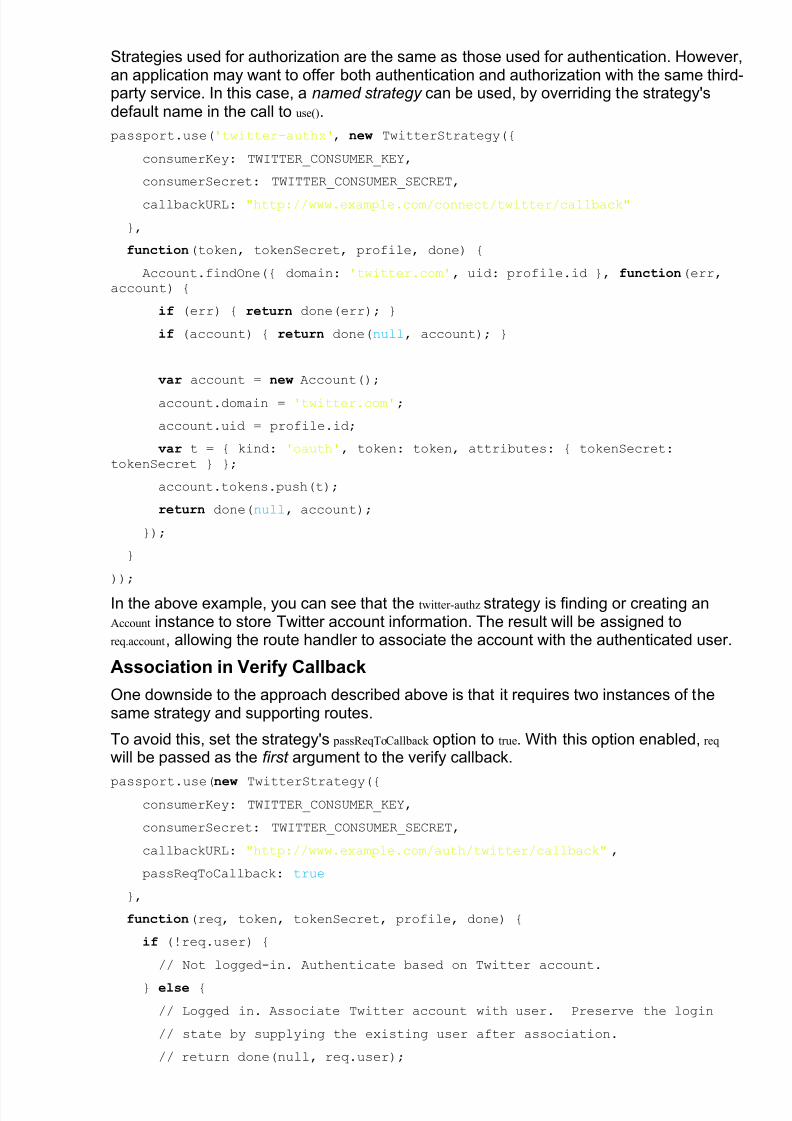
Strategies used for authorization are the same as those used for authentication. However,an application may want to offer both authentication and authorization with the same third-party service. In this case, a named strategy can be used, by overriding the strategy'sdefault name in the call to use().
passport.use('twitter-authz', new TwitterStrategy({
consumerKey: TWITTER_CONSUMER_KEY,
consumerSecret: TWITTER_CONSUMER_SECRET,
callbackURL: "http://www.example.com/connect/twitter/callback"
},
function(token, tokenSecret, profile, done) {
Account.findOne({ domain: 'twitter.com', uid: profile.id }, function(err,account) {
if (err) { return done(err); }
if (account) { return done(null, account); }
var account = new Account();
account.domain = 'twitter.com';
account.uid = profile.id;
var t = { kind: 'oauth', token: token, attributes: { tokenSecret:tokenSecret } };
account.tokens.push(t);
return done(null, account);
});
}
));
In the above example, you can see that the twitter-authz strategy is finding or creating anAccount instance to store Twitter account information. The result will be assigned toreq.account, allowing the route handler to associate the account with the authenticated user.
Association in Verify Callback
One downside to the approach described above is that it requires two instances of thesame strategy and supporting routes.
To avoid this, set the strategy's passReqToCallback option to true. With this option enabled, req will be passed as the first argument to the verify callback.
passport.use(new TwitterStrategy({consumerKey: TWITTER_CONSUMER_KEY,
consumerSecret: TWITTER_CONSUMER_SECRET,
callbackURL: "http://www.example.com/auth/twitter/callback" ,
passReqToCallback: true
},
function(req, token, tokenSecret, profile, done) {
if (!req.user) {
// Not logged-in. Authenticate based on Twitter account.
} else {
// Logged in. Associate Twitter account with user. Preserve the login
// state by supplying the existing user after association.
// return done(null, req.user);

8/18/2019 OAuth Passport
http://slidepdf.com/reader/full/oauth-passport 23/23
}
}
));
With req passed as an argument, the verify callback can use the state of the request totailor the authentication process, handling both authentication and authorization using asingle strategy instance and set of routes. For example, if a user is already logged in, thenewly "connected" account can be associated. Any additional application-specific
properties set on req, including req.session, can be used as well.