oasys pci training guide -...
TRANSCRIPT

Tutorial Guide
Welcome to the world of OASYS PCI !
The CD-ROM in this package contains the latest OASYS PCI software, new demo sound files (Multis), as well asaudio file demos of OASYS PCI synth algorithms. In addition, there’s a collection of drum, guitar and vocal audiofiles created for you to use with the OASYS PCI Effects processing, in Audio Streaming applicationswith digital audio programs. The algorithm demos and audio files are a perfect way to experiencethe power and versatility of OASYS PCI!
The OASYS PCI manuals and FAQ's are copies of the .pdf files that you OASYS PCI users will find in the ManualsFolder, which is installed along with the OASYS PCI software.
Where do you begin?First, install the OASYS PCI card and software in your computer. Then, configure your USB/Serial Port MIDI Interfaceand connect a MIDI keyboard/controller. You'll find all this information in the Installation Guide - located in the OASYSPCI box, along with the OASYS PCI card, software and breakout cables.
• Read and carefully follow the steps in the OASYS PCI Installation Guide, pages 1-30.
Once you've completed the card and the software installation and connected a MIDI keyboard/controller, you can begin workingwith this Tutorial Guide. It begins with a feature overview, followed by demonstration exercises that will familiarize you with many OAYSYS features. The exercises and tips you'll find will get you on the fast track to enjoying the OASYS PCI.Once you've gone through this guide, make sure to read the User's Guide, thePatches and EffectsManuals, as well as the FAQ's. The manuals are well written and worth their weight in gold for OASYS PCI users, andanyone who wishes to explore and learn more about this great product! In fact, the manuals are so darn good, we'veobligingly ripped off a few of the key sections and pasted them in this guide, thanks to Dan Phillips, OASYS ProductManager!
Note: Towards the end of this guide, you’ll find in-depth overviews, including demo multis and moreon OASYS PCI synthesis and modeling, as well as effects. The overviews were taken directly from thekorg.com website.

OASYS PCI Tutorial Guide
2
OASYS PCI Tutorial GuideOASYS PCI Features 3A Basic Understanding of the OASYS PCI File Types, Editor and Engine 4
The OASYS PCI Demonstration:Let's Begin - Analog, MIDI connections, Launching OASYS PCI 5Overview of the Catalog 6Overview of a Mixer Channel 7The Resource Monitor 8Selecting and Listening to a few Demo Multis 8
Demonstrate how to create and work with a New Multi:Open a new Multi and load a Program into a Mixer Channel 8Program Edit Parameters 9The Patch Control Panel 10The Insert Effects for this Program 10Modulation Palette 11Add another Program to the current Multi 11Layers and Splits in a Multi 11The Send Busses 12The Output Busses 14Recap of the demo exercises 16
How to work with Audio Inputs and Streams:The Audio Input Demonstration 16The Audio Stream Demonstration 18
OASYS PCI User Guide References 20Specific Reference Sections 21
Suggested Demo Multis 22Suggested Effects 23
The Nature of the OASYS PCI 24
OASYS PCI overviews from the korg.com website:OASYS PCI Overview 25Overview: Synthesis 1 and 2 26Overview: Effects 28
Advanced Tips: MIDI Tempo LFOs and Delays 30Specifications 32

OASYS PCI TutorialGuide
3
OASYS PCI FeaturesOASYS PCI integrates high-quality open-architecture synthesis, effects processing, and audio I/Ointo a single, professional PCI audio card – the perfect complement to any MIDI sequencer orsoftware-based digital audio workstation.
DSP Power5 Motorola DSP chips onboard, providing a staggering 480 MIPS!
Audio and sync input and output24-bit stereo analog, S/PDIF and ADAT optical input and outputBNC Word clock input and outputADAT timecode input and output/throughSample rates: 44.1kHz, 48kHz, external clock
SynthesizersSynthesizers are plug-ins loaded from disk, allowing for easy future expansionInitial release includes over 28 synthesis algorithms and hundreds of sounds, including modeled analogsynthesizers, FM, tonewheel organ and rotary speaker, reed and tine pianos, physically modeled trumpet,trombone, sax, flute, guitar, bass, and vocals, analog percussion, tempo-based LFOs and analog-stylesequencers, and more.
EffectsEffects are plug-ins loaded from disk, allowing for easy future expansionInitial release includes over 135 unique effects algorithms. Most of the effects from the Trinity workstation areincluded as well as new effects including tempo delays, envelope and LFO-swept filters, modulation viaMIDI-sync'd LFOs and analog-style sequencers analog EQ and reverb algorithms, an awesome 160 secondmaximum delay time, and more.
Submixer12 channels, each of which may process synthesis programs, audio inputs, or hard disk audio tracksChannel inserts may each have up to 4 effects4 sends, each with up to 4 effects6 stereo output busses, each with up to 4 effects
CompatibilityPCI 2.1-compliantAudio I/O supports ASIO (Mac and PC) and standard Windows audio I/OMIDI supports OMS, FreeMIDI, and standard Windows MIDICompatible with Korg-approved MacOS and Windows computers (available now for MacOS, with Windowssupport coming shortly)

OASYS PCI Tutorial Guide
4
A Basic Understanding of the OASYS PCI File Types
MultiA single, complete setup for the OASYS PCI. Mixer windows, Programs, Patches and Effects all "live" in aMulti. Up to twelve channels - any combination of Programs, Patches and Effects make up a complete Multi.
ProgramThe basic sounds of the OASYS PCI. Programs need to be placed on a Mixer Channel to be played. EachProgram can have one or two Patches, which can be layered or split by key and velocity ranges. Each Program can also have up to four Insert Effects, which appear in the Mixer Channel. Programs store all Control Panel settings for their respective Patches and Effects.
Effects-Only ProgramsThese are just like Programs without Patches loaded. Instead, Effects-Only Programs store all the InsertEffects for a Mixer Channel, including Effects Control parameters. You can use them to load chains ofEffects into a Mixer Channel, or store chains for use elsewhere. Unlike Programs, Effects-Only Programscan be used with any input source, including Audio Inputs, Streams, or even other Programs. You'll find themin the Korg factory Catalog, placed in the Programs section of the folder named "Korg FX Programs".
PatchesThe basic units of sound creation on the OASYS PCI. They must be placed in a Program in order to beplayed. Each patch contains a synthesis algorithm, which may be quite different from one Patch to another.You can edit the Patch parameters in the Patch Control Panel.
EffectsUsed to modify the sound of Patches, Audio Inputs, or Streams. They can be used as insert effects in theMixer Channels and Output Busses, or as send effects via the Send Busses. Each effect contains its ownaudio processing algorithm. The Patch Control Panel allows you to edit the Effect parameters. Thealgorithms and edit parameters can be very different from one effect to another.
The OASYS PCI EditorThis application controls all of the sound production and audio processing aspects of OASYS PCI, includingall mixer settings, loading of Programs and Effects, and all Program, Patch and Effects parameters. If you'reusing OASYS PCI in conjunction with a digital audio program, leave the OASYS PCI Editor running in thebackground, so that you can switch to it for editing Programs and Effects.
The OASYS PCI EngineThis controls sending and receiving MIDI, playing sounds, and so on. It's located in the System Extensionsfolder, and automatically starts up when OASYS PCI is being used. You don't actually interact with theOASYS PCI Engine itself; instead, you control it via the OASYS PCI Editor and any audio and / or MIDIsoftware being used.

OASYS PCI Tutorial Guide
5
OASYS PCI Tutorial
The following sections begin by covering the most basic interaction with OASYS PCI - using it as a stand-alone synthesizer and effects processor, without using OMS, FreeMIDI or digital audio sequencingprograms. We suggest that you use the OASYS PCI in this way, by trying out the OASYS PCI soundsand effects, and finally by using the OASYS PCI in conjunction with digital audio programs like DigitalPerformer, Logic Audio, etc. Later in this guide, you'll learn how to use the OASYS PCI, used with adigital audio program, for inputting and streaming audio. The "flow" of this method will help youto understand and appreciate the power and versatility of OASYS PCI.
Let's get started with an overview of the Catalog window and the Mixer.
Note: If you haven’t already configured your USB/Serial Port MIDI interface, and connected a MIDIkeyboard/controller to the computer, see the OASYS PCI Installation Guide, page 16.
Let's begin:1. Make sure that the L/R Analog Outputs of OASYS PCI are connected to your stereo monitoring
system, and that your MIDI keyboard/controller is connected your computer, and set to transmit onMIDI channel 1. The preset Multis respond to MIDI channel 1, and play from the card's analogoutputs.
2. The OASYS PCI installer program will have opened two folders on the desktop. Locate the foldernamed "OASYS PCI Demo Multis". This folder contains a number of demo sounds - a great way foryou to start enjoying OASYS PCI in “all it’s glory”!
3. Open one of the Demo Multis, by double-clicking its icon in the MacOS finder. The OASYS PCIEditor will open, and the selected Multi will appear, along with the Catalog.
Note: After you've worked through this guide, you'll find listings of suggested Demo Multis and Effectsto use in your OASYS PCI.
OASYS PCI Tutorial Guide
6
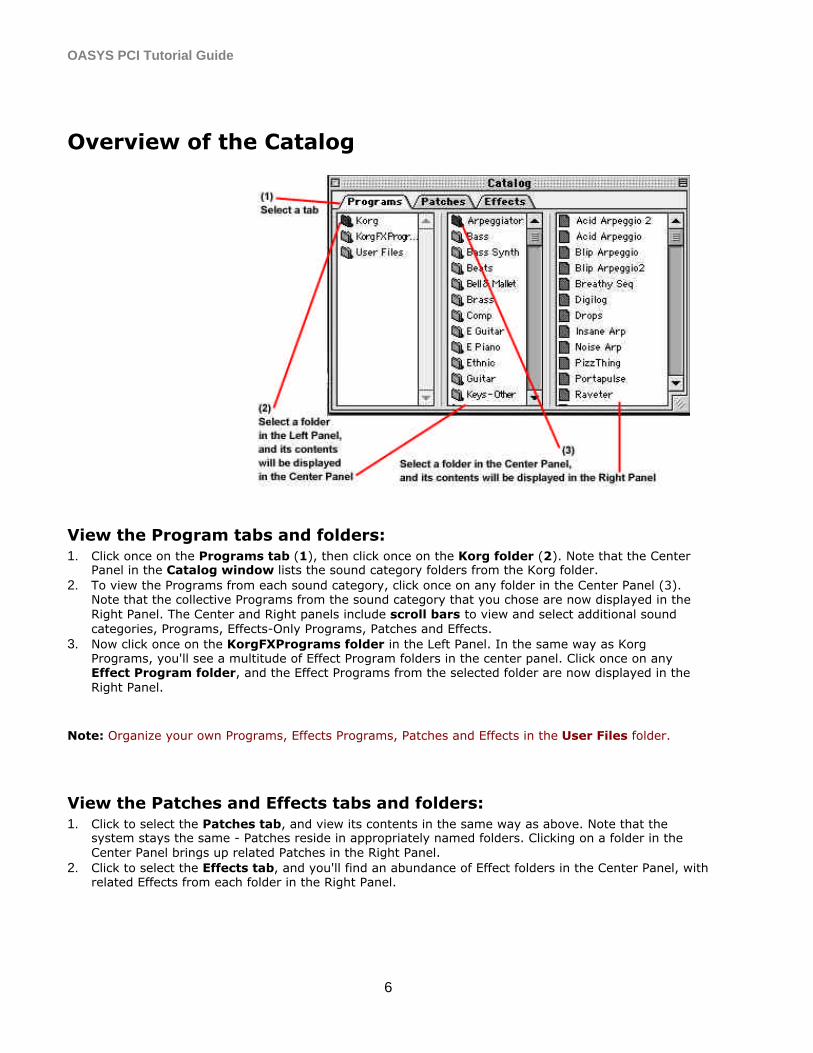
Overview of the Catalog
View the Program tabs and folders:1. Click once on the Programs tab (1), then click once on the Korg folder (2). Note that the Center
Panel in the Catalog window lists the sound category folders from the Korg folder.2. To view the Programs from each sound category, click once on any folder in the Center Panel (3).
Note that the collective Programs from the sound category that you chose are now displayed in theRight Panel. The Center and Right panels include scroll bars to view and select additional soundcategories, Programs, Effects-Only Programs, Patches and Effects.
3. Now click once on the KorgFXPrograms folder in the Left Panel. In the same way as KorgPrograms, you'll see a multitude of Effect Program folders in the center panel. Click once on anyEffect Program folder, and the Effect Programs from the selected folder are now displayed in theRight Panel.
Note: Organize your own Programs, Effects Programs, Patches and Effects in the User Files folder.
View the Patches and Effects tabs and folders:1. Click to select the Patches tab, and view its contents in the same way as above. Note that the
system stays the same - Patches reside in appropriately named folders. Clicking on a folder in theCenter Panel brings up related Patches in the Right Panel.
2. Click to select the Effects tab, and you'll find an abundance of Effect folders in the Center Panel, withrelated Effects from each folder in the Right Panel.

OASYS PCI Tutorial Guide
7
Overview of a Mixer Channel
The Mixer is the heart of OASYS PCI. It's made up of 12 channels, each of which can processOASYS PCI Programs, Audio Inputs, and Streams (from a digital audio program).
A Send Bus A 1-4 - click and select Send Bus 1-4B Send Level A -click on and use mouse to set levelC Send Bus B 1-4 - click and select Send Bus 1-4D Send Level B -click on and use mouse to set levelE Send Mute A - click to mute/un-mute Send Bus OutputF Pre/Post A - post-insert/pre-fader, or post-insert/post-faderG Send Mute B -click to mute/un-mute Send Bus OutputH Pre/Post B - post-insert/pre-fader, or post-insert/post-faderI FX Auto-Load -when on, Effects will load automatically when a
Program or Effects-Only Program is loadedJ Insert Effect Slots (4) -pre-fader Insert Effect slots. Click on
numbers to the left of slots to bypass each Effect (gray). (option-click to bypass all Effects)
K Output menu -click and select from menu of Output Busses forMixer Channel routing
L Pan Knob -click on and use mouse to set placementM Pan indicator -click and manually set pan with computer keypadN Width -overall stereo placement. Click and set with keypadO Clip indicator -click to clear clipping indicatorP Solo button -click to solo one or more Mixer Channels/Send
BussesQ Mute button -click to mute output of Mixer Channel and FX sendsR MIDI Channel (2 sets, A & B 1-16) -click and select from menuS Level Meter - post-FX output volume. Double click to monitor input
and reset value to “111” (0dB)T Volume indicator -click and set volume with keypadU Mono / Stereo indicator for Programs or Audio inputsV In Type menu -click and select Input Type as Program, Audio In,
Stream, OffW Input Slot -double-click Input Slot for Program Edit windowX Menu button - click and select from Audio Inputs or Streams

OASYS PCI Tutorial Guide
8
The Resource MonitorAs you use the OASYS PCI, you can open the Resource Monitor from the Windows menuto view the resources being used. The Resource Monitor displays a summary of host processingpower, memory, and DSP processing power, memory and busses. One of the key features to rememberis that OASYS PCI uses its own DSP power for the majority of the work it does - with very littleburden on the host CPU.
Note: As you view the DSP 1 indicator in the Resource Monitor, you’ll notice that it’s continually workingat 100%. That’s because DSP 1 is always “in charge” of the OASYS PCI system – DSP 2-5 are used asadditional resources when you manage and make changes to the system.
Tip: By setting the OASYS PCI Sample Rate to 44.1k, you’ll get about 8% more processing power forOASYS PCI synthesizers and/or effects. Set the Sample Rate by opening the Edit window and selectingPreferences. Then click the MIDI/Global tab. In the Global Settings, select 44.1k, then click theSave button. For more information, see the User Guide, page 85.
Selecting and listening to a few Demo Multis:1. Make sure that the main Mixer window is in the foreground, then select Close from the file menu,
to close the main Mixer window and the current Multi. If you've changed anything, a message willappear asking if you'd like to save your changes; press the Don't Save button.
2. Open the Demo Multis folder, and double-click on a Multi you'd like to check out.3. As the shampoo bottles say, "repeat as desired". Enjoy!
Note: You'll find listings of Demo Multis and Effects, suggested for your presentations of OASYS PCI, laterin this guide.
How to work with a New Multi:1. Close any current Multis on the desktop.2. Select New from the File menu. This will create a new, empty Multi and open the Multi's Mixer
window. Notice that you can then add Programs and Effects to the new Multi, andassign Mixer Channels to Audio Inputs or Streams.

OASYS PCI Tutorial Guide
9
Load a Program into a Mixer Channel:1. Follow the steps in the diagram below, and drag Program "Guitar and Pad" from the Right
Panel to the Mixer Channel 1 Input Slot. The Program will appear in the Input Slot. Auto-LoadFX is on for the new Multi's Mixer Channel, and so the selected Program's Effects are loaded into theInsert Effect Slot (s) automatically.
Tip: Another way to place Effects in Insert Slots, versus dragging them from the Catalog, is to clickonce in an Insert Slot, then double-click the desired Effect in the Right Panel of the Catalog. Theselected Effect will then appear in the Insert Slot.
4. Play the Program to get an idea of how it sounds.
Overview of this Program's Edit parameters:1. Double-click in the Input Slot , and the Program Edit window will open. This is how
the basic structure of a Program is created here, where you can bring in new Patches from theCatalog, set the amount of voices needed for each Patch, set tuning parameters, key and velocityzones, etc.
OASYS PCI Tutorial Guide
10
Tip: The Connect / Disconnect command, available in the File menu, allows you to temporarily pauseOASYS PCI. Any edits you make, such as adding or removing Programs, adding several effects at once,changing Input Types, etc., require a certain amount of DSP processing. These "instructions" may take afew seconds to download. To speed up the process when making edits of this sort, first Disconnect(command-K), make your edits, then Connect (command-K) to download all your changes at once.
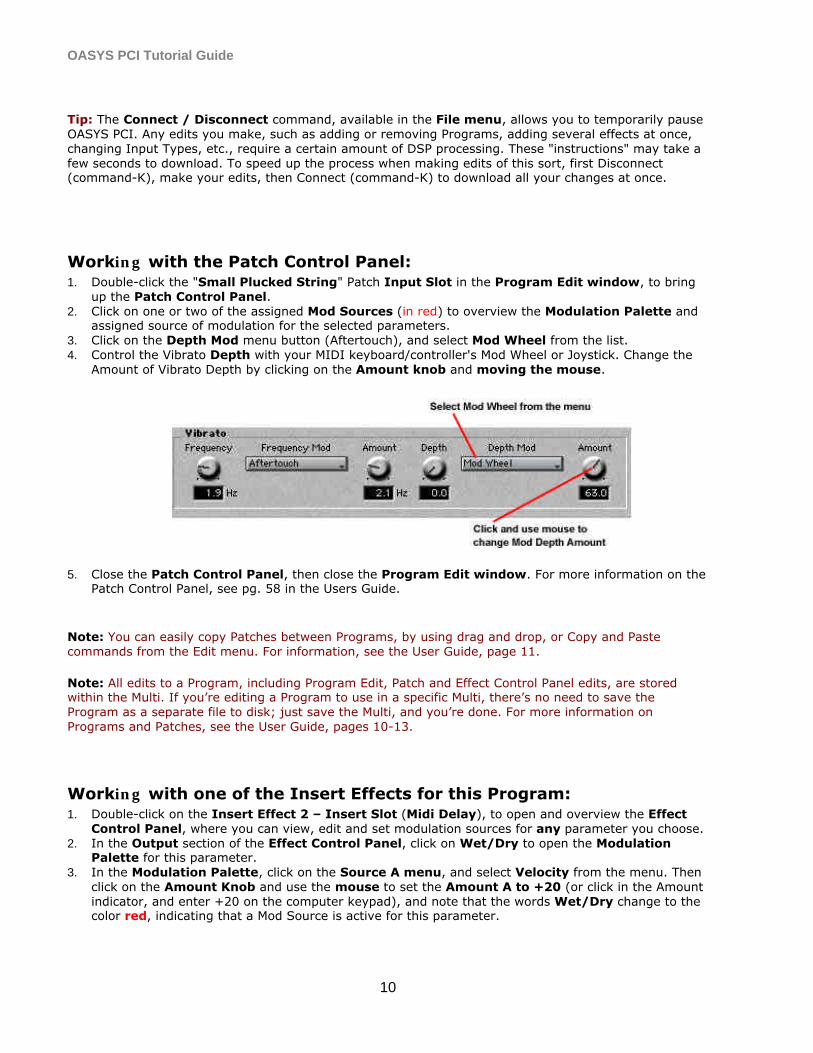
Working with the Patch Control Panel:1. Double-click the "Small Plucked String" Patch Input Slot in the Program Edit window, to bring
up the Patch Control Panel.2. Click on one or two of the assigned Mod Sources (in red) to overview the Modulation Palette and
assigned source of modulation for the selected parameters.3. Click on the Depth Mod menu button (Aftertouch), and select Mod Wheel from the list.4. Control the Vibrato Depth with your MIDI keyboard/controller's Mod Wheel or Joystick. Change the
Amount of Vibrato Depth by clicking on the Amount knob and moving the mouse.
5. Close the Patch Control Panel, then close the Program Edit window. For more information on thePatch Control Panel, see pg. 58 in the Users Guide.
Note: You can easily copy Patches between Programs, by using drag and drop, or Copy and Pastecommands from the Edit menu. For information, see the User Guide, page 11.
Note: All edits to a Program, including Program Edit, Patch and Effect Control Panel edits, are storedwithin the Multi. If you’re editing a Program to use in a specific Multi, there’s no need to save theProgram as a separate file to disk; just save the Multi, and you’re done. For more information onPrograms and Patches, see the User Guide, pages 10-13.
Working with one of the Insert Effects for this Program:1. Double-click on the Insert Effect 2 – Insert Slot (Midi Delay), to open and overview the Effect
Control Panel, where you can view, edit and set modulation sources for any parameter you choose.2. In the Output section of the Effect Control Panel, click on Wet/Dry to open the Modulation
Palette for this parameter.3. In the Modulation Palette, click on the Source A menu, and select Velocity from the menu. Then
click on the Amount Knob and use the mouse to set the Amount A to +20 (or click in the Amountindicator, and enter +20 on the computer keypad), and note that the words Wet/Dry change to thecolor red, indicating that a Mod Source is active for this parameter.

OASYS PCI Tutorial Guide
11
4. Play your MIDI controller with varied degrees of velocity to control the new Wet/Dry modulationsource, and point out that each Modulation Palette contains two available sources of modulation (Aand B) for control of every edit parameter in OASYS PCI.
5. Lower the Amount A knob value to 0, or set the Source A selection to None.6. Close the Modulation Palette and the Effect Control Panel.7. Again, point out that each Program can use up to four Insert Effects.
Adding another Program to the current Multi:1. From the Program Catalog, scroll up in the Center Panel and click on the Bass folder. Then select
and drag Analog Fretless2 from the Right Panel to the Mixer Channel 2 Input Slot. Again, pointout that FX Auto-Load is enabled on this channel, so the Stereo Chorus Effect from this Program isalso loaded when the Program is loaded into the Input Slot.
Setting both Mixer Channels to the same MIDI Channel:1. Click on the MIDI menu button in Mixer Channel 2, and select A1 from the list. This layers the
Programs on Mixer Channels 1 and 2. Point out that two or more Programs can be layered in aMulti.

OASYS PCI Tutorial Guide
12
Setting up a Split in the Channel Parameters Window:1. Select Channel Parameters from the Windows menu, notice this well organized
menu of various parameters for all the Programs in a Multi.2. Click once in the Channel 1 Low Key edit field, then press C4 (middle C) on your MIDI controller to
set the Low Key value. (You can also enter this value on the computer keyboard)3. Click once in the Channel 2 High Key edit field, then press B3 on your MIDI controller to set the
High Key value.4. Close the Channel Parameters Window.5. Play your MIDI controller to demonstrate the new split.6. Be sure to point out that key and velocity settings can be made for each Program in a Multi, and
in addition, these settings can be made for Patches in a Program.
Note: For more information on Channel Parameters, and setting key and velocity windows in the ProgramEdit Window, see the User Guide, pages 55 and 70.
Tip: Keep your window sets simple and organized on your OASYS PCI. As you work, closewindows you are finished working with - to optimize system resources. And resize the Multi, so that youare only working with the current number of Mixer Channels. This creates more room on the desktop todisplay additional windows, when needed.
Exploring and working with the Send Busses:1. Open the Send Bus window from the Windows menu, and drag it to fit next to the current Multi.
Explain that OASYS PCI provides four Send Busses, and each Mixer Channel can access up totwo of these Send Busses simultaneously. The Send Busses are useful for effects which areheard along with the original signal, such as reverbs, delays, and so on. This is opposed to inlineeffects such as compressors, EQs, distortion, etc., which are more appropriate for use as InsertEffects in the Mixer Channels.
2. From the Mixer Channel 1 Send A menu, select Send Bus 1, as shown in the diagram below:

OASYS PCI Tutorial Guide
13
3. From the Catalog, click the Effects tab, then scroll down in the Center Panel and click the Reverbfolder. The available Reverb Effects will appear in the Right Panel.
4. Drag the Hall Ambience Effect from the Right Panel, to the first insert slot in Send Bus 1, asshown in the diagram below:
5. Click and select Master from the Send Bus 1 - Out: menu, then play in the upperrange of the keyboard.
6. Click on the Mixer Channel 1 – Send A Level knob, and use the mouse to set the send level (youcan also click in the Send Level indicator, and enter a value with your computer keypad).
Tip: Double-click on the knob to set the value to unity gain (111).
Tip: Another way to place Effects in Insert Slots, versus dragging them from the Catalog, is to clickonce in an Insert Slot, then double-click the desired Effect in the Right Panel of the Catalog. Theselected Effect will then appear in the Insert Slot.
Applying an Effect to Send Bus 2:1. From the Catalog, scroll up in the Center Panel, and click the Delay folder, then locate and drag the
L-C-R Delay from the Right Panel, into the first Insert Slot in Send Bus 2.2. Click and select Master from the Send Bus 2 - Out: menu.3. Click on the Mixer Channel 1 – Send B Level knob, and use the mouse to set the Send Level (you
can also click in the Send Level indicator, and enter a value with your computer keypad).
Setting the Send Busses for this Multi:1. Click on the Mixer Channel 2 – Send A Level knob, and set the send level to a value of 60 or so.
Then play in the lower range of the keyboard - you've just bussed the AnalogFretless2 Programto Send Bus 1 (Hall Ambience effect).
Note: To save a new or edited Multi to the User folder, select Save as from the File menu, navigate tothe OASYS PCI User Files folder, open the Multis folder, and then rename and save the new Multi.Make sure to retain the .oam file extension at the end of the Multi name, so that you can also access theMulti in the PC version of OASYS PCI.
Tip:The Send Busses can be used for overall effect processing, and each of theMixer Channels can access the Send Busses with two independent Send Levels. Resource management is an important part of OASYS PCI, and in situations where multipleMixer Channels can share the same Send Busses, more DSP resources become free for additionalPrograms and Effects.
OASYS PCI Tutorial Guide
14
Example of DSP resource management:In the current Multi, for example, each Mixer Channel has a Stereo Chorus Insert Effect, andthe same effect algorithm - but edited for each Program. If the parameter edits for both effects were similar,one of the effects could be dragged to a Send Bus Insert Slot, edited to suit, and then both Mixer Channelscould be bussed to this new Send Bus Insert - with independent Send Levels. The Stereo Chorus Effects inthe Mixer Channel Insert Slots could then be replaced with new Effects, if needed – just one benefit of goodDSP resource management!
Tip:OASYS PCI provides output Busses for each pair of audio outputs(6), giving you access to up to four more insert FX.
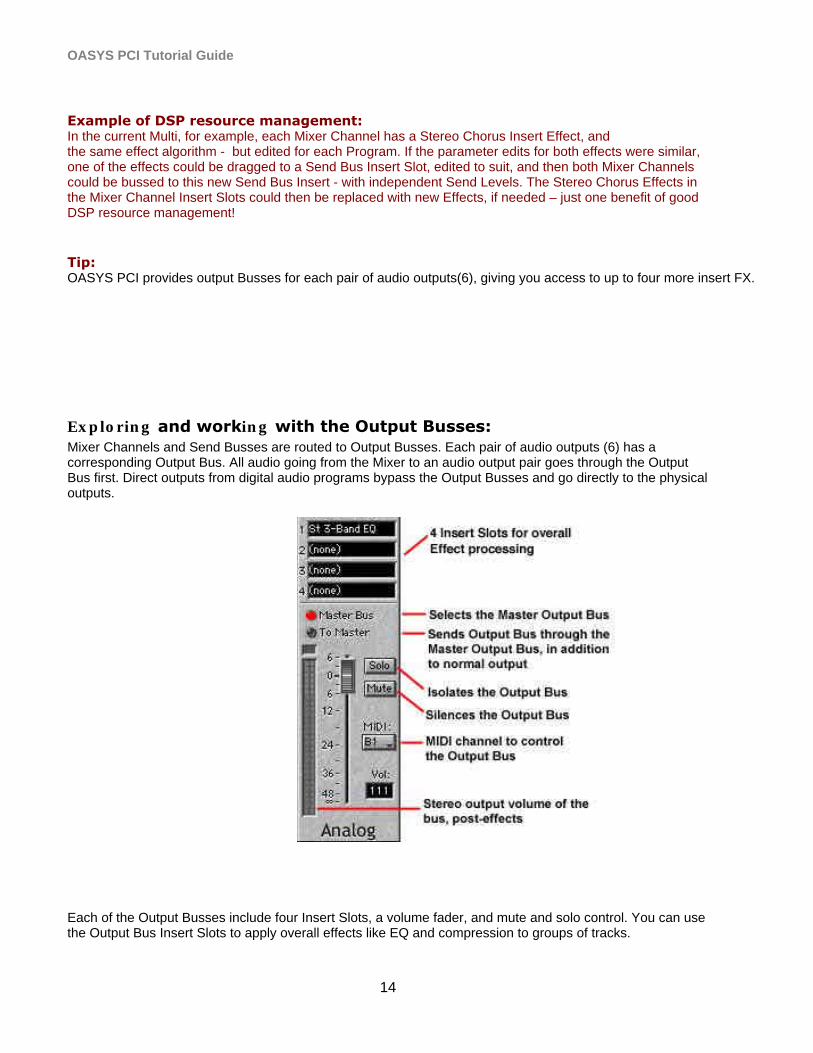
Exploring and working with the Output Busses:Mixer Channels and Send Busses are routed to Output Busses. Each pair of audio outputs (6) has acorresponding Output Bus. All audio going from the Mixer to an audio output pair goes through the OutputBus first. Direct outputs from digital audio programs bypass the Output Busses and go directly to the physicaloutputs.
Each of the Output Busses include four Insert Slots, a volume fader, and mute and solo control. You can usethe Output Bus Insert Slots to apply overall effects like EQ and compression to groups of tracks.

OASYS PCI Tutorial Guide
15
Applying an Insert Effect to the Analog Output Bus:1. Select Output Busses from the Windows menu.2. From the Catalog, click the Effects tab, then locate and click on the EQ folder in the Center Panel.3. Drag the St 3-Band EQ from the Right Panel, to the Analog Output Bus Insert Slot 1 (see the
previous diagram).4. Double-click on the Insert Slot, to bring up the St 3-band EQ - Effect Control Panel.5. Work with the EQ parameters as you play your MIDI keyboard/controller.6. Close the Effect Control Panel.
Tip: Another way to place Effects in Insert Slots, versus dragging them from the Catalog, is to clickonce in an Insert Slot, then double-click the desired Effect in the Right Panel of the Catalog. Theselected Effect will then appear in the Insert Slot.
Note: After you've completed the demo exercises in this guide, and you close the Multi that you’ve beenworking with, you'll be asked if you want to Save Changes to Untitled Multi. Select Don’t Save fromthe menu.
Tip: Set MIDI Channel designations on Send Busses and Output Busses, to the same channel as yourMIDI keyboard/controller. This way you can apply mod sources to the Effects you use in the Send andOutput Bus Insert Slots.
Output Bus Tips
• You can use an Output Bus as a way to share Insert Effects between two or more channels. To do this,use an Output Bus instead of a Master Output, and use the Output parameter to assign the desiredMixer Channels to the same Output Bus. Then add the desired Effects to the Output Bus.
• To create a chain of more than four Effects, build your Effect Chains in the Mixer Channel or Send Busas normal, then set the Output of the Mixer Channel or Send Bus to an unused Output Bus, and addmore Effects to the Output Bus.
• To hear all of the OASYS PCI sounds through a single stereo pair, press the To Master button for theOutput Bus. This routes the Output Bus to the Master output.
• The factory preset Multis are all set to use the Analog Output as the Master Bus. If in your demo area,you wish to use another output, such as S/PDIF or ADAT 1-2, you can set this up in the GeneralPreferences, located in the Edit menu.
Tip: The Connect / Disconnect command, available in the File menu, allows you to temporarily pauseOASYS PCI. Edits you make, such as adding or removing Programs, adding several effects at once,changing Input Types, etc., require a certain amount of DSP processing. These "instructions" may take afew seconds to download. To speed up the process when making edits of this sort, first Disconnect(command-K), make your edits, then Connect (command-K) to download all your changes at once.

OASYS PCI Tutorial Guide
16
Let's recap the previous exercises…
• Before we continue, let's take a look at what you've learned.
1. Launching OASYS PCI.2. Working with the Catalog - open and view the Programs, Patches. and Effects.3. Understanding a Mixer Channel.4. Understanding the Resource Monitor.5. Playing a few of the Demo Multis.6. Creating a New Multi - loading and working with Programs, Patches, and
Effects.7. Adding another Program to the Multi - how to layer and split Programs on the Mixer
Channels.8. Understanding and working with the Send Busses and the Output Busses for a Multi.
The Audio Inputs
Connect your source and create a new Multi:1. Connect the L/R audio outputs of your source (mixer, synthesizer, guitar preamp, etc) to the
Analog L/R inputs of the OASYS PCI Analog Breakout Cable.
Tip:Use a microphone to try out the OASYS PCI Effects on the incoming audio. You canapply Delay and Reverb Effects, as well as special effects such as Pitch Shifter, and then use your MIDIkeyboard/controller to modulate Effect parameters as you speak into the microphone – a great way tohear the superb quality and versatility of the Effect Programs and Effects.
2. Close any current Multis (command-W), then select New Multi (command-N) from the File menu.3. Resize the Multi so that 2 Mixer Channels remain in the window.4. Set the Mixer Channel 1 - In Type to Audio In. Mixer Channel 1's Input Slot will now indicate
Analog L-R In.5. Play your source instrument (or speak into the microphone), and adjust the Input Level for Mixer
Channel 1 (click and drag the fader), so that plenty of signal appears in the Level Meter, andclipping does not occur (watch the clipping indicator).
6. Disable your source instrument effects, if any, so that you are inputting a dry signal to the MixerChannel.
Tip: If you use a MIDI keyboard's sequence (like the Korg Triton’s preset drum patterns) as the source ofyour audio input. use a looped drum (or other) pattern. This allows you to freely hear theOASYS PCI effects as the pattern plays, (Make sure to disable the sourcepattern’s effects)

OASYS PCI Tutorial Guide
17
Apply an Effect Program to Mixer Channel 1:1. From the Catalog, click the Program tab, then click the KorgFXPrograms folder in the Left Panel.2. From the Center Panel, click an Effects Program folder that contains the type of effects you'd like
to apply to the source instrument you're using in this exercice.3. In the Right Panel, locate and drag a desired Effects Program to the Mixer Channel 1 Input Slot
(Analog L-R In). The Insert Effects that make up this Effects Program will appear in the MixerChannel’s Insert Slot(s). Note that you can’t drag an FX-Only Program into an Insert Slot – you mustdrag the FX-Only Program to an Input Slot.
4. Play your source instrument to listen to the applied Effects Program.5. Open one of the Insert Effects (double-click the Insert Slot), then overview and work with the
Effect Control Panel parameters.6. Close the Effect Control Panel.
Tip: Another way to place Effect Programs in Input Slots (versus dragging them from the Catalog) isto click once in an Input Slot , then double-click the desired Effect in the Right Panel of theCatalog. The selected Effects will appear in the Insert Slots.
Apply an Effect to the Send Bus:1. Open the Send Busses window from the Window menu, and position it next to the Mixer
window.2. Select Master from the Send Bus 1 - Out: menu.3. From the Catalog, click the Effects tab, then click the Korg folder in the Left Panel.4. From the Center Panel, locate and click an Effects folder that contains the type of effect you'd like
to use in Send Bus 1. (Choose an overall processing effect like Reverb, Delay, EQ, etc.)5. In the Right Panel, locate and drag the desired Effect to Send Bus 1 - Insert Slot 1.6. From the Mixer Channel 1 - Send Bus 1 menu, select Send Bus 1.7. Play your source instrument to check out the Effects, then open and work with the
Effect Control Panel for the applied Send Bus Effect.8. Close the Effect Control Panel.
Note: After you've completed the rest of the exercises in this guide, and you close the Multi thatyou’ve been working with, you'll be asked if you want to Save Changes to Untitled Multi. Select Don’tSave from the menu.
Note: You can bounce all OASYS PCI synths and effects directly to disk, using any ASIO-compatibledigital audio program. For more information on this, as well as recording the output of the OASYS PCIMixer directly to a digital audio program, see the Users Guide, page 26.
Note: For information on zero-latency record monitoring and record monitoring with effects, see the UserGuide, pages 26 and 27.

OASYS PCI Tutorial Guide
18
Streaming Audio Overview
OASYS PCI is designed for seamless use with all ASIO- (Audio Stream Input/Output) compatible programs,such as Cakewalk Metro, Cubase VST, Digital Performer, Logic Audio, Studio Vision Pro, and Vision DSP.
With any ASIO-compatible program, you can process up to 8 channels of audio through the OASYS PCI's mixerchannels and Effect Send Busses, and route an additional 12 channels directly to the OASYS PCI's outputs.
• When used with Audio Input and Streams, OASYS PCI becomes a very powerfulcombination of a 12-channel, 24-bit I/O card and an 8-input multi-effect processor!
Note: See the Installation Guide, page 23, for more information on configuring ASIO Software. See theUser Guide, page 24, for more information on Using ASIO Audio Programs.
Set up an Audio Stream in the Multi:1. Open an ASIO-compatible digital audio program, and make sure that OASYS PCI is selected as
the ASIO device in the digital audio program.2. Load a dry audio sequence to an audio track in the digital audio program…3. Assign the audio program's track output to Stream 1 (if mono source), or Stream 1-2 (if stereo
source).4. Set the Mixer Channel 2 - In Type: to Stream, then select Stream 1 (if mono source), or Stream
1-2 (if stereo source) from the Mixer Channel In Type menu (to the right of the Input Slot).5. Playback the audio track, and adjust the Input Level in Mixer Channel 2 (click and drag fader) so
that plenty of input signal appears in the Level Meter, and clipping does not occur (watch theclipping indicator).
*Note: Cubase required us to save multiple files, each containing different examples that are set to the sameBPM, so choose whichever of the files you want to try.

OASYS PCI Tutorial Guide
19
Apply OASYS PCI Effects to the Audio Stream Input:1. In the same way as the previous Audio Input exercise for Mixer Channel 1, add a desired Effect
Program (drag from the Right Panel to the Input Slot), or Effect(s) (drag from the Right Panel toInsert Slot(s).
2. Apply an Effect (s) to the Mixer Channel 2 - Send Bus 2.3. Work with the Effects in both the Mixer and Send Bus, by opening the Effect Control
Panels, and making edits/applying modulation sources.4. Open the Output Busses window from the Window menu, then work with the
Analog Output Bus for this Multi - apply Effects to the Output Bus, etc.
Note: After you've completed the rest of the exercises in this guide, and you close the Multi thatyou’ve been working with, you'll be asked if you want to Save Changes to Untitled Multi. Select Don’tSave from the menu.
Note: You can bounce all OASYS PCI synths and effects directly to disk, using any ASIO-compatibledigital audio program. For more information on this, as well as recording the output of the OASYS PCIMixer directly to a digital audio program, see the Users Guide, page 26.
Note: For information on zero-latency record monitoring and record monitoring with effects, see the UserGuide, pages 26 and 27.

OASYS PCI Tutorial Guide
20
OASYS PCI User Guide References
Multis, Programs and Patches PageRemoving a Program or Effect from a Multi 6Copying Programs or Effects 6Creating Velocity Splits between two or more Programs 7Auditioning Multis through a specific Output Bus 7Saving Multis 8Editing a Program Name 10Copying Patches between Programs 11Creating Velocity Splits between two Patches 12Saving Programs 13EffectsSending a Stream to a Send Bus 15Using Send Busses to conserve DSP resources 16Using Output Bus Effects 16Copying and Removing Effects 18Using OASYS PCI Effects along with other plug-ins 18Saving Effects-Only Programs 19ModulationFixed and Assignable Modulation Paths 20Modulation on/off parameter control via MIDI 21Editing and deleting modulation routings 21Sysex Parameter Information 21ASIO - relatedRouting Information 24Recording from the OASYS PCI Inputs 25Recording the Output of the OASYS PCI Mixer 26Zero-latency Record Monitoring 26Record Monitoring with Effects 27Working with FilesFile Types and Folder Organization 28Adding a new set of Korg or third-party sounds 29File Names 30Managing ResourcesVoice Allocation in the Program Edit window 31Optimizing Physical Bus Usage 31MIDI Parameter Changes and Control Panel Objects 32Additional Resource Management Tips 33

OASYS PCI Tutorial Guide
21
Specific Reference Sections
Reference Topics PageMixer 38Send Busses 46Output Busses 50Channel Parameters 55Program Edit 58Control Panel 64Modulation Palette 69Resource Monitor 70Catalog 73File Menu 76Edit Menu 78Windows Menu 79Preferences 80ASIO Control Panel/Audio Settings 87Scales 91

OASYS PCI Tutorial Guide
22
Suggested Demo MultisThese Demo Multis are great examples of the power of the OAYSYS PCI. But remember, there are over 25 synthesisalgorithms (and counting!) available in OASYS PCI. Use these Demo Multis as a Starting point. Then explore the rest of the Multis in the Demo Multis and Korg Multis folders, for even more great sounds. After that.you can start creating your own Multis, using sounds from the Programs, Patches and Effects folders.
# Category Multi Name Algorithm Features – Multi HighlightsPro Synth Tailored filter res, poly mod, sync, simultaneous waves,
just like the original Prophet™!03 Unison Glide Portamento and incredible resonant sweep
23 ModuDarkPad Haunting Prophet™ with ModWheel surprises!
Mini Synth Specific modeling of hi/lo freq filter resonance, modeledMinimoog™ envelope and vca sections
02 MiniBass Cocoa Vintage Minimoog™ bass, ModWheel-away!
12 Bright Lead Screaming Minimoog™ lead, ModWheel heaven!
Percussion Synth Analog-modeled percussion synths, plus Electribe-inspired percussion sequencer that syncs to MIDI
10 DandB Aggressive Split Insane Beat Box, VPM, Noise Synth, ModWheel/Aftertouch
22 KR-808 Analog drum kit – mapped and ready to sequence
VPM Synthesis Virtual Phase Modulation, complex timbres for digitalbells, electric pianos, special effects
11 Tines 1 4 operator, ModWheel – LFO frequency and Chorus depth
32 Lunar Bells VPM & Noise Synth, Delay, St Chorus and O-verb
Tonewheel Organ model Drawbars, key click, full 61-key polyphony, Korg G4rotary speaker, mono percussion, perfect phasecoherency
01 Big Organ Vibrato Chorus, G4, tons of modulation sources!
17 Perc Organ OD4 Slammin! ModWh –G4, SW1 –OD, SW2 -Percussion
31 Pipe Organ 1 From the Z1, group additive synthesis, incredible realism!
Electric Piano model High polyphony, change pickup type and position, smoothvelocity transitions from soft to overdrive
04 ModPan EP Wurlitzer™, ModWheel –pickup “bite”, plus St Auto Pan
Guitar & Slap Bass models Adjust pickup type position/tone, pick type, morph fromsteel string to nylon, and more
05 Folk Guitar - Strum Adjustable “pickup” position, damping, decay, dispersion
16 Dispersive Slap Bass Ulltimate punch & cut, nonlinear “hyper-slap”
21 Fretless and Pad Guitar AcGuit/PW Strings/FretlessBass, beautiful split!
14 Zither Hard Hammer Incredible and rich - great programming of Pluck String algorithm!
Trumpet & Trombone models Modeled lip embouchure, valve/slide/bell for rich tone,realistic “falls” and “rips”
08 Trumpet Jazz ModWheel –Breath, P-Bend –Rip, turn on TalkMod Insert FX
25 Trombone 2 Mod Wheel-Breath, P-Bend –Scoops, AT/ModWh control
Sax & Flute models Breath pressure/MIDI response, sax featuresgrowl/fingering noise, flute is incredible!
06 Silver Flute Can be “overblown” for puchy “chiff” breath noise, ModWheel/AT
41 EP & Tenor Sax Split, Sax -Realistic growl, breath & fingering noise, ModWh/AT
Vocal models Physically-modeled human voice, control of noisecomponents, vowel transition and more!
07 Soprano and Choir Split, FX controllers – ModWheel, Aftertouch, P-Bend
20 Ambient Vox Pad P-Bend for vowel control, and check out Patch Control Panel!
Analog /303 models Powerful and expressive analog and 303 synth models13 LosAngeles Bell Pad PWM strings & VPM, ModWheel/Aftertouch - filter
00 Dreamweaver Great polyphonic layer of Analog1 and 2 oscillator models
15 KraZee 303 Mini filter, Overdrive, SubOsc, St MIDI Delay FX!!!

OASYS PCI Tutorial Guide
23
Suggested Demo EffectsThe following is a listing of just a few of the superb Effects to use with the OASYS PCI synth Programs,Audio Inputs and Streams. Included are brief descriptions of each Effect:
Category Effect Effect HighlightsDelay Folder
St Diffuse Delay A smooth 8-second true stereo MIDI delay, high andlowpass filters, various feedback and stereo-relatedoptions, diffuser from the O-Verb
Flanger FolderSt Tempo Flanger Stereo Flanger, Tempo LFO with 6 basic waveforms,
LFO shape and smoothing
Phaser FolderSt Tempo Phase 2 Stereo Phaser, Tempo LFO with 6 basic waveforms,
plus separate “Step” Tempo LFO
Chorus Folder6-Tap Chorus 6 Chorus Delays, allowing a combination of Chorus
and Delay effects
Filters FolderRez Filter Seq Multi-mode, multi-pole resonant filter, plus analog-
style sequencer
Organ FX FolderRotary Speaker From the Korg G4 Rotary Speaker Effect, incredibly
realistic Leslie™ sound and control, with overdrive
Reverb FolderO-Verb XL The amazing O-Verb, plus two smooth MIDI-synced
Delays and 8 Early Reflection Delays, differentdiffusion options for the various delays allow for acombination of direct, mid, and distant delays forcreating complex early reflection patterns

OASYS PCI Tutorial Guide
24
Understanding the OASYS PCI
The OASYS PCI is unique, how it relates to other card-based systems is as follows.
What are the other card-based systems? They can range from audio I/O card up through systems like the CreamwarePulsar and even DigiDesign ProTools.
So how does the OASYS PCI fit into this universe? The OASYS PCI is certainly a very capable I/O card, offering high-quality 24-bit audio with analog, S/PDIF and ADAT “lightpipe” audio paths. However, it is true that the user lookingfor an inexpensive audio I/O card is not likely to start off with as complex and capable a system as we offer.
Looking at the OASYS PCI in relation to other cards which include synthesis and effects, you’ll easily see that the qualityof the algorithms that Korg is offering make all the difference. Korg has been in this business over thirty years, and thatexperience can be heard in every sound the OASYS PCI makes.
So the OASYS PCI sits at the high-end of the quality spectrum in the marketplace, and who doesn’t want thebest quality possible? It won’t replace a large, multi-I/O audio card, but it can be used in conjunction with them. It is not areplacement for a ProTools system, but again, it can be used within one.
Note: In both of these instances you would be using the OASYS PCI as a synthesizer/effects processor, which justhappens to be installed in your computer. You would run audio into it using the various 24-bit I/O options, andwould record the output of it into your system again using hardware I/O rather than internal streams.
Next lets discuss native plug-ins and soft synth applications.
The real limitations of Plug-Ins and Software Synths is that no matter how powerful your computer is, you will still be “hitting the wall” in DSP usage as they add more tracks and try to run more plug-ins. In contrast, adding an OASYS PCI card is adding more power to your computer, which translates into more synths and effectsrunning at the same time. And who doesn’t want more power?
The final subject we need to address is the cost/value of plug-ins versus the OASYS PCI card.Many folks don’t see this at first, simply thinking the card is expensive. But take a look at the current marketplacefor synth and effect plug-ins and that perception can easily be changed. A decent quality synth plug-in or nativeapplication can run $300, up to $800 for a TDM-based synth algorithm. That’s right – up to $800 for a single algorithm!So what price do you put on over 28 high-quality synth algorithms. Even pricing them at $200 a piece would say that theOASYS PCI could be worth $5,000!
Looking at effects plug-ins, a single high-quality algorithm could run from $99 up to $400, and suites of effects can easilyrun up to $800. So what price do you put on 135 effects algorithms? Again, let’s be generous and price them at $50 per(such a deal!). That’s $6,750. And add the cost of a 24-bit 12 in/12-out I/O card (let’s say $400), and you’ve got a systemthat might cost the user up to $12,000. Crazy? The values we’re using here are real-world, but since many audioapplications give away a certain amount of plug-ins to get you started, and there are some shareware titles out there,let’s be even more generous and cut this example in half and you’ve got a $6,000 value. And once you've haveheard the quality of the OASYS PCI sounds and effects it is easy to justify the system’s value/performance. It is an amazing value for what you get. And did we remember to include the cost of the co-processing thecard offers…
Note: The initial purchase of OASYS PCI includes over 28 synth algorithms and 135 effects algorithms. Korg’s long-term commitment to the OASYS PCI project gives end-users a very valuable project “partnership” of their own:the ability to download new synth and effect algorithms from the korg.com website at no additional charge, asthey become available!

OASYS PCI Tutorial Guide
25
OASYS PCI Overview (From korg.com)
Open Architecture Synthesis, Effects, & Audio I/OOASYS PCI integrates professional-quality synthesis, effects processing, and computer audio input and output into asingle, professional PCI audio card - the perfect complement to any MIDI sequencer or digital audio workstation.Much more than just an audio card, OASYS PCI offers a vast array of professional synthesis and effects processingtools, including some of the best synths and effects available at any price. Even better, it's fueled by a powerful system ofdedicated DSPs, leaving your main CPU free to play back audio tracks and run host-based plug-ins.
State of the Art DSP SynthesisOASYS PCI's synthesizer algorithms represent a continual evolution from Korg's legendary OASYS project. There arehundreds of sounds based on over 25 great-sounding synthesis algorithms, including modeled analog synths, VPM,tonewheel organ and rotary speaker, reed and tine pianos, physically modeled trumpet, trombone, sax, flute, guitar,bass, and vocals, pipe organ, analog percussion, and more.Synthesis algorithms are plug-ins loaded from disk, allowing easy upgrades and expansion. This means that Korg andthird-party sound developers can easily introduce new algorithms, or even entirely new types of synthesis.
Incredible Multichannel Effects ProcessingBuilding on the award- winning Korg Trinity's effects algorithms, the OASYS PCI offers a stunning variety of high-qualityeffects - over 135 different algorithms in all. Included are everything from standard reverbs, choruses, flangers, phasers,overdrives, and amp simulations to unique effects such as random filter, stepped phaser, doppler shift, and talkingmodulator.Additional new effects include tempo delays, modulation via MIDI-sync'd LFOs and analog-style sequencers, envelopeand LFO-swept filters, new high-quality analog EQ and reverb algorithms, an awesome 160 second maximum delaytime, and more.
These effects can process the onboard synthesizers, tracks from digital audio programs, and live audio inputs -simultaneously!Using the built-in submixer, chains of up to 4 effects each can be used on up to 12 channels, 4 sends, and 6 stereooutput busses. As with synthesis algorithms, all effects are plug-ins loaded from disk, allowing for easy expansion in thefuture.
Professional, Multi-format Analog and Digital I/OThe OASYS PCI features a total of 12 inputs and outputs: stereo analog, stereo S/PDIF, and eight-channel ADAT optical.Naturally, all inputs and outputs are 24-bit, and all can be used simultaneously with compatible multitrack audio software.Korg knows that in music, timing is everything, and so the onboard DSP processing power provides zero-latency recordmonitoring - even with effects!Korg always keeps the needs of professional studios in mind, so we've provided Word clock and ADAT timecode I/O toensure easy integration with other digital audio equipment.
Seamless Integration with MIDI and Digital Audio SoftwareThe OASYS PCI supports all major audio and MIDI standards, for compatibility with virtually every audio and MIDIprogram. ASIO drivers for MacOS and Windows provide direct compatibility with Cakewalk Metro, Cubase VST, DigitalPerformer, Logic Audio, Vision DSP, Studio Vision Pro, and more. Standard Windows drivers provide compatibility withall popular Windows audio programs, including Cakewalk, Samplitude, SAW, Acid, Sound Forge, and more. OMS,FreeMIDI, and standard Windows MIDI drivers seamlessly connect the OASYS PCI to all MIDI sequencers.
Complete Automation via MIDIAlmost every parameter can be controlled via MIDI, allowing easy modulation and automation of mixing, synthesis, andeffects from any MIDI sequencer or real-time MIDI controller.

OASYS PCI Tutorial Guide
26
OASYS PCI “Synthesis 1 & 2” (From korg.com)
Our analog synths are audibly superior to other "analog modeling" products. After listening to theOASYS PCI, we think you'll agree that other "virtual" analog synths sound...well...kind of virtual.
So, what should you listen for? To start with, our oscillators are rich, bright, and smooth, with extremely lowjitter and aliasing. We've worked hard to eliminate the usual artifacts of digital oscillators.The filters are warm and fat, with resonance extending to frequencies far above typical digital "analog" filters.They're flexible, too, with many algorithms offering a choice of poles and modes. There's also a special, fullymodulatable comb filter, for sounds like you've never heard before!Finally, the envelopes are punchy, smooth, and lightning-fast, and use audio-rate processing just like old-school analog envelopes.Any parameter on any synth or effect control panel can be modulated by two MIDI controllers, each with theirown mod amount.)In addition to several flexible analog synth algorithms, which allow you to make your own balance betweenfeatures and polyphony, we've included a few incredible re-creations of classic analog synths, as describedbelow.
Prophet™ modelOur Pro Synth model features specifically tailored filter resonance, envelope shapes, and VCA output nonlinearity, alongwith poly mod, sync, and simultaneous waveforms, just like the original.
Minimoog™ modelOur Mini Synth model features specific and separate modeling of the synth's high and low frequency filter resonance, aswell as its distinctive envelope shapes and VCA sound.
Percussion synthThis synth is optimized for analog-modeled percussion, with a hard-hitting, punchy sound. There are several versions ofthe percussion synth, including one coupled with an Electribe-inspired percussion sequencer.The sequencer is modulatable in real-time - and syncs to MIDI clock, of course!
VPM synthesisVPM stands for Virtual Phase Modulation, in which the phase of one oscillator (the Carrier) is modulated by anotheroscillator (the Modulator), producing a complex timbre. VPM is great for creating classic digital bells, electric pianos, andspecial effects, and OASYS PCI offers several different VPM synths to choose from.
Physical modeling - the future of synthesis arrivesOASYS PCI's analog synths are awesome - but they're only a small part of the story. Korg has been on the forefront ofphysical modeling research for almost a decade, and we're proud to present the fruits of that research in OASYS PCI.OASYS PCI includes models of electro-acoustic instruments, such as organ and electric piano, along with models ofphysical instruments, such as guitar, slap bass, trumpet, trombone, flute, saxophone, and even human vocals.
Of course, traditional sample playback instruments also provide these sorts of sounds.So, why use physical modeling?

OASYS PCI Tutorial Guide
27
ExpressionThere are several reasons. To start with, physical modeling generates sound in real-time, by modeling the actual physicalcharacteristics of the instrument and the player. This allows you to "reach inside" and play the model just as you would areal acoustic instrument, such as plucking a string gently or firmly, or blowing into a trumpet loudly or softly. Using thisreal-time control, you can shape phrases or even individual notes in natural, intuitive ways, for an unusual degree ofmusical expression.RealismAlso, models respond to your playing in organic and sometimes unpredictable ways, just like real acoustic instruments.Pitch-bend the flute model, for instance, and it will slowly bend a bit, grow a little unstable, and then abruptly jump anoctave. Play fast and loud on the trumpet, and the transitions between notes will sometimes include a subtle "blat" ofinstability; do a pitch-bend, and it "rips" through the harmonic series. Play hard on the acoustic guitar, and you'llsometimes hear a string "twang" brightly. These organic "imperfections" combine to give the player - and the listener - anuncanny sensation of reality.Sound qualityFinally, modeling offers an edge in sound quality, as well. For instance, modeling all 91 tone-wheels in an organ meansthat they are all precisely in phase, resulting in the pure, powerful sound of the genuine article. Use vibrato on a guitar,and notice how satisfying it is to hear a string "stretching."
Tonewheel organ with rotary speakerWe're extremely proud of our tonewheel organ model. Its awesome sound starts with perfect tonewheel phasecoherency, resulting in pure, powerful sounding chords, just like the real thing.Then, we added subtle and sophisticated features such as complete drawbar control, fully programmable key click, andtrue mono percussion. Compare this model to sampled organs, with their fixed drawbar settings, out-of-phase chords,and percussion on every note, and you'll hear the difference immediately.Best of all, the organ is fully polyphonic (61 notes at a time), and yet, even combined with both authentic vibrato androtary speaker effects, it uses only half of the OASYS PCI's DSP power!Naturally, with a B3 model this good, we had to have an equally impressive rotary speaker. So, we included theincredibly realistic rotary speaker model from Korg's acclaimed Toneworks G4.
Electric piano modelThe electric piano model features natural, smooth velocity sensitive transitions from soft, sweet, and bell-like to loud,overdriven, and cutting. You can select the type of pickup, and the position of the pickup on the reed. As you move thepickup towards center, it hears more and more of the first harmonic.
Guitar and Slap Bass modelsOur acoustic guitar model features fully adjustable string gauge, bridge rigidity, pick type and technique, pickup positionand tone, and more, allowing you to morph from steel string to nylon string to a surreal "plucked iron girder" guitar.On the other end of the spectrum, the slap bass offers a "SuperBass" synth patch for the millennium - the ultimate inpunch and cut, with an over-the-top, nonlinear hyper-slap sound.
Trumpet and Trombone modelsThe physically modeled trumpet and trombone algorithms feature modeled lip embouchure, valves and slides, and bells,resulting in rich tone, magnificent expressiveness, and realistic "falls" and "rips."
Sax and Flute modelsOur physically modeled woodwinds respond to breath pressure (or other midi controllers) with incredible realism. The saxmodel features realistic growl and fingering noise, while being free of the formant shifts characteristic of sampledsaxophones.The flute model is capable of everything from sweet, classical tones to edgy, breathy, chiffy pop and ethnic timbres.Pitch-bend it for an authentic octave mode-jump.
Vocal modelWith the physically modeled human vocals, you can control the shape of the glottal pulse, noise components, andtransitions between vowels, to create other-worldly melodies, pads, and effects.
OASYS PCI Tutorial Guide
28
MicrotuningThe OASYS PCI's Scales allow any incoming MIDI note to create any pitch, with a resolution of one cent (1/100 of asemitone). You can create stretch tunings, historic European tunings, scales with greater or fewer than 12 tones peroctave, and more. Tuning can be specified separately for each of the 128 MIDI notes, and each Patch in a Program mayhave its own Scale. Scales are text files, so you can create and edit them using any standard text editing program, suchas SimpleText. You can add as many custom Scales as desired.
OASYS PCI Effects Overview (From korg.com)
Wide Variety of High-Quality EffectsBuilding on the award-winning Korg Trinity's effects algorithms, the OASYS PCI offers a stunning variety of high-qualityeffects - over 135 different algorithms in all.For instance, in addition to the standard chorus effect, there's a harmonic chorus, two different step choruses (withrhythmic transitions instead of a smooth LFO), a two-band chorus with independent processing for high and lowfrequencies, four- and six-tap multitap chorus/delays, a bi-phase modulator with dual LFOs, tempo-synced choruses, andensembles - many of which are true stereo, in and out.With that selection of choruses, clearly there are a large number of more unusual effects, as well. For instance, there'sthe talking modulator, which processes any signal through sweeping, dynamic vowel shapes. The decimator, for addinglow-fi grunge and attitude. The doppler shift, for making any source into a fly-by. Flangers and phasers with triggeredenvelopes and MIDI-synced LFOs. A MIDI gate with full envelope control, for punchy, lightening-fast rhythm effects. 160seconds of MIDI-synced delays.
All of those effects and many, many more - overdrives, amp simulations, resonators, delays, auto-wahs, auto-panners,vibratos, early reflections, the rotary speaker from the Korg Toneworks G4, classic organ-style chorus-vibrato, a sub-oscillator, a ring modulator, a dynamic exciter, a stereo enhancer, a multi-band limiter, and still more, as described below.Even better, all effects are plug-ins loaded from disk, so it's easy for Korg or third-party developers to add new ones inthe future.
Multichannel ProcessingThe effects can process the onboard synthesizers, tracks from digital audio programs, and live audio inputs -simultaneously! Using the built-in submixer, chains of up to 4 effects each can be used on up to 12 channels, 4 sends,and 6 stereo output busses.

OASYS PCI Tutorial Guide
29
High-Quality MIDI-Synced Tempo DelaysA bunch of recent synths and effects include MIDI-synced delays. With some of them, however, you might notice a tell-tale clicking when the tempo changes - or even when it's supposed to be completely steady!
In contrast, the OASYS PCI's MIDI-synced tempo delays are smooth, responsive, and click-free, due to several MIDItempo innovations - including the unique Smoothing parameter.They also offer delay times up to 40 seconds (and you can use up to four of these 40-second delays at once!), fine adjustof synced delay times to create "swing" rhythms, individual high and low cut filters per tap, and more.There's also the special Diffuse Delay effects, which combine tempo delays with the diffusion section of the O-Verbreverb. The diffusion softens and blurs the delays, resulting in a unique effect well-suited to vocals, drums, and all sharpor percussive sounds.
MIDI-Synced LFO EffectsChorus, flanger, phaser, resonant filters, auto-pan, tremelo, and vibrato effects are available with MIDI-synced tempoLFOs. The standard tempo LFO features six different basic waveforms, with continuous adjustment between logarithmic,linear, and exponential shapes, as well as parameterized smoothing - all of which can be modulated in real time. TheLFO phase can be reset via MIDI, and the initial phase is fully adjustable, allowing you to create just the right feel to fitinto a groove. For stereo effects, the LFO's Left/Right phase difference is also continuously adjustable.
Multi-mode resonant filter effectsThe filters we developed for our analog synthesizers sounded so good, we knew that we had to make them into effectsas well. So, we included a selection of multi-mode, multi-pole resonant filter effects, featuring modulation from triggeredenvelopes, MIDI-synced LFOs and analog-style sequencers, and more, available for processing any audio source - evenother synthesizers. Happy tweaking!
New EQ and reverbTo inaugurate the release of the OASYS PCI, we've dramatically improved some of our meat-and-potatoes algorithms,as well. The new high-precision, analog-style EQ has smooth, balanced curves throughout the audible frequency range,in pleasant contrast to many digital EQs. And the completely new O-Verb reverb offers separate control of high, mid, andlow reverb times, a lush, smooth tail, and up to ten fully parameterized, diffused delays, for creating complex earlyreflection patterns and tempo-based effects.

OASYS PCI Tutorial Guide
30
Getting MIDI Tempo LFOs to Groove
Use the LFO's MIDI Phase ResetThe OASYS PCI's MIDI-synced LFOs can be triggered via MIDI. This ensures that the LFO starts in phase with themusic. You can include one or more triggers in the MIDI sequence, so that the LFO sounds the same every time. To dothis:
1. Create a track in the sequence to use specifically for triggering the LFO. Assign it to the same MIDIchannel as the Effect or Program that you'll be controlling.
2. In the control panel, assign a mod source for the LFO's Phase Reset. "Any Note Gate" works well,unless there's also a Program on the same MIDI channel. In that case, select another controller.
3. Enter a single MIDI event in the sequencer at the start of measure 2, using the mod source assignedto Phase Reset (from now on, we'll call this the "phase reset trigger"). If you like, you can duplicatethe phase reset trigger at intervals at downbeats throughout the sequence (such as every 8 bars orso), so that you can start from the middle of the sequence and the phase will still be reset. This issimilar, in some ways, to triggering a loop on a sampler.
4. Also, enter the phase reset trigger every time that the time signature changes.
Now, whenever the OASYS PCI receives the phase reset trigger, the LFO will reset to the position set by the InitialPhase parameter.
Note: You can trigger as many different LFOs as you like, using different triggers on different MIDIchannels.
Adjust "Feel" using the Initial Phase ParameterUsing the LFO's Initial Phase parameter, you can start the LFO at any point of its waveform - at the peak, in the trough,at zero, or at any point in between. You can use this to subtly adjust the rhythmic feel of the LFO; this is especially usefulfor smooth waveforms, such as triangle, sine, and saw up.
Note: You can also set the Initial Phase to 180 to shift the waveform to the offbeat.
Also note the Shape and Smoothing parameterShape: Adjusts any sloped LFO shape (everything but S/H and Square) between logarithmic, linear, and exponentialshapes. See page 367 of the Patches and Effects Guide for a diagram. This basically meansthat the LFO will spend more time "up" or more time "down."
Smoothing: Rounds out any rough edges on the LFO. It will turn a Square shape into almost a Sine, for instance.Bothshape and smoothing can be modulated smoothly in real time.
To really hear the results, crank up the flanger or phaser feedback parameter. Or, use long LFO time - tempo-basedtimes of 1/2 note and over, for instance. Otherwise, the difference can be more subtle.
Start on measure 2We've found that triggering LFOs on the downbeat of the very first measure may not always work properly (probablybecause the sequencer sends the MIDI message triggering the phase slightly after the actual downbeat). This can resultin the LFO being out of phase, so that it doesn't sit properly in the groove.
To avoid this, leave a blank measure at the start of the sequence. Start your MIDI data, and send the first LFO trigger, inmeasure 2.

OASYS PCI Tutorial Guide
31
More about Tempo Delays and MIDI
Reference Effects: St MIDI Delay and St Diffuse Delay
Tempo Delay Threshold (in Preferences)This parameter reduces jitter for incoming MIDI Clock signals from sequencing programs etc. Programmable MIDI clockjitter suppression is an exclusive Korg feature. This is necessary because as far aswe've seen, nothing outputs a jitter-free MIDI clock. This parameter sets the number of consecutive MIDI clockcommands which must be received before changing the tempo.
More on the delay algorithmsSmoothing: This sets the amount of time that it takes the delay to slide to a new delay time setting. When syncing toMIDI clocks, this smoothes out the response of the delay to changing tempos. When smoothing is at 0, changes in tempowill cause clicks in the audio. (This is how most other "MIDI" delays sound!) A setting of 50 gives a fast response, but issmooth enough to prevent clicks. A setting of 80 or so will result in an audible glide time, like a tape machine speeding upor slowing down.
Fine Adjust: Allows you to adjust delay time by +/-10% to create swing rhythms, so that the delay matches the groove.(High feedback settings will interfere with this, however)
Note individual high and low filters per tap.
Diffuse delay effects create a cool, "smeared" sound by combining the delays with part of the O-Verb reverb.

OASYS PCI Tutorial Guide
32
OASYS PCI Specifications
Analog I/OConverters
24-bit, 128x oversampling sigma-delta24-bit, 128x oversampling sigma-delta, 8x digital filters
S/(THD+N) Ratio (A weighted)92dB at -0.5dBFS93.0 dB at -0.5 dBFS
Dynamic Range98dB (typical) @IHF-A108dB (typical) @IHF-A
THD+N (A weighted)0.005% at 1kHz, +16dBu Input, 100kOhm load0.002% at 1kHz, +16dBu Input, 100kOhm load
Frequency Response20 Hz - 20 kHz, +/- 0.02dB, +4dBu Input, 100kOhm load20 Hz - 20 kHz, +/- 0.09dB, -12.0 dBFS, 100kOhm load
Impedance100kOhm (calculated)50 Ohm (measured)
Nominal Level+4 dBu
Headroom12 dB
Sample Rates44.1 kHz, 48 kHz, external clock
Digital I/O* ADAT optical I/O: 24-bit* S/PDIF coaxial I/O: 24-bit* Word clock I/O: BNC* ADAT Timecode: Input and through
Synthesis* Synthesizers are plug-ins loaded from disk, allowing for easy future expansion.* Initial release includes over 28 synthesis algorithms and hundreds of sounds.
Effects Processing* Effects are plug-ins loaded from disk, allowing for easy future expansion.* Currently includes over 135 unique effects algorithms.
Submixer* 12 channels, each of which may process synthesis programs, audio inputs, or hard disk audio tracks* Channel inserts may each have up to 4 effects* 4 sends, each with up to 4 effects* 6 stereo output busses, each with up to 4 effects
General* DSP Processing MIPS: 480* PCI revision 2.1 compliant, full length, installable in any MacOS-compatible computer equipped with full-length
PCI slots.* PCI Power Consumption: +5V = 1.875W, +12V = 0.294W, -12V = 0.117W* Audio I/O supports ASIO* MIDI supports OMS, FreeMIDI, and serial ports* Compatible with Korg-approved MacOS computers (initial release for MacOS, Windows support to follow
shortly)