nurse/medical assistant workflow guidenurse/medical assistant workflow guide learn how to check-in...
TRANSCRIPT

Last updated 5/31/2016
Nurse/Medical Assistant Workflow Guide
Learn how to check-in patients, update medical history, send a referral, manage flowsheets, and use ePrior Authorization.
1. View schedule
2. Patient intake and recording medical history
3. Reviewing clinical summary
4. Complete Prior Authorizations
5. Immunizations
6. Referrals

Last updated 5/31/2016
1. Start with your Schedule
The Appointments tab in the scheduler is your starting point.
The appointment status can be updated with the drop-down menu to the far left. Use this menu to
check patients in or document a cancelled or no-show appointment.
Note that an encounter note is automatically created for this visit once the patient is checked in
(appointment status is changed to “In lobby”)
Click “View Encounter” to move to the patient’s chart and encounter note for the visit.

Last updated 5/31/2016
2. Patient intake and recording history The encounter will open within the patient’s chart in a tab highlighted in white with the date
Insider Tip: Use the “Go to…” menu to easily navigate to sections within the encounter
Confirm encounter details are correct and click “Record” or “Edit” next to Chief Complaint. Enter in
vitals by clicking the plus symbol.
ADDITIONAL RESOURCES
ARTICLE/VIDEO: How do I use Flowsheets?
VIDEO: Easily track vital and lab trends with Flowsheets

Last updated 5/31/2016
Record the patient’s diagnosis history by clicking “Record”. Easily search by ICD-10 code and make your
selection from the drop down menu. Add the diagnosis details, then select “Done” or “Add Another”
Insider Tip: Customize your frequent Dx List in your Settings for quick selection
Record the patient’s drug/food/environmental allergy history by clicking “Record”. Search for the
allergen and add the severity before clicking “Done” to save.
Last updated 5/31/2016
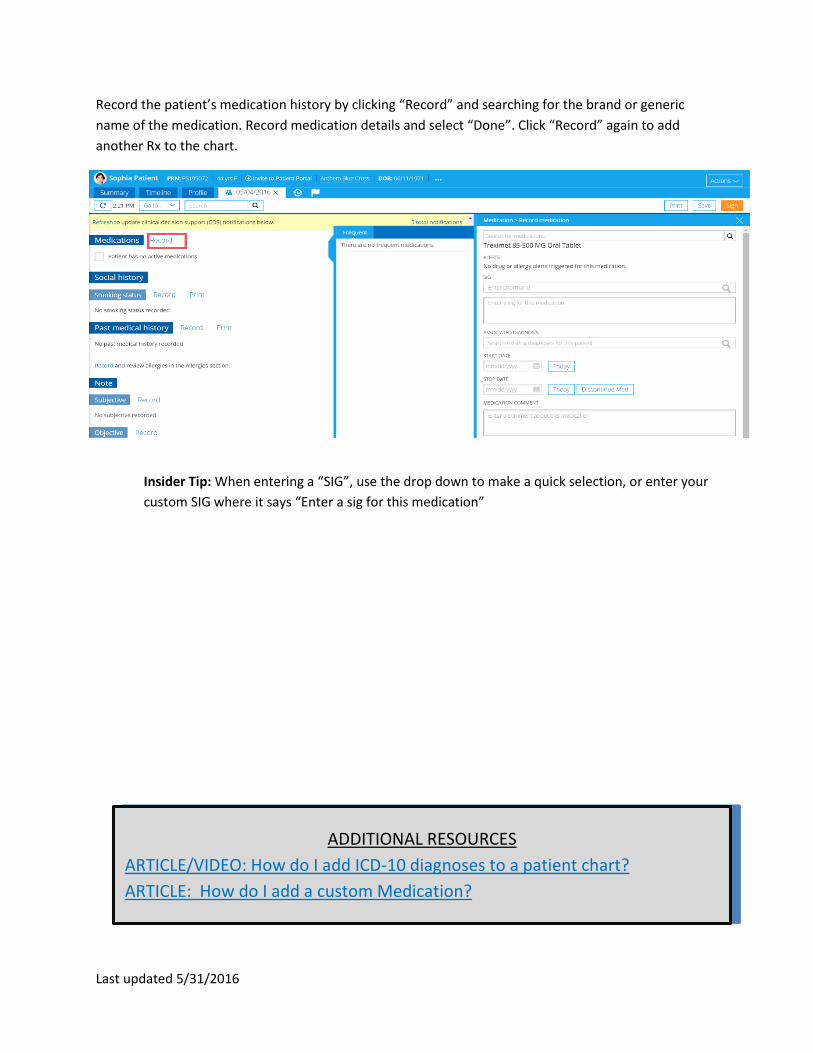
Record the patient’s medication history by clicking “Record” and searching for the brand or generic
name of the medication. Record medication details and select “Done”. Click “Record” again to add
another Rx to the chart.
Insider Tip: When entering a “SIG”, use the drop down to make a quick selection, or enter your
custom SIG where it says “Enter a sig for this medication”
ADDITIONAL RESOURCES
ARTICLE/VIDEO: How do I add ICD-10 diagnoses to a patient chart?
ARTICLE: How do I add a custom Medication?
Last updated 5/31/2016
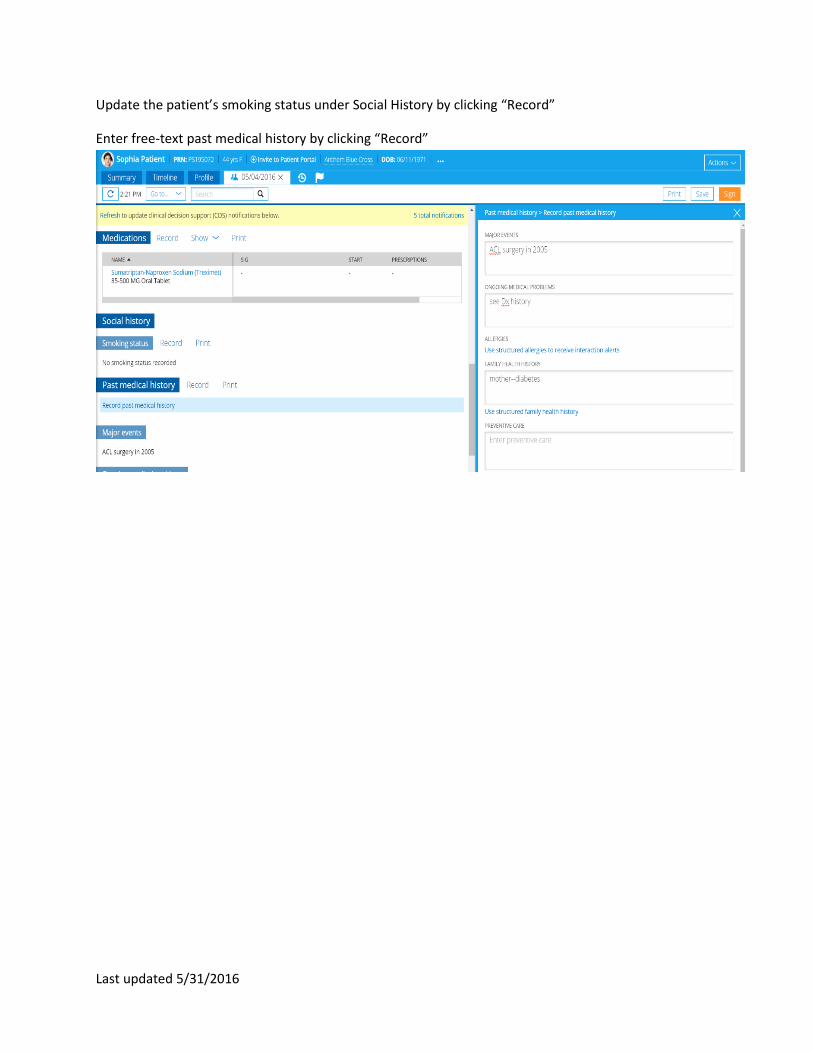
Update the patient’s smoking status under Social History by clicking “Record”
Enter free-text past medical history by clicking “Record”

Last updated 5/31/2016
3. Review or Update Clinical Summary All clinical information in the Summary tab is synced with sections of the Patient Encounter (SOAP) note.
Add new clinical information to any section by clicking the (+) button next to the heading.
*If you do not see any (+) button in your account, you may not have the correct edit permissions. Ask an
account Administrator to update your role in your user profile. View edit levels here.
Insider Tip: Generate a new message regarding a patient and opt to save it to their Summary for
seamless internal communication. Create a reminder about this patient by going to the “Actions” drop-
down menu and selecting “New Task”.
ADDITIONAL RESOURCES
ARTICLE: How do I create a custom reminder task?
ARTICLE: How do I use messaging?
VIDEO: Send and receive internal and external messages

Last updated 5/31/2016
4. Completing ePrior Authorization If the provider prescribes a medication that requires prior authorization from the patient’s insurance, it
can be found in the Prior Authorization Report.
When processing Prior Auth, you will see a list of forms based on the patient’s eligibility and medication.
Select the appropriate form from the drop-down menu.

Last updated 5/31/2016
You'll be presented with a series of questions. Required questions will be noted with an asterisk (*),
while others might be noted as important but not required.
After completing the form, click the “Send Prior Auth” button at the bottom of the form. Once the form
has been submitted, the status will change from “New- Not Sent to Plan” to “Pending-Sent to Plan”.
ADDITIONAL RESOURCES
ARTICLE/VIDEO: How do I use ePrior Authorization?

Last updated 5/31/2016
5. Recording Immunizations Open the patient’s chart to the Summary Tab or Encounter note. Use the “Go To…” Drop down menu to
select “Immunizations”
Within the Immunizations section of the patient chart, click “Add Vaccine”
Record whether you are administering the vaccine, documenting a historical vaccine, or documenting a
refused vaccine

Last updated 5/31/2016
Search by brand name or vaccine name and you will see that a menu populates with options to select
from.
ADDITIONAL RESOURCES
ARTICLE: How do I add immunizations or vaccines?
ARTICLE: How do I record a vaccination to transmit to my immunization registry?
ARTICLE: How do I add a custom immunization or vaccine?
VIDEO: Connect your immunization registry to Practice Fusion

Last updated 5/31/2016
6. Sending Referrals & eFaxes Anywhere in the patient’s chart, use the Actions drop-down menu to select “Add Referral”
Select a contact from your physician directory, or add a new connection by clicking the new contact icon
Create a memo using the prebuilt templates in the left panel or create your own template for future use

Last updated 5/31/2016
Attach encounter notes, lab results, and documents before clicking “Send”. Your fax will be sent to the
contact selected. You can view the status of this fax in the patient’s Timeline > Referrals.
ADDITIONAL RESOURCES
ARTICLE: How do I send a referral?
ARTICLE: How do I populate my physician directory?
VIDEO: How can I seamlessly transfer incoming faxes to Practice Fusion?

Last updated 5/31/2016
For information about features not reviewed in this guide, please
visit the Knowledge Base to view step-by-step instructional articles
relating to every feature in Practice Fusion.
For video tutorials and to learn more about Practice Fusion’s newest features,
check out the Learning Center!
Additional Sites for Your Reference:
Meaningful Use Center
Help Center
e-Prescribing Center
Electronic Lab Ordering Center