nstudy: an internet tool to support learning ...lpb/tr/2009-luc_p_beaudoin-phil_winne-nstudy.pdf ·...
TRANSCRIPT

Page 1/28
nStudy: An Internet Tool to Support Learning, Collaboration and Researching
Learning Strategies
Luc Beaudoin and Philip H. Winne Simon Fraser University
e-mail: [email protected], [email protected]
Support for this work was provided by grants to Philip H. Winne from the British Columbia Knowledge Development Fund, the Canada Foundation for Innovation, Simon Fraser University and the Social Sciences and Humanities Research Council of Canada (410-2002-1787 and 512-2003-1012).

nStudy Page 2/28
Luc Beaudoin and Philip H. Winne
Contents 1 Abstract............................................................................................................... 4
2 Introduction ........................................................................................................ 4 2.1 nStudy’s Information Objects........................................................................ 5
3 The nStudy Browser and Annotating Content .................................................. 6 3.1 Tagging Text................................................................................................. 8 3.2 Linking Text to New Notes ........................................................................... 9 3.3 Linking Text to New Terms ........................................................................ 10
4 Editing Notes..................................................................................................... 10 5 Editing Note Forms........................................................................................... 13
6 Linking Existing Items ..................................................................................... 15 7 Editing Documents............................................................................................ 15
8 Learning Strategies........................................................................................... 18 9 Working With Terms ....................................................................................... 19
10 Working With Items in the nStudy Library.................................................. 20 10.1 Copying Objects........................................................................................ 22
11 Using Workspaces for Tasks and Collaboration ........................................... 22
12 Maps................................................................................................................ 23 13 Term Net ......................................................................................................... 24
14 Chatting........................................................................................................... 25 15 Logging and Analysis...................................................................................... 26
16 Future Developments...................................................................................... 27 17 References ....................................................................................................... 28

nStudy Page 3/28
Luc Beaudoin and Philip H. Winne
List of Figures Figure 1 nStudy Browser Window 7 Figure 2 Note Editor (“Learning Objective” Form) 10 Figure 3 The Basic Note-Form 11 Figure 4 Note Editor (“Argument” Form) 12 Figure 5 Note Editor (“Summary” Form) 13 Figure 6 Form Editor Window 14 Figure 7 Linker Tool 15 Figure 8 Document Editor 16 Figure 9 Document Version Window 17 Figure 10 Document Comparison Window 17 Figure 11 Learning Strategy Editor 18 Figure 12 Learning Strategies in Library Window 19 Figure 13 Term Editor 20 Figure 14 Library Window 21 Figure 15 Configuring Columns 22 Figure 16 User Map 24 Figure 17 Chat Windows 25
List of Tables Table 1 Sample Tags....................................................................................................... 8 Table 2 Example Chat Roles and Prompts..................................................................... 26

nStudy Page 4/28
Luc Beaudoin and Philip H. Winne
1 Abstract We describe and demonstrate nStudy (Winne & Hadwyn, 2009), a rich web-based internet application for personal learning based on an agentic model of self-regulated learning (Beaudoin, 1994; Winne & Nesbit, 2009). nStudy supports learners in carrying out solo and collaborative structured conceptual analysis of online content in a web browser with desktop-like capabilities. Learners can read arbitrary web content and link selected content to new or previously created personal learning objects, including: notes, terms, learning strategies, tags, concept maps, chats and rich text documents. nStudy provides a user-configurable set of educationally useful tags to help learners describe and evaluate content and to manage their learning objectives. nStudy also supports learners in creating and editing web forms (with drag and drop) that they can apply to their notes and strategies. Fields in notes’ forms– text boxes, sliders, checkboxes, radio buttons, dates, spreadsheets, etc. – can represent important educational schemas such as criticisms, debates, reviews, analyses, etc. Learning strategies are embedded in nStudy as learning objects that learners can read, apply and link. nStudy also provides tools for collaborating and sharing learning objects with peers. Other tools slated for delivery by year end, include: concept mapping, goal setting, monitoring learning progress, and self testing. At the same time as nStudy enriches learning activities, it provides researchers with a highly configurable tool for carrying out sophisticated scientific investigations of learning by logging very detailed, structured data about learning patterns; content selection, use and review; and use of learning strategies.
2 Introduction Learners of all ages acquire much of their learning content by browsing the Internet. Regrettably, web browsers provide no or poor support for learning. Even with the advent of so-called “web 2.0” features, browsers lack built in support for solo and social annotation and offer only rudimentary tools for storing and tagging information. None offer direct support for organizing and analyzing information.
At Simon Fraser University our team has developed nStudy, a web-based learning environment. nStudy provides a rich collection of tools for learners to actively interact with information, apply learning strategies and learn in a self-regulated fashion. nStudy’s tools are explicitly designed to support best practices at the same time as they help learners improve how they learn.
In nStudy, people are active in learning and researching in the web: they create, manipulate and link learning objects – user-created data packages that serve needs and help achieve learning goals. Learning objects are of multiple kinds: bookmarks, notes, forms, tags, documents, chats, terms, and various graphical representations of networked (linked) information objects such as concept maps and term networks. These can be sorted and filtered by metadata (e.g., title, author, date created, date last viewed, snips that record the origin of the information in a learning object, and so forth).
A significant benefit of nStudy is that learners can organize their learning objects by linking them to one another. For example, learners can select a string of text or an image

nStudy Page 5/28
Luc Beaudoin and Philip H. Winne
(e.g., an equation) on a web page, tag it and link that information to a new or an extant note, a document (e.g., a term paper), an arbitrary web page, a transcript of a chat with a peer or teacher, and more. Linking allows learners to create their own rich network of data and navigate that structured information in ways that extend its uses far beyond existing HTML links or search tools.
A key feature of nStudy is its support for learning key terms that form the bedrock of subjects learners study. When terms refer to one another, nStudy automatically links them. For every learning object a learner has in view, nStudy shows a term network that depicts not only which terms are “in use” but how they relate to one another.
nStudy’s integrated capabilities and ontology allows Internet users to step beyond passive clicking and reading to interacting with information, elaborating it, building new structures of information and managing information’s multidimensional character.
2.1 nStudy’s Information Objects. Annotating information in nStudy is achieved through easy to use interfaces where users have access to multiple classes of information objects.
• Bookmarks catalog sites in the Internet (URLs).
• Notes allow users to elaborate information according to their interpretations. Each note is automatically linked to the information object that prompted making the note. If text was selected in the source information object, a copy of that text is recorded in the note as a hot link snip. Clicking a snip returns the user to the originating information object.
• Forms provide a method for creating structured re-usable notes. Creating forms invites learners to consider necessary kinds of information they need for a task. Using forms ensures that key information is recorded or identified as missing. A variety of fields can be included in a form: rich text, checkboxes, radio buttons, sliders, drop-down classifications, spreadsheets, images, and attached files.
• Tags are indexes to information objects or to snips within objects. Learners can create their own tags tailored to identify categories they need to catalog tasks, qualities, follow-ups, events, and so forth.
• Documents allow users to create a text – a memo, lab report, business plan – using a richly formatted tool.
• Chats are text records generated as people exchange information. Information objects can be easily linked as chats unfold using a drag-and-drop method.
• Terms offer a standard form for defining key concepts in a domain. When a term uses another term in its definition, nStudy automatically links both terms so the user can easily traverse the conceptual structure of a domain.
• A term net provides a graphical display of a domain’s key concepts in the form of a node-link network. Each term is a node in the network. Links among terms are drawn as lines that depict the conceptual structure of the domain. The term net automatically updates to represent the semantic structure of terms in every currently open window (e.g., bookmarked web sites, notes, documents, chats).

nStudy Page 6/28
Luc Beaudoin and Philip H. Winne
• The library is a table that presents information objects according to the user’s selections of preferred metadata. Each column in the library represents a feature of an information object such as its title, author, date created, number of links, date last viewed and more.
• Maps are graphical representations of relationships (links) among information objects (nodes in the map). Users can create a new map by generating information objects in a map and linking them at will. Also, maps can be created after filtering the library to limit information objects to those with particular qualities. A map of the information objects linked to a current focus, say a note, can be generated at the click of a button in a toolbar. Information objects in a map can be grouped and any information object’s “reach” can be extended by showing its links to others.
3 The nStudy Browser and Annotating Content nStudy provides its own browser within a browser. In nStudy’s browser window, users can browse web pages and annotate them. The browser window has three major sets of components: a toolbar at the top, a “table of contents and links” sidebar on the left, and a content panel on the right. See Figure 1 below.

nStudy Page 7/28
Luc Beaudoin and Philip H. Winne
Figure 1 nStudy Browser Window
The browser window toolbar, like most toolbars in nStudy, has a Windows menu which allows the user to access other windows open in nStudy. This is useful because users can potentially spawn many windows. The Browser menu provides a shortcut for opening a new browser window or accessing other open browser windows. A Bookmark button allows the user to create nStudy bookmarks for a web page currently in view. The Map button is a convenient way for users to bring up a new concept map window or to bring up the term net. The New menu is a means for users to create new learning objects of any type (document, note, form, strategy, term, etc.) Back, forward, refresh, and address bar components are provided as in regular Firefox windows. nStudy hides the normal Firefox browser toolbar buttons but preserves the address bar, though it is read-only.
The left sidebar in the browser contains a summary of all links between other information objects that annotate the page currently in view – it is a “super” table of contents. The first set of annotations is a list of tags that have been applied to the document as a whole or selections within it. Each tag may have been applied a number of times so one entry per tag is shown in the sidebar. Each of these entries is a clickable link. Clicking an entry scrolls the document to the location where the tag was applied.
The second set of annotations in the sidebar is a list of all the other nStudy information objects that a user has linked to this page. Each link originates from somewhere in the document in view and points to another learning object. The type of the learning object is indicated by a unique icon representing the kind of information item. For example, in Figure 1 above there is a link to a note and a number of terms. A single-click on an entry in this list scrolls to the location in the document from which the link emanates; a double-click opens a new window showing the information object that is the link’s destination. These features make it easy for a user to see all the annotations she applied to a web page, where each annotation links to specific information in the document and to access the annotations themselves. Finally, the sidebar also contains a list of the terms used on this page that the user has previously created in her personal workspace. This provides an important overview of topics covered in a document.
The main content panel of the browser, to the right of the sidebar, presents the web page the user has loaded. It is always ready to be annotated.
Within a browser window the user can select some text or an image and link it to new or existing learning objects. Annotation may be performed using a pop-up menu or the fastmark tool described below.
The browser annotation pop-up menu contains the following options for annotating the selected text or image: 1. One entry for each of the n most recently applied tags (e.g., n=5). Selecting an item
applies the tag. 2. An entry to link to a new note. Selecting this item brings up a new note window. 3. An entry to link to a new term. Selecting this item brings up a new term window.

nStudy Page 8/28
Luc Beaudoin and Philip H. Winne
4. An entry to link to an existing item. This brings up a new linker window where each kind of learning object can be selected from tabs, then a specific learning object can be selected as the destination of the link.
These options are described below.
3.1 Tagging Text Tagging text is a useful way for learners to make educationally relevant judgments about text. In systems like diigo and delicious, tags apply to entire bookmarks (a whole web site or page). In nStudy, tags can be applied to specific selections within bookmarked sites and documents.
Each “workspace” has its own of tags. Each user can create, edit and delete tags. Each tag has an editable label, a user-assigned color and a description. Learners, teachers and content developers can create tags to reflect the particular qualities of content, educational practices and metacognitive theories. This can help remind learners of how they can or should approach learning and categories they need to consider about the information they study. The availability of these tags invites users to describe content, take action on the content, and evaluate the content. Table 1 presents a sample collection of educationally-designed tags.
Table 1 Sample Tags
Descriptive Tags Evaluative Tags Action Tags
• Argument
• Cause
• Clarification
• Critique
• Description
• Effect
• Elaboration
• Historical
• Hypothesis
• Methods
• Probability
• Rationale
• Regularity
• Result
• Summary
• Supports
• Theory
• Contradiction
• False
• I agree
• I disagree
• I don’t understand
• Important
• Interesting
• Needs further conceptual analysis
• Original
• True
• Unclear
• Analyze further
• Ask teacher
• Assess
• Clarify
• Criticize
• Evaluate
• Ignore
• Re-read
• Research
• Review for class
• Verify

nStudy Page 9/28
Luc Beaudoin and Philip H. Winne
Tagging information, like other forms of annotation, links the selected information or an entire learning object to a particular information item, in this case a tag.
nStudy also provides a fastmark tool. In fastmark tagging mode, users first select a tag and thereafter, whenever text is selected, the chosen tag is applied – there is no need to display a popup menu, move the cursor to a toolbar or use a keyboard combination. Fastmark tagging can be used to run through the text and make judgments, for example about what needs further attention. Research has shown that learners who make judgments about what they do not know are in a better position to overcome their knowledge gaps. The fastmark tool also supports rapidly linking selections of information to notes and to terms.
3.2 Linking Text to New Notes nStudy has extensive note editing facilities. Users can link text to a new note. For example, a learner might purposively approach a new browser web page by creating a “Learning Objective” note as illustrated in Figure 2 below. This note could guide self-regulating of learning toward outcomes the learner wants to achieve which, in turn, helps guide the entire learning activity. Setting learning objectives for each important document is an important educational practice – studying is most productive when learners set specific, challenging yet realistic goals.
Notice that in this particular note form, there are several fields of different types: • The Title field designates the title of this note. • The Form field indicates that this note uses the Learning Objective form. • The Importance field is used to describe the importance of the learning objectives. • The Due Date indicates the date by which the learning objective should be met. • The Difficulty field indicates the difficulty of the goals the user has set. • The Completion field is used to indicate the extent to which the goal has been
completed (as opposed to a simple binary “done” field). Every learners’ workspace would normally contain several other forms which they might use in annotating text with notes. Note editing is described in more detail in Section 4 below.

nStudy Page 10/28
Luc Beaudoin and Philip H. Winne
Figure 2 Note Editor (“Learning Objective” Form)
3.3 Linking Text to New Terms Learners can also add terms to their workspace by linking text to new terms or simply adding new terms that are not linked to the text. This feature invites learners to think about the semantic space in which they are studying and how the full semantic space relates to the information displayed in currently open windows. nStudy scans each window’s content for related terms and automatically annotates the text with links to those terms.
4 Editing Notes Notes in nStudy are personal learning objects. Each note is structured according to a form. Like other learning object windows, note windows have a toolbar at the top, an annotation sidebar on the left, and the content panel to the right of the sidebar. There is also a retractable form editor sidebar that can be exposed on the right for in-line editing of forms. When editing a note, the learner also is provided a “save in” combo box which allows her to choose the folder in which the current item will be saved without needing to access the Library window.

nStudy Page 11/28
Luc Beaudoin and Philip H. Winne
The content panel of a note contains the following components: • A Title field. The prompt for adding a title is configured based on the form. • A Form Selection field. This is a menu (combo-box) containing a list of all the fields
in the workspace. Selecting an entry replaces all the fields in the currently displayed form with new fields that are dictated by the alternative form the learner wants to use.
• A Snips field. This contains one entry for every string of text (snip) that the learner has linked to this note. So if a learner selects some text in the browser, such as “Formally speaking, there are many ways of distinguishing between control states.” and links this selection to a new note, then the snips field of the note will contain “Formally speaking, there are many ways of distinguishing between control states.” This provides learners with an explicit reminder of what the note links to. A note might be linked to several snips. Each snip is a clickable link back to the original text in whatever learning object contains it.
• A list of form fields that are determined by the form, as described below. Forms are templates that guide the learner to associate specific types of information with a note and indirectly to associate the note with other web content. Formally, a form specifies a list of fields. Each field has a type, a title and a set of properties. Forms are meant to encourage learners to think about the kinds of and designs for knowledge they should be developing in their annotations. A built in basic note form is provided in each workspace. See Figure 3 below.
Figure 3 The Basic Note-Form We have already seen that a Learning Objective form can be used to encourage users to create goals and elaborate on properties of their goals (importance, urgency, difficulty, etc.) Another form might be an Argument form. This can be used to encourage students

nStudy Page 12/28
Luc Beaudoin and Philip H. Winne
to analyze and assess an argument by describing the claim that is made, evidence for the claim, the strength of the argument, and the relevance of the argument (see Figure 4 below). As another example, a Summary form for notes might prompt the user to enter the topic, main idea and key details.
Figure 4 Note Editor (“Argument” Form)

nStudy Page 13/28
Luc Beaudoin and Philip H. Winne
Figure 5 Note Editor (“Summary” Form) When users select a form from the form chooser in a note window, the note is transformed to present the fields specified by the chosen form. If a new form is needed, the learner can also click on the “form editor” button to add, remove or edit the structure of the form embedded in this note. For example, the learner might want to add a “one-off” text field for an additional type of comment associated with an argument form. When the form of a note is changed, a visual indicator is added to the form name (in the form chooser combo box) to signal the form in the current note is a derivative of the form with which the learner started. This invites learners to think more broadly about how to design personal learning objects.
5 Editing Note Forms A note editor is provided for changing and creating note forms as shown in Figure 6 below. When multiple forms are available for taking notes, learners can be informed and reminded about different ways in which they can annotate content. This can potentially lead to a richer cognitive experience. For example, the available of a Summary form can prompt users to summarize web pages. It can also be used by teachers to support their teaching objectives. For example, an assignment could be given to students to go through a collection of web pages and, for each web page, to fill out an argument form that characterizes the arguments presented. Or, in a course on social science research methods, a set of forms keyed to various types of research methodologies could be provided in a workspace. Students could be instructed to go through each of a set of web

nStudy Page 14/28
Luc Beaudoin and Philip H. Winne
pages and select the appropriate form to describe a research design (e.g., longitudinal, ABAB, correlational, etc.) and annotate the study according to the form in terms of general features of research (e.g., hypothesis (text field), number and characteristics of participants, measures, etc.) and features particular to a kind of research design (e.g., check on treatment implementation validity, inter-rater agreement, etc.).
Figure 6 Form Editor Window The form editor window has the same overall structure as the other editor windows in nStudy, namely: a toolbar at the top, an annotation sidebar on the left, and a content panel. It is augmented with a form editor sidebar on the right.
Within the form editor sidebar there are three tabs: • Add Fields. The user can drag and drop fields of various types onto the form content
panel. • Add Forms. This presents the user with a list of forms in the workspace. The user can
select an existing form then drag and drop it onto the canvas to create one form out of another form. This could be useful, for instance, if the user wishes to create several variants of an “experiment” form.
• Set Properties. The user can click on any field within the form content panel and set its properties, such as its name, font size, weight, values for combo boxes, slider ranges, choices for checkboxes, values for list items, files for attachments, etc.

nStudy Page 15/28
Luc Beaudoin and Philip H. Winne
6 Linking Existing Items Often, annotation involves linking selections or a current learning object to tags or to a new note. However, it is sometimes useful to link two learning objects that already have been created. nStudy provides a linker tool for this purpose as shown in Figure 7 below. The linker tool is available in most windows by clicking on the Link button in the top toolbar. The effect is to link the item in which the Link button was clicked to another item selected in the linking tool. For example, a learner might write a learning objective for a web page concerning motivation and link it to a learning strategy object that describes goal setting.
Figure 7 Linker Tool In the Linker window, the learner selects the type of learning object to link to by clicking on a tab then chooses any existing item to be linked. The learner also can filter the table with a search tool.
7 Editing Documents Learners often have to produce essays and other kinds of reports and papers. To accommodate this need, nStudy provides a document editor consisting of a single rich text field. See Figure 8 below. The same fine grained annotations available to annotate web pages are provided for documents. Thus, learners can link (possibly overlapping) selections of text in their report to new or existing learning objects. This provides a convenient way for learners annotate – tag, make notes about, and link draft text to primary resources – their essays; and, for teachers or peers to provide constructive feedback on drafts of essays. For example in Figure 8 below, the user has marked a paragraph as important.

nStudy Page 16/28
Luc Beaudoin and Philip H. Winne
Figure 8 Document Editor Users can access previous revisions of nStudy documents and compare them. This is very useful in collaboration and solo learning situations. This provides an opportunity for peers and teachers to comment on the progress of documents and provide feedback on the process of improving drafts. It also makes it unnecessary for learners to create backups of their documents.
Users access these features by clicking on the “Compare” button at the bottom of the editor window. This presents a Document Version window (see Figure 9 below). That contains a list of all the versions of a document. Clicking on the View button next to a version brings the version to the foreground. Selecting two versions and clicking on the Compare button brings up the Document Comparison window (see Figure 10 below), which shows the additions (underlined and in green) and deletions (strike-through and in red).

nStudy Page 17/28
Luc Beaudoin and Philip H. Winne
Figure 9 Document Version Window
Figure 10 Document Comparison Window

nStudy Page 18/28
Luc Beaudoin and Philip H. Winne
8 Learning Strategies nStudy provides a type of learning object specifically tailored to describe learning strategies, illustrated in Figure 11 below. These strategy objects have their own forms. Typically, the form of a strategy explains when to use it, why it helps and provides examples. Learners can create their own learning strategies and link to them. Or they can link text in a browser window to a particular strategy as a reminder to apply it.
Figure 11 Learning Strategy Editor Figure 12 below illustrates some of the learning strategies built into an nStudy workspace.

nStudy Page 19/28
Luc Beaudoin and Philip H. Winne
Figure 12 Learning Strategies in Library Window
9 Working With Terms nStudy provides an editor for terms as shown in Figure 13 below . Terms are effectively glossary or dictionary entries that play a special role in the system. The sidebar of every editor window contains a section listing terms used in the learning object. This section is populated with the subset of all terms in the workspace that are mentioned in the learning object currently in view. The list of terms provides a means for learners, at a glance, to identify which concepts are being discussed in the document. Also, learners can immediately review the definition of these terms by double clicking them. As they build more complex conceptual structures, learners also can manually link related sections of texts to terms.

nStudy Page 20/28
Luc Beaudoin and Philip H. Winne
Figure 13 Term Editor
10 Working With Items in the nStudy Library The nStudy library is a window with a tabbed table listing a learners’ personal learning objects. An example is shown in Figure 14 below. Given the large quantity of personal learning objects that learners generate in learning, it is important to have many different ways to search, filter and organize them: • Learners can organize their items into folders, as shown in the top left panel of the
library. • They can do a full text search or search by meta-data such as: creator, last editor, date
created, date modified, folder, last viewer, snip, title, etc. • They can filter the window according to type of learning objects (e.g., note,
bookmarks, etc.) • They can sort the table by any of its columns that describe the meta-data of learning
objects.

nStudy Page 21/28
Luc Beaudoin and Philip H. Winne
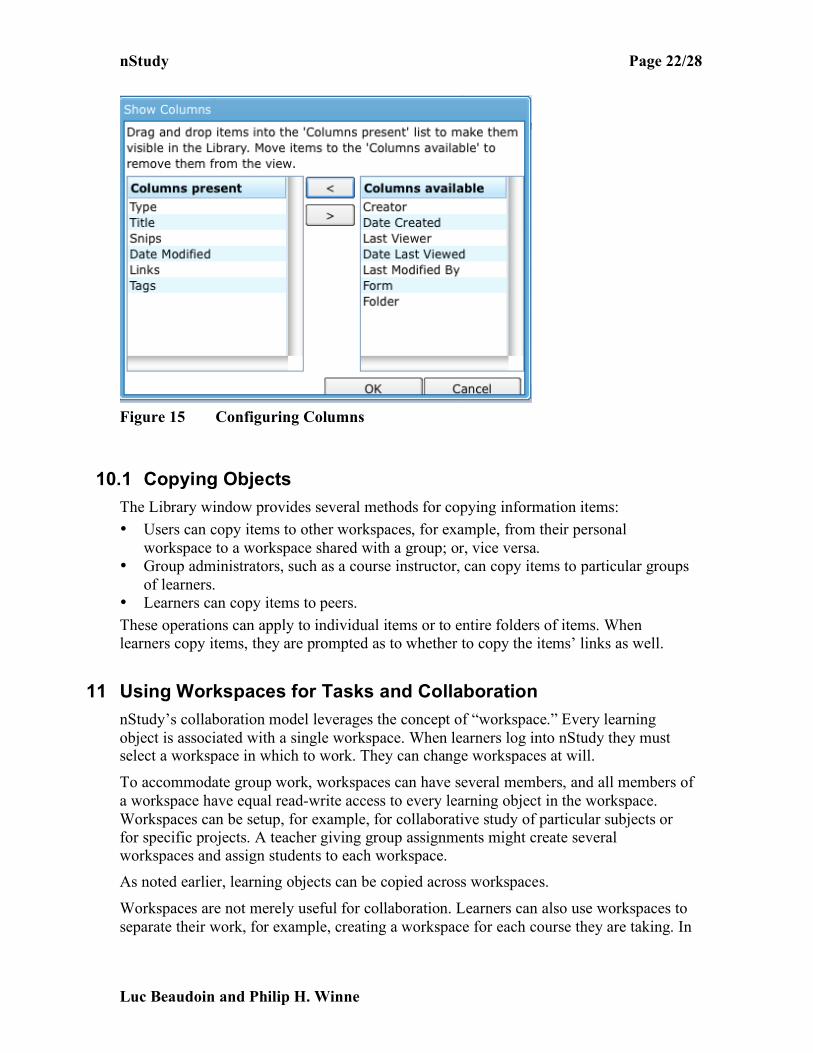
• They can configure which columns they want to view, for example, the number of links a learning object has to other objects, its tags, date last viewed, etc. See Figure 15 below.
• They can filter the table by tag, as shown in the bottom left panel, e.g., to show only learning objects tagged as “I don’t understand”.
By examining the links column, learners get an idea of how many annotations are associated with a particular learning object. For example, in the figure below, the bookmark “A definition of development” has 20 links. By looking at the tags column, it can be seen this page has six tags.
Figure 14 Library Window
nStudy Page 22/28
Luc Beaudoin and Philip H. Winne
Figure 15 Configuring Columns
10.1 Copying Objects The Library window provides several methods for copying information items: • Users can copy items to other workspaces, for example, from their personal
workspace to a workspace shared with a group; or, vice versa. • Group administrators, such as a course instructor, can copy items to particular groups
of learners. • Learners can copy items to peers. These operations can apply to individual items or to entire folders of items. When learners copy items, they are prompted as to whether to copy the items’ links as well.
11 Using Workspaces for Tasks and Collaboration nStudy’s collaboration model leverages the concept of “workspace.” Every learning object is associated with a single workspace. When learners log into nStudy they must select a workspace in which to work. They can change workspaces at will.
To accommodate group work, workspaces can have several members, and all members of a workspace have equal read-write access to every learning object in the workspace. Workspaces can be setup, for example, for collaborative study of particular subjects or for specific projects. A teacher giving group assignments might create several workspaces and assign students to each workspace. As noted earlier, learning objects can be copied across workspaces.
Workspaces are not merely useful for collaboration. Learners can also use workspaces to separate their work, for example, creating a workspace for each course they are taking. In

nStudy Page 23/28
Luc Beaudoin and Philip H. Winne
future work, we plan to allow a learner to have simultaneous access to multiple workspaces.
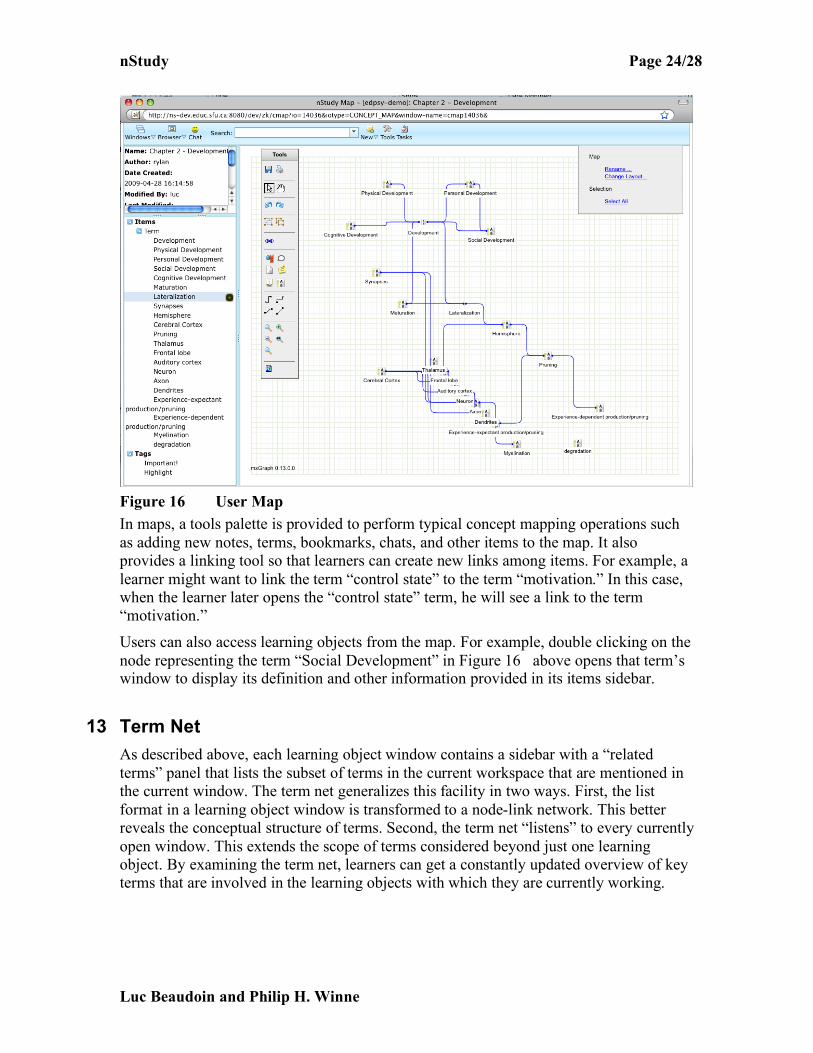
12 Maps nStudy contains a “map” tool that is a generalization of a concept mapping tool. A map is a graphical representation of information in a workspace that extends the library window’s tabular representation of those learning objects. See Figure 16 below. Learners can add any existing or new information item to a user map. Maps of learning objects are easy to create. For example, in the library, filter or select rows to create a collection of learning objects and click the “Show on Map” button in the toolbar. Learners can also create learning objects directly in a map.
In a map, learning objects are represented as nodes. Links between nodes are automatically displayed. For example, a user might select a bookmark in the library window and show it on a new map. All the learning objects linked to that bookmark are displayed in the map.
Maps, like other learning objects, can be shared amongst workspace members. This invites learners to reflect together on collaborative progress and their respective contributions to collaborative projects.
Map windows have a similar layout to other windows in nStudy. They contain a sidebar with an items panel listing all the items that are shown in the map. Learners can select an item in the items panel which causes it to be selected on the map.
Maps do not display tags or forms on the canvas. Instead, tags and forms that have been applied to items in the map are listed in the sidebar. A user can select a tag (such as “Important!”) in the sidebar which causes all the correspondingly tagged nodes in the map to be selected. This provides a quick method for visually identifying items to which a particular tag has been applied and examining how those learning objects relate to others in the map.
nStudy Page 24/28
Luc Beaudoin and Philip H. Winne
Figure 16 User Map In maps, a tools palette is provided to perform typical concept mapping operations such as adding new notes, terms, bookmarks, chats, and other items to the map. It also provides a linking tool so that learners can create new links among items. For example, a learner might want to link the term “control state” to the term “motivation.” In this case, when the learner later opens the “control state” term, he will see a link to the term “motivation.”
Users can also access learning objects from the map. For example, double clicking on the node representing the term “Social Development” in Figure 16 above opens that term’s window to display its definition and other information provided in its items sidebar.
13 Term Net As described above, each learning object window contains a sidebar with a “related terms” panel that lists the subset of terms in the current workspace that are mentioned in the current window. The term net generalizes this facility in two ways. First, the list format in a learning object window is transformed to a node-link network. This better reveals the conceptual structure of terms. Second, the term net “listens” to every currently open window. This extends the scope of terms considered beyond just one learning object. By examining the term net, learners can get a constantly updated overview of key terms that are involved in the learning objects with which they are currently working.

nStudy Page 25/28
Luc Beaudoin and Philip H. Winne
14 Chatting nStudy has an integrated chat tool based on the jabber protocol. (See Figure 17 below.) Our chat tool has three unique features. First, learners can annotate chats “live.” As the chat unfolds, they can link contributions from their peers to learning objects in their personal workspace. Second, the “terms used” panel of a chat provides a live update of the key terms mentioned in a chat. Third, teachers or researchers can configure roles for participants in a chat and develop prompts coordinated to specific roles. This feature helps chatters develop a structure for their collaboration that improves their shared work. Table 2 below provides some example roles and prompts that users can assign to themselves in study-related chats. Like some other chat tools, learners can also share with one another their learning objects. And, as is true of all nStudy’s learning objects, chats are preserved for later annotation and linking, and can be added to maps.
Figure 17 Chat Windows

nStudy Page 26/28
Luc Beaudoin and Philip H. Winne
Table 2 Example Chat Roles and Prompts
Role Stem
Summarizer “Did you think this part was about ...”
“Did you think the main point was...”
“What you got from this was….”
“You thought…..”
“It seems as though…..”
Questioner “One question you had was.... “
“What were you thinking about…”
“What question(s) can you ask about”
“I’m curious about...”
“Why do you think…..”
Clarifier “I wasn’t sure about...”
“Can anyone explain….”
“Where do you find….”
“This is where I found….”
“Do you think this means…”
Predictor “Do you think we will be reading about…”
“Do you wonder if... “
“Do you predict that...”
“Based on what we know….”
“What will happen if….”
15 Logging and Analysis nStudy is not just a learning environment. It is also a powerful scientific tool for investigating learner behavior in fine detail. nStudy generates extensive logs of learners’ interactions with information and the ways they use the system’s tools to survey information, annotate it and study. The system logs the time of every learner event, the identify of the learner who generated the event and information specific to the type of event, as described below.
The two main types of events are model events and view events. Model events are logged when users create, modify, delete or link learning objects. The entire state history of any learning object can be reconstructed from model events. This information can be leveraged for learners’ use as well. For example, users can view the history of every note, term, tag, form, strategy and document.
View events capture learners’ interactions with nStudy’s interface. When learners click on “hot” items , make a selection in a list, click on a link, load a new item in a window, add a node to a map, send a chat message, and so forth, a view event is generated. nStudy

nStudy Page 27/28
Luc Beaudoin and Philip H. Winne
logs the type of event (e.g., button pushed), the ID of the specific component generating the event, and the containment hierarchy of the component (e.g., the window). The learning object in which these view events occur is also captured, when applicable (i.e., what note was opened).
nStudy events are formatted according to an XML schema which supports detailed analyses of events’ occurrence, frequency, sequence, pattern, and other qualities of how learners study.
These detailed logs are designed to help education researchers answer a wide variety of questions about learning, such as: (a) How do text cues affect the information that learners select? (b) Which tags promote the detection of knowledge gaps? (c) What are the effects of goal setting on the enactment of learning strategies? (d) Is recall more accurate or more thorough when users use argument note forms vs. when they use summarization note forms? (e) Do learners write more comprehensive essays when they build maps from scratch or create node-link representations after annotating resource documents?
We are currently designing software tools to help learners, instructors, researchers and nStudy designers summarize and analyze the extensive and detailed log data that nStudy collects. Sample reports that the system will describe include: • For each class of learning object, summaries of each type of event (create, update,
delete, view). • Time spent on particular tasks. • Reading rates for browser documents. • Number of times items were reviewed, when and for how long each time. • Percentage of content that was annotated. • Relations between terms and learning objects (e.g., which terms appeared in which
items). • Time spent viewing vs. linking information items as a function of the number of
terms in them. We will provide ways for users to “drill down” from reports to the actual event data and information items that are consolidated in the report. For example, when viewing a table of note update events, users should be able to access the state of the note at the time at which the note was updated.
16 Future Developments Several enhancements are planned and in progress, including a self-test system, more extensive log analysis and user feedback.
A practice question learning object will be introduced. This will consist of a question, a collapsible snip field, an answer field, and several additional fields such as: importance, deadline, difficulty, mastery and number of attempts. Learners will be able to read a browser document and link snips of text to new practice questions. They will be able to do the same thing for terms and other learning objects.
Having created practice questions for a web page, learners will be able to click a “Quiz” button on the browser’s toolbar whereupon nStudy will present practice questions

nStudy Page 28/28
Luc Beaudoin and Philip H. Winne
associated with that page according to an algorithm that considers factors such as: how recently questions were presented, the learner’s success rate with the questions, delay since last viewing the web page and other factors that educational research identifies to help learners experience a valid test of knowledge. This will provide a convenient way for students to assess and improve their mastery of the content on that page. In the browser window’s sidebar, nStudy will present the learner’s success rate with page-relevant questions and other statistics about the questions, such as the average difficulty of the questions.
Learners also will be able to generate a self-quiz from the library window. They will be able to select a folder or a collection of items in the library table, control-click, and select “Quiz” from the popup menu. This will launch a quiz based on the question items that have been linked to the selected items.
Learners have difficulty formulating useful practice questions. We are currently designing tools to automatically generate quiz questions for glossary items. For example, given related terms in a term net, the tool will pose questions for students to define terms, compare related terms, analyze terms, criticize definitions, describe the relation between terms, and so forth.
17 References Beaudoin, L. (1994). Goal processing in autonomous agents. Ph.D. thesis. School of Computer Science. University of Birmingham.
Winne, P. H. and Hadwin, A. (2009). nStudy: A web application for researching and promoting self-regulated learning (version 0.8) [computer program]. Simon Fraser University, Burnaby, BC, Canada.
Winne, P. H., & Nesbit, J. C. (2009). Supporting self-regulated learning with cognitive tools. In D. J. Hacker, J. Dunlosky & A. C. Graesser (Eds.), Handbook of metacognition in education (pp. 259-277). New York: Routledge .