nsc80 compact colorant dispenser
TRANSCRIPT

Part
No:
376
11
Rev.
A
10-1
5
Harbil®
NSC80 Compact Colorant Dispenser
Operating and
Instruction
Manual

Fluid Management Customer Service 1.800.462.2466 2 | Harbil NSC80 Series
2011 Fluid Management as published work all rights reserved. Under the copyright laws, this material may not be copied, in whole or in part, without the written consent of Fluid Management. Your rights to the software are governed by the accompanying software license agreement. Use of Fluid Management trademarks, service marks, or logos for commercial purposes without the prior written consent of Fluid Management may constitute trademark infringement and unfair competition in violation of federal and state laws. Fluid Management, FMDirect, ColorPro, DVX, Harbil, Blendorama, Accutinter, Duraflow, Fast & Fluid Management, GyroFlex, GyroMixer, MicroTint, TintMaster, V1, and VR1 are trademarks of Fluid Management, registered in the U.S. and/or other countries.
Every effort has been made to ensure that the information in this guide is accurate. Fluid Management is not responsible for printing or clerical errors. Fluid Management 1023 Wheeling Road Wheeling, Illinois 60090-5776 USA
800-462-2466 http://www.fluidman.com Published in the United States. Mention of third-party products is for informational purposes only and constitutes neither an endorsement nor a recommendation. Fluid Management assumes no responsibility with regard to the performance or use of these products.

Fluid Management Customer Service 1.800.462.2466 Harbil NSC80 Series | 3
LIMITED WARRANTY ON EQUIPMENT If within one year from the date of shipment or one year from the proven date of installation, any equipment covered by this manual shall prove to be defective in materials or workmanship upon examination by FLUID MANAGEMENT LP. ("SELLER"), SELLER will supply identical or substantially similar replacement equipment or parts, or at SELLER's option, will repair or allow credit for such equipment. In addition, within the United States and Canada, labor costs are covered for the first six months following shipment or proven installation date for repairs to the following components: crankshafts, motors, speed reducers, circuit boards, relays, relay panels, power supplies, transformers, frames, gear pumps, solenoid valves, can holders, bearings and clutch springs. All labor must be approved in advance by SELLER and performed by a Fluid Management Authorized Service Center. PURCHASER MUST NOTIFY SELLER OF A WARRANTY CLAIM WITHIN THIS PERIOD. NO RETURNS ARE AUTHORIZED WITHOUT A RETURN GOODS AUTHORIZATION FORM. Any repair or replacement provided hereunder shall be warranted against detects in material or workmanship for the unexpired portion of the equipment warranty. This warranty does not cover software, which is covered by separate warranty.
DISCLAIMER THIS WARRANTY SHALL BE APPLICABLE ONLY IF THE EQUIPMENT SHALL BE THE PROPERTY OF THE ORIGINAL PURCHASER OR USER, AND SHALL HAVE BEEN PROPERLY USED, OPERATED AND MAINTAINED IN ACCORDANCE WITH THE MANUAL OR INSTRUCTIONS PROVIDED WITH THE EQUIPMENT AND FOR THE PURPOSE FOR WHICH SOLD. NORMAL WEAR AND TEAR IS NOT COVERED BY THIS WARRANTY. THIS WARRANTY SHALL NOT BE APPLICABLE IF THE EQUIPMENT OR ANY PART THEREOF HAS BEEN REPAIRED OR REPLACED BY THE BUYER WITHOUT THE SELLER'S PRIOR PERMISSION OR HAS BEEN SUBJECTED TO ANY ACCIDENT, CASUALTY, MISAPPLICATION, ALTERATION, ABUSE OR MISUSE. NO OTHER WARRANTY, EITHER EXPRESS OR IMPLIED, AND INCLUDING A WARRANTY OR MERCHANTABILITY AND FITNESS FOR A PARTICULAR PURPOSE, HAS BEEN OR WILL BE MADE BY OR ON BEHALF OF SELLER OR BY OPERATION OF LAW WITH RESPECT TO THE EQUIPMENT AND ACCESSORIES OR THEIR INSTALLATION, USE, OPERATION, REPLACEMENT OR REPAIR. SELLER SHALL NOT BE LIABLE BY VIRTUE OF THIS WARRANTY, OR OTHERWISE, FOR ANY INCIDENTAL, SPECIAL OR CONSEQUENTIAL DAMAGE RESULTING FROM THE USE OR OPERATION OF THE EQUIPMENT, WHETHER OR NOT SELLER WAS INFORMED OF THE POSSIBILITY OF SUCH DAMAGES. IRRESPECTIVE OF ANY STATUTE, THE BUYER RECOGNIZES THAT THE EXPRESS WARRANTY SET FORTH ABOVE IS THE EXCLUSIVE REMEDY TO WHICH IT IS ENTITLED AND WAIVES ALL OTHER REMEDIES, STATUTORY OR OTHERWISE. REPAIR OR REPLACEMENT SHALL BE BUYER'S SOLE REMEDY UNDER THIS WARRANTY.

Fluid Management Customer Service 1.800.462.2466 4 | Harbil NSC80 Series
O nce your NSC80 Dispenser is installed, what’s next? In this guide, you’ll find more information to help you get the most from your new Fluid Management NSC80 Dispenser.
NSC80 12 Canister Dispenser
About This Guide 5 How to Use this Guide 5 For Your Safety
Important Safety Information 6 Information and Instruction Labels 6 Safety Notice Information 6 General Safety Information 7 Grounding 7 Danger 7 Safety and Regulatory Compliance Information 7 FCC Compliance Statement
Getting to Know Your NSC80 Dispenser 8 Technical Specifications 8 Environmental Conditions 8 Highlights 8 Features
Getting Started 9 Unpacking & Installation 10 Assembling the Machines 11 Filling the Canisters 11 Priming the Pumps
Basic Operations 12 Dispensing from the Machine 13 Remote Dispensing 14 Repeatability Gauge
Maintenance Procedures 15 Daily and Weekly Maintenance 16 Clogged Nozzle 16 Cleaning the Canister Pump Assembly
Service 17 Upgrades and Replacement Parts
Parts 18 Parts

Fluid Management Customer Service 1.800.462.2466
Important S
Harbil NSC80 Series | 5
Safety Precautions • Read this guide and
all warning labels before using the machine.
• Keep this guide in a safe place.
• Read and adhere to all Warning and Caution labels on the machine.
• Prepare, level, and clear the area where the machine will be installed.
• To avoid risk of fire or injury, unplug the power before servicing electrical components.
• DO NOT use the dispenser with or near flammable or combustible materials.
• DO NOT dispense flammable materials.
• After installing, complete a purge for each position.
• Check that canisters are in place and secure.
• DO NOT install equipment in an area that water jet equipment is used.
• Ensure that nothing rests on your equipment’s cables and that the cables are not located where they can be stepped on or tripped over.
• Plug into an approved grounded outlet only. Make sure the outlet meets all national and local codes.
• To reduce the risk of electric shock or injury, use indoors only.
How to Use this Guide
This guide is organized into eight sections. Each section provides detailed information on NSC80 Dispenser topics and provides a basic reference that can be used to help you with specific issues.
Important: Carefully read all the installation instructions and the safety information before you first use your NSC80 Dispenser.
This guide provides instructions for safely and easily installing your NSC80 Dispenser when it arrives. This publication also includes operational instructions, daily and preventative maintenance procedures, basic troubleshooting suggestions, customer service, and warranty information. If you are an experienced user, you may already know enough to get started. Make sure you look over the information in Getting to Know Your NSC80 Dispenser to find out about the features of this NSC80 Dispenser. If you have internet access, the most current information for your NSC80 Dispenser is available from the worldwide web at
http://www.fluidman.com For Your Safety Customer safety is important. Our products are designed to be safe and effective. However, dispensers are electrical equipment. The NSC80 Dispenser is safe and reliable—designed to bring many years of operation. There are precautions you can take to avoid damage to the equipment or bodily injury before operating. By carefully following the instructions in this document and the warning and maintenance labels on the machine, you can help protect yourself from hazards and create a safer work environment. Equipment can become damaged due to misuse or neglect. Some product damage is serious enough that the product should not be used again until it has been inspected and, if necessary, repaired by a Fluid Management authorized service technician. As with any electronic device, pay close attention to the mixer when it is turned on. On very rare occasions, you might notice an odor or see a puff of smoke or sparks vent from your machine, or you might hear sounds like popping, cracking or hissing. These conditions might merely mean that an internal electronic component has failed in a safe and controlled manner. However, it may indicate a potential safety issue. DO NOT take risks or attempt to diagnose the situation yourself. Contact Fluid Management at 1-800-462-2466 for assistance. NOTE: This appliance can be used by children aged from 8 years and above,
and persons with reduced physical, sensory, or mental capabilities or lack of experience and knowledge, if they have been given supervision or instruction concerning use of the appliance in a safe way and understand the hazards involved. Children shall not play with the appliance. Cleaning and user maintenance shall not be made by children without supervision.

About this Guide
Fluid Management Customer Service 1.800.462.2466
6 | Harbil NSC80 Series
Information and Instruction Labels You should become familiar with the information labels affixed to the machine, as well as the warnings, cautions, and notes which appear throughout this guide. Read all the warning labels on the exterior and interior of the mixer. If the labels become damaged or unreadable, you may purchase replacements from Fluid Management Customer Service. Safety Notice Information The two main notices used in this guide and on the NSC80 Dispenser are Warning and Caution.
WARNING
Unplug before servicing
WARNING
HAZARDOUS ELECTRICAL
COMPONENTS
CAUTION
POTENTIAL SAFETY HAZARD
A Warning notice tells you about a hazard that could cause serious injury to you or extensive damage to the equipment. This information is featured in the beginning of the guide to emphasize safety. When you see a Warning notice in this guide, read it carefully before continuing with the operation of the machine. Take all necessary precautions to avoid potential injury.
A Caution notice tells you about a danger that could cause injury to you or minor damage to the mixer. When you see a Caution notice in this guide, read it carefully and be sure you understand it before continuing.
Use a dedicated
15 amp circuit (US & Latin America only)
WARNING DO NOT use with or
near flammables
General Safety Information ALWAYS make sure that the power is turned off and the machine is unplugged before you attempt to replace any components on your dispenser. If you have any questions or concerns, contact Fluid Management Customer Service
Fluid Management Customer Service 1.800.462.2466
Important Safety Information
Harbil NSC80 Series | 7
(A) GROUNDED PIN
Warnings
• This machine draws
1.5 Amps at 120 ± 10% VAC 0.8 Amps at 220 ± 10% VAC
• DO NOT modify the
provided plug • Improper use of grounding
plug can result in risk of electric shock.
Cautions
• Check with a qualified
electrician or service person if grounding instructions are not completely understood or if in doubt as to whether product is properly grounded.
• DO NOT use an adapter or
extension cord with this product.
• To reduce the risk of
electric shock or injury, use indoors only.
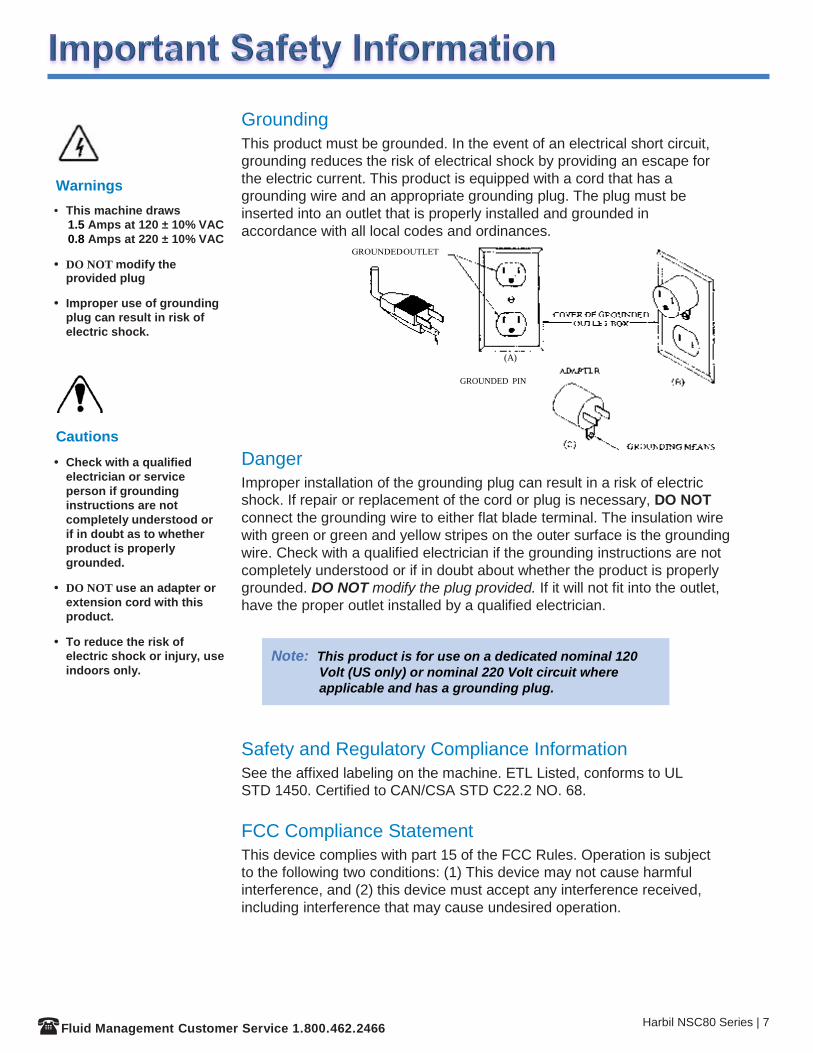
Grounding This product must be grounded. In the event of an electrical short circuit, grounding reduces the risk of electrical shock by providing an escape for the electric current. This product is equipped with a cord that has a grounding wire and an appropriate grounding plug. The plug must be inserted into an outlet that is properly installed and grounded in accordance with all local codes and ordinances.
Danger Improper installation of the grounding plug can result in a risk of electric shock. If repair or replacement of the cord or plug is necessary, DO NOT connect the grounding wire to either flat blade terminal. The insulation wire with green or green and yellow stripes on the outer surface is the grounding wire. Check with a qualified electrician if the grounding instructions are not completely understood or if in doubt about whether the product is properly grounded. DO NOT modify the plug provided. If it will not fit into the outlet, have the proper outlet installed by a qualified electrician.
Note: This product is for use on a dedicated nominal 120 Volt (US only) or nominal 220 Volt circuit where applicable and has a grounding plug.
Safety and Regulatory Compliance Information See the affixed labeling on the machine. ETL Listed, conforms to UL STD 1450. Certified to CAN/CSA STD C22.2 NO. 68.
FCC Compliance Statement This device complies with part 15 of the FCC Rules. Operation is subject to the following two conditions: (1) This device may not cause harmful interference, and (2) this device must accept any interference received, including interference that may cause undesired operation.

Fluid Management Customer Service 1.800.462.2466
8 | Harbil NSC80 Series
NSC80 12 Canister
Model Shown
Technical Specifications NSC80 Dispensers 12 Canister Model Height: 56.3” (143 cm) Width: 27.7” (70cm) Depth: 27.7” (70 cm) 1-Gal. Shelf Height: 28.5” (72 cm) 5-Gal. Shelf Height: 21” (53 cm) Weight: 120 pounds (50 kg)
Maximum power: 120V, 1.5 Amps +/- 10%, 60 Hz 220V, 0.75 Amps +/- 10%, 50Hz 16 Canister Model Height: 56.3” (143 cm) Width: 34.2” (87 cm) Depth: 34.2” (87 cm) 1-Gal. Shelf Height: 28.5” (72 cm) 5-Gal. Shelf Height: 21” (53 cm) Weight: 120 pounds (50 kg)
Maximum power: 120V, 1.5 Amps +/- 10%, 60 Hz Environmental Conditions • Operating Temperature: Between 50°F (10°C) and 104°F (40°C)
• Relative Humidity: Between 5% and 85% without condensation
Highlights • Accurate dispensing through saw-toothed, self-
zeroing gauges • 2.5 qt stainless steel canisters • 2-oz piston pumps with 1/128th minimum dispense
accuracy (colorant dependent) • Industrial grade seals and lid compatible with solvent
and LVOC/ZVOC colorant. • Agitation timer provided with all floor model
dispensers.
Features • Nozzle closers provided on every canister to
help minimize tip drying for water-based colorants.
• Larger and greater number of agitation blades for better colorant agitation in each canister.
• Repeatability gauges provided on every canister making it easier for your operators to repeat the last dispense with multiple gallon orders.
• Removable canisters from the dispenser with a press of a button
• Bottom electric driven agitation making it easier to fill colorant and reduce the risk of canisters being left open when removed from the dispenser.
NSC80 Front View NSC80 Side View

Fluid Management Customer Service 1.800.462.2466
Important Safety Information
Harbil NSC80 Series | 9
Your Harbil NSC80 is a compact manual colorant dispenser that was designed for exceptional reliability and ease of use. It is a nearly maintenance free device that should deliver many years of reliable service. Its features include: • Heavy-duty components and a durable finish for long wear. • Bottom agitation linked with rotation of the canisters. • Special adjustable shelving to accommodate all can sizes. Your Harbil NSC80 Compact Color Dispenser has been designed with every consideration possible to provide for simplicity of operation, complete accuracy and no maintenance of any mechanical parts. It can be set up and put into service within a matter of minutes and anyone can learn to operate it on the first attempt by following the simple instructions contained in this manual. While function was a primary factor in the design, the NSC80 Dispenser is an attractive unit and will always look like new with proper housekeeping. Cleanliness of the dispenser and proper maintenance of the colorant in the machine are the only requirements necessary for a long and satisfactory use of this dispenser.
IMPORTANT:
Unpack all of the shipping cartons and carefully inspect the contents for any concealed damage, which may have occurred in transit. If any damage is found, notify the carrier at once and arrange for inspection in order to claim recovery. Claims for damage must be made by the consignee (YOU).The carrier assumes full responsibility upon acceptance of shipment and will not entertain any claims by the consignor (Fluid Management).
CAUTION:
To reduce the risk of Electric Shock or Injury, Use Indoors Only.
READ CAREFULLY BEFORE REMOVING BASE FROM PACKAGING
When removing the base of the dispenser from the packaging, be
sure to use the lower plate shown in the figure #1 when lifting into
location. This lower plate is mounted directly to the bottom cabinet
and will provide the support needed to move the dispenser into its
final location.
Figure #1

Fluid Management Customer Service 1.800.462.2466 10 | Harbil NSC80 Series
Assembling the Machines Your Harbil NSC80 Compact Color Dispenser requires only the simple attaching of the individual canisters to the turntable or fastening to the in-line base. Do not fill the canisters with colorant before they are mounted on the base. For In-Line NSC80 Dispensers
1. Place the first canister in position on the in-line base or at the front of the turntable.
2. Screw three 1/4-20 hex-head bolts with rubber washers into the bottom of the canister and after all three bolts are in place snug them up with a wrench (these bolts and washers are packaged in a separate bag with the red nozzle caps). DO NOT overtighten the bolts.
3. The canister covers can now be installed on the canisters. (See IMPORTANT note in turntable section,
#3.) For Turntable NSC80 Dispensers
1. Place the first canister in position at the front of the turntable.
2. Depress the index lever and move the turntable to the next position and repeat the above procedure until all of the canisters are mounted.
3. The canister covers can now be installed on the canisters.
IMPORTANT:
• The canister covers should be kept on the canisters at all times to minimize the evaporation and drying of the colorant.
• Nozzle closers are provided with every canister to help prevent drying of the colorant

Fluid Management Customer Service 1.800.462.2466
Important Safety Information
Harbil NSC80 Series | 11
and they closed after every use.
Filling the Canisters
After all of the canisters have been installed on the turntable, they can be filled. Each canister has a maximum capacity of 2-1/2 quarts. It is recommended that each canister be filled with two (2) quarts of colorant. The maximum capacity of the pump is two (2) ounces.
The following steps represent the process by which the canisters should be filled:
1. Locate the first canister and determine which colorant is to be placed into that canister.
2. Place the appropriate decal on the canister.
3. IMPORTANT – After setting up machine, let machine and colorants warm to room temperature before pouring colorants into canisters
4. Shake of stir the colorant following manufacturer’s recommendations.
5. Slowly, pour the colorant into the canister to the level of approximately two (2) quarts.
6. Place the top on the canister.
7. Repeat these steps for each of the remaining canisters.
8. After all of the canisters have been filled, agitate by turning on the agitation motor. This will release
any air trapped in the colorant. Priming the Pumps
Once the canisters have been both filled and agitated, the pumps attached to each of the canisters must be properly primed. Follow these steps to prime the pumps.
1. Locate the first canister.
2. Slowly pull the pump handle all of the way to the top of its stroke and wait in this position for a count of approximately three (3) seconds.
3. Slowly press the pump handle all of the way down to the bottom of its stroke.
4. Repeat these steps five (5) times.
5. Repeat steps 1 through 4 for each of the remaining canisters.

Fluid Management Customer Service 1.800.462.2466
12 | Harbil NSC80 Series
Dispensing from the Machine This dispensing equipment is designed for ease of use. The following steps represent the method by which a formula is to be dispensed:
1. Determine the formula of the color selected by the customer.
2. Refer to the formula book and select the proper base paint. 3. Remove the lid on the base paint. 4. Pull out the appropriate shelf and place the can of base paint on the shelf. 5. Press the turntable indexing lever down and rotate the turntable to the position indicated by the formula
book. 6. Turn the pump gauge to the left or right to center the indicator pointer. 7. Raise the pump gauge so that the indicator is opposite the notch on the gauge corresponding to the
amount of colorant to be dispensed. 8. Turn the handle to the left or right and move the indicator into the desired notch that represents the desired
amount of colorant per the formula book. 9. After the pump handle has been in this position for about three (3) seconds, open the dispensing valve by
pulling the valve lever forward until a positive stop is felt. 10. Open the nozzle closer by pressing the black lever to the right. 11. Turn the gauge to the center of the indicator and slowly push the pump handle down all of the way to the
bottom of the stroke. This will dispense a metered amount of colorant into the base paint. 12. Lift the dispense valve lever and repeat from step 6 as may be required by the formula book. 13. When finished dispensing, close the nozzle closer on the canister by pressing the black lever to the left. 14. Referring to the formula book, Pull down the turntable indexing lever and rotate the turntable to the next
position indicated and repeat these steps for each of the colorants in the formula. 15. At this point in the process, the can of base paint has been tinted. Remove the can, press the lid back on
and mix appropriately.
CAUTION:
Do not open (pull forward) the dispensing valve lever when measuring colorant. If the valve lever is opened before the pump gauge has been located in the proper notch, it can be corrected by releasing (closing) the valve lever and fully depressing the pump gauge returning the colorant to the canister. The pump must then be re-primed (see Priming the Pumps) before starting the measuring procedure again.

Fluid Management Customer Service 1.800.462.2466
Important Safety Information
Harbil NSC80 Series | 13
After the pump gauge indicator is located in the notch and the valve lever is opened, any further movement of the pump gauge either in an upward or downward direction will have no effect on the accuracy of the amount of colorant to be dispensed, as the colorant source from the canister is shut off once the valve lever is opened. However, if the pump gauge is raised after the valve lever is opened air will be drawn into the pump through the dispense nozzle. Therefore, care should be taken in SLOWLY depressing the pump gauge to avoid spattering of the colorant as the air leaves the dispense nozzle. IMPORTANT:
If at any time after raising the pump gauge and with the valve lever open the pump gauge cannot be depressed, DO NOT FORCE the pump gauge. Release (close) the valve lever and then depress the pump gauge, returning the colorant to the canister. The failure to depress the pump gauge will be due to dried colorant clogging the dispense nozzle of the canister. To correct this OPEN the valve lever and while holding it in the open position, insert a paper clip or other similar object into the dispense nozzle. BE SURE TO REMOVE the paper clip before allowing the valve lever to close (any movement of the valve lever while the paper clip is in place may cause damage to the Teflon Valve Assembly).
Remote Dispensing The canisters on the turntable version of the NSC80 can be easily removed from the machine with the press of a button allowing for remote dispensing. For large paint orders, it can be easier to remotely tint paint directly into the 5-gallon cans instead of lifting them onto the dispenser. The canisters can be removed from the turntable with the following steps.
Press Button to Release Canister

Fluid Management Customer Service 1.800.462.2466
14 | Harbil NSC80 Series
Repeatability Gauge For large orders of the same colorant formula with multiple gallons, a repeatability gauge has been provided with each canister providing the operator a way to set the gauge once as specified in a formula and repeat the same dispense without having to adjust the dispense stroke each time. 1. Loosen black dial and slide repeatability gauge to desired location as
specified in the formula.
2. Dispense as directed on page 12 using the repeatability gauge as a stop when filling the tube with colorant before dispensing.
3. Repeat for each colorant as specified by the formulation for that customer color.
4. The same stops can be used when customers request multiple quarts, 1-gallons or 5-gallon of the same color.
5. When finished, loosen each black dial on the repeatability gauge and lower to their original location.

Fluid Management Customer Service 1.800.462.2466
Important Safety Information
Harbil NSC80 Series | 15
Unplug from outlet before servicing and cleaning.
To ensure safe, dependable operation of the equipment, follow the maintenance schedule detailed below:
DAILY
Cleaning & Filling:
• Agitate colorants every morning for five (5) to ten (10) minutes.
• Clean nozzles & outside cabinet surfaces with soap and water.
• Check canisters and fill as required.
WEEKLY
Cleaning & Nozzle Maintenance:
• Dispense a full measure of any colorant that has not been used during the previous week. Dispense into a clean container and return to the appropriate canister.
• Clean all accessible inside surfaces with soap and water.
• Clean nozzle closers and inspect sealing pads. o Open nozzle closer, pull towards you and clean using soap and water. o Return nozzle closer into canister, which will click into place. o Close nozzle closer.

Fluid Management Customer Service 1.800.462.2466 16 | Harbil NSC80 Series
Clogged Nozzle If a nozzle becomes clogged, the obstruction can generally be cleared by inserting a paper clip or similar object in the valve opening. Before inserting such a device, open the valve by pulling the valve lever down and holding while clearing the opening. BE SURE THAT THE VALVE IS OPENED, AND STAYS OPEN WHILE CLEANING IN THIS WAY. IF THE VALVE CLOSES AT ANY TIME DURING THIS OPERATION, THE VALVE COULD BE DAMAGED. If colorant leaks develop at the top of the pump, or if colorant can be observed on the pump piston rod, the pump assembly must be repaired. The Pump Repair Kit (P/N 4223212) can be purchased from the Fluid Management Customer Service Department. A colorant leak at the bottom of the pump assembly generally indicates that the pump assembly has been damaged. In this case, the valve assembly must be replaced with the Thiokol Repair Kit (P/N 4231011).
Cleaning the Canister Pump Assembly
When it becomes necessary to clean a canister pump assembly, remove the canister from the base and pour out as much of the colorant as possible. If the colorants are water soluble, wash the canister thoroughly with warm water and a liquid detergent and rinse with clean warm water. Next fill the canister with a small amount of water, and with the valve lever closed, raise and lower the handle on the pump and gauge assembly several times. Then make several dispenses of the water through the dispense nozzle, the same as you would for colorant. Pour out any remaining water and wipe dry before replacing the canister on the dispenser. Dispense any water left in the pump assembly before refilling the colorant. If the colorants are not water soluble, the procedure is the same as above, except in place of water mineral spirits or a similar solvent is recommended.
IMPORTANT:
When cleaning the canister, DO NOT submerge the pump gauge assembly portion of the canister or let water or mineral spirits get into the top of the pump assembly.

Fluid Management Customer Service 1.800.462.2466
Harbil NSC80 Series | 17
Upgrades and Replacement Parts
Some parts can be upgraded or replaced by the customer. Fluid Management expressly identifies parts as such, and provides documentation with instructions when it is appropriate for customers to replace those parts. You must closely follow all instructions when performing such replacements. ALWAYS make sure that the power is turned off and that the product is unplugged from any power source before you attempt the replacement.
Fluid Management Customer Service 1.800.462.2466
Save time and money. If something should go wrong, we suggest consulting the Maintenance, and Service sections of this guide. They are designed to solve basic problems before consulting a service technician. However, should you need assistance, please have your model and serial number ready. Be near your machine when you call and have a purchase order number if ordering parts. The serial plate is located on the side panel of the machine. It includes the serial and model numbers for your machine. Please make a note of these numbers below: Date of purchase:
Model Number:
Serial Number:

Fluid Management Customer Service 1.800.462.2466 18 | Harbil NSC80 Series

Fluid Management Customer Service 1.800.462.2466
Harbil NSC80 Series | 19

NSC80 Compact Colorant Dispenser
Fluid Management, Inc. 1023 Wheeling Road • Wheeling IL 60090 p: 847.462.2466 f: 847.537.3221 www.fluidman.com