nrl core getting started - university of maryland obtaining the nrl core virtual machine after...
TRANSCRIPT

Spring 2017
NRL CORE Getting Started
CMSC417

2
Table of Contents
Overview........................................................................................................................................................3
Installing the Hypervisor.................................................................................................................................4
Obtaining the NRL Core Virtual Machine ........................................................................................................5
Running the NRL Core Virtual Machine...........................................................................................................6
Required Changes...........................................................................................................................................7Configuring Networking ............................................................................................................................................7Installing gcc .............................................................................................................................................................7
Using the NRL Core Emulator..........................................................................................................................8Creating Nodes .......................................................................................................................................................10Connecting Nodes...................................................................................................................................................11Starting the simulation ...........................................................................................................................................12Interacting with the Nodes .....................................................................................................................................12Recap......................................................................................................................................................................14
Terminology ................................................................................................................................................. 15
(More) Pro‐Tips ............................................................................................................................................ 16

3
Overview Due to the great variety in the way that different machines handle networking, all programming for this course is required to be done in a virtual machine. We will not accept code that does not run in the provided virtual machine. We have chosen a pre-built virtual machine released by the Navy Research Lab because it includes a graphical network emulator that allow you to practice connecting multiple machines without the issues of firewalls, network connectivity problems, and sharing ports.

4
Installing the Hypervisor The Hypervisor is an application that runs on your machine which allows you run multiple operating systems on top of your main OS. For this class, we will be using VMware (Workstation for PC / Linux, Fusion for Mac). The software is available for download at: terpware.umd.edu* VMWare Workstation 12 (PC) http://terpware.umd.edu/Windows/title/1975 VMWare Workstation 12 (Linux) http://terpware.umd.edu/Linux/title/1975 VMWare Fusion 8 (Mac) http://terpware.umd.edu/Mac/title/1975 * It is strongly recommended that you use the version available on Terpware since it comes with a free 1-Year license. If you use the trial version from the VMWare website, you risk your trial running out in the middle of the semester.

5
Obtaining the NRL Core Virtual Machine After downloading (and installing) VMWare, you will need to download a pre-built Virtual Machine Image to run.
1. The virtual machine image is available at: https://downloads.pf.itd.nrl.navy.mil/core/vmware-image/
2. Download vcore-4.7.zip (yes, this does matter) 3. Extract the .zip file that you downloaded in the previous step to a location on your
machine where you would like to store the virtual machine.

6
Running the NRL Core Virtual Machine
1. Select ‘File’ then ‘Open’ 2. Navigate to the location that you extracted the Virtual Machine image in step ___ and
open the .vmx file 3. There should now be a “Play” button
a. On Workstation it should be located on the toolbar b. On Fusion, it’s in the middle of the black box on the screen
ProTip: some students have said that on OSX, they can only load the machine if they double click on the .vmx file in Finder.

7
Required Changes The following configuration changes are critical and you may be unable to complete the assignments without completing them
Configuring Networking You will need to set network from ‘Bridged’ mode to ‘NAT’ mode (if you don’t complete this step, your VM may not be able to access outside networks. On OSX, the option you want is called “Share with my Mac”
1. The instructions are different for VMWare Fusion and VMWare Workstation, but the setting is located under ‘Virtual Machine’ settings.
2. Select the network adapter and change from Bridged to NAT
Installing gcc You will need to install gcc in order to compile and build the first two projects Open a terminal window in the Virtual Machine and type:
sudo apt-get update sudo apt-get install build-essential
ProTip: the username and password are both: core

8
Using the NRL Core Emulator In this demonstration, we will create a simple network emulation with two nodes.
1. When your Virtual Machine is successfully loaded, you should see something similar to the following:
2. Double click on the CORE icon to open the CORE Network Emulator, and you should see a window similar to the following

9

10
Creating Nodes
1. Click on ‘network-layer virtual nodes’ and select PC
2. Click in two locations on the canvas to place the two virtual nodes

11
Connecting Nodes
1. Click on the ‘link-tool’
2. Click and drag a link from n1 to n2
You should now see a canvas with two nodes, n1 and n2. n1 has the IPv4 address 10.0.0.20 and n2 has the IPv4 address 10.0.0.21

12
Starting the simulation With the nodes placed and connected, it is time to start the emulation
1. Click on the ‘start the session’ button (the green circle with an arrow) above the ‘link tool’ button.
Interacting with the Nodes With the simulation started, you can now interact with the nodes
1. Double click on each node once to open a terminal for that node
13
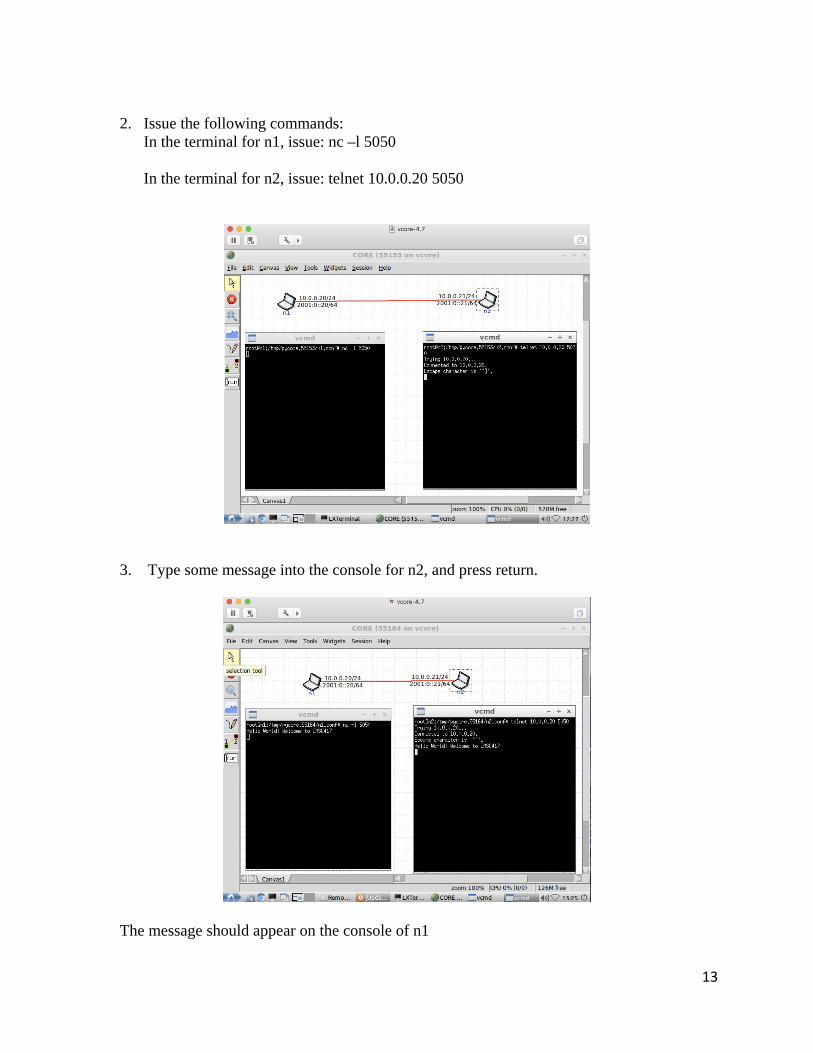
2. Issue the following commands:
In the terminal for n1, issue: nc –l 5050 In the terminal for n2, issue: telnet 10.0.0.20 5050
3. Type some message into the console for n2, and press return.
The message should appear on the console of n1

14
4. To exit telnet (on n2), press Ctrl+] then type quit 5. To exit nc (on n2), press Ctrl+c (quitting telnet should cause nc to exit) 6. To end the emulation, click on ‘stop the session’ which is a red circle with an X in it.
Recap We created two virtual nodes (n1 and n2), and created a connection between them. We then ran ‘netcat’ on n1 and told is to listen for incoming connections on port 5050. We then used telnet on n2 to connect to n1, at its routable IPv4 address 10.0.0.20 on port 5050. We then sent some data to n1 over the connection between the nodes.

15
Terminology In order to prevent confusion at a later time in the semester, we will adopt the following conventions. Host Machine: this is the machine that is running the hypervisor (i.e. your laptop / desktop) Guest Machine: this is the OS that is running inside the hypervisor Virtual Node: this is a single instance of a virtual node that you create in the CORE emulator (i.e. n1 and n2 in the previous example)

16
(More) Pro‐Tips If you find yourself disgruntled by the small resolution… The solution is to install the VMWare tools in the Guest Machine. Select “Virtual Machine” from the VMware Menu Select “Install VMWare Tools”
- This will insert a virtual CD drive into your Guest Machine with the VMWare tools install files
Open a terminal in the Guest Machine and issue the following commands:
mkdir ~/Desktop/vmwaretools cp /media/VMware\ Tools/* ~/Desktop/vmwaretools cd ~/Desktop/vmwaretools tar –xvzf VMwaretools*.tar.gz sudo perl ./vmware-tools-distrib/vmware-install.pl
The default options should work fine, so just press Enter (return) at each step. If you want to keep your desktop clean:
cd && rm –rf ~/Desktop/vmwaretools
ProTip: you must install gcc before installing the VMware Tools. ProTip: you will need to restart after installing the VMware Tools If you wish to access files on the Guest Machine from a Virtual Node (i.e. to run your code)… In the Virtual Node’s terminal, simply use the full path of the filename. For example, to access a file (file.txt) on the desktop of the Guest Machine: /home/core/Desktop/file.txt

17
If you wish to access files on the Host Machine from the Guest Machine… … there is a way to do it, but it’s not required for this course, so I won’t be covering it in this tutorial. If you wish to use a decent editor on the Guest Machine… … install sublime text … install emacs