np -$0.76 adult, vocational education; - ericthe textile design guide is the third of a series of...
TRANSCRIPT
ED 102 409
TITLE
INSTITUTIONSPONS AGENCY
PUB DATENOTE
AVAILABLE FROM
DOCUMENT RESUME
95 CI 003 141
Textile Design: A Suggested Program Guide.Industry Series No. 3.Fashion Inst. of Tech., New York, N.T.Bureau of Adult, Vocational, and Technictl(DREW /OE), Washington, D.C.
Fashion
Education
73121p.; For other documents in Fashion IndustrySeries, see CB 003 139-142 and CB 003 621Superintendent of Documents, U.S. Government Printing
Office, Washington, D.C. 20402
EDRS PRICE NP -$0.76 HC-$5.70 PLUS POSTAGE
DESCRIPTORS Adult, Vocational Education; Behavioral Objectives;Career Ladders; *Curriculum Guides; *Design; Design
Crafts; Educational Equipment; EmploymentOpportunities; Instructional Materials; *JobTraining; Needle Trades; *Occupational RomeEconomics; Occupational Information; ProgramDevelopment; Resource Guides; Resource Units;
Secondary Education; Skill Development; *Textiles
InstructionIDENTIFIERS *Fashion Industry
ABSTRACTThe textile design guide is the third of a series of
five interrelated program resource guides encompassing the various
disensions of the fashion industry. The job-preparatory guide is
conceived to provide youth and adults with intensive preparation for
initial entry esploysent and also with career advancement
opportunities within specific categories of jobs within the textile
industry. The guide provides an overview of the textile design field,
occupational opportunities, and cospetencies required of workers. It
contains outlines of areas of instruction which include objectives to
be achieved, teaching content, and suggestions for learning
experiences, evaluation, teaching resources, and instructional
supplies. These areas include fundasental background instruction,
basic skill developsent instruction, and career advancement
instruction, ranging from basic design and textile courses to
advanced job skills in print design, screen printing, woven design,
and weft knit design. (Author/NV)
I
111.
V
I 0 a 0 0 a
10-
_IV
111111111PP'
U.S. DI PAR MINT OP NSW%EDUCATION A WII.PARINATIONAL INSTITUT* OP
EDUCATIONTHIS DOCUMENT HAS SEEN REPRODUCED EXACTl. AS RECEIVED FROMTHE PERSON OR ORGANIZATION ORIGINATING It POINTS OF VIEW OR OPINIONSSTATED DO NOT NECESSARILY REPRESENT OFFICIAL NATIONAL INSTITUTE OFEDUCATION POSITION OR POLICY
DISCRIMINATION PROHIBITED Title VI of the Civil Rights Act of 1964 states: "Noperson in the United States shall, on the ground of race, color, or national origin, beexcluded from participation in, be denied the benefits of, or be subject to discriminationunder any program or activity receiving Federal financial assistance." Therefore, theVocational Education program, like every program or activity receiving financial assistance from the Department of Health, Education, and Welfare, must be operated incompliance with this law.
CO FASHION INDUSTRY SERIES NO. 3Ire
LW,
Textile Designa suggested program guide
Developed pursuant to a grantfrom the
U.S. Office of Educationto
The Fashion institute of TechnologyNew York, New York
1973
"The project presented or reported herein was performed pursuant to a Grant from theU.S. Office of Education, Department of Health, Education, and Welfare. However, theopinions expressed herein do not necessarily reflect the position or policy of the U.S.Office of Education, and no official endorsement by the U.S. Office of Education shouldbe inferred."
For sale by the Superintendent of Documents, U.S. Government Printing MeeWashington, D.C. 20402
FOREWORD
The Textile Design guide is one of a series of interrelated program resource guidesencompassing the various dimensions of the Fashion Industry. The purpose of the seriesis to provide school administrators and teachers with a source of information which canbe used to establish, expand, or evaluate instructional programs related to the broadfield of fashion.
The Fashion Industry Program Series includes five separate guides. Career Explo-ration in the Fashion Industry Series No. 1 presents an introduction to the differentsegments of the fashion field and a suggested career exploration program. Apparel De-sign and Production Series No. 2, Textile Design Series No. 3, Fashion Merchandis-ing Series No. 4, and Dry Cleaning and Laundering Series No. 5, are suggested job-preparatory (skill development) program guides. These job-preparatory guides are con-ceived to provide youth and adults with intensive preparation for initial entry employ-ment and career advancement opportunities within specific categories of jobs in thefashion industry.
In developing the job-preparatory guides, consideration was given to the structuringof objectives, content, and learning experiences in terms of the varying' competenciesconsidered essential for different levels of employment responsibility, thereby facilitatingthe adoption of performance-based instruction within a variety of institutional settings.The outcomes of such instruction are identified with immediate employment or continu-ing higher education.
This Textile Design guide provides an overview of the textile design field, occupa-tional opportunities, and competencies required of workers. It contains outlines of areasof instruction which include objectives to be achieved, teaching content and suggestionsfor learning experience, evaluation, teaching resources, and instructional supplies. Sug-gested equipment and approximate costs are included as well as a bibliography and alist of representative track associations. Other program considerations and services judgedto be important to this job-preparatory program are also presented.
All of the guides were developed by faculty specialists of the Fashion Institute ofTechnology pursuant to a grant from the U.S. Office of Education to the Institute.This guide was prepared by Miriam Russo, Associate Protessor and Chairman of theTextile Design department. Miriam Fredenthal, Assistant Professor of Textile Designprepared the areas of instruction in Woven Design; W. Parrish-Martin, Assistant Pro-fessor of Textile Design contributed the Screen Printing Design instructional areas; andGeorge Gati, Adjunct instructor of Textile Design developed the Knit Design instruc-tional areas. Lorraine Har, Assistant Chairman and Professor of Textile Design co-ordinated the suggested equipment and supplies.
The development of the guides was under the direction of William Berndt, ProjectOfficer, and Mary Lee Hurt and Edwin L. Nelson, Education Program Specialists in theU.S. Office of Education.
Many useful suggestions were received from industry and educational consultants,and from administrators and teachers of existing programs. Although all suggestionscould not be incorporated, each was carefully considered in terms of the publication'sintended use. In view of this, it should not be inferred that the program suggestions arecompletely endorsed by any one institution, agency, or person.
The program suggestions contained in this guide should be viewed as resource in-formation which can be modified and adapted by administrators and teachers to meetlocal, State, and regional needs.
Jeannette JarnowEdwin Goodman Professor, Fashion Institute of Technology;Project Director, Program Guides for the Fashion Industry.
Jac
ACKNOWLEDGMENTS
Grateful acknowledgment is due many teachers, school administrators, publishingcolleagues, and individuals in the textile industry for their aid, counsel, and cooperationin the preparation of this publication.
In particular, the project team of the Fashion Institute of Technology wishes torecognize the special guidance provided by the following individuals:
Robert Gentile, Stylist, Fisher and Gentile Ltd., New York, Ner York.Eta Herbst, Head of Fabrics Development Department, Aileen Inc., New York,
New York.Irving Kap low, Vice-President, Reeves Bros. Inc., New York, N.Y.; Chairman,
Education Committee of Textile Distributors' Association.Ed Newman, Director of Creative Services, Dan River Sales, New York, New
York.Leslie Til lett, Consultant on Design, New York, New York.Susan Wasack, Stylist, Hess Goldsmith Division, Burlington Industries Inc.,
New York, N.:w York.Nell Znamierowski, Coordinator of Textile Design Program, Brooklyn Museum
Art School, Brooklyn, N.Y.; Free-Lance Designer and Lecturer. New York,New York.
The information and cooperation provided by administrators and staff of thefollowing associations and institutions during the development of this publication arealso acknowledged with appreciation:
American Textile Manufacturers' Institute, Charlotte, North'Carolina.Board of Cooperative Educational Services, Westbury, New York.High School of Fashion Industries, New York, New York.Jane Addams High School, Cleveland, Ohio.
Textile Distributors' Association Inc., New York, New York.
rry
TABLE OF CONTENTS
PegsFOREWORD iiiACKNOWLEDGMENTS
THE IMPORTANCE OF THE FASHION INDUSTRY ixThe Impact of Fashion ixScope of the Fashion Industry ixEconomic ImportanceBroad Range of Occupational Opportunities
UTILIZATION OF THE GUIDE xiiiStructure of the Program xiiiConsiderations in Adaptation and Modification xiiiTime Allotments x iv
THE TEXTILE DESIGN FIELD 1
Manpower Needs 2Desired Competencies 2Educational Preparation 2Occupational Opportunities 2Profile of Occupations 3
Entry Jobs 3Advanced Career Opportunities 4
THE TEXTILE DESIGN PROGRAM 7
Program Objectives 7Desired Behavioral Outcomes 7Example of a Comprehensive Textile Design ProgramThe Program and Occupational Relationships 9Brief Overview of Areas of Instruction 10
GENERAL PROGRAM CONSIDERATIONS 13
Survey of Needs 13Faculty 13Student Enrollment and Services 14
Guidance and Counseling Services 14Placement and Follow-up Services 14Competency Certification 14
Student Organizati 14Advisory Committee 15Cooperative Training 15Safety 16Instructional Equipment 16Instructional Materials i 16Library Support 16Textbooks, References, and Audiovisual Aids 16
Svii
Page
OUTLINES OF AREAS OF INSTRUCTION 19
Fundamental Background instruction 20Color and Design 20Basic Textiles 28Drawing and Nature Study I 31Textile Design 1 34
Basic Skill Development instruction 38Drawing and Nature Study II 38Textile Design II 41Design Research 45Print Studio Techniques 48Screen Printing 1 53Woven Design I 59Weft Knit Design and Technology 84
Career Advancement Instruction 68Textile Design Ill 68Current Trends and industrial Practices 73Advanced Print Design 77Advanced Screen Printing 80Advanced Woven Design 84Advanced Weft Knit Design 89
FACILITIES, LABORATORIES, EQUIPMENT, SUPPLIES, COSTS 93
Facilities and Laboratories 93Equipment 94Supplies 97
SELECTED BIBLIOGRAPHY 105
APPENDIX 111
Representative Trade Associations 111
9viii
THE IMPORTANCE OF THE FASHION INDUSTRY
Fashion is as old as recorded history and as new astomorrow. It manifests itself not only in what peoplewear but in what they eat, the way they talk, whatthey do, how they live and the things they use.
THE IMPACT OF FASHION
Fashion can be defined as all of the prevailing stylesfollowed by substantial groups of people at a given timein a given place. Fashion touches many facets of humanliving and, in turn, the changing conditions of the envi-ronment in which that living takes place bring aboutchanges in fashion. The intensity with which changesin fashion are followed by people everywhere on alllevels of society is evidence of its impact on humanactivities and its significance as a social phenomenon.
The phenomenon of fashion has been studied, an-alyzed, and explained in many different terms. Econ-omists view it as an element of artificial obsolescencethat impels people to replace commodities which stillretain their original usefulness even though the new maynot greatly dii fer from the old. To sociologists it rep-resents a manifestation of social interraction and anelement of status seeking; psychologists find indicationsof sex impulses in patterns of dress. Historians seefashions as a reflection and documentation of theithals, tastes, and values of their times just as arepaintings, sculpture and other art forms.
The influence of fashion is felt not only through-out the social world but in all categories of economicactivities. It is most clearly demonstrated however ina multi-billion dollar industr, complex, commonlyknown as the "Fashion Industry", which is dedicatedto the design, production, and distribution of appareland accessories for men, women and children. Becauseclothing is considered to be the oldest and purest formof fashion expression, this industry embodies moreaspects of fashion thar any other single rallying point.
Fifty years ago "fashion" was directed, ordained,cultivated and handled by the few, in smal; hop operations. Today the fashion industry is, on the one hand,the exclusive air of an elegant specialty store presentinga collection of high-priced originals, and on the otherhand, it is the giant factories that dispatch "blue jeans"
10
in endless dozens to cities and prairie towns acrossAmerica.
A business that began as an enterprise of small shopsnow caters to and employs millions of people, offersa multitudinous array of products, utilizes a diversity oftalents and ranks among the largest industries in oureconomy.
SCOPE OF THE FASHION INDUSTRY
The fashion industry is not a clearly defined entity.It is a complex of many different industries, not all ofwhich appear to have anything of fashion among theirproducts.
Plainly recognizable as part of the fashion buiinessare those industries devoted to the making of appareland accessories for men, women and children. Whenone moves back to an earlier stage of production, tothe fabrics, leathers, and plastics from which the finishedproducts are made, the line between what is and what isnot the fashion business becomes even harder to draw.Some textile mills that produce apparel fabrics alsoproduce bed sheets, carpets, or industrial fabrics. Somechemical companies that produce fibers which even-tually are spun, woven and cut to make garments areproducers also of explosives, fertilizers, and photographicfilm. Some producers and processors in fields normallyremote from fashion find themselves temporarily withone foot in the fashion business when prevailing stylesdemand such items as industrial zippers, chain belts,paper dresses, or whatever the case may be. A seasonor two later, they may be as far removed from it as.ever, but for the time being, they too are part of thebusiness of fashion.
The fashion business includes the stores that sell andservice apparel and accessories, and the mail-ordercatalogues from which many consumer purchases aremade. It includes businesses that neither produce norsell merchandise, but render advice, assistance or in-formation to those that do. In this last category areconsumer publications that disseminate news of fashion,ranging from the women's page of the daily newspaperto magazines devoted primarily to fashion news such asVogue, Harper's Bazaar or Gentlemen's Quarterly. Also
Included in this category are trade periodicals whichcarry news of fashion and information on productionand distribution techniques to retailers, apparel manu-facturers, and textile mills. It includes also publicistsand advertising specialists, fashion consultants, andbuying offices that represent retail stores in the vastwholesale centers.
All these and more are part of the business farmsand mills and factories, union labor and white-collarworkers, business tycoons and creative artists. All playtheir parts in the business of fashion.
ECONOMIC IMPORTANCE*
The economic activities involved in the design, pro-duction, merchandising and maintenance of textiles,apparel and accessories are a sizeable force in our nation.Whatever yardstick one uses as a measurement, theirimportance becomes clear.
In terms of money that Americans spent in 1972,clothing, accessories, shoes, and clothing care servicesaccounted for 62 billion dollars, an amount whichconstituted almost 10% of total consumer expendi-tures. In terms of factory output, the industry alsoranks high. Textile output for 1972 reached 28 billiondollars and factory shipments of men's, women's andchildren's apparel exceeded 26 billion dollars.
Millions of people are employed in producing tex-tiles and apparel, in staffing the retail stores that makethis merchandise available to the consumer, and in theretail or industrial establishments that specialize inclothing services. Of the 20 million people employedin U.S. manufacttiling industries in 1972, practicallyone in every eight was employed either in the industrydivisions that produce apparel for men, women, andchildren or that produce the materials from whichclothing is made. The apparel segment which aloneemploys almost 1.4 million people is the 6th largestemployer of people in the manufacturing sector of theeconomy and, for example, employs more people thanthe entire printing and publishing field or the chemicaland drug industry. Textile firms employ another million
Source of figures: U.S. Industrial Outlook 1973, U.S. Depart-ment of Commerce.
x
workers. In addition, retail outlets that play a significantpart in the distribution of clothing employed the servicesof more than 1/4 of the 11.7 million men and womenengaged in retail occupations in 1972 and of this numberit is estimated that 60% are engaged in activities directlyconcerned with the merchandising of apparel and tex-tile products. !kw:leaning and laundering service estab-lishments employed an additional 1/2 million.
The industry is also important to all parts of thecountry rather than just a small geographic area.Although the heaviest concentration of textile manufac-turing facilities is in the South and New England, somephase of textile activity is carried on in nearly everystate of the Union. Apparel production plants can alsobe found in every state and are increasingly beinglocated in small towns where, in many cases, they arethe only industry or the largest employer. Apparel andfabric retailers are to be found in every major city, inevery suburb and in the smallest of towns.
BROAD RANGE OF
OCCUPATIONAL OPPORTUNITIES
Numbers alone, however, do not tell the full storyof the importance of the fashion industry as a field ofemployment opportunity. The industry is many-facetedand offers a host of varied entry-jobs and career oppor-tunities. it employs ,orkers with every degree of skilland educational preparation. Training and/or experiencein one segment is often an asset applied to another.Working conditions and financial compensation aresatisfactory, and good pay is a by-product of goodtraining, good job performance, good experience andgood breaks. Pay rates vary from city to city, fromcompany to company and from time to time.
There is a place in the industry for people of manydifferent types and levels of skills which refit ire diversetalents, interests and educational preparatio t. Techni-cians and artists, chemists and engineers, originators andcopyists, cutters and sewers, buyers and sellers, adminis-trators and entrepreneurs . . . . all these and more con-stitute the variety of occupational opportunities in thecomplex of industries involved in the design, production,distribution and servicing of textiles and apparel products.
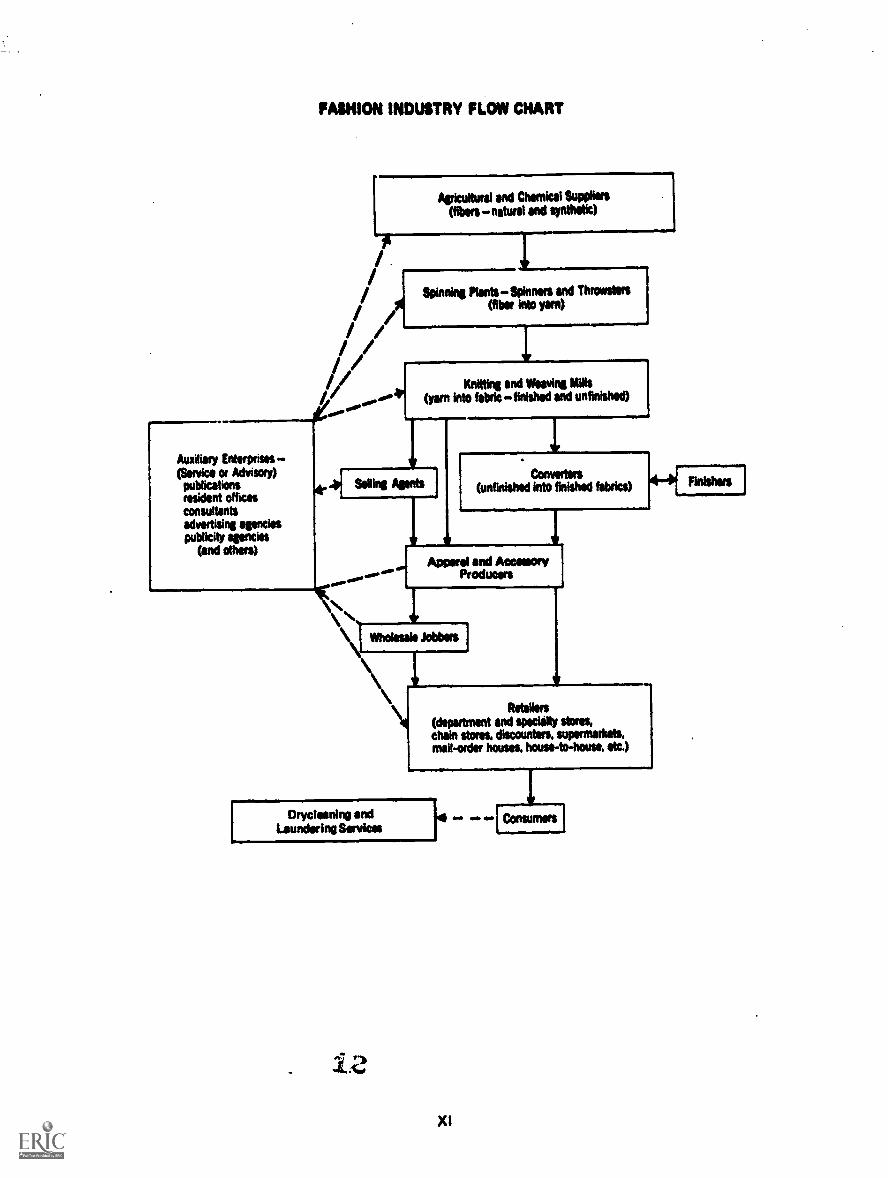
Auxiliary Enterprises(Service or Advisory)
publicationsresident officesconsultantsadvertising agenciespublicity agencies
(and others)
FASHION INDUSTRY FLOW CHART
Agricultural end Chemical Suppliers(fibersnatural and synthetic)
Spinning RentsSpinners and(fiber into yam)
1
Knitting and Weaving Mies(yarn into fabric finished and unfinished)
44I AgentsConverters
(unfinished into finished fabrics)
ail Apparel and Accessory
F.Producers
Wholesale Jobbers
Retailers(department and %Willy stores,chain stems, discounters, supermarkets,mail-order houses, house-to-house, etc.)
Drycloning andLaundering Services
XI
unws

UTILIZATION OF THE GUIDE
School personnel using this guide will find that modi-fications can be easily made to fit the local conditions oftheir specific situation. The design of the suggested over-all program is such that areas of instruction can andshould be combined or eliminated entirely in adaptingthe program to meet local needs.
STRUCTURE OF THE PROGRAM
The components of the program contained in thisguide are based upon the differing performance require-ments of different levels of employment responsibility.The program, therefore, reflects levels of competencyto be achieved rather than levels of education, therebyfacilitating its adaptation and use by secondary schools,post-secondary institutions and other types of trainingcenters.
The basic skill development areas of instruction cot.respond to specific competencies needed for basic entryjobs and aim to prepare students for initial employment.The advanced areas of instruction progress in depth,scope and complexity of content and are designed to
serve the needs of students who have more advancedcareer goals and/or gfeater educational or employmentexperience. The fundamental background areas of in-struction, although not always essential for some basicskills, broaden the students' understanding of the oc-cupational field and enhance their opportunities for jobsatisfaction and career progression. Where necessary forthe development of specific skills, they are noted asprerequisites in the outlines of the areas of instruction.
The areas of instruction in the guide and the teachingmodules in the instructional guidelines are flexibleenough to allow for vertical and/or lateral occupationaltraining plans. For example, enrollees in the programcan:
1. Either progress laterally, component by relatedcomponent, from simple to complex job skills insuch a way that they can exit at varying pointswith a mastery of a specialized skill, if they choosenot to complete the entire program.
2. Or enter the program at wherever they are oc-cupationally and move vertically for laterally) asfar as they can or choose.
CONSIDERATIONS IN ADAPTATION
AND MODIFICATION
The number of the different areas of instruction thatare offered, the manner in which they are combined, the
emphasis that is given to the different levels of areas ofinstruction, and the comprehensiveness of the programwill depend upon:
The type of educational institution in which theprogram is being offered: for example, an adulttraining center would be less likely to offer theentire programthan a post-secondary school.
The time available for the program: for example,it would be more advisable in a one-year programes contrasted to a two-year program, to eliminatecomplete areas of instruction rather than com-promise the development or specific competenciesdesirable for meaningful employment.
The occupational opportunities in the community:for example, it would be wiser to put the emphasison print design instructional areas rather than onwoven design if employment opportunities in theweaving field are nonexistent or limited in thecommunity.
The job levels for which the program is designed:for example, little or no emphasis should be puton career-advancement areas of instruction if theobjective of the program is to prepare students forbasic-skill entry jobs.
The nature of existing programs in the educa-tional institution: for example, complete areas ofinstruction in textile design could be substitutedor added, and offered as an option to students whoare enrolled in currently existing textile or artprograms.
The students' special needs and occupational goals:for example, being responsive to students' indi-vidual needs in terms of where they are and whatthey wish to be.
The opportunities that are available to the studentsfor continuing study and articulation with ad-vanced job-preparatory programs: for example, a
secondary school in a community which does notoffer post-secondary jobpreparatory programsshould include career advancement areas of instruction; a secondary school in a community in whichpost-secondary job-preparatory programs are al-ready in existence might do better to concentrateon fundamental background and basic skill-de-velopment areas of instruction.
TIME ALLOTMENTS
The hours to be allotted to each area of instructionshould also be modified and adapted to suit localsituations. However, it is suggested that certain teaching-modules and/or complete areas of instruction be elimi-nated rather than weaken the development of skillsneeded for job entry.
THE TEXTILE DESIGN FIELD
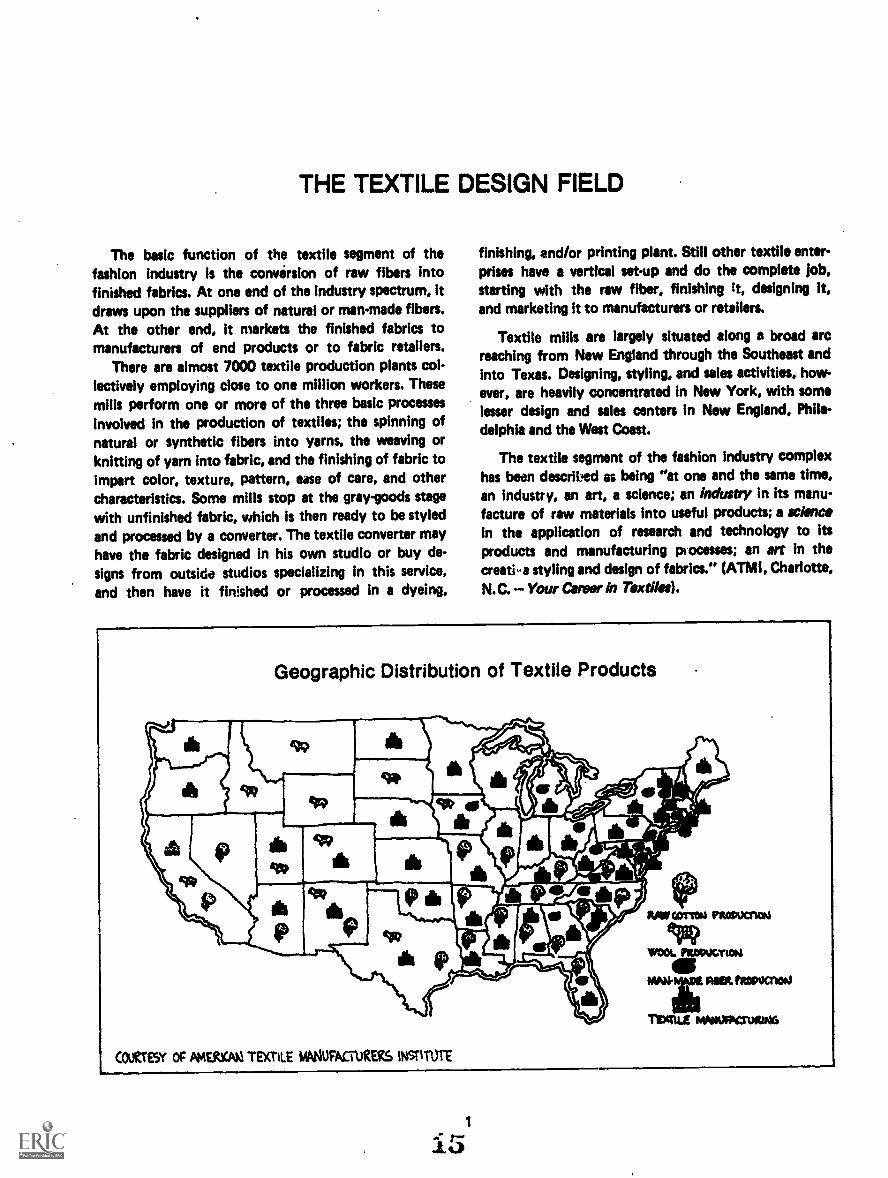
The basic function of the textile segment of thefashion industry is the conversion of raw fibers intofinished fabrics. At one end of the industry spectrum, itdraws upon the suppliers of natural or man-made fibers.At the other end, it markets the finished fabrics tomanufacturers of end products or to fabric retailers.
There are almost 7000 textile production plants col-lectively employing close to one million workers. Thesemills perform one or more of the three basic processesinvolved in the production of textiles; the spinning ofnatural or synthetic fibers into yarns, the weaving orknitting of yarn into fabric, and the finishing of fabric toimpart color, texture, pattern, ease of care, and othercharacteristics. Some mills stop at the gray-goods stagewith unfinished fabric, which is then ready to be styledand processed by a converter. The textile converter mayhave the fabric designed in his own studio or buy de-signs from outside studios specializing in this service,and then have it finished or processed in a dyeing,
finishing, end/or printing plant. Still other textile enter-prises have a vertical set-up and do the complete job,starting with the raw fiber, finishing it, designing it,and marketing it to manufacturers or retailers.
Textile mills are largely situated along a broad arcreaching from New England through the Southeast andinto Texas. Designing, styling, and sales activities, how-ever, are heavily concentrated in New York, with somelesser design and sales centers in New England, Phila-delphia and the West Coast.
The textile segment of the fashion industry complexhas been descrilJed as being "at one and the same time,an industry, an art, a science; an industry in its manu-facture of raw materials into useful products; a sciencein the application of research and technology to itsproducts and manufacturing processes; an art in thecreati-a styling and design of fabrics." (ATM!, Charlotte,N. C. Your Carver in Textiles).
Geographic Distribution of Textile Products
CUTESY Of PMERICAN1 TEXTILE MANUFACTURERS %%SMOTE
1.5
MANPOWER NEEDS
Few American industries place as great a premiumupon creativeness and artistic expression as does thetextile segment of the fashion industry. Textile designers,colorists, fabric stylists, repeat artists, screen printers,weavers - -all have a hand in the creation of new fabrics.In an industry where as many as 10,000 different designsare produced in a single year, there is a wide variety ofoccupational opportunities for those with creative talentand appropriate preparation. The increasing interest infashion, paralleled by the impact of technological de-velopments in the industry, is creating a growing needfor textile design personnel to meet the continuallygrowing and rapidly changing needs of this nation.
DESIRED COMPETENCIES
A textile designer is a person who creates the patternsor designs for fabrics, whether structural, as in woven orknitted design, or whether applied to the surface of afabric, as in printed design. In general, print designerspaint their designs on paper for reproduction by suchprinting processes as machine rollers and screen printing,as contrasted to designers of structural fabrics whoplan or plot their patterns and designs for weavinglooms or knitting machines. Often, the designer forwoven fabrics may work directly on a small loomweaving sample fabrics while knitwear designers willcreate their designs on a sample knitting machine; bothmust adhere to their technical limitations and plot theirdesigns for eventual massproduction.
Many of the basic competencies, aptitudes, and skill-deveiopment experiences vary for the different types oftextile designing. The print designer must have an in-herent art ability or aptitude along with a workingknowledge of textiles, fabric construction, and printingprocesses. For the structural designer, the ability todraw is an advantage but not a necessity. Designers ofwoven or knitted fabrics require a greater depth ofknowledge about yarn characteristics, technical proc-esses, and machine capabilities. They must also be skilledin the usage of textile loom or knitting machines.Equally important for both are a vivid and fertileimagination, a real feeling for color and design aesthetics,a good tactile sense, a sensitivity to customers' desires,and the ability to visualize the effect of their designs oncloth.
Fabric designers tend to become specialists in aparticular field for several reasons. One reason pertainsto the high degree of specialization within the structureof the industry itself. Another factor is that one personseldom possesses the aptitude, interest, or preparation in
all of the artistic end technical competencies necessaryto make him or her efficient in all types of designing.
EDUCATIONAL PREPARATION
To a greater or lesser degree, depending upon the areaof design specialization, the tools of a textile designer arecolor, paint, paper, design techniques, fibers, fabrics, andtextile processes. The best training for the aspiringtextile designer is to become conversant with the differ-ent areas of textile design through a series of introduc-tory and basic skill-development educational experiencesthat are applicable to all. These basic experiences canthen be followed by further educational and/or on-the-job training in the specialized design area that best suitsthe individual's aptitudes, interests, and/or job opportu-nities. Other skill-development studies such as print-making, graphic design, photography, jewelry designing,and draftsmanship are related areas which interestedstudents might explore in order to widen their futurecareer possibilities.
As important as the vocational training that con-tributes to the students' technical competency are otherdisciplines that expand the social and personal develop-ment, and the life skills of the students, and that broadentheir understanding of the socio-economic forces thataffect the fashion industry. Of particular help to textiledesign students are studies in art history and apprecia-tion, social studies, foreign languages, and communica-tion skills.
OCCUPATIONAL OPPORTUNITIES
Regardless of the area of specialization, the field oftextile design offers many entry jobs and career op-portunities for those who have a feeling for pattern, alove of color, manual dexterity, a technical proficiencyin design techniques, and a working knowledge oftextile processes.
While the designing and styling activities of thetextile mills and factories that are located all over thecountry tend to be largely concentrated in New York,the fact remains that an increasing number of textilefirms are employing artists who are capable of designing,coloring, and doing repeats, and that textile activity doesspread throughout the U.S. Burlington Industries, forinstance, maintains carpet mills in Georgia, severalweaving mills in Mississippi and Texas, vinyl plants inMassachusetts, design studios in New York and NewJersey, and other textile activities in North and SouthCarolina, Virginia, Tennessee, Alabama and California.Pennsylvania and Rhode Island are also important mill-operation states.
16
Moreover, basic preparation in textile designing canalso lead into a variety of occupational design opportu-nities in many other parts of the country depending onthe individual's talent and ingenuity in adapting it tolocal situations. Designing greeting cards, packaging,illustrations, and home furnishings are but a few of thewide range of employment opportunities, not to men-tion the possibility of free-lance designing.
Independent textile design studios from whom tex-tile concerns, large and small alike, purchase designs area major factor in the operations of the industry andoffer the beginning designer opportunities to get startedin a career. Another important source of placement op-portunities are in the independently -owned or vertically-integrated textile converting firms that sty!, and finishthe unfinished fabrics produced by mills. Initial design-ing opportunities within mills themselves are morelimited since, in some mills, the designer must be asmuch, if not more, a technician than an artist and mustbe thoroughly conversant with factory routines andprocesses.
Print studios need colorists to render patterns morediverse and marketable, designers to originate new styletrends, repeat artists to enable the printing of patterns,mill stylists to supervise a first printing at a mill and astylist who is usually in charge of the studio and who isresponsible for its artistic output. It is through the judg-ment and fashion intuition of the stylist that a new"line" of designs is put into production and tested byconsumer response. This is the most responsible positionin a studio. The work of the stylist does not necessarily
require drawing and painting and is usually handled bysomeone extremely knowledgeable and experienced inthe textile business.
Each particular studio, whether independent, con-verter, or part of a larger vertical set-up, works in itsown most practical way, defining responsibilities in themost advantageous manner. Therefore, the titles "color-ist", "repeat artist", etc. are used simply to indicate theneed for such expert assistance. Whether these tasks areperformed by several persons in the studio or absorbed bya fewer number will depend on the particular circumstances existing within them.
The screen printing area offers much the same variedopportunities. Interesting work may involve color mixing,working out repeats, doing overlays for photographicreproduction, printing, and varied other occupations.The knit arid woven areas share the same need for com-petent and educationally prepared textile design person-nel.
In short, textiles today provide a variety of chal-lenging and satisfying beginning jobs and advancedcareer opportunities for the creative, the artistic, andthe venturesome.
The following chart presents an overview and ex-amples of textile design occupations, typical places ofemployment, and brief descriptions of what the workersdo. Occupations are classified according to entry-leveljobs and advanced career opportunities. Specific jobtitles and exact responsibilities may vary from place toplace and are subject to change as technologies changeand new positions are created.
PROFILE OF OCCUPATIONS IN TEXTILE DESIGN
Entry Jobs
OCCUPATION PLACES OF EMPLOYMENT
Reference SwatchOrganizer
Colorist
Print Design Studios
Print Design StudiosConvertersTextile Print
Plants (Rolleror Screen)
Color Coordinator Print Design StudiosConverters
WHAT WORKERS DO
Collect and catalogue reference pieces of existing and newdesigns for studio and mill use.
Match colors and paint combinations of existing patterns forstudios or print plants.
Set up a new color palette for each season; direct and organizework of colorists.
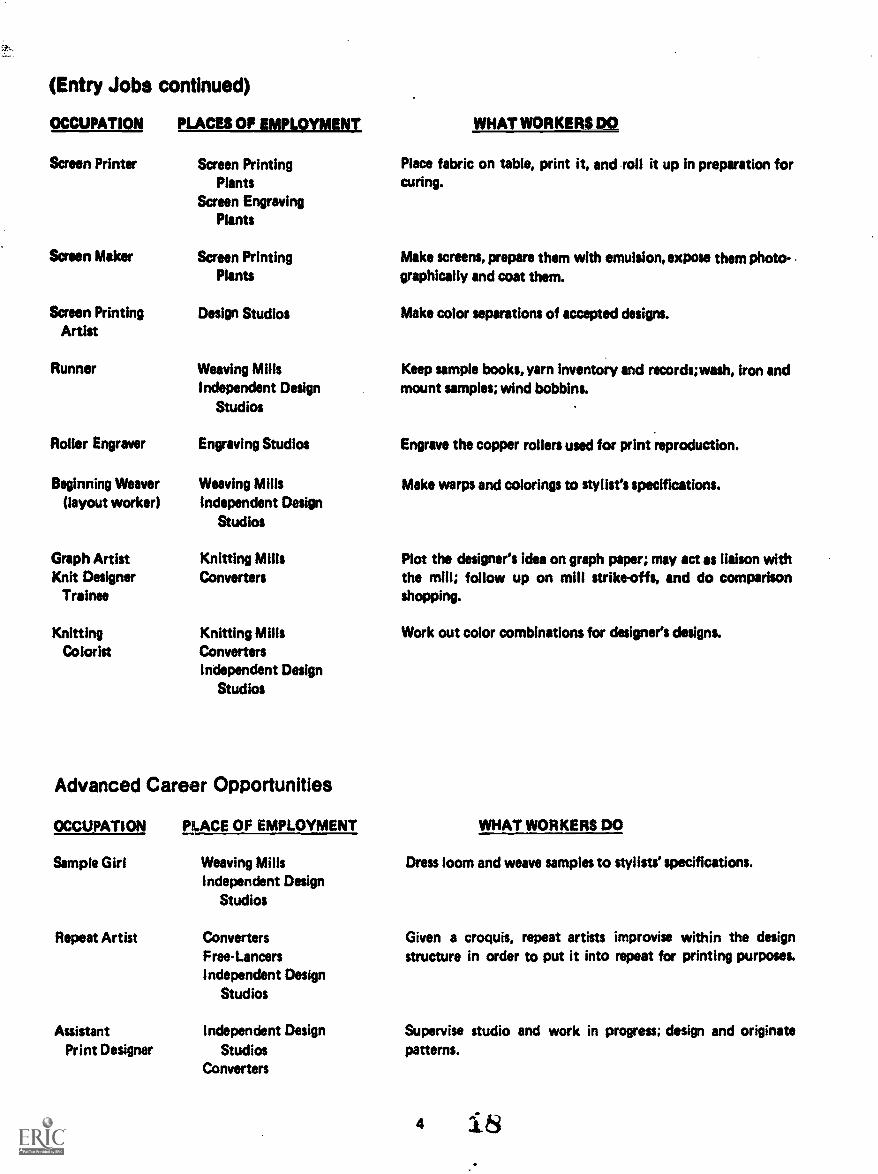
(Entry Jobs continued)
OCCUPATION PLACES OF EMPLOYMENT WHAT WORKERS DO
Screen Printer Screen PrintingPlants
Screen EngravingPlants
Screen Maker
Screen PrintingArtist
Screen PrintingPlants
Design Studios
Runner Weaving MillsIndependent Design
Studios
Roller Engraver Engraving Studios
Beginning Weaver Weaving Mills(layout worker) Independent Design
Studios
Place fabric on table, print it, and roll it up in preparation forcuring.
Make screens, prepare them with emulsion, expose them photo-graphically and coat them.
Make color separations of accepted designs.
Keep sample books, yarn inventory and records; wash, iron andmount samples; wind bobbins.
Engrave the copper rollers used for print reproduction.
Make warps and colorings to stylist's specifications.
Graph Artist Knitting Mills Plot the designer's idea on graph paper; may act as liaison withKnit Designer Converters the mill; follow up on mill strike-offs, and do comparison
Trainee shopping.
Knitting Knitting Mills Work out color combinations for designer's designs.Colorist Converters
Independent DesignStudios
Advanced Career Opportunities
OCCUPATION PLACE OF EMPLOYMENT WHAT WORKERS DO
Sample Girl
Repeat Artist
Weaving MillsIndependent Design
Studios
ConvertersFree-LancersIndependent Design
Studios
Assistant Independent DesignPrint Designer Studios
Converters
Dress loom and weave samples to stylists' specifications.
Given a croquis, repeat artists improvise within the designstructure in order to put it into repeat for printing purposes.
Supervise studio and work in progress; design and originatepatterns.
4
(Advanced Career Opportunities continued)
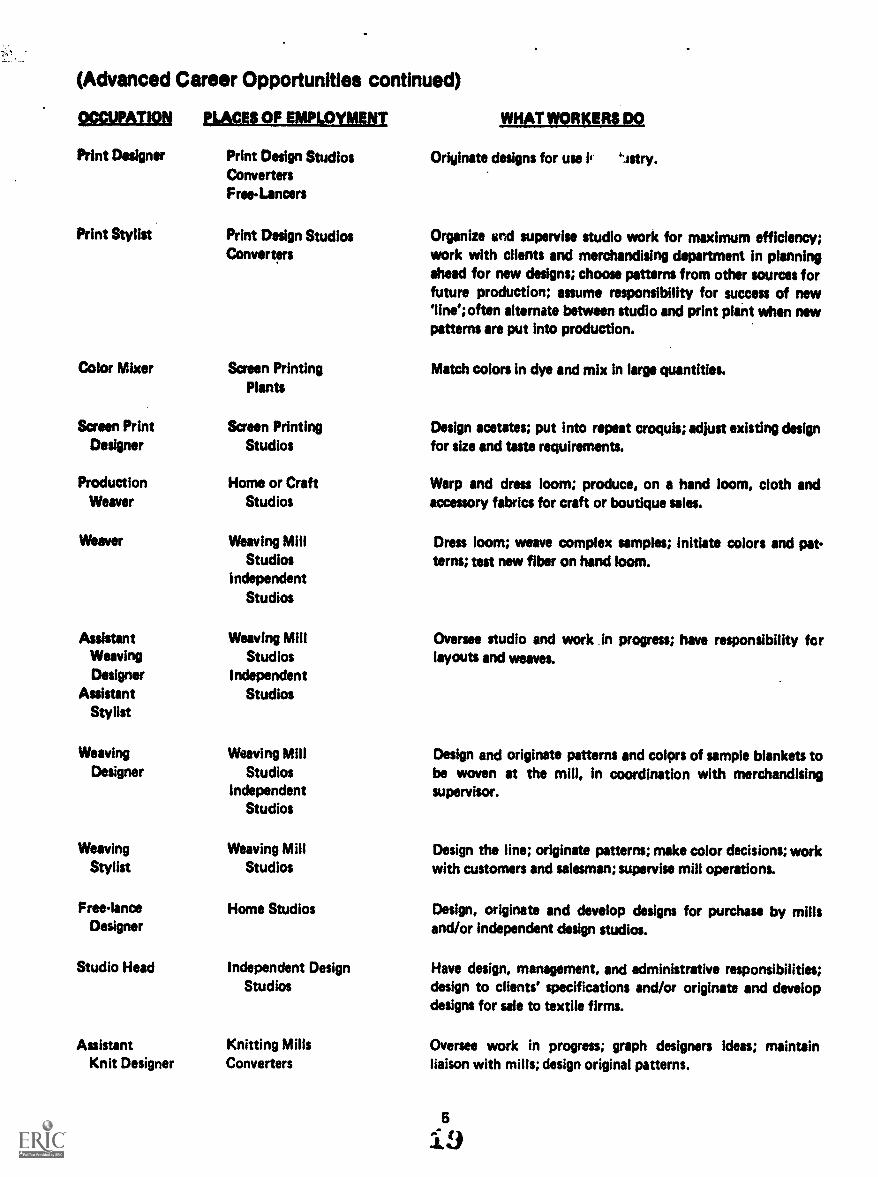
OCCUPATION PLACES OF EMPLOYMENT WHAT WORKERS DO
Print Designer Print Design StudiosConvertersFreeLancers
Originate designs for use
Print Stylist Print Design Studios Organize end supervise studio work for maximum efficiency;Converters work with clients and merchandising department in planning
ahead for new designs; choose patterns from other sources forfuture production; assume responsibility for success of new'line'; often alternate between studio and print plant when newpatterns are put into production.
Color Mixer Screen Printing Match colors in dye and mix in large quantities.Plants
Screen Print Screen Printing Design acetates; put into repeat croquis; adjust existing designDesigner Studios for size and taste requirements.
Production Home or Craft Warp and dress loom; produce, on a hand loom, cloth andWeaver Studios accessory fabrics for craft or boutique sales.
Weaver Weaving Miii Dress loom; weave complex samples; initiate colors and pat-Studios terns; test new fiber on hand loom.
independentStudios
Assistant Weaving Mill Oversee studio and work in progress; have responsibility forWeaving Studios layouts and weaves.Designer Independent
Assistant StudiosStylist
Weaving Weaving Miii Design and originate patterns and colors of sample blankets toDesigner Studios be woven at the mill, in coordination with merchandising
Independent supervisor.Studios
Weaving Weaving Mill Design the line; originate patterns; make color decisions; workStylist Studios with customers and salesman; supervise mill operations.
Free-lance Home Studios Design, originate and develop designs for purchase by millsDesigner and/or independent design studios.
Studio Head Independent Design Have design, management, and administrative responsibilities;Studios design to clients' specifications and/or originate and develop
designs for sale to textile firms.
Assistant Knitting MillsKnit Designer Converters
Oversee work in progress; graph designers ideas; maintainliaison with mills; design original patterns.
5

(Advanced Career Opportunities continued)
QCCYPATION, PLACES OF EMPLOYMENT WHAT WORKERS DO
Knit Designer Knitting Mills Design and originate patterns; maintain customers' contacts;Converters have total mill responsibility; plan color combinations.
Knit Stylist Knitting Mills Style lines; coordinate colors; advise on trends; work withConverters customers.
,
6
THE TEXTILE DESIGN PROGRAM
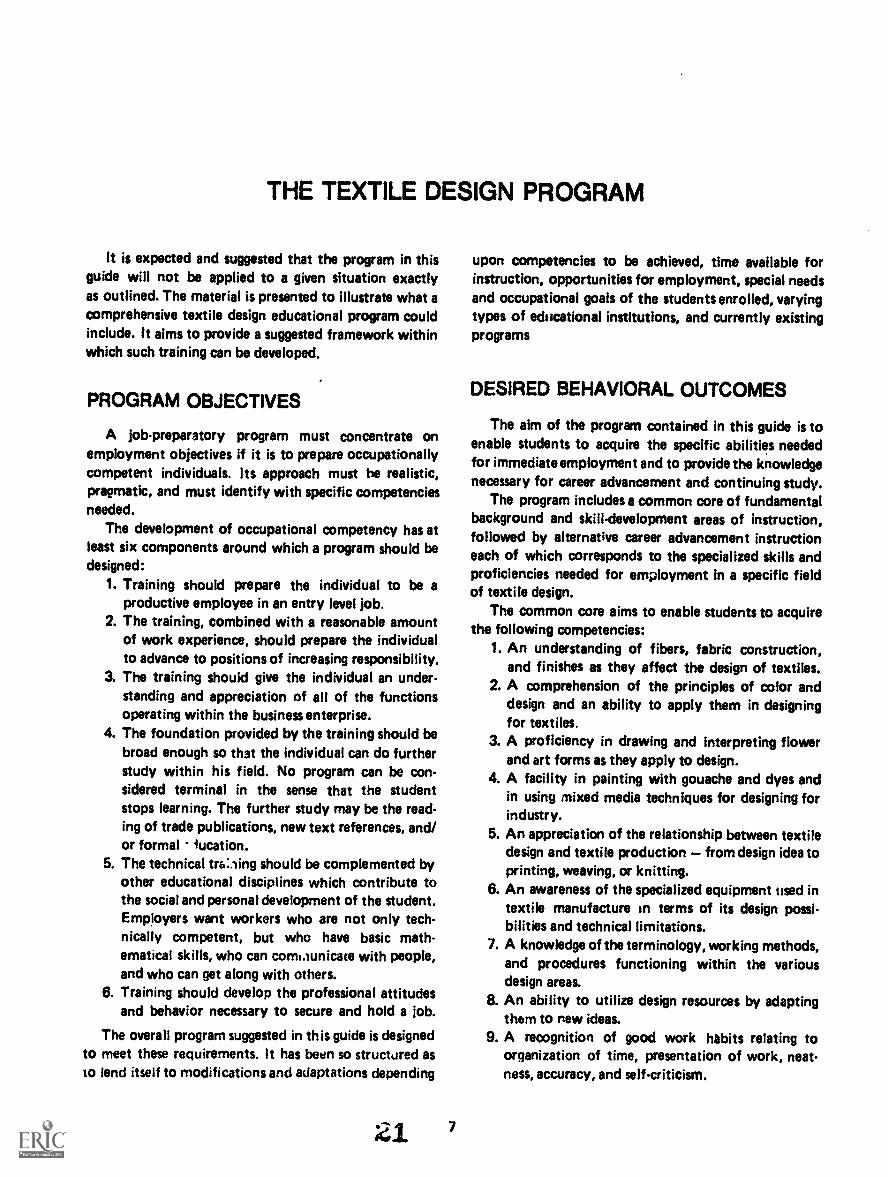
It is expected and suggested that the program in thisguide will not be applied to a given situation exactlyas outlined. The material is presented to illustrate what acomprehensive textile design educational program couldinclude. It aims to provide a suggested framework withinwhich such training can be developed.
PROGRAM OBJECTIVES
A job-preparatory program must concentrate onemployment objectives if it is to prepare occupationallycompetent individuals. Its approach must be realistic,pragmatic, and must identify with specific competenciesneeded.
The development of occupational competency has atleast six components around which a program should bedesigned:
1. Training should prepare the individual to be aproductive employee in an entry level job.
2. The training, combined with a reasonable amountof work experience, should prepare the individualto advance to positions of increasing responsibility.
3. The training should give the individual an under-standing and appreciation of all of the functionsoperating within the business enterprise.
4. The foundation provided by the training should bebroad enough so that the individual can do furtherstudy within his field. No program can be con-sidered terminal in the sense that the studentstops learning. The further study may be the read-ing of trade publications, new text references, and/or formal iucation.
5. The technical tria:ling should be complemented byother educational disciplines which contribute tothe social and personal development of the student.Employers want workers who are not only tech-nically competent, but who have basic math-ematical skills, who can corniaunicate with people,and who can get along with others.
6. Training should develop the professional attitudesand behavior necessary to secure and hold a job.
The overall program suggested in this guide is designedto meet these requirements. It has been so structured asto lend itself to modifications and adaptations depending
21 7
upon competencies to be achieved, time available forinstruction, opportunities for employment, special needsand occupational goals of the students enrolled, varyingtypes of educational institutions, and currently existingprograms
DESIRED BEHAVIORAL OUTCOMES
The aim of the program contained in this guide is toenable students to acquire the specific abilities neededfor immediate employment and to provide the knowledgenecessary for career advancement and continuing study.
The program includes a common core of fundamentalbackground and skill-development areas of instruction,followed by alternative career advancement instructioneach of which corresponds to the specialized skills andproficiencies needed for employment in a specific fieldof textile design.
The common core aims to enable students to acquirethe following competencies:
1. An understanding of fibers, fabric construction,and finishes as they affect the design of textiles.
2. A comprehension of the principles of color anddesign and an ability to apply them in designingfor textiles.
3. A proficiency in drawing and interpreting flowerand art forms as they apply to design.
4. A facility in painting with gouache and dyes andin using mixed media techniques for designing forindustry.
5. An appreciation of the relationship between textiledesign and textile production from design idea toprinting, weaving, or knitting.
6. An awareness of the specialized equipment used intextile manufacture in terms of its design possi-bilities and technical limitations.
7. A knowledge of the terminology, working methods,and procedures functioning within the variousdesign areas.
8. An ability to utilize design resources by adaptingthem to new ideas.
9. A recognition of good work habits relating toorganization of time, presentation of work, neat-ness, accuracy, and self-criticism.

10. An understanding and appreciation of the opera-tions of the textile industry as a whole.
The optional advanced instructional areas, as illustratedin the example of a comprensive textile design programwhich follows, aim to provide:
1. A facility in the techniques of a specialized areaof textile design such as woven, print, knit, and/orscreen -print designing.
2. A comprehension of the materials, equipment andtechnical demands of a specialized area of design.
EXAMPLE OF A COMPREHENSIVE TEXTILE PROGRAM
Areas of Instruction
FUNDAMENTAL BACKGROUND
Color and DesignBasic TextilesDrawing and Nature Study ITextile Design I
BASIC SKILL DEVELOPMENT
Drawing and Nature Study IITextile Design IIDesign ResearchPrint Studio TechniquesScreen Printing IWoven Design IWeft Knit Design and Technology
CAREER ADVANCEMENT
Textile Design IllCurrent Trends and Industrial PracticesAdvanced Print DesignAdvanced Screen PrintingAdvanced Woven DesignAdvanced Weft Knit Desi3n
Suggested Hours
90606090
60120
7590606060
120
30
60906060
This sample program can be modified in terms of hours and instructional areas to suit the time, facilities andobjectives of varying types of educational institutions, the job goals of the students, and the job opportunities inthe community.
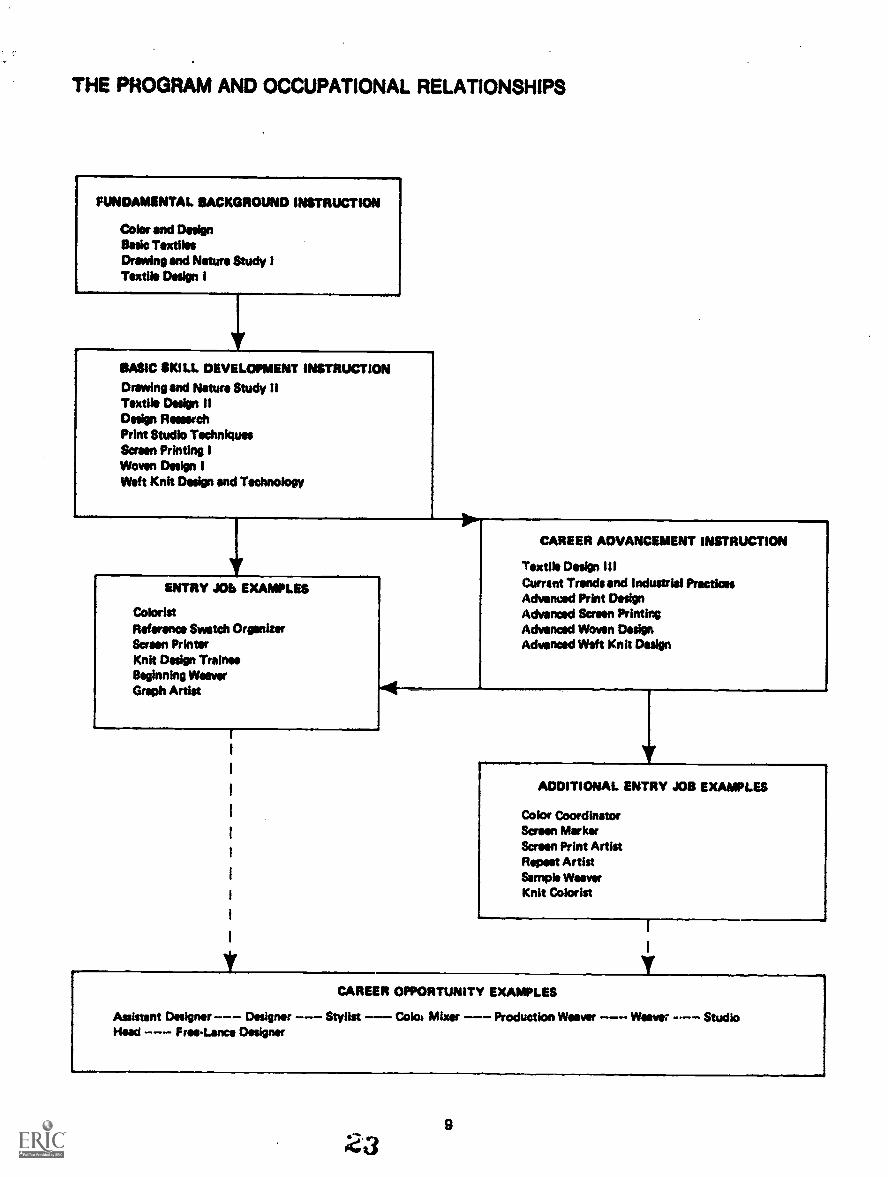
THE PROGRAM AND OCCUPATIONAL RELATIONSHIPS
FUNDAMENTAL BACKGROUND INSTRUCTION
Color and DesignBasic TextilesDrawing and Nature Study ITextile Design I
BASIC SKILL DEVELOPMENT INSTRUCTION
Drawing and Nature Study IITextile Design IIDesign ResearchPrint Studio TechniquesScreen Printing IWoven Design IWeft Knit Design and Technology
ENTRY JOB EXAMPLES
ColoristReference Swatch OrganiserScreen PrinterKnit Design TraineeBeginning WeeverGraph Artist
CAREER ADVANCEMENT INSTRUCTION
Textile Design IllCurrant Trends and Industrial PracticesAdvanced Print DesignAdvanced Screen PrintingAdvanced Woven DesignAdvanced Weft Knit Design
ADDITIONAL ENTRY JOB EXAMPLES
Color CoordinatorScreen MarkerScreen Print ArtistRepeat ArtistSemple WeeverKnit Colorist
I
yCAREER OPPORTUNITY EXAMPLES
Assistant Designer --- Designer --- Stylist Colo' Mixer -- Production Weever --- Mew --- StudioHead --- Free -Lance Designer
9
BRIEF OVERVIEW OF AREAS OF
INSTRUCTION
Color and Design
Covers the basic principles of design and color andhow each affects the other. Students become aware ofdesign possibilities within the environment, and of coloras a means of expressions.
Basic Textiles
Covers textile fibers, fabric constructions, and finishes,with major emphasis on finished fabrics. The elements inthe manufacturing of fabrics are related to fabric hand,appearance, and expected performance properties.
Drawing and Nature Study I
Analyzes the design structure of flowers and othernatural forms as a source of inspiration for textiledesigning. Students develop manual dexterity and skillwith pencil, ink, gouache, and mixed media throughstylized, natural, and conventional design interpretations.
Textile Design I
Introduces the principles of designing for industrythrough a study of technological limitations, such asroller sizes, various types of repeat, and color limitations.Students work out designs for children's wear and otherspecific markets.
Drawing and Nature Study II
Explores advanced techniques and experimental ap-proaches to the art of drawing and observations withparticular stress on line, form, and composition. Studentsdevelop traditional, Oriental, and impressionistic inter-pretations of florals
Textile Design II
Introduces the design of yarndyed fabrics, such asshirtings, ties, plaids, and checks, using gouache as themedium. Also covers the use of dyes on waxed ricepaper in designing for specific markets.
10
Design Research
Concerns itself with the evolution of form andaesthetics in design as it relates to textiles. Studentsgain practical experience in the use of historic docu-mentation as a source of inspiration for modern design.
Print Studio Techniques
Gives practical experiences in the design techniquesand procedures used in print studios. Covers such studiopractices as tracings, coloring, overlays, references pieces,adaptations, color matching, repeats, textures, and thethe like.
Screen Printing I
Covers the design and production of screen printedtextiles from original idea to finished fabric. Studentsstudy dyes and the different fabrics to which they aresuited, the finishing of fabrics, and the use and care ofprint room equipment.
Woven Design I
Provides experiences in the ways that woven fabric isdesigned and produced. Students learn how to designbasic weaves and variations on the hand loom, and howto interrelate design, color, and type of weave into afinished fabric.
Weft Knit Design and Technology
Covers the technical possibilities and limitations thatgovern the design requirements for weft knitted fabricsand gives students experiences in designing for singleknitted fabrics.
Textile Design Ill
Introduces the designing of textiles for markets suchas decorative fabrics, walicoverings, sheets, towels, andwearing apparel, using varied media. Printing techniquesare stressed and emphasis is placed on flexibility indesigning.
Current Trends and industrial Practices
Covers the industrial practices, current trends, antdifferent types of enteroskes in the fashion industrycomplex, with particular emphasis on the textileindustry. Teaching content and learning experienceshelp students to develop an understanding of careeropportunities and an insight into the "workings" offashion.
Advanced Print Design
Gives experiences in styling a line for a specificfashion market and season. Experimentation in design isencouraged and a professional approach to design isstressed.
Advanced Screen Printing
Gives advanced experiences in applying screen print-ing design and printing techniques to decorative wall-
K
papers, lane's, and dress fabrics. Students are introducedto the techniques of block print, tie and dye, and batikas sources of design effects.
Advanced Woven Design
Offers advanced instruction ;n weaving on multiple-harness floor looms. Students plan and weave a series ofcoordinated "blankets" and arrange them into a presentation portfolio.
Advanced Weft Knit Design
Provides skill-development experiences in the designand structure of double-knit fabrics. Students solveproblems in adapting design to machines using variousJacquard mechanisms, including electronic patterning.

GENERAL PROGRAM CONSIDERATIONS
There are many administrative factors to be taken intoconsideration before a job-preparatory program is under-taken or expanded. Questions such as the followingrequire affirmative answers:
1. Does such a program meet a manpower and educa-tional need in the State or community and at areasonable cost?
2. Is the present faculty, if any, qualified or canqualified faculty be obtained?
3. Will there be adequate financial support to providethe program with the necessary facilities andequipment, and to maintain it by providingsupport for the proper instructional resourcesnecessary for high quality programs?
4. Can provisions be made for effective guidance andplacement services?
SURVEY OF NEEDS
The basic purpose of this or any other job-prepar-atory program is to prepare students for advantageousinitial employment. It is obvious that a program of thistype should not be undertaken unless:
1. There is every indication that it fills an educationalor manpower need in the community or State andat a reasonable cost.
2. There is some assurance, as determined by a study,that there are advantageous and meaningful entry-job opportunities for enrollees of the program.
Those who believe that a program of this type may beneeded in their institution should begin with a com-prehensive regional, State, and/or local study. It shouldbe made with the help of people acquainted with thetextile industry needs in textile design. Such a survey isnecessary to catalog the educational needs, to definecommunity support, to evaluate available student popula-tion, and to form a basis for a decision as to whether ornot to offer the program in whole or in part. Furthermore,no program should be undertaken unless there is strongindication that there will be a continuing need.
FACULTY
The effectiveness of a job-preparatory program de-pends largely on the competence and enthusiasm of the
teaching staff. It is imperative that instructors in thisprogram be occupationally competent through bonafide wage earning in relevant occupations, and to havehad or be given instruction in the techniques of teaching.Occupationally experienced teachers not only add cred-ibility and realism to a program, but they can be ofinvaluable help in counseling their students regardingjob placement, and in guiding them through momentsof technical difficulty and indecision.
The problem of identifying and recruiting qualifiedinstructors is a very real one since it is difficult, if notimpossible, to find teachers who are proficient in morethan one specialized area of textile design. If vocationalor technical teachers of textile design are unavailable ona full-time basis, some instructors may be recruited fromindustry who are available for teaching on a part-timebasis. There are often industry professionals who areeager and able to teach 2 or 3 hours a day or some otheragreed upon schedule. Also, some individuals who haveretired from industrial positions, and who are physicallyand mentally alert, may be recruited as part-time instruc-tors for areas of textile design In which they have had asuccessful experience.
Experience has shown that graduates of technicalschools, who have acquired suitable employment ex-perience, often become excellent teachers in job-prepar-atory curriculums. Persons with this background are morelikely to understand the objectives, values, and uniqueinstructional requirements of vocational-technical educa-tion and often bring to the program the kind of enthu-siasm which has meaning to the students they meet.
Programs of an occupational nature need to be keptup-to-date if they are to be effective in preparing peoplefor employment. In-service training programs should bedeveloped and used to help instructors with teachingtechniques, use of instructional materials, planninginstructional procedures, evaluation procedures, etc.,and to update instructors in terms of new industrydevelopments. Faculty members should also be encour-aged to maintain their contacts with industry and toparticipate as active members of professional and/ortrade associations. Such contacts will serve as importantsources of information for new instructional materialsand for continuing reports of new processes, concepts,
developments, and student job opportunities related totheir technology. A list of these trade associations andprofessional societies can be found in the Appendix.
STUDENT ENROLLMENT ANDSERVICES
It is recommended that there be some system forenrolling students who have a reasonable expectation ofsucceeding in all or a meaningful part of the program,since the effectiveness and success of the program willultimately be measured by the job-performance of itsenrollees.
Students entering the Textile Design program shouldshow some evidence of creative ability, a feeling for color,some knowledge of drawing, and imagination. A highdegree of interest and motivation is desirable. Studentswho are specifically interested in print design shoulddemonstrate an aptitude for drawing and/or painting.This might be in the form of some type of their ownwork to be submitted for evaluation, or in the form of anentrance examination in drawing. For weaving andknitting design, an ability to draw is not essential.
Above all, the students must enjoy designing andworking with color. Design skills An be acquired butthe motivation necessary for success will depend onstudents' genuine interest in their work.
General school records, aptitude test results, andinformation on exploratory experiences and activities canbe useful tools in assisting potential students in makingthe decision on whether to enter this program or not.
Guidance and Counseling Services
Guidance and counseling are important in order tobring into the prograr students who have a basic under-standing of the demands and rewards of the occupation,and who have the potential for developing the com-petence and confidence to meet the demands and achievethe rewards.
In view of individual differences, diverse occupationalobjectives, the variety of instructional areas, and thelevels of training opportunity, the importance of informedand continuous counseling cannot be overemphasized.Teachers, coordinators and guidance personnel mustassume responsihilities for:
1. Aiding students in their selection of educationaland occupational objectives consistent with theirinterests and aptitudes.
2. Providing for assessment and recognition of in-dividual student's competencies achieved or devel-oped in previous educational programs and/or em-ployment experiences.
3. Assisting students in a continual assessment oftheir progress toward their individual occupationalgoals.
4. Assisting students in revising their educationalobjectives if other interests and vocational goalsemerge as students develop.
Students should also be involved in determining howmuch job preparation they want, how much they willundertake, and for how long. After completing theirfirst goals, they could then be encouraged to participatein progressive levels of job preparation in order tobroaden employment potential and satisfy maturingoccupational choices.
Placement and Follow-Up Services
Effective occupational preparation is impossible if the
school feels that its obligation ends when the studentsgraduate. Placing the students on the job and followingup their successes and failures provide the best possibleiniormation to the school on its own strengths andweaknesses.
An excellent placement record is important in attrac-ting new enrollees. Also, a school which is successful inplacing its students is more likely to have motivatedstudents than a school which divorces itself from theplacement responsibility.
Follow-up of employed graduates should be utilizedto determine:
1. Graduates' success or failure in employment2. Effectiveness and value of the program3. Possible revisions to be made in the program
Competency Certification
In industries such as the fashion industry whereemployment certification is not prescribed, certificationcould be considered informal. Student records could bemaintained in terms of the degree to which the studentis able to perform one or more of the competenciesneeded for identified occupations. Another factor to beconsidered for competency certification is employerevaluations of the student's performance in cases where acooperative traing experience is provided.
STUDENT ORGANIZATIONS
Student clubs that are related to an instructionalprogram, should be encouraged and sponsored by facultymembers. Groups such as these strengthen relationshipsamong students, and develop leadership potential and anability to work with other people. They also provideopportunities for students with similiar interests to
select and discuss areas about which they would likefurther information, and to invite guest speakers oftheir own choice.
These student groups should be directed by thestudents but faculty assistance and advice must be avail-able whenever needed. To be encouraged, also, areaffiliations with relevant student organizations that arenational or statewide in scope, such as the DistributiveEducation Clubs of America.
ADVISORY COMMITTEES
The success of job-preparatory programs dependsgreatly upon the formal and informal support of industryadvisory committees. Such committees serve withoutpay, as interested citizens.
The committee can be important as an aid in estab-lishing, maintaining and/or evaluating the program.Members can also be helpful in recruiting faculty,placing graduates, recommending, and in many casessecuring donations of, instructional equipment andmaterials, providing assistance and facilities for fieldtrips, assisting with training stations for cooperativetraining, and the like.
The committee should be made up of representativesof industry, trade associations, related business and in-dustry and, where appropriate, local labor organizationsin the community, area, or State for which trainees arebeing prepared. Committee members should be appointedon a rotating basis so that the duty will not become aburden to any individual member. Rotating membershipswill also give other interested people an opportunity toserve. The average committee usually consists of about12 - 20 members. Members should be invited andappointed by the responsible educational authority. Theduties and responsibilities of the advisory committeeshould be clearly understood so that maximum servicecan be rendered.
For further information about advisory committeessee (1) American Vocational Association, The AdvisoryCommittee and Vocational Education, Washington, TheAssociation, 1969, and (2) Riendeau, Albert J., TheRole of the Advisory Committee in Occupational Educa-tion in the Junior College, Washington, American Associa-tion of Junior Co'leges, 1967.
COOPERATIVE TRAINING
A good way to develop employment skills is throughactual employment. To the extent that the labor marketallows, cooperative work training should be a regularpart of a job-preparatory program. It may be scheduledfor a block of time planned for full-time employment
15
;4.8
during peak business periods or for a period of timeduring which part-time school attendance is alternatedwith part-time employment.
When employment is used, it should be considered anessential element in the educational process and shouldbe related to the field of study in which the students areengaged. For example, many of the learning experiencessuggested in this guide can be adapted for completion atthe students' employment sites.
When students test and apply their school-learnedtheory in a work situation, study becomes more mean-ingful. Just as important, the student has an opportunityto learn the importance of reliability, cooperation,judgment, and other qualities associated with the success-ful worker. Through this exposure to the real world ofwork students' career choices are stimulated and shaped.Should they find through their work experience thatthey are not fitted for a specific area of work, they maydecide to change their field of study. This decision mayprevent them from wasting their time on a misguidedcareer choice.
Specific employment is obtained, as chcumstancespermit, by a teacher-coordinator or a placement officewithin the educational institution. The institution regardsthe cooperative training technique as an integral part ofthe program as a whole. It is not regarded primarily as anearning opportunity, although all students are paid wagesthat are commensurate with those paid to beginningworkers in the particular job for which they are employed.Job evaluation reports are submitted to the schoolcoordinator by the employer and are then discussedwith the student. Work reports are submitted by thestudents to the classroom instructors) who utilize themto reinforce instruction.
The cooperative training technique offers importantadvantages to students, to the school, and to employers.It offers students an opportunity to gain the type ofrelated experience that will make them more desirable asemployees. As a result of their employment experiencewith a particular establishment, many students are offeredpermanent positions with that organization upon comple-tion of their schooling. Regardless of their next steps,students establish employment records that are extremelyimportant for future reference.
Cooperative education also provides opportunities forthe educational institution to maintain close contactwith employers. This contact becomes a valuable two-way channel of communication that helps the educationalinstitution to keep its knowledge of specific employmentneeds up-to-date, and at the same time keeps employersacquainted with, and involved in, the program of theinstitution.
Ideally, students should be exposed to work experienceafter they have acquired some of the basic skills required
for entry jobs. At this point, they can render some mean-ingful service to the employer and, in turn, gain a realisticview into their chosen occupation. They will then beable to approach further study with a better understand-ing of the actual working conditions and career opportu-nities in their field.
Additional expenditures of time and money arenecessary to locate work training stations, and to super-vise and counsel the students who are assigned to them.Few expenditures, however, will bring a bigger return inlinking education with productivity and in makingschools effective in preparing young people for mean-ingful careers.
Specific suggestions for using the cooperative planare available from vocational education directors inState Departments of Education.
SAFETY
Principles of safety should be taught and stressedas an integral part of each instructional area that involveshandling of tools and equipment. By emphasizing carefulprocedures and by observing the normal safety practices,many dangers can be avoided.
The importance of protecting human life and limb isparamount, but students also need to learn good workhabits and to develop a pride in workmanship. Teachingproper care and use of equipment is more important thanteaching how to repair it as a result of negligence.
INSTRUCTIONAL EQUIPMENT
In determining and selecting instructional equipment,the need for every item should be established. Instructorsshould recognize that the purpose of laboratory and/orlearning experiences is to teach or reinforce principlesand basic skills. The latest and most expensive equipmentis not always necessarily the best for instructionalpurposes. In many cases, simpler equipment may bemore effective because it represents only the essentials.Equipment, however, should reflect current industryusage.
The possibility of getting donations of equipmentfrom industry resources should be investigated by thelocal school or by the State vocational education offices.Advisory committees can be helpful in this area.
The instructional equipment and facilities suggestedin this guide are planned for classes of approximately 20students.
The ingenuity of the instructor, however will play themajor part in governing the selection and cost of theinstructional equipment. Suggestions for desirable facil-ities, specific equipment, and approximate costs arediscussed in a separate section.
INSTRUCTIONAL MATERIALS
Specific instructional materials that are suggested forthis program are included in the instructional outlinesand are also discussed in the section on Facilities, Labora-tories, Equipment, Supplies, Costs. The following aregeneral suggestions for sources of supply for free instruc-tional materials that can enhance instruction and alsohave financial advantages to the program:
1. Donations and/or loans of fabrics, fabric swatches,mill strike-offs, studio croquis, layouts and ref-erence pieces, screen-printed fabric samples, designroughs, and the like, are often obtainable free ofcharge, from local or centralized design studios andtextile producers.
2. Brochures, catalogues, and filmstrips from textilefirms and textile trade associations are also obtain-able free of charge.
LIBRARY SUPPORT
A school library is the major source for the reading,research, and reference facilities that are necessary tomake an educational program fully effective. Instructorsmust recognize their responsibility for developing andenriching the resources of the library to support theirprogram, and for stimulating student use of the library.Assignments and projects calling for the use of thelibrary enable students to understand the researchresources in libraries and how they relate to their presentcareer choice.
A well-equipped library is mandatory for a textiledesign program. Many of the projects and learning experi-ences in the instructional areas are dependent upon theavailability of pertinent and stimulating books as visualaids and research references. One of the important thingsthat a textile designer must learn is to become self-sufficient as regards inspirational material. Therefore artbooks of many types, botanical studies, and art andfashion periodicals should be housed in the library. Onlyby using these independently can students learn tofunction well in the field of textile design.
TEXTBOOKS, REFERENCES AND
AUDIOVISUAL AIDS
Due to the dynamic nature of the industry, tech-niques, fashions, products, and technologies are constantlychanging. Textbooks, references and visual aids must bereviewed constantly in light of new developments.
The texts and reference materials that are suggestedin the instructional area outlines should be examined bythe instructor and analyzed for content and relevancy;

newer and more pertinent ones should be substitutedas they become available. The information needed tocover a particular area of instruction is more often thannot unavailable in a single text; hence the multiplelisting of references.
In many areas of instruction, it will be necessary forthe teacher to develop his own teaching materials.Reading references must usually be augmented by mim-eographed material reproduced by the instructor fromcurrent materials in trade publications and/or by bro-chures, bulletins, and reports from trade associations andfrom business firms within the fashion industry itself.
Audiovisual aids can be a great help in teaching butmust be previewed before use in order to determine theirtimeliness and pertinency to a teaching objective. Only a
few have been listed in this guide because changes intechniques and procedures tend to make films obsoletein a relatively short time.
It is expected and hoped that a skillful instructor willmake liberal use of merchandise samples, slides, transpar-encies, charts, industry materials, and other visual aidsthat illustrate and visualize technical aspects of thecontent that is being taught. These again must usually becollected and/or preps:ad by the individual instructor.They must also be updated regularly in order to keepthem current. Some suggestions for visual aids areincluded in the instructional outlines, but the ingenuityof the instructor and/or department head must play themajor part in the preparation and use of instructionalaids.
d017
OUTLINES OF AREAS OF INSTRUCTION
The outlines of the areas of instruction that followcontain the subject matter to be included, the behav-ioral objectives, and brief instructional guidelines. Theyare organized according to teaching modules each ofwhich contains suggestions for teaching content and stu-dent learning experiences. Suggested hours, prerequisites,approaches for student evaluation, and teaching resourcesare also included for each area of instruction. It is recom-mended that these materials be modified to suit the needsof local situations and to take advantage of the specialinterests, capabilities, and ideas of the teaching staff in aparticular institution.
The importance of flexibility in varying behavioralobjectives to meet the needs of individual students, andin allowing individual students sufficient time to developat least one employable skill, cannot be over emphasized.While the successful completion of all objectives for eacharea of instruction and for the program in its entirety isdesirable, this is not attainable by all students. It mustfurther be remembered that skill development can onlybe "learned-by-doing", and that what one student canlearn in one week may take three weeks for another.
The role of the teacher in education has changed frombeing primarily an information giver in large group ses-sions to functioning as a resource person, a motivator, adiagnostician, and an organizer in sum, a learningmanager. It is incumbent upon the teacher to:
19
Asseis the individual student's present skills andpotential.Identify those behavioral objectives that individualscan attain.Encourage students to acquire at least one if notmore marketable job skill, allow them sufficienttime to do this, and emphasize the importance andinterdependence of all operations in an employ-ment setting.Individualize desired behavioral outcomes in orderto obtain a sense of accomplishment for all studentsin the class.Encourage and motivate all students to continuallystrive for higher goals.
Although individualizing instruction is not easy, it is
necessary if the overall objectives of job-preparatory pro-grams are to be achieved.
The suggestions for evaluation that are included in theoutlines offer but a few approaches. Regardless of theevaluation techniques that are used and of their frequency
whether they be written, oral, or performance assess-ments evaluation should be in terms of the desiredbehavioral objectives. In addition, students should bemade aware of all objectives and kept aware of theirown performance and progress as it appears to the in-structor.
31
Fundamental Background Instruction
COLOR AND DESIGN
Prerequisites: None
Suggested. Hours: go
Behavioral Objectives
This area of instruction should enable the student to.
1. Know the basic principles and terminology of color.2. Understand the various types of color contrasts
which govern its perception.3. Develop an individual feeling for color as a means
of expression in designing.4. Know the principles of design and understand,
through practical application, how both color anddesign affect each other.
5. Understand and apply the many possibilities forvariations in designing squares and checks.
6. Develop a facility for designing stripes and utilizingpositive/negative effects.
7. Understand the principles and design possibilitiesof the 'turning square'.
8. Be conscious of rhythm, movement, and growthas important inspirations for design.
Instructional Guidelines
This area of instruction exposes students to the infinitepossibilities of color as it affects design, and to thosebasic principles in art which constitute the foundationfor later studies. The subject matter here presentedhas been condensed to offer a valid and useful back-ground to any student and especially to those inter-ested in any aspect of art and its related areas. Thearea of instruction has been arranged so that theymay find practical advantage in following its variousteaching points.
It is difficult to determine the number of projectsneeded for skill-development since much depends onthe ability and performance of the individual student.Basic exercises in color and design are alternated withsuggested projects involving personal interpretationand inventiveness. The paper method or painting with
20
gouache are recommended media, with the choicebased on the instructor's determination of which willbest fit the student's abilities and needs. It is notnecessary to use the same medium for all projects andalternating between the two media may prove thebest approach.
For practical reasons, this instructional area is basedon painting techniques. The student learns aboutcolor theory through visual perception and applica-tion. It is suggested that several indispensable colortheory books be used in the classroom e.g. The Artof Color by Johannes Men, The Interaction of Colorby Josef Albers, etc., to stimulate the student anddemonstrate the various areas of concentration. inaddition to these, it is suggestert that the instructorcollect as many color swatches of different materials(e.g. leather, glass, paint chips, buttons, etc.) as pos-sible.
Emphasis is on color terminology as used in variousareas of design. Several color systems are studied andappraised, a twelve-part color wheel is matched andpainted for the student's reference and use. Severalcolor exercises are performed which makb the studentaware of the versatility of color. Some learning experi-ences are basic, others involve a free choice of colorswithin the specified format; all are necessary forpractical experience. The principles of the seven colorcontrasts and color as a means of expression are thenstudied and applied.
The design area teaches the student its basic principlesand encourages a personal approach in project solu-tions. It is suggested that designed fabric swatches besupplemented by photographs of the works ofMondrian, Klee, and other graphic artists. Severalprojects involving the division of squares, checks,stripes and positive/negative effects teach the studentvarious approaches to decorative design. Finally, theturning square and personal interpretations of rhythm,movement and growth complete the student's artisticdiscoveries.
It is recommended that students discuss all projectswith the instructor before they develop them and thatprojects be mounted upon completion. It is further
suggested that group evaluations and discussions offinished projects take place whenever possible to offerthe student an added stimulus towards developingobjectivity and mature critical judgment.
Teaching Modules
I. Introduction to ColorI1. Color Perception
III. Color as a Means of ExpressionIV. Principles of DesignV. Divisions of Squares and Checks
VI. Stripes, Positive/Negative EffectsVII. The Turning SquareVIII. Rhythm, Movement, Growth
I. INTRODUCTION TO COLOR
Teaching Content
A. Color Approaches1. Impression2. Expression3. Construction
B. Color Terminology1. Hue2. Value3. Intensity4. Spectrum5. Tint6. Tone7. Shade8. Achromatic9. Chromatic
10. Complementary11. Prism12. Analogous
C. The Color Wheel1. Primary colors2. Secondary colors3. Tertiary colors
D. Specific Color Systems1. Albert Munselt2. Wilhelm Ostwaid3. Isaac Newton4. Ewald Hering5. Herbert Ives6. Johannes Itten7. Josef Albers
Learning Experiences
1. Have students work out an interesting compositionon black paper (app. 9" x 12 1 using color strips
cut from magazines. Students will then reproducethe same composition on white paper, and cowpare the results. Effects serve as basis for classdiscussions.
2. Have students choose two of the color. theoristsdiscussed in class, write a report of about 300 wordson their experiments in color and compare theirtheories.
II. COLOR PERCEPTION
Teaching Content
A. Color1. Through comparison2. Through contrast
B. Seven Kinds of Color Contrast1. Hue2. Lightdark3. Coldwarm4. Complementary5. Simultaneous6. Saturation7. Extension
C. Black and White as Color Influences
D. Texture in Color1. Glossy versus fiat2. Smooth versus rough3. Transparent versus opaque
Learning Experiences
Have students:1. Paint a value scale in 12 steps leading from white
(top) to black (bottom), mixing squares V in size.Students are to choose favorite color and paint itsvalue scale going from light to dark, matching thebrilliances to the corresponding values of the grays.The color will be most inte..44 and pure at onestep, above which it will be tinted by white andbelow which it will be shaded by black.
2. Paint a color wheel on 2ply bristol in gouache,using Johannes ttten's 12part color circle as an ex-ample. Colors must be matched perfectly. (Sug-gested size: 7" circle on a 10" square mount.)
3. Paint a color triangle using one hue, plus tints andshades.
4. Work out a composition illustrating monochromaticharmony, using tints, shades and tones of onecolor. This may be executed in paper or gouache.
5. Design a composition using complements: one colorintense, one greyed - plus various tints, shades,neutral colors, and white or black.
6. Paint a triangle with orange, green and violet, toillustrate triads.
7. Work out a composition using tones of triads plusneutral tones of the colors. Have students use oneor two colors in full intensity and the others muted.
8. Design a composition in which one color looks liketwo (through a change of background and the like).
9. Work out any color principle learned so far by re-interpreting it, using transparencies (colored ace-tates or colored tissue papers) in a new composition.Discuss with students the afect of overlapping andthe different shades produced.
10. Paint a 1" square within a 3" square to illustratethe principle of simultaneous contrast.
11. Discuss contrast of saturation and then havethem paint an illustration of the principle in-volved.
12. Determine concept of contrast of extension andpaint an illustration of its working power, usingtwo or more colors.
Ill. COLOR AS A MEANS OF EXPRESSION
Teaching Content
A. Color Moods1. Harmunious2. Contrasting3. Monotone4. Emotional (e.g. sad, happy, etc.)5. Vibrating
B. Working with Color1. Through values2. Through proportions3. Through color relationships
Learning Experiences
1. Have students express the moods suggested inteaching content, using their own sense of color asfollows:
a. Mix and paint checks of the colors they wish touse; work on one 'mood' at a time, varying colorsas desired; mount each 'mood' combinationtogether and label. Students are to group allexercises on one sheet of bristol paper. (Projectsshould serve as bases for class discussions.)
b. Choose the 'mood' combination preferred anddesign an interesting composition using its colorsin strips of varying sizes. (Suggested size: 11" x14".)
2. Have students design an attractive compositionutilizing strips of torn paper in analagous (related)colors, and gouache or mixed media.
3422
IV. PRINCIPLES OF DESIGN
Teaching Content
A. Differences between Textile Design and Fine Art1. Unit of repeat2. Repetition
B. Elements of Design1. Line2. Direction3. Shape4. Size5. Texture8. Color
C. Application of Design Elements1. Repetition2. Alternation3. Harmony4. Gradation5. Contrast, opposition, conflict8. Dominance7. Unity8. Balance
D. Importance of Variety
Learning Experiences
(All graph projects are to be developed in pencil ontracing paper using W' graph paper sectioned byinches as the working background. Accepted designswill be backed and transferred to white two-ply bristolto be completed in gouache. The 14" size check mayserve adequately for color roughs and try-outs, but itis suggested that in the final version the square be en-larged to 'h" or larger.)1. Have students work out the following exercise
within a 7 square by 5 square area; choose anyseries of number combinations (up to 7) for eachrow of squares, e.g.:
1 6 7 2 43 7 6 24 3 5 1
5 2 7
1 3 5Students are to mark chosen squares to form aunit (see above) and assign a color to each num-ber; paint unit according to the numeration; re-peat unit at least three times horizontally andvertically.
2. Have students divide project in half (diagonally orvertically) by an imaginary line, and add a color tothe white areas, thus producing a 'blotched' back-ground. Discuss the effect obtained.
3. Have students draw a series of 25 one inch checkswithin a 5" by 5" square. Referring to the seven
elements of design, students are to work out aseries of paired units within each check to illustratethe following: gradation, repetition, alternation,balance, opposition, unity, harmony, dominance.To simplify work, students may limit colors tored, blue, light gray, and black.
4. Have students choose the most successful unit designed in project 3 and reinterpret it on a largerscale, adding color and variety to design. {Proposedsize: 5" square.)
V. DIVISIONS OF SQUARES AND CHECKS
Teaching Content
A. Variations in Designing Checks1. Basic (classic)2. Decorative
a. Floralb. Geometricc. Divided
3. Noveltya. Conversation motifsb. Variations in color, size and texture
B. Divisions of Squares
Learning Experiences
1. Have students design a series of four decoratedchecks (using a triangle, divided checks, a circle,etc.) and 4 colors; construct a complete unit ofrepeat using the following sequence:
1 2 3 4 14 1 2 3 43 4 1 2 32 3 4 1 21 2 3 4 1
Students are to repeat the unit at least three timesvertically and horizontally.
2. Have students reinterpret the project above using5 simple and varied checks and five complementarycolors. Students are to construct a complete unitof repeat using the following sequence and repeatat least three times as done previously:
II 5 4 3 2 1 54 3 2 1 5 4
III 3 2 1 5 4 32 1 5 4 3 21 5 4 3 2 1
5 4 3 2 1 53. Have students design a unit of repeat using three
shapes: two harmonious in two analogous colorsand 1 contrasting, painted in a contrasting color.Students repeat the shapes several times to form adesirable layout.
4. Have students design a varied check using theirimagination and as many colors as they wish inany sequence preferred,
VI. STRIPES, POSITIVE/NEGATIVE EFFECTS
Teaching Content
A. Stripes as Design Possibilities1. Types of Lines
a. Straightb. Curvedc. Verticald. Horizontale. 46 degree diagonal
2. Line Decorationsa. Geometric designsb. Free designs
3. Variations in Linesa. Different widthsb. Different colors
B. Positive/Negative Effects1. Use of color2. Use of design3. Use of texture
Learning Experiences
1. Have students design a varied stripe using fourcolors and contrasting edges, emphasizing the nega-tive spaces between the stripes as an importantvisual area. Have them balance the stripe by begin-ning and ending with the same one.
2. Have students design an interesting diagonal stripeon a 45 degree angle emphasizing different widths,using any five colors preferred.
3. Have students design a horizontal stripe (bayadere)in which both straight and curved lines are combined and decorate, using two colors plus blackand white.
4. Assign students to use positive/negative effects indesigning a dramatic decorative stripe in black andwhite.
VII. THE TURNING SQUARE
Teaching Content
A. Definition1. Single motif2. Varying positions3. Unlimited design possibilities
B. Procedures1. Design unit2. Turning possibilities
Learning Experiences
1. Demonstrate turning square procedures as follows:a. Build a design unit within the square, avoiding:
1) motif in center of square2) corner to corner decoration3) center to center interest
b. Write TOP to determine position of the unit.c. Make four tracings of the unit and play with
varying positions (flip, turn, diagonal, etc.) toachieve a satisfactory visual effect for entireunit of four squares.
d. Back unit of repeat, drawing tiny cross marksat its corners.
e. Rub down carefully on two-ply bristol, makingsure that the register marks coincide perfectly.
f. 'Turning' possibilities:1) one direction2) two directions3) four directions combined: flopped and turn-
ingg. Overlap the edges to avoid a 'framed' look.h. Work with two tracings side by side and correct
in order to obtain a perfect unit of repeat.2. Have students construct a design based cm the
principle of the turning square, painting in gouacheand using up to four colors. Using two to fivecomplementary colors and a different unit of re-peat, students then develop a design involving a dif-ferent arrangement from the one used previously.
3. Have students design a unit of repeat with over-lapping edges, using four colors, and correcting alltracings according to desired effect. Students thenpaint the design.
VIII. RHYTHM, MOVEMENT, GROWTH
Teaching Content
A. Examples of Rhythm, Movement and Growth1. Musical2. Visual3. Emotional4. Artistic
B. Applications of Nature to Art1. Water2. Wind3. Clouds
Learning Experiences
1. Using as many varied materials as desired, havestudents develop a rhythmic composition in shadesof one color and paste materials to two-ply bristol.(Project is to be at least 10" by 15- and will coverthe board entirely). Suggested materials: glass,
24
linoleum, leather, paint chips, buttons, string,feathers, fabric, yarns, and the like.
2. Borrowing all kinds of architectural elements fromresearch sources or from the environment, havestudents design a pleasing composition emphasizingknowledge of drawing and application of color.(The project is to be approximately 10" by 15".)
Suggested Evaluation
Evaluation may be based on evidence of the students'ability to:1. Demonstrate through the completion of class work
(at least 25 projects, including exercises, compo-sitions and personal interpretations) that they havebeen able to apply the basic principles of color anddesign, paint projects neatly, utilize a satisfactorytechnique, and adhere to time schedules.
2. Demonstrate their knowledge of color terminology.3. Write a short report on color theories covered in
teaching content which demon"rates their under-standing.
Teaching Resources
TEXTS AND REFERENCES
Albers, J. The Interaction of ColorAnderson, D. Elements of DesignBates, K. Basic DesignBirren, F. Principles of ColorChedreul, M. The Principles of Harmony and Contrast of
Colon and Their Application to the ArtsDowner, M. Discovering Design- --- The Story of DesignGraves, M: The Art of Color and DesignHickethier, A. Color Mixing by NumbersItten, J. Design & Form- --- The Elements of ColorJacobson, E. Basic ColorMunson, A. A Color Notation
PERIODICALS
American FabricsDesignDomusHarper's BazaarL'Offkiel de la CouleurVogue
AUDIOVISUAL AIDS
The Vision of Color by Faber Birren, Series A, 35mmcolor slidesVan Nostrand Reinhold Co., New York, 1972
The Perception of Color by Faber Birren, Series II, 35mmcolor slidesVan Nostrand Reinhold Co., New York, 1972
INSTRUCTIONAL SUPPLIES
Color Aid papersColor chips of all kinds of materials: buttons, cereals,
feathers, glass, leather. paper, plastic, ribbons,strings, threads, wood, yarns, etc. (Students shouldbe encouraged to find their own materielsi
a Colored pencils or crayons or magic markers (In color)Compasses, rulers, pencils, erasers, sable brushes
25
Fabric watches related to sknple check and colorlayoutsGraph piper pad W' squares (sectioned by inches)Photographs or slides of the works of: Josef Albers,
Johannes Men, Paul Klee, Piet Mondrian, and othersTracing paperRed rope envelope 20" x 26"Winter Newton Designers' Colors or Talons (tubes)'Worthy' bristol Pad 11"x 14" or 14"x 22"
BASIC TEXTILES
Prerequisites: None
Suggested Hours: co
Behavioral Objectives
This area of instruction should enable students to:1. Use the terminology that is identified with the
textile industry.2. Know fabric characteristics as they relate to ap-
pearance, hand, expected performance, and end-product use.
3. Perceive the relationship between fiber properties,fabric types and end -product requirements.
4. Understand the major systems of yarn manufactur-irry their effect on the properties of finishedfabrics.
5. Comprehend the methods of fabric constructionthat determine the characteristics of fabrics.
6. Be familiar with the coloring methods applied tofabrics.
7. Be familiar with the various types of processes usedon textile materials.
8. Be familiar with federal laws and regulations asthey apply to fabrics.
instructional Guidelines
This area of instruction is an introduction to textileswith major emphasis on finished fabrics. It is sug-gested that a representative cross-section of fabricswatches be distributed to 'he students and thatfrequent reference be made to these samples in orderto illustrate various points. Traditional fabric typesshould comprise the major portion of the student'ssamples and the classical names for these fabricsshould be employed. Fabric manufacturing should berelated to fabric hand, appearance and expectedperformance, and these in turn should be related toend-product use. The study of finished fabric char-acteristics should be reinforced as the student pro-gresses through the study of the various manufactur-ing elements that affect the end product.
Teaching Modules Suggested Hours
I. Introduction and Orientation 3U. Fabric Characteristics 6
III. Fibers 9IV. Yarns 6V. Methods of Fabrication 15
VI. Dyeing and Printing 12VII. Finishing 8
VIII. Federal Laws and Regulations 3
Total Hours ---- 60
I. INTRODUCTION AND ORIENTATION
Teaching Content
A. What Are Textiles?1. Definition of fiber2. Definition of yarn3. Definition of fabric
B. Concept of Basic Textile Constructions1. Fiber type2. Yarn type3. Method of fabrication4. Method of coloring5. Finish
C. The Flow of Textiles (relationship between levelsand functions of each).1. Fiber producer
a. Naturalb. Man-made
2. Yarn milla. Spinningb. Throwing
3. Fabric millsa. Weavingb. Knittingc. Tuftingd. Other
4. Converters and their function5. Dyeing, printing and finishing plants6. End-product manufacturers
a. Apparelb. Home Furnishings
c. Domesticsd. Industrial
7. Retailers
Learning Experiences
1. Have students examine the apparel they are wearingand distinguish between fiber, yarn, and fabric.
2. Have students make a list of business enterprises inlocal area that are involved in different levels ofproduction and distribution.
3. Show and discuss film, Cloth: From Fiber toFabric or Textiles For Everyone.
II. FABRIC CHARACTERISTICS
Teaching Content
A. Describing Fabric Appearance1. Color2. Pattern3. Texture
B. Describing Fabric Hand
C. Describing Fabric Weight1. By endproduct use2. By typical industry terminology
D. Determining Face of Fabric1. Major characteristics2. Designer choice3. Factors limiting designer
E. Fabric Traditional Names
Learning Experiences
1. Have students go through various fabrics in thebundle of fabric swatches. Each fabric should bedescribed, named if a traditional name is knownfor that fabric, and the face identified.
2. Assign students to find three traditional fabrics intheir homes and classify according to fabric name,fibers used, description of the fabric and the endproduct.
3. Have students see how many different fabrics theycan identify by traditional fabric name in theirhome.
III FIBERS
Teaching Content
A. Classification of Fibers1. By origin2. By generic class3. By filament or spun
B. Properties of Fibers
1. Related to processing2. Related to fabric appearances, hand, and per-
formance3. Major properties of each generic class
C. Modification of Fibers1. Chemical variations2. Modified physical shape
a. Lengthb. Cross-sectioned
D. Methods of Fiber Identification (limitations andvalue of each)1. Burning and other simple test2. Microscopic examination3. Fiber identification stains4. Chemical solubility: quantitative identification
E. Grades of Fibers1. Cotton
a. Staple lengthb. Grade
2. Wool3. Man-made fibers
Learning Experiences
1. Demonstrate some simple tests such as the burningtest, the wet-dry strength test, a simple acid test, toidentify the fiber content of several unknown fiberfabrics and have students perform similar tests.
2. Have students examine their own wardrobes andmake a chart showing the fiber content and thedescription of the end-product item. Room shouldbe left on the chart to add information about theother elements of fabric manufacture that will bepresented in this area of instruction.
3. Arrange a field trip to a fiber producer, cotton gin,cotton or wool warehouse, or the opening room ofa mill during this module.
4. Show and discuss film: The Way It Is With ManMade Fibers.
IV. YARNS
Teaching Content
A. Types of Yarns and Properties of Each1. Spun
a. Cotton systemb. Wool system
2. Filament3. Textured filament4. Stretch yarns5. Novelty yarns6. High bulk yarns7. Ply yarns
Zr)
27
B. Twist in Yarn1. Direction2. Amount3. Importance and effect4. Relation to fabric type
C. Yarn Numbering Systems1. Relationship to weight2. Major systems used
a. Denier: rule of denierb. Count: rule of countc. Tex: rule of tex number
D. Yarn Quality Factors1. Uniformity2. Neppiness3. Fuzziness4. Strength
Learning Experiences
1. Using a yarn of known size, have students approxi-mate the yarn size of several yarns of unknown size.These may be taken from fabric samples given tothe students and the effect of yarn size on thefabric hand and appearance can be discussed.
2. Select various fabric samples and have the studentsidentify the quality factors of the yarns used, thetype of yarn, and the relationship between theyarns and the fabric appearance and hand.
3. Have students refer back to the chart begun in themodule on fibers and add to each item informationabout the yarn and its effect on the finishedproduct.
4. Show and discuss film: Yarns Used in MakingCloth.
V. METHODS OF FABRICATION
Teaching Content
A. Woven Fabrics1. Loom motions2. Woven fabric terminology3. Basic weave formation4. Special weave effects
a. Lenob. Pilec. Dobbyd. Jacquard
5. Fabric count
B. Knitted Fabrics1. How knit fabrics are formed
a. Weft knittingb. Warp knitting
2. Knitted fabric terminology
28
3. Basic weft knit machinesa. Jerseyb. Ribc. Links
4. Basic warp knit machinesa. Tricotb. Rachel
5. Fabric type produced on each of above machines6. Characteristics of knit fabrics
C. Tufted Fabrics1. How formed2. Endproducts in current use3. Characteristics
D. Non-woven Fabrics1. How formed2. End-products in current use3. Characteristics
E. Other Fabrication Methods1. Lace2. Braid
Learning Experiences
1. Arrange a field trip to local mills that either weave,knit, tuft, or produce nonwovens, and/or showand discuss film: Construction of Cloth.
2. Have students identify the fabrication method em-ployed to produce the fabrics in their swatchbundle.
3. Have students refer to the chart started in themodule on fibers and add information on thefabrication method and its effect on the finishedfabric.
VI. DYEING AND PRINTING
Teaching Content
A. How Fabrics are Colored1. Solution dyeing2. Chemical reaction with dyestuff3. Resin bonded pigments
B. Properties of Dye and Fiber Relationships1. Affinity2. Relative cost3. Color fastness4. Metamerism5. Availability of shades
C. Major Dye Classes in Current Use1. Fibers on which each is used2. Properties of each class
D. Colorfastness1. Colorfastness and end-use
2. Simple testsE. Methods of Dyeing
1. Recognition of eacha. Stockb. Topc. Yarnd. Piece
1) Cross dye2) Union dye
2. Reason for each
F. Methods of Printing1. Roller2. Screen
a. Handb. Machinec. Rotary
3. Heat transfer4. Other methods
G. Types of Prints and Recognition1. Direct2. Discharge3. Resist4. Blotch5. Overprint6. Duplex7. Flock8. Burn-out9. Warp
H. Comparison of Wet-Process Prints and PigmentPrints1. Processing steps2. Cost3. Properties of each
Learning Experiences
1. Have students use a vegetable such as beets, onion,cabbage, etc. to prepare their own dyes. This isdone by boiling the vegetable for a long period oftime and then straining the solution. Then thestudents can try to dye a cellulose fiber, a proteinfiber, and a synthetic fiber in the dye they made.These dyed samples can then be tested for color-fastness to light and laundering if the equipment isavailable.
2. Have students identify the method of coloring usedon a variety of samples from the fabric bundles.
3. Have students refer to the chart begun in the fibermodule and add the information on method ofcoloring.
VII. FINISHING
Teaching Content
A. Purpose of Finishing
4129
1. Alteration of hand2. Alteration of appearance3. Creation of performance characteristic
8. Nature of Finishing1. Mechanical processes2. Chemical additives
C. Major Types of Finishes and Fabrics on Which Used
1. Preparatory finishesa. Shrinkage controlb. Bleachingc. Singeingd. Others
2. Basic finishesa. Calenderingb. Nappingc. Brushingd. Fillinge. Mercerizingf. Others
3. End-use finishesa. Flame retardantsb. Water repellentsc. Stain repellentsd. Permanent presse. Others
Learning Experiences
1. Using treated and untreated samples of similarfabrics, demonstrate a water repellent finish and aflame retardant finish.
2. Have students identify the probable finishes em-ployed on ten different samples from their fabricbundle.
3. Refer again to the chart begun in the fibers moduleand have the students add the information onvisible or tactile finishes and expected finishes.
VIII. FEDERAL LAWS AND REGULATIONS
Teaching Content
A. Fiber Labelling Laws1. Wool Products Act2. Textile Fiber Products Identification Act3. Historic reasons for legislation4. Requirements of laws5. Definitions of terms
a. Virgin or new fiberb. Re-processed fiberc. Re-used fiber
6. Advertising requirements
B. Flammability Laws1. History

2. Current standards and test methods
3. Outlook for additional standards in future4. Effect on textile industry
C. Care Labelling Regulations1. History2. Current status3. Requirements4. Standard and test methods
Learning Experiences
1. Have students bring in labels, or advertisementswhich feature labels, for evaluation and discussionof contents.
2. Using special, incorrectly prepared labels, have stu-dents identify the illegal labels and re-design themcorrectly.
Suggested Evaluation
1. Given a set of swatches, students are evaluated ontheir ability to recognize 40 to 50 basic fabrics by:a. Classic nameb. Method of constructionc. Type of yarn usedd. Finishes where apparente. Appropriate end-usesf. Expected performance of the fabric
2. Students are evaluated on their ability to do a
cloth count of either a woven or knitted fabric.3. Students can demonstrate their awareness of laws
relating to textiles by documenting informationprovided by a salesperson or clipping news items.
Teaching Resources
TEXTS AND REFERENCES
Cowan, M. L. Introduction to TextilesHall, A. J. The Standard Handbook of Textiles
30
Holten, N. and J. Soldier, TextilesJoseph, M. L. Introductory Textile ScienceLinton, G. E. Applied Basic TextilesPotter, M. and B. Corbman, Textiles: Film to FabricStout, E. E. Introduction to TextilesWingate, I. Textile Fabrics and Their Selection
PERIODICALS
American FabricsDaily News RecordModern Textiles
AUDIOVISUAL AIDS
Cloth: Fiber to Fabric. 17 min., 15mm color film, soundEncyclopedia Brittanica, Education Corporation, 426N. Michigan Ave., Chicago, Ill. 60611
Construction of Cloth. 25 min., 30 color slides withwritten commentary and 20 fabric swatches keyed toprogram
Introduction to Textiles. 30 min., 32 color slides withwritten commentary and 18 fabric swatches keyed toprogram
Yarns Used in Making Cloth. 25 min., 32 color slideswith written commentary and 22 fabric swatches keyedto programFairchild Visuals, 7 East 12th St., New York, N.Y.10003
Textiles for Everyone. 15 min., color filmstrip, soundAmerican Textile Manufacturers Institute.1501 John-ston Building, Charlotte, N.C. 28200
The Way It Is With Man Made Fibers. 27 min., 16mmcolor film, soundE. I. Dupont de Nemours and Co., Product Informa-tion Section, Textile Fibers Dept., Centre Road Bldg.,Wilmington, Delaware
INSTRUCTIONAL SUPPLIES
Swatch bundles (as described in instructional. Guide-lines)
Fabric labelsSamples of current fabricsTesting equipment and supplies
DRAWING AND NATURE STUDY I
Prerequisites: None
Suggested Hours: 60
Behavioral Objectives
This area of instruction should enable the students to:
1. Develop their hand in the execution of single linedrawings.
2. Understand the botanical principles which governleaf forms and how to utilize them in designing.
3. Become familiar with various line, color andtechnique applications.
4. Understand the botanical principles which governflower forms and their growth and know how to
*14interpret them for industrial use.
5. Understand how to draw various nature forms,such as shells, insects, etc.
6. Develop spontaneity and facility in the drawingand painting of fruits and vegetables.
7. Acquire speed and dexterity in the interpretationof nature forms, using various media.
Instructional Guidelines
Print textile designers must be equipped to meet thedemands of industry. Competence in drawing andpainting are prime factors in developing ability and inenabling them to qualify for first level entry jobs.This area of instruction enables students to developthe manual dexterity and flexibility required fortextile design occupations. It encourages the studyand interpretation of nature forms as a means toartistic expression and provides the instruction andbackground which will prepare students for moreadvanced areas of instruction in Textile Design. Itmakes students aware of the importance of observa-tion and enables them to find the design potential incomposition and in nature itself.
Flower forms are studied and drawn in variouspositions, stressing growth, movement, structure, andradiation as important parts of their visual beauty.At first pencil is used, then pen and ink, then color.
43 31
Lectures on the quality of line, composition andshading brief the student in the art of self expression.Naturalistic and stylized interpretations are discussedas they affect the designer. Laboratory teamingexperiences provide the student with the instructionand guidance needed for technical advancement. Theyare organized as individual learning experiences, eachproviding the student with new and importantconcepts in designing. The suggested visual aidsinclude real flowers, leaves, fruit, vegetables, and shells,to name but a few of the nature forms that may beused as inspiration.
The area of instruction may be divided into two parts:the first emphasizing shape, form, composition, andspace; the second stressing interpretation and color.Each project is intended to offer students themaximum experience to serve as stimulation by theirdiversity and to encourage experimentation as ameans to discovery and accomplishment. The tech-niques that are suggested develop discipline in thehandling of tools.
Teaching Modules
Single Line DrawingsLeaf FormsTechniquesFlower FormsShells and InsectsFruits and VegetablesQuick Sketch Techniques
I. SINGLE LINE DRAWINGS
Teaching Content
A. Different Qualities of Line1. Flowing2. Accented3. Forceful4. Varied
B. Composition1. Examples of things to avoid
a. Center interestb. Too much repetition
2. Examples of things to remember and usea. Variations of expression in colorb. Variations of expression in line
3. Space as an important concept in composition4. Overlapping versus no overlapping5. The silhouette
Learning Experiences
1. Have students make two drawings of familiarobjects using different qualities of line in twodifferent compositions.
2. Have students draw a simple free form compo-sition emphasizing space.
II. LEAF FORMS
Teaching Content
A. Analysis of Individual Shapes1. Veinings2. Edges
B. Foreshortened Views
Learning Experiences
1. Have students make three rough sketches of basic-type leaves, such as maple, oak, ivy, laurel, huckle-berry, rhododendron and the like, to be evaluatedby the instructor and one to be used as simple ar-rangement for a finished drawing. Have studentsemphasize quality of line, using a soft pencil.
2. Have students compose a simple arrangement oftwo or more leaf sprays using pencil or pen andink.
III. TECHNIQUES
Teaching Content
A. Shading1. With line2. With color3. With technique
B. Naturalistic versus Stylized Interpretations1. Advantages of choice2. Reasons to use either
C. Stylizing a Flower or Nature Form
Learning Experiences
1. Have students make a series of three (3) drawingsrelating to different types of leaves and leaf sprays,using pencil and pen. Direct students to emphasizecomposition and shading.
2. Have students make a stylized drawing of a simpleleaf spray, to be painted in four (4) colors, usinggouache.
44 32
IV. FLOWER FORMS
Teaching Content
A. Flower Forms in Circular Perspective (daisy, simpletype chrysanthemum)1. Analysis and observation of front and fore-
shortened views2. Foliage in perspective3. Principles of growth, structure, movement,
radiation
B. Naturalistic Study and Analysis of Cup andand Saucer Type Flowers (tulip, daffodil, iris,petunia, morning glory)1. Views in perspective2. roreshortened views of foliage
C. Flowers with Depth Construction (snapdragons,stock, gladioli)1. Structure and growth2. Foreshortened views
D. Rose and Bud1. Basic shapes and growth pattern2. The spiral in nature
Learning Experiences
1. Have students draw a flower arrangement inpencil, putting emphasis on form and growth andusing shading.
2. Have students paint a balanced composition ofmixed flowers and leaves using shading techniques.
3. Have students make a drawing of a group (atleast three) of cup and saucer type flowers usingpencil or pen and experimenting with line shading.Then have students paint the same composition ingouache using up to five colors.
4. Have students paint a simple composition in amonotone feeling, using three colors.
V. SHELLS AND INSECTS
Teaching Content
A. Shell Structure1. The spiral in nature2. Variations in color pattern and structure
B. Anatomy and Color Patterns of Winged Insects1. Butterflies2. Bees3. Dragonflies4. Others
Learning Experiences
1. Have students compose an arrangement of shellsusing pen, pencil or paint as the medium and usingshading or color to bring out details and form.
2. Have students paint a butterfly naturalisticallyand then paint a stylized version of the samebutterfly.
VI. FRUITS AND VEGETABLES
Teaching Content
A. Structure Studies1. Simple forms
a. The sphereb. The cylinderc. Others
2. Shading
B. Fruits and Vegetables as Design Motifs1. Natural interpretations2. Stylized interpretations
Learning Experiences
1. Have students make a series of sketches in pencilusing different fruit and vegetable arrangements asinspiration and then choose one sketch to paintrealistically in gouache.
2. Have students stylize the same arrangements, usingup to five colors.
VII. QUICK SKETCH TECHNIQUES
Teaching Content
A. Reasons for Quick Sketches
1. Spontaneity2. Skill development3. Self-assurance
B. Media for Quick Sketches1. Black and white gouache2. Color3. Mixed media
Learning Experiences
1. Have students make a series of ten-minutesketches of flowers, leaves, vegetables, and othernature forms studied using pencil or pen, and
working out several compositional arrangements.Have students choose one of the drawings aboveand paint it in color, limiting their working time tofifteen minutes.
2. Have students make a series of five-minutesketches, trying to capture the essence of thenature forms chosen and then reinterpret one ofabove studies in color, limiting their working timeto fifteen minutes.
3. Have students make a series of ten-minute sketchesusing brush and it,k and repeat one of the sketches
using color.
33
4. Have students make a series of sketches frommemory, referring to any of the objects andnature forms studied and using any medium.Limit working time to fifteen minutes.
5. Have students paint a few quick sketches of chosenobjects or nature forms, trying to capture theiressence with spontaneous brush strokes and usinggouache.
6. Have students compose an arrangement using theabove studies as references and paint it on a black
background.7. Have students paint a series of studies using
butterflies, flowers, leaves, vegetables, and the likeas subjects and alternating compositional arrange-ments with free interpretations.
8. Have students paint a mixed bouquet in a balancedcomposition on a black background.
9. Have students continue projects until drawingcompetency and spontaneity have been estab-lished.
Suggested Evaluation
Evaluation may be based on evidence of the student'sability to:1. Execute single line drawings.2. Draw flower forms, utilizing their structural forms.3. Use various line, color and technique applications.4. Vary interpretations of nature forms such as shells,
flowers, insects, etc.5. Complete a portfolio of at least 15 finished
drawing and painting studies which demonstrateprogressive improvement in drawing and spon-taneity, color and interpretation.
Teaching Resources
TEXTS AND REFERENCES
Barton, J. Wild FlowersBorsig, T. Designs in NatureGollwitzer, G. The Joy of DrawingRottger. E. and D. Klante. Creative Drawing, Point and
LineStrache, W. Forms and Patterns in Nature
PERIODICALS
National Geographic
INSTRUCTIONAL SUPPLIES
Botanical studies and photographs, slides, etc.Dried flowers and leaves, shells, feathers, etc.Flower and seed cataloguesReal flowers, fruits, vegetables

TEXTILE DESIGN I
Prerequisites: Color and Design; Drawing andNature Study I
Suggested Hours: so
Behavioral Objectives
This area of instruction should enable the student to:
1. Know how to acqure and utilize valid methods ofdesign research.
2. Understand the meaning and use of a croquis inindustrial practice and know how to design one.
3. Understand the principle of the repeat in design-ing and its variations, and acquire facility inapplying its technique.
4. Develop dexterity in the various painting tech-niques used in industry.
5. Understand the underlying principles and im-portance of color combinations in designing forfabrics and acquire the ability to develop them.
6. Become familiar with the various printing processesand technical limitations which affect designingfor industry.
Insti uctional Guidelines
This area of instruction provides the foundation forfurther studies in printing methods by teachingstudents the technological requirements involved inthe mass-production of a pattern. It stresses thosebasic steps in the art of textile designing which enablean idea to find its way from the drawing board to theengraving of a roller to the printing of a fabric.Laboratory sessions provide students with opportu-nities to search out an idea, evaluate it, design acroquis, and put the design into repeat. These stepsconstitute the basis for the work of a textile designer.
The art of painting suitable color combinations forpatterns, and the various psychologies and practicalreasons which make them necessary are included. Thevarious printing methods used in the textile industryand pertinent information on roller sizes, repeat sizes,
34
color limitations and the like should be presented inclass lectures.
The learning experiences consist of five projects, thelast of which is a planned repeat. A lecture-discussionshould precede each learning experience, suggesting acertain need and intent for the design to be created.Students should be shown how to handle researchmaterial effectively, and be encouraged to start anotebook for their design ideas and color suggestions.
It is suggested that a minimum of three roughsketches in color be presented for each project forevaluation by the instructor before one is chosen tobe put into a suitable layout. This simple methodensures students of greater design flexibility andenables the instructor to encourage the constructiveuse of at least part of their three ideas.
The learning experiences and skills acquired in thisinstructional area correspond to the techniques ofdesign studios and prepare the student for furtherin-depth studies.
Teaching Modules
Acquiring Methods of ResearchThe CroquisThe RepeatMastering Painting TechniquesColor CombinationsPrinting Processes
I. ACQUIRING METHODS OF RESEARCH
Teaching Content
A. The Importance of Creative Thinking
B. Sources of Information
C. Records of Design Ideas
D. Editing and Evaluation of Information
E. Translation into a Design
Learning Experiences
1. Using the environment as inspiration, have studentschoose three objects of everyday life which appeal

to tnem as design possibilities (for example, eye-glasses, india ink bottles) and make a three-colorsketch of each one.
2. Have students choose three other objects from thereference books at their disposal and make acolored sketch of each of these.
3. Have students choose the best sketches from theabove, and using three colors, refine the drawingand painting technique and enter in notebook.
Ii. THE CROQUIS
Teaching Content
A. Explanation of the Croquis1. What it is
a. Design ideab. Example of the pattern
2. Reasons for usinga. Records ideab. Time-saving
B. Designing a Croquis1. Size of croquis2. Color balance3. Suggestion of layout
Learning Experiences
As an introduction to designing, have students paintthree small croquis (6" x suitable for women'swear or children's wear, using three colors. They maydevelop some of the motifs produced in Module I.Encourage students to try to create different sponta-neous layout arrangements, using the same motif indifferent positions so as to develop an awareness ofdesign possibilities. Have students enter these designideas into a notebook for possible future reference.
III. THE REPEAT
Teaching Content
A. Types of layout1. Straight or set2. Half-drop3. All-over4. Stripe5. Bayadere6. Diagonal7. Border
B. Directions of Patterns1. One -way2. Two-way3. Four-way4. All-over
C. Development of Layouts
35
D. Sizes of Repeats: Common Roller Sizes1. 15" to 161A" vertical repeats2. Fractions of 15" to 16V3. Flexibility of width
E. Determination of Repeat Sizes1. Size of motif2. Avoidance of sketches3. Other considerations
F. Procedures for Putting Croquis in Repeat
Learning Experiences
1. Demonstrate how to put a croquis into repeatas follows:a. Square off paper for accurate measurement.b. Experiment with different layout possibilities
by making several quick tracings of the motifto be used. Tracings should then be 'flopped',turned upside down, to suggest the bestpossible arrangement.
c. Arrange motif in line so that it repeats atdesired position.
d. Place side repeat at the half-drop position.e. Determine the width of the repeat.f. Make a good tracing of the final design.g. Transfer the tracing to good paper by
burnishing.h. Paint the design, using gouache.
2. (Note: To facilitate the first student learningexperience of the repeat, it is suggested that a setlayout be used. The single motif of Module I maybe placed into a rectangular shape (e.g. 1'4" x 3")which can easily be adapted to a 15" roller size.)Have students design a set tailored pattern inspiredby an object of everyday life. They may use thereference sketches from Modules I and II. Stresslayout, withan accent on positive/negative spacescreated by positioning the motif. Have studentsuse two directions, up and down, and paint inthree colors: one dark, one light, one bright.
IV. MASTERING PAINTING TECHNIQUES
Teaching Content
A. Opaque Background Wash with Gouache
B. Blotching in a Background
Learning Experiences:
1. Demonstrate how to paint an opaque backgroundwash using gouache as the medium, as follows:a. Tack paper on to board.b. Mix enough color to cover area to be painted
(paint must be neither too thick nor too thin).44 7
c. Have water and damp sponge at hand to pre-pare brush for painting.
d. Paint background with even horizontal strokes,going from top to bottom; then change directionto up and down (going from left to right) sothat paint evens out easily.
2. Demonstrate how to blotch in a background asfollows:a. Mix enough paint to cover area.b. Take painted croquis and proceed to apply
background color between motifs, leaving at-tractive accents of white to facilitate printing.
c. Try to section areas off so that join marks, ifany, are neat.
d. Paint in one direction to avoid streaking.3. Have students design an all-over pattern in croquis
form inspired by nature, using a free tossedarrangement and an analogous color scheme infour (4) colors and painting or blotching in abackground.
V. COLOR COMBINATIONS
Teaching Content
A. Use and Importance1. Adds variety to new designs2. Revitalizes old patterns3. Promotes saleability
B. Color Combinations 'Weighed In' to Original Pat-tern1. Procedures for matching colors2. Utilization of color to change pattern look
a. Experimentationb. Application of color theory
C. Size of Color Combinations
Learning Experiences
1. Have students design a bold sportswear pattern incroquis form for men's or women's wear inspiredby geometrics and abstracts, using up to five colors.
2. Have students paint a color combination for thedesign, weighing in the colors to the original andmaintaining color relationships.
3. Have students paint a color combination for thedesign, changing the look of the pattern andmaintaining the same number of rollers.
VI. PRINTING PROCESSES
Teaching Content
A. Methods of Roller Engraving
1. Pantographic method2. Photographic method
B. Types of Roller and Screen Printing1. Direct2. Discharge3. Resist
C. Methods of Printing1. Hand block printing2. Roller printing (copper)3. Screen printing
a. Hand screenb. Flat bed machine screenc. Rotary screen
4. Sublastatic paper (heat transfer)5. Others
D. Limitations of Color1. Reasons for color limitations2. Cost per color (roller or screen)
Learning Experiences
1. Depending upon community resources, take stu-dents on field trips to textile engraving and/orprinting plants to observe varied methods offabric printing.
2. Have students plan a suitable repeat for thecroquis designed in Module IV or V and work ontracing paper with charcoal at first, then withpencil.
3. Have students back tracing and transfer the designto georgian, seminole or Bristol paper (dull finish).
4. Have students paint the design in its originalcolors, extending it about three inches all aroundthe repeat.
5. Have students continue projects until competencyin all areas has been established.
Suggested Evaluation
Evaluation may be based on evidence of the student'sability to:
1. Apply valid methods of design research.2. Paint a croquis.3. Demonstrate understanding of the principles of
the repeat and its variations by designing a patternand putting it into repeat.
4. Complete at /east five class projects successfully,painting them with a clean technique, showinggood color sense.
5. Paint color combinations of patterns to 'weigh in'with original design.
Teaching Resources
TEXTS AND REFERENCES
Barton, J.G. Wild Flowers
Bates, K. Basic Design
Butter, E. J. and B. C. Lockhart. Design for You
Bouts, G. L'Ewrit do le Cpuleur
Conran, T. Printed Textile Design
Downer, M. The Stow of Design
Horning, C.P. Referance Handbook of Designs and Devices
Meurello, R.S. Introduction to the Visual ArtsMunari, B. Discovery of the Circle
37
Stevenson, R. L. A Child's Garden of Versos
Webster, M.D. Guilts
PERIODICALS
American FabricsCalifornia Man's and Women's StylistNew York TimmWomen's Weer DailyFashion magazines
INSTRUCTIONAL SUPPLIES
Fabric watches which illustrate teaching contentExamples of studio croquis, repeats end color com-binations
Basic Skill Development Instruction
DRAWING AND NATURE STUDY li
Prerequisites: Drawing and Nature Study I;Textile Design //
Suggested Hours: co
Behavioral Objectives
This area of instruction should enable students to:
1. Comprehend the various techniques of floral paint-ing and acquire spontaneity and speed in usingthem to interpret flower and nature forms.
2. Develop personal style and dexterity in the draw-ing and painting of nature forms through quicksketches.
3. Design various types of formal floral compositionsusing different techniques.
4. Design floral patterns suitable for industry utilizinga free interpretation of the painting techniques and
compositional studies perfected.
Instructional Guidelines
This area of instruction provides the means for furtherstudent experimentation and development in refiningthose technical processes which are basic requisites`or the textile designer. Students make analyticalstudies of old techniques and learn to master newapproaches to design while developing their ownindividual style. Old prints, Oriental brush drawings,medieval tapestries and Impressionist paintings arestudied and discussed in the light of their character-istics and artistic potential. Pencil, pen, gouache,dyes, crayon, and mixed media are used.
Quick sketches of flowers and plant forms loosen thehand and prepare the student for more formal com-positions. Of these there are four: a botanical study,a study of Oriental brush techniques, a tapestry(warp) study, and a study of Impressionist paintingmethods. The formal compositions are then followedby personal free interpretations of nature forms sug-gested by them, to be painted in dyes or gouache.
60 38
Emphasis should be on independent experimentationin order to provide students with the means for de-veloping their artistic potential for imaginative ex-pression.
Teaching Modules
I. TechniquesII. Quick Sketch PracticesIII. Formal CompositionsIV. Free Interpretations
I. TECHNIQUES
Teaching Content
A. Botanical Studies: Old Print Techniques1. Research methods and materials2. Characteristics of botanical prints
a. Medium of water colorb. Illustration of growth patternc. Others
B. Oriental Studies1. Research materials and methods2. Characteristics of Oriental studies
a. Brush techniquesb. Spontaneityc. Subtle coloringd. Expressione. Purity of line
C. Tapestry Warp Techniques1. Research materials and methods2. Characteristics of tapestry warp techniques
a. Vertical warp effectsb. Coloringsc. Textured effects
3. Modern interpretations versus authentic color-ing
D. Impressionist Techniques1. Research materials and methods2. Characteristics of Impressionist techniques
a. Looseness of strokesb. Vibrating colors
Learning Experiences
Using the appropriate research materials as models,and working from fresh flowers, have students:
1. Practice dye and pen techniques in the feeling of a
botanical study and make several small sketches,emphasizing composition and detail.
2. Practice the brush and pen techniques usingChinese ink block brushes. Students are to try tocapture the purity of line and freshness of strokeand make several studies until competency hasbeen established.
3. Use gouache in trying to simulate the texture of atapestry floral and make several small studies incroquis form.
4. Try to capture the feeling of a' impressionistfloral technique using any appropriate medium andany color arrangement. Students make severalsmall sketches experimenting with different typesof renderings, e.g. Van Gogh, Cezanne, Renoir,Seurat, Gaugin, etc. (Note: Have students keep allpractice sketches for further studies.)
II. QUICK SKETCH PRACTICES
Teaching Content
A. Reasons for Quick Sketches1. Spontaneity2. Preparation for formal composition3. Development of speed and dexterity4. Development of a personal style
B. Media for Quick Sketches1. Ink2. Pencil3. Gouache4. Dyes
Learning Experiences
1. Limiting the working time to 10 minutes for eachdrawing, have students:a. Draw a simple flower or flower arrangement in
pencil, emphasizing composition and shading,and repeat, emphasizing foreshortened view andstructure.
h. Draw two different compositional arrangementsof nature forms in pen and ink, stressingspontaneity.
c. Using gouache as a medium, paint two free inter-pretations of fruits, vegetables, or both.
d. Draw a free form composition of flowers andleaves, using dyes as the medium. Students may"trap" colors and stylize forms.
2. Limiting working time to five minutes for eachdrawing, have students:
39
a. Draw a single flower, trying to capture its feel-ing and form through the use of the varied linetechnique.
b. Make a brush and ink study of a flower, tryingto keep the strokes spontaneous and loose.
c. Using gouache as the medium, paint a quickrendition of a leaf spray which they may stylizeif they wish. Students are to use flat or watercolor shading.
d. Paint a single flower in dyes using any tech-nique.
ill. FORMAL COMPOSITIONS
Teaching Content
A. Techniques for Formal Compositions1. Botanical study2. Oriental study3. Tapestry warp technique4. impressionist technique
B. Characteristics of Formal Compositions
Learning Experiences
For each of the following projects, have students do aminimum of three color roughs, utilizing previousstudies. Evaluate the roughs and choose one for com-pletion.
1. Have students use gouache or dyes, with no colorlimitations, to develop and paint a finished studyof the old print technique.
2. Have students make several quick sketches offlowers or nature forms using the Oriental brushtechnique with the emphasis on spontaneity andpureness of line. These are to be painted withChinese brushes and ink.
3. Have students paint three croquis using the warptechnique as center of interest, and using gouacheas the medium. Have students develop sketchesinto a finished study.
4. Have students choose an Impressionist artist andmake several color roughs trying to capture his orher technique. Have students select one rough anddevelop it into a finished composition of natureor abstract forms using the Impressionist feeling.Students may use any appropriate media.
IV. FREE INTERPRETATIONS
Teaching Content
A. Evaluation of Techniques1. Practicality in printing2. Desirability as design processes
B. Personal Adaptation of an Established Technique
C. Modification of Techniques1. Suitability to one's needs2. Avoidance of difficult printing details3. Limitation of color
Learning Experiences
1. Have students select one of the techniques learnedin Module ill and using up to five colors, makethree color sketches in croquis form for a floralpattern. After evaluation by the instructor, one isto be chosen as a layout for a finished design.
2. Have students continue projects until competencyand flexibility have been established.
Suggested Evaluation
1. Evidence which demonstrates the student's abilityto apply the botanical study or water color tech-nique, the Oriental technique, the tapestry warptechnique and the impressionist technique to theinterpretation of flowers and nature forms.
2. Evidence of student's ability to draw quicksketches (5 and 10 minutes' working time) whichdemonstrate style and dexterity.
3. Evidence of student's ability to use a given numberof different techniques in designing a specifiednumber of formal flower compositions.
40
4. A completed portfolio of a minimum of 15 classprojects which demonstrate flexibility of "hand"or technique, and competency in drawing, composition and the use of color.
5. Evidence of the student's ability to design a floralpattern which is suitable for industry use andwhich utilizes free interpretations of the paintingtechniques and compositional studies perfected.
Teaching Resources
TEXTS AND REFERENCES
Blunt, W. The Art of Botanical IllustrationChest, B. The Art of DrawingGuichard-Mell, J. MatisseYetsuaki, K. Shells of the Western Pacific in Color
PERIODICALS
House and GardenNational Geographic
INSTRUCTIONAL SUPPLIES
Fresh flowers, leaves, fruits, vegetablesDried flowers and leaves, shells, feathers, etc.Flower and seed cataloguesExamples of different techniques
TEXTILE DESIGN II
Prerequisites: Textile Design I
Suggested Hours: 120
Behavioral Objectives
This area of instruction should enable students to:1. Understand the technical differences between
yarn-dyed fabrics and printed fabrics with a wovenlook.
2. Design for both types of fabrics, using appropriatetechniques.
3. Acquire competency in designing for industry,using the waxed paper method and other tech-niques.
4. Know the various types of flora's used in indus-try, utilizing both dyes and gouache as mediums.
Instructional Guidelines
This area of instruction introduces the student to twonew designing methods: (1) the art of designing plaidsand checks for yarn-dyed and printed woven fabrics,and (2) the technique of painting with dyes on waxedrice paper as used in the textile industry. Gouacheis the medium to be used.
Teacher demonstrations are followed by practicesessions in which the students, guided by the instruc-tor, learn to master the different techniques anddevelop their competencies. The procedures describedin Module II apply to all woven design projects.A learning experience in a documentary-inspiredstripe initiates students to the waxed rice papermethod and is followed by several other suggestedprojects which help students develop their skills inthis technique.
Different types of florets are described and discussedas important inspiration for the textile designer,especially the Liberty type pattern which is renderedin dyes. A lecture-discussion should precede eachlearning experience suggesting the need and intent forthe design to be created. It is suggested that a mini-mum of three color roughs should be painted for each
41
pattern for evaluation and discussion by the instruc-tor and selection of one to be developed as thefinished croquis layout.
A Madras plaid and the design for a m en's necktiefollow, and one of the floral croquis is put into repeat.Color combinations are suggested for several of thepatterns, to keep students flexible and to afford themthe maximum experience with color.
Teaching Modules
I. Yarn-Dyed Fabrics or PrintedWoven LookPainted Woven Plaids
III. The Waxed Paper MethodIV. Types of Florets in Dyes and GouacheV. Review of Design Techniques
Fabrics with a
1. YARN-DYED FABRICS OR PRINTED FABRICSWITH A WOVEN LOOK
Teaching Content
A. Printed or Yam-Dyed Wovens1. Painted versus woven plaids
a. Visual possibilitiesb. Limitations
2. Color limitationsa. Unlimited for warpb. Maximum of four for filling
3. Technical requirementsa. Neatnessb. Accuracy
B. Types of Plaids1. Balanced2. Unbalanced3. Madras plaid4. Checks
a. One-dimensionalb. Two-dimensional
C. Sources for Research lino Inspiration1. Color photographs from magazines2. Fabric or color swatches3. Textile design idea and color notebook
D. Decorative Possibilities1. Satin stripe (added thread)2. Ground dobby (warp thread)3. Clip spot (added thread)4. Cord (added thread)5. Top beam (added thread)6. Push cord (added thread)7. End and end (warp thread)8. Stitch cord (added thread)
E. Experimentation with Acetate1. Filling color2. Decorations on finished plaids
F. Ombre Effects1. Through strength of color
a. Monotoneb. Varied color
2. Through width of stripes
Learning Experiences:
1. Direct students to select a few colored magazinepages and isolate those shades which they feel willreproduce their color feeling. These are to be dis-cussed with the instructor and one chosen formatching color to photograph in quantity to beused for project #3 in following Module.
II. PAINTED WOVEN PLAIDS
Teaching Content
A. Application of Woven Design Techniques t: Paper
B. Experimentation in Woven or Printed Stripes
C. Steps in Painting Woven or Printed Stripes
D. Steps in Stippling Woven or Printed Stripes
Learning Experiences
1. Demonstrate:a. How to apply woven design techniques to paper
using gouache1) Mount paper on metal edge board (16"x 21").2) Use a metal T square and right triangle on
metal edge board.3) Use ruling pen.4) Stipple with straight edge bristle tooth-
brushes to obtain a woven effect (40%coverage).
5) Use paper for measuring instead of a ruler.a) Encourages freedombi Encourages inventiveness
b. Procedures in planning stripes1) Experiment with color dabs.2) Experiment with width of stripes. 54
42
3) Experiment with position and repetition ofcolors within the repeat.
4) Experiment with the size of the warp repeat.5) Experiment with filling repeat possibilities
following the same procedure as above,keeping the number of colors to a maxi-mum of four.
c. Painting a woven or printed stripe1) Square off the stripe area on 2 ply bristol
paper using a metal T square and righttriangle.
2) Mark off the warp repeat measurements ac-curately at top and bottom of the paper,indicating color to be painted within eachstripe and leaving a one inch margin ateither end for practice space. (Show repeatat least twice; begin and end with the samecolor, possibly with the same stripe).
3) Paint an even number of stripes, alternatelight and dark.
4) Paint in light colors first, free ha Id, goingover the edges slightly on either site.
5) Draw in the side of a darker stripe using theruling pen and appropriate co'
6) Fill in stripe carefully with vie same color,using a regular brush.
d. Stippling a woven or printed woven stripe1) Mark off the filling repeat at either edge of
the paper, indicating color to be used.2) Section off area to be stippled with paper
and masking tape. (Frisket paper or stipplebars can also be used).
3) Stipple filling colors onto painted warpstripes using straight edge bristle tooth-brushes and a small straight edge butter orparing knife (40% coverage). The air brushtechnique should also be demonstrated.
4) Cut and mount the printed woven design,adding a one inch strip of the original warpat the top.
Have students paint a 14" long multi-color warpstripe in repeat, to be used for practice stippling.Students are to stipple each of four three-inchsections with a different color, concentrating onan even texture and 40% coverage. Colors to beused for stippling: (a) white; (b) contrasting color;(c) one of the colors appearing in stripe; (d) black.Have students mount, including one inch of theoriginal warp stripe at the top.
3. Have students design an unbalanced plaid suitablefor sportswear, using the colored photographchosen in Module I and keeping the color feelingof the photograph. (Remind students that warpcolors can and should be repeated within the
repeat as accents to create variation and interestand that the same may apply to the filling repeat).
4. Have students design a one or two-dimensionalcheck suitable for children's wear and mount onwhite paper, including one inch of the warp construction at top.
5. Have students design an ombre stripe warp layout18" long, divide it into two sections and createtwo versions of an unbalanced plaid, changing thefilling repeats and colors to give different"seasonal" looks, for example, one for summer,one for fall. Have students mount as for project#4.
6. Have students design a balanced plaid suitable forsportswear, using variations of two complementarycolors (e.g., yellow, purple, yellow plus black,yellow plus white, etc.) and mount as for project#4.
7. Using a sheet of prepared acetate over the finisheddesigns, have students experiment with decorationsand add them where suitable. (To be done forthree of the four woven projects after discussingpossibilities with the instructor). Decorative details will eventually be painted on the finisheddesign with fine brush strokes or neat ruling penand brush work. Remind students to observe andfollow the direction of the thread when paintingground dobbies.
Ill. THE WAXED PAPER METHOD
Teaching Content
A. Waxed Rice Paper1. Advantages in making waxed paper2. Disadvantages in making waxed paper3. Utilization
a. Elimination of tracingsb. Cannot be erased or cleaned
B. Techniques of Dye Painting on Waxed Paper1. Slightly slanted board2. Colorflex, Non-Crawl or detergents3. Experimentation in mixing4. Use of "traps" or overlapping colors
C. Dye Painting on Unwaxed Paper1. Use of backed tracings or light drawings to
transfer designs2. Elimination of NonCrawl or other dye agents
Learning Experiences
1. Direct students to choose a culture whose decorative arts inspire them (e.g., Oriental, Persian,
43
African), make a few studies of details that suggestdesign material, develop three of these ideas, andenter all reference studies into design notebook.Using reference materials, have students design adocumentary stripe in up to five colors, suitablefor women's wear or men's wear, and using dyes.The design will be in repeat and take either thevertical, diagonal or horizontal direction (bayadere).
2. Have students paint one color combination for thedesign, "weighing in" five different colors to theoriginal, maintaining the same color relationships.
3. Have students paint one color combination for thedesign, using a monochromatic or analogous colorfeeling.
IV. TYPES OF FLORALS IN DYES AND GOUACHE
Teaching Content
A. "Bread and Butter" Floral
B. Stylized Floral
C. Liberty Floral
Learning Experiences
1. Using nature study sketches or notebook refer-ences of nature forms, have students design a"Bread and Butter" floral in croquis form, usinggouache and up to five colors. Students are topaint two color combinations for the pattern,maintaining color relationships and "weighing in"colors to the original.
2. Have students design a modern stylized floralpattern suitable for sportswear, using gouachepaint and one color, and painting on a white orcolored ground. Boldness and a dramatic feelingare to be emphasized. Have students paint twocolor combinations for the same pattern.
3. Using appropriate floral research and nature studysketches as reference, have students design aLiberty floral for women's wear, using dyes and upto five colors. Have students experiment with traps(bonus colors, since they are automatically createdby the overlapping of two colors). Adhering to theoutline characteristic of the floral, have studentstry to interpret it as a personal expression of theircolor and design ideas.
a. Have students; paint two color combinations forthe same pattern, maintaining color relation.ships.
b. Have student; paint a color combination of thesame pattern creating a different color feeling(e.g., using pastels instead of rich colors).
V. REVIEW OF DESIGN TECHNIQUES
Teaching Content
A. Madras Plaid
B. Repeat on a Floral
C. Design for a Man's Tie
Learning Experiences
1. Following the procedures demonstrated and dis-cussed in Modules I and II and using appropriatereferences, have students design a Madras plaid forsportswear. (Both warp and filling repeats shouldbe varied, colors are to be deep and rich, empha-sizing the "bleeding" Madras look).
2. Have students choose one of the floral croquis lay-outs just completed and put it into a suitable re-peat, adhering to the technological limitationsobserved for roller printing. Have students paintthe repeat in the same medium as the original.
3. Have students design a pattern in gouache suitablefor a man's tie, using a printed woven effect, astripe effect, or an abstract pattern. The designmay be covered by a tie-shaped stencil or bristolpaper for presentation.
Suggested Evaluation
Evaluation may be based on the students' ability to:
1. Demonstrate their understanding of the technicaldifferences between yarn-dyed fabrics and printedfabrics with a woven look (e.g., plaids and the like).
2. Design for both types of fabrics, using appropriatetechniques.
3. Paint in dyes on waxed rice paper as is done inindustry.
4. Utilize both dyes and gouache in designing varioustypes of florets.
5. Complete at least 15 projects showing a progressiveimprovement in painting technique, originality,and adherence to time schedules.
44
Teaching Resources
TEXTS AND REFERENCES
Anderson, D. M. Elements of DesignBallinger, L. B. Perspective: Space end DesignBowfin, M. E. Design Through DiscoveryCollier, A. M. Handbook of TextilesConran, T. '''inted Textile DesignKepis, (.3. Vision # Value SeriesUnborn, N. Banners and Hangings: Design and Construc-
tionMebane, J. The Complete Book of Collecting Art
NouveauMontgomery, F. M. Printed Textiles, English and Ameri-
can Cottons and Linens, 1700.1850Taylor, J. F. Design and Expression in the Visual ArtsWarren, O. All Color Book of Art Nouveau
PERIODICALS
AmbassadorAmerican Fabrics (particularly useful is the "Madras"
issue)EleganceEllaGentlemen's QuarterlyHarper's BazaarInternational TextilesL'Official de la CouleurTextiles SuissesVogueWomen's Wear Daily
INSTRUCTIONAL SUPPLIES
Air brush equipment (Poncho) desirable, but notmandatory
Beeswax, paraffin, a dotage boiler, a hot plate, a fiat2" brush
Fabric samples of stripes of all dimensions and typesFabric swatches of checks, plaids (balanced and un-
balanced)a Fabrics with dobbies, clip spots and other decorative
details that illustrate teaching points coveredFrisket paper
a Samples of studio croquis of printed and yarn-dyedwoven fabrics
Sample studio layouts, croquis, color combinations.etc. painted on waxed and unwaxed rice paperwith dyes
Sample studio layouts, croquis, color combinations.etc. painted on various papers using gouache andother media
Section liners, ruling pens, T-squares, metal-edgedboards 116" x 21"), straight-edge bristle tooth-brushes for stippling
Stipple bars
DESIGN RESEARCH
Prerequisites:'Textile Design I
Suggested Hours: 75
Behavioral Objectives
This area of instruction should enable the student to:
1. Understand how to master research procedures.2 Know the visual importance of historical ornaments
as a valid and desirable approach and inspiration todesign.
3. Distinguish the difference between the adaptationand the adoption of design ideas.
Instructional Guidelines
Good designers must be conscious of the past, involvedwith the present, and intuitive of the future. They areaware of today's problems and living conditions, andhave studied and frequently refer to the rich culturalperiods of the past as an inspiration for new trends.This consciousness of historical art is one of the firmfoundations on which the young designers can buildtheir own productive structure.
This area of instruction is designed to prdvide thestudent with practical experience in acquiring pro-fessional methods of research as a stimulus to design-ing in general and to textile designing in particular.Major emphasis should be on the evaluation of formand design as it relates to lextiles. Historical artperiods should be studied and discussed with thepurpose of extracting from them ideas fof color andnew designs. A notebook should be required in whichstudents will catalogue their findings and on whichthey are to be evaluated.
The materials for design research are massive and much
will depend on community resources and facilities.Instructors, therefore, must edit the suggested con-tent to suit their particular situation and preferences.
Optimum community resources would include a near-by museum and a reference library. Slides can sub-stitute for the lack of a museum but a reasonably -well
a.) 9/
45
equipped reference library is mandatory. Class pro-cedures would ideally alternate between museum andlibrary trips during which students draw reference design ideas free hand, and classroom experiences inwhich students translate their references into designssuitable for fabrics.
Once guided by the instructor, students are encouragedto do independent research and record their findingsin their design notebook. A short lecture on thehistorical background of the various periods to besurveyed should precede museum trips and the showing of slides or other appropriate material, so that thestudent may profit more knowledgeably from thelearning experience.
There are five suggested projects. Each session willallow students time to use reference material andrecord their choice of design ideas from the variousperiods covered at the time. After several distinct artperiods' have been examined, the students will as-semble their own material and transfer the best ideasto their notebook in color. The project resulting fromthis research is to be discussed with, and approved by,the instructor before being undertaken and completed.(It is important that students learn to evaluate andconstruct the 'look' of an art period rather than mixtheir research findings into one design. Inventivenessis to be encouraged, but students must be madeaware of the need for both types of patterns). Thisprocedure will be followed until all art periods arecovered and five plates finished.
Teaching Modules
I. Research ProceduresII. History of Ornaments
Ill. Adaptation versus Adoption
I. RESEARCH PROCEDURES
Teaching Content
A. Defining Areas of Research
1. Environmenta. Museumsb. Architectural features on buildingsc. Others
2. Library resources3. Photograph slides4. Retail stores
B. Recording of Research Materials1. Modification for needs2. Notebook entries for reference and use
C. Evaluation of Research Materials1. Selection of design elements rather than histori-
cal objects2. Commercial practicality of design ideas3. Appropriateness for apparel and accessories
Learning Experiences
1. Assign students to select five design motifs fromarchitectural features of buildings, homes, etc. oftheir. environment and draw them free hand forfuture use.
2. Have students develop a border pattern in pencilusing all or parts of the environmental designmotifs from project #1 above and change motifsif it suits their needs. Direct students to transferthe most successful part of the exercise to theirdesign notebooks.
II. HISTORY OF ORNAMENTS
Teaching Content
A. Primitives1. Prehistoric2. Historic3. Modern
B. Ancient Egyptian1. Assyria2. Crete3. Mycenae4. Related Near Eastern cultures
C. Greco-Roman1. Greek2. Homan
D. Byzantine1. Coptic2. Islamic
E. Romanesque and Gothic
F. Persia and India
G. China and Japan
H. The Renaissance
46
1. Italy2. France3. England4. Spain5. Flanders6. Germany
I. Baroque
J. Louis XIV, XV and XVI
K. French Empire
L. England1. Wedgewood2. Adam3. Christopher Wren
M. Colonial and Early American
N. American Indian1. Alaska2. U.S. Indians3. Mexico
a. Aztecb. Mayan
4. Central America5. Inca
Learning Experiences
After a brief lecture-discussion on the historical back-ground of a selected number of inspirational areasand an explanation of the sources of research materialavailable to the students, assign students to accumulateresearch material for future reference and class use.Suggestions for student research procedures are asfollows:
Have students research a minimum of 5 differentcultures and gather as many design ideas fromeach as they wish, which they find inspirational.Students are to transfer these ideas with properdocumentation to their notebooks and enter themin alphabetical order according to the country oforigin. Students may use color if they desire.
III. ADAPTATION VERSUS ADOPTION
Teaching Content
A. Copies versus Re-Interpretations1. Copies2. Re-interpretations
a. Informationb. Inspiration
B. Examples of 1900-1960 Adaptations1. Art Nouveau2. Art Deco3. Bauhaus
4. Radler5. Dufy
C. Examples of Contemporary Adaptations1. Pucci2. Ken Scott3. Jack Lenor Larsen4. Dorothy Liebes
Learning Experiences
1. Have students use the research material gatheredfrom one historic period (e.g., Persian, etc.) todesign a documentary stripe suitable for men'swear. Remind students that the stripe can be variedand to try to balance its layout on paper by be-ginning and ending with the same stripe. Have stu-dents develop their design into a 5" half-drop re-peat, show at least two extra inches all around, andpaint in four colors with gouache.
2. Have students design an ailover pattern suitablefor womens wear in croquis form using an interest-ing motif developed from a different documentaryreference. Students are to paint the design ingouache, using three colors on a light background.
3. Ask students to find a design idea among theirreferences to re-interpret into a tailored set patternsuitable for shirts or blouses. The design is to be ina 4" or 8" repeat (if alternating the colors), andmay be developed as a halfdrop, using up to fourcolors in gouache and showing at least two extrainches all around.
4. Have students select a new documentary referencefrom their notebook and design a bayadere (hori-zontal stripe) in 3 colors, using variations withinthe repeat, which is suitable for summer sports-wear. Students are to use a half-drop layout andthe most appropriate of these sizes for the verticalrepeat: 4", 5", 7Y2", 8".
5. Have students design an important border for fallwomen's wear, using up to 4 colors in gouache, fromanother of their documentary references. Studentsare to use a 7Y2" or 8" repeat (affects the border asa side repeat, since the pattern is printed oncealong the selvedge of the goods) and emphasizenegative spaces within the design.
(Note: It is suggested that at least one of the doc-umentary-inspired designs be developed as a floral.)
47
Suggested Evaluation
1. Evidence of the students' ability to demonstrate ina design research notebook, their understandingand application of design research procedures.
2. A student portfolio of a minimum of 5 projects tobe evaluated for evidence which demonstrates:a. The students' versatility and imagination in
adapting and reinterpreting design ideasb. Their understanding of historical ornamentation
as a valid approach to designc. Practicality of designs for endusesd. Design techniques
Teaching Resources
TEXTS AND REFERENCES
As Iln, E. The Aesthetic Movement, Prelude to Art NouveauBallinger, L. and T. Vroman. Design Sources and ResourcesBeer, A. B. Trade Goods: A Study of Indian ChintzBell, K. M. Decorative Motifs of Oriental ArtBoardman, J. Greek ArtBodrogi, T. Art in Africa.Christensen, E. The Index of American DesignDowner, M. The Story of DesignJanson, H. W. History of ArtMunari, B. Design as Art- --- Discovery of the CirclePlath, I. The Decorative Arts of SwedenRice, T. T. Ancient Arts of Central Asia- -- A Concise History of Russian ArtRice, D. T. Islamic ArtWarren, G. All Color Book of Art NouveauWesley, R. Bead DesignWeibel, A. C. Two Thousand Years of TextilesWillett. F. African Art
PERIODICALS
American FabricsDesignHarper's BazaarInternational TextilesL'Officiel de la CouleurNational GeographicRealitiesVogue
INSTRUCTIONAL SUPPLIES
a Sample studio layouts and reference pieces, textures,OW.
Fabric swatches to illustrate the various teaching pointscovered, e.g. batiks, Indian, Indonesian and otherforeign fabrics
Ribbons, laces, embroideries or any other designedarticle that illustrate teaching content
PRINT STUDIO TECHNIQUES
Prerequisites: Textile Design
Suggested Hours: 90
Behavioral Objectives
This area of instruction should enable students to:1. Develop and apply their sense of color through
practical experience in color matching.2. Design different types of croquis.3. Develop dexterity in making good tracings for
studio use.4. Acquire flexibility in creating color combinations.5. Know how to put designs into repeat for studio
and mill use.6. Develop the ability to 'match a hand'.7. Utilize proper methods in adapting designs.8. Utilize overlays for studio use.9. Develop dexterity in using various techniques on
waxed and unwaxed papers.10. Design textures by means of various techniques.
Instructional Guidelines
This area of instruction aims to give students anunderstanding of the techniques used in industryprint studios and to develop the specialized com-petencies essential for entry-level jobs and careeradvancement in print design occupations.
Projects and exercises in matching colors, designingcroquis, making tracings, painting color combinations,and working out repeats provide students with op-portunities to apply and refine the knowledge andskills acquired in previous textile design studies. Ref-erence pieces are made whereby students learn to'match a hand'. Teaching content and learning ex-periences also include studio techniques for adaptingpatterns, using overlays and designing textures. Stu-dents are taught the importance and use of thetjanting pen for resist work with dyes.
Projects should be explained by the instructor muchas a stylist or studio head would require them for aspecific market or particular purpose. it is suggested
48
that all work be discussed with instructors and com-pleted only after their approval. Certain projects willrequire color roughs or layout sketches. The studentshould present at least two idea roughs for everydesign, one of which is to be chosen for completion.
Experimentation should be encouraged in techniquesand in the development of students' artistic capabil-ities.
Teaching Modules
I. Color Matching TechniqueII. Considerations in Designing Croquis
II I . TracingsIV. Techniques for ColoringsV. Utilization of Croquis for Repeats
VI. Techniques for Reference PiecesVii. Adaptation of Patterns
VIII. Overlays (Prepared Acetates)IX. Tjanting Pen TechniqueX. Printed Texture Techniques
I. COLOR MATCHING TECHNIQUE
Teaching Content
A. Importance of a Perfect Match
B. "Cut-out Window" Technique1. Advantages2. Procedures
Learning Experiences
1. Have students bring in five different colored fabricswatches or trims such as piping, ribbon and thelike, cut them in half (length of each cut sectionshould be about 3"), and put one group of thecut halves aside. Direct students to match eachof their five colors as closely as they can by usinggouache and then paint a 3" square of each color.Have students mount alt five matching squareswith their corresponding colors on a sheet of whitepaper.
2. Have each student then exchange the cut halvesat- of their five color swatches with a fellow student
in order to match and mount the fabric colors thateach receives. Have the class compare and evaluateresults, and discuss the industry uses and needsfor perfect color matches.
II. CONSIDERATIONS IN DESIGNING CROQUIS
Teaching Content
A. Uses of Croquis1. Experimentation for new design ideas2. Suggestions for new design ideas3. Presentation to studio customers4. Possible utilization for repeats
B. Factors Affecting Size of Croquis1. Size of motif2. Complexity of design idea
Learning Experiences
1. Have students design two different croquis of asmall, tailored geometric pattern appropriate formen's ties or ladies' blouses, using four colors andpainting in gouache.
2. Have students design two different croquis of asmall floral pattern suitable for lingerie, blouses orchildren's wear, using dyes and India ink on whitepaper. Students are to use five colors on a whitebackground.
III. TRACINGS
Teaching Content
A. Guidelines for Making Tracings1. Margin around sheet to prevent tearing2. Sharp pencil (not too soft)3. Accuracy4. Register marks to ensure precision5. Backed tracing to transfer original pc 'ion of
motifs to fresh paper6. Second sheet over original tracing while burnish-
ing to prevent warping of paper.
B. Tracings for Dark Grounds1. Use of white or light powder versus use of pencil2. Use of light or white carbon paper
C. Use of Frosted Acetate for Tracings1. For fine detailed patterns2. For darker hard to distinguish patterns
D. Methods of Eliminating Tracings1. Office duplicating machine2. Waxed rice paper3. Use of light table
49
Learning Experiences
1. Have students make a tracing of one of the tailoredpattern croquis painted in Module II and back it,rubbing tracing twice on to georgian paper.
2. Have students make a tracing of one of the twofloral designs painted in Module II, back the tracing and transfer it twice on to bristol paper (dullfinish).
IV. TECHNIQUES FOR COLORINGS
Teaching Content
A. Considerations in Colorings1. Element of designs2. Fashion trends in colors3. Season4. End use5. Saleability6. Revitalization of past patterns
B. Techniques for Changing Colors1. Changes in background color2. Changes within the pattern3. Addition of rollers4. Elimination of rollers5. Others
Learning Experiences
1. Using the tracing layouts prepared in Module III:
a. Have students paint the tailored geometric pat-tern in gouache.1) Using a monotone or analogous feeling2) Weighing in different colors to the original
croquis
b. Have students paint two color combinations ofthe small floral pattern in dyes.1) Weighing in different colors to the original2) Creating a pastel feeling using ether mono-
tone or analogous shades
2. Using either colored paper or painting their ownbackground, have students choose any one of thepatterns that they prepared ii, M* Jule ill andtransfer the tracing by means it Johnson's WhitePowder. Direct students to paint a new color version of the pattern, suitable for either the fall,holiday, or spring season, and identify their season.
3. Assign students to "shop" one or more major retailstores and report on the colors in apparel that arebeing featured by the stores. Have class discusscurrent fashion trends in colors and their impli-cations for textile designers.
V. UTILIZATION OF CROQUIS FOR REPEATS
Teaching Content
A. Advantage1. Original 'hand' of the croquis2. Incorporation of original into engraving copy
B. Alternative Possibilities1. Use a complete croquis2. Partial elimination of croquis design
C. Method of Cutting-out a Croquis1. Working out croquis repeat on tracing paper2. Rubbing down of tracing3. Simultaneous cutting of croquis and good paper
a. Insertion within its shapeb. Removal of excess paper
4. Taping of croquis shape to back of good paper5. Painting
Learning Experiences
1. Using either a geometric or tailored pattern de-veloped in Module II, have students work out arepeat layout on tracing paper. Discuss and checkfor balance and accuracy.
2. Have students back the tracing and transfer togeorgian or bristol paper for completion. The orig-inal croquis is to be used as part of the repeat andinserted into the good paper after the tracing hasbeen transferred.
3. Have students paint in gouache or dyes, like theoriginal.
fVI.: TECHNIQUES FOR REFERENCE PIECES
Teaching Content
A. Purpose of Reference Pieces1. Customer copies for salesmen's use2. Pattern record for mill use3. Inventory record for studio use
B. Method of Matching a Hand1. Analysis and identification of technique2. Experimentation for duplication3. Tracing4. Matching of colors5. Painting
Learning Experiences
1. Have students choose one of the painted studiocroquis or fabric swatches at their disposal andmake a 6" x 8" (approximate) tracing of it, em-phasizing the important aspects of the design. Havestudents match colors perfectly and paint, stressingsimilarity of technique, and mount both fabric andreference piece together on white paper.
50
2. Have students repeat procedure with new swatches,if necessary, until competency has been established,choosing a different technique from that studiedin project above (e.g. a tight hand versus a freehand, etc.).
VII. ADAPTATION OF PATTERNS
Teaching Content
A. Reasons for Adaptations1. Variations of past design successes-2. Elimination of controversy with competitors
over 'Knockoffs'3. Avoidance of exact copies
B. Technique of Designing Adaptations1. Analysis of original design
a. Major featuresb. Design ideac. Relationship of forms
2. Maintenance of similar relationship of forms3. Possibilities for adaptation
a. Change of formsb. Change of colorsc. Change of scale
Learning Experiences
1. Have students choose one of the fabric swatches attheir disposal and develop an adaptation of the de-sign, using the same number of rollers and the samecolors.
2. Using the same fabric swatch and its new inter-pretation, have students re-design it by adding oreliminating s roller, changing the colors, enlargingor reducing the scale.
3. Have students repeat projects, with variations, untilcompetency has been established.
4. Have class choose the most original and successfuladaptations for mounting on white paper, togetherwith the original designs.
VIII. OVERLAYS (PREPARED ACETATES)
Teaching Content
A. Facts Concerning Acetates1. Non-Crawl or Colorflex in color essential2. Used to best advantage for gouache and pen and
ink work
8. Use of Overlays in Studio Work1. For experimentation2. For greater color choice in showing color
combinations*.
Learning Experiences
1. Using one of the colorings painted in Module IV,have students cover it with a piece of acetate andchange its colors with gouache.
2. Have students design a small croquis (6" x 8")inspired by Persian or Indian reference, using blackink and a Rapidograph pen on white bristol paper(dull finish).
3. Have students cover the design with acetate andpaint in a two-color version, using the black rolleras an outline.
4. Direct students to remove the first acetate, coverdesign with another piece, and paint in anotherversion, using a different color feeling and fourrollers (plus the black). Have students clip or tapethe edges of both acetates to the pen and inkoriginal so that the acetates move freely for easyviewing. Discuss variations and possibilities.
IX. TJANTING PEN TECHNIQUE
Teaching Content
A. Explanation of Tjanting Pen1. What it is
a. Design toolb. Melted wax is mediumc. Origin: Indonesia
2. Utilizationa. To resist color and design areasb. To create resist technique on waxed paper
B. Materials Needed1. Tjanting pen2. Paraffin or beeswax3. Melted wax in a double boiler4. Small electric burner.i. Waxed rice paper, unwaxed Troya paper, Masa
paper and certain fabrics, e.g china silk, cotton6. Manila newsprint pad, clean brown paper7. Newspapers
C. Alternative Techniques
Learning Experiences
1. Demonstrate tjanting pen technique as follows:a. Melt beeswax and paraffin together in equal
proportions in a double boiler.b. Place tjanting pen in the melted wax and lift
out, using a small piece of cardboard to preventwax from escaping from pen opening.
c. Bring pen to the surface of the waxed paper,remove cardboard and start to draw. The fasterthe pen is moved, the finer the line; the slowerthe movement, the wider the line.
51
d. Continue this procedure until all areas to beresisted are covered.
e. When wax has cooled, areas may be paintedwith dyes. Resisted areas may be cleared ofwax by ironing the waxed paper between twosheets of manila newsprint pad, using news-papers as a cushion. Continue to iron, changingposition and paper until it appears free of wax.
f. Continue to paint and resist according to plan.2.. Have students design a croquis (approximately 6"
x 9") using an abstract pattern layout suitable forsportswear. Have students use up to five colors,utilize trap effects and execute in dyes on waxedpaper, using the tjanting pen technique for colorand design variations. Have students paint a colorcombination for project #2, weighing in five dif-ferent colors to the original, using the same tjantingpen procedure as before and mount together withthe original.
3. Have students design a floral pattern suitable forwomen's wear on white or tracing paper, paint alight ground (beige, yellow, light blue, for instance)on the waxed paper and place over the design.Direct students to use the tjanting pen to draw inthe outline and paint in the design, trapping colorswith the background. When finished, students areto wax entire paper, later removing it by ironingbetween sheets of manila newsprint paper untilwax has disappeared. (Original background colorwill appear as outline) Have students paint designusing an analogous color scheme and up to sixcolors.
4. Have students paint a color combination for proj-ect #3, changing the background and adjusting thecolors to a different color scheme. Direct studentsto maintain color . ylationships and mount togetherwith the original.
5. Continue projects until competency has been estab-lished.
X. PRINTED TEXTURE TECHNIQUES
Teaching Content
A. Texture Design1. What it is2. Why it is used
a. To create added interestb. To support a design feeling (e.g. documen-
tary)
B. How to Achieve a Texture1. Using a gimmick2. Using techniques
C.tityntages and Disadvantages
D. Application of Texture1. Relation to original design2. Dominance of original design
E. Reasons for Texturing1. Addition of interest to pattern2. Simulation of woven cloth (e.g. linen or flax)3. Addition of interest to apparel4. Unique and personal means of design expression
F. Examples of Techniques1. Crayon plus dye, on bristol paper2. Liqui-Tex Gesso (plus dye, if desired) spread on
to dull bristol paper and textured3. Rubber cement in applicator bottle for resist
work on bristol paper4. Sobo or Elmer's glue (70%) plus dye (30%) on
bristol paper, using a small cardboard or matchcover or pallette knife to shape design.
5. Rubber cement in applicator bottle for outlineeffects, wash on background, lift off rubbercement, proceed with Sobo or Elmer's glue anddye in applicator bottle.
6. Drawing with India ink using an eyedropper.
Learning Experiences
1. Demonstrate a batik design as follows:Paint design on Troya paper (fine Oriental paper)using dyes. Let dry. Wax entire surface using par-affin wax for a coarser line effect (a combinationof beeswax and paraffin will give a fine batik ef-fect). Crinkle areas of waxed paper, then fold.Brush color across open areas with a wad of sat-urated Kleenex. Let dry, then iron out.
2. Demonstrate a batik effect as follows:Take a sheet of georgian paper, wet and wrinkle,then dry and iron. Proceed to paint as usual, usingdyes.
3. Using their textile design notebook reference andany other documentary research available, havestudents design a pattern suitable for menswear,using as inspiration any period of historic design.Direct students to use up to five colors, and stressoriginality and wearability. Have students transferto good paper and interpret, using one of thetechniques suggested above and mount.
4. Using up to four colors, have students reinterpretthe same design layout by changing techniquesand mount.
5. Using the applicator bottle and gesso/dye tech-nique, have students design a free floral in up tofive colors and mount.
6. Have students reinterpret project #3 above on acolored background, using the crayon/dye to
in up to five colors and mount. 64
52
7. Continue projects until competency and flexibil-ity have been established.
Suggested Evaluation
Evaluation may be based on the student's ability to:1. Match color to given swatches as is done in in-
dustrial studios.2. Design different types of croquis.3. Make good tracings for studio use.4. Develop color combinations on existing patterns.5. Put designs into repeat for studio and mill use.
6. 'Match a hand'.7. Differentiate between the adaptation and the
adoption of a design.8. Utilize overlays and develop dexterity in using
vat:ous techniques on waxed and unwaxed papers.9. Use texture in design as an added interest to certain
patterns.
Teaching Resources
TEXTS AND REFERENCES
Anderson, D. Elements of DesignBing, S. Artistic America, Tiffan Glass and Art NouveauDhanapala, D. B. Buddhist Paintings from Shrines and
Temples in CeylonEditors of American Fabrics Magazine. Encyclopedia of
Tex tilesJohnston, M. P. and G. Kaufman. Design on FabricsKeller, I. Batik: The Art and CraftRobinson, S. A History of Printed TextilesRowland, B. The Ajanta CavesSloane, P. Color: Basic Principles and New DirectionsVanderbilt, G. Gloria Vanderbilt Book of Collage
PERIODICALS
American FabricsEleganceElleHarper's BazaarVogueWomen's Wear Daily
INSTRUCTIONAL SUPPLIES
Beeswax, paraffin, a double boiler, a hot plateEyedropper, and an applicator bottleFabric swatches illustrating the various teaching points
covered, e.g. the tjanting pen technique, the visualeffect of transparent colors 'trapping,' textures ofall types, etc.
Sample studio layouts, reference piecas, textures, etc.painted both in gouache and with dyes on waxedrice paper and other assorted unwaxed papers
Rapidograph and other type pensTianting pens with varying spouts
SCREEN PRINTING I
Prerequisites: Textile Design II; Color and Design;Drawing and Nature Study II
Suggested Hours: 6o
Behavioral Objectives
This area of instruction should enable the students to:1. Understand the equipment and supplies in a
screen-print room and know the proper basicprocedures in their use.
2. Make a workable screen starting with a framecovering material, staples, and tape.
3. Know the various kinds of blocked-out screens,their preparation and their uses.
4. Prepare acetates for photographic-emulsion screens.5. Make a screen with photographic emulsion.6. Design, make the screens for, and print a two-
screen design in repeat.7. Understand the curing of pigment-printed fabrics.8. Make a blotch-printed fabric.9. Make "textural" screens.
10. Design and print a half-drop repeat.
Instructional Guidelines
This area of instruction teaches the students totransform their design ideas into, ultimately, aprinted fabric. The adjustment of their designs to thelimitations of screen printing will teach them tech-nical resourcefulness and a comprehension of thepossibilities and demands of the medium.
Students learn to direct their aesthetic sense to theend use of the textile and to think in terms of thedesign's suitability to the fabric, the best colors for itsprinting and the development of a rhythmic con-tinuous pattern for a specific purpose. Emphasis isplaced on the importance of color and the student isshown that the screen is an excellent tool for trial andexperiment in color.
Lecture-discussions and demonstrations should pro-vide information as quickly as possible and be kept tothe shortest practical time to allow for maximum
64353
laboratory learning experiences during which thestudents will make and print screens with colors theyhave mixed themselves, learning, by actual perform-ance, the means of producing printed fabrics ofquality.
Student notebooks on lecture information and scrap-books containing design ideas, clipped from period.icals, brochures and the like, will be kept and willprove invaluable for future reference.
Teaching Modules
V.VI.
VII.VIII.
IX.X.
Introduction to Print Room EquipmentScreen StretchingBlocked-Out Screen TypesPreparing Acetates for Photographic EmulsionScreens
Photographic Emulsion ScreensPrinting a Two-Way Screen PatternCuring Pigment Printed FabricsThe Blotch PrintTextural ScreensThe Half-Drop Repeat Screen
I. INTRODUCTION TO PRINT ROOM EQUIPMENT
Teaching Content
A. The Print Table1. Construction and covering2. Print rail and rail stops3. Jig'4. Rail spacer
B. Screens1. Screen brands2
' A large T-square-shape crossbar consisting of a 4" widex 3/4" thick wood strip, the width of the print table with an18" long horizontal bass of the seine 3" wood attached to oneend with movable tape tabs to correspond with marks made onleft edge of screen can be substituted for the jig.- It is in-expensive but requires considerable care and patience in its use.
'The smell screen (outside measurements 24" square) used inschools are necessary, because students cannot handle andprint singly the customerv40" to 50" long selvedge-to-selvedgescreens generally used in industry. Too, the storage of thelatter in the number required by the class would present aserious problem.

2. Coverings (dacron, organdy or silk)3. Staples (1/4" leg driven in by handgun)4. Taping (3" wide adhesive)5. Hot angle iron (4" wide on one side)6. Screen coatings
a. Lacquer and other blockoutsb. Photographic emulsion
C. The Squeegee
D. Dark or Coating Room for Photographic Screens1. Coating table2. DI ying racks3. Fans4. Scraper
E. The Light Table1. Boards2. Weights3. Felt pads
F. The Color Laboratory1. Counters and sinks2. Storage shelves and cabinets3. Electric homogenizers4. Stainless steel containers and measurers5. Metric scales6. Photographic emulsion7. Photographic sensitizer8. Colors (pigments, dyes, etc.)9. Gum and thickeners
10. Chemical reagents
G. The Wash-Out Room1. Trough2. Hose3. Proper washing techniques with hose
H. Drying Racks for Screens
I. Screen Storage Racks
J. The Worktable
K. Pigmentcuring Electric Mangle
L. Safety Rules1. Correct screen storage2. Keeping aisles and print tables clear3. Inflammable solvents and poisonous reagents4. Electric curing mangle
Learning Experiences
1. Di 4.....ctrate how to print a screen and how to use
ba, equipment, materials and facilities of theprint ooms as follows:
7.. Mix a small amount of pigment color withpolymer vehicle (20% print concentrate plus80% water) in proportion (color lab or area).
54
b. Select a screen from the "library" of previouslymade screens.
c. Pin a length of fabric slightly larger than thescreen onto the print table using pins at 3"intervals.
d. Place screen on the fabric.e. Pour pigment along far edge of the screen.f. Place rubber edge of squeegee behind the
pigment.g. Draw squeegee with gentle, firm pressure
across the screen toward you, return it tooriginal position using the same pressure.
h. With the squeegee resting inside the screen,raise screen up from one side and lift away.
i. Wash screen and squeegee thoroughly. Dry andstore on correct shelves.
2. Using a previously prepared screen, have studentsprint it several times on paper, using a medium-intensity pigment, clean equipment, and storecorrectly.
II. SCREEN STRETCHING
Teaching Content
A. Procedures in Stretching Screens
B. Characteristics of Screen1. Dacron, silk or organdy (dacron suggested for
school use)2. Absolute tightness of dacron
a. Insures clean printb. Insures proper register
3. Importance of careful stapling4. Importance of neat taping
Learning Experiences
1. Demonstrate characteristics of screens.2. Have students choose a screen frame and stretch
dacron tightly over it, first tacking down threecorners, drawing absolutely taut between thesepoints, then filling in staples at 1" intervals.Direct students to staple the remaining two sidesat the same intervals, using maximum tension toinsure tightness, tape with 3" white adhesive thefour sides of screen, allowing 1 ii" w extend overdacron, the remainder being neatly and tightlypressed on frame, and make mitered corners,pressing down tightly.
Ill. BLOCKED-OUT SCREEN TYPES
Teaching Content
A. Types of Blocked Out Screens1. Tusche-and-glue screen2. Red lacquer screen
3. Wax and resist caustic screen4. rape-blockout screen5. Cut lacquer film screen
B. Methods of Making Block-Out Screens
C. Considerations for Each Type1. Ease of making2. Time and effort3. Possible effects4. Precluded effects5. Comparative costs6. End uses in industry
Learning Experiences
1. Demonstrate each type of blocked-out screen asfollows:a. Tusche-and-glue screen
1) Paint a simple large 'blocky' motif withliquid tusche on face of screen and allow todry,
2) With a heavy cardboard scraper, coat face ofscreen with thin glue solution and allow todry.
3) Give a second glue coat to screen and allowto dry.
4) Scrub out tusch areas with cloth soaked inbenzine and allow to dry.
5) Print the screen with pigment.6) Clean screen and squeegee with benzine.
b. The red-lacquer screen1) Draw a bold simple design on the face of
screen with soft lead pencil.2) Fill in all areas other than the motif with
thin red lacquer and allow to dry.3) On a light table examine screen for pin
hots and gaps, touch in with lacquer, anddry.
4) Print with pigment on cloth.5) Clean screen and squeegee with cold water.
c. The wax-and-caustic resist screen.1) With a soft camel hair brush, paint a design
on dacron face of screen, using coldsynthetic wax and allow to dry.
2) Place screen, face down, on coating rack.3) Pour a line of caustic resist along upper
edge of inside screen surface and thaw acrosssurface in a thin coating, using a metalscraper.
4) When dry, wash with hot water, using highpressure from both sides of screen until thewaxed areas have fallen away and allow todry.
5) Print with pigment on cloth.6) Clean screen and squeegee with water.
55
d. The tape blockout1) Using varying widths and shapes of cut
adhesive tape, place on face of screen andpress on firmly using the thumb nail to pressedges firmly on the screen covering.
2) Print with pigment on white cotton.3) Clean screen and squeegee with water.
e. The cut lacquer film screen1) Tape a square of lacquer film, shiny or
lacquer side up, over a large simple motifand with sharp mat knife or X-acto blade,score the film following the outline; all cutsmust join and the backing paper must not becut through.
2) The film within the outline is peeled away,exposing the white backing paper.
3) Lay a clean screen, face down, over film,with the glossy side up, and adhere bywetting a small area at a time with lacquerthinner soaked cotton cloth and rub this areafirmly until dacron darkens, showing thatthe film has adhered.
4) Turn screen over and peel off paper backing.5) Fill in edges with red lacquer, touch out any
pin holes and allow to dry.2. Have students write briefly the directions for mak-
ing each type of screen.3. Have students make a checklist of the advantages
and limitations of each method.4. Using any one of the methods demonstrated, have
students make and print a small screen.
IV. PREPARING ACETATES FOR PHOTOGRAPHICEMULSION SCREENS
Teaching Content
A. Drawing the Repeat
B. Color Separation for Two Acetates
Learning Experiences
1. Demonstrate procedures for drawing the repeat:a. Develop a two-screen repeat design (two colors
plus overprint).b. Place register marks at corners.
2. Demonstrate separation of colors for two acetatesas follows:a. Paint a separate frosted acetate for each color,
being sure to include overprint areas, withopaque medium.
b. Draw register marks on each acetate, makingcertain they match exactly.
3. Have students make two acetates, using a geometricmotif for a 15" repeat; try for 80% coverage and
7
provide for overprints; place registration markscorrectly.
V. PHOTOGRAPHIC EMULSION SCREENS
Teaching Content
A. Preparation of Screens
B. Exposure of Screens
Learning Experiences
1. Demonstrate preparation of screens as follows:a. Wash face of screens with household bleach to
clean, rinse throughly and allow to dry.b. Place acetate on print table beside a jig and six
inches from print rail.c. Place the two register marks at the sane
distance from the jig, by pinning down the topone, measuring the distance to the center of thetop register mark, then placing the lower one tothe same distance (the jig lever is against a railstop to prevent its moving).
d. Place screen face down on acetate, its angleiron extended over jig crossbar, fit a railstop oncrossbar and tighten it well.
e. Center the screen over the design laterally, butallow about 3" or more at the top which willserve as a color "well"; fasten stop on print. rail
well.f. Trace register marks on the dacron with sharp,
soft lead pencil, using a straight edge, andmaking each mark about 1W' long.Repeat above with second screen.Mix photographic emulsion (one ounce sen-sitizer solution to five ounces emulsion in asmall container).
i. In the dark room lay the screens flat, face up,and coat by drawing the emulsion across thethe screen with metal scraper (a thin even coat-ing is desirable here). Repeat process withsecond screen.Store screens, face up, in racks below coatingtable before fans, close door: to prevent ex-posure to light.
-k. Allow to dry, approximately 25 minutes.
2. Demonstrate procedures in exposing the screen as
follows:a. Tape one of the acetates on glass of the light
table.b. Bring a screen from the dark room and quickly
place it, face down, over acetate, aligningregister marks exactly.
CL;Lj
g.h.
j.
56
c. Place, first, a foam rubber mat or felt padthe dacron, then a piece of plywood, both thesize of the inside of the screen on the dacron.
d. Distribute several five-pound weights over theplywood, being careful not to move the screen.
e. Turn on lights and exposure for correct time(usually 1.2 minutes).
f. Turn off tights, remove weights, board, and padfrom screen and rush to wash room.
g. Gently wash face of screen with cold water,concentrating on the pattern until those partswash out.
h. Dry screen before fans.i. Repeat above, using the second acetate and the
other screen.j. On light table, touch up any pin holes with
emulsion on face of screens.3. Have students make two photographic emulsion
screens using acetates prepared in preceding
module.
VI. PRINTING A TWO-WAY SCREEN PATTERN
Teaching Content
A. Placement of Rail Stops on Print Rail
B. Attachment of Iron to Screen
C. Use of Stops on Jig
D. Mixture of Pigment Colors
E. Preparation of Table and Fabric for Printing
F. Printing of Fabric
Learning Experiences
1. Demonstrate procedures of printing a two-screenpattern as follows:a. Placement of rail stops on print rail
1) Measure width of repeat on screen.2) Set this distance on the rail-spacer.3) Using rail-spacer, place rail stops at correct
intervals along print rail and tighten.4) Secure by turning the rail stops down
firmly and then giving each a half turn withpliers.
b. Attaching iron to screen, fasten 4" angle ironwith two 5/8" screws, five inches below upperleft corner of screen, one of its sides extendingbeyond the screen frame.
c. Using the stops on jig1) Measure the height of repeat of design.2) Set first stop on jig to allow screen to print
to selvedge.
3) Using rail-spacer, set rail stops on jigs forheight of design.
4) To print across fabric width, place the upperedge of the extending angle iron tightlyagainst the rail stops on the jig, keep theleft edge tight against edge of jig.
6) To print, laterally lift lever of jig and rolljig to proper print rail stop, lower lever onright side of stop.
6) Place angle iron on screen snugly againstthe proper rail stop on the jig.
d. Mixing pigment colors1) Use enough previously prepared polymer
"vehicle" (mixed 1/3 polymer print con-centrate to 2/3 water) in a print container,slowly adding and stirring in pigment color(1/10.1/4) until desired shade is attained.
2) Test color on fabric swatch and allow todry.
3) Add more vehicle to lighten, or morepigment to darken color until desiredintensity is reached.
e. Preparing the table and fabric for printing1) Brush table thoroughly for pins, paper, etc.2) Check that there is space for jig to move
along fabric.3) Place fabric to be printed on table 4" from
nearest print rail, pin ends, drawing fabrictight, with T-pins at 4" intervals, pin sidesthe same way.
f. Printing the fabric1) Using the jig and rail stops, print fabric in
alternate spaces to allow time for color todry before coming back to fill in openspaces.
2) Set down and lift screen carefully to avoidsmudging.
3) Be sure jig lever is tight against right side ofrail stops in printing length of fabric.
4) Be sure angle iron is snug against front ofrail stops on jig it printing across width.
5) Print with two even strokes of squeegee,printing alternate spaces first then filling inblanks.
6) Carefully wipe edges of screen with cloth toremove any wet color that may have beenpicked up before the screen is set down inits next position.
2. Using the two screens prepared in Module IV,have students print two yards of white cottonbroadcloth with pigments in analogous colors.
57
VII. CURING PIGMENT PRINTED FABRICS
Teaching Content
A. The Electric Mangle
B. Procedures
Learning Experiences
1. Demonstrate and explain procedures for using theelectric mangle.a. Set thermostat and preheat mangle at 300°
Fahrenheit for twenty minutes for cotton.b. Pin corners of one end of printed cotton
length on padded roll of mangle.c. Raise front board to horizontal position thus
bringing the cylinder in contact with the heatediron surface of the "shoe".
d. Immediately start motor to rotate cylinder.Fabric will be rolled onto cylinder.
e. Allow iron to turn for fifteen minutes for two -yard length of fabric.
f. Lower front board, turn off motor and heat.Remove fabric and pins.
g. The heat has bonded the resin in the colormixture to the cotton, making it fast for wash-ing and cleaning.
2. Have students cure the length of cotton whichthey printed in Module V.
VIII. THE BLOTCH PRINT
Teaching Content
A. Purposes of Blotch Print1. Colored background for design2. Design created by shaped openings in the
blotch
B. Procedures
Learning Experiences
1. Demonstrate blotch print procedures.2. Have students:
a. Draw a simple bold one-r 'or floral (15"square repeat) making sure n. ifs touch, or arenot more than an inch apart.
b. Paint spaces between motifs (and line detailwithin them:. on acetate with opaque medium;where necessary make short joins on oppositeedges.
c. Make a screen photographically from thisacetate following directions given in Module IV.
IX. TEXTURE SCREENS
Teaching Content
A. Purpose
1. For photographic emulsion screens2. Alternative to drawn and painted patterns
B. Linoleum Blocks as a Textural Motif
C. Rubbings of Textured Surfaces1. Shells2. Caning rough wood3. Others
D. Examples of "Accidental" Effects1. Spatter2. Dropped string3. Confetti4. Sponging5. Others
Learning Experiences
1. Demonstrate textural screens.2. Have students:
a. Cut a stylized ri mmetrical design on a 4" by 4"linoleum block, using a simple subject fromnature (fish, flower, butterfly, etc.) and texturebackground deeply.
b. Make several prints on thinnest rice paper andarrange these on clear acetate in a 15" repeat,taping the prints down with scotch tape.
c. "Shoot" a photographic screen from this as ifit were on opaque print acetate. (exposuretime, less than one minute)
d. Wash out very gently with cold water and dry.e. Print in suitable color on fabric (see Module V).
X. THE HALF-DROP REPEAT SCREEN
Teaching Content
A. Examples
B. Advantages
C. Differences
D. Procedures
Learning Experiences
1. Demonstrate half-drop repeat screens as follows:a. Show several examples of half-drop repeat,
pointing out advantages in variety of layout.
58
b. Note difference from the block sideby-sidepreviously used.
c. Show a one-color 15" pattern In half-drop,using abstract floral motifs.
d. Show acetate with opaque medium.e. Make a photographic screen from the above
acetate.f. Set stops on jig and print rail, and print,
dropping every second row of repeats, 7V.2. Have students design and print in two colors a
simple half-drop fabric, using pigment color.
Suggested Evaluation
1. Evaluate notebooks and scrapbooks for a com-prehension of screen printing and an awareness ofthe design possibilities available everywhere.
2. Have students do an outline for a printing projectwhich identifies end use and includes a rough ofdesign and color swatches and evaluate for:a. Understanding of technical aspectsb. Use of colorc. Composition and continuity of designd. Originality of concepte. Neatness of execution
3. Evaluation of original fabrics developed in learningexperiences to be based on use of color, originalityof concept, technical proficiency, design com-position and neatness of execution.
Teaching Resources
TEXTS AND REFERENCES
Johnson M. and G. Kaufman. Design on FabricsLanterburg, L Fabric PrintingSchwaibach M. and J. Schwalbach. Screen Process Printing
for the Serigrapher and Textile Designer
INSTRUCTIONAL SUPPLIES
Silk screensScreen printed sample fabricsSamples of design roughsAcetatesEnd - product examples of different types of silk
screensFabrics for screen printing
WOVEN DESIGN I
Prerequisites: Basic Textiles; Color and Design
Suggested Hours: so
Behavioral Objectives
This area of instruction should enable students to:
1. Understand how cloth is woven and the equip-ment on which it is done.
2. Understand and use the most basic terminology ofweaving.
3. Know how to calculate the number of ends andthe length of a warp.
4. Be able to wind warps.5. Dress a hand loom (by the back to front method)6. Weave samples of cloth.7. Recognize and use the basic 4 harness weaves and
their derivatives.8. Tie a new warp onto a "dummy" warp.9. Know the various classifications of stripes.
10. Understand how the use of color in weaving differsbasically from other applicatio .
Instructional Guidelines
In this area of instruction students are introduced toweaving by means of the 4 harness hand- or foot-operated I om. Whether table r floor model, it isidentical in principle to all other shaft or harnesslooms no matter how driven or .rlhat size, and mostof the weaving which will be done on it is exactlylike cloths done on any other loom.
On this equipment the student will execute two proj-ects--the central learning experiences of this area.It is suggested that project #1 be a black and whitewarp, about 6" x 8" in width (roughly 1/3 black,1/3 white, 1/3 a stripe of the student's plan). The settis 15 ends per inch or less depending upon the eize ofthe yarn available. The larger the yarn, the easier todiscern the weaves and relate them to the drafting.The same yarn is used for filling in all but one of thesamples. On this warp the basic weaves and theirvariations are assigned to be woven in 2" 9r ITs
59
lengths; solid white, solid black, pick and pick, etc.Once techniques have been mastered, students areencouraged to experiment and try out their ownideas.
The second project, a solid color warp tied directlyonto the end of the first, applies basic principles ofcolor theory to weaving. By redrawing half of thewarp it demonstrates how another type of Drawing-Inwill change the character of the weaves with whichthe student is already familiar. Students should begiven considerable freedom to exercise choice of pat-tern and weaves on this warp.
Combined lecture-demonstrations should be plannedby the instructor in order to enable students to ob-serve the various processes just prior to executingthem themselves.
Teaching Modules
I. Introduction and OrientationIt. Loom Parts and Their Function
III. Planning and Making a WarpIV. Dressing the Loom: Back to FrontV. Weaving: The Plain Weave and Its Derivatives
VI. The Twill Weaves and Their DerivativesVII. Finishing the Sample
VIII. Changing Part of the Draw: Designing FillingStripes
IX. Using Color in Weaving
I. INTRODUCTION AND ORIENTATION
Teaching Content
A. Overview of Weaving1. Beginnings: basketry, twi -ling, etc.2. Hand-production of cloth from Roman times to
Industrial Revolution3. Modern textile mills
B. Terms Related to the Weaving Process1. Warp-end2. Filling3. Pick4. Shuttle
5. Shed6. Balanced weave
Learning Experiences
1. Illustrate weaving terms by a demonstration onthe loom.
2. Have students identify and discuss the formationof the fabrics of the clothes that they are wearingand/or from sample swatches of the three basicweaves.
3. Assign students to collect examples (either actualfabrics or good photographs) of woven cloth withvarying characteristics, identify and bring.into class.
II. LOOM PARTS AND THEIR FUNCTION
Teaching Content
A. Loom Parts: Their Function1. Warp beam and apron2. Cloth beam and apron3. Harnesses and heddles4. Ratchets (let-off)5. Levers (table loom) or lams and treadles (floor
loom)6. Beater and reed
B. Table Loom and Floor Loom1. Comparison2. Types of harness operation
a. Counterbalanced loomb. Jack loomc. Countermarch loom
3. Relationship of handloom to power loom4. Role of hand loom in industry
C. Warp Specifications and Related Terms (prepara-tion for project #1)1. Cut length2. Sett-Reed plan3. Warp arrangement4. Warp plan (drawing-in draft, entering or thread-
ing draft): straight draw
Learning Experiences
1. Distribute project sheet and discuss the warp speci-fications in it (see Instructional Guidelines).
2. Assign students to their looms and have themfamiliarize themselves with the various parts andmovements.
3. Following the "warp specifications" on their proj-ect sheet, have students begin to design their warpsto be made at the next class meeting. The arrange-ment may first be determined by sketching butshould then be made into a wrapping done to scalearound a piece of cardboard about 1" x 7" usingthe same yarns as will be used later in the warp.
-.) ?f q6.0
60
III. PLANNING AND MAKING A WARP
Teaching Content
A. Selecting Yarns1. Strength and smoothness2. Non-abrasive qualities
B. Determining Number of Ends per Inch
C. Determining "Cut Length" of a Warp1. Woven length2. Loom waste3. Take-up and shrinkage
D. Warping Process1. Reel or board2. Warping terms
a. Endb. Coursec. Cross
Learning Experiences
1. Examine and approve students' plans for their warpand then have students proceed to make warps.Have students work in pairs, with one studentchecking for errors and assisting the other to handlethe yarn. Check each warp to see that it is correctlytied at the cross before it is chained off the WarpingBoard or Reel.
2. Assign students to prepare a page in their note-books for "Warp Specifications" with the follow-ing information:a. the Wrapping: to scale and in warp yarnsb. the Warp arrangement: written outc. the Cut length of the warpd. the Drawing-in-draft: showing each end in a
straight Drawe. the size of the reed or sett or number of E/"
IV. DRESSING THE LOOM: BACK TO FRONT
Teaching Content
A. Methods of Loom Dressing1. Back to front2. Front to back
B. Terms and Equipment1. Lease sticks2. Raddle3. Drawing-in hook4. Dents (in the reed)5. Sleying the warp
C. Procedures in Dressing Loom Back to Front
Learning Experiences
1. Demonstrate dressing the loom back to front, asfollows:
a. Placing lease sticks in crossb. Placing rod of warp beam apron through loop
at topc. Placing ends in a raddled. Adjusting apron rode. Smoothing unevenness in the top of the warpf. Rolling warp onto beamg. Suspending lease sticks behind harnessesh. Drawing-in the endsi. Sleying the warpj. Tying the warp to the rod of the cloth apron
2. Have students warp their looms, still working inpairs to facilitate the process. (The principle indressing the loom is to get each end placed smoothlyon the back beam in approximately the positionthe end will have in the woven cloth. It is easier toachieve this if one person is in front of the loomhandling the warp, unchaining it, shaking yarnsapart, and holding the tension smooth, while anassistant at the back moves the lease sticks forward,turns the crank of the warp beam, places paperaround the beam as the warp is going on). Cautionstudents that absolute accuracy is necessary indrawingin the ends in the heddles, and in sleyingthe ends in the dents of the reed; that if errorsoccur in these processes, corrections can be verytime consuming.
V. WEAVING: THE PLAIN WEAVE AND ITS DE-RIVATIVES
Teaching Content
A. Weave Drafting and Terminology1. Raiser (or Riser)2. Sinker3. Symbol4. Unit of repeat
B. The Plain Weave: Variations and Relationship toWarp Plan1. The 1/1 plain weave2. The 2/2 basket weave3. Oxford weave
C. The Chain - Harness Motion1. How it is determined2. How it is written
D. Details of Weaving Procedure1. Filling the shuttle2. Making the sheds3. Beginning and ending a color4. Laying in the pick5. Beating up the fabric6. Moving the warp forward (during weaving)
e:361
7. Establishing smooth and rhythmic weaving mo-tions
8. Checking filling specifications
Learning Experiences
1. Demonstrate the teaching content of this module.2. Have students check their looms for accuracy.3. Have students begin to weave their samples. En-
courage them to unweave anything that is notcorrect or not satisfactory.
VI. THE TWILL WEAVES AND THEIR DERIVA-TIVES
Teaching Content
A. The Twill Weaves1. The 2/2 twill: right or left hand2. The 3/1 warp face twill3. The 1/3 filling face twill4. Reverse or zig-zag twills5. Crowsfoot or broken twills
B. Relationship to the Warp Plan
C. Finding the Chains for Each Weave
D. Filling Specifications and Related Terms1. Weave draft (2 x 2 Repeat)2. Chain3. Filling arrangement4. Number of picks per inch5. Swatches of filling yarns
Learning Experiences
1. Besides sampling all the weaves, have studentsachieve the following:a. A true "Plaid" (for one balanced cloth)b. A "Reversible" (for one unbalanced cloth)c. Three or four weaves, or combination of weaves,
of the student's design to be executed at the endof the warps in order to test his/her own ideasand understanding of the woven structure.
2. Assign students to prepare pages in their notebookson "Filling Specifications," in which they will re-cord each weave as discussed in this module.
VII. FINISHING THE SAMPLE
Teaching Content
A. The Role of Finishing in Textile Production1. Burling and mending2. Washing3. Tentering

4. Pressing5. Shrinking
B. Finishing Sample Warps1. Finishing top and bottom
a. Decorative braiding or knottingb. Machine stitching and trimming
2. Mending broken ends and threads3. Trimming loose threads4. Steam pressing
C. Preparation for Project #21. The "Dummy" warp2. Warp specifications
a. Cut lengthb. Sett-Reed planc. Warp arrangementd. Warp plan: straight and even point
Learning Experiences
1. Have students complete first project, cutting it offat breast beam, leaving enough "dressed" warp onloom.
2. Assign finished first project and related documentsto be brought to class for evaluation.
3. Distribute project sheet and discuss the warp speci-fications in it (see Instructional Guidelines).
4. Have students proceed with the new project by:a. Selecting yarn and colorb. Making warps and placing lease sticks in crossc. Securing lease sticks to breast beamd. Cutting top of warpe. Tying new warp to old onef. Easing knots through reed and heddlesg. Beaming the warph. Tying down
5. Assign students to prepare draft of evenpoint forthat section of warp to be redrawn.
VIII. CHANGING PART OF THE DRAW: DESIGNINGFILLING STRIPES
Teaching Content
A. Redrawing Part of the Warp1. Placing lease sticks in plain weave sheds2. Removing ends to be redrawn from heddles3. Re-entering ends in new sequence4. Resleying and tying-down
B. Striping Systems1. Classical: Roman2. Striae: fine random3. Ombre4. Composite5. Pin or chalk
62
6. Outline7. Random inbalanced
C. Creating Filling Stripes1. Using more than one color2. Varying the beat3. Using more than one weave4. Using different size yarns5. Using different textured yarns
Learning Experiences
1. Assign students to do the following:a. Make a series of 7 wrappings (maximum 2"
long) to document the various stripes.b. Using two large yarns of equal size and contrast-
ing color, wrap them so that no more thanthree strands of either color are next to eachother in all but the classical (Roman) and ran-dom stripes.
2. Have students continue to get warps onto thelooms, placing 1/2 of the new ends in the even-point draw, and start weaving when ready.
IX. USING COLOR IN WEAVING
Teaching Content
A. Color Schemes1. Monochromatic2. Complementary3. Analogous4. Split-complementary5. Triad
B. Factors Influencing the Appearance of Color inWeaving
1. Fragmentation: crossing of warp and filling2. Modification
a. Highlights and shadows of three-dimensionalsurface
b. Absorption or reflection of light by yarns
Learning Experiences
1. Explain and discuss filling specifications and colorschemes of Project #2.
2. Have students select colors for their second project.Allow them latitude to ekercise choice and to de-velop awareness of their individual objectives, i.e.harmoniousness, serenity, richness, etc.
3. Have students execute their second warp with a
minimum of supervision, using notes from lecturesand first weave structure. Records of all weaves,filling arrangements, and yarn swatches are to bekept for notebooks.

4. Assign students to bring in completed project andthe documents relating to it, for analysis and criticalevaluation.
Suggested Evaluation
Evaluation may be based on student work which evi-dences:1. Absence of weaving errors2. Uniformity of beat3. Reasonably good edges (selvedge)4. Meeting of specifications5. Originality and taste6. "Professional" appearance of work7. Neatness, accuracy, and completeness of notebooks
Teaching Resources
TEXTS AND REFERENCES
Blumeneau, L. The An and Craft 07 HandweavingLarson, J. L. and A. S. Thorpe. Elements of WeavingZnernierowski, N. Step -144m Weaving
INSTRUCTIONAL SUPPLIES
4Harness hand-operated loomsYarnsWarping boardsSmall accessory toolsFabric swatches of basic weaves
WEFT KNIT DESIGN AND TECHNOLOGY
Prerequisites: Basic Textiles; Color and Design
Suggested Hours: so
Behavioral Objectives
This area of instruction should enable students to:
1. Distinguish between the different types of knitconstruction and understand the basics of loopformation.
2. Understand the technical and aesthetic use ofcolor in knitted fabrics.
3. Know how yarn types and sizes affect the weightand hand of knitted fabrics.
4. Be proficient in graphing designs for single knitfabrics.
5. Know the technology, aesthetics and proceduresfor.designing stripes in knitted fabrics.
6. Know the application of pattern areas relating tothe respective patterning mechanisms.
7. Identify, design and duplicate fabrics knitted onsingle knit machines.
Instructional Guidelines
This area of instruction should aim to apply thefundamentals of color and design aesthetics to thetechnology of fabricating designs for weft knittedmaterials. The textile design program im lodes twoareas of knit design instruction: (1) the design forsingle knits, and (2) the design for double knits, inall their inherent variations. This introduction toWeft Knit Design and Technology represents thefirst of these two areas of instruction.
Since it is virtually impossible, however, to designfor knitted fabrics without a fundamental knowledgeand understanding of the capabilities and limitationsof knitting mechanisms, students who are interestedin knitting design should have a basic comprehensionof knitting technology as a prerequisite for knitdesign. Concurrently, as the students familiarizethemselves with the technical possibilities and limita-tions of knitting machines, major emphasis is placed
I" I'
64
on the creative utilization of the machines' capabilities.Visits to knitting mills should implement this area ofinstruction, since direct exposure to the technicalmachinery involved will facilitate the students' com-prehension of the knitting process and improve theirperformance.
Sample swatches of current knit fabrications of alltypes should be used extensively for learning expe-riences, in order to help students develop their under-standing of machine potentials and become familiarwith presently accepted fabrics. It is further recom-mended that an end-term portfolio of original designsbe required of each student, for eventual presentationto potential employers. It will be noted that theareas of instruction deal primarily with weft knittingdesign. Designing for warp knit structures is morecomplex and furthermore cannot be taught onrelatively inexpensive hand-knitting machines. If awarp knitting machine laboratory is available in theschool, teaching modules or an area of instruction inwarp knitting design can be added or substituted.
Teaching Modules
I. Introduction to Knitting DesignII. Color in Knitted Fabrics
III. Fabric Quality FactorsIV. Single KnitsV. Stripes
VI. Patterning MechanismsVII. Novelty Single Knit Fabrics
I. INTRODUCTION TO KNITTING DESIGN
Teaching Content
A. Definition of Knitting
B. Basic Terminology1. Needle loop2. Sinker loop3. Wales4. Courses5. Stitches per inch
C. Types of Knitting1. Warp
a. Raschelb. Tricot
2. Wefta. Flat bedb. Circular
1) Single
2) Double3) Purl4) Sweater-strip machine
D. Basics of Loop Formation1. Needles used
a. Latchb. Spring beardedc. Compound
2. Appearance of loop (knit and tuck)a. On faceb. On back
3. Drawing loop diagramsa. Jerseyb. Ribc. Purl (Links-Links)
Learning Experiences
1. Distribute different types of knitted swatches tostudents and have them analyze the knittingcharacteristics of each swatch.
2. Have students draw loop diagrams for face andback of single knit fabrics.
3. Take students on one or more field trips toknitting mills.
Ii. COLOR IN KNITTED FABRICS
Teaching Content
A. Imparting Color into Knitted Fabrics1. Yarn dyeing before knitting2. Piece dyeing after knitting3. Combination of the above two
B. Color Limitations for Knitted Fabrics1. Using yarn dye2. Using piece dye
C. Aesthetic Use of Minimal Colors
D. Color Distortion Created by Knitting Constructionand How to Use It to Advantage
E. Creation of Shading Effects (3 Colors from 2Colors)
F. Color As a Weight Factor
G. Planning of Seasonal Color Linesi"
a" di
65
1. Fall2. Holiday3. Spring
H. Painting and Graphing Design Ideas for KnittedFabrics in Color1. Economic factors relating to color2. Economic factors relating to fiber choice
Learning Experiences:
1. Assign students to plan a color line for a specificseason and end use, and visually present their"line" by means of color samples (e.g. coloredyarns, swatches, clippings, etc.)
2. Have students choose (a) two colors, and (b)three colors, and use them for multi-color effects,evaluating their aesthetic possibilities.
3. Have students research and present suitable noveltyyarns for textural effects in knitting.
4. Distribute a swatch of woven fabric and havestudents try to duplicate it, using the same numberof colors.
III. FABRIC QUALITY FACTORS
Teaching Content
A. Yield
B. Wales and Courses per Inch1. How to calculate, given the machine gauge2. Relation to pattern size
C. Yarns Used1. Spun
a. Cottonb. Worstedc. Woolen
2. Filamenta. Straightb. Textured
3. Pi yarns
D. Yarn Size and Numbering System1. Cotton2. Worsted3. Woolen4. Filament5. Conversion factors6. Relation of yarn size to cut
E. Other Factors in Yarn Quality1. Twist2. Uniformity3. Strength4. Elasticity5. Number of ends plied
of machine.

Learning Experiences
1. Distribute samples of different types of yarns andhave students distinguish between them.
2. Distribute swatches of the same knitted construction, each of which has different yarn sizes andhave students identify the sizes.
3. Have students make yarn count conversions relatingto specific machine gauges.
4. Have students choose their own fiber type andcount for the construction of a garment of theirchoice, including the machine specifications suit.able for its manufacture.
IV. SINGLE KNITS
Teaching Content
A. Technical Terminology1. Needles2. Sinkers3. Knit stitches4. Tuck stitches5. Miss or welt stitches6. Feed units
B. Accordion Fabrics: Rules and Applications1. Straight2. Alternate3. Selective accordion
C. Basic Single Knit Constructions1. Jersey2. Knit and tuck3. Knit and welt4. Laying in5. Plaiting6. Pulled needles
D. Needle Selection on Knitting Machines1. High and low butt2. Long and short3. Multiple selection
Learning Experiences
1. Distribute four sample swatches of fabrics andhave students identify the construction of each.
2. Have students design and graph fabrics of constructions similiar to the above for twoneedle selectionpatterning, a-d suggest suitable yarn size andmachine gauge for each.
3. Have students design and graph fabrics of theabove constructions for multiple needle selectionpatterning, and suggest suitable yarn size andmachine gauge for their construction.
V. STRIPES
Teaching Content
A. Designing Feed (or Fixed) Stripes
1. Limitation of height or size of stripe2. Limitations of number of colors versus machine
feeds
3. Aesthetic evaluation
B. Inspiration for Stripe Designs
1. Pictorial2. Ribbons3. Textures
C. Automatic Striping Machines
1. Striping drums2. Striping fingers3. Chain arrangement4. Tuck bar (pattern placer)
D. Repeat Limitations and Possibilities on AutomaticMachines
1. Garment length repeats2. Repeat length variations on knit and welt
construction3. Repeat length variations on knit and tuck
construction
E. Evaluating Stripes
1. By repeat2. By size arrangements3. By color arrangements
F. Using Industrial Striping Charts for Programmingof Automatic Stripes
1. With striping chain only2. With pattern placer (tuck-bar) and striping
chain3. With wheels, chain and pattern placer
Learning Experiences:
1. Distribute sample swatches of fabrics producedon automatic and fixed stripe machines and havestudents identify them accordingly.
2. Have students create stripe designs for fixedstripes and automatic stripes, and identify the endproducts for which their designs would be appro-priate.
66
3. Have students program their stripe designs for themachine.
4. Have students draw (or trace) an end product forwhich their stripe designs are appropriate, and drawtheir stripes on it.
VI. PATTERNING MECHANISMS 2. Have students create a given number of their ownlace and terry designs.
Teaching Content
A. Calculating Pattern Areas1. Relating number of feed units to height of graph2. Relating number of wales to width of design3. Relating drawing graphs to actual size, taking
into consideration pattern areas and machinegauge.
B. Raceway Machines1. Four raceway fixed cams2. Eight raceway fixed cams
C. Multiple Selection Machines (mini-jacks)1. Twelve-step2. Twenty-four step3. More than twenty-four step
D. Pattern Wheels1. Straight2. Alternating3. "L" shaped4. Argyle
Learning Experiences:
1. Have students design several knit fabrics whichdemonstrate the students' understanding of patternareas relating to different types of mechanisms.
2. Have students evaluate knitted swatches and de-termine their suitability for the various patterningmechanisms learned.
3. Have students modify distributed swatches andadjust them to be suitable to knit on two or moredifferent patterning mechanisms.
VII. NOVELTY SINGLE KNIT FABRICS
Teaching Content
A. Eyelets1. Drop-stitch2. Plaited lace3. Transfer eyelet
B. Loop Fabrics1. Plain terry2. Jacquard terry
C. Inlay Fabrics1. With elastic yarn2. Napped or brushed
Learning Experiences:
1. Distribute swatches of lace and terry designs forstudent analysis, identification and discussion.
67
Suggested Evaluation
1. Evaluation may be based on an end-term portfo-lio of the students' own designs which demons-trates:a. Technical correctnessb. Originality of designc. Neatness in presentation of portfoliod. Ability to identify the correct machines suitable
for knitting their designs2. Students may be evaluated on their ability to
correctly graph out a given number of assigneddesigns.
Teaching Resources
TEXTS AND REFERENCES
Abrams, A. and L. Mishcon. Pattern Wheel Designing forCircular Jersey Knitting Machines.
Dubied Knitting Manual.
Reichman, C. Knitting Dictionary
.0
am, OW
.110
ado
Knitting EncyclopediaKnitted FabricPrinciples of Knitting OuterwearFabrics and Garments
PERIODICALS
American FabricsDaily News RecordKnitting TimesModern Textiles
INSTRUCTIONAL SUPPLIES
Flat bed hand knitting machinesSample swatches of different types of knitted fabricsSamples watches of piece dyed, cross dyed and yarndyed fabricsSamples of different types of yarnSample swatches of knitted fabrics with different yarnsizes
a Sample swatches of single knit fabrics, fabrics producedon automatic and fixed stripe machines. rib fabrics.jacquard mechanism fabrics, purl knits, lace, and terryfabricsGraph paperPick-out glassesPick-out needles
Paintfelt-tip pens
Brushes
Career Advancement Instruction
TEXTILE DESIGN III
Prerequisites: Textile Design II
Suggested Hours: 120
Behavioral Objectives
This area of instruction should enable the student to:
1. Develop professional judgment in the selection andpresentation of work according to industrystandards.
2. Acquire speed and dexterity in designing forspecific markets, using various techniques.
3. Understand the requisites needed for designing forthe home furnishings field, specifically draperiesand walicoverings.
4. Know how to design for sheets and pillowcases.5. Know how to design for towels and shower
curtains.
Instructional Guidelines
This area offers the student the opportunity of re-viewing and perfecting those techniques and skillslearned in previous Textile Design studies and ofadapting them to designing for a new range of prod-ucts in the home furnishings field, such as draperies,wailcoverings, sheets, pillowcases, towels, showercurtains, and the like.
Industry standards and professional methods of workshould be stressed, and two important areas shouldbe emphasized: (1) the presentation of work and (2)meeting deadlines. The proper presentation of workshould be discussed and demonstrated as an importantpart of a designer's professionalism. Previous projectsare reviewed and remounted where necessary.
This area of study concentrates on giving studentsthe means of rising above the first level capacity asdesigner and progressing to knowledgeable self-confi-dence in their work. A series of "Quickies" introducethe time element within the working experience.These projects, usually completed within three hours,enable the student to function independently while
8168
designing for suggested markets. This method sharpensskill competency and critical judgment. There shouldbe no criticism during these "Quickie" sessions. Theobjective here is to promote self-reliance and freedomof choice. Students learn to develop their own de-signs independently and to organize their time indoing so. Upon completion of the projects, however,the instructor will join students in a group discussionof all the designs. The best of these will either bemounted or worked upon for further development.
Designing for home furnishings represents an im-portant part of this area of study. Discussions regard-ing the decorating field and its possibilities should befollowed by pertinent technological informationgoverning the creative area, such as repeat sizes forthe various products and the printing processes usedin their production.
It is important to remember that sizes and methodsof printing in the home furnishings area vary fromconverter to converter, depending on the price range,the type of pattern and its eventual place in a line(whether commercial or custom). This also applies tojacquard construction weaving for towels, where dif-ferent technical limitations would apply. The sizesand methods of production listed in the teachingcontent are basic, and relate exclusively to the printarea. Since a design can easily be translated into anyspecified measurement quite easily, these specifica-tions can be considered guidelines for students tohelp them design for different products. The stresshere is on the flexibility of textile design and of theimportance of design itself as a selling point.
Several projects are suggested for each area, somewith color combinations. The instructor is free tomodify and limit these to suit his or her own particu-lar situation. Since competence is the main objective,much will depend on the general and particular per-formance of students.
The policy of requesting three color roughs for eachproject is left to the discretion of the instructor.A color rough for any design is advisable, sincestudios work on the premise that patterns must be
sold (accepted) before being developed. This area ofstudy encourages experimentation and inventiveness,and the student develops under the guidance of theinstructor.
Teaching Modules
I. Proper Presentation of Work11. "Quickies"
111. Draperies and WailcoveringsIV. Sheets and PillowcasesV. Printed Towels and Shower Curtains
I. PROPER PRESENTATION OF WORK
Teaching Content
A. Size1. Full scale (unless otherwise noted)2. Variations in layout measurements
8. Large Patterns1. Reinforcement at edges2. Rolled
C. Information for Inclusion1. Color scale2. Repeat information3. Name of artist4. Title of design (if any)
D. Consistency in Presentation
E. Mounting1. Color combinations on separate sheets or
acetate overlays2. Space at bottom
F. Neatness
G. Quantity1. Meaningful2. Brief
Learning Experiences
Choosing any project or projects from a previous areaof study, have students re-mount, applying teachingpoints discussed.
II. "QUICKIES"
Teaching Content
A. Reasons for "Quickies"1. Time element in industry2. Sharpens skill competency3. Develops critical judgment
B. Examples of "Quickies"
69
1. Documentary inspired2. Florets3. Others
Learning Experiences
(All designs are to be in croquis form except, eventu-ally, bayaderes or stripes which would automaticallyhave to be in repeat, depending on the size.)
1. Using research books or notebook reference, havestudents choose historic material and design apattern suitable for women's wear in one or twocolors and in any medium.
2. Using the same historic reference, have studentsdesign a variation of the same pattern suitable formen's wear, in one to three colors and in a differ-)ent medium from the preceding one, as well aswith a different layout.
3. Have students design a sophisticated Liberty floralsuitable for women's wear, using dyes, pen andink technique, and from one to five colors.Students then design a floral suitable for sports.wear, using any technique and up to three colors.
4. Have students develop a bold design suitable formen's wear using any technique or inspiration inone to four colors.
III. DRAPERIES AND WALLCOVERINGS
Teaching Content
A. Purpose and Physical Function
B. Decorative Function1. Addition of Interest2. Addition of color3. Creation of mood4. Distraction from architectural flaws
C. Comparison to Designs for Apparel1. Media
a. Gouache mostlyb. Dyes occasionally
2. One or non-directional3. Larger color areas4. Larger motifs5. Importance of color themes
D. Types of Designs1. Documentary2. Nature
a. Floralb. Leavesc. Scenic
3. Modern Geometrica. Abstractb. Semi-abstract
4. Conversational5. Panels
E. Types of Design Styles1. Naturalistic2. Stylized3. Formal4. Informal5. Random6. Set
F. Avoidance or Modification of Controversial Sub-jects1. Religious objects2. Insects3. Birds4. Objects with unpleasant connotations
G. Possibilities of Wallcovering/Drapery Relationships1. Coordinated designs2. Companion designs3. Design related to solid color
H. Customary Repeat Sizes1. Draperies
a. Width of goods: 45", 48". 50", 54"b. Vertical repeats: 22", 24", 27"c. Others
2. Waitcoveringsa. Widths: 27"b. Vertical repeats: 18", 27"c. Others
I. Printing Process Widths1. Machine roller prints: 36" and 48"2. Rotary screen prints: 52" and 54"3. Others
J. Considerations for Repeats1. Seaming problems2. Need for perfect joining at edges
Learning Experiences
1. Have students design a pattern for drapery with ageometric theme, using up to five colors. The de-sign will be in repeat and show approximately fourextra inches all around.
2. Have students design a modern floral for chintz tobe screen printed, using 6 to 8 colors on a mediumor light background. Possible repeat: 18" x 18",27" x 27" half-drop or square.
3. Using references at their disposal, have studentsdesign a pattern for drapery with a documentarytheme, using up to five colors. Have students stressoriginality and practicality, using a textured effectif they wish. Possible repeat: 27" x 27" or anyfraction thereof.
70
4. Have students design a wallpaper pattern to co-ordinate with drapery project #3 above. This designwill relate to it in some way (color and form),emphasizing or using part of it, but not over-powering the drapery. Students may eliminatesome colors.
IV. SHEETS AND PILLOWCASES
Teaching Content
A. Physical Function
B. Decorative Function1. Accent areas2. Environmental complements
C. Repeat Sizes1. Width: any fraction of 120"2. Length: any fraction of 36"3. Pillowcase: 21" x 36" (including 4" side hem)4. Other variations
D. Printing Processes1. Machine roller2. Rotary screen3. Others
E. Design Considerations1. Practicality2. Inventiveness3. Re-interpretation of traditional designs4. Current trends in design5. Freshness of techniques
F. Design Possibilities1. Borders
a. Solid with design borderb. Design with solid border
2. All-over3. Stripes4. Engineered prints
Learning Experiences
1. Assign students to shop one or more major storesand report on the type of designs being featured insheets and pillowcases. Have class discuss currentand dominant trends in design.
2. Have students design a coordinated sheet andpillowcase as follows:a. A dramatic pattern for sheets which is ap-
plicable to various areas through color changes(e.g. a man's room or a girl's room). Studentsare to use dyes or gouache in one to four colors.
b. A pillowcase in the same colors, coordinated tothe sheet using the 21" to 36" printing spaceto best advantage. Students may design for the
entire 42" x 38" area or divide, as preferred,keeping in mind that the seam represents thebottom of the case.
c. Paint up two color combinations for both sheetand pillowcase to complement their patternpresentation and mount the combinations onseparate sheets.
3. Have students:a. Design a floral pattern for sheets emphasizing
an original layout and personal interpretation,using up to five colors and concentrating on anengineered print for the 28" "fold" section ofthe sheet.
b. Coordinate their idea with a design for the bot-tom sheet, eliminating some colors if they sowish.
c. Working with original layout idea, plan a pillow-case for the above pattern using the same colors.
d. Mount designs.4. Have students:
a. Design a sheet suitable for teen-agers (orchildren) using contemporary idea trends andup to four colors.
b. Coordinate an all-over pattern for use as thebottom sheet. They may eliminate one of thecolors, if desired. Have students paint, using thesame medium as the original.
c. Design a pillowcase for the pattern, using thesame colors.
d. Mount designs.
V. PRINTED TOWELS AND SHOWER CURTAINS
Teaching Content
A. Towels1. Decorative function
a. Color accentsb. Creation of mood
2. Customary sizes for repeatsa. Bath or beach sheet: 44" x 72"b. Bath: 27" x 50"c. Hand: 18" x 30"d. Guest: 11 "x 18"e. Washcloth: 13" x 13"f. Other variations
3. Rotary printing method4. Design consic'eraticns
a. Suitability for folded towelsb. Engineered or all-over design
B. Shower Curtains1. Decorative function
a. Decorative accentsb. Coordinated to towels
8371
2. Customary sizes for repeats .
a. Width: 38" or any fraction thereofb. Length: 18" or any fraction thereofc. Variations
3. Methods of printinga. Machine rollerb. Rotary screenc. Others
4. Types of materialsa. Plasticsb. Fabricsc. Others
Learning Experiences
1. Have students design a floral pattern for towels,using four colors. Direct students to predominateone color and stress an ,.eginal layout.
2. Have students design a shower curtain pattern tocoordinate with the towel above, using the samecolors and any layout they feel to be appropriate.
3. Using documentary reference, have students de-sign an important border for towels, using up tofour colors. The design is to be in repeat. Studentsthen design a coordinated shower curtain to beused with the above towels, using the same colorsand improvising on a related, but different layout.
4. Have students design an original beach sheet, usingone color on a white or colored background for adramatic effect. Their theme is to be a free choiceof any appropriate inspiration.
Suggested Evaluation
Evaluation may be based on evidence of the student'sability to:
1. Demonstrate critical judgment in the selection andpresentation of work according to industrystandards.
2. Complete at We 18 projects successfully (includ-ing color combinations and design coordinates)using various techniques and adhering strictly topre-determined time schedules.
3. Develop coordinated designs for draperies andwallcoverings, adhering to the technical limita-tions which affect these patterns.
4. Develop a given number of coordinated designs forsheets and pillowcases.
5. Develop a given number of coordinated designs fortowels and shower curtains.

Teaching Resources
TEXTS AND REFERENCES
Min, E. The Aesthetic Movement: Prelude to Art NouveauCheskin, L. Colors: What They Can Do for YouCrewdson, F. Color in Decoration and DesignHalle, A. The Use of Colon in InterimsKampmann, L. Creating with Printing MaterialLuckiesh, M. Color and ColonMcClellan, N. Historic WallpapersPettit, F. America's Printed and Painted Fabrics, rem
wooSargent, W. The Enjoyment and Use of ColorWeeks, J. Rugs and Carpets of Europe and the Western
WorldWhiton, S. Elements of Interior Design and Decoration
S172
PERIODICALS
American FabricsDomusGraph!,House BeautifulHome Furnishings DailyHouse and GardenInteriorsVogue
INSTRUCTIONAL SUPPLIES
s Samples of studio drapery and wallpaper design%Samples of drapery fabrics and wallcoveringsSample books of draperies and wallpapersSamples of designed sheets, pillowcases, towels, shower
curtainsRetail advertisements and catalogues
CURRENT TRENDS AND INDUSTRIALPRACTICES
Prerequisites: Textile Design Ill
Suggested Hours: 45
Behavioral Objectives
This area of instruction should enable students to:
1. Understand the function of the textile industry inthe business of fashion.
2. Know the structure and industrial practices of thetextile industry.
3. Recognize the importance of fashion in textiles andthe sources of information available for fashionplanning and projections.
4. Differentiate between possible places of employ.ment for textile design occupations and understandthe advantages and limitations of each.
5. Understand the procedures for getting a job.
Instructional Guidelines
This area of instruction is designed to help textiledesign students relate their special field of interestand educational preparation to the industrial practicesand career opportunities in the textile industry. It alsoaims to deepen the students' understanding of the re-lationship of the textile field to the fashion industrycomplex and.to the fashion process.
Although the objectives of this instructional area con-centrate on the development of knowledge and under-standing rather than on the development of specificdesign skills, it is recommended that class lecture timebe .kept to a minimum. Community resources shouldbe utilized to the fullest for on-site visitations andguest speakers, and emphasis should be placed on"minds-on" learning experiences.
Teaching Modules
I. Fashion Industry OverviewII. The Textile Industry
Ill. Importance of Fashion for TextilesIV. Careers in Textile Design
I. FASHION INDUSTRY OVERVIEW
Teaching Content
A. Fashion Industry Enterprises and Their Function1. Primary markets: foreign and domestic
a. Textilesb. Non-textiles: leathers, furs, plastics
2. Secondary markets: foreign and domestic ap-parel and accessory producersa. Men'sb. Women'sc. Children's
3. Retailersa. Department storesb. Specialty stores: large and smallc. Chain store organizationsd. Discount storese. Mail-order housesf. Direct sellers: house-to-house
4. Auxiliary enterpriiesa. Advertising agenciesb. Publicity agenciesc. Fashion publications: trade and consumerd. Consultants: fashion, display, marketinge. Trade associations: fashion groups, textile
producers, textile distributors, color associ-ations, apparel producers, etc.
f. Independent design studios: apparel, textiles,etc.
B. Dominant Role of Consumers1. Determination of fashions by consumers
a. Industry proposes styles and designs: appareland textiles
b. Acceptance by customers determines thefashions
c. Different fashions for different groups: socio-economic and geographic differences
2. Buying motivation and behavior
Learning Experiences
1. Assign students to survey and report on the dif-ferent types of business enterprises in the com-munity that are involved in the business of fashion.
2. Have student groups develop a flow chart of fash-ion industry activities beginning with the clothesthat they themselves are wearing and working back-wards through the retailers to the producers oftheir garments, the producers of the textiles, andthe suppliers of natural or man-made fibers.
3. In small group discussions, have students analyzewhy they have bought (or have made) what theyare wearing. Have students classify their reasons asemotional or rational buying motives, come to con-clusions on the major reasons for buying fashionproducts, and suggest the implications of their buy-ing motives for designers of fashion products.
4. In order to emphasize the dominant role of theconsumer in the fashion industry, explore students'opinions about their freedom of choice to buy ornot, their many alternative product choices, andthe excess of supply over demand.
II. THE TEXTILE INDUSTRY
Teaching Content
A. History and Development1. First mill in 17932. Rapid growth in 19th century3. Movement of mills from North to South4. Entry of man-made fibers5. Vertical integration in 20th century6. Current economic importance
a. Number of millsb. Number of people employedc. Value of outputd. Geographic location
B. Types of Enterprises and Major Activities1. Enterprises: types, function, and relationships
a. Millsb. Convertersc. Dyeing, finishing and printing plantsd. Sales officese. Independent textile design studios
2. Classification of activitiesa. Designb. Productionc. Marketing
C. Customers of the Textile Industry1. Apparel and accessory producers2. Retail piece goods departments3. Others
8674
D. Characteristics of the Textile Industry1. Publicly-owned giant textile firms2. Specialized operations
a. Within vertically-integrated firmsb. Independent firms
3. Emphasis on brand-name fibers and advertising4. The converting function5. Design piracy6. Use of independent design studios7. Work flow
E. Review of Textile Design and Production Termi-nology
Learning Experiences
1. If community resources permit, plan a behind-the-scenes field trip to a textile firm. Arrange for arepresentative of the firm to explain and show thefirm's activities relating to design, production, andmarketing.
2. Assign students, either working individually or ingroups, to research the history and development ofthe textile industry in the U.S. for a class presenta-tion of their findings. Assign different periods todifferent students to prevent excessive duplication.
3. Distribute the company brochures of J.P. StevensCo. and/or Burlington Industries to students andhave them discuss the organization and divisions ofa vertically-integrated giant textile enterprise.
4. Distribute a pre-prepared list of textile design andproduction terminology to students and have themclassify its contents according to (a) design proc-esses and techniques, and (b) production processes.Then assign students to add terminology that theymay have acquired in their previous textile designstudies. The following terminology may be givento the students as a "starter":
(1) converter(2) gimmick(3) mill engraving(4) grin(5) flock patterns(6) sketch(7) pantograph(8) photographic en-
graving(9) overprint
(10) grey goods(11) trap or fall-on(12) batik(13) end use(14) warp printing(15) blotch printing(16) copper roller
(17) vertical set-up(18) crocking(19) embossing(20) knock-off(21) bread and butter
patter,.(22) calendering(23) flushing(24) half-etch(25) independent
studio(26) resist printing(27) discharge printing(28) doctor blade(29) adaptation(30) free-lance131) block printing
(32) 'weighing in'(33) printing(34) screen printing(35) jig(36) strike-off(37) direct printing(38) end or warp
(39) filling or pick(40) top beam designs(41) clip spots(42) ground dobby(43) wales(44) courses
(45) jacquard loom
III. IMPORTANCE OF FASHION FOR TEXTILES
Teaching Content
A. The Dynamics of Fashion1. Terminology
a. Fashionb. Stylec. Designd. Fade. Trend
2. How fashions changea. Evolutionary nature of fashion changeb. Fashion cycles
3. Influencing factorsa. New technical developmentsb. Important current events and personalitiesc. Life stylesd. Demographic and psychographic trends
B. Impact of Fashion on Textile Industry1. Demand for variety and change2. Early fashion planning in yarns and fabrics3. Importance of design4. Use of fashion as a selling tool5. Fashion personnel specialists
a. Fashion coordinatorsb. Stylists
C. How Fashion Expresses Itself in Textiles1. Colors2. Textures and textured effects3. Motifs, themes, patterns
D. Projecting Fashions1. Fashion research: sources of information
a. Trade periodicalsb. Fashion reporting servicesc. Trade association reportsd. Fashion and fabric magazinese. Retail storesf. News items: important events and personal.
itiesg. Demographic and psychographic studiesh. "People-watching"
2. Analysis and evaluation of research informationa. Appropriateness for firm's customersb. Analysis of common denominators
6775
c. Application of fashion principles: evolution-ary nature of fashion changes
d. Order of importancee. Element of riskf. Element of costs
3. Interpretation and applicationa. Designsb. Testing procedures
Learning Experiences
1. Assign students to bring into class examples of cur-rent fashions as illustrated in magazines or news-papers. Have class discuss these fashions as they re-flect, relate, and are influenced by life-styles, tech-nical developments, events and personalities in thenews, and/or demographic and psychographictrends.
2. Assign students to visit local museums and/or re-search historical fashion books in order to studyand compare the home-produced textile designs of(a) the early American settlers and (b) past andpresent primitive cultures, with the design elementsof contemporary fabrics. Have students summarizeand report their findings in a visual presentation,and come to conclusions on the differences inmodern textile designing and their implicationsfor textile designers.
3. Have students research sources of fashion infor-mation, as discussed in class, and write a report of400-500 words on their projection of fashions forthe coming season in terms of color trends, typesof patterns, and textures. Have students identifytheir sources of information and Implement theirreasoning and projections with fabric swatches andsample croquis of their predicted styles.
IV. CAREERS IN TEXTILE DESIGN
Teaching Content
A. Possible Places of Employment1. Independent design studios
a. Advantagesb. Limitations
2. Independent convertersa. Advantagesb. Limitations
3. Design studios in vertically integrated firmsa. Advantagesb. Limitations
4. Printing plantsa. Advantagesb. Limitations
5. Free-lancing
a. Advantagesb. Limitations
B. Types of Jobs and Responsibilities1. Entry jobs2. Career advancement
C. Getting a Job1. Qualifications
a. Attitudesb. Abilities
2. Sources of information about jobsa. School placement servicesb. Help-wanted advertisementsc. Employment agencies
3. Applying for a joba. Resumes: personal data, education and train-
ing, work experienceb. Portfolios
Learning Experiences
1. invite as a guest speaker for, if possible, a panel ofspeakers) a stylist, studio head, or textile designerto discuss with the students the career opportu-nities in textile design in terms of possible placesof employment, entry jobs, career advancement,and qualifications. Ask the guest speaker(s) to im-plement their discussion with samples from theircurrent line.
2. Have students write a short report on the type oftextile design position they would prefer and forwhich they believe they are qualified, and givereasons for their choice.
3. Have students, using their portfolios, role-play jobinterviews for textile design jobs. The role of theemployers may be played by the instructor and/orother students. Have class evaluate interviews andmake suggestions for improvement.
4. Have each student write a helpwanted advertise-ment for a specific textile design occupation whichincludes job responsibilities and desired qualifica-tions. Have students exchange advertisements andexplain their interest and qualifications for theadvertised job.
b'3
76
Suggested Evaluation
Evaluation may be based on evidence of the student'sability to:1. Identify and distinguish between the different types
of enterprises in the textile industry.2. Define or briefly explain a given list of textile
design and industry terminology.3. Demonstrate their understanding of the relation-
ship of textile design to fashion.4. Identify the sources of information available for
fashion research and the factors to be consideredin evaluating information researched.
6. Cite the advantages and limitations of design jobsin two different types of industrial set-ups.
Teaching Resources
TEXTS AND REFERENCES
Barnhardt, R. Opportunities in the Textile Industry!Wren, F. Selling Color to PeopleCone, S. Aim for Job in the Textile IndustryEnglish, W. The Textile IndustryFried, E. Is the Fashion Susinem Your &sinewPotter, N. Mat Is Designer.
PERIODICALS
American Pahl=California Men's StylistClothes MagazineDaily News RecordEleganceFashion magazines: Harpers, Vogue, etc.Women's Wier Daily
INSTRUCTIONAL SUPPLIES
Company brochures of Burlington Industrial, 1345Avenue of Americas, New York, N.Y. 10036 andJ.P. Stevens 8 Co., 1186 Avenue of Americas, NewYork, N.Y. 10018
Swatches of current fabric fashionsFabric Term Dictionary, Dan River Mills Inc., 111 West
40th Street, New York, N.Y. 10018
ADVANCED PRINT DESIGN
Prerequisites: Print Studio Techniques
Suggested Hours: so
Behavioral Objectives
This area of instruction should enable students to:1. Evaluate their technical capabilities and develop
their competencies in those areas which they con-sider weak.
2. Design different types of patterns, using variousinspirational sources, which reflect industry stand-ards and organization of time.
3. Develop their own personal sense Gf design andcolor by 'styling a line' for a specific fashionmarket, and adapting industry methods in thepresentation of work.
Instructional Guidelines
This area of instruction offers advanced students theopportunity of developing and perfecting those skillsand techniques which will enable them to handle themore responsible studio jobs, such as color stylist, de.signer, stylist, etc.
The learning experiences encourage the student towork independently, under the guidance of the in-structor. Each of the three main projects will be dis-cussed with the instructor, but will eventually be de-veloped by the students themselves. It is suggestedthat a time limit be given for the completion of eachproject. This method will enable the young designersto assume full responsibility for their work, and willfurther develop their sense of organization and timing.
The number of projects should be flexible, since muchwill depend on the speed and versatility of the students. At the outset, their portfolio of finished de-signs should be evaluated and discussed by both theinstructor and student. Where necessary, a number ofpractice sessions are suggested to help them strengthenweak areas, e.g. florals, colorings, flexibility of hand.The students may prefer to re-interpret one of theirown designs, which they feel they could improve, or
h977
they may elect to develop a new one. The projectwhich results from these practice sessions should laterbe evaluated.
Experimental designing is stressed, whereby studentsuse inspirational sources of their own choosing and de-velop original layouts and design concepts suitable forspecific markets. They may use any technique andwork independently within the technological limita-tions they have learned. Here, again, the amount ofwork produced depends on their inventiveness andtechnical ability. Three projects are suggested, but in-structors may modify the number according to theirdiscretion and the needs of the students. Finally, thestudents learn to develop their own 'line,' a series ofvariations on a design theme of their own, developedfor a specific season and market.
It is important to point out to the student that timeli-ness, practicality and projection are necessary con-siderations in styling a line. This first experience,limited to a few suggested types of patterns, exposesthe student to the actual responsibility of developinga fashion concept from idea to finished layout. Thecroquis involved do not have to be large, but shouldbe sufficient to show the patterns to advantage. Alldesigns should be mounted, and presentation whichmeets industry standards should be stressed. Colorcombinations may be included for a more completeshowing.
Teaching Modules
I. Self-Evaluation11. Inspirational Sources for Experimental Designing
III. Styling a 'Line'
I. SELFEVALUATION
Teaching Content
A. Student Appraisal of "Weak Areas"1. Florals2. Colorings3. Flexibility of hand4. Techniques5. Others

Learning Experiences
1. Have students define their own design areas thatneed strengthening and then produce any pattern,coloring, or technique which will test and improvetheir performance, discussing results with the instructor and developing their exercises into a fin-ished design suitable for a specific market, for ex-ample, printed wovens, menswear, home furnish.ings, etc.
2. Continue projects where necessary, until compe-tency has been established.
II ..INSPI RATIONAL SOURCES FOR EXPERIMENTALDESIGNING
Teaching Content
A. Newspaper Clippings
B. Architectural and Rhythmic Concepts
C. Linear Technique
D. Free Choice
Learning Experiences
Have students choose three of the four suggestedareas of inspiration and design croquis suitable foridentified specific markets, varying designs through,(1) technique, (2) color feeling, (3) layout. Directstudents to use up to five colors for one, three colorsfor the other, and black and white for a third. Dis-cuss results with students.
III. STYLING 'A LINE
Teaching Content
A. Explanation of a 'Line'
B. Considerations in Designing a 'Line'1. Season2. Potential customer market3. Production factors
a. Capabilitiesb. Costsc. Processes
4. Fashion trendsa. Colorsb. Texturesc. Silhouettes and shapes
5. Anticipated end uses6. Design theme7. Objectivity
C. Examples of Design Theme Va. lations1. Coordination of different types of designs
a. Floralsb. Stripes '39
78
c. Geometricsd. Borders
2. Coordination of key colorsa. Single colorsb. Multi-colors
3. Coordination of pattern relationships
Learning Experiences
Extended and continuing project: Have students iden-tify a specific season and intended customer marketand develop a small 'line' of a minimum of five suit-able patterns. Patterns are to include:1. A minimum of one coordinated pattern2. A dramatic pattern3. A sophisticated floral4. A documentary inspired pattern5. A basic patternDirect students to key colors together so that patternswill relate to each other, even though the predominantcolors in each may differ. Emphasize originality inboth color and design ideas. Discuss problems andprocedures with students but allow them to developtheir 'line' independently.
Suggested Evaluation
Evaluation may be based on evidence of the student'sability to:1. Demonstrate versatility and competence in the ex
ecution and completion of self-imposed projects.2. Design different types of patterns, using various
media and inspirational sources, which reflect professional attitudes, organization of time, and in-dustry standards.
3. Demonstrate imagination, flexibility and an in-dividual sense of color and design in 'styling a line'of at least five different and coordinated patternsfor a specific fashion season and market.
Teaching Resources
TEXTS AND REFERENCES
Adhemar, J. Twentieth Century GraphicsBodrogi, T. Art in AfricaEditors of American Fabrics Magnin*. Encyclopedia of
TextilesLuckiesh. M. Visual IllusionsWeibel, A. Two Thousand Years of Textiles
PERIODICALS
AmbassadorAmerican FabricsDaily News Record
DesignEleganceGentlemen's QuarterlyGraph!:Harper's BazaarHome Furnishings DailyHouse and GardenInteriorsL'Officiel de la CouleurVogueWomen's Wear Daily
INSTRUCTIONAL SUPPLIES
Beeswax, paraffin, double boiler, hot plate, tjantingpens
Retail store catalogues
Fabric swatches of all types for illustration and dis-cussion
Examples of studio layouts, reference pieces, textures,etc.
ADVANCED SCREEN PRINTING
Prerequisites: Screen Printing
Suggested Hours: so
Behavioral Objectives
This area of instruction should enable students to:
1. Understand dyes and the textiles for which theyare suited, the processes of dyeing and curing, themerits and drawbacks of each.
2. Design and print a large repeat decorative cottonfabric, using reactive dyes.
3. Print silk and wool with acid dyes, and finishthese prints by steaming.
4. Use resists to make patterned dyed fabric.5. Use discharge to produce design by removing color
from dyed fabric.6. Employ tie-dye grounds with screen print.7. Use batik techniques to make grounds for printing.8. Correctly print a poster in several colors using one
screen and the block-out method.
Instructional Guidelines
This advanced area of instruction continues the stu-dents' training in printing with emphasis on dyes andthe means for producing new effects with dischargeand resists. The printing of decorative panels or posterson paper or cardboard, as a further use of screen print-ing, is the final project in this area of study.
Lectures and demonstrations should supply informa-tion on different dye systems, the fabrics to whichthey are best suited, and the necessary curing methods.Students will keep notebooks of dye formulas anddyeing procedures for their current and future use. Itis recommended that students be required to keep ascrapbook of design ideas gathered from periodicals,brochures and the like, along with swatches of fabrics.It is further recommended that visiting industry ex-perts be invited to demonstrate dyeing and printingmethods used in their field.
Teaching Modules
I. Dyes and Their AffinitiesII. Decorative FabricsIII. Printing Silk and Wool with Acid DyesIV. Creating Patterns With ResistsV. Use of the Discharge Method
VI. Tie-Dye BackgroundsVII. Batik Effects
VIII. Pictures, Panels, Posters on Cardboard or Paper
I. DYES AND THEIR AFFINITIES
Teaching Conten^.
A. Dyes for Printing Cellulosic Fibers1. Basic dyes
a. Merits and disadvantagesb. Formulas and dyeing procedurec. Curing procedure
2. Fiber-reactive dyesa. Merits and drawbacksb. Formula and dyeing procedurec. Curing procedure
3. Direct dyesa. Advantages and drawbacksb. Formulas and dyeing procedurec. Curing method
4. So lubir vat dyes (also dye silk)a. Advantages and disadvantagesb. Formula and dyeing procedurec. Finishing
B. Dyes for Printing Animal Fibers1. Acid dyes
a. Formula and procedureb. Curing
2. Fiber-reactive dyesa. Advantagesb. Formula, dyeing procedurec. Curing
C. Dyes for Printing Synthetic Fibers1. Disperse dyes
a. Formulab. Curing
2. Acid dyes (for nylon)a. Formula and procedureb. Curing
II. DECORATIVE FABRICS
Teaching Content
A. Design Considerations1. Size of repeat2. Type of coloring3. Drawing and composition
B. EndUse Considerations1. Function of room2. Type of decor3. Possibilities of end usage
Learning Experiences
Have students design a two-screen fabric with a repeatsize of 24" x 38", with acetates; prepare with opaquemedium from design and make two photograph emulsion screens. Mix sufficient reactive dyes and printwith the aid of another student; set up print rail stopsfor these widthof-fabric screens and print five yardsof cotton in two-man teams, working one on eitherside of table. Finally, cure the fabric (heat at 300°).
III. PRINTING SILK AND WOOL WITH ACID DYES
Teaching Content
A. Dye Solutions1. Components2. Sequence of combining ingredients3. Heating solution
8. Finishing Fabric1. Steaming2. Washing
Learning Experiences
1. Demonstrate printing with acid dyes as follows:a. Mix dye solution and discuss:
1) Components: dyestuff, glycerin, water, thickener (gum tragacanth }, tartaric acid
2) Sequence of combining ingredients3) Heating solution to dissolve dyestuff
b. Discuss steaming and washing to finish fabric.c. Steam for one hour in closed box or over metal
pot steamer.d. Wash in cold then lukewarm water.
2. Have students print a half yard of white silk withacid dyes they have mixed; when dry, steam, wash,finish. t.
k,. L.,
81
IV. CREATING PATTERNS WITH RESISTS
Teaching Content
A. Characteristics of Resist Method1. Determination of pattern by resist shape2. Dyeing of entire fabric3. Crackle effects4. Addition of color to pattern
B. Applications of Resists1. Batik2. Starch resists3. Stencilled resists
C. Tools of Resist Method1. Tjanting pen for batik2. Sticks and feathers for primitive effects3. Punchedout metal stencils
Learning Experiences
1. Demonstrate resist method as follows:a. Paint simple design on white cotton using feath-
ers, brushes, wooden blades, etc., with laundrystarch. Let dry.
b. Dip fabric in hot dye.c. Crack away starch resist.d. Wash fabric.e. Using boldly designed screen, "print" cold syn-
thetic wax on white cotton. Print over it withopen screen using pigment. Press between news-paper until wax is removed, showing white wherewax was "printed."
f. With a tjanting batik tool or brushes applyparaffinbeeswax in loose freehand design onwhite or light-colored cotton. When dry, dyewith reactive dye. Cure, wash and press.
2. Have students make a fabric using one of the aboveresists; when dry and cleaned, add more of thesame resist to other areas, dye again, clean andfinish.
V. USE OF THE DISCHARGE METHOD
Teaching Content
A. Effects of Discharge Method1. Uniformity of background color2. Production of colorless areas
B. Economic Advantages1. Labor saving2. Less wastage
C. Discharge Agents1. Lemon juice2. Commercial agents
Learning Experiences
1. Demonstrate the discharge method as follows:a. Dye cotton with direct dyes using a dark shade.
Dry.b. Screen over it a discharge paste (sodium sulph-
oxylate, glycerin, gum tragacanth thickener)using any design. Dry. Steam for 5 minutes,then rinse in several baths of lukewarm water.
c. Print over cotton dyed with potassium perman-ganate using lemon juice mixed with gum thick-ener. Dry resulting fabric, rinse in cold water,boil in detergent bath, rinse again.
2. Have students screen print lemon juice dischargepaste over potassium permanganate dyed cloth;repeat with paste using approximately one-half thequantity of lemon juice; compare results and noticea light value has been produced on a dark ground.
VI. TIE-DYE BACKGROUNDS
Teaching Content
A. Types of Tie-Dye1. Fold dye2. Tied-in small objects
B. Pattern Effects1. Liberated effects2. Ombres3. Stripes and plaids4. Polka-dots
C. Advantages1. Degree of control2. Low cost of dye materials3. Enhancement of tow-cost fabrics4. Coordination possibilities to screen-printed
motifs
Learning Experiences
1. Demonstrate tie-dyeing a fabric as follows:a. Fold dye a yard of cotton in a middle value of
brown or blue, using simple two-inch wide pleats.b. Print a small-motif screen over the finished
fabric, coordinating the print with the ground.Cure with pigment.
c. Tie up marbles or small pebbles tightly in whitecotton at regular intervals in a geometric pat-tern. Dye fabric. Overprint with a small all-overdesign.
2. Have students combine the two tie-dye effectsabove to form a ground for a specific small-detailedscreen; when dry, overprint with pigment or reac-tive dye. Heat cure.
VII. BATIK EFFECTS
Teaching Content
A. Types of Batik Designs1. Batik colors2. Batik-crackle ground
B. Batik Effects1. Color2. Texture3. Background for silk-screen printing
C. Tools1. Batik
a. Tjanting pensb. Brushesc. Hot wax
2. Batik-cracklea. Broad simple brushesb. Wax
Learning Experiences
1. Demonstrate a batik design as follows:a. Using a variety of tjantings and brushes, paint a
design in wax on white cotton.b. Dye the cotton with cold reactive dye.c. Remove wax with benzine bath.d. Overprint coordinated screen, using reactive dye
in a strong value.e. Cure with heat.
2. Demonstrate batik crackle-ground as follows:a. Pin out on newspaper a yard of white cotton.b. Using a two-inch brush, coat the fabric with hat
paraf in. Allow to harden.c. Unpin the fabric and crumple it with the hands.
Flatten out.d. Immerse fabric in cold bath of household dye
for three minutes.e. Dry, scrape off excess wax, wash out residue
with benzine.f. Pin out fabric and overprint with pigment color.
3. Have students combine the two batik effects dem-onstrated to produce two yards of dyed and printedfabric.
VIII. PICTURES, PANELS, POSTERS ON CARD-BOARD OR PAPER
Teaching Content
A. Considerations in Printing on Cardboard or Paper1. Non-absorbency2. Need for special drying racks3. Exactness of screen registration
:3A82
4. Composition for a contained area5. Length of drying time
B. Materials1. Printing inks with thickeners2. Pigment fabric colors3. Hinged screen frames (control of registration)
C. Methods of Obtaining Registry1. Registration tabs2. Hinged screen frames
Learning Experiences
1. Demonstrate teaching content as follows:a. Show a variety of screen printed panels and
posters. Point out the number of colors andprobable sequence.
b. Show a screen frame hinged to drawing boardfor printing posters.
c. Point out how registry is obtained.d. Show how same screen can be printed several
times on a poster, blocking out indicating areasand changing color correctly for each successiveprint.
2. Have students design and print a three-color posteror panel using printing inks (or pigments) and be-ginning with one screen to be blocked out in stages.
Suggested Evaluation
1. Evaluate student laboratory projects for:a. Understanding and application of teaching con-
tent
83
b. Improvement of work methodsc. Aesthetic qualityd. Evidence of advanced skill
2. Evaluate students' clipping scrapbooks for:a. Varietyb. Utility as design inspirationc. Evidence of their imagination
Teaching Resources
TEXTS AND REFERENCES
Johnson, M. and G. Kaufman. Design on FabricsLanterburg, L. Fabric PrintingSchwalbach M. and J. Schwalbach. Screen Process Print-
ing for the Seriagrapher and Textile Designer
PERIODICALS
American FabricsClothes MagazineHouse and Garden
INSTRUCTIONAL SUPPLIES
a Large swatches of printed decorative fabricsSamples of resist-method primitive ethnic fabricsSamples of printed cardboard or per posters, dec-
orative panels, brochures, etc.a Samples of tie-dyed fabrics
Samples of commercial discharge fabricsHinged boards with small screens for posters, panels, etc.
ADVANCED WOVEN DESIGN
Prerequisites: Woven Design I
Suggested Hours: 60
Behavioral Objectives
This area of instruction should enable students to:
1. Understand the "Designer's Blanket".2. Comprehend the basic types of Drawing-In Drafts
and the fabrics they produce.3. Experiment with the patterning capacity of 8
harnesses, on graph paper, as well as on the loom.4. Dress a hand loom (by the front to back method)
and tie-up the lams and treadles.5. Know what constitutes a "color line" and the
sources of information of color trends.6. Do a pick-out and basic analysis of a woven fabric.7. Know what "Color and Weave Effects" are and
how to draft them.8. Alter an existing warp by adding "tie-ins".9. Keep more complex weaving records.
10. Understand how to prepare samples for presenta-tion.
11. Produce a portfolio of their work.
Instructional Guidelines
Multiple harness foot powered looms with a minimumof 8 harnesses are used in the development studios ofmost mills as a flexible and inexpensive way to test-produce, correct or modify fabric "ideas." As anecessary step in the development of a cloth, cus-tomer orders may be placed and accepted with con-fidence on samples correctly woven by hand.
The central learning experience of this area of instruc-tion is planned around one project in 4 parts. Theproject could be used as it is given, with other relatedprojects, or assigned as two, thrae or four shorter co-ordinated warps. Once information is given thestudents, the more time they are allowed and themore wort: they can achieve, the more competentthey will become.
While it is essential that students be able to read andunderstand a specification and meet its requirement,it should only be enforced rigidly when a learningpoint is to be made. Also, students should takeresponsibility for making decisions as rapidly as theyare able, as part of the learning experience. (Forinstance: if the draws and weaves are specified,students should figure out the chains or if thechains and draws are given, students should figureout the weaves). Once they have sufficient informa-tion and are encouraged to find the answers to theirown questions, they should be able to originate much
of their own material.
A minimum of demonstration is needed at this pointin study, but many lectures and homework assign-ments should be given covering specific informationwith which a textile weaving designer must befamiliar.
The final phase of this area of instruction should bethe preparation of a portfolio consisting of a care-fully arranged and selected presentation of the
samples woven during the learning experiences. Thisportfolio is presented by the students at future jobinterviews as evidence of their experience, originalityand taste, and general understanding and proficiency.
Teaching Modules
I. Introduction to DraftingII. The Basic Drawing-1n Drafts: The Color Line
111. Dressing the Loom (Front to Back): The Tie-UpIV. Doing a Pick-Out and Drawing-In DraftV. Weaving on the Floor Loom
VI. Color and Weave Effects: Changing an ExistingWarp: Tie-In's
VII. Finishing Samples: The Portfolio
I. INTRODUCTION TO DRAFTING
Teaching Content
A. HaFdiing Looms and Yarns-1 ring for looms and work areas
2. Handiinq yarns
13684
3. Using accessory equipment
B. Procedure to Follow in Drafting1. Determining the area of repeat
a. For a drawinin draftb. For a weave draft
2. Marking off on graph paper'3. Drafting the 1st end4. Drafting the 2nd end, etc.
Learning Experiences
1. To reorient students, have them do the followingexercises:a. Draft an evenpoint draw on 4 harnesses that
repeats on 30 ends.b. Draft a straight draw on 12 harnesses.c. Draft a herringbone on 4 harnesses - 16 ends
right,18 ends left, with clear breaks.d. Identify the fewest harnesses needed to produce:
1) Plain weave2) Twill weave3) A 4/1 satin weave
2. Distribute and discuss the following project forthis area of instruction: A designer's blanket madewith yarns appropriate to type of fabric selectedfor study by student (women's wear, men's wear,etc.). The warp in five 4" sections (each section adifferent but related color, each section in differentdraw) will be woven in four parts, with 25samples for each part.Part #1. Simple weaves (a different weave for each
warp); the blanket woven on itselfPart #2. Simple weaves, textured fillingsPart #3. Complex weavesPart #4.2 and 3-color tie-in's: checks and plaids
3. Give students the following assignment for thenext class meeting: "There are 18 different ordersof 45 degree twill interfacings on a 7 harnessstraight draw. Draft these weaves and write theirsymbols."
4. Assign each student a loom and show whereheddles, cranks and shuttles are kept. Have studentsreview notes from Woven Design 1 and familiarizethemselves with equipment and determine type ofshed.
6. Show students the yarns with which they will beworking; finer, more fragile, and more elastic thancotton, it will be clear upon examination that thesamples they are to make will have quality.
II. THE BASIC DRAWING-IN DRAFTS: THE COLORLINE
Teaching Content
A. The Drawing-In Draft :37
85
1. Definition2. Different ways of writing3. Other names
B. Basic Types of Drawing in Drafts1. Straight2. Point3. Broken4. intermittent or Offset5. Grouped8. Scattered or Satin7. Spiral8. Divided9. Combination
C. Guidelines for Planning DrawingIn Drafts1. Logic and clarity2. Minimum number of harnesses3. Even distribution of ends4. Exceptions
D. The "Color Line"1. What does it constitute2. How is it determined
E. Sources of Information about Color Trends1. Fashion magazines2. Retail stores3. Mass culture and life styles4. Current events5. Customer purchases and requests
Learning Experiences
1. Have students start to plan for their blankets by:a. Selecting warp colorsb. Determining the sett of the yarnc. Checking the dents/inch in reedsd. Deciding the sleying sequencee. Completing all calculationsf. Researching and/or originating warp plansg. Preparing drafts of the 5 warp plans to use
during drawing-inh. Determining number of heddles needed on each
harness
I. Preparing the loom for dressing2. When all material has been approved by the
instructor, students will proceed to make theirwarps.
III. DRESSING THE LOOM (FRONT TO BACK):THE TIE-UP
Teaching Content
A. Advantages of Dressing the Loom1. Back to front2. Front to back
B. The Function of the Lams1. On a multi-harness loom2. During the weaving process3. in production weaving
C. The Tie-up1. Relation to the chain2. How accomplished
a. On a counterbalanced loomb. On a jack loom
Learning Experiences
1. Demonstrate dressing the loom front to back:a. Warp and lease sticks secured on breast beamb. Loop cut at top of warpc. Warp centered and slaved in reed
d. Cross and lease sticks transferred behind reede. Ends entered in heddles and tied onto apron of
warp beamf. Warp rolled onto beam under smooth tensiong. Ends trimmed and tied onto front apron
2. Have students finish warping and proceed to dresslooms as fast and as efficiently as possible. Theywill be able to do the sleying and entering alone,but beaming the warp is carried out most rapidlywhen there are two persons working: one in front,unchaining, "combing" the warp with the beater,snapping yarns apart and moving uneveness towardsthe bottom of the warp while holding tensioneven; the assistant in back, turning the crank and
placing heavy paper or sticks between the layersof warp.
3. Assign students to bring pick glasses to next class.
IV. DOING A PICK-OUT AND DRAWING-IN DRAFT
Teaching Content
A. The Pick-Out1. Explanation2. Usefulness
B. General Analysis of Fabric1. Identification of the face2. Identification of the warp3. Counting of ends per inch4. Writing out warp arrangement5. Testing of yarns for ply, fiber, count6. Analysis of filling as above
Learning Experiences
1. Demonstrate pick-out and drawing in draft as fol-lows:a. Trim swatch (prepare for taking apart).b. Loosen first end and study under pick glass. .s
86
c. When pattern of weaving is clear, draft end andremove.
d. Continue observing, recording, discarding endsuntil the drafted weave repeats itself and thepick-out is now complete. (Select adequatespace on graph paper directly below pickouton which to plot the drawing-in draft).
a. Starting on one side, draft the first end of pick-out on 1st harness.
f. Scan the weave and place all ends weaving asfirst end on the 1st harness.Place next available end on next availableharness (in this case, #2); draw down all likeends on same harness.
h. Continue as above until all ends are drafted.
2. Have students spend enough time to be certainthey understand how to do the pick-out and assigna completed analysis and weave and drawing-indraft with mounted sample for next class. Thisfirst experience should be followed by two orthree others to enable students to have practice inthe technique.
V. WEAVING ON THE FLOOR LOOM
Teaching Content
A. Good Weaving Techniques1. Making bobbins and "dressing" shuttles cor-
rectly2. Grasping center of beater3. Using both hands and feet4. Developing rhythmic movements
B. Factors in Estimating and Achieving CorrectPickage1. Relaxing of yarns when warp is off tension2. Shrinkage factor of type of yarn3. Heavier or lighter beat depending upon weave
Learning Experiences
1. When looms have been tied-up, heading woven,and work checked for errors in threading, sleying,or tension, have students start weaving first part ofthe project. Keep filling specifications simple andhave students concentrate on learning to adapt4-harness weaves to 8-harnesses, learning to tie-upthe weaves, learning good weaving technique, andgetting an evenly beat-up fabric.
2. In weaving the second part of the project, en-courage students to think of different ways toachieve a textured look besides the obvious one ofusing nubby, hi.iry, or loopy yarns as solid fillings.
For example:a. Plying yarns of contrasting colorb. Using 4 or 5 different colors equal in value, in a
pick and pick arrangementc. Using plain and fancy yarns in striped or pick
and pick (Urge students to bring in fillings theywould like to try out)
3. In weaving part #3 of the project, students will beexperimenting with the capacity of the 8haritessesto produce intricate and/or bold patterns (one afancy twill). This will involve research and "out ofclass" study as well as class time in which to testideas out on the loom. Discuss drafts with thestudents before they weave.
VI. COLOR AND WEAVE EFFECTS: CHANGING ANEXISTING WARP: TIE-IN'S
Teaching Content
A. Color and Weave Effects1. Description of how achieved2. importance to commercial designing3. Procedure for drafting
a. Placement of motif in corner of graph paperb. indication of warp arrangement across topc. Indication of filling arrangement down sided. Drafting of interfacings where dark warp is
raised
e. Drafting of interlacing: where dark filling issurface of weave
f. Continuation until completion of all weaves
B. Tie -in's
Learning Experiences
1. Have students spend time studying color and weavedrafting and work out a few weaves so they under-stand how it is done. Assign a plate for the nextclass (3 to 5 of these plates should be planned bythe instructor).
2. Demonstrate tie-in's as follows:a. Secure lease sticks holding new ends to breast
beam.
b. Cut ends to be replaced.c. Tie new ends onto old.d. Ease knots through reed, heddles and secure in
back.e. Secure tension on new ends in front.
3. Have students incorporate a series of stripes, tie-in'susing 2 or 3 colors per section into the existingwarp in Part #4 of the project. Careful planningwill be necessary to achieve variety and to keepthe tie-in's as simple yet as effective as possible(replacing a minimum of ends). Have studen§3proceed to do the tie-in's by:
87
a. Designing the new warp arrangementsb. Deciding on exact number of ends of each color
and their cut lengthc. Warping the endsd. Placing them in the warp
VII. FINISHING SAMPLES: THE PORTFOLIO
Teaching Content
A. Procedure for Finishing Blankets1. Stitching ends
a. Mendingb. Trimming
2. Washinga. Wetting out in lukewarm waterb. Soaking clean in 2 baths (pure soap)c. Gentle rinsing in 2 bathsd. Using fabric softener in 3rd rinsee. Pattirg out moisture in towellingf. Drying away from heat, in towellingg. Steam pressing
3. Roiling tighly (face in) around a paper tube
B. Presentation of Samples1. By designers2. By students
a. Presentation portfoliob. Bristol boards and envelope
Learning Experiences
1. Have students wash and press their blankets andbring into class for evaluation
2. After a "critique" by the teacher, have studentsprepare their work for presentation as follows:a. With blanket face down on table, strip top,
bottom and both sides of individual sampleswith masking tape.
b. Turn blanket face up and cut samples apartparallel to warp and filling, using pinkingscissors if possible.
c. Sort swatches, and place in groups which have abasic color-look in common.
d. Arrange on pages or boards. Work for an at-tractive, fresh look and get as much impact aspossible by adding a couple of swatches instrong contrast to the group.
e. When finally arranged, lightly rubber-cement inplace.
Note: The job of arranging these "pages" is morecomplicated, requires more time and studythan would appear. A minimum of three classsessions can easily be devoted to this task. it isa pleasant end of semester activity with every-body working together under the guidance andencouragement of the instructor.
Suggested Evaluation
Evaluation of samples woven by the student to bebased on:I. "Hand" and evenness of beat2. Absence of weaving errors3. Appropriateness of fabric fur the intended end use
specified by the student4. Richness and harmoniousness of color and texture5. Accuracy of the documentary records6. Neatness of the records
Teaching Resources
TEXTS AND REFERENCES
Kirby, M. Designing on the Loom: How to Do It Soria*67
109
88
Wow, G. H. Handbook of WeavesWatson, W. Twill' Design and Color
PERIODICALS
Anwrkan FabricsFashion MagazinesWoman's Mar Daily
INSTRUCTIONAL MATERIALS
Foot powered looms with a minimum of 8 harnessesYarnsAuxiliary small toolsWarping boardsBobbin winders and yarn holdersPick glasses8" x 10" square graph paperScissorsTaperneasure
ADVANCED WEFT KNIT DESIGN
Prerequisites: Weft Knit Design and Technology
Suggested Hours: 60
Behavioral Objectives
This area of instruction should enable students to:
1. Understand and recognize the fabric constructionmade on two-needle bed machines.
2. Be able to judge the yarn sizes suitable fordifferent gauges of double knit versus single knitmachines.
3. Recognize and be able to plan the application andaesthetics of color in double knit fabrics asopposed to single knit construction.
4. Know the technology, aesthetics, and proceduresfor designing rib fabrics.
5. Know the technology and procedures for dis-tinguishing between different types of doublekn its.
6. Understand the design possibilities and limitationsgoverning jacquard mechanisms using double knitmachines, as opposed to single knit designing.
7. Understand the concept of electronic knittingmachines and know the procedures used indesigning for them.
Instructional Guidelines
This area of instruction, which builds on the students'knowledge of knit design and technology acquired inthe prerequisite instructional area, develops theirability to design for double knits and more advancedknit mechanisms. It aims to provide students withinformation and design experiences relating to doubleknit equipment, from simple knitting machines tosophisticated electronic ones.
Since both the design element in knits and technicalefficiency are equally as important,it is suggested thatthe instructor modify or continue learning experienceprojects according to the particular capabilities andLiterests of individual students.
It is further suggested that instruction should beimplemented by frequent mill visits and exposure toactual knitting processes, since the cost of completedouble knit laboratory equipment makes it impracticaland quite prohibitive for a textile design program.
Teaching Modules
Double Knit Machines and ConstructionColor in Double Knit FabricsRib FabricsDouble Knit FabricsJacquard MechanismsElectronic Knitting Machines
I. DOUBLE KNIT MACHINES AND CONSTRUCTION
Teaching Content
A. Components of Double Knit Machines1. Cylinder2. Dial3. Yarn supply for both needle beds4. Camming: KWT (knit-welt-tuck)5. Take-up mechanism6. Timing: synchronized, delayed
B. Varieties of Needle Selection1. Single purpose one-type needle2. Two - needle selection3. More than two-needle selection4. Jacquard mechanisms5. Selection on dial, two-needle, four-needle
C. Single Purpose Double Knit Machine1. Single purpose knit camming2. Single purpose interlock camming
D. Multi-Purpose Double Knit Machines1. Multi-track, multi-needle2. Equipped with individual needle selection
mechanism
Learning Experiences:
1. Using an actual cam section from a cylinder anddial of a double knit machine, demonstrate needle
10.189
path and action. Distribute mimeographed diagramsof same.
2. Taking the carriage of the demonstration flat bedhand knitting machine, show needlecam inter-action during different stitch formations.
3. Have students draw a loop diagram of double knitconstruction, demonstrating all needles knitting.
4. Distribute double knit swatches. Have studentscompare face and back appearance, noting V-ference between single knit, and double knit faceand back. Then have students unravel swatches andnote difference between single knit and doubleknit fabrics.
6. Demonstrate the absence of the curling factor indouble knit fabrics as opposed to single knits.
6. Demonstrate yield and yarn size differences in therespective cloths and discuss the reasons for thesedifferences.
II. COLOR IN DOUBLE KNIT FABRICS
Teaching Content
A. Practical Limitations of Numbers of Colors inDouble Knits1. Production increase through judicious limitation
of color2. Color distortion in double knits3. Ameliorating or planning for color distortion4. Limitations of floats on single versus double
knits as relating to clarity of design in con-struction
5. How to achieve clearer color6. Coordinating solid knits with jacquard patterns
B. Striping with Color on Double Knit Machines1. Color limitations on double knit stripers2. Achieving maximum color effect with minimal
number of colored yarns
C. Achieving Maximum Color Effects in Double KnitJacquard, Maintaining Minimal Weight and Hand
Learning Experiences
1. Have students visit a knitting mill to observe actualmachine and work operations. If possible, arrangefor a lecture-discussion by a knitting technologiston the operations viewed.
2. Have students draw a loop diagram demonstratinghow color not needed on the face of the fabric istaken up by dial needles.
3. Distribute swatches demonstrating degree of colordistortion created by using different dial con-struction and then have students plan and graph 5or 6 small color patterns, using two-feed facecourses.
ti
90
4. Demonstrate how the number of feeds available onthe machine control the number of colors in theheight of repeat.
5. Demonstrate how to impart "grin through" intosolid cloth planned to coordinate with part of ajacquard fabric, and then have students plan 2 or 3different coordinated designs for it.
Ill RIB FABRICS
Teaching Content
A. Types of Rib Fabrics1. Regular2. Irregular
B. Rib Fabrics Using Two or Three Different Stitches1. Halfcardigan, fullcardigan2. Ribs constructed for required elasticity3. Increasing or decreasing yield (width and
weight) by using different stitch construction4. Racked ribs
C. Representation1. Needle bed representation2. Gaiting of needle beds3. Graphing of various ribs
D. Individual FabricLengths with Finished Edgesthrough Transfer Starts
Learning Experiences
1. Distribute samples of different types of ribbedfabrics for students to analyze and identify.
2. Have students design and knit simple ribbedfabrics on the hand knitting machine.
3. Have students knit half and full cardigan ribs onthe hand knitting machine and then discuss thedifferences between their respective width andweight.
4. Using the hand knitting machine, demonstratehow to achieve separated pieces through differ3ntconstructions.
5. Have students design a sweater for their own useout of available yarns in 3 colors:a. with plain rib constructionb. with fancy stitches
6. Have students knit a garment of their own designas a term project. It is suggested that this be doneon a rotating basis, with two students working asa team.
IV. DOUBLE KNIT FABR ICS
Teaching Content
A. Importance and Representation of Dial Stitches(Back of Cloth)
1. Distortion due to improper dial knitting2. Interlock dial3. Pique dial4. Graphing dial stitches in solid colored fabric5. Graphing dial stitches, in 2, 3, and 4 colored
patterns
B. Standard Double Knit Construction1. Interlock2. Pique (Swiss and French)3. Ponte de Roma4. Milano Rib5. Ottoman6. La Coste7. Blister cloth
C. Aesthetics and Graphing
1. Representation of stitches on proper sizedgraph paper
2. Relationship of graph to size of design of actualknitted fabric and how to calculate it
3. Allowing for knitted motif distortion in designfor double knit fabrics
Learning Experiences
1. Have students visit a knitting mill tc observetechnicians at work graphing patterns for pro-duction.
2. Distribute samples of double knit construction tostudents to analyze, identify, and distinguishbetween the different constructions.
3. Have students draw loop diagrams of double knitfabrics.
4. Have students design vertical 2-color stripes ongraph paper for interlock fabrics.
5. Have students design horizontal stripes on graphpaper for interlock fabrics.
6. Have students design checkerboards for interlockfabrics.
7. Have students draw the backs of the above threefabrics with interlock versus pique camming.
8. Have students design feed stripes for Swiss Piqueand Ponte de Roma constructions, using (a) 36-feedmachine, and (b) 72-feed machine.
9. Demonstrate weie and course ratio in fabric versusgraph paper ratio.
10. Have students draw a checkerboard design ongraph paper, compensating for distortion.
V. JACQUARD MECHANISMS
Teaching Content
A. Various Means of Achieving individual NeedleSelection on Double Knit Machines1. Raceway
2. Minijack3. Wheel4. Drum5. Discs6. Wheel and tape7. Others
B. Limitations of Repeat Areas in Width1. Number of slots in wheel and its relation to the
number of needles in cylinder2. Number of different butt heights on clavettes
in cylinder3. Height of drum4. Number of teeth on each disc5. Arrangements of jacks around needle cylinder
C. Limitations of Repeat Areas in Length1. Number of feeds on machine2. Number of different link heights on chain3. Number of positions on drum4. Number of discs in stack5. Length of film6. Capacity of film cannister
Learning Experiences
1. Distribute samples of fabriCs knitted on machinesequipped with (a) wheel, (b) drum, (c) otherjacquard patterning mechanism. Have studentsanalyze, identify, and compare design capabilitiesand limitations of each type of jacquard machine.
2. Have students design patterns suitable for knittingon (a) wheel, and (b) drum machine for identicalappearance.
3. Have students design a 3-color jacquard for drummachine, using basic repeat area, and have themelongate same to a garment-length pattern, usingirregular drum racking or idling.
4. Have students visit a knitting mill and arrange tohave them examine various jacquard machineoperations.
5. Have students design a coordinated group of 3colors, using 1 mini-jack, 1 wheel, and 1 discmachine in three color ways, choosing from 8yarn-dyed colors.
6. Have students design and graph the face appearanceand the expanded graph for a 4-color jacquardfabric, using one color as single blister construction.
VI. ELECTRONIC KNITTING MACHINES
Teaching Content
A. Components of a Complete Electronic KnittingSet-up1. Pattern preparation system2. Electronic knitting machine
10391
B. Pattern Preparation Systems for Electronic Knitting1. Optical scanning2. Digitizing3. Others
C. Limitations of Pattern Areas1. Small repeats2. Number of needles in machine
D. Comparison of Some Electronic Knitting Equip-ment1. Morotronic2. Electraknit 483. Bentley4. Dubied5. Others
Learning Experiences
1. If community resources permit, have studentsvisit a mill which uses any of the electronicknitting systems.
2. Demonstrate how to design a jacquard patternusing the Morat System. Then have studentsdesign a large jacquard pattern of 4 colors, usinghalf the number of needles in the cylinder andtranslate two revolutions onto mylar film usedby the Morat System.
3. Demonstrate various design modification capabilities available through computer programming,and then have students graphically simulate someon their own designs.
4. Continue projects, as time permits, until studentshave familiarized themselves thoroughly with allphases of design for weft knitting machines.
Suggested Evaluation
1. Evaluation may be based on an end-term port-folio of the students' own designs which dem-onstrate:a. Technical accuracyb. Originality of designc. Neatness in presentation of portfolio
10=192
d. Ability to identify the correct machines forknitting their designs
2. Students may be evaluated on their ability tocorrectly graph out a given number of assigneddesigns.
Teaching Resources
TEXTS AND REFERENCES
Dubied Knitting ManualLancashire, J. B. Jacquard Design and KnittingMills, R. W. fully - Fashioned Garment ManufactureMoyer, Earl D. Principles of Double KnittingReichman, C. Advanced Knitting Principles- --- Double Knit Fabric Manual- --- Electronics in Knitting- -- Handbook of Knitting Yams and Knitwear Dyeing
Processes
PERIODICALS
American FabricsDaily News RecordKnitting TimesModem Textiles
INSTRUCTIONAL SUPPLIES
Flat bed hand knitting machineA cam section from a cylinder and dial of a double
knit machineSample swatches of different types of double knit
fabricsSample swatches of piece dyed, cross dyed and yarn
dyed fabricsSamples of different types of yamSamples swatches of knitted fabrics with different
yarn sizesSample swatches of single and double knit fabrics,
fabrics produced on automatic and fixed stripemachines, rib fabrics, jacquard mechanism fabrics,
Graphperorpdainated knit fabrics
Magic markersPickout glasses
a Pick-out needlesPaint
a Brushes

FACILITIES, LABORATORIES, EQUIPMENT, SUPPLIES, COSTS
FACILITIES AND LABORATORIES
The instructional facilities and laboratories for a textiledesign program require careful planning because of thespecialized nature of different design areasand the storagefacilities that each requires for specialized equipment andsupplies. Class sizes must also be carefully consideredand predetermined in planning laboratories since anycontemplated increases involve a good deal more thanthe simple addition of a few chairs. The laboratories,layouts and equipment discussed in this section are basedon classes ranging from 16 to 20 students.
Although each specialized laboratory room or arearequires different functional equipment and arrangements,it is recommended that the following factors and facil-ities be included in all:
1. Maximum wall space for blackboards with aminimum of 4' x 16'.
2. One 4' x 4' blackboard with a specialized grid fordrafting and designing of lessons.
3. Proper lighting for student work-stations as wellas for the room in general. Fluorescent lighting isdesirable. (It is iuggested that a lighting specialistbe consulted since the set-up in each room is likelyto be different.)
4. Plumbing and electrical services.a. Hot and cold running waterb. 220 volt electrical service, preferably with
circuit breakers and a master control panel, orpower switch key
6. Ample display space for finished work in the formof racks, cork boards, display cases or other displayfacilities. (If laboratory space is limited, displayspace can be located in adjacent hallways orelsewhere in the school.)
6. Lockable storage facilities for students and teachers.(Careful consideration should be given to the wholematter of security because of the high cost ofequipment and supplies.)
7. instructor facilities:a. Lockable desk
'Plumbing and electrical specialists should be consulted forproper installations after functional layouts are planned.
b. Storage facilities for teaching resources such asillustrated books, fabrics, yarns, photos, mag-azine clippings, slides, specialized equipment,slide projector, etc.
c. Storage facilities for student work to be graded(Size of storage facilities will depend upon classsize, number and complexity of class assign-ments, and frequency of grading.)
d. File cabinet for student projects, instructionaloutlines, supply lists, and miscellaneousmaterials
Print Design Laboratory
Print design laboratories are used for all textile designareas of instruction other than specialized classes inweaving and screen printing. The number and size of thelaboratories will therefore depend upon the size of thelargest class, and the number and scheduling of classsections.
A layout of the suggested space and functional arrange-ment of a print design laboratory for a class of 20 stu-dents is included in this section. Storage space is ampleto accommodate its various needs. Two worktables anda light-table provide added facilities and enable studentsto work simultaneously at different tasks. A cork boardat the rear of the room provides space for project viewing.
Storage lockers which are needed by textile designstudents are not included in the laboratory since studentscan utilize large clothing lockers for their work-in-progressportfolios.
Woven Design Laboratory
Each student in a beginning weaving class needs a214' x 3' flat counter top work station to accommodatea table loom and other necessary weaving equipmentsuch as warping boards, reels and the like. Since work-in-progress remains on the loom, a seillrate loom and alockable storage cabinet for each loom, measuring 12"wide, 18" deep and 14" high, are efsential for eachstudent. Thus the total number of beginning weavingstudents determines the total number of looms and

sterols cabinets required while the size of the largestclass thitermines the number of work stations needed.
Advanced weaving classrooms require space for onefloor loom and a combination storage-seating bench forNth student and Sufficient access space to each loomfrom all sides.
The diagrammed layout of a weaving laboratory whichis included in this section is for a weaving laboratoryfacility that is suitable for beginning classes and for anadvanced class of 15 students. The floor space for 16floor looms (15 students and teacher) can be eliminatedif advanced classes are to be housed in a separate weavinglaboratory or if advanced weaving courses are not in-cluded in the program.
Screen Print Laboratory
Unlike the print and woven design laboratories, sep-arate work stations are not required for each student.While some are working at the print tables, others willbe at the tight box, light table, wash room, drying racksand so forth. Each student, however, does need individual,separate, storage space. In the screen printing laboratorylayout included in this section. student storage facilitiesare shown behind the sliding blackboards but they canalso be located in an adjoining room or hallway. Withinthe laboratory there must be adequate and accessiblestorage space in the Color Mixing, Wash, and ScreenCoating areas for specialized tools and equipment usedby the students. Additional storage facilities are neededfor rolls of fabric and paper that require vertical storage.
Water and chemical solutions are used extensively inall areas of the laboratory. Because of inevitable spills, tosay nothing of possible leaks, a waterproof membrane isnecessary under the flooring to protect ceilings below,and the floor itself should be designed with these usagesin mind.
1. The Color Mixing area requires sinks for rinsingfreshly dyed fabrics, and for washing equipment.At least two electrical outlets of 220 volts areneeded, plus two rheostats for current control ofhomogenizers. Under-counter storage space isneeded for electrical hot plates (used for heatingdyes, and waxes for batik, etc.), as well as for
EQUIPMENT
ladles, small plastic color pots, and associatedequipment. In addition, plenty of shelf space isrequired in the Color Mixing area for dyes, pig-ments, metric scales for weighing dyes, dye potsand measures, etc.
2. The Wash area needs a hot and cold water supply,and a trough with hoses at each end for washingout screens, as well as storage space for wet screens.
3. The Screen Coating area, where photographicemulsions are applied, should be lighted solely bytwo 15 watt bulbs over the print table. Outletsfor 2 electric fans are needed, together with racksbeneath the table to accommodate screens whiledrying.
Other factors to bear in mind in laying out the lab-oratory for plumbing connections and electrical circuitsare the following:
1. The "Iron" in the diagram is a rotary mangle witha 51" wide roller for curing pigment prints andreactive cotton dyes.
2. The Fabric Rack is to store at least 5 rolls ofcurrently used 51" wide material of approximately100 yards each, and one roll each of brown paperand white paper. Iron pipes are best used to holdthese bolts.
3. A sink with hot water is needed near the stainlesssteel color table.
4. The [jet Boxes are used for tracings and forretouching pinholes in screens.
Knit Design Facilities
The equipment needed for weft knitting design, whichis the emphasis of the areas of instruction included inthis program, may be accommodated in the print designlaboratory. As pictured in the floor plan, storage "G"should be reserved for yarn storage, with pull-outshelves to csisure better functionality. Additional storagespace may be found in any of the "A" sliding cabinetsand drawers. A flat bed hand knitting machine, ormachines, may replace the working table "H" at therear of the room. A movable blackboard, one side graphedand one side plain, can be very useful as an instructionaltool.
The suggested quantities in the equipment list that follows are based on one class of 4.i students enrolled in thecomprehensive program contained in this guide. In the event that the screen printing, knitting, and/or woven designareas of instruction are excludPd from the program, the equipment listed under these areas can be omitted. Prices havebeen researched and approximated as of the date of this publication. A list of suppliers of equipment and materials isincluded at the end of this section.
10694
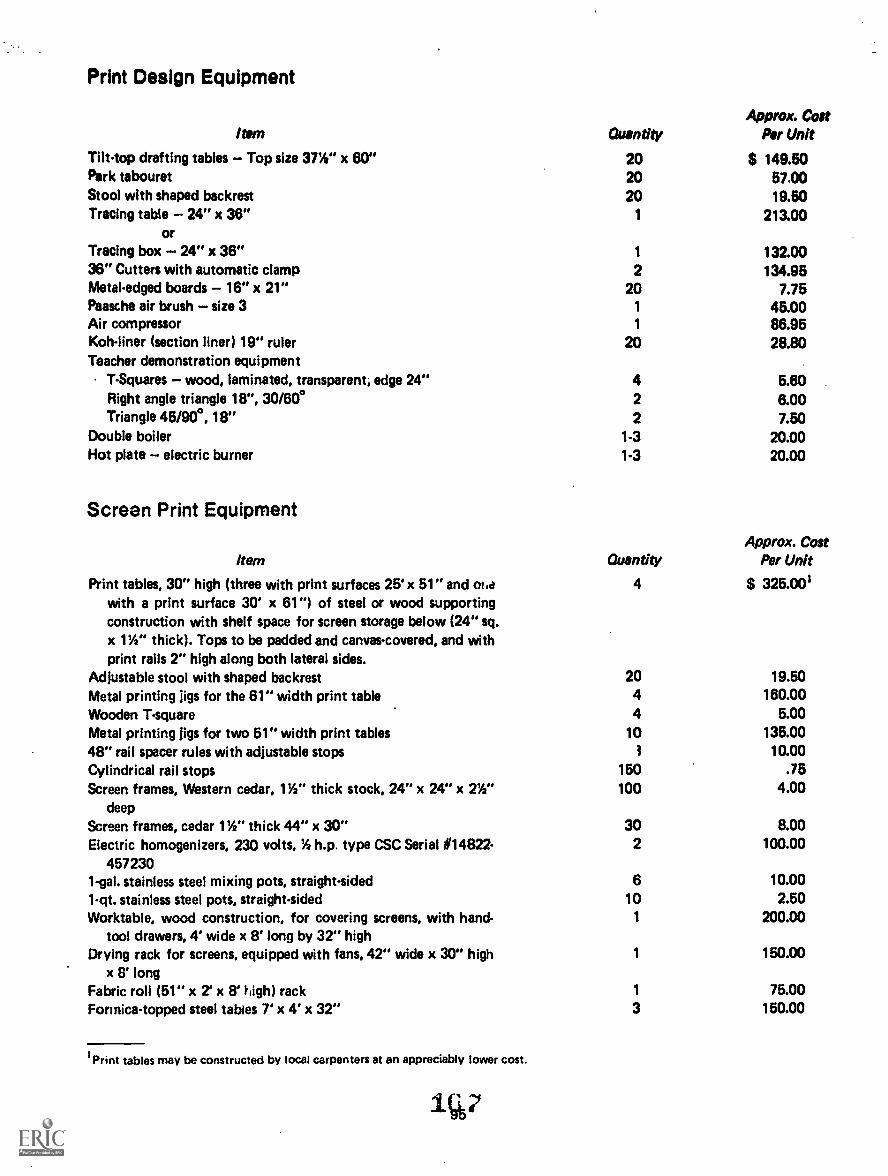
Print Design Equipment
item QuantityApprox. Cost
Par Unit
Tilt-top drafting tables - Top size 37V x 60" 20 $ 149.50Park tabouret 20 57.00Stool with shaped backrest 20 19.50Tracing table - 24" x 36"
or1 213.00
Tracing box - 24" x 36" 1 132.0036" Cutters with automatic clamp 2 134.95Metal-edged boards - 16" x 21" 20 7.75Paasche air brush - size 3 1 45.00Air compressor 1 86.95Koh-liner (section liner) 19" ruler 20 28.80Teacher demonstration equipment
TSquares - wood, laminated, transparent; edge 24" 4 5.60Right angle triangle 18", 30/60° 2 6.00Triangle 45/90°, 18" 2 7.50
Double boiler 1.3 20.00Hot plate - electric burner 1-3 20.00
Screen Print Equipment
Item QuantityApprox. Cost
Per Unit
Print tables, 30" high (three with print surfaces 25' x 51" and mawith a print surface 30' x 61") of steel or wood supportingconstruction with shelf space for screen storage below (24" sq.x 1'/2" thick). Tops to be padded and canvas-covered, and withprint rails 2" high along both lateral sides.
4 $ 325.001
Adjustable stool with shaped backrest 20 19.50
Metal printing jigs for the 61" width print table 4 160.00
Wooden T-square 4 5.00Metal printing jigs for two 51" width print tables 10 135.0048" rail spacer rules with adjustable stops 3 10.00Cylindrical rail stops 150 .75Screen frames, Western cedar, 11/2" thick stock, 24" x 24" x 2Y2"
deep
100 4.00
Screen frames, cedar 1%" thick 44" x 30" 30 8.00Electric homogenizers, 230 volts, h.p. type CSC Serial #14822- 2 100.00
4572301-gal. stainless steel mixing pots, straight-sided 6 10.001-qt. stainless steel pots, straight-sided 10 2.50Worktable, wood construction, for covering screens, with hand-
tool drawers, 4' wide x 8' long by 32" high1 200.00
Drying rack for screens, equipped with fans, 42" wide x 30" highx 8' long
1 150.00
Fabric roll (51" x 2' x 8' high) rack 1 75.00Formica-topped steel tables 7' x 4' x 32" 3 150.00
Print tables may be constructed by local carpenters at an appreciably lower cost.
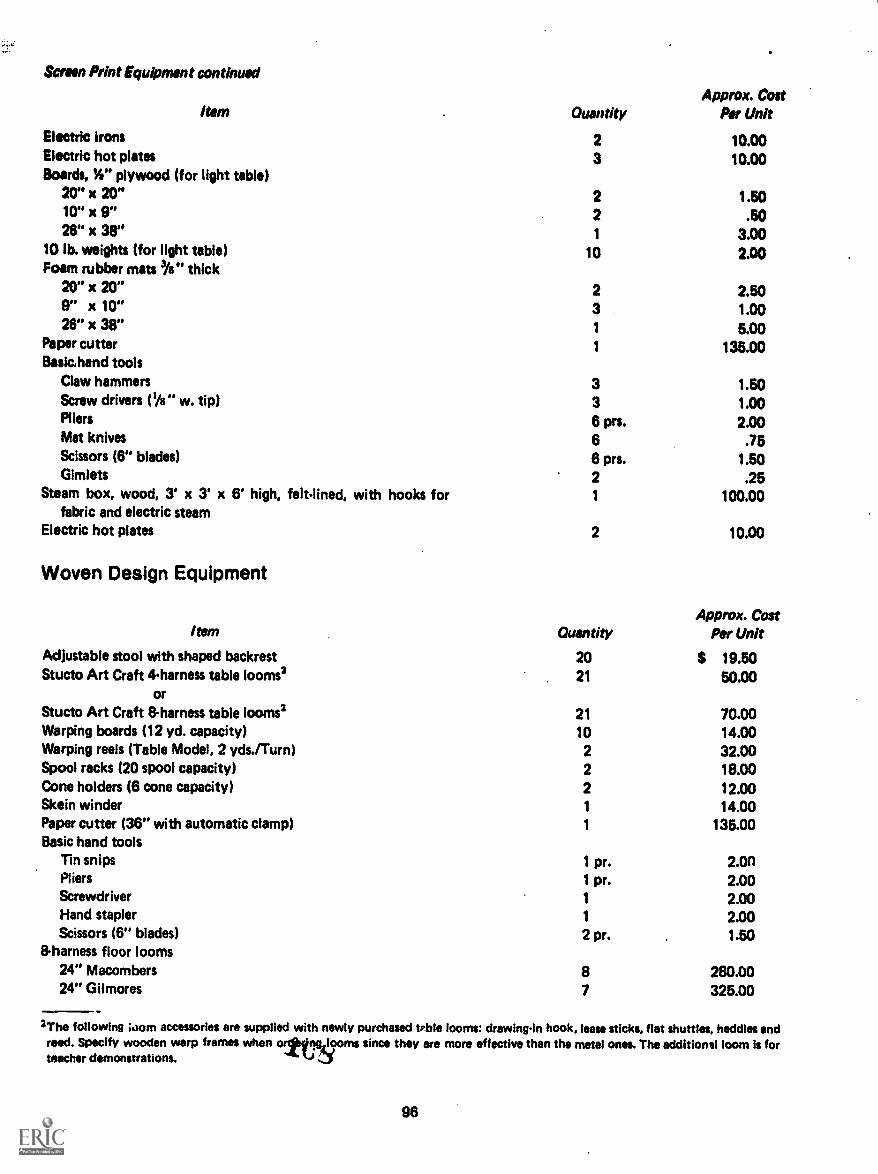
Seim Print Equipment continued
Item QuantityApprox. Cost
Per Unit
Electric irons 2 10.00Electric hot plates 3 10.00Boards, W' plywood (for light table)
20" x 20" 2 1.5010" x9" 2 .5026" x 38" 1 3.00
10 lb. weights (for light table) 10 2.00Foam rubber mats 3/s" thick
20" x 20" 2 2.509" x 10" 3 1.0026" x 38" 1 5.00
Paper cutter 1 136.00Basic, hand tools
Claw hammers 3 1.50Screw drivers ('/a" w. tip) 3 1.00Pliers 6 prs. 2.00Mat knives 6 .75Scissors (6" blades) 6 prs. 1.50Gimlets 2 .25
Steam box, wood. 3' x 3' x 6' high, feltlined,fabric and electric steam
with hooks for 1 100.00
Electric hot plates 2 10.00
Woven Design Equipment
item QuantityApprox. Cost
Per Unit
Adjustable stool with shaped backrest 20 $ 19.50Stucto Art Craft 4harness table looms2
or21 50.00
Stucto Art Craft 8-harness table looms2 21 70.00Warping boards (12 yd. capacity) 10 14.00Warping reels (Table Model, 2 yds./Turn) 2 32.00Spool racks (20 spool capacity) 2 18.00Cone holders (6 cone capacity) 2 12.00Skein winder 1 14.00Paper cutter (36" with automatic clamp) 1 135.00Basic hand tools
Tin snips 1 pr. 2.onPliers 1 pr. 2.00Screwdriver 1 2.00Hand stapler 1 2.00Scissors (6" blades) 2 pr. 1.50
8-harness floor looms24" Macombers 8 280.0024" Giimores 7 325.00
2The following loom accessories are supplied with newly purchased trble looms: drawingin hook, lease sticks, flat shuttles, heddles andreed. Specify wooden warp frames when orcttonSooms since they are more effective than the metal ones. The additional loom is forteacher demonstrations.
96
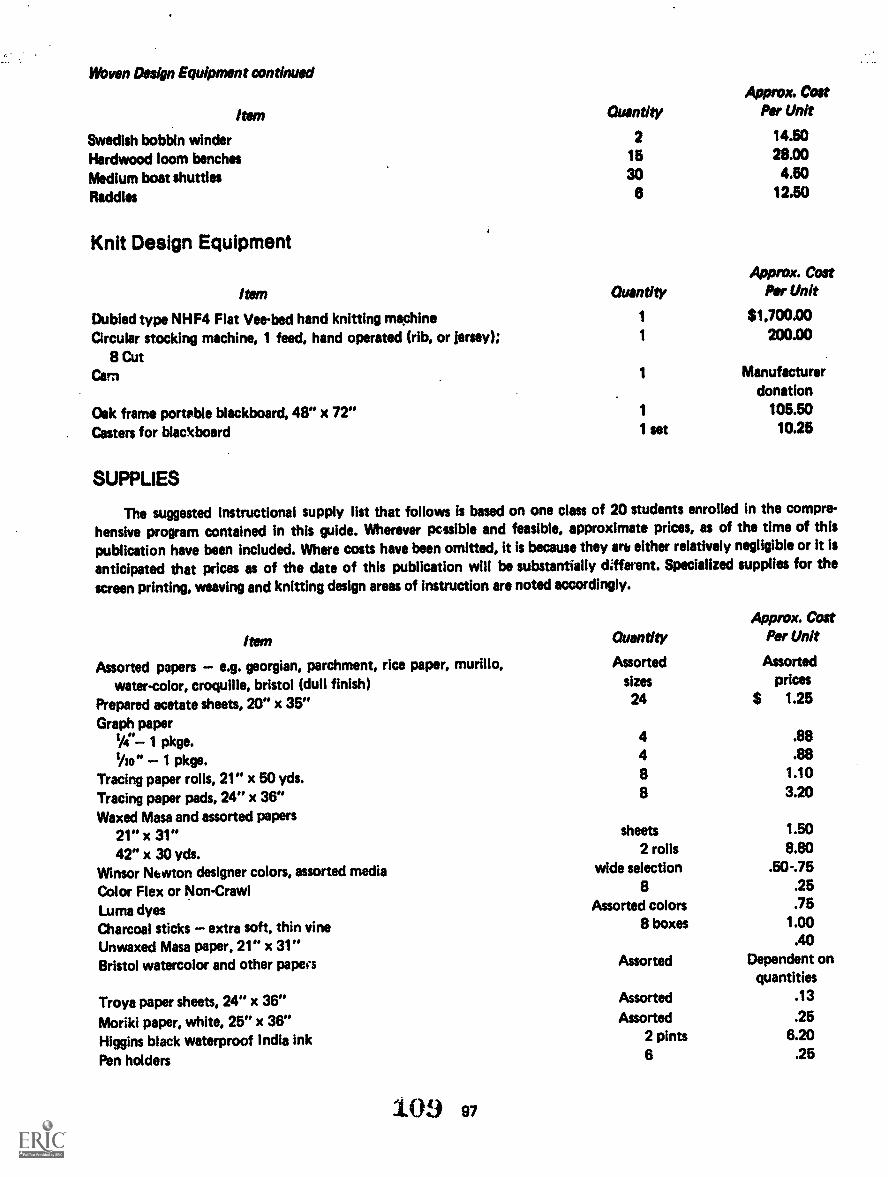
Woven Design Equipment continuedApprox. Cost
item Quantity Per Unit
Swedish bobbin winder 2 14.50
Hardwood loom benches 15 28.00
Medium boat shuttles 30 4.50
Redd les 6 12.50
Knit Design EquipmentApprox. Cost
item Quantity Per Unit
Dubied type NHF4 Flat Veebed hand knitting machine 1 $1,700.00
Circular stocking machine, 1 feed, hand operated (rib, or jersey); 1 200.00
8 CutCara 1 Manufacturer
donation
Oak frame porteble blackboard, 48" x 72" 1 105.50
Casters for blackboard 1 set 10.25
SUPPLIES
The suggested instructional supply list that follows is based on one class of 20 students enrolled in the compre-
hensive program contained in this guide. Wherever pcssible and feasible, approximate prices, as of the time of this
publication have been included. Where costs have been omitted, it is because they arteither relatively negligible or it is
anticipated that prices as of the date of this publication will be substantially (Efferent. Specialized supplies for the
screen printing, weaving and knitting design areas of instruction are noted accordingly.
item
Assorted papers e.g. georgian, parchment, rice paper, murillo,water-color, croquille, bristol (dull finish)
Prepared acetate sheets, 20" x 35"Graph paper
IA" 1 pkge.tho" 1 pkge.
Tracing paper rolls, 21" x 50 yds.Tracing paper pads, 24" x 36"Waxed Masa and assorted papers
21" x 31"42" x 30 yds.
Winsor Newton designer colors, assorted mediaColor Flex or Non-CrawlLuma dyesCharcoal sticks extra soft, thin vine 8 boxes 1.00
Unwaxed Masa paper, 21" x 31" .40
Bristol watercolor and other papers Assorted Dependent onquantities
Troya paper sheets, 24" x 36" Assorted .13
Moriki paper, white, 25" x 36" Assorted .25
Higgins black waterproof India ink 2 pints 6.20
Pen holders 6 .25
Quantity
Assortedsizes
Approx. CostPer Unit
Assortedprices
24 $ 1.25
4 .884 .88
8 1.10
8 3.20
sheets 1.50
2 rolls 8.80wide selection .50 -.75
8 .25Assorted colors .75
109 97
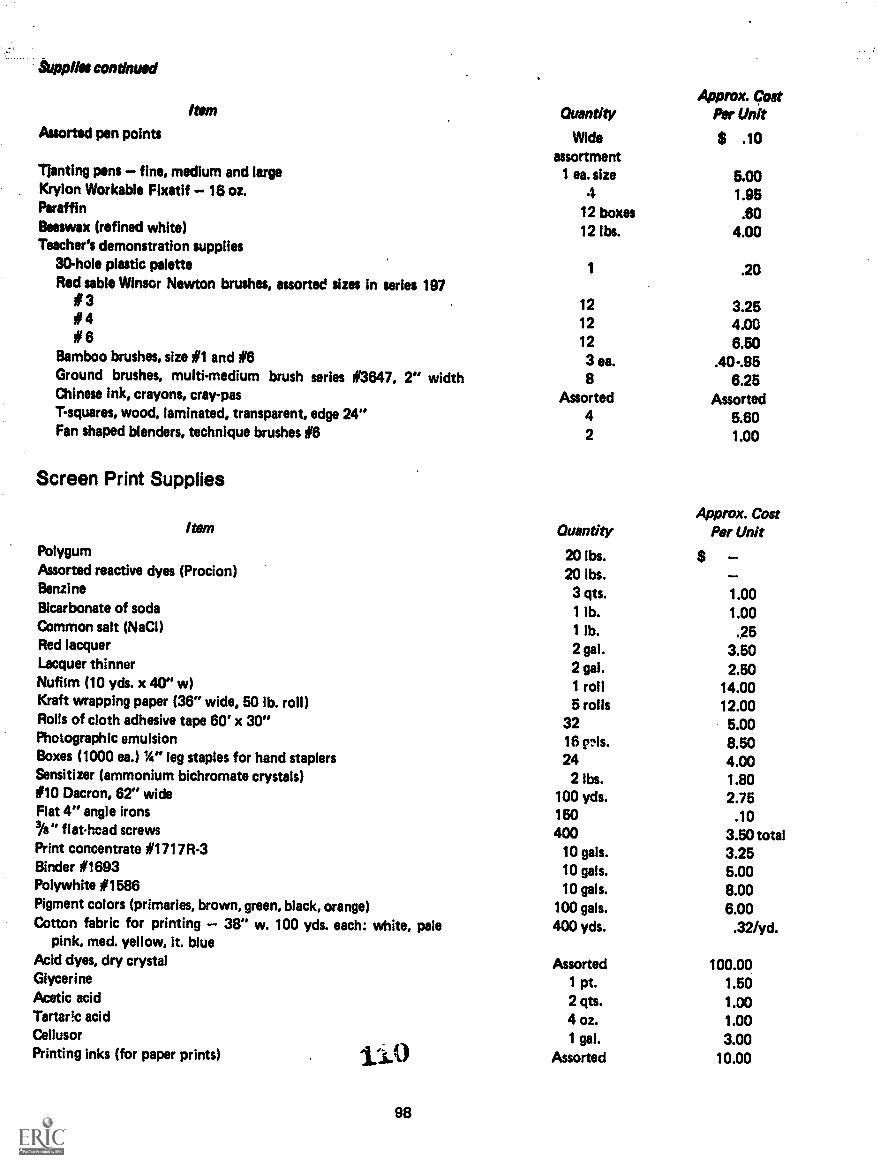
Supplies continued
Approx. CostItem Quantity Per Unit
Assorted pen points Wide $ .10assortment
Tjanting pens - fine, medium and large 1 ea. size 5.00Krylon Workable Fixatif -16 oz. 4 1.95Paraffin 12 boxes .60Beeswax (refined white) 12 lbs. 4.00Teacher's demonstration supplies
30-hole plastic palette 1 .20Red sable Winsor Newton brushes, assorted sizes in series 197
# 3 12 3.25# 4 12 4.00# 6 12 6.50
Bamboo brushes, size #1 and #6 3 ea. .40-.95Ground brushes, multi-medium brush series #3647, 2" width 8 6.25Chinese ink, crayons, cray-pas Assorted AssortedT-squares, wood, laminated, transparent, edge 24"Fan shaped blenders, technique brushes #6
Screen Print Supplies
Item
PoiygumAssorted reactive dyes (Procion)Benzine
Bicarbonate of sodaCommon salt (NaCI)Red lacquerLacquer thinnerNufilm (10 yds. x 40" w)Kraft wrapping paper (36" wide, 50 lb. roll)Rolls of cloth adhesive tape 60' x 30"Photographic emulsionBoxes (1000 ea.) Y.s" leg staples for hand staplersSensitizer (ammonium bichromate crystals)#10 Dacron, 62" wideFlat 4" angle irons3/s" flathead screwsPrint concentrate #1717R-3Binder #1693Polywhite #1586Pigment colors (primaries, brown, green, black, orange)Cotton fabric for printing - 38" w. 100 yds. each: white, pale
pink, med. yellow, It. blueAcid dyes, dry crystalGlycerineAcetic acidTartaric acidCellusorPrinting inks (for paper prints) . 110
98
42
Quantity
5.601.00
Approx. CostPer Unit
20 lbs. $ -20 lbs.3 qts. 1.001 lb. 1.001 lb. .252 gal. 3.502 gal. 2.501 roll 14.005 rolls 12.00
32 5.0016 rls. 8.5024 4.00
2 lbs. 1.80100 yds. 2.75150 .10400 3.50 total
10 gals. 3.2510 gals. 5.0010 gals. 8.00
100 gals. 6.00400 yds. .32/yd.
Assorted 100.001 pt. 1.502 qts. 1.004 oz. 1.001 gal. 3.00
Assorted 10.00
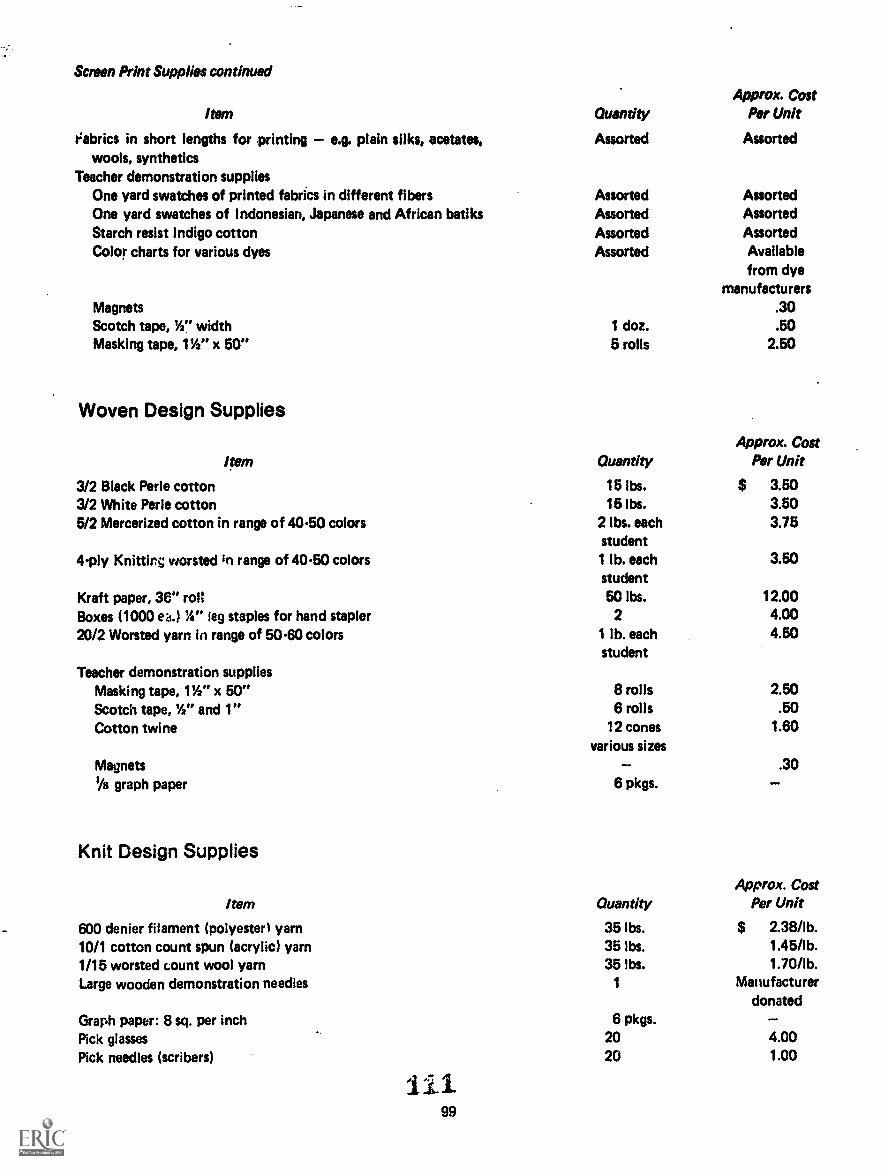
Screen Print Supplies continued
Approx. CostItem Quantity Per Unit
t:abrics in short lengths for printing e.g. plain silks, acetates, Assorted Assortedwools, synthetics
Teacher demonstration suppliesOne yard swatches of printed fabrics in different fibers Assorted AssortedOne yard swatches of Indonesian, Japanese and African batiks Assorted AssortedStarch resist Indigo cotton Assorted AssortedColor charts for various dyes Assorted Available
from dyemanufacturers
Magnets .30Scotch tape, W' width 1 doz. .50Masking tape. 114" x 50" 5 rolls 2.50
Woven Design Supplies
Approx. CostItem Quantity Per Unit
3/2 Black Per le cotton 15 lbs. $ 3.503/2 White Perle cotton 15 lbs. 3.505/2 Mercerized cotton in range of 40.50 colors 2 lbs. each 3.75
student4-ply Knitting worsted in range of 40.50 colors 1 lb. each 3.50
studentKraft paper, 36" roll 50 lbs. 12.00Boxes (1000 GI.) A" leg staples for hand stapler 2 4.00
20/2 Worsted yarn in range of 50.60 colors 1 lb. each 4.50student
Teacher demonstration suppliesMasking tape, 11/2" x 50" 8 rolls 2.50
Scotch tape, W' and 1" 6 rolls .50Cotton twine 12 cones 1.60
various sizes
Magnets .30Vs graph paper 6 pkgs.
Knit Design Supplies
Item Quantity
600 denier filament (polyesters yarn 35 lbs.
10/1 cotton count spun (acrylic) yarn 35 lbs.1/15 worsted count wool yarn 35 lbs.Large wooden demonstration needles 1
Graph paper: 8 sq. per inch 6 pkgs.
Pick glasses 20
Pick needles (scribers) 20
99
Approx. CostPer Unit
$ 2.38/1b.1.45/1b.1.70/1b.
Manufacturerdonated
4.001.00
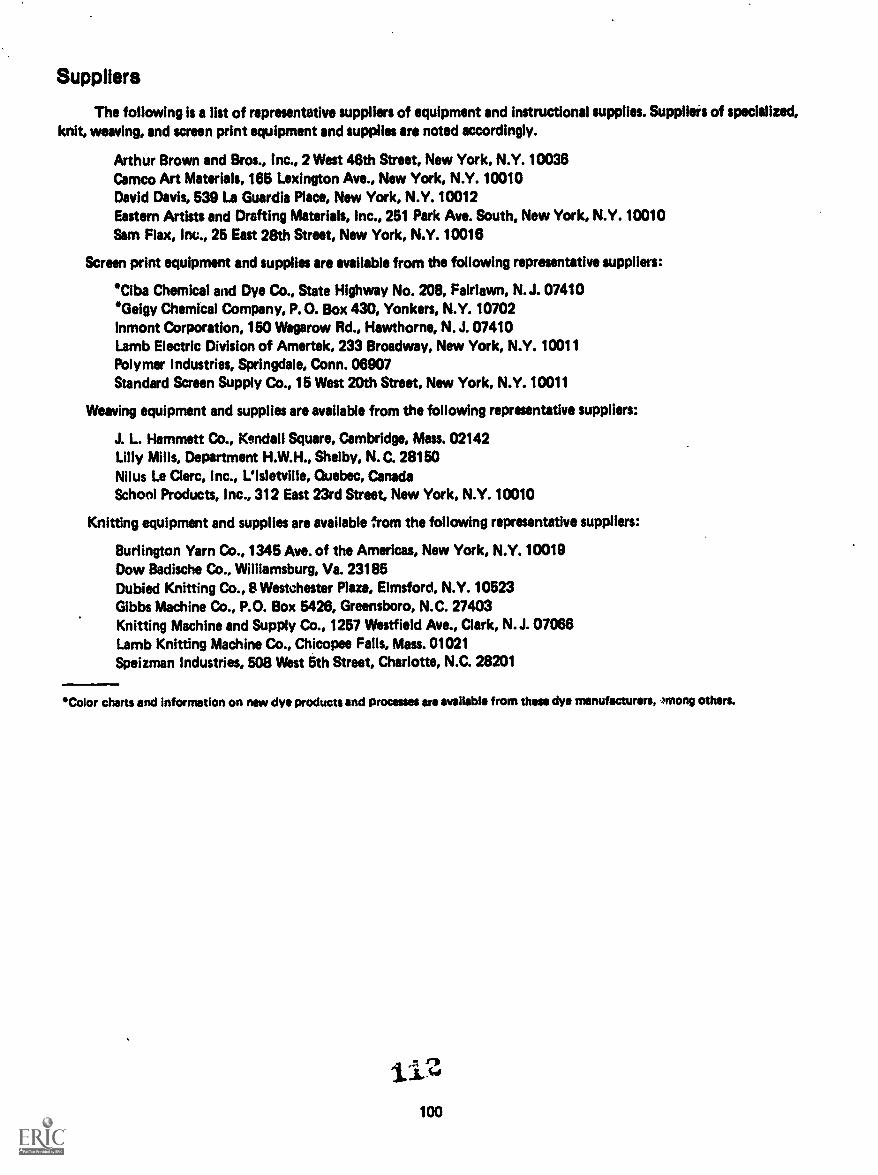
Suppliers
The following is a list of representative suppliers of equipment and instructional supplies. Supplieis of specialized,knit, weaving, and screen print equipment and supplies are noted accordingly.
Arthur Brown and Bros., Inc., 2 West 46th Street New York, N.Y. 10036Cameo Art Materials, 165 Lexington Ave., New York, N.Y. 10010David Davis, 539 La Guardia Place, New York, N.Y. 10012Eastern Artists and Drafting Materials, Inc., 251 Park Ave. South, New York, N.Y. 10010Sam Flax, Inc., 25 East 28th Street, New York, N.Y. 10016
Screen print equipment and supplies are available from the following representative suppliers:
"Ciba Chemical and Dye Co., State Highway No. 208, Fairlawn, N.J. 07410eGeigy Chemical Company, P.O. Box 430, Yonkers, N.Y. 10702lnmont Corporation, 150 Wagarow Rd., Hawthorne, N.J. 07410Lamb Electric Division of Amertek, 233 Broadway, New York, N.Y. 10011Polymer Industries, Springdale, Conn. 06907Standard Screen Supply Co., 15 West 20th Street, New York, N.Y. 10011
Weaving equipment and supplies are available from the following representative suppliers:
J. L. Hammett Co., Kendall Square, Cambridge, Mass. 02142Lilly Mills, Department H.W.H., Shelby, N. C. 28150Nilus Le Clem, Inc., L'Isletville, Quebec, CanadaSchool Products, Inc., 312 East 23rd Street, New York, N.Y. 10010
Knitting equipment and supplies are available from the following representative suppliers:
Burlington Yarn Co., 1345 Ave. of the Americas, New York, N.Y. 10019Dow Badische Co., Williamsburg, Va. 23185Dubied Knitting Co., 8 Westchester Plaza, Elmsford, N.Y. 10523Gibbs Machine Co., P.O. Box 5426, Greensboro, N.C. 27403Knitting Machine and Supply Co., 1257 Westfield Ave., Clark, N.J. 07066Lamb Knitting Machine Co., Chicopee Falls, Mass. 01021Speizman Industries, 508 West 5th Street, Charlotte, N.C. 28201
Color charts and information on new dye products and processes are available from these dye manufacturers, ,miong others.

Print Design Laboratory
113101
11411111111111111111O,
K.
SCALE. * I'
LAYour LEGENDA.SLIONts cAssmers k DOOMB.OTEJ4C.LOTAES CLOSET
C.STORAGE.
D. S1.10044CASIMET% k DRAW/EIS
E. GRIP
F.81ACKSOARD
G.SIORAGE44.WORK TABLES
T. UGAT rAeftsJ. StracKTEACIASCS DESK
1.. CORK PAe3EL (ABOVE TABLES)
=o,
N.
1111110MINWINIMII
CODA DR 'AWING &WEN mom%AI AAR&
A. 6. C.D.
11% G.
IMOIMMUNNI,
H.
M.
1I.
0
0
Q.
Q.
dlimommemor
R.
Aremosmelb
.5cALE I'I
LAYOUT LEGEND Screen Printing Laboratory .
A. SatmaISet TWO NOSE ritOUGei
C. COUNTER CSRELvE.5 ABetvr)D. LOUMTER WITH SINK (Wu/ES ABOVE)
E. TANS RACKSF.STDRALE FoRSuffuES stuverrs WO6.STORME FOR LARGE SC.C2EMSH.1,voRKTABLCS. CoLoR TABLE Watt SINK
FABitsC. RACK
K. IROK1
L. StrAm earM.ST0RAGE RACKSN. smErsm DirriNG RACKS FAN0. LAM- SoXE5V. UGAT TALEO. PRi sr TABLESR. FORMICA Mem% TAbLE55.5ma.vEs WWI) supthics BLACKBOARD IAA
102
4
a
AFic
C
II
C
1.
4 -97
iii
4 4
1
IN IN IIII II In I
=III I
11
SELECTED BIBLIOGRAPHY
GENERAL
Adtimar, Jean. Twentieth Century Graphics. New York,Frederick A. Praeger, Inc., 1971.
Albers, Josef. Interaction of Color. New Haven, Conn.,Yale University Press, 1971.
Anderson, Donald. Elements of Design. New York, Holt,Rinehart & Winston Co., 1961.
Anspach, Karlyne. The Why of Fashion. Ames, Iowa,Iowa State University Press, 1967.
As lin, Elizabeth. The Aesthetic Movement: Prelude ToArt Nouveau. New York, Frederick A. Praeger, Inc.,1969.
Ballinger, Louis B., and Thomas F. Vroman. DesignSources and Resources New York, Van NostrandReinhold Co., 1965.
---- Perspective: Space and Design. New York, VanNostrand Reinhold Co., 1969.
Barilli, Renato. Art Nouveau. London, Paul Hamlyn,Ltd., 1969.
Barton, J.G. Wild Flowers. London, Paul Hamlyn, Ltd.,1963.
Bates, Kenneth F. Basic Design. Cleveland, The WorldPub. Co., 1960.
Battersby, Martin. Art Nouveau. London, Paul Hamlyn,Ltd., 1969.
Beitler, Ethel J., and Bill C. Lockhart resign for You.New York, John Wiley & Sons, 1969.
Beviin, Majory E. Design Through Discovery. New York,Holt, Rinehart & Winston Co., 1970.
Bing, Samuel. Artistic America, Tiffany Glass and ArtNouveau. Cambridge, Mass., MIT Press, 1970.
Birren, Faber. A Grammar of Color. New York, VanNostrand Reinhold Co., 1969.
---- Principles of Color. New York, Van NostrandReinhold Co., 1969.
----Selling Color to People. New York, UniversityBooks, Inc., 1956.
Blanc, Charles. Art in Ornament and Dress. Detroit,Tower Books, 1971.
Blunt, Wilfrid. The Art of Botanical Illustration. NewYork, Charles Scribner's Sons, 1951.
Boardman, John. Greek Art. New York, Frederick A.Praeger, Inc., 1964.
Bodrogi, Tibor. Art in Africa. New York, McGraw-HillBook Co., 1968.
Borsig, Tat. Designs in Nature. New York, The VikingPress, 1981.
Boucher, Francois. X/100 Years of Fashion. New York,Harry N. Abrams, Inc., 1967.
Bussagli, Mario. Chinese Painting. London, Paul Hamlyn,Ltd., 1989.
Cameron, Alison S. Chinese Painting Techniques.Rutland, Vt., Charles E. Tuttle Co., 1968.
Chaet, Bernard. The Art of Drawing. New York, Holt,Rinehart & Winston Co., 1970.
Cheskin, Louis. Colors: What They Can Do For You.New York, Liveright Pub. Corp., 1947.
Chevreul, Michel E. The Principles of Harmony andContrast of Colors and Their Application to the Arts.New York, Van Nostrand Reinhold Co., 1987.
Christensen, Erwin 0. Primitive Art New York, CrowellCollier & Macmillan, Inc., 1955.
---- The Index of American Design. New York, TheMacmillan Co., 1950.
Crewdson, Frederick. Colors in Decoration and Design.Wilmette, Ill., Frederick J. Drake & Co., 1953.
Daniels, Harvey. Printmaking. New York, The VikingPress, 1971.
D'Assailly, Giselle. Ages of Elegance: Five ThousandYears of Fashion and Frivolity. London, Macdonald& Co., 1968.
Davids, Arlette. Tulips, Hyacinths, Narcissi. London,Hyperion Press, 1940.
Dhanapala, D.B. Buddhist Paintings from Shrines andTemples in Ceylon. New York, New AmericanLibrary of World Literature, Inc., 1964.
Dix, Johan F., and Walter Roozen. Flowers in Colour.New York, Oxford University Press, 1948.
Downer, Marion. Discovering Design. New York, Lothrop,Lee & Shepard Co., 1942.
---- The Story of Design. New York, Lothrop, Lee& Shepard Co., 1963.
Eitner, Lorenz. Introduction to Art Minneapolis, SurpassPub. Co., 1961.
Fried, Eleanor. Is The Fashion Business Your Business.3rd ed. Nev York, Fairchild Pubs., 1970
Won, E4;g:und " 1- A.. "rilin' NeYt YoriCerZnYfrPubs., 1969.
Gollwitzer, Gerhard. The Joy of Drawing. New York,Sterling Pub. Co., Inc., 1961.
Graves, Maitland E. The Art of Color and Design. 2nd ed.New York, McGraw-Hill Book Co., 1951.
Gualtieri de San, Lannaro. Klee: A Study of His Lifeand Work. New York, Frederick A. Praeger, Inc.,1964.
Guichard-Meil, Jean. Matisse. New York, Frederick A.Praeger, Inc., 1987.
Haftmann, Werner. The Mind and Work of Paul Klee.New York, Frederick A. Praeger, Inc., 1954.
Heise, Albert 0. The Use of Color in Interiors. NewYork, McGraw-Hill Book Co., 1968.
Hatton, Richard G. Handbook of Plant and FloralArrangement. New York, Dover Pubs., 1960.
Hickthier, Alfred. Color Mixing By Numbers. NewYork, Van Nostrand Reinhold Co., 1972.
Hylander, Clarence J. Macmillan Wild Flower Book. NewYork, The Macmillan Co., 1954.
Men, Johannes. Design and Form. New York, VanNostrand Reinhold Co., 1964.
---- The Art of Color. New York, Van NostrandReinhold Co., 1961.
-- The Elementr of Color. New York, Van NostrandReinhold Co., 1970.
Jaeger, Paul. The Wonderful Life of Flowers. London,George G. Harrap Co., Ltd., 1961.
Jacobson, Egbert. Basic Color. Chicago, Paul TheobaldPub. Co., 1948.
Janson, Horst W. History of Art. Englewood Cliffs, NewJersey, Prentice-Hall, Inc., 1964.
Jarnow, Jeannette, and Beatrice Judelle. Inside theFashion Business. 2nd ed. New York, John Wiley &Sons, 1974.
Kepes, Gyorgy. Vision and Value Series. New York,George Braziller Inc., 1965.
Klee, Paul. Pedagogical Sketchbook. New York, FrederickA. Praeger, Inc., 1963.
Kramer, Hilton. Perspectives on the Arts. New York,The Art Digest, Inc., 1961.
Laliberte, Norman. Banners and Hangings: Design andConstruction. New York, Van Nostrand Reinhold Co.,1966.
Laver, James. The Concise History of Costume andFashion. New York, Harry N. Abrams, Inc., 1969.
Lee, Sherman E. Japanese Decorative Style. New York,Icon Editions, Pubs., 1972.
Lesch, Alma. Vegetable Dyeing. New York, Watson-Guptill Pubs., Inc. 1971.
Luckiesh, Matthew D. Color and Colors. New York, VanNostrand Reinhold Co., 1938.
---- Visual Illusions. Nnw York, Dover Pubs., 1965.7y1dimerinO, tea. Flower Portraits. London, Ariel Press,
1961.
Marcus, Margaret F. Tableaux Des Flours par LesGrands Maitres. New York, Harry N. Abrams, Inc.,1954.
Maurello, Ralph S. Introduction to the Visual Arts.New York. Tudor Pub. Co., 1968.
Mebane, John. The Complete Book of Collecting ArtNouveau. New York, Coward, McCann & Geohagen,Inc., 1970
Menaboian, Athos, and Sara. Menaboian's Birds. NewYork, Holt, Rinehart & Winston, Inc., 1960.
Mucha, Jiri. Beautiful Butterflies. London, Artie West-brook House, 1963.
Muensterberger, W. Drawings, Pastels, Studies - VincentVan Gogh. London, Falcon Press, Ltd., 1947.
Munari, Bruno. Discovery of the Square. New York,George Wittenborn Pub. Co., 1965.
---- Discovery of the Circle. New York, GeorgeWittenborn Pub. Co., 1966.
--- Design as Art. Baltimore, Penguin Books, Inc.,1957.
Munsell, A. H. A Color Notation. 10th ed. Baltimore,Munsell Color Co., 1954.
Myer, Franz S. Handbook of Ornament. New York,Dover Pubs., 1957.
Pistolese, Rosana, and Ruth Horsting. History ofFashions. New York, John Wiley & Sons, 1970.
Plath, lone. The Decorative Arts of Sweden. New York,Dover Pubs., 1966.
Pool, Phoebe. Impressionism. New York, Frederick A.Praeger, Inc., 1967.
Potter, Norman. What Is a Designer. New York, VanNostrand Reinhold Co., 1969.
Puma, Fernando. Modem Art Looks Ahead. New York,The Beechurst Press, 1947.
Rice, David Talbot. Islamic Art. New York, Frederick A.Praeger, Inc. 1965.
Rice, Tamara Talbot. Ancient Arts of Central Asia. NewYork, Frederick A. Praeger, Inc., 1965.
---- A Concise History of Russian Art. New York,Frederick A. Praeger, Inc., 1963.
Richett, Harold W. Wild Flowers of America. New York,Crown Pubs., Inc., 1953.
Rottger, Ernst, and Dieter Kiante. Creative Drawing,Point and Line. New York, Van Nostrand ReinholdCo., 1964.
Rowland, Benjamin. The Ajanta Caves. New York, NewAmerican Library of World Literature, Inc., 1963.
Sargent, Walter. The Enjoyment and Use of Color. NewYork, Dover Pubs., 1964.
Sitwell, Sacheverell. Tropical Birds. London, B.T. Bats-ford, Ltd., 1948.
Sloane, Patricia. Color: Basic Principles and New Direc-tions. New York, Van Nostrand Reinhold Co., 1967.

Stevenson, Robert Louis. A Child's Garden of Verses.New York Franklin Watts, Inc., 1988.
Sutton, Felix. The Planet We Live On. New York, Grosset& Dunlap, Inc. 1960.
Taylor, John F. Design and Expression in the VisualArts. New York, Dover Pubs., 1964.
Tetsuaki, Kira. Shells of the Western Pacific in Color.Rev. ed. Osaka, Japan, Hoikusha Pub. Co., 1965.
Tuer, Andrew W. Japanese Stencil Designs. New York,Dover Pubs., 1967.
Vaughan-Jackson, Genevieve. Animals and Men inArmour. New York, Hastings House, 1958.
Welch, Stuart C. et al. Gods, Thrones and Peacocks.New York, Harry N. Abrams, Inc., 1965.
Whiton, Sherril. Elements of Interior Design and Decora-tion. 3rd ed. New York, J.B. Lippincott Co., 1963.
Willett, Frank. African Art. New York, Frederick A.Praeger, Inc., 1971.
Williams, Elsa. Creative Canvas Work. New York, VanNostrand Reinhold Co., 1971.
Zim, Herbert S., and Ira N. Gabrielson. Birds. New York,Simon & Schuster Inc., 1949.
Zimell , U., and G. Vergerio. Decorative Ironwork.London, Paul Hamlyn, Ltd., 1969.
Zimmerman, Richard. Floral Forms in Design. Metuchen,New Jersey, Textile Book Publ., n.d.
TEXTILES
Abrams, Abraham, and Lester Mishcon. Pattern WheelDesigning for Circular Jersey Knitting Machines.Brooklyn, N.Y., Supreme Knitting Machine Co.,1949.
Adrosko, Rita J. Natural Dyes and Home Dyeing. NewYork, Dover Pubs., 1968.
Albeck, Pat. Printed Textiles. New York, OxfordUniversity Press, 1969.
Asli, Beryl. Introducing Dyeing and Printing. New York,WatsonGuptill Pubs., Inc., 1970.
Barnhardt, Robert. Opportunities in the Textile Industry.New York, Vocational Guidance Manuals, UniversalPub. Co., 1966.
Barnes, Charles. Bargello and !?elated Stitching. GreatNeck, New York, Hearthside Press, Inc., 1971.
Beer, Alice Baldwin. Trade Goods: A Study of IndianChintz. Washington, D.C., Smithsonian institute Press,1970.
Biegeleisen, Jacob I. Screen Printing. New York, Watson-Guptill Pubs., Inc., 1971.
Birkner, Heinrick. Screen Printing. New York, SterlingPub. Co., Inc., 1971.
Blackwell, Liz. A Treasury of Crochet Patterns. NewYork, Charles Scribner's Sons, 1971.
Blumeneau, Lill. The Art and Craft of Handweaving.New York, Crown Pub., 1955.
Bystrom, Ellen. Printing on Fabric: Basic Techniques.New York, Van Nostrand Reinhold Co., 1971.
Campana, Michele. Oriental Carpets. London, PaulHamlyn, Ltd., 1969.
Carr, Francis A. A Guide to Screen Process Printing.London, Studio Vista Ltd., 1961.
Christie, Archibald H. Pattern Design. New York, DoverPubs., 1969.
Collier, Ann M. A Handbook of Textiles. New York,Pergamon Press, 1970.
Computer Technolody For Textiles. Atlanta, Ga., W.R.C.Smith Co., 1970.
Cone, Sidney. Aim for a Job in the Textile Industry.New York, Richards Rosen Press, Inc., 1969.
Connor, Margaret. Introducing Fabric Collage. NewYork, Watson-Guptill Pubs., Inc., 1969.
Conran, Terence. Printed Textile Design. New York,Studio Pubs., 1957.
Cowan, Mary L. Introduction to Textiles. New York,AppletonCentury-Crofts, Inc., 1962.
Davis, Mildred J. Embroidery Designs (1780-1820).New York, Crown Pub., 1971.
Deyrus, Astrith. Getting Started in Batik. Beverly Hills,Calif., Bruce Books, 1971.
Dubied Knitting Manual. Dubied Edouard E. and Cie,S.A. Neuchatel, Switzerland, 1967.
Editors of American Fabrics Magazine. Encyclopedia ofTextiles. New York, Doric Pub. Co., 1960.
English, Walter. The Textile Industry. Harlow, England,Longmans, Green and Co., 1969.
Erickson, Janet Dobb. Block Printing on Textiles. NewYork, Watson-Guptill Pubs., Inc., 1961.
---- Print Making Without A Pm:. New York, VanNostrand Reinhold Co., 1966.
Giitsoff, Natalie. Fashion Seed Embroidery. NewtonCentre, Mass., Charles T. Branford Co , 1971.
Green, David. Fabric Printing. Newton Coistre, Mass.,Charles T. Branford Co., 1971.
Hanley, Hope. Needlepoint Rugs. Nea York, CharlesScribner's sons, 1971.
Hall, Archibald J. The Standard Book of Textiles. NewYork, Chemical Publ. Co., 1965.
Hartung, Rolf. More Creative Textile Design: Color andTexture. New York, Van Nostrand Reinhold Cc.,1965.
Hein, Gisela. Basic Stitches of Embroidery. New York,Van Nostrand Reinhold Co., 1971.
Helier, Jules. Printmaking Today: A Studio Handbook.2nd ed. New York, Holt, Rinehart & Winston Co.,1970.
Hollen, Norman, and Jane Saddler. Textiles. 3rd ed. NewYork, The Macmillan Co., 1968.
Hunt, Anthony. How-to-Do It Series: Textile Design.New York, Studio Pubs., 1961.
Irwin, John. Shawls. London. Victoria and AlbertMuseum, 1955.
Jackson, Emily. A History of Hand-Made Lace. Detroit,Tower Books, 1971.
Jayakar, Pupil, and John Irwin. Textiles and Ornamentsof India. New York, The Museum of Modern Art,1956.
Johnson, Meda P., and Glen Kaufman. Design onFabrics. New York, Van Nostrand Reinhold Co.,1967.
Joseph, Marjory. Introductory Textile Science. 2nd ed.New York, Holt, Rinehart & Winston Co., 1972.
Kampmann, Lothar. Creating with Printing Material.New York, Van Nostrand Reinhold Co., 1969.
Katzenbach, Lois and William. The Practical Book ofAmerican Wallpaper. Philadelphia, J.B. LippincottCo., 1951.
Keller, Ha. Batik: The Art and Craft. Rutland, Vt.,Charles E. Tvttle Co., 1970.
Kirby, Mary. Designing on the Loom: How-to-Do ItSeries #57. New York, Studio Pubs., 1955.
Knecht and Fothergill. The Principles and Practices of.Textile Printing. London, Charles Griffin & Co., Ltd.1952.
Kosloff. Albert. Textile Screen Printing. New York, Signsof the Times, 1966.
---- The Art sad Craft of Screen Process Printing.New York, The Bruce Pub. Co., 1961.
Kuehnemann, Ursula. Textile Printing and PaintingMade Easy. New York, Tapiinger Publ. Co., Inc., 1967.
Lancashire, J. B. Jacquard Design and Knitting. NewYurk, National Knitted Wear Association, 1969.
Lanterburg, Lotti. Fabric Printing. New York, VanNostrand Reinhold Co., 1963.
Larson, Jack, and Azalea Thorpe. Elements of Weaving.New York, Doubleday & Co., 1967.
Linton, George. Applied Basic Textiles. New York,Meredith Press, 1966.
MacKinnon, Charles R. Tartans and Highland Dress.New York, Wm. Collins Sons & Co., Ltd., 1960.
May, F lorence L. Silk Textiles of Spain: Eighth toFifteenth Centuries. New York, Hispanic Society,1957.
McClelland, Nancy V. Historic Wallpapers. Philadelphia,J. B. Lippincott Co., 1924.
McLennen. Barbara. Crewel Embroidery Made Easy.New York, Doubleday & Co., 1972.
McNeil, Moyri. Pulled Thread Embroidery. New York,Taplinger Pub. Co., Inc., 1972.
Meitach, Dona Z. Making Contemporary Rugs and WallHangings. New York, Abelard-Schuman, 1970.
Mills, Ralph W. Fully Fashioned Garment Manufacture.London, Cassell and Co., 1965.
Monk, Kathleen. Fun With Fabric Printing. New York,Taplinger Pub. Co., Inc., 1969.
Montgomery Florence M. Printed Textiles: English andAmerican Cottons and Linens, 1770-1860. New York.The Viking Press, 1970.
Moyer, Earl D. Principles of Double Knitting. Brooklyn,N.Y., Montrose Supply and Equipment Co., 1972.
Nea, Sara. Batik: Designs, Materials, Techniques. NewYork, Van Nostrand Reinhold Co., 1971.
---- Tie-Dye: Designs, Materials, Techniques. NewYork, Van Nostrand Reinhold Co., 1971.
Oelsner, Gustaf H. A Handbook of Weaves. New York,Dover Pubs., 1952.
Pettit, Florence H. America's Printed and PaintedFabrics,1600-1900. New York, Hastings House, 1970.
Potter, David, and Bernard Corbman. Textiles: Fiber toto Fabric. 4th ed. New York, McGraw-Hill Book Co.,1967.
Procion Dyestuffs In Textile Printing. London, ImperialChemistries, Ltd., 1960.
Proud, Nora. Textile Printing and Dyeing. London, B.T.Batsford Ltd., 1967.
Reichman, Charles. Advanced Knitting Principles. NewYork, National Knitted Outerwear Association, 1964.
Double Knit Fabric Manual. New York, NationalKnitted Outerwear Association, 1961.
-- Electronics in Knitting. New York, NationalKnitted Cuterwear Association, 1972.
----Handbook of Knitting Yarns and Knitwear Dye-ing Processes. New York, National Knitted Outer-wear Association, 1962.
----Knitting Dictionary. New York, National KnittedOuterwear Association. 1966.
Knitting Encyclopedia. New York, NationalKnitted Outerwear Association, 1972.
--- Knitted Fabric Primer. New York, NationalKnitted Outerwear Association, 1967.--- Principles of Knitting Outerwear, Fabrics andGarments. New York, National Knitted OuterwearAssociation, 1961.
Robinson, Stuart. Exploring Fabric Printing. NewtonCentre, Mass., Charles T. Branford Co., 1971.
A History of Printed Textiles. Cambridge, Mass.,MIT Press, 1969.
Schwalbach, Mathilda V., and James A. Screen-ProcessPrinting for the Serigrapher and Textile Designer. NewYork, Van Nostrand Reinhold Co., 1970.
Silverstein, Mira. Fun with Bargello. New York, CharlesScribner's Sons, 1970.
Stein, Vivian. Batik as a Hobby. New York, Sterling Pub.Co., Inc., 1969.
Stout, Evelyn. Introduction to Textiles. 3rd ed. NewYork, John Wiley & Sons, 1970.
Strache, Wolf. Forms and Patterns in Nature. New York,. Pantheon Books, 1956.Tibet!, Harriet. The Weaver's Book. New York, The
Macmillan Co., 1961.Vanderbilt, Gloria. Gloria Vanderbilt Book of Collage.
New York, Van Nostrand Reinhold Co., 1970.Wesley, Ruth. Bead Design. New York, Crown Pub.,
1970.Watson, William. Textile Design and Color. 6th ed. New
York, Longmans, Green & Co., Ltd., 1964.Warren, Geoffry. All Colour Book of Art Nouveau.
London, Octopus Books, Ltd., 1972.Weeks, Jeanne G. Rugs and Carpets of Europe and the
Western World. Philadelphia, Chilton Book Co., 1969.Weibel, Adele Coulin. Two Thousand Years of Textile&
New York, Hacker Art Books, 1952.Wilson, Erica. Crewel Embroidery. New York, Charles
Scribner's Sons, 1962.Wilson, Jean. Weaving is Creative. New York, Van
Nostrand Reinhold Co., 1971.-- Weaving is Fun. New York, Van Nostrand
Reinhold Co., 1971.Wingate, Isabel. Textile Fabrics and Their Selection. 6th
ed. Englewood Cliffs, N.J., Prentice-Hall, Inc., 1970.Znamierowski, Nell. Step by Step Weaving. New York,
Golden Press, 1968.---- Step by Step Rugmaking. New York, Golden
Press, 1972.
PERIODICALS
Ambassador, Ambassador Publishing Services Ltd., 49Park Lane, London W. 2. England.
American Fabrics, Doric Publishing, 24 East 28th St.,New York, N.Y. 10016
America's Textile Reporter, 286 Congress St., Boston,Mass. 02210
Art News, Newsweek Inc., 444 Madison Ave., NewYork, N.Y. 10022
California Men's Stylist, 1020 S. Main St., Los Angeles,Calif. 90015
109
Clothes Magazine, 44 West 44th St., New York, N.Y.10003
Craft Horizons, American Craftsmen's Council, 16 East52nd St., New York, N.Y. 10019
Daily News Record, 7 East 12th St., New York, N.Y.10003
Design, 100 Waterway Blvd., Indianapolis, Ind. 46207Domus, Via Monti di Pieta, 15, Milan, Italy.Elegance, (International) SA. Gartenstrasse 14, Postfach
8039, Zurich, Switzerland.Elle, 100 rue Reaumur, Paris (2e), France.Gentlemen's Quarterly, 488 Madison Ave., New York,
N.Y. 10022Graphis, 45 Nuschelerstrasse 8001, Zurich, Switzerland.Handweaver & Craftsman, 220 Fifth Ave., New York,
N.Y. 10001Harper's Bazaar, 572 Madison Ave., New York, N.Y.
10022Home Furnishings Daily, 7 East 12th St., New York,
N.Y. 10003House Beautiful, 717 Fifth Ave., New York, N.Y. 10022House & Garden, 420 Lexington Ave., New York, N.Y.
10017Interiors, 130 East 59th St., New York, N.Y. 10022International Textiles, 1760 Peachtree Rd., N.W., Atlanta,
Ga. 30309Knitting Times, 51 Madison Ave., New York, N.Y.
10010L'Officiel De La Couleur, 14 Rue Duphot, Paris,
France.L'Officiel De La Couture, 228 Rue du Faubourg St.
Honore, Paris, France.Modern Textiles, 303 Fifth Ave., New York, N.Y. 10016National Geographic Magazine, 1145 17th St. N.W.,
Washington, D.C. 20036Realites, 301 Madison Ave., New York, N.Y. 10017Textiles Suisses, 18 Rue Bellefontaine, CH 1001,
Lausanne, Switzerland.Vogue, 420 Lexington Ave., New York, N.Y. 10017Vogue, (French) 420 Lexington Ave., New York, N.Y.
10017Women's Wear Daily, 7 East 12th St., New York, N.Y.
10003
1.,;a0

Appendix
REPRESENTATIVE TRADE ASSOCIATIONS
AMERICAN PRINTED FABRIC COUNCIL, INC., 1440Broadway, New York, New York 10018
AMERICAN SOCIETY OF INDUSTRIAL DESIGNERS,60 West 55th Street, New York, New York 10019
AMERICAN TEXTILE MANUFACTURERS' INSTI-TUTE, 1501 Johnston Building, Charlotte.. N.C.,28202
AMERICAN WOOL COUNCIL, 570 Seventh Avenue,New York, New York 10018
COTTON IMPORTERS' ASSOCIATION, INC., 37 WallStreet, New York, New York 10005
COTTON, INC., 350 Fifth Avenue, New York, New York10016
INTERNATIONAL SILK ASSOCIATION OF U.S.A.,INC., 299 Madison Avenue, New York, New York10016
JAPAN SILK ASSOCIATION, INC., 385. Fifth Avenue,New York, New York 10016
LINEN TRADE ASSOCIATION, 111 Fifth Avenue,New York, New York 10003
NATIONAL ASSOCIATION OF TEXTILE AND AP-PARE L WHOLESALERS, 350 Fifth Avenue, NewYork, New York 10016
NATIONAL KNITTED OUTERWEAR ASSOCIATION,51 Madison Avenue, New York, New York 10010
TEXTILE DISTRIBUTORS' ASSOCIATION, INC., 1040Avenue of Americas, New York, New York 10020
THE COLOR ASSOCIATION OF THE U.S., INC.,200 Madison Avenue, New York, New York 10016
THE TEXTILE COLOR AND CARD ASSOCIATION OFTHE U.S., INC., 200 Madison Avenue, New York10016
VINYL FABRICS INSTITUTE, 60 East 42nd Street,New York, New York 10017
WALL PAPER INSTITUTE, 989 Third Avenue, NewYork, New York 10017
111