novell compliance management platform€¦ · 5.3.7 verifying the kerberos configuration ... 8...
TRANSCRIPT
Novell®
novdocx (en) 13 May 2009
AUTHORIZED DOCUMENTATION
Novell Compliance Management Platform Extension for SAP Environments 1.0 SP1 Solutions Guide
www.novell.com
Compliance Management Platform
1.0.1August 28, 2009
Extension for SAP* Environments Solutions Guide

novdocx (en) 13 May 2009
Legal Notices
Novell, Inc., makes no representations or warranties with respect to the contents or use of this documentation, and specifically disclaims any express or implied warranties of merchantability or fitness for any particular purpose. Further, Novell, Inc., reserves the right to revise this publication and to make changes to its content, at any time, without obligation to notify any person or entity of such revisions or changes.
Further, Novell, Inc., makes no representations or warranties with respect to any software, and specifically disclaims any express or implied warranties of merchantability or fitness for any particular purpose. Further, Novell, Inc., reserves the right to make changes to any and all parts of Novell software, at any time, without any obligation to notify any person or entity of such changes.
Any products or technical information provided under this Agreement may be subject to U.S. export controls and the trade laws of other countries. You agree to comply with all export control regulations and to obtain any required licenses or classification to export, re-export or import deliverables. You agree not to export or re-export to entities on the current U.S. export exclusion lists or to any embargoed or terrorist countries as specified in the U.S. export laws. You agree to not use deliverables for prohibited nuclear, missile, or chemical biological weaponry end uses. See the Novell International Trade Services Web page (http://www.novell.com/info/exports/) for more information on exporting Novell software. Novell assumes no responsibility for your failure to obtain any necessary export approvals.
Copyright © 2009 Novell, Inc. All rights reserved. No part of this publication may be reproduced, photocopied, stored on a retrieval system, or transmitted without the express written consent of the publisher.
Novell, Inc., has intellectual property rights relating to technology embodied in the product that is described in this document. In particular, and without limitation, these intellectual property rights may include one or more of the U.S. patents listed on the Novell Legal Patents Web page (http://www.novell.com/company/legal/patents/) and one or more additional patents or pending patent applications in the U.S. and in other countries.
Novell, Inc.404 Wyman Street, Suite 500Waltham, MA 02451U.S.A.www.novell.com
Online Documentation: To access the latest online documentation for this and other Novell products, see the Novell Documentation Web page (http://www.novell.com/documentation).

novdocx (en) 13 May 2009
Novell Trademarks
For Novell trademarks, see the Novell Trademark and Service Mark list (http://www.novell.com/company/legal/trademarks/tmlist.html).
Third-Party Materials
All third-party trademarks are the property of their respective owners.

4 Novell
novdocx (en) 13 May 2009
Compliance Management Platform Extension for SAP Environments 1.0 SP1 Solutions Guide
Contents
novdocx (en) 13 May 2009
About This Guide 71 Overview 91.1 Terminology . . . . . . . . . . . . . . . . . . . . . . . . . . . . . . . . . . . . . . . . . . . . . . . . . . . . . . . . . . . . . . . . 91.2 Business Solutions for the Extension for SAP Environments. . . . . . . . . . . . . . . . . . . . . . . . . . 10
1.2.1 Managing Accounts . . . . . . . . . . . . . . . . . . . . . . . . . . . . . . . . . . . . . . . . . . . . . . . . . . 101.2.2 Managing Roles. . . . . . . . . . . . . . . . . . . . . . . . . . . . . . . . . . . . . . . . . . . . . . . . . . . . . 101.2.3 Managing Passwords . . . . . . . . . . . . . . . . . . . . . . . . . . . . . . . . . . . . . . . . . . . . . . . . 101.2.4 Managing User Access . . . . . . . . . . . . . . . . . . . . . . . . . . . . . . . . . . . . . . . . . . . . . . . 111.2.5 Auditing Real-Time Events . . . . . . . . . . . . . . . . . . . . . . . . . . . . . . . . . . . . . . . . . . . . 11
2 Managing User Accounts 132.1 Prerequisites . . . . . . . . . . . . . . . . . . . . . . . . . . . . . . . . . . . . . . . . . . . . . . . . . . . . . . . . . . . . . . 142.2 Configuring the User Application Roles Based Provisioning Module to Consume Dynamic
Groups . . . . . . . . . . . . . . . . . . . . . . . . . . . . . . . . . . . . . . . . . . . . . . . . . . . . . . . . . . . . . . . . . . . 152.3 Creating Dynamic Groups . . . . . . . . . . . . . . . . . . . . . . . . . . . . . . . . . . . . . . . . . . . . . . . . . . . . 152.4 Creating Roles Based Provisioning Module Roles. . . . . . . . . . . . . . . . . . . . . . . . . . . . . . . . . . 172.5 Assigning the Roles Based Provisioning Module Roles to the Dynamic Group. . . . . . . . . . . . 172.6 Installing and Configuring the Identity Manager Drivers for SAP . . . . . . . . . . . . . . . . . . . . . . . 182.7 Mapping the SAP Authorizations to the Roles . . . . . . . . . . . . . . . . . . . . . . . . . . . . . . . . . . . . . 19
3 Managing Roles 213.1 Prerequisites . . . . . . . . . . . . . . . . . . . . . . . . . . . . . . . . . . . . . . . . . . . . . . . . . . . . . . . . . . . . . . 213.2 Implementing User Self Service for SAP Authorization Requests . . . . . . . . . . . . . . . . . . . . . . 223.3 Implementing Approval Policies on Roles that Grant SAP Authorizations. . . . . . . . . . . . . . . . 23
4 Managing Passwords 254.1 Prerequisites . . . . . . . . . . . . . . . . . . . . . . . . . . . . . . . . . . . . . . . . . . . . . . . . . . . . . . . . . . . . . . 254.2 Enabling Universal Password in the Identity Vault . . . . . . . . . . . . . . . . . . . . . . . . . . . . . . . . . . 25
4.2.1 Creating the Password Policy . . . . . . . . . . . . . . . . . . . . . . . . . . . . . . . . . . . . . . . . . . 264.2.2 Configuring the Password Policy for Universal Password . . . . . . . . . . . . . . . . . . . . . 264.2.3 Assigning the Password Policy . . . . . . . . . . . . . . . . . . . . . . . . . . . . . . . . . . . . . . . . . 27
4.3 Configuring the Identity Manager Drivers to Provision Passwords . . . . . . . . . . . . . . . . . . . . . 274.4 Configuring the Password Self-Service Feature . . . . . . . . . . . . . . . . . . . . . . . . . . . . . . . . . . . 28
5 Simplifying User Access 295.1 Prerequisites . . . . . . . . . . . . . . . . . . . . . . . . . . . . . . . . . . . . . . . . . . . . . . . . . . . . . . . . . . . . . . 305.2 Configuring Active Directory to Assign Kerberos Tickets . . . . . . . . . . . . . . . . . . . . . . . . . . . . . 30
5.2.1 Installing the spn and ktpass Utilities. . . . . . . . . . . . . . . . . . . . . . . . . . . . . . . . . . . . . 305.2.2 Creating a User Account in Active Directory for the Identity Server . . . . . . . . . . . . . 315.2.3 Creating a Keytab File . . . . . . . . . . . . . . . . . . . . . . . . . . . . . . . . . . . . . . . . . . . . . . . . 31
5.3 Configuring the Access Manager Identity Server to Consume the Kerberos Tickets. . . . . . . . 325.3.1 Enabling Logging for Kerberos Transactions. . . . . . . . . . . . . . . . . . . . . . . . . . . . . . . 325.3.2 Creating the bcsLogin.conf File . . . . . . . . . . . . . . . . . . . . . . . . . . . . . . . . . . . . . . . . . 33
Contents 5

6 Novell
novdocx (en) 13 May 2009
5.3.3 Creating a User Store for the Active Directory Domain . . . . . . . . . . . . . . . . . . . . . . . 345.3.4 Creating a Kerberos Authentication Class for the Identity Server . . . . . . . . . . . . . . . 345.3.5 Creating a Kerberos Method for the Identity Server . . . . . . . . . . . . . . . . . . . . . . . . . 355.3.6 Creating a Kerberos Contract for the Identity Server. . . . . . . . . . . . . . . . . . . . . . . . . 355.3.7 Verifying the Kerberos Configuration. . . . . . . . . . . . . . . . . . . . . . . . . . . . . . . . . . . . . 355.3.8 Creating a SAML Identity Injection Policy . . . . . . . . . . . . . . . . . . . . . . . . . . . . . . . . . 365.3.9 Refreshing the Identity Server . . . . . . . . . . . . . . . . . . . . . . . . . . . . . . . . . . . . . . . . . . 37
5.4 Configuring the User’s Web Browser . . . . . . . . . . . . . . . . . . . . . . . . . . . . . . . . . . . . . . . . . . . . 375.5 Adding the SAP Portal as a Protected Resource in Access Manager . . . . . . . . . . . . . . . . . . . 38
5.5.1 Refreshing the Access Gateway . . . . . . . . . . . . . . . . . . . . . . . . . . . . . . . . . . . . . . . . 385.6 Configuring the SAP Portal for Kerberos Authentication . . . . . . . . . . . . . . . . . . . . . . . . . . . . . 39
6 Auditing Real-Time Events 416.1 Enabling Auditing . . . . . . . . . . . . . . . . . . . . . . . . . . . . . . . . . . . . . . . . . . . . . . . . . . . . . . . . . . . 43
6.1.1 Prerequisites . . . . . . . . . . . . . . . . . . . . . . . . . . . . . . . . . . . . . . . . . . . . . . . . . . . . . . . 436.1.2 Configuring the SAP Servers for Auditing . . . . . . . . . . . . . . . . . . . . . . . . . . . . . . . . . 436.1.3 Importing the SAP CCMS Collector and the SAP XAL Connector . . . . . . . . . . . . . . 456.1.4 Adding Auxiliary Files for the SAP XAL Connector . . . . . . . . . . . . . . . . . . . . . . . . . . 466.1.5 Configuring the SAP CCMS Collector . . . . . . . . . . . . . . . . . . . . . . . . . . . . . . . . . . . . 466.1.6 Configuring the SAP XAL Connector. . . . . . . . . . . . . . . . . . . . . . . . . . . . . . . . . . . . . 476.1.7 Configuring the SAP Event Source . . . . . . . . . . . . . . . . . . . . . . . . . . . . . . . . . . . . . . 48
6.2 Enabling Account Tracking . . . . . . . . . . . . . . . . . . . . . . . . . . . . . . . . . . . . . . . . . . . . . . . . . . . 496.2.1 Prerequisites . . . . . . . . . . . . . . . . . . . . . . . . . . . . . . . . . . . . . . . . . . . . . . . . . . . . . . . 496.2.2 Enabling Account Tracking on the SAP Drivers . . . . . . . . . . . . . . . . . . . . . . . . . . . . 49
6.3 Sending Alerts when Rogue Administration Occurs. . . . . . . . . . . . . . . . . . . . . . . . . . . . . . . . . 50
Compliance Management Platform Extension for SAP Environments 1.0 SP1 Solutions Guide

novdocx (en) 13 May 2009
About This Guide
This guide provides example solutions that you can implement when using the Novell® Compliance Management Platform extension for SAP environments. The guide is organized as follows:
Chapter 1, “Overview,” on page 9Chapter 2, “Managing User Accounts,” on page 13Chapter 3, “Managing Roles,” on page 21Chapter 4, “Managing Passwords,” on page 25Chapter 5, “Simplifying User Access,” on page 29Chapter 6, “Auditing Real-Time Events,” on page 41
Audience
This guide is intended for partners, consultants, and customers who are extremely familiar with SAP and the Novell products in the Novell Compliance Management Platform.
Feedback
We want to hear your comments and suggestions about this manual and the other documentation included with this product. Please use the User Comments feature at the bottom of each page of the online documentation, or go to www.novell.com/documentation/feedback.html and enter your comments there.
Documentation Updates
For the most recent version of the Novell Compliance Manage Platform Extension for SAP Environments Solutions Guide, visit the Novell Compliance Management Platform Extension for SAP Environments Documentation Web site (http://www.novell.com/documentation/ncmp_sap10).
Additional Documentation
For documentation on the Novell Compliance Management Platform, see the Novell Compliance Management Platform Documentation Web site (http://www.novell.com/documentation/ncmp10/index.html).
For documentation on the Role Mapping Administrator, see the Novell Compliance Management Platform Documentation Web site (http://www.novell.com/documentation/ncmp_sap10).
For documentation on the Identity Manager Roles Based Provisioning Module, see the Identity Manager Roles Based Provisioning Module 3.6.1 Documentation Web site (http://www.novell.com/documentation/idmrbpm361/index.html).
For documentation on the SAP drivers, see the Identity Manager 3.6.1 Drivers Documentation Web site (http://www.novell.com/documentation/idm36drivers/index.html).
For documentation on Access Manager, see the Access Manager 3.1 Documentation Web site (http://www.novell.com/documentation/novellaccessmanager31/index.html).
About This Guide 7
8 Novell
novdocx (en) 13 May 2009
For documentation on SentinelTM, see the Sentinel 6.1 Documentation Web site (http://www.novell.com/documentation/sentinel61/index.html).
For documentation on the SAP Connector, SAP Collector, and the SAP Solution Pack, see the Sentinel 6.1 download Web site (http://support.novell.com/products/sentinel/secure/sentinel61.html).
Documentation Conventions
In Novell documentation, a greater-than symbol (>) is used to separate actions within a step and items in a cross-reference path.
A trademark symbol (®, TM, etc.) denotes a Novell trademark. An asterisk (*) denotes a third-party trademark.
When a single pathname can be written with a backslash for some platforms or a forward slash for other platforms, the pathname is presented with a backslash. Users of platforms that require a forward slash, such as Linux* or UNIX*, should use forward slashes as required by your software.
Compliance Management Platform Extension for SAP Environments 1.0 SP1 Solutions Guide

1novdocx (en) 13 M
ay 2009
1Overview
The extension for SAP environments contains business solutions that simplify the management of your SAP systems. These business solutions help mitigate risk, simplify business governance, and ensure compliance throughout the enterprise.
Section 1.1, “Terminology,” on page 9Section 1.2, “Business Solutions for the Extension for SAP Environments,” on page 10
1.1 TerminologyThis section gives you essential information about terminology used with SAP. If you need further help with SAP terminology, see the Glossary for the SAP Library (http://help.sap.com/saphelp_46c/helpdata/En/35/2cd77bd7705394e10000009b387c12/frameset.htm).
ABAP: Advanced Business Application Programming. A programming language designed for creating large-scale business applications.
ALE: Application Link Enabling. Technology that enables communication between SAP and external systems such as the Identity Vault.
BAPI: Business Application Programming Interface. SAP business APIs for the SAP business object types.
CCMS: Computer Center Management System. A set of tools to monitor, control, and configure an SAP system.
client: In an SAP system, a self-contained unit with its own set of users and data.
CUA: Central User Administration. The SAP tool used to centrally maintain user master records.
ERP: Enterprise resource planning. A software system for planning and automating enterprise-wide business processes.
GRC: Governance, risk, and compliance. Software or business processes that facilitate conformity to legal requirements.
IDocs: Intermediate document. A data exchange format used between SAP systems and between SAP systems and external applications.
JCo: SAP Java* Connector. A toolkit that allows Java applications to communicate with any SAP system.
SPML: Service Provisioning Markup Language. An XML-based framework for managing the provisioning and allocation of identity information and system resources within and between organizations.
SSCR: SAP Software Change Registration. A procedure for registering manual changes to SAP source code and dictionary object.s
UME: User Management Engine. Provides central user administration for Java applications.
Overview 9
10 Novell
novdocx (en) 13 May 2009
XAL: External interface for alert management. Enables external system management software to read and set properties in order to integrate with SAP administration tools.
1.2 Business Solutions for the Extension for SAP EnvironmentsYou see some common business problems when managing your SAP systems.
Section 1.2.1, “Managing Accounts,” on page 10Section 1.2.2, “Managing Roles,” on page 10Section 1.2.3, “Managing Passwords,” on page 10Section 1.2.4, “Managing User Access,” on page 11Section 1.2.5, “Auditing Real-Time Events,” on page 11
1.2.1 Managing AccountsManaging accounts in the different SAP systems is a very complex task. Trying to manually maintain account information in the SAP systems and then trying to synchronize that information with the other systems in your environment is very costly, time-consuming, and error-prone.
The extension for SAP environments contains provisioning solutions for the different SAP systems in your environment. The solutions allow you to provision users from the SAP GRC Access Control, the SAP Portal, and from traditional SAP application servers.
The provisioning solutions use the new and updated Identity Manager drivers to provision the SAP accounts. Identity Manager then provisions the SAP account information into any other system that you have connected through Identity Manager. These provisioning processes are automated to save time and money, and to reduce errors. For instructions on how to configure the provisioning solutions, see Chapter 2, “Managing User Accounts,” on page 13.
1.2.2 Managing RolesTypically, business managers do not have direct access to assign SAP roles or profiles to users. Instead, they must work through the SAP administrator to facilitate these assignments. The extension for SAP environments provides a solution that enables business managers to easily make role assignments. For instructions on how to configure the solutions for managing roles, see Chapter 3, “Managing Roles,” on page 21.
1.2.3 Managing PasswordsOne of the most common and expensive business problems is how to manage user passwords. SAP adds many complexities to password management because each user account in each system and child system has a password associated with it. The extension for SAP environments contains two solutions for managing passwords:
The SAP Identity Manager driver automatically assigns passwords to users when they are provisioned in to the SAP systems and child systems.You can allow users to manage their own passwords.
Compliance Management Platform Extension for SAP Environments 1.0 SP1 Solutions Guide
novdocx (en) 13 May 2009
For instructions on how to manage user passwords, see Chapter 4, “Managing Passwords,” on page 25.
1.2.4 Managing User AccessAfter users are provisioned, they need access to the resources to do their jobs. A common frustration for users is being required to authenticate each time they access a resource. The solution provided with the extension for SAP environments uses Access Manager to allow users to log into Windows* workstation and then have access to the SAP Portal, the Roles Based Provisioning Module, and the Role Mapping Administrator. When users launch a Web browser that is pointing at one of these resources, they are automatically authenticated to that resource through Access Manager. For instructions on how to configure the single sign-on solution, see Chapter 5, “Simplifying User Access,” on page 29.
1.2.5 Auditing Real-Time EventsThe final part of any solution is to provide auditing and reporting capabilities for the solution. The extension for SAP environments provides real-time auditing and reporting capabilities for your SAP systems through SentinelTM. This allows you to provide automated reports that can prove compliance with the business policies implemented when users are provisioned and granted access to resources. For instructions on how to configure the auditing solution, see Chapter 6, “Auditing Real-Time Events,” on page 41.
Overview 11

12 Novell
novdocx (en) 13 May 2009
Compliance Management Platform Extension for SAP Environments 1.0 SP1 Solutions Guide

2novdocx (en) 13 M
ay 2009
2Managing User Accounts
The extension for SAP environments provides multiple solutions that allow you to automate the management of user accounts in your SAP environment. These solutions automate the provisioning of user objects throughout SAP clients, CUA, NetWeaver*, ERP systems, and GRC systems. These provisioning solutions use one or more of the Identity Manager drivers to automate the managing of users accounts.
In an SAP landscape, a user has multiple accounts in multiple systems that are not connected. For example, when a new finance clerk is hired in a company, he or she needs access to the SAP finance system and to the SAP Portal. Without the provisioning solutions, an SAP administrator creates the user in the SAP HR system, in the SAP client that is running the SAP Finance application, and in the SAP Portal.
The manual process takes considerable time, because it is likely that a different people create each user account. The manual process is error-prone. It can also be expensive, because new employees can’t work and be productive until they have access to the systems they need to do the job.
This solution explains how to take advantage of features in Identity Manager to simplify provisioning of user accounts. This solution uses dynamic groups and entitlements, and is based on the Roles Based Provisioning Module as the entitlement agent, as displayed in Figure 2-1.
The solution explains how to set up your environment so that a new user who is created as an active employee automatically receives the required accounts and resources.
Managing User Accounts 13

14 Novell
novdocx (en) 13 May 2009
Figure 2-1 Provisioning Solution with Multiple SAP Systems
Complete the following sections to implement the managing users solutions.
Section 2.1, “Prerequisites,” on page 14Section 2.2, “Configuring the User Application Roles Based Provisioning Module to Consume Dynamic Groups,” on page 15Section 2.3, “Creating Dynamic Groups,” on page 15Section 2.4, “Creating Roles Based Provisioning Module Roles,” on page 17Section 2.5, “Assigning the Roles Based Provisioning Module Roles to the Dynamic Group,” on page 17Section 2.6, “Installing and Configuring the Identity Manager Drivers for SAP,” on page 18Section 2.7, “Mapping the SAP Authorizations to the Roles,” on page 19
2.1 PrerequisitesThis solution assumes the following:
Identity Manager 3.6 is installed. For more information, see “ Installing Identity Manager” in the Identity Manager 3.6.1 Installation Guide.
SAP UserManagement
Driver
SAP UserManagement
Driver
SAP PortalDriver
CUA/Single Client
ABAP
NetWeaver(UME)
Client 1
Retail
Material
F 1
. . .
. . .
. . .
. . .
Client 2. . .
Client 2. . .
Data System
Driver Set
UserAccount
Users
Role
Group
UserAccount
Role
Profile
SAPPortalDriver
SAP UserManagement
Driver
Identity Vault
CUA/Single
SAP
Role MappingAdministrator
BidirectionalFan-out
Unidirectional
SubscriberOnly
Compliance Management Platform Extension for SAP Environments 1.0 SP1 Solutions Guide

novdocx (en) 13 May 2009
The User Application Roles Based Provisioning Module 3.6.1 is installed and configured with the User Application driver and the Roles Service driver. For more information, see the Identity Manager Roles Based Provisioning Module 3.6.1 User Application: Installation Guide (http://www.novell.com/documentation/idmrbpm361/install/data/bookinfo.html)Your Identity Manager project is contained in Designer. For more information, see “Importing into Designer” in the Designer 3.0.1 for Identity Manager 3.6 Administration Guide.
2.2 Configuring the User Application Roles Based Provisioning Module to Consume Dynamic GroupsThe User Application Roles Based Provisioning Module must be configured to consume dynamic groups.
1 Run the ConfigUpdate utility in the User Application installation directory by executing the following command:Linux: configupdate.shWindows: configupdate.bat
2 Click Show Advanced Options.3 Select the Use Dynamic Groups option in the Metadirectory User Groups section.4 Click OK to save this selection.5 Restart the User Application to apply the changes.
2.3 Creating Dynamic GroupsThis solution uses dynamic groups to define the criteria required to receive a Roles Based Provisioning Module role. Dynamic groups allow you to specify the criteria used to evaluate membership in the group. For more information about dynamic groups, see the AppNote How to Manage and Use Dynamic Groups (http://support.novell.com/techcenter/articles/ana20020405.html)
To create a dynamic group for all active employees:
1 Log in to iManager as an administrative user.2 Click Directory Administration > Create Object under Roles and Tasks.3 Select Dynamic Group from the available object classes list, then click OK.4 Use the following information to create the dynamic group:
GroupName: Specify a unique name for the group. For example, Active Employees.Context: Browse to and select the container where you want to create the dynamic group.Dynamic Group: Select the option to create the dynamic group.Nested Group: For this solution, do not select this option.Set Owner: Select this option to set the logged-in user as the owner.
5 Click OK, then click Modify.6 In the Description field, specify a description for this role.
Managing User Accounts 15

16 Novell
novdocx (en) 13 May 2009
IMPORTANT: The description is the value displayed for the group in the User Application. If there is no description value, the group is not displayed in the User Application.
7 Click the Dynamic tab.8 Use the following information to define the criteria for membership in this dynamic group:
Query: If you have more than one requirement for the dynamic group, click the plus icon to add another query.Start search at(Base DN): Specify the DN of the starting location to perform the search for members of the group.Search Scope: Specify a scope for the search. If you don’t specify a scope, the base scope is assumed. The options are:
Search Base DN searches only the base object.Search One Level searches the direct subordinates of the base object. The base object is not searched.Search Sub Containers searches the base object and all objects in the subtree below it.
Search Multiple Servers: Select whether the search should include multiple servers or only the server containing the dynamic group object. If you select yes, the server communicates with other servers while searching for dynamic members. If you select no, a local search is performed for dynamic members.
NOTE: If you select to search multiple servers for dynamic members, it can take a long time for the results to be returned.
Search Filter Read Write Replica: Select whether to search for dynamic members in the Filtered Read Write replica. This option is enabled only if you have selected no for Search Multiple Servers.Search Filter: Define the criteria for membership in the dynamic group.You can type the text if you know the proper syntax, or you can launch the Advance Selection Criterion Wizard to define the criteria.For an object to become of a member of the dynamic group, this solution requires that it must have an objectClass that is equal to inetOrgPerson and that the attribute of employeeStatus is equal to Active.
9 Click OK to save the changes.10 Create a second dynamic group where the objectClass is equal to inetOrgPerson and the Title
attribute is equal to Finance Clerk.
Compliance Management Platform Extension for SAP Environments 1.0 SP1 Solutions Guide
novdocx (en) 13 May 2009
2.4 Creating Roles Based Provisioning Module RolesThe Roles Based Provisioning Module role is used to assign privileges in the connected system. In our solution is it used to assign access to the SAP Portal as well as restrict access to finance resources. When a user requests access to the SAP Portal, they are granted access. When a user requests access to a finance resource, their manager has to approve the resource.
To create the SAP Self Service role:
1 Launch Designer, and verify that your project is current. To verify that your project is current, see “Using the Compare Feature When Importing” in the Designer 3.0.1 for Identity Manager 3.6 Administration Guide.
2 In the Designer toolbar, click Window > Show View > Provisioning to display the Provisioning view.By default, the Provisioning view is displayed in the lower left corner of Designer.
3 In the Provisioning view, click User Application > Role Catalog > Roles > Business Role.4 Right-click the Business Role, then click New.5 Use the following information to create the role:
Identifier: Specify a unique name for the role. In this example, the role name is SAP Self Service. The Display Name and Description are populated with this name.Category: Select the Default category.Trustees: Add the container that holds your user objects as a trustee of this role. When a user logs in to the Roles Based Provisioning Module, this role is displayed for them to access.
6 Click Finish to create the role.7 Click the Advanced Options tab at the bottom of the new role.8 Select None under the Approval Details section.
When a user logs in to the Roles Based Provisioning Module and requests the SAP Portal resource, it is automatically granted to them.
9 Click the Save icon in the toolbar to save the change.10 Right-click the User Application driver in the Provisioning view, then click Live > Deploy to
deploy the new role to the Identity Vault.
To create a finance role that requires a manager approval, see Section 3.3, “Implementing Approval Policies on Roles that Grant SAP Authorizations,” on page 23. Create the role with the name of SAP Finance instead of SAP Restricted Resource.
2.5 Assigning the Roles Based Provisioning Module Roles to the Dynamic GroupThe Roles Service driver evaluates the dynamic group membership for Roles Based Provisioning Module updates to the associated role. When a user meets the dynamic group criteria for membership, the users inherit role assignments and are assigned the Roles Based Provisioning Module role.
Managing User Accounts 17
18 Novell
novdocx (en) 13 May 2009
To assign the role to the dynamic group:
1 Log in to the User Application as an administrative user.2 Click Roles > Role Assignments > Role Assignments.3 Click the Role icon, then click the Search icon.4 Specify the role name of SAP Self Service, then click the Search icon.5 Click the name of the role.6 Click New Assignment.7 Use the following information to make the assignment:
Initial Request Description: Specify a description that is displayed when the initial request occurs.Type of Assignment: Select Group for the type of assignment.Select Groups: Browse to and select the dynamic group created in Section 2.3, “Creating Dynamic Groups,” on page 15.Effective Date: Specify a date for this assignment to occur. If not date is specified, the effective date is immediately.
8 Click Submit to make the assignment.9 Repeat the process for the finance group and SAP Finance role create in Section 2.4, “Creating
Roles Based Provisioning Module Roles,” on page 17.
2.6 Installing and Configuring the Identity Manager Drivers for SAPYou can install and configure any of the Identity Manager drivers for SAP to work with this solution if the driver uses entitlements and can work with the Role Mapping Administrator.
Install the extension for SAP environments Identity Manager drivers. For installation instructions, see “Installing the Identity Manager Drivers for the extension for SAP environments” in the Novell Compliance Management Platform Extension for SAP Environments 1.0 SP 1 Overview.Create new driver object. For instructions, see:
“Creating a New Driver” in the Identity Manager 3.6.1 Driver for SAP GRC Access Control Implementation Guide.“Creating a New Driver” in the Identity Manager 3.6.1 Driver for SAP Portal Implementation Guide.“Creating a New Driver” in the Identity Manager 3.6.1 Driver for SAP User Managment (JCo 3) Implementation Guide.
Verify that the Use User Account Entitlement GCV is set to True in the properties of each driver used in this solution.Very that the Enable role mapping GCV is set to Yes in the properties of each driver used in this solution.
Compliance Management Platform Extension for SAP Environments 1.0 SP1 Solutions Guide
novdocx (en) 13 May 2009
2.7 Mapping the SAP Authorizations to the RolesWith the roles created for active employees and the finance clerk, you can use the Role Mapping Administrator to map the corresponding roles from SAP to these role. For instructions, see Chapter 3, “Managing Roles,” on page 21.
With the mapping in place when a user object is created and the employStatus attribute equals Active, the user is provisioned to the SAP Portal environment the SAP client that contains the finance application. When users log into the User Application, they can request access to the SAP Portal and it is automatically granted. They can also request access to the finance group. The manager receives notification of this request and either grants or denies the request.
Managing User Accounts 19

20 Novell
novdocx (en) 13 May 2009
Compliance Management Platform Extension for SAP Environments 1.0 SP1 Solutions Guide

3novdocx (en) 13 M
ay 2009
3Managing Roles
Typically, business managers do not have direct access to assign SAP roles or profiles to users. Instead, they must work through the SAP administrator to facilitate these assignments.
The extension for SAP environments provides a solution that enables business managers to easily make the role assignments. The solution utilizes the Roles Based Provisioning Module, Identity Manager drivers, and the Roles Mapping Administrator.
The Roles Mapping Administrator lets you map SAP roles, composite roles, and profiles (collectively referred to as SAP authorizations) to Identity Manager roles. When a user is assigned a role through the Identity Manager User Application, he or she receives all SAP authorizations mapped to that role. Or, when a role is removed from a user, all SAP authorizations that were granted through that role are removed.
The following are solutions that can be implemented in your environment to simplify business processes.
Section 3.1, “Prerequisites,” on page 21Section 3.2, “Implementing User Self Service for SAP Authorization Requests,” on page 22Section 3.3, “Implementing Approval Policies on Roles that Grant SAP Authorizations,” on page 23
3.1 PrerequisitesThe steps for these solutions assume the following:
Identity Manager 3.6 is installed with the User Application Roles Based Provisioning Module 3.6.1. This includes the User Application driver and Roles Service driver. For more information, see Identity Manager Roles Based Provisioning Module 3.6.1 User Application: Installation Guide (http://www.novell.com/documentation/idmrbpm361/install/data/bookinfo.html).The User Application Roles Based Provisioning system is configured with the roles to which the SAP authorizations will be mapped. If the roles do not exist, they can be created in the User Application or in the Role Mapping Administrator after it is installed. For more information, see “Configuring Roles” (http://www.novell.com/documentation/idmrbpm361/dgpro/data/roleschapter.html) in the User Application: Design Guide (http://www.novell.com/documentation/idmrbpm361/dgpro/dgpro/data/bookinfo.html).One or more of the following Identity Manager drivers for SAP are installed and connected to the SAP systems.
SAP GRC Access Control driver. For more information, see the Identity Manager 3.6.1 Driver for SAP GRC Access Control Implementation Guide.SAP Portal driver. For more information, see the Identity Manager 3.6.1 Driver for SAP Portal Implementation Guide.SAP User Management driver. For more information, see the Identity Manager 3.6.1 Driver for SAP User Managment (JCo 3) Implementation Guide.
Managing Roles 21

22 Novell
novdocx (en) 13 May 2009
The Role Mapping Administrator is installed and configured. See the Identity Manager Role Mapping Administrator 1.0 Installation and Configuration Guide.Your Identity Manager project is contained in Designer. For more information, see “Importing into Designer” in the Designer 3.0.1 for Identity Manager 3.6 Administration Guide.
3.2 Implementing User Self Service for SAP Authorization RequestsTo reduce help desk calls and the amount of time required to grant resources, you can use the Role Mapping Administrator and the Roles Based Provisioning Module to allow users to request access to certain SAP authorizations.
After the following procedures are completed, users can log into the Roles Based Provisioning Module and request access to the SAP Portal, then automatically receive access after the request is issued.
To create a SAP Self Service role:
1 Launch Designer, and verify that your project is current. To verify that your project is current, see “Using the Compare Feature When Importing” in the Designer 3.0.1 for Identity Manager 3.6 Administration Guide.
2 In the Designer toolbar, click Window > Show View > Provisioning to display the Provisioning view.By default, the Provisioning view is displayed in the lower left corner of Designer.
3 In the Provisioning view, click User Application > Role Catalog > Roles > Business Role.4 Right-click the Business Role, then click New.5 Use the following information to create the role:
Identifier: Specify a unique name for the role. In this example the role name is SAP Self Service. The Display Name and Description are populated with this name.Category: Select the Default category.Trustees: Add the container that holds your user objects as a trustee of this role. When a user logs in to the Roles Based Provisioning Module, this role is displayed for them to access.
6 Click Finish to create the role.7 Click the Advanced Options tab at the bottom of the new role.8 Select None under the Approval Details section.
When a user logs in to the Roles Based Provisioning Module and requests the SAP Portal resource, it is automatically granted to them.
9 Click the Save icon in the toolbar to save the change.10 Right-click the User Application driver in the Provisioning view, then click Live > Deploy to
deploy the new role to the Identity Vault.
To map the Self Service role to the SAP Portal Access:
1 Log in to the Role Mapping Administrator. 2 Select the SAP Self Service role.3 Access the SAP Portal System in the Authorizations panel.
Compliance Management Platform Extension for SAP Environments 1.0 SP1 Solutions Guide

novdocx (en) 13 May 2009
4 Select the roles in the SAP Portal that grant a user access to the resource and drag and drop them into the Mapping panel.
5 Click Apply to save and deploy the changes.
The Self Service role is mapped to the SAP Portal authorization, which is now available for users to request through the Roles Based Provisioning Module. When the users request this access, they are automatically granted access to the SAP Portal because of the role mapping.
3.3 Implementing Approval Policies on Roles that Grant SAP AuthorizationsTo make sure the correct people are granted access to powerful SAP authorizations, you can define a role that requires a manager’s approval for all access requests to those authorizations.
To create a restricted SAP Access role:
1 Launch Designer, and verify that your project is current. To verify that your project is current, see “Using the Compare Feature When Importing” in the Designer 3.0.1 for Identity Manager 3.6 Administration Guide.
2 In the Designer toolbar, click Window > Show View > Provisioning to display the Provisioning view.
3 In the Provisioning view, click User Application > Role Catalog > Roles > Business Role.4 Right-click the Business Role, then click New.5 Use the following information to create the role:
Identifier: Specify a unique name for the role. In this example, it is Restrict SAP Access. The Display Name and Description are populated with this name.Category: Select the Default category.Trustees: Add the container that holds your user objects as a trustee of this role. When a user logs in to the Roles Based Provisioning Module, this role is displayed for them to access.
6 Click Finish to create the role.7 Click the Advanced Options tab at the bottom of the new role.8 Select Standard to determine the type of approval process for granting access to the SAP
resource.9 Select the approval type of Serial.
When you select Serial, the request is sent to the approvers and the approvers must approve the request before it is granted. In this use case the approver is the users’ manager.
10 Click the plus icon to add the approvers for the request. You can have one or more approvers.
To map the Restricted SAP Access role to the SAP resource:
1 Log in to the Role Mapping Administrator. 2 Select the Restricted SAP Access role.3 Access the SAP system that you want to restrict access to in the Authorizations panel.4 Select the roles in the SAP system that grant a user access to the resource and drag and drop
them into the Mapping panel.5 Click Apply to save and deploy the changes.
Managing Roles 23

24 Novell
novdocx (en) 13 May 2009
The Restricted SAP access role is mapped to the SAP role, which is now available for the users to request through the Roles Based Provisioning Module. When the users request this resource, the manager is notified. The manager either approves or denies the request.
Compliance Management Platform Extension for SAP Environments 1.0 SP1 Solutions Guide

4novdocx (en) 13 M
ay 2009
4Managing Passwords
An important part of mitigating risks and reducing complexities is managing user passwords. SAP adds many complexities to password management because each user account in each system and child system has a password associated with it. The extension for SAP environments contains two solutions for managing user passwords:
The SAP Identity Manager driver automatically assigns passwords to users when they are provisioned in to the SAP systems and child systems.You can allow users to manage their own passwords.
The following sections contain the details required to create these solutions in your SAP environment.
Section 4.1, “Prerequisites,” on page 25Section 4.2, “Enabling Universal Password in the Identity Vault,” on page 25Section 4.3, “Configuring the Identity Manager Drivers to Provision Passwords,” on page 27Section 4.4, “Configuring the Password Self-Service Feature,” on page 28
4.1 PrerequisitesThe steps for these solutions assume the following:
Identity Manager 3.6 is installed and there are Identity Manager drivers that are installed and configured. For more information, see “ Installing Identity Manager” in the Identity Manager 3.6.1 Installation Guide.The User Application Roles Based Provisioning Module is installed and configured. For more information, see the Identity Manager Roles Based Provisioning Module 3.6.1 User Application: Installation Guide (http://www.novell.com/documentation/idmrbpm361/install/data/bookinfo.html).
4.2 Enabling Universal Password in the Identity VaultIdentity Manager requires Universal Password for both password synchronization and password self-service. Universal Password synchronizes the various passwords (Universal, NDS®, Simple and Distribution) stored in the Identity Vault and provide password policies that define the rules for creating and replicating passwords in the Identity Vault.
To enable Universal Password in the Identity Vault, you must create a Universal Password policy in iManager, then assign it to a container to apply the password policy to the users.
Complete the following tasks to enable Universal Password in the Identity Vault:
Section 4.2.1, “Creating the Password Policy,” on page 26Section 4.2.2, “Configuring the Password Policy for Universal Password,” on page 26Section 4.2.3, “Assigning the Password Policy,” on page 27
Managing Passwords 25

26 Novell
novdocx (en) 13 May 2009
4.2.1 Creating the Password Policy1 In iManager, click Roles and Task > Passwords > Password Policies.2 Click New to create the new policy.3 Specify the following information to create the policy:
Container to create the policy in: Accept the default location where the password policy is created in the Password Policies container in the Security container.Policy Name: Specify a name for the password policy.Description: Specify a description of the policy.Password Change Message: Specify a message that the users see when changing their password through the password self-service option in the Roles Based Provisioning Module.
4 Select Create a new Password Policy based on the default settings.5 Click Next.6 Click Finish on the summary page.7 Click Close.
4.2.2 Configuring the Password Policy for Universal PasswordAfter the password policy is created, you must configure the password for your environment.
1 In iManager, click Roles and Tasks > Passwords > Password Policies.2 Click the name of the password policy you created in Section 4.2.1, “Creating the Password
Policy,” on page 26.3 Click Universal Password > Configuration Options.4 Use the following information to configure Universal Password:
Configuration Options: Select both Enable Universal Password and Enable the Advanced Password Rules.Universal Password Synchronization: These options determine how Universal Password is synchronized within the Identity Vault and with other connected systems. The following options are the best to use when synchronizing passwords with SAP systems:
Remove the NDS password when setting Universal PasswordSynchronize NDS password when setting Universal PasswordSynchronize Simple Password when setting Universal PasswordSynchronize Distribution Password when setting Universal Password
Universal Password Retrieval: Select whether you want other agents to retrieve passwords:Allow user to retrieve password: This option determines whether the Forgotten Password Self-Service feature can retrieve a password on behalf of a user, so that the password can be e-mailed to the user. If you don't select this option, the corresponding feature is dimmed on the Forgotten Password tab in the password policy.Allow admin to retrieve password: Select this box only if you have a particular service that needs it. Identity Manager does not have a need for administrators to retrieve passwords. However, some third-party services (for example, the Samba server and FreeRADIUS server that ship with Novell® Open Enterprise Server) might take advantage of this option.
Compliance Management Platform Extension for SAP Environments 1.0 SP1 Solutions Guide

novdocx (en) 13 May 2009
Allow the following to retrieve passwords: If you have another service or agent that requires the ability to retrieve passwords, you can define those services or agents here.
Authentication: You can verify whether existing passwords comply with the password policy by selecting this option. It is useful if you are deploying a new password policy or changing the Advanced Password Rules for an existing policy, and you want to verify that existing passwords comply with the new or changed rules.
5 Click Apply to save the changes.6 Click the Advanced Password Rules option under the Universal Password tab.7 Define the password rules for your environment. This is how you control the types of
passwords that users can set.8 Click OK to save the changes.
4.2.3 Assigning the Password PolicyAfter the password policy is configured, you must assign the policy for it to take affect. You can assign the password policy to a user, a container, or a container that is the root of a partition in the Identity Vault.
If you assign the policy to a container that is the root of a partition, the policy assignment is inherited by all users in that partition, including subcontainers. iManager displays whether a container is the root of a partition or not when you browse to it.
If you assign the policy to a container that is not the root of a partition, the policy assignment is inherited only by users in that specific container. It is not inherited by users that are in subcontainers. If you want the policy to apply to all users below a container that is not the root of a partition, you must assign the policy to each subcontainer individually.
To assign the policy:
1 In iManager, click Roles and Task > Password > Password Policies.2 Click the name of the password policy you created in Section 4.2.1, “Creating the Password
Policy,” on page 26.3 Click the Policy Assignment tab.4 Browse to and select the containers where you want the password policy applied.5 Click OK.
4.3 Configuring the Identity Manager Drivers to Provision PasswordsThe SAP User Management driver and the SAP Portal driver can synchronize passwords. This allows you to manage the user’s passwords through Identity Manager. The default driver configurations contain the required policies to synchronize passwords.
Managing Passwords 27

28 Novell
novdocx (en) 13 May 2009
4.4 Configuring the Password Self-Service FeatureThe User Application Roles Based Provisioning Modules comes with a feature that allows users to change a password that was forgotten. This reduces the number of help desk calls and frees time and resources to be used on other tasks.
Password self-service is installed when the User Application Roles Based Provisioning Module is installed. However, you must configure the password policy to use a challenge set of questions for a user when he or she needs to change a password.
1 In iManager, click Roles and Tasks > Passwords > Password Policies. 2 To edit the policy, click the name of the password policy you created in Section 4.2.1,
“Creating the Password Policy,” on page 26.3 Click the Forgotten Password tab.4 Select Enable Forgotten Password.5 Select Require a challenge set.6 Click Challenge Sets to create a new challenge set.7 Click New, then use the following information to create a challenge set:
Challenge set name: Specify a name for the challenge set.Create in container: Accept the default location where the challenge set is created in the Password Policy container in the Security container.Required Questions: Select which questions a user is required to answer when changing a password. You can have required questions and random questions that are presented to the user. You can change whether a question is a required question or a random question by clicking on the question, then changing the question type. You can define your own questions or use one of the default questions. The default questions are:
What is your mother’s maiden name?What is your User ID?What is your PIN?What is your childhood pet’s name?
Number of random questions to ask user when password is forgotten: Specify the number of random questions presented to a user.
8 Click OK.9 Click Close.
10 Browse to and select the new challenge set you created.11 Select Allow user to reset password (Requires a challenge set and the Universal Password
option).12 Select Force user to configure Challenge Questions and/or Hint upon authentication.13 Click OK.14 Verify that the password policy is assigned to the container where the user objects reside.
The password policy is not enforced unless it is assigned. For more information, see Section 4.2.3, “Assigning the Password Policy,” on page 27.
Compliance Management Platform Extension for SAP Environments 1.0 SP1 Solutions Guide
5novdocx (en) 13 M
ay 2009
5Simplifying User Access
The desired user experience is to log in to a system once and then have access to the applications and information required to do a job.
It frustrates a user, when they access resources and are required to authenticate each time. It takes time, and users must keep track of multiple passwords. This ultimately increases calls to the help desk for users who have forgotten their passwords, and it also reduces security because users keep their passwords on a note by the computer.
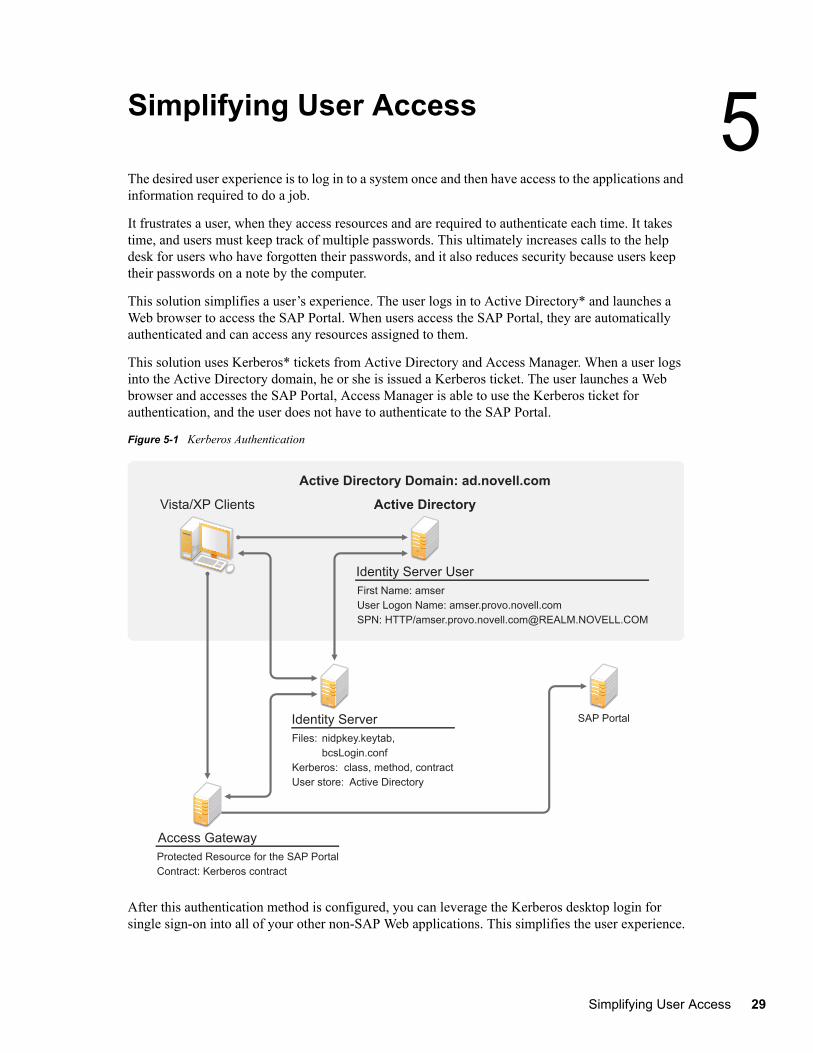
This solution simplifies a user’s experience. The user logs in to Active Directory* and launches a Web browser to access the SAP Portal. When users access the SAP Portal, they are automatically authenticated and can access any resources assigned to them.
This solution uses Kerberos* tickets from Active Directory and Access Manager. When a user logs into the Active Directory domain, he or she is issued a Kerberos ticket. The user launches a Web browser and accesses the SAP Portal, Access Manager is able to use the Kerberos ticket for authentication, and the user does not have to authenticate to the SAP Portal.
Figure 5-1 Kerberos Authentication
After this authentication method is configured, you can leverage the Kerberos desktop login for single sign-on into all of your other non-SAP Web applications. This simplifies the user experience.
Vista/XP Clients Active Directory
SAP Portal
Active Directory Domain: ad.novell.com
Identity Server
Identity Server UserFirst Name: amserUser Logon Name: amser.provo.novell.comSPN: HTTP/[email protected]
Files: nidpkey.keytab, bcsLogin.confKerberos: class, method, contractUser store: Active Directory
Protected Resource for the SAP PortalContract: Kerberos contract
Access Gateway
Simplifying User Access 29

30 Novell
novdocx (en) 13 May 2009
The following sections must be completed in the order listed to enable single sign-on.
Section 5.1, “Prerequisites,” on page 30Section 5.2, “Configuring Active Directory to Assign Kerberos Tickets,” on page 30Section 5.3, “Configuring the Access Manager Identity Server to Consume the Kerberos Tickets,” on page 32Section 5.4, “Configuring the User’s Web Browser,” on page 37Section 5.5, “Adding the SAP Portal as a Protected Resource in Access Manager,” on page 38Section 5.6, “Configuring the SAP Portal for Kerberos Authentication,” on page 39
5.1 PrerequisitesThis solution assumes the following:
Access Manager is installed and configured. For more information see the Novell Access Manager 3.1 SP1 Installation Guide.The Active Directory domain contains entries for both the users and their machines.Active Directory and the Identity Server must be configured to use a Network Time Protocol server. If time is not synchronized, authentication fails.The Access Manager prerequisites have been met for Kerberos authentication. For a list, see “Prerequisites” in the “Configuring Advanced Local Authentication Procedures” chapter of the Novell Access Manager 3.1 SP1 Identity Server Guide.A properly configured DNS server is available to provide DNS names for the Identity Server, the Access Gateway, and the SAP Portal server. Access Manager uses the DNS names to handle requests so that authentication is seamless to the user.
5.2 Configuring Active Directory to Assign Kerberos TicketsComplete the following sections to enable Active Directory to assign Kerberos tickets. When a user logs in to Active Directory, he or she is automatically issued a Kerberos ticket.
Section 5.2.1, “Installing the spn and ktpass Utilities,” on page 30Section 5.2.2, “Creating a User Account in Active Directory for the Identity Server,” on page 31Section 5.2.3, “Creating a Keytab File,” on page 31
5.2.1 Installing the spn and ktpass UtilitiesThe spn and ktpass utilities must be installed on the Active Directory domain controller. These utilities are not installed by default. You need both of these utilities to configure the Access Manager Identity Server for Kerberos authentication.
1 Insert the Windows 2003 disk into the CD drive.2 To install the utilities, run \SUPPORT\TOOLS\SUPTOOLS.MSI on the CD.
The utilities are installed in C:\Program Files\Support Tools.
Compliance Management Platform Extension for SAP Environments 1.0 SP1 Solutions Guide

novdocx (en) 13 May 2009
5.2.2 Creating a User Account in Active Directory for the Identity ServerCreating this account allows the Identity Server from Access Manager to run as a service.
1 In the user management tool, using the following information to create the user account:firstname: Specify a name for the Identity Server.lastname: Specify a name for the Identity Server.userPrincipalName: Specify the userPrincipalName. The format is HTTP/[email protected] example: HTTP/[email protected]: Specify the samAccountName for the user. It consists of the firstname-lastname (required for the setspn utility).password: Specify a password for this user account.Deselect the option User must change password at next logon and select the option Password never expires. The user account needs a password, but it must never expire or be changed.
2 Set the servicePrinicpalNames on the user object.2a From a command line, enter:
setspn -a HTTP/[email protected] samAccountName
2b From a command line, enter:setspn -a HTTP/amserv.provo.novell.com samAccountName
3 Use the ktpass utility to export the keytab file. This sends the Kerberos token to the Identity Server instead of directly to the SAP Portal, to allow the single sign-on to occur.ktpass /out nidp.keytab /princ HTTP:///[email protected] /mapuser [email protected] /pass secret +DesOnly /crypto DES-CBC-MD5 /ptype KRB5_NT_PRINCIPAL
4 Copy the keytab file to jre directory on the Identity Server.Linux: /opt/novell/java/jre/lib/securityWindows: C:\Program Files\Novell\jre\lib\security
5.2.3 Creating a Keytab FileThe keytab file contains the secret encryption key that is used to decrypt the Kerberos ticket. You need to generate the keytab file and copy it to the Identity Server.
1 On the Active Directory server, open a command window and enter a ktpass command with the following parameters:ktpass /out value /princ value /mapuser value /pass value
The command parameters require the following values:
Parameter Value Description
/out <outputFilename> Specify a name for the file, with.keytab as the extension. For example: nidpkey.keytab
Simplifying User Access 31

32 Novell
novdocx (en) 13 May 2009
For this configuration example, you would enter the following command to create a keytab file named nidkey:ktpass /out nidkey.keytab /princ HTTP/[email protected] /mapuser/ [email protected] /pass novell
2 Copy the keytab file to the Identity Server.The default location for the keytab file on the Identity Server is:
Linux: /opt/novell/java/jre/lib/securityWindows: C:\Program Files\Novell\jre\lib\security
5.3 Configuring the Access Manager Identity Server to Consume the Kerberos TicketsYou must configure Access Manager to consume the Kerberos tickets from Active Directory. Access Manager can use the authentication information in the Kerberos tickets to enable single sign-on for the SAP Portal.
Section 5.3.1, “Enabling Logging for Kerberos Transactions,” on page 32Section 5.3.2, “Creating the bcsLogin.conf File,” on page 33Section 5.3.3, “Creating a User Store for the Active Directory Domain,” on page 34Section 5.3.4, “Creating a Kerberos Authentication Class for the Identity Server,” on page 34Section 5.3.5, “Creating a Kerberos Method for the Identity Server,” on page 35Section 5.3.6, “Creating a Kerberos Contract for the Identity Server,” on page 35Section 5.3.7, “Verifying the Kerberos Configuration,” on page 35Section 5.3.8, “Creating a SAML Identity Injection Policy,” on page 36Section 5.3.9, “Refreshing the Identity Server,” on page 37
5.3.1 Enabling Logging for Kerberos TransactionsThis helps to troubleshoot authentication issues.
1 In the Access Manager Administration Console, click Devices > Identity Server > Edit > Logging.
2 Select the File Logging and Echo to Console options to enable these options.
/princ <servicePrincipalName>@<KERBEROS_REALM>
Specify the service principal name for the Identity Server, then @, followed by Kerberos realm. The default value for the Kerberos realm is the Active Directory domain name in all capitals. The Kerberos realm value is case sensitive.
/mapuser <identityServerUser>@<AD_DOMAIN>
Specify the username of the Identity Server user and the Active Directory domain to which the user belongs.
/pass <userPassword> Specify the password for this user.
Parameter Value Description
Compliance Management Platform Extension for SAP Environments 1.0 SP1 Solutions Guide

novdocx (en) 13 May 2009
3 Under the Component File Loggers Levels heading, set the Application option to debug.4 Enable Trace Logging, then select Application, Configuration, and User Store as Component
Content Filters.5 Click OK, then refresh the Identity Server.
5.3.2 Creating the bcsLogin.conf FileThe bcsLogin.conf file is an authentication file for the Java* authentication and authorization service (JAAS).
1 In an text editor, enter the following lines:com.sun.security.jgss.accept {com.sun.security.auth.module.Krb5LoginModule requireddebug="true"useTicketCache="true"ticketCache="/opt/novell/java/jre/lib/security/spnegoTicket.cache"doNotPrompt="true"principal="HTTP/[email protected]"useKeyTab="true"keyTab="/opt/novell/java/jre/lib/security/nidpkey.keytab"storeKey="true";};
The file cannot contain any white space, only end-of-line characters. ticketCache: The location of the cache file where the Kerberos ticket is stored. In the example, this is the default location on SUSE® Linux Enterprise Server (SLES) 10. If you are using Windows for the cache, the default location is:C:\\Program Files\\Novell\\jre\\lib\\security\\spnegoTicket.cache
The path must contain double slashes.principal: Specify the service principal name for the Access Manager Identity Server. This value is unique to your configuration.keyTab: Specify the location of the keytab you created in “Creating a Keytab File” on page 31. This value is unique to your configuration. In the example, this is the default location on SLES 10. If you are using Windows for the cache, the default location is:C:\\Program Files\\Novell\\jre\\lib\\security\\nidpkey.keytab
The path must contain double slashes.2 Save this file with the name bcsLogin.conf.3 Copy this file to the same directory as where the keytab file is stored.4 Make sure that the permissions are set correctly. The permissions are set to 644.5 Restart Tomcat.
Linux: /etc/init.d/novell-tomcat5 restartWindows: Stop and start the Tomcat service from the control panel.When a change is made to the bcsLogin.conf file, Tomcat must be restarted.
Simplifying User Access 33

34 Novell
novdocx (en) 13 May 2009
5.3.3 Creating a User Store for the Active Directory DomainYou need to either configure your Identity Server to use Active Directory as a user store or verify your existing configuration for your Active Directory user store.
1 In the Administration Console, click Devices > Identity Servers > Edit.2 Click Local to view your user stores.
If you have already configured your Identity Server to use the Active Directory server, click its name.If you haven’t configured a user store for the Active Directory server, click New.
3 For a new user store, fill in the following fields. For an existing Active Directory user store, verify the values.Name: Specify a name for the user store for reference.Admin name: Specify the name of the administrator of the Active Directory server. Administrator-level rights are required for setting up a user store. This ensures read/write access to all objects used by Access Manager.Directory Type: Select Active Directory.Server replica: (Conditional) For a new Active Directory user store, click New to add a replica. Fill in the following fields:
Name: Specify a name of the replica for reference. This can be the name of the Active Directory server.IP Address: Specify the IP address of the Active Directory server and the port you want the Identity Server to use when communicating with the Active Directory server.Port: Specify the port that the Active Directory server uses to communicate to the Identity Server. This communication occurs over LDAP. The default non-secure port is 389. The default secure port is 636.
Search Context: For a new user store, click New and specify the context of the administrator of the Active Directory server. For an existing user store, verify that you have an entry for the context of the administrator. Add a context if it is missing.
4 Click OK to save the changes.
5.3.4 Creating a Kerberos Authentication Class for the Identity Server
1 In the Local tab of the Identity Server, click Classes > New.2 Fill in the following fields:
Display name: Specify a name to identify this class.Java Class: Select KerberosClass.
3 Click Next.4 Fill in the following fields:
Service Principal Name: Specify the value of the servicePrincipalName attribute of the Identity Server user. This is the user created in “Creating a User Account in Active Directory for the Identity Server” on page 31.
Compliance Management Platform Extension for SAP Environments 1.0 SP1 Solutions Guide
novdocx (en) 13 May 2009
Kerberos Realm: Specify the name of the Kerberos realm. The default value for this realm is the domain name of the Active Directory server, entered in all capitals. The value in this field is case sensitive.JAAS config file for Kerberos: Specify the path to the bcsLogin.conf file. This is the created in “Creating the bcsLogin.conf File” on page 33.Kerberos KDC: Specify the IP address of the Active Directory server.User Attribute: Specify the attribute in the Identity Vault that contains the userPrincipalName from Active Directory. For example, the mail attribute in the Identity Vault can store the userPrincipalName from Active Directory.If this attribute does not contain the userPrincipalName from Active Directory, the authentication into the SAP Portal fails.
5 Click Finish to save the authentication class.
5.3.5 Creating a Kerberos Method for the Identity Server1 In the Local tab of the Identity Server, click Method > New.2 Fill in the following fields:
Display name: Specify a name to identify this method.Class: Select the Kerberos class created in “Creating a Kerberos Authentication Class for the Identity Server” on page 34.User stores: Move the user store for the Identity Vault to the list of User stores. This must be the Identity Vault user store, not the Active Directory user store.
3 Click Finish to save the method.
5.3.6 Creating a Kerberos Contract for the Identity Server1 In the Local tab of the Identity Server, click Contract > New.2 Fill in the following fields:
Display name: Specify a name to identify this contract.URI: Specify a value that uniquely identifies the contract from all other contracts.The URI cannot begin with a slash, and it must uniquely identify the contract. For example: kerberos/contract.Methods: From the list of available methods, move the Kerberos method, created in “Creating a Kerberos Method for the Identity Server” on page 35, to the Methods list.
3 Click Finish to save the contract.
5.3.7 Verifying the Kerberos ConfigurationTo view the catalina.out (Linux) or the stdout.log (Windows) file of the Identity Server:
1 In the Administration Console, click Auditing > General Logging.2 In the Identity Servers section, select the catalina.out or stdout.log file.3 Download the file and open it in a text editor.
Simplifying User Access 35
36 Novell
novdocx (en) 13 May 2009
4 Search for Kerberos and verify that a subsequent line contains a Commit Succeeded phrase. For the configuration example, the lines look similar to the following:principal's key obtained from the keytabprincipal is HTTP/[email protected] server's keyKerberos Principal HTTP/[email protected] Version 3key EncryptionKey: keyType=3 keyBytes (hex dump)=0000: CB 0E 91 FB 7A 4C 64 FE
[Krb5LoginModule] added Krb5Principal HTTP/[email protected] to SubjectCommit Succeeded
5 If the file does not contain any lines similar to these, verify that you have enabled logging. See “Enabling Logging for Kerberos Transactions” on page 32.
6 If the commit did not succeed, search backward in the file and verify the following values:Service Principal NameName of keytab file
For the example configuration, the file contains lines with text similar to the following:Principal is HTTP/amser.provo.novell.com
KeyTab is /usr/lib/java/jre/lib/security/nidpkey.keytab
7 (Conditional) If you make any modifications to the configuration, either in the Administration Console or to the bcsLogin file, restart Tomcat on the Identity Server.
5.3.8 Creating a SAML Identity Injection PolicyYou must create a SAML identity injection policy for Access Manager to use. This allows the authentication information in the Kerberos tickets to be passed to the Role Mapping Application.
1 In the Administration Console, click Policies > Policies > Master_Container.The policy must reside in the master container.
2 Click New to create a new policy.3 Specify a name to identify the policy.4 For the policy type, select Access Gateway: Identity Injection.5 Click OK.6 Fill in the following fields to define the policy:
Description: Specify a description for the policy.Priority: Leave the priority at the default level of 1.Actions: Click New > Inject into Authentication Header.
User Name: Select Credential Profile, then select LDAP Credentials:LDAP User Name for the username.Password: Select Credential Profile, then select SAML Credentials:SAML AssertionMulti-Value Separator: Leave the default separator as a comma.DN Format: Leave the default DN format as LDAP.
7 Click OK twice to save the policy.
Compliance Management Platform Extension for SAP Environments 1.0 SP1 Solutions Guide

novdocx (en) 13 May 2009
5.3.9 Refreshing the Identity ServerIn order for the changes to the Identity Server to take affect, you must refresh the Identity Server.
1 In the Administration Console, select Devices > Identity Servers.2 Select your Identity Server, then click Refresh.3 Click Close.
5.4 Configuring the User’s Web BrowserEach user’s Web browser must be configured to trust the Access Manager Identity Server.
1 Add the computers of the users to the Active Directory domain.For instructions, see your Active Directory documentation.
2 Log in to the Active Directory domain, rather than the machine.3 Configure the Web browser to trust the Identity Server:
Internet Explorer: For version 7, click Tools > Internet Options > Security > Local intranet > Sites > Advanced. (For Internet Explorer version 6, click Tools > Internet Options > Security > Trusted sites > Sites.)In the Add this website to the zone text box, enter the Base URL for the Identity Server, then click Add.In the configuration example, this is http://amser.provo.novell.com.Click Close.Firefox: In the URL field, specify about:config. In the Filter field, specify network.n. Double-click network.negotiate-auth.trusted-uris. For this example configuration, you would add http://amser.provo.novell.com to the list.This preference lists the sites that are permitted to engage in SPNEGO Authentication with the browser. Specify a comma-delimited list of trusted domains or URLs. If the deployed SPNEGO solution is using the advanced Kerberos feature of Credential Delegation, double-click network.negotiate-auth.delegation-uris. This preference lists the sites for which the browser can delegate user authorization to the server. Specify a comma-delimited list of trusted domains or URLs.For this example configuration, you would add http://amser.provo.novell.com to the list.
4 Click OK. The configuration appears as updated.Restart your browser to activate this configuration.
5 In the URL field, enter the base URL of the Identity Server with port and application. For this example configuration:http://amser.provo.novell.com:8080/nidp
The Identity Server authenticates the user without prompting the user for authentication information.
Simplifying User Access 37

38 Novell
novdocx (en) 13 May 2009
5.5 Adding the SAP Portal as a Protected Resource in Access ManagerYou must configure the SAP Portal as a protected resource in the Access Gateway.
1 In the Administration Console, click Devices > Access Gateways, then click the name of your Access Gateway.
2 (Conditional) If you have a Proxy Service defined for the SAP Portal, skip to Step 3. Otherwise, complete the following steps to create the Proxy Service for the SAP Portal:2a Click New in the Proxy Service List.2b Fill in the following fields:
Proxy Service Name: Specify a name to identify the SAP Portal as a Proxy Service.Multi-Homing Type: Select Domain-Based.Published DNS Name: Specify the DNS name for the SAP Portal server.Path: Specify the SAP Portal’s application context.Web Server IP Address: Specify the IP address of the Web server.Host Header: Select Web Server Host Name to publish the DNS name that the user sent in the request to be replaced by the DNS name of the Web server.Web Server Host Name: Specify the DNS name of the Web server.
2c Click OK to create the Proxy Service for the SAP Portal.3 Click the display name of the SAP Portal Proxy Service.4 Click the Protected Resources tab, then click New.5 Specify the name of the protected resource, then click OK.6 Fill in the following fields on the Overview tab:
Description: Specify a description for the protected resource.Contract: Select the Kerberos contract created in “Creating a Kerberos Contract for the Identity Server” on page 35.URL Path: Click the /* path, then define the application context for the SAP Portal.The default application context is /irj/portal. You need to have two entries. For example: /*
/irj/portal.7 Click the Identity Injection tab, then click Manage Policies.8 Select the policy created in “Creating a SAML Identity Injection Policy” on page 36, then click
Apply Changes.9 Click Close to close the policies window.
10 Click OK twice to save the changes to the protect resource.
5.5.1 Refreshing the Access GatewayIn order for the changes for the protect resource to take effect, you must refresh the Access Gateway.
1 In the Administration Console, select Devices > Access Gateways.
Compliance Management Platform Extension for SAP Environments 1.0 SP1 Solutions Guide

novdocx (en) 13 May 2009
2 Select your Access Gateway, then select Refresh.3 Click Close.
5.6 Configuring the SAP Portal for Kerberos Authentication
1 Add the following attributes to the default read-only datasourceConfiguration file:kbr5principalnamekpnprefixdn added to the user definition and mapped to the ADS attributes
The SAP Portal UME Identity Store must be configured as an Active Directory Server (ADS) with Kerberos attributes added. For more information, see SAP Note 994791 (https://service.sap.com/sap/support/notes/994791).
2 Run the SPNego Wizard on the portal:2a For the Kerberos Principal Name, select Enter Principal.2b Specify the samAccountName of the user created for the Identity Server in Section 5.3.3,
“Creating a User Store for the Active Directory Domain,” on page 34.2c Specify the password for this user.2d Deselect Basic Password Fallback.2e Complete the wizard.
3 Restart the J2EE* SAP server.4 Assign the SPNego Authentication Template to the Security Provider > ticket component
through the J2EE Visual Admin Tool on the portal J2EE server.5 Restart the portal J2EE server.
Simplifying User Access 39
40 Novell
novdocx (en) 13 May 2009
Compliance Management Platform Extension for SAP Environments 1.0 SP1 Solutions Guide

6novdocx (en) 13 M
ay 2009
6Auditing Real-Time Events
The final part of any solution is to provide auditing and reporting capabilities for the solution. The extension for SAP environments provides real-time auditing and reporting capabilities for your SAP systems. This allows you to provide automated reports that can prove compliance with the business policies implemented when users are provisioned and granted access to resources.
In order to provide reports that contain value, the solution must be able to correlate each account and identity a user has. Each user account can have one or more identities for the account. For example, in Active Directory a user account is identified by sAMAccountName, DN, userPrincipalName, and an association. In SentinelTM, a user’s identity is tracked through Connectors. There are Connectors for each system. They send the events to a Sentinel Collectors that gather the information. The events for the users are stored in an accounts table in Sentinel. Reports are run against this data.
The problem at this point is that Sentinel is not aware that John Smith in Active Directory is the same account as jsmith in SAP. The Account Tracking feature of the Novell® Compliance Management Platform (CMP) can to track each account and identity.
Account tracking adds a Sentinel driver and an Identity Vault collector to the solution. The Sentinel driver synchronizes all accounts and identities from each system to Sentinel. The information is stored in an identity table. The Sentinel reports and the identity browser display the accounts and identities for each user. The reports also contains a list of all events for the user in each system. This provides a complete picture of what each user is doing in your environment.
The following figure shows how the solution works. Identity Manager provisions accounts for the connected systems and databases. Sentinel tracks each account and identity individually. Account Tracking connects the two features to provided real-time tracking of events for each account and identity.
Auditing Real-Time Events 41
42 Novell
novdocx (en) 13 May 2009
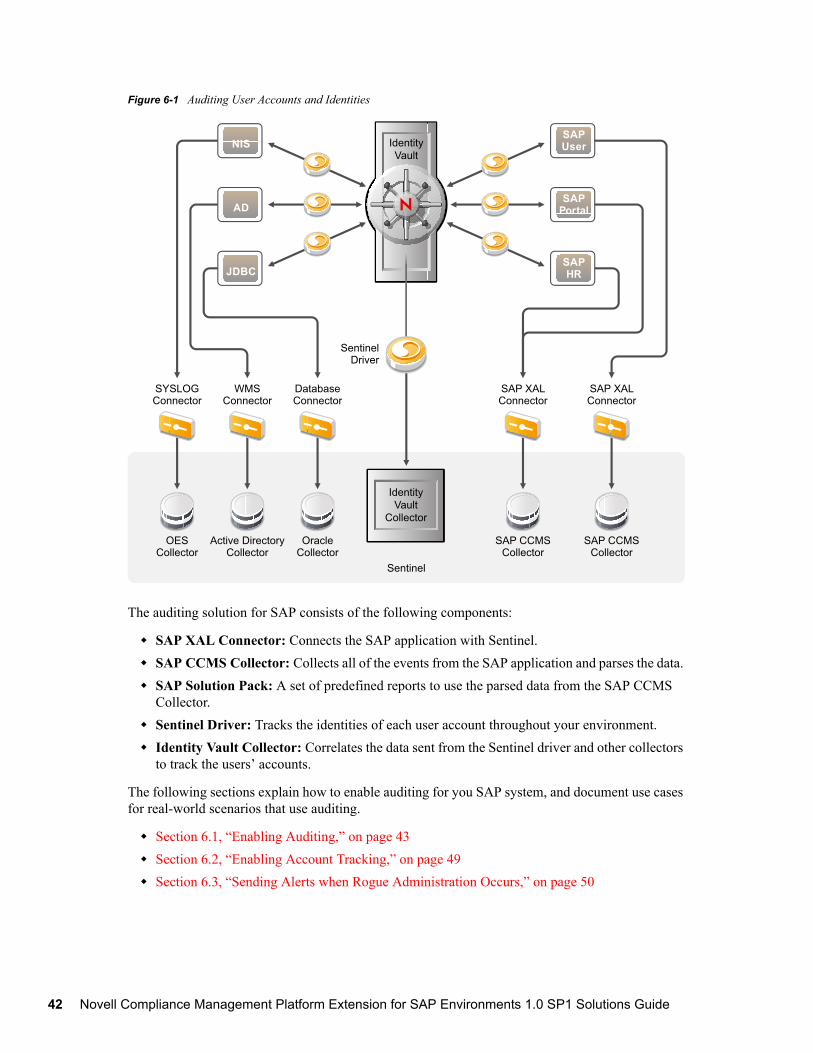
Figure 6-1 Auditing User Accounts and Identities
The auditing solution for SAP consists of the following components:
SAP XAL Connector: Connects the SAP application with Sentinel.SAP CCMS Collector: Collects all of the events from the SAP application and parses the data. SAP Solution Pack: A set of predefined reports to use the parsed data from the SAP CCMS Collector.Sentinel Driver: Tracks the identities of each user account throughout your environment.Identity Vault Collector: Correlates the data sent from the Sentinel driver and other collectors to track the users’ accounts.
The following sections explain how to enable auditing for you SAP system, and document use cases for real-world scenarios that use auditing.
Section 6.1, “Enabling Auditing,” on page 43Section 6.2, “Enabling Account Tracking,” on page 49Section 6.3, “Sending Alerts when Rogue Administration Occurs,” on page 50
OESCollector
Active DirectoryCollector
SYSLOGConnector
WMSConnector
DatabaseConnector
SAP XALConnector
OracleCollector
SAP CCMSCollector
SAP CCMSCollector
IdentityVault
IdentityVault
Collector
SentinelDriver
Sentinel
SAP XALConnector
SAPUser
SAPPortal
SAPHR
AD
NIS
JDBC
Compliance Management Platform Extension for SAP Environments 1.0 SP1 Solutions Guide

novdocx (en) 13 May 2009
6.1 Enabling AuditingCompleting the following procedures allows you to audit the events that occur in the SAP system. These events can be security events, or provisioning events that are a result of the Identity Manager drivers.
Each of the use cases requires that auditing be enabled. Use the following procedures to enable auditing for your SAP environment.
Section 6.1.1, “Prerequisites,” on page 43Section 6.1.2, “Configuring the SAP Servers for Auditing,” on page 43Section 6.1.3, “Importing the SAP CCMS Collector and the SAP XAL Connector,” on page 45Section 6.1.4, “Adding Auxiliary Files for the SAP XAL Connector,” on page 46Section 6.1.5, “Configuring the SAP CCMS Collector,” on page 46Section 6.1.6, “Configuring the SAP XAL Connector,” on page 47Section 6.1.7, “Configuring the SAP Event Source,” on page 48
6.1.1 PrerequisitesThe procedures assume the following items have been completed:
Sentinel 6.1 is installed and configured. For more information, see the Sentinel 6.1 Installation Guide (http://www.novell.com/documentation/sentinel61/pdfdoc/sentinel_61_installation_guide.pdf).Identity Manager 3.6 is installed and configured. For more information, see the Identity Manager 3.6.1 Installation Guide.
6.1.2 Configuring the SAP Servers for AuditingComplete the following steps to enable the SAP server for auditing. These steps must be completed on each server you want to audit.
1 Shut down the SAP instance through the SAPMMC.2 Edit the SAP profile <SID>_<INSTANCE_NAME>_<SERVER_NAME>.
For example: DMO_DVEBMGS01_sapserverUNIX System: /usr/sap/<SID>/SYS/profileWindows NT System: X:\usr\sap\<SID>\SYS\profileDo not modify a SAP profile file with a .1 or .2 extension. These are the backup files.
3 Add the following parameters to the SAP profile file:
Parameter Description
rsau/enable = 1 Enables the Security Audit Log
rsau/max_diskspace/local = 2147483647
Maximum space to allocate for the audit files
Auditing Real-Time Events 43

44 Novell
novdocx (en) 13 May 2009
4 (Conditional) Modify the following parameters to the SAP profile if you are using the SAP ABAP trial version to increase memory allocation to the CCMS alert system. The CCMS alert system is disabled by default.
5 Start the SAP instance through the SAPMMC.6 Log in to SAP.7 Specify the SAP transaction SM19, then select Environment > Profile Parameter from the
toolbar.7a In transaction SM19, click the Dynamic Configuration tab.7b Click the Display <-> Change icon to add additional events to Filter 1.7c Select Filter Active to activate the filter.7d Select all event types, such as logon and master record change.
By default, only System events are selected.7e Click the Display <-> Change icon to save and distribute the changes to your SAP
servers.8 Load the SAP CCMS Monitor Templates > Security monitor via transaction RZ20:
8a Run transaction RZ20.8b Expand the SAP CCMS Monitor Templates node, then select the Security Monitor set.
rsau/selection_slots = 10 Number of filters to allow for the security audit log
rsau/max_diskspace/per_file = 2147483647
Maximum space to allocate for the audit files
rsau/max_diskspace/per_day = 21474836470
Maximum space to allocate for the audit files
Parameter Description
alert/MONI_SEGM_SIZE = 40000000 Allocates memory space for the alert system
rdisp/autoabaptime = 300 Parameter for the background job scheduler
Parameter Description
Compliance Management Platform Extension for SAP Environments 1.0 SP1 Solutions Guide

novdocx (en) 13 May 2009
8c Right-click the Security Monitor set, then click Load monitor.
9 Repeat Step 1 through Step 8 for each SAP server that you want to enable auditing for.
6.1.3 Importing the SAP CCMS Collector and the SAP XAL ConnectorThe SAP CCMS Collector and the SAP XAL Connector need to be added to the Event Source Manager once. The SAP CCMS Collector and the SAP XAL Connector are then displayed as options to select during the configuration procedures.
To import the SAP CCMS Collector and the SAP XAL Connector:
1 Download the SAP CCMS Collector (SAP_CCMS_6.1r1.clz.zip) from the Sentinel 6.1 download Web site (http://support.novell.com/products/sentinel/secure/sentinel61.html) to the server where the Sentinel Control Center is running.
2 Download the SAP XAL Connector (sap_connector.zip)from the Sentinel 6.1 download Web site (http://support.novell.com/products/sentinel/secure/sentinel61.html) to the server where the Sentinel Control Center is running.
3 Log in to the Sentinel Control Center.4 Select Event Source Management > Live View, then select Tools > Import plugin.5 Browse to and select the SAP CCMS Collector SAP_CCMS_6.1r1.clz.zip file, then click
Next.
Auditing Real-Time Events 45

46 Novell
novdocx (en) 13 May 2009
6 Follow the remaining prompts, then click Finish.7 Repeat steps Step 4 through Step 6, except browse to and select the SAP XAL Connector
sap_connector.zip file.
6.1.4 Adding Auxiliary Files for the SAP XAL ConnectorThe SAP Java Connector 3 (JCO) library files must be added to the Sentinel server for the SAP XAL Connector to work.
1 Download the SAP JCO3 library files from the SAP Service Market Place Web site (http://www.sap.com/services/index.epx).The SAP XAL Connector only supports version 3 of the JCO library files. These files are:
sapjco3.jar
Native libraries:Linux/UNIX: libsapjco3.soWindows: sapjco3.dll
2 Log in to the Sentinel Control Center.3 (Conditional) If you have more than one Connector, select the Connector, then proceed to the
next step.4 Select Event Source Management > Live View, then select the Add Auxiliary File icon .5 Browse to and select the native library file for your platform.6 Repeat Step 4 for the sapjco3.jar file.
6.1.5 Configuring the SAP CCMS CollectorFor each SAP XAL Connector, you must have one SAP CCMS Collector.
1 In the Event Source Management live view, right-click the Collection Manager, then click Add Collector.
2 Select Novell in the vendor column.3 Select SAP CCMS Alerts 6r1 in the Name column, then click Next.4 Select Novell Engineering and SAP_CCMS_6.1r1 for the Collector script, then click Next.5 Configure the SAP CCMS Collector for your needs by using the following information:
Configuration Parameter Default Value Description
Event Source Time Zone +0000 Sets the time zone offset UTC (+0000) of the event source data time stamps. This is used if the source data is reported only in local time with no time zone indicated. The format is + or - followed by a two-digit hour and minute offset.
Compliance Management Platform Extension for SAP Environments 1.0 SP1 Solutions Guide

novdocx (en) 13 May 2009
6 Click Next.7 Complete the configuration of the SAP CCMS Collector with the following information:
Name: Specify a name for this Collector.Run: Select whether the Collector is started whenever the Collector Manager is started.Alert if no data received in specified time period: (Optional) Select this option to send the No Data Alert event to Sentinel if data is not received by the collector in the specified time period.Limit Data Rate: (Optional) Select this option to set a maximum limit on the rate of data the collector sends to Sentinel. If the data rate limit is reached, Sentinel throttles back on the source in order to limit the flow of data.Set Filter: (Optional) Specify a filter on the raw data passing through the collector.Trust Event Source Time: (Optional) Select this option if you trust the Event Source server’s time.
8 Click Finish to save the Collector.
6.1.6 Configuring the SAP XAL ConnectorThe SAP XAL Connector can connect to more than one SAP Application.
1 In the Event Source Management live view, right-click the SAP CCMS Collector, then select Add Connector.
2 Select SAP from the list of installed Connectors, then click Next.3 Configure the Connector by specifying the following information:
Execution Mode release Sets the execution mode for the collector. There are three options:
release: Use this mode for normal operation.
custom: Use this mode if the Identity Manager Collector is customized.
debug: Use this mode when troubleshooting. It generates debug trace files.
MSSP Customer Name
Script Error Severity 5 Severe (5) Sets the severity for a script error event.
Send Script Error Message
yes Sends a script error event when there is an error with the Collector script.
Sentinel Driver Instance ID
Enables multiple Sentinel drivers. Each Sentinel driver is paired with a specific Identity Vault Collector. This instance ID is synchronized between the Sentinel driver and the Identity Vault Collector. By default, there is no value. Use letters and numbers only.
iSCALE Connection URL localhost:10012 The URL that the Identity Vault Collector uses to retrieve identity events stored in the SonicMQ* message queue.
Configuration Parameter Default Value Description
Auditing Real-Time Events 47

48 Novell
novdocx (en) 13 May 2009
Name: Specify the name of the Connector to display.Run: (Optional) Select this option to start the Connector when the Collector Manager starts.Alert if no data received in specified time period: (Optional) Select this option to send a No Data Alert event to Sentinel if no data is received by the Connector in the specified time period. There is also an option to resend the alert if multiple time periods pass without receiving data from the Connector.Limit Data Rate: (Optional) Specify the maximum limit on the rate of data this connector can send to Sentinel. If the data limit is reached, Sentinel begins to throttle back on the source in order to limit the flow of data.Set Filter: (Optional) Specify a filter on the raw data passing through this connector.Save Raw Data to a file: (Optional) Saves the raw data passing through the Connector to a file for further analysis.
4 Click Finish to save the configuration.
6.1.7 Configuring the SAP Event SourceYou must configure one or more event sources for the SAP XAL Connector to poll for SAP system alerts.
1 In the Event Source Management live view, right-click the SAP XAL Connector, then select Add Event Source.
2 Specify the Connector parameters for the desired SAP server.Host Name: Specify the DNS name or IP address of the SAP server that is polled for SAP system alerts.System Number: Specify the system number of the SAP server.Client Number: Specify the client number of the SAP server.User Name: Specify the username of a user with sufficient authorization to perform CCMS administration. This involves the collection and completion of system alerts. It is recommended that a Communication (CPIC) User account be utilized.Password: Specify the password of the CCMS administrative user.Language: Specify the two-letter language code. The default is EN for English.
3 Click Next.4 Specify a monitor set followed by the forward-slash-separated path to the desired monitor
object. The default monitor set and object are SAP CCMS Monitor Templates/Security.The default monitor path is the most commonly used for system alerts that are related to system auditing.
5 Click Next.6 Specify a name for the SAP server to be displayed as an event source in the Event Source
Manager.This allows you to identify each SAP server in the Event Source Manager.
7 Click Next.8 Click Finish to save the configuration for the new event source object.
Compliance Management Platform Extension for SAP Environments 1.0 SP1 Solutions Guide

novdocx (en) 13 May 2009
9 Right-click the new SAP event source object, then click Start to start the event source object.10 Repeat Step 1 through Step 8 for each SAP server you want to monitor through the same
connector.
6.2 Enabling Account TrackingAccount tracking is the ability to track each user’s accounts and identities in your system. This solution tracks the user accounts in your SAP system.
Complete the following sections to enable account tracking for your SAP system. The items in the prerequisites section must be completed before the other section.
After the sections are complete, you can track the accounts through Sentinel reports included in the Sentinel Solution Pack for SAP or in the identity browser in Sentinel.
Section 6.2.1, “Prerequisites,” on page 49Section 6.2.2, “Enabling Account Tracking on the SAP Drivers,” on page 49
6.2.1 PrerequisitesThe steps for the solution assume the following:
All of the procedures in Section 6.1, “Enabling Auditing,” on page 43 are complete.You have installed and configure the Sentinel driver and the Identity Vault Collector. For more information, see “Checklist for Enabling Account Tracking” in the Identity Manager 3.6.1 Driver for Sentinel 6.1 and the Identity Vault Collector Implementation Guide.
6.2.2 Enabling Account Tracking on the SAP DriversComplete the following tasks to enable Account Tracking for each SAP Portal and SAP User Management driver you have installed and configured in your environment. The SAP HR driver and the SAP Business Logic drivers are not enabled for Account Tracking.
1 Access the Account Tracking GCV on the SAP driver:In Designer: Right-click the driver icon, then select Properties > GCVs.In iManager: Edit the driver properties, then click the Global Config Values tab.
2 Set the Account Tracking > Show Account Tracking Configuration option to show.3 Use the following information to enable account tracking:
Enable account tracking: Select true to enable the policies in the driver to use the DirXML-Accounts attribute.Realm: Specify the name of your realm, security domain, or namespace where the account name is unique.Object Class: Specify the object classes to track with account tracking. The class name must be in the application namespace.Identifiers: Each driver has different account identifier attribute. By default the attributes are prepopulated for each driver.
SAP User Management: association, USERNAME:BAPIBNAME
Auditing Real-Time Events 49

50 Novell
novdocx (en) 13 May 2009
SAP Portal: association, logonnameStatus attribute: Specify the name of the attribute in the application namespace that represents the account status. By default the attributes are:
SAP User Management: LOCKUSERSAP Portal: isLocked
Status active attribute: The value of the status attribute that represents an active state. By default, the value is false.Status inactive attribute: The value of the status attribute that represents an inactive state. By default, the value is true.Subscription default status: The default status the policies assume when an object is subscribed to the application and the status attribute is not set in the Identity Vault. By default, the status is Active.Publication default status: The default status the policies assume when an object is published to the Identity Vault and the status attribute is not set in the application. By default, the status is Uninitialized.
4 Click OK to save the changes.If the driver is running, it must be restarted for the changes to take effect.
5 Repeat Step 1 through Step 4 for each SAP driver in your environment.
6.3 Sending Alerts when Rogue Administration OccursWhen an identity attribute is changed by an administrator, not by Identity Manager, Sentinel logs the event and then takes the appropriate action. This solution is included with NCMP. If you have implemented this solution with NCMP, there are no additional steps required for this solution to work for your SAP systems. If you have not implemented this solution, follow the instructions in the Novell Compliance Management Platform 1.0 SP1 Integration Guide for “Sending Alerts when Rogue Administration Occurs”.
Compliance Management Platform Extension for SAP Environments 1.0 SP1 Solutions Guide