northwest woodworkers association the sawdust …nwwoodworkers.org/newsletters/march 2018...
TRANSCRIPT

1
Northwest Woodworkers Association
THE SAWDUST NEWS
March 2018
An association for woodworkers of all skill levels to share their common interest
The Next Meeting Date: Thursday, April 26, 2018 at 6:30 PM Location: Wood Technology Center – Seattle Central College
2310 S Lane St, Seattle, WA 98144
Program Highlight: Guided Tour Jeffery Wasserman will give us a guided tour of this facility and describe the woodworking programs offered there. Several past and present Association members have attended classes there and some have graduated from their woodworking programs.
March 2018 Meeting Highlights Meeting Photos by Scott Wilson Meeting Notes by Tim Newsome
The March 2018 meeting of the Northwest Woodworkers Association was held on Thursday, March 29, 2018 at Rockler Woodworking -Northgate. Eighteen members attended this interesting and informative meeting. Don Beacom conducted the meeting.
We want to express our appreciation to Michael Reszler and the Rockler Woodworking staff for again providing a wonderful venue for this meeting. We really appreciate your long-standing support of the Association.

2
New Members
We want to acknowledge two new members to the Northwest Woodworkers Association, who joined us at this meeting. We extend a warm welcome to you and hope that we will be able to help you succeed and advance your skill level and knowledge to enhance your woodworking experience. We are here to help!
Ben Severson noted that he finally has space for a shop! He said that he is planning to start building cabinets. We look forward to seeing some of your projects, Ben.
Tom English told us that he is just starting woodworking. He noted that he is building a storage cabinet for his wife’s jewelry collection. Like they say on the forums, “If there ain’t no pics, it didn’t happen!”, so be sure to bring along some photos of your project to a future meeting, Tom.
New Tools
John Gonder mentioned that he had purchased a Laguna dust collector for his shop. He said it took him about 5 1/2 hours to assemble the unit. He noted that he has located the DC outside his shop and was in the process of installing 6” PVC ducting both into and out of his shop. We look forward to seeing pictures of your installation and a report on your DC performance, John.
Show ‘N’ Tell
Dan Cordwell mentioned at our last meeting that he had made a modification to one of his hand planes to enable him to better plane the edges of plywood panels positioned horizontally. He brought along his low angle block plane, modified by adding thin steel side plates
lined with polypropylene, providing low friction surfaces to guide the plane along the panel. Dan noted that it was convenient to just drill and tap the sides of the plane to attach the guide plates and that the polypropylene material held screw threads very well. He also added the triangular aluminum extension to the side of the plane to provide a convenient handle to grip during planing. Very innovative idea, Dan!

3
Chris Green brought along two more of his wonderful artistic creations, “Parabolic Paradox” and “Conjunctions”.
Parabolic Paradox was a lathe-turned piece having 128 separate blocks of 8 different species of wood! Chris posed an interesting question, noting that the piece was made from straight edged blocks, “Where did the parabolas come from?” [Ed. Note: What is a parabola? Dictionary definition: “A parabola is a symmetrical open plane curve formed by the intersection of a cone with a plane parallel to its side. The path of a projectile under the influence of gravity ideally follows a curve of this shape.”]
It is interesting to see how the diameter of the conical shape affects the height and parabolic shapes. Chris noted that despite the careful attention to the size, position, dimensional accuracy, and selection of wood species he exercised to produce this result, some of his success was just “a happy accident”. [Ed. Note: Somehow my “accidents” never seem to be that “happy”…………...!] Considering all the dimensional tolerances involved, this piece shows and amazing degree of symmetry – a testimony to Chris’s careful planning and accurate milling of his detail parts. Truly a beautiful piece, Chris, which creatively displays the multiplicity of colors and grain patterns of the wood species. Thanks for sharing it with us.

4
His second creation, “Conjunctions”, wonderfully displays the beauty of spalted (partially decayed) wood. The cube is a piece of Cork Oak, which appears to be balanced on one corner in the center of a uniquely designed base of multiple wood species. Chris has cleverly designed the base and positioned the cube to draw the focus of the eye to the center (i.e. conjunction) of the piece!
Project Photos by Chris Green
How intriguing and beautiful are the grain patterns created by the bacteria that produce the spalting in the wood, which is part of the decaying process. The medullary rays in the end grain also contribute greatly to the visual effect. Again, well done, Chris!
5
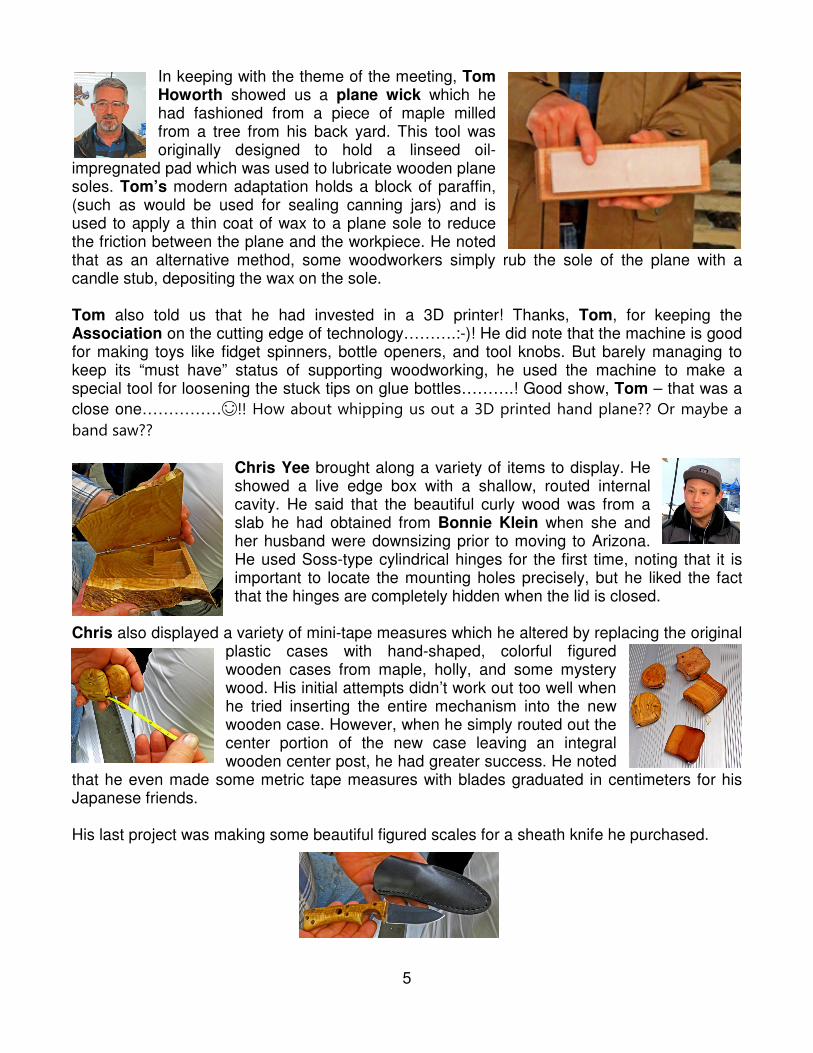
In keeping with the theme of the meeting, Tom Howorth showed us a plane wick which he had fashioned from a piece of maple milled from a tree from his back yard. This tool was originally designed to hold a linseed oil-
impregnated pad which was used to lubricate wooden plane soles. Tom’s modern adaptation holds a block of paraffin, (such as would be used for sealing canning jars) and is used to apply a thin coat of wax to a plane sole to reduce the friction between the plane and the workpiece. He noted that as an alternative method, some woodworkers simply rub the sole of the plane with a candle stub, depositing the wax on the sole. Tom also told us that he had invested in a 3D printer! Thanks, Tom, for keeping the Association on the cutting edge of technology……….:-)! He did note that the machine is good for making toys like fidget spinners, bottle openers, and tool knobs. But barely managing to keep its “must have” status of supporting woodworking, he used the machine to make a special tool for loosening the stuck tips on glue bottles……….! Good show, Tom – that was a
close one……………�!! How about whipping us out a 3D printed hand plane?? Or maybe a band saw??
Chris Yee brought along a variety of items to display. He showed a live edge box with a shallow, routed internal cavity. He said that the beautiful curly wood was from a slab he had obtained from Bonnie Klein when she and her husband were downsizing prior to moving to Arizona. He used Soss-type cylindrical hinges for the first time, noting that it is important to locate the mounting holes precisely, but he liked the fact that the hinges are completely hidden when the lid is closed.
Chris also displayed a variety of mini-tape measures which he altered by replacing the original plastic cases with hand-shaped, colorful figured wooden cases from maple, holly, and some mystery wood. His initial attempts didn’t work out too well when he tried inserting the entire mechanism into the new wooden case. However, when he simply routed out the center portion of the new case leaving an integral wooden center post, he had greater success. He noted
that he even made some metric tape measures with blades graduated in centimeters for his Japanese friends. His last project was making some beautiful figured scales for a sheath knife he purchased.

6
Chris also showed us some photos of a walnut slab table he purchased from Slab Art Studio (https://www.slabart.com/copy-of-home). One of the co-owners, Eric Holder, customized the table for him by installing four bowtie inserts in the top – one for Chris and his wife, and one for each of his children! We are looking forward to seeing pics of the finished piece, Chris.
Tim Newsome showed us a series of photos of an interesting, innovative, and practical project he recently completed – an outdoor box for holding delivered packages. He noted that he made the box from Western Red Cedar, this species being a
weather-resistant wood which has a warm, natural appearance. His construction method with tongue and groove joints looked as though that was a good choice to make the installation of the floating side and bottom panel components self-aligning. Tim said he chose gas springs to support the hinged lid to take advantage of their built-in controlled closing operation. The
scroll-sawed letters really set off the project and make its purpose pretty clear……………. � Looks like it’s a-workin’ Tim! Great project, and great photo documentation – thanks for sharing it with us!
Project Photos by Tim Newsome
7
Program Highlight – Using Hand Tools
Tony Grosinger, our program presenter for the meeting, gave a very interesting and informative presentation related to the use of hand tools. In this day and age where the woodworking emphasis appears to be focused on bigger and better(?) power tools, it was refreshing and educational to be reminded (or learn for the first time) about the various hand tools and their proper usage. Sometimes we forget
that in the not so distant past, almost all furniture was produced by skilled craftsmen (and craftswomen) using hand tools! Seeing the complexity and beauty of so many of the period pieces still in use today is certainly a testament to the effectiveness of hand tools in the hands of someone who knows how to use them! Having seen Tony’s previous presentation about his world class workbench project, which he built with hand tools, would indicate that he has a
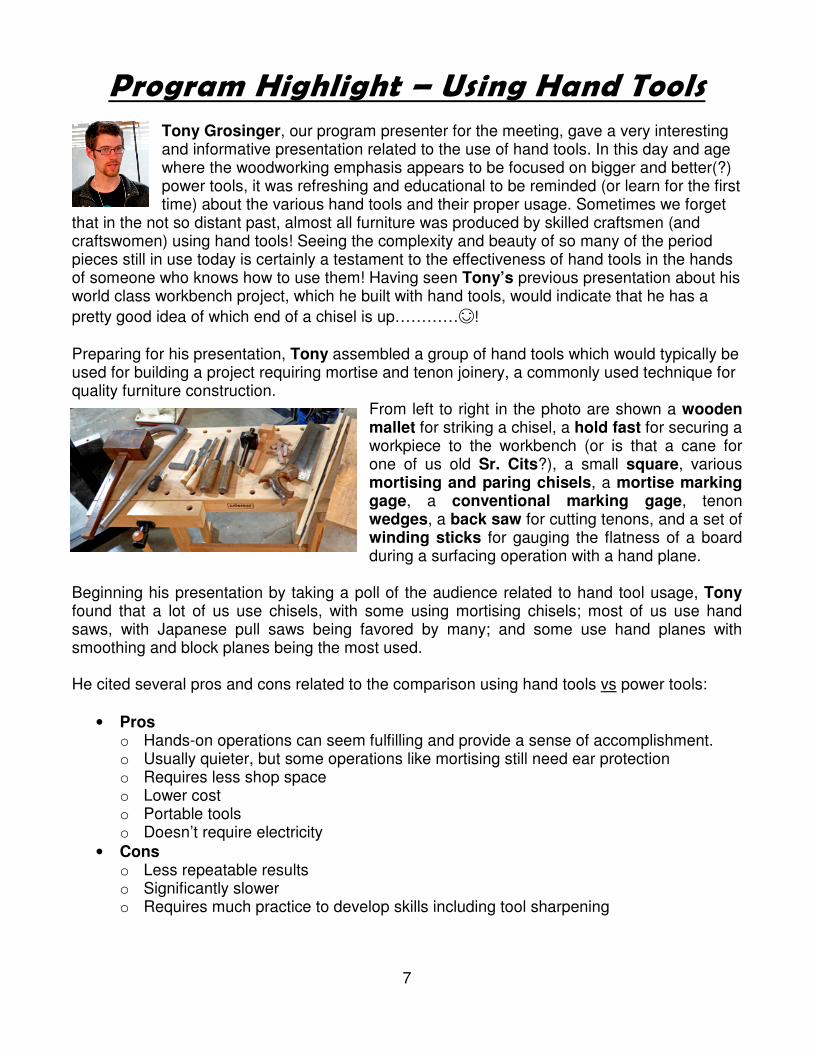
pretty good idea of which end of a chisel is up…………�! Preparing for his presentation, Tony assembled a group of hand tools which would typically be used for building a project requiring mortise and tenon joinery, a commonly used technique for quality furniture construction.
From left to right in the photo are shown a wooden mallet for striking a chisel, a hold fast for securing a workpiece to the workbench (or is that a cane for one of us old Sr. Cits?), a small square, various mortising and paring chisels, a mortise marking gage, a conventional marking gage, tenon wedges, a back saw for cutting tenons, and a set of winding sticks for gauging the flatness of a board during a surfacing operation with a hand plane.
Beginning his presentation by taking a poll of the audience related to hand tool usage, Tony found that a lot of us use chisels, with some using mortising chisels; most of us use hand saws, with Japanese pull saws being favored by many; and some use hand planes with smoothing and block planes being the most used. He cited several pros and cons related to the comparison using hand tools vs power tools:
• Pros o Hands-on operations can seem fulfilling and provide a sense of accomplishment. o Usually quieter, but some operations like mortising still need ear protection o Requires less shop space o Lower cost o Portable tools o Doesn’t require electricity
• Cons o Less repeatable results o Significantly slower o Requires much practice to develop skills including tool sharpening

8
To illustrate his presentation, Tony performed live demonstrations of some common hand tool operations required for making mortise and tenon joints and surfacing with a hand plane.
• Chisels: A mortising chisel usually has a thick, stout body with a shallow taper; a paring chisel usually has a thinner, wider blade with a higher angle taper
• Marking Gages: A conventional marking gage has a single pin or blade with a movable head; a mortising gage has an adjustable head with two pins or blades that can be spaced to match the width of the selected mortising chisel
• Bench Hook: A Z-shaped tool consisting of a flat body with a crosswise block attached near the end on alternate sides of the body; the bottom block hooks over the edge of the workbench and the top block acts as a stop to hold a part against for trimming.
• Back Saw: A short, fine-toothed saw with a rigid back to hold the blade straight used for sawing tenons.
• Hold Fast: A heavy crook shaped tool which is pounded into a dog hole on a bench to secure a workpiece.
• Tips for Making the Tenon o Set the mortise marking gage to the desired width, usually to match the width of the
mortising chisel. o Mark both sides and the end of the workpiece where the tenon is to be located,
making sure the gage is indexed to the same side of the workpiece. o Saw at an angle just outside the line on the faces of the tenon, leaving a triangular
waste area on each face; saw a second time to remove the waste areas. o Use a plane to smooth the faces of the tenon and a paring chisel to trim into the
corner of the tenon shoulder.
• Tips for Making the Mortise o Where possible, use a Hold Fast to secure the workpiece to the bench. o Make the mortise by using a mallet to strike a mortising chisel positioned just inside
the marked line on the workpiece. o Take small cuts until half way through the piece. o Turn the part over and repeat from the second side
Hand Planes Hand planes come in a wide variety of sizes and are frequently designed to perform certain functions. Shown in the photo are two Stanley planes and two Bailey planes – two of the most common brands. Sometimes referred to by their number designations, such as No. 4 or No. 8, etc. The number of the plane designates roughly its size ranking, with the lower numbers being shorter, the higher numbers being longer. The short plane on the right is a No. 4 smoothing plane; the longest on the left is a No. 8 jointing plane. To add to the confusion, there are also other names, such as a No. 5 Jack Plane, a No. 6 Fore Plane, etc. As you can see in the photo, the basic difference between the planes is the length of the sole – the No. 4 being 8”-9” while the No. 8 is about 22”. The No. 4 & 5 smoothing planes are some of the most commonly used ones which work well for smoothing large surfaces or hogging off material for rough sizing. The long No. 8 is used primarily for jointing the edges of boards to produce long straight surfaces.

9
Hand Plane Usage Tips
• Planing can be done obliquely or across the grain to quickly remove material.
• Be cautious when planing near or off the edge of the board to prevent tearout; making a slight chamfer on the edge prior to face planing will help prevent edge tearout.
• Edge jointing should be performed with the grain to provide the best results.
• When planing the second side of a board, use a marking gage to scribe a line all around the board and plane to the line.
• Apply wax to the plane sole to reduce friction.
• Planes with corrugated soles usually require less effort to use.
• Frequent honing of the plane iron on a leather strop charged with honing compound improves performance and reduces the number of sharpenings required.
• Older planes tend to use softer steel for the plane irons, requiring more frequent sharpening – modern planes incorporate tool steel blades such as A-2, which hold a sharp edge much longer, requiring less frequent sharpening.
Another unique accessory used for hand tool surface preparation is a pair of Winding Sticks. These straight Winding Sticks are used to provide a visual indication of parallelism between areas on the surface of a board. The pair of sticks are usually of contrasting colors (frequently black and white) are positioned at opposite ends of a board. If, when sighting across the top surface of one of the sticks at the top surface of the other stick, the two surfaces are parallel, the board does not have any twist in the top surface. The Winding Sticks are usually substantially longer than the board is wide to exaggerate any twist conditions.
For more detailed information, Tony suggests the following informational videos:
• Paul Sellers - https://www.youtube.com/channel/UCc3EpWncNq5QL0QhwUNQb7w • Wood by Wright - https://www.youtube.com/channel/UCbMtJOly6TpO5MQQnNwkCHg
• The Woodwright Shop - http://www.pbs.org/woodwrightsshop/home/
Thanks, Tony, for all the work you put into this interesting and informative presentation. I’m sure all of us learned something new about hand tool usage and gained a greater appreciation for these time-tested tools and methods. Great job!

10
Note from the Editor
I really enjoyed Tony Grosinger’s presentation. In our modern woodworking world there seems to be so much advertising and emphasis on high tech, expensive machinery that we sometimes forget the old, time-tested methods and tools that have been in use for centuries. It is true that many of these tools and techniques are much more difficult to master than learning how to use a power
tool, but each method is just a different path to accomplish the same goal. However, especially when seeing an accomplished craftsman skillfully performing some of the manual operations, like planing and mortising, it is obvious that there is a hands-on sense of accomplishment, fullfilment, and enjoyment that is frequently missing when simply operating a machine tool to perform the same task. That said, I also recognize that the frenetic pace of our modern world seems to minimize the time we have available to enjoy our woodworking craft, so the much faster, accurate, repeatable machine operations, requiring much less manual skills, frequently get the nod. However, there is a place for both hand tool and power tool woodworking and each should be appreciated for its unique features and attractions. I admit to being a Power Tool Guy, but I have a great respect and admiration for our Hand Tool Guys and Gals, who have skills (and patience!) that I don’t possess. On a different note, I would like to encourage each of our members to give some serious attention to the photo documentation of their projects. Today, most of us have easy to use point and shoot digital cameras, which are ideal for capturing the progress of your project. These photos are very useful, not only for presentations, or inclusion in our Newsletters, but also as a reminder of how you performed a particular operation, the steps involved, or how a special tool or jig was used to build your project. One habit I learned long ago, having worked in the R&D field for many years, where photo documentation was a way of life, was to pay attention to the background items in your photo. I recall that my boss would go ballistic when he noticed any red shop rags on the floor in our photos! Sometimes by just taking the extra minute to remove unnecessary objects from the background or slightly change our viewing point can make a world of difference in our photos. We spend a lot of time making our projects look good, so let’s go the extra mile and make sure they look good in the photos. Thanks! Happy and Safe Woodworking, Paul
In Memorium We were saddened to hear of the passing of one of our long time members, Al Falco, who died from Large Cell NH Lymphoma, the most common form of brain cancer tumors. A talented and highly skilled woodworker in the original Northwest Woodworkers Guild, Al had been an Activities Coordinator, VP, and Treasurer, and his wife Colleen Webster was the Membership Chairperson and Newsletter Editor back in the typewriter and early, awkward PC software era. In the early 2000 years, Al attended and graduated from the South Seattle Central College (now Wood Technology Center) Cabinetry program and actively supported that program until his death. We offer our sincere and heartfelt condolences to his wife, Colleen Webster and their family.

11
Northwest Woodworkers Association Sponsors We appreciate the generous support provided by our NWWA sponsors, from providing member discounts on purchased items to providing state of the art venues for us to conduct our monthly meetings. Thank you, Sponsors! Craftsman Studio 2815 Baker St. Suite 205 Everett, WA 98275 10% Online with entered code Crosscut Hardwoods 4100 – 1st Avenue South Seattle, WA 98134 10% Discount with Membership Card Edensaw Woods 925 East 25th Street Tacoma, WA 98421-2323 IsGood Woodworks 4660 E. Marginal Way S., Suite 7 Seattle, WA 98134 10% Member Discount on Selected Services
Midway Plywood 14004 Highway 99 Lynnwood, WA 98087 10% Discount with Membership Card Rockler Woodworking and Hardware-Northgate 832 NE Northgate Way Seattle, WA 98125 10% Member Discount (except sale items and power tools) Rockler Woodworking and Hardware-Tukwila 345 Tukwila Parkway Seattle, WA 98188 10% Member Discount (except sale items and power tools) Woodcraft Supply Seattle, WA 98108 10% Member Discount (except sale items and power tools, and workbeches)
Northwest Woodworkers Association Contacts
Membership—Allen McCall [email protected] Treasurer—Chris Green [email protected] Secretary—Jan Erickson [email protected] Raffle— Herb Stoops [email protected] Webmaster --- Tony Grosinger [email protected] Newsletter Editor--- Paul Stoops [email protected] Photographer— Scott Wilson [email protected] Steering Committee Don Beacom [email protected] John Gonder [email protected] Tony Grosinger [email protected] Tim Newsome [email protected] Scott Wilson [email protected]
We encourage our members to contact any of the above individuals with questions, comments, or items that may be of interest to the membership. In addition, please visit our website: http://www.nwwoodworkers.org