north carolina electronic disease surveillance system...
TRANSCRIPT
NORTH CAROLINA ELECTRONIC DISEASE SURVEILLANCE SYSTEM
LEAD User’s Manual and Training Guide
Version 4.0
May 2010
Consilience Software 9005 Mountain Ridge Drive Suite 190 Austin, TX 78759

ii
iii
TABLE OF CONTENTS CHAPTER 1: OVERVIEW OF THE NC ELECTRONIC DISEASE SURVEILLANCE SYSTEM LEAD1
The North Carolina Electronic Lead Surveillance System........................................ 2
Users, Roles and Groups .......................................................................................... 2
Main vs. Administration Applications ...................................................................... 3
Logging In ............................................................................................................... 4
System Passwords ................................................................................................... 5
Logging Out ............................................................................................................. 5
Exercise 1.1 – Logging into NC Lead ................................................................................ 6
Chapter 1 - Review Questions ......................................................................................... 7
CHAPTER 2: THE NC LEAD DASHBOARD ................................................................................. 9
The NC Lead Dashboard ........................................................................................ 10
Shortcut Buttons ................................................................................................... 11
The Dashboard Toolbar ......................................................................................... 11
The Event Summary Section .................................................................................. 13
The Event Information Section ............................................................................. 16
Chapter 2 – Review Questions ........................................................................................ 28
CHAPTER 3: WORKING WITH CHILDHOOD LEAD EVENTS ..................................................29
Creating an Event .................................................................................................. 30
Choosing an Event Type ........................................................................................ 31
Exercise 3.1 –Create a New Event ................................................................................... 40
Searching for an Existing Event ............................................................................ 41
Recent Cases ......................................................................................................... 44
Exercise 3.2 – Search for Events ..................................................................................... 45
Adding or Updating information in an Event ......................................................... 46
Changing the Event Type ....................................................................................... 47
Temporary Locks ................................................................................................... 47
iv
Exercise 3.3 – Add/Modify Event Information ................................................................... 48
CHAPTER 4: EDITING PERSON DATA ....................................................................................49
Person Information ............................................................................................... 50
Modifying Person Information .............................................................................. 50
The Persons Tab .................................................................................................... 50
The Demographic Question Package ..................................................................... 57
Exercise 4.1 – Modify Person Information ........................................................................ 59
CHAPTER 5: THE WORKFLOW QUEUE AND TASKS ...............................................................61
Case Specific Monitors ........................................................................................... 63
Exercise 5.1 – Interacting with Workflow Queues .............................................................. 66
Tasks ...................................................................................................................... 67
Create and Assign a New Task .............................................................................. 67
Assign a Case ......................................................................................................... 76
Exercise 5.2 – Create and Assign a Task .......................................................................... 78
Sharing a Case ....................................................................................................... 79
Exercise 5.3 – Share a Case (Demonstration) ................................................................... 81
CHAPTER 6: PRINTING, REPORTING, AND ADDING ATTACHMENTS .................................83
The Event Print Document ..................................................................................... 86
Exercise 6.1 – Print a Document ..................................................................................... 87
NC Lead Reporting ................................................................................................. 88
Exercise 6.2 – View a Report .......................................................................................... 91
Attaching Files ....................................................................................................... 92
Exercise 6.3 – Add an Attachment ................................................................................... 94
CHAPTER 7: LINKING EVENTS ...............................................................................................95
Linking Events ....................................................................................................... 96
Link Types .............................................................................................................. 96
Viewing Linked Property Events to Child Events ................................................... 96
v
CONCLUSION ..........................................................................................................................97
INDEX ......................................................................................................................................98
APPENDIX A: TIPS IN INTERNET EXPLORER .................................................................... 100
APPENDIX B: HOW TO UNLOCK A LOCKED FORM IN MS WORD: .................................... 102
APPENDIX C: ANSWERS TO CHAPTER REVIEW QUESTIONS ........................................... 104
Chapter 1 - Review Questions ......................................................................................... 104
Chapter 2 – Review Questions ........................................................................................ 104
Exercise 4.1 – Modify Person Information ........................................................................ 105
Exercise 5.1 – Interacting with Workflow Queues .............................................................. 106
Exercise 5.2 – Create and Assign a Task .......................................................................... 106
Exercise 6.1 – Print a Document ..................................................................................... 107
Exercise 6.2 – View a Report .......................................................................................... 108
Exercise 6.3 – Add an Attachment ................................................................................... 109
APPENDIX D: DEFINITIONS ............................................................................................... 110
APPENDIX E: LINKING PROPERTY-CHILD EVENTS .......................................................... 113
Linking Events ..................................................................................................... 114
Link Types ............................................................................................................ 114
Linking Property Events to Child Events ............................................................. 114
APPENDIX F: DEDUPLICATION........................................................................................... 117
Deduplication ...................................................................................................... 118
Event Deduplication ............................................................................................ 118
Person Deduplication .......................................................................................... 121
How to Avoid Creating Duplicates ....................................................................... 122
Deduplicating Persons ......................................................................................... 123
Deduplicating Events ........................................................................................... 125
Question Merging in Question Packages ............................................................. 127
Manually Invoking Deduplication ........................................................................ 130
vi
APPENDIX G: CLOSING EVENTS ......................................................................................... 132
Closing an Event .................................................................................................. 133
Reopen a Closed Event ........................................................................................ 134
1
Chapter 1: Overview of the NC Electronic Disease Surveillance
System Lead
Learning Objectives:
1. Explain the purpose and benefits of implementing the North Carolina Electronic Lead Surveillance System (NC Lead).
2. Describe the purpose of permissions, roles, and groups within the NC Lead system.
3. Demonstrate the ability to log into the North Carolina Electronic Disease Surveillance System Lead.
Chapter 1: Overview of the NC Electronic Disease Surveillance System Lead 2
The North Carolina Electronic Lead Surveillance System NC Lead is an electronic lead surveillance system (ELSS) for North Carolina that allows public health officials to receive, manage, process, and analyze data for cases of suspected childhood lead exposure. Through data analysis, NC Lead can extract surveillance data for the identification, tracking and reporting of childhood lead exposure.
NC Lead allows secure communication and coordination between state and local health departments (LHD's). Furthermore, NC Lead enables immediate exchange of information among clinics, labs and local health departments. NC Lead security environment displays only the data someone needs and is authorized to see. Additional NC Lead functions include:
• Electronic data exchange and flow of work among groups working on public health lead management
• Ability for lab reports to be imported electronically • Data entry capability • Reporting • Tracking of persons and properties
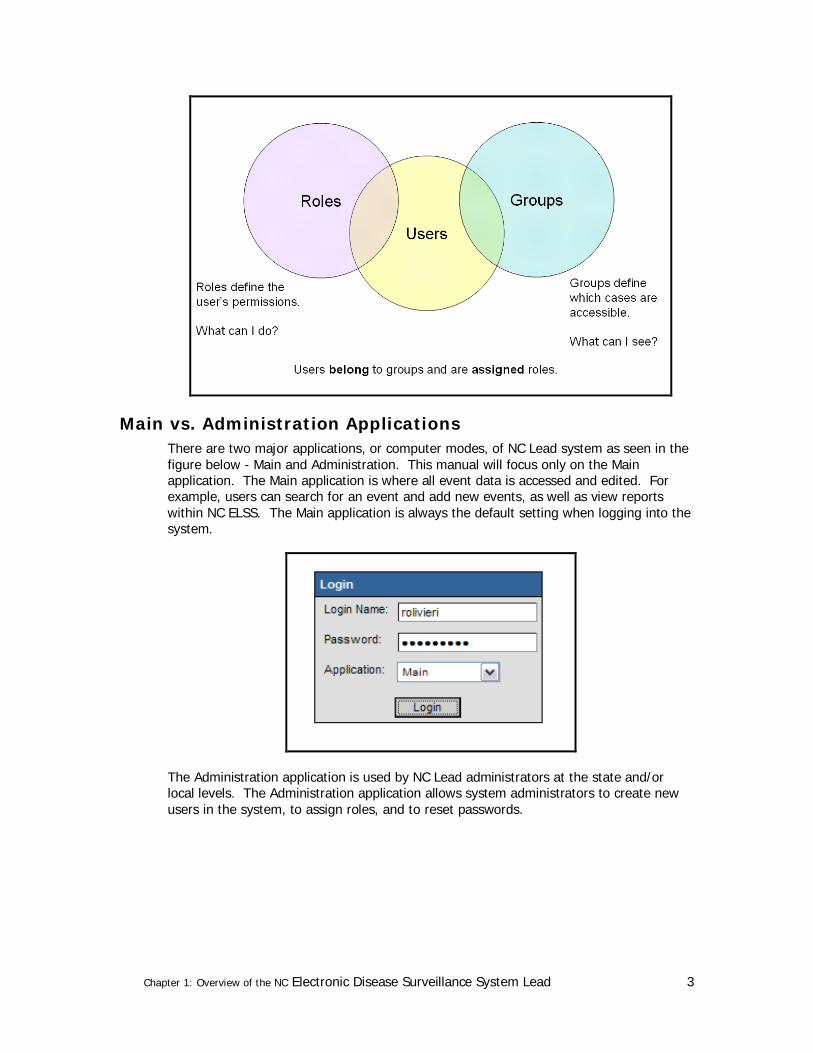
Users, Roles and Groups System security is in accordance with specified requirements. Users will be assigned a username and password that will provide access to the system. Each username is associated with one or more roles and one or more groups, which give access to specific system features and lead information. The roles and groups to which a user is assigned depend on their job function. Permissions, roles, and groups are described in detail below.
User: Any individual using the NC Lead system.
Group: Groups determine what cases are visible to the user. Users are members of groups based on jurisdiction and specialization. For example: members of the Wake County group would only be able to access Wake County events. Users can belong to more than one group.
Role: Roles define the user's permissions - the ability to use specific functions/features in NC Lead. Example: The Local Health Clinician role has permissions to create or edit an event, and to run reports. A user belonging to the Local Data Entry Role has a different set of permissions than the Clinician.
Permission: Permissions in NC Lead provide the ability within the system to perform certain actions, such as “run a report” or “delete a case”.
Chapter 1: Overview of the NC Electronic Disease Surveillance System Lead 3
Main vs. Administration Applications There are two major applications, or computer modes, of NC Lead system as seen in the figure below - Main and Administration. This manual will focus only on the Main application. The Main application is where all event data is accessed and edited. For example, users can search for an event and add new events, as well as view reports within NC ELSS. The Main application is always the default setting when logging into the system.
The Administration application is used by NC Lead administrators at the state and/or local levels. The Administration application allows system administrators to create new users in the system, to assign roles, and to reset passwords.
Chapter 1: Overview of the NC Electronic Disease Surveillance System Lead 4
Logging In • The North Carolina Electronic Lead Surveillance System (NC Lead) can be
accessed through Internet Explorer 6.0 and above or Firefox 2.0 and above; however, NC Lead is not supported by Netscape. Logging into the system is simple. To do so, follow these steps:
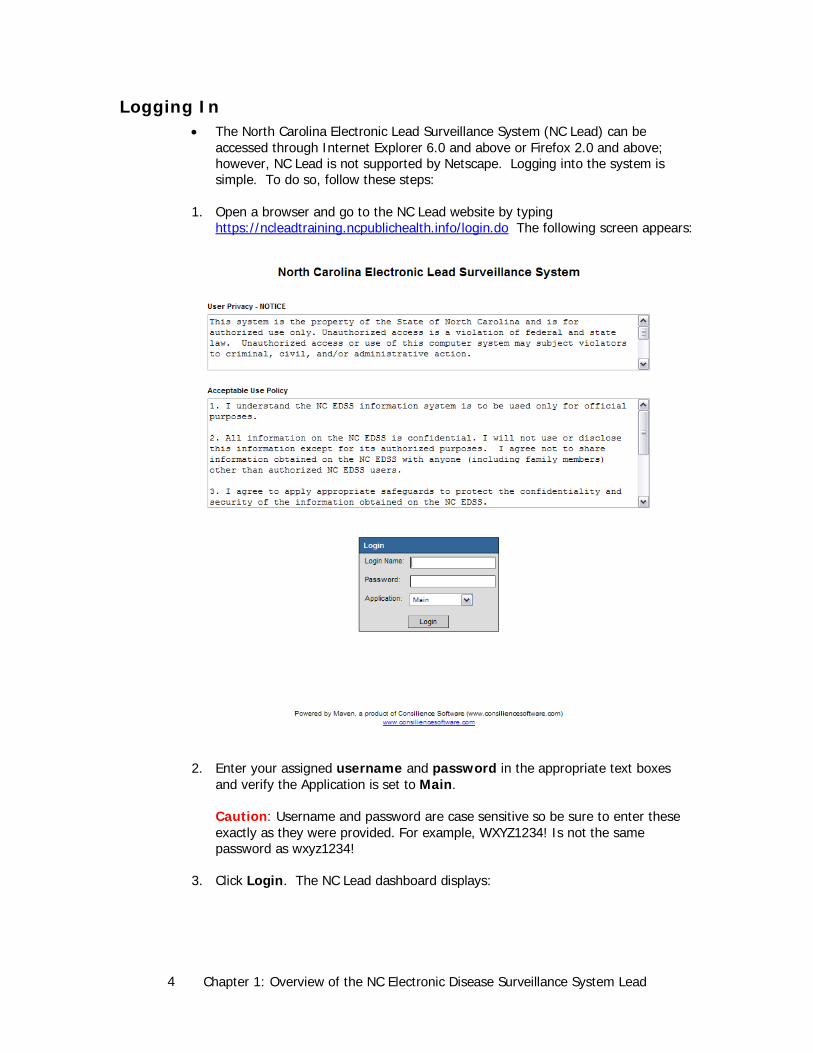
1. Open a browser and go to the NC Lead website by typing https://ncleadtraining.ncpublichealth.info/login.do The following screen appears:
2. Enter your assigned username and password in the appropriate text boxes and verify the Application is set to Main. Caution: Username and password are case sensitive so be sure to enter these exactly as they were provided. For example, WXYZ1234! Is not the same password as wxyz1234!
3. Click Login. The NC Lead dashboard displays:
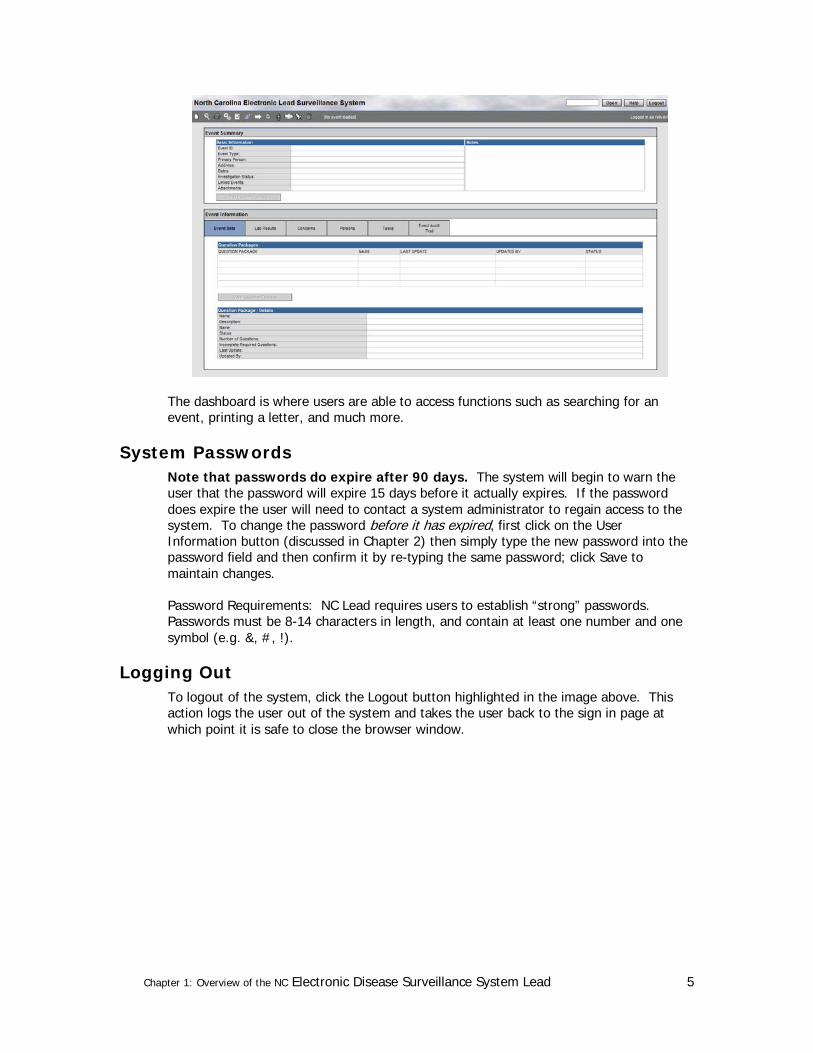
Chapter 1: Overview of the NC Electronic Disease Surveillance System Lead 5
The dashboard is where users are able to access functions such as searching for an event, printing a letter, and much more.
System Passwords Note that passwords do expire after 90 days. The system will begin to warn the user that the password will expire 15 days before it actually expires. If the password does expire the user will need to contact a system administrator to regain access to the system. To change the password before it has expired, first click on the User Information button (discussed in Chapter 2) then simply type the new password into the password field and then confirm it by re-typing the same password; click Save to maintain changes.
Password Requirements: NC Lead requires users to establish “strong” passwords. Passwords must be 8-14 characters in length, and contain at least one number and one symbol (e.g. &, #, !).
Logging Out To logout of the system, click the Logout button highlighted in the image above. This action logs the user out of the system and takes the user back to the sign in page at which point it is safe to close the browser window.
Chapter 1: Overview of the NC Electronic Disease Surveillance System Lead 6
Exercise 1.1 – Logging into NC Lead The purpose of this exercise is to demonstrate the ability to log into the North Carolina Electronic Lead Surveillance System.
1. Open a browser and enter the URL* for the training system.
2. Enter login* information.
3. Click Login.
* This information will be provided by the instructor.
Chapter 1: Overview of the NC Electronic Disease Surveillance System Lead 7
Chapter 1 - Review Questions 1. Your NC Lead password will expire if you do not change it within how many
days?
2. What are three benefits of implementing NC Lead?
3. What is the purpose of permissions within NC Lead?
4. What is the difference between a role and a group in NC Lead?

Chapter 1: Overview of the NC Electronic Disease Surveillance System Lead 8
Chapter 2: The NC Lead Dashboard 9
Chapter 2: The NC Lead Dashboard
Learning Objectives:
1. Identify the three distinct areas of the NC Lead Dashboard and specify the purpose of each.
Chapter 2: The NC Lead Dashboard 10
The NC Lead Dashboard NC Lead Dashboard is the point from which most actions take place. Here are some examples of what users can access from this screen:
• Create a New Childhood Lead Event for either a person or property
• Search for an Existing Event
• View Workflow Queues
• Add a Task
• Print a Letter
• View Reports
• Question packages to enter data.
NC Lead Dashboard is divided into three separate areas. The first is the dashboard toolbar which has icons that perform the majority of the functions within the product. Depending on a user’s role, the buttons displayed in the toolbar may vary. For example, one user might see a trashcan icon which is used to delete an event, while another user may not see a trashcan because his assigned role doesn’t permit deleting items.
The second area, Event Summary, is for event information specific to each reported lead event. The third distinct area on the dashboard is the Event Information, which contains the detailed information about the event.
Event Information
Event Summary
Shortcut Buttons
Chapter 2: The NC Lead Dashboard 11
Shortcut Buttons The shortcut buttons allow the user to quickly locate an event by its ID, provide the user help, and allow the user to logout of the system. To locate an event by its ID, enter the ID in the textbox and click the Open button. To obtain general help, click the Help button. To logout of the system, click the Logout button. This action will take the user back to the login screen.
The Dashboard Toolbar The buttons on the toolbar are described below from left to right.
Create Event - used to create a new lead event. A detailed description of how to enter a new event is covered in Chapter 3.
Search Event - used to search for an existing event, based on various search criteria. A detailed description of how to search for an event is covered in Chapter 3.
Print Case - used to print letters or other forms specific to the open event. This topic is covered in depth in Chapter 7.
Workflow - used to view user specified workflow queues. Workflow queues display results of database queries. The queries are designed to bring attention to various issues which may need the users’ attention. A detailed description of how to view and use workflow queues is covered in Chapter 5.
Tasks – use this to assign and update the status of specific tasks. Learn more about creating and assigning tasks in Chapter 5.
Assign Case - provides the user with a shortcut to assigning an event to someone else. This is discussed further in Chapter 5.
Reports – users can view and print reports from data entered in NCEDSS. This is covered in greater detail in Chapter 7.

Chapter 2: The NC Lead Dashboard 12
User Information – provides information about the current user of the system. Use this button to enter your contact information and to change your password, if prompted.
Share Case - provides the user the ability to share an event with someone who would not ordinarily have permissions to see it. Details regarding sharing events are covered in Chapter 5.
Recent Cases – provides easy access to the previous 20 events that have been worked on by the current user. A detailed description of how to search for an event or lead report is covered in Chapter 3.
Chapter 2: The NC Lead Dashboard 13
The Event Summary Section The Event Summary section is divided into two smaller sections: Basic Information and Notes. There is also an Edit Event Properties button in this section which takes the user to a new screen when clicked.
The Basic Information section, as its name implies, highlights the following subjects for every event.
Event ID The unique event number automatically assigned by NC ELSS.
Event Type The type selected from a dropdown menu when an event is first entered into NC Lead is reflected in this field.
Primary Person
The person about whom data is entered when an event is input into NC Lead is reflected in this field.
Address The address of the person in the event.
Dates The date the event was created.
Investigation Status
The investigation status displays the current status of the event; typically the status will be either open or closed.
Linked Events
Displays the number of other events that are linked to this event. This is also a tool where one could initiate the linking of one event to another.
Attachments Displays the number of files that are attached to this event. This is also the tool used to access the attachments. Any file, such as a report, letter, or photographs can be attached to an event.
Additional Information
Displays additional information about the event, such as a listing of linked events.
Chapter 2: The NC Lead Dashboard 14
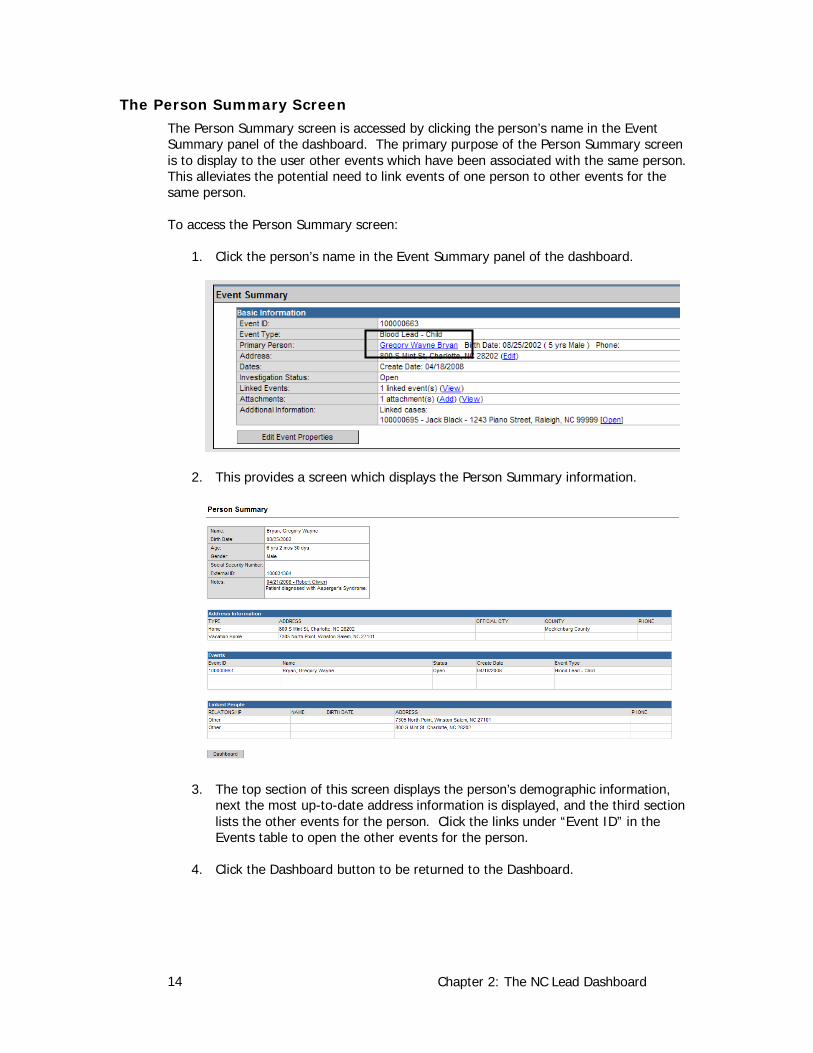
The Person Summary Screen The Person Summary screen is accessed by clicking the person’s name in the Event Summary panel of the dashboard. The primary purpose of the Person Summary screen is to display to the user other events which have been associated with the same person. This alleviates the potential need to link events of one person to other events for the same person.
To access the Person Summary screen:
1. Click the person’s name in the Event Summary panel of the dashboard.
2. This provides a screen which displays the Person Summary information.
3. The top section of this screen displays the person’s demographic information, next the most up-to-date address information is displayed, and the third section lists the other events for the person. Click the links under “Event ID” in the Events table to open the other events for the person.
4. Click the Dashboard button to be returned to the Dashboard.
Chapter 2: The NC Lead Dashboard 15
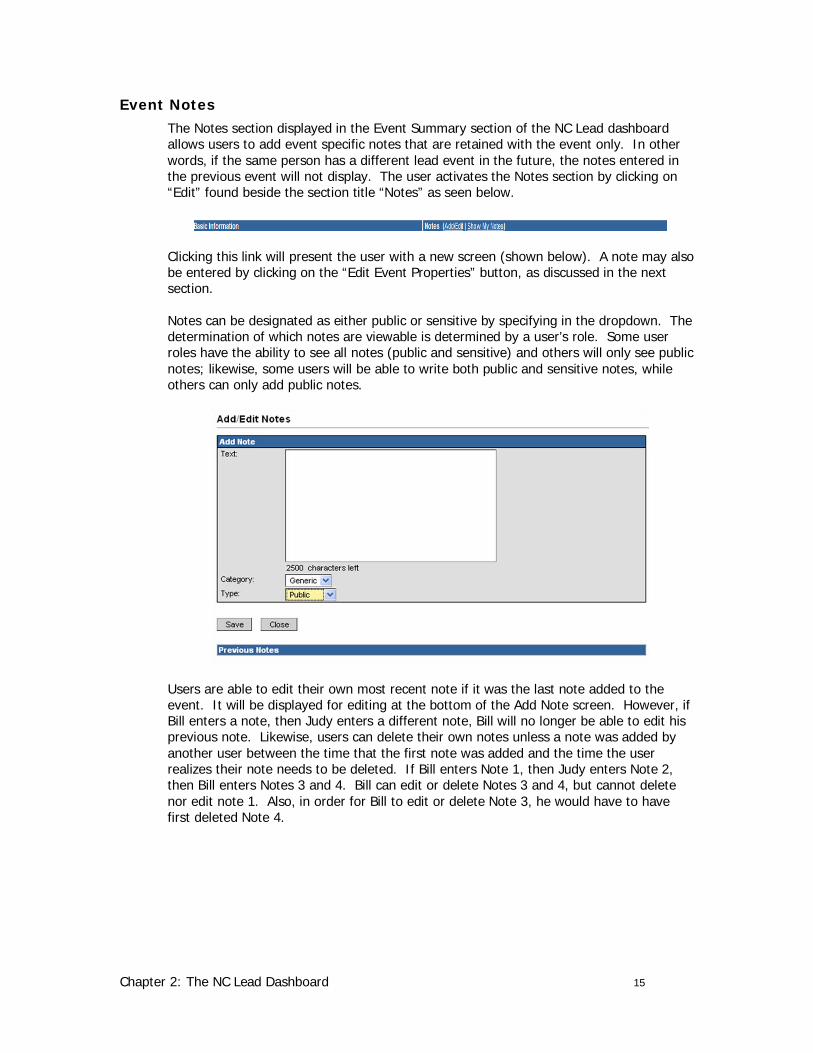
Event Notes The Notes section displayed in the Event Summary section of the NC Lead dashboard allows users to add event specific notes that are retained with the event only. In other words, if the same person has a different lead event in the future, the notes entered in the previous event will not display. The user activates the Notes section by clicking on “Edit” found beside the section title “Notes” as seen below.
Clicking this link will present the user with a new screen (shown below). A note may also be entered by clicking on the “Edit Event Properties” button, as discussed in the next section.
Notes can be designated as either public or sensitive by specifying in the dropdown. The determination of which notes are viewable is determined by a user’s role. Some user roles have the ability to see all notes (public and sensitive) and others will only see public notes; likewise, some users will be able to write both public and sensitive notes, while others can only add public notes.
Users are able to edit their own most recent note if it was the last note added to the event. It will be displayed for editing at the bottom of the Add Note screen. However, if Bill enters a note, then Judy enters a different note, Bill will no longer be able to edit his previous note. Likewise, users can delete their own notes unless a note was added by another user between the time that the first note was added and the time the user realizes their note needs to be deleted. If Bill enters Note 1, then Judy enters Note 2, then Bill enters Notes 3 and 4. Bill can edit or delete Notes 3 and 4, but cannot delete nor edit note 1. Also, in order for Bill to edit or delete Note 3, he would have to have first deleted Note 4.
Chapter 2: The NC Lead Dashboard 16
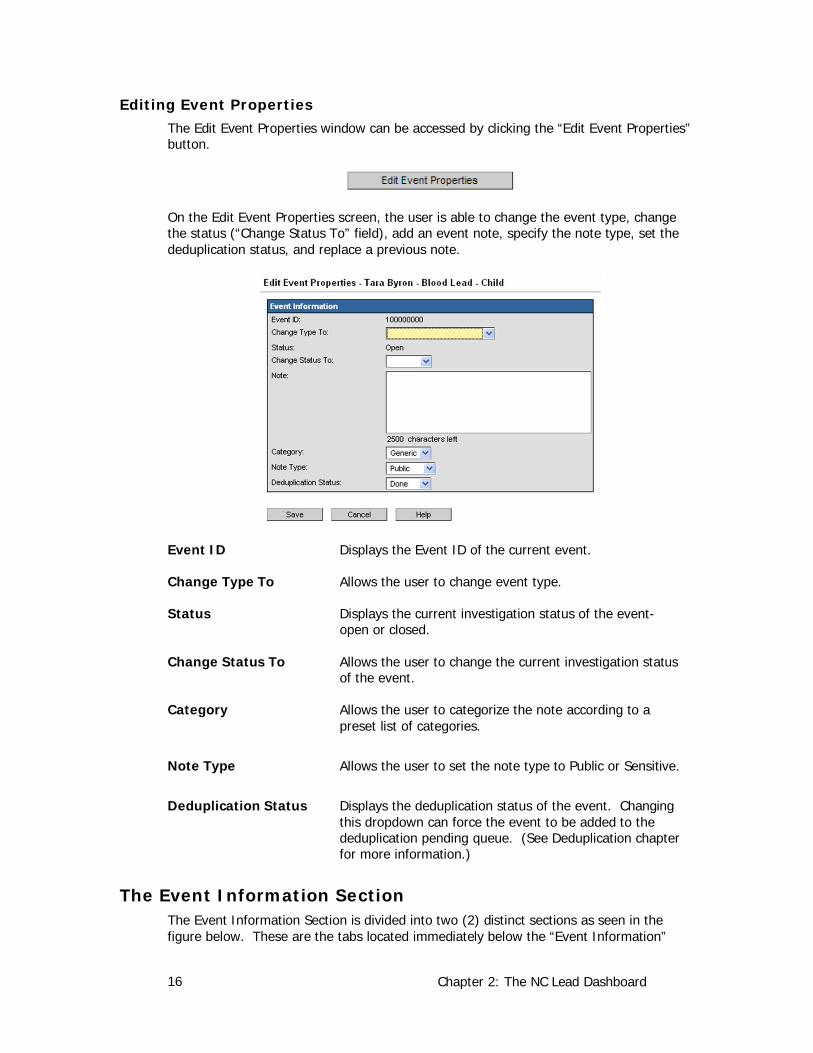
Editing Event Properties The Edit Event Properties window can be accessed by clicking the “Edit Event Properties” button.
On the Edit Event Properties screen, the user is able to change the event type, change the status (“Change Status To” field), add an event note, specify the note type, set the deduplication status, and replace a previous note.
Event ID Displays the Event ID of the current event.
Change Type To Allows the user to change event type.
Status Displays the current investigation status of the event- open or closed.
Change Status To Allows the user to change the current investigation status of the event.
Category Allows the user to categorize the note according to a preset list of categories.
Note Type Allows the user to set the note type to Public or Sensitive.
Deduplication Status Displays the deduplication status of the event. Changing this dropdown can force the event to be added to the deduplication pending queue. (See Deduplication chapter for more information.)
The Event Information Section The Event Information Section is divided into two (2) distinct sections as seen in the figure below. These are the tabs located immediately below the “Event Information”

Chapter 2: The NC Lead Dashboard 17
section header and the descriptive areas which change depending upon the chosen tab. Each view will be discussed in more detail below. These tabs vary depending on the type of event you are working in. In this case, a child event is referenced unless otherwise noted.
Event Information - Tabs The Tabs section contains tabs that provide the user with a variety of information about the event. Depending on the user’s permissions, he may not be able to see each tab.
These tabs are discussed below:
Event Data Clicking the Event Data tab presents the user with the question packages specific to the event. Further information on question packages is covered in Chapter 3.
Lab Results Clicking Lab Results presents users with the ability to view, add, and edit lab results for a particular event. Electronic lab results are also displayed here.
Concerns Clicking the Concerns tab allows the user to see possible issues with data entry. (For example, if someone types a blood lead test date that is prior to the patient’s date of birth a notification will display in the concerns tab indicating the error.) Additionally, concerns can be entered manually.
Child Event
Property Event
Chapter 2: The NC Lead Dashboard 18
Persons
(Child Event)
Clicking the Persons tab allows the user to enter or change demographic information for the person involved in this particular event. This person information will display if a future event is created for this person.
Site Information
(Property Event)
Clicking this tab allows the user to enter or change demographic information for the property involved in this particular event.
Tasks Clicking the tasks tab will provide the user with information about all the tasks associated with the open event. Event tasks will display here regardless of who is assigned the task.
Event Properties
(Property Event)
Event properties is a read-only section that shows summary information about the event, and the output of various rules. The information on this tab is generally used for configuration and troubleshooting
Event History The event history displays the time and date the event was created, and keeps track of the times the event has been updated, including which question packages were modified and the username of the person who made the update.
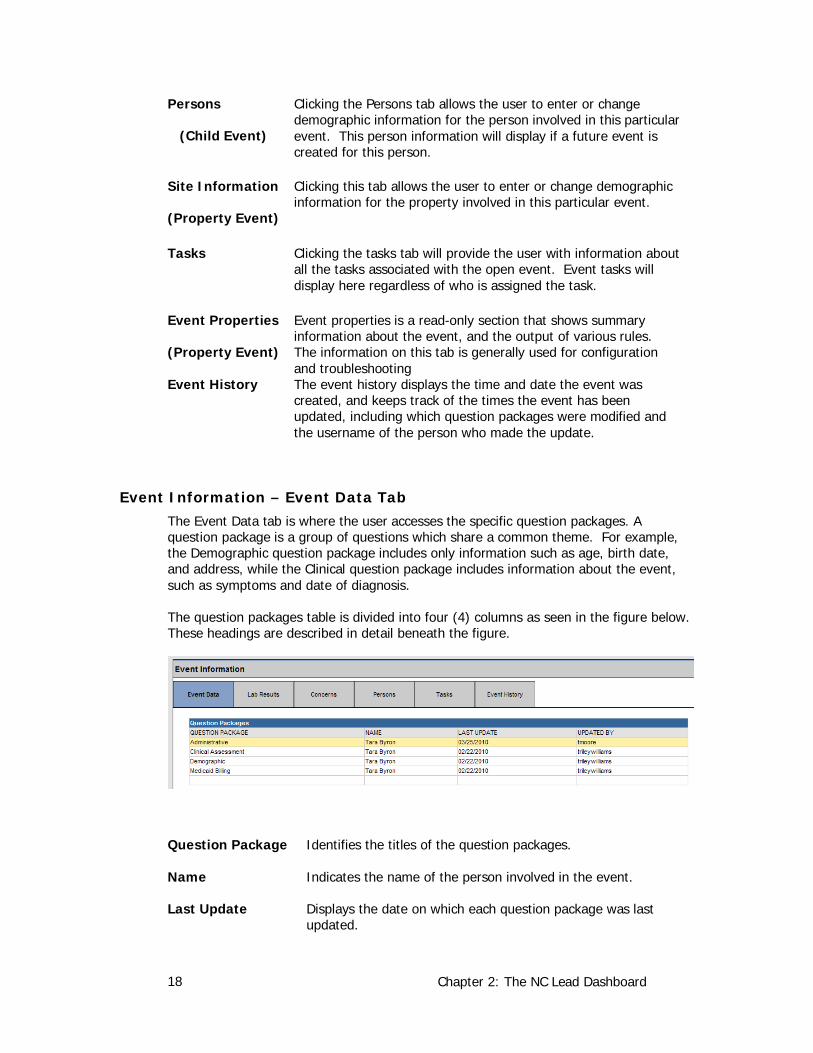
Event Information – Event Data Tab The Event Data tab is where the user accesses the specific question packages. A question package is a group of questions which share a common theme. For example, the Demographic question package includes only information such as age, birth date, and address, while the Clinical question package includes information about the event, such as symptoms and date of diagnosis.
The question packages table is divided into four (4) columns as seen in the figure below. These headings are described in detail beneath the figure.
Question Package Identifies the titles of the question packages.
Name Indicates the name of the person involved in the event.
Last Update Displays the date on which each question package was last updated.
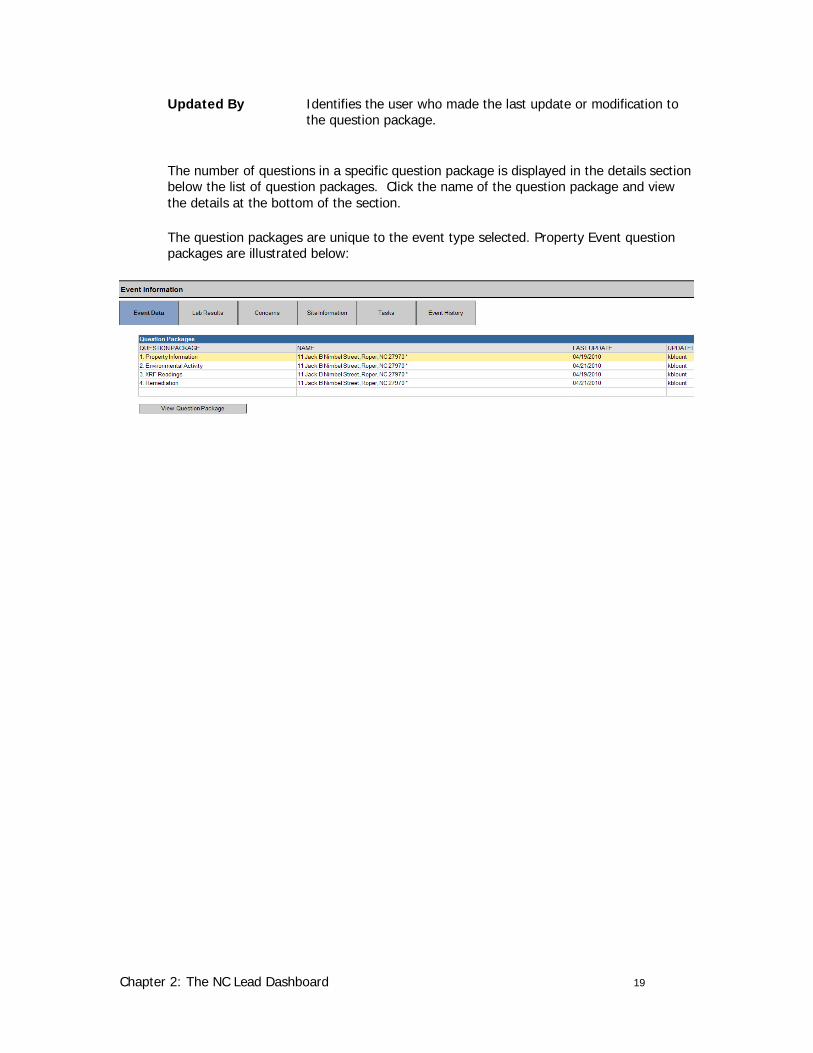
Chapter 2: The NC Lead Dashboard 19
Updated By Identifies the user who made the last update or modification to the question package.
The number of questions in a specific question package is displayed in the details section below the list of question packages. Click the name of the question package and view the details at the bottom of the section.
The question packages are unique to the event type selected. Property Event question packages are illustrated below:
Chapter 2: The NC Lead Dashboard 20
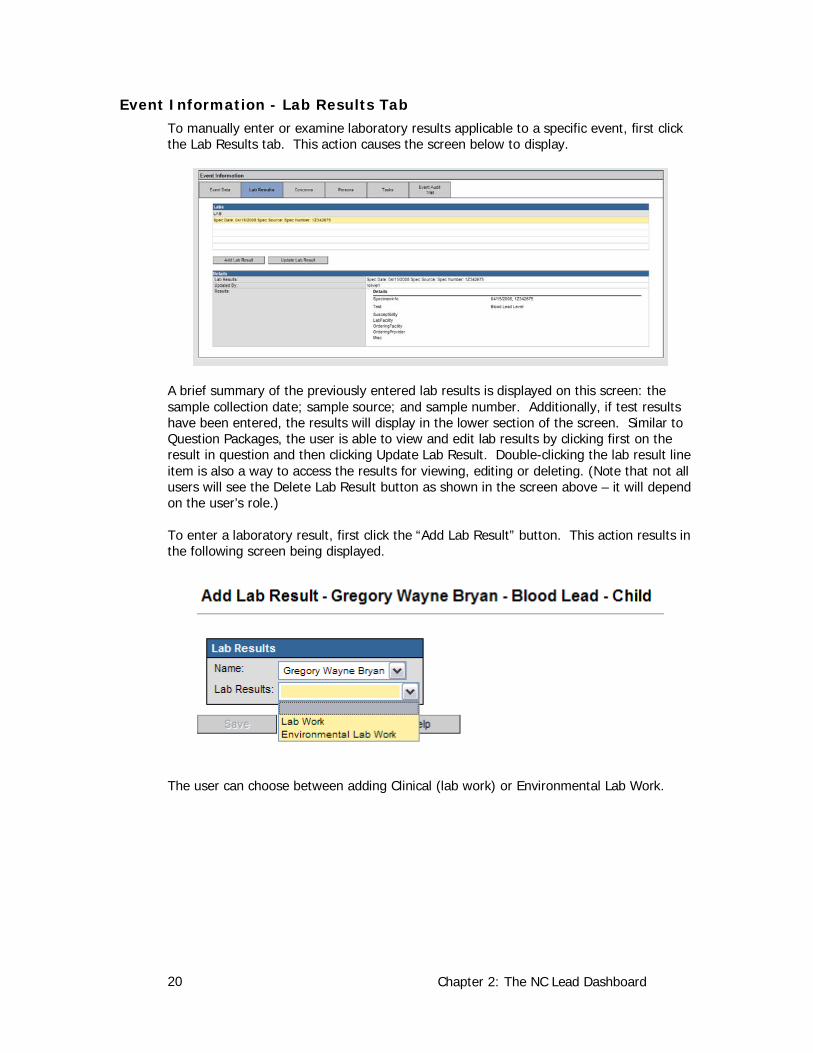
Event Information - Lab Results Tab To manually enter or examine laboratory results applicable to a specific event, first click the Lab Results tab. This action causes the screen below to display.
A brief summary of the previously entered lab results is displayed on this screen: the sample collection date; sample source; and sample number. Additionally, if test results have been entered, the results will display in the lower section of the screen. Similar to Question Packages, the user is able to view and edit lab results by clicking first on the result in question and then clicking Update Lab Result. Double-clicking the lab result line item is also a way to access the results for viewing, editing or deleting. (Note that not all users will see the Delete Lab Result button as shown in the screen above – it will depend on the user’s role.)
To enter a laboratory result, first click the “Add Lab Result” button. This action results in the following screen being displayed.
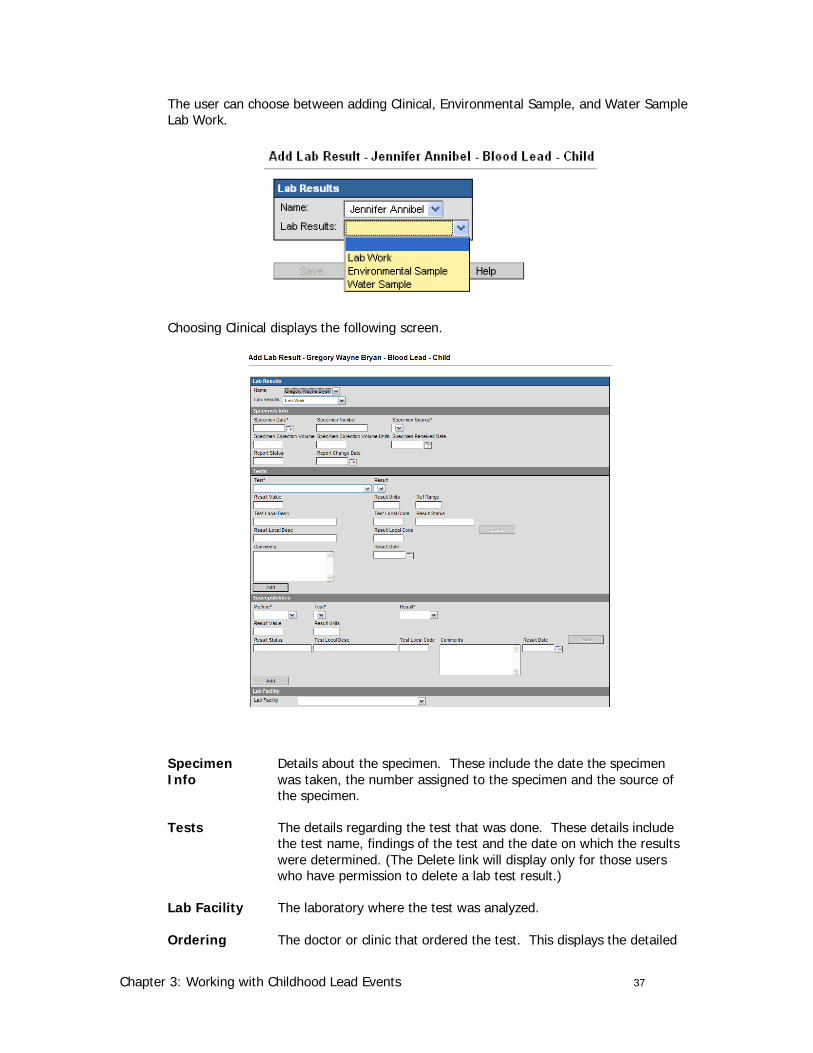
The user can choose between adding Clinical (lab work) or Environmental Lab Work.
Chapter 2: The NC Lead Dashboard 21
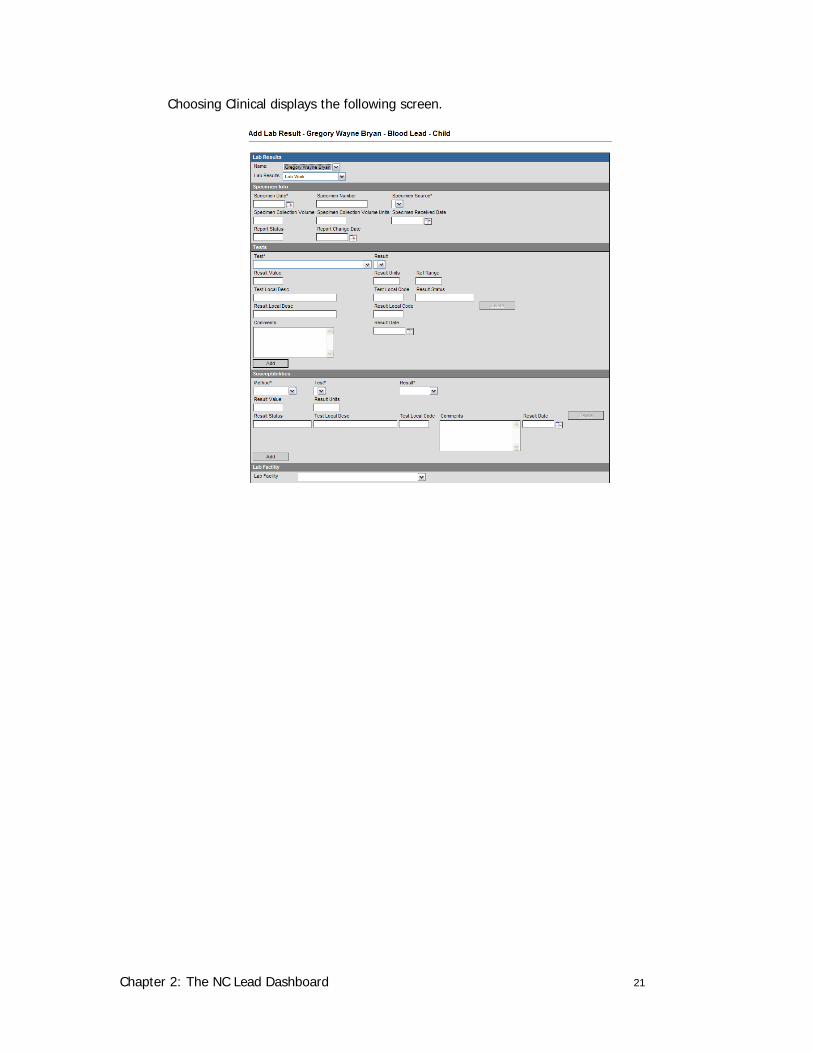
Choosing Clinical displays the following screen.
Chapter 2: The NC Lead Dashboard 22
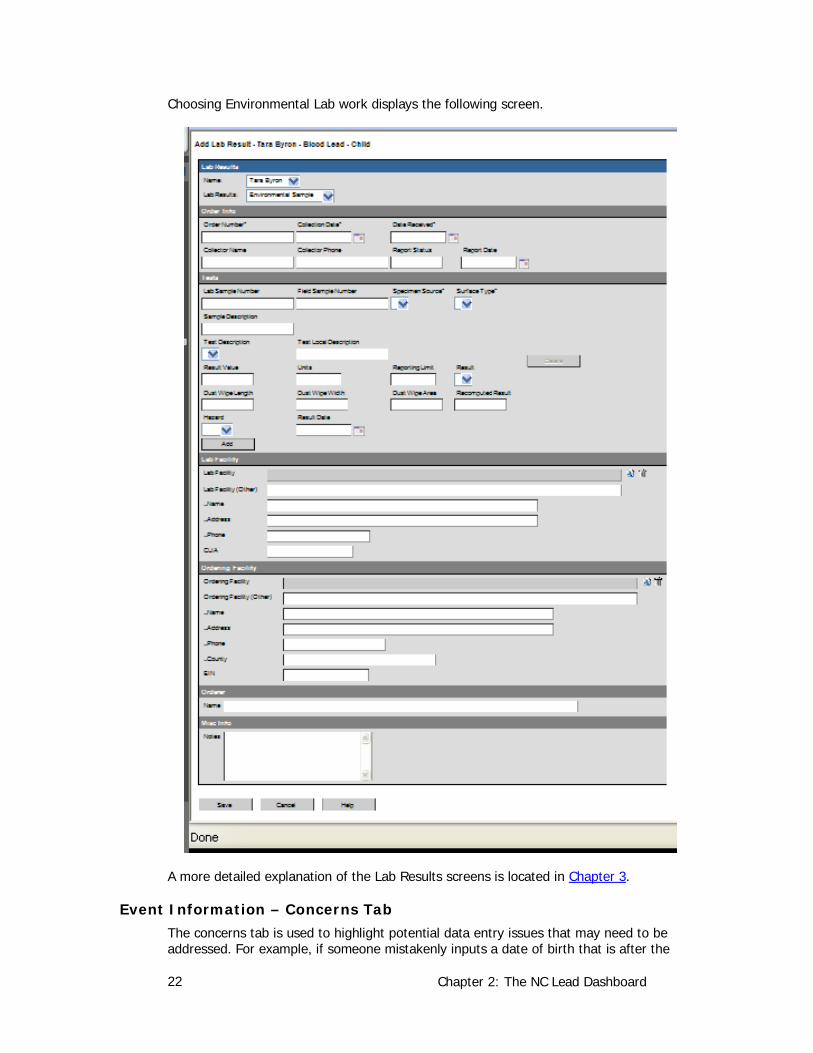
Choosing Environmental Lab work displays the following screen.
A more detailed explanation of the Lab Results screens is located in Chapter 3.
Event Information – Concerns Tab The concerns tab is used to highlight potential data entry issues that may need to be addressed. For example, if someone mistakenly inputs a date of birth that is after the
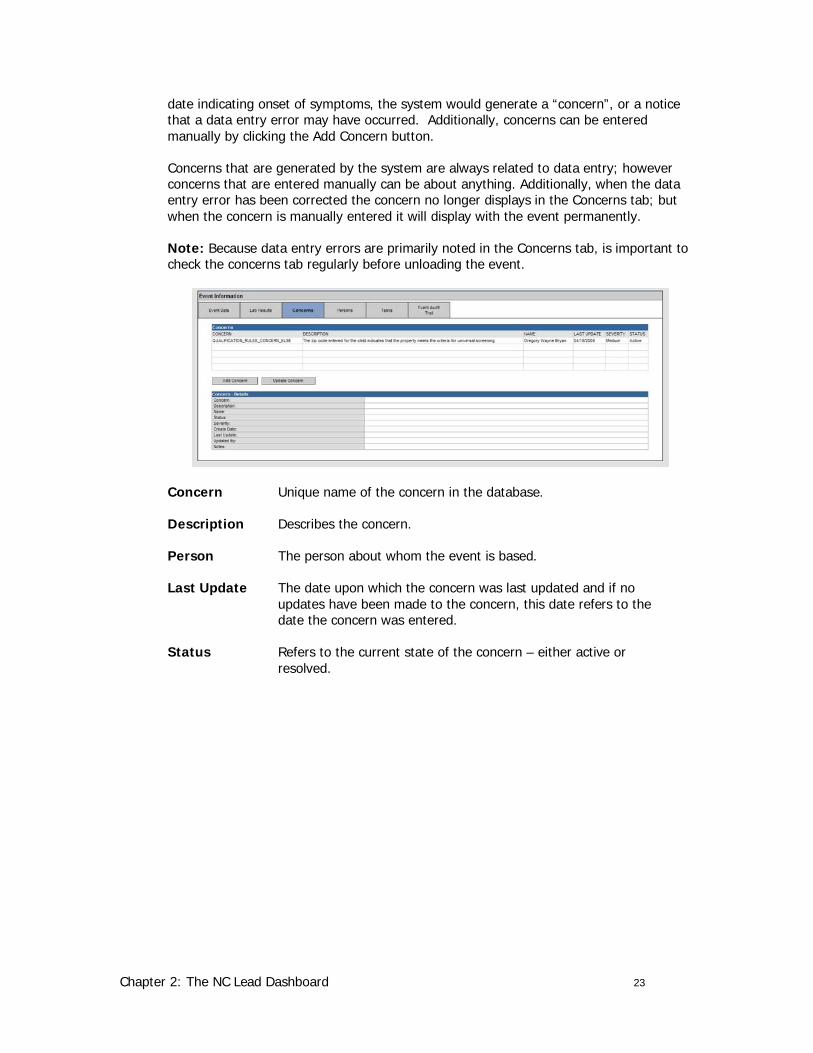
Chapter 2: The NC Lead Dashboard 23
date indicating onset of symptoms, the system would generate a “concern”, or a notice that a data entry error may have occurred. Additionally, concerns can be entered manually by clicking the Add Concern button.
Concerns that are generated by the system are always related to data entry; however concerns that are entered manually can be about anything. Additionally, when the data entry error has been corrected the concern no longer displays in the Concerns tab; but when the concern is manually entered it will display with the event permanently.
Note: Because data entry errors are primarily noted in the Concerns tab, is important to check the concerns tab regularly before unloading the event.
Concern Unique name of the concern in the database.
Description Describes the concern.
Person The person about whom the event is based.
Last Update The date upon which the concern was last updated and if no updates have been made to the concern, this date refers to the date the concern was entered.
Status Refers to the current state of the concern – either active or resolved.
Chapter 2: The NC Lead Dashboard 24
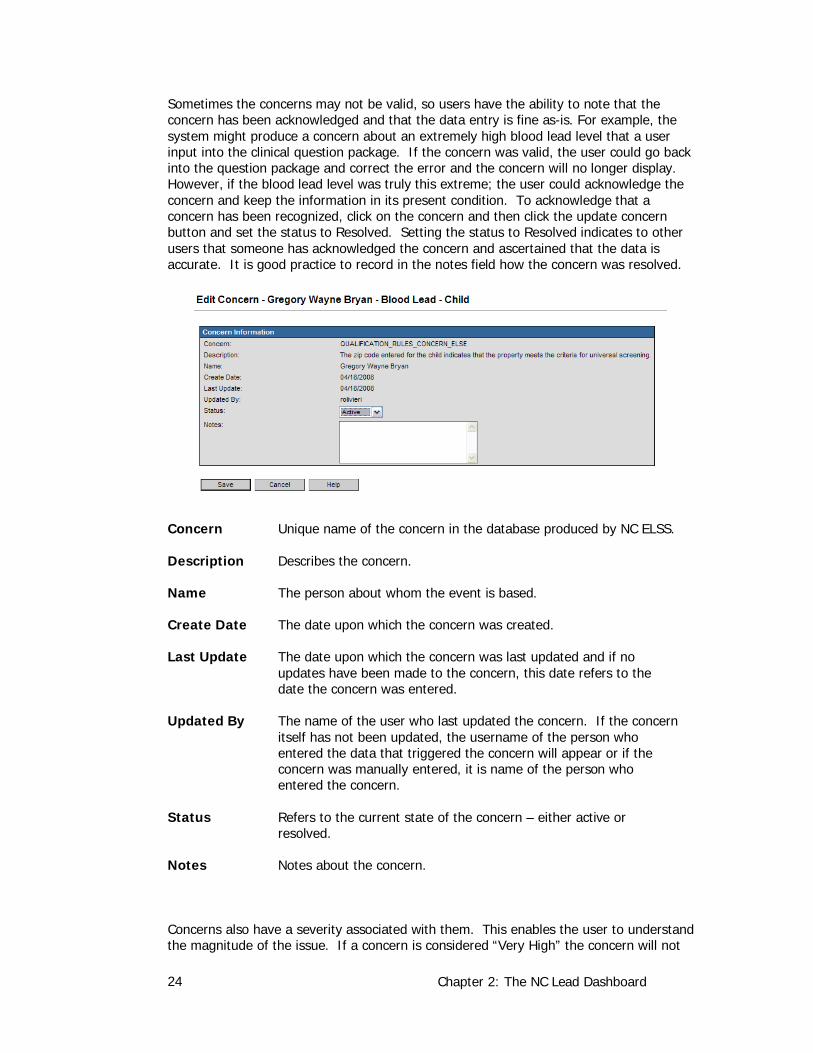
Sometimes the concerns may not be valid, so users have the ability to note that the concern has been acknowledged and that the data entry is fine as-is. For example, the system might produce a concern about an extremely high blood lead level that a user input into the clinical question package. If the concern was valid, the user could go back into the question package and correct the error and the concern will no longer display. However, if the blood lead level was truly this extreme; the user could acknowledge the concern and keep the information in its present condition. To acknowledge that a concern has been recognized, click on the concern and then click the update concern button and set the status to Resolved. Setting the status to Resolved indicates to other users that someone has acknowledged the concern and ascertained that the data is accurate. It is good practice to record in the notes field how the concern was resolved.
Concern Unique name of the concern in the database produced by NC ELSS.
Description Describes the concern.
Name The person about whom the event is based.
Create Date The date upon which the concern was created.
Last Update The date upon which the concern was last updated and if no updates have been made to the concern, this date refers to the date the concern was entered.
Updated By The name of the user who last updated the concern. If the concern itself has not been updated, the username of the person who entered the data that triggered the concern will appear or if the concern was manually entered, it is name of the person who entered the concern.
Status Refers to the current state of the concern – either active or resolved.
Notes Notes about the concern.
Concerns also have a severity associated with them. This enables the user to understand the magnitude of the issue. If a concern is considered “Very High” the concern will not
Chapter 2: The NC Lead Dashboard 25
only display in the Concerns tab, but also in red on the dashboard. The concern will remain on the dashboard until it has either been corrected (data entry error) or it has been marked Resolved.
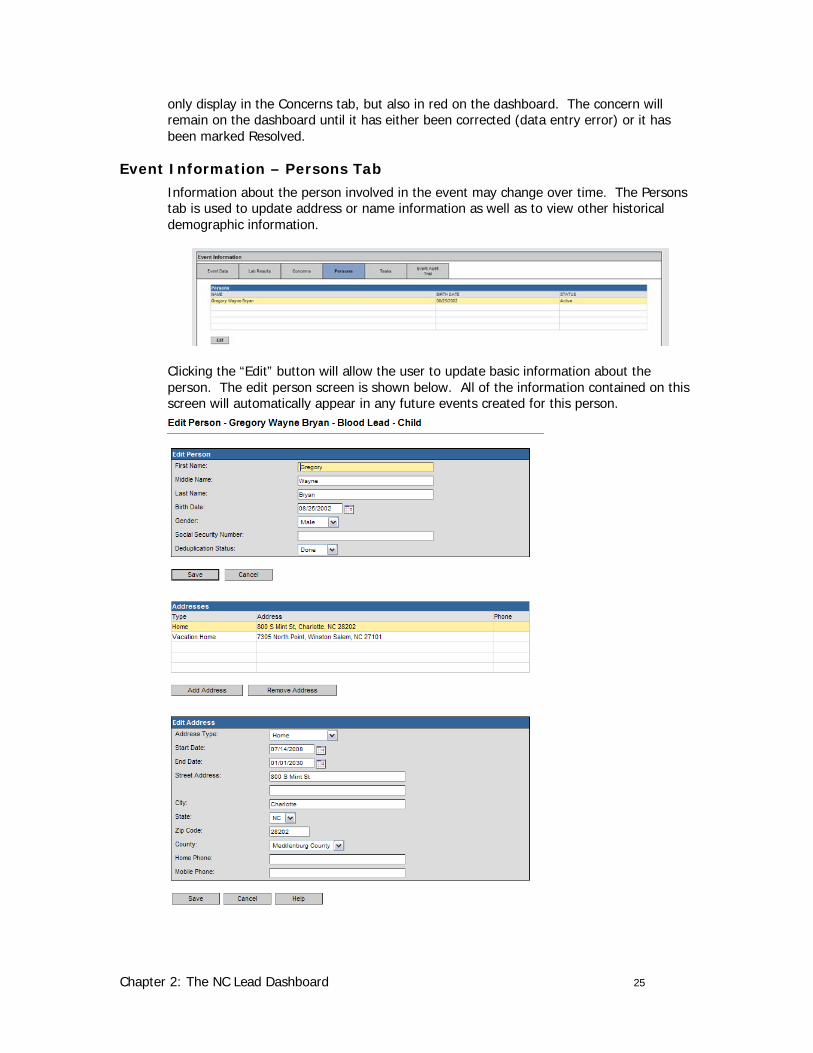
Event Information – Persons Tab Information about the person involved in the event may change over time. The Persons tab is used to update address or name information as well as to view other historical demographic information.
Clicking the “Edit” button will allow the user to update basic information about the person. The edit person screen is shown below. All of the information contained on this screen will automatically appear in any future events created for this person.
Chapter 2: The NC Lead Dashboard 26
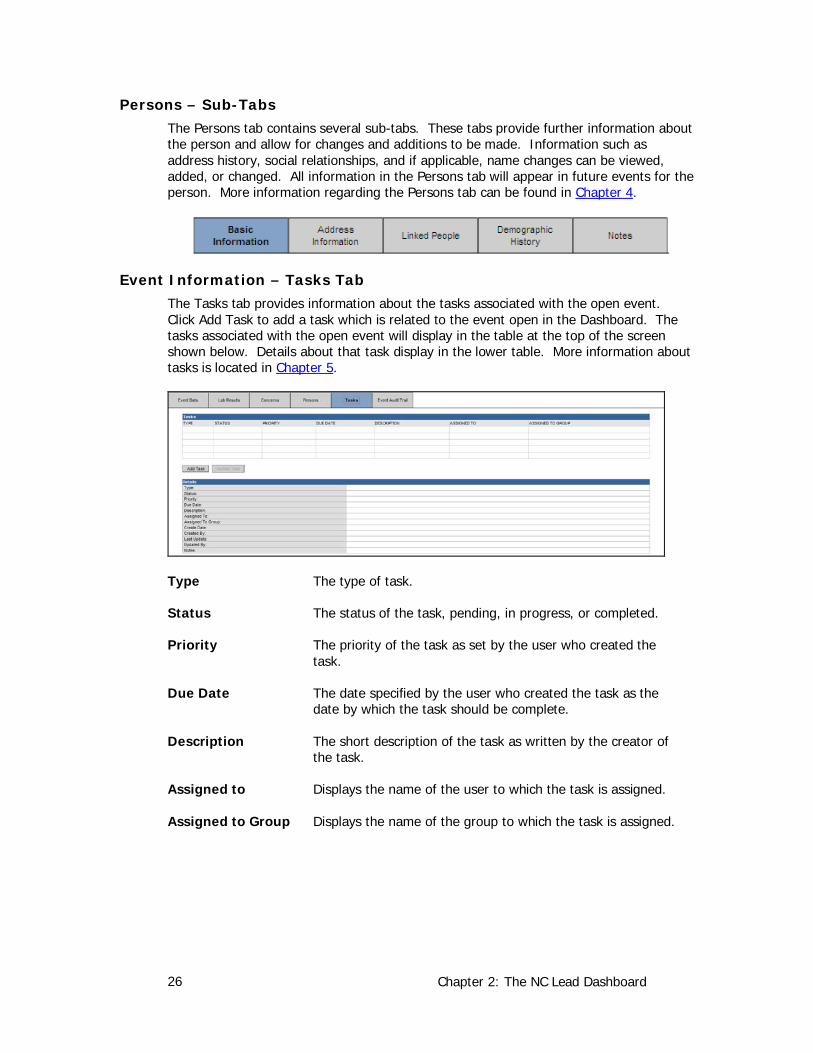
Persons – Sub-Tabs The Persons tab contains several sub-tabs. These tabs provide further information about the person and allow for changes and additions to be made. Information such as address history, social relationships, and if applicable, name changes can be viewed, added, or changed. All information in the Persons tab will appear in future events for the person. More information regarding the Persons tab can be found in Chapter 4.
Event Information – Tasks Tab The Tasks tab provides information about the tasks associated with the open event. Click Add Task to add a task which is related to the event open in the Dashboard. The tasks associated with the open event will display in the table at the top of the screen shown below. Details about that task display in the lower table. More information about tasks is located in Chapter 5.
Type The type of task.
Status The status of the task, pending, in progress, or completed.
Priority The priority of the task as set by the user who created the task.
Due Date The date specified by the user who created the task as the date by which the task should be complete.
Description The short description of the task as written by the creator of the task.
Assigned to Displays the name of the user to which the task is assigned.
Assigned to Group Displays the name of the group to which the task is assigned.
Chapter 2: The NC Lead Dashboard 27
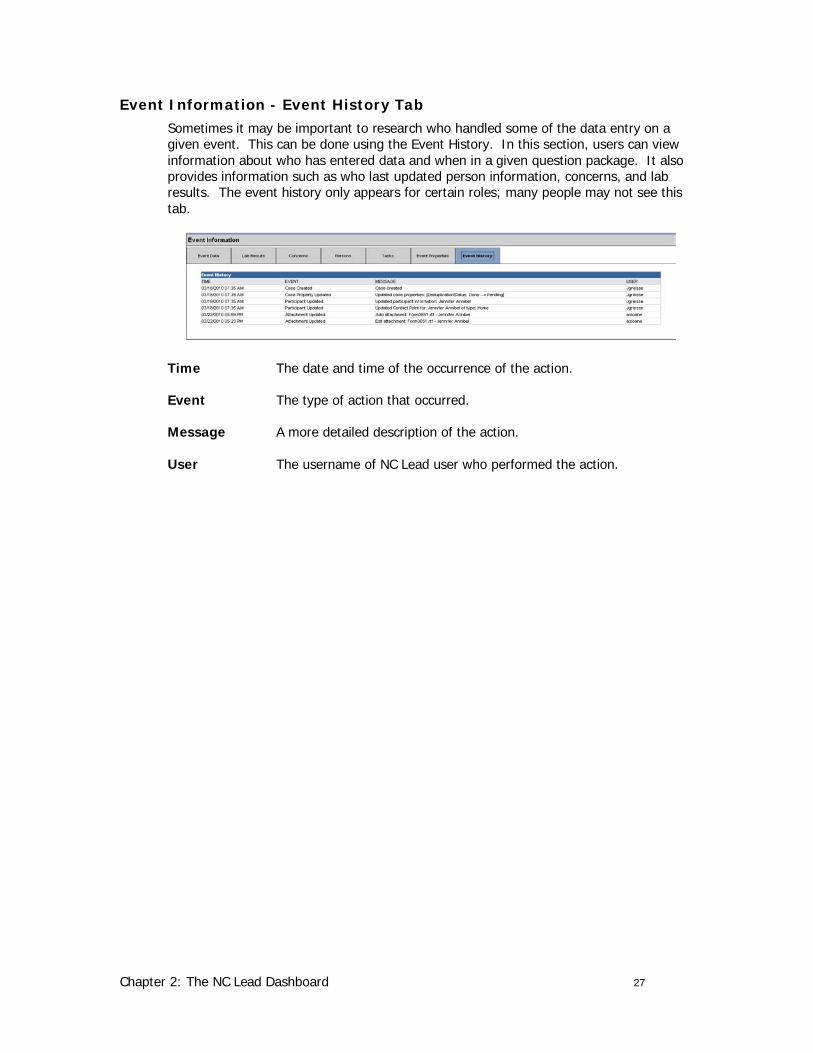
Event Information - Event History Tab Sometimes it may be important to research who handled some of the data entry on a given event. This can be done using the Event History. In this section, users can view information about who has entered data and when in a given question package. It also provides information such as who last updated person information, concerns, and lab results. The event history only appears for certain roles; many people may not see this tab.
Time The date and time of the occurrence of the action.
Event The type of action that occurred.
Message A more detailed description of the action.
User The username of NC Lead user who performed the action.
Chapter 2: The NC Lead Dashboard 28
Chapter 2 – Review Questions 1. Name and describe the purpose of each of the following buttons from NC Lead
Dashboard toolbar:
2. What are three pieces of information ascertained from the Event Summary portion of NC Lead Dashboard?
3. What are the tabs shown in the Event Information section and what is the primary purpose of each?
Chapter 3: Working with Childhood Lead Events 29
Chapter 3: Working with Childhood Lead Events
Learning Objectives:
1. Demonstrate the ability to create a new event
2. Demonstrate the ability to search for an existing event
3. Demonstrate the ability to modify/update an event
Chapter 3: Working with Childhood Lead Events 30
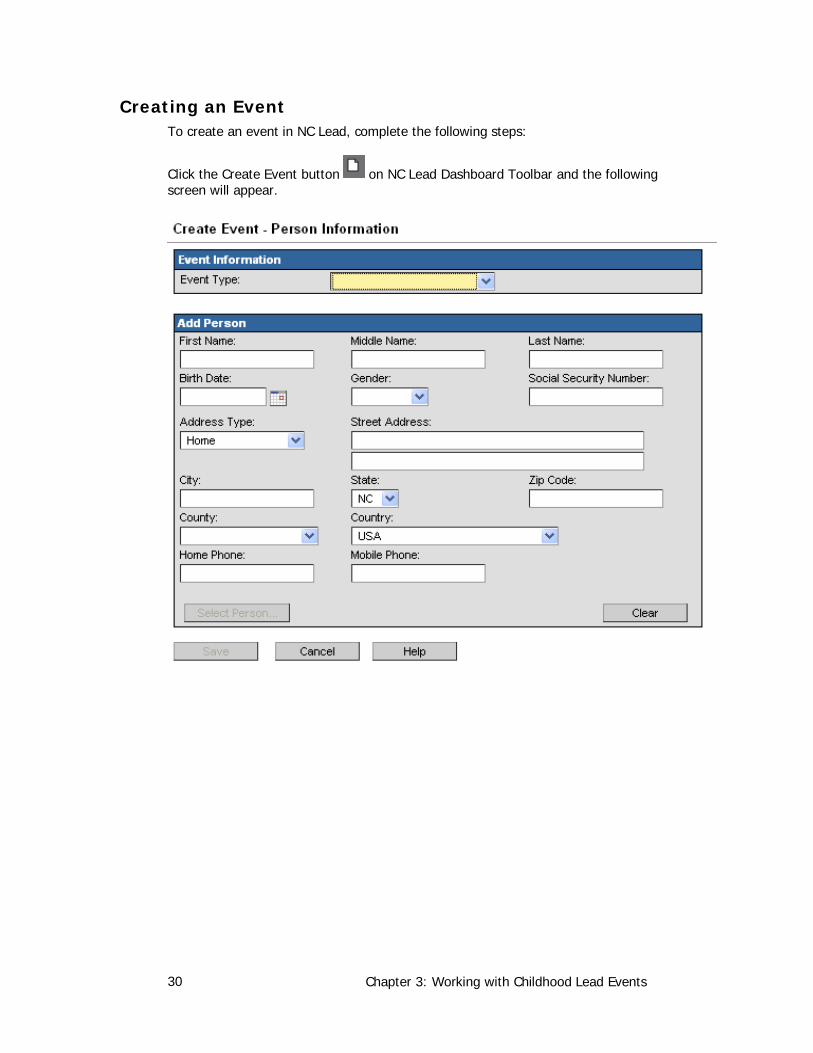
Creating an Event To create an event in NC Lead, complete the following steps:
Click the Create Event button on NC Lead Dashboard Toolbar and the following screen will appear.
Chapter 3: Working with Childhood Lead Events 31
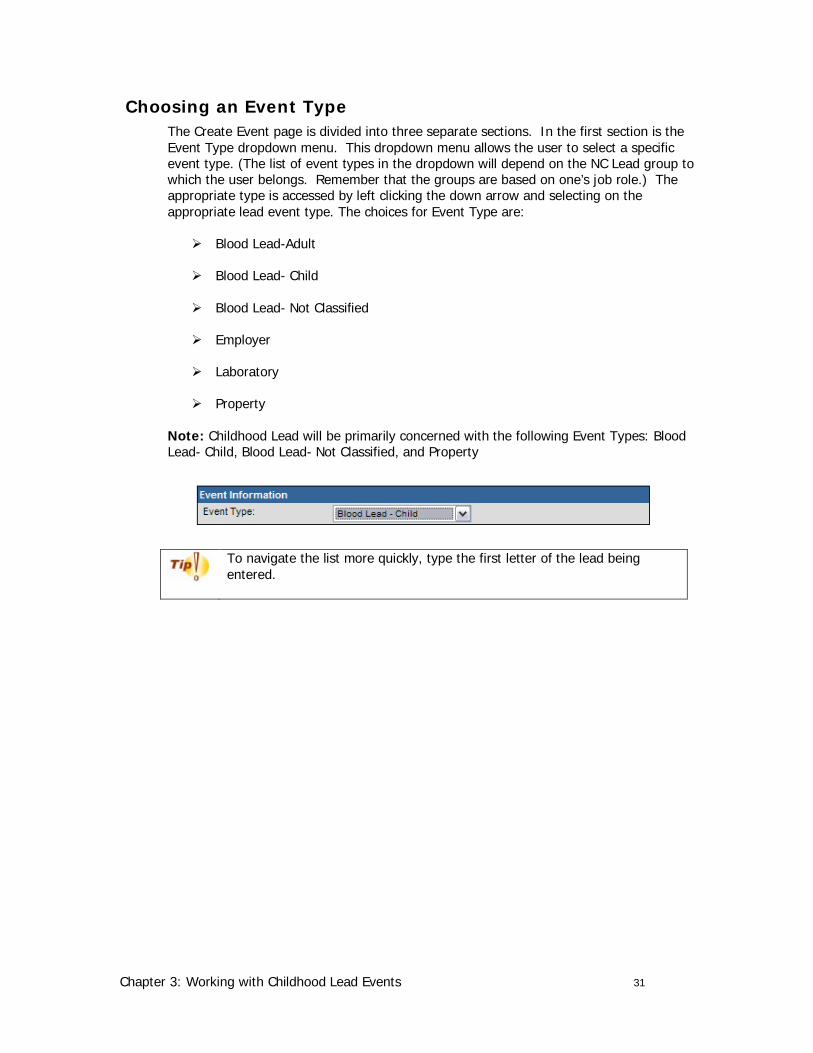
Choosing an Event Type The Create Event page is divided into three separate sections. In the first section is the Event Type dropdown menu. This dropdown menu allows the user to select a specific event type. (The list of event types in the dropdown will depend on the NC Lead group to which the user belongs. Remember that the groups are based on one’s job role.) The appropriate type is accessed by left clicking the down arrow and selecting on the appropriate lead event type. The choices for Event Type are:
Blood Lead-Adult
Blood Lead- Child
Blood Lead- Not Classified
Employer
Laboratory
Property
Note: Childhood Lead will be primarily concerned with the following Event Types: Blood Lead- Child, Blood Lead- Not Classified, and Property
To navigate the list more quickly, type the first letter of the lead being entered.
Chapter 3: Working with Childhood Lead Events 32
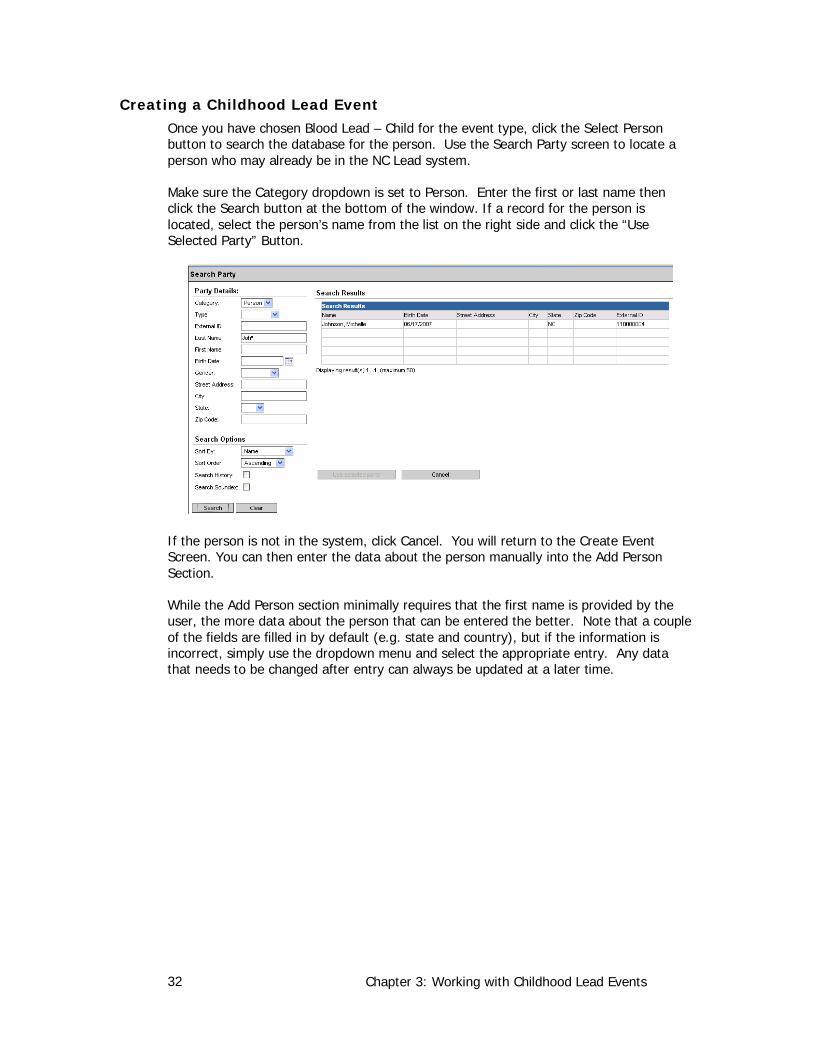
Creating a Childhood Lead Event Once you have chosen Blood Lead – Child for the event type, click the Select Person button to search the database for the person. Use the Search Party screen to locate a person who may already be in the NC Lead system.
Make sure the Category dropdown is set to Person. Enter the first or last name then click the Search button at the bottom of the window. If a record for the person is located, select the person’s name from the list on the right side and click the “Use Selected Party” Button.
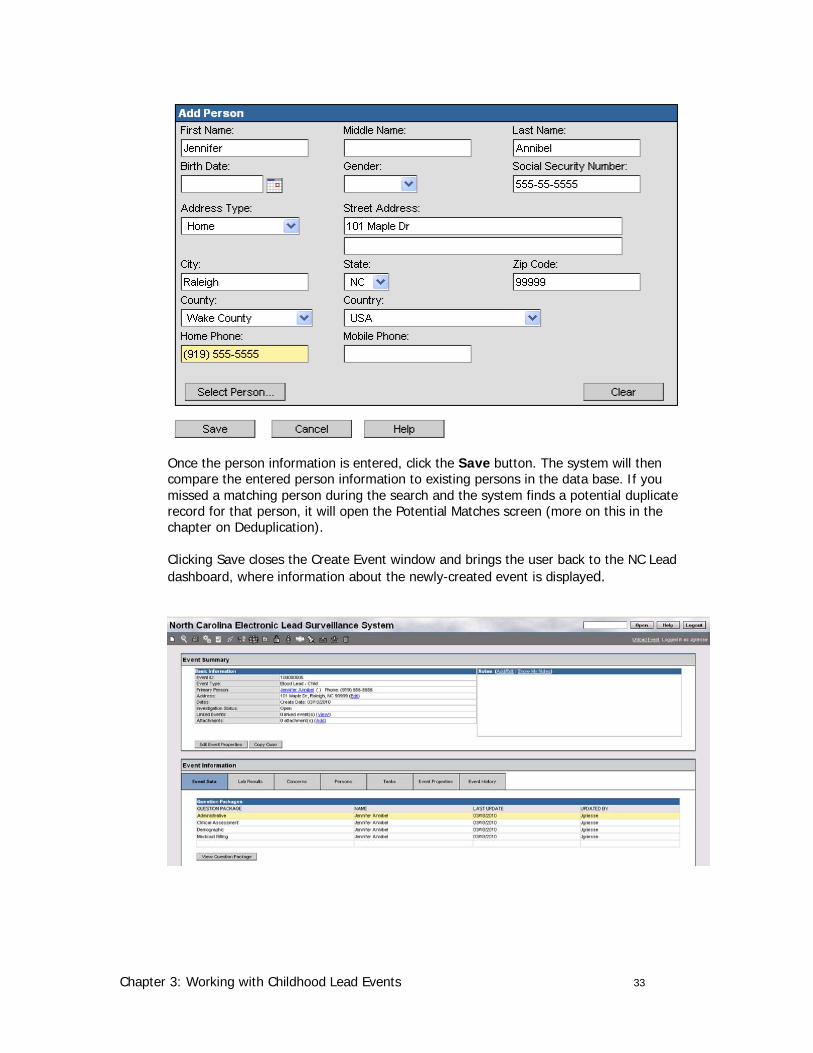
If the person is not in the system, click Cancel. You will return to the Create Event Screen. You can then enter the data about the person manually into the Add Person Section.
While the Add Person section minimally requires that the first name is provided by the user, the more data about the person that can be entered the better. Note that a couple of the fields are filled in by default (e.g. state and country), but if the information is incorrect, simply use the dropdown menu and select the appropriate entry. Any data that needs to be changed after entry can always be updated at a later time.
Chapter 3: Working with Childhood Lead Events 33
Once the person information is entered, click the Save button. The system will then compare the entered person information to existing persons in the data base. If you missed a matching person during the search and the system finds a potential duplicate record for that person, it will open the Potential Matches screen (more on this in the chapter on Deduplication).
Clicking Save closes the Create Event window and brings the user back to the NC Lead dashboard, where information about the newly-created event is displayed.
Chapter 3: Working with Childhood Lead Events 34
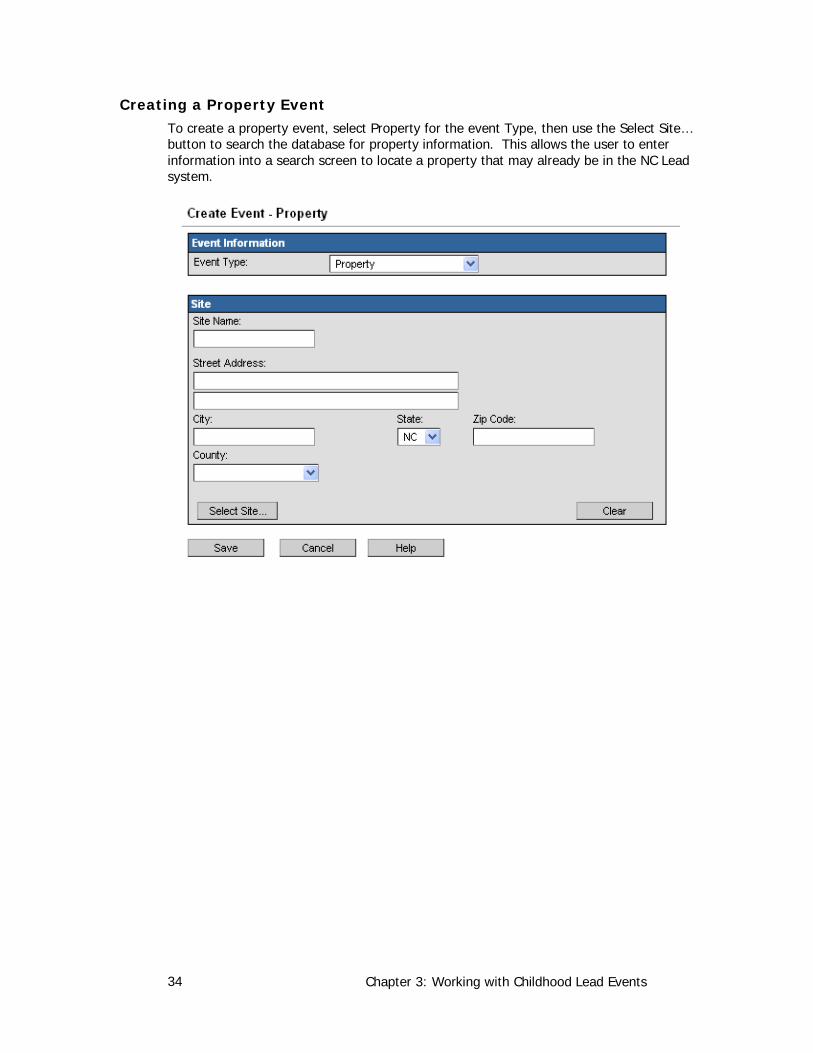
Creating a Property Event To create a property event, select Property for the event Type, then use the Select Site… button to search the database for property information. This allows the user to enter information into a search screen to locate a property that may already be in the NC Lead system.
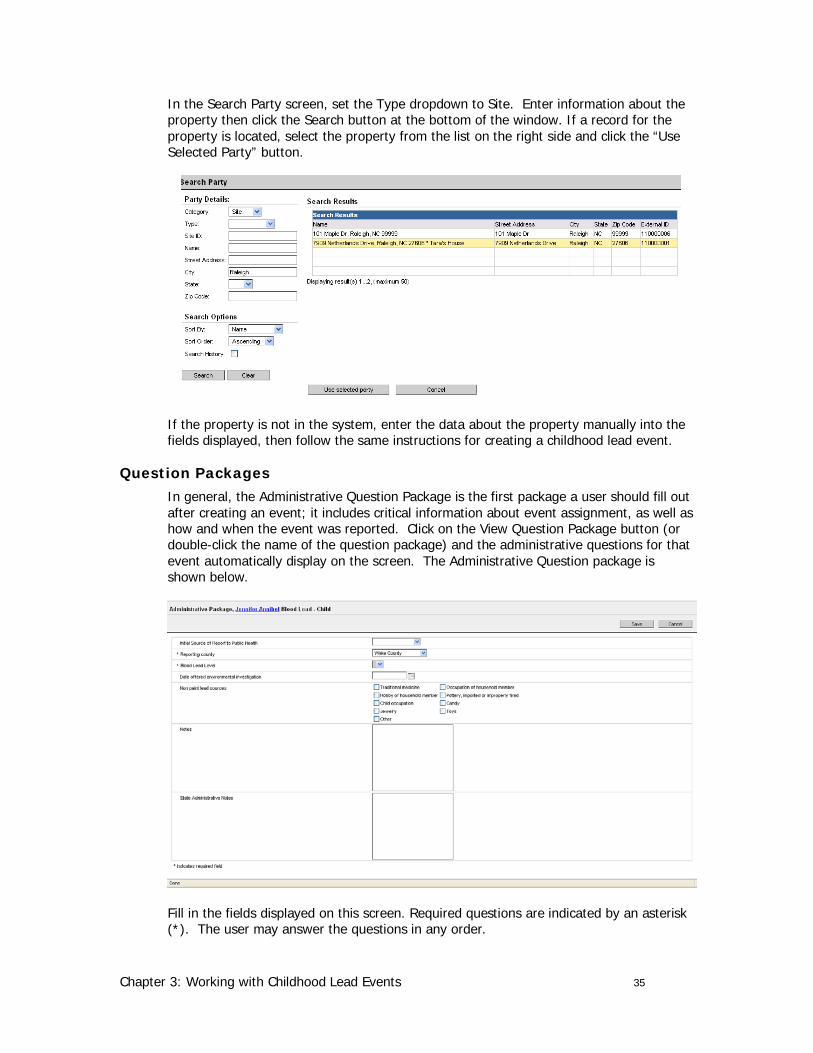
Chapter 3: Working with Childhood Lead Events 35
In the Search Party screen, set the Type dropdown to Site. Enter information about the property then click the Search button at the bottom of the window. If a record for the property is located, select the property from the list on the right side and click the “Use Selected Party” button.
If the property is not in the system, enter the data about the property manually into the fields displayed, then follow the same instructions for creating a childhood lead event.
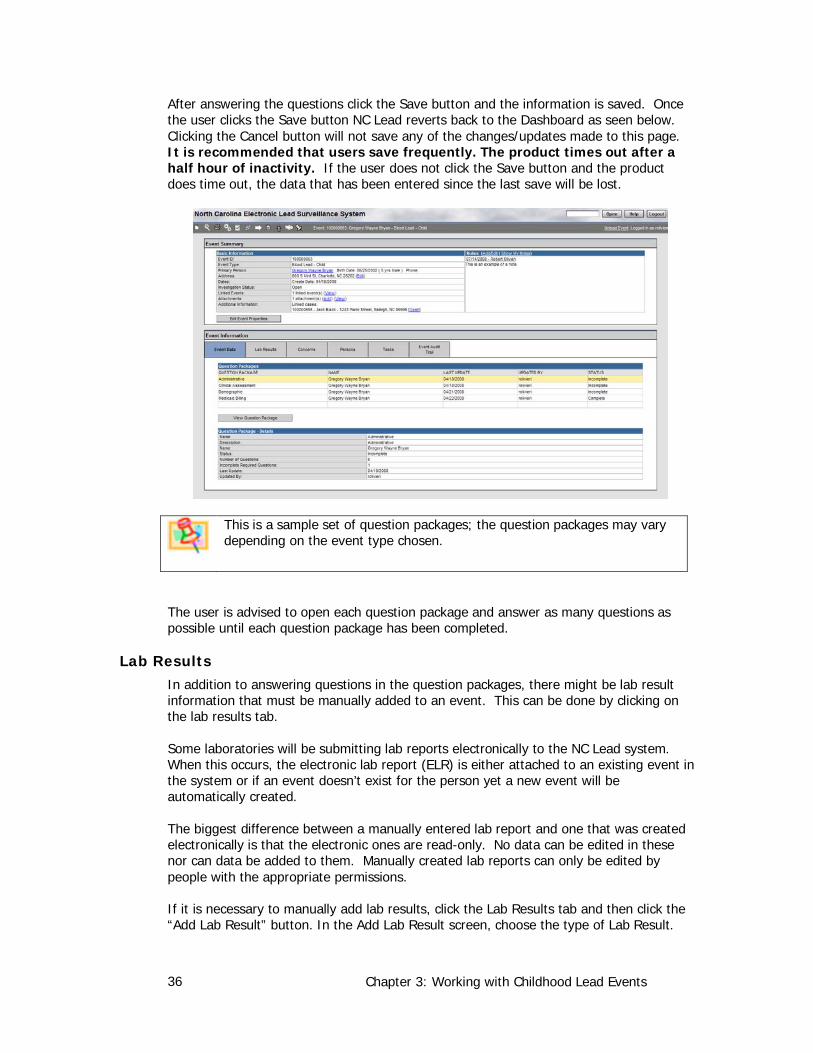
Question Packages In general, the Administrative Question Package is the first package a user should fill out after creating an event; it includes critical information about event assignment, as well as how and when the event was reported. Click on the View Question Package button (or double-click the name of the question package) and the administrative questions for that event automatically display on the screen. The Administrative Question package is shown below.
Fill in the fields displayed on this screen. Required questions are indicated by an asterisk (*). The user may answer the questions in any order.
Chapter 3: Working with Childhood Lead Events 36
After answering the questions click the Save button and the information is saved. Once the user clicks the Save button NC Lead reverts back to the Dashboard as seen below. Clicking the Cancel button will not save any of the changes/updates made to this page. It is recommended that users save frequently. The product times out after a half hour of inactivity. If the user does not click the Save button and the product does time out, the data that has been entered since the last save will be lost.
This is a sample set of question packages; the question packages may vary depending on the event type chosen.
The user is advised to open each question package and answer as many questions as possible until each question package has been completed.
Lab Results In addition to answering questions in the question packages, there might be lab result information that must be manually added to an event. This can be done by clicking on the lab results tab.
Some laboratories will be submitting lab reports electronically to the NC Lead system. When this occurs, the electronic lab report (ELR) is either attached to an existing event in the system or if an event doesn’t exist for the person yet a new event will be automatically created.
The biggest difference between a manually entered lab report and one that was created electronically is that the electronic ones are read-only. No data can be edited in these nor can data be added to them. Manually created lab reports can only be edited by people with the appropriate permissions.
If it is necessary to manually add lab results, click the Lab Results tab and then click the “Add Lab Result” button. In the Add Lab Result screen, choose the type of Lab Result.
Chapter 3: Working with Childhood Lead Events 37
The user can choose between adding Clinical, Environmental Sample, and Water Sample Lab Work.
Choosing Clinical displays the following screen.
Specimen Info
Details about the specimen. These include the date the specimen was taken, the number assigned to the specimen and the source of the specimen.
Tests The details regarding the test that was done. These details include the test name, findings of the test and the date on which the results were determined. (The Delete link will display only for those users who have permission to delete a lab test result.)
Lab Facility The laboratory where the test was analyzed.
Ordering The doctor or clinic that ordered the test. This displays the detailed
Chapter 3: Working with Childhood Lead Events 38
Facility address and phone information for that doctor or clinic.
Ordering Provider
The provider that ordered the test. (optional info)
Misc Info Miscellaneous information and/or notes regarding the lab results.
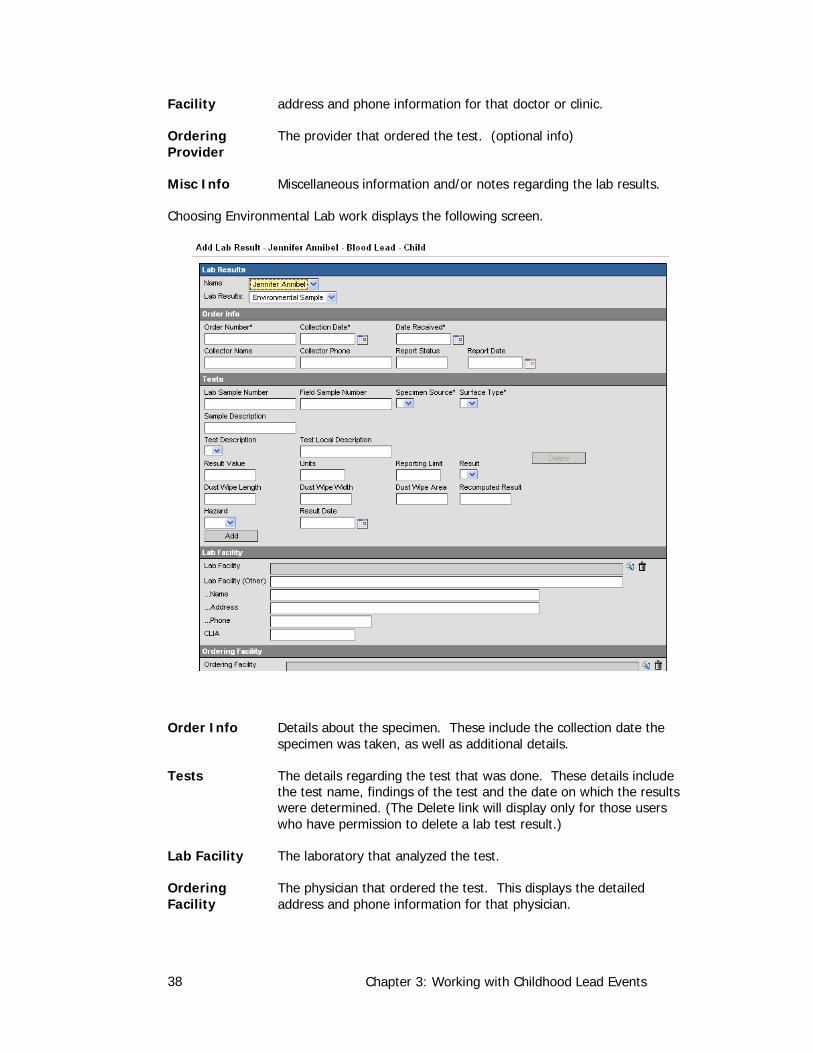
Choosing Environmental Lab work displays the following screen.
Order Info Details about the specimen. These include the collection date the specimen was taken, as well as additional details.
Tests The details regarding the test that was done. These details include the test name, findings of the test and the date on which the results were determined. (The Delete link will display only for those users who have permission to delete a lab test result.)
Lab Facility The laboratory that analyzed the test.
Ordering Facility
The physician that ordered the test. This displays the detailed address and phone information for that physician.

Chapter 3: Working with Childhood Lead Events 39
Orderer Name of the EHS person that ordered the test.
Misc Info Miscellaneous information and/or notes regarding the lab results.
Chapter 3: Working with Childhood Lead Events 40
Exercise 3.1 –Create a New Event The purpose of this exercise is to demonstrate the ability to create a new event within NC ELSS.
1. Decide on a name and a date of birth for a make-believe person and write the information in the spaces below:
Name (First/Middle/Last):______________________________________
Date of Birth:_________________________________
2. Click the Create Event button on the toolbar.
3. Select the Blood lead – child from the dropdown list.
4. Click the Select Person button to verify that your make-believe person is not already in the NC LEAD database.
5. Enter the following information for your new event:
• First Name, Last Name, Birth Date – Please enter the name and birth date you specified above.
• County: Choose Wake County
6. Click Add.
7. Click Save to create the new event.
Chapter 3: Working with Childhood Lead Events 41
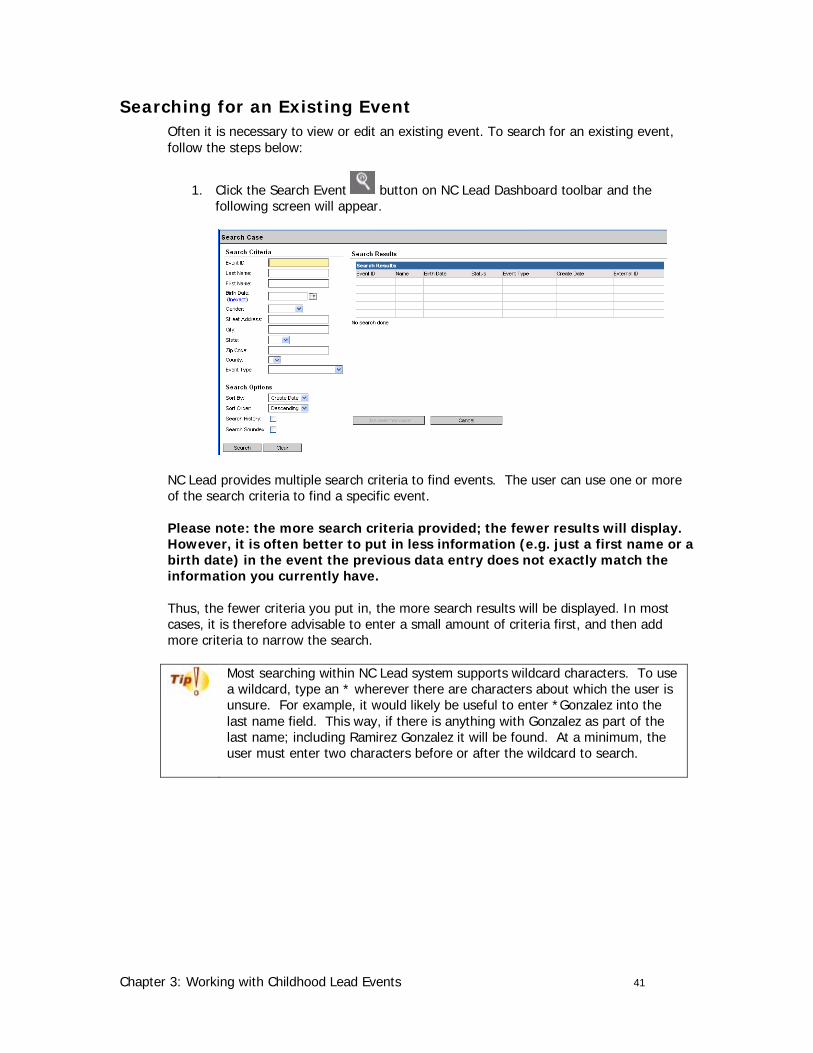
Searching for an Existing Event Often it is necessary to view or edit an existing event. To search for an existing event, follow the steps below:
1. Click the Search Event button on NC Lead Dashboard toolbar and the following screen will appear.
NC Lead provides multiple search criteria to find events. The user can use one or more of the search criteria to find a specific event.
Please note: the more search criteria provided; the fewer results will display. However, it is often better to put in less information (e.g. just a first name or a birth date) in the event the previous data entry does not exactly match the information you currently have.
Thus, the fewer criteria you put in, the more search results will be displayed. In most cases, it is therefore advisable to enter a small amount of criteria first, and then add more criteria to narrow the search.
Most searching within NC Lead system supports wildcard characters. To use a wildcard, type an * wherever there are characters about which the user is unsure. For example, it would likely be useful to enter *Gonzalez into the last name field. This way, if there is anything with Gonzalez as part of the last name; including Ramirez Gonzalez it will be found. At a minimum, the user must enter two characters before or after the wildcard to search.
Chapter 3: Working with Childhood Lead Events 42
Event searching is also tied to security. Users will only be able to view the cases they are authorized to see based on their group membership.
Event ID Allows the user to search for a specific event if the Event ID is known.
First Name Any First Name for whom the user wishes to search.
Last name Any Last Name for whom the user wishes to search.
Birth Date Any birth date using the mm/dd/yyyy search format.
Gender Allows the user to search by gender.
State Allows the user to specify the state of residence associated with the person.
County Allows the user to specify the county of residence associated with the person.
Event Type All event types are listed in this dropdown, however if the user only has permissions to see specific events, and selects a type of event for which the user does not have permissions, no results will be displayed due to the user’s role.
Sort By Provides two dropdown menus for the user to choose how the search results are presented. The first dropdown menu specifies which field to sort results by and the other dropdown specifies the order in which the results will be presented – ascending (alphabetical or numeric) or descending (reverse alphabetical or numeric).
Search History Allows the user to broaden the search to include historical event/party history. When this box is checked, historical demographic / address information is also compared against the search criteria (e.g., old address or old event/ party ID etc.).
Search Soundex Allows the user to broaden the search beyond the literal spelling of the input search criteria; e.g., searching on “Tom” will also search on “Thom”; searching on “John” will also search on “Jack”.
Please note that these search criteria are the minimum criteria that will be available. There may be additional criteria as well.

Chapter 3: Working with Childhood Lead Events 43
2. Enter parameter information into one or more of the event details fields. (For example, a first name or first few letters with a wildcard.)
3. Set the sort by criteria in the way you’d like the search results to appear.
4. Click Search. (Clicking the Clear button will delete any search parameters that have been entered.)
5. Search results will display in the table to the right of the screen, as shown.
6. Upon locating the event in question, select the corresponding line and click “Use selected Case” or simply double-click on the record.
7. This action automatically closes the search window and displays the selected event in the NC Lead dashboard.
The user can now update, print, or review the event information as required.
Chapter 3: Working with Childhood Lead Events 44
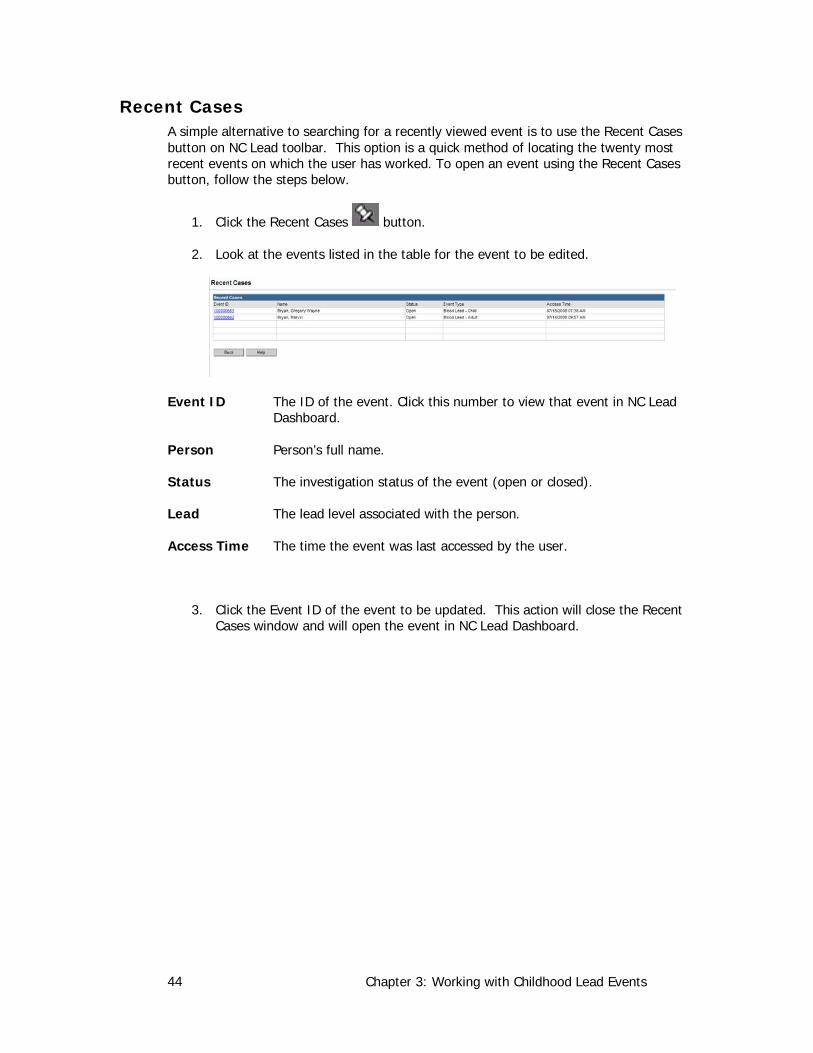
Recent Cases A simple alternative to searching for a recently viewed event is to use the Recent Cases button on NC Lead toolbar. This option is a quick method of locating the twenty most recent events on which the user has worked. To open an event using the Recent Cases button, follow the steps below.
1. Click the Recent Cases button.
2. Look at the events listed in the table for the event to be edited.
Event ID The ID of the event. Click this number to view that event in NC Lead Dashboard.
Person Person’s full name.
Status The investigation status of the event (open or closed).
Lead The lead level associated with the person.
Access Time The time the event was last accessed by the user.
3. Click the Event ID of the event to be updated. This action will close the Recent Cases window and will open the event in NC Lead Dashboard.
Chapter 3: Working with Childhood Lead Events 45
Exercise 3.2 – Search for Events The purpose of this exercise is to demonstrate the ability to search for and locate an event within NC Lead.
1. Unload your event.
2. Click the Search Event button on the toolbar.
3. Search for events to answer the following questions:
• What event type is associated with Adam Hill's event?
• When is JoAnne Baker's birthday?
• On what date was Melanie Smith's event created?
• How many events are associated with people who have the first name Michael?
• Anna Ramirez-Gonzalez was just recently married. Her event was previously entered into NC Lead using her maiden name and a middle name. Locate her event. How old is Anna Ramirez-Gonzalez?
Chapter 3: Working with Childhood Lead Events 46
Adding or Updating information in an Event It is often necessary to add, change, or delete information in an existing event. To modify an existing event, follow the steps below:
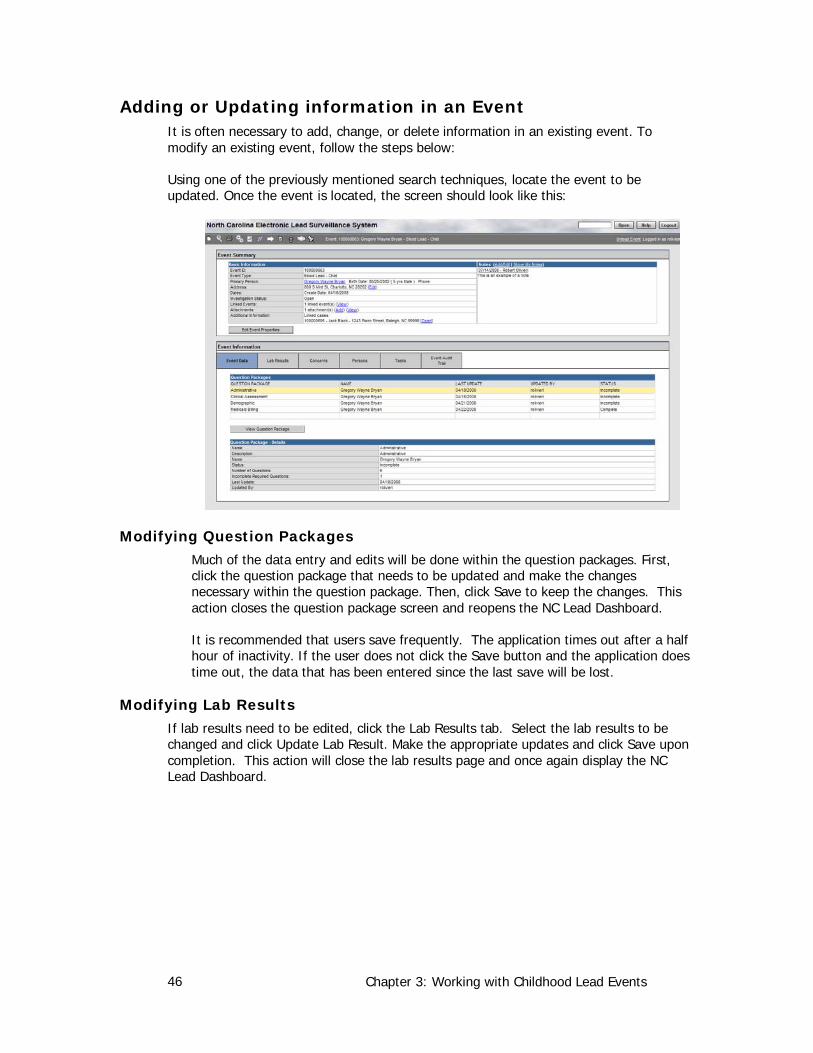
Using one of the previously mentioned search techniques, locate the event to be updated. Once the event is located, the screen should look like this:
Modifying Question Packages Much of the data entry and edits will be done within the question packages. First, click the question package that needs to be updated and make the changes necessary within the question package. Then, click Save to keep the changes. This action closes the question package screen and reopens the NC Lead Dashboard.
It is recommended that users save frequently. The application times out after a half hour of inactivity. If the user does not click the Save button and the application does time out, the data that has been entered since the last save will be lost.
Modifying Lab Results If lab results need to be edited, click the Lab Results tab. Select the lab results to be changed and click Update Lab Result. Make the appropriate updates and click Save upon completion. This action will close the lab results page and once again display the NC Lead Dashboard.
Chapter 3: Working with Childhood Lead Events 47
Changing the Event Type If an event type needs to be changed, it is possible for someone with the appropriate permissions to change it. Open the event to be changed in the NC Lead dashboard. Click the Edit Event Properties button and change the Change Type to dropdown to the appropriate event type. The dropdown list shows only a limited number of types based on your original selection.
Remember that questions differ between event types so if the user changes the type for an event, all data that does not apply to the new type will be lost. Changing back to the original type will not restore the lost data.
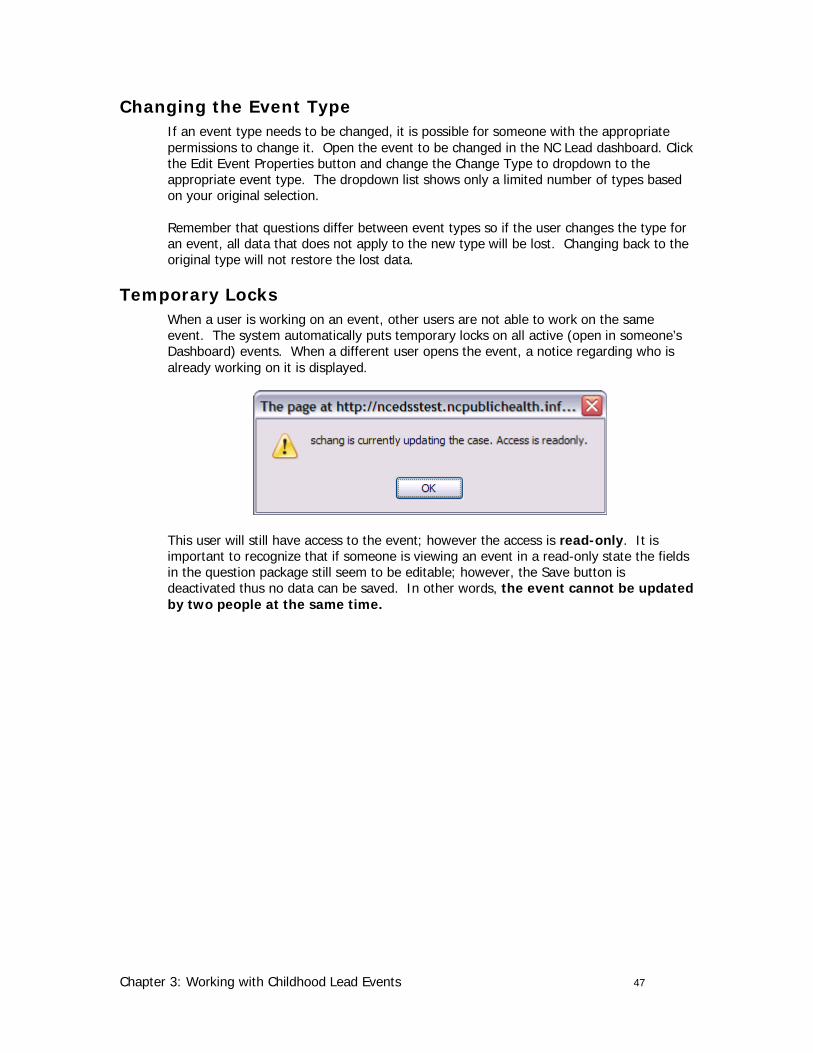
Temporary Locks When a user is working on an event, other users are not able to work on the same event. The system automatically puts temporary locks on all active (open in someone’s Dashboard) events. When a different user opens the event, a notice regarding who is already working on it is displayed.
This user will still have access to the event; however the access is read-only. It is important to recognize that if someone is viewing an event in a read-only state the fields in the question package still seem to be editable; however, the Save button is deactivated thus no data can be saved. In other words, the event cannot be updated by two people at the same time.
Chapter 3: Working with Childhood Lead Events 48
Exercise 3.3 – Add/Modify Event Information The purpose of this exercise is to demonstrate the ability to add or modify event information using NC Lead.
1. Load the event you created earlier.
2. Open a question package and add new information. Don't forget to save your changes.
3. Click the Lab Results tab in the Event Information section. Add a new lab result with two tests for the same specimen relevant to the associated lead for your event.
4. Click the Concerns tab in the Event Information section. Add a new concern. Set the severity of the concern to Very High.
5. Click the Edit link in the Event Summary section to add two (2) new Event Notes. Click Done. Click the Edit link once more and Edit the last note you added.
Chapter 4: Editing Person Data 49
Chapter 4: Editing Person Data
Learning Objectives:
1. Demonstrate the ability to edit person data.
2. Explain which data will display in future events for the person.
Chapter 4: Editing Person Data 50
Person Information NC Lead stores a Master Patient Index in the database. This means that anytime a person is entered into the system, whether or not the event was reported and even if the event is closed immediately, the person exists as an entry in the database. Because this person now exists in the database, it is important to remember to reuse the person information rather than creating a new person entry in the system. Reuse of the data helps to keep data and reporting information as up-to-date and accurate as possible.
Let’s look at an example: Jennifer Annibel has been entered in NC Lead as a contact of someone else. Two years later Jennifer Annibel is suspected of having high levels of lead. To create the new event in the system for Jennifer, remember to utilize the Select Person button on the create event screen. If Jennifer’s personal information has changed since she was originally entered in the database two years earlier, please review the steps below to understand how to update her information.
Modifying Person Information Person information is entered in the Persons tab as well as in the Demographic Question Package. The information that is entered in the Persons tab is applicable to all events for the person. The information in the demographic question package is not necessarily the same across events. Please see below for the distinctions on these as well as information on how to enter/edit data in the persons tab.
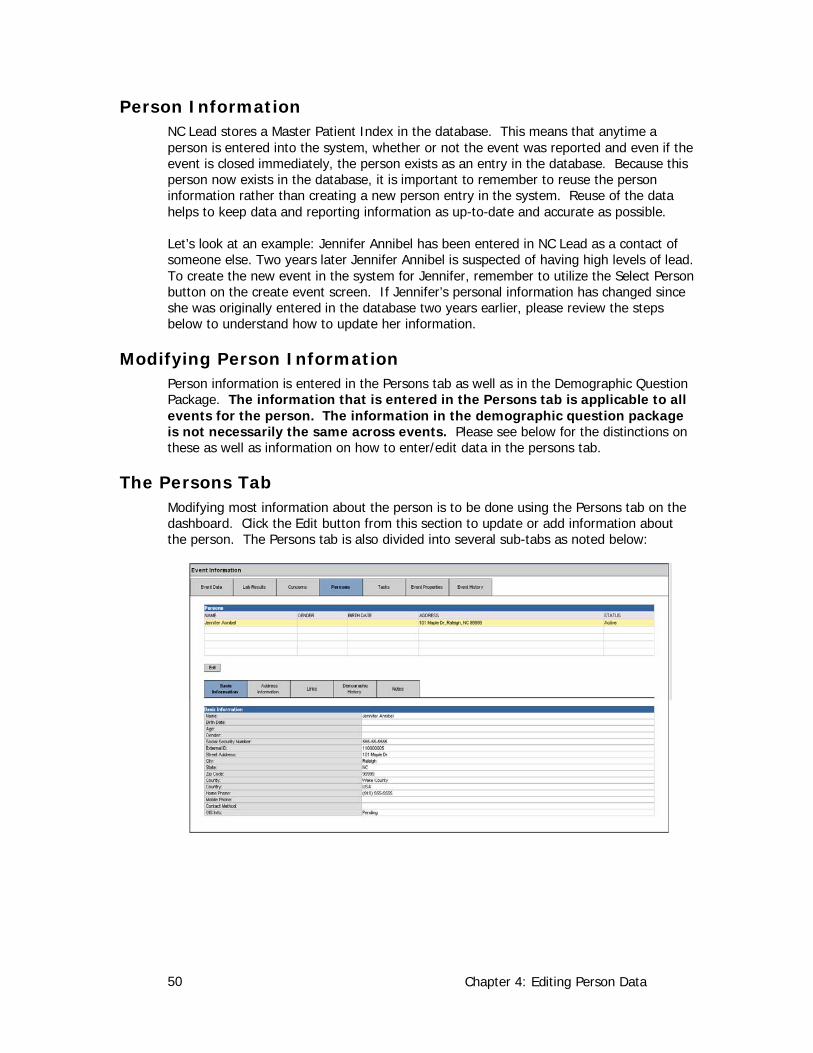
The Persons Tab Modifying most information about the person is to be done using the Persons tab on the dashboard. Click the Edit button from this section to update or add information about the person. The Persons tab is also divided into several sub-tabs as noted below:
Chapter 4: Editing Person Data 51
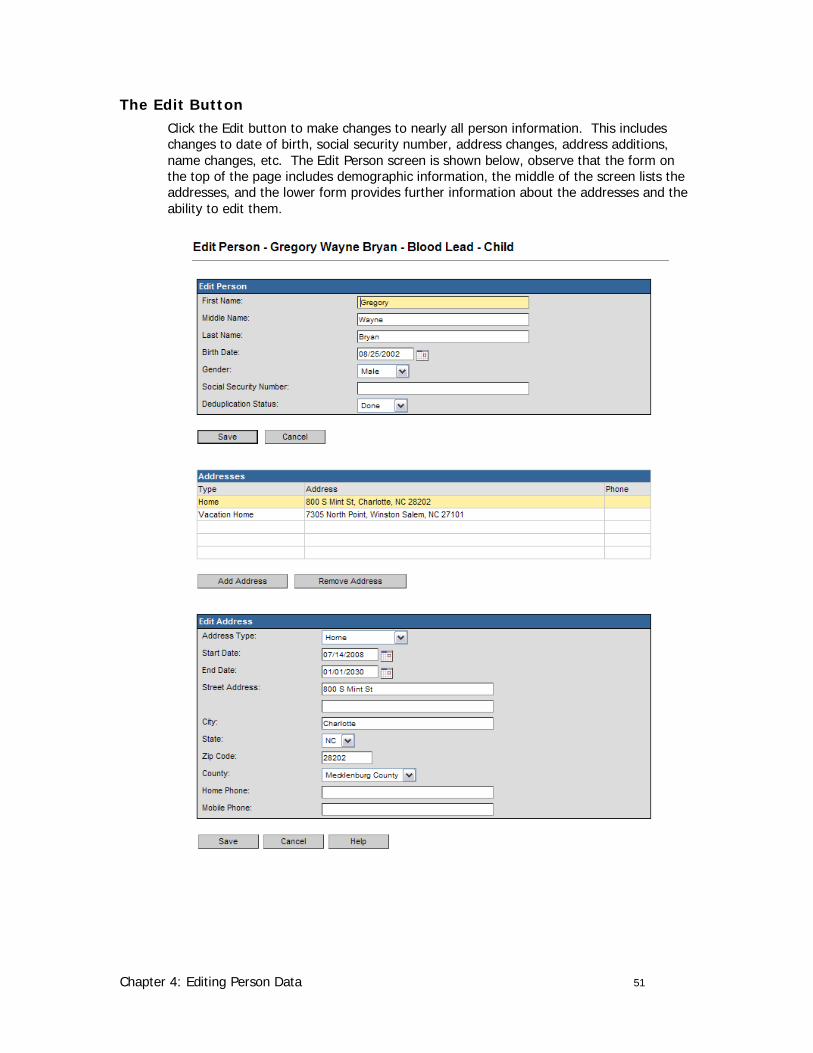
The Edit Button Click the Edit button to make changes to nearly all person information. This includes changes to date of birth, social security number, address changes, address additions, name changes, etc. The Edit Person screen is shown below, observe that the form on the top of the page includes demographic information, the middle of the screen lists the addresses, and the lower form provides further information about the addresses and the ability to edit them.
Chapter 4: Editing Person Data 52
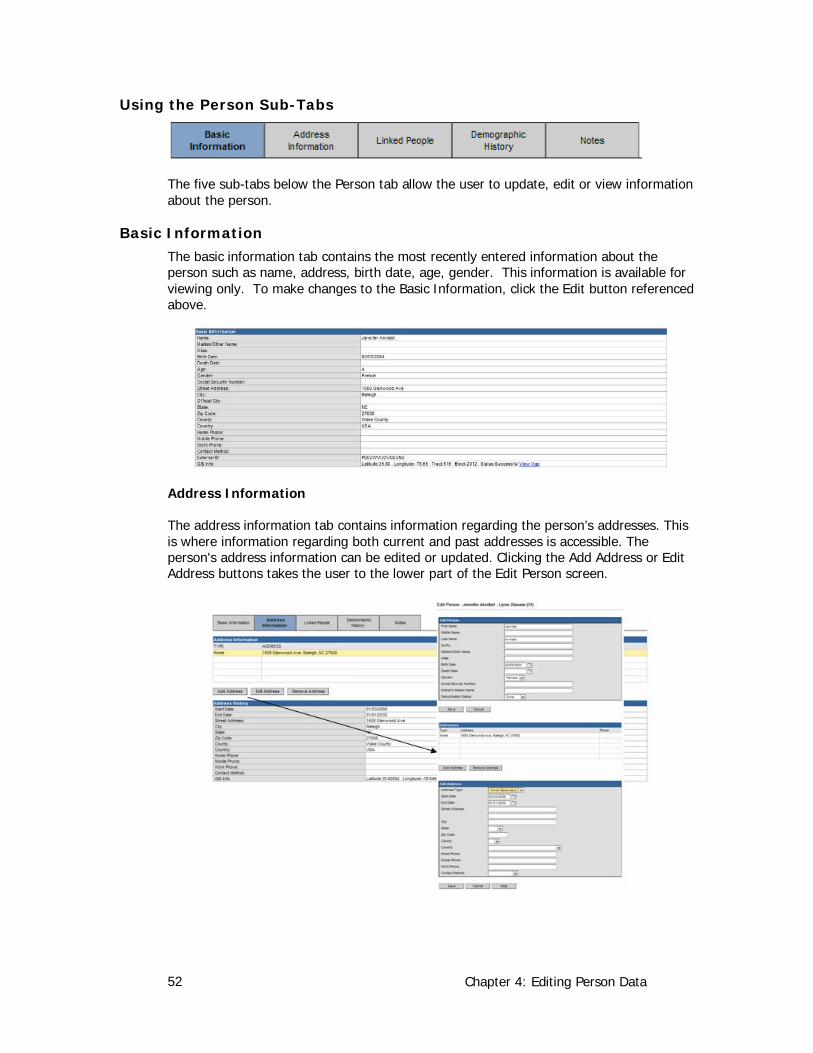
Using the Person Sub-Tabs
The five sub-tabs below the Person tab allow the user to update, edit or view information about the person.
Basic Information The basic information tab contains the most recently entered information about the person such as name, address, birth date, age, gender. This information is available for viewing only. To make changes to the Basic Information, click the Edit button referenced above.
Address Information
The address information tab contains information regarding the person’s addresses. This is where information regarding both current and past addresses is accessible. The person's address information can be edited or updated. Clicking the Add Address or Edit Address buttons takes the user to the lower part of the Edit Person screen.
Chapter 4: Editing Person Data 53
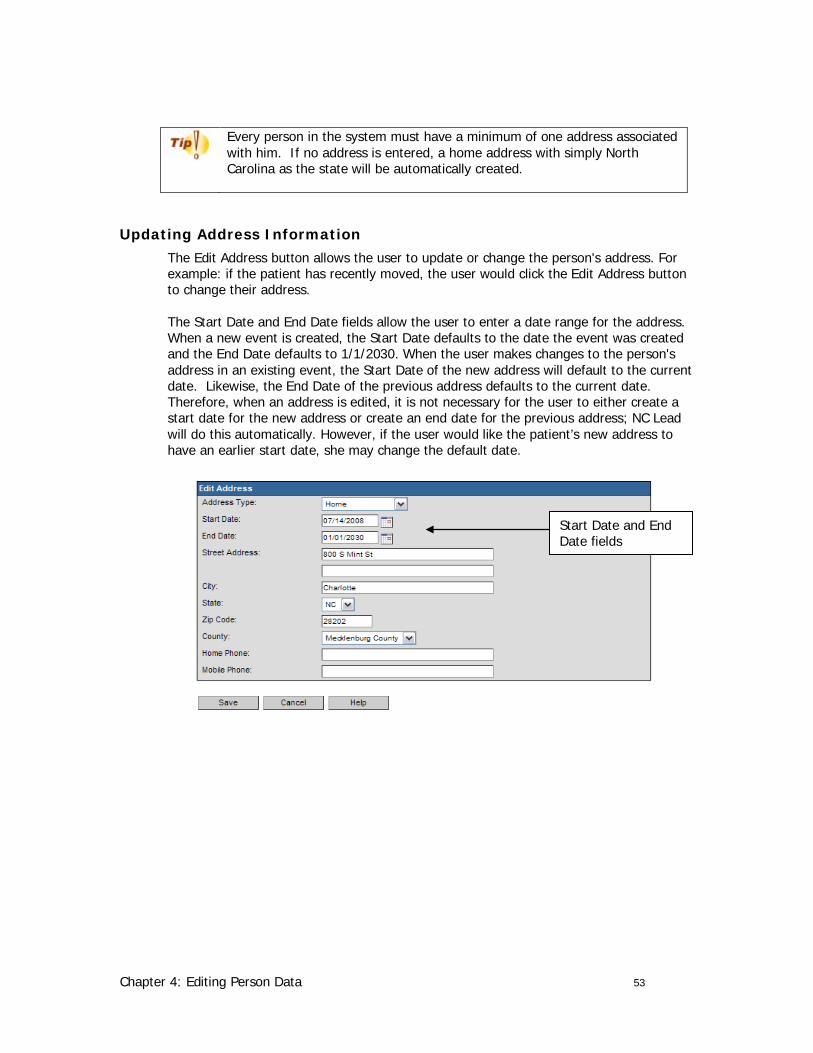
Every person in the system must have a minimum of one address associated with him. If no address is entered, a home address with simply North Carolina as the state will be automatically created.
Updating Address Information The Edit Address button allows the user to update or change the person's address. For example: if the patient has recently moved, the user would click the Edit Address button to change their address.
The Start Date and End Date fields allow the user to enter a date range for the address. When a new event is created, the Start Date defaults to the date the event was created and the End Date defaults to 1/1/2030. When the user makes changes to the person's address in an existing event, the Start Date of the new address will default to the current date. Likewise, the End Date of the previous address defaults to the current date. Therefore, when an address is edited, it is not necessary for the user to either create a start date for the new address or create an end date for the previous address; NC Lead will do this automatically. However, if the user would like the patient’s new address to have an earlier start date, she may change the default date.
Start Date and End Date fields
Chapter 4: Editing Person Data 54
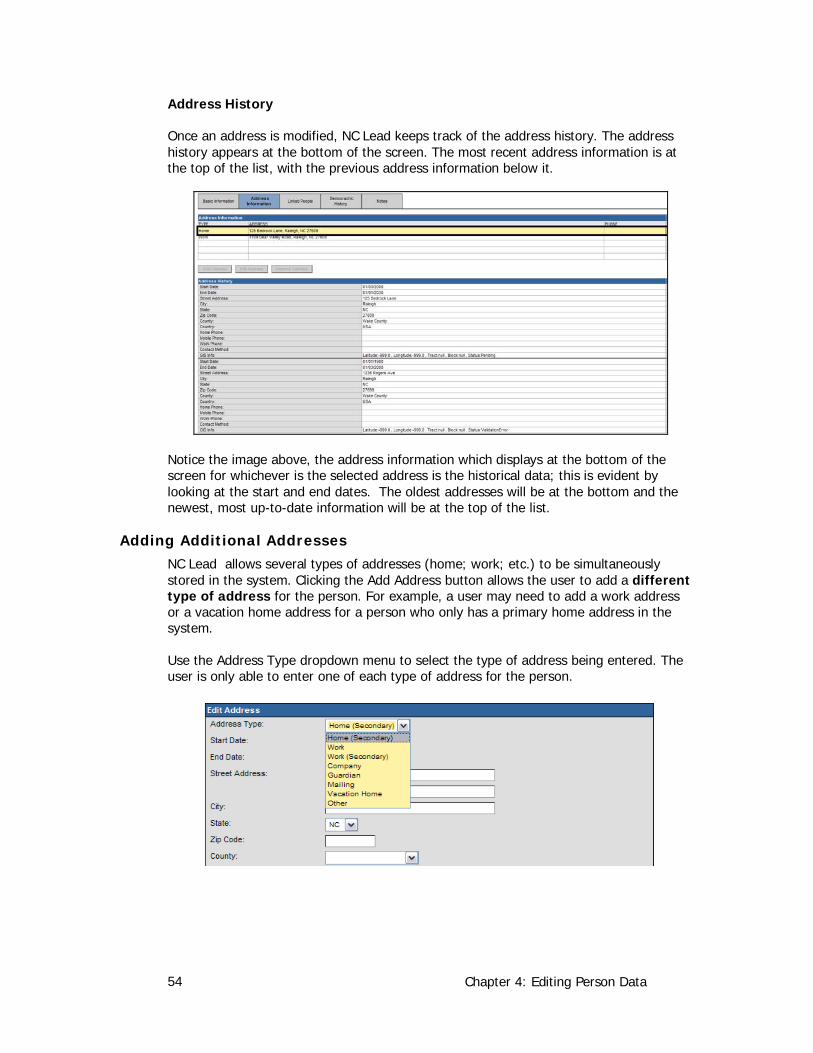
Address History
Once an address is modified, NC Lead keeps track of the address history. The address history appears at the bottom of the screen. The most recent address information is at the top of the list, with the previous address information below it.
Notice the image above, the address information which displays at the bottom of the screen for whichever is the selected address is the historical data; this is evident by looking at the start and end dates. The oldest addresses will be at the bottom and the newest, most up-to-date information will be at the top of the list.
Adding Additional Addresses NC Lead allows several types of addresses (home; work; etc.) to be simultaneously stored in the system. Clicking the Add Address button allows the user to add a different type of address for the person. For example, a user may need to add a work address or a vacation home address for a person who only has a primary home address in the system.
Use the Address Type dropdown menu to select the type of address being entered. The user is only able to enter one of each type of address for the person.
Chapter 4: Editing Person Data 55
Removing Addresses Clicking the Remove Address button will allow a user to delete an address that’s no longer relevant. Note that if the Remove Address button is clicked, it removes not only the current address, but all addresses of this type in the address history. For example, if a user highlights the work address and clicks Remove Address, this work address and any previous work addresses in the history will be deleted. The user is not prompted to be sure that he wants to remove the address, the address is simply deleted. Please be cautious about using this button, particularly for home address.
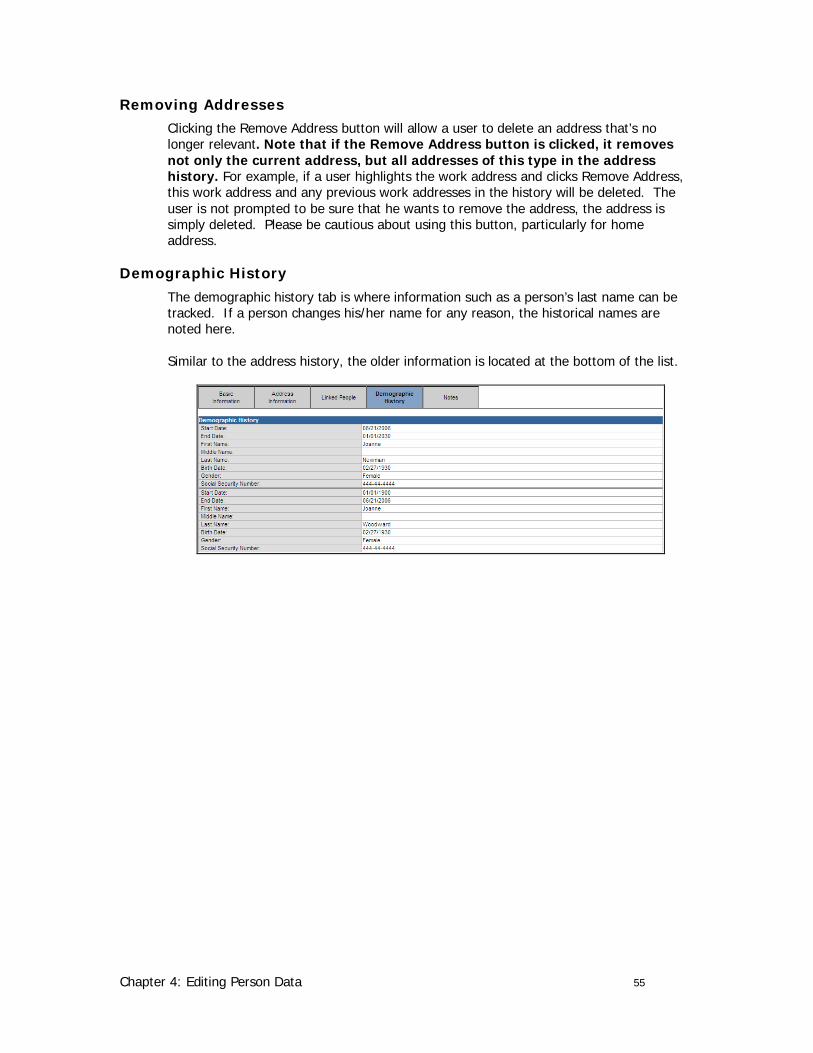
Demographic History The demographic history tab is where information such as a person’s last name can be tracked. If a person changes his/her name for any reason, the historical names are noted here.
Similar to the address history, the older information is located at the bottom of the list.
Chapter 4: Editing Person Data 56
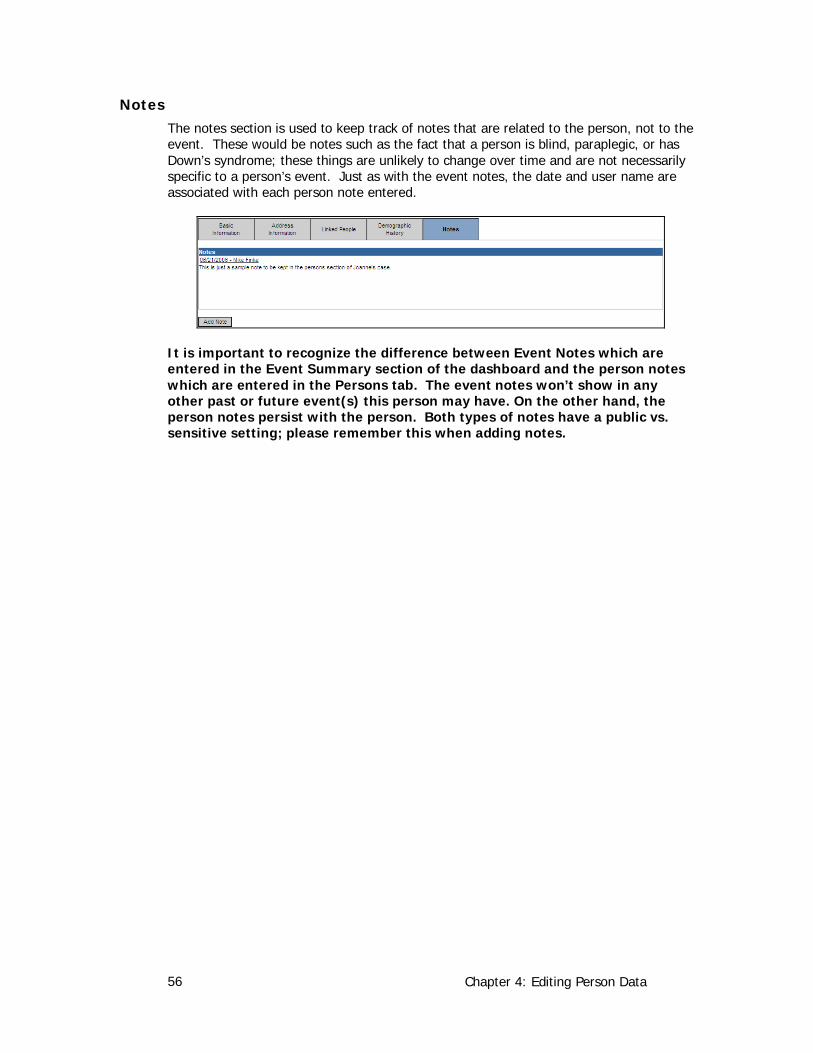
Notes The notes section is used to keep track of notes that are related to the person, not to the event. These would be notes such as the fact that a person is blind, paraplegic, or has Down’s syndrome; these things are unlikely to change over time and are not necessarily specific to a person’s event. Just as with the event notes, the date and user name are associated with each person note entered.
It is important to recognize the difference between Event Notes which are entered in the Event Summary section of the dashboard and the person notes which are entered in the Persons tab. The event notes won’t show in any other past or future event(s) this person may have. On the other hand, the person notes persist with the person. Both types of notes have a public vs. sensitive setting; please remember this when adding notes.
Chapter 4: Editing Person Data 57
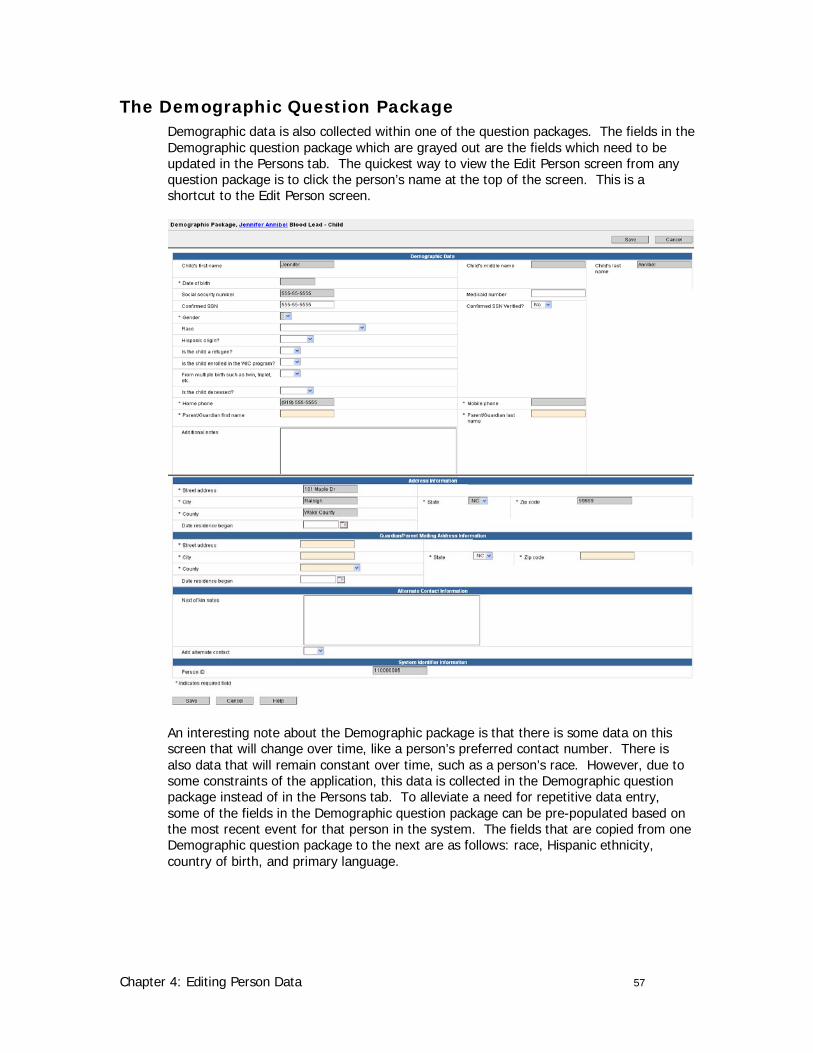
The Demographic Question Package Demographic data is also collected within one of the question packages. The fields in the Demographic question package which are grayed out are the fields which need to be updated in the Persons tab. The quickest way to view the Edit Person screen from any question package is to click the person’s name at the top of the screen. This is a shortcut to the Edit Person screen.
An interesting note about the Demographic package is that there is some data on this screen that will change over time, like a person’s preferred contact number. There is also data that will remain constant over time, such as a person’s race. However, due to some constraints of the application, this data is collected in the Demographic question package instead of in the Persons tab. To alleviate a need for repetitive data entry, some of the fields in the Demographic question package can be pre-populated based on the most recent event for that person in the system. The fields that are copied from one Demographic question package to the next are as follows: race, Hispanic ethnicity, country of birth, and primary language.

Chapter 4: Editing Person Data 58
If this data is entered in a person’s first event and then changed in a second event, the subsequent event(s) will display the most recently entered data (i.e. from the second event) until further changes are made.
This behavior is unique to the Demographic question package. All other question package data is entered for each event in the system and none of the rest of this data is copied from one event to another.
Chapter 4: Editing Person Data 59
Exercise 4.1 – Modify Person Information The purpose of this exercise is to demonstrate the ability to modify person information within NC ELSS.
1. Where would the user make changes to a street address?
2. Where would the user change the patient’s primary language?
3. Which fields from the Demographic question package carry over if the patient has an illness in the future?
4. Make a change to the home street address for your event.
5. Add a vacation home address for your event.

Chapter 4: Editing Person Data 60
Chapter 5: The Workflow Queue and Tasks 61
Chapter 5: The Workflow Queue and Tasks
Learning Objectives:
1. Explain the importance of the Workflow Queue.
2. Demonstrate how to interact with the Workflow Queue.
3. Explain the importance of tasks.
4. Perform a task.
5. Assign an existing task.
6. Create and assign a new task.
7. Share a case.
Chapter 5: The Workflow Queue and Tasks 62
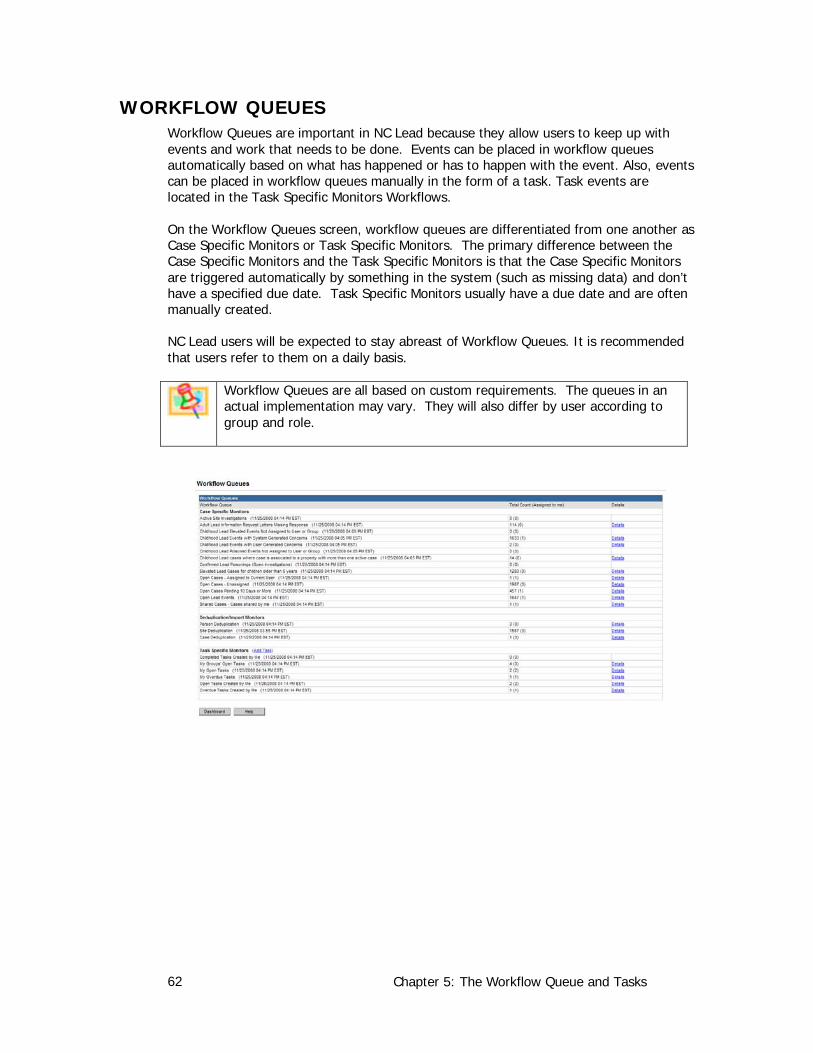
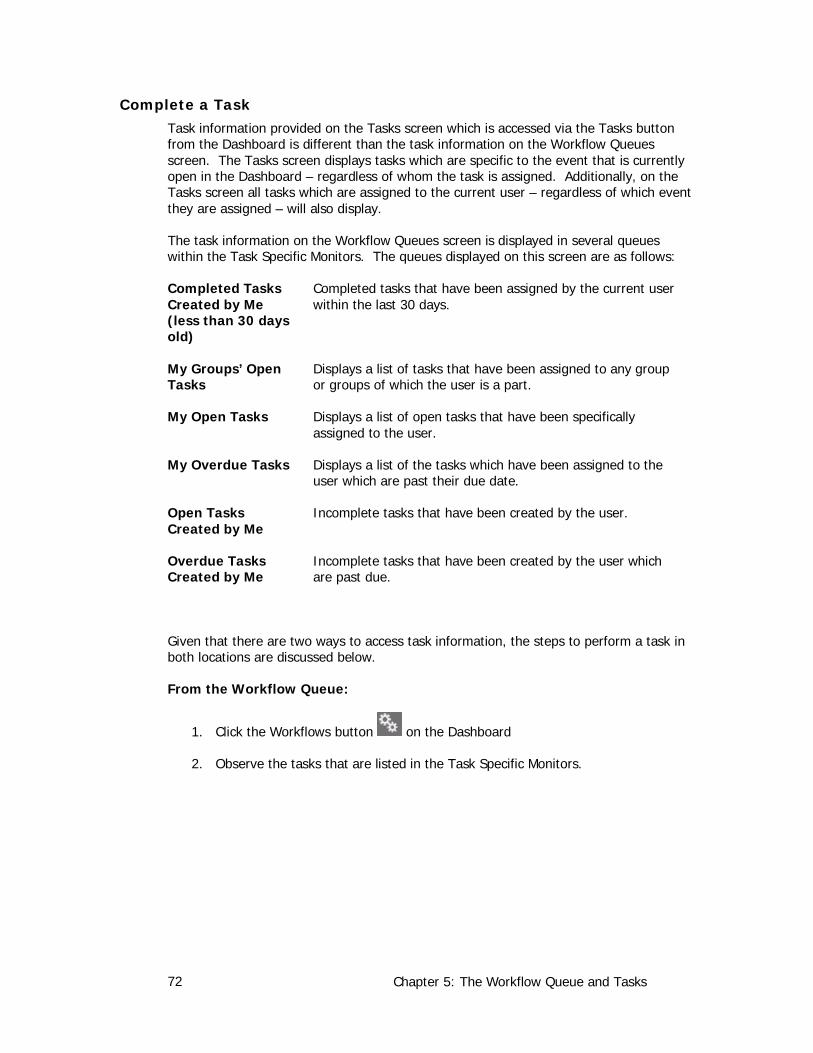
WORKFLOW QUEUES Workflow Queues are important in NC Lead because they allow users to keep up with events and work that needs to be done. Events can be placed in workflow queues automatically based on what has happened or has to happen with the event. Also, events can be placed in workflow queues manually in the form of a task. Task events are located in the Task Specific Monitors Workflows.
On the Workflow Queues screen, workflow queues are differentiated from one another as Case Specific Monitors or Task Specific Monitors. The primary difference between the Case Specific Monitors and the Task Specific Monitors is that the Case Specific Monitors are triggered automatically by something in the system (such as missing data) and don’t have a specified due date. Task Specific Monitors usually have a due date and are often manually created.
NC Lead users will be expected to stay abreast of Workflow Queues. It is recommended that users refer to them on a daily basis.
Workflow Queues are all based on custom requirements. The queues in an actual implementation may vary. They will also differ by user according to group and role.
Chapter 5: The Workflow Queue and Tasks 63
The fields within the workflow screen are described below:
Workflow Queue The name of the query which describes the condition of the events.
Total Count (Assigned to me) The number of events that have been triggered by the specific monitor and the number within the parentheses () is the number of events that have specifically been assigned to the user.
Details Clicking the link within this column will open a new screen which provides further detail about the event(s) in the queue.
Case Specific Monitors These automatically run monitors that describe the condition of events. These vary depending upon the user’s permissions within the system. For NC Lead these workflows are categorized according to Clinician and Environmental Health Specialist.
Task Specific Monitors Tasks that have been assigned to a specific user or group which were created manually and may have a due date associated. Task specific monitors are always cleared manually by the user completing the task.
Case Specific Monitors A case specific monitor is automatically “watching” for a specific occurrence which will trigger it. These occurrences may vary from event to event and role to role. An example of a case specific monitor is when an electronic lab result leads to the creation of a new event within NC Lead. A Case Specific Monitor may display that there are new events in a users (clinical or environmental health) workflow. A message would then be displayed in the appropriate users’ or groups’ Workflow Queue. Usually these types of monitors can be cleared and the workflow queue emptied by filling in a field (or fields) in a question package.
NC Lead runs queries intermittently throughout a 24 hour period. Some workflow queries run 1 time in 24 hours, where others may run as frequently as every 5 minutes. The frequency with which the workflow query runs is based on the criticality of the workflow as well as the burden on the system.
Chapter 5: The Workflow Queue and Tasks 64
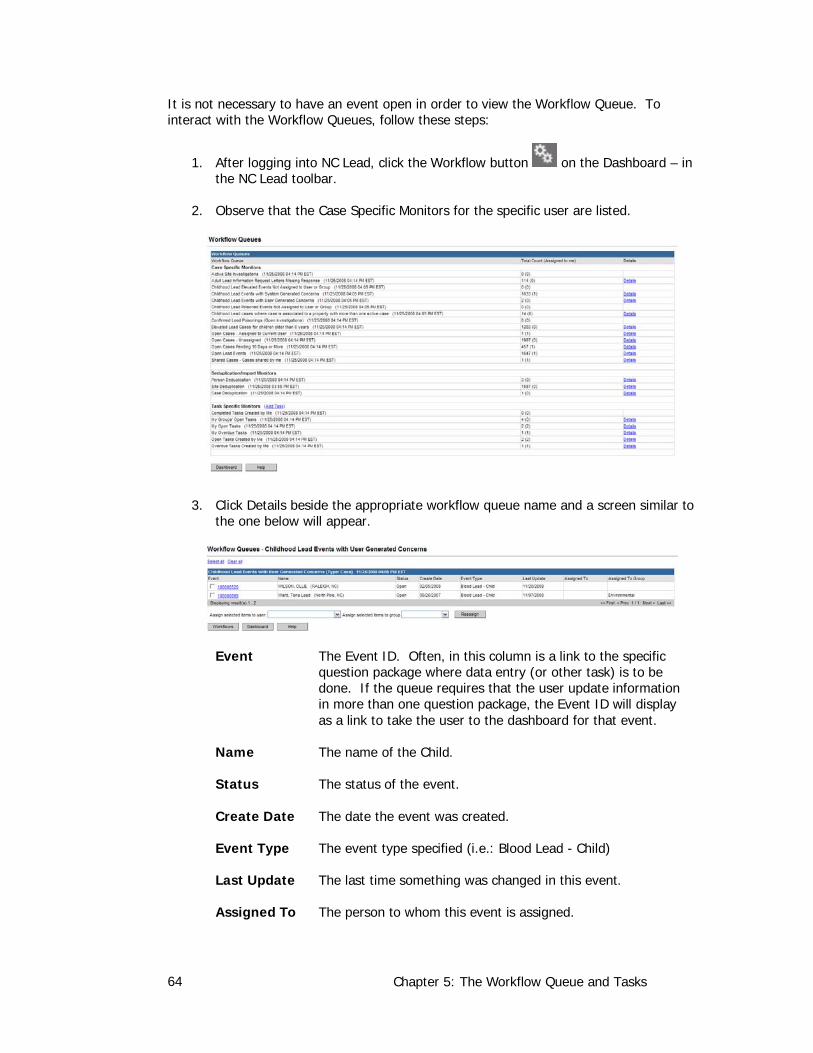
It is not necessary to have an event open in order to view the Workflow Queue. To interact with the Workflow Queues, follow these steps:
1. After logging into NC Lead, click the Workflow button on the Dashboard – in the NC Lead toolbar.
2. Observe that the Case Specific Monitors for the specific user are listed.
3. Click Details beside the appropriate workflow queue name and a screen similar to the one below will appear.
Event The Event ID. Often, in this column is a link to the specific question package where data entry (or other task) is to be done. If the queue requires that the user update information in more than one question package, the Event ID will display as a link to take the user to the dashboard for that event.
Name The name of the Child.
Status The status of the event.
Create Date The date the event was created.
Event Type The event type specified (i.e.: Blood Lead - Child)
Last Update The last time something was changed in this event.
Assigned To The person to whom this event is assigned.
Chapter 5: The Workflow Queue and Tasks 65
Assigned to Group
The group to whom this event is assigned.
Other actions performed on this page are noted below:
Select all Places a check mark inside the checkboxes to the left of each event. Checking multiple (or individual) events allows for an action to be completed on those events, such as reassigning them or performing a bulk action on them. (See below for more information about bulk actions.)
Clear all Removes any checks within the checkboxes.
Assign selected items to user
Allows the current user to assign selected events to a specific NC Lead user. Check the box beside all events that are to be assigned to the new user.
Assign selected items to group
Allows the current user to assign selected events to a specific NC Lead group. Check the box beside all events that are to be assigned to the new group.
4. Click the link beside the Event ID if applicable. This will either open the appropriate question package or open the event to the dashboard so that the required action(s) may be performed.
5. Remember that upon making changes to question packages, click the Save button. This action returns the user to NC Lead dashboard for the currently active event.
If it is necessary to assign the event to another person or group, check the events to be assigned first and then use the appropriate dropdown list (user and/or group) and select the appropriate user or group. Then click the Reassign button. Use the Workflows button to go back to the Workflow Queue page or the Dashboard button to return to the Dashboard.
If the user tries to assign an event to someone who does not have permission to view the event, the event will not be assigned and the user will see a note at the top of the screen indicating the following:
“Warning”: The group selected does not have access to at least one of the selected cases.”
When assigning an event in the workflow queue, it’s important to recognize that the event will also be assigned to that user or group if the same event is listed in other workflow queues.
Chapter 5: The Workflow Queue and Tasks 66
Exercise 5.1 – Interacting with Workflow Queues The purpose of this exercise is to demonstrate the ability to interact with Workflow Queues in NC Lead .
1. What is the purpose of Workflow Queues?
2. Click the Workflows button on the toolbar. Find a workflow queue named "Childhood Lead Events with User Generated Concerns.” Find your event within that queue.
3. Open your event by clicking on the Event ID link. Next, click the Concerns tab in the Event Information section, and find the concern you created in exercise 3.3. Update the concern by changing the value of the Status field to Resolved and save your changes. Click the Workflows button once again. Has your event been removed from the queue?
Chapter 5: The Workflow Queue and Tasks 67
Tasks Similar to the items in the Case Specific Monitors, a task within NC Lead is another technique for users to delegate assignments or work to others. The major difference between task and case specific monitors is that task monitors have a due date while case specific monitors do not. Tasks can be accessed from three places: the toolbar on the dashboard (Tasks button), the Add Task button in the Tasks tab in the Event Information section, and from the Workflow Queues page (the Add Task link under Task Specific Monitors). All three provide similar information but offer slightly different views and functionality.
Task creation can be different depending upon where the user initiates the create task action.
If the user clicks the Add Task button under the Task tab, they can only create an event-specific task.
If the user clicks the Add Task link from the Workflow Queues page (under Task Specific Monitors), they can only create a general (not event-specific) task.
If the user clicks the Tasks button on the toolbar, they can create both – the task can be associated with the currently active event or it can be non-event specific.
An example of a task that would be associated to a specific event is to ask a user to contact the patient for an interview. An example of a non-event specific task would be to ask a user (or group) to review lab results for all of the EBL events that have been received in their jurisdiction recently to check for similarities to previous EBL cases.
Create and Assign a New Task Again, it is important to note that tasks can be associated or not be associated with a specific event. The steps to create either type of task are virtually the same. Follow the procedures outlined below, but first determine if the task you need to create is associated with a specific event.
Chapter 5: The Workflow Queue and Tasks 68
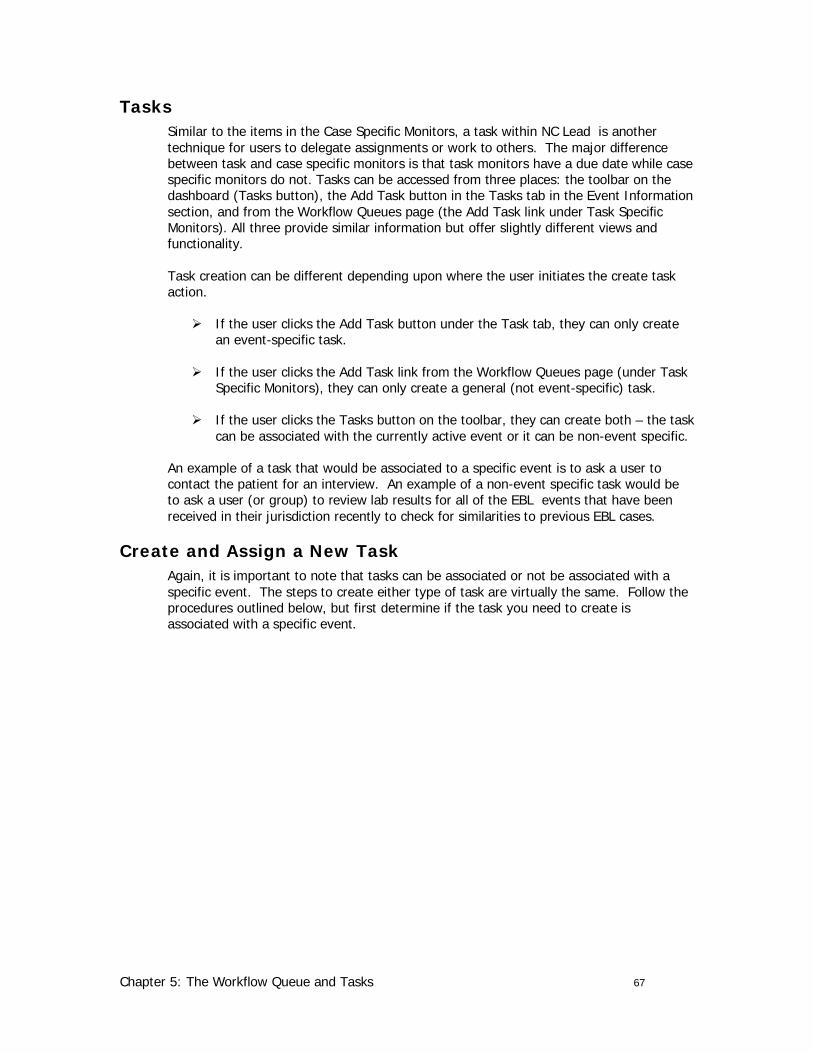
Create an Event-Specific Task 1. If it is necessary to create a task specific to an event, first open the event in
NC Lead dashboard.
2. Click the Tasks button on NC Lead toolbar. Then click the Add event task button.
OR
Click the Tasks tab in the Event Information section. Then click the Add Task button.
Clicking this button brings up the following screen.
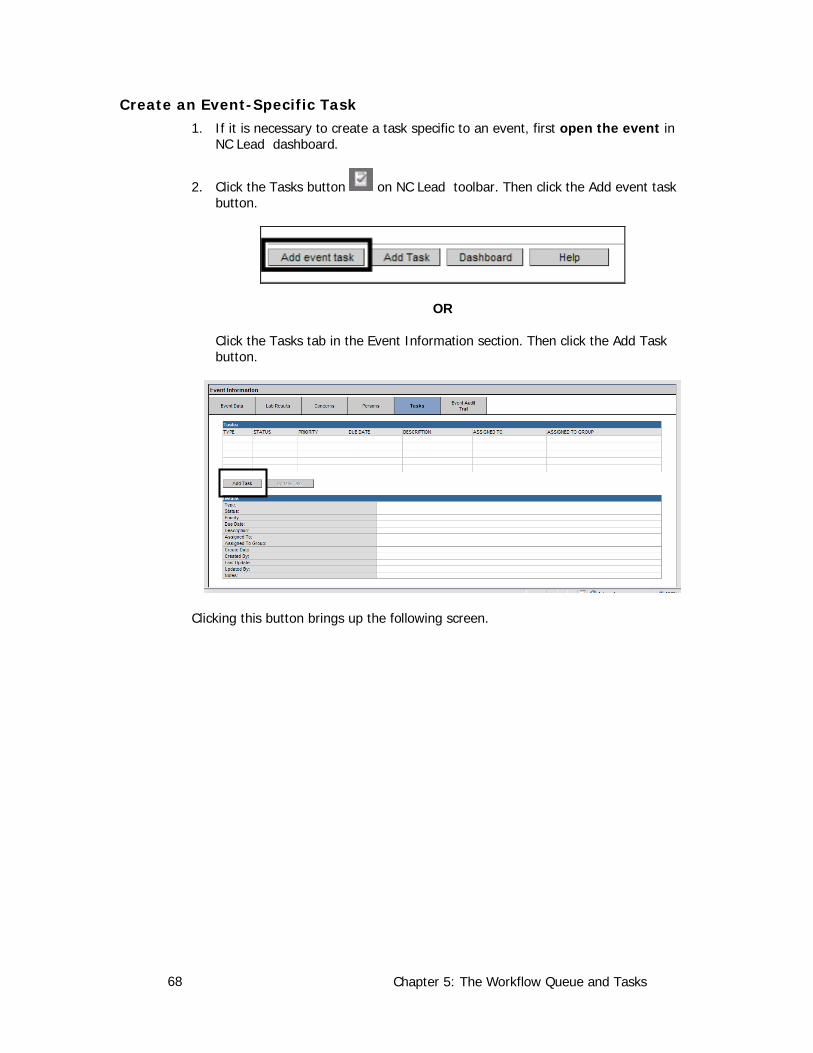
Chapter 5: The Workflow Queue and Tasks 69
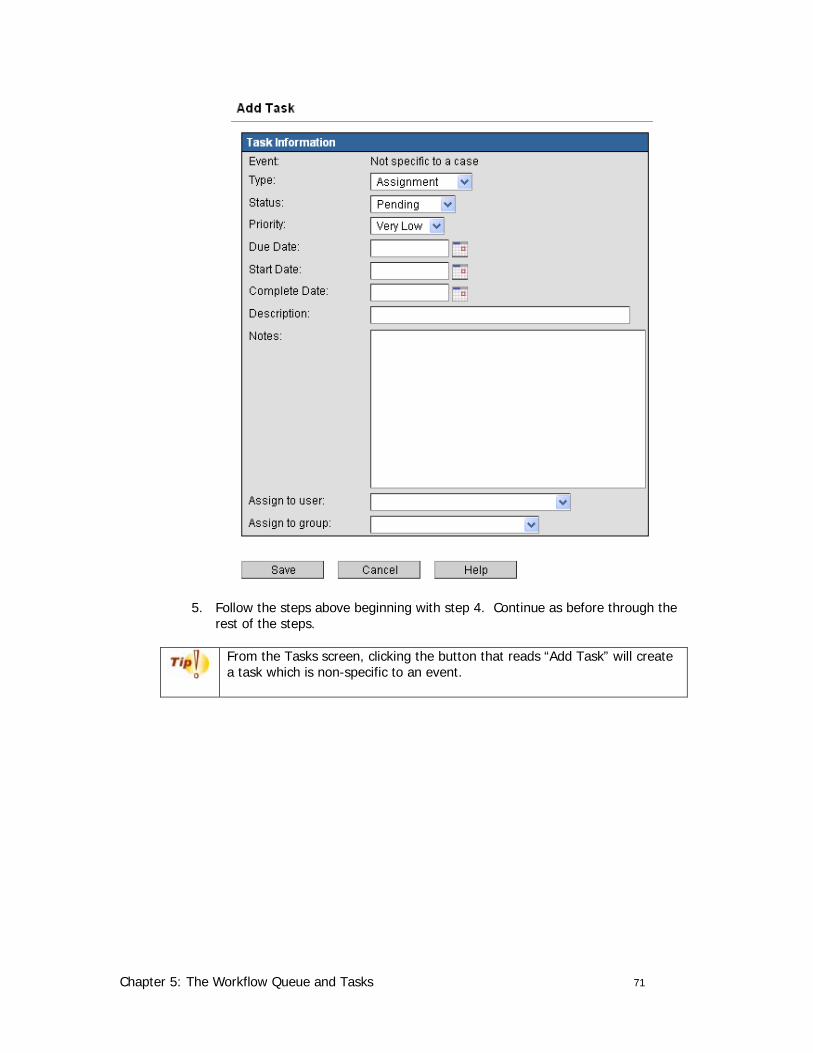
Event The Event ID, Full Name, and Disease to which a task is to be associated. (This will not appear if the task is not specific to an event; instead the user will see “Not specific to a case.”)
Type The type of task: assignment, outreach, business rule, investigation, other.
Status The status of the task. The status will be Pending by default when a task is first assigned. The statuses include Pending, In Progress, and Completed.
Priority Assigns a specific priority to the event. (Very High, High, Medium, Low, Very Low)
Due Date The date by which the task is to be completed.
Start Date The date that work on the task begins.
Complete Date The date entered by the user completing the task; indicating the completion date of the task.
Chapter 5: The Workflow Queue and Tasks 70
Description Describes briefly the task to be accomplished.
Notes Further notes regarding the task to be completed.
Assign to user A dropdown list of users on NC Lead system.
Assign to group A dropdown list of groups on NC Lead system.
3. Select the type of task from the dropdown list.
4. The status of the task is most likely Pending since the user is creating the event, but if it’s something other than Pending, select the appropriate option from the list.
5. Select the priority of the task and if necessary, set the due date of the task.
6. Enter a brief but concise description of the task to be done so that the assignee has a clear understanding of what is to be done. Add notes to clarify if necessary.
7. Select the correct user or group from the appropriate dropdown list.
8. Click the Save button. (Repeat steps 1-9 to create and assign another task.)
Alternatively, another way to create an Event-Specific task is to click the Tasks Tab in the Event Information section of the NC Lead dashboard. Click the Add Task button and then follow the steps beginning at step 4 above.
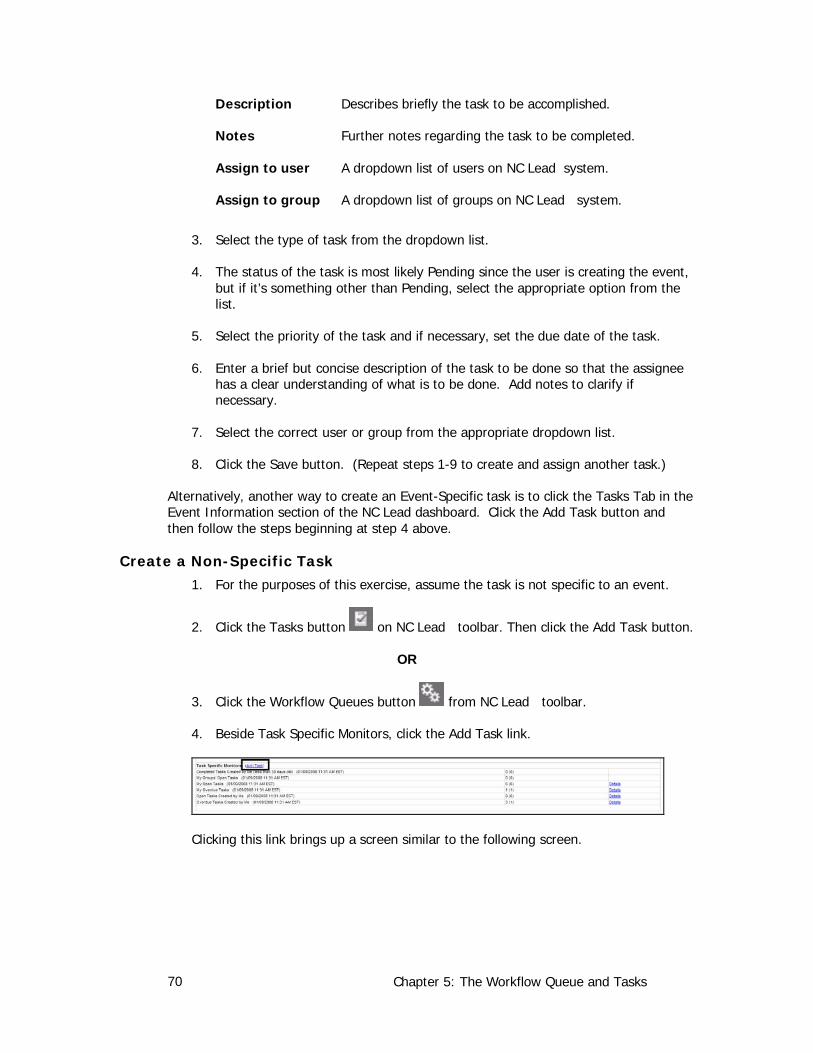
Create a Non-Specific Task 1. For the purposes of this exercise, assume the task is not specific to an event.
2. Click the Tasks button on NC Lead toolbar. Then click the Add Task button.
OR
3. Click the Workflow Queues button from NC Lead toolbar.
4. Beside Task Specific Monitors, click the Add Task link.
Clicking this link brings up a screen similar to the following screen.
Chapter 5: The Workflow Queue and Tasks 71
5. Follow the steps above beginning with step 4. Continue as before through the rest of the steps.
From the Tasks screen, clicking the button that reads “Add Task” will create a task which is non-specific to an event.
Chapter 5: The Workflow Queue and Tasks 72
Complete a Task Task information provided on the Tasks screen which is accessed via the Tasks button from the Dashboard is different than the task information on the Workflow Queues screen. The Tasks screen displays tasks which are specific to the event that is currently open in the Dashboard – regardless of whom the task is assigned. Additionally, on the Tasks screen all tasks which are assigned to the current user – regardless of which event they are assigned – will also display.
The task information on the Workflow Queues screen is displayed in several queues within the Task Specific Monitors. The queues displayed on this screen are as follows:
Completed Tasks Created by Me (less than 30 days old)
Completed tasks that have been assigned by the current user within the last 30 days.
My Groups’ Open Tasks
Displays a list of tasks that have been assigned to any group or groups of which the user is a part.
My Open Tasks Displays a list of open tasks that have been specifically assigned to the user.
My Overdue Tasks Displays a list of the tasks which have been assigned to the user which are past their due date.
Open Tasks Created by Me
Incomplete tasks that have been created by the user.
Overdue Tasks Created by Me
Incomplete tasks that have been created by the user which are past due.
Given that there are two ways to access task information, the steps to perform a task in both locations are discussed below.
From the Workflow Queue:
1. Click the Workflows button on the Dashboard
2. Observe the tasks that are listed in the Task Specific Monitors.
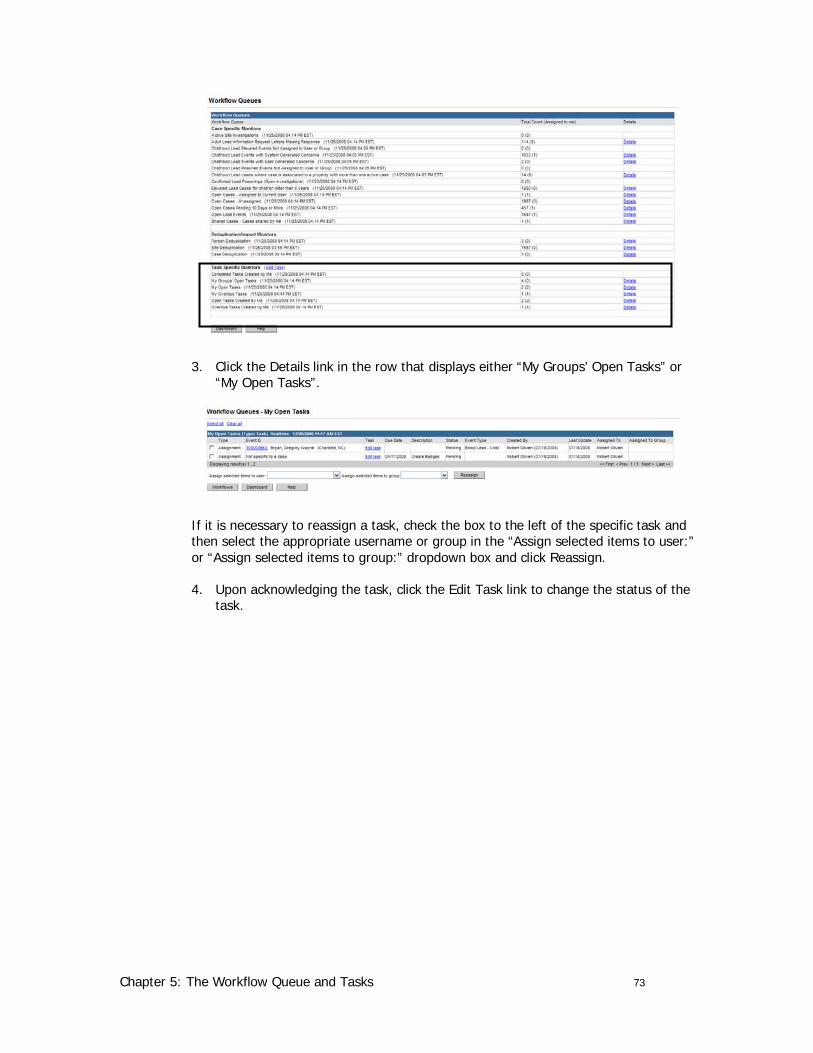
Chapter 5: The Workflow Queue and Tasks 73
3. Click the Details link in the row that displays either “My Groups’ Open Tasks” or “My Open Tasks”.
If it is necessary to reassign a task, check the box to the left of the specific task and then select the appropriate username or group in the “Assign selected items to user:” or “Assign selected items to group:” dropdown box and click Reassign.
4. Upon acknowledging the task, click the Edit Task link to change the status of the task.
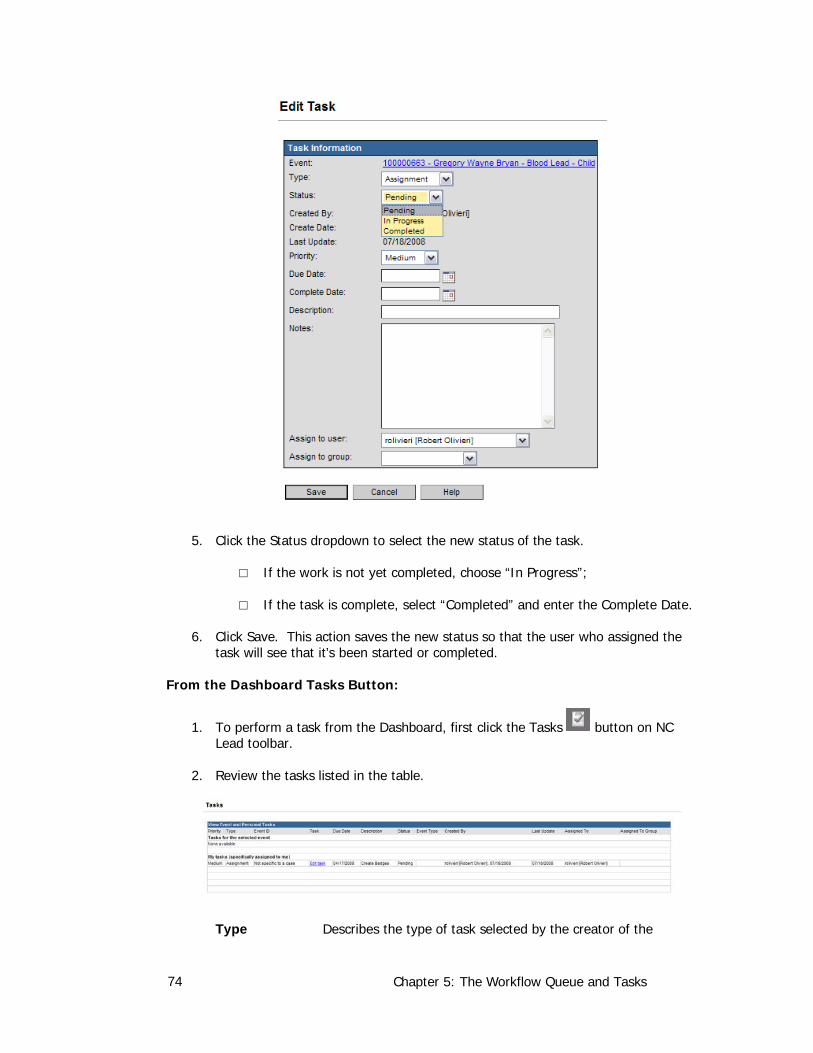
Chapter 5: The Workflow Queue and Tasks 74
5. Click the Status dropdown to select the new status of the task.
□ If the work is not yet completed, choose “In Progress”;
□ If the task is complete, select “Completed” and enter the Complete Date.
6. Click Save. This action saves the new status so that the user who assigned the task will see that it’s been started or completed.
From the Dashboard Tasks Button:
1. To perform a task from the Dashboard, first click the Tasks button on NC Lead toolbar.
2. Review the tasks listed in the table.
Type Describes the type of task selected by the creator of the
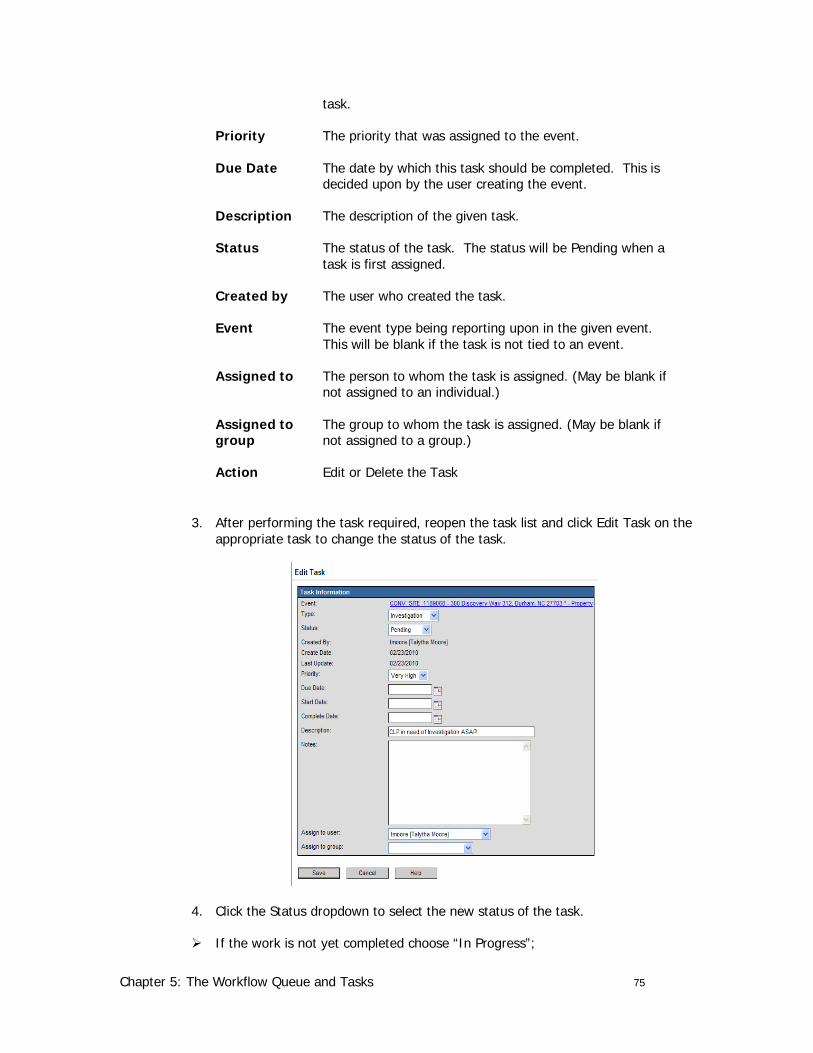
Chapter 5: The Workflow Queue and Tasks 75
task.
Priority The priority that was assigned to the event.
Due Date The date by which this task should be completed. This is decided upon by the user creating the event.
Description The description of the given task.
Status The status of the task. The status will be Pending when a task is first assigned.
Created by The user who created the task.
Event The event type being reporting upon in the given event. This will be blank if the task is not tied to an event.
Assigned to The person to whom the task is assigned. (May be blank if not assigned to an individual.)
Assigned to group
The group to whom the task is assigned. (May be blank if not assigned to a group.)
Action Edit or Delete the Task
3. After performing the task required, reopen the task list and click Edit Task on the appropriate task to change the status of the task.
4. Click the Status dropdown to select the new status of the task.
If the work is not yet completed choose “In Progress”;
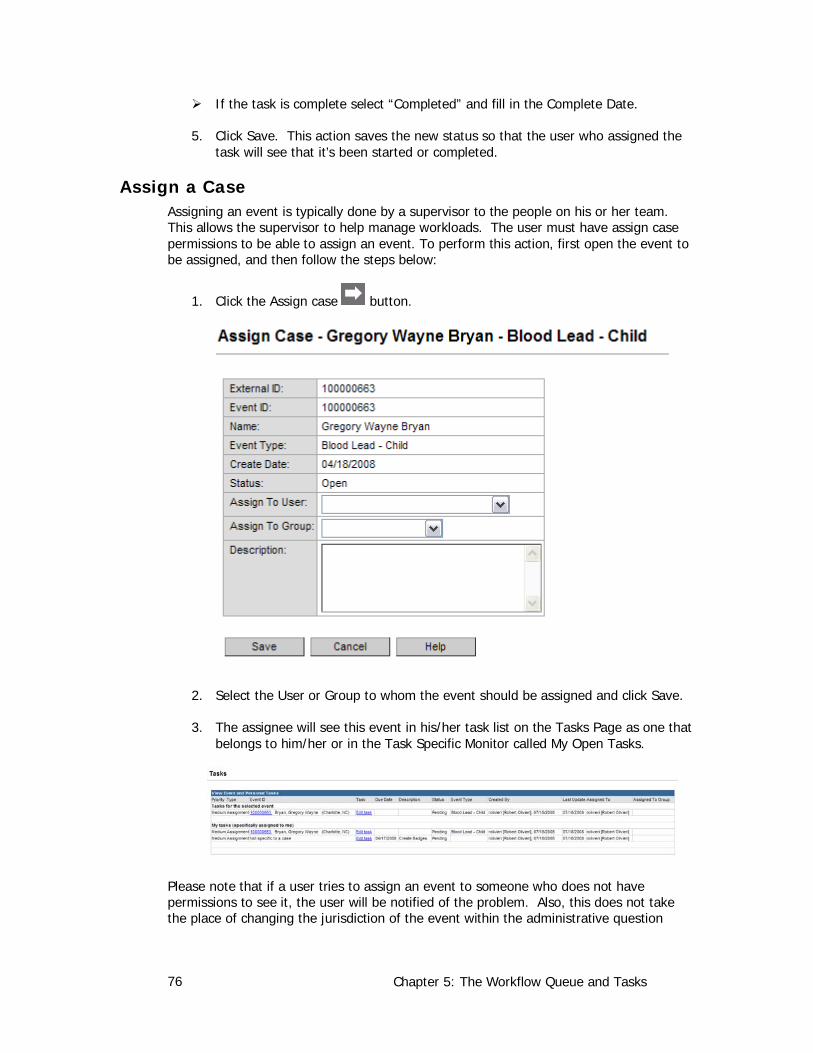
Chapter 5: The Workflow Queue and Tasks 76
If the task is complete select “Completed” and fill in the Complete Date.
5. Click Save. This action saves the new status so that the user who assigned the task will see that it’s been started or completed.
Assign a Case Assigning an event is typically done by a supervisor to the people on his or her team. This allows the supervisor to help manage workloads. The user must have assign case permissions to be able to assign an event. To perform this action, first open the event to be assigned, and then follow the steps below:
1. Click the Assign case button.
2. Select the User or Group to whom the event should be assigned and click Save.
3. The assignee will see this event in his/her task list on the Tasks Page as one that belongs to him/her or in the Task Specific Monitor called My Open Tasks.
Please note that if a user tries to assign an event to someone who does not have permissions to see it, the user will be notified of the problem. Also, this does not take the place of changing the jurisdiction of the event within the administrative question
Chapter 5: The Workflow Queue and Tasks 77
package. If the event is permanently changing ownership to another jurisdiction, please use the assignment trail within the administrative package.
Also remember that if the event is not visible by the user or group to whom the event is being assigned, it will need to be shared. (See next section.)
Chapter 5: The Workflow Queue and Tasks 78
Exercise 5.2 – Create and Assign a Task The purpose of this exercise is to demonstrate the ability to create and assign a task within NC Lead.
1. With your partner from the previous exercise, decide who is Partner A and Partner B.
2. Partner A: create a new event-specific task (remember, open the event and click the tasks button) and assign it to Partner B.
3. Partner B: locate the task that has been assigned to you and complete the task.
4. Partner B: mark the task as complete.
5. Partner B: create a new non event-specific task (this can be done from the Workflow screen or the Tasks screen) and assign it to Partner A.
6. Partner A: locate the task that has been assigned to you and complete the task.
7. Partner A: mark the task as complete.
8. How did you know that a task had been assigned to you?
9. How can you tell if a task that you’ve created and assigned has been completed?
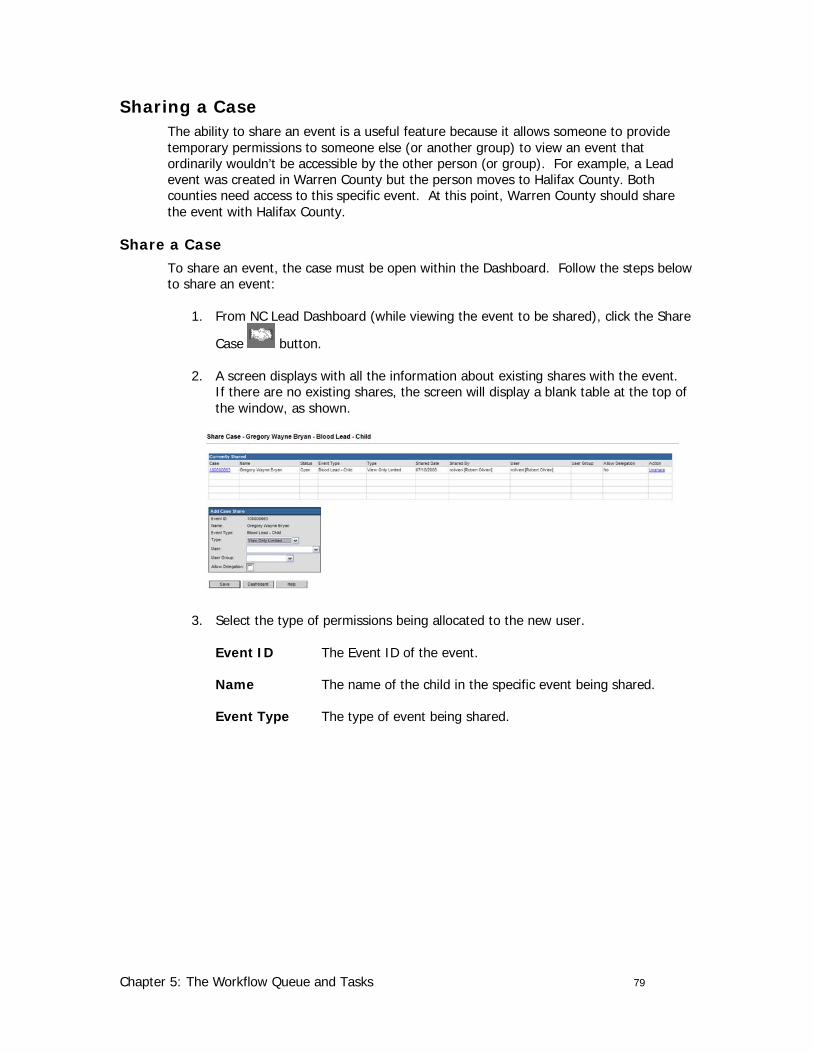
Chapter 5: The Workflow Queue and Tasks 79
Sharing a Case The ability to share an event is a useful feature because it allows someone to provide temporary permissions to someone else (or another group) to view an event that ordinarily wouldn’t be accessible by the other person (or group). For example, a Lead event was created in Warren County but the person moves to Halifax County. Both counties need access to this specific event. At this point, Warren County should share the event with Halifax County.
Share a Case To share an event, the case must be open within the Dashboard. Follow the steps below to share an event:
1. From NC Lead Dashboard (while viewing the event to be shared), click the Share
Case button.
2. A screen displays with all the information about existing shares with the event. If there are no existing shares, the screen will display a blank table at the top of the window, as shown.
3. Select the type of permissions being allocated to the new user.
Event ID The Event ID of the event.
Name The name of the child in the specific event being shared.
Event Type The type of event being shared.
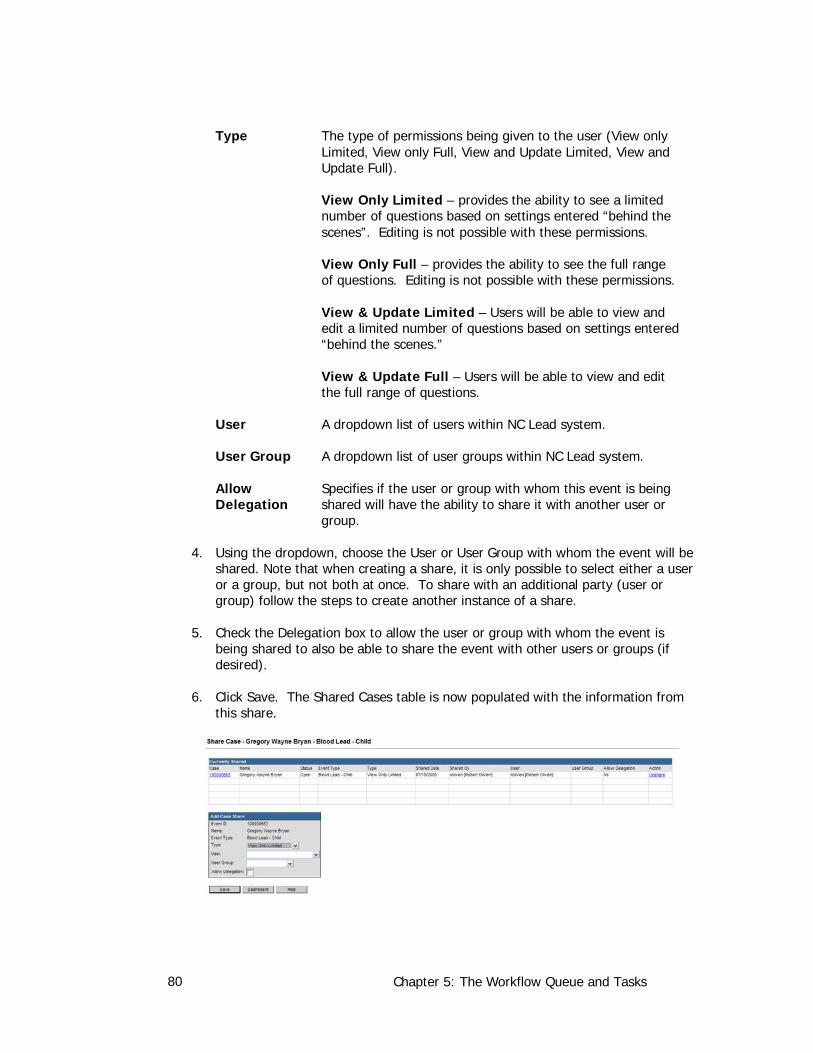
Chapter 5: The Workflow Queue and Tasks 80
Type The type of permissions being given to the user (View only Limited, View only Full, View and Update Limited, View and Update Full).
View Only Limited – provides the ability to see a limited number of questions based on settings entered “behind the scenes”. Editing is not possible with these permissions.
View Only Full – provides the ability to see the full range of questions. Editing is not possible with these permissions.
View & Update Limited – Users will be able to view and edit a limited number of questions based on settings entered “behind the scenes.”
View & Update Full – Users will be able to view and edit the full range of questions.
User A dropdown list of users within NC Lead system.
User Group A dropdown list of user groups within NC Lead system.
Allow Delegation
Specifies if the user or group with whom this event is being shared will have the ability to share it with another user or group.
4. Using the dropdown, choose the User or User Group with whom the event will be shared. Note that when creating a share, it is only possible to select either a user or a group, but not both at once. To share with an additional party (user or group) follow the steps to create another instance of a share.
5. Check the Delegation box to allow the user or group with whom the event is being shared to also be able to share the event with other users or groups (if desired).
6. Click Save. The Shared Cases table is now populated with the information from this share.
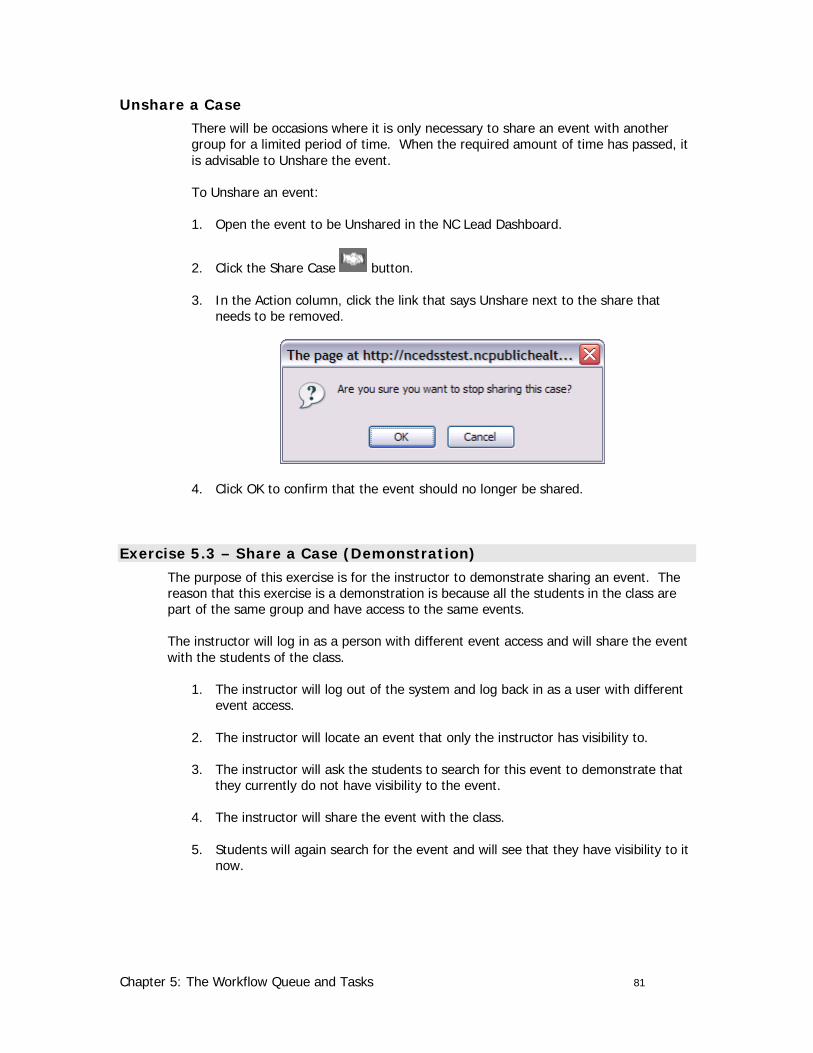
Chapter 5: The Workflow Queue and Tasks 81
Unshare a Case There will be occasions where it is only necessary to share an event with another group for a limited period of time. When the required amount of time has passed, it is advisable to Unshare the event.
To Unshare an event:
1. Open the event to be Unshared in the NC Lead Dashboard.
2. Click the Share Case button.
3. In the Action column, click the link that says Unshare next to the share that needs to be removed.
4. Click OK to confirm that the event should no longer be shared.
Exercise 5.3 – Share a Case (Demonstration) The purpose of this exercise is for the instructor to demonstrate sharing an event. The reason that this exercise is a demonstration is because all the students in the class are part of the same group and have access to the same events.
The instructor will log in as a person with different event access and will share the event with the students of the class.
1. The instructor will log out of the system and log back in as a user with different event access.
2. The instructor will locate an event that only the instructor has visibility to.
3. The instructor will ask the students to search for this event to demonstrate that they currently do not have visibility to the event.
4. The instructor will share the event with the class.
5. Students will again search for the event and will see that they have visibility to it now.

Chapter 5: The Workflow Queue and Tasks 82
Chapter 6: Printing, Reporting, and Adding Attachments 83
Chapter 6: Printing, Reporting, and Adding Attachments
Learning Objectives:
1. Demonstrate the ability to view and print letters.
2. Demonstrate the ability to open and view existing reports.
3. Demonstrate the ability to add an attachment to an existing event.
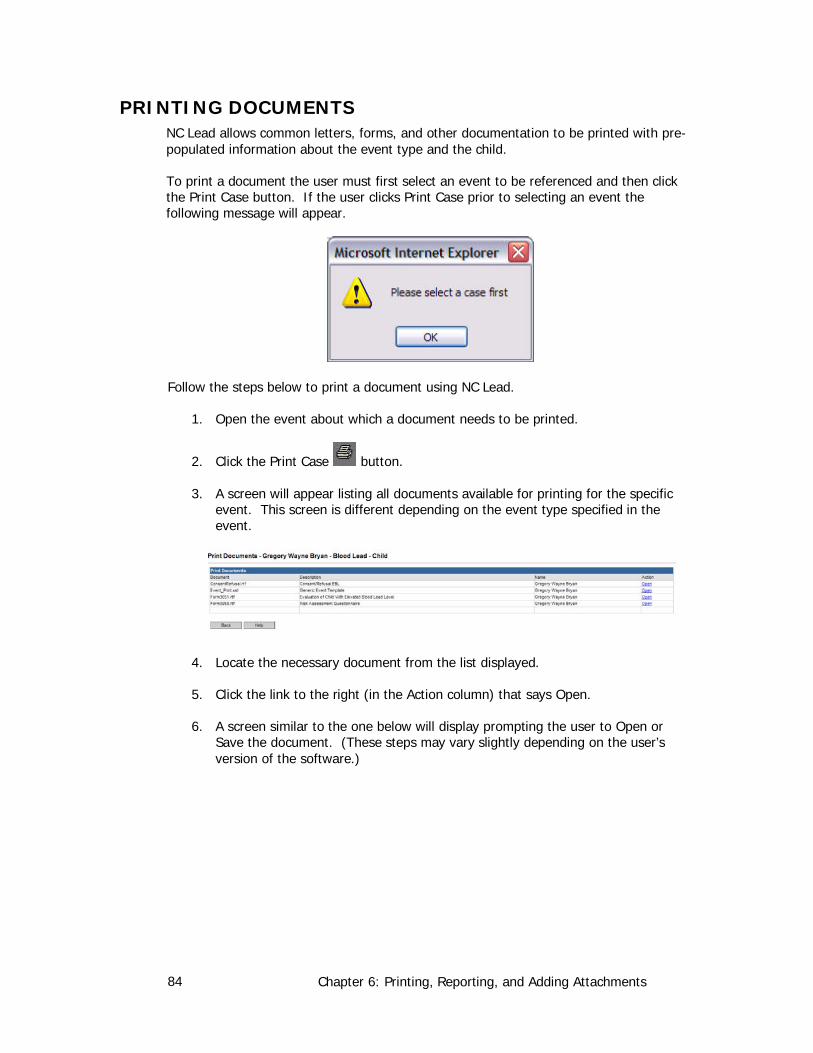
Chapter 6: Printing, Reporting, and Adding Attachments 84
PRINTING DOCUMENTS NC Lead allows common letters, forms, and other documentation to be printed with pre-populated information about the event type and the child.
To print a document the user must first select an event to be referenced and then click the Print Case button. If the user clicks Print Case prior to selecting an event the following message will appear.
Follow the steps below to print a document using NC Lead.
1. Open the event about which a document needs to be printed.
2. Click the Print Case button.
3. A screen will appear listing all documents available for printing for the specific event. This screen is different depending on the event type specified in the event.
4. Locate the necessary document from the list displayed.
5. Click the link to the right (in the Action column) that says Open.
6. A screen similar to the one below will display prompting the user to Open or Save the document. (These steps may vary slightly depending on the user’s version of the software.)
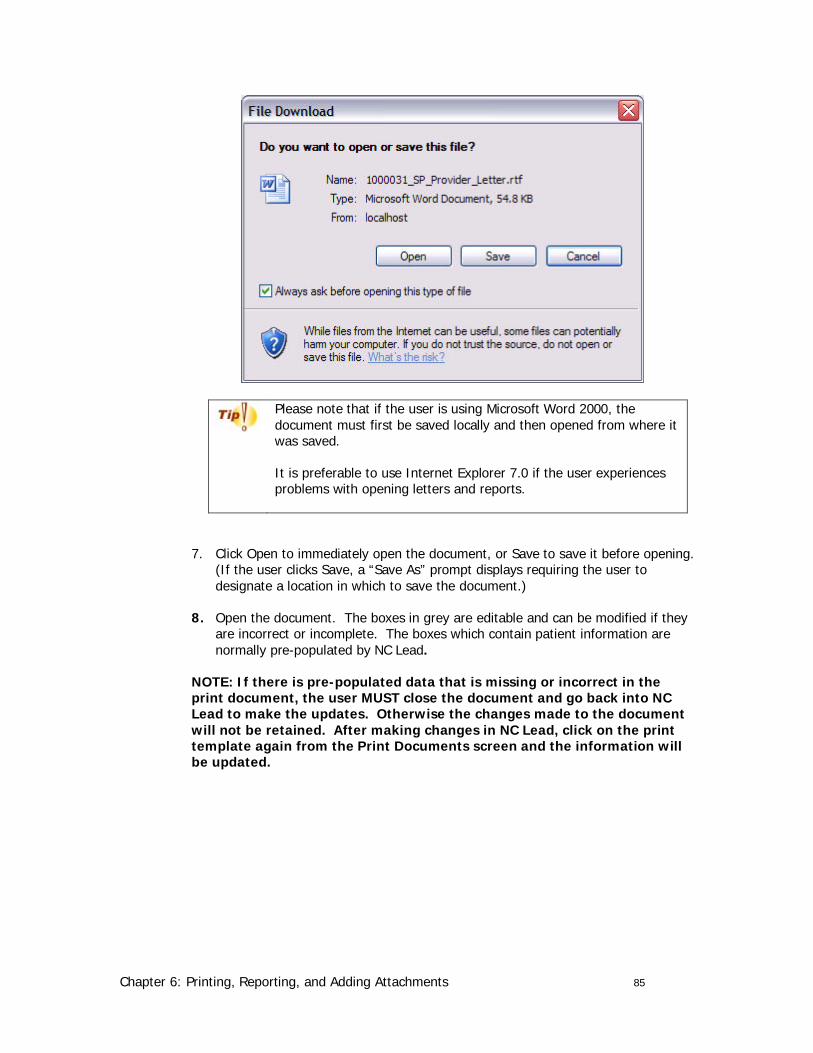
Chapter 6: Printing, Reporting, and Adding Attachments 85
Please note that if the user is using Microsoft Word 2000, the document must first be saved locally and then opened from where it was saved.
It is preferable to use Internet Explorer 7.0 if the user experiences problems with opening letters and reports.
7. Click Open to immediately open the document, or Save to save it before opening. (If the user clicks Save, a “Save As” prompt displays requiring the user to designate a location in which to save the document.)
8. Open the document. The boxes in grey are editable and can be modified if they are incorrect or incomplete. The boxes which contain patient information are normally pre-populated by NC Lead.
NOTE: If there is pre-populated data that is missing or incorrect in the print document, the user MUST close the document and go back into NC Lead to make the updates. Otherwise the changes made to the document will not be retained. After making changes in NC Lead, click on the print template again from the Print Documents screen and the information will be updated.
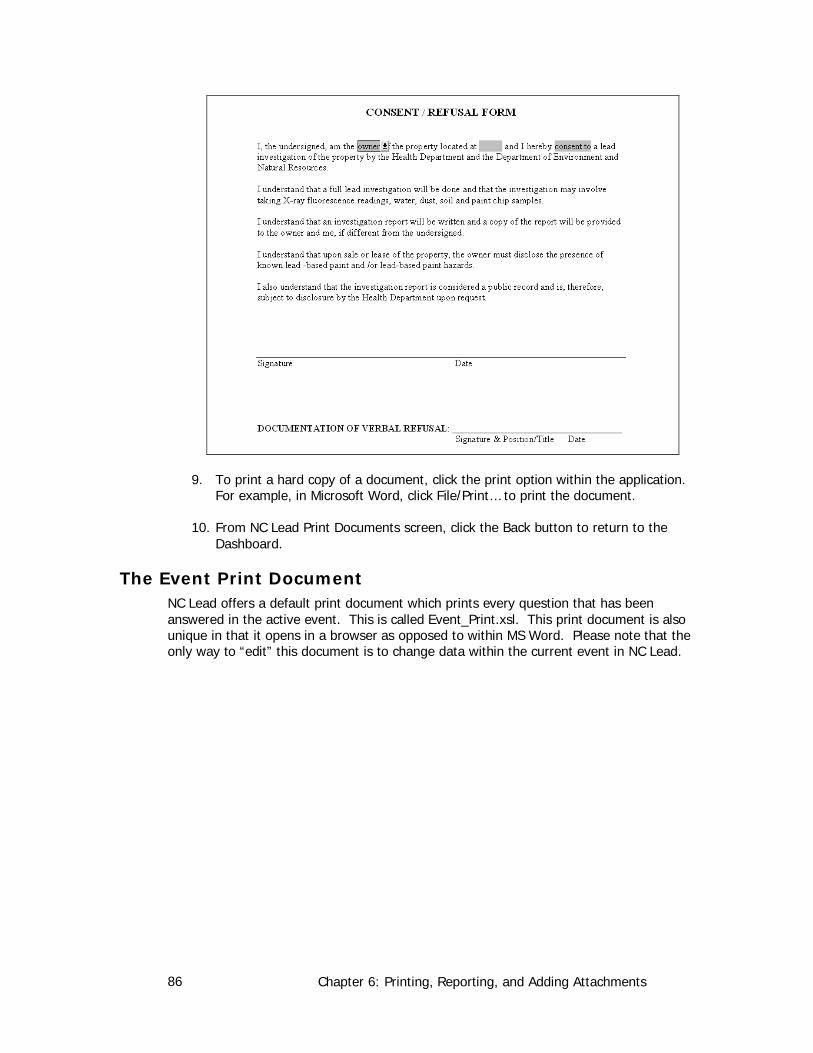
Chapter 6: Printing, Reporting, and Adding Attachments 86
9. To print a hard copy of a document, click the print option within the application. For example, in Microsoft Word, click File/Print… to print the document.
10. From NC Lead Print Documents screen, click the Back button to return to the Dashboard.
The Event Print Document NC Lead offers a default print document which prints every question that has been answered in the active event. This is called Event_Print.xsl. This print document is also unique in that it opens in a browser as opposed to within MS Word. Please note that the only way to “edit” this document is to change data within the current event in NC Lead.
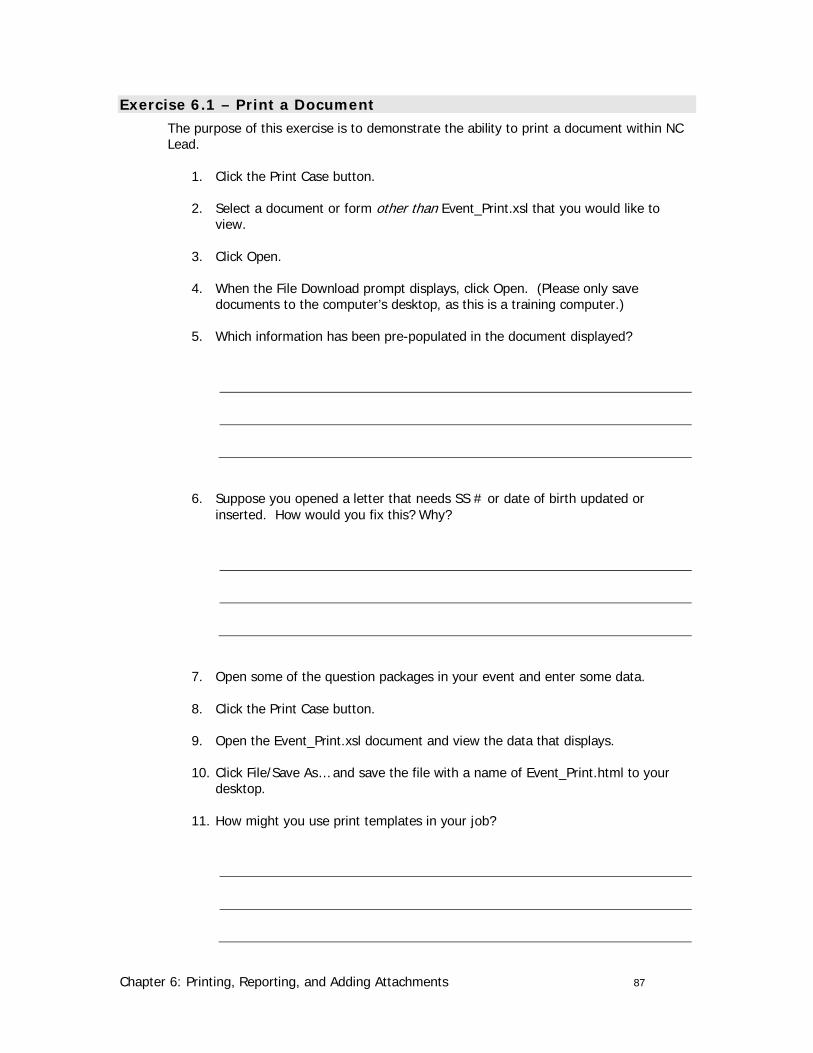
Chapter 6: Printing, Reporting, and Adding Attachments 87
Exercise 6.1 – Print a Document The purpose of this exercise is to demonstrate the ability to print a document within NC Lead.
1. Click the Print Case button.
2. Select a document or form other than Event_Print.xsl that you would like to view.
3. Click Open.
4. When the File Download prompt displays, click Open. (Please only save documents to the computer’s desktop, as this is a training computer.)
5. Which information has been pre-populated in the document displayed?
6. Suppose you opened a letter that needs SS # or date of birth updated or inserted. How would you fix this? Why?
7. Open some of the question packages in your event and enter some data.
8. Click the Print Case button.
9. Open the Event_Print.xsl document and view the data that displays.
10. Click File/Save As… and save the file with a name of Event_Print.html to your desktop.
11. How might you use print templates in your job?
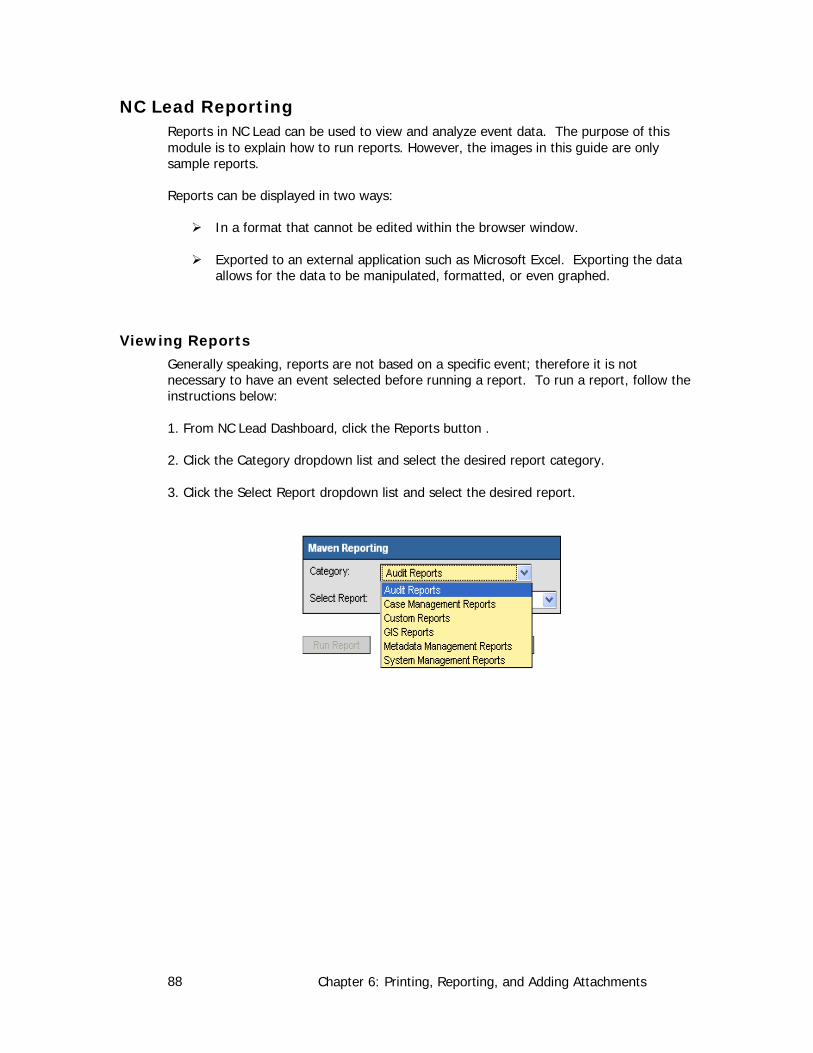
Chapter 6: Printing, Reporting, and Adding Attachments 88
NC Lead Reporting Reports in NC Lead can be used to view and analyze event data. The purpose of this module is to explain how to run reports. However, the images in this guide are only sample reports.
Reports can be displayed in two ways:
In a format that cannot be edited within the browser window.
Exported to an external application such as Microsoft Excel. Exporting the data allows for the data to be manipulated, formatted, or even graphed.
Viewing Reports Generally speaking, reports are not based on a specific event; therefore it is not necessary to have an event selected before running a report. To run a report, follow the instructions below:
1. From NC Lead Dashboard, click the Reports button .
2. Click the Category dropdown list and select the desired report category.
3. Click the Select Report dropdown list and select the desired report.
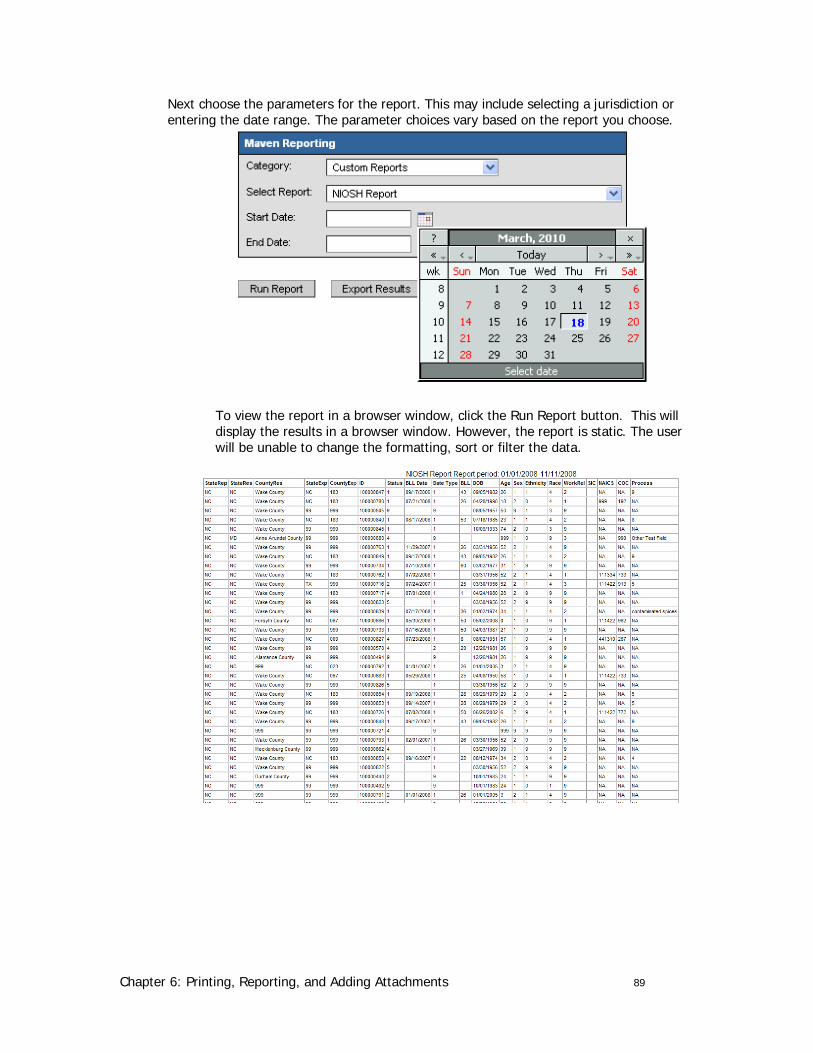
Chapter 6: Printing, Reporting, and Adding Attachments 89
Next choose the parameters for the report. This may include selecting a jurisdiction or entering the date range. The parameter choices vary based on the report you choose.
To view the report in a browser window, click the Run Report button. This will display the results in a browser window. However, the report is static. The user will be unable to change the formatting, sort or filter the data.
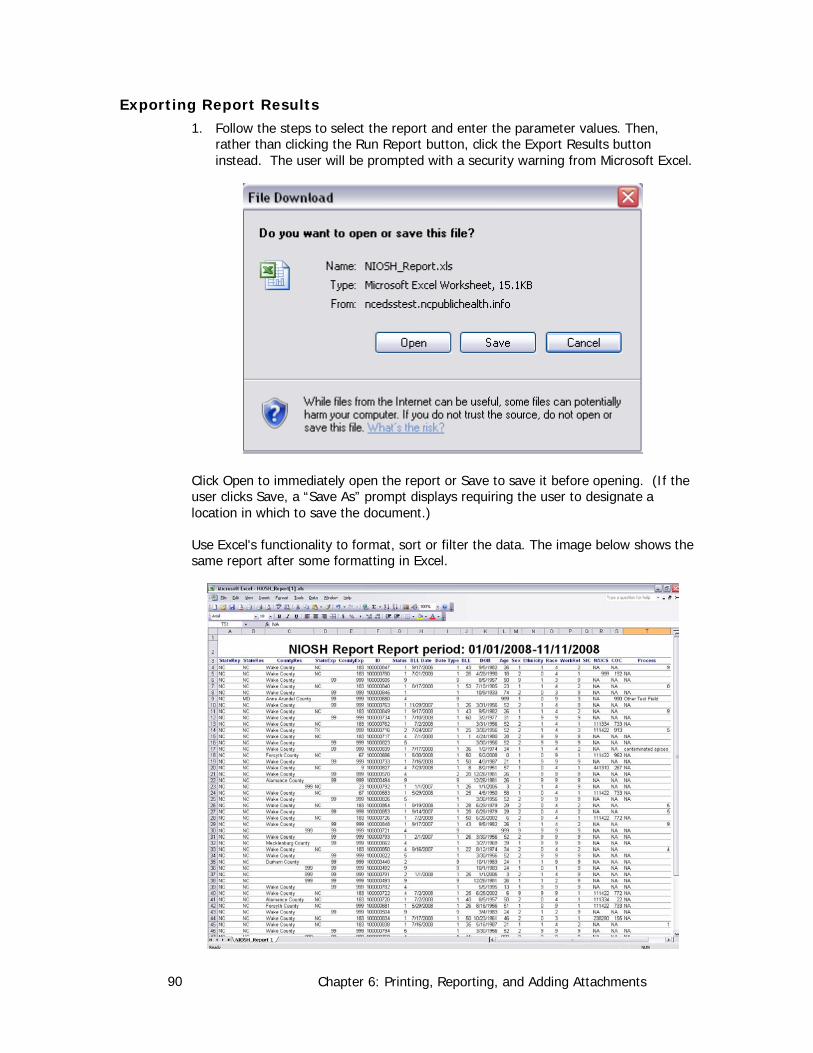
Chapter 6: Printing, Reporting, and Adding Attachments 90
Exporting Report Results 1. Follow the steps to select the report and enter the parameter values. Then,
rather than clicking the Run Report button, click the Export Results button instead. The user will be prompted with a security warning from Microsoft Excel.
Click Open to immediately open the report or Save to save it before opening. (If the user clicks Save, a “Save As” prompt displays requiring the user to designate a location in which to save the document.)
Use Excel's functionality to format, sort or filter the data. The image below shows the same report after some formatting in Excel.
Chapter 6: Printing, Reporting, and Adding Attachments 91
Exercise 6.2 – View a Report The purpose of this exercise is to demonstrate the ability to view a report within NEDSS Lead.
1. Click the Reports button.
2. Select a report. Enter the desired data into the fields displayed.
3. View the report in the browser.
4. Repeat the process and view the same report in Excel.
5. What is the difference between viewing a report in a browser and viewing it in Excel?
6. Which view do you prefer? Why?
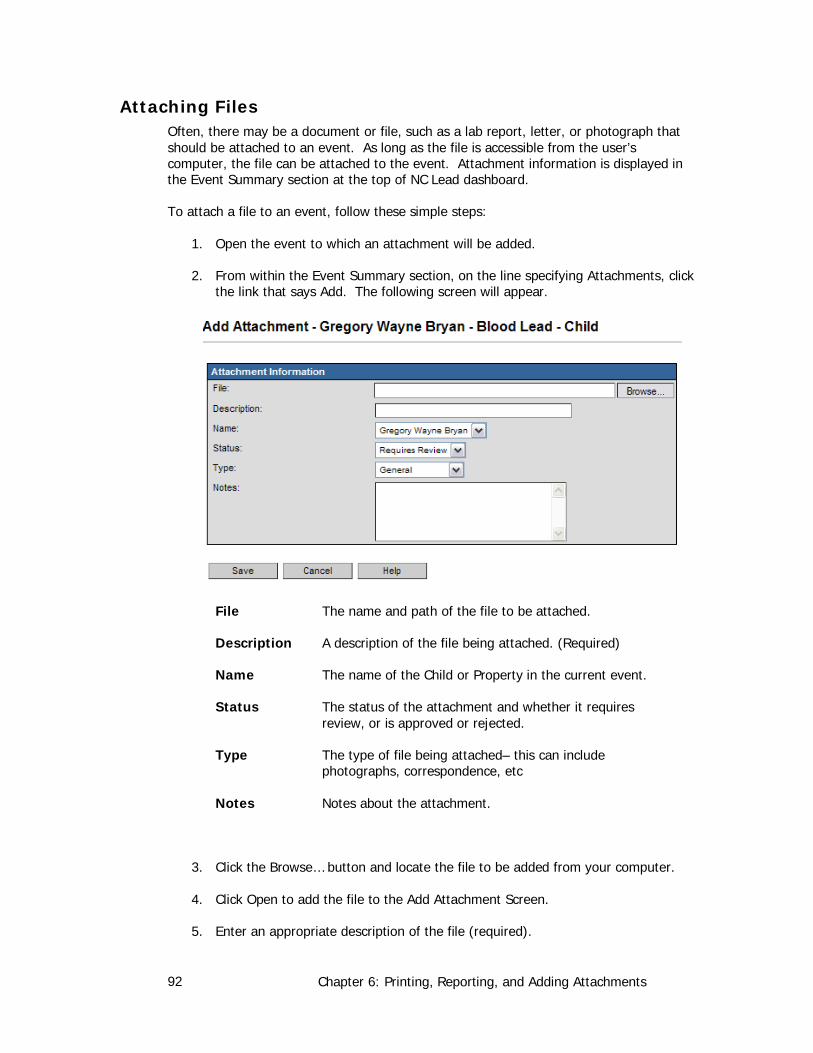
Chapter 6: Printing, Reporting, and Adding Attachments 92
Attaching Files Often, there may be a document or file, such as a lab report, letter, or photograph that should be attached to an event. As long as the file is accessible from the user’s computer, the file can be attached to the event. Attachment information is displayed in the Event Summary section at the top of NC Lead dashboard.
To attach a file to an event, follow these simple steps:
1. Open the event to which an attachment will be added.
2. From within the Event Summary section, on the line specifying Attachments, click the link that says Add. The following screen will appear.
File The name and path of the file to be attached.
Description A description of the file being attached. (Required)
Name The name of the Child or Property in the current event.
Status The status of the attachment and whether it requires review, or is approved or rejected.
Type The type of file being attached– this can include photographs, correspondence, etc
Notes Notes about the attachment.
3. Click the Browse… button and locate the file to be added from your computer.
4. Click Open to add the file to the Add Attachment Screen.
5. Enter an appropriate description of the file (required).
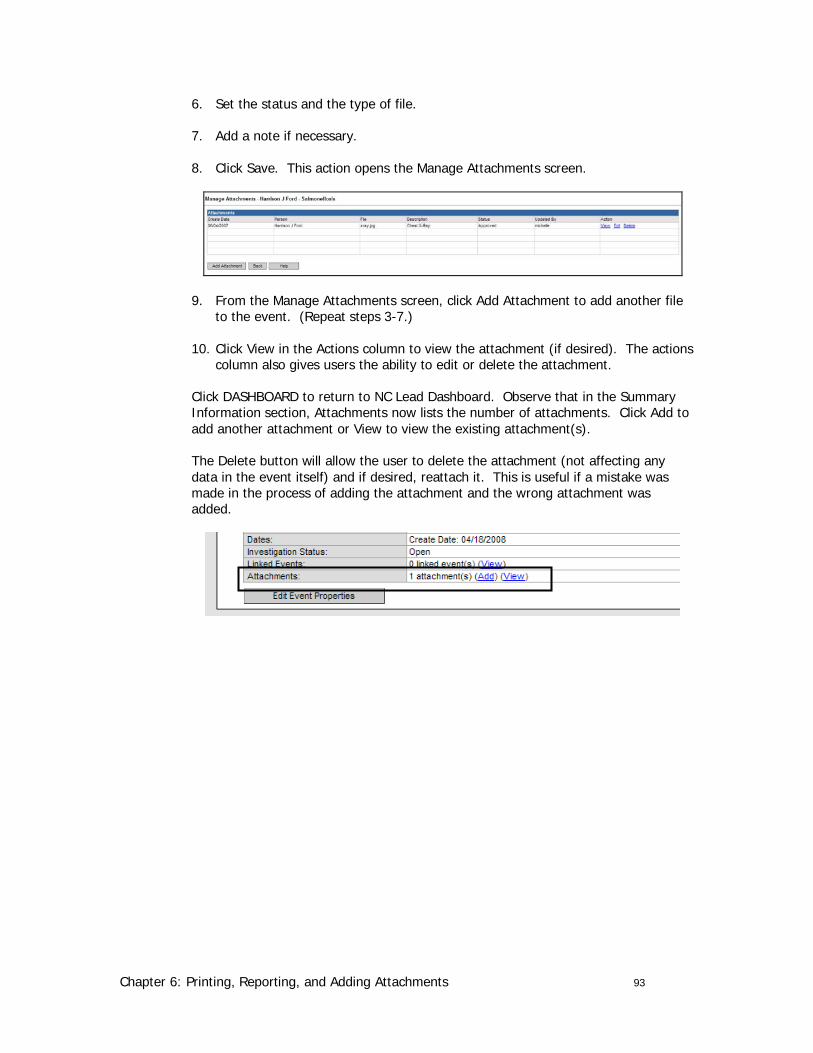
Chapter 6: Printing, Reporting, and Adding Attachments 93
6. Set the status and the type of file.
7. Add a note if necessary.
8. Click Save. This action opens the Manage Attachments screen.
9. From the Manage Attachments screen, click Add Attachment to add another file to the event. (Repeat steps 3-7.)
10. Click View in the Actions column to view the attachment (if desired). The actions column also gives users the ability to edit or delete the attachment.
Click DASHBOARD to return to NC Lead Dashboard. Observe that in the Summary Information section, Attachments now lists the number of attachments. Click Add to add another attachment or View to view the existing attachment(s). The Delete button will allow the user to delete the attachment (not affecting any data in the event itself) and if desired, reattach it. This is useful if a mistake was made in the process of adding the attachment and the wrong attachment was added.

Chapter 6: Printing, Reporting, and Adding Attachments 94
Exercise 6.3 – Add an Attachment The purpose of this exercise is to demonstrate the ability to add an attachment within NC Lead.
1. Open your event.
2. How many files are currently attached to it?
3. Attach the Event Print file (you saved this to your desktop) to the event.
4. Enter a description for the attachment that says “print template” and click Save.
5. View the file after it has been attached.
6. What is a real-life example of when you might attach a print template to an event? Why might you do this?
Chapter 7: Linking Events 95
Chapter 7: Linking Events
Learning Objectives:
1. Demonstrate the ability to view linked events
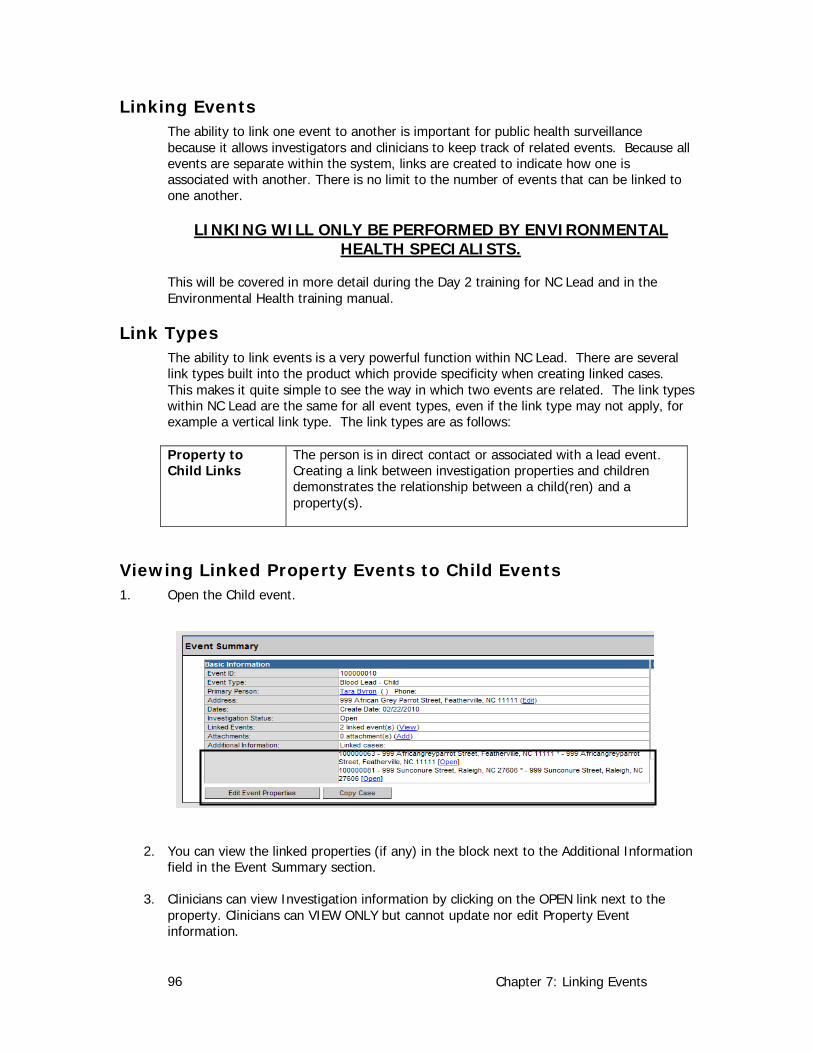
Chapter 7: Linking Events 96
Linking Events The ability to link one event to another is important for public health surveillance because it allows investigators and clinicians to keep track of related events. Because all events are separate within the system, links are created to indicate how one is associated with another. There is no limit to the number of events that can be linked to one another.
LINKING WILL ONLY BE PERFORMED BY ENVIRONMENTAL HEALTH SPECIALISTS.
This will be covered in more detail during the Day 2 training for NC Lead and in the Environmental Health training manual.
Link Types The ability to link events is a very powerful function within NC Lead. There are several link types built into the product which provide specificity when creating linked cases. This makes it quite simple to see the way in which two events are related. The link types within NC Lead are the same for all event types, even if the link type may not apply, for example a vertical link type. The link types are as follows:
Property to Child Links
The person is in direct contact or associated with a lead event. Creating a link between investigation properties and children demonstrates the relationship between a child(ren) and a property(s).
Viewing Linked Property Events to Child Events 1. Open the Child event.
2. You can view the linked properties (if any) in the block next to the Additional Information field in the Event Summary section.
3. Clinicians can view Investigation information by clicking on the OPEN link next to the property. Clinicians can VIEW ONLY but cannot update nor edit Property Event information.
Conclusion 97
Conclusion
Conclusion
The user should have an understanding of the following:
• Benefits of the system
• Parts of NC Lead Dashboard
• Creating new events
• Searching for existing events
• Modifying events
• Printing documents and letters
• Viewing reports in either a browser or within Excel
• Adding attachments
• Utilizing the Workflow Queue
• Editing, assigning, and creating tasks
• Linking events
If questions arise regarding this course, please contact [email protected]. For general questions regarding NC Lead please call the Help Desk at 1-877-625-9259.
Index 98
Index
Adding Additional Addresses 52
Assign a Case 73
Attaching Files 87
Basic Information Sub-Tab 50
Buttons
Assign Case 10
Create Event 10
Print Case 10
Recent Cases 11
Reports 10
Search Event 10
Share Case 11
Tasks 10
User Information 11
Workflow 10
Case Specific Monitors 60
Change password 5
Changing the Event Type 45
Choosing an Event Type 30
Closing an Event APP G
Complete a Task 69
Concerns Tab 22
Creating a Childhood Lead Event 31
Creating a Property Event 33
Creating an Event 29
Dashboard
Event Information Section 15
Event Summary Section 12
Sections 9
Shortcut Buttons 10
Toolbar 10
Deduplicating Events APP F
Deduplicating Persons APP F
Deduplication APP F
Demographic History Sub-Tab 53
Demographic Question Package 55
Edit Event Properties 15
Event History 26
Event Data Tab 17
Event Deduplication APP F
Event Notes 14
Event Print Document 81
Event-Specific Task 65
How to Avoid Creating Duplicates APP F
Lab Results 35
Lab Results Tab 19
Linking Events
Creating a New Linked Event 91
Index 99
Link Types 91
Linking to Existing Events APP E
Linking to Multiple Events APP E
Logging In 4
Logging Out 5
Main vs. Administration Applications 3
Manually Invoking Deduplication APP F
Modify Event Information 15
Modifying Person Information 48
NC LEAD Reporting 83
Non-Specific Task 67
Person Deduplication APP F
Person Notes Sub-Tab 54
Person Summary Screen 13
Persons – Sub-Tabs 25
Persons Tab 24
Printing documents 81
Question Packages 34
Recent Cases 42
Removing Addresses 53
Reopen a Closed Event APP G
Reports
Exporting Results 85
Viewing Reports 83
Searching for an Event 39
Sharing a Case 75
System Passwords 5
Tabs
Concerns 21
Lab Results 19
Persons 24
Tasks 25
Event History 26
Event Data 17
Tasks 63
Tasks Tab 25
Temporary Locks 45
Unshare a Case 77
Updating Address Information 51
Users, Roles and Groups 2
Workflow Queue 59
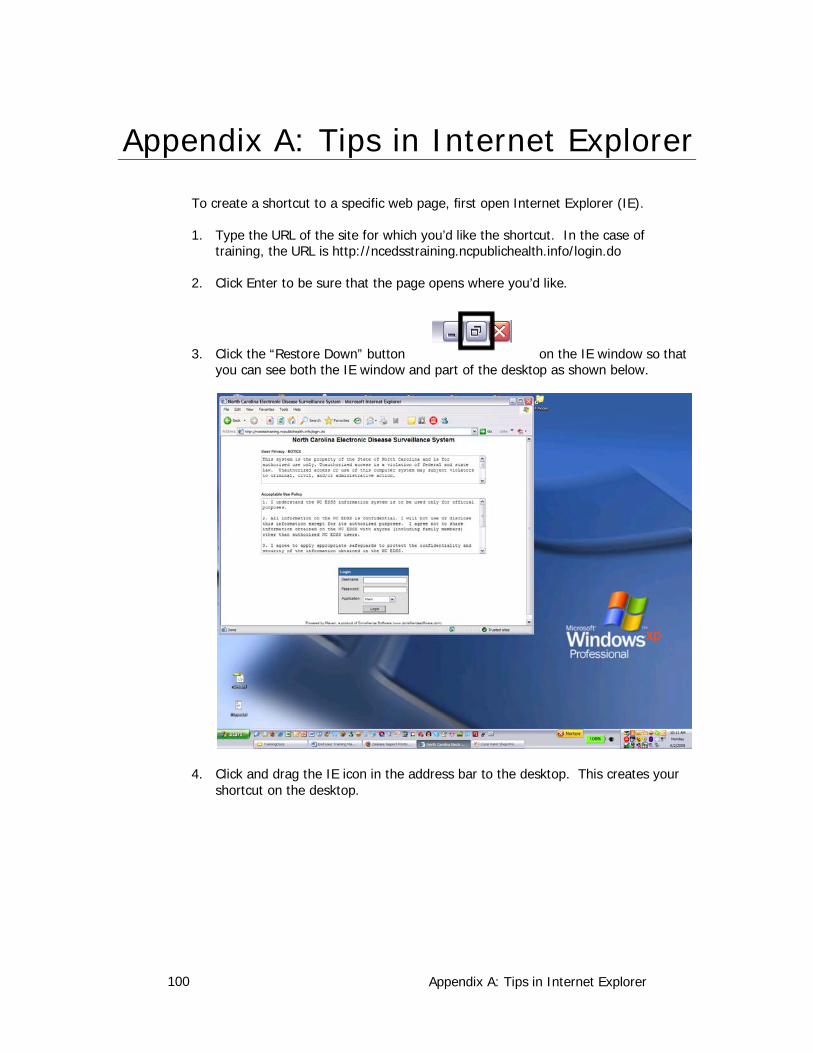
Appendix A: Tips in Internet Explorer 100
Appendix A: Tips in Internet Explorer
To create a shortcut to a specific web page, first open Internet Explorer (IE).
1. Type the URL of the site for which you’d like the shortcut. In the case of training, the URL is http://ncedsstraining.ncpublichealth.info/login.do
2. Click Enter to be sure that the page opens where you’d like.
3. Click the “Restore Down” button on the IE window so that you can see both the IE window and part of the desktop as shown below.
4. Click and drag the IE icon in the address bar to the desktop. This creates your shortcut on the desktop.
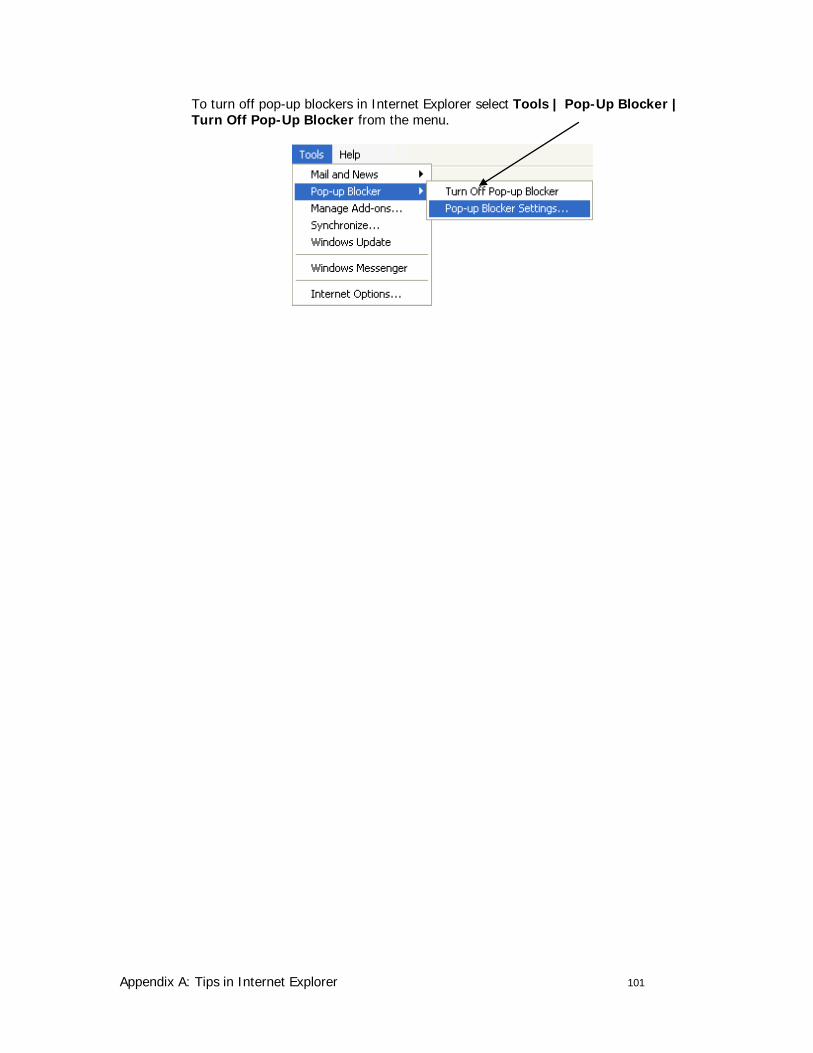
Appendix A: Tips in Internet Explorer 101
To turn off pop-up blockers in Internet Explorer select Tools | Pop-Up Blocker | Turn Off Pop-Up Blocker from the menu.
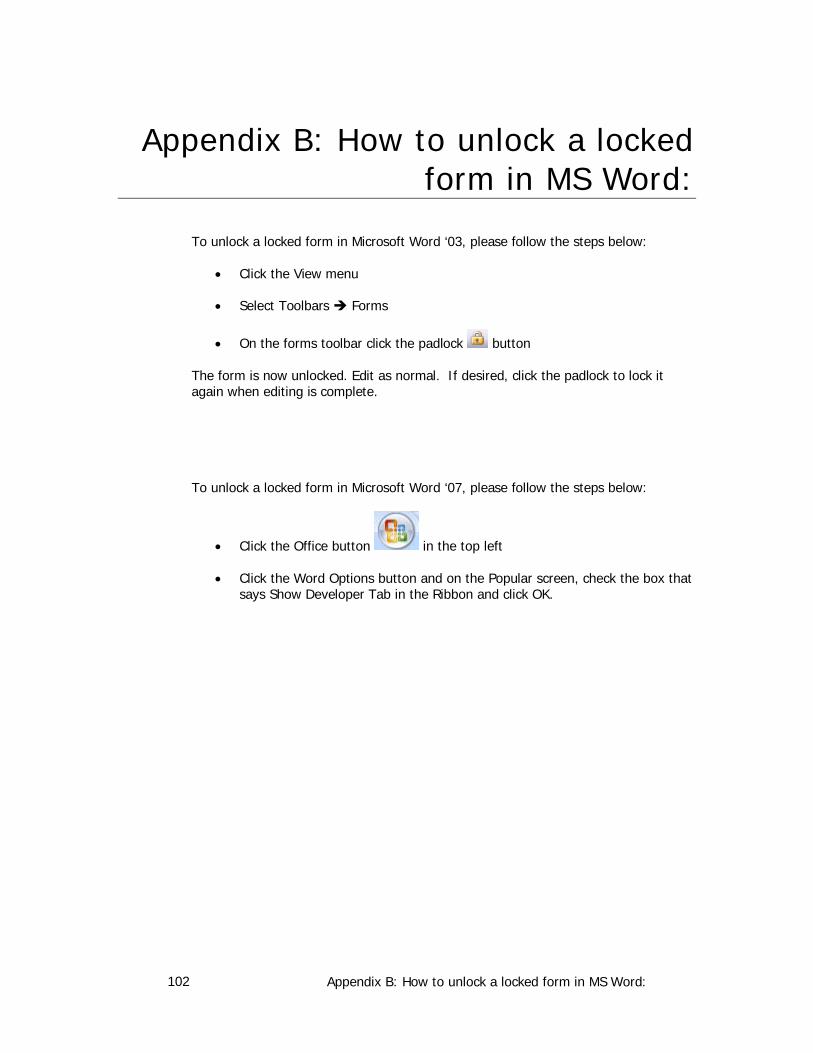
Appendix B: How to unlock a locked form in MS Word: 102
Appendix B: How to unlock a locked form in MS Word:
To unlock a locked form in Microsoft Word ‘03, please follow the steps below:
• Click the View menu
• Select Toolbars Forms
• On the forms toolbar click the padlock button
The form is now unlocked. Edit as normal. If desired, click the padlock to lock it again when editing is complete.
To unlock a locked form in Microsoft Word ‘07, please follow the steps below:
• Click the Office button in the top left
• Click the Word Options button and on the Popular screen, check the box that says Show Developer Tab in the Ribbon and click OK.
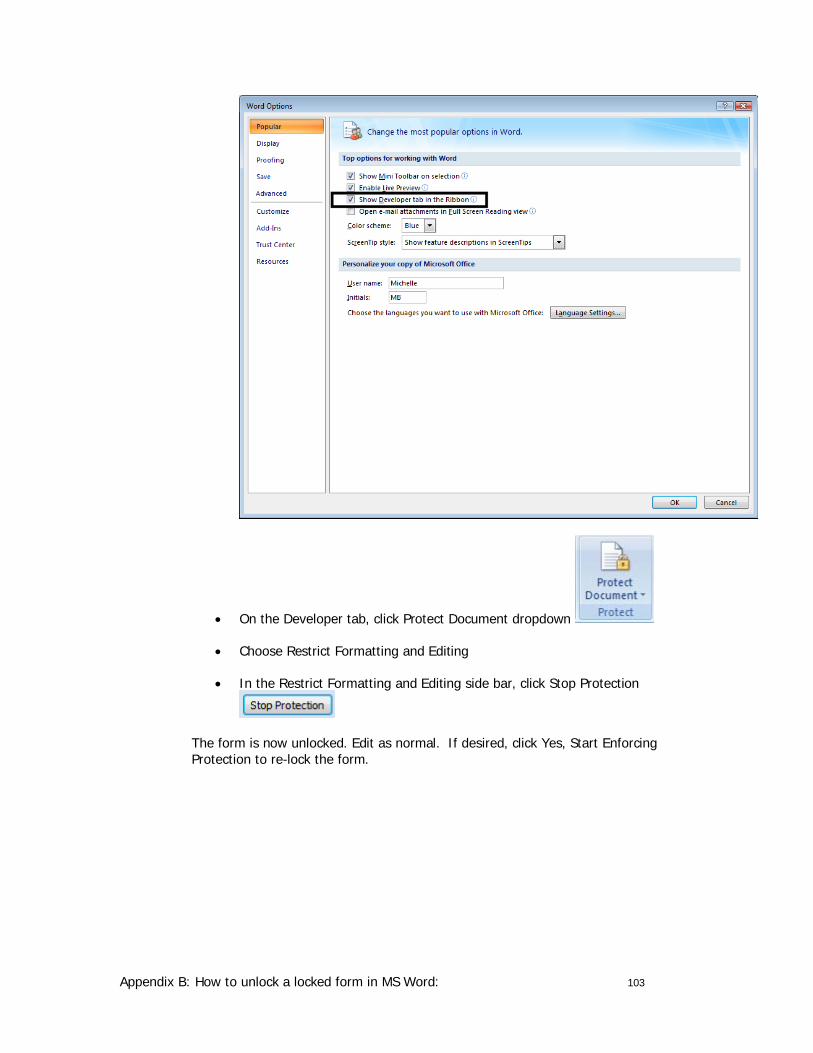
Appendix B: How to unlock a locked form in MS Word: 103
• On the Developer tab, click Protect Document dropdown
• Choose Restrict Formatting and Editing
• In the Restrict Formatting and Editing side bar, click Stop Protection
The form is now unlocked. Edit as normal. If desired, click Yes, Start Enforcing Protection to re-lock the form.
Appendix C: Answers to Chapter Review Questions 104
Appendix C: Answers to Chapter Review Questions
Chapter 1 - Review Questions 5. What does EDSS stand for in NC Lead
Electronic Disease Surveillance System
6. What are three benefits of implementing NC Lead?
• Answers will vary, some examples are: • Ability to import labs electronically • Increased data entry capability • Secure electronic data exchange among groups working in childhood lead. • Improved data reporting and tracking
7. What is the purpose of permissions within NC Lead?
Permissions in NC Lead provide the ability within the system to perform certain actions such as “run a report” or “delete a case”
8. What is the difference between a role and a group in NC Lead?
Roles define the user's permissions - the ability to use specific functions/features in NC Lead. Example: The Local Health Clinician role has permissions to create or edit an event, and to run reports.
Groups determine what cases are visible to the user. Users are members of groups based on jurisdiction and specialization.
Chapter 2 – Review Questions 4. Name and describe the purpose of each of the following buttons from NC Lead
Dashboard toolbar:
Create Event – used to create a new lead report
Search Event – used to search for a specific lead event based on various search criteria
Recent Cases – lists the last 20 events opened by the user
Appendix C: Answers to Chapter Review Questions 105
Tasks – use this to assign and update statuses of specific tasks
5. What are three pieces of information ascertained from the Event Summary portion of NC Lead Dashboard?
Answers will vary – Event ID, Event Type, Primary Person, Address, Date the event was created, Investigation status, Linked events, attachments
6. What are the tabs shown in the Event Information section and what is the primary purpose of each?
Event Data: clicking the Event Data tab allows the user to access the question packages specific to the event.
Lab Results: clicking the Lab Results tab gives users the ability to view, add, and edit lab results for a particular event
Persons: clicking the Persons tab allows the user to enter or change demographic information for the person involved in this particular event.
Event History: the event history keeps track of the times the event has been updated, the question packages that were modified, and the username of the person who made the update.
Exercise 4.1 – Modify Person Information The purpose of this exercise is to demonstrate the ability to modify person information within NC ELSS.
6. Where would the user make changes to a street address?
In the Persons Tab – not the demographic question package.
7. Where would the user change the patient’s primary language?
In the Demographic Question Package (not Person’s tab)
8. Which fields from the Demographic question package carry over if the patient has an illness in the future?
Hispanic Ethnicity, Race, Country of Birth, Primary language
Appendix C: Answers to Chapter Review Questions 106
Exercise 5.1 – Interacting with Workflow Queues The purpose of this exercise is to demonstrate the ability to interact with Workflow Queues in NC LEAD.
4. What is the purpose of Workflow Queues?
They allow users to keep up with events and work that needs to be done.
5. Click the Workflows button on the toolbar. Find a workflow queue named "Childhood Lead Events with User Generated Concerns.” Find your event within that queue.
6. Open your event by clicking on the Event ID link. Next, click the Concerns tab in the Event Information section, and find the concern you created in exercise 3.3. Update the concern by changing the value of the Status field to Resolved and save your changes. Click the Workflows button once again. Has your event been removed from the queue?
Yes
Exercise 5.2 – Create and Assign a Task The purpose of this exercise is to demonstrate the ability to create and assign a task within NC LEAD.
10. With your partner from the previous exercise, decide who is Partner A and Partner B.
11. Partner A: create a new event-specific task (remember, open the event and click the tasks button) and assign it to Partner B.
12. Partner B: locate the task that has been assigned to you and complete the task.
13. Partner B: mark the task as complete.
14. Partner B: create a new non event-specific task (this can be done from the Workflow screen or the Tasks screen) and assign it to Partner A.
15. Partner A: locate the task that has been assigned to you and complete the task.
16. Partner A: mark the task as complete.
17. How did you know that a task had been assigned to you?
View My Open Tasks in the Workflow Queue
18. How can you tell if a task that you’ve created and assigned has been completed?
View Completed Tasks Created by Me (less than 30 days old) in the Workflow Queue
Appendix C: Answers to Chapter Review Questions 107
Exercise 6.1 – Print a Document The purpose of this exercise is to demonstrate the ability to print a document within NC ELSS.
12. Click the Print Case button.
13. Select a document or form other than Event_Print.xsl that you would like to view.
14. Click Open.
15. When the File Download prompt displays, click Open. (Please only save documents to the computer’s desktop, as this is a training computer.)
16. Which information has been pre-populated in the document displayed?
Typically the Child/ Property Demographic info as well as Guardian/ Parent Demographic Info
17. Suppose you opened a letter that needs SS # or date of birth updated or inserted. How would you fix this? Why?
Go back into the NC LEAD Event, Then go into the correct question package to edit the information.
18. Open some of the question packages in your event and enter some data.
19. Click the Print Case button.
20. Open the Event_Print.xsl document and view the data that displays.
21. Click File/Save As… and save the file with a name of Event_Print.html to your desktop.
22. How might you use print templates in your job?
Answers will vary.
Appendix C: Answers to Chapter Review Questions 108
Exercise 6.2 – View a Report The purpose of this exercise is to demonstrate the ability to view a report within NC ELSS.
7. Click the Reports button.
8. Select a report. Enter the desired data into the fields displayed.
9. View the report in the browser.
10. Repeat the process and view the same report in Excel.
11. What is the difference between viewing a report in a browser and viewing it in Excel?
Viewing in a browser: cannot be edited within the browser window.
Viewing in Excel: Exporting the data allows for the data to be manipulated, formatted, or even graphed.
12. Which view do you prefer? Why?
Depends on what you need to do with the data. If you just need to view it and print it as it, then use the browser. If you need to manipulate data, then export it to excel.
Appendix C: Answers to Chapter Review Questions 109
Exercise 6.3 – Add an Attachment The purpose of this exercise is to demonstrate the ability to add an attachment within NC ELSS.
7. Open your event.
8. How many files are currently attached to it?
Answers will vary.
9. Attach the Event Print file (you saved this to your desktop) to the event.
10. Enter a description for the attachment that says “print template” and click Save.
11. View the file after it has been attached.
12. What is a real-life example of when you might attach a print template to an event? Why might you do this?
Attaching a 3651 form, scanned documents with signatures such as Consent Refusal forms, photographs of the property, schematics from investigations, etc.
Appendix D: Definitions 110
Appendix D: Def initions
Access Time The time the event was last accessed by the user.
Additional Information Displays additional information about the event, such as a listing of linked events. Address The address of the person in the event.
Allow Delegation Has to do with Sharing a Case. Specifies if the user or group with whom this event is being shared will have the ability to share it with another user or group.
Attachments Displays the number of files that are attached to this event. This is also the tool used to access the attachments. Any file, such as a report, letter, or photographs can be attached to an event.
Bulk Actions Bulk actions are actions which take place on more than one event within a workflow queue. Examples: print letters for multiple people at one time, close several events at once, etc.
Case Specific Monitors Workflows that automatically run monitors describing the condition of events. These vary depending upon the user’s permissions within the system. For NC LEAD these workflows are categorized according to Clinician and Environmental Health Specialist. These workflows are triggered automatically by something in the system (such as missing data) and don’t have a specified due date.
Category Allows the user to categorize the note according to a preset list of categories. Change Status To Allows the user to change the current investigation status of the event.
Change Type To Allows the user to change event type.
Concern Unique name of the concern in the database. Concerns Tab Clicking the Concerns tab allows the user to see possible issues with data entry.
(For example, if someone types a blood lead test date that is prior to the patient’s date of birth a notification will display in the concerns tab indicating the error.) Additionally, concerns can be entered manually.
Dates The date the event was created.
Deduplication Status Displays the deduplication status of the event. Changing this dropdown can force the event to be added to the deduplication pending queue. (See Deduplication chapter for more information.)
Entry Method Defines how the lab entry was entered in NC ELSS. Event The type of action that occurred.
Event History The event history keeps track of the times the event has been updated, the question packages that were modified, and the username of the person who made the update.
Event Data Clicking the Event Data tab presents the user with the question packages specific to the event. Further information on question packages is covered in Chapter 3.
Event ID Displays the Event ID of the current event.
Appendix D: Definitions 111
Group Groups determine what cases are visible to the user. Users are members of groups based on jurisdiction and specialization. For example: members of the Wake County group would only be able to access Wake County events. Users can belong to more than one group.
Health Dept The health department that performed the test.
Investigation Status The investigation status displays the current status of the event; typically the status will be either open or closed.
Lab Facility The facility where the test was performed.
Lab Results Clicking Lab Results presents users with the ability to view, add, and edit lab results for a particular event. Electronic lab results are also displayed here.
Last Update The date upon which the concern was last updated and if no updates have been made to the concern, this date refers to the date the concern was entered.
Lead The lead level associated with the person. Linked Events Displays the number of other events that are linked to this event. This is also a tool
where one could initiate the linking of one event to another.
Links Links are created between Children and Properties to indicate how one is associated with another. Created only by Environmental Health Specialists.
Message A more detailed description of the action. Misc Info Miscellaneous information and/or notes regarding the lab results.
Note Allows the user to enter an event-related note. (This produces the same result as adding a note in the edit notes screen shown above.)
Note Type Allows the user to set the note type to Public or Sensitive.
Ordering Facility The laboratory facility that placed the order for the test(s) to be done. Ordering Physician The physician that ordered the test. This displays the detailed address and phone
information for that physician.
Ordering Provider The doctor or clinic that ordered the test. This displays the detailed address and phone information for that doctor or clinic.
Permission Permissions in NC Lead provide the ability within the system to perform certain actions, such as “run a report” or “delete a case”.
Person The person about whom the event is based. Persons Tab Clicking the Persons tab allows the user to enter or change demographic
information for the person involved in this particular event. This person information will display if a future event is created for this person.
Primary Person The person about whom data is entered when an event is input into NC Lead is reflected in this field.
Reports Used to view and analyze event data.
Role Roles define the user's permissions - the ability to use specific functions/features in NC Lead. Example: The Local Health Clinician role has permissions to create or edit an event, and to run reports. A user belonging to the Local Data Entry Role has a different set of permissions than the Clinician.

Appendix D: Definitions 112
Share a Case It allows someone to provide temporary permissions to someone else (or another group) to view an event that ordinarily wouldn’t be accessible by the other person (or group).
Specimen Info Details about the specimen. These include the date the specimen was taken, the number assigned to the specimen and the source of the specimen.
Status Displays the current investigation status of the event, concern or investigation status of the event.
Task Specific Monitors Workflows that usually have a due date and are often manually created by the user.
Tasks A technique for users to manually delegate assignments or work to others within their group. Typically tasks have a due date. Tasks can be accessed from three places: the toolbar on the dashboard (Tasks button), the Add Task button in the Tasks tab in the Event Information section, and from the Workflow Queues page (the Add Task link under Task Specific Monitors).
Tasks Tab Clicking the tasks tab will provide the user with information about all the tasks associated with the open event. Event tasks will display here regardless of who is assigned the task.
Tests The details regarding the test that was done. These details include the test name, findings of the test and the date on which the results were determined. (The Delete link will display only for those users who have permission to delete a lab test result.)
Time The date and time of the occurrence of the action.
User The username of NC Lead user who performed the action. Any individual using the NC Lead system.
View & Update Full Users will be able to view and edit the full range of questions. Has to do with Sharing a Case.
View & Update Limited Users will be able to view and edit a limited number of questions based on settings entered “behind the scenes.” Has to do with Sharing a Case.
View only Full Provides the ability to see the full range of questions. Editing is not possible with these permissions. Has to do with Sharing a Case.
View only Limited Provides the ability to see a limited number of questions based on settings entered “behind the scenes”. Editing is not possible with these permissions. Has to do with Sharing a Case.
Workflow Queues Allow users to keep up with events and work that needs to be done.
Appendix E: Linking Property-Child Events 113
Appendix E: Linking Property-Child Events
Environmental Users Only
Learning Objectives:
1. Demonstrate the ability to link events
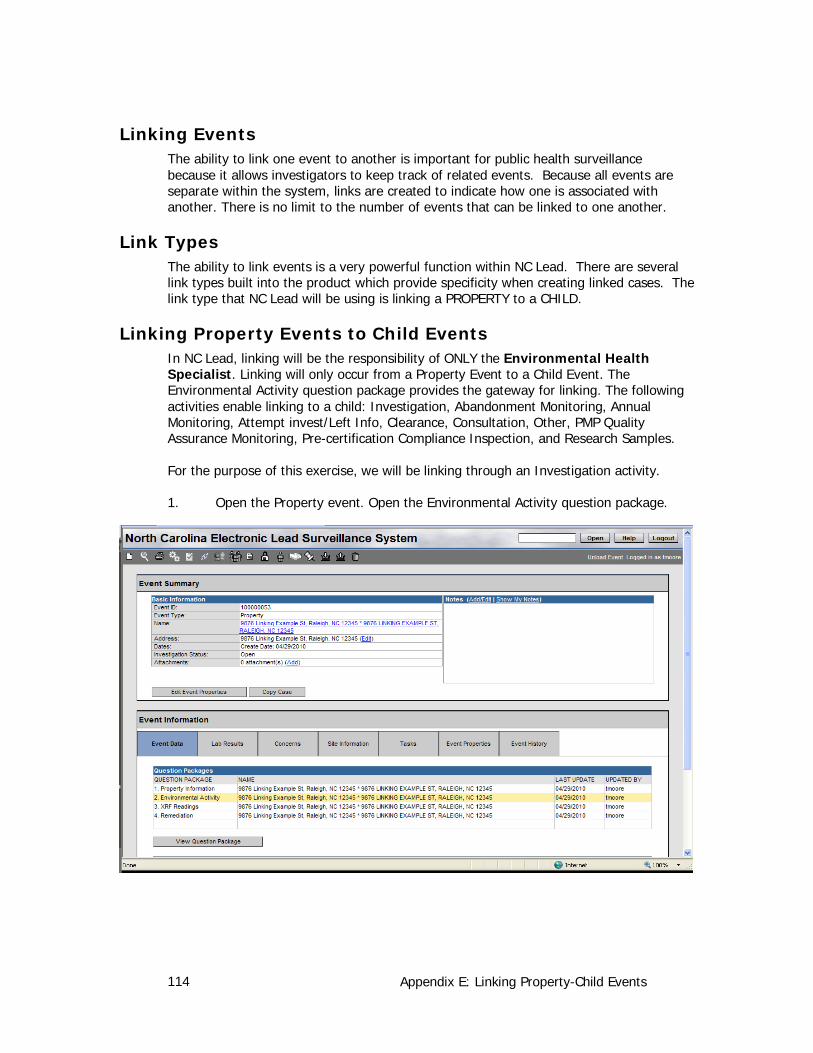
Appendix E: Linking Property-Child Events 114
Linking Events The ability to link one event to another is important for public health surveillance because it allows investigators to keep track of related events. Because all events are separate within the system, links are created to indicate how one is associated with another. There is no limit to the number of events that can be linked to one another.
Link Types The ability to link events is a very powerful function within NC Lead. There are several link types built into the product which provide specificity when creating linked cases. The link type that NC Lead will be using is linking a PROPERTY to a CHILD.
Linking Property Events to Child Events In NC Lead, linking will be the responsibility of ONLY the Environmental Health Specialist. Linking will only occur from a Property Event to a Child Event. The Environmental Activity question package provides the gateway for linking. The following activities enable linking to a child: Investigation, Abandonment Monitoring, Annual Monitoring, Attempt invest/Left Info, Clearance, Consultation, Other, PMP Quality Assurance Monitoring, Pre-certification Compliance Inspection, and Research Samples.
For the purpose of this exercise, we will be linking through an Investigation activity.
1. Open the Property event. Open the Environmental Activity question package.
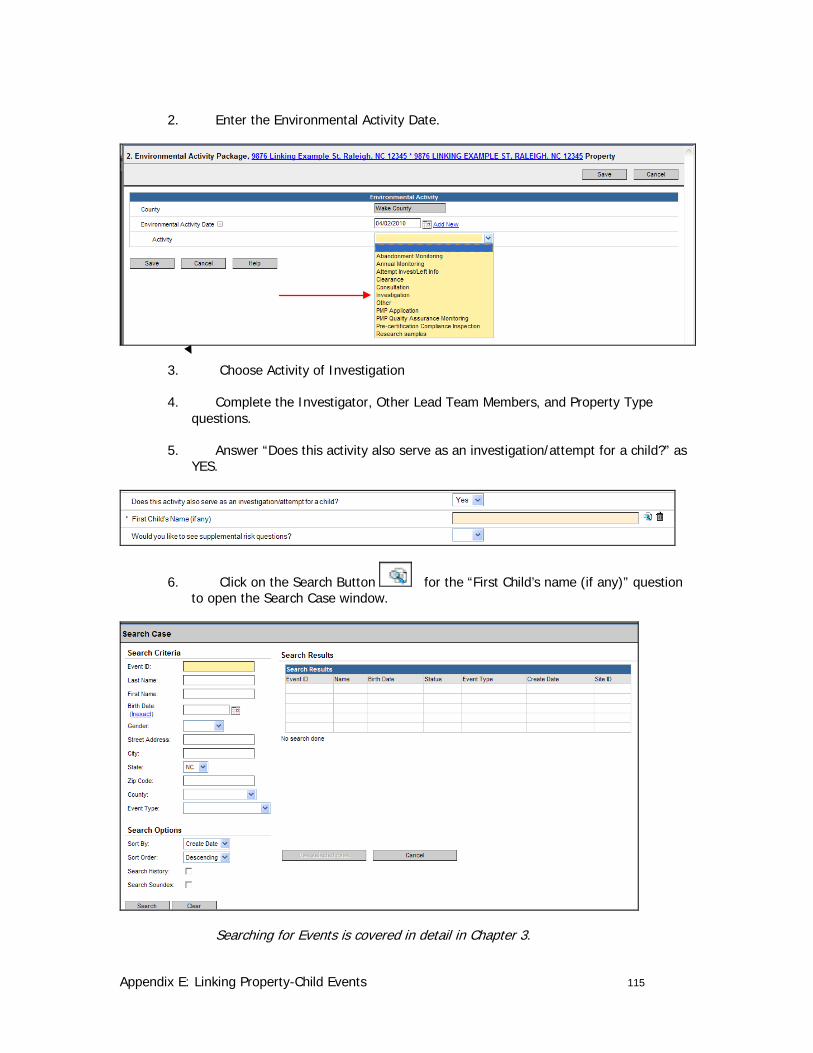
Appendix E: Linking Property-Child Events 115
2. Enter the Environmental Activity Date.
3. Choose Activity of Investigation
4. Complete the Investigator, Other Lead Team Members, and Property Type questions.
5. Answer “Does this activity also serve as an investigation/attempt for a child?” as YES.
6. Click on the Search Button for the “First Child’s name (if any)” question to open the Search Case window.
Searching for Events is covered in detail in Chapter 3.
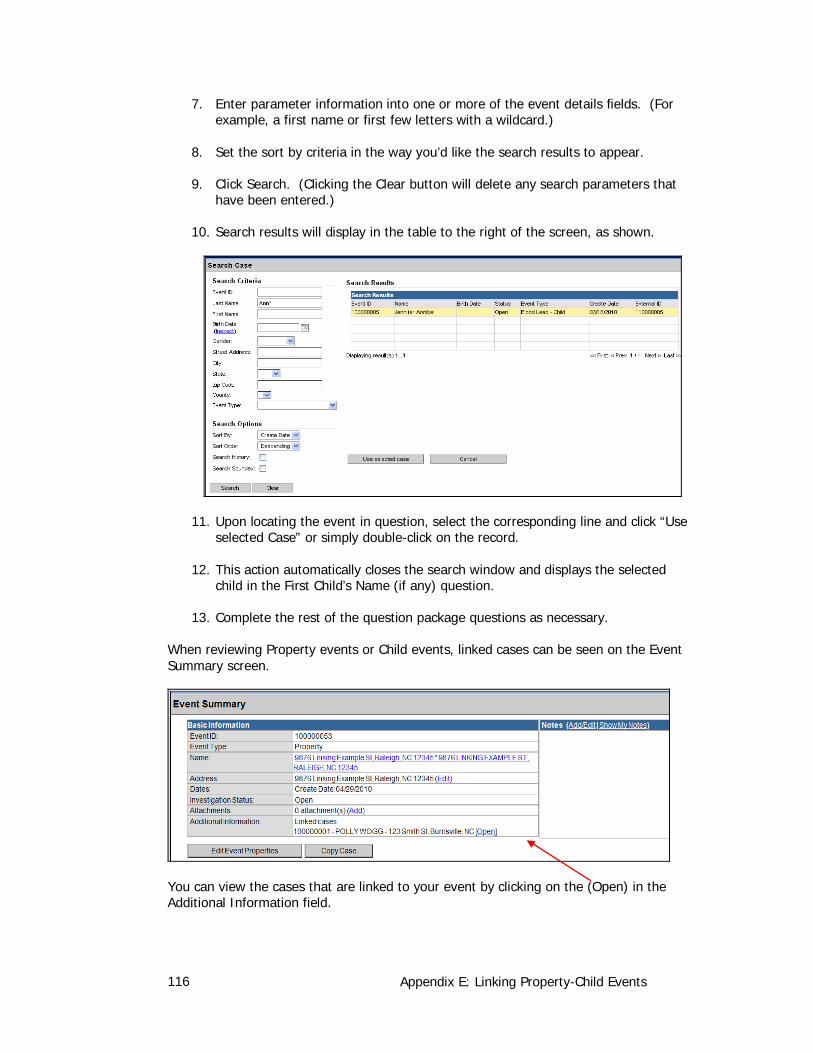
Appendix E: Linking Property-Child Events 116
7. Enter parameter information into one or more of the event details fields. (For example, a first name or first few letters with a wildcard.)
8. Set the sort by criteria in the way you’d like the search results to appear.
9. Click Search. (Clicking the Clear button will delete any search parameters that have been entered.)
10. Search results will display in the table to the right of the screen, as shown.
11. Upon locating the event in question, select the corresponding line and click “Use selected Case” or simply double-click on the record.
12. This action automatically closes the search window and displays the selected child in the First Child’s Name (if any) question.
13. Complete the rest of the question package questions as necessary.
When reviewing Property events or Child events, linked cases can be seen on the Event Summary screen.
You can view the cases that are linked to your event by clicking on the (Open) in the Additional Information field.
Appendix F: Deduplication 117
Appendix F: Deduplication
Administrative Users Only
Learning Objectives:
1. Demonstrate the ability to explain what deduplication is and why it’s necessary.
2. Demonstrate the ability to deduplicate persons.
3. Demonstrate the ability to deduplicate events.
4. Demonstrate the ability to manually invoke deduplication.
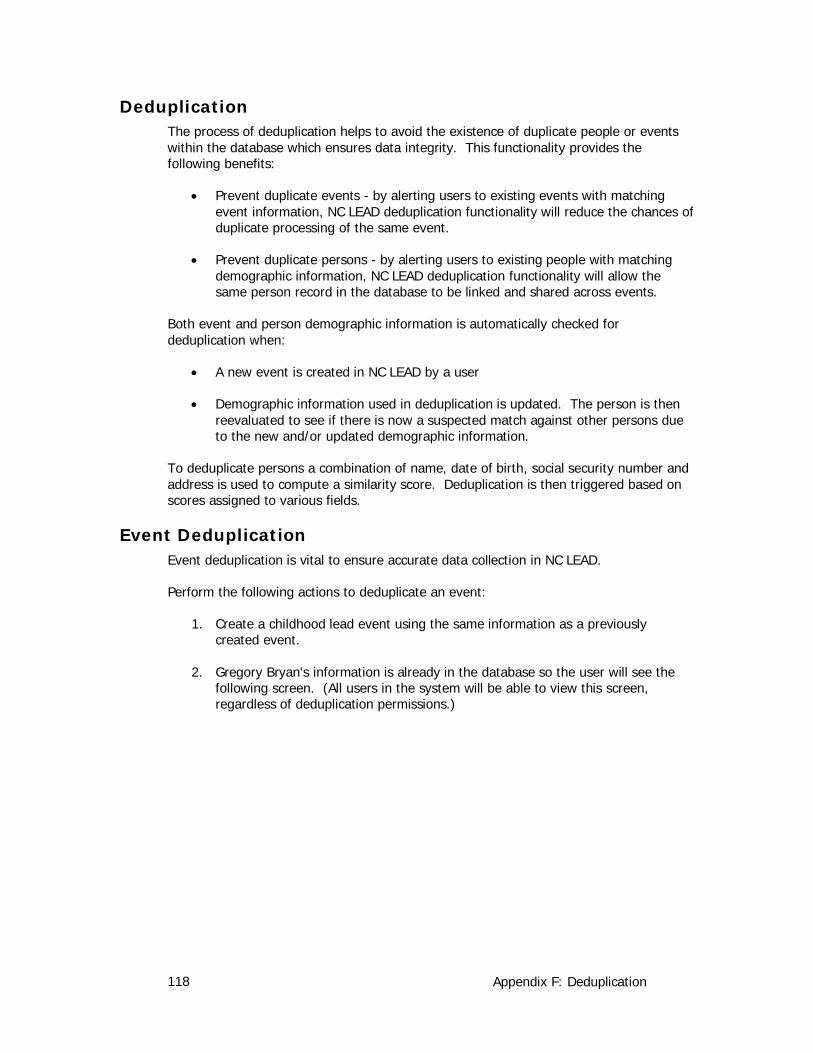
Appendix F: Deduplication 118
Deduplication The process of deduplication helps to avoid the existence of duplicate people or events within the database which ensures data integrity. This functionality provides the following benefits:
• Prevent duplicate events - by alerting users to existing events with matching event information, NC LEAD deduplication functionality will reduce the chances of duplicate processing of the same event.
• Prevent duplicate persons - by alerting users to existing people with matching demographic information, NC LEAD deduplication functionality will allow the same person record in the database to be linked and shared across events.
Both event and person demographic information is automatically checked for deduplication when:
• A new event is created in NC LEAD by a user
• Demographic information used in deduplication is updated. The person is then reevaluated to see if there is now a suspected match against other persons due to the new and/or updated demographic information.
To deduplicate persons a combination of name, date of birth, social security number and address is used to compute a similarity score. Deduplication is then triggered based on scores assigned to various fields.
Event Deduplication Event deduplication is vital to ensure accurate data collection in NC LEAD.
Perform the following actions to deduplicate an event:
1. Create a childhood lead event using the same information as a previously created event.
2. Gregory Bryan's information is already in the database so the user will see the following screen. (All users in the system will be able to view this screen, regardless of deduplication permissions.)
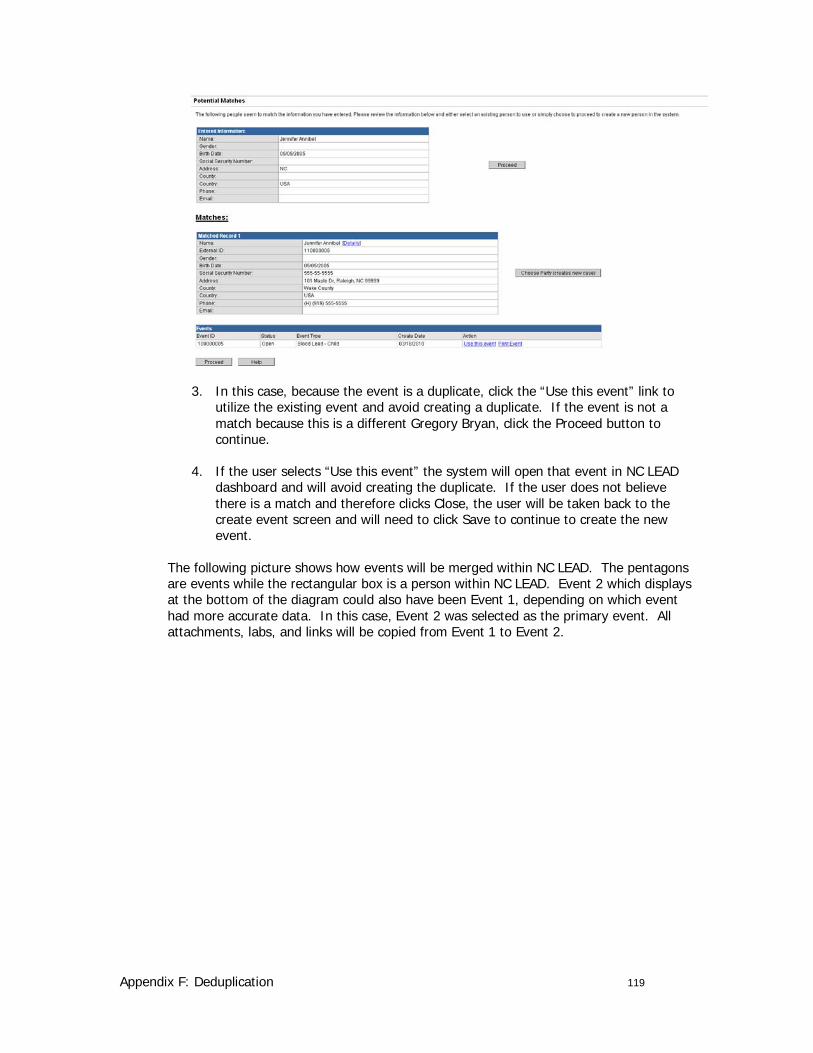
Appendix F: Deduplication 119
3. In this case, because the event is a duplicate, click the “Use this event” link to utilize the existing event and avoid creating a duplicate. If the event is not a match because this is a different Gregory Bryan, click the Proceed button to continue.
4. If the user selects “Use this event” the system will open that event in NC LEAD dashboard and will avoid creating the duplicate. If the user does not believe there is a match and therefore clicks Close, the user will be taken back to the create event screen and will need to click Save to continue to create the new event.
The following picture shows how events will be merged within NC LEAD. The pentagons are events while the rectangular box is a person within NC LEAD. Event 2 which displays at the bottom of the diagram could also have been Event 1, depending on which event had more accurate data. In this case, Event 2 was selected as the primary event. All attachments, labs, and links will be copied from Event 1 to Event 2.
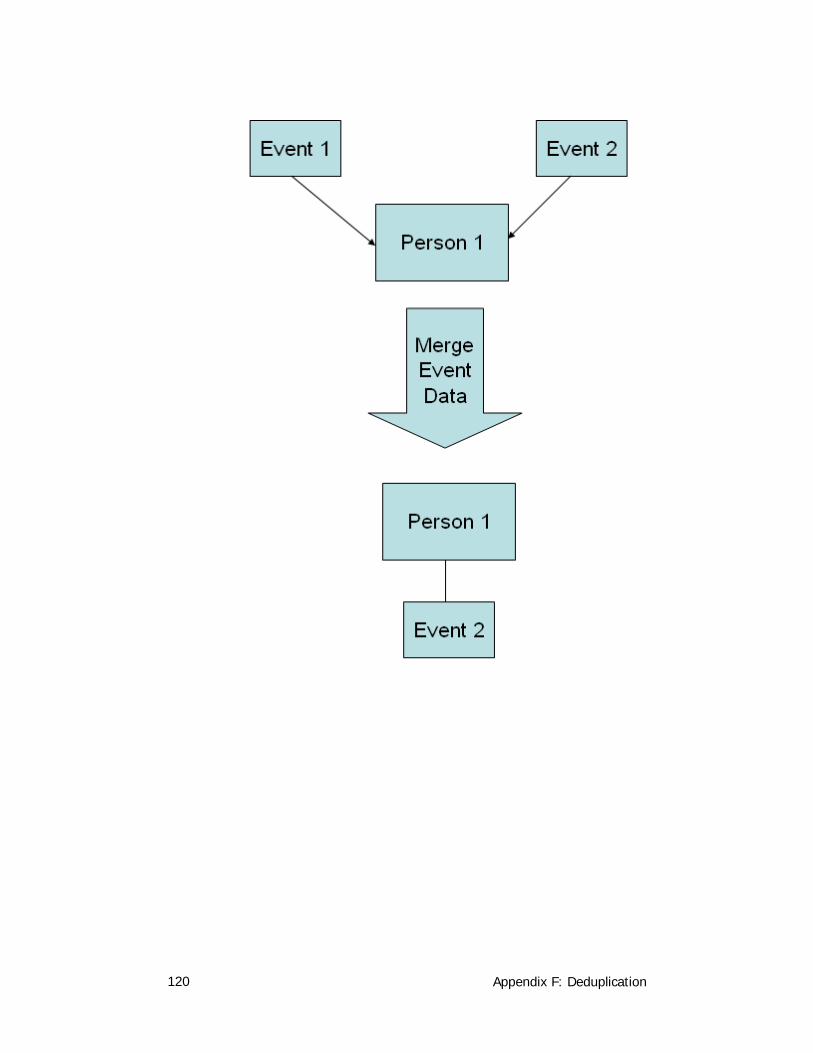
Appendix F: Deduplication 120
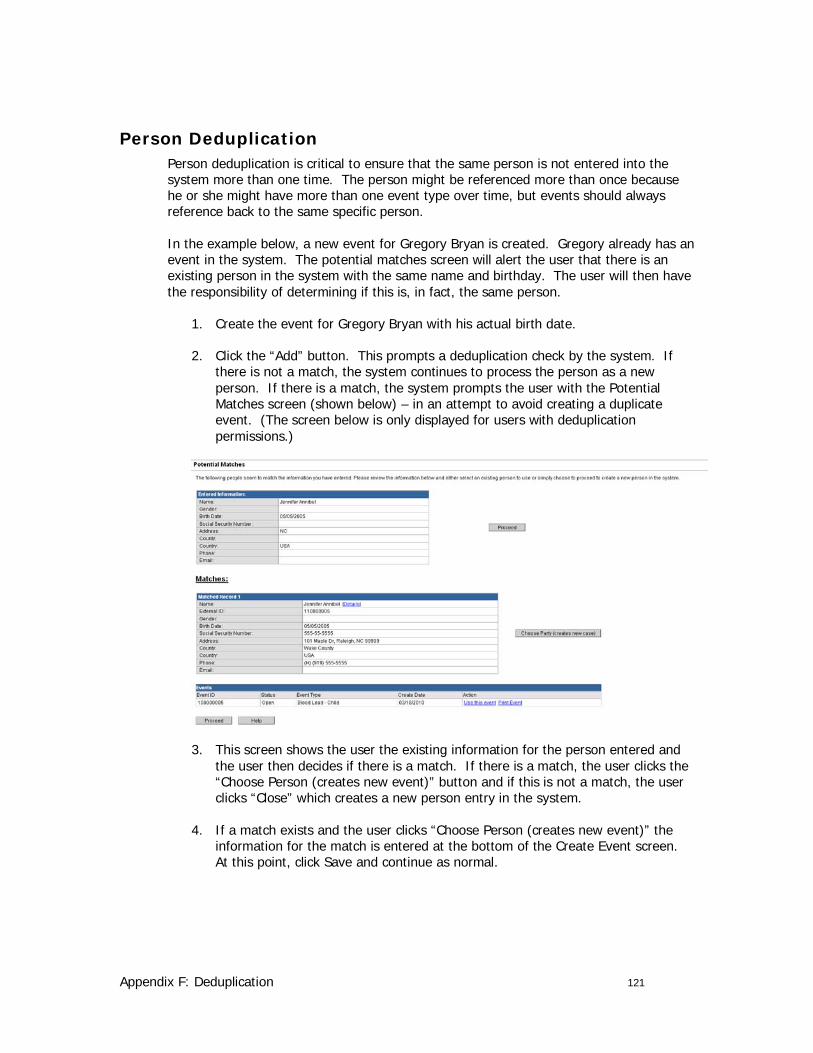
Appendix F: Deduplication 121
Person Deduplication Person deduplication is critical to ensure that the same person is not entered into the system more than one time. The person might be referenced more than once because he or she might have more than one event type over time, but events should always reference back to the same specific person.
In the example below, a new event for Gregory Bryan is created. Gregory already has an event in the system. The potential matches screen will alert the user that there is an existing person in the system with the same name and birthday. The user will then have the responsibility of determining if this is, in fact, the same person.
1. Create the event for Gregory Bryan with his actual birth date.
2. Click the “Add” button. This prompts a deduplication check by the system. If there is not a match, the system continues to process the person as a new person. If there is a match, the system prompts the user with the Potential Matches screen (shown below) – in an attempt to avoid creating a duplicate event. (The screen below is only displayed for users with deduplication permissions.)
3. This screen shows the user the existing information for the person entered and the user then decides if there is a match. If there is a match, the user clicks the “Choose Person (creates new event)” button and if this is not a match, the user clicks “Close” which creates a new person entry in the system.
4. If a match exists and the user clicks “Choose Person (creates new event)” the information for the match is entered at the bottom of the Create Event screen. At this point, click Save and continue as normal.
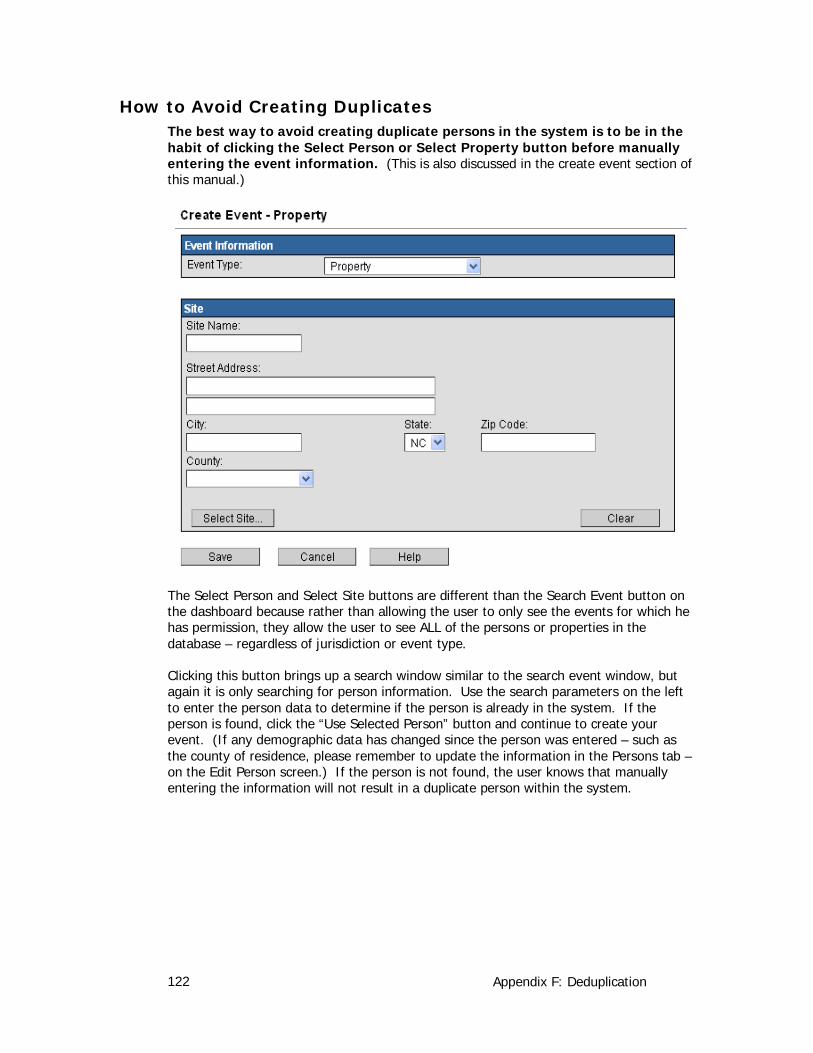
Appendix F: Deduplication 122
How to Avoid Creating Duplicates The best way to avoid creating duplicate persons in the system is to be in the habit of clicking the Select Person or Select Property button before manually entering the event information. (This is also discussed in the create event section of this manual.)
The Select Person and Select Site buttons are different than the Search Event button on the dashboard because rather than allowing the user to only see the events for which he has permission, they allow the user to see ALL of the persons or properties in the database – regardless of jurisdiction or event type.
Clicking this button brings up a search window similar to the search event window, but again it is only searching for person information. Use the search parameters on the left to enter the person data to determine if the person is already in the system. If the person is found, click the “Use Selected Person” button and continue to create your event. (If any demographic data has changed since the person was entered – such as the county of residence, please remember to update the information in the Persons tab – on the Edit Person screen.) If the person is not found, the user knows that manually entering the information will not result in a duplicate person within the system.
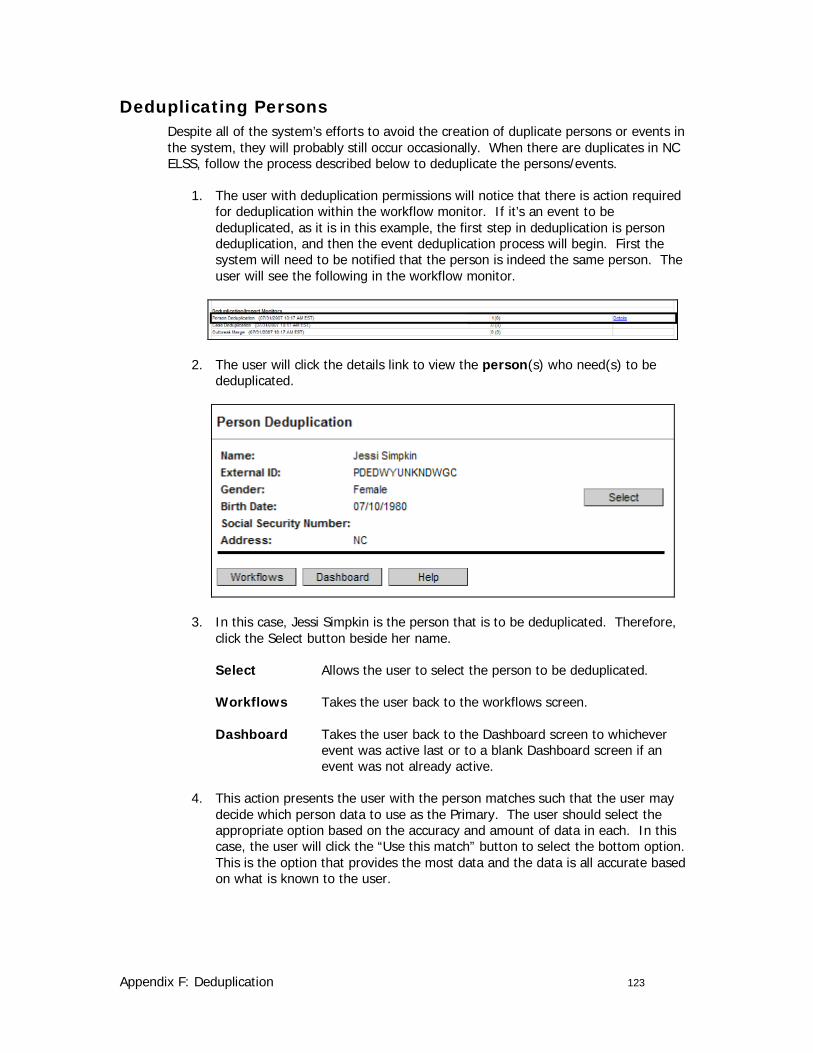
Appendix F: Deduplication 123
Deduplicating Persons Despite all of the system’s efforts to avoid the creation of duplicate persons or events in the system, they will probably still occur occasionally. When there are duplicates in NC ELSS, follow the process described below to deduplicate the persons/events.
1. The user with deduplication permissions will notice that there is action required for deduplication within the workflow monitor. If it’s an event to be deduplicated, as it is in this example, the first step in deduplication is person deduplication, and then the event deduplication process will begin. First the system will need to be notified that the person is indeed the same person. The user will see the following in the workflow monitor.
2. The user will click the details link to view the person(s) who need(s) to be deduplicated.
3. In this case, Jessi Simpkin is the person that is to be deduplicated. Therefore, click the Select button beside her name.
Select Allows the user to select the person to be deduplicated.
Workflows Takes the user back to the workflows screen.
Dashboard Takes the user back to the Dashboard screen to whichever event was active last or to a blank Dashboard screen if an event was not already active.
4. This action presents the user with the person matches such that the user may decide which person data to use as the Primary. The user should select the appropriate option based on the accuracy and amount of data in each. In this case, the user will click the “Use this match” button to select the bottom option. This is the option that provides the most data and the data is all accurate based on what is known to the user.
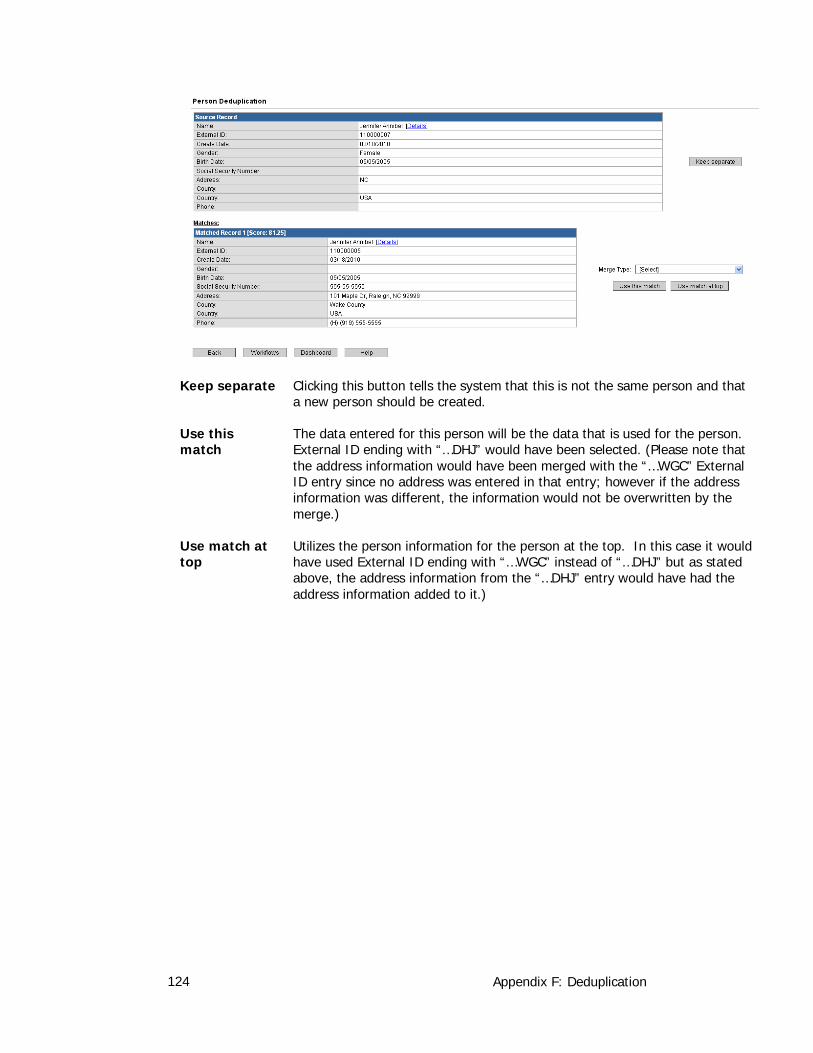
Appendix F: Deduplication 124
Keep separate Clicking this button tells the system that this is not the same person and that a new person should be created.
Use this match
The data entered for this person will be the data that is used for the person. External ID ending with “…DHJ” would have been selected. (Please note that the address information would have been merged with the “…WGC” External ID entry since no address was entered in that entry; however if the address information was different, the information would not be overwritten by the merge.)
Use match at top
Utilizes the person information for the person at the top. In this case it would have used External ID ending with “…WGC” instead of “…DHJ” but as stated above, the address information from the “…DHJ” entry would have had the address information added to it.)
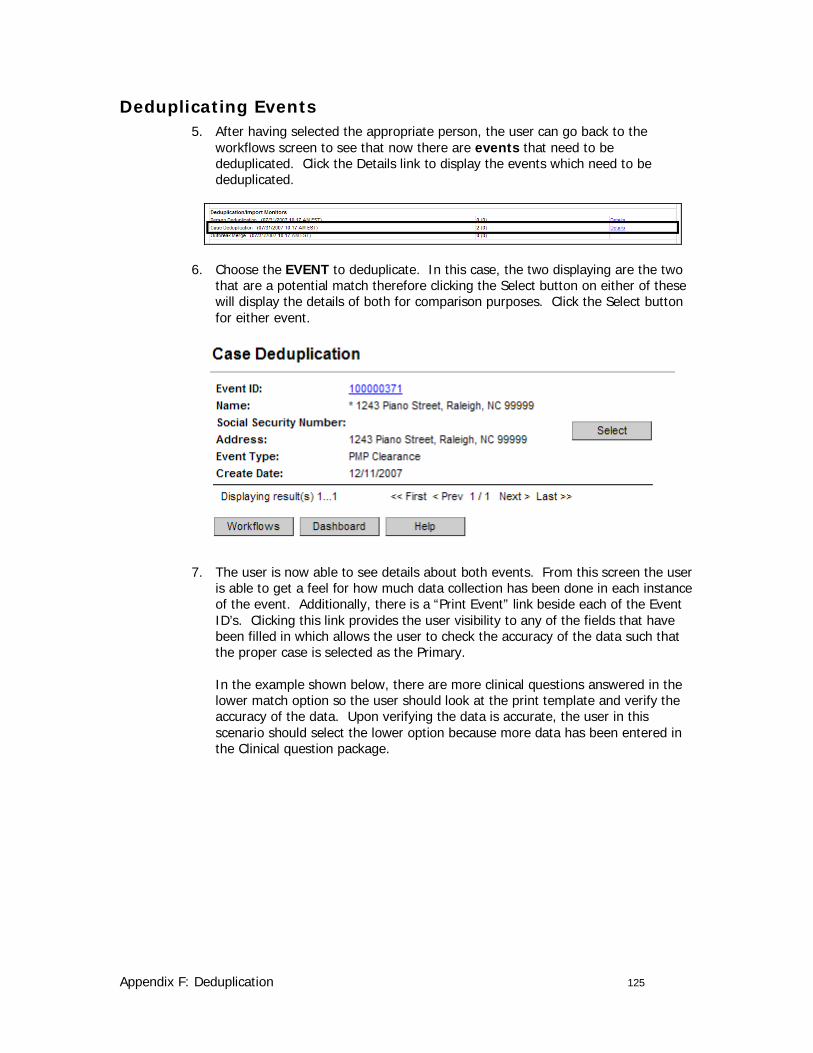
Appendix F: Deduplication 125
Deduplicating Events 5. After having selected the appropriate person, the user can go back to the
workflows screen to see that now there are events that need to be deduplicated. Click the Details link to display the events which need to be deduplicated.
6. Choose the EVENT to deduplicate. In this case, the two displaying are the two that are a potential match therefore clicking the Select button on either of these will display the details of both for comparison purposes. Click the Select button for either event.
7. The user is now able to see details about both events. From this screen the user is able to get a feel for how much data collection has been done in each instance of the event. Additionally, there is a “Print Event” link beside each of the Event ID’s. Clicking this link provides the user visibility to any of the fields that have been filled in which allows the user to check the accuracy of the data such that the proper case is selected as the Primary. In the example shown below, there are more clinical questions answered in the lower match option so the user should look at the print template and verify the accuracy of the data. Upon verifying the data is accurate, the user in this scenario should select the lower option because more data has been entered in the Clinical question package.
Appendix F: Deduplication 126
8. Upon making the decision of which event to use as the Primary event, click the appropriate button. If the event below is the Primary, click the Use this Match button, if instead it’s the one above, click the Use match at top button. If the events are truly not duplicates of one another, the user should click the Keep separate button.
In this scenario, the user would click the “Use this match” button.
9. Work can resume as normal on the event.
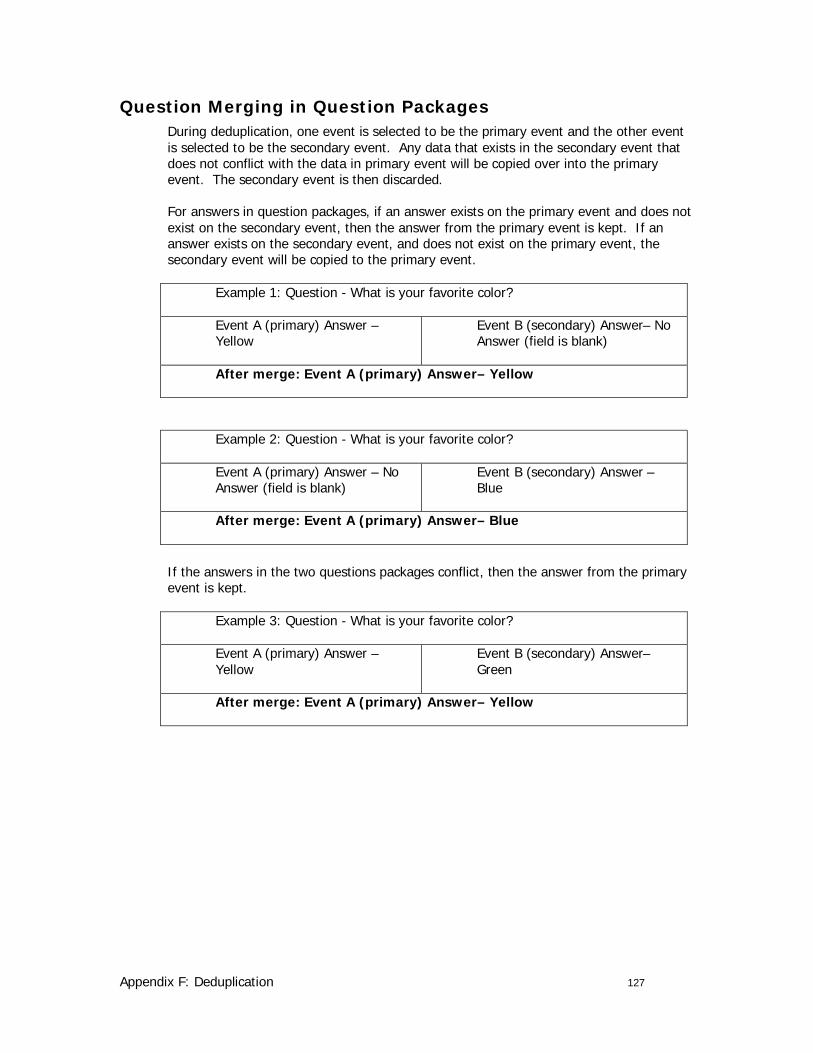
Appendix F: Deduplication 127
Question Merging in Question Packages During deduplication, one event is selected to be the primary event and the other event is selected to be the secondary event. Any data that exists in the secondary event that does not conflict with the data in primary event will be copied over into the primary event. The secondary event is then discarded.
For answers in question packages, if an answer exists on the primary event and does not exist on the secondary event, then the answer from the primary event is kept. If an answer exists on the secondary event, and does not exist on the primary event, the secondary event will be copied to the primary event.
Example 1: Question - What is your favorite color?
Event A (primary) Answer – Yellow
Event B (secondary) Answer– No Answer (field is blank)
After merge: Event A (primary) Answer– Yellow
Example 2: Question - What is your favorite color?
Event A (primary) Answer – No Answer (field is blank)
Event B (secondary) Answer – Blue
After merge: Event A (primary) Answer– Blue
If the answers in the two questions packages conflict, then the answer from the primary event is kept.
Example 3: Question - What is your favorite color?
Event A (primary) Answer – Yellow
Event B (secondary) Answer– Green
After merge: Event A (primary) Answer– Yellow
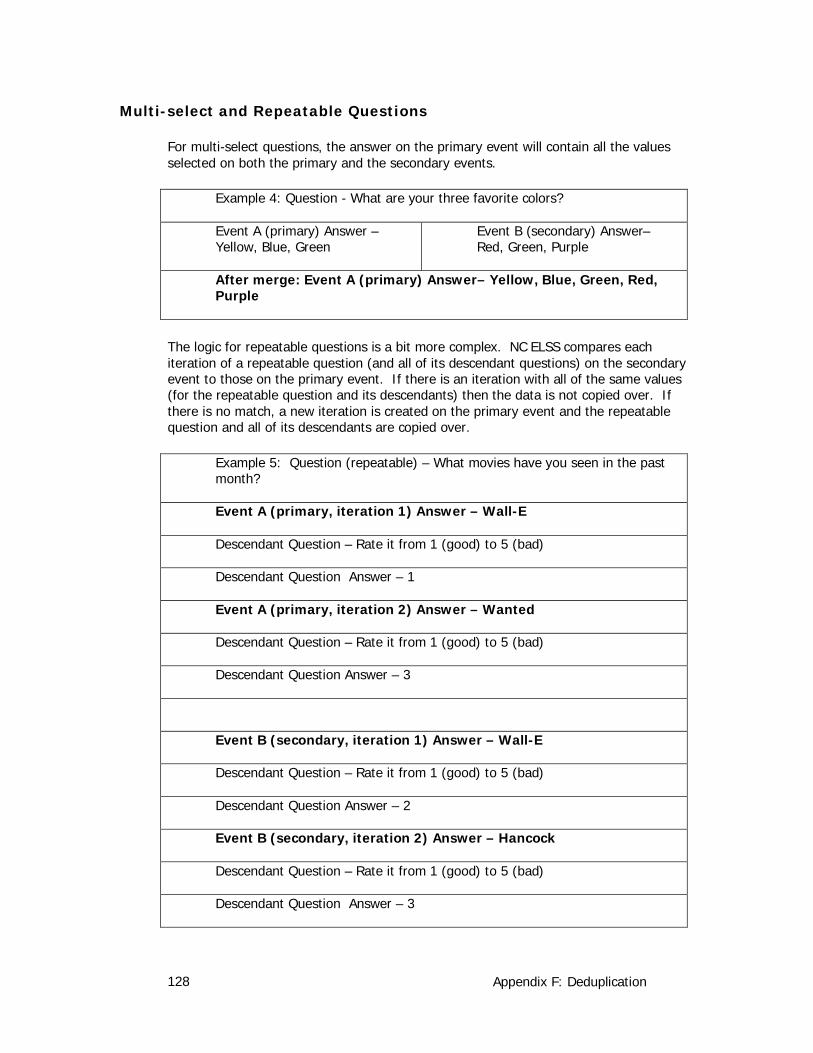
Appendix F: Deduplication 128
Multi-select and Repeatable Questions
For multi-select questions, the answer on the primary event will contain all the values selected on both the primary and the secondary events.
Example 4: Question - What are your three favorite colors?
Event A (primary) Answer – Yellow, Blue, Green
Event B (secondary) Answer– Red, Green, Purple
After merge: Event A (primary) Answer– Yellow, Blue, Green, Red, Purple
The logic for repeatable questions is a bit more complex. NC ELSS compares each iteration of a repeatable question (and all of its descendant questions) on the secondary event to those on the primary event. If there is an iteration with all of the same values (for the repeatable question and its descendants) then the data is not copied over. If there is no match, a new iteration is created on the primary event and the repeatable question and all of its descendants are copied over.
Example 5: Question (repeatable) – What movies have you seen in the past month?
Event A (primary, iteration 1) Answer – Wall-E
Descendant Question – Rate it from 1 (good) to 5 (bad)
Descendant Question Answer – 1
Event A (primary, iteration 2) Answer – Wanted
Descendant Question – Rate it from 1 (good) to 5 (bad)
Descendant Question Answer – 3
Event B (secondary, iteration 1) Answer – Wall-E
Descendant Question – Rate it from 1 (good) to 5 (bad)
Descendant Question Answer – 2
Event B (secondary, iteration 2) Answer – Hancock
Descendant Question – Rate it from 1 (good) to 5 (bad)
Descendant Question Answer – 3
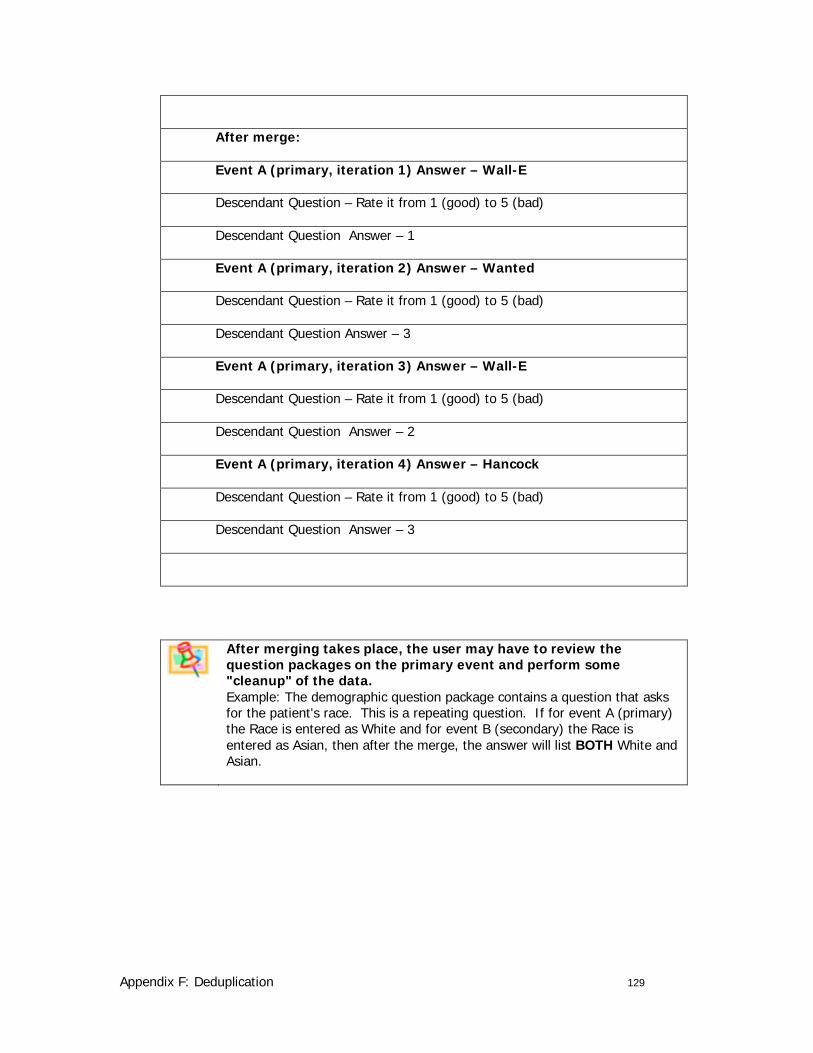
Appendix F: Deduplication 129
After merge:
Event A (primary, iteration 1) Answer – Wall-E
Descendant Question – Rate it from 1 (good) to 5 (bad)
Descendant Question Answer – 1
Event A (primary, iteration 2) Answer – Wanted
Descendant Question – Rate it from 1 (good) to 5 (bad)
Descendant Question Answer – 3
Event A (primary, iteration 3) Answer – Wall-E
Descendant Question – Rate it from 1 (good) to 5 (bad)
Descendant Question Answer – 2
Event A (primary, iteration 4) Answer – Hancock
Descendant Question – Rate it from 1 (good) to 5 (bad)
Descendant Question Answer – 3
After merging takes place, the user may have to review the question packages on the primary event and perform some "cleanup" of the data. Example: The demographic question package contains a question that asks for the patient's race. This is a repeating question. If for event A (primary) the Race is entered as White and for event B (secondary) the Race is entered as Asian, then after the merge, the answer will list BOTH White and Asian.
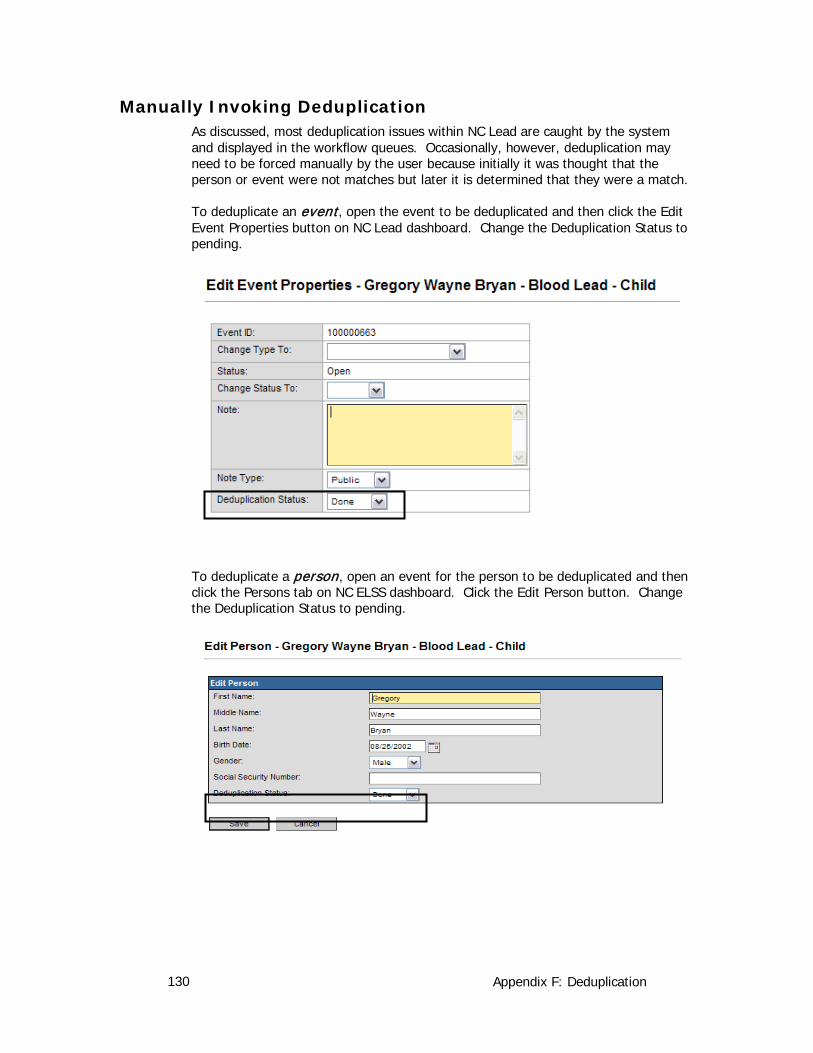
Appendix F: Deduplication 130
Manually Invoking Deduplication As discussed, most deduplication issues within NC Lead are caught by the system and displayed in the workflow queues. Occasionally, however, deduplication may need to be forced manually by the user because initially it was thought that the person or event were not matches but later it is determined that they were a match.
To deduplicate an event, open the event to be deduplicated and then click the Edit Event Properties button on NC Lead dashboard. Change the Deduplication Status to pending.
To deduplicate a person, open an event for the person to be deduplicated and then click the Persons tab on NC ELSS dashboard. Click the Edit Person button. Change the Deduplication Status to pending.
Appendix F: Deduplication 131
Upon changing the status(es) of the persons or events to be deduplicated to pending, the workflow queue page should display that there are either persons or events to be deduplicated. Follow the procedure as explained above to deduplicate the persons or events.
When person deduplication is complete; this may cause event deduplication to become necessary. Follow the procedures outlined previously in this chapter to complete this process. If there no event matches, the message “no matches found” will display on the Case Deduplication screen.
Appendix G: Closing Events 132
Appendix G: Closing Events
Administrative Users Only
Learning Objectives:
1. Close an event in NC ELSS
2. Reopen an event within NC ELSS

Appendix G: Closing Events 133
Closing an Event When an investigation is completed, it is important to close events as appropriate to maintain accurate records. Close an event by performing the following procedure:
1. Be sure that the event to be closed is displayed on NC Lead Dashboard.
2. Click the Edit Event Properties button just under the Summary Information section of the screen.
3. In Change Status To, select the dropdown option that says Closed.
4. If necessary, enter any relevant notes in the Add Note text area.
5. Click Save to save your changes.
Note that there is a difference between closing an event and changing the event type status. Changing the event type status is done in the Administrative package and only refers to the status of the patient’s event whereas the event status refers to the status of the investigation. Therefore, if the event classification status is “Does Not Meet Criteria” it is necessary to first select this classification status and then to close the event – utilizing the procedure covered above.

Appendix G: Closing Events 134
Reopen a Closed Event If an event was closed prematurely, it can be reopened by someone with the appropriate privileges. To reopen an event, first locate the event to be reopened. (This can be done by searching for the event.) When the event to be reopened is being displayed on the NC Lead dashboard, click the Edit Event Properties button and change the Change Status To dropdown to Open.