nootteess 10. chart components - huntington,...
TRANSCRIPT

Owner: Cerner Learning Services CPOE Physician Training Guide Effective date: April 18, 2011 Version 1 Tracking Number: 25TRGEXT019862 Cerner Corporation. All rights reserved. This document contains confidential information which may not be reproduced or transmitted without the express written consent of Cerner. Page 114 of 239
NNNooottteeesss 10. Chart Components The patient chart menu displays a series of sections conveniently linking you to the various components of a patient chart and the tasks that fit within your workflow.
Inpatient Summary MPages The Inpatient Summary focuses on providing a patient summary view for clinicians. This summary allows interactive monitoring of real-time patient information, and is a quick one-view snapshot of the patient’s chart.
Every component within the Inpatient Summary has an expand or collapse
icon in the upper right corner.

Owner: Cerner Learning Services CPOE Physician Training Guide Effective date: April 18, 2011 Version 1 Tracking Number: 25TRGEXT019862 Cerner Corporation. All rights reserved. This document contains confidential information which may not be reproduced or transmitted without the express written consent of Cerner.
NNNooottteeesss
Page 115 of 239
The Inpatient Summary toolbar displays the Binoculars by default. Click this button to launch a Find window enabling you to search for a term or a value in the Inpatient Summary.
Each titled section of the Inpatient Summary is linked to the appropriate
component of the patient chart. The link is indicated with the link hand icon when positioning the pointer over the title. Click the title to go to the component.
Position the pointer over a reported result in the Inpatient Summary to view more information about the value in a tooltip window.

Owner: Cerner Learning Services CPOE Physician Training Guide Effective date: April 18, 2011 Version 1 Tracking Number: 25TRGEXT019862 Cerner Corporation. All rights reserved. This document contains confidential information which may not be reproduced or transmitted without the express written consent of Cerner. Page 116 of 239
NNNooottteeesss
Tips for Using the MPages
Click plus or minus in each box to expand or collapse the section.
Expand all sections by clicking Expand All .
Graph a result by clicking the result label . A graph displays all data points for the result.
Overview The Overview section provides a snapshot of a patient’s medical status. The Overview is organized into four tabbed sections: Since Last Time, This Visit, Summary, and Interdisciplinary Summary.
The information in the Overview reflects data relevant to the patient since the last
time you clicked Date / Time Stamp on the Since Last Time tab.
The Overview is a view-only section. Information cannot be edited through this route. You can view details about the items this section in two ways.
1. Click an item to view it in a Details pane.

Owner: Cerner Learning Services CPOE Physician Training Guide Effective date: April 18, 2011 Version 1 Tracking Number: 25TRGEXT019862 Cerner Corporation. All rights reserved. This document contains confidential information which may not be reproduced or transmitted without the express written consent of Cerner.
NNNooottteeesss
Page 117 of 239
2. Right-click an item and select an appropriate action.
Results Review PowerChart uses flowsheets to display patient results. Results charted from Task List, Ad Hoc Charting, or PowerNote can be displayed in a flowsheet in Results Review.
Navigate the Results Review
Sections within Results Review
The results are organized in categories displayed as tabs:
Flowsheet Toolbar
The features of a flowsheet are designed to make finding clinical information as efficient as possible. The flowsheet toolbar allows you to select the type of flowsheet to view; the Level, or scope of information to include; and how to display the results in an optimal manner such as in a table, by group, or as a list.
View Result Details
Double-click a result to display the Results Details window.
Owner: Cerner Learning Services CPOE Physician Training Guide Effective date: April 18, 2011 Version 1 Tracking Number: 25TRGEXT019862 Cerner Corporation. All rights reserved. This document contains confidential information which may not be reproduced or transmitted without the express written consent of Cerner. Page 118 of 239
NNNooottteeesss The Results Details window displays result history, general result information, and an action list. The action list displays Action, Performed By, Performed Date, Action Status, Comment, Proxy Personnel, Requested By, Requested Date, and Request Comment columns.
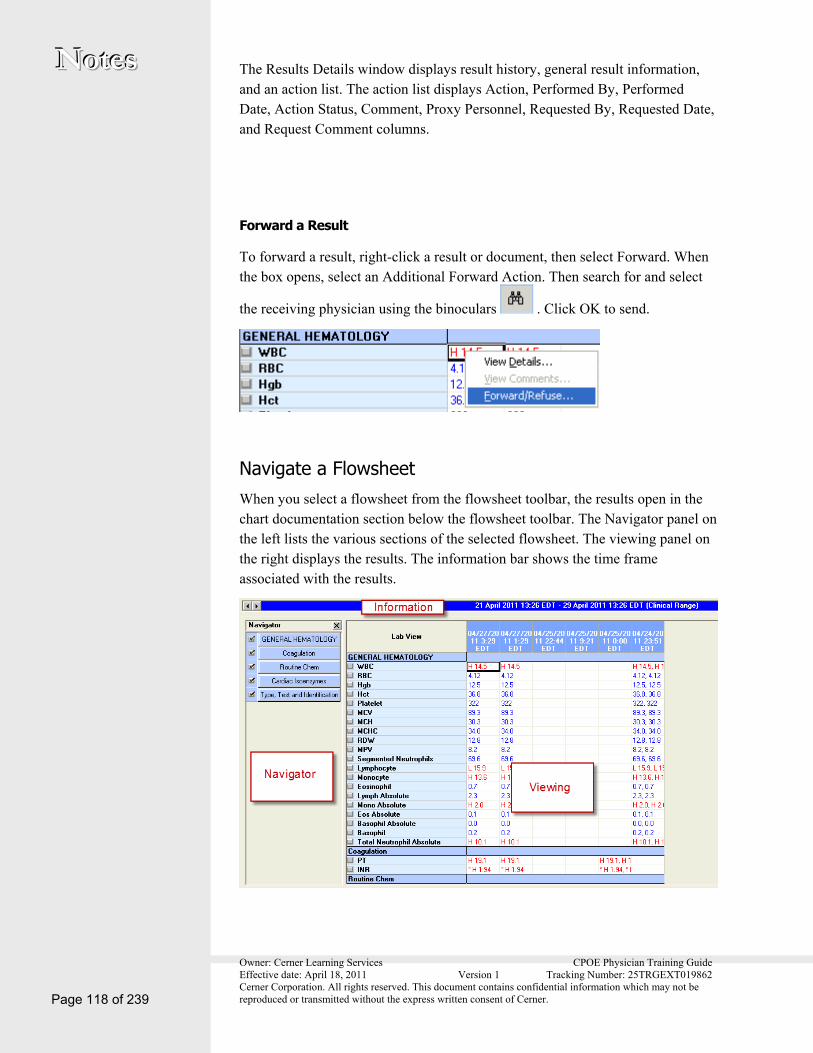
Forward a Result
To forward a result, right-click a result or document, then select Forward. When the box opens, select an Additional Forward Action. Then search for and select
the receiving physician using the binoculars . Click OK to send.
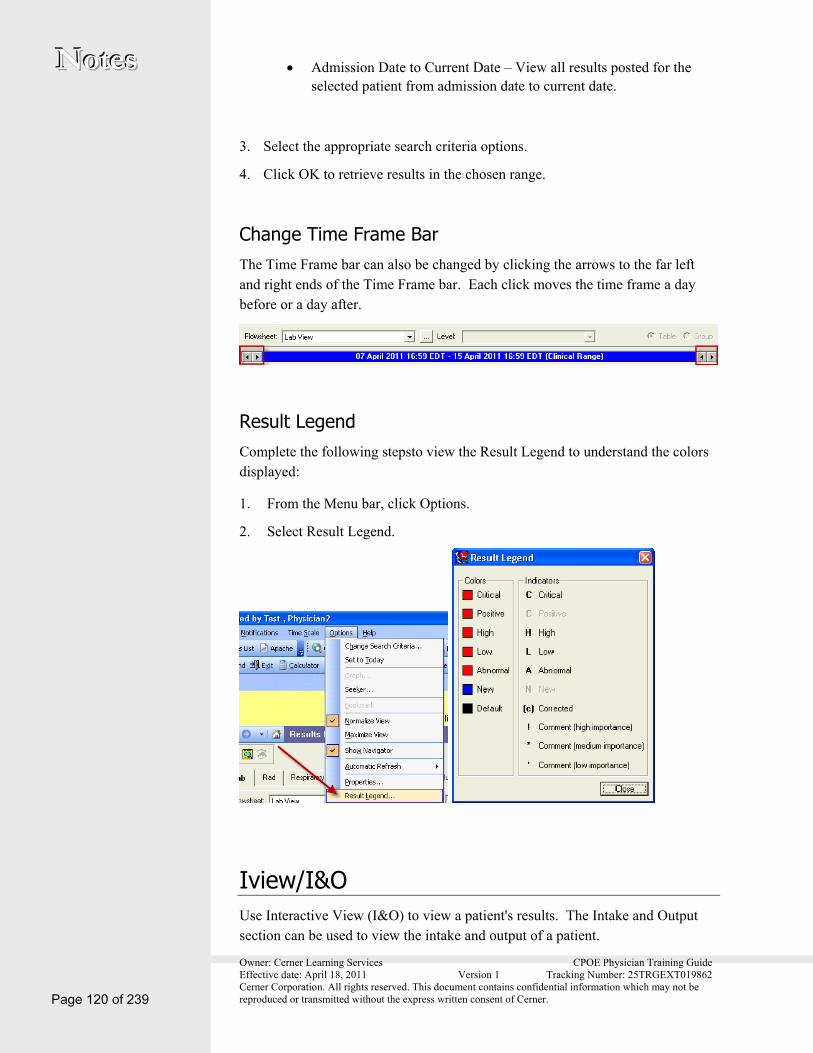
Navigate a Flowsheet When you select a flowsheet from the flowsheet toolbar, the results open in the chart documentation section below the flowsheet toolbar. The Navigator panel on the left lists the various sections of the selected flowsheet. The viewing panel on the right displays the results. The information bar shows the time frame associated with the results.

Owner: Cerner Learning Services CPOE Physician Training Guide Effective date: April 18, 2011 Version 1 Tracking Number: 25TRGEXT019862 Cerner Corporation. All rights reserved. This document contains confidential information which may not be reproduced or transmitted without the express written consent of Cerner.
NNNooottteeesss
Page 119 of 239
Use checkmarks in the Navigator to select which sections of the flowsheet display in the Results section.
Results displayed in red are critical, orange are high, brown are abnormal, and blue is low.
Use the scroll bar in the viewing panel to scroll up or down the list of results, or click a section in the Navigator to link directly to the section in the viewing panel.
Changing Search Criteria and Time Frame The Information Bar displays the date and time range for results.
1. Right-click the Information Bar to display the Search Criteria menu.
2. Select Change Search Criteria.
The Search Criteria box offers you several options to customize the results being displayed.
Clinical Range – Displays results within an occurrence time and within the specified time range.
Posting Range – Displays results that have posting times within the specified time range.
Result Count – Allows you to select the specific number of latest entries to the patients’ chart to be displayed from 1–1,000.
Owner: Cerner Learning Services CPOE Physician Training Guide Effective date: April 18, 2011 Version 1 Tracking Number: 25TRGEXT019862 Cerner Corporation. All rights reserved. This document contains confidential information which may not be reproduced or transmitted without the express written consent of Cerner. Page 120 of 239
NNNooottteeesss Admission Date to Current Date – View all results posted for the selected patient from admission date to current date.
3. Select the appropriate search criteria options.
4. Click OK to retrieve results in the chosen range.
Change Time Frame Bar The Time Frame bar can also be changed by clicking the arrows to the far left and right ends of the Time Frame bar. Each click moves the time frame a day before or a day after.
Result Legend Complete the following stepsto view the Result Legend to understand the colors displayed:
1. From the Menu bar, click Options.
2. Select Result Legend.
Iview/I&O Use Interactive View (I&O) to view a patient's results. The Intake and Output section can be used to view the intake and output of a patient.

Owner: Cerner Learning Services CPOE Physician Training Guide Effective date: April 18, 2011 Version 1 Tracking Number: 25TRGEXT019862 Cerner Corporation. All rights reserved. This document contains confidential information which may not be reproduced or transmitted without the express written consent of Cerner.
NNNooottteeesss
Page 121 of 239
There are three main sections of the screen when using the IView:
Navigator
IView Window
Filter Window
The Navigator The left side of IView is known as the Navigator. The Navigator consists of several gray bands, and each band contains sections for documentation. Bands and sections differ depending on the user and location.
Click a band to view the sections that are included.
Click a section to display data boxes in the Interactive View window.
A check mark to the left of a section indicates that there is documentation in that section.
IView Window The IView window is used to direct chart, modify, and analyze data. It can be used to view patient data in real-time, meaning that information documented is

Owner: Cerner Learning Services CPOE Physician Training Guide Effective date: April 18, 2011 Version 1 Tracking Number: 25TRGEXT019862 Cerner Corporation. All rights reserved. This document contains confidential information which may not be reproduced or transmitted without the express written consent of Cerner. Page 122 of 239
NNNooottteeesss immediately available to all users. The window view is made up of several components:
Sections
Sub-Sections
Cells
Units of Measure
Timescale
Calculated Field
By right-clicking on the blue bar, you can change the results criteria.
Filter Window The Filter windows are located above the Interactive View window. These windows allow the caregiver to easily locate specific types of information. The selected results are then be displayed in the Filter window for the defined time frame.

Owner: Cerner Learning Services CPOE Physician Training Guide Effective date: April 18, 2011 Version 1 Tracking Number: 25TRGEXT019862 Cerner Corporation. All rights reserved. This document contains confidential information which may not be reproduced or transmitted without the express written consent of Cerner.
NNNooottteeesss
Page 123 of 239
The Filter window can be used to find a specific data field or to find different types of results, such as high or low.
To search for a specific data field, click the Find Item list down arrow to search for the item. You can also type directly in the Find Item list to search for the item.
To search for a specific type of result, select the option from the Filter window. For example, selecting the High option displays all high results in the Filter window.
Clinical Notes Clinical Notes allows you to use PowerNote to document the patient encounter and create an electronic record of that encounter. PowerNote allows you to complete an entire patient encounter, including writing documentation, reviewing results, assigning a diagnosis, and placing orders.
Features of the PowerNote include:
Immediate availability of posted information.

Owner: Cerner Learning Services CPOE Physician Training Guide Effective date: April 18, 2011 Version 1 Tracking Number: 25TRGEXT019862 Cerner Corporation. All rights reserved. This document contains confidential information which may not be reproduced or transmitted without the express written consent of Cerner. Page 124 of 239
NNNooottteeesss Sort documents by author, date, encounter type, note type, and note status.
Accurately capture edits and addenda to documents. The original document remains preserved with an unlimited number of corrections and emendations attached to it.
Visual alerts in both icon and alphanumeric form show providers when clinical results are available in the system.
Note: Remember to use the Refresh button frequently.
Creating a PowerNote starts with selecting an encounter pathway, which is designed for a single, specific reason for encounter. The encounter pathway then expands to display all the elements of the diagnostic exam, from the symptoms of the present illness to treatment plans and a final diagnosis (including ICD-9 billing codes). The encounter pathway serves as a template, with data based on best practices, enabling the healthcare provider to focus on questioning, the examination, and overall patient evaluation.
Navigating Clinical Notes After selecting the Clinical Notes section from the chart menu, it is organized into a navigator pane on the left, listing the notes available, and a PowerNote workspace on the right.
Clinical Notes displays a toolbar just below the Demographic Bar enabling you create a new note, or to perform specific actions related to the selected PowerNote.
Owner: Cerner Learning Services CPOE Physician Training Guide Effective date: April 18, 2011 Version 1 Tracking Number: 25TRGEXT019862 Cerner Corporation. All rights reserved. This document contains confidential information which may not be reproduced or transmitted without the express written consent of Cerner.
NNNooottteeesss
Page 125 of 239
Use the Display feature above the note list to select search criteria when finding a specific note or a specific set of notes. Search criteria include author, date, encounter type, note type, and note status.
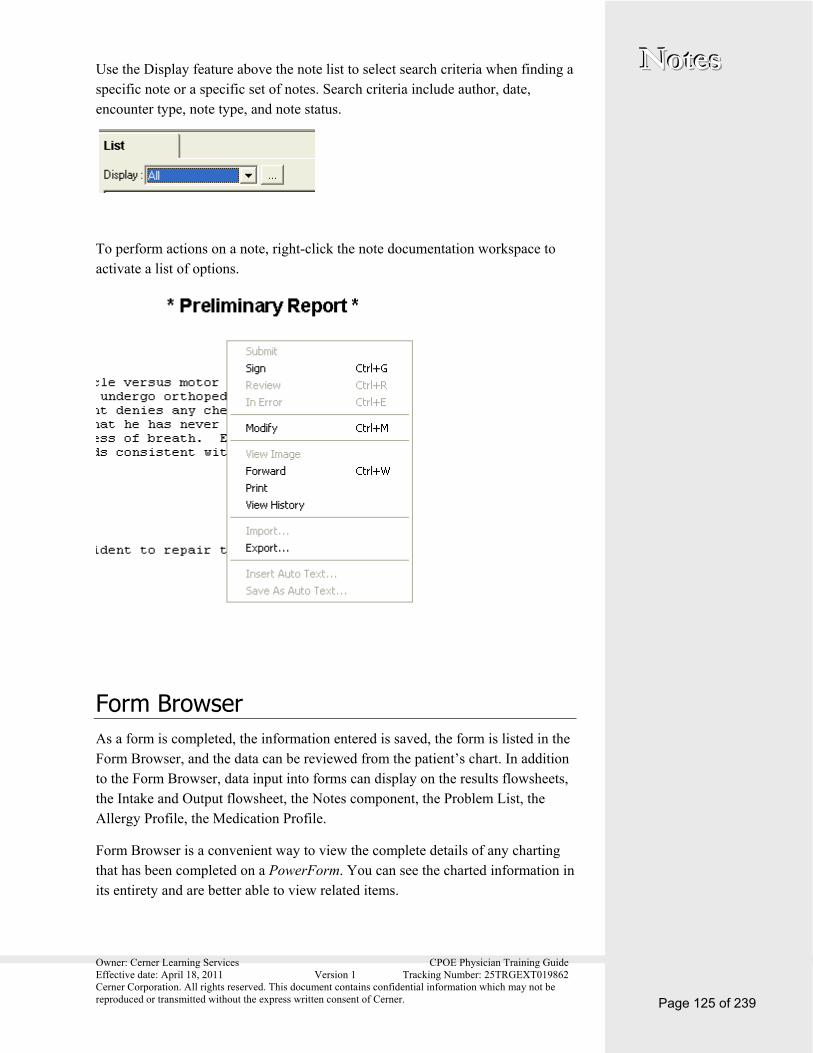
To perform actions on a note, right-click the note documentation workspace to activate a list of options.
Form Browser As a form is completed, the information entered is saved, the form is listed in the Form Browser, and the data can be reviewed from the patient’s chart. In addition to the Form Browser, data input into forms can display on the results flowsheets, the Intake and Output flowsheet, the Notes component, the Problem List, the Allergy Profile, the Medication Profile.
Form Browser is a convenient way to view the complete details of any charting that has been completed on a PowerForm. You can see the charted information in its entirety and are better able to view related items.

Owner: Cerner Learning Services CPOE Physician Training Guide Effective date: April 18, 2011 Version 1 Tracking Number: 25TRGEXT019862 Cerner Corporation. All rights reserved. This document contains confidential information which may not be reproduced or transmitted without the express written consent of Cerner. Page 126 of 239
NNNooottteeesss The Form Browser documentation workspace organizes all the completed forms for the selected patient in tree arrangement. Open a form to view the information in the same format used to capture it.
Note: The Form Browser displays an icon to the left of each listed form. A red icon indicates the form is missing required information. A blue icon indicates all required information is complete in the form.
Note: The recommended way to view PowerForms data is to use the flowsheet. The form gives only one instance of the assessment, versus how the assessment has progressed over time.
Open a Form Complete the following steps to view patient information that has been documented using a form:
1. From the Chart Menu, click Form Browser. A list of forms completed for this patient during the specified time range displays in a tree.
2. Arrange the forms using the Sort By list to easily locate the form. You can sort by date, form, status, encounter date, or encounter form by making a selection from the Sort By drop-down box.
3. To adjust the time range of the search, right-click the blue Search Criteria bar and select the Search Criteria option.
Owner: Cerner Learning Services CPOE Physician Training Guide Effective date: April 18, 2011 Version 1 Tracking Number: 25TRGEXT019862 Cerner Corporation. All rights reserved. This document contains confidential information which may not be reproduced or transmitted without the express written consent of Cerner.
NNNooottteeesss
Page 127 of 239
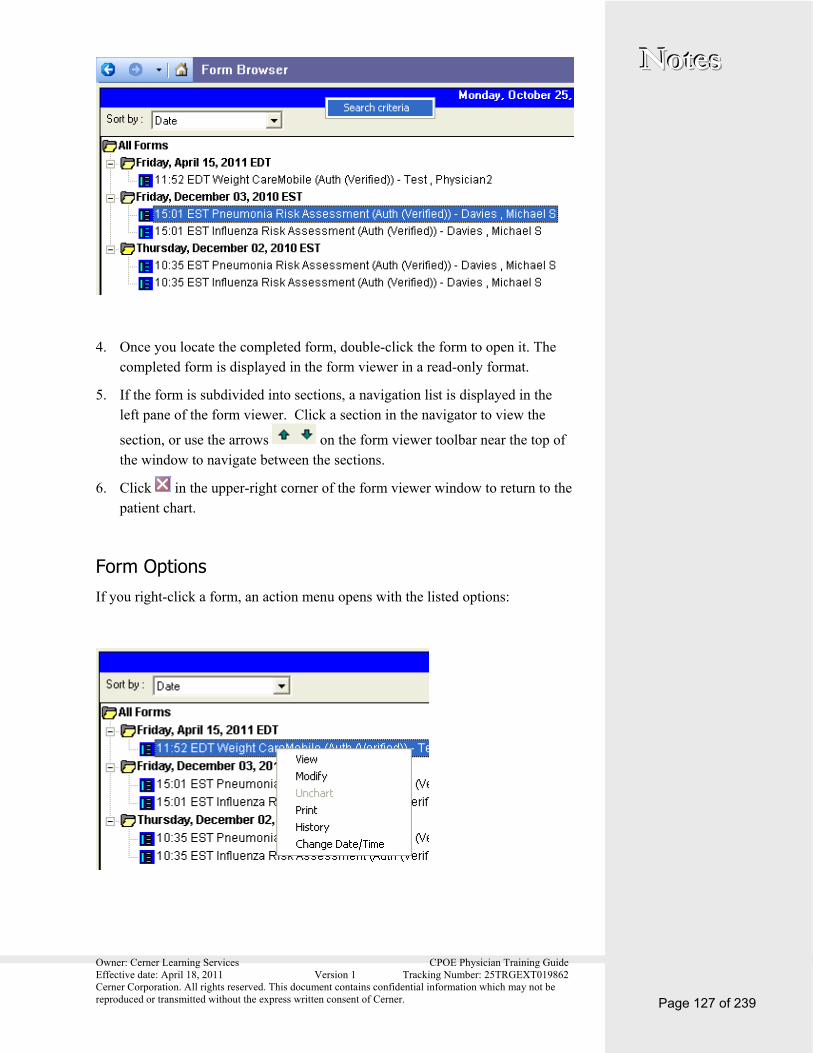
4. Once you locate the completed form, double-click the form to open it. The completed form is displayed in the form viewer in a read-only format.
5. If the form is subdivided into sections, a navigation list is displayed in the left pane of the form viewer. Click a section in the navigator to view the
section, or use the arrows on the form viewer toolbar near the top of the window to navigate between the sections.
6. Click in the upper-right corner of the form viewer window to return to the patient chart.
Form Options If you right-click a form, an action menu opens with the listed options:

Owner: Cerner Learning Services CPOE Physician Training Guide Effective date: April 18, 2011 Version 1 Tracking Number: 25TRGEXT019862 Cerner Corporation. All rights reserved. This document contains confidential information which may not be reproduced or transmitted without the express written consent of Cerner. Page 128 of 239
NNNooottteeesss Select from these options to open a dialog box enabling you to perform the selected action.
Documents The Documents section from the Menu enables providers to add a document to a patient chart by entering text freely. You categorize the note as a particular type before saving or signing the document.
The Notes section also displays notes generated through the PowerNotes section, as well as documents scanned in to PowerChart such as advanced directives.
1. From Menu, select Notes.
2. Right-click the Search Criteria Bar to adjust the time range or document count to reflect the appropriate range for document retrieval, and select Change Search Criteria.
3. If documents are found for the time range, they are listed in the navigator displayed as a tree. Double-click a folder to view its contents.
4. Double-click any sub-folders that represent the document category until you reach the documents in the folders. The individual documents are denoted by a colored icon that reflects document status.
5. The documents are color coordinated by status. If you forget what the colors represent you can right-click an empty space within the folders window to view the legend.

Owner: Cerner Learning Services CPOE Physician Training Guide Effective date: April 18, 2011 Version 1 Tracking Number: 25TRGEXT019862 Cerner Corporation. All rights reserved. This document contains confidential information which may not be reproduced or transmitted without the express written consent of Cerner.
NNNooottteeesss
Page 129 of 239
6. Double-click the document to open it.
7. To view the history of the current document in detail, point to the lower border of the document display area until the cursor becomes a pair of opposing arrows. Drag the splitter bar (lower border of the document display) upwards.

Owner: Cerner Learning Services CPOE Physician Training Guide Effective date: April 18, 2011 Version 1 Tracking Number: 25TRGEXT019862 Cerner Corporation. All rights reserved. This document contains confidential information which may not be reproduced or transmitted without the express written consent of Cerner. Page 130 of 239
NNNooottteeesss
Right-Click Options
If you right-click a note, a menu opens. Depending on the privileges assigned to your role, you might be able to perform one or more of the following actions:
Open
Open Additional Document
Print document
Forward document
Modify
Complete the following steps to modify a note:
1. From the patient chart menu ,select Note.
2. Navigate to the appropriate note, and open it.
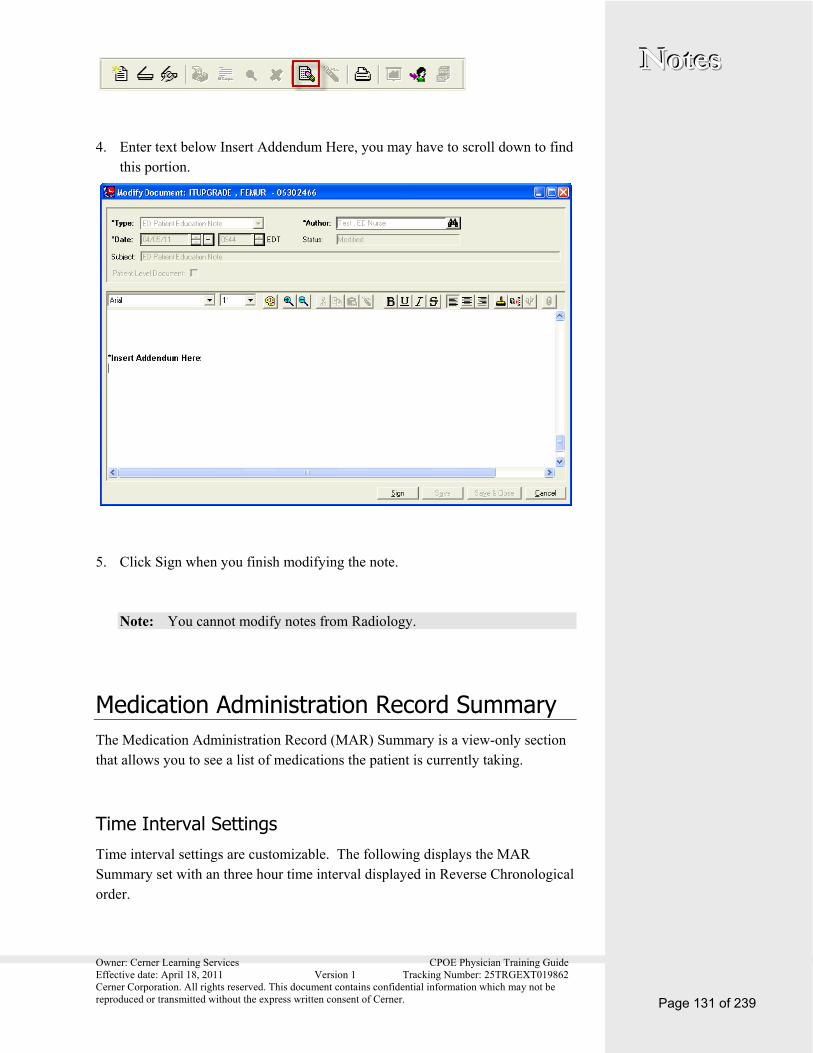
3. Click the Modify icon from the Note toolbar located below the Demographic Bar.
Owner: Cerner Learning Services CPOE Physician Training Guide Effective date: April 18, 2011 Version 1 Tracking Number: 25TRGEXT019862 Cerner Corporation. All rights reserved. This document contains confidential information which may not be reproduced or transmitted without the express written consent of Cerner.
NNNooottteeesss
Page 131 of 239
4. Enter text below Insert Addendum Here, you may have to scroll down to find this portion.
5. Click Sign when you finish modifying the note.
Note: You cannot modify notes from Radiology.
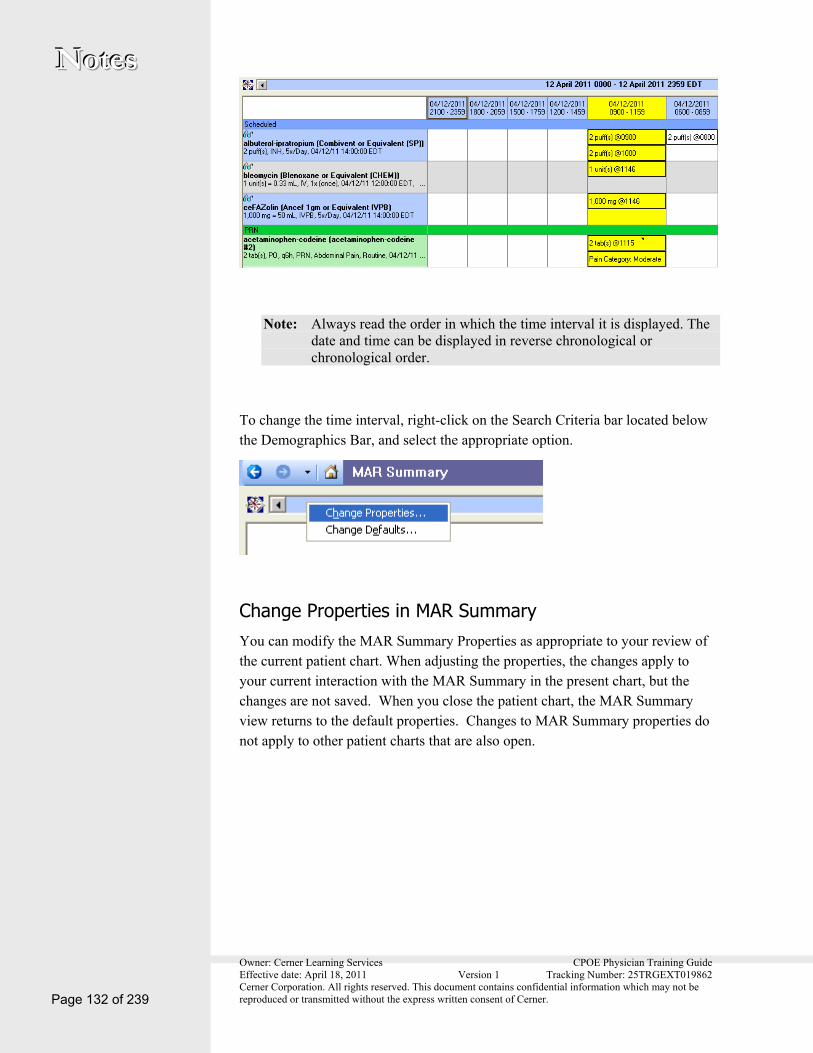
Medication Administration Record Summary The Medication Administration Record (MAR) Summary is a view-only section that allows you to see a list of medications the patient is currently taking.
Time Interval Settings Time interval settings are customizable. The following displays the MAR Summary set with an three hour time interval displayed in Reverse Chronological order.
Owner: Cerner Learning Services CPOE Physician Training Guide Effective date: April 18, 2011 Version 1 Tracking Number: 25TRGEXT019862 Cerner Corporation. All rights reserved. This document contains confidential information which may not be reproduced or transmitted without the express written consent of Cerner. Page 132 of 239
NNNooottteeesss
Note: Always read the order in which the time interval it is displayed. The date and time can be displayed in reverse chronological or chronological order.
To change the time interval, right-click on the Search Criteria bar located below the Demographics Bar, and select the appropriate option.
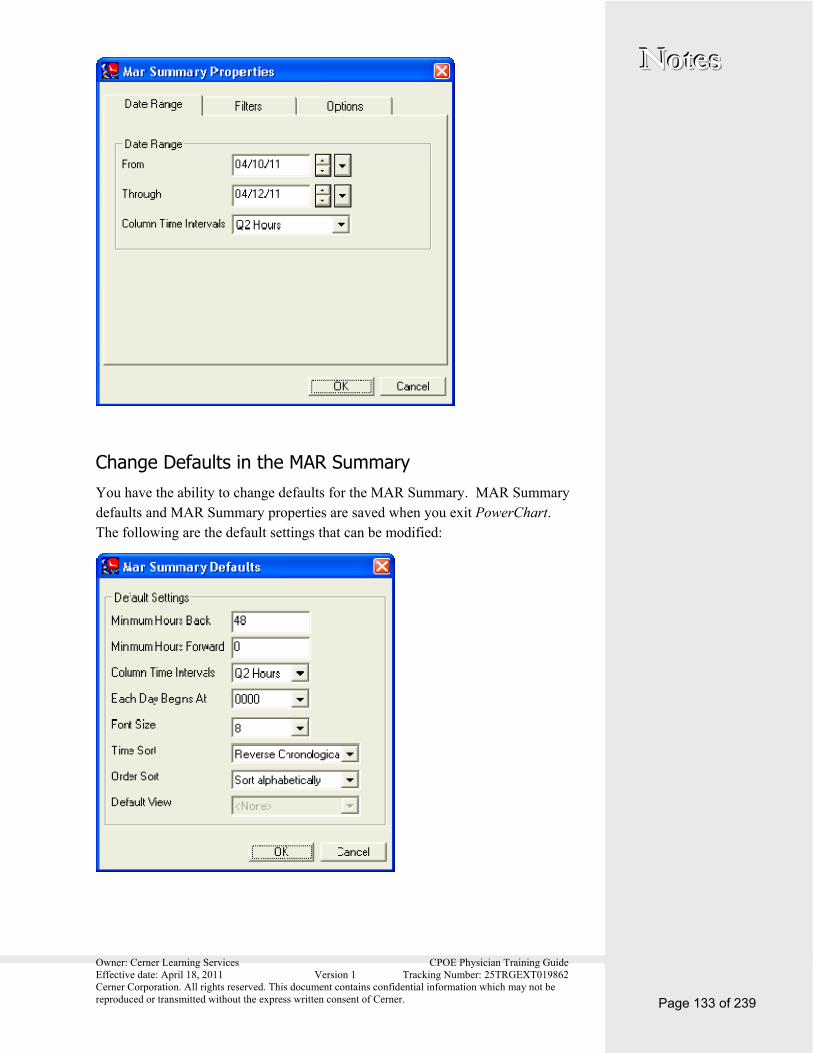
Change Properties in MAR Summary You can modify the MAR Summary Properties as appropriate to your review of the current patient chart. When adjusting the properties, the changes apply to your current interaction with the MAR Summary in the present chart, but the changes are not saved. When you close the patient chart, the MAR Summary view returns to the default properties. Changes to MAR Summary properties do not apply to other patient charts that are also open.
Owner: Cerner Learning Services CPOE Physician Training Guide Effective date: April 18, 2011 Version 1 Tracking Number: 25TRGEXT019862 Cerner Corporation. All rights reserved. This document contains confidential information which may not be reproduced or transmitted without the express written consent of Cerner.
NNNooottteeesss
Page 133 of 239
Change Defaults in the MAR Summary You have the ability to change defaults for the MAR Summary. MAR Summary defaults and MAR Summary properties are saved when you exit PowerChart. The following are the default settings that can be modified:
Owner: Cerner Learning Services CPOE Physician Training Guide Effective date: April 18, 2011 Version 1 Tracking Number: 25TRGEXT019862 Cerner Corporation. All rights reserved. This document contains confidential information which may not be reproduced or transmitted without the express written consent of Cerner. Page 134 of 239
NNNooottteeesss Note: Use caution when adjusting the MAR Time Sort defaults. If you ask another provider to look at the chart with you, the other provider may be accustomed to viewing this section according to system-default Reverse Chronological order. This can create confusion when reading the data.
Note: Remember, the MAR Summary is view-only. You do not do any documentation or charting in this section of PowerChart.
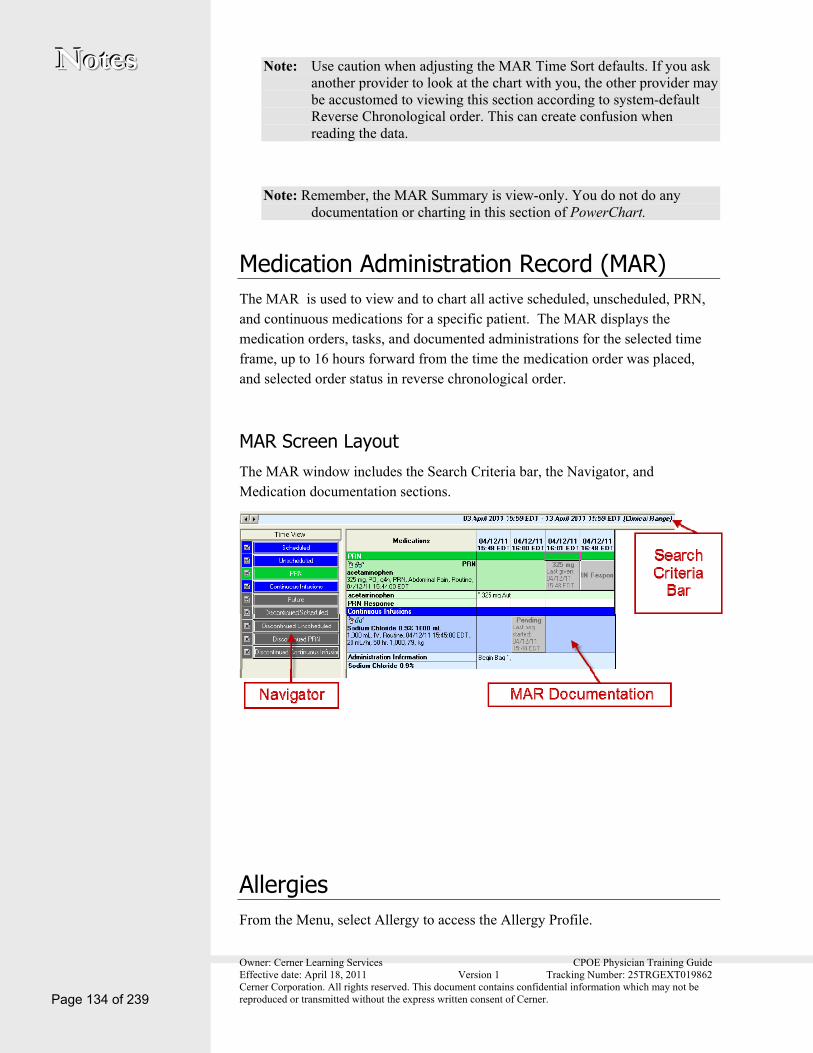
Medication Administration Record (MAR) The MAR is used to view and to chart all active scheduled, unscheduled, PRN, and continuous medications for a specific patient. The MAR displays the medication orders, tasks, and documented administrations for the selected time frame, up to 16 hours forward from the time the medication order was placed, and selected order status in reverse chronological order.
MAR Screen Layout The MAR window includes the Search Criteria bar, the Navigator, and Medication documentation sections.
Allergies From the Menu, select Allergy to access the Allergy Profile.

Owner: Cerner Learning Services CPOE Physician Training Guide Effective date: April 18, 2011 Version 1 Tracking Number: 25TRGEXT019862 Cerner Corporation. All rights reserved. This document contains confidential information which may not be reproduced or transmitted without the express written consent of Cerner.
NNNooottteeesss
Page 135 of 239
Allergy Profile Options
The choices from the display box include:
Active (default) – Includes Active and Proposed
Inactive – Includes Resolved and Canceled.
All – Includes Active, Proposed, Resolved, Canceled.
Click the column heading to sort any column.
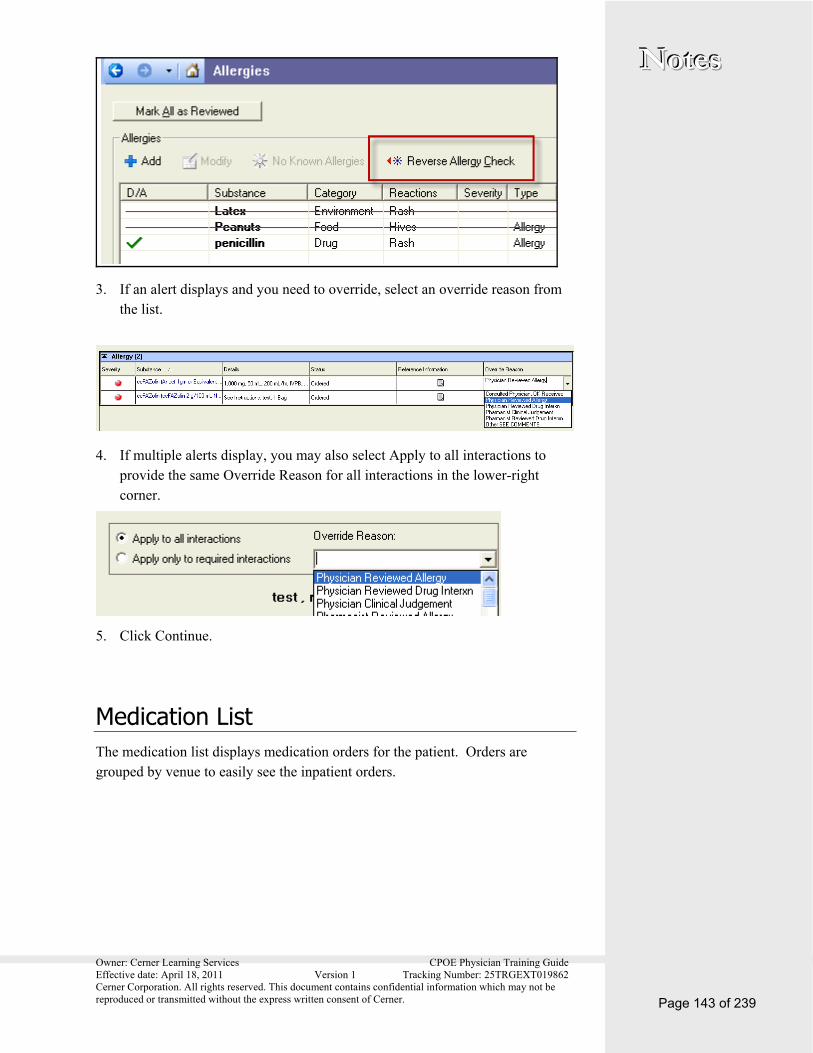
Click Reverse Allergy Check to compare the patients’ allergies with current medications. The system determines if there are any interactions.
The Mark All as Reviewed option allows you to document that you reviewed the allergies.
Adding an Allergy Complete the following steps to document an allergy:
1. From the Menu, select Allergies to open the Allergy profile.
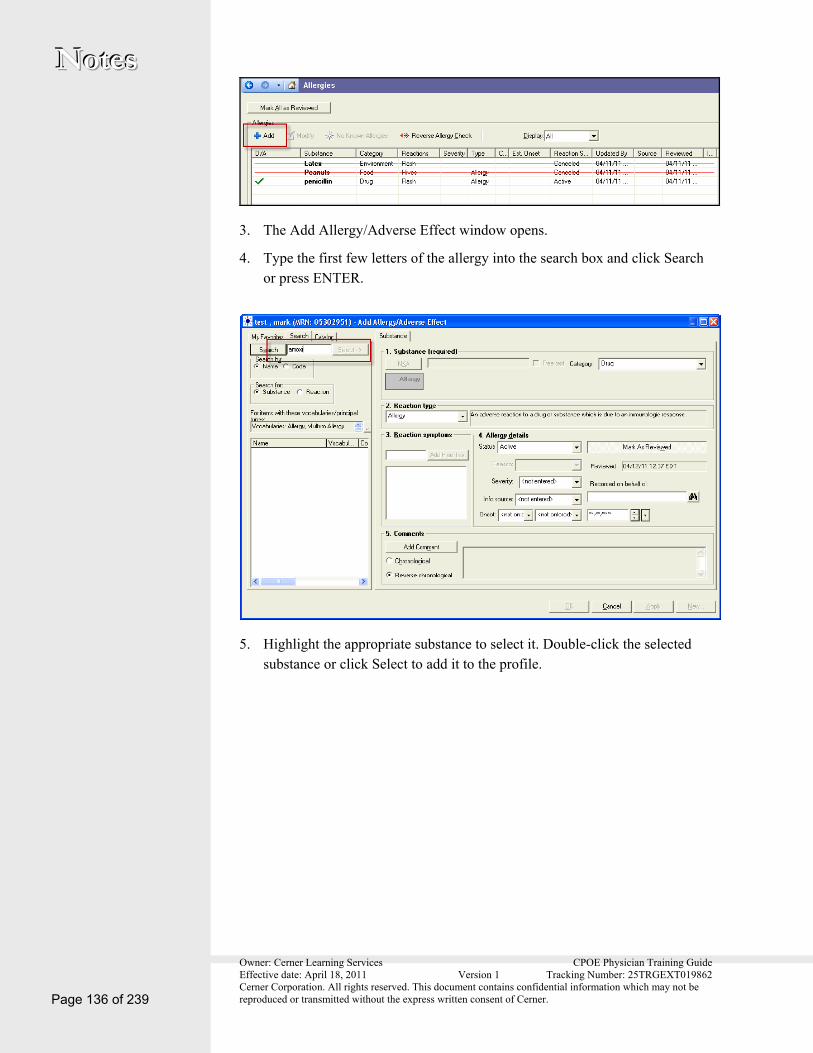
2. Click Add .
Owner: Cerner Learning Services CPOE Physician Training Guide Effective date: April 18, 2011 Version 1 Tracking Number: 25TRGEXT019862 Cerner Corporation. All rights reserved. This document contains confidential information which may not be reproduced or transmitted without the express written consent of Cerner. Page 136 of 239
NNNooottteeesss
3. The Add Allergy/Adverse Effect window opens.
4. Type the first few letters of the allergy into the search box and click Search or press ENTER.
5. Highlight the appropriate substance to select it. Double-click the selected substance or click Select to add it to the profile.

Owner: Cerner Learning Services CPOE Physician Training Guide Effective date: April 18, 2011 Version 1 Tracking Number: 25TRGEXT019862 Cerner Corporation. All rights reserved. This document contains confidential information which may not be reproduced or transmitted without the express written consent of Cerner.
NNNooottteeesss
Page 137 of 239
Note: Once a substance has been selected, the Search For box automatically changes to search for reactions.
6. Search for a Reaction Symptom using the Search For box. Confirm that the search is for Reaction, rather than Substance.

Owner: Cerner Learning Services CPOE Physician Training Guide Effective date: April 18, 2011 Version 1 Tracking Number: 25TRGEXT019862 Cerner Corporation. All rights reserved. This document contains confidential information which may not be reproduced or transmitted without the express written consent of Cerner. Page 138 of 239
NNNooottteeesss 7. Highlight the appropriate reaction to select it. Double-click the selected reactions or click Select to add it to the profile.
8. The reaction now shows within the Reaction window. Codified reactions are displayed with the key icon.
9. If known, you can answer the allergy details (such as Onset). This information is not required.
10. Click OK. The allergy displays on the patient’s Allergy Profile.
Indicating No Known Allergies (NKA) If the patient reports they have no allergies, you can add No Known Allergies to the allergy profile. This option is only available if there are no active allergies recorded on the patient. You can access this by using the right-click option.

Owner: Cerner Learning Services CPOE Physician Training Guide Effective date: April 18, 2011 Version 1 Tracking Number: 25TRGEXT019862 Cerner Corporation. All rights reserved. This document contains confidential information which may not be reproduced or transmitted without the express written consent of Cerner.
NNNooottteeesss
Page 139 of 239
1. From the Menu, select Allergies.
2. Click No Known Allergies.
3. The Add Allergy/Adverse Effect window opens.
4. No Known Allergies, or NKA, automatically populates in the box to the right.
5. Click OK.
Cancel an Allergy 1. From the Menu, select Allergies.
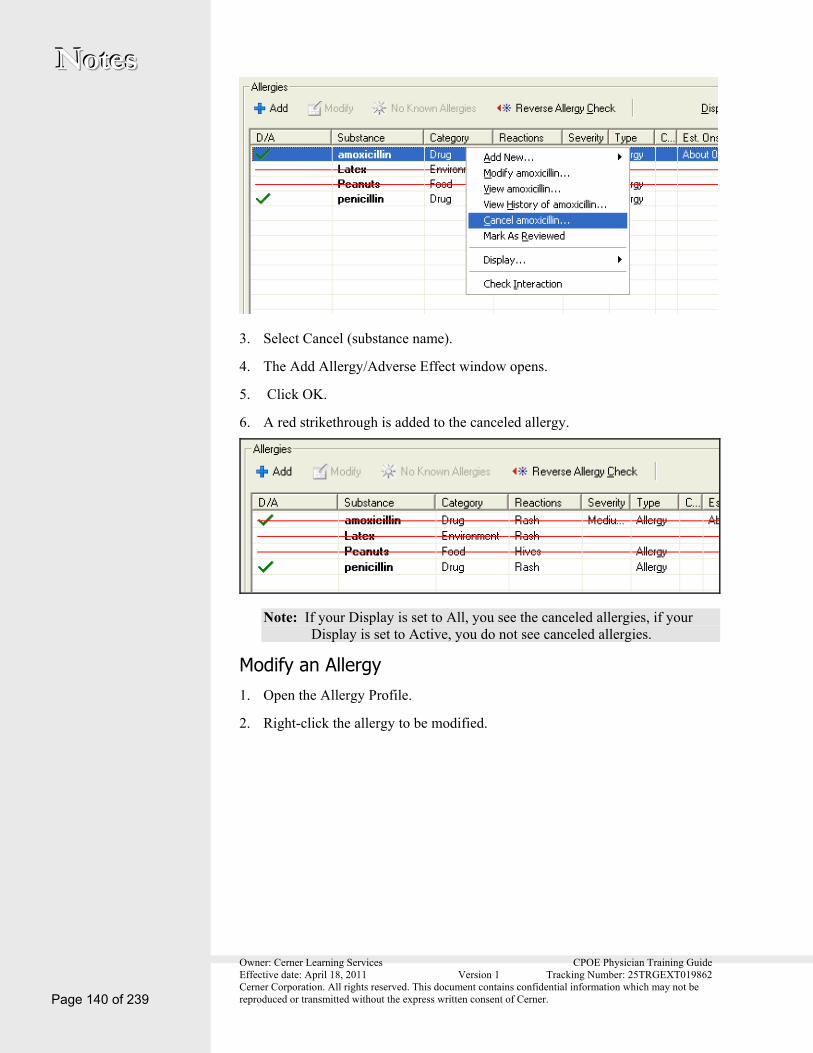
2. Right-click the allergy to be canceled.
Owner: Cerner Learning Services CPOE Physician Training Guide Effective date: April 18, 2011 Version 1 Tracking Number: 25TRGEXT019862 Cerner Corporation. All rights reserved. This document contains confidential information which may not be reproduced or transmitted without the express written consent of Cerner. Page 140 of 239
NNNooottteeesss
3. Select Cancel (substance name).
4. The Add Allergy/Adverse Effect window opens.
5. Click OK.
6. A red strikethrough is added to the canceled allergy.
Note: If your Display is set to All, you see the canceled allergies, if your Display is set to Active, you do not see canceled allergies.
Modify an Allergy 1. Open the Allergy Profile.
2. Right-click the allergy to be modified.
Owner: Cerner Learning Services CPOE Physician Training Guide Effective date: April 18, 2011 Version 1 Tracking Number: 25TRGEXT019862 Cerner Corporation. All rights reserved. This document contains confidential information which may not be reproduced or transmitted without the express written consent of Cerner.
NNNooottteeesss
Page 141 of 239
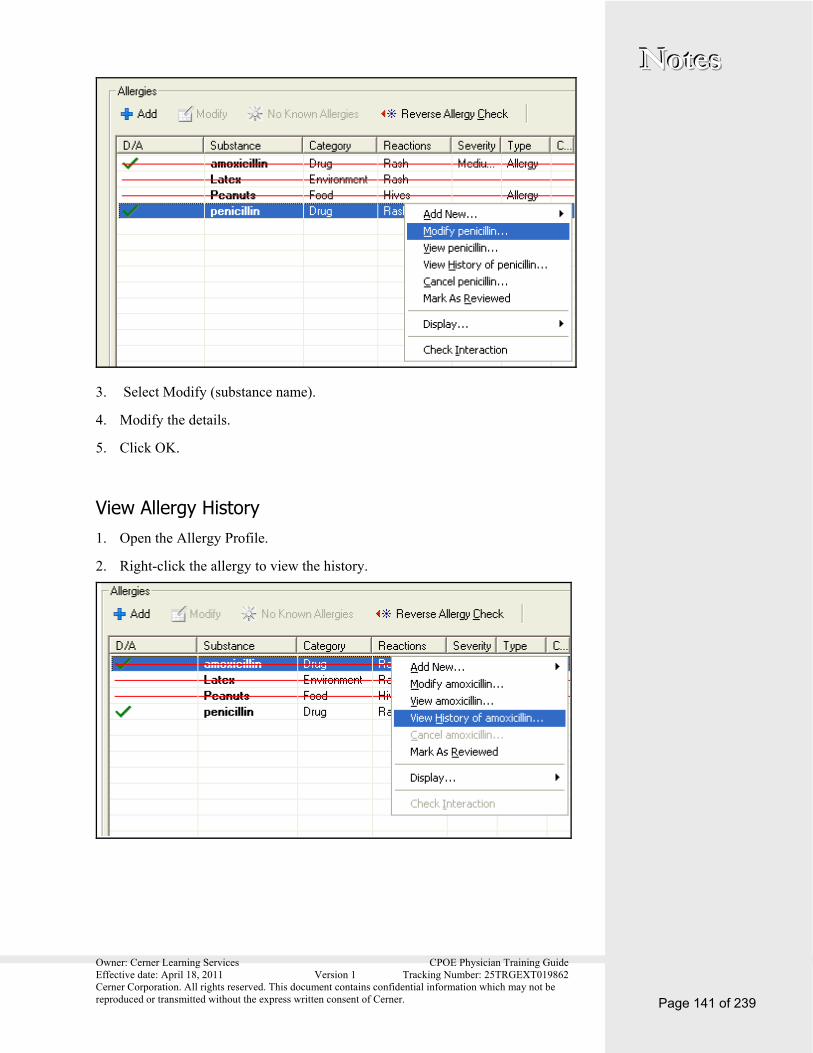
3. Select Modify (substance name).
4. Modify the details.
5. Click OK.
View Allergy History 1. Open the Allergy Profile.
2. Right-click the allergy to view the history.
Owner: Cerner Learning Services CPOE Physician Training Guide Effective date: April 18, 2011 Version 1 Tracking Number: 25TRGEXT019862 Cerner Corporation. All rights reserved. This document contains confidential information which may not be reproduced or transmitted without the express written consent of Cerner. Page 142 of 239
NNNooottteeesss
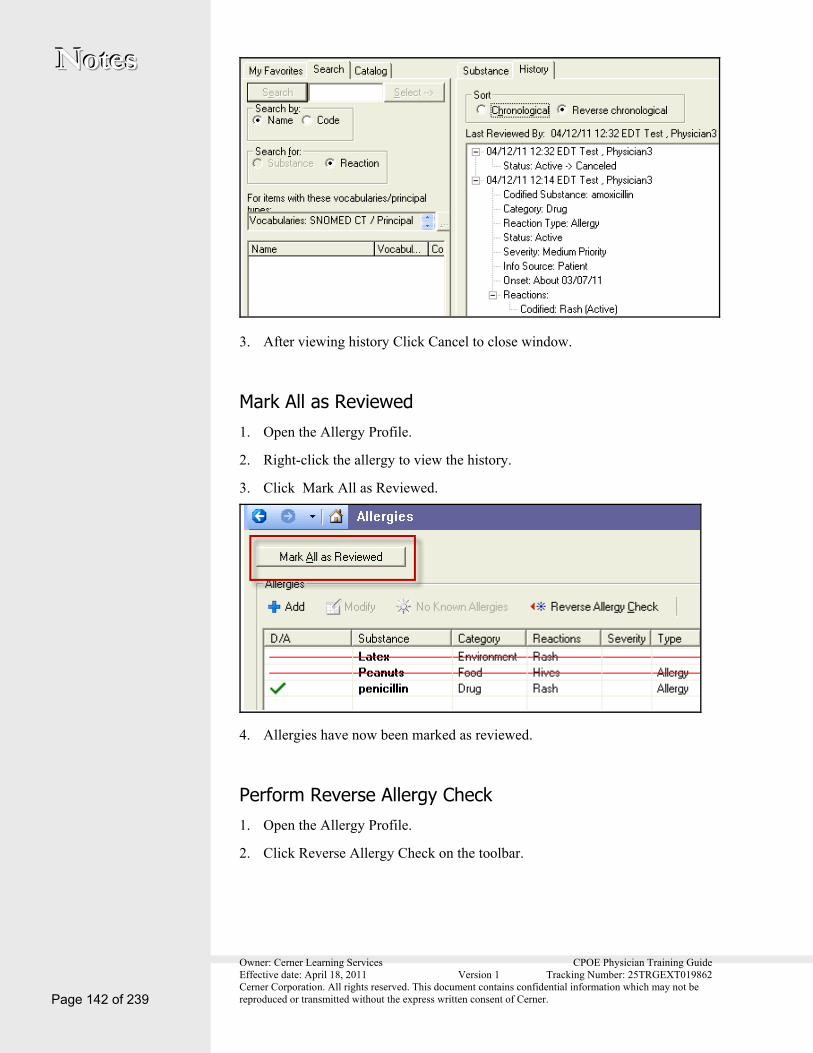
3. After viewing history Click Cancel to close window.
Mark All as Reviewed 1. Open the Allergy Profile.
2. Right-click the allergy to view the history.
3. Click Mark All as Reviewed.
4. Allergies have now been marked as reviewed.
Perform Reverse Allergy Check 1. Open the Allergy Profile.
2. Click Reverse Allergy Check on the toolbar.
Owner: Cerner Learning Services CPOE Physician Training Guide Effective date: April 18, 2011 Version 1 Tracking Number: 25TRGEXT019862 Cerner Corporation. All rights reserved. This document contains confidential information which may not be reproduced or transmitted without the express written consent of Cerner.
NNNooottteeesss
Page 143 of 239
3. If an alert displays and you need to override, select an override reason from the list.
4. If multiple alerts display, you may also select Apply to all interactions to provide the same Override Reason for all interactions in the lower-right corner.
5. Click Continue.
Medication List The medication list displays medication orders for the patient. Orders are grouped by venue to easily see the inpatient orders.

Owner: Cerner Learning Services CPOE Physician Training Guide Effective date: April 18, 2011 Version 1 Tracking Number: 25TRGEXT019862 Cerner Corporation. All rights reserved. This document contains confidential information which may not be reproduced or transmitted without the express written consent of Cerner. Page 144 of 239
NNNooottteeesss
Immunization Schedule Use the Immunization Schedule to display all recorded immunizations for a patient. If your immunization is not listed on the MAR to document administration, you can add an immunization record to the list, view the details of an immunization record, and modify the record.
Chart Historical Immunizations 1. From the Menu, click Immunization Schedule.
2. Click History.

Owner: Cerner Learning Services CPOE Physician Training Guide Effective date: April 18, 2011 Version 1 Tracking Number: 25TRGEXT019862 Cerner Corporation. All rights reserved. This document contains confidential information which may not be reproduced or transmitted without the express written consent of Cerner.
NNNooottteeesss
Page 145 of 239
3. The Add Immunization dialog box opens. Click Add to Selections.
4. The Add to List of Immunization dialog box opens. Select the correct vaccine from the list and click Add.
Note: If you have saved favorite vaccines, select My Favorites to view your favorite immunizations list.
Owner: Cerner Learning Services CPOE Physician Training Guide Effective date: April 18, 2011 Version 1 Tracking Number: 25TRGEXT019862 Cerner Corporation. All rights reserved. This document contains confidential information which may not be reproduced or transmitted without the express written consent of Cerner. Page 146 of 239
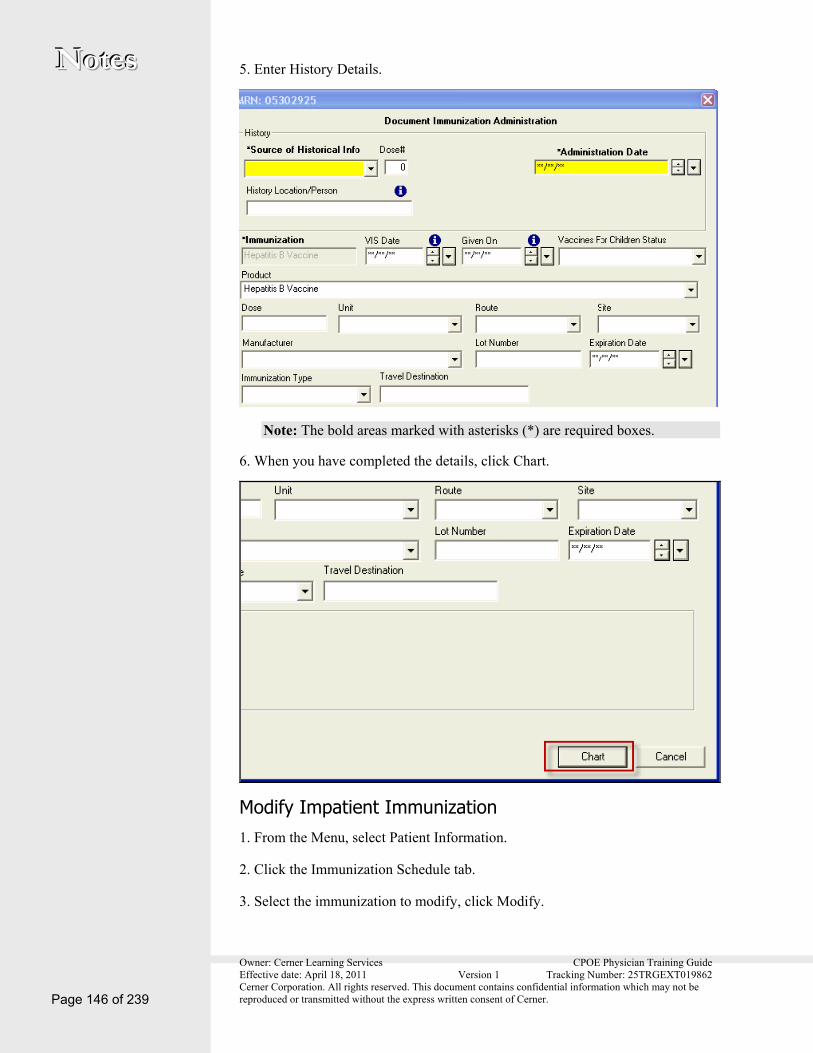
NNNooottteeesss 5. Enter History Details.
Note: The bold areas marked with asterisks (*) are required boxes.
6. When you have completed the details, click Chart.
Modify Impatient Immunization 1. From the Menu, select Patient Information.
2. Click the Immunization Schedule tab.
3. Select the immunization to modify, click Modify.

Owner: Cerner Learning Services CPOE Physician Training Guide Effective date: April 18, 2011 Version 1 Tracking Number: 25TRGEXT019862 Cerner Corporation. All rights reserved. This document contains confidential information which may not be reproduced or transmitted without the express written consent of Cerner.
NNNooottteeesss
Page 147 of 239
4. Make any necessary changes.
5. Click OK to finish modifications.
Note: If the immunization was documented on the MAR, modify the immunization from the MAR.
Unchart an Immunization 1. From the Menu, select Patient Information.
2. Click the Immunization tab.
3. Right-click the immunization, select Unchart from the menu.
4. At the Results Uncharting window, enter a reason for uncharting in the Comments box.
5. Click OK.
6. The immunization you uncharted now has a strikethrough to indicate it was entered in error.
Note: Immunizations and MAR are integrated.

Owner: Cerner Learning Services CPOE Physician Training Guide Effective date: April 18, 2011 Version 1 Tracking Number: 25TRGEXT019862 Cerner Corporation. All rights reserved. This document contains confidential information which may not be reproduced or transmitted without the express written consent of Cerner. Page 148 of 239
NNNooottteeesss History The Histories component allows you to view medical history for a patient. This includes the patient’s family history, procedure history, and past medical history. The patient’s past medical and current problems can be found on the Problems and Diagnosis area and is maintained by the physician and other qualified providers.
Family The Family Member View displays a list of family members and their conditions. Family members are listed in this order: Mother, Father, Siblings, and Grandparents. Beneath each family member, the system lists those conditions for which they are documented as positive (to view all conditions, select Family Member View (All)).
The Family Member View only displays family conditions marked with positive responses in an Add action. Conditions marked negative are hidden unless the entire family history is marked as Negative. In this case, the condition is marked Family History Negative in both the Condition View and the Family History View. To view more information on a particular condition, click the Detail icon.
Marking Negative or Unknown for all Conditions If the patients’ biological family history is negative, unknown, unable to obtain for all conditions, or the patient is adopted you can mark the entire family history.
Complete the following steps to select the entire family history for a patient,:
1. From the Menu, select Histories.

Owner: Cerner Learning Services CPOE Physician Training Guide Effective date: April 18, 2011 Version 1 Tracking Number: 25TRGEXT019862 Cerner Corporation. All rights reserved. This document contains confidential information which may not be reproduced or transmitted without the express written consent of Cerner.
NNNooottteeesss
Page 149 of 239
2. Click the Family tab.
3. Select Negative, Unknown, Unable to Obtain, or Patient Adopted.
Documenting a Negative Condition You can select a family-member’s history as Negative for all conditions, and the system applies this value to that family member, for all conditions.
Complete the following steps to select a family member history as Negative or Unknown:
1. From the Family tab, click Add . The Add Family History pane opens and displays a list of family members in the following sequence: Mother, Father, Siblings, and Grandparents.
2. Select the relationship whose history you want to mark as Negative or Unknown (such as Mother or Sibling).
3. From the menu beneath the column heading (Mother or Sibling), select the left white box to mark as negative. A minus sign displays (-) in the box.
4. Click OK. The system applies that value to the entire record for that family member, until you change it.
Owner: Cerner Learning Services CPOE Physician Training Guide Effective date: April 18, 2011 Version 1 Tracking Number: 25TRGEXT019862 Cerner Corporation. All rights reserved. This document contains confidential information which may not be reproduced or transmitted without the express written consent of Cerner. Page 150 of 239
NNNooottteeesss Documenting a Positive Condition Complete the following steps to add positive conditions to Family History:
1. From the Family Member tab, click Add. The Add Family History pane opens. Displayed are condition categories with associated parent conditions beneath them.
2. Locate the condition category, such as Cardiology, that you want to add a condition to. Click in the blue box to mark as positive.
3. Double-click the plus sign to add details to the condition. Such as, comments, severity, condition status, condition details.
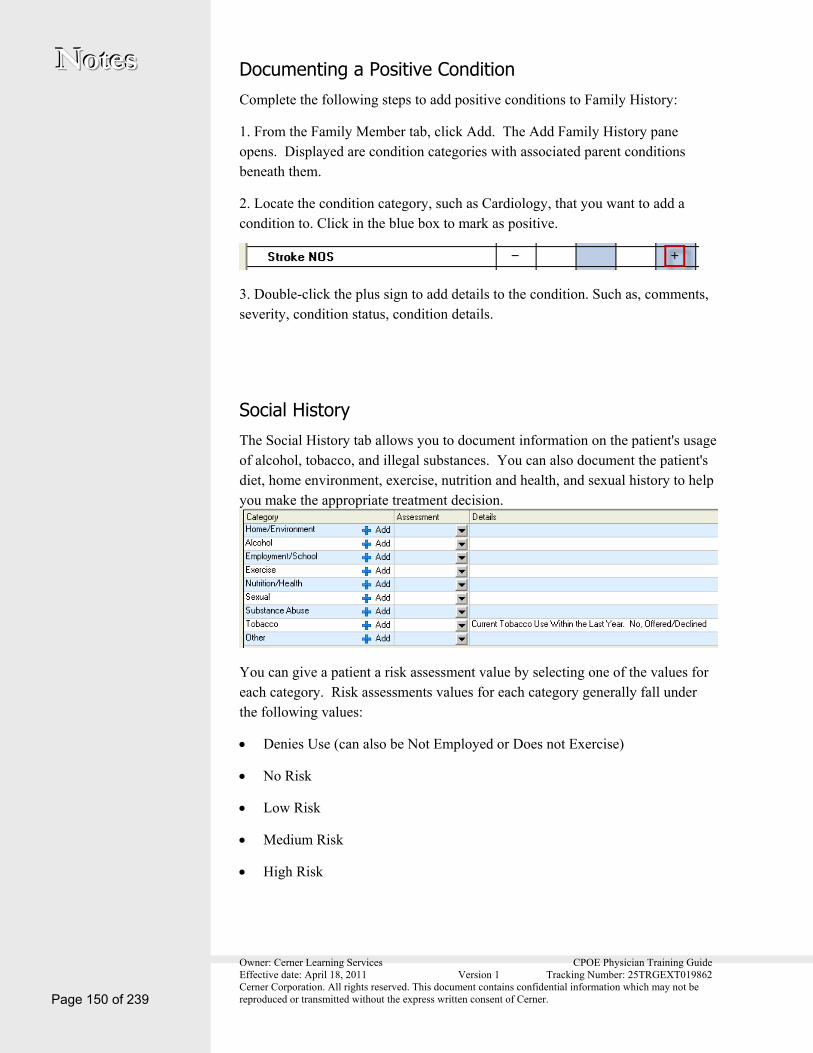
Social History The Social History tab allows you to document information on the patient's usage of alcohol, tobacco, and illegal substances. You can also document the patient's diet, home environment, exercise, nutrition and health, and sexual history to help you make the appropriate treatment decision.
You can give a patient a risk assessment value by selecting one of the values for each category. Risk assessments values for each category generally fall under the following values:
Denies Use (can also be Not Employed or Does not Exercise)
No Risk
Low Risk
Medium Risk
High Risk
Owner: Cerner Learning Services CPOE Physician Training Guide Effective date: April 18, 2011 Version 1 Tracking Number: 25TRGEXT019862 Cerner Corporation. All rights reserved. This document contains confidential information which may not be reproduced or transmitted without the express written consent of Cerner.
NNNooottteeesss
Page 151 of 239
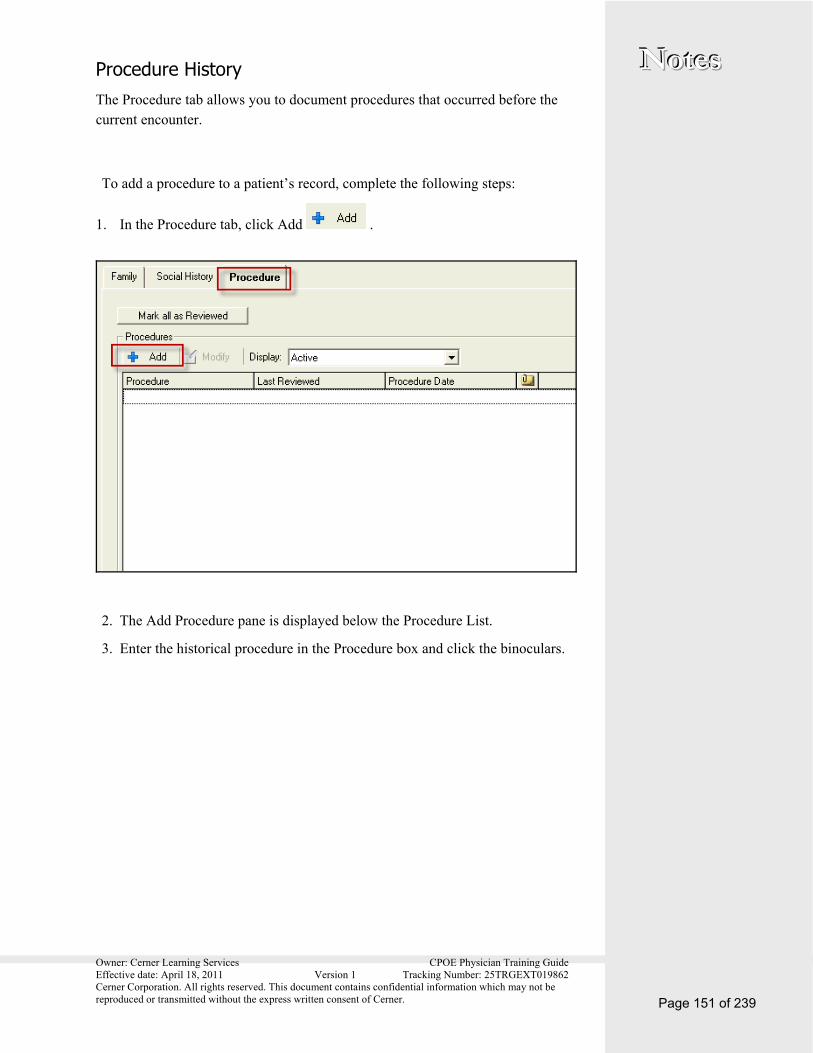
Procedure History The Procedure tab allows you to document procedures that occurred before the current encounter.
To add a procedure to a patient’s record, complete the following steps:
1. In the Procedure tab, click Add .
2. The Add Procedure pane is displayed below the Procedure List.
3. Enter the historical procedure in the Procedure box and click the binoculars.
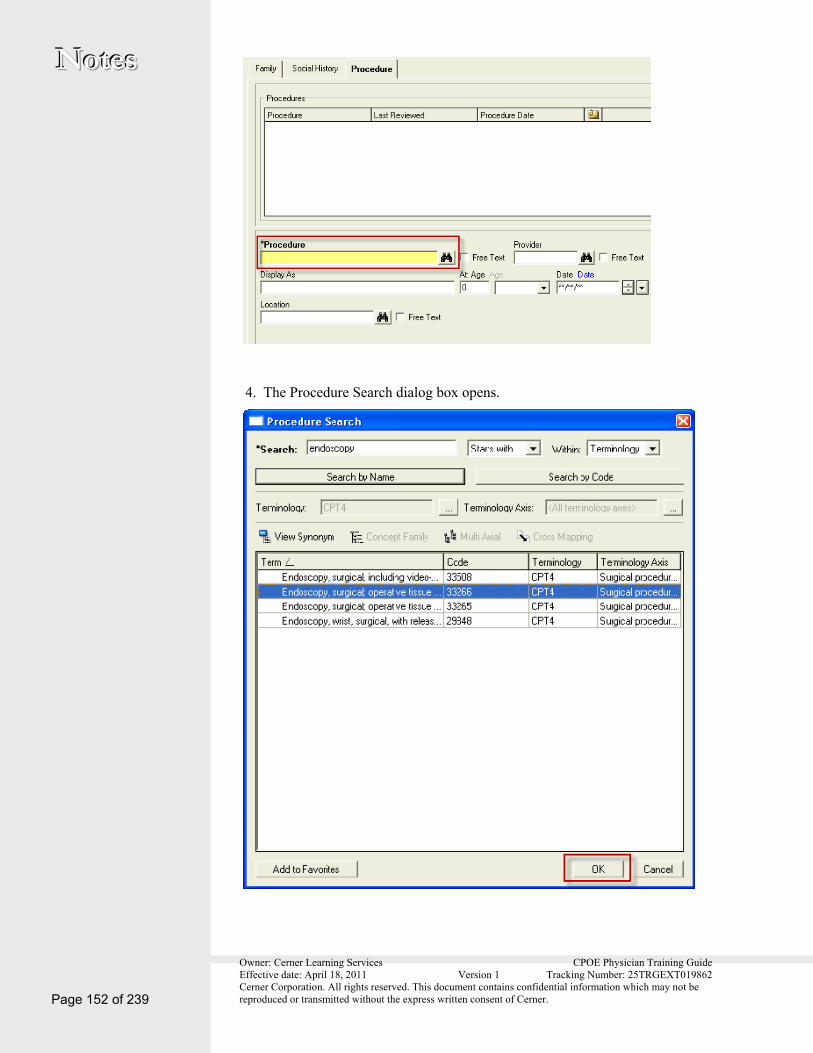
Owner: Cerner Learning Services CPOE Physician Training Guide Effective date: April 18, 2011 Version 1 Tracking Number: 25TRGEXT019862 Cerner Corporation. All rights reserved. This document contains confidential information which may not be reproduced or transmitted without the express written consent of Cerner. Page 152 of 239
NNNooottteeesss
4. The Procedure Search dialog box opens.
Owner: Cerner Learning Services CPOE Physician Training Guide Effective date: April 18, 2011 Version 1 Tracking Number: 25TRGEXT019862 Cerner Corporation. All rights reserved. This document contains confidential information which may not be reproduced or transmitted without the express written consent of Cerner.
NNNooottteeesss
Page 153 of 239
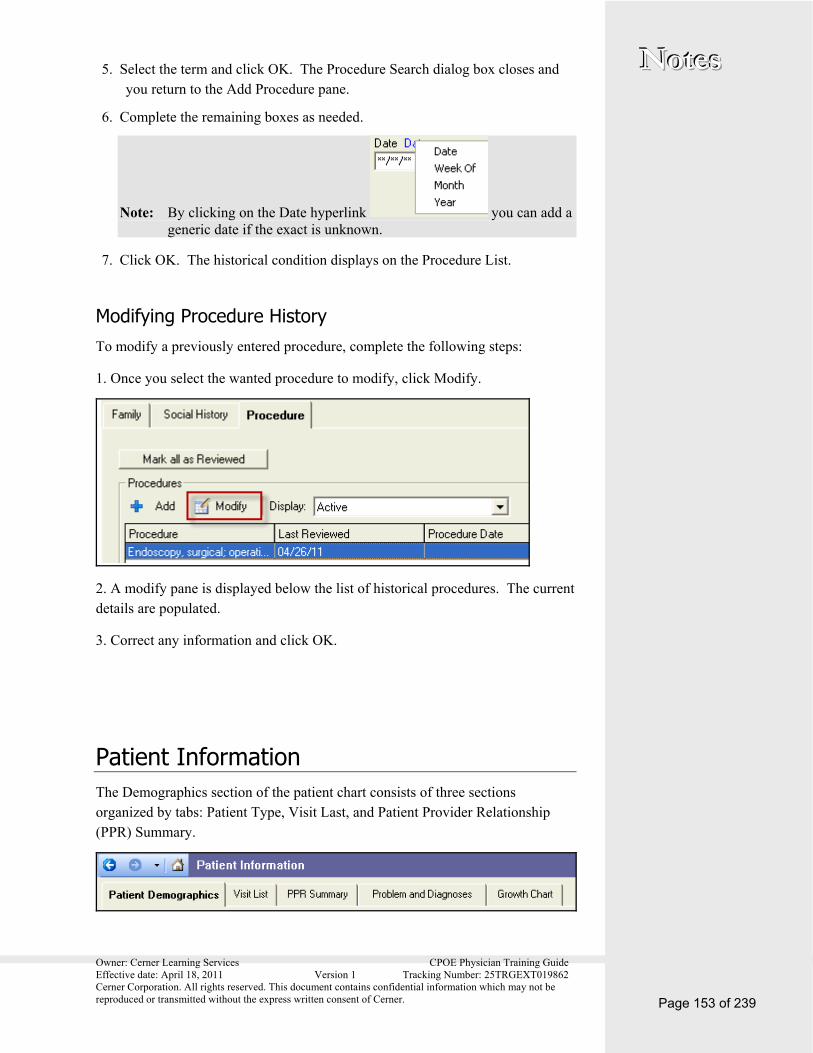
5. Select the term and click OK. The Procedure Search dialog box closes and you return to the Add Procedure pane.
6. Complete the remaining boxes as needed.
Note: By clicking on the Date hyperlink you can add a generic date if the exact is unknown.
7. Click OK. The historical condition displays on the Procedure List.
Modifying Procedure History To modify a previously entered procedure, complete the following steps:
1. Once you select the wanted procedure to modify, click Modify.
2. A modify pane is displayed below the list of historical procedures. The current details are populated.
3. Correct any information and click OK.
Patient Information The Demographics section of the patient chart consists of three sections organized by tabs: Patient Type, Visit Last, and Patient Provider Relationship (PPR) Summary.

Owner: Cerner Learning Services CPOE Physician Training Guide Effective date: April 18, 2011 Version 1 Tracking Number: 25TRGEXT019862 Cerner Corporation. All rights reserved. This document contains confidential information which may not be reproduced or transmitted without the express written consent of Cerner. Page 154 of 239
NNNooottteeesss Patient Demographics Use the Patient Demographics tab in the Patient Information view the same way that you would a paper chart’s face sheet. It displays general information regarding the selected patient. This is a read-only screen.
Visit List The Visit List tab displays a patient visit summary to help you outline past admissions. The top section of this tab displays a list of the patient’s visits including the admission and discharge date, facility, location, medical service, and visit type and reason. The highlighted visit corresponds to the visit details listed in the lower section of this tab.

Owner: Cerner Learning Services CPOE Physician Training Guide Effective date: April 18, 2011 Version 1 Tracking Number: 25TRGEXT019862 Cerner Corporation. All rights reserved. This document contains confidential information which may not be reproduced or transmitted without the express written consent of Cerner.
NNNooottteeesss
Page 155 of 239
Patient Provider Relationship Summary Use Patient Provider Relationship (PPR) Summary tab in the Patient Information view to display a patient’s relationships with healthcare providers known to the system.
Separate lists are provided for lifetime and visit-specific relationships. You can filter the lists to display only your relationships or current active relationships. The default view displays all relationships.
Growth Chart The Growth Chart component gives you the ability to easily monitor height, weight, and head circumference for your patient over time. Growth charts for females display in red, while growth charts for males display in blue. You can change the chart type or input data by right-clicking on the chart.

Owner: Cerner Learning Services CPOE Physician Training Guide Effective date: April 18, 2011 Version 1 Tracking Number: 25TRGEXT019862 Cerner Corporation. All rights reserved. This document contains confidential information which may not be reproduced or transmitted without the express written consent of Cerner. Page 156 of 239
NNNooottteeesss Patient Care Summary The Patient Care Summary component pulls information entered or viewed in different areas of the chart into a single convenient view.
The primary purpose of this summary is to present pertinent, clinically relevant information to you to facilitate your workflow.
Problems and Diagnoses In the Problem and Diagnosis tab, you can view problems and diagnoses together on the same window. You can add and update problems or diagnoses, create advanced filters to display problems, and convert problems to diagnoses.
The Diagnosis window allows clinicians to document clinical diagnoses at natural points of care within the clinical workflow. The diagnoses are viewable and accessible from windows within relevant applications that require such information to support the care process and clinical workflow. In addition, Clinical Diagnosis can be used to complement the Problem List component to provide a thorough profile of the diagnostic state of the patient.
Note: Only providers can add a diagnosis whereas other clinicians can add to the Problem List.

Owner: Cerner Learning Services CPOE Physician Training Guide Effective date: April 18, 2011 Version 1 Tracking Number: 25TRGEXT019862 Cerner Corporation. All rights reserved. This document contains confidential information which may not be reproduced or transmitted without the express written consent of Cerner.
NNNooottteeesss
Page 157 of 239
The Problem List provides a way to sort and track patient problems across encounters. Use the Problem List to view, add to, or update a list of known health problems associated with a person. Anything that presents a problem to the patient's overall health can be listed in the Problem List. The Problem List uses duplicate checking to help prevent duplicated problems.
Problems and diagnoses are selected using nomenclature items from one or multiple vocabularies. Some examples of possible problems are listed below.
Anemia
Decreased vision
Renal failure syndrome
Mycardial infarction
Alcohol abuse
Add a Problem The system allows you to record all pertinent information about a patient’s problem. Below is a listing of steps to create a new problem.
1. To add a new problem, click Add .The Problem Search dialog box opens.
2. In the Search box, search for a problem by typing a few letters of the
problem and then selecting Search .
3. Once a problem is selected, complete the required fields. Select from the list in each box.
4. If a problem has a classification of Medical, you have the option to select File to Past Medical History at which point the problem is available on the Past Medical History profile.
Note: If a problem has a classification of Medical and is moved to a status of Resolved, a File to Past Medical History option is automatically selected. The resolved problem is available for display in the Past Medical History.

Owner: Cerner Learning Services CPOE Physician Training Guide Effective date: April 18, 2011 Version 1 Tracking Number: 25TRGEXT019862 Cerner Corporation. All rights reserved. This document contains confidential information which may not be reproduced or transmitted without the express written consent of Cerner. Page 158 of 239
NNNooottteeesss
5. Once all fields are completed, click OK.
6. To add a second problem, click OK & Add New. Continue to add a second problem.
Add a Problem to Diagnosis You can change a problem to a diagnosis when needed. Complete the following steps to convert a problem to a diagnosis:
1. From the Chart Menu, navigate to Diagnosis & Problems.
2. In the Problems section, right-click the wanted problem.
3. Select Add to Diagnosis from the list. The problem is then converted to a diagnosis and displayed in the Diagnosis section as well as in the Problems section.
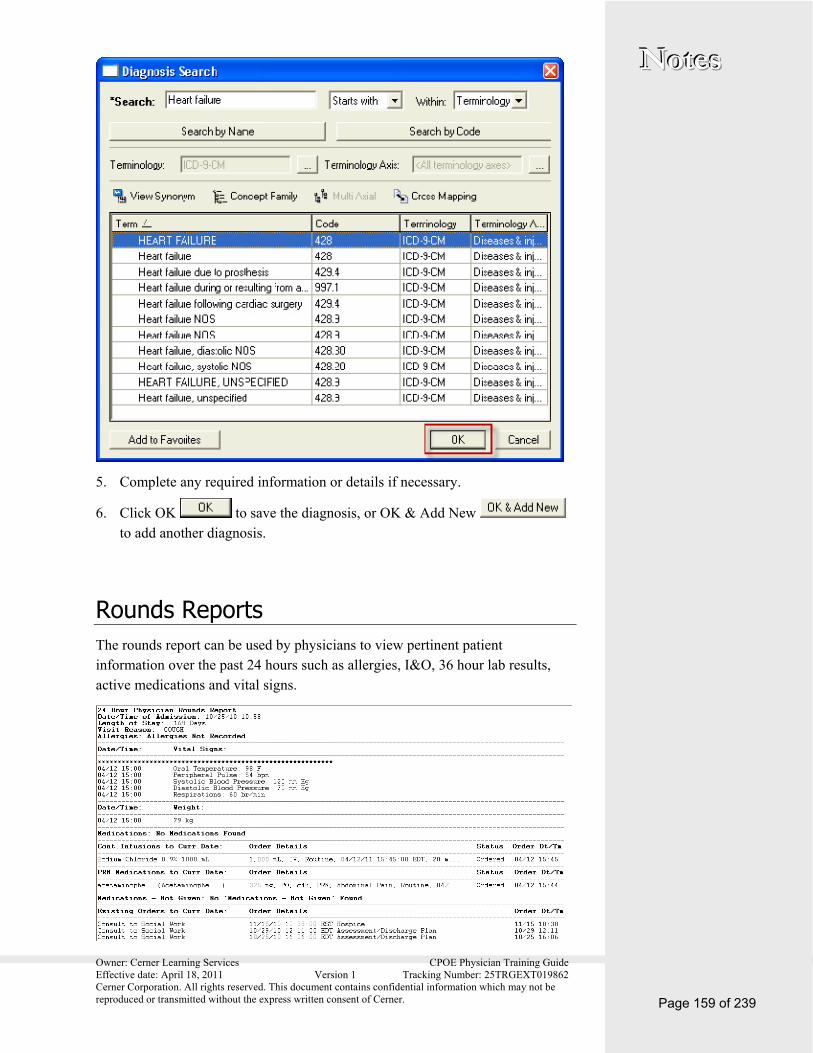
Add a Diagnosis When you add a new diagnosis, there are many ways to enter the details of the diagnosis, allowing you to record all pertinent information about a person’s diagnosis. Some steps are required and others are optional. Below is a listing of steps you can follow to create a new problem. Optional, additional steps are referenced at the end.
1. From the patient’s chart, click the Problems and Diagnoses tab. You are now able to view the list of diagnoses in the top section.
2. To add a new diagnosis, click Add or right-click in the white area of the diagnosis section, and select Add. The Add Diagnosis window opens.
3. In the Diagnosis box, enter the first few letters of the diagnosis in the Diagnosis box and press ENTER.
4. Select the appropriate diagnosis, and click OK .
Owner: Cerner Learning Services CPOE Physician Training Guide Effective date: April 18, 2011 Version 1 Tracking Number: 25TRGEXT019862 Cerner Corporation. All rights reserved. This document contains confidential information which may not be reproduced or transmitted without the express written consent of Cerner.
NNNooottteeesss
Page 159 of 239
5. Complete any required information or details if necessary.
6. Click OK to save the diagnosis, or OK & Add New to add another diagnosis.
Rounds Reports The rounds report can be used by physicians to view pertinent patient information over the past 24 hours such as allergies, I&O, 36 hour lab results, active medications and vital signs.

Owner: Cerner Learning Services CPOE Physician Training Guide Effective date: April 18, 2011 Version 1 Tracking Number: 25TRGEXT019862 Cerner Corporation. All rights reserved. This document contains confidential information which may not be reproduced or transmitted without the express written consent of Cerner. Page 160 of 239
NNNooottteeesss
Reference Text Browser The Reference Text browser provides a respository of information organized into three sections by tabs: Drug Reference, Education Leaflet, and Reference .
Drug Reference The Drug Reference tab contains the Multum content for medications in a format that would normally be used by providers , pharmacists, and other clinicians.
Education Leaflet 1. Click the Education Leaflet tab.
2. Type one or more letters of an education reference in the Search box and click Search.
3. Select from the list of available education leaflets.

Owner: Cerner Learning Services CPOE Physician Training Guide Effective date: April 18, 2011 Version 1 Tracking Number: 25TRGEXT019862 Cerner Corporation. All rights reserved. This document contains confidential information which may not be reproduced or transmitted without the express written consent of Cerner.
NNNooottteeesss
Page 161 of 239
4. Click Select .
5. To print, right-click anywhere in the white space and click Print.
Reference Finally, the Reference tab gives you access to reference text that has been built within the system as part of the design including nurse preparations.
To view reference text:
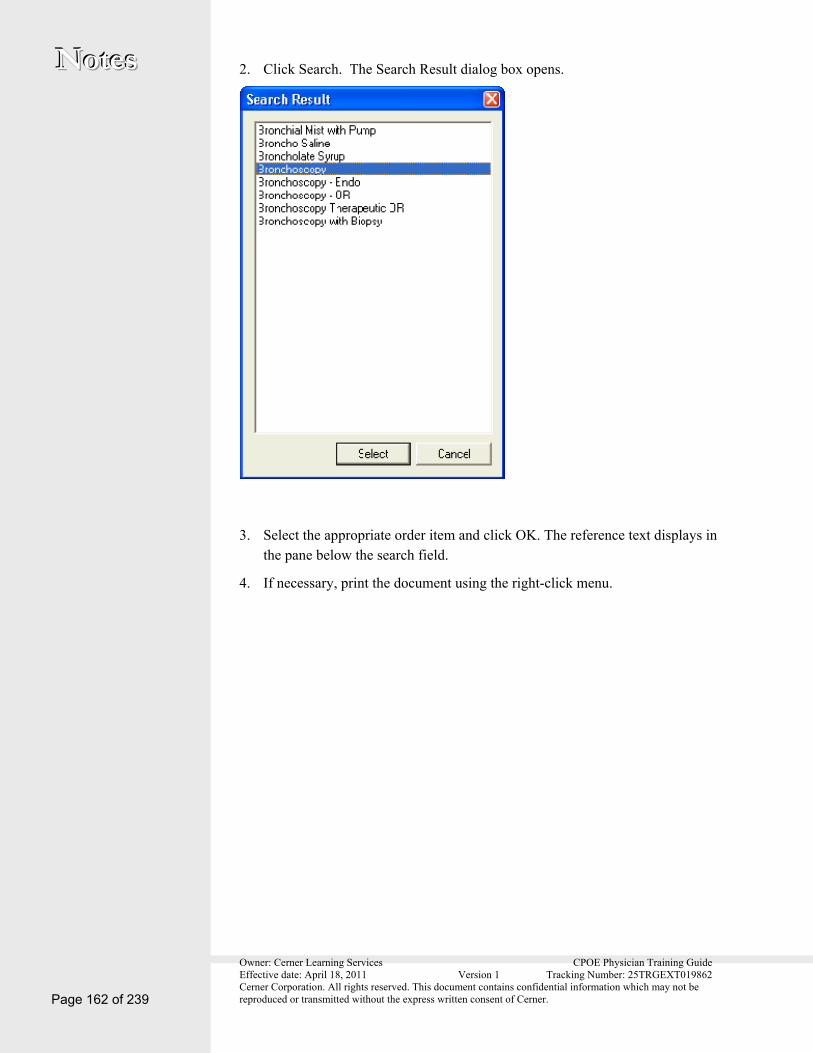
1. Type all or part of the item to be searched.
Owner: Cerner Learning Services CPOE Physician Training Guide Effective date: April 18, 2011 Version 1 Tracking Number: 25TRGEXT019862 Cerner Corporation. All rights reserved. This document contains confidential information which may not be reproduced or transmitted without the express written consent of Cerner. Page 162 of 239
NNNooottteeesss 2. Click Search. The Search Result dialog box opens.
3. Select the appropriate order item and click OK. The reference text displays in the pane below the search field.
4. If necessary, print the document using the right-click menu.