non-employee expense report user guide - cmu · the non-employee expense report form continues to...
TRANSCRIPT

Non-Employee Expense Report User Guide
12/15/17

1
Contents
Introduction: .................................................................................................................... 2
Overview of Non-Employee Expense Report Creation: .............................................. 2
Detailed Steps - Non-Employee Expense Report Creation: ........................................ 4
Non-Employee Expense Report Creation .............................................................................................................................. 4
Payee Submission ........................................................................................................................................................................... 7
Preparer Completion .................................................................................................................................................................... 9
Save & Complete Later .............................................................................................................................................................. 15
Approver Action .......................................................................................................................................................................... 16
Pending Action 7 day Reminder Emails .................................................................................................................................. 22
Viewing in Oracle ........................................................................................................................................................................ 24
Non-Employee Expense Report Checklist: ................................................................. 27

2
Introduction:
Non-employees, including visitors, recruits, independent contractors, consultants, students, courtesy
appointments, etc. who incur university related expenses for which the university has agreed to pay
are reimbursed via a Non-Employee Expense Report form. This document will review the process
and steps to complete the form that initiates the reimbursement payment.
Overview of Non-Employee Expense Report Creation:
A person who has been identified as a Preparer of expense reports for non-employees (visitors,
speakers, lecturers, students, etc.) is granted the appropriate security to access the non-employee
expense report form, which can be found through the Finance Forms website.
After clicking on the Non-Employee Expense Report, the user is presented with the Non-Employee
Expense Report form:
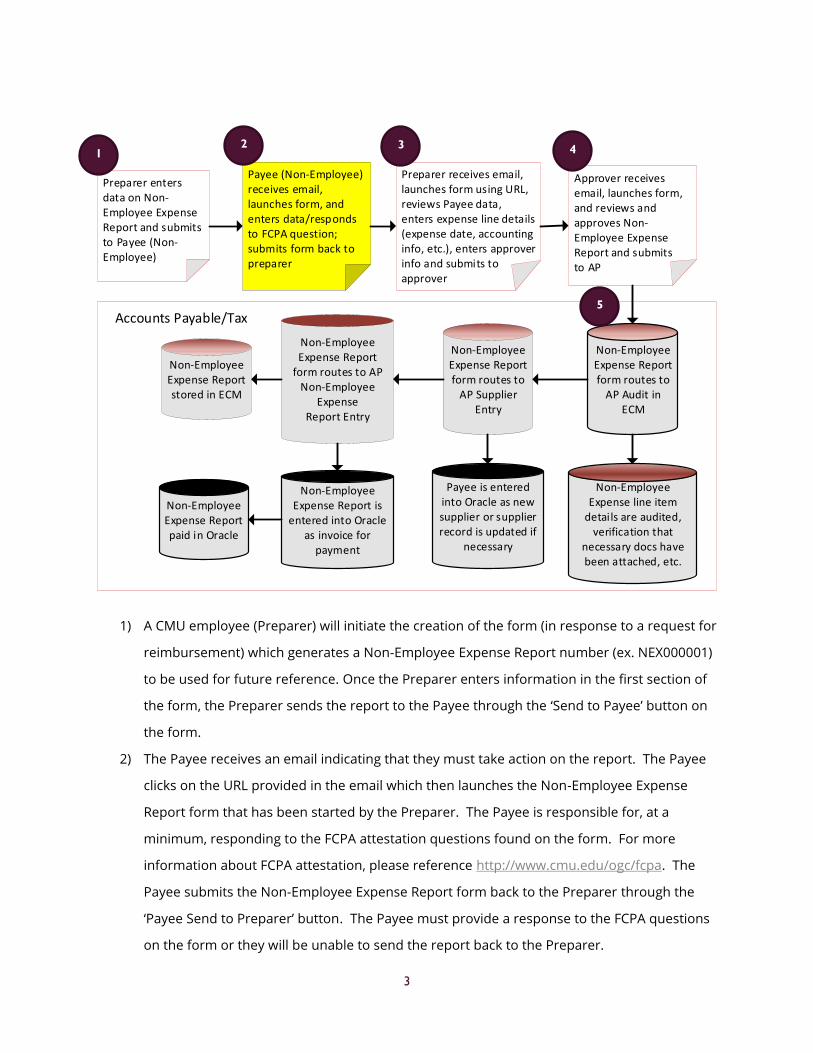
The form includes four distinct sections. The color of the shading corresponds to the role of the
person responsible for completing each section:
White = Preparer
Light Grey = Non-Employee / Payee (person being reimbursed)
Dark Grey = Approver
The following is a breakdown as to how the ECM process works:
3
Payee (Non-Employee) receives email, launches form, and enters data/responds to FCPA question; submits form back to preparer
Approver receives email, launches form, and reviews and approves Non-Employee Expense Report and submits to AP
Preparer receives email, launches form using URL, reviews Payee data, enters expense line details (expense date, accounting info, etc.), enters approver info and submits to approver
Non-Employee Expense Report form routes to
AP Supplier Entry
Non-Employee Expense Report
form routes to AP Non-Employee
Expense Report Entry
Non-Employee Expense Report stored in ECM
Preparer enters data on Non-Employee Expense Report and submits to Payee (Non-Employee)
Accounts Payable/Tax
Non-Employee Expense Report form routes to
AP Audit in ECM
Non-Employee Expense Report paid in Oracle
Payee is entered into Oracle as new supplier or supplier record is updated if
necessary
Non-Employee Expense Report is
entered into Oracle as invoice for
payment
Non-Employee Expense line item
details are audited, verification that
necessary docs have been attached, etc.
1) A CMU employee (Preparer) will initiate the creation of the form (in response to a request for
reimbursement) which generates a Non-Employee Expense Report number (ex. NEX000001)
to be used for future reference. Once the Preparer enters information in the first section of
the form, the Preparer sends the report to the Payee through the ‘Send to Payee’ button on
the form.
2) The Payee receives an email indicating that they must take action on the report. The Payee
clicks on the URL provided in the email which then launches the Non-Employee Expense
Report form that has been started by the Preparer. The Payee is responsible for, at a
minimum, responding to the FCPA attestation questions found on the form. For more
information about FCPA attestation, please reference http://www.cmu.edu/ogc/fcpa. The
Payee submits the Non-Employee Expense Report form back to the Preparer through the
‘Payee Send to Preparer’ button. The Payee must provide a response to the FCPA questions
on the form or they will be unable to send the report back to the Preparer.
1 2 3 4
5

4
3) The Preparer receives an email to make them aware that action is required on the Non-
Employee Expense Report. The Preparer clicks on the URL provided in the email which then
launches the Non-Employee Expense Report form. The Preparer reviews the information
entered by the Payee to confirm that information has been provided (ex. complete address
information has been entered, valid email address has been provided, etc.). The Preparer
then enters the details of the expenses being reimbursed (line item details, justification,
accounting distributions) and enters the Approver information (name, email, etc.). The
Preparer uses the ‘Preparer Submits to Approver’ button to send the report for approval.
4) The Approver receives an email that action is required on a Non-Employee Expense Report.
The Approver launches the report using the URL found in the email and is able to Approve,
Deny, Forward the report to another Approver or Cancel.
5) Following the approval of the Non-Employee Expense Report, the report is automatically
forwarded to the Accounts Payable department to be processed through Audit, Tax, Invoice
Entry, and Payment Processing. The Preparer of the report receives an email that informs
them of the approval of the report and that the report is with the Accounts Payable
department, and receives another email once the report is ready for payment.
Detailed Steps - Non-Employee Expense Report Creation:
Non-Employee Expense Report Creation
1) The Preparer launches the Non-Employee Expense Report form which launches an internet
browser window (Internet Explorer is the preferred browser). The Non-Employee Expense
Report number (beginning with ‘NEX’) is generated. NOTE: The Non-Employee Expense
Report form will time-out after 20 minutes of inactivity.
2) The Preparer enters their Andrew ID in the Preparer’s Andrew ID field. Once the Andrew ID
is entered, tabbing out of the field will allow the Preparer’s First and Last Name, Preparer’s
Phone Number, and Preparer’s Email Address to be populated automatically. NOTE: If the
Preparer has not been granted access to create this form, an error message will appear.
3) The Preparer enters the ER Reason. This information will be included in the email that is
sent to the Non-Employee being reimbursed as to why the reimbursement is occurring.
4) The Preparer answers the question as to whether the Payee being reimbursed is a CMU
student. If the answer is ‘Yes’ the reimbursement is for a CMU student, the Preparer must
enter the Student’s Andrew ID.
5) The Preparer enters the Payee’s Email Address (accuracy is EXTREMELY important in order
for the report to be routed to the Payee successfully).
6) The Preparer enters the Payee’s Last Name, First Name, and Prefix.
The information entered into these fields is used to create the email to the Payee and is also
presented within the body of the email as well. Accuracy is important!

5
7) Once the information has been entered into the first section of the form, the Preparer must
click on the Send to Payee button.
A. Clicking on this button generates the following message for the Preparer to confirm
that the report has been submitted to the Preparer successfully:
**Please Note: The system generated tracking number included in this message is not
useful for end users, in this case the Preparer, and can be ignored. There is no need to
retain/capture this tracking number.
B. Clicking on the Send to Payee button also generates the following two email
messages:
i. The Preparer receives the following message with the subject line starting
with ‘FYI’ to indicate that no action is required of the Preparer.

6
ii. Most importantly, the Payee (non-employee), receives the following message
with the subject line starting with ‘Action Required’ to indicate that the Payee
is expected to perform an action. This email and the Payee taking the
action of clicking on the URL within the email are critical to ensure that
the Non-Employee Expense Report form continues to be processed.
7
Payee Submission
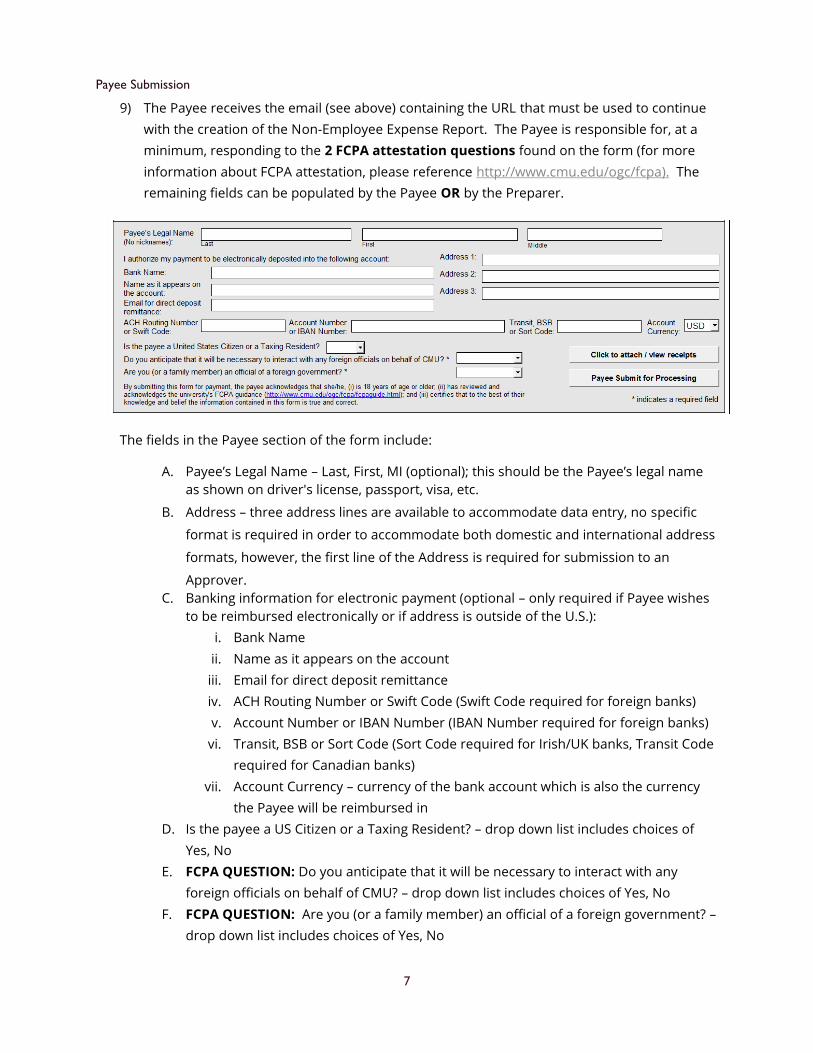
9) The Payee receives the email (see above) containing the URL that must be used to continue
with the creation of the Non-Employee Expense Report. The Payee is responsible for, at a
minimum, responding to the 2 FCPA attestation questions found on the form (for more
information about FCPA attestation, please reference http://www.cmu.edu/ogc/fcpa). The
remaining fields can be populated by the Payee OR by the Preparer.
The fields in the Payee section of the form include:
A. Payee’s Legal Name – Last, First, MI (optional); this should be the Payee’s legal name
as shown on driver's license, passport, visa, etc.
B. Address – three address lines are available to accommodate data entry, no specific
format is required in order to accommodate both domestic and international address
formats, however, the first line of the Address is required for submission to an
Approver.
C. Banking information for electronic payment (optional – only required if Payee wishes
to be reimbursed electronically or if address is outside of the U.S.):
i. Bank Name
ii. Name as it appears on the account
iii. Email for direct deposit remittance
iv. ACH Routing Number or Swift Code (Swift Code required for foreign banks)
v. Account Number or IBAN Number (IBAN Number required for foreign banks)
vi. Transit, BSB or Sort Code (Sort Code required for Irish/UK banks, Transit Code
required for Canadian banks)
vii. Account Currency – currency of the bank account which is also the currency
the Payee will be reimbursed in
D. Is the payee a US Citizen or a Taxing Resident? – drop down list includes choices of
Yes, No
E. FCPA QUESTION: Do you anticipate that it will be necessary to interact with any
foreign officials on behalf of CMU? – drop down list includes choices of Yes, No
F. FCPA QUESTION: Are you (or a family member) an official of a foreign government? –
drop down list includes choices of Yes, No
8
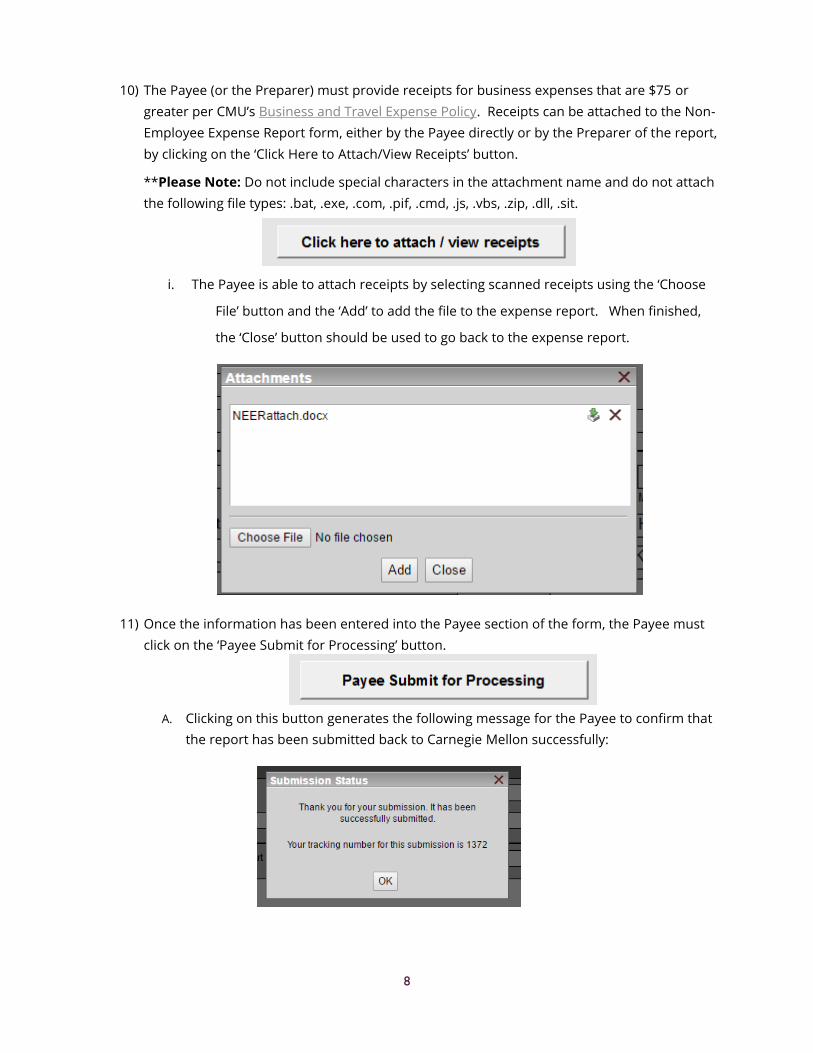
10) The Payee (or the Preparer) must provide receipts for business expenses that are $75 or
greater per CMU’s Business and Travel Expense Policy. Receipts can be attached to the Non-
Employee Expense Report form, either by the Payee directly or by the Preparer of the report,
by clicking on the ‘Click Here to Attach/View Receipts’ button.
**Please Note: Do not include special characters in the attachment name and do not attach
the following file types: .bat, .exe, .com, .pif, .cmd, .js, .vbs, .zip, .dll, .sit.
i. The Payee is able to attach receipts by selecting scanned receipts using the ‘Choose
File’ button and the ‘Add’ to add the file to the expense report. When finished,
the ‘Close’ button should be used to go back to the expense report.
11) Once the information has been entered into the Payee section of the form, the Payee must
click on the ‘Payee Submit for Processing’ button.
A. Clicking on this button generates the following message for the Payee to confirm that
the report has been submitted back to Carnegie Mellon successfully:

9
**Please Note: The system generated tracking number included in this message is not
useful for end users, in this case the Payee, and can be ignored. There is no need to
retain/capture this tracking number.
B. Clicking on the ‘Payee Submit for Processing’ button also generates the following
‘Action Required’ email message to the Preparer of the Non-Employee Expense
Report:
Preparer Completion
12) The Preparer receives the email (see above) containing the URL that must be used to
continue with the creation of the Non-Employee Expense Report. The Preparer should
review the Payee section to confirm that the Payee populated the fields in that section. If the
Payee did not populate the fields, the Preparer must enter the missing data in order to allow
for successful approval of the form and processing of the reimbursement.
13) The Preparer must now complete the main body of the Non-Employee Expense Report.
NOTE: The Non-Employee Expense Report form will time-out after 20 minutes of inactivity,
unless the Preparer clicks Save and Complete Later. See Save and Complete Later section
below.
10
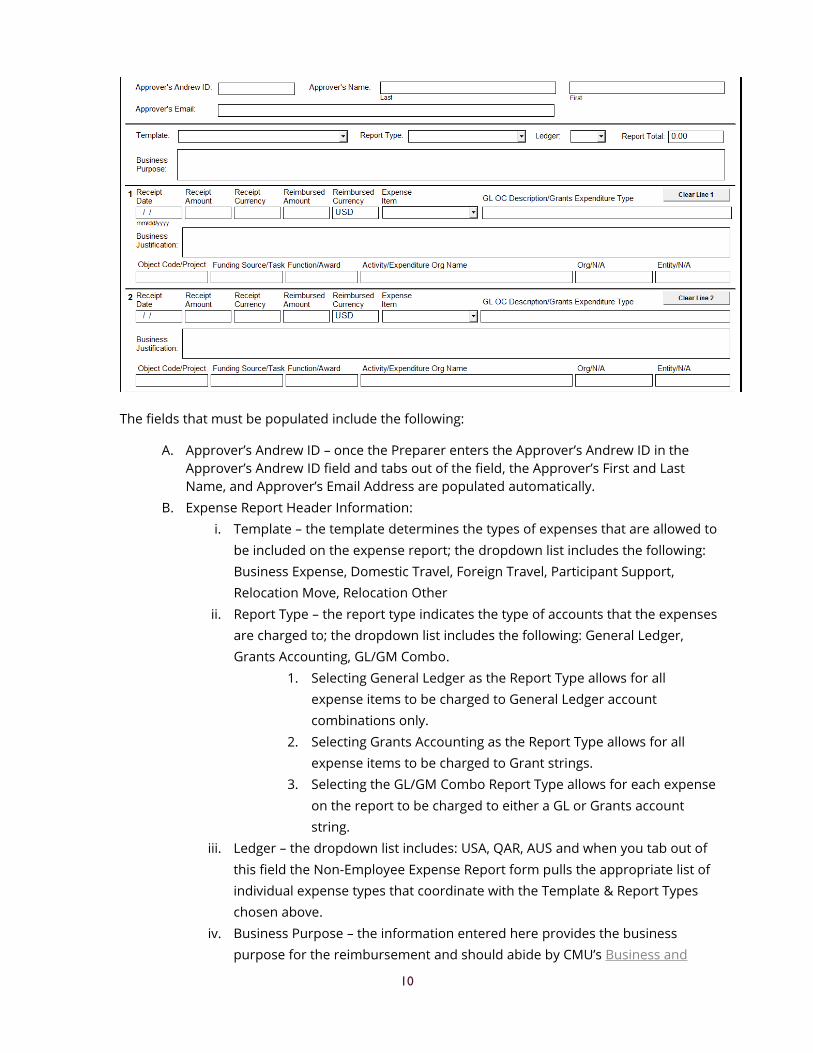
The fields that must be populated include the following:
A. Approver’s Andrew ID – once the Preparer enters the Approver’s Andrew ID in the
Approver’s Andrew ID field and tabs out of the field, the Approver’s First and Last
Name, and Approver’s Email Address are populated automatically.
B. Expense Report Header Information:
i. Template – the template determines the types of expenses that are allowed to
be included on the expense report; the dropdown list includes the following:
Business Expense, Domestic Travel, Foreign Travel, Participant Support,
Relocation Move, Relocation Other
ii. Report Type – the report type indicates the type of accounts that the expenses
are charged to; the dropdown list includes the following: General Ledger,
Grants Accounting, GL/GM Combo.
1. Selecting General Ledger as the Report Type allows for all
expense items to be charged to General Ledger account
combinations only.
2. Selecting Grants Accounting as the Report Type allows for all
expense items to be charged to Grant strings.
3. Selecting the GL/GM Combo Report Type allows for each expense
on the report to be charged to either a GL or Grants account
string.
iii. Ledger – the dropdown list includes: USA, QAR, AUS and when you tab out of
this field the Non-Employee Expense Report form pulls the appropriate list of
individual expense types that coordinate with the Template & Report Types
chosen above.
iv. Business Purpose – the information entered here provides the business
purpose for the reimbursement and should abide by CMU’s Business and

11
Travel Expense Policy. This field allows for 240 characters (per Oracle
requirements).
C. Individual Expense Details:
i. Receipt Date – this is the date of the expense
ii. Receipt Amount – this is the actual amount of the incurred expense regardless
of currency
iii. Receipt Currency – this is the currency of the incurred expense
iv. Reimbursed Amount – this is the amount of the expense based on the
currency of the bank account; if the currency of the expense is not the same
currency of the bank account, the Preparer must convert the receipt amount
into the amount based on the reimbursed currency and attach the conversion
rates as a receipt for audit purposes
v. Reimbursed Currency - determined by the currency found in the Account
Currency field in the Payee section of the expense report
vi. Expense Item – this dropdown list will contain the expense types that are
specific to the Template & Report Type that was selected above.
vii. Business Justification – this must include the Who, What, When, Where, & Why
information as per CMU’s Business and Travel Expense Policy.
viii. Accounting Information – the accounting information required for entry is
dependent on the Report Type selected in the section above: General Ledger,
Grants Accounting, or GL/GM Combo. The labels on the fields below change
depending on the Report Type selected.
D. The Non-Employee Expense Report form displays three expense item lines on the first
page. However, if more than three expense items exist, there are two additional
pages available so that a total of 20 expense items can be created on the same
expense report for the Non-Employee. In order to enter additional lines of expense
items, Preparers can click on the ‘Click to add or view additional lines’ button:
E. The Preparer must ensure that the appropriate receipts (per policy threshold) are
attached to the report. This can be done by clicking on the ‘Click to attach/view
receipts’ button.

12
i. Note: there are two ‘Click to attach / view receipts’ buttons on the form, and
either can be used by the Preparer since both buttons point to the same
attached files.
ii. The following screen appears:
iii. The Preparer clicks on the Choose File button to select the file/receipt to
attach to the Non-Employee Expense Report. A browse window appears
from where a scanned/downloaded receipt/file can be selected as an
attachment:
iv. The appropriate receipt/file is selected and the Attachments window appears
again with the name of the file next to the ‘Choose File’ button:

13
v. Once a file has been chosen, click on the ‘Add’ button to attach the file to the
form.
**Please Note: Do not include special characters in the attachment name and do
not attach the following file types: .bat, .exe, .com, .pif, .cmd, .js, .vbs, .zip, .dll, .sit.
vi. Preparers and Approvers are able to view the attachments added by either
the Preparer or the Payee by clicking on the download icon.
vii. If a Payee or a Preparer has attached a receipt that is not appropriate per
policy or is not necessary, the Preparer is able to remove the receipt by
clicking on the red X next to the download icon.
14) With the information populated into the various sections as mentioned above, the Preparer
clicks on the ‘Preparer Submit to Approver’ button:
14
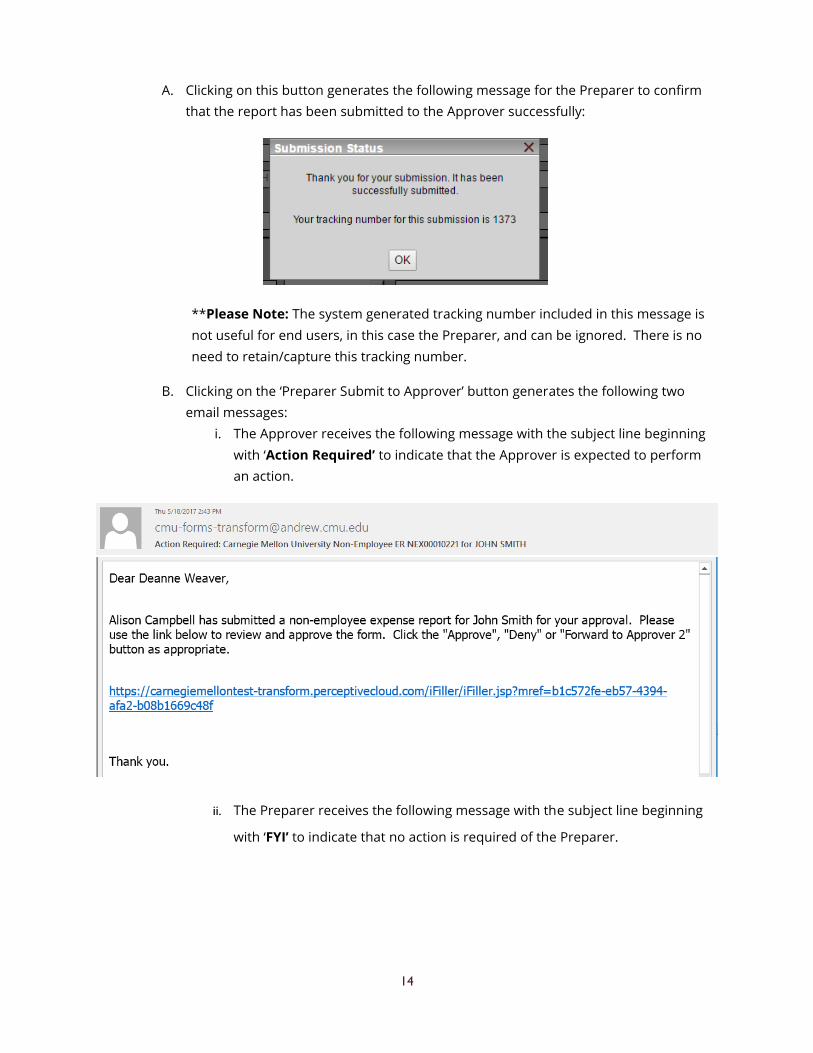
A. Clicking on this button generates the following message for the Preparer to confirm
that the report has been submitted to the Approver successfully:
**Please Note: The system generated tracking number included in this message is
not useful for end users, in this case the Preparer, and can be ignored. There is no
need to retain/capture this tracking number.
B. Clicking on the ‘Preparer Submit to Approver’ button generates the following two
email messages:
i. The Approver receives the following message with the subject line beginning
with ‘Action Required’ to indicate that the Approver is expected to perform
an action.
ii. The Preparer receives the following message with the subject line beginning
with ‘FYI’ to indicate that no action is required of the Preparer.

15
Save & Complete Later
15) Preparers have an option to save the form and complete later while entering the expense
detail portion of the form.
16) Clicking on the ‘Save and Complete Later’ button generates the following email message with
a subject line starting with ‘Action Required’ to indicate that the Preparer is expected to
perform an action.
**Please Note: If the Preparer does not use this new email notification to access the form,
the form will not show their progress made thus far.

16
17) To complete the form preparer can click on the URL from the email and continue entry on
the form. There is no llimit to how many times a Preparer can click Save and Complete Later on the
same form.
Approver Action
18) The Approver receives the email (see above) containing the URL that must be used to
continue with the processing of the Non-Employee Expense Report. The Approver should
review the entire report including Payee information, expenses, receipts, business
justifications, account strings, etc. before approving the report for payment. The Approver
can take four different actions:
A. Approve:
i. When clicking on the Approve button, the Approver, Approver Andrew ID and
Date fields automatically populate.
A B
C
D

17
ii. The Approver receives a confirmation message that the report has been
submitted successfully:
**Please Note: The system generated tracking number included in this message is
not useful for end users, in this case the Approver, and can be ignored. There is no
need to retain/capture this tracking number.
iii. Clicking on the ‘Approve’ button also generates the following ‘FYI’ email
message to the Preparer of the Non-Employee Expense Report:
B. Cancel:
i. When clicking on the Cancel button, the Approver receives the following
message:

18
1. If the Approver clicks ‘No’, nothing happens to the report and the
Approver is able to approve, deny, or forward the report to
another approver.
2. If the Approver clicks ‘Yes’, the report is deleted (no longer exists)
and the Approver will receive the following message:
ii. The Preparer receives the following ‘FYI’ email so that they are aware that the
Approver chose to cancel the Non-Employee Expense Report form.
C. Deny:
i. When choosing to Deny the Non-Employee Expense Report, the Approver
must enter a Denial Reason. This Denial Reason is provided to the Preparer
via an email so that the Preparer can take the appropriate action to re-submit
the report.

19
ii. Once a Denial Reason is entered, the Approver clicks on the Deny button and
receives the following message:
1. If the Approver fails to remember to enter a Denial Reason prior
to clicking on the Deny button, the Approver receives the
following message:
iii. The Preparer receives the following ‘Action Required’ email informing them
of the Approver’s denial of the report, as well as, the Denial Reason.
20
iv. The Preparer is able to take appropriate action on the report and resubmit it
which will send the Approver another ‘Action Required’ email and allow for
the Approval process to occur again. The Approver is able to deny the report
multiple times, providing a Denial Reason each time.
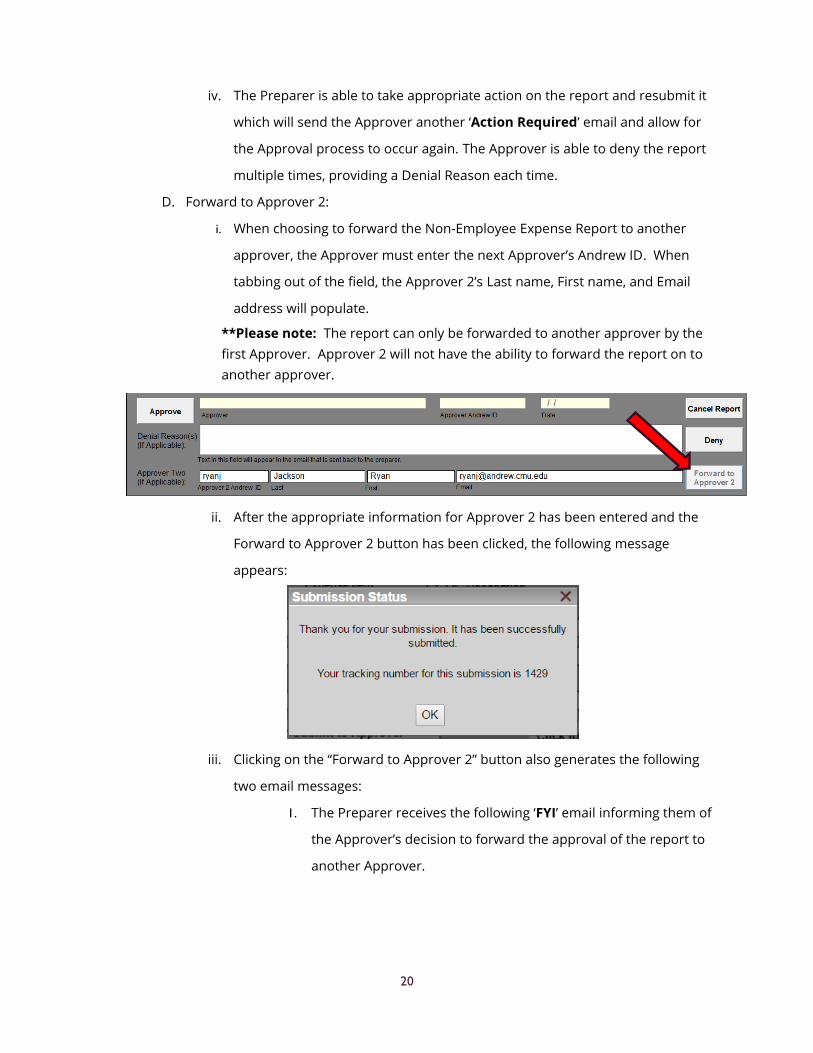
D. Forward to Approver 2:
i. When choosing to forward the Non-Employee Expense Report to another
approver, the Approver must enter the next Approver’s Andrew ID. When
tabbing out of the field, the Approver 2’s Last name, First name, and Email
address will populate.
**Please note: The report can only be forwarded to another approver by the
first Approver. Approver 2 will not have the ability to forward the report on to
another approver.
ii. After the appropriate information for Approver 2 has been entered and the
Forward to Approver 2 button has been clicked, the following message
appears:
iii. Clicking on the “Forward to Approver 2” button also generates the following
two email messages:
1. The Preparer receives the following ‘FYI’ email informing them of
the Approver’s decision to forward the approval of the report to
another Approver.
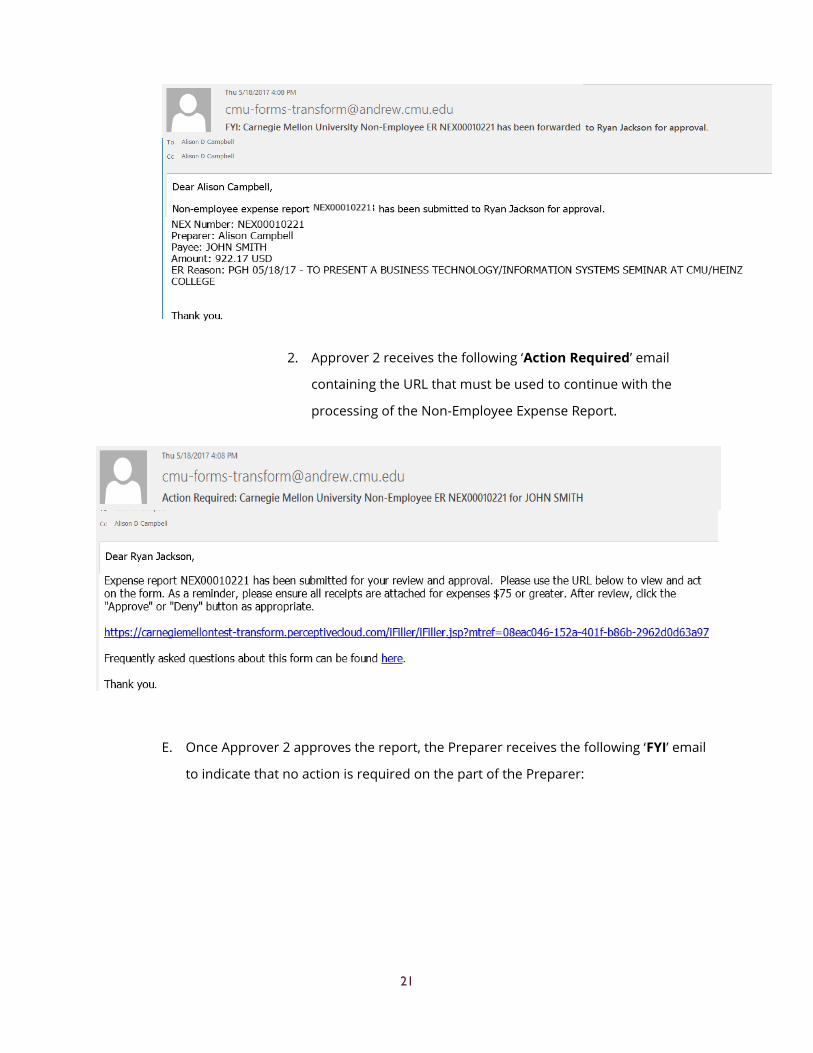
21
2. Approver 2 receives the following ‘Action Required’ email
containing the URL that must be used to continue with the
processing of the Non-Employee Expense Report.
iv. The Approver should review the entire report including Payee information,
expenses, business justifications, account strings, etc. before approving the
report for payment. As stated in the email Approver 2 can either Approve or
Deny the Non-Employee Expense report.
E. Once Approver 2 approves the report, the Preparer receives the following ‘FYI’ email
to indicate that no action is required on the part of the Preparer:

22
19) Once the report has been processed through Accounts Payable and is ready for payment,
the Preparer receives the final email regarding the Non-Employee Expense Report:
A. Attached to this final email is the first page of the non-employee expense report. This
can be viewed by the Preparer to be reminded as to the purpose of the
reimbursement. Additionally, the email states that the Preparer is able to view the
non-employee expense report through Oracle via the appropriate set of books AP
Inquiry responsibility. The section titled Viewing in Oracle of this document for
details.
Pending Action 7 day Reminder Emails
20) If any document has no action for seven consecutive days, while pending with the Non-
Employee or Preparer, the following ‘FYI’ email is sent to the Preparer. The reminder will
continue to be sent every seven days until action is taken.
A. To act on the NEX form, the Preparer should access the URL from the ‘Action
Required’ email that was sent seven or more days ago.

23
21) If any document has no action for seven consecutive days while pending with the Approver
or Approver2, the following ‘FYI’ email is sent to the Approver or Approver 2 respectively.
The reminder will continue to be sent every seven days until action is taken.
A. To act on the NEX form, the Approver/Approver 2 should access the URL from the
‘Action Required’ email that was sent seven or more days ago.

24
Viewing in Oracle
22) After a payment is scheduled by Accounts Payable, the invoice is visible within Oracle to
anyone with AP Inquiry access in Oracle.
23) Navigate to your AP Inquiry responsibility:
24) Navigate to Invoices->Inquiry->Invoices:
25) After launching the Invoices window, the Find Invoices screen will appear. The invoice
number generated through the ECM process (beginning with ‘NEX’) and using all capital
letters) will be the number that is entered into Oracle as the invoice number. In this
example, the invoice number is NEX00010221. **Please note: Enter the invoice number in
all capital letters (ex. NEX) as the Oracle search is case sensitive. Once the invoice number
has been entered, click on the Find button:

25
26) The Invoice Workbench screen will launch. The data in the fields found on this screen will
represent the information that was entered onto the non-employee expense report form.
27) To view the ECM non-employee expense report itself, click on the Perceptive icon in the
toolbar.

26
28) Clicking on this icon will launch a web browser window. If you do not see anything happen
when you’ve clicked on the icon, it may be that the browser opened behind Oracle. You can
get to the browser by hovering over your web browser icon (in this example, Internet
Explorer) in the Taskbar at the bottom of the screen. The browser windows that are
currently open will display as you hover and you will see a browser for Perceptive Content.
29) The non-employee expense report will display in the web browser with any personal
identification information redacted (hidden with black boxes). The arrows at the bottom of
the page will allow you to view all attachments associated with the report.

27
Non-Employee Expense Report Checklist:
Did the Payee fill out their name correctly (last, first, middle) with their full legal
name (no nicknames)?

28
Did the Payee fill out their full address? Must include full street address, City, State,
Zip Code and Country (if applicable)
Is the Payee bank information filled out correctly?
Routing number and Account number – US Bank Payments
Swift Code and IBAN – Foreign Bank Payments
Is the Payee associated with the University (i.e. student)? If so, is their Andrew ID in
the Payee section?
Is the Payee’s email address in the top section? Is this the correct email to send both
the form and remittance advise too?
Did the person seeking reimbursement respond to the question whether or not they
are a US Citizen?
Are all receipts attached for expenses over $75? If a receipt is missing and/or
damaged, please ensure that the Missing Receipt form
(http://www.cmu.edu/finance/forms/files/missing_rcpt.pdf) is completed and
attached to ER when submitted.
Is mileage rate accurate for the reimbursement year?
(http://www.cmu.edu/finance/controller/bte/mileage-rates.html) Please ensure you
have included support, such as Google Maps directions, to support the mileage
claim.
Does the ER request reimbursement for the same currency type throughout the ER?
An ER can only be processed in one currency. If a receipt needs to be converted to a
different currency, please ensure the currency conversion support is attached with
the original receipt. (https://www.oanda.com/currency/converter/)
Are the expenses being submitted over 90 days from the expense being incurred? If
yes…
Please attach the W-9 for a US Citizen
Please attach the FNIF and W-8Ben for Foreign Nationals
Non-resident aliens could be subject up to 30% withholding on their
payment.