ninja ide documentation - read the docs · pdf filechapter 1 installing ninja-ide first steps...
TRANSCRIPT

Ninja IDE DocumentationRelease 2.3
Not me
Sep 15, 2017


Contents
1 Installing NINJA-IDE 31.1 First steps with NINJA-IDE . . . . . . . . . . . . . . . . . . . . . . . . . . . . . . . . . . . . . . . 3
1.1.1 Installation on Mac OS with Homebrew . . . . . . . . . . . . . . . . . . . . . . . . . . . . 31.2 Executing NINJA-IDE from source . . . . . . . . . . . . . . . . . . . . . . . . . . . . . . . . . . . 3
2 Plugin Tutorial 52.1 Why do we need plugins on NINJA-IDE? . . . . . . . . . . . . . . . . . . . . . . . . . . . . . . . . 52.2 Architecture . . . . . . . . . . . . . . . . . . . . . . . . . . . . . . . . . . . . . . . . . . . . . . . 52.3 How to create plugins . . . . . . . . . . . . . . . . . . . . . . . . . . . . . . . . . . . . . . . . . . 6
2.3.1 Plugin Descriptor file . . . . . . . . . . . . . . . . . . . . . . . . . . . . . . . . . . . . . . 62.3.2 Service locator class . . . . . . . . . . . . . . . . . . . . . . . . . . . . . . . . . . . . . . 72.3.3 Plugin class . . . . . . . . . . . . . . . . . . . . . . . . . . . . . . . . . . . . . . . . . . . 7
2.3.3.1 Attributes . . . . . . . . . . . . . . . . . . . . . . . . . . . . . . . . . . . . . . . 72.3.3.2 PluginLogger . . . . . . . . . . . . . . . . . . . . . . . . . . . . . . . . . . . . . 72.3.3.3 Methods . . . . . . . . . . . . . . . . . . . . . . . . . . . . . . . . . . . . . . . . 72.3.3.4 Example . . . . . . . . . . . . . . . . . . . . . . . . . . . . . . . . . . . . . . . . 8
2.3.4 Plugins interfaces . . . . . . . . . . . . . . . . . . . . . . . . . . . . . . . . . . . . . . . . 82.3.4.1 IProjectTypeHandler . . . . . . . . . . . . . . . . . . . . . . . . . . . . . . . . . . 82.3.4.2 ISymbolsHandler . . . . . . . . . . . . . . . . . . . . . . . . . . . . . . . . . . . 82.3.4.3 IPluginPreferences . . . . . . . . . . . . . . . . . . . . . . . . . . . . . . . . . . . 9
2.3.5 Services . . . . . . . . . . . . . . . . . . . . . . . . . . . . . . . . . . . . . . . . . . . . . 92.3.5.1 editor . . . . . . . . . . . . . . . . . . . . . . . . . . . . . . . . . . . . . . . . . . 92.3.5.2 toolbar . . . . . . . . . . . . . . . . . . . . . . . . . . . . . . . . . . . . . . . . . 122.3.5.3 menuApp . . . . . . . . . . . . . . . . . . . . . . . . . . . . . . . . . . . . . . . 152.3.5.4 misc . . . . . . . . . . . . . . . . . . . . . . . . . . . . . . . . . . . . . . . . . . 172.3.5.5 explorer . . . . . . . . . . . . . . . . . . . . . . . . . . . . . . . . . . . . . . . . 18
2.3.6 Testing your plugin . . . . . . . . . . . . . . . . . . . . . . . . . . . . . . . . . . . . . . . 222.3.7 Debugging your plugin . . . . . . . . . . . . . . . . . . . . . . . . . . . . . . . . . . . . . 23
i

ii

Ninja IDE Documentation, Release 2.3
NINJA-IDE (from the recursive acronym: “Ninja-IDE Is Not Just Another IDE”), is a cross-platform integrated devel-opment environment (IDE). NINJA-IDE runs on Linux/X11, Mac OS X and Windows desktop operating systems, andallows developers to create applications for several purposes using all the tools and utilities of NINJA-IDE, makingthe task of writing software easier and more enjoyable.
Contents:
Contents 1

Ninja IDE Documentation, Release 2.3
2 Contents

CHAPTER 1
Installing NINJA-IDE
First steps with NINJA-IDE
So you have decided to install NINJA-IDE (good for you my young padawan!). The first thing you should do is visitthis page:
http://ninja-ide.org/downloads/
There you will be able to find installers for Linux, Windows and Mac. Once you download the proper package foryour system, you just need to execute that package and you will be able to be coding in NINJA-IDE in a heartbeat!
Installation on Mac OS with Homebrew
It is also possible to install Ninja-IDE on Mac OS X with Homebrew by using the command:
brew install ninja-ide
When Ninja-IDE is installed you can start the application by typing:
$ ninja-ide
Make sure that macfsevents ($ pip install macfsevents) is installed before you install Ninja-IDE.
Executing NINJA-IDE from source
If you are a leading edge guy/girl/alien, you can use NINJA-IDE from source and enjoy always from the latest changesin the code (Also, if you are an alien please let us know. We will definitely like to hear about that). To execute NINJA-IDE from sources you just need to satisfy a small set of dependencies:
• Python >= 2.7 (or Python 3)
• PyQt >= 4.8
3

Ninja IDE Documentation, Release 2.3
• Linux: pyinotify (Ubuntu$ sudo apt-get install python-pyinotify)
• Windows: pywin32
• MAC OS: macfsevents ($ pip install macfsevents)
Then, if you have Git installed, you can clone the NINJA-IDE repository like this:
$ git clone https://github.com/ninja-ide/ninja-ide.git
Or you can get the latest version of the code by downloading this zip:
https://github.com/ninja-ide/ninja-ide/zipball/master
Now you have everything you need to execute NINJA-IDE from source!
Warning: We always try to keep the repository stable, but with the latest code, some kind of new bugs mightappear... The good news is that you can be the first one reporting these kind of things and help us fix it faster.
Ok, so... let’s execute NINJA-IDE from source. Go to the ninja-ide folder (the one where you cloned the repositoryto, or where you uncompressed the zip file), and just type:
$ python ninja-ide.py
And you are done!
4 Chapter 1. Installing NINJA-IDE
CHAPTER 2
Plugin Tutorial
Why do we need plugins on NINJA-IDE?
Plugins are small pieces of code that can interact with NINJA-IDE and add specific features to it. This is useful if youwant to have special features that NINJA-IDE does not provide.
Many times developers around the world try to collaborate on an open source project, but that task could be hard formany reasons. In these cases plugins are a good option to collaborate. You just need to learn the project API.
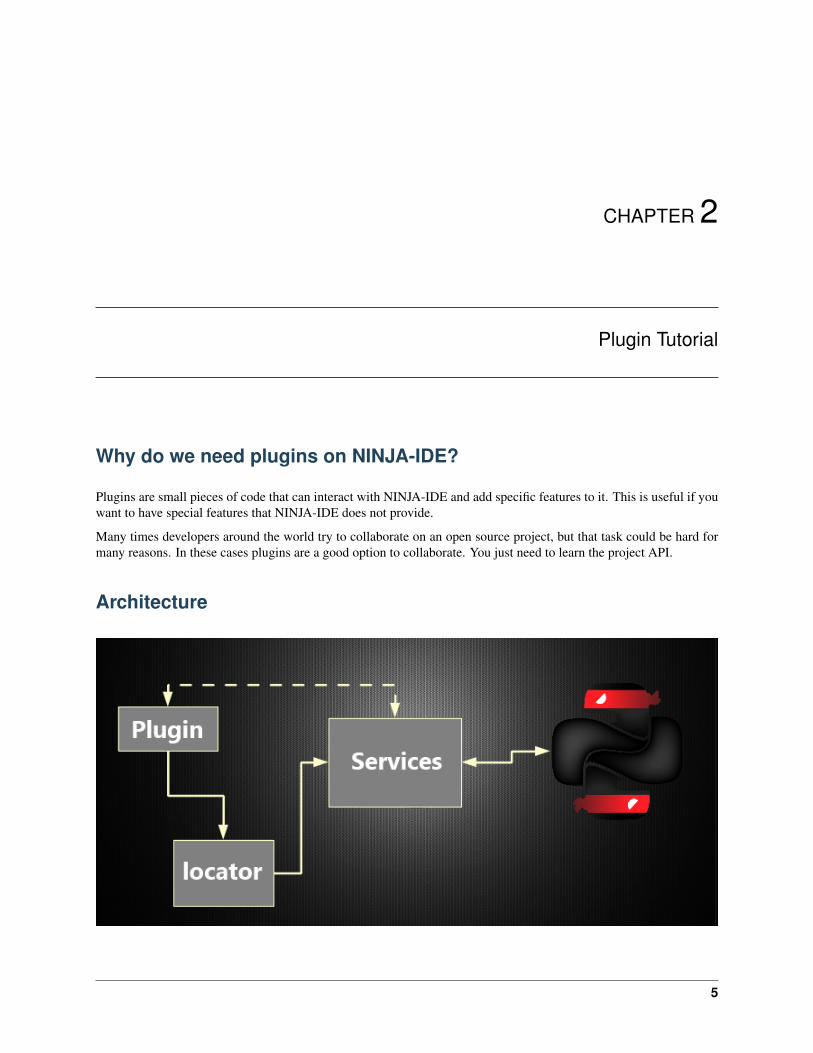
Architecture
5
Ninja IDE Documentation, Release 2.3
The image above shows the connection between plugins and NINJA-IDE. Plugins get services by using a servicelocator. The service locator returns the specific service and the plugin uses this service to talk with NINJA-IDE.
How to create plugins
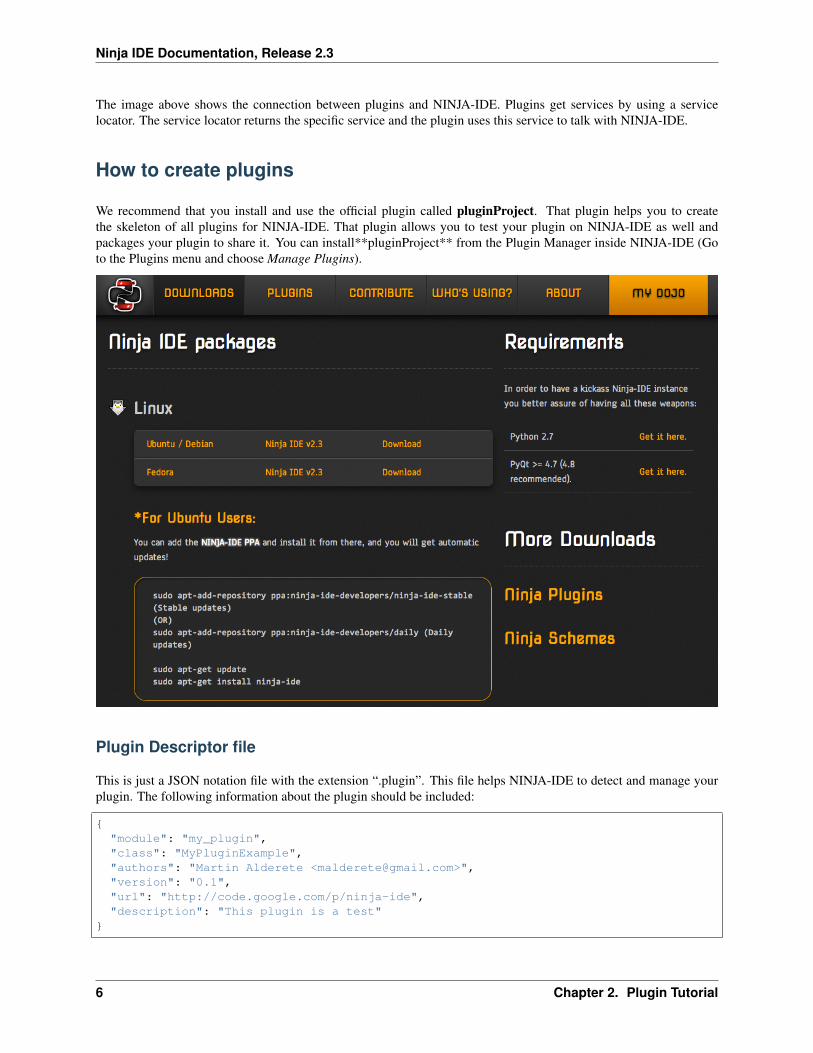
We recommend that you install and use the official plugin called pluginProject. That plugin helps you to createthe skeleton of all plugins for NINJA-IDE. That plugin allows you to test your plugin on NINJA-IDE as well andpackages your plugin to share it. You can install**pluginProject** from the Plugin Manager inside NINJA-IDE (Goto the Plugins menu and choose Manage Plugins).
Plugin Descriptor file
This is just a JSON notation file with the extension “.plugin”. This file helps NINJA-IDE to detect and manage yourplugin. The following information about the plugin should be included:
{"module": "my_plugin","class": "MyPluginExample","authors": "Martin Alderete <[email protected]>","version": "0.1","url": "http://code.google.com/p/ninja-ide","description": "This plugin is a test"
}
6 Chapter 2. Plugin Tutorial

Ninja IDE Documentation, Release 2.3
• module: Indicates the name of the module where the plugin class resides, which will be instantiated by NINJA-IDE.
• class: Indicates the name of the class which implements the plugin.
• authors: String with the author(s).
• version: Indicates the plugin version.
• url: Indicates the url of the plugin (the documentation could be provided here).
• description: Plugin description.
Service locator class
This class provides an easy way to request and get the NINJA-IDE services for your plugin. This class has twomethods: one to get a service and one to get the names of all available services.
To get a service:
one_service = service_locator.get_service("name_of_the_Service")
To check all the available services:
for service_name in service_locator.get_availables_services():print service_name
Plugin class
All plugins must inherit from this class. This is the base class that NINJA-IDE provides to create plugins. This classalso inherits from QObject. Because of that your plugins are compatible with signals/slots of the Qt library.
Attributes
• self.metadata: A Python Dictionary with the contents of the plugin descriptor file.
• self.locator: An instance of the ServiceLocator class.
• self.path: A string with the plugin directory.
• self.logger: An instance of PluginLogger.
PluginLogger
This is the logger for plugins. It allows to record events occurred on plugins. This is a wrapper over the logging.Loggerclass of the logging module.
Methods
initialize()
This method is called by NINJA-IDE when your plugin is ready to start. This is the recommended place to request/getthe NINJA-IDE services for your plugin.
finish()
2.3. How to create plugins 7
Ninja IDE Documentation, Release 2.3
This method is called when NINJA-IDE is shutting down.
get_preferences_widget()
This method is called by NINJA-IDE when the user opens the preferences dialog. This method allows us to integratea custom configuration widget in the NINJA-IDE preferences. It is important that this is TRUNCATED! Pleasedownload pandoc if you want to convert large files.
Example
from ninja_ide.core import pluginfrom ninja_ide.core import plugin_interfacesfrom PyQt4.QtGuiimport QWidget
class MyPluginExample(plugin.Plugin):
def initialize(self):print "The plugin is loading..."print "plugin information: %s" % self.metadataprint "service locator: %s" % self.locator
def finish(self):print "The plugin is shutting down because the user has closed NINJA-IDE"
def get_preferences_widget(self):pass
Plugins interfaces
Some actions from plugins require objects with special interfaces. Here we describe the possible interfaces.
IProjectTypeHandler
This interface is useful if you want to add a new type of project to NINJA-IDE.
def get_pages(self):"""Should return a collection of QWizardPage or subclass"""
def on_wizard_finish(self, wizard):"""Called when the user finishes the wizard"""
def get_context_menus(self):"""Should return an iterable of QMenu for the context type of the new project type"""
ISymbolsHandler
This interface is useful if you want to provide symbols for a language distinct of Python.
8 Chapter 2. Plugin Tutorial

Ninja IDE Documentation, Release 2.3
IPluginPreferences
This interface is useful if you want to add custom preferences for your plugin.
def obtain_symbols(self, source):"""Returns the dict needed by the treeSource code in plain text"""
NOTE: Must return the following structure:
{'attributes': {name: line, name: line},'functions': {name: line, name: line},'classes': {name: (line, {
'attributes': {name: line},'function': {name: line}})
}}
Services
Services are the way that plugins talk with NINJA-IDE. Conceptually services are proxies to NINJA-IDE components.NINJA-IDE defines different components, each one of these has different features.
editor
This service allows to interact with the main parts of NINJA-IDE, such as the editor, the tab manager, listen to signalswhich NINJA-IDE emits when saving a file, save project, change the current tab, etc.
Signals
editorKeyPressEvent(QEvent)
Emitted when the user presses a key.
To connect the plugin to this signal use:
SERVICE_NAME = "editor"editor_service = self.locator.get_service(SERVICE_NAME)editor_service.editorKeyPressEvent.connect(self._do_something)
def do_something(self, event):#the code goes here!
beforeFileSaved(fileName)
Emitted before the fileName is saved on disc.
To connect the plugin to this signal use:
2.3. How to create plugins 9

Ninja IDE Documentation, Release 2.3
SERVICE_NAME = "editor"editor_service = self.locator.get_service(SERVICE_NAME)editor_service.beforeFileSaved.connect(self._do_something)
def do_something(self, fileName):#the code goes here!
fileSaved(fileName)
Emitted when the user saves a file.
To connect the plugin to this signal use:
SERVICE_NAME = "editor"editor_service = self.locator.get_service(SERVICE_NAME)editor_service.fileSaved.connect(self._do_something)
def do_something(self, fileName):#the code goes here!
currentTabChanged(fileName)
Emitted when the user changes the current tab.
To connect the plugin to this signal use:
SERVICE_NAME = "editor"editor_service = self.locator.get_service(SERVICE_NAME)editor_service.currentTabChanged.connect(self._do_something)
def do_something(self, fileName):#the code goes here!
fileExecuted(fileName)
Emitted when the user executes a file.
To connect the plugin to this signal use:
SERVICE_NAME = "editor"editor_service = self.locator.get_service(SERVICE_NAME)editor_service.fileExecuted.connect(self._do_something)
def do_something(self, fileName):#the code goes here!
fileOpened(fileName)
Emitted when the user opens a file
To connect the plugin to this signal use:
SERVICE_NAME = "editor"editor_service = self.locator.get_service(SERVICE_NAME)editor_service.fileOpened.connect(self._do_something)
def do_something(self, fileName):#the code goes here!
10 Chapter 2. Plugin Tutorial

Ninja IDE Documentation, Release 2.3
Methods
get_tab_manager(self)
This method returns the TabWidget (ninja_ide.gui.main_panel.tab_widget.TabWidget) subclass of QTabWidget.
add_menu(self, menu, lang=”.py”)
This method adds an extra context menu to the editor’s context menu (QMenu).
get_opened_documents(self)
This method returns the name of the open file(s).
add_editor(self, fileName=”“, content=None, syntax=None)
This method creates a new editor.
• fileName: Absolute path to a file
• content: Content for the editor if not fileName
• syntax: Syntax name, for example python
If the method is called without fileName and content an empty editor is created.
get_editor(self)
This method returns the actual editor (instance of ninja_ide.gui.editor.Editor). This method could return None.
get_editor_path(self)
This method returns the actual editor’s path. This method could return None if there isn’t an editor.
get_project_owner(self, editorWidget=None)
This method returns the project where the current file in the editor belongs to, or an empty string (if the Editor Widgetis not specified it returns the information from the current editor in focus).
get_text(self)
This method returns the plain text of the current editor, or None if there isn’t an editor.
get_selected_text(self)
This method returns the selected text of an editor. This method could return None.
insert_text(self, text)
This method inserts text into the current cursor position.
get_file_syntax(self, editorWidget=None)
This method returns the syntax for the current file. The syntax is represented as a dictionary that contains the descriptorthat Ninja recognizes for each language (if the Editor Widget is not specified it returns the information from the currenteditor in focus).
jump_to_line(self, lineno)
This method jumps to a specific line in the current editor.
get_lines_count(self)
This method returns the count of lines in the current editor.
save_file(self)
This method saves the actual file.
open_files(self, files, mainTab=True)
2.3. How to create plugins 11

Ninja IDE Documentation, Release 2.3
This method opens multiple files, each one in a different editor.
open_file(self, fileName=’‘, cursorPosition=0, positionIsLineNumber=False)
This method opens a single file. If the file is already open it gets in focus.
open_image(self, filename)
This method opens a single image.
toolbar
This service allows to interact with the toolbar of NINJA-IDE. The toolbar is an instance of QToolbar, so we can addactions (QAction) to it.
By default the toolbar of NINJA-IDE looks like the image below:
12 Chapter 2. Plugin Tutorial

Ninja IDE Documentation, Release 2.3
Methods
add_action(self, action)
This method allows to add an action (QAction) to the toolbar.
To add one action use:
SERVICE_NAME = "toolbar"toolbar_service = self.locator.get_service(SERVICE_NAME)
2.3. How to create plugins 13

Ninja IDE Documentation, Release 2.3
#instantiate a QAction (or subclass)one_Action = QAction(...)
#add the action to the toolbar of NINJA-IDEtoolbar_service.add_action(one_action)
When this code is added, the toolbar of NINJA-IDE looks like this:
14 Chapter 2. Plugin Tutorial

Ninja IDE Documentation, Release 2.3
Great! We have added an action to the toolbar of NINJA-IDE.
menuApp
This service allows to interact with the Plugins menu of NINJA-IDE. We can insert menus (QMenu) or/and actions(QAction).
2.3. How to create plugins 15

Ninja IDE Documentation, Release 2.3
By default the Plugins Menu of NINJA-IDE looks like the image below:
Methods
add_menu(self, menu)
This method allows to add a menu (QMenu) to the NINJA-IDE plugins menu.
To add one menu to the NINJA-IDE use:
SERVICE_NAME = "menuApp"menu_service = self.locator.get_service(SERVICE_NAME)
#instantiate a QMenu (or subclass)one_menu = QMenu(...)
#add the menu to NINJA-IDEmenu_service.add_menu(one_menu)
When this code is added, the Plugins Menu of NINJA-IDE looks like this:
add_action(self, action)
This method allows to add an action (QAction) to the NINJA-IDE plugins menu.
To add one action to NINJA-IDE use:
SERVICE_NAME = "menuApp"menu_service = self.locator.get_service(SERVICE_NAME)
#instantiate a QAction (or subclass)one_action = QAction(...)
#add the action to NINJA-IDEmenu_service.add_action(one_action)
When this code is added, the Plugins Menu of NINJA-IDE looks like this:
16 Chapter 2. Plugin Tutorial
Ninja IDE Documentation, Release 2.3
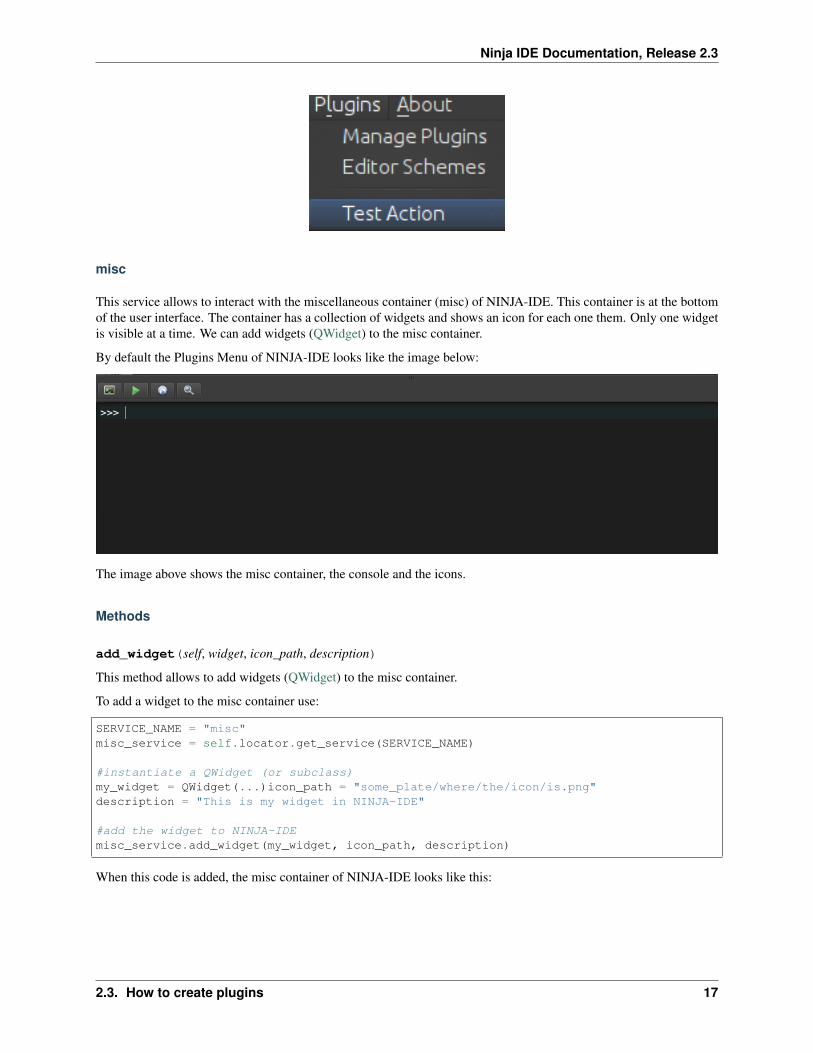
misc
This service allows to interact with the miscellaneous container (misc) of NINJA-IDE. This container is at the bottomof the user interface. The container has a collection of widgets and shows an icon for each one them. Only one widgetis visible at a time. We can add widgets (QWidget) to the misc container.
By default the Plugins Menu of NINJA-IDE looks like the image below:
The image above shows the misc container, the console and the icons.
Methods
add_widget(self, widget, icon_path, description)
This method allows to add widgets (QWidget) to the misc container.
To add a widget to the misc container use:
SERVICE_NAME = "misc"misc_service = self.locator.get_service(SERVICE_NAME)
#instantiate a QWidget (or subclass)my_widget = QWidget(...)icon_path = "some_plate/where/the/icon/is.png"description = "This is my widget in NINJA-IDE"
#add the widget to NINJA-IDEmisc_service.add_widget(my_widget, icon_path, description)
When this code is added, the misc container of NINJA-IDE looks like this:
2.3. How to create plugins 17
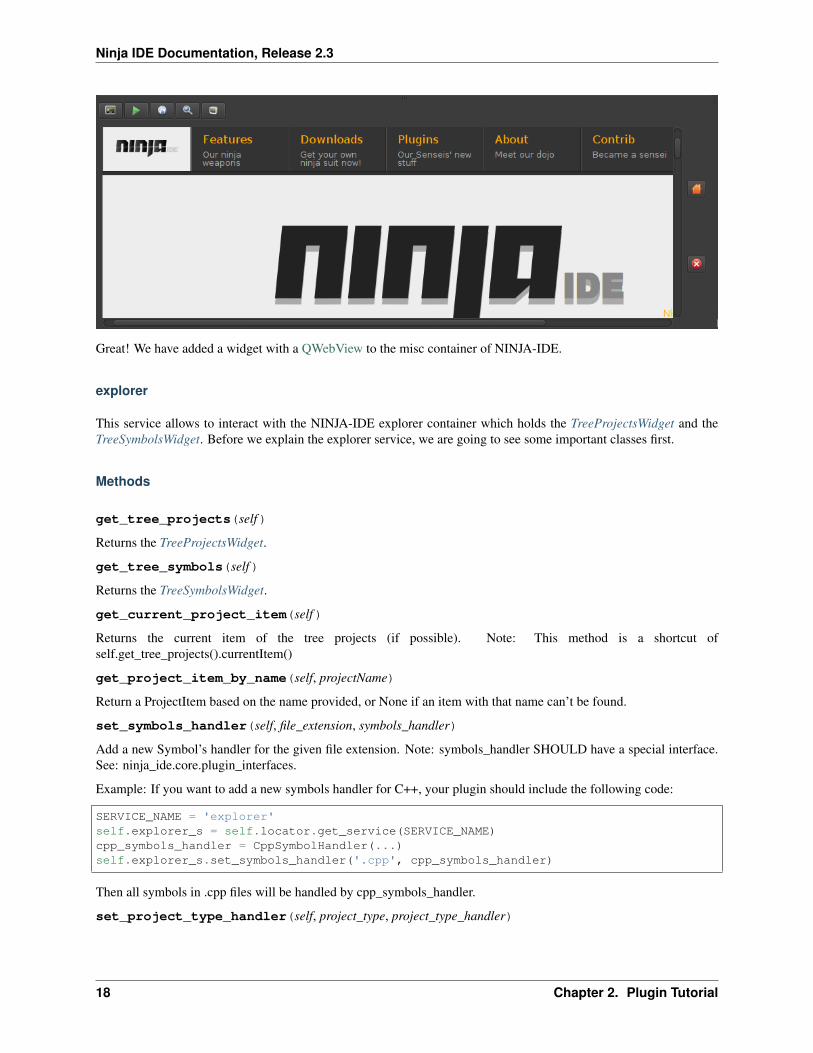
Ninja IDE Documentation, Release 2.3
Great! We have added a widget with a QWebView to the misc container of NINJA-IDE.
explorer
This service allows to interact with the NINJA-IDE explorer container which holds the TreeProjectsWidget and theTreeSymbolsWidget. Before we explain the explorer service, we are going to see some important classes first.
Methods
get_tree_projects(self)
Returns the TreeProjectsWidget.
get_tree_symbols(self)
Returns the TreeSymbolsWidget.
get_current_project_item(self)
Returns the current item of the tree projects (if possible). Note: This method is a shortcut ofself.get_tree_projects().currentItem()
get_project_item_by_name(self, projectName)
Return a ProjectItem based on the name provided, or None if an item with that name can’t be found.
set_symbols_handler(self, file_extension, symbols_handler)
Add a new Symbol’s handler for the given file extension. Note: symbols_handler SHOULD have a special interface.See: ninja_ide.core.plugin_interfaces.
Example: If you want to add a new symbols handler for C++, your plugin should include the following code:
SERVICE_NAME = 'explorer'self.explorer_s = self.locator.get_service(SERVICE_NAME)cpp_symbols_handler = CppSymbolHandler(...)self.explorer_s.set_symbols_handler('.cpp', cpp_symbols_handler)
Then all symbols in .cpp files will be handled by cpp_symbols_handler.
set_project_type_handler(self, project_type, project_type_handler)
18 Chapter 2. Plugin Tutorial
Ninja IDE Documentation, Release 2.3
Add a new Project Type and the handler for it. Note: project_type_handler SHOULD have a special interface. See:ninja_ide.core.plugin_interfaces.
Example: If you want to add a custom type of project, your plugin should include the following code:
SERVICE_NAME = 'explorer'self.explorer_s = self.locator.get_service(SERVICE_NAME)foo_project_handler = FooProjectHandler(...)self.explorer_s.set_project_type_handler('Foo Project', foo_project_handler)
Then ‘Foo Project’ will appear in the New Project wizard and the foo_project_handler instance controls the wizard.
add_tab(self, tab, title)
Add a tab (QTabWidget) with the given title (string).
get_actual_project(self)
Returns the path of the opened projects.
get_opened_projects(self)
Returns a list of strings with the paths of the opened projects, or an empty list if there aren’t any opened projects.
add_project_menu(self, menu, lang=’all’)
Add an extra menu(QMenu) to the project explorer for files that are specified by lang. Note: lang is a file extensionsuch as .php, .py, .cpp. If you want to add an extra menu for any kind of file, you need to specify lang=’all’.
Example 1: If you want to add an extra menu for Python files, your plugin should include the following code:
SERVICE_NAME = 'explorer'self.explorer_s = self.locator.get_service(SERVICE_NAME)extra_menu = MyCustomMenuForPHPFiles()self.explorer_s.add_project_menu(extra_menu, lang='.php')
Example 2: If you want to add an extra menu for all files, your plugin should include the following code:
SERVICE_NAME = 'explorer'self.explorer_s = self.locator.get_service(SERVICE_NAME)extra_menu = MyCustomMenuForPythonFiles()self.explorer_s.add_project_menu(extra_menu, lang='all')
Signals
projectExecuted(projectPath)
Emitted when the user executes a project.
To connect the plugin to this signal use:
SERVICE_NAME = "explorer"explorer_service = self.locator.get_service(SERVICE_NAME)explorer_service.projectExecuted.connect(self._do_something)
def do_something(self, projectPath):#the code goes here!
projectOpened(projectPath)
2.3. How to create plugins 19

Ninja IDE Documentation, Release 2.3
Emitted when the user opens a project.
To connect the plugin to this signal use:
SERVICE_NAME = "explorer"explorer_service = self.locator.get_service(SERVICE_NAME)explorer_service.projectOpened.connect(self._do_something)
def do_something(self, projectPath):#the code goes here!
TreeProjectsWidget
This class inherits from QTreeWidget and represents a tree with all the NINJA-IDE projects and their content (foldersand files).
ProjectTree
This class inherits from QTreeWidgetItem and is used to represent projects (root of tree).
This class contains general information about the project:
• self.path
• self.isFolder
• self.projectType
• self.description
20 Chapter 2. Plugin Tutorial

Ninja IDE Documentation, Release 2.3
• self.url
• self.license
• self.mainFile
• self.extensions
• self.pythonPath
• self.programParams
• self.venv
def lang(self)
Returns the programming language of the project.
def get_full_path(self)
Returns the full path of the project.
ProjectItem
This class inherits from QTreeWidgetItem and is used to represent the content of projects (folder and files).
This class contains general information about the file.
• self.path: Absolute path to the given item (folder or file).
• self.isFolder: Boolean value depending on the item is folder or item.
def get_full_path(self)
Returns the full path of the file.
TreeSymbolsWidget
This class inherits from QTreeWidget and represents the content of a file classes, methods, functions and globalvariables. NINJA-IDE only handles symbols for Python files, but we can add handlers for different files.
The TreeSymbolsWidget class looks like this:
2.3. How to create plugins 21

Ninja IDE Documentation, Release 2.3
Testing your plugin
There are different methods to test your plugin:
• Hacker way
You have to move your plugin code and the plugin descriptor file to ~/.ninja_ide/addins/plugins/. Re run NINJA-IDEand see what happens.
• pluginProject (Recommended way)
You have to install the official pluginProject plugin, create a new project, select the NINJA-Plugin-Project -type andfollow the wizard. When you’ve finished the wizard, the new project will be opened and some code will be includedinto some files. Go to the root of the project and right-click in it. Go to “Plugin Tools” and then select “Test thisplugin on NINJA-IDE”. This will launch a new instance of NINJA-IDE with your plugin.
• NINJA-IDE embedded console (Recommended way)
You can test the NINJA-IDE plugins API using the embedded console in NINJA-IDE. To do this you have to open theconsole (F4) and write your plugin code. You will see the results in real time on NINJA-IDE. For example, see thesession below when the user is playing with the API:
22 Chapter 2. Plugin Tutorial

Ninja IDE Documentation, Release 2.3
Debugging your plugin
When you install/test a plugin, it could fail. If the plugin fails, NINJA-IDE shows you a dialog with information(plugin name and traceback) about it. The image below shows how NINJA-IDE reports plugin errors.
2.3. How to create plugins 23

Ninja IDE Documentation, Release 2.3
24 Chapter 2. Plugin Tutorial

Index
Aadd_action(), 13, 16add_editor(), 11add_menu(), 11, 16add_project_menu(), 19add_tab(), 19add_widget(), 17
BbeforeFileSaved(), 9
CcurrentTabChanged(), 10
EeditorKeyPressEvent(), 9
FfileExecuted(), 10fileOpened(), 10fileSaved(), 10finish(), 7
Gget_actual_project(), 19get_current_project_item(), 18get_editor(), 11get_editor_path(), 11get_file_syntax(), 11get_lines_count(), 11get_opened_documents(), 11get_opened_projects(), 19get_preferences_widget(), 8get_project_item_by_name(), 18get_project_owner(), 11get_selected_text(), 11get_tab_manager(), 11get_text(), 11get_tree_projects(), 18
get_tree_symbols(), 18
Iinitialize(), 7insert_text(), 11
Jjump_to_line(), 11
Oopen_file(), 12open_files(), 11open_image(), 12
PprojectExecuted(), 19projectOpened(), 19
Ssave_file(), 11set_project_type_handler(), 18set_symbols_handler(), 18
25