nimsoft® monitor™ server · minor revisions and documentation fixes for nimsoft server 6.10....
TRANSCRIPT

Installation Guide version 6.10
Nimsoft® Monitor™ Server

Document Revision History
Document Version Date Changes
1.0 6/30/2010 Initial version Nimsoft Server Installation and User Guide
2.0 10/24/2011 New title: Nimsoft Server Installation Guide. Contains only content and procedures for new installations of Nimsoft Server v5.6. Updated for InstallAnywhere Windows installer. Added section on Advanced Agent Installer (AAI).
Migrated content from previous use guide to new document: Nimsoft Server Configuration Guide.
3.0 12/16/2011 Minor revisions and documentation fixes for Nimsoft Server 5.61
3.1 1/4/2012 Documentation fixes and "AAI robot installer packages" relabeled as "robot_msi_rpm installer packages."
3.2 2/22/2012 Documentation fixes and hardware capacity planning figures revised
3.3 3/12/2012 Documentation fixes; added remote access and authentication install information for MySQL.
6.0 6/29/2012 Revised for release 6.0 of Nimsoft Monitor Server and ADE probe v1.0
6.1
9/10/2012
Minor revisions and documentation fixes for Nimsoft Server 6.10.

Contact Nimsoft
For your convenience, Nimsoft provides a single site where you can access information about Nimsoft products.
At http://support.nimsoft.com/, you can access the following:
■ Online and telephone contact information for technical assistance and customer services
■ Information about user communities and forums
■ Product and documentation downloads
■ Nimsoft Support policies and guidelines
■ Other helpful resources appropriate for your product
Provide Feedback
If you have comments or questions about Nimsoft product documentation, you can send a message to [email protected].

Legal Notices Copyright © 2012, CA. All rights reserved.
Warranty
The material contained in this document is provided "as is," and is subject to being changed, without notice, in future editions. Further, to the maximum extent permitted by applicable law, Nimsoft LLC disclaims all warranties, either express or implied, with regard to this manual and any information contained herein, including but not limited to the implied warranties of merchantability and fitness for a particular purpose. Nimsoft LLC shall not be liable for errors or for incidental or consequential damages in connection with the furnishing, use, or performance of this document or of any information contained herein. Should Nimsoft LLC and the user have a separate written agreement with warranty terms covering the material in this document that conflict with these terms, the warranty terms in the separate agreement shall control.
Technology Licenses
The hardware and/or software described in this document are furnished under a license and may be used or copied only in accordance with the terms of such license.
No part of this manual may be reproduced in any form or by any means (including electronic storage and retrieval or translation into a foreign language) without prior agreement and written consent from Nimsoft LLC as governed by United States and international copyright laws.
Restricted Rights Legend
If software is for use in the performance of a U.S. Government prime contract or subcontract, Software is delivered and licensed as "Commercial computer software" as defined in DFAR 252.227-7014 (June 1995), or as a "commercial item" as defined in FAR 2.101(a) or as "Restricted computer software" as defined in FAR 52.227-19 (June 1987) or any equivalent agency regulation or contract clause. Use, duplication or disclosure of Software is subject to Nimsoft LLC’s standard commercial license terms, and non-DOD Departments and Agencies of the U.S. Government will receive no greater than Restricted Rights as defined in FAR 52.227-19(c)(1-2) (June 1987). U.S. Government users will receive no greater than Limited Rights as defined in FAR 52.227-14 (June 1987) or DFAR 252.227-7015 (b)(2) (November 1995), as applicable in any technical data.
Trademarks
Nimsoft is a trademark of CA.
Adobe®, Acrobat®, Acrobat Reader®, and Acrobat Exchange® are registered trademarks of Adobe Systems Incorporated.
Intel® and Pentium® are U.S. registered trademarks of Intel Corporation.
Java(TM) is a U.S. trademark of Sun Microsystems, Inc.
Microsoft® and Windows® are U.S. registered trademarks of Microsoft Corporation.
Netscape(TM) is a U.S. trademark of Netscape Communications Corporation.
Oracle® is a U.S. registered trademark of Oracle Corporation, Redwood City, California.
UNIX® is a registered trademark of the Open Group.
ITIL® is a Registered Trade Mark of the Office of Government Commerce in the United Kingdom and other countries.
All other trademarks, trade names, service marks and logos referenced herein belong to their respective companies.

Contents 5
Contents
Chapter 1: Introduction 9
About this Guide .......................................................................................................................................................... 9
Installation Overview ................................................................................................................................................. 10
Basic Installation ................................................................................................................................................. 10
Working with Firewalls and DMZs ...................................................................................................................... 14
Post-installation Tasks ................................................................................................................................................ 16
Chapter 2: NMS Pre-installation 17
Pre-installation Planning ............................................................................................................................................ 18
Distribution of Nimsoft Components .................................................................................................................. 18
Determining Database Performance Requirements ........................................................................................... 19
Determining Hardware Requirements ................................................................................................................ 19
Hardware Requirements and Recommendations ...................................................................................................... 20
Minimum Hardware Requirements .................................................................................................................... 20
Hardware Recommendations ............................................................................................................................. 20
Microsoft Windows and MS-SQL Server .................................................................................................................... 21
Windows System Prerequisites ........................................................................................................................... 21
Microsoft SQL Server Database Prerequisites .................................................................................................... 23
Microsoft Windows and MySQL Server ..................................................................................................................... 25
Windows System Prerequisites ........................................................................................................................... 25
MySQL Server Database Prerequisites ................................................................................................................ 27
Microsoft Windows and Oracle .................................................................................................................................. 30
Windows System Prerequisites ........................................................................................................................... 30
Oracle Database Prerequisites ............................................................................................................................ 32
Linux and MySQL Server ............................................................................................................................................. 34
Linux System Prerequisites ................................................................................................................................. 35
MySQL Server Database Prerequisites ................................................................................................................ 37
Linux and Oracle ......................................................................................................................................................... 40
Linux System Prerequisites ................................................................................................................................. 40
Oracle Database Prerequisites ............................................................................................................................ 43
Solaris and MySQL Server ........................................................................................................................................... 45
Solaris System Prerequisites ............................................................................................................................... 46
MySQL Server Database Prerequisites ................................................................................................................ 47
Solaris and Oracle ....................................................................................................................................................... 50
Solaris System Prerequisites ............................................................................................................................... 51
Oracle Database Prerequisites ............................................................................................................................ 52

6 Installation Guide
Chapter 3: NMS Installation 57
Overview .................................................................................................................................................................... 57
Installation Requirements ................................................................................................................................... 58
Installed Components ......................................................................................................................................... 58
Installing NMS on Windows—GUI Mode ................................................................................................................... 60
Installing NMS on Linux or Solaris—Console Mode ................................................................................................... 63
GUI and Console Mode Parameter Values ................................................................................................................. 65
MySQL Database Parameters .............................................................................................................................. 65
SQL Server Database Parameters........................................................................................................................ 66
Oracle Database Parameters .............................................................................................................................. 66
Hub Configuration Values ................................................................................................................................... 67
Installing NMS on Windows, Linux or Solaris—Silent Mode ...................................................................................... 68
Silent Install Parameter Values .................................................................................................................................. 69
Database Configuration Parameters ................................................................................................................... 70
Hub Configuration Parameters ........................................................................................................................... 71
Uninstalling NMS ........................................................................................................................................................ 73
Windows ............................................................................................................................................................. 73
Linux and Solaris.................................................................................................................................................. 73
Chapter 4: Nimsoft Client Installation 75
Client Installation Overview ....................................................................................................................................... 75
Management Consoles ....................................................................................................................................... 77
Infrastructure Components ................................................................................................................................. 77
Typical Infrastructure Deployment ..................................................................................................................... 78
Installing Infrastructure on Windows Clients ............................................................................................................. 78
Installing Infrastructure Manager ....................................................................................................................... 78
Installing a Windows Robot ................................................................................................................................ 79
Installing Windows Robot, Hub and Distribution Server..................................................................................... 79
Installing Infrastructure on Linux or Solaris Clients .................................................................................................... 83
Check the Client Computer IP Address in /etc/hosts .......................................................................................... 83
Installing Infrastructure with the Nimsoft Loader (nimldr) ................................................................................. 84
Questions and Answers for the nimldr Installer ................................................................................................. 85
Flags for nimldr Installer ..................................................................................................................................... 88
Installing a Robot on an AS400 Computer ................................................................................................................. 89
Appendix A: Bulk Robot Deployment with the Automated Deployment Engine (ADE) 93
Introduction ............................................................................................................................................................... 93
Prerequisites for ADE ................................................................................................................................................. 94
Using ADE in GUI Mode .............................................................................................................................................. 96

Contents 7
Deploying Robots with the ADE GUI ................................................................................................................... 97
Deployment Details ............................................................................................................................................. 98
Authentication Parameters ................................................................................................................................. 99
Hub and Robot Parameters ................................................................................................................................. 99
Host Parameters ............................................................................................................................................... 100
Using the ADE Command Line Interface .................................................................................................................. 100
Deploying Robots with the Command Line Interface ....................................................................................... 101
Deployment Details ........................................................................................................................................... 102
Example host-profiles.xml File .......................................................................................................................... 103
Parameter Values for host-profiles.xml ............................................................................................................ 103
Deploying Robots with a Third-Party Mechanism .................................................................................................... 104
Deployment Steps ............................................................................................................................................. 105
Answer File Syntax and Parameters .................................................................................................................. 107
Removing the Package ...................................................................................................................................... 108
Troubleshooting ....................................................................................................................................................... 108
Appendix B: Installing NMS in an Active/Passive Microsoft Cluster 109
Prerequisites ............................................................................................................................................................ 109
Installing NMS on the Cluster ................................................................................................................................... 110
Configuring the Nimsoft Robot Watcher Service ..................................................................................................... 111
Testing Failover Operation ....................................................................................................................................... 114
Appendix C: MySQL Windows Installation 115
Prerequisites and Considerations ............................................................................................................................ 115
Installation Steps ...................................................................................................................................................... 116
Standard Post-installation Configuration ................................................................................................................. 117
Basic Tuning Configuration Changes ........................................................................................................................ 118
Deployment Statistics and Estimations .................................................................................................................... 119
Schema and Data Management ............................................................................................................................... 120
Appendix D: Installation Modifications to Windows Systems 121
Robot Modifications ................................................................................................................................................. 121
NMS or Nimsoft Infrastructure Modifications ......................................................................................................... 121


Chapter 1: Introduction 9
Chapter 1: Introduction
This section contains the following topics:
About this Guide (see page 9) Installation Overview (see page 10) Post-installation Tasks (see page 16)
About this Guide
This guide helps you successfully install the Nimsoft Monitor Server (NMS) software. It contains the following sections:
■ Introduction (see page 9)—an overview of the installation phases
■ NMS Pre-installation (see page 17)—pre-installation computer and database configuration
■ NMS Installation (see page 57)—NM server installation
■ Nimsoft Client Installation—deployment of client software into your monitored infrastructure
■ Other sections cover bulk robot installation (using the ADE probe and robot_msi_rpm installer packages), installation in a Microsoft Cluster, and MySQL installation on Windows.
Notes: To improve accuracy and provide the most current information possible, product documentation and online help is now hosted on the Internet, and requires Internet access to view.
The Nimsoft Unified Management Portal (UMP), Unified Reporter (UR) and Service Desk (NSD) products have their own installation guides, available from the Downloads tab at support.nimsoft.com.
For upgrade installations, see the NMS Release Notes and Upgrade Guide, available from the Downloads tab at support.nimsoft.com.

Installation Overview
10 Installation Guide
Installation Overview
Basic Installation
Nimsoft Monitor is made up of a number of distributed and loosely coupled software modules. The process of installing these modules to build out a full system can be divided into three phases:
1. Preparation and pre-installation. Proper configuration of the operating system and database helps ensure a successful installation.
2. Nimsoft Monitor Server (NMS) installation. This process installs the foundation for Nimsoft Monitor, which consists of:
■ Nimsoft message bus
■ Nimsoft domain
■ Primary hub
■ Server robot and probes
■ Server web page, which has links to installers for client systems
■ Nimsoft Information Store (NIS) database, also referred to as the SLM database
■ User accounts on the NM server and database server that are needed by Nimsoft Monitor

Installation Overview
Chapter 1: Introduction 11
3. Client installation. Install Nimsoft infrastructure (hubs, robots and probes) on client systems to monitor devices and services and to allow management consoles (such as Infrastructure Manager) to be run from other systems.
Note: After installation, most users install Unified Management Portal (UMP). See the UMP Installation Guide available from the Downloads tab at support.nimsoft.com.
You can install infrastructure:
■ Locally into your IT environment to monitor and manage on-premise devices and services.

Installation Overview
12 Installation Guide
■ Remotely to extend the managed domain by deploying infrastructure to remote sites. This might require you to create secure tunnels between hubs.

Installation Overview
Chapter 1: Introduction 13
Required Ports
The ports required for a successful infrastructure installation depend on how hubs are set up. If we assume the default first port of 48000 is used, port assignments are as follows.
■ Single-hub infrastructure or multi-hub infrastructure that does NOT use tunnels:
– 48000 for robot controller probe
– 48001 for robot spooler probe
– 48002 to allow robot-to-hub and manager-to-hub communications
– A port for each probe you install; these ports start at 48004 and are assigned to each probe as the probe is activated
■ Multi-hub infrastructure that uses tunnels that are NOT SLL tunnels:
– All ports used in a single-hub installation
– 48003, the port to the tunnel server (this also can bet set to 443)
■ Multi-hub infrastructure that uses Nimsoft SSL tunnels:
– 48000 (controller) and 48002 (hub)
– 48003 to allow the tunnel client to access the tunnel server
– 8008 (httpd) to allow users to access web components
More information:
■ Working with Firewalls and DMZs (see page 14)
■ Required Ports for SSL Tunnels (see page 15)

Installation Overview
14 Installation Guide
Working with Firewalls and DMZs
Most companies have one or more firewalls in their network, both internally between different networks and externally against the Internet or a network DMZ.
Because network administrators are often reluctant to open a firewall for the number of IP addresses and ports that management applications require, it can be difficult to administer and monitor the whole network from a central location.
The solution is to set up a secure shell (SSH) tunnel between two hubs that are separated by a firewall. The tunnel sets up a VPN (Virtual Private Network) connection between the two hubs and enables all requests and messages to be routed over the tunnel and dispatched on the other side. This routing is transparent to all the users within the Nimsoft Monitor domain.
You can create tunnels between any Nimsoft hubs.
Note: A hub in a DMZ must have a public IP address if you want to access it from the Internet.
Security
Security is handled in two ways: certificates to authenticate the tunnel client and encryption to secure the network traffic.
■ Authorization and Authentication Certificates provide authorization and authentication. Both the client and the server need valid certificates issued by the same CA (Certificate Authority). The system receiving the connection (the server) is its own CA and only accepts certificates issued by itself.
■ Encryption Encryption settings range from None to High. No encryption means that the traffic is still authenticated and is therefore recommended for tunnels within LANs and WANs. Higher encryption level since are more resource intensive for the systems at both ends of the tunnel.
Which Hub Should Be the Server?
Because the tunnel server uses a fair amount of computing power, the system with the lower load should be the tunnel server. If you plan to have a central hub with several remote hubs attached to it, it is better for the remote hubs to be the tunnel servers so that each remote hub only adds a small amount of overhead to the central hub.

Installation Overview
Chapter 1: Introduction 15
Required Ports for SSL Tunnels
The following ports are required.
■ 48000 (controller) and 48002 (hub)
■ A configured tunnel server port (default is 48003, this also can be set to 443) allows the tunnel client to access the tunnel server. How this is set up in the firewall is firewall-dependent. If necessary, refer to your firewall documentation on how to open a connection between the two systems.
■ Port 8008 (httpd) is required if you want users to have access to a web server.
The following illustration shows the components installed and the ports that need to be opened in a scenario with a DMZ and two firewalls.
Tunnel Setup Overview
You must first set up the tunnel server (which generates the client certificate), then set up the tunnel client (where the certificate must reside).
You can set up tunnels:
■ During installation. The hub installation processes include option to set up DMZ tunnel servers and clients. For details refer to:
– Installing a Windows Robot, Hub and Distribution Server (see page 79)
– Installing Infrastructure on Linux or Solaris Clients (see page 83)
■ On existing hubs after installation. This is done with the Infrastructure Manager management console.

Post-installation Tasks
16 Installation Guide
Post-installation Tasks
After installation, you configure the various Nimsoft infrastructure components within your environment. This includes:
■ Tuning thresholds so that alarms are raised appropriately
■ Setting up actions in response to alarms
■ Setting up SLAs
■ Configuring dashboards to view QoS information
For instructions and details, refer to the:
■ NMS Configuration Guide, available from the Downloads tab at http://support.nimsoft.com
■ Online help available with each component probe, package, or product.

Chapter 2: NMS Pre-installation 17
Chapter 2: NMS Pre-installation
Proper configuration of the host computers and database helps ensure a successful installation.To do this, make sure you have:
■ Determined where to install Nimsoft components and taken into account database performance and hardware considerations, as explained in Pre-installation Planning (see page 18)
■ Allocated sufficient hardware, as described in Hardware Requirements and Recommendations (see page 20)
■ Met the operating system and database prerequisites.
All pre-installation information for a particular operating system/database combination is in one section. Refer to the section that applies to your choice of OS and database.
This section contains the following topics:
Pre-installation Planning (see page 18) Hardware Requirements and Recommendations (see page 20) Microsoft Windows and MS-SQL Server (see page 21) Microsoft Windows and MySQL Server (see page 25) Microsoft Windows and Oracle (see page 30) Linux and MySQL Server (see page 34) Linux and Oracle (see page 40) Solaris and MySQL Server (see page 45) Solaris and Oracle (see page 50)

Pre-installation Planning
18 Installation Guide
Pre-installation Planning
Distribution of Nimsoft Components
You need to make two decisions about distributing Nimsoft components.
■ Where to install the primary components. The Nimsoft solution has three primary components:
– NM server, which contains (and is sometimes referred to as) the primary hub
– Nimsoft Information Store (NIS) database, previously called the SLM database
– Unified Management Portal (UMP)
When installing for a small environment, you may choose to install everything on a single machine. However, Nimsoft recommends you distribute these components across multiple virtual or physical servers. This gives each component sufficient computing power and memory to perform optimally.
How you distribute them is guided by the size of your deployment For details, refer to Hardware Recommendations.
Note: The optional UMP DMZ proxy server component must be installed on an additional system.
■ Where to install hubs. You may want to install two hubs on the same domain and use the High-Availability probe to provide fail-over capability. This ensures that in the event the primary hub fails:
– Your Nimsoft solution continues to operate seamlessly.
– Your user and security data—such as Nimsoft user definitions, ACLs, and so on—remains intact and fully functional.

Pre-installation Planning
Chapter 2: NMS Pre-installation 19
Determining Database Performance Requirements
Relational database server performance is heavily affected by disk I/O performance and server bus bandwidth. Crowded VM hosts, clusters, or heavily shared storage in VM environments are not recommended for hosting the Nimsoft NIS database.
Nimsoft recommends that you:
■ Start with at least 1 TB of storage for the NIS database
■ Use RAID 10 for speed and reliability
■ Consider spreading the database files across multiple disks to improve I/O performance
■ Choose drive subsystems with low latency and seek times, high spindle speeds and high interconnect bandwidth
■ Consider data redundancy and synchronization on an on-going basis, taking into account the growth of the database
Note: Selecting the right database storage solution is beyond the scope of this document. Nimsoft recommends you discuss this with your storage vendor or consultant.
Determining Hardware Requirements
Assessing the hardware requirements for any large and complex software system is a challenge. Oversizing seems wasteful, but underestimating needs can create performance problems. Unfortunately, no fixed rules or formulas can guarantee a minimum optimal configuration. Every environment has its own challenges and opportunities, including yours.
When considering your hardware needs:
■ Keep in mind that a hardware configuration that works today may need to grow in the future. Take forecast growth into consideration when planning your hardware requirements.
■ Use the information in this section to begin planning your deployment, but consider that your particular situation may impose greater or lesser demands on the system.
■ Note that many professionals believe it is wise to obtain and use hardware of the most current generation. By starting with hardware of the latest architecture, one can anticipate the longest useful life.
■ Consult your Nimsoft Sales Engineer if you have any doubts or concerns about your hardware needs.

Hardware Requirements and Recommendations
20 Installation Guide
Hardware Requirements and Recommendations
Minimum Hardware Requirements
These are the minimum requirements for basic functionality. Actual requirements depend on the size of your IT environment and the extent of your monitoring needs. Hardware Recommendations provides guidelines for various deployment scenarios.
■ Two servers or virtual machines:
– One for the NMS software and UMP
– One for the NIS database
Note: While it is possible for the NMS software and database to reside on the same system, Nimsoft does not recommend this.
■ One dual-core processor (XEON-class 2.0 GHz or better) per server
■ 4 GB of memory
Note: The NMS Installer will terminate if it determines that the target system for installation has less than 4 GB of memory.
Hardware Recommendations
While every situation is unique, the following deployment categories give you a starting point for assessing your hardware requirements.
Deployment size
Physical or virtual server requirements
Server Processor (XEON-class 2.0 GHz or better)
Memory
One hub, fewer than 100 robots
Modest deployment, such as a proof-of-concept for a small business
NMS and UMP
One dual-core processor 4 GB to 8 GB
NIS database
One dual-core processor 8 GB
Up to five hubs, fewer than 250 robots
Medium-scale deployment, such as a small government agency
NMS One or two quad-core processors
12 GB
UMP One quad-core processor 4GB to 8 GB
NIS database
One or two quad-core processors
12 GB

Microsoft Windows and MS-SQL Server
Chapter 2: NMS Pre-installation 21
Deployment size Physical or virtual server requirements
Up to twenty hubs, fewer than 500 robots
Large-scale deployment
NMS Two quad-core processors 12 GB
UMP Two quad-core processors 8 GB to 12 GB
NIS database
Two quad-core processors 12 GB to 18 GB
Up to fifty hubs, fewer than 1000 robots
Major deployment
NMS Two quad- or eight-core processors
16GB to 24 GB
UMP Two quad-core processors 16 GB
NIS database
Two quad- or eight-core processors
18 GB to 24 GB
Over fifty hubs, over 1000 robots
Use the specifications above as a starting point and consult with Nimsoft professional services or a Nimsoft certified partner.
Microsoft Windows and MS-SQL Server
Your system must meet these criteria. Check the Nimsoft Compatibility Support Matrix to confirm which versions are supported.
NM server host system options
■ Windows Server 2003
■ Windows Server 2008
Database options
■ SQL Server 2008
■ SQL Server 2008 R2
Windows System Prerequisites
Note: The Nimsoft hub message queue is stored on disk and is constantly undergoing read and write activity. Because disk compression reduces I/O performance, NMS does not support compression on Windows.

Microsoft Windows and MS-SQL Server
22 Installation Guide
Microsoft Windows User Account Control
Supported Microsoft Windows platforms newer than Windows XP and Windows 2003 implement User Account Control (UAC) to prevent unauthorized modifications to the computer.
If UAC is turned on, administrative privileges are needed to install NMS. On Windows Vista, they are also needed to run the NM server.
Note: Nimsoft recommends using Windows Vista only for test or evaluation.
Note: Although Nimsoft does not recommend it, you can turn UAC off if you prefer. See the Windows documentation for details.
Java Virtual Machine (JVM)
The installer requires Java Virtual Machine (JVM) 1.6 or later. It is generally acceptable to simply install the latest JVM, but be sure to check the NMS Release Notes and Upgrade Guide for the latest updates on supported JVM versions.
To ensure you have a supported Java Virtual Machine, execute:
java -version
If the command fails:
■ Make sure you have the right package (32-bit or 64-bit) for your operating system.
■ If you believe your system has a supported version, make sure that the JVM is part of the system PATH environment variable.
■ If there is no directory on the system for Java, go to http://www.java.com (not affiliated with Nimsoft) and download a Java distribution. Install it according to the directions on that site and ensure that the JVM is included in the PATH environment variable.
Java on VMware Virtual Machines
When installing on a VMware ESX Server, please review the VMware Enterprise Java Applications on VMware - Best Practices Guide, available at http://www.vmware.com/resources/techresources/1087 (not affiliated with Nimsoft).

Microsoft Windows and MS-SQL Server
Chapter 2: NMS Pre-installation 23
Firewalls and Virus Scanners
Before installation:
■ Shut down any anti-virus software (required).
■ Shut down the firewall (optional). While not always necessary, this maximizes your chance of a successful installation. If you keep your firewall running, you must at least:
– Ensure the port between the NMS system and the database system is open.
– Specify a starting port during NMS installation (the recommended default is port 48000).
– Ensure that an adequate range of ports are open (for example, ports 48000 through 48020). At minimum, the first three ports assigned (controller, spooler, and hub) must be open. The port used for distsrv is dynamically assigned.
Note: Restart the firewall and anti-virus software when installation is complete.
Microsoft SQL Server Database Prerequisites
Nimsoft strongly encourages you to begin with a fresh database installation on a clean system. NMS has a track record of easy and successful installation in such an environment. Experience shows that using a pre-existing database can cause subtle configuration conflicts that are hard to diagnose and make installation unnecessarily difficult.
Microsoft SQL Server Software Installation
Nimsoft recommends only the full licensed product version with database authentication or Windows authentication for production environments.
Check the Nimsoft Compatibility Support Matrix for supported versions.
Note: Use the free Express version only for evaluation or demonstration purposes.
To obtain a copy of Microsoft SQL Server, go to www.microsoft.com/sqlserver/ (not affiliated with Nimsoft). Make sure the version is compatible with your hardware (32-bit or 64-bit).
Follow the installation instructions available with the download.
Configuring Microsoft SQL Server
The simplest option:
■ Accept the default instance name when you install Microsoft SQL Server
■ Use the default port (1433) when you install NMS

Microsoft Windows and MS-SQL Server
24 Installation Guide
Other options have different requirements. If you:
■ Use a non-default instance name for the Microsoft SQL Server, you must use the default port (1433) when installing NMS.
■ Want to use a port other than 1433 for NMS, you must use the default MS SQL Server instance name.
During NM server installation you select one of these authentication options:
■ SQL Server with SQL Server login. You must provide the SQL server user name and password during installation. No modifications are needed.
■ SQL Server with Windows authentication. You might need to make database modifications in advance, as described in the following section.
SQL Server with Windows NT Authentication
Windows authentication has these requirements.
■ Before you install NMS, you must:
– Add a domain administrator with permission to Log on as a Service on both the NMS system and the database system. For instructions, go to:
http://technet.microsoft.com/en-us/library/dd277404.aspx
– Configure SQL server to use Windows authentication. For instructions, go to:
http://msdn.microsoft.com/en-us/library/aa337562.aspx
Note: The user installing NMS must have the same administrative rights as those used to install the SQL server, and supply those credentials during the installation. Specifically, the data_engine probe must have identical administrative rights on both the NMS system and the database system.
■ After installation, you must:
– Change the login for the Nimsoft Robot Watcher service to run as a user with the same administrative rights used to access the SQL server.
– Ensure that you enter the following for the system where you plan to install UMP:
<domain>\<UMP_system_name>$
NMI--SQL Server Express
Note: SQL Server Express can be used for demonstration and proof-of-concept installations. It is not supported for production use because of limitations it imposes on security, storage capacity, and performance.

Microsoft Windows and MySQL Server
Chapter 2: NMS Pre-installation 25
To use SQL Server Express, you must:
■ Specify the following options to the SQL Server Express setup program:
SAPWD=<password> SECURITYMODE=SQL DISABLENETWORKPROTOCOLS=0
■ Use this format when specifying the server name:
<server_name>\SQLEXPRESS
■ Use the default port (1433) when you install NMS because SQL Server Express installs a named instance (SQLExpress) unless a default instance is specified.
Microsoft Windows and MySQL Server
Your system must meet these criteria. Check the Nimsoft Compatibility Support Matrix to confirm which versions are supported.
NMS host system options
■ Windows Server 2003
■ Windows Server 2008
Database options
■ MySQL Server 5.5 (recommended due to improved performance and scalability)
■ MySQL Server 5.1 (supported but to be discontinued in a future release)
Windows System Prerequisites
Note: The Nimsoft hub message queue is stored on disk and is constantly undergoing read and write activity. Because disk compression reduces I/O performance, NMS does not support compression on Windows.
Microsoft Windows User Account Control
Supported Microsoft Windows platforms newer than Windows XP and Windows 2003 implement User Account Control (UAC) to prevent unauthorized modifications to the computer.
If UAC is turned on, administrative privileges are needed to install NMS. On Windows Vista, they are also needed to run the NM server.
Note: Nimsoft recommends using Windows Vista only for test or evaluation.
Note: Although Nimsoft does not recommend it, you can turn UAC off if you prefer. See the Windows documentation for details.
Microsoft Windows and MySQL Server
26 Installation Guide
Java Virtual Machine (JVM)
The installer requires Java Virtual Machine (JVM) 1.6 or later. It is generally acceptable to simply install the latest JVM, but be sure to check the NMS Release Notes and Upgrade Guide for the latest updates on supported JVM versions.
To ensure you have a supported Java Virtual Machine, execute:
java -version
If the command fails:
■ Make sure you have the right package (32-bit or 64-bit) for your operating system.
■ If you believe your system has a supported version, make sure that the JVM is part of the system PATH environment variable.
■ If there is no directory on the system for Java, go to http://www.java.com (not affiliated with Nimsoft) and download a Java distribution. Install it according to the directions on that site and ensure that the JVM is included in the PATH environment variable.
Java on VMware Virtual Machines
When installing on a VMware ESX Server, please review the VMware Enterprise Java Applications on VMware - Best Practices Guide, available at http://www.vmware.com/resources/techresources/1087 (not affiliated with Nimsoft).
Firewalls and Virus Scanners
Before installation:
■ Shut down any anti-virus software (required).
■ Shut down the firewall (optional). While not always necessary, this maximizes your chance of a successful installation. If you keep your firewall running, you must at least:
– Ensure the port between the NMS system and the database system is open.
– Specify a starting port during NMS installation (the recommended default is port 48000).
– Ensure that an adequate range of ports are open (for example, ports 48000 through 48020). At minimum, the first three ports assigned (controller, spooler, and hub) must be open. The port used for distsrv is dynamically assigned.
Note: Restart the firewall and anti-virus software when installation is complete.

Microsoft Windows and MySQL Server
Chapter 2: NMS Pre-installation 27
MySQL Server Database Prerequisites
Nimsoft strongly encourages you to begin with a fresh database installation on a clean system. NMS has a track record of easy and successful installation in such an environment. Experience shows that using a pre-existing database can cause subtle configuration conflicts that are hard to diagnose and make installation unnecessarily difficult.
Installing the MySQL Software
You can obtain a copy of the open-source MySQL database software from http://dev.mysql.com/downloads/ (not affiliated with CA Nimsoft). Make sure the version is supported and compatible with your hardware. You can use either the Community Server version or a licensed version.
For installation instructions, go to http://dev.mysql.com/doc.
Required MySQL Configuration
Certain capabilities are set via MySQL variables.
Note: You must restart the database after making changes.
To check and set the required MySQL variable settings:
1. Log in as the MySQL administrator.
2. On the MySQL server, execute:
show variables like 'local_infile';
show variables like 'lower_case_table_names';
3. See if you have these variables and values.
■ local_infile: ON
■ lower_case_table_names: 1
■ binlog_format: mixed
4. If the variables do not exist or the values are not correct, add these lines to the MySQL server configuration file or correct their values.
[mysqld]
local_infile = 1
lower_case_table_names = 1
binlog_format = mixed

Microsoft Windows and MySQL Server
28 Installation Guide
MySQL in Large Environments
If you are preparing for a large-scale or major deployment, you must set additional database parameters to allow for the greater demands of such an environment. Nimsoft recommends you begin with the values shown in the following example, and then fine-tune settings depending on your circumstances.
As the MySQL administrator, add these lines to the MySQL server configuration file:
[mysqld]
max_heap_table_size = 134217728
query_cache_limit = 4194304
query_cache_size = 268435456
sort_buffer_size = 25165824
join_buffer_size = 67108864
max_tmp_tables = 64
Note: Large-scale and major deployments are defined in Hardware Recommendations.
Creating the Database and User
There are three ways to create the database and user:
■ Installer creates the database; user is root
■ Installer creates the database; user is an existing account
■ Administrator creates the database and user before NMS installation
Installer Creates Database; User is root
This method creates the MySQL database and gives access to the root user. This requires you to:
■ Grant the root user remote access to the MySQL server before installation.
To allow this access, execute directly on the MySQL database server:
GRANT ALL PRIVILEGES ON *.* TO 'root'@'%' IDENTIFIED BY ‘<root password>’ WITH GRANT OPTION;
GRANT TRIGGER ON nimsoftnis.* TO 'root'@'%' WITH GRANT OPTION;
GRANT SUPER ON *.* TO 'root'@'%';
FLUSH PRIVILEGES;

Microsoft Windows and MySQL Server
Chapter 2: NMS Pre-installation 29
Installer Creates Database; User is an Existing Account
The installer can create the database with an existing user provided you use root to create the database during installation. This requires you to:
■ Grant the root user remote access to the database server before installation. To do this, execute on the database server:
GRANT ALL PRIVILEGES ON *.* TO 'root'@'%' IDENTIFIED BY ‘<root password>’ WITH GRANT OPTION;
GRANT TRIGGER ON nimsoftnis.* TO 'root'@'%' WITH GRANT OPTION;
GRANT SUPER ON *.* TO 'root'@'%';
FLUSH PRIVILEGES;
■ Specify a user in the Nimsoft SLM Database User Account field during installation. The root user creates the database and apply the appropriate permissions to the existing user.
Administrator Creates Database and User Before NMS Installation
The advantage of this approach is that you do not have to allow Nimsoft Server access to a MySQL account with administrator privileges. If you decide to create a Nimsoft-specific MySQL user account, you should also create the database.
To manually create the NIS database and user and grant the required privileges, follow these steps.
1. Log in as the MySQL administrator.
2. Create the database. Execute:
CREATE DATABASE IF NOT EXISTS DB_name DEFAULT CHARACTER SET =utf8 DEFAULT COLLATE =utf8_unicode_ci;
where DB_name is the desired database name.
3. Create the user and assign required privileges. Execute:
CREATE USER 'nmsuser'@'%' IDENTIFIED BY 'nmsuserpass';
GRANT ALL PRIVILEGES ON DB_name.* TO 'nmsuser'@'%';
GRANT TRIGGER ON DB_name.* TO 'nmsuser'@'%';
GRANT SUPER ON *.* TO 'nmsuser'@'%';
FLUSH PRIVILEGES;
where nmuser is the desired Nimsoft user name, nmuserpass is the desired password, and DB_name is the name of the database you created.
Note: The single-quotation marks (') are required.
When you install NMS:
■ Select Use existing database for the Nimsoft Server information.
■ Provide the actual database name, user and password you created above.

Microsoft Windows and Oracle
30 Installation Guide
Microsoft Windows and Oracle
Your system must meet these criteria. Check the Nimsoft Compatibility Support Matrix to confirm which versions are supported.
NMS host system options
■ Windows Server 2003
■ Windows Server 2008
Database options
■ Oracle 11g R1
■ Oracle 11g R2
Windows System Prerequisites
Note: The Nimsoft hub message queue is stored on disk and is constantly undergoing read and write activity. Because disk compression reduces I/O performance, NMS does not support compression on Windows.
Microsoft Windows User Account Control
Supported Microsoft Windows platforms newer than Windows XP and Windows 2003 implement User Account Control (UAC) to prevent unauthorized modifications to the computer.
If UAC is turned on, administrative privileges are needed to install NMS. On Windows Vista, they are also needed to run the NM server.
Note: Nimsoft recommends using Windows Vista only for test or evaluation.
Note: Although Nimsoft does not recommend it, you can turn UAC off if you prefer. See the Windows documentation for details.

Microsoft Windows and Oracle
Chapter 2: NMS Pre-installation 31
Java Virtual Machine (JVM)
The installer requires Java Virtual Machine (JVM) 1.6 or later. It is generally acceptable to simply install the latest JVM, but be sure to check the NMS Release Notes and Upgrade Guide for the latest updates on supported JVM versions.
To ensure you have a supported Java Virtual Machine, execute:
java -version
If the command fails:
■ Make sure you have the right package (32-bit or 64-bit) for your operating system.
■ If you believe your system has a supported version, make sure that the JVM is part of the system PATH environment variable.
■ If there is no directory on the system for Java, go to http://www.java.com (not affiliated with Nimsoft) and download a Java distribution. Install it according to the directions on that site and ensure that the JVM is included in the PATH environment variable.
Java on VMware Virtual Machines
When installing on a VMware ESX Server, please review the VMware Enterprise Java Applications on VMware - Best Practices Guide, available at http://www.vmware.com/resources/techresources/1087 (not affiliated with Nimsoft).
Firewalls and Virus Scanners
Before installation:
■ Shut down any anti-virus software (required).
■ Shut down the firewall (optional). While not always necessary, this maximizes your chance of a successful installation. If you keep your firewall running, you must at least:
– Ensure the port between the NMS system and the database system is open.
– Specify a starting port during NMS installation (the recommended default is port 48000).
– Ensure that an adequate range of ports are open (for example, ports 48000 through 48020). At minimum, the first three ports assigned (controller, spooler, and hub) must be open. The port used for distsrv is dynamically assigned.
Note: Restart the firewall and anti-virus software when installation is complete.

Microsoft Windows and Oracle
32 Installation Guide
Oracle Database Prerequisites
Nimsoft strongly encourages you to begin with a fresh database installation on a clean system. NMS has a track record of easy and successful installation in such an environment. Experience shows that using a pre-existing database can cause subtle configuration conflicts that are hard to diagnose and make installation unnecessarily difficult.
Required Oracle Environment
The Oracle Instant Client must be installed on the NMS system so it can access the Oracle database.
Follow these steps:
1. Go to www.oracle.com and select Downloads > Instant Client.
2. Click the link for the operating system and hardware of your system.
3. Download the zip file for the Instant Client Package – Basic.
4. Install the Instant Client according to the directions on the web site. Be sure to add the unzipped Instant Client directory to your path.
5. Restart the system.
Required Oracle Configuration
The Oracle administrator must set required configuration parameters before installing NMS.
Follow these steps:
1. As the Oracle database administrator, execute:
ALTER SYSTEM SET NLS_COMP=BINARY SCOPE=SPFILE;
ALTER SYSTEM SET NLS_SORT=BINARY SCOPE=SPFILE;
ALTER SYSTEM SET PROCESSES = 300 SCOPE=SPFILE;
ALTER SYSTEM SET SESSIONS = 335 SCOPE=SPFILE; -- 1.1 * PROCESSES + 5
ALTER SYSTEM SET OPEN_CURSORS=1000 SCOPE=BOTH;
2. Restart the database.

Microsoft Windows and Oracle
Chapter 2: NMS Pre-installation 33
Creating the Tablespace and User
You can either:
■ Create the database tablespace and user before running the installer (recommended).
Advantage: You do not have to allow NMS to access an Oracle account.
■ Allow the NMS installer to create the Oracle tablespace.
Risk: You must allow NMS to access an Oracle account with administrator privileges (such as SYS), which can be a security risk.
To create the database tablespace before installation:
1. Log in as the Oracle administrator.
2. To create the tablespace, execute:
create tablespace <nimsoftslm> datafile '<nimsoftslm>.dbf' size 1000m autoextend on maxsize unlimited;
where <nimsoftslm> is a tablespace name of your choice.
3. To create the user and assign required privileges, execute:
create user <nmuser> IDENTIFIED BY Password1 DEFAULT TABLESPACE nimsoftslm;
grant all privileges to <nmuser>;
grant select on sys.v_$database to <nmuser>;
grant select on sy.v_$session to <nmuser>;
grant select on sys.v_$parameter to <nmuser>;
grant select on sys.sm$ts_used to <nmuser>;
grant select on sys.dba_data_files to <nmuser>;
grant select on sys.dba_tables to <nmuser>;
grant select on sys.dba_free_space to <nmuser>;
where <nmsuser> is a user name of your choice.
4. Restart the database to create the user and assign required privileges.
Note: You will need the user name and tablespace name during NMS installation.
Linking Shared Oracle Libraries
Shared Oracle libraries must be linked.
Follow these steps:
1. Create the following file:
/etc/ld.so.conf.d/oracle.conf
2. In the file, enter the path to the Instant Client directory. For example:
/root/instantclient_11_1
3. Save the file.
4. Navigate to the Instant Client directory (/root/instantclient_11_1 in the example).

Linux and MySQL Server
34 Installation Guide
5. Execute:
ldconfig
6. Execute:
ldd libociei.so
7. Verify that there are links for all the libraries and there are no not found messages. The output should look similar to this:
linux-vdso.so.1 => (0x00007fff5b0e2000)
libclntsh.so.11.1 => /root/instantclient_11_1/libclntsh.so.11.1 (0x00007f36030b3000)
libdl.so.2 => /lib64/libdl.so.2 (0x00007f3602eae000)
libm.so.6 => /lib64/libm.so.6 (0x00007f3602c57000)
libpthread.so.0 => /lib64/libpthread.so.0 (0x00007f3602a3a000)
libnsl.so.1 => /lib64/libnsl.so.1 (0x00007f3602821000)
libc.so.6 => /lib64/libc.so.6 (0x00007f36024c1000)
libnnz11.so => /root/instantclient_11_1/libnnz11.so (0x00007f3602064000)
libaio.so.1 => /lib64/libaio.so.1 (0x00007f3601e61000)
/lib64/ld-linux-x86-64.so.2 (0x00007f360a0a0000)
Linux and MySQL Server
Your system must meet these criteria. Check the Nimsoft Compatibility Support Matrix to confirm which versions are supported.
NMS host system options
■ Red Hat Enterprise Linux (RHEL) version 6
■ Red Hat Enterprise Linux (RHEL) version 5
■ SUSE Linux Enterprise Server (SLES) version 11
■ SUSE Linux Enterprise Server (SLES) version 10
Note: The system must be running on x86 or AMD64 hardware.
Database options
■ MySQL Server 5.5 (recommended due to improved performance and scalability)
■ MySQL Server 5.1 (supported but to be discontinued in a future release)

Linux and MySQL Server
Chapter 2: NMS Pre-installation 35
Linux System Prerequisites
Linux System Swap Space
The system must be configured with either:
■ 4 GB of swap space (minimum)
■ 6 GB or more of swap space (recommended for optimal performance and reliability)
This requirement applies to both the NMS system and the Unified Management Portal (UMP) system.
Java Virtual Machine (JVM)
The installer requires Java Virtual Machine (JVM) 1.6 or later. It is generally acceptable to simply install the latest JVM, but be sure to check the NMS Release Notes and Upgrade Guide for the latest updates on supported JVM versions.
To ensure you have a supported Java Virtual Machine, execute:
java -version
If the command fails:
■ Make sure you have the right package (32-bit or 64-bit) for your operating system.
■ If you believe your system has a supported version, make sure that the JVM is part of the system PATH environment variable.
■ If there is no directory on the system for Java, go to http://www.java.com (not affiliated with Nimsoft) and download a Java distribution. Install it according to the directions on that site and ensure that the JVM is included in the PATH environment variable.
The Standard C++ Compatibility Library
The standard C++ library must be present.
If necessary, download the distribution that applies to your architecture from:
■ Your Linux distribution official support site
■ www.rpmseek.com (not affiliated with Nimsoft); search for compat-libstd and download the latest version
Install the package according to the instructions available with the download.

Linux and MySQL Server
36 Installation Guide
Firewalls and Virus Scanners
Before installation:
■ Shut down any anti-virus software (required).
■ Shut down the firewall (optional). While not always necessary, this maximizes your chance of a successful installation. If you keep your firewall running, you must at least:
– Ensure the port between the NMS system and the database system is open.
– Specify a starting port during NMS installation (the recommended default is port 48000).
– Ensure that an adequate range of ports are open (for example, ports 48000 through 48020). At minimum, the first three ports assigned (controller, spooler, and hub) must be open. The port used for distsrv is dynamically assigned.
Note: Restart the firewall and anti-virus software when installation is complete.
Security-Enhanced Linux
Security-Enhanced Linux (SELinux) is a Linux feature that supports access control security policies. While shutting down SELinux before installing NM server is not always necessary, doing so maximizes your chance for a successful installation.
If SELinux status is enabled, a Current mode of permissive is acceptable. Disabling SELinux entirely is an even safer approach.
If you must run NM server in SELinux Enforcing mode, add the Nimsoft shared libraries to a safe list. After you install NMS, execute:
chcon -f -t textrel_shlib_t /<NM_install>/hub/libldapssl.so.0
chcon -f -t textrel_shlib_t /<NM_install>/hub/libldapsdk.so.0
chcon -f -t textrel_shlib_t /<NM_installn>/hub/libldapx.so.0
where NM_install is the directory where NMS is installed.
Note: After installation, NMS cannot function correctly in SELinux Enforcing mode until you add the Nimsoft shared libraries to the safe list.

Linux and MySQL Server
Chapter 2: NMS Pre-installation 37
About Localization
If the system is set to a non-English language, the following error message appears during installation:
The database does not exist or could not be created.
To prevent this, execute:
export LC_ALL=your_locale
where your_locale is the appropriate locale string (for example, norwegian).
MySQL Server Database Prerequisites
Nimsoft strongly encourages you to begin with a fresh database installation on a clean system. NMS has a track record of easy and successful installation in such an environment. Experience shows that using a pre-existing database can cause subtle configuration conflicts that are hard to diagnose and make installation unnecessarily difficult.
Installing the MySQL Software
You can obtain a copy of the open-source MySQL database software from http://dev.mysql.com/downloads/ (not affiliated with CA Nimsoft). Make sure the version is supported and compatible with your hardware. You can use either the Community Server version or a licensed version.
For installation instructions, go to http://dev.mysql.com/doc.
Required MySQL Configuration
Certain capabilities are set via MySQL variables.
Note: You must restart the database after making changes.
To check and set the required MySQL variable settings:
1. Log in as the MySQL administrator.
2. On the MySQL server, execute:
show variables like 'local_infile';
show variables like 'lower_case_table_names';
3. See if you have these variables and values.
■ local_infile: ON
■ lower_case_table_names: 1
■ binlog_format: mixed

Linux and MySQL Server
38 Installation Guide
4. If the variables do not exist or the values are not correct, add these lines to the MySQL server configuration file or correct their values.
[mysqld]
local_infile = 1
lower_case_table_names = 1
binlog_format = mixed
MySQL in Large Environments
If you are preparing for a large-scale or major deployment, you must set additional database parameters to allow for the greater demands of such an environment. Nimsoft recommends you begin with the values shown in the following example, and then fine-tune settings depending on your circumstances.
As the MySQL administrator, add these lines to the MySQL server configuration file:
[mysqld]
max_heap_table_size = 134217728
query_cache_limit = 4194304
query_cache_size = 268435456
sort_buffer_size = 25165824
join_buffer_size = 67108864
max_tmp_tables = 64
Note: Large-scale and major deployments are defined in Hardware Recommendations.
Creating the Database and User
There are three ways to create the database and user:
■ Installer creates the database; user is root
■ Installer creates the database; user is an existing account
■ Administrator creates the database and user before NMS installation
Installer Creates Database; User is root
This method creates the MySQL database and gives access to the root user. This requires you to:
■ Grant the root user remote access to the MySQL server before installation.
To allow this access, execute directly on the MySQL database server:
GRANT ALL PRIVILEGES ON *.* TO 'root'@'%' IDENTIFIED BY ‘<root password>’ WITH GRANT OPTION;
GRANT TRIGGER ON nimsoftnis.* TO 'root'@'%' WITH GRANT OPTION;
GRANT SUPER ON *.* TO 'root'@'%';
FLUSH PRIVILEGES;

Linux and MySQL Server
Chapter 2: NMS Pre-installation 39
Installer Creates Database; User is an Existing Account
The installer can create the database with an existing user provided you use root to create the database during installation. This requires you to:
■ Grant the root user remote access to the database server before installation. To do this, execute on the database server:
GRANT ALL PRIVILEGES ON *.* TO 'root'@'%' IDENTIFIED BY ‘<root password>’ WITH GRANT OPTION;
GRANT TRIGGER ON nimsoftnis.* TO 'root'@'%' WITH GRANT OPTION;
GRANT SUPER ON *.* TO 'root'@'%';
FLUSH PRIVILEGES;
■ Specify a user in the Nimsoft SLM Database User Account field during installation. The root user creates the database and apply the appropriate permissions to the existing user.
Administrator Creates Database and User Before NMS Installation
The advantage of this approach is that you do not have to allow Nimsoft Server access to a MySQL account with administrator privileges. If you decide to create a Nimsoft-specific MySQL user account, you should also create the database.
To manually create the NIS database and user and grant the required privileges, follow these steps.
1. Log in as the MySQL administrator.
2. Create the database. Execute:
CREATE DATABASE IF NOT EXISTS DB_name DEFAULT CHARACTER SET =utf8 DEFAULT COLLATE =utf8_unicode_ci;
where DB_name is the desired database name.
3. Create the user and assign required privileges. Execute:
CREATE USER 'nmsuser'@'%' IDENTIFIED BY 'nmsuserpass';
GRANT ALL PRIVILEGES ON DB_name.* TO 'nmsuser'@'%';
GRANT TRIGGER ON DB_name.* TO 'nmsuser'@'%';
GRANT SUPER ON *.* TO 'nmsuser'@'%';
FLUSH PRIVILEGES;
where nmuser is the desired Nimsoft user name, nmuserpass is the desired password, and DB_name is the name of the database you created.
Note: The single-quotation marks (') are required.
When you install NMS:
■ Select Use existing database for the Nimsoft Server information.
■ Provide the actual database name, user and password you created above.

Linux and Oracle
40 Installation Guide
Linux and Oracle
Your system must meet these criteria. Check the Nimsoft Compatibility Support Matrix to confirm which versions are supported.
NMS host system options
■ Red Hat Enterprise Linux (RHEL) version 6
■ Red Hat Enterprise Linux (RHEL) version 5
■ SUSE Linux Enterprise Server (SLES) version 11
■ SUSE Linux Enterprise Server (SLES) version 10
Note: The system must be running on x86 or AMD64 hardware.
Database options
■ Oracle 11g R1
■ Oracle 11g R2
Linux System Prerequisites
Linux System Swap Space
The system must be configured with either:
■ 4 GB of swap space (minimum)
■ 6 GB or more of swap space (recommended for optimal performance and reliability)
This requirement applies to both the NMS system and the Unified Management Portal (UMP) system.

Linux and Oracle
Chapter 2: NMS Pre-installation 41
Java Virtual Machine (JVM)
The installer requires Java Virtual Machine (JVM) 1.6 or later. It is generally acceptable to simply install the latest JVM, but be sure to check the NMS Release Notes and Upgrade Guide for the latest updates on supported JVM versions.
To ensure you have a supported Java Virtual Machine, execute:
java -version
If the command fails:
■ Make sure you have the right package (32-bit or 64-bit) for your operating system.
■ If you believe your system has a supported version, make sure that the JVM is part of the system PATH environment variable.
■ If there is no directory on the system for Java, go to http://www.java.com (not affiliated with Nimsoft) and download a Java distribution. Install it according to the directions on that site and ensure that the JVM is included in the PATH environment variable.
The Standard C++ Compatibility Library
The standard C++ library must be present.
If necessary, download the distribution that applies to your architecture from:
■ Your Linux distribution official support site
■ www.rpmseek.com (not affiliated with Nimsoft); search for compat-libstd and download the latest version
Install the package according to the instructions available with the download.

Linux and Oracle
42 Installation Guide
Firewalls and Virus Scanners
Before installation:
■ Shut down any anti-virus software (required).
■ Shut down the firewall (optional). While not always necessary, this maximizes your chance of a successful installation. If you keep your firewall running, you must at least:
– Ensure the port between the NMS system and the database system is open.
– Specify a starting port during NMS installation (the recommended default is port 48000).
– Ensure that an adequate range of ports are open (for example, ports 48000 through 48020). At minimum, the first three ports assigned (controller, spooler, and hub) must be open. The port used for distsrv is dynamically assigned.
Note: Restart the firewall and anti-virus software when installation is complete.
Security-Enhanced Linux
Security-Enhanced Linux (SELinux) is a Linux feature that supports access control security policies. While shutting down SELinux before installing NM server is not always necessary, doing so maximizes your chance for a successful installation.
If SELinux status is enabled, a Current mode of permissive is acceptable. Disabling SELinux entirely is an even safer approach.
If you must run NM server in SELinux Enforcing mode, add the Nimsoft shared libraries to a safe list. After you install NMS, execute:
chcon -f -t textrel_shlib_t /<NM_install>/hub/libldapssl.so.0
chcon -f -t textrel_shlib_t /<NM_install>/hub/libldapsdk.so.0
chcon -f -t textrel_shlib_t /<NM_installn>/hub/libldapx.so.0
where NM_install is the directory where NMS is installed.
Note: After installation, NMS cannot function correctly in SELinux Enforcing mode until you add the Nimsoft shared libraries to the safe list.

Linux and Oracle
Chapter 2: NMS Pre-installation 43
About Localization
If the system is set to a non-English language, the following error message appears during installation:
The database does not exist or could not be created.
To prevent this, execute:
export LC_ALL=your_locale
where your_locale is the appropriate locale string (for example, norwegian).
Oracle Database Prerequisites
Nimsoft strongly encourages you to begin with a fresh database installation on a clean system. NMS has a track record of easy and successful installation in such an environment. Experience shows that using a pre-existing database can cause subtle configuration conflicts that are hard to diagnose and make installation unnecessarily difficult.
Required Oracle Environment
The Oracle Instant Client must be installed on the NMS system so it can access the Oracle database.
Follow these steps:
1. Go to www.oracle.com and select Downloads > Instant Client.
2. Click the link for the operating system and hardware of your system.
3. Download the zip file for the Instant Client Package – Basic.
4. Install the Instant Client according to the directions on the web site. Be sure to add the unzipped Instant Client directory to your path.
5. Restart the system.

Linux and Oracle
44 Installation Guide
Required Oracle Configuration
The Oracle administrator must set required configuration parameters before installing NMS.
Follow these steps:
1. As the Oracle database administrator, execute:
ALTER SYSTEM SET NLS_COMP=BINARY SCOPE=SPFILE;
ALTER SYSTEM SET NLS_SORT=BINARY SCOPE=SPFILE;
ALTER SYSTEM SET PROCESSES = 300 SCOPE=SPFILE;
ALTER SYSTEM SET SESSIONS = 335 SCOPE=SPFILE; -- 1.1 * PROCESSES + 5
ALTER SYSTEM SET OPEN_CURSORS=1000 SCOPE=BOTH;
2. Restart the database.
Creating the Tablespace and User
You can either:
■ Create the database tablespace and user before running the installer (recommended).
Advantage: You do not have to allow NMS to access an Oracle account.
■ Allow the NMS installer to create the Oracle tablespace.
Risk: You must allow NMS to access an Oracle account with administrator privileges (such as SYS), which can be a security risk.
To create the database tablespace before installation:
1. Log in as the Oracle administrator.
2. To create the tablespace, execute:
create tablespace <nimsoftslm> datafile '<nimsoftslm>.dbf' size 1000m autoextend on maxsize unlimited;
where <nimsoftslm> is a tablespace name of your choice.
3. To create the user and assign required privileges, execute:
create user <nmuser> IDENTIFIED BY Password1 DEFAULT TABLESPACE nimsoftslm;
grant all privileges to <nmuser>;
grant select on sys.v_$database to <nmuser>;
grant select on sy.v_$session to <nmuser>;
grant select on sys.v_$parameter to <nmuser>;
grant select on sys.sm$ts_used to <nmuser>;
grant select on sys.dba_data_files to <nmuser>;
grant select on sys.dba_tables to <nmuser>;
grant select on sys.dba_free_space to <nmuser>;
where <nmsuser> is a user name of your choice.
4. Restart the database to create the user and assign required privileges.
Note: You will need the user name and tablespace name during NMS installation.

Solaris and MySQL Server
Chapter 2: NMS Pre-installation 45
Linking Shared Oracle Libraries
Shared Oracle libraries must be linked.
Follow these steps:
1. Create the following file:
/etc/ld.so.conf.d/oracle.conf
2. In the file, enter the path to the Instant Client directory. For example:
/root/instantclient_11_1
3. Save the file.
4. Navigate to the Instant Client directory (/root/instantclient_11_1 in the example).
5. Execute:
ldconfig
6. Execute:
ldd libociei.so
7. Verify that there are links for all the libraries and there are no not found messages. The output should look similar to this:
linux-vdso.so.1 => (0x00007fff5b0e2000)
libclntsh.so.11.1 => /root/instantclient_11_1/libclntsh.so.11.1 (0x00007f36030b3000)
libdl.so.2 => /lib64/libdl.so.2 (0x00007f3602eae000)
libm.so.6 => /lib64/libm.so.6 (0x00007f3602c57000)
libpthread.so.0 => /lib64/libpthread.so.0 (0x00007f3602a3a000)
libnsl.so.1 => /lib64/libnsl.so.1 (0x00007f3602821000)
libc.so.6 => /lib64/libc.so.6 (0x00007f36024c1000)
libnnz11.so => /root/instantclient_11_1/libnnz11.so (0x00007f3602064000)
libaio.so.1 => /lib64/libaio.so.1 (0x00007f3601e61000)
/lib64/ld-linux-x86-64.so.2 (0x00007f360a0a0000)
Solaris and MySQL Server
Your system must meet these criteria. Check the Nimsoft Compatibility Support Matrix to confirm which versions are supported.
NMS host system
■ Solaris 10
■ SPARC or x86 hardware
Database options
■ MySQL Server 5.5 (recommended due to improved performance and scalability)
■ MySQL Server 5.1 (supported but to be discontinued in a future release)

Solaris and MySQL Server
46 Installation Guide
Solaris System Prerequisites
Solaris System Swap Space
The system must be configured with a minimum of 4 GB of swap space during installation. Nimsoft highly recommends 6 GB or more for optimal performance and reliability. This requirement applies to both the NMS system and the UMP system. For more information on sufficient swap space, review the swap man page.
Note: If the NMS installation on Solaris is interrupted, or for some reason fails, then installer files (/tmp/install.*) remain in /tmp. SInce Solaris swap includes the /tmp directory, Nimsoft recommends manually deleting these files before running the installer again.
Java Virtual Machine (JVM)
The installer requires Java Virtual Machine (JVM) 1.6 or later. It is generally acceptable to simply install the latest JVM, but be sure to check the NMS Release Notes and Upgrade Guide for the latest updates on supported JVM versions.
To ensure you have a supported Java Virtual Machine, execute:
java -version
If the command fails:
■ Make sure you have the right package (32-bit or 64-bit) for your operating system.
■ If you believe your system has a supported version, make sure that the JVM is part of the system PATH environment variable.
■ If there is no directory on the system for Java, go to http://www.java.com (not affiliated with Nimsoft) and download a Java distribution. Install it according to the directions on that site and ensure that the JVM is included in the PATH environment variable.
Java on VMware Virtual Machines
When installing on a VMware ESX Server, please review the VMware Enterprise Java Applications on VMware - Best Practices Guide, available at http://www.vmware.com/resources/techresources/1087 (not affiliated with Nimsoft).

Solaris and MySQL Server
Chapter 2: NMS Pre-installation 47
Firewalls and Virus Scanners
Before installation:
■ Shut down any anti-virus software (required).
■ Shut down the firewall (optional). While not always necessary, this maximizes your chance of a successful installation. If you keep your firewall running, you must at least:
– Ensure the port between the NMS system and the database system is open.
– Specify a starting port during NMS installation (the recommended default is port 48000).
– Ensure that an adequate range of ports are open (for example, ports 48000 through 48020). At minimum, the first three ports assigned (controller, spooler, and hub) must be open. The port used for distsrv is dynamically assigned.
Note: Restart the firewall and anti-virus software when installation is complete.
About Localization
If the system is set to a non-English language, the following error message appears during installation:
The database does not exist or could not be created.
To prevent this, execute:
export LC_ALL=your_locale
where your_locale is the appropriate locale string (for example, norwegian).
MySQL Server Database Prerequisites
Nimsoft strongly encourages you to begin with a fresh database installation on a clean system. NMS has a track record of easy and successful installation in such an environment. Experience shows that using a pre-existing database can cause subtle configuration conflicts that are hard to diagnose and make installation unnecessarily difficult.
Installing the MySQL Software
You can obtain a copy of the open-source MySQL database software from http://dev.mysql.com/downloads/ (not affiliated with CA Nimsoft). Make sure the version is supported and compatible with your hardware. You can use either the Community Server version or a licensed version.
For installation instructions, go to http://dev.mysql.com/doc.

Solaris and MySQL Server
48 Installation Guide
Required MySQL Configuration
Certain capabilities are set via MySQL variables.
Note: You must restart the database after making changes.
To check and set the required MySQL variable settings:
1. Log in as the MySQL administrator.
2. On the MySQL server, execute:
show variables like 'local_infile';
show variables like 'lower_case_table_names';
3. See if you have these variables and values.
■ local_infile: ON
■ lower_case_table_names: 1
■ binlog_format: mixed
4. If the variables do not exist or the values are not correct, add these lines to the MySQL server configuration file or correct their values.
[mysqld]
local_infile = 1
lower_case_table_names = 1
binlog_format = mixed
MySQL in Large Environments
If you are preparing for a large-scale or major deployment, you must set additional database parameters to allow for the greater demands of such an environment. Nimsoft recommends you begin with the values shown in the following example, and then fine-tune settings depending on your circumstances.
As the MySQL administrator, add these lines to the MySQL server configuration file:
[mysqld]
max_heap_table_size = 134217728
query_cache_limit = 4194304
query_cache_size = 268435456
sort_buffer_size = 25165824
join_buffer_size = 67108864
max_tmp_tables = 64
Note: Large-scale and major deployments are defined in Hardware Recommendations.
Solaris and MySQL Server
Chapter 2: NMS Pre-installation 49
Creating the Database and User
There are three ways to create the database and user:
■ Installer creates the database; user is root
■ Installer creates the database; user is an existing account
■ Administrator creates the database and user before NMS installation
Installer Creates Database; User is root
This method creates the MySQL database and gives access to the root user. This requires you to:
■ Grant the root user remote access to the MySQL server before installation.
To allow this access, execute directly on the MySQL database server:
GRANT ALL PRIVILEGES ON *.* TO 'root'@'%' IDENTIFIED BY ‘<root password>’ WITH GRANT OPTION;
GRANT TRIGGER ON nimsoftnis.* TO 'root'@'%' WITH GRANT OPTION;
GRANT SUPER ON *.* TO 'root'@'%';
FLUSH PRIVILEGES;
Installer Creates Database; User is an Existing Account
The installer can create the database with an existing user provided you use root to create the database during installation. This requires you to:
■ Grant the root user remote access to the database server before installation. To do this, execute on the database server:
GRANT ALL PRIVILEGES ON *.* TO 'root'@'%' IDENTIFIED BY ‘<root password>’ WITH GRANT OPTION;
GRANT TRIGGER ON nimsoftnis.* TO 'root'@'%' WITH GRANT OPTION;
GRANT SUPER ON *.* TO 'root'@'%';
FLUSH PRIVILEGES;
■ Specify a user in the Nimsoft SLM Database User Account field during installation. The root user creates the database and apply the appropriate permissions to the existing user.

Solaris and Oracle
50 Installation Guide
Administrator Creates Database and User Before NMS Installation
The advantage of this approach is that you do not have to allow Nimsoft Server access to a MySQL account with administrator privileges. If you decide to create a Nimsoft-specific MySQL user account, you should also create the database.
To manually create the NIS database and user and grant the required privileges, follow these steps.
1. Log in as the MySQL administrator.
2. Create the database. Execute:
CREATE DATABASE IF NOT EXISTS DB_name DEFAULT CHARACTER SET =utf8 DEFAULT COLLATE =utf8_unicode_ci;
where DB_name is the desired database name.
3. Create the user and assign required privileges. Execute:
CREATE USER 'nmsuser'@'%' IDENTIFIED BY 'nmsuserpass';
GRANT ALL PRIVILEGES ON DB_name.* TO 'nmsuser'@'%';
GRANT TRIGGER ON DB_name.* TO 'nmsuser'@'%';
GRANT SUPER ON *.* TO 'nmsuser'@'%';
FLUSH PRIVILEGES;
where nmuser is the desired Nimsoft user name, nmuserpass is the desired password, and DB_name is the name of the database you created.
Note: The single-quotation marks (') are required.
When you install NMS:
■ Select Use existing database for the Nimsoft Server information.
■ Provide the actual database name, user and password you created above.
Solaris and Oracle
Your system must meet these criteria. Check the Nimsoft Compatibility Support Matrix to confirm which versions are supported.
NMS host system
■ Solaris 10
■ SPARC or x86 hardware
Database
■ Oracle 11g R1

Solaris and Oracle
Chapter 2: NMS Pre-installation 51
Solaris System Prerequisites
Solaris System Swap Space
The system must be configured with a minimum of 4 GB of swap space during installation. Nimsoft highly recommends 6 GB or more for optimal performance and reliability. This requirement applies to both the NMS system and the UMP system. For more information on sufficient swap space, review the swap man page.
Note: If the NMS installation on Solaris is interrupted, or for some reason fails, then installer files (/tmp/install.*) remain in /tmp. SInce Solaris swap includes the /tmp directory, Nimsoft recommends manually deleting these files before running the installer again.
Java Virtual Machine (JVM)
The installer requires Java Virtual Machine (JVM) 1.6 or later. It is generally acceptable to simply install the latest JVM, but be sure to check the NMS Release Notes and Upgrade Guide for the latest updates on supported JVM versions.
To ensure you have a supported Java Virtual Machine, execute:
java -version
If the command fails:
■ Make sure you have the right package (32-bit or 64-bit) for your operating system.
■ If you believe your system has a supported version, make sure that the JVM is part of the system PATH environment variable.
■ If there is no directory on the system for Java, go to http://www.java.com (not affiliated with Nimsoft) and download a Java distribution. Install it according to the directions on that site and ensure that the JVM is included in the PATH environment variable.
Java on VMware Virtual Machines
When installing on a VMware ESX Server, please review the VMware Enterprise Java Applications on VMware - Best Practices Guide, available at http://www.vmware.com/resources/techresources/1087 (not affiliated with Nimsoft).

Solaris and Oracle
52 Installation Guide
Firewalls and Virus Scanners
Before installation:
■ Shut down any anti-virus software (required).
■ Shut down the firewall (optional). While not always necessary, this maximizes your chance of a successful installation. If you keep your firewall running, you must at least:
– Ensure the port between the NMS system and the database system is open.
– Specify a starting port during NMS installation (the recommended default is port 48000).
– Ensure that an adequate range of ports are open (for example, ports 48000 through 48020). At minimum, the first three ports assigned (controller, spooler, and hub) must be open. The port used for distsrv is dynamically assigned.
Note: Restart the firewall and anti-virus software when installation is complete.
About Localization
If the system is set to a non-English language, the following error message appears during installation:
The database does not exist or could not be created.
To prevent this, execute:
export LC_ALL=your_locale
where your_locale is the appropriate locale string (for example, norwegian).
Oracle Database Prerequisites
Nimsoft strongly encourages you to begin with a fresh database installation on a clean system. NMS has a track record of easy and successful installation in such an environment. Experience shows that using a pre-existing database can cause subtle configuration conflicts that are hard to diagnose and make installation unnecessarily difficult.

Solaris and Oracle
Chapter 2: NMS Pre-installation 53
Required Oracle Environment
The Oracle Instant Client must be installed on the NMS system so it can access the Oracle database.
Follow these steps:
1. Go to www.oracle.com and select Downloads > Instant Client.
2. Click the link for the operating system and hardware of your system.
3. Download the zip file for the Instant Client Package – Basic.
4. Install the Instant Client according to the directions on the web site. Be sure to add the unzipped Instant Client directory to your path.
5. Restart the system.
Required Oracle Configuration
The Oracle administrator must set required configuration parameters before installing NMS.
Follow these steps:
1. As the Oracle database administrator, execute:
ALTER SYSTEM SET NLS_COMP=BINARY SCOPE=SPFILE;
ALTER SYSTEM SET NLS_SORT=BINARY SCOPE=SPFILE;
ALTER SYSTEM SET PROCESSES = 300 SCOPE=SPFILE;
ALTER SYSTEM SET SESSIONS = 335 SCOPE=SPFILE; -- 1.1 * PROCESSES + 5
ALTER SYSTEM SET OPEN_CURSORS=1000 SCOPE=BOTH;
2. Restart the database.

Solaris and Oracle
54 Installation Guide
Creating the Tablespace and User
You can either:
■ Create the database tablespace and user before running the installer (recommended).
Advantage: You do not have to allow NMS to access an Oracle account.
■ Allow the NMS installer to create the Oracle tablespace.
Risk: You must allow NMS to access an Oracle account with administrator privileges (such as SYS), which can be a security risk.
To create the database tablespace before installation:
1. Log in as the Oracle administrator.
2. To create the tablespace, execute:
create tablespace <nimsoftslm> datafile '<nimsoftslm>.dbf' size 1000m autoextend on maxsize unlimited;
where <nimsoftslm> is a tablespace name of your choice.
3. To create the user and assign required privileges, execute:
create user <nmuser> IDENTIFIED BY Password1 DEFAULT TABLESPACE nimsoftslm;
grant all privileges to <nmuser>;
grant select on sys.v_$database to <nmuser>;
grant select on sy.v_$session to <nmuser>;
grant select on sys.v_$parameter to <nmuser>;
grant select on sys.sm$ts_used to <nmuser>;
grant select on sys.dba_data_files to <nmuser>;
grant select on sys.dba_tables to <nmuser>;
grant select on sys.dba_free_space to <nmuser>;
where <nmsuser> is a user name of your choice.
4. Restart the database to create the user and assign required privileges.
Note: You will need the user name and tablespace name during NMS installation.
Linking Shared Oracle Libraries
Shared Oracle libraries must be linked.
Follow these steps:
1. Create the following file:
/etc/ld.so.conf.d/oracle.conf
2. In the file, enter the path to the Instant Client directory. For example:
/root/instantclient_11_1
3. Save the file.
4. Navigate to the Instant Client directory (/root/instantclient_11_1 in the example).

Solaris and Oracle
Chapter 2: NMS Pre-installation 55
5. Execute:
ldconfig
6. Execute:
ldd libociei.so
7. Verify that there are links for all the libraries and there are no not found messages. The output should look similar to this:
linux-vdso.so.1 => (0x00007fff5b0e2000)
libclntsh.so.11.1 => /root/instantclient_11_1/libclntsh.so.11.1 (0x00007f36030b3000)
libdl.so.2 => /lib64/libdl.so.2 (0x00007f3602eae000)
libm.so.6 => /lib64/libm.so.6 (0x00007f3602c57000)
libpthread.so.0 => /lib64/libpthread.so.0 (0x00007f3602a3a000)
libnsl.so.1 => /lib64/libnsl.so.1 (0x00007f3602821000)
libc.so.6 => /lib64/libc.so.6 (0x00007f36024c1000)
libnnz11.so => /root/instantclient_11_1/libnnz11.so (0x00007f3602064000)
libaio.so.1 => /lib64/libaio.so.1 (0x00007f3601e61000)
/lib64/ld-linux-x86-64.so.2 (0x00007f360a0a0000)


Chapter 3: NMS Installation 57
Chapter 3: NMS Installation
This section is intended for a first-time installation of the NMS software.
Note: To update an existing installation, see the NM Server Release Notes and Upgrade Guide available from the Downloads tab at support.nimsoft.com.
This section contains the following topics:
Overview (see page 57) Installing NMS on Windows—GUI Mode (see page 60) Installing NMS on Linux or Solaris—Console Mode (see page 63) GUI and Console Mode Parameter Values (see page 65) Installing NMS on Windows, Linux or Solaris—Silent Mode (see page 68) Silent Install Parameter Values (see page 69) Uninstalling NMS (see page 73)
Overview
NMS installation is done with an InstallAnywhere installer, which unifies installation under Windows, Linux, and Solaris. The installer guides you through installation by your choice of:
■ A graphical user interface (GUI) on Windows, Linux and Solaris systems
■ Console mode on Linux and Solaris systems
■ Silent mode on Windows, Linux and Solaris systems (you specify installation parameter values in a file that is used to complete the install with no user interaction)

Overview
58 Installation Guide
Installation Requirements
All three methods require that you:
■ Ensure all pre-installation requirements are met.
Note: System checks in the NMS installers do not allow installation on a host that has less than 4 GB of memory or an unsupported operating system.
■ Have administrator login information and IP addresses for your NMS system and database system.
■ Download the installation package.
■ Choose whether to have the installer create the Nimsoft database (called the Nimsoft Information Store, or NIS; also referred to as the SLM database).
■ Have necessary information about your existing database (if already created), such as the database name and administrator login information. If you let the installer set up the database, you will specify this information during installation.
■ Specify primary hub configuration information.
Installed Components
After installation, the following components reside on the NMS system:
■ Nimsoft primary hub
■ Nimsoft message bus
■ Server robot
■ Service probes
■ Infrastructure Manager
■ Server web page, which:
– Will be accessed by users on client systems who will download and install Nimsoft infrastructure and management consoles
– References packages used to automatically deploy and install Nimsoft infrastructure on many client systems.

Overview
Chapter 3: NMS Installation 59
The Nimsoft Information Store (NIS) database, also referred to as the SLM database, resides on the database server.
Note: If you use the GUI install method on a Windows systems, Infrastructure Manager is automatically installed. If you use silent mode on Windows, you can manually install Infrastructure Manager on the NMS server. Infrastructure Manager is not supported on UNIX systems. In those cases, Infrastructure Manager is installed on a Windows system that is then used to remotely manage your monitoring infrastructure.
Note: If you are installing on a Microsoft high-availability platform, refer to Installing NMS in an Active/Passive Microsoft Cluster (see page 109).

Installing NMS on Windows—GUI Mode
60 Installation Guide
Installing NMS on Windows—GUI Mode
This procedure is intended for a first-time installation. If you want to:
■ Upgrade, see the NMS Release Notes and Upgrade Guide, available from the Downloads tab at http://support.nimsoft.com.
■ Reinstall, click Cancel, uninstall the prior version as explained in Uninstalling NMS (see page 73), and restart the installation process. Note that your server configuration information (domain and hub names, IP addresses, user accounts and passwords) is not retained.
Follow these steps.
Note: All fields in the installer dialogs are case-sensitive.
1. Turn off any anti-virus scanners running on your computer (these scanners can significantly slow down the installation).
Note: Turn the anti-virus scanners on again immediately after installation.
2. Go to the Downloads tab at Nimsoft Technical Support and download the most recent NMS Install Package for Windows.
3. Double-click installNMS. The Install Package files are unpacked (this could take a few minutes), and the Introduction dialog displays.
4. Select a language and click OK.
Note: If you select Spanish or Brazilian Portuguese, you must first configure cmd.exe (or the command shell you use) to use the appropriate codepage for your intended locale, and to display in a TrueType font, rather than a raster font. Otherwise, the installer messages will not display properly.

Installing NMS on Windows—GUI Mode
Chapter 3: NMS Installation 61
5. Make sure you have quit all other programs before continuing and follow the recommended precautions. Click Next.
Note: If the installer detects a previous installation, the software version and a warning message are shown. If you want to:
■ Upgrade, see the NMS Release Notes and Upgrade Guide, available from the Downloads tab http://support.nimsoft.com.
■ Reinstall, click Cancel, uninstall the prior version, and restart the install process. Note that your server configuration (domain and hub names, IP addresses, user accounts /passwords, etc.) is not retained.
6. Accept the terms of the license agreement to continue.
7. You are informed that the installer will launch the software after installation. Click Next.
8. Enter the path (or use the default path) to the folder where you want to install NMS, then click Next.
9. Select either:
■ Create database. The installer builds the required tables on the database server and creates the Nimsoft Information Store (NIS).
■ Use existing database. Nimsoft strongly encourages you to begin with a fresh installation of your database software on an otherwise clean system. Using a pre-existing database can result in subtle configuration conflicts that are difficult to diagnose.
10. Select the type of database (MySQL, Oracle, or SQL Server).
11. Perform the appropriate action for your database type:
■ MySQL— Go to the next step
■ Oracle—Note that the Oracle InstantClient is required
■ SQL Server—Choose a database authentication type (Windows or SQL Server)
12. Specify the database server parameters.
The parameters available depend on the database type and whether it is new or existing. All fields are case-sensitive.For details, refer to:
■ MySQL Database Parameters (see page 65)
■ SQL Server Database Parameters (see page 66)
■ Oracle Database Parameters (see page 66)
13. The installer verifies the parameters. If there are:
■ No errors, a verification screen appears.
■ Errors, the cause (as nearly as the installer can determine) is shown. If you entered incorrect data, go Back and make corrections, or Cancel the installation, address the causes, and restart the installation.

Installing NMS on Windows—GUI Mode
62 Installation Guide
14. Specify your NMS hub configuration information. For details, refer to:
■ Hub Configuration Values (see page 67)
15. Specify a network mask or IP address range that you want NMS to discover, and a range of IP addresses to exclude if necessary.
Note: If no entries are made, discovery is skipped.
16. Select the methods you want NMS to use to obtain information, then enter the authentication credentials under each selected method.
■ WMI—domain, user and password
■ SNMP—community string, this is often public (the default)
■ ssh—User name and password for a user with administrative privileges on your UNIX®-based computers
Note: You can add additional credentials later with the Remote Administration utility or NIS Manager.
17. Select the Service Catalogs. Devices discovered on the network are grouped into these catalogs by pre-defined filters.
■ Windows Servers
■ UNIX®-based Servers
■ Network Printers
■ Network Devices
■ Auto Configure Managed Systems only: This option selects a pre-defined configuration profile that is used for all computer systems manually set to Managed state in Remote Administrator or NIS Manager.If not selected, the pre-defined profile is used for all computer systems, independent of the state set in Remote Administrator or NIS Manager.
Note: Use Remote Administrator or NIS Manager to make catalog changes later or modify the filters, which can filter on a number of parameters, such as IP range or OS.
18. Review the pre-installation summary. If the information is not correct, click Previous to return to previous screens and make the corrections.
19. Click Install to begin the file extraction. A progress bar shows process status.
20. When extraction is complete, the Ready for post configuration screen displays. Click Continue. Post configuration can take several minutes.
21. The Install Complete window prompts you to restart the system to complete the installation. Click Next.
Note: A warning that one or more probes did not activate before the installer finished executing does not necessarily represent an issue. Some probes might not finish their startup sequence before the installer displays its final screen.

Installing NMS on Linux or Solaris—Console Mode
Chapter 3: NMS Installation 63
22. Click Done to exit.
23. If you turned off any anti-virus scanners, turn them back on now.
Installation is complete. Go to Chapter 4: Nimsoft Client Installation (see page 75) to deploy and install Nimsoft infrastructure on client systems.
Installing NMS on Linux or Solaris—Console Mode
This procedure is intended for a first-time installation. If you want to:
■ Upgrade, see the NMS Release Notes and Upgrade Guide, available from the Downloads tab at http://support.nimsoft.com.
■ Reinstall, click Cancel, uninstall the prior version as explained in Uninstalling NMS (see page 73), and restart the installation process. Note that your server configuration information (domain and hub names, IP addresses, user accounts and passwords) is not retained.
Follow these steps.
1. Turn off any anti-virus scanners running on your computer (these scanners can significantly slow down the installation).
Note: Turn the anti-virus scanners on again immediately after installation.
2. Go to the Downloads tab at Nimsoft Technical Support and download the most recent NMS install package for Linux or Solaris (the package is over 1 GB, so this could take several minutes).
3. Execute chmod 755 on the install file to make it executable.
4. Run the installer. From a command line, execute:
■ Linux—installNMS_linux.bin -i console
■ Solaris—installNMS_solaris.bin -i console
The installer unpacks the files (this could take several minutes) then displays the Introduction.
5. Specify a language.
6. Read the license agreement (optional).
7. Enter the path to the directory where you want NMS to be installed, or use the default path (/opt/nimsoft).
8. Specify whether you want to use an existing database or create a new one.

Installing NMS on Linux or Solaris—Console Mode
64 Installation Guide
9. Specify the database type.
10. Specify the database server parameters.
The parameters available depend on the database type and whether it is new or existing. All fields are case-sensitive.For details, refer to:
■ MySQL Database Parameters (see page 65)
■ SQL Server Database Parameters (see page 66)
■ Oracle Database Parameters (see page 66)
11. The installer verifies the parameters for your database. If there are:
■ Errors, the cause—as nearly as the installer can determine—is displayed. Cancel the installation, address the reason for the errors, and restart the installation.
■ No errors, you get a verification screen.
12. Specify your NMS hub configuration information. For details, refer to:
■ Hub Configuration Values (see page 67)
13. Enter the authentication credentials for each method you want NMS to use to obtain information. Skip any that do not apply in your case.
■ SNMP—community string, this is often public (the default)
■ WMI—domain, user name and password
■ ssh—user name and password for a user with administrative privileges on your UNIX®-based computers
14. Enter the Service Catalogs to be created in the database. Devices discovered on the network are grouped into these catalogs by pre-defined filters.
■ Windows Servers
■ UNIX®-based Servers
■ Network Printers
■ Network Devices
■ Auto Configure Managed Systems only; if this option is:
– Selected, a pre-defined configuration profile is used for all systems manually set to Managed state in Remote Administrator or NIS Manager.
– Not selected, the pre-defined configuration profile is used for all computer systems, regardless of the state set in Remote Administrator(or NIS Manager.
Note: Use Remote Administrator or NIS Manager to make catalog changes later or to modify the filters, which can filter on a number of parameters, such as IP range and OS.
GUI and Console Mode Parameter Values
Chapter 3: NMS Installation 65
15. Review the pre-installation summary. If you need to make changes, go back to prior steps.
16. The installer unpacks the files and completes the installation. A progress bar shows the installation status.
This process can take several minutes or more. To see the progress of the installation in detail, execute:
tail -f /tmp/ia/iaoutput.txt
17. NMS launches. If it does not, execute:
cd /etc/init.d
nimbus start
18. If you turned off any anti-virus scanners, turn them back on now.
Installation is complete. Go to Chapter 4: Nimsoft Client Installation (see page 75) to deploy and install Nimsoft infrastructure on client systems.
GUI and Console Mode Parameter Values
MySQL Database Parameters
Parameter Value
Database Server Database server IP address
Database Name Desired name (new) or actual name (existing)
Database Port Database server port (typically 3306)
Database Administrator
Administrator Password
Either:
■ Use the MySQL administrative account (root). If you are creating a new database, enter the desired password for the root account to be created.
■ Use an account other than root by checking Nimsoft SLM Database User Account. Enter the username and password for an existing account (new or existing database), or enter the desired name and password for an account to be set up (new database).

GUI and Console Mode Parameter Values
66 Installation Guide
SQL Server Database Parameters
Parameter Value
Database Server ■ Database server hostname or IP address
■ Hostname\instance_name if you have a named instance on a standard port (i.e. 1433)
■ Hostname if you have a named instance on a non-standard port
Database Name Desired name (new) or actual name (existing)
Database Port Database server port (typically 1433)
Database User Database administrative account (root)
Database Password Password for database administrator account or desired password if the account is to be created
Oracle Database Parameters
Parameter Value
Database Server Database server IP address
Service Name Desired database name (new) or actual name (existing)
Database Port Database server port (typically 1521)
SYS Password Password for the server system administrator account
Nimsoft DB User Desired name for the Nimsoft database administrator account, which will be created by the installer
Nimsoft DB Password Desired password for the Nimsoft database administrator
Tablespace Name Desired name (new) or actual name (existing)
Tablespace Location Desired location or leave blank to use the default (new)
Database Size Desired size (new)
Auto Extend Size Desired size or leave blank to use the default
Maximum Size Desired size or leave blank to use the default

GUI and Console Mode Parameter Values
Chapter 3: NMS Installation 67
Hub Configuration Values
Parameter Value
Hub Domain Desired name for this NMS domain (default is the name of the server with dom appended).
Hub Name Desired name for this hub (default is the name of the server with hub appended).
Password Desired password (at least six characters) for your Nimsoft administrator. The name of this user is always administrator; the name and the password are required to log in to NMS after installation.
First Probe Port (optional)
Use the default (48000) and let the system assign ports as needed unless you have a reason to specify an initial port for Nimsoft probes.
License The license key exactly as it appears on your Nimsoft License Document. (If you do not have a license, the installer creates a temporary trial license that will work for 30 days).
Select IP for Hub The installer displays all network interfaces attached to the computer. Select the IP address you want to use for NMS traffic.
Note: Unless you have a specific reason to do so, do not choose a Link Local address, which is an address that starts with 169.254 (IPv4) or fe80: (IPv6). A warning displays if you do. If you want to proceed using a Link Local address, click the Allow Link Local Address box.

Installing NMS on Windows, Linux or Solaris—Silent Mode
68 Installation Guide
Installing NMS on Windows, Linux or Solaris—Silent Mode
This procedure is intended for a first-time installation. If you want to:
■ Upgrade, see the NMS Release Notes and Upgrade Guide, available from the Downloads tab at http://support.nimsoft.com.
■ Reinstall, click Cancel, uninstall the prior version as explained in Uninstalling NMS (see page 73), and restart the installation process. Note that your server configuration information (domain and hub names, IP addresses, user accounts and passwords) is not retained.
Follow these steps.
1. Turn off any anti-virus scanners running on your computer (these scanners can significantly slow down the installation).
Note: Turn the anti-virus scanners on again immediately after installation.
2. Go to the Downloads tab at Nimsoft Technical Support and download the:
■ Most recent NMS install package for your operating system (the package is over 1 GB, so this could take several minutes)
■ Silent install template zip package
3. On Linux or Solaris, make the install file executable. Execute:
chmod 755
4. Prepare your response file:
a. Extract the silent install templates.
b. Locate the installer.database_type.OS.properties file that corresponds to your system setup, and save the file as installer.properties in the same directory as the installer.
c. Open installer.properties and enter or change the parameter values. All lines that do not begin with a # symbol must have a value.
For details, refer to Silent Install Parameter Values.
d. Save the file, ensuring the file type is still PROPERTIES. If the file type is Text Document, remove the .txt extension (which may not be displayed in the folder).
5. Run the installer.
■ Windows―execute:
installNMS.exe -i silent
■ Linux or Solaris―execute either:
installNMS_linux.bin -i silent
installNMS_solaris.bin -i silent
6. The installer unpacks the files and completes the installation. This process can take several minutes or more. To see the progress of the installation, execute:

Silent Install Parameter Values
Chapter 3: NMS Installation 69
tail -f /tmp/ia/iaoutput.txt
7. NMS launches. If for some reason it does not, enter these commands:
■ Windows―execute:
net start NimbusWatcher Service
■ Linux or Solaris―execute either:
cd /etc/init.d
nimbus start
8. If you turned off any anti-virus scanners, turn them back on now.
Installation is complete. Go to Nimsoft Client Installation (see page 75) to deploy and install Nimsoft infrastructure on client systems.
Silent Install Parameter Values
For silent install, the following parameters must be defined in the installer.properties file. Note that some parameters:
■ Are not required for certain platforms and/or operating systems. If a parameter is not included in the installer.DB_type_OS.properties file, it is not required.
■ Require actual values if your database or required user accounts are already created.
■ Require you to specify values if the database and/or accounts are to be created.
In the accepted values columns:
■ Bold text represents actual accepted values that can be entered verbatim.
■ Regular text represents values that exist and are specific to your setup, such as a server IP address .
■ Italic text represents values you define during installation, such as the Nimsoft domain name.

Silent Install Parameter Values
70 Installation Guide
Database Configuration Parameters
Parameter Definition Value
USER_INSTALL_DIR Target folder for installed files
■ C\:\\Program Files\\Nimsoft (Windows default)
■ /opt/nimsoft (Linux/Solaris default)
■ Existing directory
■ Directory to be created by installer
NIMDBCREATE Create database? ■ true (default)
■ false
NIMDBTYPE Database Type ■ mysql, oracle or mssql (defaults)
MSSQLAUTHTYPE Microsoft SQL Authentication Type
■ sql (default)
■ trusted
DB_SERVER Database server hostname or IP address
■ Hostname or IP address
On SQL server:
■ hostname\instance_name if you have a named instance on a standard port (i.e. 1433)
■ hostname if you have a named instance on a non-standard port
DB_PORT Database port ■ 3306 (MySQL default)
■ 1521 (Oracle default)
■ 1433 (MSSQ L default)
■ User-specified port
NIMDBNAME Database name ■ NimsoftSLM (default)
■ Desired database name (new database)
■ Actual database name (existing database)
DB_ADMIN_USER Nimsoft database administrator username
■ Sys (required user for Oracle)
■ DB admin username (MySQL and SQL server)

Silent Install Parameter Values
Chapter 3: NMS Installation 71
Parameter Definition Value
USER_INSTALL_DIR Target folder for installed files
■ C\:\\Program Files\\Nimsoft (Windows default)
■ /opt/nimsoft (Linux/Solaris default)
■ Existing directory
■ Directory to be created by installer
DB_ADMIN_PASSWORD Database administrator password
■ SYS password (Oracle)
■ Actual DB admin password (MySQL and SQL server)
NIMDB_USER
Oracle: required
MySQL: optional
Nimsoft database user account
■ Nimsoft (default for new DB; required on Oracle)
■ root (optional for MySQL)
NIMDB_PASS
Oracle: required
MySQL: optional
Nimsoft database account password
■ SID (Oracle)
DROP_COLUMNS (MySQL and Oracle)
Drop the inserttime column from the database schema
■ 1 (drop columns, default)
■ 2 (keep but do not create in new table)
■ 3 (keep and create in new table)
Hub Configuration Parameters
Parameter Definition Value
NMSHUB Hostname or IP address for the primary hub
Hostname or IP address
NMSDOMAIN NMS domain name ■ Actual domain name (if it exists)
■ User-specified domain name (if being created)
■ <no value> (default domain name is the server name with dom appended)

Silent Install Parameter Values
72 Installation Guide
Parameter Definition Value
NMSNETWORKIP NMS Network Interface IP ■ IP address of primary hub NIC
NMS_PROBE_PORT NMS first probe port ■ 48000 (default)
■ Any available port
■ <no value> (probe ports will be auto assigned)
IPV6_ENABLED=0 Enable IPV6 ■ 0 (false, default)
■ 1 (true)
NMSLICENSE Nimsoft License string ■ License number
NMS_PASSWORD Password created for NMS Administrator account
■ User-specified
DISCOVERY_NET_1 Addresses to be included in discovery
■ Range of addresses (can be a scope or range, ex: 18.4.135.0/24)
DISCOVERY_NET_2 Addresses to be excluded from discovery
■ Range of addresses (can be a scope or range, ex: 18.4.135.0/24)
SRVCAT_WINSRV SRVCAT_UNIXSRV SRVCAT_NETPRN SRVCAT_NETDEV
Configure for Windows servers, UNIX servers, network printers or network devices
■ true
■ false (default)
■
SRVCAT_AUTOMNG Auto Configure Managed Systems only
■ true (default)
■ false
SNMP authentication string parameters; leave blank if none
SNMP_AUTH SNMP community string; typically public
■ String
■ <blank>
WMI_AUTH_1 WMI Authentication Credentials (leave blank if none)
■ windows domain
WMI_AUTH_2 WMI Authentication Credentials (leave blank if none)
■ wmi domain user
WMI_PASS WMI Authentication Credentials (leave blank if none)
■ wmi password
Secure Shell (SSH) authentication string parameters; leave blank if none
SSH_AUTH SSH authentication credentials ■ ssh user

Uninstalling NMS
Chapter 3: NMS Installation 73
Parameter Definition Value
SSH_PASS SSH password ■ ssh password
Uninstalling NMS
These are the only recommended methods to uninstall NMS.
Windows
Follow these steps:
1. Go to the Control Panel.
2. Choose Programs and Features (Add/Remove Programs on older versions of Windows).
3. Select each NMS component.
4. Click Uninstall/Change, then follow the system prompts.
Linux and Solaris
Follow these steps:
1. Go to:
<NMS_install_dir>/NM_Server_installation
where <NMS_install_dir> is the directory where NMS was installed (default is /opt/nimsoft).
2. Run the uninstaller:
uninstall -i console
Note: The Nimsoft-provided uninstaller will succeed regardless of the method (GUI, console or silent) used to install NMS. No other uninstall approach is advised.


Chapter 4: Nimsoft Client Installation 75
Chapter 4: Nimsoft Client Installation
This section explains how to install Nimsoft management tools and infrastructure components on client systems in your managed environment.
This section contains the following topics:
Client Installation Overview (see page 75) Installing Infrastructure on Windows Clients (see page 78) Installing Infrastructure on Linux or Solaris Clients (see page 83) Installing a Robot on an AS400 Computer (see page 89)
Client Installation Overview
All software required by client systems resides on the NMS system. Various installation packages available on the NMS web page allow you to install the components of your choice.
Client systems can be set up with either a pull or push deployment model.
■ Pull – Administrators and users download the install packages from the NMS web page to the client system, then execute the install packages on the client systems. This model is explained in this chapter.
■ Push – An administrator pushes the software from the NMS system to robots either individually or in bulk. For details, refer to Bulk Deployment using the Automated Deployment Engine probe (ADE) (see page 93).

Client Installation Overview
76 Installation Guide
The following illustration shows a robot and a variety of probes deployed from the NMS system to each of three computers within a managed Nimsoft domain.
If you are installing infrastructure on remote sites, you may need to set up tunnels to enable secure communication. The DMZ wizard helps you set up tunnels between hubs.

Client Installation Overview
Chapter 4: Nimsoft Client Installation 77
Management Consoles
Management consoles let you manage your Nimsoft infrastructure and control and view the collected data. Two consoles are available:
■ Unified Management Portal (UMP)
UMP offers the most features. Functionality for older consoles (such as Enterprise Console) has been and will continue to be incorporated in UMP. For UMP Installation, see the UMP Installation Guide available from the Downloads tab at Nimsoft Technical Support.
■ Infrastructure Manager (Windows only)
This interface lets you configure the Nimsoft Infrastructure and view monitoring information for systems, applications and networks. Some legacy configuration tasks can only be accomplished using Infrastructure Manager.
Note: Infrastructure Manager can be installed and run stand-alone on any Windows-based computer that has network access to the Nimsoft hub.
Infrastructure Components
Nimsoft infrastructure refers to the hubs, robots, and probes that gather QoS and alarm information from your IT environment and direct this information to management consoles and the Alarm Console.
The following infrastructure installation packages are available:
■ Windows Robot, Hub, Distribution Server
This package installs a hub on a Windows system. It also includes the DMZ wizard, which sets up a tunnel between the firewall and the DMZ server.
■ Windows Robot
This package installs a robot on a Windows system.
■ UNIX installation utility (nimldr) for all platforms
This package installs a robot on a Linux or Solaris system.

Installing Infrastructure on Windows Clients
78 Installation Guide
Typical Infrastructure Deployment
Steps 2 through 4 in the following illustration show a typical infrastructure component deployment:
Note: In some cases you need to download the probe packages from the Archives tab at Nimsoft Technical Support. Some probes require additional licensing. See License Updates for details.
Installing Infrastructure on Windows Clients
Installing Infrastructure Manager
1. On the client computer where you want to install Infrastructure Manager, browse to your NMS web page (http://<servername_or_server_IP_address>:8008).
2. In the left pane, click Client Installation.
3. In the User Interfaces table, click Infrastructure Manager, then select Run.
4. Follow the prompts to complete the installation. Note that:
■ You must select which components to install: Infrastructure Manager and/or Alarm SubConsole. Normally both should be installed.
■ If you choose to install the Microsoft SOAP Toolkit, the toolkit setup wizard launches.
5. Verify that the installation was successful by launching the console:
■ Start > Programs > Nimsoft Monitoring > Infrastructure Manager

Installing Infrastructure on Windows Clients
Chapter 4: Nimsoft Client Installation 79
Installing a Windows Robot
When you install a robot you can choose Normal or Cloud installation.
Cloud installation lets administrators install a Nimsoft robot onto a master image of a virtual machine (VM) for provisioning purposes. This lets the administrator monitor new VMs as they are deployed.
Note: Cloud installation leaves the installed robot in a latent state. The robot starts after a configurable number of host restarts.
1. On the client computer, browse to your NMS web page (http://<servername_or_server_IP_address>:8008).
2. In the left pane, click Client Installation.
3. In the Infrastructure table, click Windows Robot, then select Run.
4. Follow the prompts to complete the installation. Note that:
■ For Normal installation, you must specify the domain you want the robot to be part of. Check a domain (if more than one is available) or select Choose to connect to the network interface through IP address to attach the robot to a specific hub.
■ For Cloud installation, a hub on a cloud instance is assumed. If a hub external to the cloud is used, the robot must be configured with robotip_alias = <external IP of cloud instance> after the cloud instance is created.
■ If the computer has multiple network interface cards (NICs), the Local IP address dialog appears. Select the network interface the robot will use to send and receive information.
■ In the Options dialog:
– Leave the First probe port field blank (recommended) to let the system will use default port numbers, or specify the first port to be used to start probes.
– Select Passive mode if you want to set the hub as passive.
Installing Windows Robot, Hub and Distribution Server
This install package offers three types of installation: automatic, custom and DMZ.
Note: If Nimsoft software is found on the system, the installer allows you to either:
■ Remove all components then restart the installation (recommended)
■ Select Upgrade/Reinstall to overwrite existing components

Installing Infrastructure on Windows Clients
80 Installation Guide
Automatic Installation
Automatic installation searches for a hub. If a hub is:
■ not found, then the robot, hub, and Distribution Server (distsrv) are installed
■ found, the robot-only software is installed.
Follow these steps:
1. On the client computer, browse to your NMS web page (http://<servername_or_server_IP_address>:8008).
2. In the left pane, click Client Installation.
3. In the Infrastructure table, click Windows Robot, Hub, Distribution server, Alarm Server, then select Run.
4. Follow the prompts to complete the installation. Note that:
■ Setup Type is Automatic.
■ If no hub is found, you must specify an existing domain name.
■ If you are setting up a hub, you must specify the desired hub name.

Installing Infrastructure on Windows Clients
Chapter 4: Nimsoft Client Installation 81
Custom Installation
Custom installation allows you to decide which Nimsoft components to install:
■ Robot
■ Hub (Nimsoft recommends you install at least two hubs on the same domain and network to ensure you have a backup of the user and security data stored on the primary hub)
■ Distribution Server (distsrv)
■ Probe Runtime libraries (needed to create your own probes)
■ DMZ Wizard
Follow these steps:
1. On the client computer, browse to your NMS web page (http://<servername_or_server_IP_address>:8008).
2. In the left pane, click Client Installation.
3. In the Infrastructure table, click Windows Robot, Hub, Distribution server, Alarm Server, then select Run.
4. Follow the prompts to complete the installation. The information required depends on your system and the components selected.
■ If no hub is found, you must choose an existing domain. All available domains are shown.
■ If you are setting up a hub:
– You must specify the desired hub name and enter the hub license number.
– You will set up a hub user account (called the Initial User) for the hub. Specify a user name or use the default (administrator), and choose a password.
■ Unless you have a reason to specify the first probe port, leave the field blank to let the system assign ports automatically.
■ If you choose to install the DMZ wizard, refer to DMZ Installation (see page 82) for details.

Installing Infrastructure on Windows Clients
82 Installation Guide
DMZ Installation
DMZ installation:
■ Lets you set up a secure communication tunnel between hubs separated by a firewall, DMZ or both.
■ Consists of two phases: creating and configuring a tunnel server, then creating and configuring a tunnel client.
■ Requires that you determine which hub will be the tunnel server and install this hub first, then set up the tunnel client.
This section explains how to set up tunnels during installation. To configure an existing hub for tunnels, use the Infrastructure Manager Hub Configuration utility.
Follow these steps:
1. On the client computer, browse to your NMS web page (http://<servername_or_server_IP_address>:8008).
2. In the left pane, click Client Installation.
3. In the Infrastructure table, click Windows Robot, Hub, Distribution server, Alarm Server, then select Run.
4. Follow the prompts to complete the installation. Note that:
■ When prompted to log in, use the Nimsoft hub administrator account you set up during this installation.
■ You must specify an existing domain name.
■ You must specify the desired hub name. The hub must have a public IP address if you want to access it from the Internet.
■ For a DMZ tunnel server:
– You will set up a hub user account (called the Initial User) for the hub. Specify a user name or use the default (administrator), and choose a password.
– When prompted to log in, enter the hub user name and password.
– In the Setting up Tunnel Server dialog, you create an authentication password. This password is required when you set up the tunnel client.
– In the Generating Client Certificate dialog, enter the IP address of the client for which you want to generate the certificate.
– Copy the certificate to removable media. You will need it when you set up the client.
■ For a DMZ tunnel client:
– Enter the IP of the tunnel server, the server port, and the password created during tunnel server setup.

Installing Infrastructure on Linux or Solaris Clients
Chapter 4: Nimsoft Client Installation 83
– Browse for the certificate file. When the file is found, the certificate text displays.
Installing Infrastructure on Linux or Solaris Clients
All Linux or Solaris client installations use the Nimsoft Loader utility (nimldr). Utility options let you set up:
■ Robots, which include a robot and basic service probes.
■ Hubs, which include a hub, robot, service probes and the Distribution Server (distsrv).
Nimsoft recommends you install at least two Nimsoft hubs on the same domain and network to ensure you have a backup of the user and security data in the event the primary hubs fails.
■ Tunnel server hubs and tunnel client hubs, which allow secure communication in environments with firewalls or a DMZ. To learn more about Nimsoft SSL tunnels and required ports, refer to:
– Working with Firewalls and DMZs (see page 14)
– Required Ports for SSL Tunnels (see page 15)
Note: If NM server is already installed and running on the system:
■ Turn off all NMS processes:
/opt/Nimsoft/bin/niminit stop
■ Remove the robot:
/opt/Nimsoft/bin/inst_init.sh remove
Check the Client Computer IP Address in /etc/hosts
Before installation, confirm that any client computer on which you plan to install a robot has a valid assigned IP address listed in its /etc/hosts file. A non-loopback IP address is required for nimldr to install a robot and communicate with it successfully.
Example:
IP Address Hostname Note Explanation
127.0.0.1 localhost loopback IPv4 loopback address (insufficient information, if this is the only entry)
76.3.4.125 <hostname> Example assigned IP address (required information for nimldr)

Installing Infrastructure on Linux or Solaris Clients
84 Installation Guide
Installing Infrastructure with the Nimsoft Loader (nimldr)
Follow these steps:
1. On the client computer, browse to your NMS web page:
http://<server_name_or_IP_address>:8008
Note: You must specify port 8008.
2. In the left pane, click Client Installation.
3. In the Infrastructure table, click UNIX installation utility (nimldr) for all platforms, then click Save the file.
Note: If the client system doesn’t have a browser, download the installer to a Windows computer and copy it to the client. Make sure the file is named nimldr.tar.Z.
4. Uncompress nimldr.tar.Z.
5. Extract the tar file :
# tar xf nimldr.tar
This creates a directory with sub-directories that contain nimldr installers for various Linux and Solaris platforms.
6. Enter the appropriate sub-directory for your platform (for example, LINUX_23_64).
7. If the client is on the:
■ Same network segment as the NM server, execute:
# ./nimldr
■ Different network segment ,execute:
# ./nimldr -I <NM_server_IP_address>
8. The install program guides you through the installation by asking a series of questions, which are detailed in Questions and Answers for the nimldr Installer (see page ).
Installation progress is logged in the nimldr.log file located where nimldr stores temporary files (typically opt/nimsoft/tmp). To view it, execute:
tail -f /opt/nimsoft/tmp/nimldr.log

Installing Infrastructure on Linux or Solaris Clients
Chapter 4: Nimsoft Client Installation 85
Questions and Answers for the nimldr Installer
The following table lists the questions asked by the installer. Note that:
■ Default answers are in brackets. Press Enter to use the default, or type in the requested information.
■ Not all questions are asked; some questions are asked or not depending on your answers to previous questions.
■ Answers in italics represent values that do not exist but will be created by the installer.
■ If express installation is specified, default values are used automatically.
■ Additional questions for tunnel server and tunnel client setup follow this table.
Question Answer
Where should nimldr store temporary files? ■ opt/nimsoft/tmp (default)
■ Directory of your choice
Is this a Cloud installation? ■ Yes (cloud install)
■ No (all other installs)
Do we have the installation file locally? ■ Yes
■ No
Where do we have the installation file(s)? ■ Path to installation file(s)
Is there a host running a Nimsoft hub we can query for the installation file?
■ Yes
■ No
What is the IP address of the host running a Nimsoft hub? ■ Hub IP address
What is the Nimsoft Domain called?
■ Domain name (if it exists)
■ Desired name (if it is being created)
■ * (asterisk) to search for domains
What is the Nimsoft hub called?
■ Hub name (if it exists)
■ Desired name (if it is being created)
■ * to search for hubs
What is the installation file called? ■ install_platform
Which of these archives would you like to connect to? ■ Specify archive

Installing Infrastructure on Linux or Solaris Clients
86 Installation Guide
Question Answer
Enter Nimsoft username and password.
■ Name/password of the Nimsoft account set up during NMS installation
■ administrator (typically)
Where do we have the installation files? ■ Install file directory (if local)
What are we installing? ■ 1 (robot only)
■ 2 (robot and hub, tunnel server, or tunnel client)
Would you like to install the Distribution Server (distsrv)?
distsrv is the Nimsoft probe archive
■ Yes
■ No
Where should the Nimsoft software be installed? ■ /opt/nimsoft (default)
Automatically unregister robot from hub on termination?
■ Yes
■ No (default)
Should this robot run in passive mode? ■ Yes (default, hub requests data from
robot)
■ No (robot sends data to hub)
What is this Nimsoft Domain called? ■ Existing domain set up during NMS installation
Which Nimsoft hub should this robot connect to? ■ Hub name
What is this Nimsoft hub called? ■ Hub name
What is that Nimsoft hub's IP address? ■ IP address
Are you setting up a tunnel between this hub and another hub?
■ Yes
■ No
Would you like to initialize the security settings on this hub?
■ Yes (default)
■ No
Please specify the administrator user password.
■ Password for Nimsoft account set up during NMS installation
Are you setting up a Nimsoft tunnel between this hub and another hub?
■ Yes
■ No

Installing Infrastructure on Linux or Solaris Clients
Chapter 4: Nimsoft Client Installation 87
Tunnel Server Installation Questions
Question Answer
Enter Nimsoft username and password. ■ Username and password for Nimsoft
administrator account set up during NMS installation
Is this hub going to be a tunnel server? ■ Yes
The following values are used to create the tunnel client certificate, which the tunnel client needs to connect to the tunnel server.
What is the name of your organization? ■ Company name
What is the name of the organizational unit? ■ Organizational unit
What is the administrator email address? ■ Nimsoft administrator account address
What password should we use for the Server certificate?
■ Password you specify for tunnel client certificate
■ Note: you need this password when you set up the tunnel client
What is the IP address of the tunnel client?
■ IP address of the system on which you will install the tunnel client
What file should the certificate be written to?
■ /opt/nimsoft/client.txt (default)
■ Path and filename for client certificate
What is the IP address of the tunnel server hub? ■ Tunnel server hub IP address
Tunnel Client Installation Questions
Question Answer
Is this hub going to be a tunnel server? ■ No
Is this hub going to be a tunnel client? ■ Yes
What is the IP address of the tunnel server hub? ■ Tunnel server hub IP address
What port is the server listening on? ■ Port number assigned during NMS installation; typically 48000 (default)
What password was used to generate this certificate?
■ Password defined when tunnel client certificate was created during tunnel server setup
Installing Infrastructure on Linux or Solaris Clients
88 Installation Guide
Question Answer
What file is the client certificate in? ■ Path and filename for client certificate
that was copied from the tunnel server to the tunnel client
Flags for nimldr Installer
The following flags can be used to specify specific information or modify how the installer runs.
Usage Flag Description
All installations -d Debug level , 0 (default)-5
-l Installation logfile
-t Location for temporary files during installation; default is /opt/nimsoft/tmp
-D NimBUS domain name
-H NimBUS hub name
-N Override robot name
-p NimBUS installation path; default is /opt/nimsoft
-f
Override package file name; default installation file is detected by the program
Note: Case sensitive, omit .zip extension
-u Install as current user, not as root (NOT recommended)
-o First probe port
-R IP address for this robot (useful for systems with multiple network cards)
-a set the automatic unregister flag; default is no
-s Set the robot to passive mode
-v prints version of ./nimldr
-h prints this help text
Installation file is on local system
-F Directory containing installation file (if installation file is on local system)
Installation file is on a NimBUS
-I IP address of NimBUS hub running a Distribution Server (note that this overrides the -H flag)

Installing a Robot on an AS400 Computer
Chapter 4: Nimsoft Client Installation 89
Usage Flag Description
Distribution Server -V
Package version (gets the specified version of the package, not the latest one)
Installation modes
-r Install robot only (default)
-i Install Infrastructure (robot, hub and distsrv)
-E Express installation (uses defaults or supplied flags; requires that install file is on local system)
-X Silent express installation (fails instead of going to interactive mode; requires that install file is on local system)
Cloud installation -C Cumber of restarts until robot should become active
-M DNS name of the system running the hub
Installing a Robot on an AS400 Computer
Follow these steps.
1. Download the install files:
a. On the AS400 client system or any other Nimsoft client, browse to your NMS web page (http://<servername_or_server_IP_address>:8008).
b. In the left pane, click Client Installation.
c. In the Infrastructure table, select:
■ iSeries Robot Program Files and Save the file (nimBUS.savf). This file contains the program files.
■ iSeries Robot File Structure, then Save the file (nimsoft.savf).This file contains the file structure and configuration files.
d. If you are using a client that is not the target AS400, copy the files to the AS400.
2. On the AS400, create the NIMBUS user:
CRTUSRPRF USRPRF(NIMBUS) PASSWORD()
USRCLS(*SECOFR) TEXT('Nimbus User for Nimsoft Management')
3. Create temporary files for the save files:
CRTSAVF <LIBRARY>/NIMBUS TEXT('Savf of Nimsoft LIB')
CRTSAVF <LIBRARY>/NIMSOFT TEXT('Savf of Nimbus_Software')

Installing a Robot on an AS400 Computer
90 Installation Guide
4. Execute:
LCD <workstation folder containing savefiles>
CD <LIBRARY on AS400 containing temporary save files>
BIN
PUT NIMBUS.savf
PUT NIMSOFT.savf
Quit
5. Install the robot.
a. Restore /qsys.lib/Nimbus.lib. Execute:
RSTLIB SAVLIB(NIMBUS) DEV(*SAVF) SAVF(<<LIBRARY>>/NIMBUS)
b. Restore the /Nimbus_Software/NimBUS file-tree. Execute:
QSYS/CRTDIR DIR('/Nimbus_Software')
QSYS/CRTDIR DIR('/Nimbus_Software/NimBUS/')
QSYS/RST DEV('/QSYS.lib/<<LIBRARY>>.lib/NIMSOFT.file')
OBJ(('/Nimbus_Software/NimBUS/*'))
6. Edit the /Nimbus_Software/NimBUS/robot.cfg configuration parameters with appropriate values. The file follows this format:
EDTF STMF('/Nimbus_Software/NimBUS/robot/robot.cfg')
<controller>
domain = Nimsoft
hub = Development
hubrobotname = src1
hubip = 10.0.0.10
robotname = server3
robotip = 10.0.0.11
</controller>
<remote>
contip = 10.0.0.11
</remote>
Parameter Value
domain Nimsoft domain name
hub Name of the hub to which the robot will connect
hubrobotname Name of the robot to install
hubip Hub IP address
robotname Intended name for the robot on the target system
robotip Target system IP address
contip Target system IP address

Installing a Robot on an AS400 Computer
Chapter 4: Nimsoft Client Installation 91
7. To start the robot, execute:
STRSBS NIMBUS/NIMBUS
Notes:
■ To stop the robot, execute:
ENDSBS NIMBUS
■ If you want to shut down the /tcpip system each night for backup, you should also stop Nimsoft and start it again after tcpip has been restarted.
Stopping and starting Nimsoft can be done in jobscde as shown in the following example (which has stop time 01.00.00 and start time 07.00.00 every day):
ADDJOBSCDE JOB(ENDNIMSOFT) CMD(ENDSBS SBS(NIMBUS) DELAY(120)) FRQ(*WEEKLY) SCDDATE(*NONE)
SCDDAY(*ALL) SCDTIME('01.00.00') USER(NIMBUS) TEXT('End Nimsoft')
ADDJOBSCDE JOB(STRNIMSOFT) CMD(STRSBS SBSD(NIMBUS/NIMBUS)) FRQ(*WEEKLY) SCDDATE(*NONE) SCDDAY(*ALL)
SCDTIME('07.00.00') USER(NIMBUS) TEXT('Str Nimsoft')


Appendix A: Bulk Robot Deployment with the Automated Deployment Engine (ADE) 93
Appendix A: Bulk Robot Deployment with the Automated Deployment Engine (ADE)
Nimsoft Monitor administrators can use the following tools to deploy robots in bulk to multiple remote computers and virtual machines:
■ Automated Deployment Engine (ADE) probe with the graphical user interface
■ ADE probe with the command-line interface (XML-based deployment)
■ robot_msi_rpm robot installer packages with a third-party deployment tool of choice
■ Automated Agent Deployment feature in Unified Service Manager (USM), accessed through UMP; for details, see the UMP online help topic Automated Agent Deployment
This section contains the following topics:
Introduction (see page 93) Prerequisites for ADE (see page 94) Using ADE in GUI Mode (see page 96) Using the ADE Command Line Interface (see page 100) Deploying Robots with a Third-Party Mechanism (see page 104) Troubleshooting (see page 108)
Introduction
The Nimsoft ADE probe provides a push alternative to the standard pull robot distribution method:
■ Push—With ADE, robot software from the source system (the NMS system or a hub) is deployed silently and simultaneously to multiple target systems.
■ Pull—With standard client installation, a user on a client system downloads the software from the NMS server system. This is explained in Nimsoft Client Installation (see page 75).
The ADE probe is installed and activated by default when NMS is installed or upgraded to the latest version.

Prerequisites for ADE
94 Installation Guide
Prerequisites for ADE
Before using ADE, ensure that:
■ Your source system NMS Archive has the required archive package robot_msi_rpm.zip, which includes both MSI and RPM robot installers. Nimsoft recommends you run ADE from the primary hub, which by default, has this archive package installed and available.
■ Your target systems are supported. ADE is supported on Windows and Linux. For supported versions, see the Nimsoft Compatibility Support Matrix (http://support.nimsoft.com/downloads/doc/compatibility_supportmatrix_current.pdf), which is updated regularly.
■ You have the required software components on the source and target systems:
Windows Linux
■ .NET 2.0 runtime library or higher (required for the ADE GUI and MSI robot installer packages)
■ Visual C++ 2008 runtime library
■ WMI and DCOM are configured and running*, as are the services WMI requires:
- COM+ Event System
- COM+ System Application
- Remote Procedure Call (RPC)
- Remote Procedure Call (RPC) Locator
- Remote Registry
- Server
- Windows Management Instrumentation
■ Nimsoft robot installed on the system where ADE will run
■ * More information: Problems with connectivity to Windows target hosts (see page 108)
■ /bin/sh (symlink to bash; /bin/bash must be installed, note that any shell can be run)
■ ssh (secure shell)
■ glibc
■ All appropriate firewall ports are configured to allow remote WMI and DCOM connections, as well as Windows shares (refer to Microsoft documentation for details).
■ The source system and target systems are in the same Windows domain, unless the target systems are in the default Windows domain workgroup.

Prerequisites for ADE
Appendix A: Bulk Robot Deployment with the Automated Deployment Engine (ADE) 95
Note: Redhat Linux provides a native authentication tool that allows a Linux system to join a Windows domain.
Note: You can deploy to systems in the default Windows domain, workgroup, from any Linux or Windows system provided the hostname is specified in this format: workgroup\[hostname].
■ You have appropriate privileges.
Windows:
– If you are using Windows Native Deployment, you must have local administrative privileges on the target systems.
– The user listed in the host-profiles.xml for target Windows systems must have remote access and remote execution privileges. It is recommended that this user be an administrator.
Linux: root

Using ADE in GUI Mode
96 Installation Guide
Using ADE in GUI Mode
The ADE graphical user interface lets you set up and specify parameters for a distribution request. ADE executes the distribution request according to the source and target information you specify in three tables:
■ Authentication, which lets you specify login information for targets
■ Hub Information and Robot Parameters, which lets you specify target robot parameters
■ Hosts, which lets you specify the targets to which the robots will be deployed

Using ADE in GUI Mode
Appendix A: Bulk Robot Deployment with the Automated Deployment Engine (ADE) 97
Deploying Robots with the ADE GUI
Important: Information entered into the GUI persists only as long as the GUI is open--it is not saved to disk. If the GUI closes for any reason before your distribution request is finished, the information entered is lost.
1. Open the ADE probe GUI (double-click the automated deployment engine probe in Infrastructure Manger) and enter the desired deployment information.
■ Authentication—Create a profile for an admin account on each target system. Target systems that use the same admin username and password can use the same profile. Authentication Parameters (see page 99) provides details.
■ Hub Information and Robot—Specify details about the robot and its hub. Hub Information and Robot Parameters (see page 99) provides details.
Check the Edit Parameters checkbox to activate a grid that lets you view and set additional parameters. Select a parameter in the grid to see its description and default value.
Using ADE in GUI Mode
98 Installation Guide
If a parameter does not have a value, the default value will be assigned when the deployed robot starts.
■ Hosts—For each target, specify system details, choose an authentication profile, and choose a robot profile. Hosts Parameters (see page 100) provides details.
2. Review the values you have entered and enter any missing information. Press Enter to instantiate the last value, exit edit mode, and activate the Distribute button.
3. Click Distribute to start deployment.
The GUI switches to the History tab, which shows the real-time distribution status for each host:
– JobID: a numeric identifier for the distribution
– Status of the current job: QUEUED, IN_PROGRESS, SUCCESS, FAILURE, COMPLETED, ALREADY_IN_PROGRESS, NO_ACTION, WARNING, INCOMPLETE
– Host name or IP address of the target system
– Description of the status, including error messages (if applicable)
4. Click Clear to clear the progress status if desired.
Deployment is complete. If the distribution information is needed again, it is available in the probe log files automated_deployment_engine.log or ade_history.<JobID>.working.log.
Deployment Details
■ ADE installs robots in groups, with group size determined according to the number of CPU cores on the hub where the ADE probe is running.
■ When a secondary hub is specified under Hubname:
1. ADE deploys a copy of itself to the secondary hub.
2. The primary hub distributes the deployment job to the secondary hub.
3. The secondary hub carries out the robot deployment.
■ In the case of multiple ADE probes, deployment tasks are executed in this order:
1. The primary ADE executes its robot deployment tasks
2. The primary ADE deploys secondary ADE probes.
3. The secondary ADE probe(s) execute their robot deployment tasks.

Using ADE in GUI Mode
Appendix A: Bulk Robot Deployment with the Automated Deployment Engine (ADE) 99
■ After deploying a robot, ADE waits fifty seconds (default) for the robot to start before reporting its status in the history tab. To change the default length of time, change the value for verifyDelay in the ADE probe config file automated_deployment_engine.cfg.
■ During execution, all robot deployment jobs are given their own log file: ade_history.[JobID].working.log. When distribution is complete, this file is renamed to ade_history.[JobID].[timestamp].log, where timestamp is the time (in milliseconds) when the deployment job finished.
Authentication Parameters Parameter Definition Value
Authentication Profile Name for this set of account information
Unique ID of your choice
Username Account username Any administrative account on the target
Password Account password for the associated username
Password
Hub and Robot Parameters Parameter Definition Value
Robot Profile Name for this set of hub/robot information
Unique ID of your choice
Domain Nimsoft domain Select from list of available domains visible to the local ADE
HubName Name of the hub this robot is associated with
Select from list of available hubs within the selected domain
HubIP IP address associated with the Hub Prefilled with the IP address of the Hub
HubRobotName Name of the robot on the distributing hub
Prefilled with the name of the robot on the distributing hub
HubPort Port that the hub listens on Port specified during hub setup
48002 (default)
Set
Indicates whether or not one or more extended parameters for the robot have been defined or modified from the default
blank—Not modified from default values
Y—extended parameters have been modified Recommendation: review these before distribution

Using the ADE Command Line Interface
100 Installation Guide
Parameter Definition Value
Edit Parameters
Displays the extended robot property grid, which has optional parameters for:
■ Robot Identification and Configuration
■ Alarm Configuration
■ Failover Configuration
■ Message Enhancements
Checked (displays grid)
Note: A description and default value for the selected parameter displays below the grid.
Unchecked (hides grid)
Host Parameters Parameter Definition Value
Profile Operating system on target system Windows
Linux
Arch Architecture of target operating system 32-bit
64-bit
Hostname Target system name Hostname
IP address
Authentication Profile
Login information Select from the list of profiles defined in the Authentication table *
Robot Profile Robot/hub information Select from the list of profiles defined in the Hub Information and Robot Parameters table *
* The GUI displays a warning if an attempt is made to change the name of either an authentication or robot profile while it is associated with a host.
Using the ADE Command Line Interface
Command line mode lets you specify parameters in an XML file (host-profiles.xml). ADE then uses this file to direct robot deployment.
The command line interface:
■ Supports public key authentication for SSH. The XML field that defines the path to the public key is on the hub machine at:
<rsakeyfile>/path/to/public_key_file</rsakeyfile>
■ Allows use of ADE on Linux systems where no windowing environment is available.
Using the ADE Command Line Interface
Appendix A: Bulk Robot Deployment with the Automated Deployment Engine (ADE) 101
Deploying Robots with the Command Line Interface
Follow these steps:
1. Create a host-profiles.xml file in your preferred text editor to specify the:
■ hosts on which to install robots
■ information for the hub to which the robots will connect
The format for host-profiles.xml is described in:
■ Example host-profiles.xml File (see page 103)
■ Parameter Values for host-profiles.xml (see page 103)
Note: Windows hostname must be in the form domain\hostname. If a host is specified in an invalid format, deployment to that host is skipped to prevent issues.
2. Copy the host-profiles.xml file into the ADE probe directory. By default this is:
■ Windows—nimsoft_directory\probes\service\automated_deployment_engine
■ Linux—nimsoft_directory/probes/service/automated_deployment_engine
Note: The default nimsoft_directory is:
■ Windows—C:\Program Files\Nimsoft or C:\Program Files (x86)\Nimsoft
■ Linux—/opt/nimsoft
3. Deployment begins automatically. The ADE probe scans the probe directory every thirty seconds and starts the deployment whenever a host-profiles.xml file is detected.
Deployment is complete. Note that:
■ Following deployment (regardless of success or failure), host-profiles.xml is renamed host-profiles-YYYY-MM-DD_HH-mm-ss to reflect the date and time of deployment.
This ensures that in the event the ADE probe restarts, deployment does not automatically restart. If you want to restart distribution, the ADE service/daemon will deploy using the same file if you (a) manually rename the file back to host-profiles.xml, and (b) change its size by a nominal amount (edit the file and add an additional line.) Deployment will restart with the next scan of the probe directory by the ADE service/daemon.
■ Deployment status is stored in ade_history.[JobID].working.log in the ADE probe directory. View the status with tail (Linux and Solaris) or a similar utility in Windows. For example:
tail –f ade_history.[JobID].log
You can also tail automated_deployment_engine.log for additional detail on probe activity.

Using the ADE Command Line Interface
102 Installation Guide
Deployment Details
■ ADE installs robots in groups, with group size determined according to the number of CPU cores on the hub where the ADE probe is running.
■ When a secondary hub is specified under Hubname:
1. ADE deploys a copy of itself to the secondary hub.
2. The primary hub distributes the deployment job to the secondary hub.
3. The secondary hub carries out the robot deployment.
■ In the case of multiple ADE probes, deployment tasks are executed in this order:
1. The primary ADE executes its robot deployment tasks
2. The primary ADE deploys secondary ADE probes.
3. The secondary ADE probe(s) execute their robot deployment tasks.
■ After deploying a robot, ADE waits fifty seconds (default) for the robot to start before reporting its status in the history tab. To change the default length of time, change the value for verifyDelay in the ADE probe config file automated_deployment_engine.cfg.
■ During execution, all robot deployment jobs are given their own log file: ade_history.[JobID].working.log. When distribution is complete, this file is renamed to ade_history.[JobID].[timestamp].log, where timestamp is the time (in milliseconds) when the deployment job finished.

Using the ADE Command Line Interface
Appendix A: Bulk Robot Deployment with the Automated Deployment Engine (ADE) 103
Example host-profiles.xml File <!-- profile | hostname:port | username | password | domain | hubip | hubname |
hubrobotname | hubport -->
<!-- default port is 22 -->
<hosts>
<host>
<profile>Linux</profile>
<arch>64</arch>
<hostname>172.19.8.81</hostname>
<username>root</username>
<password>password</password>
<domain>mcanji-W2K8-2dom</domain>
<hubip>172.19.8.8</hubip>
<hub>mcanji-W2K8-2hub</hub>
<hubrobotname>mcanji-w2k8-2</hubrobotname>
<hubport>48002</hubport>
</host>
<host>
<profile>Windows</profile>
<arch>32</arch>
<hostname>workgroup\172.19.8.34</hostname>
<username>Administrator</username>
<password>password</password>
<domain>mcanji-W2K8-2dom</domain>
<hubip>172.19.8.8</hubip>
<hub>mcanji-W2K8-2hub</hub>
<hubrobotname>mcanji-w2k8-2</hubrobotname>
<hubport>48002</hubport>
</host>
</hosts>
Parameter Values for host-profiles.xml
Parameter Definition Value
profile Operating system on target system
Windows
Linux
arch Architecture of target operating system
32
64
hostname Target system name Hostname or IP address
username Admin account on target system
Any account on the target that has administrative permissions
password Admin account password Password string

Deploying Robots with a Third-Party Mechanism
104 Installation Guide
Parameter Definition Value
domain Nimsoft domain Nimsoft domain name (case-sensitive)
hubip IP address of the hub to which this robot will belong
IP address
hub Name of the hub to which this robot will belong
Hub name
hubrobotname Name of the robot to be deployed
Name of the robot on the distributing hub (respect case)
hubport Port that the hub listens on 48002 (default)
Port specified during hub setup
Deploying Robots with a Third-Party Mechanism
Many IT environments already have a mass software deployment mechanism in place. Some examples are Puppet and Yum (Linux), Altiris (Windows), or Microsoft System Center Configuration Manager (Windows). Almost any third-party distribution mechanism can be used as long as it can:
■ Copy an msi or rpm robot installer to remote systems
■ Copy an answer file that uses the format specified in Answer File Sytnax and Parameters (see page 107)
■ Execute the installer
There are a total of four robot_msi_rpm installers:
■ Two Windows installers: one 32-bit and one 64-bit Microsoft Installer (MSI) package
■ Two Linux (SUSE and RedHat) installers: one 32-bit and one 64-bit RPM (RedHat Package Manager) package
Note: The msi and rpm installers are designed to execute silently and require an answer file. For manual installation of a robot without need for an answer file, refer to Nimsoft Client Installation.

Deploying Robots with a Third-Party Mechanism
Appendix A: Bulk Robot Deployment with the Automated Deployment Engine (ADE) 105
Deployment Steps
Follow these steps:
1. On the computer that will distribute robots (the source system), obtain the desired robot_msi_rpm package from either the:
■ Client Installation page on the NMS web page (http://<nm_server>:8008)
■ NMS file system:
– Windows: C:\Program Files (x86)\Nimsoft\install\setup
– Linux: /opt/nimsoft/install/setup
2. Prepare the answer file named nms-robot-vars.cfg as described in:
■ Answer File Syntax and Parameters (see page 107)
3. Copy the answer file to a directory on the target system.
■ Windows : same directory as the package
■ Linux: /opt (even if installing the robot to a non-standard directory)
4. Execute the appropriate command:
■ Windows
msiexec /i <MSI _package> /qn
To specify the target directory, execute:
msiexec /I <MSI_package> /qn TARGETDIR="path"
You also can omit qn (silent mode) to display a simple GUI (interactive mode) where you can specify the target directory.

Deploying Robots with a Third-Party Mechanism
106 Installation Guide
■ Linux
rpm -ivh <RPM_package>
To specify the target directory, execute:
rpm -ivh nimsoft-robot.<arch>.rpm --prefix=<directory >
where:
■ <arch> is the architecture of the target system (x86 or x86_64)
■ <directory> is the path/name of the target directory
The rpm flags function as follows:
■ -i installs the software packaged
■ -v displays a simple status line to show what is being installed (verbose mode)
■ -h displays fifty hash marks (#) to show the status as the install proceeds; when all fifty have displayed, the install is complete
Tip: To view detailed status and progress as the deployment progresses, execute tail ade_history.log in the probe directory (Linux only; in Windows, use a utility similar to tail).
5. Installation is successful if there are no errors related to failing scripts and if the software is installed in the specified directory.
After execution, the robots will (by default):
■ Auto-start on Windows systems
■ Not auto-start on Linux systems
To start a robot on Linux, execute:
/etc/init.d/nimbus start
To view status of the robot, execute either:
view controller.log
tail -f controller.log

Deploying Robots with a Third-Party Mechanism
Appendix A: Bulk Robot Deployment with the Automated Deployment Engine (ADE) 107
Answer File Syntax and Parameters
The file follows this syntax and format:
domain = <name of the domain that the robot belongs to>
hub = <primary hub name>
hubip = <primary hub IP address>
hubrobotname = <robot name of the primary hub>
hubport = <port number of the primary hub; default is 48002>
(optional fields)
Note that:
■ All text within brackets must be replaced with actual values.
■ Optional parameters with no answer are valid. However, it is better to omit a parameter from the answer file rather than include it with an empty setting.
■ A best practice is to prepare a simple answer file with only required fields during initial robot deployment, and add optional fields later. Bulk changes to robot configuration are quickly accomplished using "drag and drop" in Nimsoft Infrastructure Manager.
Parameter Definition Example value
domain Nimsoft Domain HOST_ABC_DOM
hub Nimsoft name of the hub to which the robot will be assigned
HOST_ABC_HUB
hubip Hostname or IP address of the hub to which this robot will belong
10.0.0.10
hubrobotname Name of the robot to be deployed HOST_ABC_HUB
hubport Port that the hub listens on 48002
robotip optional
Hostname or IP address of the target system
10.0.0.10
robotname optional
Desired name for robot on target (default is the hub IP)
HOST_ABC
first_probe_port optional
Port on source system to be used by the first probe
48000
Note: For a full description of all robot configuration parameters, refer to the online help in the Controller probe GUI.

Troubleshooting
108 Installation Guide
Removing the Package
When deployment is complete, remove the package by executing the appropriate command.
■ Windows:
msiexec /x <MSI _package> /qn
■ Linux:
rpm -e <RPM_package minus the .rpm extension>
Note: On Linux, you can first confirm that a robot package is installed by executing the following command:
rpm -q nimsoft -robot
If an entry is listed, a robot is installed.
Troubleshooting
ADE uses Microsoft’s WMI/DCOM technology to deploy Nimsoft robots to remote Windows hosts. If you see an error message during ADE deployment that says you must correctly configure the Windows machine for DCOM access, the issue may be improper WMI/DCOM configuration.
A full treatment of system-level Microsoft administration is outside the scope of this document. However, a number of useful resources can assist in setting up WMI/DCOM. For example:
■ www.j-interop.org/quickstart.html
■ http://msdn.microsoft.com (search for WMI connectivity)
■ http://blogs.msdn.com/b/wmi (search for DCOM)
Nimsoft has prepared a limited-scope, best-practices guide on WMI/DCOM setup, available on the Nimsoft Customer Portal (login required):
■ https://na4.salesforce.com/articles/best_practices/nimsoft-setup-guide-for-wmi-and-dcom
If you ensure the source and target systems are fully enabled for WMI/DCOM and you still have a problem isolated to Nimsoft ADE, contact Nimsoft support at http://support.nimsoft.com for assistance.

Appendix B: Installing NMS in an Active/Passive Microsoft Cluster 109
Appendix B: Installing NMS in an Active/Passive Microsoft Cluster
Running NMS within an active/passive MS Server 2008 R2 Failover Cluster minimizes the risk of having a single point of failure due to hardware problems or maintenance. All monitoring continues to operate as if nothing had happened, even if the cluster nodes change state.
This section contains the following topics:
Prerequisites (see page 109) Installing NMS on the Cluster (see page 110) Configuring the Nimsoft Robot Watcher Service (see page 111) Testing Failover Operation (see page 114)
Prerequisites
Required
■ Virtual IP address you will assign to the virtual Nimsoft service
■ Administrative access to an active/passive two-node failover cluster
■ Shared disk/iSCSI target (typically SAN, NAS or RAID array) configured
■ All resources are available to both cluster nodes
■ Configured cluster
Cluster configuration is covered in detail in Microsoft documentation and a variety of Microsoft developer and third-party internet resources. Some suggested sources for more information:
– http://technet.microsoft.com
– http://blogs.msdn.com
– Search internet video sites for Windows Server 2008 R2 Failover Clustering
Recommended
■ Do not install any Nimsoft consoles (primarily Infrastructure Manager) on the cluster nodes. Install these on a separate workstation.
Note: For database high availability, MS SQL Server is often itself configured to run on an MS Server 2008 cluster. When using an MS SQL Server database (with NMS running either on a single host or in a cluster), the HA database service appears to NMS the same as a non-cluster implementation. No special database connection or configuration is required.

Installing NMS on the Cluster
110 Installation Guide
Installing NMS on the Cluster
Follow these steps:
1. Install NMS on the active node in the cluster. Use one of the Windows installation procedures in NMS Installation (see page 57), with one exception:
■ When you specify the network interface, enter the virtual IP address you assigned to the virtual Nimsoft service. Do not use the virtual IP address of the node or its physical IP address.
2. Verify that the installation was successful by using Infrastructure Manager to view the status of the hub and robot(s).
3. Use Failover Cluster Manager to fail over the cluster from the active node to the passive node (second system in the cluster).
4. Install NMS on the second system in the cluster (now that it is active) using the procedure you chose for step 1, the virtual IP address assigned to the virtual Nimsoft service for the network interface.
Installing in this manner ensures that all required registry entries and DLLs are installed properly on both nodes of the cluster, and that IP bindings are correct.

Configuring the Nimsoft Robot Watcher Service
Appendix B: Installing NMS in an Active/Passive Microsoft Cluster 111
Configuring the Nimsoft Robot Watcher Service The Nimsoft Robot Watcher restarts the robot if it stops for any reason. In this context, if the robot stops because a primary node goes down, this service restarts the robot on the failover node.
1. On the active node, launch Failover Cluster Manager. The failover cluster is shown. (In the following example, the cluster is NS_PHUB_CL; the NMS service is NS-PHUB-VS.)
2. Expand the tree in the left frame. Under Services and applications, select the failover cluster object.
3. Right-click on the cluster, then select Add a resource > Generic Service.

Configuring the Nimsoft Robot Watcher Service
112 Installation Guide
4. The New Resource Wizard launches. Select the Nimsoft Robot Watcher service, then click Next and Finish.

Configuring the Nimsoft Robot Watcher Service
Appendix B: Installing NMS in an Active/Passive Microsoft Cluster 113
5. In the cluster Summary screen, right-click Nimsoft Robot Watcher and select Properties.
6. On the Dependencies tab, set the dependencies for the Nimsoft Robot Watcher service. Three cluster resources must all be online and available before the Nimsoft Robot Watcher service should start:
■ Cluster shared disk
■ Virtual Nimsoft resource
■ Virtual IP address assigned to the virtual Nimsoft service

Testing Failover Operation
114 Installation Guide
Testing Failover Operation
Test the failover and failback operation of Nimsoft within the cluster.
Follow these steps:
Note: If you have Infrastructure Manager open on a separate workstation, you can observe the status of the Nimsoft Hub during the failover test.
1. Launch Failover Cluster Manager and expand the tree in the left frame.
2. Right-click the virtual Nimsoft hub and select Move the service or application to another node.
3. Select the other node in the cluster and confirm the operation. As the service moves to the passive node, Infrastructure Manager shows that the hub becomes unavailable by displaying it in red. Failover Cluster Manager shows the status of the cluster as the NMS service moves to the failover node.
4. After a short time, check the hub status in Infrastructure Manager. It should be green, indicating that NMS has come up successfully on the failover node.
5. Repeat these steps to failback the service to the original node.

Appendix C: MySQL Windows Installation 115
Appendix C: MySQL Windows Installation
This section contains the following topics:
Prerequisites and Considerations (see page 115) Installation Steps (see page 116) Standard Post-installation Configuration (see page 117) Basic Tuning Configuration Changes (see page 118) Deployment Statistics and Estimations (see page 119) Schema and Data Management (see page 120)
Prerequisites and Considerations ■ To verify that your version of Windows is supported, check the Nimsoft
Compatibility Support Matrix, which is updated regularly.
■ If table sizes are expected to exceed 4 GB, then MySQL must be installed on an NTFS or newer file system.
■ Virus scanning software can sometimes generate erroneous alerts that incorrectly identify the datafile contents as malicious. This is due to the combination of the MySQL datafile update frequency and the fingerprinting used by some anti-virus packages.
Recommendation: After installation, prevent any anti-virus software from scanning the main data directory (datadir) and any other directory used by MySQL for temporary datafile creation.
■ Windows XP and later include a firewall that specifically blocks ports. If you intend to use MySQL through a network port, ensure the relevant ports are open before installation.

Installation Steps
116 Installation Guide
Installation Steps
MySQL should be installed by an administrator to help avoid problems with paths, environment variables or accessing the service control manager. Once installed, MySQL does not need to be run by an administrator.
Follow these steps:
1. Go to http://dev.mysql.com (not affiliated with Nimsoft). Download the:
■ Installer package from the Downloads tab
■ Installation instructions for your platform from the Documentation tab
2. Run the installer package. Note the following:
■ Acknowledge any security warnings.
■ When you select install type:
– Complete is recommended.
– Choose Custom if you want to specify datafile locations, such as on a separate, high-performance disk. Specify the paths where required (or do this after installation by rerunning the installer and selecting Modify).
■ In the Ready to install dialogue, select Continue. Ignore information about MySQL Enterprise.
3. When installation is complete, the installer allows you to Register MySQL as a Service. This is recommended, as it allows control of MySQL from Windows Service Manager and ensures the database starts automatically if required.
The paths, directories, system tables and service manager registration are all set up by the installer.
If desired, you can configure the MySQL instance. For example, you can create the root password, add additional users, specify configuration details such as datafile location.

Standard Post-installation Configuration
Appendix C: MySQL Windows Installation 117
Standard Post-installation Configuration 1. To enable mysql start during system startup and to simplify the server control, copy
the server startup scripts to the relevant location. From the mysql directory, execute:
cp support-files/mysql.server
/etc/init.d/mysqld
This allows the server to be started using:
/etc/init.d/mysqld [start|stop|restart|status]
2. Create the empty file /etc/my.cnf (or modify one of the standard configurations as specified in Basic Tuning Configuration Changes (see page 118).
3. Insert the following into my.cnf in the mysqld section:
[mysqld]
innodb_file_per_table
slow_query_log_file=[path/to/chosen/location/for/slowlog.log]
datadir=[path/to/datafile/location]

Basic Tuning Configuration Changes
118 Installation Guide
Basic Tuning Configuration Changes
Available tuning parameters depend on the hardware, memory, number of expected connections and throughput/queries per second.
You can establish a good initial setup with the following parameters and configuration settings. As more of this information is available and known, you can modify the settings to ensure optimal database performance.
Follow these steps:
1. Choose a configuration file appropriate for your system.
A number of pre-populated my.cnf or my.ini configuration files are bundled with MySQL. These are named my-small, my-medium, my-large, and my-huge.
The configuration files contain indicators of the size of system for which they might be appropriate.
2. Estimate the max_connections parameters based on the total RAM available with the following calculation:
(total RAM — global buffers)/ total size of thread buffers
a. From the MySQL command line, execute:
show variables
b. Calculate global_buffers by adding the values of:
key_buffer_size
innodb_buffer_pool_size
innodb_log_buffer_size
innodb_additional_mem_pool
net_buffer_length
c. Calculate thread buffers by adding the values of:
sort_buffer_size
myisam_sort_buffer_size
read_buffer_size
join_buffer_size
read_rnd_buffer_size
d. Estimate of the open_files_limit. Add the number of max_connections with the table_cache, then double the number.
3. Because this installation is InnoDB specific, we suggest the following parameters as a starting point. Note that:
■ Changes you make to my.cnf parameters take effect when the server is restarted.
■ Some parameters are dynamic and can be changed via the MySQL client for immediate benefit.
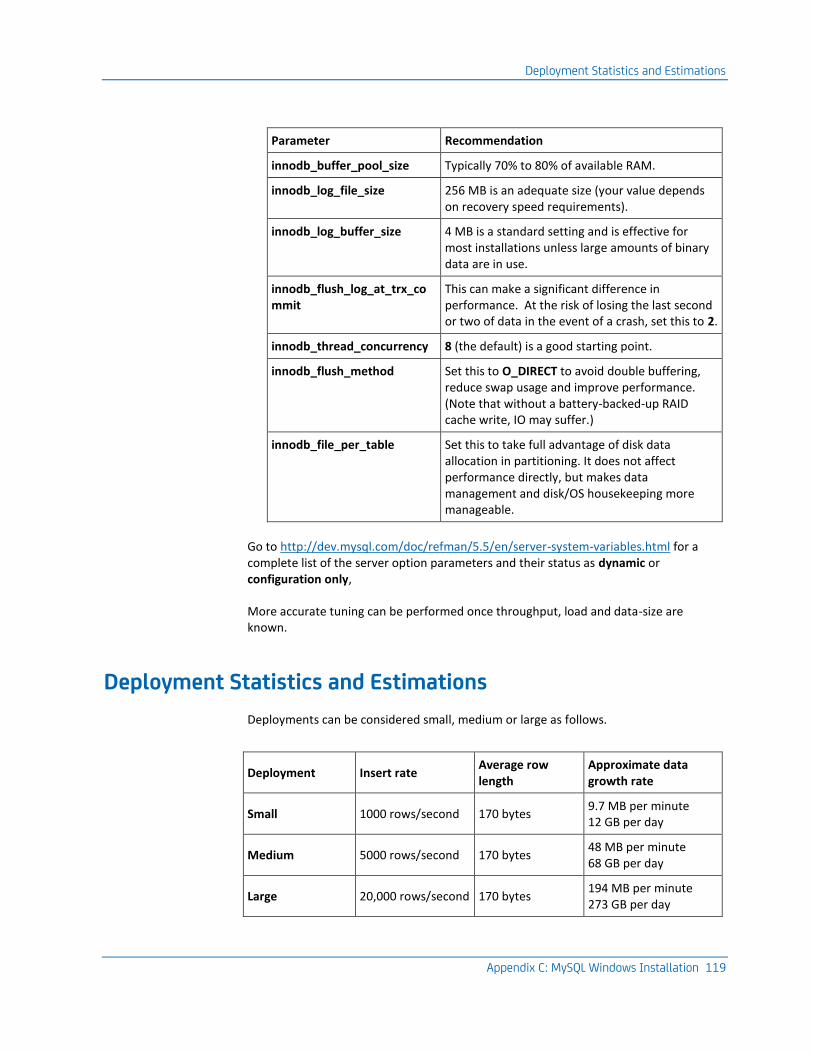
Deployment Statistics and Estimations
Appendix C: MySQL Windows Installation 119
Parameter Recommendation
innodb_buffer_pool_size Typically 70% to 80% of available RAM.
innodb_log_file_size 256 MB is an adequate size (your value depends on recovery speed requirements).
innodb_log_buffer_size 4 MB is a standard setting and is effective for most installations unless large amounts of binary data are in use.
innodb_flush_log_at_trx_commit
This can make a significant difference in performance. At the risk of losing the last second or two of data in the event of a crash, set this to 2.
innodb_thread_concurrency 8 (the default) is a good starting point.
innodb_flush_method Set this to O_DIRECT to avoid double buffering, reduce swap usage and improve performance. (Note that without a battery-backed-up RAID cache write, IO may suffer.)
innodb_file_per_table Set this to take full advantage of disk data allocation in partitioning. It does not affect performance directly, but makes data management and disk/OS housekeeping more manageable.
Go to http://dev.mysql.com/doc/refman/5.5/en/server-system-variables.html for a complete list of the server option parameters and their status as dynamic or configuration only,
More accurate tuning can be performed once throughput, load and data-size are known.
Deployment Statistics and Estimations
Deployments can be considered small, medium or large as follows.
Deployment Insert rate Average row length
Approximate data growth rate
Small 1000 rows/second 170 bytes 9.7 MB per minute 12 GB per day
Medium 5000 rows/second 170 bytes 48 MB per minute 68 GB per day
Large 20,000 rows/second 170 bytes 194 MB per minute 273 GB per day

Schema and Data Management
120 Installation Guide
Specific disk configurations are not required to accommodate this data, as MySQL does not use the same logging configurations as other RDBMSs.
Schema and Data Management
The table schema is as follows:
CREATE TABLE `test`.`RN_QOS_DATA_xxxx` (
`table_id` int(11) NOT NULL,
`sampletime` timestamp NOT NULL,
`samplevalue` bigint(20) DEFAULT NULL,
`samplestdev` bigint(20) NOT NULL,
`samplerate` bigint(20) NOT NULL,
`samplemax` bigint(20) NOT NULL,
`compressed` tinyint(4) DEFAULT '0',
`tz_offset` bigint(20) NOT NULL,
`inserttime` timestamp NOT NULL,
PRIMARY KEY (`sampletime`,`table_id`)
) ENGINE=InnoDB;

Appendix D: Installation Modifications to Windows Systems 121
Appendix D: Installation Modifications to Windows Systems
This section describes the system modifications made by NMS installation.
Robot Modifications
The following components are installed (valid on Windows Server 2003/2008).
Component Install status
.../Nimsoft Nimsoft product directory.
The default is C:\Program Files\Nimsoft Monitoring.
msvcrt.dll (Microsoft C library; installed in Windows system directory)
Updated if the existing version is old. This should not be the case on Window XP or Windows 2000 with an updated service pack.
New Registry sections
These store variables used internally by Nimsoft.
HKEY_LOCAL_MACHINE\Software\Nimsoft Software
HKEY_LOCAL_MACHINE\Software\Nimsoft Software AS
HKEY_LOCAL_MACHINE\Software\Nimsoft Corporation
Start > Programs > Nimsoft Monitoring
Menu choice to start the Service Controller.
Services
The Nimsoft Watcher service can be managed with the service controller. To remove the service, execute:
…\Nimsoft\bin\Nimsoft -remove
NMS or Nimsoft Infrastructure Modifications
If you select a VB runtime when installing NMS or Nimsoft Infrastructure, the following components are installed.
Component Install status
atl.dll (Windows system directory)
Updated if the existing version is old. This should not be the case on Window XP or Windows 2000 with an updated service pack.

NMS or Nimsoft Infrastructure Modifications
122 Installation Guide
asycfilt.dll stdole2.tlb
Updated if the existing version is old. This should not be the case on Window XP or Windows 2000 with an updated service pack.
asycfilt.dll stdole2.tlb
Updated if nonexistent, or the existing version is old.