nicelabel 2017 user guide for designers 2017 user guide for designers rev-1601 ©nicelabel 2016
TRANSCRIPT

NiceLabel 2017 User Guide for DesignersRev-1601 ©NiceLabel 2016. www.nicelabel.com

Contents
Contents 2Introduction 4
Designer Terminology 4
System Requirements 5
Get Started 7
Workspace Overview 7
Configuring the Program 37
Keyboard and Mouse Support 41
Label 44
Label Setup Wizard 44
Label Properties 46
Label Objects 51
Selecting and Setting up a Printer 79
Working with Objects 80
Barcode 82
Source 82
Barcode 82
Check Digit 82
Human Readable 83
Bearer Bar 83
Details 84
Position 84
Relative Position 84
General 85
1D Barcode Details 86
2D Barcode Details 86
GS1 DataBar Specifics 88
Maxicode Barcode Content 88
Printing 90
Step 1: Create 90
www.nicelabel.com 2

Step 2: Preview 90
Step 3: Select printer 90
Step 4: Set print quantity 90
Step 5. Start Printing 91
Preview and Print a Label 91
Customize Printing Form 91
Printing Using NiceLabel Print 91
Store/Recall Printing Mode 92
Optimize Printing Speed 93
Handle Missing Images 94
Printing from Databases 94
Changing Common Printer Settings 95
Changing Dithering Options 96
Defining Unprintable Area 97
Work with Dynamic Data Sources 99
Variables as Dynamic Data Source 99
Functions as Dynamic Data Source 117
Databases as Dynamic Data Source 127
Internal Variables as Dynamic Data Source 160
Global Variables as Dynamic Data Source 161
Groups of Permitted Input Characters 164
Forms and Solutions 165
Solution 165
Form 166
Form Objects 168
Define Actions 205
NiceLabel Print 256
Managing Document Locations 256
Opening the Documents 256
Online Support 257
www.nicelabel.com 3

IntroductionDesigner Terminology
This section describes the Designer elements that enable you to efficiently design a simple label or to create and manage a complex labeling solution that includes multiple labels, dynamic data sources and automatically run actions.
PRODUCT LEVEL INFO Solution building is available in NiceLabel PowerForms.
Below listed are the essential Designer concepts. Being familiar with them gives a per-fect starting point for successful labeling projects.
l Solution
l Label
l Form
l Object
l Design Surface
l Content Providers
l Solution Explorer
l Data Source Explorer
l Actions Editor
l Dynamic Data Manager
If you come across any other unfamiliar items while working with NiceLabel Designer, browse the Help tab.
LabelPRODUCT LEVEL INFO Solution building is available in NiceLabel PowerForms.
Label is the base of any designing and printing process in NiceLabel Designer. A label can be set as a simple file that marks an item with fixed content or a complex and thor-oughly designed mixture of multiple dynamic product identifiers. To design a printable label belongs to basic Designer tasks. Designer allows creating and printing of standalone labels and labels that are included in a printing solution.Read about how to create, design or edit a label here.
FormPRODUCT LEVEL INFO This section is applicable to NiceLabel PowerForms.
NiceLabel Designer form serves as a panel for entering, viewing and selecting the data to be presented and printed on a label. The advantage of using a form are simplified data-entry and label printing process for the end-user.In NiceLabel Designer, a form is created within a printing solution. This means that a form is usually built in combination with a predesigned label. Read about how to create, design or edit a form here.
www.nicelabel.com 4
SolutionPRODUCT LEVEL INFO This section is applicable to NiceLabel PowerForms.
NiceLabel Designer solution is a single label printing file that includes multiple stan-dalone items or interconnected labels and/or forms. A solution enables adding any number of labels, forms and common variable data sources. By doing this, a single Designer solution file serves as a container that envelops multiple labels and forms.How do labels and forms cooperate in a solution? A label alone can be designed, printed, and, if necessary, reprinted. Multiplied manual printing of a single label file is time con-suming and difficult if the content needs to be constantly updated. Therefore, NiceLabel introduced the ability to create forms which are combined with labels in a complete print-ing solution file. In a solution, labels specify the layout of printed labels. Forms make sure the content of printed labels is easily defined, edited, updated, and reprinted. Forms also offer the user the control over a wide range of data- and print-related actions.The advantages of keeping multiple labels and forms in a single file are:
l simplified management of printing solutions
l simpler and time efficient label designing and printing
l simplified use of variable data sources
Read about how to create or edit a solution here.
ObjectPRODUCT LEVEL INFO Creation of forms and use of form objects is available in NiceLabel PowerForms.
In NiceLabel Designer, an object is the basic building block for designing labels and forms. To design a label or form means to select, add, and position the objects on the design surface.
EXAMPLE Ea ch object perf orms a dif f erent role. For exa mple, Text object is us ed f or s ingle-line t ext ua l cont ent t ha t does not need t o a da pt it s f ont s ize t o t he la bel des ign. D a t a ini-t ia liza t ion object on t he ot her ha nd s erv es a pa nel f or a s s igning init ia l v a lues t o v a r ia bles on t he s elect ed la bel.
Label object types and their purpose are listed here.Form object types and their purpose are listed here.
System RequirementsNiceLabel 2017
l CPU: Intel or compatible x86 family processor
l Memory: 2 GB or more RAM
l Hard drive: 1 GB of available disk space
www.nicelabel.com 5

l 32-bit or 64-bit Windows operating systems: Windows Server 2008 R2, Windows 7, Windows 8, Windows 8.1, Windows Server 2012, Windows Server 2012 R2, Win-dows 10
l Microsoft .NET Framework Version 4.5
l Display: 1366×768 or higher resolution monitor
Additional Requirements For NiceLabel Control Center And NiceLabel PowerForms Web Components
l Database Server: Microsoft SQL Server 2005, Microsoft SQL Server 2008, Microsoft SQL Server 2012, Microsoft SQL Server 2014 (Express Edition of products listed above are also supported)
l IIS 7 or IIS 7.5 or IIS 8
www.nicelabel.com 6

Get StartedRead the following sections to make your first steps with Designer easy and efficient:
l Workspace basics section explains the Designer interface – menus, managers, dia-logs and design surface.
l Configuring the Program section describes how the Designer can be set to adapt to the current needs while designing a label.
l Keyboard and Mouse support gives advice on efficient work with mouse and key-board.
Workspace OverviewPRODUCT LEVEL INFO Solution building is available in NiceLabel PowerForms.
Designer's workspace offers a flexible and easy-to-use environment for both – simple label designing and complex solution building. Designer workspace follows the widely used application interface guidelines and is there-fore equipped with tools and interface elements are familiar to a majority of users. The Designer works space consists of the following segments:
l Top segment: Tabs and Ribbons
l Left segment: Toolbars
l Right segment: Object Properties
l Design Surface
l Status and Printer bar
Landing PagePRODUCT LEVEL INFO Solution building is available in NiceLabel PowerForms.
Designer's landing page is an introductory application page which opens once the soft-ware completes loading. It consists of the following segments:
l Recent Files: List of recently used Designer files.
l Open other files: Opens existing label and solution files.
l New document area: Enables you to create new Designer documents:
l New Label: Creates a basic label for printing.
l New Solution: Creates an advanced labeling solution with labels and forms.
l New from Sample Templates: Creates a document based on a selection of industry standard compliant templates.
www.nicelabel.com 7

Tabs And RibbonsPRODUCT LEVEL INFO Creation of forms and use of form objects is available in NiceLabel PowerForms.
NiceLabel Designer uses a standard Windows based interface. The Designer's top section interface segments are described below.
Tabs Tabs represent subsets of Designer features. The tabs contain interrelated commands that are available to the user in an organized way – grouped, and labeled:
l File (background): opens the print form and document management panel.
l Home: offers commonly used commands such as copy/paste, print, and style com-mands.
l Data: offers data source related commands.
l View: gives you control over layout tools, zooming options and element markers visibility.
l Solution: allows adding new labels and forms, starts printing actions and enables label file importing and exporting.
l Contextual tabs: appear after clicking an object. They allow you to define object-specific settings. The type of contextual tabs adapts to the selected object.
l Help: besides offering the access to F1 help, this tab leads you to multiple helpful resources that make yor work with Designer easier and more efficient.
RibbonRibbon is a rectangular area that spreads across the top of an application window. Related commands are divided into ribbon groups. The ribbon changes along with the selected tabs and adapts to the currently used tools using the contextual tabs. The following Designer dialog boxes are equipped with a dedicated ribbon:
l Dynamic Data Manager l Actions Editor l Rich Text Editor
File TabFile tab serves as document management panel. The below listed options are available:
l Info: defines the label or solution properties and prevents the label or solution from unwanted editing.
l New: creates a new standalone label or a complete solution.
l Open: allows opening existing label and solution files.
l Import: allows you to import labeling files from non-NiceLabel labeling software.
l Save: saves the active label or solution.
www.nicelabel.com 8
l Save as: allows saving the active label or solution file by defining its name and loc-ation.
l Print: opens the printing form.
l Store: stores the current label as a template on the printer to be used in store/re-call mode.
l Protection
l Close: closes the current Designer document.
l Options: opens the dialog for configuring the program defaults.
l About: provides license and software version information.
l Exit: closes the application.
New
PRODUCT LEVEL INFO Solution building is available in NiceLabel PowerForms.
New Label creates a new standalone label. New Label Setup Wizard opens after clicking this button.New Solution creates a complete solution including (multiple) labels and printing forms. Solution designer opens after clicking this option.New from Sample Templates creates a document based on a selection of industry standard templates.
NOTE Adding new labels or forms is also available in the Solution explorer. See sec-tion Solution explorer for more details.
OpenOpen dialog allows opening existing label and solution files.Browse allows selecting the label or solution files on local or connected network drives.Recent Files field lists the latest files that have been edited. Click any of them to open the file.
File Tab ImportImport allows you to import files from NiceLabel labeling software.Currently supported label formats are:
l Solution file (.nsln)
l Label file (.nlbl)
l Label file (V6) (.lbl)
l XFF Form File (.xff)
When an import command is issued, the Open dialog opens. Select the label file for importing. If the import as finished successfully, a new unnamed label opens.
www.nicelabel.com 9

SaveSave saves the active label or solution using the same file name that was used for open-ing it.
NOTE If a file has been opened for the first time, Save directs you to the Save as backstage dialog.
Save asSave as allows saving the active label or solution file by defining its name and location.Recent folders field lists the folders that were recently used for saving the label or solu-tion files.
PrintPrint opens the print dialog. In Designer, the print dialog is represented by a cus-tomizable printing form.Details about the Designer print dialog are available here.Customize printing form options are described here.
Store/Recall Printing ModeStore/Recall printing mode optimizes the printing process. It increases printer response by reducing the amount of data that needs to be sent during repetitive print-ing tasks.With store/recall mode activated, Designer does not need to resend the complete label data for each printout. Instead, default labels (templates) are stored in the printer memory and the Designer only sends recall commands which complete the stored label content during the printing process. Typically, a few bytes of data are sent to the printer, compared to a few kilobytes as would be the case during normal printing.The action consists of two processes:
l Store label. During this process, Designer creates a description of the label tem-plate formatted in the selected printer's command language. When done, Designer sends the created command file to the printer memory and stores it.
l Recall label. A label stored in the printer memory is printed out immediately. Using the recall process, Designer creates another command file to instruct the printer which label from its memory should be printed. The recall label command occupies a few bytes of data only. The actual amount of data depends on the cur-rent situation. For fixed labels without any variable contents, the recall command file only contains the recall label command. For variable labels that contain vari-able fields, the command file includes the values for these variables and the recall label command.
NOTE Before activating this mode, make sure the appropriate printer driver is selec-ted for the label printer. Not all label printers have the ability to use the store/recall printing mode.
Follow these steps to activate the Store/Recall printing mode:
www.nicelabel.com 10

1. Double click the label design surface. Label Properties dialog appears.
2. To enable the mode, select Use store/recall printing mode on Printer tab. Click OK.
3. Define the label template(s). All label objects with variable content must be format-ted as internal printer objects:
l Format the text object with internal printer fonts (not Truetype!).
l Format barcode objects as internal printer barcodes.
l If using variable objects formatted in Truetype fonts, variable pictures or database fields, default values are sent to the printer during the label store process.
4. Click File -> Store. Make sure the Store variant points to the correct memory loc-ation in the printer.
5. Insert or select the values for variable objects that are not formatted as internal printer objects. These variables will be given the same value on each label. They will behave as objects with fixed values.
6. Click Store to printer to create the command file with label template description and to send it to the printer.
7. Insert the values for prompted label variables. These variables link to the internal printer objects on the label. For this reason, their values can be changed during each printing.
8. Click Print to send the variable values and the recall label command to the selec-ted label printer.
ProtectionProtection prevents the label or solution from editing. This options is also useful for pro-tecting the solutions from being copied or used in any unwanted scenarios.
l Prevent document from editing: locks the label or solution. Enabling this option makes the file uneditable – only printing is possible. A user may still disable this option and continue editing the file.
l Requires a password to unlick document: prevents the file editing with a pass-word protection. Check this option to set a password. A file becomes editable only after entering a correct password.
Configuring the Program
PRODUCT LEVEL INFO Solution building is available in NiceLabel PowerForms.
To customize the general program configuration of Designer, open the Options dialog which is accessible from the File tab.Designer configuration options are grouped on the following tabs:
l Folders: allows you to set the default locations for storing the labels, forms (solu-tions), databases and picture files.
www.nicelabel.com 11

l Language: selects user interface language. Select the preferred language from the listed options. Designer interface language changes after the restart.
l Global Variables: storage location for global variables.
l Printer usage: locally logged usage of installed printers.
l Automation: enables you to configure NiceLabel Automation settings.
Home Tab
PRODUCT LEVEL INFO Creation of forms and use of form objects is available in NiceLabel PowerForms.
Home Tab provides access to frequently used commands and settings in the following ribbon groups:
l Clipboard: temporarily stores the selected elements, objects or groups of objects.
l Font: group lets you define the font properties.
l Action: group contains the Print button which starts the printing procedure or runs a form.
l Management: group provides direct access to the Dynamic Data Manager and Document properties – active label or form properties dialog.
l Object: group allows you to align, group or arrange label objects.
ClipboardClipboard group temporarily stores the selected elements, objects or groups of objects. Use the selected and stored objects to transfer them from one label or solution to another.
TIP: Copying and pasting of textual (plaint text, RTF) and graphical (bitmaps) content between multiple applications is supported.
l Paste: pastes the clipboard contents on the design surface. Multiple reuse of a single clipboard item is allowed.
l Cut: removes the selected element(s) from the design surface and adds it to the clipboard to be pasted elsewhere. Note that the first element is selected by click-ing it. When selecting additional elements, press and hold the <Shift> key while clicking these elements.
l Copy: copies the selected content to the clipboard. Multiple objects can be copied at once – select them and click Copy.
l Delete: deletes the selected elements or objects. They are not stored in the clip-board.
FontFont group defines font properties:
www.nicelabel.com 12

l Show/hide printer fonts: button makes the printer fonts available on the typeface list or hidden.
l Typeface: defines the font family to be used in a selected object.
l Point Size: defines the text size in an object. Select the desired point size from the drop down selector or enter it manually.
l Font Style: defines the object text stylistic characteristics of text, such as bold or italic.
l Alignment: defines horizontal text positioning in an object: Left, Center or Right.
l Justify: makes a paragraph aligned along the left and right object margins.
l Show/hide True Type and Open Type Fonts: toggles TrueType and OpenType font visibility on the font list.
l Show/hide Printer Fonts: lets you toggle the visibility of fonts that are installed on the connected printers.
NOTE To set the default Text and Text Box object fonts, click the Font dialog box launcher at the bottom right part of the Home ribbon's Font group.
Action
PRODUCT LEVEL INFO Creation of forms and use of form objects is available in NiceLabel PowerForms.
Action group starts the printing procedure or runs a form.
l Print: starts the DesignerPrint dialog as defined by the Default Printing Form.
l Print: opens the default printing form which serves as the Designer print dialog.
l Customize Printing Form: allows adding, removing, rearranging or editing the printing form objects and their properties. Read more about the print-ing form customization here.
l Recreate Printing Form: resets the printing form to its default layout and reestablishes the dynamic content providers after being edited.
l Prompt Order: allows changing the order in which the variable values are prompted at print time.
l Run Form: activates the print dialog based on the selected (active) label or form.
ManagementManagement ribbon group provides direct access to:
l Dynamic Data Manager dialog. Click the button to start managing the dynamic data sources that are connected to objects.
l Document Properties opens current label or form properties.
ObjectObject group allows you to set:
www.nicelabel.com 13

l Object alignment: positioning of object according to the design surface and other existing objects.
l Object grouping and arranging.
Data TabData tab displays the Designer ribbon with groups that enable you to instantly connect an object with commonly used data sources, or to define data connections in more detail:
l Step-by-Step Database Wizard ribbon group opens database wizard for typical database types.
l Data Source Management ribbon group gives direct access to the Dynamic Data-base Manager and Prompt Order dialogs.
l RFID ribbon group gives direct acces to RFID Tag dialog.
Variables as Dynamic Data Source
PRODUCT LEVEL INFO This segment is applicable to NiceLabel Designer Pro and NiceLabel PowerForms.
Variables serve as containers for storing and passing data between objects, scripts, external applications, printers, and user inputs. You may want to print labels on which data changes for each label. For example, counters, serial numbers, date and time, weight, article pictures… To accommodate the changing data, the labeling application can easily be used to format labels using variable data.Designer offers multiple types of variables:
l Variable: type of variable that changes its value at print time or according to user-defined conditions.
l Variable Keyboard Input: type of variable that enables the content of a prompted field to be different for every print job. Its value is defined before each printing.
l Current Date: current date taken as a variable value.
l Current Time: current time taken as a variable value.
l Counter: variable that changes its value incrementally or decrementally with each label print.
TIP: All label or solution variables are managed in Data Source Explorer.
Step-by-Step Database WizardDatabase wizard is a guided process that allows the user to configure a connection to a database and to select which tables and fields will be used. Dedicated buttons provide instant access to the most commonly used database types. Use the All Databases but-ton to start the wizard in general mode and to select the database type during the next step. Edit Database allows you to edit all existing connected databases using a wizard. The wizard additionally allows you to sort, filter records, and to define how many label copies will be printed per database record.
www.nicelabel.com 14

Data Source ManagementData Source Management ribbon group provides access to:
l Dynamic Data Manager: dialog for managing and connecting to various data sources.
l Prompt Order: dialog for defining the order of prompted variables on the print form.
View TabView Tab gives you control over document zooming, marker visibility, visual aids and design surface rotation. It makes the following ribbon groups available:
l Zoom: defines design surface zoom level and Designer window zoom behavior.
l Object Markers Visibility: defines visibility settings for object properties.
l Alignment and Gridlines: sets object positioning behavior and defines properties for design surface gridlines.
l Rotation: rotates the design surface clockwise for 90° per click.
ZoomZoom group defines the design surface zoom level and window zoom behavior. The exact Zoom level value and zoom behavior type are shown in the bottom right section of the Designer window.
l Zoom to Document: displays the entire label in the Designer window.
l Zoom to Objects: displays all objects in the Designer window.
l Zoom in: magnifies the design surface for a percentage of the currently defined zoom level.
l Zoom out: decreases the design surface for a percentage of the currently defined zoom level.
Object Markers VisibilityObjects markers visibility group toggles the visibility for the following object prop-erties:
l Object name: displays the name of an object.
l Internal element: indicates if an object is connected to an internal variable.
l Counter: indicates that the connected variable is a Counter.
l Locked object: indicates that the object's position is locked.
l Events: indicates that the form object runs assigned Action(s).
l Data Source: indicates that the object is connected to a dynamic data source.
www.nicelabel.com 15

Alignment and GridlinesAlignment and Gridlines group sets object positioning behavior and defines properties for design surface gridlines.
l Display grid line guides: makes the design surface grid dots visible.
l Grid Size X: defines horizontal distance between the grid dots.
l Grid Size Y: defines vertical distance between the grid dots.
l Grid Offset X: defines the horizontal offset of the grid from the design surface center.
l Grid Offset Y: defines the vertical offset of the grid from the design surface cen-ter.
l Align to Objects: makes an object align with other object on the design surface. When an object is aligned, a line which marks the object alignment appears.
l Align to Guides: aligns the selected objects with gridlines.
l Do Not Align: makes the object position independent of gridlines and position of other object(s).
RotationRotate view button rotates the design surface clockwise for 90° per click. Horizontal and vertical rulers adapt to the current position of the design surface.
Solution Tab
PRODUCT LEVEL INFO Solution building is available in NiceLabel PowerForms.
Solution Tab enables quick and easy access to commands that are related to the entire print solution. The tab makes the following ribbon groups available:
l Clipboard: stores selected objects or groups of objects.
l New: allows adding additional labels or forms to the active solution.
l Action: starts the printing procedure or runs a form.
l Import&Export: allows importing, publishing and exporting the solution files.
ClipboardClipboard group temporarily stores the selected elements, objects or groups of objects. Use the selected and stored objects to transfer them from one label or solution to another.
TIP: Copying and pasting of textual (plaint text, RTF) and graphical (bitmaps) content between multiple applications is supported.
l Paste: pastes the clipboard contents on the design surface. Multiple reuse of a single clipboard item is allowed.
www.nicelabel.com 16

l Cut: removes the selected element(s) from the design surface and adds it to the clipboard to be pasted elsewhere. Note that the first element is selected by click-ing it. When selecting additional elements, press and hold the <Shift> key while clicking these elements.
l Copy: copies the selected content to the clipboard. Multiple objects can be copied at once – select them and click Copy.
l Delete: deletes the selected elements or objects. They are not stored in the clip-board.
New
PRODUCT LEVEL INFO Creation of forms and use of form objects is available in NiceLabel PowerForms.
New allows adding additional labels or forms to the active solution. Labels and form that are included in the solution are listed in the Solution explorer.
l New Label: adds a new label to the active solution. After clicking the New Label button the Label Setup Wizard appears.
l New Form: adds a new form to the active solution. After clicking the New Form button, a blank design surface appears. The form is ready for editing.
Action
PRODUCT LEVEL INFO Creation of forms and use of form objects is available in NiceLabel PowerForms.
Action group starts the printing procedure or runs a form.
l Print: starts the DesignerPrint dialog as defined by the Default Printing Form.
l Print: opens the default printing form which serves as the Designer print dialog.
l Customize Printing Form: allows adding, removing, rearranging or editing the printing form objects and their properties. Read more about the print-ing form customization here.
l Recreate Printing Form: resets the printing form to its default layout and reestablishes the dynamic content providers after being edited.
l Prompt Order: allows changing the order in which the variable values are prompted at print time.
l Run Form: activates the print dialog based on the selected (active) label or form.
Set as Startup Form sets the current form as your default Designer form.
Import and ExportImport and Export group allows importing, publishing and exporting the solution files.
l Import into Solution: locates the label or solution files and imports them into the active solution. After clicking the Import into Solution, an open file dialog opens. Browse for the file to be imported and click Open.
www.nicelabel.com 17
l Export Label: saves the label to disk and makes it available for use in another solu-tion. After clicking Export Label the Export label dialog appears. Select a location to save the label to.
Help TabHelp tab provides direct access to various resources that help you design and use labels and forms quickly and efficiently. Help ribbon group includes buttons with links to the following resources:
l Help: Designer online help
l User Guides: online collection of NiceLabel user guides. The collection includes user guides for the entire product portfolio.
l Training Videos: NiceLabel collection of training videos.
l Knowledge base: online library of articles that describe many technical solutions, tips and solved issues for labels and printing solutions.
l Sample files: access to the collection of sample label files. Use them to get famil-iar with Designer and to explore software capabilities.
l Technical support: connects you with NiceLabel technical support department.
Product ribbon group includes links to.
l Software About page
l NiceLabel web page.
RFID
PRODUCT LEVEL INFO This segment is applicable to NiceLabel Designer Pro and NiceLabel PowerForms.
RFID group provides access to the RFID Tag dialog. This dialog allows you to select the appropriate RFID tag type, to define its content, and to configure which type of data is going to be encoded on the tag.
NOTE RFID functionality is available with installed NiceLabel printer driver.
RFID Tag dialog allows you to configure how the tag content is encoded in a tag:
l Select the RFID tag type.
l Configure various tag settings related to its structure and programming.
l Insert and configure data fields.
Print RFID data fields as internal text or barcode objects option allows you to read and print the RFID data fields on a label using objects with internal printer elements.
TagTag tab of the RFID Tag dialog allows you to select which tag type is going to carry the encoded data and how the data should be written to the tag.Tag group includes the tag type selection.
www.nicelabel.com 18
l Tag type drop down list offers the selection of available RFID tag types. The selec-tion of tag types is automatically defined by the printer driver.
NOTE Select the printer (and the corresponding driver) for the label with RFID tag in the status bar.
Usage group defines the RFID Tag data sources and how the data is written to the tag.
l Write data to tag while printing: enables or disables data writing to the RFID tag.
Disabled writing might be useful during the label designing process or during specific workflow phases.
l Print RFID data fields as internal text or barcode objects option allows you to read and print the RFID data fields on a label using Text or Barcode objects with internal printer elements. Available fonts and barcode types are defined by the selected printer driver.
The encodable RFID data fields are added to the Dynamic Data explorer under RFID Tag.
D A T A F I E L D P O S S I B I L I T I E S
- EPC : da t a f ield wit h Elect ronic P roduct C ode
- Us er Data: da t a f ield wit h pa y loa d t o be encoded on t he R FI D t a g.
- T ID: da t a f ield wit h unique I D of t he R FI D t a g.
- G ID C o d e: genera l ident if ier code f or R FI D t a gs .
- C ID C o d e: ca rd ident if ica t ion number.
TIP: Drag the appropriate data field and place it on the label in form of a Text or Bar-code object (defined by the driver).
ContentContent tab of the RFID Tag dialog allows you to define the content of an RFID tag. To encode the data in an RFID tag, complete the below described steps.
Step 1: Select Data FieldsData fields group allows you to select the data fields. These fields are going to contain the encoded data of the RFID tag.
NOTE The selection of available Data Fields with corresponding settings depends on the selected Tag type.
D A T A F I E L D E X A M P L E S
- T ID: unique I D of t he R FI D t a g.
- EPC : s y nt a x f or unique ident if iers a s s igned t o object s , unit loa ds , loca t ions , or ot her ent it -ies t ha t a re included in bus ines s opera t ions .
- Us er Data: pa y loa d da t a t o be wr it t en in t he R FI D t a g.
- RFID T ag Memo ry: t he only da t a f ield a v a ila ble f or non-G en2 R FI D t a gs .
www.nicelabel.com 19

Step 2: Select Data TypeData type defines the method for entering the Data field content. The availability of data types depends on the selected Data field:
l Memory block: the table allows you to enter the data into individual RFID tag memory blocks. Each table row represents a single block of the selected Tag type.
NOTE Memory block structure and properties of individual blocks depend on the selected Tag type.
NOTE Data type can be defined for each block individually.
l Electronic Product Code (EPC): added fields allow you to enter the RFID data according to the EPC standard.
l ASCII string: RFID data to be entered as a string of ASCII characters.
l HEX encoded string: RFID data to be entered as a string of hexadecimal pairs.
l Numeric: RFID data to be entered as a string of digits.
Step 3: Enter ValueEnter the value to be encoded in the RFID tag according to the selected Data type.
SecuritySettings tab of the RFID Tag dialog allows you to configure the RFID tag security set-tings. These settings allow or reject the access to RFID data writing or editing. Security settings depend on the selected printer. There are three major configuration types.
Single Memory Field with Multiple BlocksLocking group includes an overview of the blocks that are included in the RFID tag memory. Each block can be locked individually. To protect the block for editing and writing, enable the Block locked option.
www.nicelabel.com 20

Lock all blocks option allows you to lock all blocks in the memory field simultaneously or unlock them if they are already locked.
Multiple Memory FieldsAccess Protection group sets a password that must be entered before editing or writ-ing the RFID data.Data type defines the method for entering the Password.
l ASCII string: Password should be entered as a string of ASCII characters.
l HEX encoded string: Password should be entered as a string of hexadecimal pairs.
l Numeric: Password should be entered as a string of digits.
Kill code defines the code that disables the RFID tag permanently and irreversibly.
TIP: Having being activated, the data can neither be retrieved from nor written to the tag.
Data type defines the method for entering the Kill code characters.
l ASCII string: Kill code should be entered as a string of ASCII characters.
l HEX encoded string: Kill code should be entered as a string of hexadecimal pairs.
l Numeric:Kill code should be entered as a string of digits.
Kill code: code which permanently and irreversibly disables an RFID tag. Having being activated, the data can neither be retrieved from nor written to the tag.
Multiple Memory Fields with Block LockingAdditional settings from Multiple Memory Fields allow the user to set the locking for individual blocks withing RFID tag memory fields.Locking group includes an overview of the memory fields that are included in the RFID tag. Each memory field can be locked individually. Select locking settings allows you to define how the blocks are locked:
www.nicelabel.com 21

l Preserve original locking setting: original locking setting cannot be retrieved, but the default option assumes that the tag setting should remain unchanged.
l Lock: block is locked and further changes are prevented.
l Unlock: block is unlocked and editable.
l Relock: RFID tag is unlocked for the changes to be applied. When done, the tag is relocked immediately after.
l Permanent lock, unlock or relock: makes the above described settings per-manent. These setting cannot be undone.
Blocks for locking: defines the individual blocks or range(s) of blocks to be locked.
TIP: Individually locked blocks are defined with an index and separated by a comma (with or without inserting the space between). Ranges of blocks are defined with a dash.
SettingsSettings tab of the RFID Tag dialog allows you to configure various tag settings related to its structure and programming.All available settings are listed in a table under the Settings group:
l Antenna offset: defines distance between the top of the label and the embedded RFID inlay.
l Power attenuation: specifies radio output power. Use it to adjust RF emission power from the antenna.
l Maximum tags to stop: specifies how many tags are allowed to be programmed inadequately before the printing of labels stops. The option can be used as a pre-caution measure because it prevents endless consumption of labels. When the programming of the RFID tag fails, usually the word "VOID" is printed on the label.
www.nicelabel.com 22

l Number of retries: specifies the number of times the printer tries to program the tag if the initial attempt fails. The parameter is sent to the printer along with the rest of the data.
l Check for valid tag: before the tag programming begins, printer verifies if a proper RFID tag is available on the smart label. The printer also verifies if the tag is programmable.
l Verify data write: once the data has been encoded into the RFID tag, the printer checks if the written data is equal to the original value.
l Electronic Article Surveillance (EAS): is an anti-theft system used where an electronically-detectable tag is attached to the item.
l Preserve original EAS setting: original EAS setting cannot be retrieved, but the default option assumes that the tag setting should remain unchanged.
l Enable EAS: enables surveillance in the RFID tag. If this was the original set-ting, the tag would remain unchanged.
l Disable EAS: disable surveillance in the RFID tag. If this was the original set-ting, the tag would remain unchanged.
l Permanently lock EAS tag setting: permanently locks the chosen setting for the EAS. This lock cannot be undone.
NOTE The selection of available settings depends on the current Tag type.
RFID Read and PrintThis section describes the procedure of defining which data fields from the RFID tag should be read and printed on the label using the internal printer elements.
Enable RFID Read and printTo enable the RFID read and print data functionality, open the RFID Tag dialog (Tag tab) and enable option Print RFID data fields as internal text or barcode objects. Cur-rently available data fields are listed in the Dynamic Data explorer.
Configure RFID Data Field PropertiesTo configure data field properties and to make it appear on the label, drag it to design sur-face. After adding it to design surface, the data field appears as a normal Text label object with below described additional properties.Data format defines the format in which the RFID data field content is written in the label object and printed.
NOTE Available data formats and number of permitted characters are defined by the printer driver and selected tag type.
l HEX encoded string: data field content is a string of hexadecimal pairs.
l ASCII string: data field content is a string of ASCII characters.
l Numeric: data field content is a string of numbers.
NOTE The data field content is presented using internal printer elements. When selecting a font that does not belong to the internal printer fonts, the printing becomes impossible. An error appears.
www.nicelabel.com 23

Preview presents the data field content as it would appear using the selected Data format. Preview field does not include the actual encoded data. Enter the characters manually. By default, the object contains as many question marks, as given by the length of the RFID data field.
TIP: The role of Preview field is to fill the object with dummy content during the label design process and to give an impression of its layout on the printed label. The object on the actual printed label displays the content which was read from the RFID tag.
Data Extraction group defines which part(s) of data field content should be read from the RFID tag and printed on the label.
TIP: By default, the entire range of encoded data is read from the RFID tag.
l Select bytes: specifies which bytes of the encoded RFID tag data should appear in the label object.
l Starting byte: the number of byte in an encoded string which starts the selection.
l Length in bytes: number of selected bytes which should be extracted from the encoded data.
l Select blocks: specifies which blocks of the encoded RFID tag data should appear in the label object.
l Starting block: the number of block in an encoded string which starts the selection.
l Number of blocks: number of selected blocks which should be extracted from the encoded data.
Status And Printer Bar IntroStatus and printer bar offers instant printer selection and design surface zooming:
l Printer Selection
l Design Surface Zooming
Status Bar Printer SelectionStatus Bar Printer Selection drop down list allows instant printer selection for label printing. The list is populated with printers which are installed on the system.Design surface dimensions adapt to the selected printer automatically – as defined by the printer driver.
ZoomZoom group defines the design surface zoom level and window zoom behavior. The exact Zoom level value and zoom behavior type are shown in the bottom right section of the Designer window.
l Zoom to Document: displays the entire label in the Designer window.
l Zoom to Objects: displays all objects in the Designer window.
l Zoom in: magnifies the design surface for a percentage of the currently defined zoom level.
www.nicelabel.com 24

l Zoom out: decreases the design surface for a percentage of the currently defined zoom level.
Design SurfacePRODUCT LEVEL INFO Creation of forms and use of form objects is available in NiceLabel PowerForms.
Design surface is Designer's central field that serves as a place to create, add, position, and interconnect the label and form objects. To make the designing of labels and forms as simple and efficient as possible, the design surface follows the same usability and functional principles as other standard Windows applications. Design surface elements are described here.Design surface actions are described here.
Design Surface Elements
PRODUCT LEVEL INFO Solution building is available in NiceLabel PowerForms.
Below listed are basic elements that enable the user to interact with NiceLabel Designer.Gridlines serve as a visual aid during the design process. They can be either visible or hidden. Their density is customizable. Gridline options are available in Designer's Visual aids ribbon group.Snaplines are non-visible alignment lines that help the user align the objects during the design process. Snap options are available in Designer's Align ribbon group.Ruler shows the available design area for label (white colored field) and file page (gray colored field).Resize handles appear on the selected (active) objects. They enable you to resize the object dimensions. X and X dimensions can be resized simultaneously or separately.Margins are the amount of fixed space between the edge of an object and the edge of a label.Tabs for Active Documents allow the user to toggle between multiple labels and forms in a solution. Tabs are also used when designing batches of labels – header, body and tail labels are placed on separate tabs.
Design Surface Edit ing ActionsBelow listed are the most relevant common actions for editing the objects on design sur-face:
l Object layering: allows the objects to be located in multiple layers. An object can be placed above or under the neighboring object. Layering options are described here.
l Objects aligning: allows the objects to be aligned among each other. Aligning options are described here.
l Zooming: enables the entire design surface to be zoomed in or out. Zooming options are described here.
l Scrolling: enables sliding the design surface up and down.
www.nicelabel.com 25

l Selecting: enables the objects on design surface to be selected for editing indi-vidually or in a group. Group selection allows any actions to be applied to multiple object simultaneously.
l Rotating: enables object rotation.
Object Properties Toolbar
PRODUCT LEVEL INFO Creation of forms and use of form objects is available in NiceLabel PowerForms.
In addition to the object properties available in the Designer ribbon, the Properties tool-bar opens on the right side of the design surface.
NOTE The Object properties toolbar is hidden at start and only appears after press-ing F4 or clicking Properties on the right-click menu.
Available toolbar options adapt to each selected object and its properties:
l Available label objects and their properties are described here.
l Available form objects and their properties are described here.
Design Surface Elements
PRODUCT LEVEL INFO Solution building is available in NiceLabel PowerForms.
Below listed are basic elements that enable the user to interact with NiceLabel Designer.Gridlines serve as a visual aid during the design process. They can be either visible or hidden. Their density is customizable. Gridline options are available in Designer's Visual aids ribbon group.Snaplines are non-visible alignment lines that help the user align the objects during the design process. Snap options are available in Designer's Align ribbon group.Ruler shows the available design area for label (white colored field) and file page (gray colored field).Resize handles appear on the selected (active) objects. They enable you to resize the object dimensions. X and X dimensions can be resized simultaneously or separately.Margins are the amount of fixed space between the edge of an object and the edge of a label.Tabs for Active Documents allow the user to toggle between multiple labels and forms in a solution. Tabs are also used when designing batches of labels – header, body and tail labels are placed on separate tabs.
Context MenusIn Designer, right mouse click displays various context menus that contain commonly used commands. The availability of commands depends on the selected items – design surface or object.
l Design surface context menu commands are described here.
l Object context menu commands are described here.
www.nicelabel.com 26

Design Surface Context Menu
PRODUCT LEVEL INFO Creation of forms and use of form objects is available in NiceLabel PowerForms.
When right-clicking the design surface, a context menu appears. The context menu includes commonly used commands:
l Document Properties: opens the label properties or form properties dialog.
l Paste: pastes clipboard contents on the design surface. Multiple reuse of a single clipboard item is allowed.
l Cut: removes the selected element(s) from the design surface and adds it to the clipboard to be pasted elsewhere.
l Copy: copies the selected object to the clipboard.
l Align with objects: makes the object on the design surface align with other objects. When two objects are aligned, a leading line appears linking the edges of the two aligned objects.
l Align with gridlines: makes the object on the design surface align with gridlines. When moving the object, it always snaps to the gridline.
l Display gridline: makes the gridlines visible.
l Select all: selects all object on the design surface.
l Objects markers visibility: toggles visibility for the below listed object prop-erties. Markers become visible when moving the mouse pointer over the object:
l Object name: marker shows the name of an object.
l Internal element: marker shows if the selected object belongs to the internal printer elements.
l Counter: marker shows that the connected variable is Counter.
l Locked object: marker shows that an object's position is locked.
l Events: marker shows that the form object runs assigned Action(s).
l Zoom: defines zooming behavior:
l Zoom to Document: shows the entire label in the Designer window.
l Zoom to Objects: shows all objects in the Designer window.
Object Context Menu
PRODUCT LEVEL INFO Creation of forms and use of form objects is available in NiceLabel PowerForms.
When right-clicking an object, a context menu appears. The context menu includes the below described commands:
l Properties: opens the label properties or form properties dialog.
l Copy: copies the selected content to the clipboard
www.nicelabel.com 27

l Cut: removes the selected element(s) from the design surface and adds it to the clipboard to be pasted elsewhere. Note that the first element is selected by click-ing it.
l Delete: removes the selected object from the design surface.
l Lock position: prevents the selected object from being moved.
l Arrange: positions the objects so that they appear either in front of or behind each other:
l Bring Forward: sends the element forward for one level.
l Send backward: sends the element back for one level.
l Send to Front: sends the element in front of all other elements on the label.
l Send to Back: sends the element behind all other elements on the label.
Group Context Menu
PRODUCT LEVEL INFO Creation of forms and use of form objects is available in NiceLabel PowerForms.
When right-clicking an object, a context menu appears. The context menu includes the below described commands:
l Document Properties: opens the label properties or form properties dialog.
l Copy: copies the selected content to the clipboard
l Cut: removes the selected element(s) from the design surface and adds it to the clipboard to be pasted elsewhere. Note that the first element is selected by click-ing it.
l Delete: removes the selected object from the design surface.
l Select All: selects all added objects on a label or form.
l Alignment and Gridlines
l Align to Objects: makes an object align with other object on the design sur-face. When an object is aligned, a line which marks the object alignment appears.
l Align to Guides: aligns the selected objects with gridlines.
l Do Not Align: makes the object position independent of gridlines and pos-ition of other object(s).
l Display grid line guides: makes the design surface grid dots visible.
Objects markers visibility group toggles the visibility for the following object properties:
l Object name: displays the name of an object.
l Internal element: indicates if an object is connected to an internal variable.
l Counter: indicates that the connected variable is a Counter.
www.nicelabel.com 28

l Locked object: indicates that the object's position is locked.
l Events: indicates that the form object runs assigned Action(s).
l Data Source: indicates that the object is connected to a dynamic data source.
l Zoom: defines zooming behavior:
l Zoom to Document: shows the entire label in the Designer window.
l Zoom to Objects: shows all objects in the Designer window.
l Group Objects: unites the selected objects and make them behave as a single element.
Document Properties And Management DialogsLabel PropertiesLabel Properties dialog selects the printer, sets label dimensions and defines the print-ing paper properties. The settings are available on the below listed dialog tabs.
Label Property Description
Printer Selects the preferred printer.
Label Dimensions Defines the Unit of measure and label dimensions.
Paper Defines the printing paper properties.
Stocks Selects the stock type.
Style Defines the label style parameters.
Batch Printing Defines details for grouped printing of labels.
Cutter Enables label roll cutting during or after the printing procedure.
Info Inserts the label description.
www.nicelabel.com 29
TIP: To open the Label Properties dialog, double click the design surface.
PrinterPrinter tab lets you define the printer to print the labels on, and sets basic printing beha-vior.Printer drop down menu selects a printer from the currently installed printers.
TIP: To set the printer settings, select a printer and click Printer properties. This but-ton gives direct access to the selected printer's driver and its settings.
NOTE For additional information on the installed printer drivers and their settings, read the NiceLabel Driver Installation Manual.
l Always use the default printer: selects the default system printer to be used for the current print job.
l Double-sided printing: enables double-sided label printing.
l Use custom printer settings saved in the label: each label may have its own printer settings defined and saved by the user. Select this option to use these set-tings while printing.
l Use default printer settings from the printer driver: select if you prefer the default printer settings or if no custom settings have been defined. Default printer settings are going to be used for printing.
Printing group of settings optimizes the printing process.
l Optimize printing of identical labels: if multiple identical labels are printed, the printer does not need to receive the label file each time. With this option enabled, the printer alone multiplies the print job.
l Use advanced printer driver interface: speeds up label printing.
TIP: When selected, the optimized printer commands are in use. Deselected option disables printing optimization. Each label is sent to the printer in form of an image.
l Combine all non-printer elements into a single graphic item when sent to a printer: merges multiple items and sends it to the printer as a single printable graphic.
l Use store/recall printing mode: optimizes printing performance.
With this mode activated, the Designer does not need to resend the complete label data for each printout. Instead, default labels (templates) are stored in the printer memory and the Designer only sends recall commands to complete the label content during the printing process. For more information, read section Use Store/Recall Mode.
l Store variant: printer memory location to store the label templates.
NOTE To make sure the stored label samples are not lost after power cycling the printer, store them at non-volatile locations.
www.nicelabel.com 30

Label DimensionsLabel Dimensions tab specifies label dimensions and defines whether its size should adapt to the changing size of the objects or not.Unit of measure defines the unit to be used while designing the label. There are four available units: cm, in, mm, and dot. Label Dimensions group defines the label's Width and Height.
NOTE When manually inserting the unit of measure, this also changes the cur-rently defined Unit.
Margins group sets the distance between the edge of the printing surface and the edge of the label (left/right, top/bottom).
Most laser and other non-thermal printers cannot print over the entire label sur-face. There is usually a non-printable label area of about 5 mm from the border of a page. In Designer, this area is marked by a red line. Any object on or bey-ond the red line is not printed entirely.
Radius group enables you to make the label corners rounded.
l Vertical radius: adjusts roundness value in vertical direction.
l Horizontal radius: adjusts roundness value in horizontal direction.
Labels Across defines the number of labels to be printed on a single label sheet.
l Horizontal count: labels distributed horizontally.
l Vertical count: labels distributed vertically.
l Horizontal gap: horizontal distance between labels on a sheet.
l Vertical gap: vertical distance between labels on a sheet.
Variable Label Size enables the label size to change in accordance with the size of its objects. When assigning additional data to label objects, their size increases and occupies more space. Therefore, the label height must adapt.
l Offset: distance between the last object on a label and the bottom edge of a label.
PaperPaper tab sets printing paper properties.Unit selects the Unit of measure to be used in a label.Paper Type group defines paper dimensioning type – automatic or manual.
l Automatically set page size based on the label dimensions (labels on a roll): page size is defined by the printer driver.
NOTE If a thermal printer is selected in the previous wizard step, this option is enabled by default.
l Manually set page size (sheets of paper): page size is set manually.
www.nicelabel.com 31

NOTE If a regular office laser printer is selected in the previous wizard step, this option is enabled by default.
In case the page size is defined manually, additional options appear:
l Paper: selection of standard paper formats.
l Width and Height: custom paper dimensions.
Orientation group sets the new label layout as Portrait or Landscape.
l Rotated: Printer Layout rotation for 180 degrees.
Preview displays current label screen and print layouts.
StocksLabel stocks are a time-saving alternative to designing labels from scratch. Use stock templates when designing labels for a specific printer type and when optimizing the label designing process. Stock type defines which stock type should be used when designing and printing a label. Stock types are usually associated with printer vendors or stationery suppliers.
NOTE Here defined stock properties override manually set label properties.
Stock defines the exact stock which belongs to the Stock type.
NOTE If the selected stock is not compatible with the selected printer, a warning appears. Label designing and printing becomes impossible.
Stock information displays the selected stock's properties:
l Label dimensions
l Labels across
l Description
l Author
StyleStyle tab is used for defining label style parameters.Background color is defined by the Standard or Advanced color selection.Background picture sets a picture on the label background.
l Embed the picture to document: makes the picture an integral part of label doc-ument.
l Save embedded picture to file: embedded picture is saved to a file. l Picture position: background picture to be centered, to fit the label dimensions,
or to be stretched. l Rotation: background picture rotation by 90 degrees. l Print background picture: background picture is printed.
Batch Printing
PRODUCT LEVEL INFO This section is applicable to NiceLabel PowerForms.
Batch printing allows grouped printing of labels that belong to the same batch.
www.nicelabel.com 32

TIP: A batch is a set of labels printed within a single print job. Each print job can con-sist of a single or multiple batches.
The first purpose of batch printing is to automate the execution of a predefined action after the batch has been printed.
EXAMPLE La bel roll is a ut oma t ica lly cut a f t er a ba t ch of f iv e la bels ha s been pr int ed.
The second purpose of batch printing is to enable header and tail label printing with each batch.
EXAMPLE A ba t ch of f iv e la bels s t a rt s wit h a hea der a nd ends wit h a t a il la bel. B ot h of t hem dif f er f rom t he ma in ( body ) la bels .
l Enable batch printing: activates batch printing mode. Batch definition menu becomes active.
l Batch definition: specifies what a batch of labels should consist of:
l All labels in the print job: all labels in the current print job are assigned to the same batch.
l Batch ends after a specific number of labels: batch is finalized after a spe-cified number of labels is printed.
l Batch ends when the data source changes value: changed value of the selected variable is used as a marker for opening a new batch.
Actions group defines the action that executes after a batch has been printed. The avail-ability of actions depends on the selected printer's driver. If the driver provides no information on the action availability, the list is empty.
EXAMPLE C ommonly us ed ba t ch a ct ions a re C utter, Paus e p rinter, Batch mark , Batch s ep -arato r, et c. Wit h a def ined web of la bels ( la bel t empla t e wit h la bels next t o ea ch ot her) , a n a pplica ble a ct ion a ls o becomes Eject p ag e. Thes e pr int er comma nds ca n be a pplied dy na m-ica lly dur ing t he pr int ing proces s .
Header / Tail Labels group specifies the properties of header and tail labels in a batch.
l Use header label: header label of a batch.
l Action after header label: action to be taken after the header label has been prin-ted. The selection of available actions depends on the selected printer's driver.
NOTE The selection of available actions depends on the selected printer's driver.
l Use tail label: last label of a batch.
l Action after tail label: action to be taken after the tail label has been printed.
NOTE The selection of available actions depends on the selected printer's driver.
TIP: Header, tail and main (body) labels of a single batch are accessible via tabs that are located under the design surface (gray field).
CutterCutter enables label roll cutting during or after the printing procedure.
www.nicelabel.com 33

Enable cutter activates the label cutter and its settings.Cutter mode specifies when the label roll is cut.
l Cut after the last printed label: label roll is cut after the finished print job. l Cut after a specific number of labels: label roll is cut at a defined number of
labels or if a defined condition is met. l Cut when the data source changes: label roll is cut when the value of a data
source changes or if a defined condition is met.
InfoInfo tab includes a Description that serves as a hint or as a guidance for the user that is going to work with the label. Define label Description by entering text into the field.
Form Properties
PRODUCT LEVEL INFO This section is applicable to NiceLabel PowerForms.
Form Properties dialog is used for defining various form properties.
TIP: To open the Form Properties dialog, double click the design surface.
The settings are available on the below listed dialog tabs.
Form Property Description
Basic Settings Selects the preferred printer.
Additional Settings Selects the stock type.
Style Defines the Unit of measure and label dimensions.
Tab Order Defines the order of focus shifting.
F1 Help Defines the printing paper properties.
Events Defines the label style parameters.
Variable Events Enables label roll cutting during or after the printing procedure.
Info Inserts the label description.
Basic SettingsBasic Settings tab is used to define the title, size and startup behavior of a form.Title defines the form ID.
l Show form title bar: window title bar visible or hidden upon form startup.
l Allow closing form: form close using the window Close button allowed or not.
With this option disabled, the form can be closed from taskbar.
l Allow resizing form: form size customizable or not.
Disable this option to lock the form size.
Size group defines the form's Width and Height.
www.nicelabel.com 34

Initial form state group defines the form state upon startup. l Maximized: form opens in full screen mode. l Default form size: the form appears using the manually defined sizes.
Startup form position group defines the on-screen position of a form upon its startup. l As defined: the form appears at a location defined by the distance in pixels from
Left (left edge of the form) and Top (top edge of the form). l Screen center: screen center is the startup form position.
Additional SettingsAdditional Settings tab allows selecting the form scripting language. There are two scripting languages available for Designer form objects: VBScript and Python.
l VBScript: scripting for advanced data operations, comparisons and direct cal-culations on a form.
l Python: suitable for 64-bit systems. A significantly faster scripting alternative to VBScript.
StyleSet the label style parameters.
l Background color is defined by the Standard or Advanced color selection. Switch between these two options by clicking the Advanced or Basic button.
l Browse for the label Background picture or insert the direct path. Once the pic-ture has been defined, it is possible to:
l Embed the picture to document: makes the picture an integral part of label document.
l Save embedded picture to file: embedded picture is saved to a file.
l Picture position: background picture to be centered, to fit the label dimen-sions, or to be stretched.
Tab OrderTab order tab customizes the order of setting the focus on form objects while pressing the Tab key.
l ENTER key behaves as TAB key: Enter key has the same role as the Tab key does.
l Select the form Object and move it up or down to define the focus switching order.
F1 HelpF1 Help tab defines custom form help content to help the end-user while designing and/or using a form.
TIP: Enter custom text in the editing field and click OK.
www.nicelabel.com 35

EventsEvents tab allows setting actions for basic form events.
l On Form Load: the action is run upon form load.
l On Form Close: the action is run when the form is closed.
l On Form Timer: the action is run after a given time interval.
l Interval: duration of the time interval.
TIP: Click Actions ... to set the actions that are run by the listed events.
Variable EventsVariable Events selects the variables that are monitored for changes in their values.
l Add: adds a variable to the list.
l Delete: removes a variable from the list.
TIP: Click Actions ... to set the actions that are triggered by changed values in the lis-ted variables.
InfoInfo tab includes a Description that serves as a hint or as a guidance for the user that is going to work with the form. Define form Description by entering text into the field.
Dynamic Data Manager
PRODUCT LEVEL INFO This segment is applicable to NiceLabel Designer Pro and NiceLabel PowerForms.
Dynamic Data Manager is a dialog that enables the user to manage the dynamic data sources for label and form objects. Label and form objects can be connected to multiple variables, functions and databases. To open the dialog, click the Dynamic Data Manager button in the Designer ribbon.Dynamic Data Manager consists of the following segments:
l Ribbon: includes editing commands, enables direct connection to databases, and offers access to the Step-by-Step Database Wizard.
l Data Source Explorer: enables adding new data sources and browsing the exist-ing ones.
Explorer gives an instant overview of the data that is currently in use as dynamic content of label and form objects.
l Main/editing field: is used to define the data source properties. Its elements and layout adapt to current use.
Read more about how to define the data sources in the following sections:
l Work with variables.
l Work with functions.
www.nicelabel.com 36

l Use databases as content source.
l Use internal variables as content source.
l Use global variables as content source.
Configuring The ProgramPRODUCT LEVEL INFO Solution building is available in NiceLabel PowerForms.
To customize the general program configuration of Designer, open the Options dialog which is accessible from the File tab.Designer configuration options are grouped on the following tabs:
l Folders: allows you to set the default locations for storing the labels, forms (solu-tions), databases and picture files.
l Language: selects user interface language. Select the preferred language from the listed options. Designer interface language changes after the restart.
l Global Variables: storage location for global variables.
l Printer usage: locally logged usage of installed printers.
l Automation: enables you to configure NiceLabel Automation settings.
FoldersPRODUCT LEVEL INFO Creation of forms and use of form objects is available in NiceLabel PowerForms.
Folders tab defines the default location for opening and storing the documents and files that are edited and used in Designer.
NOTE Make sure read/write rights are granted to the account under which the Designer is running on the computer.
l Labels: location for opening and saving the label files.
l Forms: location for opening and saving the forms.
l Database: location for file databases (Excel, Access, Text).
l Picture: location for opening the picture files.
Folders set in this tab serve as the default location when searching for a specific file in Designer.
EXAMPLE Fi le name: picture.pngRes ult: When s ea rching f or a gra phic f ile na med pict ure.png, D es igner goes t o C:\User-s\user\Documents\NiceLabel\Graphics
LanguageLanguage tab allows selecting the Designer interface language. Select the appropriate language and click OK.
www.nicelabel.com 37

NOTE Restart is necessary to make the user interface appear in the selected lan-guage. Make sure you save your work before closing the program.
Global VariablesGlobal Variables tab allows defining which location with stored global variables should be used:
l Use global variables stored on the server (Control Center): sets the global vari-able storage location on the Control Center.
NOTE Select the Control Center before selecting this option.
NOTE This option becomes available when using the NiceLabel Label Man-agement Solution license.
l Use global variables stored in a file (local or shared): sets the global variable storage location in a local or shared folder. Enter the exact path or click Open to locate the file.
TIP: These two options become useful when designing solutions for multiple cus-tomers with their own sets of global variables.
Printer UsagePrinter usage tab displays the locally logged usage of installed printers.
TIP: Printer usage provides information about the print jobs which have been sent by this computer.
NOTE Printer usage logging is available with multi-seat license.
Printer usage information group displays how many of the permitted printer ports are used by printing on multiple printers.
l Number of printers allowed by license: number of permitted printers to be used with the current Designer license.
l Number of used printers in the last 7 days: number of printers that have been used with Designer during the last 7 days.
During a 7-day period, Designer license allows only the specified number of dif-ferent printers to be used.
WARNING When exceeding the allowed number of printers – this number is defined by the license – a warning appears. When doubling the number of allowed printers, printing is no longer allowed.
Printing statuses are visible in multiple columns:
l Printer: name or model of the printer that was selected for the print job.
NOTE If the connected printer is shared, only printer model is displayed.
www.nicelabel.com 38
l Location: name of the computer from which the print job has been sent.
l Port: port used by the printer.
l Last Used: time passed since the last print job.
l Reserved: prevents the printer from being removed after idling for more that 7 days.
l Remove: removes the printer from the list of used printers.
Information about the removed printer is broadcasted. Use it when the number of used printers exceeds the number permitted by the license.
NOTE If a printer remains unused for more then 7 days, it s removed auto-matically unless the Reserved option is enabled.
Control CenterControl Center tab allows you to enable and configure the monitoring of events and print jobs. The use of Control Center enables centralized event and print job reporting, and centralized storage of global variables.
NOTE This tab is available only when LMS license is activated.
AddressAddress group defines which Control Center server should be used.
l Control Center server address: URL of the connected Control Center server. You can select from the list of automatically discovered servers on the network, or enter a server address manually.
NOTE The license keys on the Control Center server and on the workstation must match to enable the connection.
Event MonitoringEvent handling in the Control Center allows central management of labeling workstation activities. Activities like label printing, errors, alerts, middleware application triggering, etc. are reported and logged to Control Center.Event Monitoring group defines what types of events should be logged by the con-nected Control Center:
l Print Events: logs the print related events from the workstation.
l Error Events: logs all reported errors.
NOTE By default, Print Events and Error Events are logged to the Control Center.
www.nicelabel.com 39

l Trigger Activity: logs all fired triggers.
l Trigger Status Change Events: logs the trigger status changes which have been caused by the fired triggers.
Print Job MonitoringPrint Job Monitoring group enables you to log the completed and ongoing print jobs to the Control Center.
l Enable Print Job Logging to Server: activates print job logging.
l Detailed printing control: enables monitoring of statuses that are reported by the connected printer.
NOTE There are two requirements to make this option available: - The printer must support bidirectional communication.- NiceLabel printer driver must be used for printing.
Command Line ArgumentsAutomationAutomation tab enables you to configure NiceLabel Automation settings.
Service CommunicationService Communication group defines the communication settings.
l Service communication port: number of the port which is used by the Auto-mation service for communication.
LogLog group configures how the below listed messages reported by the Automation Man-ager are logged.
NOTE The default data retention time is 7 days. To minimize log database size on busy systems, reduce the retention period.
l Clear log entries daily at: selects the time at which the daily log entries are cleared.
l Clear log entries when older than (days): sets the log retention time in days.
l Log messages: selects the message types that are logged.
l All messages: saves all message types in the log.
l Errors and warnings: saves errors and warnings in the log.
l Errors: saves errors in the log.
l No log: no messages are logged.
PerformancePerformance group enables improving the time-to-first label and general performance of the Automation service.
www.nicelabel.com 40

l Cache remote files enables storing the remotely located files in the local cache.
l Refresh cache files (minutes): time interval within which the files in the cache are synchronized with the files in the original folder. This is the time interval which limits the system to use version which may not be the latest.
l Remove cache files when older than (days): defines the time interval after which all files in cache are removed.
TIP: When loading the labels, images and database data from network shares, you might experience delays when printing the labels since Automation service has to fetch all required files before the printing process can begin. File caching solves this issue by storing the necessary files in the local cache.
Keyboard And Mouse SupportTo efficiently perform and complete the Designer tasks, follow the guidelines related to the use of keyboard and mouse:
l How to efficiently use keyboard and mouse
l Keyboard support
l Keyboard shortcuts
l Mouse wheel support
How To Efficiently Use The Keyboard And MouseUse the below listed tip to make your work with Designer easier and more efficient.
1. Select object anchoring point. Press <CTRL> key and click the object place-holders to quickly define the anchoring point.
2. Label scrolling and zooming. Use mouse wheel to scroll the label. Holding <CTRL> when rotating the wheel, adjusts zoom factor. <SHIFT> scrolls label left or right.
3. Set label or form properties. Double click the design surface to open the label or form properties dialog.
4. Vertical or horizontal object moving. Hold <SHIFT> while moving an object over the design surface. The object is moved in straight vertical and horizontal lines.
5. Resize an object with arrow keys. Holding <SHIFT> while pressing arrow keys resizes the object.
6. Fine tune the object position. Hold <CTRL> while pressing arrow keys.
7. Open contextual menus. Right click the object or design surface to access the label, form or design surface contextual menus.
8. Select multiple objects. Hold <SHIFT> and click the objects to add them to the selected objects in a group.
www.nicelabel.com 41

9. Quickly add an object with connected data source. Click the object's shortcut handle in the object toolbar. A list of available data sources appears. Select a data source or add a new one, and click the design surface to add an object which already has a dynamic data source connected to it.
PRODUCT LEVEL INFO Creation of forms and use of form objects is available in NiceLabel PowerForms.
Mouse Wheel SupportUse mouse wheel to speed-up design object zooming and design surface scrolling.
l Turning the wheel scrolls the label vertical direction.
l Holding <SHIFT> and turning the wheel scrolls the label left or right.
l Holding <CTRL> and turning the wheel, zooms the label in or out.
Keyboard ShortcutsUse keyboard shortcuts to reduce the time needed to accomplish frequent tasks with Designer. To complete these tasks, use a standard combination of keys.
TIP: Keyboard shortcuts are just a faster and more convenient way of choosing com-mands. The command itself is executed in the same way as if it was run from the menu or toolbar.
Action Press
Open CTRL+O
Save CTRL+S
Close ALT+F4
Cut CTRL+X
Copy CTRL+C
Paste CTRL+V
Select all CTRL+A
Bold CTRL+B
Italic CTRL+I
Center text CTRL+E
Left align text CTRL+L
Right align text CTRL+R
Cancel ESC
Undo CTRL+Z
Redo CTRL+Y
Zoom CTRL+mouse scroll
www.nicelabel.com 42

Move Focus TAB or SHIFT+TAB
Print CTRL+P
Move left ←
Move right →
Move up ↑
Move down ↓
www.nicelabel.com 43

LabelPRODUCT LEVEL INFO Solution building is available in NiceLabel PowerForms.
Label is the base of any designing and printing process in NiceLabel Designer. A label can be set as a simple file that marks an item with fixed content or a complex and thor-oughly designed mixture of multiple dynamic product identifiers. To design a printable label belongs to basic Designer tasks. Designer allows creating and printing of standalone labels and labels that are included in a printing solution.Read about how to create, design or edit a label here.
Label Setup WizardLabel Setup Wizard guides you through the process of creating a new label. The wizard consists of four configuration steps and a summary:
l Step 1: Select a Printer
l Step 2: Page Size
l Step 3: Label Layout
l Step 4: Label Dimensions
l Step 5: Summary
After finishing these steps, the label is ready for editing and printing.
NOTE To quit the Label Setup Wizard during any step, press escape. The new label properties are set to default.
Label Setup WizardStep 1: Select The PrinterThis step selects the printer to be used for printing the newly created label. It also provides direct access to printer driver properties.Select the printer from the drop-down list. To set the printer settings, select a printer from the list of installed printers and click Printer properties. This button gives you dir-ect access to the selected printer driver and its settings.
NOTE When changing the printer, Page Size settings always go to default (automatic).
l Always use the default printer: sets the default system printer to be used for the current print job.
l Double-sided printing: enables double-sided printing for the new label.
l Preview field: displays the label layout according to the currently set properties.
NOTE For additional information on the installed printer drivers and their settings, read the NiceLabel Driver Installation Manual.
www.nicelabel.com 44

Step 2: Set The Page SizeThis step defines how the page size is selected. When using a thermal printer, it is recom-mended to set the size automatically. Manual selection proves to be useful if you know the exact stock code or label format.Print on a roll of labels option prints on the installed roll of labels. Page size for thermal printers is detected automatically.
NOTE If a thermal printer is selected in the preceding Select the Printer wizard step, this option is enabled by default.
Print on a sheet of paper option prints labels on sheets of paper. It lets you manually define the label page size to fit the printer.With this option selected, additional settings appear:
l Unit of measure: defines the unit of measure to be used while designing the label.
l Paper: defines the label page Width and Height.
NOTE If a regular home/office printer is selected in the preceding Select Printer wiz-ard step, this option is enabled by default.
Load settings from a predefined stock option sets the page to be defined by the selec-ted stock type. With this option selected, additional settings appear:
l Stock type: defines which stock type should be used when designing and print-ing the newly created label. Stock types are usually associated with printer vendors or stationery suppliers.
l Stock: defines the exact stock from the Stock type. Select it from the drop down list. All listed stocks belong to the same Stock type.
l NOTE If the selected stock is not compatible with printer, a warning appears. Label designing and printing becomes impossible.
l Stock information: displays the selected stock's properties.
Step 3: Select Label LayoutThis step defines the label orientation and rotation on a printer:
l Orientation: sets the new label layout as Portrait or Landscape.
l Rotation: rotates the Printer Layout of a label for 180 degrees.
l Preview field: displays the label layout according to the currently set properties.
Step 4: Specify Label DimensionsThis step defines the dimensions of the newly created label, its margins, measurement unit, and labels across positioning settings:
l Unit of measure: defines the unit to be used while designing the label.
l Label Dimensions: define the new label's Width and Height.
www.nicelabel.com 45

l Margins: define the distance between the edge of the printing surface and the edge of the label (left/right, top/bottom).
l Labels Across: defines the number of labels to be printed on a single label sheet.
l Horizontal count: distributes labels horizontally.
l Vertical count: distributes labels vertically.
l Horizontal gap: sets horizontal distance between the labels on a sheet.
l Vertical gap: sets vertical distance between the labels on a sheet.
l Processing order: defines the direction in which the labels are printed. Set the starting corner where the printing starts and define the horizontal and vertical dir-ection of label positioning.
Step 5: SummaryThis step summarizes the new label properties as defined using the Label Setup Wizard.Before clicking Finish to enter the label editing and printing phases, check the displayed settings:
l Printer: selected printer for label printing.
l Label dimensions: dimensions of newly created label.
l Paper dimensions: dimensions of newly created label.
Label PropertiesLabel Properties dialog selects the printer, sets label dimensions and defines the print-ing paper properties. The settings are available on the below listed dialog tabs.
Label Property Description
Printer Selects the preferred printer.
Label Dimensions Defines the Unit of measure and label dimensions.
Paper Defines the printing paper properties.
Stocks Selects the stock type.
Style Defines the label style parameters.
Batch Printing Defines details for grouped printing of labels.
Cutter Enables label roll cutting during or after the printing procedure.
Info Inserts the label description.
www.nicelabel.com 46

TIP: To open the Label Properties dialog, double click the design surface.
PrinterPrinter tab lets you define the printer to print the labels on, and sets basic printing beha-vior.Printer drop down menu selects a printer from the currently installed printers.
TIP: To set the printer settings, select a printer and click Printer properties. This but-ton gives direct access to the selected printer's driver and its settings.
NOTE For additional information on the installed printer drivers and their settings, read the NiceLabel Driver Installation Manual.
l Always use the default printer: selects the default system printer to be used for the current print job.
l Double-sided printing: enables double-sided label printing.
l Use custom printer settings saved in the label: each label may have its own printer settings defined and saved by the user. Select this option to use these set-tings while printing.
l Use default printer settings from the printer driver: select if you prefer the default printer settings or if no custom settings have been defined. Default printer settings are going to be used for printing.
Printing group of settings optimizes the printing process.
l Optimize printing of identical labels: if multiple identical labels are printed, the printer does not need to receive the label file each time. With this option enabled, the printer alone multiplies the print job.
l Use advanced printer driver interface: speeds up label printing.
www.nicelabel.com 47

TIP: When selected, the optimized printer commands are in use. Deselected option disables printing optimization. Each label is sent to the printer in form of an image.
l Combine all non-printer elements into a single graphic item when sent to a printer: merges multiple items and sends it to the printer as a single printable graphic.
l Use store/recall printing mode: optimizes printing performance.
With this mode activated, the Designer does not need to resend the complete label data for each printout. Instead, default labels (templates) are stored in the printer memory and the Designer only sends recall commands to complete the label content during the printing process. For more information, read section Use Store/Recall Mode.
l Store variant: printer memory location to store the label templates.
NOTE To make sure the stored label samples are not lost after power cycling the printer, store them at non-volatile locations.
Label DimensionsLabel Dimensions tab specifies label dimensions and defines whether its size should adapt to the changing size of the objects or not.Unit of measure defines the unit to be used while designing the label. There are four available units: cm, in, mm, and dot. Label Dimensions group defines the label's Width and Height.
NOTE When manually inserting the unit of measure, this also changes the cur-rently defined Unit.
Margins group sets the distance between the edge of the printing surface and the edge of the label (left/right, top/bottom).
Most laser and other non-thermal printers cannot print over the entire label sur-face. There is usually a non-printable label area of about 5 mm from the border of a page. In Designer, this area is marked by a red line. Any object on or bey-ond the red line is not printed entirely.
Radius group enables you to make the label corners rounded.
l Vertical radius: adjusts roundness value in vertical direction.
l Horizontal radius: adjusts roundness value in horizontal direction.
Labels Across defines the number of labels to be printed on a single label sheet.
l Horizontal count: labels distributed horizontally.
l Vertical count: labels distributed vertically.
l Horizontal gap: horizontal distance between labels on a sheet.
l Vertical gap: vertical distance between labels on a sheet.
Variable Label Size enables the label size to change in accordance with the size of its objects. When assigning additional data to label objects, their size increases and occupies more space. Therefore, the label height must adapt.
www.nicelabel.com 48

l Offset: distance between the last object on a label and the bottom edge of a label.
PaperPaper tab sets printing paper properties.Unit selects the Unit of measure to be used in a label.Paper Type group defines paper dimensioning type – automatic or manual.
l Automatically set page size based on the label dimensions (labels on a roll): page size is defined by the printer driver.
NOTE If a thermal printer is selected in the previous wizard step, this option is enabled by default.
l Manually set page size (sheets of paper): page size is set manually.
NOTE If a regular office laser printer is selected in the previous wizard step, this option is enabled by default.
In case the page size is defined manually, additional options appear:
l Paper: selection of standard paper formats.
l Width and Height: custom paper dimensions.
Orientation group sets the new label layout as Portrait or Landscape.
l Rotated: Printer Layout rotation for 180 degrees.
Preview displays current label screen and print layouts.
StocksLabel stocks are a time-saving alternative to designing labels from scratch. Use stock templates when designing labels for a specific printer type and when optimizing the label designing process. Stock type defines which stock type should be used when designing and printing a label. Stock types are usually associated with printer vendors or stationery suppliers.
NOTE Here defined stock properties override manually set label properties.
Stock defines the exact stock which belongs to the Stock type.
NOTE If the selected stock is not compatible with the selected printer, a warning appears. Label designing and printing becomes impossible.
Stock information displays the selected stock's properties:
l Label dimensions
l Labels across
l Description
l Author
StyleStyle tab is used for defining label style parameters.
www.nicelabel.com 49

Background color is defined by the Standard or Advanced color selection.Background picture sets a picture on the label background.
l Embed the picture to document: makes the picture an integral part of label doc-ument.
l Save embedded picture to file: embedded picture is saved to a file. l Picture position: background picture to be centered, to fit the label dimensions,
or to be stretched. l Rotation: background picture rotation by 90 degrees. l Print background picture: background picture is printed.
Batch PrintingPRODUCT LEVEL INFO This section is applicable to NiceLabel PowerForms.
Batch printing allows grouped printing of labels that belong to the same batch.
TIP: A batch is a set of labels printed within a single print job. Each print job can con-sist of a single or multiple batches.
The first purpose of batch printing is to automate the execution of a predefined action after the batch has been printed.
EXAMPLE La bel roll is a ut oma t ica lly cut a f t er a ba t ch of f iv e la bels ha s been pr int ed.
The second purpose of batch printing is to enable header and tail label printing with each batch.
EXAMPLE A ba t ch of f iv e la bels s t a rt s wit h a hea der a nd ends wit h a t a il la bel. B ot h of t hem dif f er f rom t he ma in ( body ) la bels .
l Enable batch printing: activates batch printing mode. Batch definition menu becomes active.
l Batch definition: specifies what a batch of labels should consist of:
l All labels in the print job: all labels in the current print job are assigned to the same batch.
l Batch ends after a specific number of labels: batch is finalized after a spe-cified number of labels is printed.
l Batch ends when the data source changes value: changed value of the selected variable is used as a marker for opening a new batch.
Actions group defines the action that executes after a batch has been printed. The avail-ability of actions depends on the selected printer's driver. If the driver provides no information on the action availability, the list is empty.
EXAMPLE C ommonly us ed ba t ch a ct ions a re C utter, Paus e p rinter, Batch mark , Batch s ep -arato r, et c. Wit h a def ined web of la bels ( la bel t empla t e wit h la bels next t o ea ch ot her) , a n a pplica ble a ct ion a ls o becomes Eject p ag e. Thes e pr int er comma nds ca n be a pplied dy na m-ica lly dur ing t he pr int ing proces s .
Header / Tail Labels group specifies the properties of header and tail labels in a batch.
www.nicelabel.com 50

l Use header label: header label of a batch.
l Action after header label: action to be taken after the header label has been prin-ted. The selection of available actions depends on the selected printer's driver.
NOTE The selection of available actions depends on the selected printer's driver.
l Use tail label: last label of a batch.
l Action after tail label: action to be taken after the tail label has been printed.
NOTE The selection of available actions depends on the selected printer's driver.
TIP: Header, tail and main (body) labels of a single batch are accessible via tabs that are located under the design surface (gray field).
CutterCutter enables label roll cutting during or after the printing procedure.Enable cutter activates the label cutter and its settings.Cutter mode specifies when the label roll is cut.
l Cut after the last printed label: label roll is cut after the finished print job. l Cut after a specific number of labels: label roll is cut at a defined number of
labels or if a defined condition is met. l Cut when the data source changes: label roll is cut when the value of a data
source changes or if a defined condition is met.
InfoInfo tab includes a Description that serves as a hint or as a guidance for the user that is going to work with the label. Define label Description by entering text into the field.
Label ObjectsAfter setting the label properties, it's time to start adding content to the label. Label objects are basic design items that are used for adding and editing various content types. Each object has its own function as described in the table below.
Label Object Icon Description
Text Object for single-line textual content that does not need to adapt its font size to the label design.
Text box Object which adapts (expand/shrink) to the textual con-tent or makes the font increase or decrease its size to fit in the frame.
Rich text box Object for adding textual content that supports format-ted text, hyperlinks, line images, and other rich content created with a word processor.
www.nicelabel.com 51

Label Object Icon Description
Barcode Object for adding and editing various types of barcodes on a label.
Picture Object for adding graphic content to a label.
Rectangle Object for creating rectangle shaped frames on a label
Line Object for creating lines on a label.
Ellipse Object for creating circular shapes on a label.
Inverse Object for inverting the color of the underlying object.
TextText object encloses single-line textual content that does not adapt its font size to label design. Text object can also include multiple-line textual content – the object grows to fit the amount of entered text.
TIP: Text box object serves an alternative when designing a label on which the textual content must fit into a field with predefined dimensions.
SourceConnected data source is the dynamic data source that is connected with the object.
l Fixed data: manually entered fixed text.
l Variable keyboard input: type of variable that enables the content of a prompted field to be different for every print job.
l Variables: predefined variable values which are used as object content.
l Functions: input data transformation tools.
l Databases: database values which are used as object content.
l Link to other objects: makes the content of a label object (re)appear in another object on the same label.
Content field is used for entering the object content. Content Mask sets the format of the input data before it is displayed on a label. Mask character is a character used in the mask that is replaced with actual data on the printed label.
E X A M P L E
A us er needs t o f orma t a phone number t o be more rea da ble on t he la bel. D a t a input is not f orma t t ed s ince it is rea d f rom a da t a ba s e.
I f t he input v a lue rea d f rom a da t a ba s e is :
+38642805090
a nd t he cont ent ma s k is :
(****) **** - ****
t he res ult ing out put is :
www.nicelabel.com 52
(+386) 4280 - 5090
I f t he da t a cont a ins t he a s t er is k " *" cha ra ct er , cha nge t he Mas k character. The cha ra ct er s hould ha v e a unique v a lue t ha t does not a ppea r a ny where in t he da t a .
StyleFont color sets text font and underline color.Font selects the typeface. Fonts are divided into two groups: OpenType fonts and Printer fonts.
NOTE If the currently selected printer is a thermal printer, additional fonts become available. These are the internal Printer fonts that are installed on the printer. Printer fonts are identified by the printer icon in front of their names.
The font may appear Bold, Italic, Underlined or as a Strikethrough text.Font Scaling sets the font stretch factor. If the factor is set to 100 %, font appears in nor-mal scale. If the factor is set to 200 %, font appears twice as wide as normally. If set to 50 %, font is shrunk to half of its size.Alignment defines horizontal relative positioning of the entered content.
l Left: text aligned with the left object border.
l Center: text positioned centrally.
l Right: text aligned with the right object border.
Spacing sets the space between text characters and lines.
l Line spacing: space between each line in a paragraph.
l Character spacing: space between individual characters.
EffectsInverse: inverted text and object background colors.Mirror: mirrored text.RTL printing: right to left text printing.
Most thermal printers print right-to-left scripts automatically. This option becomes useful if the operating system does not provide native RTL support.
Posit ionPosition tab defines object positioning and its position-related behavior.Position group defines the object's position.
l X and Y: anchoring point coordinates.
Size group gives an information about the object's dimensions. l Width and Height: horizontal and vertical object dimension. l Keep aspect ratio: simultaneous changing of object dimensions while scaling.
In Text object, the size of text is determined by the font size. Object dimen-sions and aspect ratio cannot be changed manually and only serve as an inform-ation about its current size.
Rotation angle is the object angle according to the design surface.
www.nicelabel.com 53

There are multiple ways to set the object's angle: enter the angle manually , drag the slider or click and drag the icon on the selected object. Rotation angle and slider rotates the object around its anchoring point. The icon rotates the object around its central point.
Anchoring point is the spot where an object is pinned to design surface. Variable size objects increase or decrease their size in the direction that is opposite to the chosen anchoring point.Lock object on design surface prevents the object from being moved during the design process, select under the Design behavior group.
NOTE If the measurement unit is changed in label properties, the value transforms automatically.
Relative Posit ionRelative Position defines object position when the label size or neighboring object's positions are changing during the design process.
l Enable horizontal relative position: activates horizontal relative positioning.
l Relative to label border: the position of object is defined relative to the ref-erence label border. Define its horizontal offset according to this border.
l Relative to another object: the position of object is defined relative to the selected neighboring object's border. Define its horizontal offset according to this object.
l Border: reference label or neighboring object's border for horizontal rel-ative positioning.
l Offset: horizontal distance from label border or selected object's anchoring point.
l Enable vertical relative position: activates vertical relative positioning.
l Relative to label border: the position of object is defined relative to the ref-erence label border. Define its vertical offset according to this border.
l Relative to another object: the position of object is defined relative to the selected neighboring object's border. Define its vertical offset according to this object.
l Border: reference label or neighboring object's border for vertical relative positioning.
l Offset: vertical distance from label border or selected object's anchoring point.
NOTE Object position changes if label size or position of the related object are changed.
GeneralGeneral tab identifies the object and sets its status.Name sets a unique object ID. It is used for object referencing when defining functions, variables, scripts, etc.
NOTE NiceLabel recommends avoiding spaces or special characters in object names.
www.nicelabel.com 54
Description allows adding notes and annotations for an object. It provides help during the label design process.Status group defines object visibility on print preview and on printed labels.
l Not printable: prevents the object from being printed. The object still remains vis-ible on the print preview and affects other objects in relative positioning. This option is useful when printing on predesigned or stock-specific labels.
l Visible: if the check box is not selected, the object neither appears on the print preview nor on the printed label. The object is treated as if it does not exist at all.
l Condition: makes an object enabled (editable) if the result of the given condition is "True". It defines object visibility on form startup and when the connected vari-able's value changes.
l Object visibility status is explained in the table below:
Option Print Preview Printout Relative positioningNot printable (selected) YES NO YESVisible (cleared) NO NO NO
Printing optimization group allows activating the use of printer elements.
l Use printer elements if supported speeds up the printing process.
If enabled by the printer model, a share of label element processing is handled directly by the printer: internal fonts, shapes, barcodes, etc.
l Always print as graphics sends and prints the objects as graphic files.
Text BoxText box object is a fixed-size frame for adding and displaying textual content on a label. Text box object is very similar to the standard Designer Text object. The difference between these two is the presentation of textual content with variable length. Text object is always expanding or shrinking to adapt to the amount of entered content. Text Box in opposite can either adapt (expand/shrink) to the content or make the font increase or decrease its size to fit in the object frame.
TIP: To make sure the content fits the predefined box is especially useful when work-ing with variable data. No matter how long the text value is, it is always placed and dis-played on a label within the predesigned frame.
SourceConnected data source is the dynamic data source that is connected with the object.
l Fixed data: manually entered fixed text.
l Variable keyboard input: type of variable that enables the content of a prompted field to be different for every print job.
l Variables: predefined variable values which are used as object content.
l Functions: input data transformation tools.
l Databases: database values which are used as object content.
l Link to other objects: makes the content of a label object (re)appear in another object on the same label.
Content field is used for entering the object content. Mask sets the format of the input data before it is displayed on a label.
www.nicelabel.com 55

Content mask sets the format of the input data before it is displayed on a label. Mask character is a character used in the mask that is replaced with actual data on the printed label.
E X A M P L E
A us er needs t o f orma t a phone number t o be more rea da ble on t he la bel. D a t a input is not f orma t t ed s ince it is rea d f rom a da t a ba s e.
I f t he input v a lue rea d f rom a da t a ba s e is :
+38642805090
a nd t he cont ent ma s k is :
(****) **** - ****
t he res ult ing out put is :
(+386) 4280 - 5090
I f t he da t a cont a ins t he a s t er is k " *" cha ra ct er , cha nge t he Mas k character. The cha ra ct er s hould ha v e a unique v a lue t ha t does not a ppea r a ny where in t he da t a .
StyleFont color sets text font and underline color.Font selects the typeface. Fonts are divided into two groups: OpenType fonts and Printer fonts.
NOTE If the currently selected printer is a thermal printer, additional fonts become available. These are the internal Printer fonts that are installed on the printer. Printer fonts are identified by the printer icon in front of their names.
The font may appear Bold, Italic, Underlined or as a Strikethrough text.Font Scaling sets the font stretch factor. If the factor is set to 100 %, font appears in nor-mal scale. If the factor is set to 200 %, font appears twice as wide as normally. If set to 50 %, font is shrunk to half of its size.Alignment defines horizontal relative positioning of the entered content.
l Left: text aligned with the left object border.
l Center: text positioned centrally.
l Right: text aligned with the right object border.
Spacing sets the space between text characters and lines.
l Line spacing: space between each line in a paragraph.
l Character spacing: space between individual characters.
Text FitNone makes Text box size and font non-adaptable.
NOTE If the content amount exceeds the object size, an error message appears. The label is not printed. To suppress such error and print the text box, enable Ignore
.
www.nicelabel.com 56
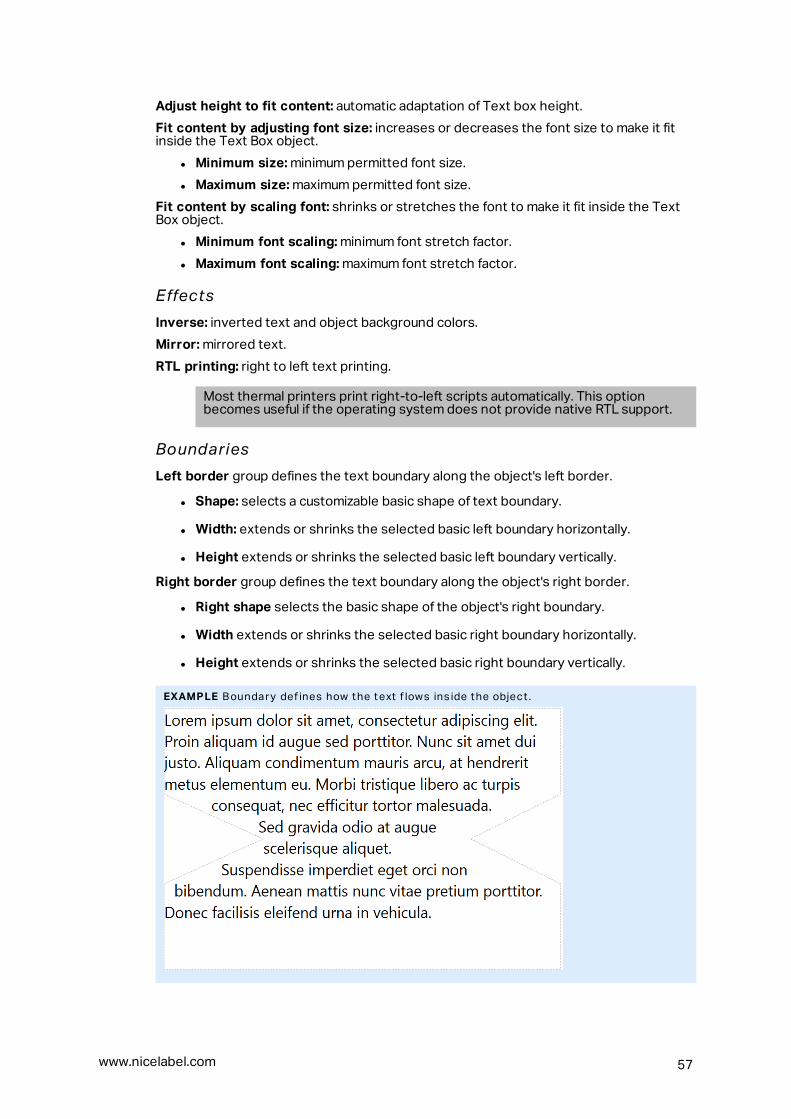
Adjust height to fit content: automatic adaptation of Text box height.Fit content by adjusting font size: increases or decreases the font size to make it fit inside the Text Box object.
l Minimum size: minimum permitted font size. l Maximum size: maximum permitted font size.
Fit content by scaling font: shrinks or stretches the font to make it fit inside the Text Box object.
l Minimum font scaling: minimum font stretch factor. l Maximum font scaling: maximum font stretch factor.
EffectsInverse: inverted text and object background colors.Mirror: mirrored text.RTL printing: right to left text printing.
Most thermal printers print right-to-left scripts automatically. This option becomes useful if the operating system does not provide native RTL support.
BoundariesLeft border group defines the text boundary along the object's left border.
l Shape: selects a customizable basic shape of text boundary.
l Width: extends or shrinks the selected basic left boundary horizontally.
l Height extends or shrinks the selected basic left boundary vertically.
Right border group defines the text boundary along the object's right border.
l Right shape selects the basic shape of the object's right boundary.
l Width extends or shrinks the selected basic right boundary horizontally.
l Height extends or shrinks the selected basic right boundary vertically.
EXAMPLE B ounda ry def ines how t he t ext f lows ins ide t he object .
www.nicelabel.com 57

Posit ionPosition tab defines object positioning and its position-related behavior.Position group defines the object's position.
l X and Y: anchoring point coordinates.
Size group sets the object's dimensions: l Width and Height: horizontal and vertical object dimension. l Keep aspect ratio: simultaneous changing of object dimensions while scaling.
Rotation angle is the object angle according to the design surface.
TIP: There are multiple ways to set the object's angle: enter the angle manually , drag the slider or click and drag the icon on the selected object. Rotation angle and slider rotates the object around its anchoring point. The icon rotates the object around its central point.
Anchoring point is the spot where an object is pinned to design surface. Variable size objects increase or decrease their size in the direction that is opposite to the chosen anchoring point.Lock object on design surface prevents the object from being moved during the design process, select under the Design behavior group.
NOTE If the measurement unit is changed in label properties, the value transforms automatically.
Relative Position defines object position when the label size or neighboring object's positions are changing during the design process.
l Enable horizontal relative position: activates horizontal relative positioning.
l Relative to label border: the position of object is defined relative to the ref-erence label border. Define its horizontal offset according to this border.
l Relative to another object: the position of object is defined relative to the selected neighboring object's border. Define its horizontal offset according to this object.
l Border: reference label or neighboring object's border for horizontal rel-ative positioning.
l Offset: horizontal distance from label border or selected object's anchoring point.
l Enable vertical relative position: activates vertical relative positioning.
l Relative to label border: the position of object is defined relative to the ref-erence label border. Define its vertical offset according to this border.
l Relative to another object: the position of object is defined relative to the selected neighboring object's border. Define its vertical offset according to this object.
l Border: reference label or neighboring object's border for vertical relative positioning.
l Offset: vertical distance from label border or selected object's anchoring point.
www.nicelabel.com 58

NOTE Object position changes if label size or position of the related object are changed.
NOTE If the measurement unit is changed, the value transforms automatically.
GeneralGeneral tab identifies the object and sets its status.Name sets a unique object ID. It is used for object referencing when defining functions, variables, scripts, etc.
NOTE NiceLabel recommends avoiding spaces or special characters in object names.
Description allows adding notes and annotations for an object. It provides help during the label design process.Status group defines object visibility on print preview and on printed labels.
l Not printable: prevents the object from being printed. The object still remains vis-ible on the print preview and affects other objects in relative positioning. This option is useful when printing on predesigned or stock-specific labels.
l Visible: if the check box is not selected, the object neither appears on the print preview nor on the printed label. The object is treated as if it does not exist at all.
l Condition: makes an object enabled (editable) if the result of the given condition is "True". It defines object visibility on form startup and when the connected vari-able's value changes.
l Object visibility status is explained in the table below:
Option Print Preview Printout Relative positioningNot printable (selected) YES NO YESVisible (cleared) NO NO NO
Printing optimization group allows activating the use of printer elements.
l Use printer elements if supported speeds up the printing process.
If enabled by the printer model, a share of label element processing is handled directly by the printer: internal fonts, shapes, barcodes, etc.
l Always print as graphics sends and prints the objects as graphic files.
Rich Text BoxRich text box (RTF) is an object for rich text editing. It encloses textual content with hyperlinks, line images, and other formatting created using an internal Designer's word processor.
SourceConnected data source is the dynamic data source that is connected with the object.
l Fixed data: manually entered fixed text.
l Variable keyboard input: type of variable that enables the content of a prompted field to be different for every print job.
www.nicelabel.com 59

l Variables: predefined variable values which are used as object content.
l Functions: input data transformation tools.
l Databases: database values which are used as object content.
l Link to other objects: makes the content of a label object (re)appear in another object on the same label.
Content field is used for entering the object content. Rich Text Box Editor is a full-scale text processor. Edit content button opens the editor. Supported actions in Rich Text Box Editor:
l Text formatting
l Content find and replace
l Inserting of images, symbols, tables, and dynamic data sources
l Content zooming
Show RTF code option displays the RTF code.
Read more about the available Rich Text Box Editor features in a dedicated topic.
Text FitNone makes Text box size and font non-adaptable.
l None: non-adaptable Rich Text box size and font.
NOTE If the content amount exceeds the object size, an error message appears. The label is not printed. To suppress such error and print the text box, enable Ignore excessive content
l Adjust height to fit content: automatic Rich Text box height adaptation.
l Fit content by adjusting font size: adaptable font size.
l Minimum size: minimum font size.
l Maximum size: maximum font size.
Posit ionPosition tab defines object positioning and its position-related behavior.Position group defines the object's position.
l X and Y: anchoring point coordinates.
Size group sets the object's dimensions: l Width and Height: horizontal and vertical object dimension. l Keep aspect ratio: simultaneous changing of object dimensions while scaling.
Rotation angle is the object angle according to the design surface.
www.nicelabel.com 60
TIP: There are multiple ways to set the object's angle: enter the angle manually , drag the slider or click and drag the icon on the selected object. Rotation angle and slider rotates the object around its anchoring point. The icon rotates the object around its central point.
Anchoring point is the spot where an object is pinned to design surface. Variable size objects increase or decrease their size in the direction that is opposite to the chosen anchoring point.Lock object on design surface prevents the object from being moved during the design process, select under the Design behavior group.
NOTE If the measurement unit is changed in label properties, the value transforms automatically.
Relative Posit ionRelative Position defines object position when the label size or neighboring object's positions are changing during the design process.
l Enable horizontal relative position: activates horizontal relative positioning.
l Relative to label border: the position of object is defined relative to the ref-erence label border. Define its horizontal offset according to this border.
l Relative to another object: the position of object is defined relative to the selected neighboring object's border. Define its horizontal offset according to this object.
l Border: reference label or neighboring object's border for horizontal rel-ative positioning.
l Offset: horizontal distance from label border or selected object's anchoring point.
l Enable vertical relative position: activates vertical relative positioning.
l Relative to label border: the position of object is defined relative to the ref-erence label border. Define its vertical offset according to this border.
l Relative to another object: the position of object is defined relative to the selected neighboring object's border. Define its vertical offset according to this object.
l Border: reference label or neighboring object's border for vertical relative positioning.
l Offset: vertical distance from label border or selected object's anchoring point.
NOTE Object position changes if label size or position of the related object are changed.
GeneralGeneral tab identifies the object and sets its status.Name sets a unique object ID. It is used for object referencing when defining functions, variables, scripts, etc.
NOTE NiceLabel recommends avoiding spaces or special characters in object names.
www.nicelabel.com 61

Description allows adding notes and annotations for an object. It provides help during the label design process.Status group defines object visibility on print preview and on printed labels.
l Not printable: prevents the object from being printed. The object still remains vis-ible on the print preview and affects other objects in relative positioning. This option is useful when printing on predesigned or stock-specific labels.
l Visible: if the check box is not selected, the object neither appears on the print preview nor on the printed label. The object is treated as if it does not exist at all.
l Condition: makes an object enabled (editable) if the result of the given condition is "True". It defines object visibility on form startup and when the connected vari-able's value changes.
l Object visibility status is explained in the table below:
Option Print Preview Printout Relative positioningNot printable (selected) YES NO YESVisible (cleared) NO NO NO
Printing optimization group allows activating the use of printer elements.
l Use printer elements if supported speeds up the printing process.
If enabled by the printer model, a share of label element processing is handled directly by the printer: internal fonts, shapes, barcodes, etc.
l Always print as graphics sends and prints the objects as graphic files.
Rich Text Box EditorRich Text Box Editor is a fully featured word processor. It enables you to create, edit and format the content of a Rich text box label object.Sections below describe editor's tabs and matching ribbon groups with commands that are available when creating and editing the Rich Text box content.
Home TabFile ribbon group enables handling of a document.
l Import: importing of textual content to the editor.
l Export: exporting of textual content from the editor.
Use file browser window to select the export location. By default, the editor con-tent is exported as a file with .rtf extension. To specify an alternative file format, select it from the drop down list.
Clipboard ribbon group activates the following actions: l Paste: pastes clipboard data. l Copy: copies current selection to the clipboard. l Cut: cuts selection to clipboard.
Undo Redo ribbon group undos or repeats editing actions.Font ribbon group includes typical font style and formatting related commands. These are font selection, size, font growing and shrinking, bold, italics, etc.
For additional font related settings, open the Font box in dialog form by clicking the icon in the bottom right corner of the ribbon group.
www.nicelabel.com 62

Text Box group defines lists and indents, toggles formatting symbols, sets alignment and line spacing, and enables text shading.
For additional text related settings, open the Text Box in dialog form by clicking the icon in the bottom right corner of the ribbon group.
Editing group includes: l Find searches and locates the inserted string within a text. l Replace locates and replaces the inserted string with a new text.
InsertInsert group enables adding editable elements to the rich text object.
l Data Source: adds variable, function or a database field as a dynamic content source.
l Table: opens the Insert Table dialog. Define Number of columns and Number of rows. After clicking OK, a table with the defined number of columns and rows is placed in the rich text editor.
l Picture: inserts a picture the rich text object.
l Symbol: opens Insert Symbol dialog for character selection.
l Search by code: character search by unicode character code.
l Font name: font selection.
l Character set: active set of characters.
l Filter:character search filter.
Frequently used symbols are displayed at the bottom of the dialog box. Click the symbol to insert it directly in the rich text object.
ViewZoom group allows zooming the text in and out.
BarcodeBarcode object is used for adding various types of barcodes on a label. Each barcode type is configurable according to specific standards.
TIP: When encoding the barcode content, make sure the used characters, length and identifiers comply with the barcode standard guidelines.
The following barcode types are available in Designer:
l 1D and 2D Barcodes
l GS1 DataBar Barcode Subtypes
SourceConnected data source is the dynamic data source that is connected with the object.
www.nicelabel.com 63
l Fixed data: manually entered fixed text.
l Variable keyboard input: type of variable that enables the content of a prompted field to be different for every print job.
l Variables: predefined variable values which are used as object content.
l Functions: input data transformation tools.
l Databases: database values which are used as object content.
l Link to other objects: makes the content of a label object (re)appear in another object on the same label.
Content field is used for entering the object content.
BarcodeBarcode Type defines which barcode is used to encode the data.
TIP: Code128 barcode type is selected by default. For more details about the avail-able barcode types, see section Barcode Types and Available Settings.
l X dimension: width of the narrowest bar in the barcode.
l Height: barcode's Y dimension.
l Ratio: the ratio between X dimension and Height.
Each barcode type has the range of permitted ratios limited by the standard. Designer only permits using valid ratios.
Actual properties based on selected printerdisplays the X dimension as it would appear printed on a label using the currently selected printer.
Check DigitCheck digit is used by any scanning system to verify that the number scanned from a barcode is read correctly.
TIP: Check digit is derived from the preceding barcode digits and is placed as the final digit of a barcode.
Include check digit defines if check digit is included in a barcode or not.
l Auto-generate check digit: automatic check digit calculation.
NOTE If the data already includes invalid check digit, Designer replaces it with a proper value.
l Verify the provided check digit: verification of the manually provided check digit. An error message appears if the check digit proves to be incorrect.
l Display in human readable: check digit included in the human readable barcode text.
Human ReadableHuman Readable text displays readable barcode data content located beneath or above the barcode. Its role is to provide backup in case the barcode is damaged or of
www.nicelabel.com 64

poor quality.
l No human readable: barcode is rendered without human readable text.
l Above barcode: human readable text above the barcode.
l Below barcode: human readable text below the barcode.
Mask sets the format of the input data before it is displayed on a label. Content mask sets the format of the input data before it is displayed on a label. Mask character is a character used in the mask that is replaced with actual data on the printed label.
E X A M P L E
A us er needs t o f orma t a phone number t o be more rea da ble on t he la bel. D a t a input is not f orma t t ed s ince it is rea d f rom a da t a ba s e.
I f t he input v a lue rea d f rom a da t a ba s e is :
+38642805090
a nd t he cont ent ma s k is :
(****) **** - ****
t he res ult ing out put is :
(+386) 4280 - 5090
I f t he da t a cont a ins t he a s t er is k " *" cha ra ct er , cha nge t he Mas k character. The cha ra ct er s hould ha v e a unique v a lue t ha t does not a ppea r a ny where in t he da t a .
Bearer BarBearer bar is a border that surrounds the barcode. Its purpose is to protect the barcode image and to enhance reading reliability.
l Fixed thickness: automatically defined bearer bar width.
l Variable thickness: user-defined bearer bar width.
l Thickness multiplier: bearer bar width factor.
l Show vertical bar: vertical bearer bars displayed or hidden.
DetailsDetails differ according to the barcode standards. Define the options that are given with regard to the currently selected barcode type. Details for 1D and 2D barcodes are described in dedicated sections:
l 1D barcode details
l 2D barcode details
Posit ionPosition tab defines object positioning and its position-related behavior.Position group defines the object's position.
l X and Y: anchoring point coordinates.
www.nicelabel.com 65
Size group sets the object's dimensions: l Width and Height: horizontal and vertical object dimension. l Keep aspect ratio: simultaneous changing of object dimensions while scaling.
Rotation angle is the object angle according to the design surface.
TIP: There are multiple ways to set the object's angle: enter the angle manually , drag the slider or click and drag the icon on the selected object. Rotation angle and slider rotates the object around its anchoring point. The icon rotates the object around its central point.
Anchoring point is the spot where an object is pinned to design surface. Variable size objects increase or decrease their size in the direction that is opposite to the chosen anchoring point.Lock object on design surface prevents the object from being moved during the design process, select under the Design behavior group.
NOTE If the measurement unit is changed in label properties, the value transforms automatically.
Relative Posit ionRelative Position defines object position when the label size or neighboring object's positions are changing during the design process.
l Enable horizontal relative position: activates horizontal relative positioning.
l Relative to label border: the position of object is defined relative to the ref-erence label border. Define its horizontal offset according to this border.
l Relative to another object: the position of object is defined relative to the selected neighboring object's border. Define its horizontal offset according to this object.
l Border: reference label or neighboring object's border for horizontal rel-ative positioning.
l Offset: horizontal distance from label border or selected object's anchoring point.
l Enable vertical relative position: activates vertical relative positioning.
l Relative to label border: the position of object is defined relative to the ref-erence label border. Define its vertical offset according to this border.
l Relative to another object: the position of object is defined relative to the selected neighboring object's border. Define its vertical offset according to this object.
l Border: reference label or neighboring object's border for vertical relative positioning.
l Offset: vertical distance from label border or selected object's anchoring point.
NOTE Object position changes if label size or position of the related object are changed.
www.nicelabel.com 66

NOTE If the measurement unit is changed in label properties, the value transforms automatically.
GeneralGeneral tab identifies the object and sets its status.Name sets a unique object ID. It is used for object referencing when defining functions, variables, scripts, etc.
NOTE NiceLabel recommends avoiding spaces or special characters in object names.
Description allows adding notes and annotations for an object. It provides help during the label design process.Status group defines object visibility on print preview and on printed labels.
l Not printable: prevents the object from being printed. The object still remains vis-ible on the print preview and affects other objects in relative positioning. This option is useful when printing on predesigned or stock-specific labels.
l Visible: if the check box is not selected, the object neither appears on the print preview nor on the printed label. The object is treated as if it does not exist at all.
l Condition: makes an object enabled (editable) if the result of the given condition is "True". It defines object visibility on form startup and when the connected vari-able's value changes.
l Object visibility status is explained in the table below:
Option Print Preview Printout Relative positioningNot printable (selected) YES NO YESVisible (cleared) NO NO NO
Printing optimization group allows activating the use of printer elements.
l Use printer elements if supported speeds up the printing process.
If enabled by the printer model, a share of label element processing is handled directly by the printer: internal fonts, shapes, barcodes, etc.
l Always print as graphics sends and prints the objects as graphic files.
PicturePicture object is used for adding graphic content to a label. The following file formats are supported:
l Enhanced Windows Metafile (.emf)
l Windows Metafile (.wmf, .wmz, .emz)
l Portable Network Graphic (.png)
l TIFF bitmaps (.tiff)
l JPEG bitmaps (.jpg)
l PDF
l Windows bitmap (.bmp)
www.nicelabel.com 67

l Paint
l Adobe Photoshop
SourceConnected data source is the dynamic data source that is connected with the object.
l Fixed data: manually entered fixed text.
l Variable keyboard input: type of variable that enables the content of a prompted field to be different for every print job.
l Variables: predefined variable values which are used as object content.
l Functions: input data transformation tools.
l Databases: database values which are used as object content.
l Link to other objects: makes the content of a label object (re)appear in another object on the same label.
Content field is used for entering the object content. To (re)define the Picture object Content, click Browse and locate the file to be displayed on the label.Embed picture in a document stores the picture in the label file. Link to the original pic-ture file is discarded.
TIP: Picture embedding makes the label file more portable as the user does not have to re-include the picture file in case of repeated use.
Posit ionPosition tab defines object positioning and its position-related behavior.Position group defines the object's position.
l X and Y: anchoring point coordinates.
Size group sets the object's dimensions: l Width and Height: horizontal and vertical object dimension. l Keep aspect ratio: simultaneous changing of object dimensions while scaling.
Rotation angle is the object angle according to the design surface.
TIP: There are multiple ways to set the object's angle: enter the angle manually , drag the slider or click and drag the icon on the selected object. Rotation angle and slider rotates the object around its anchoring point. The icon rotates the object around its central point.
Anchoring point is the spot where an object is pinned to design surface. Variable size objects increase or decrease their size in the direction that is opposite to the chosen anchoring point.Lock object on design surface prevents the object from being moved during the design process, select under the Design behavior group.
NOTE If the measurement unit is changed in label properties, the value transforms automatically.
www.nicelabel.com 68

Relative Position defines object position when the label size or neighboring object's positions are changing during the design process.
l Enable horizontal relative position: activates horizontal relative positioning.
l Relative to label border: the position of object is defined relative to the ref-erence label border. Define its horizontal offset according to this border.
l Relative to another object: the position of object is defined relative to the selected neighboring object's border. Define its horizontal offset according to this object.
l Border: reference label or neighboring object's border for horizontal rel-ative positioning.
l Offset: horizontal distance from label border or selected object's anchoring point.
l Enable vertical relative position: activates vertical relative positioning.
l Relative to label border: the position of object is defined relative to the ref-erence label border. Define its vertical offset according to this border.
l Relative to another object: the position of object is defined relative to the selected neighboring object's border. Define its vertical offset according to this object.
l Border: reference label or neighboring object's border for vertical relative positioning.
l Offset: vertical distance from label border or selected object's anchoring point.
NOTE Object position changes if label size or position of the related object are changed.
NOTE If the measurement unit is changed, the value converts automatically.
Graphic ResizingGraphic Resizing is available if the picture object is connected to a variable. These set-tings define how the Picture object adapts its size to the source file at print time.
l Keep original picture size: disabled picture resizing. Picture size remains unchanged.
l Resize proportionally: proportional picture resizing. Aspect ratio of picture dimen-sion remains fixed.
l Resize to the designed size: horizontal and vertical picture resizing to make it fit into the bounding box. This option will most likely make the picture distorted.
Original size displays the picture's Width and Height before resizing. Revert to original picture size undos the resizing actions.
GeneralGeneral tab identifies the object and sets its status.Name sets a unique object ID. It is used for object referencing when defining functions, variables, scripts, etc.
www.nicelabel.com 69

NOTE NiceLabel recommends avoiding spaces or special characters in object names.
Description allows adding notes and annotations for an object. It provides help during the label design process.Status group defines object visibility on print preview and on printed labels.
l Not printable: prevents the object from being printed. The object still remains vis-ible on the print preview and affects other objects in relative positioning. This option is useful when printing on predesigned or stock-specific labels.
l Visible: if the check box is not selected, the object neither appears on the print preview nor on the printed label. The object is treated as if it does not exist at all.
l Condition: makes an object enabled (editable) if the result of the given condition is "True". It defines object visibility on form startup and when the connected vari-able's value changes.
l Object visibility status is explained in the table below:
Option Print Preview Printout Relative positioningNot printable (selected) YES NO YESVisible (cleared) NO NO NO
Printing optimization group allows activating the use of printer elements.
l Use printer elements if supported speeds up the printing process.
If enabled by the printer model, a share of label element processing is handled directly by the printer: internal fonts, shapes, barcodes, etc.
l Always print as graphics sends and prints the objects as graphic files.
RectangleRectangle object creates a rectangle shaped frame on a label.
StyleOutline group defines line settings:
l Thickness: object line thickness.
l Line style: object line style:
l None: line invisible.
l Solid: solid line.
l Dot: dotted line.
l Dash: dashed line.
l Erase: parts of neighboring objects become invisible underneath the Rect-angle line.
l Line color: color of the line.
l Corner radius: makes the rectangle corners rounded.
Fill defines the object fill settings and color.
www.nicelabel.com 70
l Fill style: object fill properties definition:
l None: completely transparent object.
l Erase:invisible objects beneath the active one.
l Solid: fills the object with solid color.
l Right Diagonal: fills the object with diagonal lines that ascend toward the right side.
l Left Diagonal: fills the object with diagonal lines that ascend toward the left side.
l Vertical: fills the object with vertical lines.
l Horizontal: fills the object with horizontal lines.
l Cross: fills the object with crossed lines.
l Cross Diagonal: fills the object with diagonally crossed lines.
l 25% of color: fill color opacity 25 %.
l 50% of color: fill color opacity 50 %.
l 75% of color: fill color opacity 75 %.
l Fill color: object fill color definition.
NOTE The system does not allow the Line style and Fill style to be set to None at the same time.
Posit ionPosition tab defines object positioning and its position-related behavior.Position group defines the object's position.
l X and Y: anchoring point coordinates.
Size group sets the object's dimensions: l Width and Height: horizontal and vertical object dimension. l Keep aspect ratio: simultaneous changing of object dimensions while scaling.
Rotation angle is the object angle according to the design surface.
TIP: There are multiple ways to set the object's angle: enter the angle manually , drag the slider or click and drag the icon on the selected object. Rotation angle and slider rotates the object around its anchoring point. The icon rotates the object around its central point.
Anchoring point is the spot where an object is pinned to design surface. Variable size objects increase or decrease their size in the direction that is opposite to the chosen anchoring point.Lock object on design surface prevents the object from being moved during the design process, select under the Design behavior group.
www.nicelabel.com 71
NOTE If the measurement unit is changed in label properties, the value transforms automatically.
Relative Position defines object position when the label size or neighboring object's positions are changing during the design process.
l Enable horizontal relative position: activates horizontal relative positioning.
l Relative to label border: the position of object is defined relative to the ref-erence label border. Define its horizontal offset according to this border.
l Relative to another object: the position of object is defined relative to the selected neighboring object's border. Define its horizontal offset according to this object.
l Border: reference label or neighboring object's border for horizontal rel-ative positioning.
l Offset: horizontal distance from label border or selected object's anchoring point.
l Enable vertical relative position: activates vertical relative positioning.
l Relative to label border: the position of object is defined relative to the ref-erence label border. Define its vertical offset according to this border.
l Relative to another object: the position of object is defined relative to the selected neighboring object's border. Define its vertical offset according to this object.
l Border: reference label or neighboring object's border for vertical relative positioning.
l Offset: vertical distance from label border or selected object's anchoring point.
NOTE Object position changes if label size or position of the related object are changed.
NOTE If the measurement unit is changed, the value converts automatically.
GeneralGeneral tab identifies the object and sets its status.Name sets a unique object ID. It is used for object referencing when defining functions, variables, scripts, etc.
NOTE NiceLabel recommends avoiding spaces or special characters in object names.
Description allows adding notes and annotations for an object. It provides help during the label design process.Status group defines object visibility on print preview and on printed labels.
l Not printable: prevents the object from being printed. The object still remains vis-ible on the print preview and affects other objects in relative positioning. This option is useful when printing on predesigned or stock-specific labels.
www.nicelabel.com 72

l Visible: if the check box is not selected, the object neither appears on the print preview nor on the printed label. The object is treated as if it does not exist at all.
l Condition: makes an object enabled (editable) if the result of the given condition is "True". It defines object visibility on form startup and when the connected vari-able's value changes.
l Object visibility status is explained in the table below:
Option Print Preview Printout Relative positioningNot printable (selected) YES NO YESVisible (cleared) NO NO NO
Printing optimization group allows activating the use of printer elements.
l Use printer elements if supported speeds up the printing process.
If enabled by the printer model, a share of label element processing is handled directly by the printer: internal fonts, shapes, barcodes, etc.
l Always print as graphics sends and prints the objects as graphic files.
LineLine object is used to create a line on a label.
StyleOutline group defines line settings:
l Thickness: object line thickness.
l Line style: object line style:
l None: line invisible.
l Solid: solid line.
l Dot: dotted line.
l Dash: dashed line.
l Erase: parts of neighboring objects become invisible underneath the Rect-angle line.
l Line color: color of the line.
Posit ionPosition tab defines object positioning and its position-related behavior.Position group defines the object's position.
l X and Y: anchoring point coordinates.
Size group sets the object's dimensions: l Width and Height: horizontal and vertical object dimension. l Keep aspect ratio: simultaneous changing of object dimensions while scaling.
Rotation angle is the object angle according to the design surface.
TIP: There are multiple ways to set the object's angle: enter the angle manually , drag the slider or click and drag the icon on the selected object. Rotation angle and
www.nicelabel.com 73
slider rotates the object around its anchoring point. The icon rotates the object around its central point.
Anchoring point is the spot where an object is pinned to design surface. Variable size objects increase or decrease their size in the direction that is opposite to the chosen anchoring point.Lock object on design surface prevents the object from being moved during the design process, select under the Design behavior group.
NOTE If the measurement unit is changed in label properties, the value transforms automatically.
GeneralGeneral tab identifies the object and sets its status.Name sets a unique object ID. It is used for object referencing when defining functions, variables, scripts, etc.
NOTE NiceLabel recommends avoiding spaces or special characters in object names.
Description allows adding notes and annotations for an object. It provides help during the label design process.Status group defines object visibility on print preview and on printed labels.
l Not printable: prevents the object from being printed. The object still remains vis-ible on the print preview and affects other objects in relative positioning. This option is useful when printing on predesigned or stock-specific labels.
l Visible: if the check box is not selected, the object neither appears on the print preview nor on the printed label. The object is treated as if it does not exist at all.
l Condition: makes an object enabled (editable) if the result of the given condition is "True". It defines object visibility on form startup and when the connected vari-able's value changes.
l Object visibility status is explained in the table below:
Option Print Preview Printout Relative positioningNot printable (selected) YES NO YESVisible (cleared) NO NO NO
Printing optimization group allows activating the use of printer elements.
l Use printer elements if supported speeds up the printing process.
If enabled by the printer model, a share of label element processing is handled directly by the printer: internal fonts, shapes, barcodes, etc.
l Always print as graphics sends and prints the objects as graphic files.
EllipseEllipse object is used for creating a circular shaped object on a label.
StyleOutline group defines line settings:
www.nicelabel.com 74

l Thickness: object line thickness.
l Line style: object line style:
l None: line invisible.
l Solid: solid line.
l Dot: dotted line.
l Dash: dashed line.
l Erase: parts of neighboring objects become invisible underneath the Rect-angle line.
l Line color: color of the line.
Fill defines the object fill settings and color.
l Fill style: object fill properties definition:
l None: completely transparent object.
l Erase:invisible objects beneath the active one.
l Solid: fills the object with solid color.
l Right Diagonal: fills the object with diagonal lines that ascend toward the right side.
l Left Diagonal: fills the object with diagonal lines that ascend toward the left side.
l Vertical: fills the object with vertical lines.
l Horizontal: fills the object with horizontal lines.
l Cross: fills the object with crossed lines.
l Cross Diagonal: fills the object with diagonally crossed lines.
l 25% of color: fill color opacity 25 %.
l 50% of color: fill color opacity 50 %.
l 75% of color: fill color opacity 75 %.
l Fill color: object fill color definition.
NOTE The system does not allow the Line style and Fill style to be set to None at the same time.
PositionPosition tab defines object positioning and its position-related behavior.Position group defines the object's position.
l X and Y: anchoring point coordinates.
Size group sets the object's dimensions: l Width and Height: horizontal and vertical object dimension. l Keep aspect ratio: simultaneous changing of object dimensions while scaling.
www.nicelabel.com 75

Rotation angle is the object angle according to the design surface.
TIP: There are multiple ways to set the object's angle: enter the angle manually , drag the slider or click and drag the icon on the selected object. Rotation angle and slider rotates the object around its anchoring point. The icon rotates the object around its central point.
Anchoring point is the spot where an object is pinned to design surface. Variable size objects increase or decrease their size in the direction that is opposite to the chosen anchoring point.Lock object on design surface prevents the object from being moved during the design process, select under the Design behavior group.
NOTE If the measurement unit is changed in label properties, the value transforms automatically.
Relative Position defines object position when the label size or neighboring object's positions are changing during the design process.
l Enable horizontal relative position: activates horizontal relative positioning.
l Relative to label border: the position of object is defined relative to the ref-erence label border. Define its horizontal offset according to this border.
l Relative to another object: the position of object is defined relative to the selected neighboring object's border. Define its horizontal offset according to this object.
l Border: reference label or neighboring object's border for horizontal rel-ative positioning.
l Offset: horizontal distance from label border or selected object's anchoring point.
l Enable vertical relative position: activates vertical relative positioning.
l Relative to label border: the position of object is defined relative to the ref-erence label border. Define its vertical offset according to this border.
l Relative to another object: the position of object is defined relative to the selected neighboring object's border. Define its vertical offset according to this object.
l Border: reference label or neighboring object's border for vertical relative positioning.
l Offset: vertical distance from label border or selected object's anchoring point.
NOTE Object position changes if label size or position of the related object are changed.
NOTE If the measurement unit is changed, the value transforms automatically.
GeneralGeneral tab identifies the object and sets its status.Name sets a unique object ID. It is used for object referencing when defining functions, variables, scripts, etc.
www.nicelabel.com 76

NOTE NiceLabel recommends avoiding spaces or special characters in object names.
Description allows adding notes and annotations for an object. It provides help during the label design process.Status group defines object visibility on print preview and on printed labels.
l Not printable: prevents the object from being printed. The object still remains vis-ible on the print preview and affects other objects in relative positioning. This option is useful when printing on predesigned or stock-specific labels.
l Visible: if the check box is not selected, the object neither appears on the print preview nor on the printed label. The object is treated as if it does not exist at all.
l Condition: makes an object enabled (editable) if the result of the given condition is "True". It defines object visibility on form startup and when the connected vari-able's value changes.
l Object visibility status is explained in the table below:
Option Print Preview Printout Relative positioningNot printable (selected) YES NO YESVisible (cleared) NO NO NO
Printing optimization group allows activating the use of printer elements.
l Use printer elements if supported speeds up the printing process.
If enabled by the printer model, a share of label element processing is handled directly by the printer: internal fonts, shapes, barcodes, etc.
l Always print as graphics sends and prints the objects as graphic files.
InverseAboutInverse object inverts the underlying object's color .
Posit ionPosition tab defines object positioning and its position-related behavior.Position group defines the object's position.
l X and Y: anchoring point coordinates.
www.nicelabel.com 77

Size group sets the object's dimensions: l Width and Height: horizontal and vertical object dimension. l Keep aspect ratio: simultaneous changing of object dimensions while scaling.
Rotation angle is the object angle according to the design surface.
TIP: There are multiple ways to set the object's angle: enter the angle manually , drag the slider or click and drag the icon on the selected object. Rotation angle and slider rotates the object around its anchoring point. The icon rotates the object around its central point.
Anchoring point is the spot where an object is pinned to design surface. Variable size objects increase or decrease their size in the direction that is opposite to the chosen anchoring point.Lock object on design surface prevents the object from being moved during the design process, select under the Design behavior group.
NOTE If the measurement unit is changed in label properties, the value transforms automatically.
Relative Position defines object position when the label size or neighboring object's positions are changing during the design process.
l Enable horizontal relative position: activates horizontal relative positioning.
l Relative to label border: the position of object is defined relative to the ref-erence label border. Define its horizontal offset according to this border.
l Relative to another object: the position of object is defined relative to the selected neighboring object's border. Define its horizontal offset according to this object.
l Border: reference label or neighboring object's border for horizontal rel-ative positioning.
l Offset: horizontal distance from label border or selected object's anchoring point.
l Enable vertical relative position: activates vertical relative positioning.
l Relative to label border: the position of object is defined relative to the ref-erence label border. Define its vertical offset according to this border.
l Relative to another object: the position of object is defined relative to the selected neighboring object's border. Define its vertical offset according to this object.
l Border: reference label or neighboring object's border for vertical relative positioning.
l Offset: vertical distance from label border or selected object's anchoring point.
NOTE Object position changes if label size or position of the related object are changed.
NOTE If the measurement unit is changed, the value transforms automatically.
www.nicelabel.com 78
GeneralGeneral tab identifies the object and sets its status.Name sets a unique object ID. It is used for object referencing when defining functions, variables, scripts, etc.
NOTE NiceLabel recommends avoiding spaces or special characters in object names.
Description allows adding notes and annotations for an object. It provides help during the label design process.Status group defines object visibility on print preview and on printed labels.
l Not printable: prevents the object from being printed. The object still remains vis-ible on the print preview and affects other objects in relative positioning. This option is useful when printing on predesigned or stock-specific labels.
l Visible: if the check box is not selected, the object neither appears on the print preview nor on the printed label. The object is treated as if it does not exist at all.
l Condition: makes an object enabled (editable) if the result of the given condition is "True". It defines object visibility on form startup and when the connected vari-able's value changes.
l Object visibility status is explained in the table below:
Option Print Preview Printout Relative positioningNot printable (selected) YES NO YESVisible (cleared) NO NO NO
Printing optimization group allows activating the use of printer elements.
l Use printer elements if supported speeds up the printing process.
If enabled by the printer model, a share of label element processing is handled directly by the printer: internal fonts, shapes, barcodes, etc.
l Always print as graphics sends and prints the objects as graphic files.
Selecting And Setting Up A PrinterPrinterPrinter tab lets you define the printer to print the labels on, and sets basic printing beha-vior.Printer drop down menu selects a printer from the currently installed printers.
TIP: To set the printer settings, select a printer and click Printer properties. This but-ton gives direct access to the selected printer's driver and its settings.
NOTE For additional information on the installed printer drivers and their settings, read the NiceLabel Driver Installation Manual.
l Always use the default printer: selects the default system printer to be used for the current print job.
l Double-sided printing: enables double-sided label printing.
www.nicelabel.com 79

l Use custom printer settings saved in the label: each label may have its own printer settings defined and saved by the user. Select this option to use these set-tings while printing.
l Use default printer settings from the printer driver: select if you prefer the default printer settings or if no custom settings have been defined. Default printer settings are going to be used for printing.
Printing group of settings optimizes the printing process.
l Optimize printing of identical labels: if multiple identical labels are printed, the printer does not need to receive the label file each time. With this option enabled, the printer alone multiplies the print job.
l Use advanced printer driver interface: speeds up label printing.
TIP: When selected, the optimized printer commands are in use. Deselected option disables printing optimization. Each label is sent to the printer in form of an image.
l Combine all non-printer elements into a single graphic item when sent to a printer: merges multiple items and sends it to the printer as a single printable graphic.
l Use store/recall printing mode: optimizes printing performance.
With this mode activated, the Designer does not need to resend the complete label data for each printout. Instead, default labels (templates) are stored in the printer memory and the Designer only sends recall commands to complete the label content during the printing process. For more information, read section Use Store/Recall Mode.
l Store variant: printer memory location to store the label templates.
NOTE To make sure the stored label samples are not lost after power cycling the printer, store them at non-volatile locations.
Working With ObjectsThis section describes how to work with objects to make them blend with the design of a label or form. Object is a basic building block of any label or solution. Each object is dedicated to a spe-cific type of content. See the related topics for style and content related object prop-erties. The below listed actions describe which actions are common for multiple object types:
l Adding an object: add an object to a label or form, select the appropriate one in the object toolbar and drag it to the design surface.
l Adding an object with connected data source: click the down arrow next to the object button and select an existing or new data source to make the newly added object instantly connected to a dynamic data source.
www.nicelabel.com 80

l Grouping: make multiple object behave as a single object. Hold <SHIFT> and click the objects select multiple object and click Group objects to create a group of objects.
l Rotating: Changes the angle of a selected object. Details on how to rotate the objects are available here.
l Resizing: Sets the size of an object.
l Aligning: make the object positions aligned.
Object RotatingThere are two ways to set the angle of an object:
l Enter the angle manually in degrees or drag the slider. The object rotates around its anchoring point. Rotation commands are accessible in two ways:
l Click Position in the Positioning group of the Design tab
l Go to Object properties -> Position -> Rotation angle.
l Click and drag the icon next to the selected object. The icon rotates the object around its central point.
Anchoring point is the spot where an object is pinned to design surface. Variable size objects increase or decrease their size in the direction that is opposite to the chosen anchoring point.
www.nicelabel.com 81

BarcodeBarcode object is used for adding various types of barcodes on a label. Each barcode type is configurable according to specific standards.
TIP: When encoding the barcode content, make sure the used characters, length and identifiers comply with the barcode standard guidelines.
The following barcode types are available in Designer:
l 1D and 2D Barcodes
l GS1 DataBar Barcode Subtypes
SourceConnected data source is the dynamic data source that is connected with the object.
l Fixed data: manually entered fixed text.
l Variable keyboard input: type of variable that enables the content of a prompted field to be different for every print job.
l Variables: predefined variable values which are used as object content.
l Functions: input data transformation tools.
l Databases: database values which are used as object content.
l Link to other objects: makes the content of a label object (re)appear in another object on the same label.
Content field is used for entering the object content.
BarcodeBarcode Type defines which barcode is used to encode the data.
TIP: Code128 barcode type is selected by default. For more details about the avail-able barcode types, see section Barcode Types and Available Settings.
l X dimension: width of the narrowest bar in the barcode.
l Height: barcode's Y dimension.
l Ratio: the ratio between X dimension and Height.
Each barcode type has the range of permitted ratios limited by the standard. Designer only permits using valid ratios.
Actual properties based on selected printerdisplays the X dimension as it would appear printed on a label using the currently selected printer.
Check DigitCheck digit is used by any scanning system to verify that the number scanned from a barcode is read correctly.
www.nicelabel.com 82

TIP: Check digit is derived from the preceding barcode digits and is placed as the final digit of a barcode.
Include check digit defines if check digit is included in a barcode or not.
l Auto-generate check digit: automatic check digit calculation.
NOTE If the data already includes invalid check digit, Designer replaces it with a proper value.
l Verify the provided check digit: verification of the manually provided check digit. An error message appears if the check digit proves to be incorrect.
l Display in human readable: check digit included in the human readable barcode text.
Human ReadableHuman Readable text displays readable barcode data content located beneath or above the barcode. Its role is to provide backup in case the barcode is damaged or of poor quality.
l No human readable: barcode is rendered without human readable text.
l Above barcode: human readable text above the barcode.
l Below barcode: human readable text below the barcode.
Mask sets the format of the input data before it is displayed on a label. Content mask sets the format of the input data before it is displayed on a label. Mask character is a character used in the mask that is replaced with actual data on the printed label.
E X A M P L E
A us er needs t o f orma t a phone number t o be more rea da ble on t he la bel. D a t a input is not f orma t t ed s ince it is rea d f rom a da t a ba s e.
I f t he input v a lue rea d f rom a da t a ba s e is :
+38642805090
a nd t he cont ent ma s k is :
(****) **** - ****
t he res ult ing out put is :
(+386) 4280 - 5090
I f t he da t a cont a ins t he a s t er is k " *" cha ra ct er , cha nge t he Mas k character. The cha ra ct er s hould ha v e a unique v a lue t ha t does not a ppea r a ny where in t he da t a .
Bearer BarBearer bar is a border that surrounds the barcode. Its purpose is to protect the barcode image and to enhance reading reliability.
www.nicelabel.com 83

l Fixed thickness: automatically defined bearer bar width.
l Variable thickness: user-defined bearer bar width.
l Thickness multiplier: bearer bar width factor.
l Show vertical bar: vertical bearer bars displayed or hidden.
DetailsDetails differ according to the barcode standards. Define the options that are given with regard to the currently selected barcode type. Details for 1D and 2D barcodes are described in dedicated sections:
l 1D barcode details
l 2D barcode details
PositionPosition tab defines object positioning and its position-related behavior.Position group defines the object's position.
l X and Y: anchoring point coordinates.
Size group sets the object's dimensions: l Width and Height: horizontal and vertical object dimension. l Keep aspect ratio: simultaneous changing of object dimensions while scaling.
Rotation angle is the object angle according to the design surface.
TIP: There are multiple ways to set the object's angle: enter the angle manually , drag the slider or click and drag the icon on the selected object. Rotation angle and slider rotates the object around its anchoring point. The icon rotates the object around its central point.
Anchoring point is the spot where an object is pinned to design surface. Variable size objects increase or decrease their size in the direction that is opposite to the chosen anchoring point.Lock object on design surface prevents the object from being moved during the design process, select under the Design behavior group.
NOTE If the measurement unit is changed in label properties, the value transforms automatically.
Relative PositionRelative Position defines object position when the label size or neighboring object's positions are changing during the design process.
l Enable horizontal relative position: activates horizontal relative positioning.
l Relative to label border: the position of object is defined relative to the ref-erence label border. Define its horizontal offset according to this border.
www.nicelabel.com 84

l Relative to another object: the position of object is defined relative to the selected neighboring object's border. Define its horizontal offset according to this object.
l Border: reference label or neighboring object's border for horizontal rel-ative positioning.
l Offset: horizontal distance from label border or selected object's anchoring point.
l Enable vertical relative position: activates vertical relative positioning.
l Relative to label border: the position of object is defined relative to the ref-erence label border. Define its vertical offset according to this border.
l Relative to another object: the position of object is defined relative to the selected neighboring object's border. Define its vertical offset according to this object.
l Border: reference label or neighboring object's border for vertical relative positioning.
l Offset: vertical distance from label border or selected object's anchoring point.
NOTE Object position changes if label size or position of the related object are changed.
NOTE If the measurement unit is changed in label properties, the value transforms automatically.
GeneralGeneral tab identifies the object and sets its status.Name sets a unique object ID. It is used for object referencing when defining functions, variables, scripts, etc.
NOTE NiceLabel recommends avoiding spaces or special characters in object names.
Description allows adding notes and annotations for an object. It provides help during the label design process.Status group defines object visibility on print preview and on printed labels.
l Not printable: prevents the object from being printed. The object still remains vis-ible on the print preview and affects other objects in relative positioning. This option is useful when printing on predesigned or stock-specific labels.
l Visible: if the check box is not selected, the object neither appears on the print preview nor on the printed label. The object is treated as if it does not exist at all.
l Condition: makes an object enabled (editable) if the result of the given condition is "True". It defines object visibility on form startup and when the connected vari-able's value changes.
l Object visibility status is explained in the table below:
Option Print Preview Printout Relative positioningNot printable (selected) YES NO YESVisible (cleared) NO NO NO
Printing optimization group allows activating the use of printer elements.
www.nicelabel.com 85

l Use printer elements if supported speeds up the printing process.
If enabled by the printer model, a share of label element processing is handled directly by the printer: internal fonts, shapes, barcodes, etc.
l Always print as graphics sends and prints the objects as graphic files.
1D Barcode DetailsDetails tab settings vary along with the specific barcode standards.
TIP: Define the available barcode settings with regard to the currently selected bar-code type.
Designer allows setting the following 1D barcode details:
l Include quiet zones: blank space around the printed barcode. Quiet zone ensures the highest level of scanning reliability.
l Inter character gap: distance between the last bar of a character and the first bar of the next character in a barcode.
l Descender bars: makes the bars at the beginning, in the middle, and at the end of certain barcode types (EAN and UPC) longer.
l Include EAN white space: inserts a special character ("<" or ">") to indicate the EAN barcode width.
This option ensures optimum readability in case a neighboring object on a label is located right next to the barcode.
l Space correction: adds white pixels to increase the gap width between the bars.
l Symbology: UPC barcode Number system:
l 0, 1 , 6, 7 and 8 are for regular UPC codes.
l 2 is for random weight items, e.g. meat, marked in-store.
l 3 is for National Drug Code and National Health related Items.
l 4 is for in-store marking of non-food items.
l 5 and 9 are for coupon use.
2D Barcode Details2D barcodes enable multiple type-specific settings under the Details tab. When defining these settings manually, the drop down lists offers specific standard-compliant options.
TIP: Designer defines the Details tab settings automatically if the user chooses not to manually define them.
Code PageCode page defines how the mapping of code characters with scanned characters is done. To display the scanned data accurately, the correct code page must be selected. If
www.nicelabel.com 86

none of the code pages is selected by the user, Designer uses system character encod-ing.
ColumnsColumns are basic vertical elements of a PDF 417 barcode. A maximum of 30 columns may be included in a single PDF 417 symbol. Each column is 10 modules wide, which means a single barcode is capable of encoding up to 929 symbol characters. The-oretically, a single PDF417 barcode can store up to 1850 alphanumeric characters, 2710 digits or 1108 bytes.
Compaction ModeCompaction mode compacts a number of data characters into codewords. The decod-ing algorithm uses the individual codewords to place then into a meaningful matrix.
l Text: all printable ASCII characters 32–126 and ASCII 9, 10 and 13 (up to 1800 characters) are allowed.
l Binary: all 256 ASCII values (up to 1100 bytes) are allowed. l Numeric: encoding of numeric data (up to 2700 digits).
Data LayerData layer defines the number of data layers that encode data in an Aztec barcode. The number of data layers correlates directly with the barcode data capacity. If the value exceeds the data capacity provided by the selected Data layer, an error is reported. 1 to 4 data layers are allowed.
EncodingEncoding defines character encoding scheme for the active barcode.
Error Correction LevelError correction level defines the symbol security level. It adds a series of error cor-rection codewords to the encoded data. These codewords enable the printed symbol to withstand damage without data loss. The higher the security level, the greater the num-ber of data layers required to contain the symbol – and hence its overall size. If none of the Error correction levels is selected, Designer defines it automatically.
FormatFormat defines the symbol size and its capacity using the number of column and row ele-ments.
RowsRows – PDF417 barcode symbol is made of stacks of vertically aligned rows. Such bar-code adapts its size to the amount of the encoded data and may contain from 3 to 90 rows.
Symbol VersionSymbol version defines the symbol data capacity. As the amount of data increases, addi-tional modules are required to build a QR code. This makes the symbol larger on the prin-ted label.
TruncatedTruncated reduces the PDF417 barcode size by removing a single codeword and a stop bar from each symbol row.
VersionVersion defines the symbol size based on the number of columns. One-, two-, three-, and four-column version of Micro PDF417 barcode are available.
www.nicelabel.com 87

GS1 DataBar Specificsin addition to the common barcode properties, the below described specifics are avail-able for GS1 DataBar.
GS1 DataBar SourceGeneral groups specifies how the databar content is going to be formatted before encoding.
l Structured data sets the standard GS1 system data structure as a model for inserting the barcode data. Use GS1 function to encode the data correctly (for more on GS1 and other functions, see topic Functions). Composite GS1 barcodes represent structured data in the composite part of the code.
l Unstructured data allows inserting the data without a model – only character type and number must comply with the selected barcode type.
Data
l Linear data is the part of the data that is encoded in the linear part of the bar-code. The data is either manually inserted or defined by a predefined Data source.
l Composite data is the part of the data that is encoded in the composite part of the barcode. This part of data is always structured and follows one of the standard system data structures as defined by the GS1. The data is either manually inser-ted or defined by a predefined Data source.
GS1 DataBar PropertiesGS1 DataBar Expanded Stacked subtype encodes the data in form of a symbol seg-ments sequence. Symbol width is defined by the number of symbol segments in each stacked row. Symbol height is defined by the number of stacked rows and their height.
l Segments per Row defines the number of segments for each row of a symbol. Up to 22 segments are allowed per symbol. A higher number makes the symbol longer. A lower number increases the symbol in height.
Maxicode Barcode ContentSymbology Definition defines the barcode mode of operation (data structuring type).Designer supports the following modes:
l Mode 2: US carriers with postal codes up to 9 digits in length.
l Postal Code: US Zip Codes using a single field with 5 or 9 digits, or two fields with 4 or 5 digits.
l Mode 3: international carrier with alpha-numeric postal codes with up to 6 digits.
There are two additional options under Symbology Definition:
l Structured data: automatically selected Mode 2 or Mode 3 modes based on the entered data.
l Unstructured data: barcode mode of operation is set to Mode 4.
www.nicelabel.com 88

This mode encodes general data for purposes other than shipping industry (e. g. purchase order number, customer reference, invoice number).
Data Contents
SHIP TO Postal Code Mandatory. 5 or 9 alphanumeric characters. Alpha char-acters must be upper case.
4 Digit Extension (enabled with Postal code field Two Fields (5 and 4 digits) type).
Mandatory. 4 numeric digits defining micro location.
SHIP TO ISO Country Code (Mode 3 only)
Mandatory. 3 numeric digits.
Class of Service Mandatory. 3 numeric digits, a comma must be included to mark the end of field.
Transportation Data Mandatory. The 5 characters, including the GS code.
Tracking number Mandatory. 10 or 11 alphanumeric characters. Alpha char-acters must be upper case.
UPS SCAC Mandatory. 4 characters followed by the GS code.
Julian Day of Puckup Mandatory. 3 numeric digits.
Shipment ID Number Optional. 0-30 alphanumeric characters. Alpha characters must be upper case. GS code must always be sent even if no data is specified.
Package in Shipment Mandatory. 1-3 numeric digits for package number. 1-3 numeric digits for number of shipped items. Forward slash must separate these two numbers.
Package in Weight Mandatory. 1-3 numeric digits.
Address Validation Mandatory. Single character “Y” or “N”. Upper case char-acters.
SHIP TO Address Optional. 0-35 alphanumeric characters. Alpha characters in upper case. GS code must always be sent even if no data is specified.
SHIP TO City Mandatory. 1-20 alphanumeric characters. Alpha characters must be upper case.
SHIP TO State Mandatory. 2 alpha characters. Both characters must be upper case. RS code marks the end of this field and the end of the secondary message data.
www.nicelabel.com 89

PrintingPRODUCT LEVEL INFO Solution building is available in NiceLabel PowerForms.
Use the below listed steps to successfully print a label using the NiceLabel Designer.
Step 1: CreateCreate a new or edit an existing standalone label or label in a solution.
Step 2: PreviewLabel preview field is a part of default Designer Print dialog. To make the print form appear on screen, select one of the following options:
l Go to Home tab -> Action group and click Print.
l Press Ctrl+P.
Label preview field displays the current label design. If you decide to customize the default print form or to make a new one, make sure you add the Label Preview object to the form. The print form will offer label preview only if the Label Preview object is present.
PRODUCT LEVEL INFO This segment is applicable to NiceLabel Designer Pro and NiceLabel PowerForms.
TIP: The default printing form is customizable. To adapt it and to create a custom print dialog, go to Home tab -> Action group and click Customize Printing Form. Read more about printing form customization here.
Step 3: Select PrinterChoose the preferred printer from the Printer tab drop down menu. All currently installed printers are listed. More details on defining the printer are available here.During this step, printing speed and darkness can be set as well. These two parameters depend on the selected printer's driver.
Step 4: Set Print QuantityNumber of labels sets the number of printed labels.Number of pages sets the number of printed pages. This option becomes active if the labels are positioned across at least two pages.Print all labels (unlimited) prints all labels as defined by the label design. More details about this option are available here.Click more... to open the Additional Quantity Settings dialog.
l Identical copies per label defines the number of identical label copies in a print job.
l Number of label sets defines how many times the entire label printing process should repeat.
www.nicelabel.com 90

Step 5. Start PrintingClick the Print button.
Preview And Print A LabelPRODUCT LEVEL INFO Print form editing is applicable to NiceLabel Designer Pro and NiceLabel PowerForms.
When the label is ready to be printed, provides a print dialog which allows you to:
l preview the label before printing
l enter values for prompted variables variable keyboard input.
l filter and select which records should be printed if the label contains databases
l control printer settings
l control label print quantity
l set additional quantity settings
To open the print dialog, click the Print button in the Action group of the Home tab rib-bon or press Ctrl+P.The Designer print dialog is a customizable printing form. It consists of predefined form objects that can be configured, moved, added or removed. More details on how to use the printing form is available here.
Customize Printing FormPRODUCT LEVEL INFO This segment is applicable to NiceLabel Designer Pro and NiceLabel PowerForms.
In Designer, the default printing form serves as the basic print dialog for standalone and solution labels. To start customizing the default printing form, go to Home tab -> Action group -> Print and click the down arrow button. Click Customize Printing Form to add, move, remove, and edit the printing form objects and their properties. The variables that define the content of default print form objects become visible and editable in the Solution Explorer. Open the Dynamic Data Manager to manage these vari-ables.If you want to discard the printing form customization actions, click Recreate Printing Form. The default printing form is recreated.
NOTE Recreate Printing Form discards all editing actions on the default printing form.
Printing Using NiceLabel PrintTo print a label using the Print, complete the following steps.
www.nicelabel.com 91
1. Use Manage Locations dialog to select the location that stores the documents to be printed or run. See section Managing Label Locations for more details. All doc-uments become visible and instantly printable in the document display area.
Skip this step in case of repeated printing from the same folder.
2. Select a document. Document type determines the actions that follows:
o In case of a label file, click Print to open the printing form.
o When opening a label file, printing form appears. It allows the user to preview the label, select the printer, define quantity settings, and enter prompted variable values (if included on the label).
o To return to the label display field, click back arrow in the upper left corner of the Print window.
o In case of a solution, click Run to open the solution in a separate instance.
TIP: All supported document types in the document display area are presented with previews for easier recognition and selection.
Read more about Print here.
Store/Recall Printing ModeStore/Recall printing mode optimizes the printing process. It increases printer response by reducing the amount of data that needs to be sent during repetitive print-ing tasks.With store/recall mode activated, Designer does not need to resend the complete label data for each printout. Instead, default labels (templates) are stored in the printer memory and the Designer only sends recall commands which complete the stored label content during the printing process. Typically, a few bytes of data are sent to the printer, compared to a few kilobytes as would be the case during normal printing.The action consists of two processes:
l Store label. During this process, Designer creates a description of the label tem-plate formatted in the selected printer's command language. When done, Designer sends the created command file to the printer memory and stores it.
l Recall label. A label stored in the printer memory is printed out immediately. Using the recall process, Designer creates another command file to instruct the printer which label from its memory should be printed. The recall label command occupies a few bytes of data only. The actual amount of data depends on the cur-rent situation. For fixed labels without any variable contents, the recall command file only contains the recall label command. For variable labels that contain vari-able fields, the command file includes the values for these variables and the recall label command.
NOTE Before activating this mode, make sure the appropriate printer driver is selec-ted for the label printer. Not all label printers have the ability to use the store/recall printing mode.
Follow these steps to activate the Store/Recall printing mode:
www.nicelabel.com 92

1. Double click the label design surface. Label Properties dialog appears.
2. To enable the mode, select Use store/recall printing mode on Printer tab. Click OK.
3. Define the label template(s). All label objects with variable content must be format-ted as internal printer objects:
l Format the text object with internal printer fonts (not Truetype!).
l Format barcode objects as internal printer barcodes.
l If using variable objects formatted in Truetype fonts, variable pictures or database fields, default values are sent to the printer during the label store process.
4. Click File -> Store. Make sure the Store variant points to the correct memory loc-ation in the printer.
5. Insert or select the values for variable objects that are not formatted as internal printer objects. These variables will be given the same value on each label. They will behave as objects with fixed values.
6. Click Store to printer to create the command file with label template description and to send it to the printer.
7. Insert the values for prompted label variables. These variables link to the internal printer objects on the label. For this reason, their values can be changed during each printing.
8. Click Print to send the variable values and the recall label command to the selec-ted label printer.
Optimize Printing SpeedThere are many factors that affect the speed of label printing in Designer. Follow the guidelines below to dramatically increase the speed of printing.
NOTE When implementing the below listed guidelines, check if they are supported by the selected printer.
l If the selected printer supports parallel and serial port, use the parallel port. Com-puter sends the data to printer over parallel port much faster than over serial port.
l When designing a label, use internal printer fonts instead of Windows true-type fonts. True-type fonts are sent to the printer as graphics. This vastly increases the size of data sent to printer (couple of kilobytes). With internal printer fonts, only the text is sent to printer (couple of bytes).
l Avoid using graphics on labels.
l When using barcodes, make sure the barcodes are used as internal printer ele-ments.
www.nicelabel.com 93

l When using counters, the printer internally increments the numbers if the internal printer fonts are used. This means, that the printer only needs to receive the first object number. The printer later increments this number while printing additional labels. This option also reduces the amount of data transferred between com-puter and printer.
With internal printer counter, the printing speed difference becomes notice-able with high quantity of labels.
l Set the printing speed to a higher value. Increasing the printing speed usually affects the quality of printing. The higher the speed, the lower the quality. Find an acceptable compromise.
l Don't print excessive amount of data on labels. If the speed of printing is an import-ant factor, consider using preprinted labels, and only print the data, that changes with each label.
Handle Missing ImagesDesigner remembers the path and file name of pictures on a label. Each time a label is opened, Designer checks if the pictures are accessible and uses them on the label. If the picture is missing, a warning dialog box appears. The following options are available if the picture file is missing:
l Ignore the error and temporarily design the label without the missing picture.
l Discard the missing picture and permanently remove it from the label.
l In case the picture file location or name has changed, browse for the file and reselect it.
Printing From DatabasesThis section describes how to print the content of database records individually or in groups. After completing the database wizard, by default, all database records are printed. Each record is printed once per label.If you do not want to print the entire database, select which records should be printed. Prior to printing, you the print dialog shows all database records. Use the data ini-tialization field to select the records to be printed.
www.nicelabel.com 94

If you would like to print several copies of a label with record data, define this using:
l Additional Quantity Settings dialog: Use Identical copies per label to set the desired quantity for the entire range of database records.
l Increase or decrease the value in Copies field of the data initialization field to set the number of printed labels per record individually.
l Use Label copies per record step of database wizard to dynamically define the number of printed labels per record.
EXAMPLE Y ou ha v e s da t a ba s e cont a ining records wit h y our product s . I t cont a ins a f ield wit h a numeric v a lue. This v a lue s t ores t he required number of la bel copies is s t ored. Select t his f ield a nd let t he a pplica t ion pr int t he qua nt it y of la bels a s s pecif ied in t his f ield.
Changing Common Printer SettingsWhen designing a label, you also define which printer should be used by Designer to print it. Each label file remembers printer settings for the selected printer driver on the label.Any changes made in the printer settings dialog box are saved to the label and applied to future print actions.
NOTE Make sure Use custom printer settings saved in the label option is enabled in Label properties > Printer. If not, default printer settings are going to be used.
Complete these steps to change and save common printer settings for a label:
1. Open label properties dialog.
2. Click Printer propertiesbutton on Printer tab. The dialog window with printer driver settings opens.
3. Open the Printer Options tab.
www.nicelabel.com 95

4. Adjust the Speed and Darkness settings.
NOTE These settings depend on the selected printer.
5. Click OK.
6. Save the label.
Changes in label printing speed and darkness can also be done at print time. These set-tings are only valid until the file remains open. After reopening the file, the settings are again reset to those defined in Printer properties dialog.Complete the following steps:
1. Open Print dialog.
2. Click Print.
3. Adjust Speed and Darkness values under Printer group.
4. Save the label.
Changing Dithering OptionsDithering is a process of converting color or gray scale pictures to black and white pic-tures that can be printed on thermal printers. Thermal printers normally cannot print color images and can either print a dot on the label or leave the area blank. There are no intermediate shades of gray.During the dithering process, all colors and shades of gray in the picture are converted to black and white dots, creating an illusion of new colors and shades by varying the
www.nicelabel.com 96

pattern of dots. Different shades of gray are produced by varying the patterns of black and white dots. There are no gray dots at all. In printing, dithering is usually called half-toning, and shades of gray are called halftones.To change the dithering settings, do the following:
1. Open label properties dialog.
2. Click Printer propertiesbutton on Printer tab. The dialog window with printer driver settings opens.
3. Open Graphic Options tab and use Photo slider to select the preferred dithering type.
NOTE These settings depend on the selected printer.
4. Change the dithering type option to suit your needs. Look at the preview on the right side how you can expect the selected type to be applied on the label.
5. Click OK.
6. Save the label.
Defining Unprintable AreaUnprintable area is the part of the label where the printer cannot print. You can virtually increase the size of the label by enabling unprintable area in the printer driver. Thermal printer can only print labels that are placed below the print head. If you have wider labels and if the print head does not completely cover the label, the label part which juts out of the print head cannot be printed. With unprintable area feature you inform the Designer that there is an unusually wide label inserted into the printer. The software will draw vertical red lines identifying the unprintable area. The unprintable area is usually the label area left and right of the printer head.
TIP: The unprintable area is not a margin. The label objects are not shifted on the label.
To define the unprintable area, do the following:
1. Open label properties dialog.
2. Click Printer propertiesbutton on Printer tab. The dialog window with printer driver settings opens.
www.nicelabel.com 97
3. Go to Printer options tab.
4. Enter the values for Unprintable Area.
EXAMPLE Y ou ha v e a pr int er wit h 10 cm ( 4" ) pr int er hea d a nd a 12 cm wide la bel. Y ou ins ert t he la bel cent ra lly in t he pr int er , s o it s t ick s out of t he pr int hea d ev enly on bot h s ides . Y ou def ine a new la bel in t he la beling s of t wa re wit h 12 cm widt h. B y s et t ing t he unprint a ble a rea t o 1 cm on t he lef t a nd 1 cm on t he r ight s ide y ou let t he la beling s of t wa re k now t ha t t he a ct ua l la bel widt h is 10 cm. There will be t wo v ert ica l red lines on t he des ign s urf a ce ident i-f y ing t he unprint a ble a rea .
NOTE Vertical red lines are also visible when you switch the printer for the same label. The original printer might had wider print head than the new printer. Maximum widths of the labels are not the same for both printers. The labeling software will try to preserve the original label dimension and automatically define the unprintable area for the new printer.
www.nicelabel.com 98

Work with Dynamic Data Sources
PRODUCT LEVEL INFO Creation of forms and use of form objects is available in NiceLabel PowerForms.
Dynamic data sources form an essential part of working with the NiceLabel Designer. They enable the use of label and form objects that dynamically change their content with each printed label if necessary.
EXAMPLE Ty pica l dy na mic cont ent exa mples t ha t need t o be a ut oma t ica lly upda t ed a re count ers , s er ia l numbers , da t e, t ime, weight , a nd a rt icle ima ges .
To display and print the dynamic object content properly, Designer uses the following dynamic data types:
l Variable keyboard input: content of an object is defined before each printing.
l Link to other object: content of an object is defined by the content of another (linked) object on a label.
l Variables: display and store dynamic data source values which are defined at print time.
l Functions: transform the dynamic data source values. Functions define the output format to adapt the input–output conversion to specific requirements.
l Databases: retrieve and display the database record .
l Internal Variables: display the values that are automatically retrieved from a run-ning application and system environment.
l Global Variables: a type of variable that can be shared among multiple labels.
TIP: Read about how to navigate and manage dynamic data sources in topic Dynamic Data Manager.
TIP: Read more about the relation between dynamic data sources and label/form objects in section Dynamic Object Content.
Variables As Dynamic Data SourcePRODUCT LEVEL INFO This segment is applicable to NiceLabel Designer Pro and NiceLabel PowerForms.
Variables serve as containers for storing and passing data between objects, scripts, external applications, printers, and user inputs. You may want to print labels on which data changes for each label. For example, counters, serial numbers, date and time, weight, article pictures… To accommodate the changing data, the labeling application can easily be used to format labels using variable data.Designer offers multiple types of variables:
www.nicelabel.com 99

l Variable: type of variable that changes its value at print time or according to user-defined conditions.
l Variable Keyboard Input: type of variable that enables the content of a prompted field to be different for every print job. Its value is defined before each printing.
l Current Date: current date taken as a variable value.
l Current Time: current time taken as a variable value.
l Counter: variable that changes its value incrementally or decrementally with each label print.
TIP: All label or solution variables are managed in Data Source Explorer.
VariableVariable is a type of variable that obtains its value at print time.
GeneralAbout group of settings identifies the variable and sets its definition.
l Name: unique variable name. This name is used as the variable reference during its use.
NOTE Avoid using non-alphanumerical characters when defining the variable name.
Enter the name to make the variable easy to find when listed among other vari-ables in the data source explorer.
l Description: is a field that allows adding additional information and suggestions.
Definition group of settings defines which input data types are valid for a variable.
l Data type defines what type of data is stored in a variable.
l Text: variables that contain text.
l Date: variables that contain date values.
l Time: variables that contain time values.
l Floating point: representation of real numbers in a variable.
l Currency: variables that contain monetary values.
l Initial value: starting value that is assigned to a variable when created. It is defined using one of the following methods:
l Manually entering a fixed value. Characters from any group of allowed char-acters are permitted.
l Using a dynamic value. Dynamic data sources from the toolbar are sup-ported – two options are available:
www.nicelabel.com 100

l Enter the source as Name in square brackets, e.g. [CurrentDate], [Counter].
l Select the dynamic data source from the drop down list.
l Using a special character:
l Special character can be entered manually using the less than/-greater than signs, e.g. <CR>, <LF> ...
l Special character can be selected from the drop down list.
NOTE Designer supports combined values as the initial value. Read more about combining the values here.
EXAMPLE A combined init ia l v a lue of a v a r ia ble ma y cont a in a f ixed v a lue, a dy na mic da t a s ource a nd s pecia l cha ra ct ers . The order of ins ert ed it ems ca n be s et ra n-domly . Three opt ions :1. a a a 123[Va r ia ble]<C R >2. <C R >a a a 123[Va r ia ble]3. [Va r ia ble]<C R >a a a 123
Make sure the inserted initial value meets the criteria defined with Output Rules for each data type.
Prompting group of settings defines the print time behavior of a data source. Read more about prompting here.Dynamic value group defines how the last used dynamic value of a variable is handled.
l Remember the last used value (dynamic value): Designer stores the last used value of a variable. The last used value is stored in an external text file at the same location as the label or solution file. Files that store the last used values have the same filename as the label or solution, followed by .DVV extension.
NOTE When sharing labels with dynamic values, make sure not to share only label or solution files (.NLBL or .NSLN), but also files that store last used dynamic values (.DDV).
NOTE Label or solution must be saved before enabling this option.
EXAMPLE The la s t us ed v a lue is us ef ul when t he cont inua t ion of numbering f rom t he la s t pr int ed la bel is required ( e.g. s er ia l number) . C ount er ' s la s t v a lue is s t ored a nd t he num-bering is cont inued f rom t his point a t next us e.
TextText data type is used for variables that store textual content. As a result, only textual input is allowed as the variable input data type.
Input RulesData group defines permitted data properties.
l Allowed characters: definition of permitted variable input characters.
www.nicelabel.com 101
Groups of allowed characters for data input filtering are described in section Groups of Allowable Characters.
l Limit variable length: maximum length of variable value. l Fixed length: variable must contain the exact given number of characters as
defined in the Limit variable length.
Output RulesPrefix and Suffix are characters that are added to a variable value.
l Prefix: text placed in front of the variable value.
l Suffix: text placed behind the variable value.
Pad Character fills empty character position until the maximum variable length for a vari-able is reached. Pad character is enabled only if the Limit variable length in the Input rules tab is enabled.
l Padding: defines the mode of padding.
l Not used: does not use padding.
l On left: adds pad characters on the left side of the data value.
l On right: adds pad characters on the right side of the data value.
l Surrounding value: adds pad characters on both sides of the data value.
l Character: character used for padding.
EXAMPLE P a d cha ra ct er is in mos t ca s es zero ( 0) a dded on t he lef t s ide of t he v a r ia ble v a lue. I f t he ma ximum v a r ia ble lengt h is s et t o 5 cha ra ct ers a nd t he v a lue is 23, t he pa dded res ult is 00023.
Multiline: divides text into multiple lines.
WARNING Avoid using this setting if possible. The recommended alternative for presenting multiline text on a label or form is to use the Text Box object.
l Number of lines: maximum number of lines for a variable value.
l Line length: maximum number of characters in a single line.
l Word wrap: divides the text into multiple lines at space character locations.
TIP: Input rules help the user when inserting the variable data. They act as a filter that defines the type, length and other input data properties. Output rules set the final variable formatting – they define how the variable value is going to be presented in an object.
DateDate data type stores date related values in the selected variable. Date field displays the date value using various date formats. The date value format can be either selected from the preloaded formats, or customized to meet the specific local, regulatory or industry related requirements.
Input RulesInput Formatting group defines the allowed date format and displays a preview.
www.nicelabel.com 102

l Input format: allowed date input format.
l Sample value: displays the preview according to the selected input format.
NOTE Designer supports a range of preloaded or customized date formats.
Check range sets optional minimum and maximum date values.
l Minimum value: the earliest allowed date.
l Maximum value the latest allowed date.
Output RulesOutput formatting sets the output date format.
l Output format: format in which the date is displayed.
l Output language: language selection and regional formatting for days and months.
Output Language becomes relevant when the dates that inc lude months or dates are wr itten in words. In some cases , data calculations may be affec ted as well. For example, in US, a new week begins on Sunday whereas in EU and other countr ies , a new week begins on Monday.
l Sample value: date preview according to the selected input format. Current date is shown if the initial value is not defined.
Prefix and Suffix are characters that are added to a variable value.
l Prefix: text placed in front of the variable value.
l Suffix: text placed behind the variable value.
Pad Character fills empty character position until the maximum variable length for a vari-able is reached. Pad character is enabled only if the Limit variable length in the Input rules tab is enabled.
l Padding: defines the mode of padding.
l Not used: does not use padding.
l On left: adds pad characters on the left side of the data value.
l On right: adds pad characters on the right side of the data value.
l Surrounding value: adds pad characters on both sides of the data value.
l Character: character used for padding.
EXAMPLE P a d cha ra ct er is in mos t ca s es zero ( 0) a dded on t he lef t s ide of t he v a r ia ble v a lue. I f t he ma ximum v a r ia ble lengt h is s et t o 5 cha ra ct ers a nd t he v a lue is 23, t he pa dded res ult is 00023.
Multiline: divides text into multiple lines.
WARNING Avoid using this setting if possible. The recommended alternative for presenting multiline text on a label or form is to use the Text Box object.
www.nicelabel.com 103

l Number of lines: maximum number of lines for a variable value.
l Line length: maximum number of characters in a single line.
l Word wrap: divides the text into multiple lines at space character locations.
TIP: Input rules help the user when inserting the variable data. They act as a filter that defines the type, length and other input data properties. Output rules set the final variable formatting – they define how the variable value is going to be presented in an object.
TimeTime data type stores time values in a variable. Time field displays the date value using various time formats. The time value format can be either selected from the preloaded formats, or customized to meet the specific local, regulatory or industry related require-ments.
Input RulesInput Formatting defines the allowed time format and displays a preview.
l Input format: allowed time input format.
l Sample value:variable preview according to the selected input format.
NOTE Designer supports a range of preloaded or customized time formats.
Check range defines the minimum and maximum time values. Defining the minimum and maximum limits is optional.
l Minimum value: the earliest allowed time value.
l Maximum value: the latest allowed time value.
Output RulesOutput formatting defines the output time format.
l Output format: format in which the time is displayed.
l Sample value: time preview according to the selected input format.
Prefix and Suffix are characters that are added to a variable value.
l Prefix: text placed in front of the variable value.
l Suffix: text placed behind the variable value.
Pad Character fills empty character position until the maximum variable length for a vari-able is reached. Pad character is enabled only if the Limit variable length in the Input rules tab is enabled.
l Padding: defines the mode of padding.
l Not used: does not use padding.
l On left: adds pad characters on the left side of the data value.
l On right: adds pad characters on the right side of the data value.
l Surrounding value: adds pad characters on both sides of the data value.
l Character: character used for padding.
www.nicelabel.com 104
EXAMPLE P a d cha ra ct er is in mos t ca s es zero ( 0) a dded on t he lef t s ide of t he v a r ia ble v a lue. I f t he ma ximum v a r ia ble lengt h is s et t o 5 cha ra ct ers a nd t he v a lue is 23, t he pa dded res ult is 00023.
Multiline: divides text into multiple lines.
WARNING Avoid using this setting if possible. The recommended alternative for presenting multiline text on a label or form is to use the Text Box object.
l Number of lines: maximum number of lines for a variable value.
l Line length: maximum number of characters in a single line.
l Word wrap: divides the text into multiple lines at space character locations.
TIP: Input rules help the user when inserting the variable data. They act as a filter that defines the type, length and other input data properties. Output rules set the final variable formatting – they define how the variable value is going to be presented in an object.
CurrencyCurrency data type is used for variables that store numerical values of monetary amounts. Define currencies for various regions and set their properties.
Initial Value DefinitionInitial value for Currency Data type is defined using one of the following methods:
l Manually entered fixed value. The number is delimited according to the Input formatting settings.
l Use of a dynamic value. Dynamic data sources from the toolbar are supported – two options are available:
l the source is entered Name in square brackets, e.g. [Variable_1].
l dynamic data source selection from the drop down list.
l Use of a special character:
l Special character can be entered manually using the less than/greater than signs, e.g. <CR>, <LF> ...
l Special character can be selected from the drop down list.
NOTE Designer supports combined values as the initial value. Read more about combining the values here.
EXAMPLE A combined init ia l v a lue of a v a r ia ble ma y cont a in a f ixed v a lue, a dy na mic da t a s ource a nd s pecia l cha ra ct ers . The order of ins ert ed it ems ca n be s et ra ndomly . Three opt ions :1. a a a 123[Va r ia ble]<C R >2. <C R >a a a 123[Va r ia ble]3. [Va r ia ble]<C R >a a a 123
Input RulesInput formatting group specifies the allowed input currency format.
www.nicelabel.com 105

Decimal delimiter is the character that separates the integer part from the fractional part of value written in decimal form.Decimal places is the number of decimal places that is allowed to be included in the value. Use 1000 separator enables using a separator that groups the thousands into groups.
l Separator: a character that is used as 1000 separator. Currency symbol is a graphic symbol that represents a currency.
l Placement: position of the currency symbol.Sample value displays a preview of the currency input format.Limit variable length enables limiting the number of digits to be defined in a variable.
l Length (characters): allowed number of digits in a variable.Check range defines the minimum and maximum values expressed in currency. Defining the minimum and maximum limits is optional.
l Minimum value: the lowest allowed input currency value.
NOTE If already defined, the initial value is taken as the minimum value.
l Maximum value: the highest allowed input currency value.
Output RulesInput formatting specifies the preferred output currency format.
l Decimal delimiter: character that separates the integer part from the fractional part of a value written in decimal form.
l Decimal places: number of decimal places to be included in the value.
l Use 1000 separator: separator that groups the thousands into groups.
l Separator: character that is used as 1000 separator.
l Sample value: preview of the current number input format.
l Currency symbol is a graphic symbol that represents a currency.
l Placement defines the currency symbol's position. Select it from the drop down list.
l Sample value displays a preview of the currency input format.
Prefix and Suffix are characters that are added to a variable value.
l Prefix: text placed in front of the variable value.
l Suffix: text placed behind the variable value.
Pad Character fills empty character position until the maximum variable length for a vari-able is reached. Pad character is enabled only if the Limit variable length in the Input rules tab is enabled.
l Padding: defines the mode of padding.
l Not used: does not use padding.
l On left: adds pad characters on the left side of the data value.
www.nicelabel.com 106

l On right: adds pad characters on the right side of the data value.
l Surrounding value: adds pad characters on both sides of the data value.
l Character: character used for padding.
EXAMPLE P a d cha ra ct er is in mos t ca s es zero ( 0) a dded on t he lef t s ide of t he v a r ia ble v a lue. I f t he ma ximum v a r ia ble lengt h is s et t o 5 cha ra ct ers a nd t he v a lue is 23, t he pa dded res ult is 00023.
Multiline: divides text into multiple lines.
WARNING Avoid using this setting if possible. The recommended alternative for presenting multiline text on a label or form is to use the Text Box object.
l Number of lines: maximum number of lines for a variable value.
l Line length: maximum number of characters in a single line.
l Word wrap: divides the text into multiple lines at space character locations.
TIP: Input rules help the user when inserting the variable data. They act as a filter that defines the type, length and other input data properties. Output rules set the final variable formatting – they define how the variable value is going to be presented in an object.
Floating PointFloating Point data type specifies the representation settings for numeric values that are stored in a variable. This Data type is used to set the digit grouping points (sep-arators) according to the regional specifics, and to place the decimal delimiters at the right places.
Input RulesInput formatting specifies the allowed input number format.
l Decimal delimiter: specifies the character that separates the integer part from the fractional part of a number written in decimal form.
l Decimal places: the number of decimal places to be included in the number.
l Use 1000 separator: a separator that groups the thousands into groups.
l Separator: a character that is used as thousands separator.
l Sample value: displays a preview of the current number input format.
l Limit variable length: enables limiting the number of digits to be defined for a vari-able.
l Length (characters): allowed number digits in a variable.
Check range defines the minimum and maximum number values. Defining the minimum and maximum limits is optional:
l Minimum value: the lowest allowed input number.
NOTE If already defined, the initial value is taken as the minimum value.
l Maximum value: defines the highest allowed input number.
www.nicelabel.com 107
Output RulesInput formatting specifies the preferred output number format.
l Decimal delimiter: the character that separates the integer part from the frac-tional part of a number written in decimal form.
l Decimal places: the number of decimal places to be included in the number.
l Auto: decimal places are defined by local system settings.
l Use 1000 separator: enabled use of a separator that groups the thousands into groups.
l Separator: a character that is used as thousands separator.
l Sample value displays a preview of the current output format.
Prefix and Suffix are characters that are added to a variable value.
l Prefix: text placed in front of the variable value.
l Suffix: text placed behind the variable value.
Pad Character fills empty character position until the maximum variable length for a vari-able is reached. Pad character is enabled only if the Limit variable length in the Input rules tab is enabled.
l Padding: defines the mode of padding.
l Not used: does not use padding.
l On left: adds pad characters on the left side of the data value.
l On right: adds pad characters on the right side of the data value.
l Surrounding value: adds pad characters on both sides of the data value.
l Character: character used for padding.
EXAMPLE P a d cha ra ct er is in mos t ca s es zero ( 0) a dded on t he lef t s ide of t he v a r ia ble v a lue. I f t he ma ximum v a r ia ble lengt h is s et t o 5 cha ra ct ers a nd t he v a lue is 23, t he pa dded res ult is 00023.
Multiline: divides text into multiple lines.
WARNING Avoid using this setting if possible. The recommended alternative for presenting multiline text on a label or form is to use the Text Box object.
l Number of lines: maximum number of lines for a variable value.
l Line length: maximum number of characters in a single line.
l Word wrap: divides the text into multiple lines at space character locations.
TIP: Input rules help the user when inserting the variable data. They act as a filter that defines the type, length and other input data properties. Output rules set the final variable formatting – they define how the variable value is going to be presented in an object.
www.nicelabel.com 108

Variable Keyboard InputVariable Keyboard Input is a type of variable that enables the content of a prompted field to be different for every print job. Its value is defined before each printing.
GeneralDefinition group of settings defines which input data types are valid for a variable.
l Data type defines what type of data is stored in a variable.
l Text: keyboard input that contains text.
l Date: keyboard input that contains date values.
l Time: keyboard input that contains time values.
l Floating point: representation of real numbers in a variable.
l Currency: variables that contain monetary values.
l Initial value: starting value that is assigned to a variable keyboard input when cre-ated. It is defined using one of the following methods:
l Manually entering a fixed value. Characters from any group of allowed char-acters are permitted.
l Using a dynamic value. Dynamic data sources from the toolbar are sup-ported – two options are available:
l Enter the source as Name in square brackets, e.g. [CurrentDate], [Counter].
l Select the dynamic data source from the drop down list.
l Using a special character:
l Special character can be entered manually using the less than/-greater than signs, e.g. <CR>, <LF> ...
l Special character can be selected from the drop down list.
NOTE Designer supports combined values as the initial value. Read more about combining the values here.
EXAMPLE A combined init ia l v a lue of a v a r ia ble ma y cont a in a f ixed v a lue, a dy na mic da t a s ource a nd s pecia l cha ra ct ers . The order of ins ert ed it ems ca n be s et ra n-domly . Three opt ions :1. a a a 123[Va r ia ble]<C R >2. <C R >a a a 123[Va r ia ble]3. [Va r ia ble]<C R >a a a 123
Make sure the inserted initial value meets the criteria defined with Output Rules for each data type.
Prompting group of settings defines the print time behavior of a data source. Read more about prompting here.Dynamic value group defines how the last used dynamic value of a variable is handled.
www.nicelabel.com 109

l Remember the last used value (dynamic value): Designer stores the last used value of a variable. The last used value is stored in an external text file at the same location as the label or solution file. Files that store the last used values have the same filename as the label or solution, followed by .DVV extension.
NOTE When sharing labels with dynamic values, make sure not to share only label or solution files (.NLBL or .NSLN), but also files that store last used dynamic values (.DDV).
NOTE Label or solution must be saved before enabling this option.
EXAMPLE The la s t us ed v a lue is us ef ul when t he cont inua t ion of numbering f rom t he la s t pr int ed la bel is required ( e.g. s er ia l number) . C ount er ' s la s t v a lue is s t ored a nd t he num-bering is cont inued f rom t his point a t next us e.
Current DateCurrent Date is a type of variable that displays the current date value. The value is obtained from system or printer clock.
GeneralAbout group of settings identifies the variable and defines date output format and lan-guage.
l Name: unique variable name. This name is used a s variable reference during its use.
l Description: is a field that allows adding additional information and suggestions.
l Output format: format in which the date is displayed.
l Output language: language selection and regional formatting for days and months.
EXAMPLE Outp ut Lang uag e becomes relev a nt when t he da t es t ha t include mont hs or da t es a re wr it t en in words . I n s ome ca s es , da t a ca lcula t ions ma y be a f f ect ed a s well. For exa mple, in US, a new week begins on Sunda y wherea s in EU a nd ot her count r ies , a new week begins on Monda y .
l Output preview: displays how the printed current date looks like. The range of used characters adapts to the selected Output language and printer.
Date offset group enables adding or subtracting a certain number of days, months or years from the current date. The offset date is displayed in the object instead of the present date.
l Days: date offset in days.
l Months: date offset in months.
l Years: date offset in years.
Printer Clock group defines how the printer clock should be used as the date value source.
www.nicelabel.com 110

l Always use computer clock: computer (system) clock set as the exclusive Cur-rent Date value source.
l Always use printer clock: printer clock set as the exclusive Current Date value source. An error is reported if the printer clock is unavailable.
l Use printer clock if supported: printer clock set as the preferred Current Date value source. If the printer clock is not supported, the computer (system) clock value is used instead.
NOTE The selected clock source option defines the range of allowed date Formats. Printer clock option only allows the use of printer supported date formats. An error is reported if a non-valid format is used. Computer (system) clock option allows using a range of preloaded or customized date formats.
Output RulesPrefix and Suffix values may be added to a variable value if required.
l Prefix: text placed in front of the variable value.
l Suffix: text placed behind the variable value.
Multiline divides the text into multiple lines.
WARNING Avoid using this setting if possible. The recommended alternative for presenting multiline text on a label or form is to use the Text Box object.
l Number of lines: maximum number of lines for a variable value.
l Line length: maximum number of characters in a single line.
l Word wrap: divides the text into multiple lines at space character locations.
TIP: Input rules help the user when inserting the variable data. They act as a filter that defines the type, length and other input data properties. Output rules set the final variable formatting – they define how the variable value is going to be presented in an object.
Date FormatsDesigner enables flexible use of date fields. When defining the formats, the following notations are used:
Notation Descriptiond The number of day in a month. Occupies one or two characters.dd The number of day in a month. Always occupies two characters – leading
zeros are added if necessary.M M is the number of month. Occupies one or two characters.MM MM is the number of month. Always occupies two characters.yy or yyyy
The year represented with 2 or 4 digit numbers.
ddd Abbreviation of the day of week name.dddd The full day of week name.
www.nicelabel.com 111

Notation DescriptionMMMM The full name of month.MMM The abbreviation of the name of month.J The number of days since 1. January. Occupies from one to three char-
acters.JJJ The number of days since 1. January. Always occupies three characters.W The week number in current year. Occupies one or two characters.WW The week number in current year. Always occupies two characters.N The weekday number. The value range takes 1–7 characters, where 1
represents Monday and 7 represents Sunday.custom text
Any sequence of characters is displayed unchanged. Insert dots, com-mas and other characters to present the date as required.
Date format examples
Format Printed Date (English)d.M.yyyy 10.3.2016dd/MM/yy 10/03/16dddd, d.MMMM yyyy Thursday, 10.March 2016JJJWWyyyy 069102005
textd/M/yyyytext text10/3/2016text
Current TimeCurrent Time is a type of variable that displays the current time value. The value is obtained from system or printer clock.
GeneralAbout group of settings identifies the variable and defines time output format and lan-guage.
l Name: unique variable name. This name is used a s variable reference during its use.
l Description: is a field that allows adding additional information and suggestions.
Format group sets the current time presentation in an object.
l Output format: format in which the time is displayed.
l Output preview displays how the printed current time format looks like.
Time offset enables adding or subtracting a certain number of seconds, minutes or hours from the current time.
l Seconds: time offset in seconds.
l Minutes: time offset in minutes.
l Hours: time offset in hours.
Printer Clock group defines how the printer clock should be used as the time value source.
www.nicelabel.com 112

l Use printer clock if supported: printer clock set as the preferred current time value source. If the printer clock is not supported, the system clock value is used instead.
l Always use printer clock: printer clock set as the exclusive Current Time value source. An error is reported if the printer clock is unavailable.
l Always use computer clock computer (system) clock set as the exclusive Cur-rent Time value source.
NOTE The selected clock source option defines the range of supported time Formats. Printer clock option only allows the use of printer supported time formats. An error is reported if a non-valid format is used. Computer (system) clock option allows using a range of preloaded and customized time formats.
Output RulesPrefix and Suffix values may be added to a variable value if required.
l Prefix: text placed in front of the variable value.
l Suffix: text placed behind the variable value.
Multiline divides the text into multiple lines.
WARNING Avoid using this setting if possible. The recommended alternative for presenting multiline text on a label or form is to use the Text Box object.
l Number of lines: maximum number of lines for a variable value.
l Line length: maximum number of characters in a single line.
l Word wrap: divides the text into multiple lines at space character locations.
TIP: Input rules help the user when inserting the variable data. They act as a filter that defines the type, length and other input data properties. Output rules set the final variable formatting – they define how the variable value is going to be presented in an object.
Time FormatsDesigner enables flexible use of time fields. Select a predefined time format or create a customized one. When defining the formats, the following notations are used.
h Hours in 12-hour format. AM/PM is added if selected. Occupies one or two characters.
hh Hours in 12-hour format. AM/PM is added if selected. Always occupies two characters. Leading zeros are added if necessary.
H Hours in 24-hour format. Occupies one or two characters.HH Hours in 24-hour format. Always occupies two characters.mm Used for minutes.ss Used for seconds.
www.nicelabel.com 113

Time Format Examples
Format Printed Dateh:mm {AM/PM} 8:25PMH:mm 20:25hh:mm:ss 08:25:36
CounterPRODUCT LEVEL INFO Creation of forms and use of form objects is available in NiceLabel PowerForms.
Counter is a type of variable whose value increments or decrements along with the chan-ging value of system or printer counter. Thermal printers are usually equipped with an internal incremental counter. This is a ded-icated counter that counts the printed labels internally. The printer only receives the first value and automatically increases or decreases it on the subsequent labels. This option reduces the amount of data transferred between computer and printer as only ini-tial value is sent to the printer. Internal counter speeds up the label production sig-nificantly.
General TabAbout group of settings identifies the variable and defines serialization details.
l Name: unique variable name. This name is used a s variable reference during its use.
l Description: is a field that allows adding additional information and suggestions.
Serialization group of settings defines the counter behavior.
l Counter type: counter value increasing or decreasing:
l Incremental: value increases along with the printed labels.
l Decremental: variable value decreases along with the printed labels.
l Step: amount of units that represent the next state of counter value.
l Repetition: number of repetitions for each counter value.
l Initial value: value that is used when the counter starts.
l Preview: displays the counter value sequence as defined by the current Step, Repetition and Initial value.
EXAMPLE C ount er St ep = 3, R epet it ion = 3 a nd I nit ia l v a lue = 1 a re: 1,1,1,4,4,4,7,7,7,10, 10, 10, 13, 13, 13.
Prompting group of settings defines the print time behavior of a data source. Read more about prompting here.Dynamic value group defines how the last used dynamic value of a variable is handled.
l Remember the last used value (dynamic value): Designer stores the last used value of a variable. The last used value is stored in an external text file at the same
www.nicelabel.com 114

location as the label or solution file. Files that store the last used values have the same filename as the label or solution, followed by .DVV extension.
NOTE When sharing labels with dynamic values, make sure not to share only label or solution files (.NLBL or .NSLN), but also files that store last used dynamic values (.DDV).
NOTE Label or solution must be saved before enabling this option.
EXAMPLE The la s t us ed v a lue is us ef ul when t he cont inua t ion of numbering f rom t he la s t pr int ed la bel is required ( e.g. s er ia l number) . C ount er ' s la s t v a lue is s t ored a nd t he num-bering is cont inued f rom t his point a t next us e.
Printer Counter defines how the printer counter should be used.
l Use printer counter if supported: printer counter is set as the counter of choice if supported by the active printer. If the printer counter is not supported, system counter is used instead.
l Always use printer counter: printer counter set as the exclusive counter value source. If the printer counter value is not available, the default (system counter) value is used.
l Always use computer counter: computer counter set as the only counter value source.
TIP: Input rules help the user when inserting the variable data. They act as a filter that defines the type, length and other input data properties. Output rules set the final variable formatting – they define how the variable value is going to be presented in an object.
Thermal printers are in most cases equipped with an internal incremental counter. Such counter works as a dedicated device that counts the printed labels internally. The printer only receives the first value of the counter and then automatically increments the counter in steps of 1 on the subsequent labels.
TIP: This ability reduces the amount of data that needs to be transferred between computer and printer since only the starting value is sent to printer. This speeds up the label production significantly.
To use the counter as internal printer element follow the below listed rules:The variable's maximum length is limited by the printer. The value should be included in the printer user guide.
TIP: If the exact maximum variable length value is not available, NiceLabel recom-mends making a few test prints for determining the value.
l Set variable length to fixed.
l Set variable format to numeric.
l Text object that is linked to the variable must be formatted using an internal printer font.
l Enable Always use printer counter option.
www.nicelabel.com 115

l Make sure the Internal Element icon is visible next to the counter text box.
l Make sure an internal printer font is used for the counter text box.
Input RulesData defines the counter input criteria.
l Allowed characters: permitted characters for variable values. Groups of allowed characters for data input filtering are described in section Groups of Allowed Char-acters.
EXAMPLE Non-numeric cha ra ct ers ca n a ls o be us ed a s count er v a lues . Alp hanumeric s et s t he s equence wit h St ep = 3 a nd I nit ia l v a lue = 1 a s 1, 4, 7, A, D , G , J, M, P , S , V, Y , b, e, h, ...
l Limit variable length: maximum length of a variable value.
l Length (characters): specifies the exact permitted number of characters.
l Fixed length: variable must contain the exact given number of characters as defined in the Limit variable length.
Check range group defines minimum and maximum counter values.
l Minimum value: minimum counter value.
l Maximum value: maximum counter value.
Rollover settings group defines the condition at which the counter automatically resets its value to default.
l Using min/max: minimum and maximum counter values activate the rollover. l When the selected data source changes: data source value change activate the
rollover. l When date or time changes: date or time value change activate the rollover.
Output RulesPrefix and Suffix are characters that are added to a variable value.
l Prefix: text placed in front of the variable value.
l Suffix: text placed behind the variable value.
Pad Character fills empty character position until the maximum variable length for a vari-able is reached. Pad character is enabled only if the Limit variable length in the Input rules tab is enabled.
l Padding: defines the mode of padding.
l Not used: does not use padding.
l On left: adds pad characters on the left side of the data value.
l On right: adds pad characters on the right side of the data value.
l Surrounding value: adds pad characters on both sides of the data value.
l Character: character used for padding.
www.nicelabel.com 116
EXAMPLE P a d cha ra ct er is in mos t ca s es zero ( 0) a dded on t he lef t s ide of t he v a r ia ble v a lue. I f t he ma ximum v a r ia ble lengt h is s et t o 5 cha ra ct ers a nd t he v a lue is 23, t he pa dded res ult is 00023.
Multiline: divides text into multiple lines.
WARNING Avoid using this setting if possible. The recommended alternative for presenting multiline text on a label or form is to use the Text Box object.
l Number of lines: maximum number of lines for a variable value.
l Line length: maximum number of characters in a single line.
l Word wrap: divides the text into multiple lines at space character locations.
Variable PromptingWhen designing labels with variables, a value has to be assigned to them before printing. Prompted variables have their values manually assigned at print time. The user is asked for the value of every variable before each print job. The values are entered manually. The order in which they are entered may be specified using the Prompt order dialog.Prompting group asks the user for manual data input – this is done after the print dialog opens.
l Prompt at print time: enabled or disabled prompting.
NOTE If a dynamic data source is included in the Initial value, prompting becomes disabled.
l Prompt text: text that is displayed to the user. This text serves as an instruction on what kind of values should be inserted before printing.
l Value required: variable value status – mandatory or optional. If the prompt text is left empty in case the value is set as mandatory, printing cannot start. An error message appears.
Functions As Dynamic Data SourcePRODUCT LEVEL INFO This segment is applicable to NiceLabel Designer Pro and NiceLabel PowerForms.
The purpose of functions is to manipulate the data that is assigned to label objects. Func-tions process the existing data source values and store the result in function-generated data sources.Each function can be directly connected to an object and used as a part of another func-tion.
TIP: All label or solution functions are listed in the Data Source Explorer. Before defin-ing the first function, the data source explorer contains no items.
Click Add new function and select the appropriate function from the list. Designer includes the following function types:
l Subset: extracts a specific part of data according to the user-specified rules.
l Concatenate: merges two or more data source values into a single value.
www.nicelabel.com 117

l Date Offset: offsets the present date.
l Linear: transforms the current value using multiple types of linear functions.
l VBScript: allows performing complex value transformations.
l VBScript Expression: is a simplified version of VBScript.
l Python Script: allows performing complex value transformations.
l HIBC: encodes the data in compliance with the health industry barcode standard.
l GS1-128: encodes the data in compliance with the GS-128 barcode standard.
l ANSI MH10.8.2: encodes the data in compliance with ANSI MH10.8.2-2006 stand-ard.
l Transfer Data Syntax for High Capacity ADC Media: enables the ADC users to use a single mapping utility, regardless of which high-capacity ADC media is employed.
l Read from file: function reads content from a specified file and displays it in an object.
l NDEF Message: function allows you to define a message encapsulation format for the exchange of data information over an Near Field Communication (NFC) link.
SubsetSubset function extracts a specific part of data according to the user-specified rules. About group identifies the function.
l Name: function ID, initially defined by the function type.
l Description: function's purpose and role as defined by the user.
Input data source defines the existing or newly added input data source (variable, func-tion or database record). The final (output) value is extracted from the selected input data source value.Definition group offers two methods for extracting the data from input data source.Fixed length extracts a fixed number of characters from the input data source.
l Offset: number of characters to be skipped from the beginning of the value. l Length: length of extracted value.
EXAMPLE I nput v a lue: AB C D EOf f s et : 0Lengt h: 3Sub s et value: ABC
EXAMPLE I nput v a lue: AB C D EOf f s et : 2Lengt h: 3Sub s et value: C DE
Delimiter is used when extracting the data, separated by the user-specified delimiter.
www.nicelabel.com 118

l Delimiter: character (comma by default) that separates input value fields. l Text qualifier: character that encloses the values within the fields (quotation
mark by default).
If a text qualifier is used, the delimiter within the text qualifiers also belongs to the data value. Text qualifier can be left empty.
l Field number:the field number that is extracted from the input data source.
EXAMPLE I nput v a lue: " A" , " B " , " C " , " D "D elimit er : ,Text qua lif iers : "Field number: 3Sub s et value: C
ConcatenateConcatenate function merges two or more data source values into a single value.About group identifies the function.
l Name: function ID, initially defined by the function type.
l Description: function's purpose and role as defined by the user.
Input data source group defines the existing or newly added input data source (variable, function or database record) or fixed text that will be used in the function.Output Options group defines the output value format.Delimiter is a character that is inserted between the concatenated values. The delim-iting character can be entered manually or selected from one of the additional options:
l New Line (CR/LF): new line character. l Insert special character: special character is entered.
NOTE Delimiter is an optional value. With no delimiter defined, the concatenated val-ues are merged without a delimiting space or character.
l Ignore empty values: ignores empty data source values. These values are excluded from concatenation.
This option is useful if you want to avoid duplicated delimiters if empty values appear.
EXAMPLE D a t a s ource v a lue 1: A, B , C , DD a t a s ource v a lue 2: <empt y >D a t a s ource v a lue 3: E, F, GD elimit er : ,C o ncatenated value with vs . witho ut Ig no re emp ty values : A, B, C , D, E, F, G vs . A, B, C , D, , E, F, G
NOTE Ignore empty values option is effective only after executing a print com-mand. When storing a label in store/recall printing mode or when exporting a label, the empty values are not ignored. Delimiters appear duplicated.
www.nicelabel.com 119

Date OffsetDate Offset function defines the number of days, months and/or years to be added to or subtracted from any specified date (might be the current date or any past/future date).About group identifies the function.
l Name: function ID, initially defined by the function type.
l Description: function's purpose and role as defined by the user.
Input data source defines the input data source from which the data will be used in the function.Offset is the number of days, months or years to be added to or subtracted from the input data source.
EXAMPLE C urrent da t e: Ma rch 8 2016Of f s et : D a y s +1; Mont hs +1; Y ea rs +1Res ult: Ap ri l 7 2017
Output formatting group defines the function’s output.
l Output format: defines the date format to be used in the connected object.
l Sample: current date in the selected Output format.
LinearLinear function multiplies or divides an input data source value by a defined Multiplier. An optional value (Addition) can also be added.About group identifies the function.
l Name: function ID, initially defined by the function type.
l Description: function's purpose and role as defined by the user.
Input data source defines the input data source from which the data will be used in the function.Linear function parameters are:
l Mode: linear function type.
l a: function multiplier.
l b: function addition.
Output formatting group defines the function output format.Output format is the format of a modified value. more... opens additional formatting options:
l Decimal separator: character that marks the border between integral and frac-tional parts of a decimal numeral.
l Decimal places: number of places behind the decimal separator. l Use 1000 separator: thousands separated or non-separated by a delimiter. l Delimiter: character that separates the thousands from the rest of the numeral. l Sample: preview of the formatted output value.
EXAMPLE I nput v a lue: 123a : 2
www.nicelabel.com 120

b: 20Outp ut value: 2 * 123 + 20 = 266
VBScriptVBScript function enables reading, writing, and manipulating the data that belongs to any of the connected data sources.About group identifies the function.
l Name: function ID, initially defined by the function type.
l Description: function's purpose and role as defined by the user.
VBScript group allows defining the script. l Verify: validates the entered script syntax. l Export: exports the script to an external file that can be imported to other applic-
ations. l Import: imports a VBScript from an external file.
NOTE The result of the script must be saved in the 'Result'. The value of 'Result' is inserted into the name of the function. Such function is available as a dynamic data source for further use.
E X A M P L E
The v a r ia ble N AME prov ides t he f irs t a nd t he la s t na me of a pers on. Vis ua l B a s ic Scr ipt f unct ion s hould brea k t he na mes a pa rt a nd us e only t he f irs t na me a s t he res ult of t he f unc-t ion.
N AME v a r ia ble init ia l v a lue: J o hn Do e
Dim Spc
Spc = InStr(NAME, " ")
if NAME <> "" then
Result = Mid(NAME, 1, Spc-1)
end if
R es ult of VB Script : J o hn
VBScript ExpressionVBScript Expression is a simplified online version of VBScript. This Designer function can be used to:
l manipulate existing variables
l extract sub-strings
l perform quick calculations
VBScript Expression reduces the need to write dedicated VBScripts. Instead of writing an entire script, insert a single-line expression in the edit field that is validated at print time.
TIP: When compared to VBScript commands, a VBScript expression command does not require the final value to be stored in Result.
www.nicelabel.com 121
About
l Name: function ID, initially defined by the function type.
l Description: function's purpose and role as defined by the user.
Visual Basic Expression l Verify: validation of the entered script syntax. l Editor: field for script writing and editing.
Python ScriptPython script function supports even the most complex data manipulations on a label or a form.
TIP: When compared with VBScript, it proves out to be a more suitable option for 64-bit systems. It is also proved to be a notably faster scripting alternative.
About group identifies the function.
l Name: function ID, initially defined by the function type.
l Description: function's purpose and role as defined by the user.
Python Script l Verify: validation of script syntax. l Editor: dialog for writing and editing the scripts. Editor opens a new window that
allows creating a Python Script. l Export: allows exporting and reusing the script in other applications. l Import: imports scripts from external applications to be used in NiceLabel
Designer.
E X A M P L E :
The v a r ia ble N AME prov ides t he f irs t a nd t he la s t na me of a pers on. P y t hon Scr ipt f unct ion s hould brea k t he na mes a pa rt a nd us e only t he f irs t na me a s t he res ult of t he f unct ion.
N AME v a r ia ble init ia l v a lue: J o hn Do e
name = NAME.Value
Spc = name.find(' ')
if name != '' and Spc != -1:
Result.Value = name[0:Spc]
else:
Result.Value = name
R es ult of P y t hon s cr ipt : J o hn
HIBC HIBC is a barcode standard used specifically in health industry, as directed by the HIBCC organization. This standard supports composite bar codes and supports the use of mul-tiple items such as item codes, quantity and batch number in a single barcode.
TIP: Visit HIBCC website for more information about the standard.
About group identifies the function.
www.nicelabel.com 122

l Name: function ID, initially defined by the function type.
l Description: function's purpose and role as defined by the user.
Structure group selects one of the three available HIBC barcode Types to be used: l Primary: mandatory data structure with a fixed structure which identifies supplier
and item. l Secondary: optional data structure which is indicated using the separator sign "/".
It may have a variable (but prescribed) structure to contain serial or batch num-bers, quantity and expiration date.
l Primary definition: necessary item when defining the Secondary data structure. The three Primary data fields of a HIBC function must be added to the Secondary data structure. Primary definition selects the appro-priate existing HIBC function.
l Concatenated: merges the first two structure types into a single data structure.Definition group defines the content of HIBC barcode fields:Primary data structure fields:
l Labeler ID code (LIC): field assigned and maintained by the HIBCC. The first char-acter of this field is always an alphabetic character. The LIC may identify a labeler to the point of separate subsidiaries and divisions within a parent organization.
l Product or Catalog...: compressed product or catalog number. l Unit of Measure...: numeric representation of packaging level (0 to 9) with 0 being
the lowest level or “unit-of-use”.
EXAMPLE A compa ny might pa ck unit -of -us e it ems in a box, boxes in a ca rt on, a nd ca rt ons in a ca s e. One wa y of la beling would be, unit -of -us e = 0; B ox = 1; C a rt on = 3; a nd C a s e = 5.
Secondary data structure fields: l Quantity: two- or five-digit field describing the number of units-of-use included in
the package identified by the bar code label. l Date format: preferred date format to be used with a HIBC label. If no date should
be included on a label, select one of the formats that contain "No date". l Date: displays the present date. l Lot/Batch: field can be alphanumeric and may vary in length to up to a maximum of
18 characters. If the field is not required, it should be left empty. l Serial number: field can be alphanumeric and may vary in length to up to a max-
imum of 18 characters. If the field is not required, it should be left empty. l Production date: Data Identifier formatted as YYYYMMDD.
GS1-128GS1-128 function encodes barcode data using the GS1-128 standard. The standard sup-ports encoding of textual data, numbers, functions, and the entire set of 128 ASCII char-acters. GS1-128 encodes the data and defines its meaning by defining a list of Application Iden-tifiers (AI). These identifiers define the content and length of the data they include.AIs include a data field that contains a fixed or variable number of characters.
TIP: For more information about GS-128 standard and encoding principles, visit the GS1 website.
The list of available AIs is available here.About
www.nicelabel.com 123

l Name: function ID, initially defined by the function type.
l Description: function's purpose and role as defined by the user.
Application Identifiers field displays the selected AIs. Edit Function Definition button opens a dialog for editing the identifiers. Function Definition dialog allows the user to Add, Delete, Move, and edit the selected identifiers. There are four columns with identifier properties:
l Identifier: column with identifier AI number and description.
l Value: column with a manually or dynamically defined value as given by the selec-ted Data source.
Each Value column allows a limited number of characters to be inserted. The lim-itation is defined by the standard and varies according to the selected iden-tifier.
l Options: column with additional identifier options (if available).
Delimiter group defines the delimiting characters for separating the AIs.A single barcode may include multiple AIs. These fields are separated using left and right Delimiter. By default, first two digits of AI are used. Custom delimiters may be defined by inserting alphanumeric characters. Additional function outputs group defines a subordinate function.
l Create output function with unformatted contents creates a subordinate func-tion that uses the unformatted data encoded by the parent GS1-128 function.
l Function name: the name of the newly created subordinate function.
ANSI MH10.8.2 (ASC)ANSI MH10.8.2 (ASC) function encodes barcode data using the ANSI MH10.8.2-2006 standard. This standard provides a range of MH 10/SC 8 data identifiers and GS1 applic-ation identifiers. It enables the assignment of new data identifiers, and defines the cor-relation, or mapping of data identifiers to application identifiers.
TIP: For more information about ANSI MH10.8.2 (ASC) standard, visit the official web-site.
About group identifies the function.
l Name: function ID, initially defined by the function type.
l Description: function's purpose and role as defined by the user.
Application Identifiers enable cross-industry standardized use of data identifiers. They are used with any alphanumeric data carrier.Edit Function Definition button opens the Function Definition dialog. It allows the user to Add, Delete, Move, and edit the selected identifiers. There are three columns with identifier properties:
l Identifier: column with identifier ID.
l Value: column with manually inserted value or an automatically defined value as given by the selected Data source.
www.nicelabel.com 124

NOTE Each Value column allows a limited number of characters to be entered. The lim-itation (format) is defined by the standard and varies according to the selected iden-tifier.
Transfer Data Syntax For High Capacity ADC MediaHigh-capacity automatic data capture (ADC) technologies, such as two-dimensional sym-bols, RFID transponders, contact memories, and smart cards, encode multiple fields of data. These fields are usually parsed by the information system and mapped to the spe-cified data fields. ISO/IEC 15434:2005 defines the syntax for high-capacity ADC media. This enables the ADC users to use a single mapping utility, regardless of which high-capacity ADC media is employed.The data encoded according to ISO/IEC 15434:2005 includes:
l data for shipping, receiving, and inventory of transport units
l data for supporting documentation related to unit loads or transport packages
l data for sorting and tracking of transport units
About group identifies the function.
l Name: function ID, initially defined by the function type.
l Description: function's purpose and role as defined by the user.
l Application Identifiers: cross-industry standardized set of data identifiers.
TIP: The purpose of identifiers is to provide a unique item identification. To manage the identifiers, click Edit Function Definition.
Function Definition dialog allows the user to Add, Delete, and edit the selected identifiers.
l Format Envelope: column defines the starting and ending positions for a data item in a given Format.
l Data Elements: column defines the identifier content by inserting the data to be encoded.
NOTE Each identifier allows adding multiple elements.
l Format Header Data: defines two mandatory format header elements.
l Version: organization that controls the data structure.
l Release: release number of ADC media standard.
E X A M P L E :
- 02 is compliant with ASC MH10/SC 8 (us ing measurement qualif iers of pounds and kilograms)
- 06 is compliant with International Air Transpor t Assoc iation (IATA) rules .
- 56 is compliant with International Federation of Freight Forwarders (FIATA) rules .
- 96 is compliant with ASC MH10/SC 8 (pounds only).
www.nicelabel.com 125

Read From FileRead from file function reads content from a specified file. The file can be accessible loc-ally or remotely via network connection. About group identifies the function.
l Name: function ID, initially defined by the function type.
l Description: function's purpose and role as defined by the user.
Read from file parameters group sets the file connection details.File name sets the file connection.Encoding specifies the encoding type for the sent data.
l Auto: automatically defined encoding .
If needed, select the preferred encoding type from the drop down list.
NDEF MessageNDEF Message function allows you to define a message encapsulation format for the exchange of data information over an Near Field Communication (NFC) link. Such link is established between two NFC devices, or between an NFC device and a tag.
TIP: NFC is a set of communication protocols that enable two devices to establish communication by bringing them within 4 cm (2 in) of each other.
NDEF message encapsulates one or more application-defined records which appear in a variety of types and sizes. These records are combined into a single message. About group identifies the function.
l Name: function ID, initially defined by the function type.
l Description: function's purpose and role as defined by the user.
NDEF Message Structure group displays the NDEF records that are included in the mes-sage. Click Edit Function definition to open the NDEF Message dialog. This dialog allows the user to Add, Delete, Move, and edit the NDEF records. There are two columns with record properties:
l NDEF Record Type: identifies the record type. The listed standard record types are available in Designer:
l Uri: contains a string of characters that identifies a web resource.
l Text: contains textual content with information about text encoding and lan-guage code.
l Smart Poster: includes multiple sub-records – URI, title, recommended actions, icon, size and type.
NOTE Smart Poster content is represented as a single record content, although internally the structure is created as multiple (sub)records within a single record.
www.nicelabel.com 126

l BlueTooth Handover Select: a set of records including various items – han-dover version, device address string, complete local string, class of device, and service class.
l Custom: record type which allows encoding the non-native NFC data.
Drag and drop the records in NDEF Message dialog to quickly change their position.
Detailed descriptions of NDEF record types are available in NFC Forum technical specifications.
l Record Definition: settings as defined by the NDEF standard. Available options depend on the selected record type.
Include capability container adds capability container to the encoded data. Capability container stores control data for managing the NFC data in a tag or a device. It tells the NFC device that the received data is an NFC message. In cases when NFC content needs to be encoded into a standard high frequency (HF) RFID tag, enable the Include capability container option. This signalizes the reading device that NFC content is stored in the tag. Certain NFC compliant tags already include capability container in the tag which means that there is no need for including it as a part of the generated content.
Databases As Dynamic Data SourcePRODUCT LEVEL INFO Creation of forms and use of form objects is available in NiceLabel PowerForms.
Databases can be used as dynamic data source for label or form objects. To make the database content accessible and retrievable from the selected object, the database con-nection must be properly established and configured.The most time efficient and user friendly way of adding a database to your label or solu-tion data sources is to use the Step-by-Step Database Wizard. Designer also allows the database connections to be established and configured manu-ally. This way, the entire range of connection settings becomes configurable. It is recom-mended that only experienced users choose this option.All label or solution databases are listed in the Data Source Explorer.Designer supports a wide selection of database types. The supported database types are listed here. Read about how to connect to the supported database types here.Read about other available object data sources and how to use the Dynamic Data Man-ager here.
Supported Database TypesDesigner supports multiple types of databases:
l Microsoft Excel
l Microsoft Access
l Microsoft SQL Server
l Text File databases
l Oracle databases
www.nicelabel.com 127

l MySQL
l OLE databases
l ODBC data source
TIP: NiceLabel recommends using standard database types such as Text, Excel, Access, SQL Server, and MySQL. The use of standard database types is easier and more time efficient due to optimized application performance and user interface. When working with a non-standard database type, use the OLE and ODBC options.
Read about how to connect to the supported database types here.
Database Connection OptionsDesigner offers two ways for connecting an object to a database. The diagram below shows the two available options.
1. Step-by-step Database Wizard offers a guided process for:
l connecting a database to a label or form object
l adding a database to the labeling solution's data sources
The process of establishing and configuring a wizard based database connection is described here.
PRODUCT LEVEL INFO This segment is applicable to NiceLabel Designer Pro and NiceLabel PowerForms.
2. Manually established and configured database connection.
NOTE This option is intended for advanced users. It allows detailed configuration and offers all of the available database connection settings.
The process of establishing and configuring a database connection manually is described here.
Step-by-Step Database WizardDatabase wizard is a guided process that allows the user to configure a connection to a database and to select which tables and fields will be used. Dedicated buttons provide instant access to the most commonly used database types. Use the All Databases but-ton to start the wizard in general mode and to select the database type during the next step. Edit Database allows you to edit all existing connected databases using a wizard.
www.nicelabel.com 128

The wizard additionally allows you to sort, filter records, and to define how many label copies will be printed per database record.
Adding A DatabaseThere three options for starting the Database Wizard:
l Option 1: Click the preferred database button in Designer Data tab ribbon -> Step-by-step Database Wizard group.
l Option 2: Click the preferred database button in Dynamic Data Manager -> Step-by-Step Database wizard ribbon group.
l Option 3: Click the +Database wizard command in Data Source Explorer or object properties.
Below listed are the available wizard options. To successfully add a database, follow the steps for each database type:
l Adding an Excel database
l Adding an Access database
l Adding an SQL Server database
l Adding a Text File database
l Adding an Oracle database
l Adding a MySQL database
l Adding other OLE database
l Adding an ODBC data source
Database Wizard for Excel DatabaseThis section describes how to add an Excel database to a form or label object using the Designer Step-by-Step Database Wizard.
Step 1: Connection SettingsThis step defines the database connection parameters.File name defines the database file location.Advanced Setup opens the system configuration dialog. Data Link Properties window allows you to set the connection properties. Data Link Properties is a Windows system dialog – read more about its properties here.Test Connection button starts a connection testing procedure. It checks if the Designer can successfully connect to the database or not.Click Next.
Step 2: Tables and FieldsThis step defines which database table and which fields of this table should be used as data source.Available fields lists the available fields (columns) in the selected database.Selected fields lists the fields (columns) which will be included in the database table. Click Add > or < Remove buttons to add or remove the fields from the Selected fields.
www.nicelabel.com 129

NOTE When editing an existing database, a field cannot be removed if used in a script, function, action, or connected to a label or form object.
Click Next.
Step 3: Label Copies Per RecordThis step specifies the number of label copies to be printed for each database record.Fixed number of printed labels lets you insert the number of copies manually.Dynamically defined number of printed labels sets the number dynamically using a data source value.
EXAMPLE The number of pr int ed la bels is def ined in t he da t a ba s e f ield of t he record t ha t is going t o be pr int ed.
EXAMPLE The number of pr int ed records ca n be def ined us ing a v a r ia ble v a lue. I t s v a lue ma y be s et in a not her la bel or f orm object .
Click Next to proceed or Finish to continue working with the object.Read more about how to define the number of printed copies here.
Step 4: Create ObjectsThis step decides whether new objects that display the content retrieved from data-base fields should be added to a label/form or not.Create Objects step is visible when:
l starting the database wizard from Designer Data tab ribbon and adding a new database by clicking the database button
l starting the wizard in Data Source Explorer or using a generic object Add data-base selector
TIP: The Create Objects step differs if you are adding a database while designing a label or a form. See the differences below.
Create Objects step for label designing:
l Create a label text object for each field: adds a Text object that contains data-base field content.
l Do not create any label objects: skips adding new objects.
Create Objects step for form designing:
l Create an edit field object for each field: adds an edit field object to the form. The added object(s) contains database field content.
l Create a form table object: adds a database table object to a form. The added object(s) contains database field content.
l Do not create any label objects: skips adding new objects.
NOTE The number of added objects depends on the number of fields in the database.
Click Next.
www.nicelabel.com 130

Step 5: Data Preview and Other Table SettingsThis step gives a preview of the data retrieved from the database. It also offers addi-tional table settings such as filtering and sorting.Data tab displays a preview of data retrieved from the database file. You can use search controls at the top of the preview section to find a specific record.
NOTE Data preview shows up to 1000 rows.
Filter tab filters out the database file records. It allows you to define filtering conditions to be used when retrieving the data.
l Add condition: specifies single line condition(s) that filters out the content that meets the set criteria.
l Add group: specifies group(s) of conditions that filter out the content that meets the set criteria.
Sorting tab allows you to sort the retrieved data. Sorting is done for all of the fields that are added to the sorting list. Each field can be in ascending or descending order.Data Retrieving tab defines how the data should be retrieved from the connected data-base file.SQL tab offers a preview of the generated SQL statements.Read more details about database table configuration here.Click Finish. The database is ready to be used as label or form object data source.
Database Wizard for Access Database
PRODUCT LEVEL INFO This segment is applicable to NiceLabel Designer Pro and NiceLabel PowerForms.
This section describes how to add an Access database to a form or label object using the Designer Step-by-Step Database Wizard.
Step 1: Connection SettingsThis step defines the Access database file connection details.File name selects the database file.Authentication requires User name and Password for password protected Access data-base files.Advanced Setup opens the system configuration dialog. Data Link Properties window allows you to set the connection properties. Data Link Properties is a Windows system dialog – read more about its properties here.Test Connection button starts a connection testing procedure. It checks if the Designer can successfully connect to the database or not.Click Next.
Step 2: Tables and FieldsThis step defines which database table and which fields of this table should be used as data source.Available fields lists the available fields (columns) in the selected database.Selected fields lists the fields (columns) which will be included in the database table. Click Add > or < Remove buttons to add or remove the fields from the Selected fields.
NOTE When editing an existing database, a field cannot be removed if used in a script, function, action, or connected to a label or form object.
Click Next.
www.nicelabel.com 131

Step 3: Label Copies Per RecordThis step specifies the number of label copies to be printed for each database record.Fixed number of printed labels lets you insert the number of copies manually.Dynamically defined number of printed labels sets the number dynamically using a data source value.
EXAMPLE The number of pr int ed la bels is def ined in t he da t a ba s e f ield of t he record t ha t is going t o be pr int ed.
EXAMPLE The number of pr int ed records ca n be def ined us ing a v a r ia ble v a lue. I t s v a lue ma y be s et in a not her la bel or f orm object .
Click Next to proceed or Finish to continue working with the object.Read more about how to define the number of printed copies here.
Step 4: Create ObjectsThis step decides whether new objects that display the content retrieved from data-base fields should be added to a label/form or not.Create Objects step is visible when:
l starting the database wizard from Designer Data tab ribbon and adding a new database by clicking the database button
l starting the wizard in Data Source Explorer or using a generic object Add data-base selector
TIP: The Create Objects step differs if you are adding a database while designing a label or a form. See the differences below.
Create Objects step for label designing:
l Create a label text object for each field: adds a Text object that contains data-base field content.
l Do not create any label objects: skips adding new objects.
Create Objects step for form designing:
l Create an edit field object for each field: adds an edit field object to the form. The added object(s) contains database field content.
l Create a form table object: adds a database table object to a form. The added object(s) contains database field content.
l Do not create any label objects: skips adding new objects.
NOTE The number of added objects depends on the number of fields in the database.
Click Next.
Step 5: Data Preview and Other Table SettingsThis step gives a preview of the data retrieved from the database. It also offers addi-tional table settings such as filtering and sorting.Data tab displays a preview of data retrieved from the database file. You can use search controls at the top of the preview section to find a specific record.
NOTE Data preview shows up to 1000 rows.
www.nicelabel.com 132

Filter tab filters out the database file records. It allows you to define filtering conditions to be used when retrieving the data.
l Add condition: specifies single line condition(s) that filters out the content that meets the set criteria.
l Add group: specifies group(s) of conditions that filter out the content that meets the set criteria.
Sorting tab allows you to sort the retrieved data. Sorting is done for all of the fields that are added to the sorting list. Each field can be in ascending or descending order.Data Retrieving tab defines how the data should be retrieved from the connected data-base file.SQL tab offers a preview of the generated SQL statements.Read more details about database table configuration here.Click Finish. The database is ready to be used as label or form object data source.
Database Wizard for Microsoft SQL Server Database
PRODUCT LEVEL INFO This segment is applicable to NiceLabel Designer Pro and NiceLabel PowerForms.
This section describes how to add a Microsoft SQL Server database to a form or label object using the Designer Step-by-Step Database Wizard.
Step 1: Connection SettingsThis step defines the database file connection details.Server defines the database server.Authentication group defines user authentication type for database server.
l Use Windows authentication. This option defines the Windows authentication as verification method for connecting to an SQL server. The user connects to a data-base using domain username and password.
l Use SQL Server authentication. This option defines the database user name and password as the verification method. To establish a connection, enter the user name and password provided by the database administrator.
Show Connection String displays the current database connection string and allows it to be inserted or modified.
WARNING Connection string editing is intended for advanced users only. To con-figure the database connection, users are encouraged to use standard inputs in the dialog box.
Database Selection group selects the database on the connected server.Test Connection button starts a connection testing procedure. It checks if the Designer can successfully connect to the database or not.Click Next to proceed.
Step 2: Tables and FieldsThis step defines which database table and which fields of this table should be used as data source.Available fields lists the available fields (columns) in the selected database.Selected fields lists the fields (columns) which will be included in the database table. Click Add > or < Remove buttons to add or remove the fields from the Selected fields.
www.nicelabel.com 133

NOTE When editing an existing database, a field cannot be removed if used in a script, function, action, or connected to a label or form object.
Click Next.
Step 3: Label Copies Per RecordThis step specifies the number of label copies to be printed for each database record.Fixed number of printed labels lets you insert the number of copies manually.Dynamically defined number of printed labels sets the number dynamically using a data source value.
EXAMPLE The number of pr int ed la bels is def ined in t he da t a ba s e f ield of t he record t ha t is going t o be pr int ed.
EXAMPLE The number of pr int ed records ca n be def ined us ing a v a r ia ble v a lue. I t s v a lue ma y be s et in a not her la bel or f orm object .
Click Next to proceed or Finish to continue working with the object.Read more about how to define the number of printed copies here.
Step 4: Create ObjectsThis step decides whether new objects that display the content retrieved from data-base fields should be added to a label/form or not.Create Objects step is visible when:
l starting the database wizard from Designer Data tab ribbon and adding a new database by clicking the database button
l starting the wizard in Data Source Explorer or using a generic object Add data-base selector
TIP: The Create Objects step differs if you are adding a database while designing a label or a form. See the differences below.
Create Objects step for label designing:
l Create a label text object for each field: adds a Text object that contains data-base field content.
l Do not create any label objects: skips adding new objects.
Create Objects step for form designing:
l Create an edit field object for each field: adds an edit field object to the form. The added object(s) contains database field content.
l Create a form table object: adds a database table object to a form. The added object(s) contains database field content.
l Do not create any label objects: skips adding new objects.
NOTE The number of added objects depends on the number of fields in the database.
Click Next.
www.nicelabel.com 134

Step 5: Data Preview and Other Table SettingsThis step gives a preview of the data retrieved from the database. It also offers addi-tional table settings such as filtering and sorting.Data tab displays a preview of data retrieved from the database file. You can use search controls at the top of the preview section to find a specific record.
NOTE Data preview shows up to 1000 rows.
Filter tab filters out the database file records. It allows you to define filtering conditions to be used when retrieving the data.
l Add condition: specifies single line condition(s) that filters out the content that meets the set criteria.
l Add group: specifies group(s) of conditions that filter out the content that meets the set criteria.
Sorting tab allows you to sort the retrieved data. Sorting is done for all of the fields that are added to the sorting list. Each field can be in ascending or descending order.Data Retrieving tab defines how the data should be retrieved from the connected data-base file.SQL tab offers a preview of the generated SQL statements.Read more details about database table configuration here.Click Finish. The database is ready to be used as label or form object data source.
Database Wizard for Text FileThis section describes how to use a text file as data source in label or form objects. A text file is connected to an object using the Designer Step-by-Step Database Wizard.
Step 0: Text File Structure WizardText File Structure Wizard window opens if a structure for a text file you are con-necting hasn't been defined previously.The steps for completing the Text File Structure Wizard are described in a dedicated section.
NOTE After finishing this procedure, a text definition .sch file with the same name as the text database file and is created in the same folder. Next time the wizard is used on the same file, this procedure is no longer required.
Step 1: Connection SettingsThis step defines the text file path.File name defines the location of the Text file to be used. Enter the location manually or click Browse to locate it in the system.Test Connection button starts a connection testing procedure. It checks if the Designer can successfully connect to the database or not.Click Next.
Step 2: Tables and FieldsThis step defines which database table and which fields of this table should be used as data source.Available fields lists the available fields (columns) in the selected database.Selected fields lists the fields (columns) which will be included in the database table. Click Add > or < Remove buttons to add or remove the fields from the Selected fields.
www.nicelabel.com 135

NOTE When editing an existing database, a field cannot be removed if used in a script, function, action, or connected to a label or form object.
Click Next.
NOTE Table selection is not available when adding a text file as a database. The entire text file is treated as a single database table.
Step 3: Label Copies Per RecordThis step specifies the number of label copies to be printed for each database record.Fixed number of printed labels lets you insert the number of copies manually.Dynamically defined number of printed labels sets the number dynamically using a data source value.
EXAMPLE The number of pr int ed la bels is def ined in t he da t a ba s e f ield of t he record t ha t is going t o be pr int ed.
EXAMPLE The number of pr int ed records ca n be def ined us ing a v a r ia ble v a lue. I t s v a lue ma y be s et in a not her la bel or f orm object .
Click Next to proceed or Finish to continue working with the object.Read more about how to define the number of printed copies here.
Step 4: Create ObjectsThis step decides whether new objects that display the content retrieved from data-base fields should be added to a label/form or not.Create Objects step is visible when:
l starting the database wizard from Designer Data tab ribbon and adding a new database by clicking the database button
l starting the wizard in Data Source Explorer or using a generic object Add data-base selector
TIP: The Create Objects step differs if you are adding a database while designing a label or a form. See the differences below.
Create Objects step for label designing:
l Create a label text object for each field: adds a Text object that contains data-base field content.
l Do not create any label objects: skips adding new objects.
Create Objects step for form designing:
l Create an edit field object for each field: adds an edit field object to the form. The added object(s) contains database field content.
l Create a form table object: adds a database table object to a form. The added object(s) contains database field content.
l Do not create any label objects: skips adding new objects.
NOTE The number of added objects depends on the number of fields in the database.
www.nicelabel.com 136

Click Next.
Step 5: Data Preview and Other Table SettingsThis step gives a preview of the data retrieved from the database. It also offers addi-tional table settings such as filtering and sorting.Data tab displays a preview of data retrieved from the database file. You can use search controls at the top of the preview section to find a specific record.
NOTE Data preview shows up to 1000 rows.
Fields tab displays available and selected database fields. Step 3 settings of this section can be redone on this tab.Data Retrieving tab defines how the data should be retrieved from the connected data-base file. Read more about data retrieving here.Click Finish. The database is ready to be used as label or form object data source.
Database Wizard for Oracle Database
PRODUCT LEVEL INFO This segment is applicable to NiceLabel Designer Pro and NiceLabel PowerForms.
This section describes how to add an Oracle database to a form or label object using the Designer Step-by-Step Database Wizard.
Step 1: Connection SettingsThis step defines the database connection details.
NOTE Oracle Database Provider is required to establishing a connection with Oracle database.
Data Source defines the Oracle Data Source name.Authentication provides user name and password for establishing the connection.Show Connection String displays the current database connection string and allows it to be inserted or modified.
WARNING Connection string editing is intended for advanced users only. To con-figure the database connection, users are encouraged to use standard inputs or Advanced Setup dialog.
Advanced Setup button opens the Data Link Properties window allowing the user to define the connection properties. Data Link Properties is a Windows system dialog – read more about its properties here.Test Connection button starts a connection testing procedure. It checks if the Designer can successfully connect to the database or not.
Step 2: Tables and FieldsThis step defines which database table and which fields of this table should be used as data source.Available fields lists the available fields (columns) in the selected database.Selected fields lists the fields (columns) which will be included in the database table. Click Add > or < Remove buttons to add or remove the fields from the Selected fields.
NOTE When editing an existing database, a field cannot be removed if used in a script, function, action, or connected to a label or form object.
Click Next.
www.nicelabel.com 137

Step 3: Label Copies Per RecordThis step specifies the number of label copies to be printed for each database record.Fixed number of printed labels lets you insert the number of copies manually.Dynamically defined number of printed labels sets the number dynamically using a data source value.
EXAMPLE The number of pr int ed la bels is def ined in t he da t a ba s e f ield of t he record t ha t is going t o be pr int ed.
EXAMPLE The number of pr int ed records ca n be def ined us ing a v a r ia ble v a lue. I t s v a lue ma y be s et in a not her la bel or f orm object .
Click Next to proceed or Finish to continue working with the object.Read more about how to define the number of printed copies here.
Step 4: Create ObjectsThis step decides whether new objects that display the content retrieved from data-base fields should be added to a label/form or not.Create Objects step is visible when:
l starting the database wizard from Designer Data tab ribbon and adding a new database by clicking the database button
l starting the wizard in Data Source Explorer or using a generic object Add data-base selector
TIP: The Create Objects step differs if you are adding a database while designing a label or a form. See the differences below.
Create Objects step for label designing:
l Create a label text object for each field: adds a Text object that contains data-base field content.
l Do not create any label objects: skips adding new objects.
Create Objects step for form designing:
l Create an edit field object for each field: adds an edit field object to the form. The added object(s) contains database field content.
l Create a form table object: adds a database table object to a form. The added object(s) contains database field content.
l Do not create any label objects: skips adding new objects.
NOTE The number of added objects depends on the number of fields in the database.
Click Next.
Step 5: Data Preview and Other Table SettingsThis step gives a preview of the data retrieved from the database. It also offers addi-tional table settings such as filtering and sorting.Data tab displays a preview of data retrieved from the database file. You can use search controls at the top of the preview section to find a specific record.
NOTE Data preview shows up to 1000 rows.
www.nicelabel.com 138

Filter tab filters out the database file records. It allows you to define filtering conditions to be used when retrieving the data.
l Add condition: specifies single line condition(s) that filters out the content that meets the set criteria.
l Add group: specifies group(s) of conditions that filter out the content that meets the set criteria.
Sorting tab allows you to sort the retrieved data. Sorting is done for all of the fields that are added to the sorting list. Each field can be in ascending or descending order.Data Retrieving tab defines how the data should be retrieved from the connected data-base file.SQL tab offers a preview of the generated SQL statements.Read more details about database table configuration here.Click Finish. The database is ready to be used as a label or form object data source.
Database Wizard for MySQL Database
PRODUCT LEVEL INFO This segment is applicable to NiceLabel Designer Pro and NiceLabel PowerForms.
This section describes how to add a MySQL database to a form or label object using the Designer Step-by-Step Database Wizard.
Step 1: Connection SettingsThis step defines the MySQL database connection details.Database defines the exact database on a server.Host defines the database address.Port defines the port of the database server.Authentication provides user name and password for establishing the connection.Test Connection button starts a connection testing procedure. It checks if the Designer can successfully connect to the database or not.
Step 2: Tables and FieldsThis step defines which database table and which fields of this table should be used as data source.Available fields lists the available fields (columns) in the selected database.Selected fields lists the fields (columns) which will be included in the database table. Click Add > or < Remove buttons to add or remove the fields from the Selected fields.
NOTE When editing an existing database, a field cannot be removed if used in a script, function, action, or connected to a label or form object.
Click Next.
Step 3: Label Copies Per RecordThis step specifies the number of label copies to be printed for each database record.Fixed number of printed labels lets you insert the number of copies manually.Dynamically defined number of printed labels sets the number dynamically using a data source value.
EXAMPLE The number of pr int ed la bels is def ined in t he da t a ba s e f ield of t he record t ha t is going t o be pr int ed.
www.nicelabel.com 139

EXAMPLE The number of pr int ed records ca n be def ined us ing a v a r ia ble v a lue. I t s v a lue ma y be s et in a not her la bel or f orm object .
Click Next to proceed or Finish to continue working with the object.Read more about how to define the number of printed copies here.
Step 4: Create ObjectsThis step decides whether new objects that display the content retrieved from data-base fields should be added to a label/form or not.Create Objects step is visible when:
l starting the database wizard from Designer Data tab ribbon and adding a new database by clicking the database button
l starting the wizard in Data Source Explorer or using a generic object Add data-base selector
TIP: The Create Objects step differs if you are adding a database while designing a label or a form. See the differences below.
Create Objects step for label designing:
l Create a label text object for each field: adds a Text object that contains data-base field content.
l Do not create any label objects: skips adding new objects.
Create Objects step for form designing:
l Create an edit field object for each field: adds an edit field object to the form. The added object(s) contains database field content.
l Create a form table object: adds a database table object to a form. The added object(s) contains database field content.
l Do not create any label objects: skips adding new objects.
NOTE The number of added objects depends on the number of fields in the database.
Click Next.
Step 5: Data Preview and Other Table SettingsThis step gives a preview of the data retrieved from the database. It also offers addi-tional table settings such as filtering and sorting.Data tab displays a preview of data retrieved from the database file. You can use search controls at the top of the preview section to find a specific record.
NOTE Data preview shows up to 1000 rows.
Filter tab filters out the database file records. It allows you to define filtering conditions to be used when retrieving the data.
l Add condition: specifies single line condition(s) that filters out the content that meets the set criteria.
l Add group: specifies group(s) of conditions that filter out the content that meets the set criteria.
www.nicelabel.com 140

Sorting tab allows you to sort the retrieved data. Sorting is done for all of the fields that are added to the sorting list. Each field can be in ascending or descending order.Data Retrieving tab defines how the data should be retrieved from the connected data-base file.SQL tab offers a preview of the generated SQL statements.Read more details about database table configuration here.Click Finish. The database is ready to be used as a label or form object data source.
Database Wizard for Adding Databases via OLE DB
PRODUCT LEVEL INFO This segment is applicable to NiceLabel Designer Pro and NiceLabel PowerForms.
This section describes how to add various types of databases via OLE DB source to a form or label object using the Designer Step-by-Step Database Wizard.The OLE DB extracts data from a variety of OLE DB-compliant relational databases by using a database table, a view, or an SQL command.
EXAMPLE OLE D B ca n ext ra ct da t a f rom t a bles in Micros of t Acces s or SQL Serv er da t a -ba s es .
Step 1: Connection SettingsThis step defines the OLE DB connection details.Provider defines the provider to be used for accessing the data by exposing the OLE DB interfaces.Authentication provides user name and password for establishing the connection.Test Connection button starts a connection testing procedure. It checks if the Designer can successfully connect to the database or not.Authentication provides user name and password that are used for the connection.Advanced Configuration options are:
l Automatically browse for tables automatically displays the available OLE database tables. If this checkbox is cleared, you will have to enter the table name manually.
Show Connection String displays the current database connection string and allows it to be inserted or modified.
WARNING Connection string editing is intended for advanced users only. To con-figure the database connection, users are encouraged to use standard inputs or Advanced Setup dialog.
Advanced Setup button opens the Data Link Properties window allowing the user to define the connection properties. Data Link Properties is a Windows system dialog – read more about its properties here.
NOTE When connecting to a password protected database, make sure the Allow sav-ing password option is selected. If not, even after a successful Test Connection pro-cedure, database access is not going to be granted.
www.nicelabel.com 141

Test Connection button starts a connection testing procedure to confirm if a con-nection with database has been established successfully. A confirmation or error mes-sage appears.Click Next.
Step 2: Tables and FieldsThis step defines which database table and which fields of this table should be used as data source.Available fields lists the available fields (columns) in the selected database.Selected fields lists the fields (columns) which will be included in the database table. Click Add > or < Remove buttons to add or remove the fields from the Selected fields.
NOTE When editing an existing database, a field cannot be removed if used in a script, function, action, or connected to a label or form object.
Click Next.
Step 3: Label Copies Per RecordThis step specifies the number of label copies to be printed for each database record.Fixed number of printed labels lets you insert the number of copies manually.Dynamically defined number of printed labels sets the number dynamically using a data source value.
EXAMPLE The number of pr int ed la bels is def ined in t he da t a ba s e f ield of t he record t ha t is going t o be pr int ed.
EXAMPLE The number of pr int ed records ca n be def ined us ing a v a r ia ble v a lue. I t s v a lue ma y be s et in a not her la bel or f orm object .
Click Next to proceed or Finish to continue working with the object.Read more about how to define the number of printed copies here.
Step 4: Create ObjectsThis step decides whether new objects that display the content retrieved from data-base fields should be added to a label/form or not.Create Objects step is visible when:
www.nicelabel.com 142

l starting the database wizard from Designer Data tab ribbon and adding a new database by clicking the database button
l starting the wizard in Data Source Explorer or using a generic object Add data-base selector
TIP: The Create Objects step differs if you are adding a database while designing a label or a form. See the differences below.
Create Objects step for label designing:
l Create a label text object for each field: adds a Text object that contains data-base field content.
l Do not create any label objects: skips adding new objects.
Create Objects step for form designing:
l Create an edit field object for each field: adds an edit field object to the form. The added object(s) contains database field content.
l Create a form table object: adds a database table object to a form. The added object(s) contains database field content.
l Do not create any label objects: skips adding new objects.
NOTE The number of added objects depends on the number of fields in the database.
Click Next.
Step 5: Data Preview and Other Table SettingsThis step gives a preview of the data retrieved from the database. It also offers addi-tional table settings such as filtering and sorting.Data tab displays a preview of data retrieved from the database file. You can use search controls at the top of the preview section to find a specific record.
NOTE Data preview shows up to 1000 rows.
Filter tab filters out the database file records. It allows you to define filtering conditions to be used when retrieving the data.
l Add condition: specifies single line condition(s) that filters out the content that meets the set criteria.
l Add group: specifies group(s) of conditions that filter out the content that meets the set criteria.
Sorting tab allows you to sort the retrieved data. Sorting is done for all of the fields that are added to the sorting list. Each field can be in ascending or descending order.Data Retrieving tab defines how the data should be retrieved from the connected data-base file.SQL tab offers a preview of the generated SQL statements.Read more details about database table configuration here.Click Finish. The database is ready to be used as a label or form object data source.
www.nicelabel.com 143

Database Wizard for ODBC Data Sources
PRODUCT LEVEL INFO This segment is applicable to NiceLabel Designer Pro and NiceLabel PowerForms.
This section describes how to work with DesignerStep-by-Step Database Wizard when adding an ODBC data source.The Microsoft® ODBC Data Source Administrator manages database drivers and data sources. This application is located in the Windows Control Panel under Administrative Tools.For information about detailed ODBC Administrator procedures, open the ODBC Data Source Administrator dialog box and click Help.
Step 1: Connection informationThis step defines the database connection details.Data Source defines the source to retrieve the data from.Driver displays the database driver according to the selected data source.ODBC Administrator button opens the system ODBC administration dialog. See more details about the dialog here.Test Connection button starts a connection testing procedure. It checks if the Designer can successfully connect to the database or not.
Step 2: Tables and FieldsThis step defines which database table and which fields of this table should be used as data source.Available fields lists the available fields (columns) in the selected database.Selected fields lists the fields (columns) which will be included in the database table. Click Add > or < Remove buttons to add or remove the fields from the Selected fields.
NOTE When editing an existing database, a field cannot be removed if used in a script, function, action, or connected to a label or form object.
Click Next.
Step 3: Label Copies Per RecordThis step specifies the number of label copies to be printed for each database record.Fixed number of printed labels lets you insert the number of copies manually.Dynamically defined number of printed labels sets the number dynamically using a data source value.
EXAMPLE The number of pr int ed la bels is def ined in t he da t a ba s e f ield of t he record t ha t is going t o be pr int ed.
EXAMPLE The number of pr int ed records ca n be def ined us ing a v a r ia ble v a lue. I t s v a lue ma y be s et in a not her la bel or f orm object .
Click Next to proceed or Finish to continue working with the object.Read more about how to define the number of printed copies here.
Step 4: Create ObjectsThis step decides whether new objects that display the content retrieved from data-base fields should be added to a label/form or not.Create Objects step is visible when:
www.nicelabel.com 144
l starting the database wizard from Designer Data tab ribbon and adding a new database by clicking the database button
l starting the wizard in Data Source Explorer or using a generic object Add data-base selector
TIP: The Create Objects step differs if you are adding a database while designing a label or a form. See the differences below.
Create Objects step for label designing:
l Create a label text object for each field: adds a Text object that contains data-base field content.
l Do not create any label objects: skips adding new objects.
Create Objects step for form designing:
l Create an edit field object for each field: adds an edit field object to the form. The added object(s) contains database field content.
l Create a form table object: adds a database table object to a form. The added object(s) contains database field content.
l Do not create any label objects: skips adding new objects.
NOTE The number of added objects depends on the number of fields in the database.
Click Next.
Step 5: Data Preview and Other Table SettingsThis step gives a preview of the data retrieved from the database. It also offers addi-tional table settings such as filtering and sorting.Data tab displays a preview of data retrieved from the database file. You can use search controls at the top of the preview section to find a specific record.
NOTE Data preview shows up to 1000 rows.
Filter tab filters out the database file records. It allows you to define filtering conditions to be used when retrieving the data.
l Add condition: specifies single line condition(s) that filters out the content that meets the set criteria.
l Add group: specifies group(s) of conditions that filter out the content that meets the set criteria.
Sorting tab allows you to sort the retrieved data. Sorting is done for all of the fields that are added to the sorting list. Each field can be in ascending or descending order.Data Retrieving tab defines how the data should be retrieved from the connected data-base file.SQL tab offers a preview of the generated SQL statements.Read more details about database table configuration here.Click Finish. The database is ready to be used as a label or form object data source.
www.nicelabel.com 145
Editing A DatabaseEdit Database button starts the Step-by-Step Database Wizard for configuring an exist-ing database. To properly reconfigure a database that has already been added, follow the below listed steps.
Step 1: Define Database TableUse this step select among the existing databases. Select the database and the table you wish to edit. Click Next to proceed.
Step 2: Connection SettingsThis step defines the database connection parameters.File name defines the database file location.Advanced Setup opens the system configuration dialog. Data Link Properties window allows you to set the connection properties. Data Link Properties is a Windows system dialog – read more about its properties here.Test Connection button starts a connection testing procedure. It checks if the Designer can successfully connect to the database or not.Click Next.
Step 3: Table and FieldsThis step defines which database table and which fields of this table should be used as data source.Available fields lists the available fields (columns) in the selected database.Selected fields lists the fields (columns) which will be included in the database table. Click Add > or < Remove buttons to add or remove the fields from the Selected fields.
NOTE When editing an existing database, a field cannot be removed if used in a script, function, action, or connected to a label or form object.
Click Next.
Step 4: Label Copies Per RecordThis step specifies the number of label copies to be printed for each database record.Fixed number of printed labels lets you insert the number of copies manually.Dynamically defined number of printed labels sets the number dynamically using a data source value.
EXAMPLE The number of pr int ed la bels is def ined in t he da t a ba s e f ield of t he record t ha t is going t o be pr int ed.
EXAMPLE The number of pr int ed records ca n be def ined us ing a v a r ia ble v a lue. I t s v a lue ma y be s et in a not her la bel or f orm object .
Click Next to proceed or Finish to continue working with the object.Read more about how to define the number of printed copies here.
Step 5: Create ObjectsThis step decides whether new objects that display the content retrieved from data-base fields should be added to a label/form or not.Create Objects step is visible when:
www.nicelabel.com 146

l starting the database wizard from Designer Data tab ribbon and adding a new database by clicking the database button
l starting the wizard in Data Source Explorer or using a generic object Add data-base selector
TIP: The Create Objects step differs if you are adding a database while designing a label or a form. See the differences below.
Create Objects step for label designing:
l Create a label text object for each field: adds a Text object that contains data-base field content.
l Do not create any label objects: skips adding new objects.
Create Objects step for form designing:
l Create an edit field object for each field: adds an edit field object to the form. The added object(s) contains database field content.
l Create a form table object: adds a database table object to a form. The added object(s) contains database field content.
l Do not create any label objects: skips adding new objects.
NOTE The number of added objects depends on the number of fields in the database.
Click Next.
Step 6: Data Preview and Other Table SettingsThis step gives a preview of the data retrieved from the database. It also offers addi-tional table settings such as filtering and sorting.Data tab displays a preview of data retrieved from the database file. You can use search controls at the top of the preview section to find a specific record.
NOTE Data preview shows up to 1000 rows.
Filter tab filters out the database file records. It allows you to define filtering conditions to be used when retrieving the data.
l Add condition: specifies single line condition(s) that filters out the content that meets the set criteria.
l Add group: specifies group(s) of conditions that filter out the content that meets the set criteria.
Sorting tab allows you to sort the retrieved data. Sorting is done for all of the fields that are added to the sorting list. Each field can be in ascending or descending order.Data Retrieving tab defines how the data should be retrieved from the connected data-base file.SQL tab offers a preview of the generated SQL statements.Read more details about database table configuration here.Click Finish.
www.nicelabel.com 147

Manual Database Connection SetupPRODUCT LEVEL INFO This segment is applicable to NiceLabel Designer Pro and NiceLabel PowerForms.
To establish a database connection manually gives you complete control over database connection settings and configuration options.
NOTE This option is intended for advanced users. It allows detailed configuration and offers all of the available database connection settings. NiceLabel recommends using the Database Wizard.
Manual database connections are done in three steps. First step is to create the con-nection. Second step is to choose which database tables will be used. Third step would be to configure the tables.To connect to a database manually, follow the procedures described in the below listed topics:
l Connect to Text File
l Connect to Microsoft Excel File
l Connect to Microsoft Access File
l Connect to Microsoft SQL Server File
l Connect to Oracle Database
l Connect to MySQL Database
l Connect to OLE Database
l Connect to ODBC Data Source
Connect To Text Fi leText File database can be used as a dynamic data source for label objects or form objects.Text files require some additional work before they are transformed into a "real" data-base. At start, any text file contains data values but has no information about the data structure, name fields, and maximum field lengths. These missing parameters need to be specified before the text file turns into a database which can be used as an object data source.
EXAMPLE A widely us ed t ext da t a ba s e exa mple a re .cs v f iles . I n a .cs v f ile, a delimit er s epa ra t es t he da t a ba s e f ields . Ea ch line prov ides t he da t a f or a s ingle la bel – t heref ore, it ca n be under-s t ood a s a " record" in da t a ba s e nomencla t ure.
To manually connect an object to a text file database, complete the following steps.
Step 1: Select Database ConnectionOpen the Dynamic Data Manager. This dialog enables the user to manage the variable data sources for label and form objects. Click Database Connections button in the Dynamic Data Manager ribbon and select Text File as the preferred database type. Click OK.
www.nicelabel.com 148

Step 2: Set Connection InformationConnection Information window defines the database file details.File name defines the file location.Test Connection button starts a connection testing procedure. It shows whether or not a connection with the database has been established. A confirmation or error message appears depending on the connection status.
Step 2a: Finish Text File Structure WizardText File Structure Wizard window opens if a structure for a text file you are con-necting hasn't been defined previously.The steps for completing the Text File Structure Wizard are described in a dedicated section.
NOTE After finishing this procedure, a text definition .sch file with the same name as the text database file and is created in the same folder. Next time the wizard is used on the same file, this procedure is no longer required.
Step 3: Define Database Connection SettingsRead how to set database connection details for text files here.
Step 4: Define Database field SettingsRead how to set the connected database field properties here.
Connect To Microsoft Excel Fi leMicrosoft Excel databases can be used as a dynamic data source for label objects or form objects.To manually connect an object to an Excel file database, complete the below listed steps.
Step 1: Create a database ConnectionOpen the Dynamic Data Manager. This dialog enables the user to manage the variable data sources for label and form objects. Click Database Connections button in the Dynamic Data Manager ribbon and select Microsoft Excel as the preferred database type. Connection Information window defines the database file details.File name defines the file location. Advanced Setup button opens the Data Link Properties window. This window allows you to define the connection properties. Data Link Properties is a Windows system dia-log – read more about its properties here.Test Connection button starts a connection testing procedure. It shows if a connection with the database has been established successfully. A confirmation or error message appears depending on the connection status.Click Next.Step 2: Setting the connection name and descriptionConnection name defines the name for the connected database file. By default, it dis-plays the filename of the connected file. Insert a new name to make it easy to be fond in the Designer Data Source explorer.Description is a field that allows adding additional information and suggestions for the connected database.
www.nicelabel.com 149

Connection identifies the currently connected database file. To replace the currently connected file, click the Connection Setup button. New Database Connection Prop-erties window reappears – repeat step 1 to connect to an alternative database file.
Step 2: Add or remove Database TablesRead how to set database connection details for Excel files here.
Step 3: Set Table Configuration DetailsRead how to configure the connected table here.
Connect To A Microsoft Access Fi leMicrosoft Access databases can be used as a dynamic data source for label objects or form objects.To manually connect an object to an Access file database, complete the following steps.
Step 1: Select Database ConnectionOpen the Dynamic Data Manager. This dialog enables the user to manage the variable data sources for label and form objects. Click Database Connections button in the Dynamic Data Manager ribbon and select Microsoft Access as the preferred database type. Click OK.
Step 2: Set Connection InformationConnection Information window defines the database file details.File name defines the file location. Authentication provides User name and Password for connecting to a protected file.Advanced Setup button opens the Data Link Properties window. This window allows you to define the connection properties. Data Link Properties is a Windows system dia-log – read more about its properties here.Test Connection button starts a connection testing procedure. It shows if a connection with the database has been established successfully. A confirmation or error message appears depending on the connection status.Click OK.
Step 3: Configure Database ConnectionRead how to set database connection details files here.
Step 4: Set Table Configuration DetailsRead how to configure the connected table here.
Step 5: Define Database field DetailsRead how to configure the connected table here.Click OK. The database is connected and ready to be used.
Connect To A Microsoft SQL Server Database
PRODUCT LEVEL INFO This segment is applicable to NiceLabel Designer Pro and NiceLabel PowerForms.
Microsoft SQL Server database can be used as a dynamic data source for label objects or form objects.
www.nicelabel.com 150

To manually connect an object to a Microsoft SQL Server database, complete the fol-lowing steps:
Step 1: Select Database ConnectionOpen the Dynamic Data Manager. This dialog enables the user to manage the variable data sources for label and form objects. Click Database Connections button in the Dynamic Data Manager ribbon and select Microsoft SQL Server as the preferred database type.
Step 2: Connection informationThis step defines the database file connection details.Server defines the database server to be used for the connection. The available serv-ers are listed automatically. To add a non-listed server, insert its name or location manu-ally.Authentication selects the user authentication type.
l Use Windows authentication to login using your Windows domain credential.
l Use SQL Server authentication to login using the SQL server credentials.
Database selection selects the database on the previously selected server. This data-base is going to be used as a data source for the selected label or form object.
l Database defines the server database to connect to.
Show Connection String displays the current database connection string and allows it to be inserted or modified.
WARNING Connection string editing is intended for advanced users only. To con-figure the database connection, users are encouraged to use standard dialog inputs in the dialog box.
Test Connection button starts a connection testing procedure. It shows if connection with the database has been established successfully. A confirmation or error message appears depending on the connection status.
Step 3: Configure Database ConnectionRead how to set database connection details files here.
Step 4: Set Table Configuration DetailsRead how to configure the connected table here.
Step 5: Define Database field DetailsRead how to configure the connected table here.Click OK. The database is connected and ready to be used.
Connect To An Oracle Database
PRODUCT LEVEL INFO This segment is applicable to NiceLabel Designer Pro and NiceLabel PowerForms.
Oracle database can be used as a dynamic data source for label objects or form objects. To manually connect an object to an Oracle database, complete the following steps:
www.nicelabel.com 151

Step 1: Select Database ConnectionOpen the Dynamic Data Manager. This dialog enables the user to manage the variable data sources for label and form objects. Click Database Connections button in the Dynamic Data Manager ribbon and select Oracle as the preferred database type.
Step 2: Connection informationThis step defines the database file connection details.Server defines the database server to be used for the connection. The available serv-ers are listed automatically. To add a non-listed server, insert its name or location manu-ally.Authentication selects the user authentication type.
l Use Windows authentication to login using your Windows domain credential.
l Use SQL Server authentication to login using the SQL server credentials.
Database selection selects the database on the previously selected server. This data-base is going to be used as a data source for the selected label or form object.
l Database defines the server database to connect to.
Show Connection String displays the current database connection string and allows it to be inserted or modified.
WARNING Connection string editing is intended for advanced users only. To con-figure the database connection, users are encouraged to use standard dialog inputs in the dialog box.
Test Connection button starts a connection testing procedure. It shows if connection with the database has been established successfully. A confirmation or error message appears depending on the connection status.Click OK.
Step 3: Configure Database ConnectionRead how to set database connection details files here.
Step 4: Set Table Configuration DetailsRead how to configure the connected table here.
Step 5: Define Database field DetailsRead how to configure the connected table here.Click OK. The database is connected and ready to be used.
Connect To MySQL Database
PRODUCT LEVEL INFO This segment is applicable to NiceLabel Designer Pro and NiceLabel PowerForms.
MySQL database can be used as a dynamic data source for label objects or form objects. To manually connect an object to a MySQL database, complete the following steps:
www.nicelabel.com 152

Step 1: Select Database ConnectionOpen the Dynamic Data Manager. This dialog enables the user to manage the variable data sources for label and form objects. Click Database Connections button in the Dynamic Data Manager ribbon and select MySQL as the preferred database type.
Step 2: Connection informationThis step defines the database file connection details.Database defines the exact database on a server. Enter the correct name. Host defines the database server IP address or name.Port defines the port of the database server.Authentication provides user name and password for establishing the connection.Test Connection button starts a connection testing procedure. It checks if the Designer can successfully connect to the database or not.
Step 3: Configure Database ConnectionRead how to set database connection details files here.
Step 4: Set Table Configuration DetailsRead how to configure the connected table here.
Step 5: Define Database field DetailsRead how to configure the connected table here.Click OK. The database is connected and ready to be used.
Connect To Other Databases (OLE DB)
PRODUCT LEVEL INFO This segment is applicable to NiceLabel Designer Pro and NiceLabel PowerForms.
Various types of databases can be connected to label objects or form objects via OLE DB source.OLE DB extracts data from a variety of OLE DB-compliant relational databases by using a database table, a view, or an SQL command.
EXAMPLE OLE D B ca n ext ra ct da t a f rom t a bles in Micros of t Acces s or SQL Serv er da t a -ba s es .
To manually connect an object to other databases via OLE DB, complete the following steps:
Step 1: Select Database ConnectionOpen the Dynamic Data Manager. This dialog enables the user to manage the variable data sources for label and form objects. Click Database Connections button in the Dynamic Data Manager ribbon and select Other Databases (OLE DB) as the preferred database type.
Step 2: Connection informationThis step defines the OLE DB connection details.Provider defines the provider to be used for accessing the data by exposing the OLE DB interfaces.Authentication provides user name and password for establishing the connection.
www.nicelabel.com 153

Test Connection button starts a connection testing procedure. It checks if the Designer can successfully connect to the database or not.Authentication provides user name and password that are used for the connection.Advanced Configuration options are:
l Automatically browse for tables (selected by default) automatically displays the available OLE database tables. Cleared checkbox skips this step.
Show Connection String displays the current database connection string and allows it to be inserted or modified.
WARNING Connection string editing is intended for advanced users only. To con-figure the database connection, users are encouraged to use standard inputs or Advanced Setup dialog.
Advanced Setup button opens the Data Link Properties window allowing the user to define the connection properties. Data Link Properties is a Windows system dialog – read more about its properties here.
NOTE When connecting to a password protected database, make sure the Allow sav-ing password option is selected. If not, even after a successful Test Connection pro-cedure, database access is not going to be granted.
Test Connection button starts a connection testing procedure to confirm if a con-nection with database has been established successfully. A confirmation or error mes-sage appears.Click OK.
Step 3: Configure Database ConnectionRead how to set database connection details files here.
Step 4: Set Table Configuration DetailsRead how to configure the connected table here.
Step 5: Define Database field DetailsRead how to configure the connected table here.Click OK. The database is connected and ready to be used.
www.nicelabel.com 154

Connect To ODBC Data Source
PRODUCT LEVEL INFO This segment is applicable to NiceLabel Designer Pro and NiceLabel PowerForms.
Various databases can be connected to label objects or form objects via ODBC Data Source Administrator. To manually connect an object to a database, using the ODBC, complete the following steps:
Step 1: Select Database ConnectionOpen the Dynamic Data Manager. This dialog enables the user to manage the variable data sources for label and form objects. Click Database Connections button in the Dynamic Data Manager ribbon and select ODBC Data Source as the preferred database type.
Step 2: Connection informationThis step defines the ODBC connection details.Data Source defines the source to retrieve the data from.Driver displays the database driver according to the selected data source.ODBC Administrator button opens the system ODBC administration dialog. Read more details about the dialog here.Test Connection button starts a connection testing procedure. It checks if the Designer can successfully connect to the database or not.Click OK.
Step 3: Configure Database ConnectionRead how to set database connection details files here.
Step 4: Set Table Configuration DetailsRead how to configure the connected table here.
Step 5: Define Database field DetailsRead how to configure the connected table here.Click OK. The database is connected and ready to be used.
Add Or Remove Database TablesExisting database connections are configurable at any time. To add or remove tables from a connected database file, open the Dynamic Data Manager and click the database in the data source explorer.Database Connection group gives information on the connection database.
l Connection name: defines the name for the connected database file.
l Description: allows adding additional information and suggestions for the con-nected database.
l Connection identifies: currently connected database file. To replace the cur-rently connected file, click the Connection Setup button. New Database Con-nection Properties window reappears – repeat step 1 to connect to an alternative database file.
www.nicelabel.com 155
NOTE You can add the same database table more than once if different record fil-tering or sorting is required.
Tables group displays the available database tables and the tables that are selected to be used.
l Available tables: frame with available tables of the connected database. Select the tables from the list.
l Selected tables: tables to be further used as the data source.
Tables can be added to or removed from the Selected tables using Add > and < Remove buttons. To use the entire range of available tables, use Add all >> and << Remove All buttons.
l Refresh Tables: rereads the connected database file and displays the refreshed available tables.
NOTE Tables that are already used as any object's data source cannot be removed. A warning appears when trying to remove such table.
Table ConfigurationTable Configuration group allows you to configure the connected database table. Use the tabs below to browse through various configuration options.
l Table name: displays the selected database table's name.
l Table alias: gives a unique display name to a table. Table alias is useful when the same table is added for more than once under the same database connection. Alias identifies these tables when used in the Designer.
Fields TabAvailable Fields frame lists the available fields of the connected database table. Select the fields from the list.Selected fields displays the fields to be further used as the data source.The fields can be added to or removed from the Selected fields using Add > and < Remove buttons. To use the entire range of available fields , use Add all >> and << Remove All buttons.Refresh Fields rereads the connected database table and displays the refreshed avail-able fields.
Filter TabEnable filter commands activates the table filter. Use it to filter out the displayed data-base fields as defined by a condition or a group of conditions.Add condition button creates a custom filter. Select standard qualifiers: equals, does not equal, is less than, is less than or equal to, is greater than, is greater than or equal, like, not like, is blank, is not blank.Add group button activates nesting two or more conditions for a filter. Use a group to build a more complex filtering condition for a field. The conditions can be joined using AND (all conditions must be true in order to display the record) or OR (only one condition must be true in order to display the record) logical qualifiers.
www.nicelabel.com 156
The list of defined conditions and groups is placed below the table. Remove the filter(s) by clicking the Remove button.
Sorting TabField column shows the order in which the database fields are displayed in a table. To change the order, select a field and click Move up or Move down to place it at a desired position.Sort Order defines whether the records as displayed Ascending or Descending. Select the sort order from the drop-down menu.
Data Retrieving TabData selection at print time initialization group defines database print time record selection and printing options.
l Show record selection at print time: enables manual selection of database records before printing. The content of selected records is displayed in label objects and printed.
When enabled, this option adds a selection column to the database table on the print dialog. This column allows individual selection of the records to be prin-ted.
l Default print: defines which database records would be selected in the print dia-log by default.
l All records: prints out the entire range of selected records.
l First record: only prints out the first record in a table.
l Last record: only prints out the last record in a table.
Number of copies per record sets print quantities for individual database records.
l Copies per record: defines how many labels should be printed per single record.
l Number of copies can be changed at print time: allows setting the number of printed label copies for a single database record. When enabled, this option adds a column to the database table. This column allows individual setting of print quant-ity for the selected record.
Advanced options allow you to set how multiple records can be displayed. l Collect records: displays the content of multiple records in a single object.
l Delimiter: defines how the records are separated when displayed in an object. Set New line (CR/LF) or select a special character from the list.
l Limit number of collected records: enables the maximum number of displayed records in a single object.
l Records: sets the maximum number of records to be displayed in an object. l Span multiple labels: enables the records to be displayed in an object
over multiple labels. l Use the same record for entire print job: prints out the selected record only.
SQL TabSQL tab allows creating SQL statements. Commands in SQL statements determine how to obtain the data from the database. When creating a filter, the SQL sentence is auto-generated. Modify it or write your own sentence.
www.nicelabel.com 157
l Edit SQL: converts table object into a query object. This button allows defin-ing custom tables that are based on SQL queries.
NOTE This option is for experienced users only. If you make a mis-take and create an invalid SQL statement, the query results become unpredictable. No data will be returned from the database or connection to the database will become impossible.
l Export: saves the current SQL statement as an SQL file on a disk.
l Import: allows external SQL statements to be used with the current data-base.
Data TabData tab displays the connected database file table. Use search field and field selector to find the records.
Field ConfigurationDetails group allows defining the connected database field properties. Set these prop-erties to make the use of a database as simple and efficient as possible.
l Field name: defined automatically by the source database file.
l Field alias: gives a unique display name to a field.
WARNING When using Python or Visual Basic Script, use field alias names that con-tain alphanumeric and underscore characters only. The names must not start with a digit.
l Type: identifies the data type of a database field. This property depends on the connected database field and cannot be edited.
l Length: (not available for Text File) displays the field length as defined by the data-base.
l Code page: provides support for the character sets used in different countries or regions. Code pages are referred to by number – select the appropriate one from the drop down list.
Data sets the limitations for the field length.
l Limit field length (truncate excessive content): enables the maximum field length limitation. Extra characters are removed.
l Length (characters): defines the exact maximum field length using the num-ber of allowed characters.
Databases With Custom SQL QueriesDesigner allows defining custom tables that are based on SQL queries. Two methods are available for creating a custom SQL query:
1. Create a new SQL query.
Go to Dynamic Data Manager -> Database Connection Tables and click Create new query in the Available tables field.
www.nicelabel.com 158

2. Convert an existing database table into an query object.
Go to Dynamic Data Manager -> Table Configuration -> SQL Tab and click the Edit SQL button. This converts the connected database into a Query object.
NOTE This option is for experienced users only. If you make a mistake and create an invalid SQL statement, the query results become unpredictable. No data will be returned from the database or connection to the database will become impossible.
NOTE This option is not available for text database files.
Insert a custom query into the edit field. Click OK when done.
NOTE SQL statement field must not be left empty. An error appears if trying to con-tinue without defining the statement.
Using Text File Structure WizardA "real" database must contain structured data. Text databases lack data structure, which means that the structure must be defined before a text file can be used as data source. Define the structure using the Text File Structure Wizard.
NOTE Text File Structure Wizard opens if a text file you are connecting to has not been previously used as object data source.
To complete the text file structure wizard, complete the below described steps.
Step 1: WelcomeWelcome window displays the text file you are going to convert into a database and use as a data source of an object. Make sure the correct text file is displayed under Selected text file. Click Next.
Step 2: Data EncodingThis step sets the Encoding type. The following types are available:
l Auto
l ASCII
l UTF-8
l UTF-16
l UTF-16BE
When in doubt which encoding should be used, select Auto for automatic detection of encoding type. Auto identifies the encoding type by reading the BOM unicode character. If BOM is not included or is misinterpreted, Auto presumes, the text uses ASCII encoding. Inadequate character type identification might cause the database structure to be dis-played incorrectly.
NOTE While selecting the encoding type, check the preview field. Correct values must be displayed.
Click Next.
www.nicelabel.com 159

Step 3: Data StructureThis step defines the fields to be used in the text database. There are two options:
l Delimited: fields are separated by a delimiter.
l Fixed width: fields with predefined (fixed) length.
l First row contains field names: defines if the field names are included in the first row of the database file.
l Start import at row defines the row in the database file from which the data import starts. This option enables skipping the rows that do not include data.
Check the preview field. Click Next if the text content is displayed properly.
Step 4: Set Column BreaksThis step depends on the previously selected data structure option – Delimited or Fixed width.Delimited opens the Fields Delimiterwindow.
l Delimiter: defines the delimiting character. Select among the standard char-acters or insert a custom delimiter in Other field.
l Text qualifier: character that indicates textual content. Text qualifier should be used if a delimiter is a part of the text field content. Text qualifier should be used to enclose such field – the text between two text qualifiers is treated as a single field although it contains a delimiter.
Fixed width opens the Set Column Breaks window. Use mouse pointer to place the ver-tical lines where the data fields are going be separated. The lines indicate where new fields start. Click Next.
Step 5: FieldsFields window allows you to manipulate and fine-tune the field names and the order in which they are displayed. The below listed settings are also available:
l In case of Delimited fields, the Field Name can be customized.
l With Fixed width fields, the following settings are allowed:
l Include: includes a field in the selection.
l Field name: custom name for the field.
l Offset: separation line distance from the left table edge.
l Length: field length.
Click Finish. Text file database structure is set.
Internal Variables As Dynamic Data SourcePRODUCT LEVEL INFO This segment is applicable to NiceLabel Designer Pro and NiceLabel PowerForms.
www.nicelabel.com 160

An internal variable performs as a dynamic data source which holds a value that is auto-matically retrieved from a running application and system environment. Select internal variables by clicking the Internal Variables button in the Data Sources ribbon. Select the appropriate variable check boxes.
NOTE The variables in this set can neither be edited nor modified. Their value is updated with every printed label.
List of available internal variables with description:
LabelFileName The path and file name of the currently opened label file.
ShortLabelName The file name of the currently opened label file.
RequestedQuantity The quantity of labels requested for printing. This is the number of labels printed.
TotalQuantityPrinted Total quantity of the printed labels. The number is the sum of label quantities from all label batches.
CurrentBatchQuantity The number of labels reached in the current label batch. The value is reset at beginning of each label batch in the printing process.
LabelPrinterName The name of the printer driver currently selected for printing.
DefaultPrinterName The name of the default printer driver.
UserName The application username of the currently logged-in user. It will have a value only if in-application authen-tication is enabled.
SystemUserName The Windows user name of the currently logged-in user.
ComputerName The name of the computer on which the application is running.
SolutionFileName Current solution file name.
ShortSolutionFileName Current short solution file name.
SolutionFilePath Path to solution file name.
FormName The path and name of the form application used for label printing instead of Print dialog box.
ShortFormName Short name of the form application used for label print-ing instead of Print dialog box.
EPCData EPCData as read from the RFID tag.
LabelRevision Label Revision Description.
Global Variables As Dynamic Data SourcePRODUCT LEVEL INFO the use of Control Center is applicable to LMS Pro and LMS Enterprise only.
Global variable is a type of variable that can be shared among multiple labels. Once defined, it is stored outside the current label.
www.nicelabel.com 161

The global variable's last value is stored after each confirmation and with each print action. The stored values are useful when continued numbering from preceding print jobs is required. Global variable values are stored in a separate file on a disk or on a Con-trol Center.Global variables are created manually in Dynamic Data Manager or using a Control Center.
l Add and manage global variables.
l Configure global variables.
When creating a copy of the label file that uses global variables and using it on another computer, make sure the global variable source is accessible (file or Control Center).
NOTE If you skip this step, the labeling application won't find the corresponding global variable. A warning message will appear.
TIP: All label or solution global variables are managed in Data Source Explorer.
Adding Global Variables As Object Data SourcesTo add a new global variable in the Dynamic Data Manager, use one of the following meth-ods:
l Click Global Variable button in the dialog ribbon. Global variable configuration win-dow appears.
l Click Add new global variable under Global variables in Data Source Explorer. Global variable configuration window appears.
TIP: A new global variable is listed in the toolbar and ready to be used as a dynamic object content source. Add an object to the design surface and assign the global vari-able to it.
Global Variable Global variable is a type of variable that can be shared among multiple labels. Once it is defined, it is stored outside the current label.
NOTE If a global variable is not defined or inaccessible, a warning appears on the top of the dialog window. To crate a global variable, click the link inside the warning. Make sure the correct data source is defined in the Options dialog.
General TabAbout group of settings identifies the global variable and sets its definition.
l Persistent ID: identifier of the global variable. It serves as a unique reference from any connected source. Allowed values are 10000–99999.
l Name: unique global variable name. This name is used as a user-friendly identifier.
NOTE Avoid using non-alphanumerical characters when defining the variable name.
www.nicelabel.com 162

Enter the name to make the variable easy to find when listed among other vari-ables in the data source explorer.
l Description: is a field that allows adding additional information and suggestions.
l Current value: value that is assigned to a global variable when created. It is defined using one of the following methods:
l Manually entering a fixed value. Characters from any group of allowed char-acters are permitted.
l Using a special character:
l Special character can be entered manually using the less than/-greater than signs, e.g. <CR>, <LF> ...
l Special character can be selected from the drop down list.
Make sure the inserted current value meets the criteria defined with Output Rules for each data type.
Counter group settings allow you to configure global variables that perform the role of a counter.
l Do not use a counter: prevents the global variable from being used as a label counter.
l Incremental counter: counter value increases along with the printed labels. l Decremental counter: counter variable value decreases along with the printed
labels. l Step: amount of units that represent the next state of counter value. l Repetition: number of repetitions for each counter value.
Input Rules TabData defines the counter input criteria.
l Allowed characters: permitted characters for variable values. Groups of allowed characters for data input filtering are described in section Groups of Allowed Char-acters.
EXAMPLE Non-numeric cha ra ct ers ca n a ls o be us ed a s count er v a lues . Alp hanumeric s et s t he s equence wit h St ep = 3 a nd I nit ia l v a lue = 1 a s 1, 4, 7, A, D , G , J, M, P , S , V, Y , b, e, h, ...
l Limit length: maximum length of a variable value. l Length (characters): specifies the exact permitted number of characters.
l Fixed length: variable must contain the exact given number of characters as defined in the Limit variable length.
Output Rules TabPrefix and Suffix are characters that are added to a variable value.
l Prefix: text placed in front of the variable value. l Suffix: text placed behind the variable value.
Pad Character fills empty character position until the maximum variable length for a vari-able is reached. Pad character is enabled only if the Limit variable length in the Input rules tab is enabled.
www.nicelabel.com 163
l Padding: defines the mode of padding. l Not used: does not use padding. l On left: adds pad characters on the left side of the data value. l On right: adds pad characters on the right side of the data value. l Surrounding value: adds pad characters on both sides of the data value.
l Character: character used for padding.
Groups Of Permitted Input CharactersThere are multiple variable format that may be used to filter the input. This helps avoiding mistakes when entering data. The user is only allowed to enter the permitted char-acters.
All Select this format when there is no need to limit the variable input data. For example: a variable can be used to define changes in bar-code, text and graphics.
Numeric Use this format for numeric variables such as serial numbers, EAN and UPC barcodes. Only numeric characters in the range from 0 to 9 can be entered.Sequence: 0123456789
Alpha-numeric
Use this format when numbers and characters are mixed in the same variable. Characters from 0 to 9 and from A to Z can be entered.Sequence: 0123456789ABCDEFGHIJKLMNOPQRSTUVWXYZ-abcdefghijklmnopqrstuvwxyz
Letters Use this format for variables that only contain letters.Sequence: ABCDEFGHIJKLMNOPQRSTUVWXYZ-abcdefghijklmnopqrstuvwxyz
7-bit ASCII format
The variable will contain only characters with ASCII code from 0 to 127.
Hex Use this format to allow entering hexadecimal numbers.Sequence: 0123456789ABCDEF
Custom Use this format to customize the range of allowed characters.Code 39, Code 128A, Code 128B, Code 128C, Code 128, Codabar
Use these formats to only permit the use of characters that are included in the corresponding barcode standards.
www.nicelabel.com 164

Forms and SolutionsSolution
PRODUCT LEVEL INFO This section is applicable to NiceLabel PowerForms.
NiceLabel Designer solution is a single label printing file that includes multiple stan-dalone items or interconnected labels and/or forms. A solution enables adding any number of labels, forms and common variable data sources. By doing this, a single Designer solution file serves as a container that envelops multiple labels and forms.How do labels and forms cooperate in a solution? A label alone can be designed, printed, and, if necessary, reprinted. Multiplied manual printing of a single label file is time con-suming and difficult if the content needs to be constantly updated. Therefore, NiceLabel introduced the ability to create forms which are combined with labels in a complete print-ing solution file. In a solution, labels specify the layout of printed labels. Forms make sure the content of printed labels is easily defined, edited, updated, and reprinted. Forms also offer the user the control over a wide range of data- and print-related actions.The advantages of keeping multiple labels and forms in a single file are:
l simplified management of printing solutions
l simpler and time efficient label designing and printing
l simplified use of variable data sources
Read about how to create or edit a solution here.
Label Setup WizardLabel Setup Wizard guides you through the process of creating a new label. The wizard consists of four configuration steps and a summary:
l Step 1: Select a Printer
l Step 2: Page Size
l Step 3: Label Layout
l Step 4: Label Dimensions
l Step 5: Summary
After finishing these steps, the label is ready for editing and printing.
NOTE To quit the Label Setup Wizard during any step, press escape. The new label properties are set to default.
Import And ExportImport and Export group allows importing, publishing and exporting the solution files.
l Import into Solution: locates the label or solution files and imports them into the active solution. After clicking the Import into Solution, an open file dialog opens. Browse for the file to be imported and click Open.
www.nicelabel.com 165
l Export Label: saves the label to disk and makes it available for use in another solu-tion. After clicking Export Label the Export label dialog appears. Select a location to save the label to.
FormPRODUCT LEVEL INFO This section is applicable to NiceLabel PowerForms.
NiceLabel Designer form serves as a panel for entering, viewing and selecting the data to be presented and printed on a label. The advantage of using a form are simplified data-entry and label printing process for the end-user.In NiceLabel Designer, a form is created within a printing solution. This means that a form is usually built in combination with a predesigned label. Read about how to create, design or edit a form here.
Form Properties (Form Manager)Form Manager
Basic SettingsBasic Settings tab is used to define the title, size and startup behavior of a form.Title defines the form ID.
l Show form title bar: window title bar visible or hidden upon form startup.
l Allow closing form: form close using the window Close button allowed or not.
With this option disabled, the form can be closed from taskbar.
l Allow resizing form: form size customizable or not.
Disable this option to lock the form size.
Size group defines the form's Width and Height. Initial form state group defines the form state upon startup.
l Maximized: form opens in full screen mode. l Default form size: the form appears using the manually defined sizes.
Startup form position group defines the on-screen position of a form upon its startup. l As defined: the form appears at a location defined by the distance in pixels from
Left (left edge of the form) and Top (top edge of the form). l Screen center: screen center is the startup form position.
Additional SettingsAdditional Settings tab allows selecting the form scripting language. There are two scripting languages available for Designer form objects: VBScript and Python.
l VBScript: scripting for advanced data operations, comparisons and direct cal-culations on a form.
www.nicelabel.com 166

l Python: suitable for 64-bit systems. A significantly faster scripting alternative to VBScript.
StyleSet the label style parameters.
l Background color is defined by the Standard or Advanced color selection. Switch between these two options by clicking the Advanced or Basic button.
l Browse for the label Background picture or insert the direct path. Once the pic-ture has been defined, it is possible to:
l Embed the picture to document: makes the picture an integral part of label document.
l Save embedded picture to file: embedded picture is saved to a file.
l Picture position: background picture to be centered, to fit the label dimen-sions, or to be stretched.
Tab OrderTab order tab customizes the order of setting the focus on form objects while pressing the Tab key.
l ENTER key behaves as TAB key: Enter key has the same role as the Tab key does.
l Select the form Object and move it up or down to define the focus switching order.
F1 HelpF1 Help tab defines custom form help content to help the end-user while designing and/or using a form.
TIP: Enter custom text in the editing field and click OK.
EventsEvents tab allows setting actions for basic form events.
l On Form Load: the action is run upon form load.
l On Form Close: the action is run when the form is closed.
l On Form Timer: the action is run after a given time interval.
l Interval: duration of the time interval.
TIP: Click Actions ... to set the actions that are run by the listed events.
Variable EventsVariable Events selects the variables that are monitored for changes in their values.
www.nicelabel.com 167
l Add: adds a variable to the list.
l Delete: removes a variable from the list.
TIP: Click Actions ... to set the actions that are triggered by changed values in the lis-ted variables.
InfoInfo tab includes a Description that serves as a hint or as a guidance for the user that is going to work with the form. Define form Description by entering text into the field.
Form ObjectsFrameFrame object is used for creating rectangle shaped areas on a form. It visually separates multiple form fields.
StyleStyle tab defines visual appearance of an object:
l Background color: object background color.
l Transparent: transparent frame.
l Show border: frame border show/hide.
l Border color: object border color selection.
l Border width: border width definition.
l Border style selects the object border style:
l None: invisible border.
l Lowered: the object appears lower than form surface.
l Raised: the object appears higher than form surface.
l Lowered border: the border of an object appears lower than form surface.
l Raised border: makes the border of an object appear higher than form sur-face.
Posit ionPosition tab defines object positioning and its position-related behavior.Position group defines the object position.
l X and Y: anchoring point coordinates.
l Width and Height: horizontal and vertical object dimension.
www.nicelabel.com 168
l Keep aspect ratio: simultaneous changing of object dimensions while scaling.
l Lock object on design surface prevents the object from being moved during the design process.
Size group sets the object's dimensions: l Resize anchor point defines the fixed distance of an object from the form bor-
ders.
Choose the most appropriate anchor point to ensure the object's visibility regardless of the current window size.
l Horizontally resize with form and Vertically resize with form: object size auto-matically adapts to the changing size of the form.
l Horizontally resize with form: object width adapts to the resized form.
l Vertically resize with form: object height adapts to the resized form.
NOTE If both options are enabled, object width and height adapt to the resized form simultaneously.
Rotation angle is the object angle according to the design surface.
GeneralGeneral tab identifies the object and defines object settings for form startup.Name sets a unique object ID. It is used for object referencing when defining functions, variables, scripts, etc.Description allows adding notes and annotations for an object.Hint (tooltip) helps the form users by briefly explaining why or how to use an object. Hint is shown to a user when the mouse pointer floats over the selected object.Initial state on form startup group defines the object behavior when the form is run for the first time:
l Enabled: defines if the object is going to be active (editable) at form startup or not. l Visible: defines if the selected object is going to appear on the form or not.
l Condition: an object is enabled and/or visible if the result of the given con-dition is "True".
TextText is a form object for inserting textual content.
ContentConnected data source is the dynamic data source that is connected with the object.
l Fixed data: manually entered fixed text.
l Variable keyboard input: type of variable that enables the content of a prompted field to be different for every print job.
l Variables: predefined variable values which are used as object content.
l Functions: input data transformation tools.
l Databases: database values which are used as object content.
www.nicelabel.com 169

l Link to other objects: makes the content of a label object (re)appear in another object on the same label.
Content field is used for entering the object content.
SettingsText Settings tab defines if the object size or text should adapt to the amount of entered content.
l Auto size: automatically adapts the object size to the size of entered text.
l Word wrap: wraps the text to make it fit into the text box.
TIP: If the text box size is too small, a vertical scroll bar appears.
StyleStyle tab defines visual appearance of an object.Background color defines the object background color.
l Transparent: transparent object background.
Font color defines the font and underline colors.Font selects the typeface. The font may appear Bold, Italic, Underlined or as a Strikethrough text.Alignment defines horizontal relative positioning of the entered content.
l Left: text aligned with the left object border.
l Center: text positioned centrally.
l Right: text aligned with the right object border.
l Justified: object text distributed equally to both sides.
Posit ionPosition tab defines object positioning and its position-related behavior.Position group defines the object position.
l X and Y: anchoring point coordinates.
l Width and Height: horizontal and vertical object dimension.
l Keep aspect ratio: simultaneous changing of object dimensions while scaling.
l Lock object on design surface prevents the object from being moved during the design process.
Size group sets the object's dimensions: l Resize anchor point defines the fixed distance of an object from the form bor-
ders.
Choose the most appropriate anchor point to ensure the object's visibility regardless of the current window size.
www.nicelabel.com 170
l Horizontally resize with form and Vertically resize with form: object size auto-matically adapts to the changing size of the form.
l Horizontally resize with form: object width adapts to the resized form.
l Vertically resize with form: object height adapts to the resized form.
NOTE If both options are enabled, object width and height adapt to the resized form simultaneously.
Rotation angle is the object angle according to the design surface.
EventsEvents tab defines the actions that are run by various object-related events.
TIP: See section Actions Editor to read more about this powerful Designer tool.
Available events are:
l On Mouse Enter: action is run on mouse enter.
l On Mouse Leave: action is run on mouse leave.
l On Click: action is run on mouse click.
GeneralGeneral tab identifies the object and defines object settings for form startup.Name sets a unique object ID. It is used for object referencing when defining functions, variables, scripts, etc.Description allows adding notes and annotations for an object.Hint (tooltip) helps the form users by briefly explaining why or how to use an object. Hint is shown to a user when the mouse pointer floats over the selected object.Initial state on form startup group defines the object behavior when the form is run for the first time:
l Enabled: defines if the object is going to be active (editable) at form startup or not. l Visible: defines if the selected object is going to appear on the form or not.
l Condition: an object is enabled and/or visible if the result of the given con-dition is "True".
PicturePicture is a form object for inserting graphic content. The following file formats are supported:
l Enhanced Windows Metafile (.emf)
l Windows Metafile (.wmf, .wmz, .emz
l Portable Network Graphic (.png)
l TIFF bitmaps (.tiff)
l JPEG bitmaps (.jpg)
l PDF
l Windows bitmap (.bmp)
www.nicelabel.com 171

l Paint
l Adobe Photoshop
ContentConnected data source is the dynamic data source that is connected with the object.
l Fixed data: manually entered fixed text.
l Variables: predefined variable values which are used as object content.
l Functions: input data transformation tools.
l Databases: database values which are used as object content.
NOTE The down arrow object button provides direct access to dynamic data sources. Click the arrow to add a new object on the design surface and to connect it with the selected data sources simultaneously.
Content field is used for entering the object content. To (re)define the object Content, click Browse and locate the file to be displayed on the label. Embed picture in a document defines the picture as an integral part of the label file.
Posit ionPosition tab defines object positioning and its position-related behavior.Position group defines the object position.
l X and Y: anchoring point coordinates.
l Width and Height: horizontal and vertical object dimension.
l Keep aspect ratio: simultaneous changing of object dimensions while scaling.
l Lock object on design surface prevents the object from being moved during the design process.
Size group sets the object's dimensions: l Resize anchor point defines the fixed distance of an object from the form bor-
ders.
Choose the most appropriate anchor point to ensure the object's visibility regardless of the current window size.
l Horizontally resize with form and Vertically resize with form: object size auto-matically adapts to the changing size of the form.
l Horizontally resize with form: object width adapts to the resized form.
l Vertically resize with form: object height adapts to the resized form.
NOTE If both options are enabled, object width and height adapt to the resized form simultaneously.
Rotation angle is the object angle according to the design surface. Graphic Resizing tab defines variable source picture resizing.
www.nicelabel.com 172

Resize options group defines how the source file dimensions adapt to the size of Picture object at print time.
NOTE Resize options available only if the Picture object is connected to a variable data source.
l Keep original picture size: disables resizing. The source picture file is displayed in Picture object with its original dimensions.
l Resize proportionally: makes the source picture file resize proportionally. The aspect ratio of source file dimensions is preserved.
l Resize to the designed size: resizes the source picture file horizontally and ver-tically to make it fit into the bounding box. Using this option will most likely distort the image.
Original size group informs the user about the size of source image file.Revert to original picture size resizes the Picture object to the original dimensions of source image file.
EventsEvents tab defines the actions that are run by various object-related events.
TIP: See section Actions Editor to read more about this powerful Designer tool.
Available events are:
l On Mouse Enter: action is run on mouse enter.
l On Mouse Leave: action is run on mouse leave.
l On Click: action is run on mouse click.
GeneralGeneral tab identifies the object and defines object settings for form startup.Name sets a unique object ID. It is used for object referencing when defining functions, variables, scripts, etc.Description allows adding notes and annotations for an object.Hint (tooltip) helps the form users by briefly explaining why or how to use an object. Hint is shown to a user when the mouse pointer floats over the selected object.Initial state on form startup group defines the object behavior when the form is run for the first time:
l Enabled: defines if the object is going to be active (editable) at form startup or not. l Visible: defines if the selected object is going to appear on the form or not.
l Condition: an object is enabled and/or visible if the result of the given con-dition is "True".
ButtonButton adds a clickable and customizable object to a form. Its role is to activate various actions.
SourceConnected data source is the dynamic data source that is connected with the object.
www.nicelabel.com 173

l Fixed data: manually entered fixed text.
l Variables: predefined variable values which are used as object content.
l Functions: input data transformation tools.
l Databases: database values which are used as object content.
NOTE The down arrow object button provides direct access to dynamic data sources. Click the arrow to add a new object on the design surface and to connect it with the selected data sources simultaneously.
Content field is used for entering the object content.
SettingsKeyboard shortcut defines any keyboard to act as a shortcut. If the defined keyboard key is pressed, it acts as if the user would use a mouse click for running an action.Default form button invokes the assigned action when a user presses Enter.
Only one button is allowed to be defined as the default form button.
Word wrap divides the text into multiple lines. It makes sure the text is not wider than the button.Use a picture on the button group defines a graphic file to be displayed on a button.
l Picture file name: graphic file selected to be used on a button. l Embed picture in a document: picture embedded in the document.
Whenever an embedded picture is needed, it is retrieved from the document and not from the file system.
l Save embedded picture to file: embedded picture is saved to a file.
If the picture is embedded, this action enables saving it at a selected location. The picture is no longer embedded.
l Picture position: picture position in relation to the object text. l Force original size: full-size graphic without resizing is used on a button.
StyleStyle tab defines visual appearance of an object.Background color defines the object background color.
l Transparent: transparent object background.
Font color defines the font and underline colors.Font selects the typeface. The font may appear Bold, Italic, Underlined or as a Strikethrough text.Alignment defines horizontal relative positioning of the entered content.
l Left: text aligned with the left object border.
l Center: text positioned centrally.
www.nicelabel.com 174

l Right: text aligned with the right object border.
l Justified: object text distributed equally to both sides.
Posit ionPosition tab defines object positioning and its position-related behavior.Position group defines the object position.
l X and Y: anchoring point coordinates.
l Width and Height: horizontal and vertical object dimension.
l Keep aspect ratio: simultaneous changing of object dimensions while scaling.
l Lock object on design surface prevents the object from being moved during the design process.
Size group sets the object's dimensions: l Resize anchor point defines the fixed distance of an object from the form bor-
ders.
Choose the most appropriate anchor point to ensure the object's visibility regardless of the current window size.
l Horizontally resize with form and Vertically resize with form: object size auto-matically adapts to the changing size of the form.
l Horizontally resize with form: object width adapts to the resized form.
l Vertically resize with form: object height adapts to the resized form.
NOTE If both options are enabled, object width and height adapt to the resized form simultaneously.
Rotation angle is the object angle according to the design surface.
EventsEvents tab defines the actions that are run by various object-related events.
TIP: See section Actions Editor to read more about this powerful Designer tool.
Available events are:
l On Click: action is run on mouse click.
GeneralGeneral tab identifies the object and defines object settings for form startup.Name sets a unique object ID. It is used for object referencing when defining functions, variables, scripts, etc.Description allows adding notes and annotations for an object.Hint (tooltip) helps the form users by briefly explaining why or how to use an object. Hint is shown to a user when the mouse pointer floats over the selected object.Initial state on form startup group defines the object behavior when the form is run for the first time:
www.nicelabel.com 175

l Enabled: defines if the object is going to be active (editable) at form startup or not. l Visible: defines if the selected object is going to appear on the form or not.
l Condition: an object is enabled and/or visible if the result of the given con-dition is "True".
Edit FieldEdit field object is used for inserting and editing a single line of text.
SourceConnected data source is the dynamic data source that is connected with the object.
l Variables: predefined variable values which are used as object content.
l Databases: database values which are used as object content.
NOTE The down arrow object button provides direct access to dynamic data sources. Click the arrow to add a new object on the design surface and to connect it with the selected data sources simultaneously.
SettingsSettings tab contains two editable properties:
l Automatically move focus to next control: the next defined object on a form is automatically active after inserting a value. The Edit Field must be connected to a data source and must have a limited length defined.
l Password field: makes the in Edit Field characters invisible. The characters are masked with asterisks.
StyleStyle tab defines visual appearance of an object.Background color defines the object background color.
l Transparent: transparent object background.
Font color defines the font and underline colors.Font selects the typeface. The font may appear Bold, Italic, Underlined or as a Strikethrough text.Alignment defines horizontal relative positioning of the entered content.
l Left: text aligned with the left object border.
l Center: text positioned centrally.
l Right: text aligned with the right object border.
l Justified: object text distributed equally to both sides.
Posit ionPosition tab defines object positioning and its position-related behavior.Position group defines the object position.
www.nicelabel.com 176
l X and Y: anchoring point coordinates.
l Width and Height: horizontal and vertical object dimension.
l Keep aspect ratio: simultaneous changing of object dimensions while scaling.
l Lock object on design surface prevents the object from being moved during the design process.
Size group sets the object's dimensions: l Resize anchor point defines the fixed distance of an object from the form bor-
ders.
Choose the most appropriate anchor point to ensure the object's visibility regardless of the current window size.
l Horizontally resize with form and Vertically resize with form: object size auto-matically adapts to the changing size of the form.
l Horizontally resize with form: object width adapts to the resized form.
l Vertically resize with form: object height adapts to the resized form.
NOTE If both options are enabled, object width and height adapt to the resized form simultaneously.
Rotation angle is the object angle according to the design surface.
EventsEvents tab defines the actions that are run by various object-related events.
TIP: See section Actions Editor to read more about this powerful Designer tool.
Available events are: l On Focus: action is run when focus is set on the object.
l On Exit: action is run when focus moves to another object.
l On Change: action is run when a change in the Edit Field object occurs.
GeneralGeneral tab defines the object and defines object settings for form startup. Name sets a unique object ID. It is used for object referencing when defining functions, variables, scripts, etc.Description allows adding notes and annotations for an object.Hint helps the form users by briefly explaining why or how to use the selected object.Initial state on form setup group defines the object behavior while editing and printing a form:
l Enabled: defines if the object is going to be active (editable) on the print form or not.
l Read-only: prevented input and content editing.
www.nicelabel.com 177

l Visible: defines if the selected object is going to appear on the form or not. l Condition: an object is enabled and/or visible if the result of the given con-
dition is "True".Content after a print action group defines how the object content is handled after each printout.
l Reset content after print: object content reset after printing.
l Clear content: object emptied after printing.
l Reset to initial content: content reset after printing to the initially defined object content.
Memo FieldMemo field object is used for inserting textual content in multiple lines.
SourceConnected data source is the dynamic data source that is connected with the object.
l Variables: predefined variable values which are used as object content.
l Databases: database values which are used as object content.
NOTE The down arrow object button provides direct access to dynamic data sources. Click the arrow to add a new object on the design surface and to connect it with the selected data sources simultaneously.
SettingsSettings group contains two editable properties.
l Automatically move focus to next control makes the next defined object on a form automatically active after inserting a value.
TIP: The Edit Field must be connected to a data source and must have a limited length defined.
l Password field option makes the characters in this edit field invisible. They are masked with asterisks.
StyleStyle tab defines visual appearance of an object.Background color defines the object background color.
l Transparent: transparent object background.
Font color defines the font and underline colors.Font selects the typeface. The font may appear Bold, Italic, Underlined or as a Strikethrough text.Alignment defines horizontal relative positioning of the entered content.
l Left: text aligned with the left object border.
l Center: text positioned centrally.
www.nicelabel.com 178

l Right: text aligned with the right object border.
l Justified: object text distributed equally to both sides.
Posit ionPosition tab defines object positioning and its position-related behavior.Position group defines the object position.
l X and Y: anchoring point coordinates.
l Width and Height: horizontal and vertical object dimension.
l Keep aspect ratio: simultaneous changing of object dimensions while scaling.
l Lock object on design surface prevents the object from being moved during the design process.
Size group sets the object's dimensions: l Resize anchor point defines the fixed distance of an object from the form bor-
ders.
Choose the most appropriate anchor point to ensure the object's visibility regardless of the current window size.
l Horizontally resize with form and Vertically resize with form: object size auto-matically adapts to the changing size of the form.
l Horizontally resize with form: object width adapts to the resized form.
l Vertically resize with form: object height adapts to the resized form.
NOTE If both options are enabled, object width and height adapt to the resized form simultaneously.
Rotation angle is the object angle according to the design surface.
EventsEvents tab defines the actions that are run by various object-related events.
TIP: See section Actions Editor to read more about this powerful Designer tool.
Available events are: l On Focus: action is run when focus is set on the object.
l On Exit: action is run when focus moves to another object.
l On Change: action is run when a change in the Edit Field object occurs.
GeneralGeneral tab defines the object and defines object settings for form startup. Name sets a unique object ID. It is used for object referencing when defining functions, variables, scripts, etc.Description allows adding notes and annotations for an object.Hint helps the form users by briefly explaining why or how to use the selected object.
www.nicelabel.com 179

Initial state on form setup group defines the object behavior while editing and printing a form:
l Enabled: defines if the object is going to be active (editable) on the print form or not.
l Read-only: prevented input and content editing. l Visible: defines if the selected object is going to appear on the form or not.
l Condition: an object is enabled and/or visible if the result of the given con-dition is "True".
Content after a print action group defines how the object content is handled after each printout.
l Reset content after print: object content reset after printing.
l Clear content: object emptied after printing.
l Reset to initial content: content reset after printing to the initially defined object content.
Combo BoxCombo box is used as an object for user input. Its role is to let the user select an option from a drop-down list or to add a custom value to the list.
SourceConnected data source is the dynamic data source that is connected with the object.
l Variables: predefined variable values which are used as object content.
l Databases: database values which are used as object content.
SettingsSettings tab defines object content editing specifics and displaying of values. Allow input in run mode enables entering custom values when the form is running.Allow duplicates allows duplicated values appear on the drop down list.Is sorted sorts the list elements in ascending order. Use case sensitive sort addi-tionally determines if the letter case should affect the sorting order or not.Values group of settings allows defining the listed elements:
l Items source: defines the source for listed items. l Custom values: static user-defined values. l Installed printers: list of installed printers. l Database field: retrieved values from a connected database.
l Field: selection of connected database field to retrieve the content from.
l Use another field for connected data source option: connects another database field to the connected data source. The Values content list still displays the Field values, but the connected data source receives the selected value from a field in Value field.
E X A M P L E
1. C o mb o /Lis t b o x o b ject d etai ls
Items s o urce:
www.nicelabel.com 180

Description Product IDCASONCELLI ALLA CARNE 250G
CAS006
BIGOLI 250G PAS501TAGLIATELLE 250G PAS502GITAGLIOLINI 250G PAS503GI
Datab as e field : D es cr ipt ion
C o nnected d ata s o urce: Va r ia ble1
2. T ext o b ject d etai ls
Added Text object s hould only dis pla y ma t ching P roduct I D v a lues .
C o nnected d ata s o urce: Va r ia ble1
Res ult: The s elect ed D es cr ipt ion in C ombo/ Lis t box res ult s in t he ma t ching P roduct I D in Text object .
l Value field: selects the database field that is sent to the object's Connected data source and displayed as its content.
l File names: lists all files in the selected directory. l Directory: defines the path from where the labels are going to be lis-
ted. l File mask: specifies the filter for selecting the listed files.
EXAMPLE *.* lis t s a ll f iles*.lbl lis t s only f iles wit h .lbl ext ens ion.t *.lbl lis t s f iles t ha t s t a rt wit h " t " a nd ha v e t he ext ens ion .lbl.
l Show the file path: entire file path is displayed on the list. l Show the file extension: file extension visible on the list.
l Font names: lists the installed fonts. l Labels in solutions: lists all labels within the solution. l Edit: converts system-defined items on the Values content list into a list
of custom values. l Values content list: displays the current object content. l Set as default: turns the currently active selection into a default value.
www.nicelabel.com 181

Default value is a value that is automatically selected when the form is run.
NOTE All values except for custom values are populated when the form is run. The val-ues displayed at design time are sample values retrieved from the system. After click-ing the Edit, Designer makes a snapshot of values and makes them editable in the Custom Values dialog.
StyleStyle tab defines visual appearance of an object.Background color defines the object background color.
l Transparent: transparent object background.
Font color defines the font and underline colors.Font selects the typeface. The font may appear Bold, Italic, Underlined or as a Strikethrough text.Alignment defines horizontal relative positioning of the entered content.
l Left: text aligned with the left object border.
l Center: text positioned centrally.
l Right: text aligned with the right object border.
l Justified: object text distributed equally to both sides.
www.nicelabel.com 182

Posit ionPosition tab defines object positioning and its position-related behavior.Position group defines the object position.
l X and Y: anchoring point coordinates.
l Width and Height: horizontal and vertical object dimension.
l Keep aspect ratio: simultaneous changing of object dimensions while scaling.
l Lock object on design surface prevents the object from being moved during the design process.
Size group sets the object's dimensions: l Resize anchor point defines the fixed distance of an object from the form bor-
ders.
Choose the most appropriate anchor point to ensure the object's visibility regardless of the current window size.
l Horizontally resize with form and Vertically resize with form: object size auto-matically adapts to the changing size of the form.
l Horizontally resize with form: object width adapts to the resized form.
l Vertically resize with form: object height adapts to the resized form.
NOTE If both options are enabled, object width and height adapt to the resized form simultaneously.
Rotation angle is the object angle according to the design surface.
EventsEvents tab defines the actions that are run by various object-related events.
TIP: See section Actions Editor to read more about this powerful Designer tool.
Available events are: l On Focus: action is run when focus is set on the object.
l On Exit: action is run when focus moves to another object.
l On Change: action is run when a change in the Edit Field object occurs.
GeneralGeneral tab defines the object and defines object settings for form startup. Name sets a unique object ID. It is used for object referencing when defining functions, variables, scripts, etc.Description allows adding notes and annotations for an object.Hint helps the form users by briefly explaining why or how to use the selected object.Initial state on form setup group defines the object behavior while editing and printing a form:
www.nicelabel.com 183
l Enabled: defines if the object is going to be active (editable) on the print form or not.
l Read-only: prevented input and content editing. l Visible: defines if the selected object is going to appear on the form or not.
l Condition: an object is enabled and/or visible if the result of the given con-dition is "True".
Content after a print action group defines how the object content is handled after each printout.
l Reset content after print: object content reset after printing.
l Clear content: object emptied after printing.
l Reset to initial content: content reset after printing to the initially defined object content.
List BoxList box is used as a user input object. Its role is to let the user select an option from a list.
TIP: Unlike Combo box, List Box does not allow inserting custom values.
SourceConnected data source is the dynamic data source that is connected with the object.
l Variables: predefined variable values which are used as object content.
l Databases: database values which are used as object content.
NOTE The down arrow object button provides direct access to dynamic data sources. Click the arrow to add a new object on the design surface and to connect it with the selected data sources simultaneously.
SettingsSettings tab defines object content editing specifics and displaying of values. Allow duplicates allows duplicated values appear on the drop down list.Is sorted sorts the list elements in ascending order. Use case sensitive sort addi-tionally determines if the letter case should affect the sorting order or not.Values group of settings allows defining the listed elements:
l Items source: defines the source for listed items. l Custom values: static user-defined values. l Installed printers: list of installed printers. l Database field: retrieved values from a connected database.
l Field: selection of connected database field to retrieve the content from.
l Use another field for connected data source option: connects another database field to the connected data source. The Values content list still displays the Field values, but the connected data source receives the selected value from a field in Value field.
www.nicelabel.com 184

EXAMPLE Field : Object Field1Value field : Object Field2C o nnected d ata s o urce: Va r ia ble1
Res ult:Object connect ed t o Va r ia ble1 dis pla y s t he cont ent f rom Object Field1 a nd s ends t he cont ent f rom Object Field2 t o t he Va r ia ble1.
l Value field: selects the database field that is sent to the object's Connected data source and displayed as its content.
l File names: lists all files in the selected directory. l Directory: defines the path from where the labels are going to be lis-
ted. l File mask: specifies the filter for selecting the listed files.
EXAMPLE *.* lis t s a ll f iles*.lbl lis t s only f iles wit h .lbl ext ens ion.t *.lbl lis t s f iles t ha t s t a rt wit h " t " a nd ha v e t he ext ens ion .lbl.
l Show the file path: entire file path is displayed on the list. l Show the file extension: file extension visible on the list.
l Font names: lists the installed fonts. l Labels in solutions: lists all labels within the solution. l Edit: converts system-defined items on the Values content list into a list
of custom values. l Values content list: displays the current object content. l Set as default: turns the currently active selection into a default value.
Default value is a value that is automatically selected when the form is run.
NOTE All values except for custom values are populated when the form is run. The val-ues displayed at design time are sample values retrieved from the current computer.
StyleStyle tab defines visual appearance of an object.Background color defines the object background color.
l Transparent: transparent object background.
Font color defines the font and underline colors.Font selects the typeface. The font may appear Bold, Italic, Underlined or as a Strikethrough text.Alignment defines horizontal relative positioning of the entered content.
l Left: text aligned with the left object border.
l Center: text positioned centrally.
www.nicelabel.com 185

l Right: text aligned with the right object border.
l Justified: object text distributed equally to both sides.
Posit ionPosition tab defines object positioning and its position-related behavior.Position group defines the object position.
l X and Y: anchoring point coordinates.
l Width and Height: horizontal and vertical object dimension.
l Keep aspect ratio: simultaneous changing of object dimensions while scaling.
l Lock object on design surface prevents the object from being moved during the design process.
Size group sets the object's dimensions: l Resize anchor point defines the fixed distance of an object from the form bor-
ders.
Choose the most appropriate anchor point to ensure the object's visibility regardless of the current window size.
l Horizontally resize with form and Vertically resize with form: object size auto-matically adapts to the changing size of the form.
l Horizontally resize with form: object width adapts to the resized form.
l Vertically resize with form: object height adapts to the resized form.
NOTE If both options are enabled, object width and height adapt to the resized form simultaneously.
Rotation angle is the object angle according to the design surface.
EventsEvents tab defines the actions that are run by various object-related events.
TIP: See section Actions Editor to read more about this powerful Designer tool.
Available events are: l On Focus: action is run when focus is set on the object.
l On Exit: action is run when focus moves to another object.
l On Click: action is run on mouse click.
GeneralGeneral tab identifies the object and defines object settings for form startup.Name sets a unique object ID. It is used for object referencing when defining functions, variables, scripts, etc.Description allows adding notes and annotations for an object. Hint helps the form users by briefly explaining why or how to use the selected object.
www.nicelabel.com 186

Initial state on form setup group defines the object behavior while editing and printing a form:
l Enabled: defines if the object is going to be active (editable) at form startup or not. l Visible: defines if the selected object is going to appear on the form or not.
l Condition: an object is enabled and/or visible if the result of the given con-dition is "True".
Content after a print action group defines how the object content is handled after each printout.
l Reset content after print: object content reset after printing.
l Clear content: object emptied after printing.
l Reset to initial content: content reset after printing to the initially defined object content.
Radio GroupUse Radio Group object to allow a user to select a single item from a set of mutually exclusive items.
SourceConnected data source is the dynamic data source that is connected with the object.
l Variables: predefined variable values which are used as object content.
l Databases: database values which are used as object content.
NOTE The down arrow object button provides direct access to dynamic data sources. Click the arrow to add a new object on the design surface and to connect it with the selected data sources simultaneously.
SettingsSettings tab defines object content editing specifics and displaying of values. Allow duplicates allows duplicated values appear on the drop down list.Is sorted sorts the list elements in ascending order. Use case sensitive sort addi-tionally determines if the letter case should affect the sorting order or not.Values group of settings allows defining the listed elements:
l Items source: defines the source for listed items. l Custom values: static user-defined values. l Installed printers: list of installed printers. l Database field: retrieved values from a connected database.
l Field: selection of connected database field to retrieve the content from.
l Use another field for connected data source option: connects another database field to the connected data source. The Values content list still displays the Field values, but the connected data source receives the selected value from a field in Value field.
EXAMPLE Field : Object Field1Value field : Object Field2C o nnected d ata s o urce: Va r ia ble1
www.nicelabel.com 187

Res ult:Object connect ed t o Va r ia ble1 dis pla y s t he cont ent f rom Object Field1 a nd s ends t he cont ent f rom Object Field2 t o t he Va r ia ble1.
l Value field: selects the database field that is sent to the object's Connected data source and displayed as its content.
l File names: lists all files in the selected directory. l Directory: defines the path from where the labels are going to be lis-
ted. l File mask: specifies the filter for selecting the listed files.
EXAMPLE *.* lis t s a ll f iles*.lbl lis t s only f iles wit h .lbl ext ens ion.t *.lbl lis t s f iles t ha t s t a rt wit h " t " a nd ha v e t he ext ens ion .lbl.
l Show the file path: entire file path is displayed on the list. l Show the file extension: file extension visible on the list.
l Font names: lists the installed fonts. l Labels in solutions: lists all labels within the solution. l Edit: converts system-defined items on the Values content list into a list
of custom values. l Values content list: displays the current object content. l Set as default: turns the currently active selection into a default value.
Default value is a value that is automatically selected when the form is run.
NOTE All values except for custom values are populated when the form is run. The val-ues displayed at design time are sample values retrieved from the current computer.
StyleStyle tab defines visual appearance of an object.Background color defines the object background color.
l Transparent: transparent object background.
Font color defines the font and underline colors.Font selects the typeface. The font may appear Bold, Italic, Underlined or as a Strikethrough text.Alignment defines horizontal relative positioning of the entered content.
l Left: text aligned with the left object border.
l Center: text positioned centrally.
l Right: text aligned with the right object border.
l Justified: object text distributed equally to both sides.
Posit ionPosition tab defines object positioning and its position-related behavior.
www.nicelabel.com 188
Position group defines the object position.
l X and Y: anchoring point coordinates.
l Width and Height: horizontal and vertical object dimension.
l Keep aspect ratio: simultaneous changing of object dimensions while scaling.
l Lock object on design surface prevents the object from being moved during the design process.
Size group sets the object's dimensions: l Resize anchor point defines the fixed distance of an object from the form bor-
ders.
Choose the most appropriate anchor point to ensure the object's visibility regardless of the current window size.
l Horizontally resize with form and Vertically resize with form: object size auto-matically adapts to the changing size of the form.
l Horizontally resize with form: object width adapts to the resized form.
l Vertically resize with form: object height adapts to the resized form.
NOTE If both options are enabled, object width and height adapt to the resized form simultaneously.
Rotation angle is the object angle according to the design surface.
EventsEvents tab defines the actions that are run by various object-related events.
TIP: See section Actions Editor to read more about this powerful Designer tool.
Available events are: l On Focus: action is run when focus is set on the object.
l On Exit: action is run when focus moves to another object.
l On Click: action is run on mouse click.
GeneralGeneral tab identifies the object and defines object settings for form startup.Name sets a unique object ID. It is used for object referencing when defining functions, variables, scripts, etc.Description allows adding notes and annotations for an object.Hint (tooltip) helps the form users by briefly explaining why or how to use an object. Hint is shown to a user when the mouse pointer floats over the selected object.Initial state on form startup group defines the object behavior when the form is run for the first time:
www.nicelabel.com 189

l Enabled: defines if the object is going to be active (editable) at form startup or not. l Visible: defines if the selected object is going to appear on the form or not.
l Condition: an object is enabled and/or visible if the result of the given con-dition is "True".
Check BoxCheck Box is a form object that allows the user to make a binary choice – select or deselect the listed options.
SourceSource tab defines data sources, data types, values, and prompting rules.Connected data source is the dynamic data source that is connected with the object.
l Variables: predefined variable values which are used as object content.
l Databases: database values which are used as object content.
NOTE The down arrow object button provides direct access to dynamic data sources. Click the arrow to add a new object on the design surface and to connect it with the selected data sources simultaneously.
SettingsSettings tab defines specifics for object content editing and displaying of values. Check box text is a field for entering the Check Box text.
l Checked: default Check Box state (selected/cleared) when the form is run. l Word wrap: text is divided into multiple lines to make sure it does exceed the
Check Box width.State valuesdefine resulting actions of the Check Box object :
l Checked value: by default set to "True". Checked option confirms an action.
l Unchecked value by default set to "False". Checked option rejects an action.
Checked and Unchecked values are customizable. These values can be defined manually or dynamically using a Data source.
StyleStyle tab defines visual appearance of an object.Background color defines the object background color.
l Transparent: transparent object background.
Font color defines the font and underline colors.Font selects the typeface. The font may appear Bold, Italic, Underlined or as a Strikethrough text.Alignment defines horizontal relative positioning of the entered content.
l Left: text aligned with the left object border.
l Center: text positioned centrally.
www.nicelabel.com 190

l Right: text aligned with the right object border.
l Justified: object text distributed equally to both sides.
Posit ionPosition tab defines object positioning and its position-related behavior.Position group defines the object position.
l X and Y: anchoring point coordinates.
l Width and Height: horizontal and vertical object dimension.
l Keep aspect ratio: simultaneous changing of object dimensions while scaling.
l Lock object on design surface prevents the object from being moved during the design process.
Size group sets the object's dimensions: l Resize anchor point defines the fixed distance of an object from the form bor-
ders.
Choose the most appropriate anchor point to ensure the object's visibility regardless of the current window size.
l Horizontally resize with form and Vertically resize with form: object size auto-matically adapts to the changing size of the form.
l Horizontally resize with form: object width adapts to the resized form.
l Vertically resize with form: object height adapts to the resized form.
NOTE If both options are enabled, object width and height adapt to the resized form simultaneously.
Rotation angle is the object angle according to the design surface.
EventsEvents tab defines the actions that are run by various object-related events.
TIP: See section Actions Editor to read more about this powerful Designer tool.
Available events are: l On Focus: action is run when focus is set on the object.
l On Exit: action is run when focus moves to another object.
l On Click: action is run on mouse click.
GeneralGeneral tab identifies the object and defines object settings for form startup.Name sets a unique object ID. It is used for object referencing when defining functions, variables, scripts, etc.Description allows adding notes and annotations for an object. Hint helps the form users by briefly explaining why or how to use the selected object.
www.nicelabel.com 191

Initial state on form setup group defines the object behavior while editing and printing a form:
l Enabled: defines if the object is going to be active (editable) at form startup or not. l Visible: defines if the selected object is going to appear on the form or not.
l Condition: an object is enabled and/or visible if the result of the given con-dition is "True".
Content after a print action group defines how the object content is handled after each printout.
l Reset content after print: object content reset after printing.
l Clear content: object emptied after printing.
l Reset to initial content: content reset after printing to the initially defined object content.
Database TableDatabase Table object is used for displaying a selected database table on a form. Such table allows searching, filtering and selecting the database records on a form.
SettingsSettings tab allows selecting the database table.Table displays the currently used (active) database table.
TIP: Add a database by running the Database wizard or select it from the databases that have been defined using the Dynamic Data Manager.
l Enable multiple row selection allows selecting multiple database records sim-ultaneously.
l Enable selection with check box: added selection check box in front of database records.
This option enhances the use of touch screen devices. Selection of mul-tiple records becomes more user-friendly.
Show search controls option shows/hides the database search on the form.Columns group allows managing the connected database table columns.
l Style button opens the Column style dialog window. This dialog enables the user to customize the visual appearance of a selected table column or cell.
l Move up button places the selected record one position higher. l Move down button places the selected record one position lower. l Field alias column displays the name of the table field as defined in the source
database. l Caption allows defining a custom column name. l Width defines the table column width. l Visible makes the table column visible or hidden on the form. l Variable defines the variable which stores the selected table value.
StyleStyle tab defines visual appearance of the Database Object table.
www.nicelabel.com 192

l Alignment: alignment of table header row.
l Background color: table background color.
l Font color: table text font color.
l Font: table text typeface and its properties (Bold, Italic and size).
Cell style defines visual appearance of a cell in a database table.
l Alignment: table cell content alignment.
l Background color: cell background color.
l Font color: cell font and underline colors.
l Font: cell text typeface and its properties (Bold, Italic and size) to be used for the cell content.
Posit ionPosition tab defines object positioning and its position-related behavior.Position group defines the object position.
l X and Y: anchoring point coordinates.
l Width and Height: horizontal and vertical object dimension.
l Keep aspect ratio: simultaneous changing of object dimensions while scaling.
l Lock object on design surface prevents the object from being moved during the design process.
Size group sets the object's dimensions: l Resize anchor point defines the fixed distance of an object from the form bor-
ders.
Choose the most appropriate anchor point to ensure the object's visibility regardless of the current window size.
l Horizontally resize with form and Vertically resize with form: object size auto-matically adapts to the changing size of the form.
l Horizontally resize with form: object width adapts to the resized form.
l Vertically resize with form: object height adapts to the resized form.
NOTE If both options are enabled, object width and height adapt to the resized form simultaneously.
Rotation angle is the object angle according to the design surface.
GeneralGeneral tab defines the object and defines object settings for form startup. Name sets a unique object ID. It is used for object referencing when defining functions, variables, scripts, etc.Description allows adding notes and annotations for an object.Hint helps the form users by briefly explaining why or how to use the selected object.Initial state on form setup group defines the object behavior while editing and printing
www.nicelabel.com 193

a form: l Enabled: defines if the object is going to be active (editable) on the print form or
not. l Read-only: prevented input and content editing. l Visible: defines if the selected object is going to appear on the form or not.
l Condition: an object is enabled and/or visible if the result of the given con-dition is "True".
Column Style DialogColumn style dialog allows defining style-related table properties of the Database Table object.Column style group defines visual appearance of the table column.
l Override table default style enables style customization of the selected column.
l Alignment defines the header row content alignment.
l Background color defines the column background color. Transparent makes the column background invisible.
l Font color specifies the font color.
l Font allows specifying the typeface and its properties: Size, Bold and Italic.
Cell style group defines visual appearance of individual cells.
l Override table default style enables style customization of the selected cell.
l Background color defines the cell background color. Transparent makes the cell background invisible.
l Font color specifies the font color.
l Font allows specifying the typeface and its properties: Size, Bold and Italic.
Database NavigatorDatabase Navigator object is used as a tool for navigating, adding and deleting the data-base records on a form.
SettingsTable defines the database for navigating.
TIP: Add a database by running the Database wizard or select it from the databases that have been defined using the Dynamic Data Manager dialog.
Posit ionPosition tab defines object positioning and its position-related behavior.Position group defines the object position.
l X and Y: anchoring point coordinates.
l Width and Height: horizontal and vertical object dimension.
www.nicelabel.com 194

l Keep aspect ratio: simultaneous changing of object dimensions while scaling.
l Lock object on design surface prevents the object from being moved during the design process.
Size group sets the object's dimensions: l Resize anchor point defines the fixed distance of an object from the form bor-
ders.
Choose the most appropriate anchor point to ensure the object's visibility regardless of the current window size.
l Horizontally resize with form and Vertically resize with form: object size auto-matically adapts to the changing size of the form.
l Horizontally resize with form: object width adapts to the resized form.
l Vertically resize with form: object height adapts to the resized form.
NOTE If both options are enabled, object width and height adapt to the resized form simultaneously.
Rotation angle is the object angle according to the design surface.
GeneralGeneral tab defines the object and defines object settings for form startup. Name sets a unique object ID. It is used for object referencing when defining functions, variables, scripts, etc.Description allows adding notes and annotations for an object.Hint helps the form users by briefly explaining why or how to use the selected object.Initial state on form setup group defines the object behavior while editing and printing a form:
l Enabled: defines if the object is going to be active (editable) on the print form or not.
l Read-only: prevented input and content editing. l Visible: defines if the selected object is going to appear on the form or not.
l Condition: an object is enabled and/or visible if the result of the given con-dition is "True".
Database SearchDatabase Search object is a search tool for databases on a form. Search locates the record while typing the matching characters or selects it according to the database column.
SettingsTable defines the database to be searched.
TIP: Add a database by running the Database wizard or select it from the databases that have been defined using the Dynamic Data Manager dialog.
l Search on every keypress (incremental search): places the cursor on the first database record that contains the defined sequence of characters. Each
www.nicelabel.com 195

keypress repeats the procedure.
l Select record only when exact match is found exact match for finding a record is required.
StyleStyle tab defines visual appearance of an object.Background color defines the object background color.
l Transparent: transparent object background.
Font color defines the font and underline colors.Font selects the typeface. The font may appear Bold, Italic, Underlined or as a Strikethrough text.Alignment defines horizontal relative positioning of the entered content.
l Left: text aligned with the left object border.
l Center: text positioned centrally.
l Right: text aligned with the right object border.
l Justified: object text distributed equally to both sides.
Posit ionPosition tab defines object positioning and its position-related behavior.Position group defines the object position.
l X and Y: anchoring point coordinates.
l Width and Height: horizontal and vertical object dimension.
l Keep aspect ratio: simultaneous changing of object dimensions while scaling.
l Lock object on design surface prevents the object from being moved during the design process.
Size group sets the object's dimensions: l Resize anchor point defines the fixed distance of an object from the form bor-
ders.
Choose the most appropriate anchor point to ensure the object's visibility regardless of the current window size.
l Horizontally resize with form and Vertically resize with form: object size auto-matically adapts to the changing size of the form.
l Horizontally resize with form: object width adapts to the resized form.
l Vertically resize with form: object height adapts to the resized form.
NOTE If both options are enabled, object width and height adapt to the resized form simultaneously.
Rotation angle is the object angle according to the design surface.
www.nicelabel.com 196
GeneralGeneral tab defines the object and defines object settings for form startup. Name sets a unique object ID. It is used for object referencing when defining functions, variables, scripts, etc.Description allows adding notes and annotations for an object.Hint helps the print form users by briefly explaining why or how to use the selected object.Initial state on form setup group defines the object behavior while editing and printing a form:
l Enabled: defines if the object is going to be active (editable) on the print form or not.
l Visible: defines if the selected object is going to appear on the form or not. l Condition: an object is enabled and/or visible if the result of the given con-
dition is "True".
Label PreviewLabel Preview object is used for giving a live print preview with defined print para-meters for the selected label.
SettingsLabel specifies the label file whose preview is displayed in the object.
TIP: Click New label to create a new label within the solution. If the label is not sup-posed to be a part of the solution, locate it using the Browse button. The label can also be defined dynamically using a connected data source.
Printer defines the printer whose settings are used for generating the preview.
TIP: If no other printer is defined, the printer defined for the active label is used. The printer can also be defined dynamically using a connected data source.
Content group defines what the Label Preview includes:
l Show a single label: preview of label's printable area.
l Show all labels on the page: preview of the entire page containing the labels.
NOTE This option is useful when Labels Across is in use or when previewing the label margins.
Quantity group defines the number of previewed labels.
l Labels: the number of label to be displayed in the Label Preview.
l All (unlimited quantity): prints the entire range of labels depending on the data.
Number of skipped labels defines the numbers of labels to be skipped on the first page of preview.
TIP: This option is used with Labels Across.
Identical copies per label defines the number of copies for each label in the preview. Number of label sets specifies how many times the entire label preview should repeat.Label Side defines the side of the label to be displayed in the preview.
www.nicelabel.com 197

l Show front side: front side of the label appears in the preview.
l Show back side: back side of the label (if available) appears in the preview.
www.nicelabel.com 198

NOTE If both options are selected, both label sides appear on the preview.
StyleStyle tab defines visual appearance of an object.
l Background color: Label Preview background color.
l Transparent: transparent object background.
l Show border: Label Preview object border visible.
l Border color: Label Preview border color.
l Border width: Label Preview border width.
Posit ionPosition tab defines object positioning and its position-related behavior.Position group defines the object position.
l X and Y: anchoring point coordinates.
l Width and Height: horizontal and vertical object dimension.
l Keep aspect ratio: simultaneous changing of object dimensions while scaling.
l Lock object on design surface prevents the object from being moved during the design process.
Size group sets the object's dimensions: l Resize anchor point defines the fixed distance of an object from the form bor-
ders.
Choose the most appropriate anchor point to ensure the object's visibility regardless of the current window size.
l Horizontally resize with form and Vertically resize with form: object size auto-matically adapts to the changing size of the form.
l Horizontally resize with form: object width adapts to the resized form.
l Vertically resize with form: object height adapts to the resized form.
NOTE If both options are enabled, object width and height adapt to the resized form simultaneously.
Rotation angle is the object angle according to the design surface.
EventsEvents tab defines the actions that are run by various object-related events.
TIP: See section Actions Editor to read more about this powerful Designer tool.
Available events are:
www.nicelabel.com 199

l On Mouse Enter: action is run on mouse enter.
l On Mouse Leave: action is run on mouse leave.
l On Click: action is run on mouse click.
GeneralGeneral tab defines the object and defines object settings for form startup. Name sets a unique object ID. It is used for object referencing when defining functions, variables, scripts, etc.Description allows adding notes and annotations for an object.Hint helps the print form users by briefly explaining why or how to use the selected object.Initial state on form setup group defines the object behavior while editing and printing a form:
l Enabled: defines if the object is going to be active (editable) on the print form or not.
l Visible: defines if the selected object is going to appear on the form or not. l Condition: an object is enabled and/or visible if the result of the given con-
dition is "True".
Data InitializationData Initialization object is used as a panel for assigning initial values to variables on the selected label.
Settings Label selects the label that is going to be used with Data initialization object.
TIP: If the label is not a part of the solution, it can be located using the Browse button. The label can also be defined dynamically using a connected Data source.
Focus Data Initialization when label changes sets focus to the Data Initialization table when the selected label changes. This makes the table instantly editable.Show selection of labels from the solution adds a drop down list that displays all the labels contained in the solution.
TIP: This drop down list allows the user to change the active label that is going to be printed. If this option remains unchecked, select the label by setting the Label data source.
Show database table initialization allows the user to select database records and to define the printed quantities for each of them.
NOTE A separate tab is added for each database table that is connected to a label.
Columns group sets the width of data initialization table and its Prompt, Value and For-matted value columns.
l Auto-size: automatic column resizing. l Show fomatted value:visible Formatted value column.
StyleStyle tab defines visual appearance of an object.Background color defines the object background color.
www.nicelabel.com 200

l Transparent: transparent object background.
Font color defines the font and underline colors.Font selects the typeface. The font may appear Bold, Italic, Underlined or as a Strikethrough text.Alignment defines horizontal relative positioning of the entered content.
l Left: text aligned with the left object border.
l Center: text positioned centrally.
l Right: text aligned with the right object border.
l Justified: object text distributed equally to both sides.
Posit ionPosition tab defines object positioning and its position-related behavior.Position group defines the object position.
l X and Y: anchoring point coordinates.
l Width and Height: horizontal and vertical object dimension.
l Keep aspect ratio: simultaneous changing of object dimensions while scaling.
l Lock object on design surface prevents the object from being moved during the design process.
Size group sets the object's dimensions: l Resize anchor point defines the fixed distance of an object from the form bor-
ders.
Choose the most appropriate anchor point to ensure the object's visibility regardless of the current window size.
l Horizontally resize with form and Vertically resize with form: object size auto-matically adapts to the changing size of the form.
l Horizontally resize with form: object width adapts to the resized form.
l Vertically resize with form: object height adapts to the resized form.
NOTE If both options are enabled, object width and height adapt to the resized form simultaneously.
Rotation angle is the object angle according to the design surface.
GeneralGeneral tab defines the object and defines object settings for form startup. Name sets a unique object ID. It is used for object referencing when defining functions, variables, scripts, etc.Description allows adding notes and annotations for an object.Hint helps the print form users by briefly explaining why or how to use the selected object.Initial state on form setup group defines the object behavior while editing and printing
www.nicelabel.com 201

a form: l Enabled: defines if the object is going to be active (editable) on the print form or
not. l Visible: defines if the selected object is going to appear on the form or not.
l Condition: an object is enabled and/or visible if the result of the given con-dition is "True".
Printer SettingsPrinter Settings object enables adjusting printing speed and darkness on a form.
NOTE The object overrides the currently defined driver settings – printing within the active solution uses properties as defined using this object.
SettingsLabel specifies the label file to be used with Printer Settings object.
TIP: If the label is not a part of the solution, it can be located using the Browse button. The label can also be defined dynamically using a connected Data source.
Printer defines the printer whose settings are used.
TIP: If no other printer is defined, the printer defined for the active label is used. The printer can also be defined dynamically using a connected Data source.
Show speed settings sets printing speed setting availability. Show darkness settings sets printing darkness setting availability.
StyleStyle tab defines visual appearance of an object.Background color defines the object background color.
l Transparent: transparent object background.
Font color defines the font and underline colors.Font selects the typeface. The font may appear Bold, Italic, Underlined or as a Strikethrough text.Alignment defines horizontal relative positioning of the entered content.
l Left: text aligned with the left object border.
l Center: text positioned centrally.
l Right: text aligned with the right object border.
l Justified: object text distributed equally to both sides.
Posit ionPosition tab defines object positioning and its position-related behavior.Position group defines the object position.
l X and Y: anchoring point coordinates.
l Width and Height: horizontal and vertical object dimension.
www.nicelabel.com 202

l Keep aspect ratio: simultaneous changing of object dimensions while scaling.
l Lock object on design surface prevents the object from being moved during the design process.
Size group sets the object's dimensions: l Resize anchor point defines the fixed distance of an object from the form bor-
ders.
Choose the most appropriate anchor point to ensure the object's visibility regardless of the current window size.
l Horizontally resize with form and Vertically resize with form: object size auto-matically adapts to the changing size of the form.
l Horizontally resize with form: object width adapts to the resized form.
l Vertically resize with form: object height adapts to the resized form.
NOTE If both options are enabled, object width and height adapt to the resized form simultaneously.
Rotation angle is the object angle according to the design surface.
GeneralGeneral tab defines the object and defines object settings for form startup. Name sets a unique object ID. It is used for object referencing when defining functions, variables, scripts, etc.Description allows adding notes and annotations for an object.Hint helps the print form users by briefly explaining why or how to use the selected object.Initial state on form setup group defines the object behavior while editing and printing a form:
l Enabled: defines if the object is going to be active (editable) on the print form or not.
l Visible: defines if the selected object is going to appear on the form or not. l Condition: an object is enabled and/or visible if the result of the given con-
dition is "True".
Print QuantityPrint Quantity object defines the number of labels (or pages of labels) to be printed.
SettingsLabel specifies the label file to be used with Print Quantity object. Print Quantity is defined using a connected variable value.
TIP: The variable must be used as the quantity that is defined for the print action.
Show additional settings group allows defining the following properties:
l Number of skipped labels variable: assigns the selected variable a number of labels to be skipped on first page.
www.nicelabel.com 203

NOTE When defining the number of skipped labels, duplicates, or label sets, a new window appears. This window allows the user to enter the values.
This option is used with Labels Across.
l Identical copies per label variable: assigns the selected variable a number of copies for each label in a print job.
l Number of label sets variable: assigns the selected variable a value that spe-cifies how many times the entire label printing process should repeat.
WARNING At least one variable must be defined when the Show additional settings option is enabled.
StyleStyle tab defines visual appearance of an object.Background color defines the object background color.
l Transparent: transparent object background.
Font color defines the font and underline colors.Font selects the typeface. The font may appear Bold, Italic, Underlined or as a Strikethrough text.Alignment defines horizontal relative positioning of the entered content.
l Left: text aligned with the left object border.
l Center: text positioned centrally.
l Right: text aligned with the right object border.
l Justified: object text distributed equally to both sides.
Posit ionPosition tab defines object positioning and its position-related behavior.Position group defines the object position.
l X and Y: anchoring point coordinates.
l Width and Height: horizontal and vertical object dimension.
l Keep aspect ratio: simultaneous changing of object dimensions while scaling.
l Lock object on design surface prevents the object from being moved during the design process.
Size group sets the object's dimensions: l Resize anchor point defines the fixed distance of an object from the form bor-
ders.
Choose the most appropriate anchor point to ensure the object's visibility regardless of the current window size.
www.nicelabel.com 204

l Horizontally resize with form and Vertically resize with form: object size auto-matically adapts to the changing size of the form.
l Horizontally resize with form: object width adapts to the resized form.
l Vertically resize with form: object height adapts to the resized form.
NOTE If both options are enabled, object width and height adapt to the resized form simultaneously.
Rotation angle is the object angle according to the design surface.
GeneralGeneral tab defines the object and defines object settings for form startup. Name sets a unique object ID. It is used for object referencing when defining functions, variables, scripts, etc.Description allows adding notes and annotations for an object.Hint helps the print form users by briefly explaining why or how to use the selected object.Initial state on form setup group defines the object behavior while editing and printing a form:
l Enabled: defines if the object is going to be active (editable) on the print form or not.
l Visible: defines if the selected object is going to appear on the form or not. l Condition: an object is enabled and/or visible if the result of the given con-
dition is "True".
Define ActionsPRODUCT LEVEL INFO This section is applicable to NiceLabel PowerForms.
Actions are an essential part of automated labeling solutions. Each action performs a pre-defined command (or a series of commands) when a defined event happens.Designer includes a wide range of actions. Their purpose is to eliminate the need to start the solution programming from scratch. Manage the actions using the Actions Editor dialog box. Basic Action concepts and properties are described below.
l Available Actions: the range of actions that are included in Designer. These actions are grouped into functional sets.
l Defining actions: an action is defined in Actions Editor by clicking the appro-priate action icon in Add ribbon group. The main ribbon contains commonly used actions and – later – the actions you define as common actions. To see all available actions, click All Actions.
l Nested Actions: actions that cannot be used on their own. Their specific char-acteristics require them to be nested within another action. Use buttons in Action Order ribbon group to change action placement. Each action is identified with an ID number that indicates its position in the list, including its nesting. This ID num-
www.nicelabel.com 205

ber is displayed in the potential error message so you can find the problematic action faster.
P rint La bel ac tion is an example of such action. This ac tion is nested under the Open La bel ac tion, so it references the exact label to be pr inted.
l Action Execution: listed (active) actions are executed once per event. The order of actions is crucial – the execution begins at the top and moves toward bottom of the list.
l Conditional Actions: conditional actions only run when the provided conditions allow them to be run. Condition is defined with a single line VBScript Expression or Python script.
l Errors in Actions: if an action is not configured completely, it is marked with a red exclamation icon. Such action can be included in the event list but cannot be executed.
NOTE If one of the nested actions reports an error, all parent actions are also colored red. This serves as an indication for a nested action error.
l Disabling Actions: prevents an action from being executed. By default, each added action is enabled. Actions that are not needed, can be disabled and still kept in the configuration. The shortcut to action enabling & disabling is the check box in front of the action name on the list of defined actions.
l Copying Actions: any action may be copied and pasted. Use standard Windows keyboard shortcuts, or right-click the action.
Actions EditorPRODUCT LEVEL INFO This section is applicable to NiceLabel PowerForms.
Actions Editor is a dialog for managing actions in a Designer solution. To open the dia-log box, select a form object, press F4 to open the form properties and click Actions....
RibbonActions Editor Dialog ribbon includes commands for adding, removing and ordering the actions. It also provides a direct access to frequently used actions.Clipboard group icons activate the following actions:
l Paste: pastes the clipboard data.
l Cut: cuts the selection to the clipboard.
l Copy: copies the selection to the clipboard.
l Delete: deletes the selected items.
Undo & Redo group allow undoing or repeating actions.
l Undo:Designer allows the user to undo the entire sequence of actions since the last file save.
l Redo: repeats the requested range of actions.
Action Order group defines the action execution order of selected actions.
www.nicelabel.com 206

l Up and Down: arrows place the selected action in front or after any other existing action.
l Right: arrow nests the selected action under the previous existing action.
NOTE A nested action is any action that starts when the parent action is already in progress.
l Left: arrow makes a nested action independent of the preceding action.
NOTE Certain actions cannot exits independently. If such action is added to the action list, a warning appears. The warning defines which action should it be nested under.
Add assigns actions to the selected form object.
l All actions button gives access to the entire range of Designer actions. Recently used actions are listed on the top. Use Search... field to quickly locate any action by entering its name.
l Four buttons give direct access to the most commonly used actions:
l Open Label: button adds the Open Label action to the event list.
l Print Label: button adds the Print Label action to the event list.
l Set Printer: button adds the Set Printer action to the event list.
l Quit: button adds the Quit action to the event list.
Actions ExplorerActions Explorer is a tool for adding, removing and ordering the assigned actions. Use ribbon commands to manipulate with existing actions or to add new actions.
Editing Field Editing field allows editing the advanced action properties.
l Main properties of the selected action are available for editing on the top of the Main/editing field. Main properties differ with each action – read the dedicated action description sections for details.
l Hidden properties define the less frequently defined properties. Hidden prop-erties differ with each action – read the dedicated action description sections for details.
Available ActionsPRODUCT LEVEL INFO This section is applicable to NiceLabel PowerForms.
The Designer actions are grouped into multiple functional sets. The groups with basic action descriptions are listed below.General group contains frequently used label opening and activation related commands:
www.nicelabel.com 207

l Open Label
l Print Label
l Execute Script
l Open Document/Program
Printer group contains actions related to printing:
l Set Printer
l Define printer settings
l Set Print Job Name
l Redirect Printing to File
l Set Print Parameter
l Redirect Printing to PDF
l Printer Status
l Store Label to Printer
Form group defines actions related to form objects:
l Open Another Form
l Message
l Quit
l Move Focus
l Translate form
l Set Object Property
Variables group defines actions related to variables:
l Set Variable
l Save Variable Data
l Load Variable Data
l String Manipulation
Data & Connectivity group defines the actions related to databases, data sending, read-ing or receiving, and networking.
l Execute SQL Statement
l Refresh Table
l Import Data into Table
l Send Data to Serial Port
l Read Data from Serial Port
l Send Data to Printer
www.nicelabel.com 208
l HTTP Request
l Web Service
File operations group defines the active file related actions:
l Save Data to File
l Read Data from File
l Delete File
l Browse File/Folder
Flow control group defines various sequences of actions:
l For Loop
l For Every Record
l Try
l Group
Other group contains specific actions for running the commands, sending custom com-mands and verifying the licenses:
l Run Command File
l Send Custom Commands
l Verify License
General
Open LabelOpen Label specifies the label file that is going to be printed. When the action is executed, the label template opens in memory cache.The number of concurrently opened labels is not limited. If the label is already loaded and is requested again, Designer determines if a newer version is available, and approves it for printing. The label opens.Settings group selects the label file.
l Label name: label file to be opened. It can be hard-coded – the same label will be printed every time. The option Variable enables a variable file name. Select a vari-able that contains the path and/or label file name.
NOTE Use UNC syntax for network resources. For more information, see the topic Access to Network Shared Resources.
There are four ways to open a label: l Enter absolute file path. l Select an existing label from the solution. l Click Open to locate the file on the disk. l Use a data source to define the file path dynamically.
If the specified label cannot be found, Designer searches for it at alternative locations. For more information on alternative location search, see topic Search order for the requested files.
www.nicelabel.com 209

Action Execution and Error HandlingEach action in Actions Editor can be set as a conditional action. Conditional actions only run when the defined conditions allow them to be run. To define these conditions, click Show execution and error handling options. Execution options are:
l Enabled: specifies if the action is enabled or disabled. Only enabled actions are executed.
This functionality may be used while testing a form.
l Condition: action execution is defined by a single-line programming expression that provides a Boolean value (true or false). If the result of the expression is true, the action executes.
Condition offers a way to avoid executing actions every time.
Error handling options are: l Ignore failure: specifies whether an error should be ignored or not. With Ignore
failure enabled, the execution of actions continues even if the current action fails.
NOTE Nested actions that depend on the current action do not execute in case of a failure. The execution of actions continues with the next action on the same level as the current action. The error is logged, but does not break the execution of the action.
l Save error to variable: enables the user to define the Data Source (variable) to save the error to.
Print LabelPrint Label executes label printing. The action cannot be used on its own – it must always be nested within the Open Label action to obtain the reference to the label that is going to be printed. This allows the user to have multiple labels opened at the same time, so you can specify which label should be printed. When issuing this command, the label prints using the printer driver defined in the label template. If the specified printer driver is not found on the system, the label is printed using the system default printer driver.
TIP: You can override the printer driver using the Set Printer command.
Designer prints labels in asynchronous mode. This means that as soon as the event pre-processing is complete, and the instructions for the print engine are available, the print-ing thread takes it over in the background. The control is returned to the event so it can continue executing the next action.Quantity group defines the number of labels to be printed using the active form.
l Labels: sets the number of printed labels.
l All (unlimited quantity): labels are printed in different quantities, depending on the design of the label template. Read more about unlimited label printing here.
l Variable quantity (defined from label variable): specifies a label variable that defines the label quantity to be printed.
Variable value must be integer. The event doesn't receive the number of labels to be printed so it passes the decision on the quantity to the label template. The label might contain a connection to a database or another data source, which determines the label quantity value.
www.nicelabel.com 210

Advanced group defines label printing details. Click Show advanced print options to define the Advanced print options:
l Number of skipped labels: defines the amount of labels to be skipped on first page. This option is used with Labels Across.
l Identical label copies: defines the number of copies for each label in a print job.
l Label sets: specifies how many times the entire label printing process should repeat.
Action Execution and Error HandlingEach action in Actions Editor can be set as a conditional action. Conditional actions only run when the defined conditions allow them to be run. To define these conditions, click Show execution and error handling options. Execution options are:
l Enabled: specifies if the action is enabled or disabled. Only enabled actions are executed.
This functionality may be used while testing a form.
l Condition: action execution is defined by a single-line programming expression that provides a Boolean value (true or false). If the result of the expression is true, the action executes.
Condition offers a way to avoid executing actions every time.
Error handling options are: l Ignore failure: specifies whether an error should be ignored or not. With Ignore
failure enabled, the execution of actions continues even if the current action fails.
NOTE Nested actions that depend on the current action do not execute in case of a failure. The execution of actions continues with the next action on the same level as the current action. The error is logged, but does not break the execution of the action.
l Save error to variable: enables the user to define the Data Source (variable) to save the error to.
Execute ScriptExecute Script enables the use of VBScript or Python scripts as customizable actions. Use this action if the built-in predefined actions don't meet existing data manipulation requirements.
NOTE Support for VBScript is already available with your Windows system. To install Python support, see Knowledge Base article KB249.
NOTE Select the scripting language in form properties – additional settings.
Script editor offers the following features:
l Verify syntax: validates the entered script syntax.
l Export: saves the script to a disk. This makes the script reusable.
l Import: imports the script from other applications to be used in Designer.
Action Execution and Error Handling
www.nicelabel.com 211

Each action in Actions Editor can be set as a conditional action. Conditional actions only run when the defined conditions allow them to be run. To define these conditions, click Show execution and error handling options. Execution options are:
l Enabled: specifies if the action is enabled or disabled. Only enabled actions are executed.
This functionality may be used while testing a form.
l Condition: action execution is defined by a single-line programming expression that provides a Boolean value (true or false). If the result of the expression is true, the action executes.
Condition offers a way to avoid executing actions every time.
Error handling options are: l Ignore failure: specifies whether an error should be ignored or not. With Ignore
failure enabled, the execution of actions continues even if the current action fails.
NOTE Nested actions that depend on the current action do not execute in case of a failure. The execution of actions continues with the next action on the same level as the current action. The error is logged, but does not break the execution of the action.
l Save error to variable: enables the user to define the Data Source (variable) to save the error to.
Open Document / ProgramOpen Document / Program interfaces with external programs and executes them using a command line. External programs execute additional processing and provide the result back to Designer. This action allows Designer to bind with any third party software that can execute addi-tional data processing or acquire data. External software provides data response by sav-ing it in a file, from where it can be retrieved in variables.
TIP: The user can feed the value of variable(s) to the program by listing them in the command line using square brackets.
File group defines the file to be opened.
l File name: location of the file or program to be opened within this action.
Execution Options group sets program opening details.
l Hide window: renders the window of the opened program invisible. Because Designer is run as a service application within its own session, it cannot interact with desktop, even if it runs with the privileges of the currently logged user. Microsoft has prevented this interaction in Windows Vista and newer operating systems for security reasons.
l Wait for completion: specifies for action execution to wait for this action to be completed before continuing with the next scheduled action.
Enable this option if the action that follows, depends on the result of the external application.
Action Execution and Error Handling
www.nicelabel.com 212

Each action in Actions Editor can be set as a conditional action. Conditional actions only run when the defined conditions allow them to be run. To define these conditions, click Show execution and error handling options. Execution options are:
l Enabled: specifies if the action is enabled or disabled. Only enabled actions are executed.
This functionality may be used while testing a form.
l Condition: action execution is defined by a single-line programming expression that provides a Boolean value (true or false). If the result of the expression is true, the action executes.
Condition offers a way to avoid executing actions every time.
Error handling options are: l Ignore failure: specifies whether an error should be ignored or not. With Ignore
failure enabled, the execution of actions continues even if the current action fails.
NOTE Nested actions that depend on the current action do not execute in case of a failure. The execution of actions continues with the next action on the same level as the current action. The error is logged, but does not break the execution of the action.
l Save error to variable: enables the user to define the Data Source (variable) to save the error to.
Printer
Set PrinterSet Printer specifies the name of the printer to be used for printing the active label.
NOTE This action overrides the printer defined in the label properties.
This action is useful when printing an identical label on multiple printers. Always nest this action under the Open Label action to provide the label with the reference on where to change the printer. This action reads the default settings such as speed and darkness from the selected printer driver and applies them to the label. If you don't use the Set Printer action, the label prints on the printer as defined in the label.
WARNING Be careful when changing the printer from one printer brand to another, e.g. from Zebra to SATO, or even from one printer model to another model of the same brand. Printer settings might not be compatible and label printout might not be identical. Also, label design optimizations for the original printer, such as internal counters, and internal fonts, might not be available on the selected printer.
TIP: See section Automatic Font Replacement and its subsection Configuring the Font Mapping to tackle the above mentioned issue.
Printer group specifies the printer name to be used for the current print job.
l Printer name: Select it from the list of locally installed printer drivers, or manually enter a printer name. Select Data source to dynamically select the printer using a
www.nicelabel.com 213

variable. When enabled, select a variable that contains the printer name when a the action is run.
Action Execution and Error HandlingEach action in Actions Editor can be set as a conditional action. Conditional actions only run when the defined conditions allow them to be run. To define these conditions, click Show execution and error handling options. Execution options are:
l Enabled: specifies if the action is enabled or disabled. Only enabled actions are executed.
This functionality may be used while testing a form.
l Condition: action execution is defined by a single-line programming expression that provides a Boolean value (true or false). If the result of the expression is true, the action executes.
Condition offers a way to avoid executing actions every time.
Error handling options are: l Ignore failure: specifies whether an error should be ignored or not. With Ignore
failure enabled, the execution of actions continues even if the current action fails.
NOTE Nested actions that depend on the current action do not execute in case of a failure. The execution of actions continues with the next action on the same level as the current action. The error is logged, but does not break the execution of the action.
l Save error to variable: enables the user to define the Data Source (variable) to save the error to.
Define Printer SettingsDefine Printer Settings sets properties of the form's selected printer. This way, the user can change printer properties such as printing speed, darkness, and other controls independently from the current printer settings as defined the label, in the printer driver or using the printer hardware settings. The modifications the user makes using this action are temporary and affect only the cur-rent print job. The modifications are not saved in a label or form. Condition: a scripting Boolean expression. Two results are possible – True or False. Use this option to enable current action only when a term is met. The action is started only if the condition returns True as the result of the expression. Action Execution and Error HandlingEach action in Actions Editor can be set as a conditional action. Conditional actions only run when the defined conditions allow them to be run. To define these conditions, click Show execution and error handling options. Execution options are:
l Enabled: specifies if the action is enabled or disabled. Only enabled actions are executed.
This functionality may be used while testing a form.
l Condition: action execution is defined by a single-line programming expression that provides a Boolean value (true or false). If the result of the expression is true, the action executes.
www.nicelabel.com 214
Condition offers a way to avoid executing actions every time.
Error handling options are: l Ignore failure: specifies whether an error should be ignored or not. With Ignore
failure enabled, the execution of actions continues even if the current action fails.
NOTE Nested actions that depend on the current action do not execute in case of a failure. The execution of actions continues with the next action on the same level as the current action. The error is logged, but does not break the execution of the action.
l Save error to variable: enables the user to define the Data Source (variable) to save the error to.
Set Print Job NameSet Print Job Name specifies the name of the print job file as it appears in the Windows Spooler. A default print job name is the name of the used label file. This action overrides it.
NOTE Always nest the action under the Open Label action, so it applies to the adequate label file.
Print Job group defines print job name.
l Name: sets the print job name. It can be hard-coded, and the same name will be used for each print action. Variable enables a variable file name. Select a variable that contains the path and/or file name when the event happens.
Action Execution and Error HandlingEach action in Actions Editor can be set as a conditional action. Conditional actions only run when the defined conditions allow them to be run. To define these conditions, click Show execution and error handling options. Execution options are:
l Enabled: specifies if the action is enabled or disabled. Only enabled actions are executed.
This functionality may be used while testing a form.
l Condition: action execution is defined by a single-line programming expression that provides a Boolean value (true or false). If the result of the expression is true, the action executes.
Condition offers a way to avoid executing actions every time.
Error handling options are: l Ignore failure: specifies whether an error should be ignored or not. With Ignore
failure enabled, the execution of actions continues even if the current action fails.
NOTE Nested actions that depend on the current action do not execute in case of a failure. The execution of actions continues with the next action on the same level as the current action. The error is logged, but does not break the execution of the action.
www.nicelabel.com 215

l Save error to variable: enables the user to define the Data Source (variable) to save the error to.
Redirect Printing to FileRedirect Printing to File redirects the print stream to a file. Instead of sending the cre-ated print stream to the printer port as defined in the printer driver, the stream is redir-ected to a file. You can append the data to an existing file or overwrite it. Capture printer commands to a file using this action. File group of settings defines how the file selection for redirecting is done.
l Ask user for file name: lets the user define the file to print the label to. File browse dialog window opens allowing the user to select the file.
l Define file name: predefines the file to print the label to. Each time the action is run, the file is printed to the same file.
l File name: file to which the print stream is redirected to.
NOTE When using this action, make sure your user account has sufficient privileges for accessing the specified folder with read/write permissions.
File write mode group of settings selects how the file is treated in case of repeated redirects.
l Overwrite the file: if the specified file already exists on the disk, it is going to be overwritten.
l Append data to the file: print stream data is added to the existing data in the provided file.
Persistence controls the continuity of the redirect action. It defines the number of Print Label actions that are affected by the Redirect Printing to File action.
l Apply to next print action: specifies for the print redirect to be applicable to the next Print Label action only (single event).
l Apply to all subsequent print actions: specifies for the print redirect to be applic-able to all Print Label action defined after the current Redirect Printing to File action.
NOTE The action only redirects printing. Make sure it is followed by the Print Label action.
Action Execution and Error HandlingEach action in Actions Editor can be set as a conditional action. Conditional actions only run when the defined conditions allow them to be run. To define these conditions, click Show execution and error handling options. Execution options are:
l Enabled: specifies if the action is enabled or disabled. Only enabled actions are executed.
This functionality may be used while testing a form.
l Condition: action execution is defined by a single-line programming expression that provides a Boolean value (true or false). If the result of the expression is true, the action executes.
www.nicelabel.com 216

Condition offers a way to avoid executing actions every time.
Error handling options are: l Ignore failure: specifies whether an error should be ignored or not. With Ignore
failure enabled, the execution of actions continues even if the current action fails.
NOTE Nested actions that depend on the current action do not execute in case of a failure. The execution of actions continues with the next action on the same level as the current action. The error is logged, but does not break the execution of the action.
l Save error to variable: enables the user to define the Data Source (variable) to save the error to.
Set Print ParameterSet Printer Parameter allows fine-tuning the printer driver related parameters. These include parameters such as speed and darkness for label printers, or paper tray for laser printers.Printer settings are applied to the current printout only and are not remembered during the upcoming event.
TIP: If using the Set Printer Parameter action for changing the printer name, make sure you use the Set Print Parameter action after it. Before applying the DEVMODE structure to the printer driver, it is obligatory to load the default driver settings first. This is done by the Set Printer action. The DEVMODE is only compatible with the DEVMODE of the same printer driver.
Print Parameters group allows fine tuning before printing.
l Paper bin: name of the paper bin that contains the label media. This option is usu-ally used with laser and ink jet printers with multiple paper bins. The provided name of the paper bin must match the name of the bin in the printer driver. Check the printer driver properties for more details.
l Print speed: defines printing speed. This setting overrides the setting defined with label. The provided value must be in the range of accepted values.
l Darkness: defines the darkness of the printed objects on the paper and over-rides setting from the label. The provided value must be in range of accepted val-ues.
l Print offset X: applies horizontal offset. The label printout will be repositioned by the specified number of dots in the horizontal direction. Negative offset can be defined.
l Print offset Y: applies vertical offset. The label printout will be repositioned by the specified number of dots in the vertical direction. Negative offset can be defined.
Advanced group customizes the printer settings sent with the print job.Printer settings, such as printing speed, darkness, media type, offsets and similar, can be defined as follows:
www.nicelabel.com 217

l Defined in the label.
l Recalled from the printer driver.
l Recalled from the printer at print time.
The supported methods depend on the printer driver and printer capabilities. The print-ing mode (recall settings from label or driver or printer) is configurable in the label design. You might need to apply these printer settings at print time – they can vary with each printout.
EXAMPLE A s ingle la bel s hould be pr int ed us ing a v a r iet y of pr int ers , but ea ch pr int er requires s light ly dif f erent pa ra met ers . The pr int ers f rom dif f erent ma nuf a ct urers don' t us e t he s a me v a lues t o s et t he pr int ing s peed or t empera t ure. Addit iona lly , s ome pr int ers require v ert ica l or hor izont a l of f s et t o pr int t he la bel t o t he correct pos it ion. D ur ing t he t es t -ing pha s e, y ou ca n det ermine t he opt ima l s et t ings f or ev ery pr int er y ou int end t o us e a nd a pply t hem t o a s ingle la bel t empla t e jus t bef ore pr int ing. This a ct ion will a pply t he cor-res ponding s et t ings t o ea ch def ined pr int er .
This action expects to receive the printer settings in a DEVMODE structure. This is a Win-dows standard data structure with information about initialization and environment of a printer. Printer settings option applies custom printer settings. The following inputs are avail-able:
l Fixed-data Base64-encoded DEVMODE. In this case, provide the printer's DEVMODE encoded in Base64-encoded string directly into the edit field. When executed, the action will convert the Base64-encoded data back into the binary form.
l Variable-data Base64-encoded DEVMODE. In this case, the selected variable must contain the Base64-encoded DEVMODE. Enable Variable and select the appropriate variable from the list. When executed, the action will convert the Base64-encoded data back into the binary form.
l Variable-data binary DEVMODE. In this case, the selected variable must contain the DEVMODE in its native binary form. Enable Variable and select the appropriate variable from the list. When executed, the action will use the DEVMODE as-is, without any conversion.
NOTE If the variable does not provide binary DEVMODE, make sure that the selected variable is defined as binary variable in the configuration.
NOTE Make sure the Set Printer action is defined in front of this action.
Extracting the DEVMODE structureDEVMODE structure can be extracted from the registry.To help you test and use the Set Printer Parameter action, the application has been provided that retrieves the DEVMODE of the selected printer and save it to file or Base64-encode it for you. You can find the application GetPrinterSettings.exe on the NiceLabel 2017 DVD and at NiceLabel website.
Using the application interactivelyRun the application, select the printer for which you need a DEVMODE structure and click the Get Printer Settings button. The DEVMODE will be provided as Base64-encoded string. You can paste it into the Set Printer Parameter action.
www.nicelabel.com 218

Using the application with command-line parametersIn this case you can control the application with the command-line parameters. Syntax:
GetPrinterSettings.exe <printer_name> <file_name> [base64]
l printer_name: name of the printer driver as available in the Windows system.
l file_name: name of the file that will contain the extracted DEVMODE
l base64: optional parameter. If provided, the DEVMODE will be encoded into Base64 string, otherwise the DEVMODE will be provided as the binary data
For example: Save DEVMODE for printer "Avery AP 5.4 300DPI" as binary data in file "devmode1".
GetPrinterSettings.exe "Avery AP 5.4 300DPI" c:\temp\devmode1
Save DEVMODE for printer "Avery AP 5.4 300DPI" as Base64-encoded data in file "dev-mode2".
GetPrinterSettings.exe "Avery AP 5.4 300DPI" c:\temp\devmode2 base64
Action Execution and Error HandlingEach action in Actions Editor can be set as a conditional action. Conditional actions only run when the defined conditions allow them to be run. To define these conditions, click Show execution and error handling options. Execution options are:
l Enabled: specifies if the action is enabled or disabled. Only enabled actions are executed.
This functionality may be used while testing a form.
l Condition: action execution is defined by a single-line programming expression that provides a Boolean value (true or false). If the result of the expression is true, the action executes.
Condition offers a way to avoid executing actions every time.
Error handling options are: l Ignore failure: specifies whether an error should be ignored or not. With Ignore
failure enabled, the execution of actions continues even if the current action fails.
NOTE Nested actions that depend on the current action do not execute in case of a failure. The execution of actions continues with the next action on the same level as the current action. The error is logged, but does not break the execution of the action.
l Save error to variable: enables the user to define the Data Source (variable) to save the error to.
Redirect Printing to PDFRedirect Printing to PDF diverts the print stream to a PDF file. Instead of sending the label to a printer, the printout is redirected to a PDF file. The print stream data can be appended to the existing file, or it may overwrite an exist-ing file. The PDF document retains the exact label dimensions as defined during label designing. The rendering quality of graphics in the PDF matches the resolution of the tar-get printer and desired printout size.
www.nicelabel.com 219

The action will redirect printing only, so make sure it is followed by the Print Label action.File group defines the redirect file.
l File name: specifies the file name for diverting the print job to. If hard-coded, the printing is redirected to the specified file every time.
l Overwrite the file: if the specified file already exists on the disk, it is going to be overwritten (selected by default).
l Append data to the file:The job file is appended to the existing data in the provided file (deselected by default).
Persistence allows controlling the persistence of the redirect action. Define the number of Print Label actions that are affected by the Redirect Printing to File action.
l Apply to next print action: specifies for the print redirect to be applicable to the next Print Label action only (single event).
l Apply to all subsequent print actions: specifies for the print redirect to be applic-able to all Print Label action defined after the current Redirect Printing to File action.
Action Execution and Error HandlingEach action in Actions Editor can be set as a conditional action. Conditional actions only run when the defined conditions allow them to be run. To define these conditions, click Show execution and error handling options. Execution options are:
l Enabled: specifies if the action is enabled or disabled. Only enabled actions are executed.
This functionality may be used while testing a form.
l Condition: action execution is defined by a single-line programming expression that provides a Boolean value (true or false). If the result of the expression is true, the action executes.
Condition offers a way to avoid executing actions every time.
Error handling options are: l Ignore failure: specifies whether an error should be ignored or not. With Ignore
failure enabled, the execution of actions continues even if the current action fails.
NOTE Nested actions that depend on the current action do not execute in case of a failure. The execution of actions continues with the next action on the same level as the current action. The error is logged, but does not break the execution of the action.
l Save error to variable: enables the user to define the Data Source (variable) to save the error to.
Printer StatusPrinter Status communicates with the printer to acquire its real-time state, and contacts the Windows Spooler for additional information about the printer and its jobs. As a result the information about errors, spooler status, number of jobs in the spooler is collected. This uncovers the potential errors.The following prerequisites must be met to enable the live printer status:
www.nicelabel.com 220

l Use a NiceLabel Printer Driver to receive detailed printer status information. With other printer drivers, only the information retrieved from the Windows Spooler can be seen (including live printer status).
l The printer must be capable of reporting the live status. Printer models sup-porting bidirectional communication are listed on the NiceLabel Download web page.
l The printer must be connected using an interface that supports bidirectional com-munication.
l The bidirectional support must be enabled in the Control Panel > Hardware and Sound > Devices and Printers > driver > Printer Properties > Ports tab > Enable bidirectional support.
l If using network-connected label printer, make sure the Advanced TCP/IP Port (not Standard TCP/IP Port!) is used. For more information, see Knowledge Base art-icle KB189.
Printer group selects the printer.
l Printer name specifies the printer name to be used for the current print job.
Data Mapping group sets the parameters that are returned as a result of the Printer Status action.
WARNING The majority of the below listed parameters are supported only when using NiceLabel Printer Drivers. With other printer drivers, only spooler-related para-meters are available.
l Printer status: specifies the printer live status as a string. If the printer reports multiple states, all states are merged into a single string, delimited by comma ",". If there are no reported printer issues, this field is empty. Printer status might be set to Offline, Out of labels or Ribbon near end. Since there is no standardized reporting protocol, each printer vendor uses different status messages.
l Printer error: specifies the boolean (true/false) value of the printer error status.
l Printer offline: specifies the boolean (true/false) value of the printer offline status.
l Driver paused: specifies the boolean (true/false) value of the driver pause status.
l NiceDriver driver: specifies the boolean (true/false) value of the NiceLabel Printer Driver status. Provides information whether or not the selected driver is a NiceLabel Printer Driver.
l Spooler status: specifies the spooler status in the form of a string ass reported by the Windows system. The spooler can simultaneously report several statuses. In this case, the statuses are merged using comma ",".
l Spooler status ID: specifies the spooler status in the form of a number, as is repor-ted by the Windows system. The spooler can simultaneously report several statuses. In this case, the returned status IDs contain all IDs as flags. For example, value 5 represents status IDs 4 and 1, which translates to "Printer is in error,
www.nicelabel.com 221

Printer is paused". Refer to the Spooler Status ID table. The action returns a decimal value. Since the values in the table below are in hex, a conversion in necessary before parsing the response.
l Number of jobs in the spooler: specifies the number of jobs that are currently in the spooler for the selected printer.
Action Execution and Error HandlingEach action in Actions Editor can be set as a conditional action. Conditional actions only run when the defined conditions allow them to be run. To define these conditions, click Show execution and error handling options. Execution options are:
l Enabled: specifies if the action is enabled or disabled. Only enabled actions are executed.
This functionality may be used while testing a form.
l Condition: action execution is defined by a single-line programming expression that provides a Boolean value (true or false). If the result of the expression is true, the action executes.
Condition offers a way to avoid executing actions every time.
Error handling options are: l Ignore failure: specifies whether an error should be ignored or not. With Ignore
failure enabled, the execution of actions continues even if the current action fails.
NOTE Nested actions that depend on the current action do not execute in case of a failure. The execution of actions continues with the next action on the same level as the current action. The error is logged, but does not break the execution of the action.
l Save error to variable: enables the user to define the Data Source (variable) to save the error to.
Store Label to PrinterStore Label to Printer saves a label template in the printer memory. The action is a vital part of Store/Recall printing mode. Advanced options for storing label to printer group defines the printer name and store variant.
l Label name to be used on the printer: defines the name to be used for storing the label template in the printer memory.
l Store variant: specifies how the label templates should be stored. Enter the loc-ation manually. If no variant is defined, the first available variant is used. To select between the available options, use the Store variant drop down list under Label Properties -> Printer tab.
WARNING When storing the label to a printer, it is recommended to leave the label name under the advanced options empty. This prevents label name conflicts during the recall label process.
www.nicelabel.com 222

NOTE To make sure the stored label samples are not lost after power cycling the printer, store them at non-volatile locations.
Action Execution and Error HandlingEach action in Actions Editor can be set as a conditional action. Conditional actions only run when the defined conditions allow them to be run. To define these conditions, click Show execution and error handling options. Execution options are:
l Enabled: specifies if the action is enabled or disabled. Only enabled actions are executed.
This functionality may be used while testing a form.
l Condition: action execution is defined by a single-line programming expression that provides a Boolean value (true or false). If the result of the expression is true, the action executes.
Condition offers a way to avoid executing actions every time.
Error handling options are: l Ignore failure: specifies whether an error should be ignored or not. With Ignore
failure enabled, the execution of actions continues even if the current action fails.
NOTE Nested actions that depend on the current action do not execute in case of a failure. The execution of actions continues with the next action on the same level as the current action. The error is logged, but does not break the execution of the action.
l Save error to variable: enables the user to define the Data Source (variable) to save the error to.
Form
Open Another FormOpen Another Form action opens another from the same solution or a form from a disk. Settings group includes the following options:
l Navigate back to previously opened form: reopens the preceding form when the Open Another Form action is run.
l Open form: defines a form to be opened when the Open Another Form action is run.
There are four ways to open a form:
l Enter the absolute file path.
l Select an existing form from the solution.
l Click Open to locate the file on the disk.
l Use a data source to define the file path dynamically.
Form data sources group allows resetting the data source values.
www.nicelabel.com 223
l Reset data source values: resets the Data Source values after each execution of the Open Another Form action.
Action Execution and Error HandlingEach action in Actions Editor can be set as a conditional action. Conditional actions only run when the defined conditions allow them to be run. To define these conditions, click Show execution and error handling options. Execution options are:
l Enabled: specifies if the action is enabled or disabled. Only enabled actions are executed.
This functionality may be used while testing a form.
l Condition: action execution is defined by a single-line programming expression that provides a Boolean value (true or false). If the result of the expression is true, the action executes.
Condition offers a way to avoid executing actions every time.
Error handling options are: l Ignore failure: specifies whether an error should be ignored or not. With Ignore
failure enabled, the execution of actions continues even if the current action fails.
NOTE Nested actions that depend on the current action do not execute in case of a failure. The execution of actions continues with the next action on the same level as the current action. The error is logged, but does not break the execution of the action.
l Save error to variable: enables the user to define the Data Source (variable) to save the error to.
MessageMessage opens a message window containing a custom message.Content group defines caption and the message content.
l Caption: specifies the window title.
l Message: specifies the custom message content.
Action Execution and Error HandlingEach action in Actions Editor can be set as a conditional action. Conditional actions only run when the defined conditions allow them to be run. To define these conditions, click Show execution and error handling options. Execution options are:
l Enabled: specifies if the action is enabled or disabled. Only enabled actions are executed.
This functionality may be used while testing a form.
l Condition: action execution is defined by a single-line programming expression that provides a Boolean value (true or false). If the result of the expression is true, the action executes.
Condition offers a way to avoid executing actions every time.
Error handling options are:
www.nicelabel.com 224

l Ignore failure: specifies whether an error should be ignored or not. With Ignore failure enabled, the execution of actions continues even if the current action fails.
NOTE Nested actions that depend on the current action do not execute in case of a failure. The execution of actions continues with the next action on the same level as the current action. The error is logged, but does not break the execution of the action.
l Save error to variable: enables the user to define the Data Source (variable) to save the error to.
QuitQuit closes the form.Action Execution and Error HandlingEach action in Actions Editor can be set as a conditional action. Conditional actions only run when the defined conditions allow them to be run. To define these conditions, click Show execution and error handling options. Execution options are:
l Enabled: specifies if the action is enabled or disabled. Only enabled actions are executed.
This functionality may be used while testing a form.
l Condition: action execution is defined by a single-line programming expression that provides a Boolean value (true or false). If the result of the expression is true, the action executes.
Condition offers a way to avoid executing actions every time.
Error handling options are: l Ignore failure: specifies whether an error should be ignored or not. With Ignore
failure enabled, the execution of actions continues even if the current action fails.
NOTE Nested actions that depend on the current action do not execute in case of a failure. The execution of actions continues with the next action on the same level as the current action. The error is logged, but does not break the execution of the action.
l Save error to variable: enables the user to define the Data Source (variable) to save the error to.
Move FocusMove Focus moves the focus to a specified object.Settings group defines focus movement:
l Move focus to first object in tab order: sets focus on the first object in the defined order after running the form.
l Move focus to selected object places focus after running the form on the selec-ted object.
Action Execution and Error HandlingEach action in Actions Editor can be set as a conditional action. Conditional actions only run when the defined conditions allow them to be run. To define these conditions, click Show execution and error handling options.
www.nicelabel.com 225

Execution options are: l Enabled: specifies if the action is enabled or disabled. Only enabled actions are
executed.
This functionality may be used while testing a form.
l Condition: action execution is defined by a single-line programming expression that provides a Boolean value (true or false). If the result of the expression is true, the action executes.
Condition offers a way to avoid executing actions every time.
Error handling options are: l Ignore failure: specifies whether an error should be ignored or not. With Ignore
failure enabled, the execution of actions continues even if the current action fails.
NOTE Nested actions that depend on the current action do not execute in case of a failure. The execution of actions continues with the next action on the same level as the current action. The error is logged, but does not break the execution of the action.
l Save error to variable: enables the user to define the Data Source (variable) to save the error to.
Set Object PropertySet Object Property sets properties of form object, like width, height and color.Settings group defines the properties to be set:
l Object name: form object to be edited. Drop-down list contains objects on the form.
l Property: defines the property to be set. The set of available properties depends on the currently selected object
Descriptions of available properties are available in topics about the form objects.
l Value defines the property value.
Action Execution and Error HandlingEach action in Actions Editor can be set as a conditional action. Conditional actions only run when the defined conditions allow them to be run. To define these conditions, click Show execution and error handling options. Execution options are:
l Enabled: specifies if the action is enabled or disabled. Only enabled actions are executed.
This functionality may be used while testing a form.
l Condition: action execution is defined by a single-line programming expression that provides a Boolean value (true or false). If the result of the expression is true, the action executes.
Condition offers a way to avoid executing actions every time.
Error handling options are:
www.nicelabel.com 226

l Ignore failure: specifies whether an error should be ignored or not. With Ignore failure enabled, the execution of actions continues even if the current action fails.
NOTE Nested actions that depend on the current action do not execute in case of a failure. The execution of actions continues with the next action on the same level as the current action. The error is logged, but does not break the execution of the action.
l Save error to variable: enables the user to define the Data Source (variable) to save the error to.
Translate FormTranslate Forms translates all strings on a form to the selected language.Translate form settings group selects the language and creates the translation file.
l Language: language to be used on the translated form. The language name is defined in the first row of the translation file.
The language name in the translation file is user-configurable. Use the same ID (name) in the action as you have defined in the translation file. The language name can be fixed or variable. Its usage depends on the language selection type you that is used on the form.- Fixed name: hard-coded language name which must match the name in the first row of the translation file.- Variable name: Example is a drop-down box with language names. When the user changes the language in the list, the onChange event executes the Trans-late Form action. The drop-down box saves the user selection in a variable, which is used for the action.
l Translation file: file that contains source strings and translations into various lan-guages. This is a structured text file, similar to a CSV file.
l Create translation file: click this button to create the translation file containing the source and translated strings.
Translation File Structure is a text file with UTF-8 encoded data. It is similar to comma-separated-values (CSV).Formatting Rules are mandatory. Always follow the below listed rules.
l The first line contains the language ID.
l The first field is always named Source. Do not change it.
l The names of other fields in the first row are user-configurable. Use the sug-gested names, such as "Language 2" and "Language 3", or replace them with whatever describes the language better, such as "German", "French", "Chinese", etc.
l All lines that follow the first line are lines with the translations from the original lan-guage. The first field contains the original string, the next fields in the same line contain translation to other languages. The first line specifies in which order the translation should follow the source string.
l All values are enclosed with double-quote characters (").
l All values are delimited by a semicolon character (;).
www.nicelabel.com 227

l If you have multiline text objects in the form, the newline (<CR><LF>) will be encoded as special string $NEWLINE$.
l If you leave the translation empty, the Source string is used.
E X A M P L E O F T R A N S L A T I O N F I L E :
Source";"DE"
"&Print";"&Druck"
"Customize$NEWLINE$your$NEWLINE$printing$NEWLINE$forms";"Anpassen$NEWLINE$Sie$NEWLINE$Ihre$NEWLINE$Druckformen"
"Printer:";"Drucker"
"Quantity";"Menge"
"SAMPLE";"PROBE"
"Se&ttings";"Einstellungen"
"Translate";"Übersetzen"
"www.nicelabel.com/solutions";""
Translating StringsWhen using the Translate Form action anywhere in your form, all strings of the form are automatically saved to the translation file whenever you save the form. This ensures that the translation file is always up to date with your form.The translation file is Unicode-aware text file. You can edit it in any text editor, but you might have troubles recognizing the fields, because their values are semicolon-sep-arated and not aligned one below another.You can also open the file in a spreadsheet application, such as Microsoft Excel. In this case, the fields belonging to particular language are displayed in the same column of data, and much easier to edit.
NOTE Spreadsheet applications might change the input file structure of the trans-lation file. In this case, you will have to reformat the data yourself after you saving the translation file.
EXAMPLE Micros of t Excel will s a v e t he t ra ns la t ion f ile a s C SV. The f ields los e t he double quot es a round t he v a lues a nd will be delimit ed by comma ( ,) ins t ea d of s emicolon ( ;) . Y ou will ha v e t o conv ert comma s int o s emicolons a nd put double quot es a round f ields . This ca n be done wit h a f ew s ea rch & repla ce a ct ions .
Action Execution and Error HandlingEach action in Actions Editor can be set as a conditional action. Conditional actions only run when the defined conditions allow them to be run. To define these conditions, click Show execution and error handling options. Execution options are:
l Enabled: specifies if the action is enabled or disabled. Only enabled actions are executed.
This functionality may be used while testing a form.
www.nicelabel.com 228

l Condition: action execution is defined by a single-line programming expression that provides a Boolean value (true or false). If the result of the expression is true, the action executes.
Condition offers a way to avoid executing actions every time.
Error handling options are: l Ignore failure: specifies whether an error should be ignored or not. With Ignore
failure enabled, the execution of actions continues even if the current action fails.
NOTE Nested actions that depend on the current action do not execute in case of a failure. The execution of actions continues with the next action on the same level as the current action. The error is logged, but does not break the execution of the action.
l Save error to variable: enables the user to define the Data Source (variable) to save the error to.
Variables
Set VariableSet Variable assigns a new value to the selected variable when the form is run. Variable group includes the following options.
l Name: name of variable that should have the value changed.
l Value: value to be set to a variable.
The allowed content types are fixed content, mix of fixed and variable content, or variable content alone. Detailed description is available in topic Combining Values in an Object.
Action Execution and Error HandlingEach action in Actions Editor can be set as a conditional action. Conditional actions only run when the defined conditions allow them to be run. To define these conditions, click Show execution and error handling options. Execution options are:
l Enabled: specifies if the action is enabled or disabled. Only enabled actions are executed.
This functionality may be used while testing a form.
l Condition: action execution is defined by a single-line programming expression that provides a Boolean value (true or false). If the result of the expression is true, the action executes.
Condition offers a way to avoid executing actions every time.
Error handling options are: l Ignore failure: specifies whether an error should be ignored or not. With Ignore
failure enabled, the execution of actions continues even if the current action fails.
NOTE Nested actions that depend on the current action do not execute in case of a failure. The execution of actions continues with the next action on the
www.nicelabel.com 229

same level as the current action. The error is logged, but does not break the execution of the action.
l Save error to variable: enables the user to define the Data Source (variable) to save the error to.
Save Variable DataSave Variable Data stores values of a single or multiple variables in an associated file.
TIP: To recall the saved data, use action Load Variable Data. The values are saved using CSV format with the first line containing variable names. If the variables contain multiline values, the new line characters (CR/LF) are encoded as \n\r.
Settings group defines the file name.
l File name: file to save the variable data to. If the name is hard-coded, values are saved into the same file each time.
If file exists group offers additional options:
l Overwrite the file: overwrites the existing data with new variable data. The old content is lost.
l Append data to the file: appends the variable values to the existing data files.
File Structure group defines the CSV file parameters:
l Delimiter: specifies delimiter type (tab, semicolon, comma or custom character). Delimiter is a character that separates the values.
l Text qualifier: specifies the character that qualifies content as text.
l File encoding: specifies character encoding type to be used in the data file. Auto defines the encoding automatically. If required, the preferred encoding type can be selected from the drop down list.
l Add names of variable in the first row: places the variable name in the first row of the file.
Variables group defines the variables whose value should be saved.
l All variables: variable data of all variables is saved.
l Selected variables: variable data of listed variables is saved.
Action Execution and Error HandlingEach action in Actions Editor can be set as a conditional action. Conditional actions only run when the defined conditions allow them to be run. To define these conditions, click Show execution and error handling options. Execution options are:
l Enabled: specifies if the action is enabled or disabled. Only enabled actions are executed.
This functionality may be used while testing a form.
l Condition: action execution is defined by a single-line programming expression that provides a Boolean value (true or false). If the result of the expression is true, the action executes.
www.nicelabel.com 230
Condition offers a way to avoid executing actions every time.
Error handling options are: l Ignore failure: specifies whether an error should be ignored or not. With Ignore
failure enabled, the execution of actions continues even if the current action fails.
NOTE Nested actions that depend on the current action do not execute in case of a failure. The execution of actions continues with the next action on the same level as the current action. The error is logged, but does not break the execution of the action.
l Save error to variable: enables the user to define the Data Source (variable) to save the error to.
Load Variable DataLoad Variable Data loads values of a single or multiple variables from the associated file as they were saved using the Save Variable Data action. Settings group defines the file name.
l File name: specifies the file for the variable data to be loaded from. If the name is hard-coded, the values are loaded from the same file each time.
File Structure group settings must reflect the structure of the saved file from the Save Variable Data action.
l Delimiter: specifies delimiter type (tab, semicolon, comma or custom character). Delimiter is a character that separates the values.
l Text qualifier: specifies the character that qualifies content as text.
l File encoding: specifies the character encoding type used in the data file. Auto defines the encoding automatically. If needed, select the preferred encoding type from the drop down list.
Variables group defines the variables whose value should be loaded.
l All variables: specifies all defined variables in the data file to be read.
l Selected variables: specifies the specific selection of variables to be read from the data file.
Action Execution and Error HandlingEach action in Actions Editor can be set as a conditional action. Conditional actions only run when the defined conditions allow them to be run. To define these conditions, click Show execution and error handling options. Execution options are:
l Enabled: specifies if the action is enabled or disabled. Only enabled actions are executed.
This functionality may be used while testing a form.
l Condition: action execution is defined by a single-line programming expression that provides a Boolean value (true or false). If the result of the expression is true, the action executes.
Condition offers a way to avoid executing actions every time.
Error handling options are:
www.nicelabel.com 231

l Ignore failure: specifies whether an error should be ignored or not. With Ignore failure enabled, the execution of actions continues even if the current action fails.
NOTE Nested actions that depend on the current action do not execute in case of a failure. The execution of actions continues with the next action on the same level as the current action. The error is logged, but does not break the execution of the action.
l Save error to variable: enables the user to define the Data Source (variable) to save the error to.
String ManipulationString Manipulation defines the value format of the selected variables. this action's pur-pose is to fine-tune the data values.Variables group defines the variables to which the string manipulation applies.
l All variables: specifies all the defined variables in a data file to be formatted.
l Selected variables: specifies a selection of variables to be formatted from the data file.
Format Text group defines string manipulation functions that apply to the selected vari-ables or fields. Multiple functions can be used. The functions apply in the same order as seen in the editor – from top to bottom.
l Delete spaces at the beginning: deletes all space characters (decimal ASCII code 32) from the beginning of the string.
l Delete spaces at the end: deletes all space characters (decimal ASCII value 32) from the end of a string.
l Delete opening closing characters: deletes the first occurrence of the selected opening and closing characters that are found in the string.
EXAMPLE: When us ing "{" as opening character and "}" as c los ing character , the input s tr ing {{selection}} is conver ted to {selection}.
l Search and replace: executes standard search and replace function upon the provided values for find what and replace with. Regular expressions are sup-ported.
NOTE There are several implementations of the regular expressions in use. Designer uses .NET Framework syntax for the regular expressions. For more information, see Knowledge Base article KB250.
l Replace non printable characters with space: replaces all control characters in the string with space character (decimal ASCII code 32). Non printable characters are characters with decimal ASCII values between 0–31 and 127–159.
l Delete non printable characters: deletes all control characters in the string. The non-printable characters are characters with decimal ASCII values between 0–31 and 127–159.
l Decode special characters: decodes the characters (or control codes) that are not available on the keyboard, such as Carriage Return or Line Feed. Designer
www.nicelabel.com 232

uses a notation to encode such characters in human-readable form, such as <CR> for Carriage Return and <LF> for Line Feed. This option converts special char-acters from NiceLabel syntax into actual binary characters.
EXAMPLE: When you receive the data "<CR><LF>", Des igner uses it as p lain s tr ing of 8 characters . You wil l have to enable this option to interpret and use the received data as two b inary characters CR (Carr iage Return – ASCII code 13) and LF (Line Feed – ASCII code 10).
l Search and delete everything before: finds the provided string and deletes all characters in front of the defined string. The string can also be deleted.
l Search and delete everything after: finds the provided string and deletes all characters behind the defined string. The string can also be deleted.
Action Execution and Error HandlingEach action in Actions Editor can be set as a conditional action. Conditional actions only run when the defined conditions allow them to be run. To define these conditions, click Show execution and error handling options. Execution options are:
l Enabled: specifies if the action is enabled or disabled. Only enabled actions are executed.
This functionality may be used while testing a form.
l Condition: action execution is defined by a single-line programming expression that provides a Boolean value (true or false). If the result of the expression is true, the action executes.
Condition offers a way to avoid executing actions every time.
Error handling options are: l Ignore failure: specifies whether an error should be ignored or not. With Ignore
failure enabled, the execution of actions continues even if the current action fails.
NOTE Nested actions that depend on the current action do not execute in case of a failure. The execution of actions continues with the next action on the same level as the current action. The error is logged, but does not break the execution of the action.
l Save error to variable: enables the user to define the Data Source (variable) to save the error to.
Data And Connectivity
Execute SQL StatementExecute SQL Statement sends SQL commands to an SQL server and collects the res-ults.
TIP: Use commands SELECT, INSERT, UPDATE, and DELETE.
NOTE To use a variable value within an SQL statement, enter colon (:) in front of its name. This gives Designer a signal that a variable name follows.
www.nicelabel.com 233
Database Connection defines the database connection that will be used for the state-ment.SQL Statement group defines an SQL statement or query to be executed.
TIP: Statements from Data Manipulation Language (DML) are allowed to execute quer-ies upon existing database tables. Use standard SQL statements, such as SELECT, INSERT, DELETE and UPDATE, including joins, function and keywords. The statements DDL language to create databases and tables (CREATE DATABASE, CREATE TABLE), or to delete them (DROP TABLE) are not permitted.
l Test: opens the Data Preview section. Simulate execution (selected by default) tests the execution of SQL statements. Click Execute to run the simulation.
l Insert variable: inserts the predefined variables into the SQL statement.
l Export/Import: enables exporting and importing SQL statements to/from an external file.
l Execution mode: specifies the explicit mode of execution.
l Automatic: the application determines the action automatically.
l Returns set of records (SELECT): receive the data set with records.
l Does not return set of records (INSERT, DELETE, UPDATE): You are executing a query that does not return the records. Either insert new records, delete or update the existing records. The result is a status response reporting the number of rows were affected by your query.
With certain complex SQL queries, it becomes increasingly difficult to auto-matically determine what the supposed action is. If the built-in logic encounters troubles identifying the action's intent, select the main action manually.
Save result to variable defines the variable to store the SQL statement result.Retry on failure allows you to configure the action to continually retry establishing the connection to the database server in case the first attempt was not successful. If the action will fail to connect in all defined number of attempts, the error is raised.
l Retry attempts: specifies the number of tries to connect to the database server.
l Retry interval: specifies the time period to wait before trying to reconnect to the database.
Action Execution and Error HandlingEach action in Actions Editor can be set as a conditional action. Conditional actions only run when the defined conditions allow them to be run. To define these conditions, click Show execution and error handling options. Execution options are:
l Enabled: specifies if the action is enabled or disabled. Only enabled actions are executed.
This functionality may be used while testing a form.
l Condition: action execution is defined by a single-line programming expression that provides a Boolean value (true or false). If the result of the expression is true, the action executes.
Condition offers a way to avoid executing actions every time.
Error handling options are:
www.nicelabel.com 234
l Ignore failure: specifies whether an error should be ignored or not. With Ignore failure enabled, the execution of actions continues even if the current action fails.
NOTE Nested actions that depend on the current action do not execute in case of a failure. The execution of actions continues with the next action on the same level as the current action. The error is logged, but does not break the execution of the action.
l Save error to variable: enables the user to define the Data Source (variable) to save the error to.
Refresh TableRefresh Table rereads a database table.Table group selects the database table to be reread.
l Table: defines an existing table to be reread or creates a new one using the Step-by-Step Database Wizard.
Action Execution and Error HandlingEach action in Actions Editor can be set as a conditional action. Conditional actions only run when the defined conditions allow them to be run. To define these conditions, click Show execution and error handling options. Execution options are:
l Enabled: specifies if the action is enabled or disabled. Only enabled actions are executed.
This functionality may be used while testing a form.
l Condition: action execution is defined by a single-line programming expression that provides a Boolean value (true or false). If the result of the expression is true, the action executes.
Condition offers a way to avoid executing actions every time.
Error handling options are: l Ignore failure: specifies whether an error should be ignored or not. With Ignore
failure enabled, the execution of actions continues even if the current action fails.
NOTE Nested actions that depend on the current action do not execute in case of a failure. The execution of actions continues with the next action on the same level as the current action. The error is logged, but does not break the execution of the action.
l Save error to variable: enables the user to define the Data Source (variable) to save the error to.
Import Data into TableImport Data into Table action reads data from a formatted CSV text file and imports it into an SQL database.
NOTE Before using this action, a connection to the SQL database must already be set. The action does not work with file-based databases, such as Microsoft Access, or data files like Microsoft Excel, or plain text files. Use a server-based SQL database, such as Microsoft SQL Server.
www.nicelabel.com 235
The following rules apply to this action:
l The table must already exist within the SQL database.
l The table must contain PRIMARY KEY.
l The first line in a text file must define field names.
l The field names in the text file must match field names in the database table.
l If the text file does not provide a value for some field, NULL is written to the data-base. If the field does not accept NULL values, an empty string ("") is written.
l Setting values for auto-incremental fields are ignored. The database provides value for such field.
l If the value from text file does not match the structure of the field, the action is can-celed and an error message is displayed. For example, when trying to enter alpha-numerical value into numerical field.
l If you filter records on the form and display only records matching certain con-dition, you can only import records that either do not provide value for the filter field, or provide the same value for the filter as defined with the form.
l Only filters with condition "equal" , not "greater than", "less than", "contains" or sim-ilar are permitted.
l If the text file contains fields not defined in the SQL database, the import will ignore them. Only known fields will be imported.
Settings group selects the table.
l Table defines a predefined table from the drop down menu or creates a new one using the Step-by-Step Database Wizard.
File Text Structure group specifies the text database parameters:
l Delimiter: specifies the delimiter type in the data file. Select a predefined delim-iter, or create a custom one.
l Text qualifier: specifies the text qualifier. Select a predefined delimiter or insert a custom one.
l File encoding: specifies the character encoding type used in the data file. Auto defines the encoding automatically. If needed, select the preferred encoding type from the drop down list.
Action Execution and Error HandlingEach action in Actions Editor can be set as a conditional action. Conditional actions only run when the defined conditions allow them to be run. To define these conditions, click Show execution and error handling options. Execution options are:
l Enabled: specifies if the action is enabled or disabled. Only enabled actions are executed.
This functionality may be used while testing a form.
www.nicelabel.com 236
l Condition: action execution is defined by a single-line programming expression that provides a Boolean value (true or false). If the result of the expression is true, the action executes.
Condition offers a way to avoid executing actions every time.
Error handling options are: l Ignore failure: specifies whether an error should be ignored or not. With Ignore
failure enabled, the execution of actions continues even if the current action fails.
NOTE Nested actions that depend on the current action do not execute in case of a failure. The execution of actions continues with the next action on the same level as the current action. The error is logged, but does not break the execution of the action.
l Save error to variable: enables the user to define the Data Source (variable) to save the error to.
Send Data to TCP/IP PortSend Data to TCP/IP Port sends the data to any external device that supports TCP/IP connection on a predefined port number. The action establishes connection with a device, sends the data and terminates the con-nection. Connection and communication are governed by the handshake that occurs between a client and server while initiating or terminating a TCP connection.Connection Settings group sets connection details:
l Destination (IP address:port): destination address and port of the TCP/IP server. Hard-code the connection parameters and use fixed host name or IP address or use variable connection parameters by clicking the right arrow and selecting a pre-defined variable. For more information, see topic Combining Values in an Object.
l Disconnect delay: prolongs the connection with the target socket for the defined time intervals after the data has been delivered. Certain devices require more time to process the data. Insert the delay value manually or click the arrows to increase or decrease it.
Content defines the content to be sent to the TCP/IP server.
TIP: Use fixed content, mix of fixed and variable content, or variable content alone. To enter variable content, click the button with arrow to the right of data area and insert a variable from the list. For more information, see the topic Combining Values in an Object.
l Data: content to be sent outbound.
l Encoding: encoding type for the sent data. Auto defines the encoding auto-matically. If needed, select the preferred encoding type from the drop down list.
Action Execution and Error HandlingEach action in Actions Editor can be set as a conditional action. Conditional actions only run when the defined conditions allow them to be run. To define these conditions, click Show execution and error handling options. Execution options are:
l Enabled: specifies if the action is enabled or disabled. Only enabled actions are executed.
www.nicelabel.com 237

This functionality may be used while testing a form.
l Condition: action execution is defined by a single-line programming expression that provides a Boolean value (true or false). If the result of the expression is true, the action executes.
Condition offers a way to avoid executing actions every time.
Error handling options are: l Ignore failure: specifies whether an error should be ignored or not. With Ignore
failure enabled, the execution of actions continues even if the current action fails.
NOTE Nested actions that depend on the current action do not execute in case of a failure. The execution of actions continues with the next action on the same level as the current action. The error is logged, but does not break the execution of the action.
l Save error to variable: enables the user to define the Data Source (variable) to save the error to.
Send Data to Serial PortSend Data to Serial Port sends data to a serial port. Use this action to communicate with external serial-port devices. Make sure the port set-tings on both ends match. Serial port can be used by a single running application. To suc-cessfully use the port from this action, no other application should use the port, not even a printer driver.Port group defines the serial port.
l Port name: name of the port to which an external device connects to. This can be a hardware COM port or a virtual COM port.
Port Settings group defines additional port connection settings:
l Bits per second: speed rate used by the an external device to communicate with the PC. The usual alias used with the setting is "baud rate". Select the value from the drop down menu.
l Data bits: number of data bits in each character. 8 data bits are almost universally used in newer devices. Select the value from the drop down menu.
l Parity: method of detecting errors in a transmission. The most common parity set-ting, is "none", with error detection handled by a communication protocol (flow con-trol). Select the value from the drop down menu.
l Stop bits: halts the bits sent at the end of every character allowing the receiving signal hardware to detect the end of a character and to resynchronize with the character stream. Electronic devices usually use a single stop bit. Select the value from the drop down menu.
l Flow control: serial port may use interface signals to pause and resume the data transmission.
EXAMPLE A s low dev ice might need t o ha nds ha k e wit h t he s er ia l port t o indica t e t ha t da t a s hould be pa us ed while t he dev ice proces s es receiv ed da t a .
Content group defines the content to be sent to serial port.
www.nicelabel.com 238

TIP: Fixed content, mix of fixed and variable content, or variable content alone are per-mitted. To enter variable content, click the button with arrow to the right of data area and insert a variable from the list. For more information, see the topic Combining Val-ues in an Object.
l Data: content to be sent outbound.
Action Execution and Error HandlingEach action in Actions Editor can be set as a conditional action. Conditional actions only run when the defined conditions allow them to be run. To define these conditions, click Show execution and error handling options. Execution options are:
l Enabled: specifies if the action is enabled or disabled. Only enabled actions are executed.
This functionality may be used while testing a form.
l Condition: action execution is defined by a single-line programming expression that provides a Boolean value (true or false). If the result of the expression is true, the action executes.
Condition offers a way to avoid executing actions every time.
Error handling options are: l Ignore failure: specifies whether an error should be ignored or not. With Ignore
failure enabled, the execution of actions continues even if the current action fails.
NOTE Nested actions that depend on the current action do not execute in case of a failure. The execution of actions continues with the next action on the same level as the current action. The error is logged, but does not break the execution of the action.
l Save error to variable: enables the user to define the Data Source (variable) to save the error to.
Read Data From Serial PortRead Data From Serial Port collects the data received on the serial port (RS-232) and saves it to a selected variable. This action communicates with external serial port devices.Port group selects the serial port.
l Port name: port to which the external device is connected. The possibilities are hardware COM port or virtual COM port.
Port Settings group defines additional port connection settings:
l Bits per second: speed rate used by the an external device to communicate with the PC. The usual alias used with the setting is "baud rate".
l Data bits: specifies the number of data bits in each character. 8 data bits are almost universally used in newer devices.
l Parity: specifies the method of detecting errors in a transmission. The most com-mon parity setting, is "none", with error detection handled by a communication pro-tocol (flow control).
www.nicelabel.com 239

l Stop bits: halts the bits sent at the end of every character allowing the receiving signal hardware to detect the end of a character and to resynchronize with the character stream. Electronic devices usually use a single stop bit.
l Flow control: serial port may use interface signals to pause and resume the data transmission.
EXAMPLE A s low dev ice might need t o ha nds ha k e wit h t he s er ia l port t o indica t e t ha t da t a s hould be pa us ed while t he dev ice proces s es receiv ed da t a .
Options group includes the following settings:
l Read delay: optional delay when reading data from serial port. After the delay, the entire content of the serial port buffer is read. Enter the delay manually or click the arrows to increase or decrease the value.
l Send initialization data: specifies the string that is sent to the selected serial port before the data is read. This option enables the action to initialize the device to be able to provide the data. The option can also be used for sending a specific question to the device, and to receive a specific answer. Click the arrow button to enter special characters.
l Data Extraction: extracts the defined parts of the received data.
l Start position: starting position of extracted data is defined by entering a number.
l End position: ending position of extracted is defined by entering a number.
Result group defines a variable for data storing. l Save data to variable: variable selection for storing the received data.
Action Execution and Error HandlingEach action in Actions Editor can be set as a conditional action. Conditional actions only run when the defined conditions allow them to be run. To define these conditions, click Show execution and error handling options. Execution options are:
l Enabled: specifies if the action is enabled or disabled. Only enabled actions are executed.
This functionality may be used while testing a form.
l Condition: action execution is defined by a single-line programming expression that provides a Boolean value (true or false). If the result of the expression is true, the action executes.
Condition offers a way to avoid executing actions every time.
Error handling options are: l Ignore failure: specifies whether an error should be ignored or not. With Ignore
failure enabled, the execution of actions continues even if the current action fails.
NOTE Nested actions that depend on the current action do not execute in case of a failure. The execution of actions continues with the next action on the
www.nicelabel.com 240

same level as the current action. The error is logged, but does not break the execution of the action.
l Save error to variable: enables the user to define the Data Source (variable) to save the error to.
Send Data to PrinterSend Data to Printer sends data to a selected printer. The action is useful for sending pre-generated printer streams to any available printer. Designer uses the installed printer driver in pass-through mode in order to be able to send data to the target LPT, COM, TCP/IP or USB port, to which the printer is connected.Printer group selects the printer.
l Printer name: name of the printer to send the data to. Select the printer from the drop down list of locally installed printer drivers, or enter a custom printer.
Data Source defines the content to be sent to printer.
l File name: path and file name of the file containing a printer stream. Contents of the specified file is sent to a printer. Select Data source to define the file name dynamically using a variable value.
l Variable: variable that contains the printer stream.
l Custom: defines custom content to be sent to a printer. Fixed content, mix of fixed and variable content, or variable content alone are permitted. To enter vari-able content, click the button with arrow to the right of data area and insert a vari-able from the list. For more information, see the topic Combining Values in an Object.
Action Execution and Error HandlingEach action in Actions Editor can be set as a conditional action. Conditional actions only run when the defined conditions allow them to be run. To define these conditions, click Show execution and error handling options. Execution options are:
l Enabled: specifies if the action is enabled or disabled. Only enabled actions are executed.
This functionality may be used while testing a form.
l Condition: action execution is defined by a single-line programming expression that provides a Boolean value (true or false). If the result of the expression is true, the action executes.
Condition offers a way to avoid executing actions every time.
Error handling options are: l Ignore failure: specifies whether an error should be ignored or not. With Ignore
failure enabled, the execution of actions continues even if the current action fails.
NOTE Nested actions that depend on the current action do not execute in case of a failure. The execution of actions continues with the next action on the same level as the current action. The error is logged, but does not break the execution of the action.
www.nicelabel.com 241

l Save error to variable: enables the user to define the Data Source (variable) to save the error to.
HTTP RequestHTTP Request sends data to the destination Web server using the selected HTTP method. HTTP and HTTPS URI schemes are permitted.HTTP functions works as a request–response protocol in the client–server computing model. With this action Designer takes a role of the client, communicating with the remote server. This action submits the selected HTTP request message to the server. The server returns a response message containing a completion status information about the request and may also contain the requested content in the message body.Connection Settings group sets the connection parameters.
NOTE This action supports Internet Protocol version 6 (IPv6).
l Destination: address, port and destination (path) of the Web server.
If the Web server runs on default port 80, skip the port number. Hard-code the connection parameters and use a fixed host name or IP address. Use a variable value to define this option dynamically. For more information, see topic Com-bining Values in an Object.
l Request method: available request methods.
l Timeout: timeout (in ms) in which the connection to the server should be estab-lished.
l Save status reply in a variable: variable to store the status code received from the server.
l Save data reply in a variable: variable to store the data received from the server.
Content define the contents to be sent to a Web server.
l Data: content to be sent outbound. Fixed content, mix of fixed and variable con-tent, or variable content alone are permitted. To enter variable content, click the button with arrow to the right of data area and insert variable from the list. For more information, see topic Combining Values in an Object.
l Encoding: encoding type for the sent data.
Auto defines the encoding automatically. If needed, select the preferred encod-ing type from the drop down list.
l Type: Content-Type property of the HTTP message. If no type is selected, the default application/x-www-form-urlencoded type is used. If an appropriate type is not listed, define a custom one.
Additional HTTP Headers are requested by certain HTTP servers (especially for REST services).
l Additional headers: hard coded headers or headers obtained from variable val-ues. To access the variables, click the small arrow button to the right of the text area. For more information, see the topic Combining Values in an Object.
Action Execution and Error Handling
www.nicelabel.com 242

Each action in Actions Editor can be set as a conditional action. Conditional actions only run when the defined conditions allow them to be run. To define these conditions, click Show execution and error handling options. Execution options are:
l Enabled: specifies if the action is enabled or disabled. Only enabled actions are executed.
This functionality may be used while testing a form.
l Condition: action execution is defined by a single-line programming expression that provides a Boolean value (true or false). If the result of the expression is true, the action executes.
Condition offers a way to avoid executing actions every time.
Error handling options are: l Ignore failure: specifies whether an error should be ignored or not. With Ignore
failure enabled, the execution of actions continues even if the current action fails.
NOTE Nested actions that depend on the current action do not execute in case of a failure. The execution of actions continues with the next action on the same level as the current action. The error is logged, but does not break the execution of the action.
l Save error to variable: enables the user to define the Data Source (variable) to save the error to.
Web ServiceWeb Service connects to a SOAP server and executes the methods on it. This action sends inbound values to the Web service and collects the results.Web Service Definition group includes the following settings:
NOTE This action supports Internet Protocol version 6 (IPv6).
l WSDL: location of Web Service Description Language (WSDL) definition. This is XML-based interface description language that describes the functionality offered by the Web service. The WSDL is usually provided by the Web service itself. Typ-ically you would enter the link to WSDL and click the Import button to read the definition. If you have troubles getting WSDL from the online resource, save the WSDL to file and enter the path with file name to load methods from it. Designer automatically detects if the remote Web Service uses document or RPC syntax and communicates appropriately.
l Address: address where the Web Service is published. Initially, this information is retrieved from the WSDL, but can be updated it before the action is executed. This is helpful for development / test / production environments, where the same list of actions is used, but with different names of servers where Web Services run. Fixed content, mix of fixed and variable content, or variable content alone are permitted. To enter variable content, click the button with arrow to the right of data area and insert variable from the list. For more information, see the topic Com-bining Values in an Object.
www.nicelabel.com 243

l Method: methods (functions) which are available in a selected Web service. The list is automatically populated by the WSDL definition.
l Parameters: input and output variables for the selected method (function). The inbound parameters expect an input. For testing and troubleshooting reasons you can enter a fixed value and see the preview result on-screen. But typically you would select a variable for inbound parameter. Value of that variable will be used as input parameter. The outbound parameter provides the result from the func-tion. You must select the variable that will store the result.
l Timeout: timeout after which the connection to a server is established.
Authentication enable basic user authentication. This option defines the user cre-dentials that are necessary to establish an outbound call to a remote web service.
l Enable basic authentication: enables defining the Username and Password that can be entered manually or defined by variable values. Select Data sources to define the variables.
l Show password: uncovers the masked Username and Password characters.
Action Execution and Error HandlingEach action in Actions Editor can be set as a conditional action. Conditional actions only run when the defined conditions allow them to be run. To define these conditions, click Show execution and error handling options. Execution options are:
l Enabled: specifies if the action is enabled or disabled. Only enabled actions are executed.
This functionality may be used while testing a form.
l Condition: action execution is defined by a single-line programming expression that provides a Boolean value (true or false). If the result of the expression is true, the action executes.
Condition offers a way to avoid executing actions every time.
Error handling options are: l Ignore failure: specifies whether an error should be ignored or not. With Ignore
failure enabled, the execution of actions continues even if the current action fails.
NOTE Nested actions that depend on the current action do not execute in case of a failure. The execution of actions continues with the next action on the same level as the current action. The error is logged, but does not break the execution of the action.
l Save error to variable: enables the user to define the Data Source (variable) to save the error to.
File Operations
Save Data to FileSave Data to File saves data streams or a variable value in an external file. Make sure the application has write permission for the given folder.File group sets the file related details.
www.nicelabel.com 244

l File name: name of the file that stores the data. File name can be hard-coded – the data is stored in the same file with each action. Data source dynamically defines the File name.
If file exists group handles options in case of existing file. l Overwrite the file: overwrites existing data with new data. The old content is
lost.
l Append data to the file: appends the variable values to the existing data files.
Content group defines the content as provided in the text area. Fixed values, variable values and special characters are permitted. To enter variables and special characters, click the arrow button to the right of the text area. For more information, see the topic Combining Values in an Object.
l Encoding: encoding type for the sent data. Auto defines the encoding auto-matically. If needed, select the preferred encoding type from the drop down list.
Action Execution and Error HandlingEach action in Actions Editor can be set as a conditional action. Conditional actions only run when the defined conditions allow them to be run. To define these conditions, click Show execution and error handling options. Execution options are:
l Enabled: specifies if the action is enabled or disabled. Only enabled actions are executed.
This functionality may be used while testing a form.
l Condition: action execution is defined by a single-line programming expression that provides a Boolean value (true or false). If the result of the expression is true, the action executes.
Condition offers a way to avoid executing actions every time.
Error handling options are: l Ignore failure: specifies whether an error should be ignored or not. With Ignore
failure enabled, the execution of actions continues even if the current action fails.
NOTE Nested actions that depend on the current action do not execute in case of a failure. The execution of actions continues with the next action on the same level as the current action. The error is logged, but does not break the execution of the action.
l Save error to variable: enables the user to define the Data Source (variable) to save the error to.
Read Data from FileRead Data from File reads the content of a specified file and saves it in a variable. This variable can be later used as dynamic content for another object.File group sets the file related details.
l File name: name of the file to read the data from. File name can be hard-coded – the data is read from the same file with each action. Data source dynamically defines the File name.
Content group sets the file content related details.
www.nicelabel.com 245

l Variable: variable that stores the file content. At least one variable should be defined.
l Encoding: encoding type for the sent data. Auto defines the encoding auto-matically. If needed, select the preferred encoding type from the drop down list.
Retry on Failure group defines how the action should continue if the specified file becomes inaccessible.
TIP: Designer might not be able to access the file, because it is locked by another application. If an application still writes data to the selected file and keeps it locked in exclusive mode, no other application can open it at the same time, not even for read-ing. Other possible causes for action retries: file doesn't exist (yet), folder does not exist (yet), or the service user doesn't have privileges to access the file.
l Retry attempts: defines the number of retry attempts for accessing the file. If the value is set to 0, no retries will be made.
l Retry interval: time interval between individual retries in milliseconds.
Action Execution and Error HandlingEach action in Actions Editor can be set as a conditional action. Conditional actions only run when the defined conditions allow them to be run. To define these conditions, click Show execution and error handling options. Execution options are:
l Enabled: specifies if the action is enabled or disabled. Only enabled actions are executed.
This functionality may be used while testing a form.
l Condition: action execution is defined by a single-line programming expression that provides a Boolean value (true or false). If the result of the expression is true, the action executes.
Condition offers a way to avoid executing actions every time.
Error handling options are: l Ignore failure: specifies whether an error should be ignored or not. With Ignore
failure enabled, the execution of actions continues even if the current action fails.
NOTE Nested actions that depend on the current action do not execute in case of a failure. The execution of actions continues with the next action on the same level as the current action. The error is logged, but does not break the execution of the action.
l Save error to variable: enables the user to define the Data Source (variable) to save the error to.
Delete FileDelete File deletes file from disk. File group sets the file related details.
l File name: the name of the file to be deleted. File name can be hard-coded. Data source dynamically defines the File name.
Action Execution and Error Handling
www.nicelabel.com 246
Each action in Actions Editor can be set as a conditional action. Conditional actions only run when the defined conditions allow them to be run. To define these conditions, click Show execution and error handling options. Execution options are:
l Enabled: specifies if the action is enabled or disabled. Only enabled actions are executed.
This functionality may be used while testing a form.
l Condition: action execution is defined by a single-line programming expression that provides a Boolean value (true or false). If the result of the expression is true, the action executes.
Condition offers a way to avoid executing actions every time.
Error handling options are: l Ignore failure: specifies whether an error should be ignored or not. With Ignore
failure enabled, the execution of actions continues even if the current action fails.
NOTE Nested actions that depend on the current action do not execute in case of a failure. The execution of actions continues with the next action on the same level as the current action. The error is logged, but does not break the execution of the action.
l Save error to variable: enables the user to define the Data Source (variable) to save the error to.
Browse File/FolderBrowse File/Folder opens the system browse for file or folder dialog. Dialog group sets the browsing preferences.
l Browse for: selects between browsing for a file or folder.
l Filter: file type to be located. Enter the file type manually, define the filters using a Define File Filters dialog or select Data source to determine the filter dynam-ically using a variable value. The Define File Filters dialog allows the user to:
l List the filters. Each filter is identified with a Filter Name and Filter type.
l Manage the existing filters using Add, Delete, Move up and Move down buttons.
l Initial directory: directory to be opened.
l Dialog title: title of the file browser window.
Output data source group selects a variable for file/folder path storing.
l Save path to: existing or new variable for the file/folder path to be saved to.
Action Execution and Error HandlingEach action in Actions Editor can be set as a conditional action. Conditional actions only run when the defined conditions allow them to be run. To define these conditions, click Show execution and error handling options. Execution options are:
l Enabled: specifies if the action is enabled or disabled. Only enabled actions are executed.
www.nicelabel.com 247
This functionality may be used while testing a form.
l Condition: action execution is defined by a single-line programming expression that provides a Boolean value (true or false). If the result of the expression is true, the action executes.
Condition offers a way to avoid executing actions every time.
Error handling options are: l Ignore failure: specifies whether an error should be ignored or not. With Ignore
failure enabled, the execution of actions continues even if the current action fails.
NOTE Nested actions that depend on the current action do not execute in case of a failure. The execution of actions continues with the next action on the same level as the current action. The error is logged, but does not break the execution of the action.
l Save error to variable: enables the user to define the Data Source (variable) to save the error to.
Flow Control
For LoopFor Loop executes subordinate nested actions for multiple times. All of the nested actions are executed in a loop for as many times as defined by the difference between the start and the end value.Loop Settings group includes the following options:
l Start value: loop starting point reference. A negative value is permitted. Select Data source to define the start value dynamically using a variable value. Select a variable containing a numeric value for start.
l End value: ending point reference. A negative value is permitted. Select Data source to define the start value dynamically using a variable value. Select a vari-able containing a numeric value for start.
l Save loop value to a variable: saves the current loop step value in an existing or a new variable. The loop step value is allowed to contain any value between start and end value. Save the value in order to reuse it in another action to identify the current iteration.
Action Execution and Error HandlingEach action in Actions Editor can be set as a conditional action. Conditional actions only run when the defined conditions allow them to be run. To define these conditions, click Show execution and error handling options. Execution options are:
l Enabled: specifies if the action is enabled or disabled. Only enabled actions are executed.
This functionality may be used while testing a form.
l Condition: action execution is defined by a single-line programming expression that provides a Boolean value (true or false). If the result of the expression is true, the action executes.
Condition offers a way to avoid executing actions every time.
Error handling options are:
www.nicelabel.com 248

l Ignore failure: specifies whether an error should be ignored or not. With Ignore failure enabled, the execution of actions continues even if the current action fails.
NOTE Nested actions that depend on the current action do not execute in case of a failure. The execution of actions continues with the next action on the same level as the current action. The error is logged, but does not break the execution of the action.
l Save error to variable: enables the user to define the Data Source (variable) to save the error to.
For Every RecordFor every record executes subordinate nested actions multiple times. All of the nested actions are executed in a loop for as many records as present in the form table.Settings group selects the records.
l Form table: form table that contains records for which an action should repeat.
l Use all records: repeats an action for all records in a defined table.
l Use selected record: repeats an action for the selected records only.
Action Execution and Error HandlingEach action in Actions Editor can be set as a conditional action. Conditional actions only run when the defined conditions allow them to be run. To define these conditions, click Show execution and error handling options. Execution options are:
l Enabled: specifies if the action is enabled or disabled. Only enabled actions are executed.
This functionality may be used while testing a form.
l Condition: action execution is defined by a single-line programming expression that provides a Boolean value (true or false). If the result of the expression is true, the action executes.
Condition offers a way to avoid executing actions every time.
Error handling options are: l Ignore failure: specifies whether an error should be ignored or not. With Ignore
failure enabled, the execution of actions continues even if the current action fails.
NOTE Nested actions that depend on the current action do not execute in case of a failure. The execution of actions continues with the next action on the same level as the current action. The error is logged, but does not break the execution of the action.
l Save error to variable: enables the user to define the Data Source (variable) to save the error to.
TryTry allows easy monitoring of errors while the actions are being executed. If an error occurs, a different set of actions is run. The action creates Do and On error placeholders for actions. All actions that should be executed, must be placed inside the Do placeholder. If no errors are detected when executing actions from Do placeholder, these are the only actions that are executed.
www.nicelabel.com 249

However, if an error does occur, the execution of actions from Do placeholder stops and the execution switches over to actions from On error placeholder.
E X A M P L E
I f a ny of t he a ct ions in t he D o pla ceholder f a il, t he a ct ion execut ion s t op a nd res umes wit h t he a ct ions in t he On Error pla ceholder .
I f Try would be pla ced on it s own, it would t ermina t e t he execut ion. I n t his ca s e, Try is nes -t ed under t he For loop a ct ion. Norma lly , a ny error in D o pla ceholder would a ls o s t op execut -ing t he For loop a ct ion, ev en if t here a re s t ill f urt her s t eps unt il For loop s hould complet e. I n t his ca s e t he Sa v e D a t a t o File would a ls o not execut e. B y def a ult , a ny error brea k s t he ent ire a ct ion proces s ing.
H owev er, y ou ca n a ls o cont inue wit h t he execut ion of t he next it era t ion in For loop a ct ion. For t his t o ha ppen, y ou ha v e t o ena ble I gnore f a ilure in t he Try a ct ion. I f t he da t a f rom cur-rent s t ep in For Loop ca us es a n error in D o pla ceholder , a ct ions f rom On Error execut e. Af t er t ha t , t he Sa v e D a t a t o File in lev el 2 execut e a nd t hen t he For loop a ct ion cont inues t o execut e f or t he next it era t ion.
TIP: This action provides easy error detection and execution of "feedback" or "report-ing" actions. For example, if an error happens during processing, the action enables you to send out a warning.
Action Execution and Error HandlingEach action in Actions Editor can be set as a conditional action. Conditional actions only run when the defined conditions allow them to be run. To define these conditions, click Show execution and error handling options. Execution options are:
l Enabled: specifies if the action is enabled or disabled. Only enabled actions are executed.
This functionality may be used while testing a form.
l Condition: action execution is defined by a single-line programming expression that provides a Boolean value (true or false). If the result of the expression is true, the action executes.
Condition offers a way to avoid executing actions every time.
Error handling options are: l Ignore failure: specifies whether an error should be ignored or not. With Ignore
failure enabled, the execution of actions continues even if the current action fails.
NOTE Nested actions that depend on the current action do not execute in case of a failure. The execution of actions continues with the next action on the same level as the current action. The error is logged, but does not break the execution of the action.
l Save error to variable: enables the user to define the Data Source (variable) to save the error to.
GroupGroup combines multiple actions in a logical group. It enables you to define a condition for an entire set of actions instead of defining conditions individually for each separate action. Group action also helps you logically separate the actions, add descriptions, and grouped actions such as copy, paste, etc. Action Execution and Error Handling
www.nicelabel.com 250

Each action in Actions Editor can be set as a conditional action. Conditional actions only run when the defined conditions allow them to be run. To define these conditions, click Show execution and error handling options. Execution options are:
l Enabled: specifies if the action is enabled or disabled. Only enabled actions are executed.
This functionality may be used while testing a form.
l Condition: action execution is defined by a single-line programming expression that provides a Boolean value (true or false). If the result of the expression is true, the action executes.
Condition offers a way to avoid executing actions every time.
Error handling options are: l Ignore failure: specifies whether an error should be ignored or not. With Ignore
failure enabled, the execution of actions continues even if the current action fails.
NOTE Nested actions that depend on the current action do not execute in case of a failure. The execution of actions continues with the next action on the same level as the current action. The error is logged, but does not break the execution of the action.
l Save error to variable: enables the user to define the Data Source (variable) to save the error to.
Other
Run Command FileRun Command File executes the commands in the selected command file. All types of files provide commands that Designer executes in order from top to bottom. Command files usually provide data for a single label – files of any complexity level can be defined.File type specifies the type of the command file to be executed.File name: name of command file to be run. File name can be hard-coded – the data is read from the same file each time. Select Data source dynamically defines the File name.
TIP: Use UNC syntax for network resources. For more information, see topic Access to Network Shared Resources.
Action Execution and Error HandlingEach action in Actions Editor can be set as a conditional action. Conditional actions only run when the defined conditions allow them to be run. To define these conditions, click Show execution and error handling options. Execution options are:
l Enabled: specifies if the action is enabled or disabled. Only enabled actions are executed.
This functionality may be used while testing a form.
l Condition: action execution is defined by a single-line programming expression that provides a Boolean value (true or false). If the result of the expression is true, the action executes.
Condition offers a way to avoid executing actions every time.
www.nicelabel.com 251

Error handling options are: l Ignore failure: specifies whether an error should be ignored or not. With Ignore
failure enabled, the execution of actions continues even if the current action fails.
NOTE Nested actions that depend on the current action do not execute in case of a failure. The execution of actions continues with the next action on the same level as the current action. The error is logged, but does not break the execution of the action.
l Save error to variable: enables the user to define the Data Source (variable) to save the error to.
Send Custom CommandsSend Custom Commands executes the entered custom commands.Always nest this action under the Open Label action. It provides reference to the label to which the commands apply.
NOTE The majority of custom commands is available through individual actions. As a result, custom commands are not required.
Action Execution and Error HandlingEach action in Actions Editor can be set as a conditional action. Conditional actions only run when the defined conditions allow them to be run. To define these conditions, click Show execution and error handling options. Execution options are:
l Enabled: specifies if the action is enabled or disabled. Only enabled actions are executed.
This functionality may be used while testing a form.
l Condition: action execution is defined by a single-line programming expression that provides a Boolean value (true or false). If the result of the expression is true, the action executes.
Condition offers a way to avoid executing actions every time.
Error handling options are: l Ignore failure: specifies whether an error should be ignored or not. With Ignore
failure enabled, the execution of actions continues even if the current action fails.
NOTE Nested actions that depend on the current action do not execute in case of a failure. The execution of actions continues with the next action on the same level as the current action. The error is logged, but does not break the execution of the action.
l Save error to variable: enables the user to define the Data Source (variable) to save the error to.
Verify LicenseVerify License reads the activated license and executes the actions nested below this action only if a certain license type is used.
TIP: This action protects the current configuration from being run on unauthorized computers.
www.nicelabel.com 252

The license key that activates the software can also encode a Solution ID. This is a unique number that identifies the solution provider who sold the NiceLabel Designer license. If the configured Solution ID matches the Solution ID encoded in the license, the target computer is allowed to run the nested actions, effectively limiting execution to licenses sold by the solution provider.Solution ID defines the ID number of the licenses that are allowed to run the nested actions.
l If the entered value is not the Solution ID that is encoded in the license, the nes-ted actions is not executed.
l If the entered value is set to 0, the actions execute if any valid license is found.
Action Execution and Error HandlingEach action in Actions Editor can be set as a conditional action. Conditional actions only run when the defined conditions allow them to be run. To define these conditions, click Show execution and error handling options. Execution options are:
l Enabled: specifies if the action is enabled or disabled. Only enabled actions are executed.
This functionality may be used while testing a form.
l Condition: action execution is defined by a single-line programming expression that provides a Boolean value (true or false). If the result of the expression is true, the action executes.
Condition offers a way to avoid executing actions every time.
Error handling options are: l Ignore failure: specifies whether an error should be ignored or not. With Ignore
failure enabled, the execution of actions continues even if the current action fails.
NOTE Nested actions that depend on the current action do not execute in case of a failure. The execution of actions continues with the next action on the same level as the current action. The error is logged, but does not break the execution of the action.
l Save error to variable: enables the user to define the Data Source (variable) to save the error to.
Combining Values In An ObjectCertain objects accept multiple values as their content. Such content can be a com-bination of fixed values, variables and special characters (control codes). The objects that accept combined values are identified by a small right arrow button on the right side of the object. Click the arrow button to enter either a variable or a special character.
l Using fixed values. Enter a fixed value for the variable.
This is a fixed value.
l Using fixed values and data from variables. Combined values may contain vari-ables and fixed values. The variable names must be enclosed in square brackets []. Enter the variables manually or insert them by clicking the arrow button to the right. During the processing time, the values of variables are merged together with fixed data and used as the object content. In the example below, the content is merged from three variables and fixed data
www.nicelabel.com 253

items.
[variable1] // This is fixed value [variable2][variable3]
l Using special characters. Special characters are supported with combined val-ues. You can enter the special characters manually, or insert them using a drop down list. In this case, the value of variable1 is merged with fixed data and form-feed binary character. The list of available special characters is available here.
[variable1] Form feed will follow this fixed text <FF>
Access To Shared Network ResourcesThis topic describes best practice steps to use shared network resources.
User Privi leges For Service ModeThe execution component of Designer runs in service mode under specified user account inheriting access privileges of that account. To be able to open label files and to user printer drivers in Designer, the associated user account must be granted sufficient privileges.
UNC Notation For Network SharesWhen accessing the file on a network drive, use the UNC syntax and not the mapped drive letters. UNC is a naming convention to specify and map network drives. Designer will try to replace the drive-letter syntax with the UNC syntax automatically.
EXAMPLE I f t he f ile is a cces s ible a s G:\Labels\label.lbl , ref er t o it in UNC not a -t ion a s \\server\share\Labels\label.lbl ( where G : dr iv e is ma pped t o \\server\share ) .
Notation For Accessing Fi les In Control CenterWhen opening a file in Document Storage inside Control Center, use the HTTP notation such as http://servername:8080/label.lbl, or WebDAV notation as \\server-name@8080\DavWWWRoot\label.lbl.
Additional notes:
1. The user account that is used to run a service is used to obtain files from the Docu-ment Storage. This user must be configured in Control Center Administration tab in order to gain access to files in the Document Storage.
2. The WebDAV access can only be used with Windows user authentication in Control Center.
Printer Drivers Availabil ityTo print labels using a network shared printer, make the printer driver available on the server where Designer is installed on. Make sure the user account that Designer runs under has access to the printer driver. If the network printer was just installed on the machine, Designer might not see it until you restart the Service.
TIP: To allow automatic notification of new network printer drivers, you have to enable the appropriate inbound rule in Windows firewall. For more information, see Know-ledge Base article KB 265.
www.nicelabel.com 254

Search Order For Requested FilesWhen the Designer attempts to load a specified label or image file, it does not cancel the processing and reports an error in case the file is not found. It tries to locate the reques-ted file at alternate locations.Designer performs file location checks in the below listed order:
1. Check if the file exists at the location as defined in the action.
2. Check if the file exists in the same folder as the solution or label file.
3. Check if the label file exists in .\Labels folder (for graphic files check .\Graphics folder).
4. Check if the label file exists in ..\Labels folder (for graphic files check ..\Graphics folder).
5. Check if the file exists in the global Labels folder (Graphics folder for graphics files).
If the file cannot be found at any of above listed locations, the action fails. An error is raised.
www.nicelabel.com 255

NiceLabel PrintPrint is a standalone application for fast and easy printing. It eliminates the need for opening label and solution documents in Designer. Print window consists of:
l File location selector: drop down list lets you select and manage the locations that store labels or solutions.
See section below for more details on files and locations.
l Search: finds the requested document.
l Location folder structure: displays the folders that are selected in the File loc-ation selector.
l Document display area: presents the documents which are stored in the selec-ted folder.
Managing Document LocationsWhen using the Print for the first time, a blank Print window appears. Click Manage Loca-tions in the File location selector. Manage Locations dialog opens.Use Manage Locations dialog to browse for document locations on your system or net-work.
l Add: button for adding the label files:
l Folder Location: browses for files on your system or network.
l PowerForms Web/Cloud location: opens an additional window for spe-cifying the server that hosts the label or solution files.
l Server URL: server location.
EXAMPLE P owerForms Web s erv er loca t ion – ht t p:/ / s erv er/ P owerForms Web
l Insert User name and Password to connect to a protected server.
NOTE User name and password are optional. With enabled authen-tication, the user is prompted for credentials if the user name and pass-word fields are left empty before opening a solution from server.
l Move up and Move down: change the order of selected label locations.
l Delete: removes the location from Print.
Opening The DocumentsAfter defining the local or remote location that stores the documents, start with printing. Follow the steps in this section to successfully print the labels.
www.nicelabel.com 256
Online SupportYou can find the latest builds, updates, workarounds for problems and Frequently Asked Questions (FAQ) on the product web site at www.nicelabel.com. For more information, please refer to:
l Knowledge base: http://www.nicelabel.com/support/knowledge-base
l NiceLabel Support: http://www.nicelabel.com/support/technical-support
l NiceLabel Tutorials: http://www.nicelabel.com/learning-center/tutorials
l NiceLabel Forums: http://forums.nicelabel.com/
NOTE If you have a Service Maintenance Agreement (SMA), please contact the premium support as specified in the agreement.
www.nicelabel.com 257

Americas+1 262 784 [email protected]
EMEA+386 4280 [email protected]
Germany+49 6104 68 99 [email protected]
China+86 21 6249 [email protected]
www.nicelabel.com