nfv 134-wbt: at&t vyatta 5600 vrouter dynamic host ... · dynamic host configuration protocol,...
TRANSCRIPT

AT&T Confidential and Proprietary Information-The information contained herein is for use by authorized persons only under
applicable nondisclosure terms and is not for general distribution
Revision 0515
NFV 134-WBT: AT&T Vyatta 5600 vRouter Dynamic Host Configuration Protocol (DHCP) & Domain Name System (DNS)
The training materials and other content provided herein for assistance in
training on the Vyatta vRouter may have references to Brocade as the Vyatta
vRouter was formerly a Brocade product prior to AT&T’s acquisition of
Vyatta. Brocade remains a separate company and is not affiliated to AT&T.”
Welcome to the AT&T Vyatta 5600 vRouter DHCP & DNS course.
AT&T Confidential and Proprietary Information-The information contained herein is for use by authorized persons only under
applicable nondisclosure terms and is not for general distribution 1 – 1
NFV 134- DHCP & DNS

Legal Disclaimer
All or some of the products detailed in this presentation may still be
under development and certain specifications may be subject to
change.
Nothing in this presentation shall be deemed to create a warranty of
any kind.
©2017 AT&T Intellectual Property. All rights reserved. AT&T, the Globe logo, Vyatta and VPlane are
registered trademarks of AT&T Intellectual Property. All other marks are the property of their respective
owners.
AT&T Confidential and Proprietary Information-The information contained herein is for use by authorized persons only under applicable nondisclosure terms and is not for general distribution 2
Please take a moment to read our legal disclaimer.
AT&T Confidential and Proprietary Information-The information contained herein is for use by authorized persons only under
applicable nondisclosure terms and is not for general distribution1 – 2
NFV 362 WBT- Policy-based routing
Dynamic Host Configuration Protocol (DHCP)
DHCP
AT&T Confidential and Proprietary Information-The information contained herein is for use by authorized persons only under
applicable nondisclosure terms and is not for general distribution 9 – 3
NFV 134- DHCP & DNS

After completing this module, you will be able to
• Describe how DHCP works
• Configure the vRouter as a DHCP server
• Configure the vRouter as a DHCP relay device
• And Verify DHCP functionality
Objectives
After completing this module, you will be able to
Describe how Dynamic Host Configuration Protocol (DHCP) works
Configure the vRouter as a DHCP server
Configure the vRouter as a DHCP relay device
Verify DHCP functionality
AT&T Confidential and Proprietary Information-The information contained herein is for use by authorized persons only under applicable nondisclosure terms and is
not for general distribution4
DHCP
AT&T Confidential and Proprietary Information-The information contained herein is for use by authorized persons only under
applicable nondisclosure terms and is not for general distribution 9 – 4
NFV 134- DHCP & DNS
We will begin with an overview of DHCP, what it is, and how it works.
DHCP Overview
5
DHCP
AT&T Confidential and Proprietary Information-The information contained herein is for use by authorized persons only under
applicable nondisclosure terms and is not for general distribution 9 – 5
NFV 134- DHCP & DNS

Dynamic Host Configuration Protocol, or DHCP, is a protocol that allows end stations to
request IP configuration information from a local sever rather than having to be manually
configured. DHCP can provide several pieces of IP configuration data to the end station,
including: IP address, IP gateway address, and addresses for IP services, such as DNS
servers and WINS servers.
DHCP offers several advantages to the network administrator.
It centralizes management of IP addresses. Instead of manually assigning addresses, then
having to track which addresses are in use, the administrator configures a pool of
addresses on the DHCP server that will be assigned to end stations. The server takes care of
the assignment and tracking.
Because addresses are used in an on-demand fashion, available address space is used
efficiently, rather than having hard-coded addresses consumed even if a device is not in
use.
DHCP also means less configuration needs to be done on individual end stations. Most
devices today boot up with DHCP automatically enabled, so you don't have to touch an end
station to enable IP connectivity to a network.
Dynamic Host Configuration Protocol
Enables automatic distribution of IP information to end stationsIP address
Router (default gateway) address
IP service information (DNS, WINS)
AdvantagesCentralizes management of IP addresses
Efficient use of address space
Less direct management of end stations
IP Information
AT&T Confidential and Proprietary Information-The information contained herein is for use by authorized persons only
under applicable nondisclosure terms and is not for general distribution 6
DHCP
AT&T Confidential and Proprietary Information-The information contained herein is for use by authorized persons only under
applicable nondisclosure terms and is not for general distribution 9 – 6
NFV 134- DHCP & DNS

DHCP is a client-server protocol, with the client initiating the data exchange.
When a DHCP-enabled device first connects to the network, it broadcasts a DHCP discover
packet, requesting configuration information that includes IP address, subnet mask, and
optional values such as default gateway and DNS server address.
Any DHCP servers on the local segment will see the broadcast and return a DHCP offer
packet that contains an IP address, lease duration, and other information.
If there are multiple DHCP servers on the segment, the client may receive multiple DHCP
offer messages. The client chooses one of then, then broadcasts a DHCP request message
that identifies the server and lease offer that it selected. This decision may be based on
which offer has the longest lease or which offer provides the most requested information.
Because this is a broadcast, the DHCP servers that were not selected will receive it as well,
and release the address they reserved for the client.
If the offered address is still valid, the server will respond with a DHCP ACK message. If the
offer is no longer valid, perhaps due to a timeout or due to another client acquiring the
same address, the server will respond with a DHCP NACK message, which will cause the
client to issue another DHCP discover message.
DHCP Process
DHCPDISCOVER
DHCPREQUEST
DHCPOFFER
DHCPACK
I need an address!
I’ll use 192.168.42.51
192.168.42.51
is available
192.168.42.51 is
yours
AT&T Confidential and Proprietary Information-The information contained herein is for use by authorized persons only
under applicable nondisclosure terms and is not for general distribution 7
DHCP
AT&T Confidential and Proprietary Information-The information contained herein is for use by authorized persons only under
applicable nondisclosure terms and is not for general distribution 9 – 7
NFV 134- DHCP & DNS

Addresses assigned by DHCP are leased; that is, they are not permanently assigned to a
device.
When the device sends a DHCP request message, the assigning server marks the address as
leased and notes the lease expiration. The server will not assign that address to another
workstation until the lease expires or the client sends a DHCP release message to explicitly
terminate the lease. If the client shuts down but does not send a release, the address will
remain allocated on the server.
The DHCP server administrator is responsible for configuring the lease duration.
Lease duration depends on several factors, including size of address pool when compared
to potential users, and how dynamic the user pool is. For example, a WiFi hotspot may
have relatively short lease periods, so that addresses are released even though customer
devices may not send release messages. A corporate environment, on the other hand, may
have relatively long lease durations, since the user base is less dynamic.
You can override the lease process by statically assigning an IP address to a specific MAC
address within the DHCP server. When the DHCP server sees a DHCP discover message
from the specified MAC address, it will respond with the configured IP address.
For more detailed information on DHCP operations, message structure, and suggestions for
lease duration configuration, please refer the DHCP RFC 2131.
DHCP Leases
Addresses are leased, not permanently assignedConfigure DHCP lease duration
– The default is 24 hours
– Leases can be expired manually
Override with static IP to MAC address mapping
Address Pool Lease Expiration
192.168.42.50
192.168.42.51
192.168.42.52
I’ll use 192.168.42.51
03/11/2014 17:34:45
AT&T Confidential and Proprietary Information-The information contained herein is for use by authorized persons only
under applicable nondisclosure terms and is not for general distribution 8
DHCP
AT&T Confidential and Proprietary Information-The information contained herein is for use by authorized persons only under
applicable nondisclosure terms and is not for general distribution 9 – 8
NFV 134- DHCP & DNS

DHCPv6 for IPv6
IPv6 supports Stateless Autoconfiguration (SLAAC)
IPv6 no longer relies on a DHCP server or manual address configuration
SLAAC allows individual interfaces on a host to dynamically assign themselves IP
addresses
DHCPv6 can be implemented to provide stateful address creation, or to provide
hosts with additional configuration such as, DNS server and NTP server
5600 vRouter provides:
DHCPv6 server functionality
DHCPv6 relay functionality
DHCPv6 client-side functionality (on data plane interfaces only)
Note: For more information on DHCPv6 please refer to the AT&T 5600 Software Documentation
AT&T Confidential and Proprietary Information-The information contained herein is for use by authorized persons only
under applicable nondisclosure terms and is not for general distribution 9
DHCPv6 provides a stateful address auto-configuration service and a stateful auto-
configuration protocol for the IPv6 suite of protocols.
Although it bears many features in common with DHCP and shares a common
architectural model, DHCPv6 is a separate protocol and is configured independently
of DHCP. It is defined in separate protocol specification documents and the functions
it provides differ in significant ways from those provided by DHCP.
The 5600 vRouter provides DHCPv6 server functionality, DHCPv6 relay
functionality, and DHCPv6 client-side functionality (currently only available on data plane
interfaces).
This course does not cover the specifics or configuration of DHCPv6, but the full details of
DHCPv6 can be found in the AT&T 5600 Software Documentation on
http://businesscenter.att.com.
DHCP
AT&T Confidential and Proprietary Information-The information contained herein is for use by authorized persons only under
applicable nondisclosure terms and is not for general distribution 9 – 9
NFV 134- DHCP & DNS

Next, we will take a look at the commands to configure your vRouter as a DHCP server.
Configuring DHCP Server
10
DHCP
AT&T Confidential and Proprietary Information-The information contained herein is for use by authorized persons only under
applicable nondisclosure terms and is not for general distribution 9 – 10
NFV 134- DHCP & DNS

A basic DHCP server setup consists of an address pool with specific parameters.
The address pool, or shared-network-name, is a named configuration entity.
Because you will be setting several parameters for the address pool, we recommend the
use of the edit command. This will move you within the configuration hierarchy and
ensure that all parameters are associated with the same address pool. It also cuts down on
the amount of typing you have to do, and eliminates potential mistakes.
Next, set the subnet associated with this address pool. This subnet must match a subnet
configured on one of your device interfaces. The vRouter will match the DHCP subnet with
the interface in order to determine which interface will be active as a DHCP server.
Again, use the edit command, as there are a few parameters associated with subnet.
The first of those parameters is to set the range of addresses available for assignment to
clients. We set the first and last addresses in the range in a single command. These
addresses must be within the defined subnet, and should exclude any manually assigned
addresses.
Next is the default router address. Most commonly, this is the address of the matching
interface on the vRouter, but it could be the address of another router on the same subnet.
However, the address must be on the same subnet.
Next, set the IP address of the DNS server. You can specify as many DNS servers as you
want; however, the client may only accept the first two or three DNS servers configured.
Enter this command for each DNS server.
DHCP Server Configuration Commands
Enable DHCP server and create address pool
edit service dhcp-server shared-network-name name
Configure subnet for the address pool
set subnet network/mask
Create address pool start and stop addresses
set start ip-address stop ip-address
Specify the default router for DHCP clients on the subnet
set default-router ip-address
Specify the DNS server(s) for DHCP clients on the subnet
– Enter this command for each DNS server on the subnet
set dns-server ip-address
AT&T Confidential and Proprietary Information-The information contained herein is for use by authorized persons only
under applicable nondisclosure terms and is not for general distribution 11
DHCP
AT&T Confidential and Proprietary Information-The information contained herein is for use by authorized persons only under
applicable nondisclosure terms and is not for general distribution 9 – 11
NFV 134- DHCP & DNS

Let’s apply these commands to an example.
In this scenario, we want to enable DHCP services on data plane interface 1.
Based on the IP address on interface 1, the subnet we use for DHCP is 192.168.42.0 with a
24 bit mask.
We will make addresses 192.168.42.10 through .200 available for assignment to clients.
The vRouter is the default router for all devices and the DNS server is 192.168.2.6.
Basic DHCP Scenario
Enable DHCP for workstations connected to dp0p3p1Subnet is 192.168.42.0/24
Addresses to assign are 192.168.42.10 – 192.168.42.200
vRouter is default router
DNS servers are: 192.168.2.6 and 192.168.2.7
dp0p3p1
192.168.42.1/24
AT&T Confidential and Proprietary Information-The information contained herein is for use by authorized persons only
under applicable nondisclosure terms and is not for general distribution 12
DHCP
AT&T Confidential and Proprietary Information-The information contained herein is for use by authorized persons only under
applicable nondisclosure terms and is not for general distribution 9 – 12
NFV 134- DHCP & DNS

We use the edit command to create an address pool called DHCP-dp1. The name signifies
that the pool is associated with the subnet on data plane interface 1.
Next, we assign the subnet to the pool, using the edit command in order to move within
the hierarchy.
Next, we configure the start and stop addresses.
Now we set the default router address for this subnet, and the address of the DNS server.
We finish by committing and saving our changes.
Basic DHCP Scenario Configuration
[edit]
vyatta@vyatta# edit service dhcp-server shared-network-name DHCP-dp1[edit service dhcp-server shared-network-name DHCP-dp1]
vyatta@vyatta# edit subnet 192.168.42.0/24
[edit service dhcp-server shared-network-name DHCP-dp1 subnet 192.168.42.0/24]
vyatta@vyatta#
[edit service dhcp-server shared-network-name DHCP-dp1 subnet 192.168.42.0/24]
vyatta@vyatta#
[edit service dhcp-server shared-network-name DHCP-dp1 subnet 192.168.42.0/24]
vyatta@vyatta#
[edit service dhcp-server shared-network-name DHCP-dp1 subnet 192.168.42.0/24]
vyatta@vyatta#
[edit]
vyatta@vyatta#
commit
set dns-server 192.168.2.6
set start 192.168.42.10 stop 192.168.42.200
[edit service dhcp-server shared-network-name DHCP-dp1 subnet 192.168.42.0/24]
vyatta@vyatta# set default-router 192.168.42.1
• Remember to use the edit version of a command if all
subsequent commands are within the level of the hierarchy
set dns-server 192.168.2.7
save
AT&T Confidential and Proprietary Information-The information contained herein is for use by authorized persons only
under applicable nondisclosure terms and is not for general distribution 13
DHCP
AT&T Confidential and Proprietary Information-The information contained herein is for use by authorized persons only under
applicable nondisclosure terms and is not for general distribution 9 – 13
NFV 134- DHCP & DNS

To verify that the device is operating as a DHCP server, check the DHCP lease table using
the show dhcp leases command.
We see all the assigned addresses, the MAC address of the station the address has been
assigned to, the lease expiration date and time, the pool the address came from, and, if
configured, the name of the client device that acquired the address.
If multiple address pools have been configured, we can add the parameter pool and the
name of the address pool to the command to restrict the output.
Display DHCP address allocation and lease information
show dhcp server leases [expired | pool poolname]
Operational mode command
Verifying DHCP Server Operation
vyatta@vyatta:~$ show dhcp server leases
IP address Hardware Address Lease expiration Pool Client Name
---------- ---------------- ---------------- ---- -----------
192.168.42.10 00:0c:29:f5:40:6e 2014/11/04 23:52:07 DHCP-dp1 JansPC
192.168.42.11 00:0c:29:a5:02:c7 2014/11/04 23:52:11 DHCP-dp1 Desktop
192.168.42.22 00:15:c5:b3:2e:64 2014/11/04 17:55:01 DHCP-dp1
192.168.42.23 00:04:f2:02:84:49 2014/11/04 17:24:59 DHCP-dp1 FredsPC
vyatta@vyatta:~$
AT&T Confidential and Proprietary Information-The information contained herein is for use by authorized persons only under applicable nondisclosure terms and is not for general distribution 14
DHCP
AT&T Confidential and Proprietary Information-The information contained herein is for use by authorized persons only under
applicable nondisclosure terms and is not for general distribution 9 – 14
NFV 134- DHCP & DNS

You can view simple statistics for DHCP server functionality using the show dhcp
statistics command.
Viewing DHCP Server Statistics
Display current lease information
show dhcp statistics
Operational mode command
vyatta@vyatta:~$ show dhcp statistics
pool pool size # leased # avail
---- --------- -------- -------
DHCP-dp1 191 5 186
vyatta@vyatta:~$
AT&T Confidential and Proprietary Information-The information contained herein is for use by authorized persons only under applicable nondisclosure terms and is not for general distribution 15
DHCP
AT&T Confidential and Proprietary Information-The information contained herein is for use by authorized persons only under
applicable nondisclosure terms and is not for general distribution 9 – 15
NFV 134- DHCP & DNS

You can manually force the expiration of a lease with the command reset dhcp
lease ip, followed by the address you want to release.
You can clear the entire lease table with the command reset dhcp leases.
Expiring a Lease
Leases can be expired manuallyRemove a lease from a specific address
reset dhcp server lease ip address
Remove all leases
reset dhcp server leases
AT&T Confidential and Proprietary Information-The information contained herein is for use by authorized persons only under applicable nondisclosure terms and is not for general distribution 16
DHCP
AT&T Confidential and Proprietary Information-The information contained herein is for use by authorized persons only under
applicable nondisclosure terms and is not for general distribution 9 – 16
NFV 134- DHCP & DNS

There are a couple of additional address assignment options.
All of the following commands are set within the subnet level of the configuration
hierarchy, so make sure your prompt includes the subnet specification.
You can only define one start and one stop address per subnet. If you have manually
assigned addresses in the middle of the subnet, you can still use the rest of the subnet
range by excluding them from the pool using the exclude command. You can type as
many exclude statements as you like. If you have devices with statically assigned IP
addresses, you must remove them from the pool in order to prevent addressing conflicts
on the segment.
Another method of handling static address assignment, is to perform the static mapping on
the DHCP server rather than the end station. On the vRouter, assign a name to the address
pair, signified in the example command as mapname. Then specify which IP address and
which MAC address should be matched. When the vRouter sees a DHCP request from the
specified MAC address, it will return the specified IP address. This is effective as long as you
do not change hardware on the end station.
Another DHCP configuration setting is the lease duration. The lease duration is expressed in
seconds, and the default is a 24 hour lease.
Address Assignment Options
AT&T Confidential and Proprietary Information-The information contained herein is for use by authorized persons only under applicable nondisclosure terms and is not for general distribution 17
Use the edit form of the command to configure options within the subnet level of the shared-network-name hierarchy
edit service dhcp-server shared-network-name name
subnet addr/mask
Exclude an address from an address pool
set exclude ip-address
Create a static IP address to MAC address mapping
set static-mapping mapname ip-address ipaddress
Configure DHCP lease duration
set lease seconds
– The default is 24 hours
DHCP
AT&T Confidential and Proprietary Information-The information contained herein is for use by authorized persons only under
applicable nondisclosure terms and is not for general distribution 9 – 17
NFV 134- DHCP & DNS

You can configure the DHCP server to return any combination of the following service
information in addition to the default gateway and DNS servers we configured earlier.
Again, these command are set within the subnet level of the shared-network-name
hierarchy.
You can send the end station the addresses of your POP3 and SMTP servers.
You can configure time server information.
If you are using Coordinated Universal Time (UTC) on your time server, you can send the
time offset from UTC in seconds.
You can send the domain name used in your environment.
In addition to configuring a default gateway, you can also configure a static route to a
specific network. You can only configure one static route per DHCP subnet.
For additional DHCP server options, please refer to the AT&T 5600 vRouter Software
Documentation on http://businesscenter.att.com.
Address Assignment Options (cont.)
Configure Mail servers
set pop-server address
set smtp-server address
Time servers
set ntp-server address
set time-server address
Time offset
set time-offset seconds
Domain name
set domain-name text
Static route
set static-route router ip-address
set static-route destination-subnet ip-address/maskAT&T Confidential and Proprietary Information-The information contained herein is for use by authorized persons only under applicable nondisclosure terms and is not for general distribution 18
DHCP
AT&T Confidential and Proprietary Information-The information contained herein is for use by authorized persons only under
applicable nondisclosure terms and is not for general distribution 9 – 18
NFV 134- DHCP & DNS

The Authoritative setting determines whether the vRouter is an “authoritative” DHCP
server.
If your vRouter is the only DHCP server on a given segment, making it authoritative can
speed the address acquisition process for devices that move from subnet to subnet
frequently. A device always attempts to re-acquire the same IP address it had when it was
last used. If the address is invalid for the local subnet, an authoritative server can send a
NACK to the requesting station, forcing it to begin the address acquisition process. Without
the authoritative setting, devices have to wait for the initial request to time out before
starting the acquisition process.
The set authoritative [enable | disable] command is set at the address
pool level, not the subnet level, so make sure your prompt reflects the correct level before
using the command.
Define if the DHCP server is Authoritativeset authoritative state [enable | disable]
The vRouter is not authoritative by default
Enable if the vRouter is the only DHCP server on segment
Address pool level command
Enabling Authoritative State
AT&T Confidential and Proprietary Information-The information contained herein is for use by authorized persons only under applicable nondisclosure terms and is not for general distribution19
DHCP
AT&T Confidential and Proprietary Information-The information contained herein is for use by authorized persons only under
applicable nondisclosure terms and is not for general distribution 9 – 19
NFV 134- DHCP & DNS

Let's apply our options to our existing scenario.
We will exclude addresses .150 and .151, since they are manually assigned to servers in the
network, and we will extend the lease period to 7 days.
We will send devices the address of our NTP server, which is 192.168.51.10.
We will send devices the domain name, which is acme.com.
Finally, since the vRouter is the only DHCP server on the segment, we will make it
authoritative.
DHCP Options Scenario
Exclude addresses .150 and .151
Set lease period to 7 days (604800 seconds)
Return address of NTP server: 192.168.51.10
Return domain name: acme.com
Make server authoritative
dp0p3p1
192.168.42.1/24
192.168.42.150
192.168.42.151
VYA1
VYA2
AT&T Confidential and Proprietary Information-The information contained herein is for use by authorized persons only under applicable nondisclosure terms and is not for general distribution 20
DHCP
AT&T Confidential and Proprietary Information-The information contained herein is for use by authorized persons only under
applicable nondisclosure terms and is not for general distribution 9 – 20
NFV 134- DHCP & DNS

In Configuration mode, we go back into the edit service dhcp-server shared-
network-name name hierarchy.
We make the server authoritative using the set authoritative enable
command.
Next, we go into the subnet hierarchy and exclude the address of the first server .150 and
second server .151.
Next, we set the lease duration to 7 days or 604800 seconds.
The NTP server address is 192.168.51.10, and the domain name is acme.com.
Finally, we commit and save our changes.
DHCP Options Scenario Configuration
[edit]
vyatta@vyatta# edit service dhcp-server shared-network-name DHCP-dp1
[edit service dhcp-server shared-network-name DHCP-dp1]
vyatta@vyatta# set authoritative enable
[edit service dhcp-server shared-network-name DHCP-dp1]
vyatta@vyatta# edit subnet 192.168.42.0/24
[edit service dhcp-server shared-network-name DHCP-dp1 subnet 192.168.42.0/24]
vyatta@vyatta#
[edit service dhcp-server shared-network-name DHCP-dp1 subnet 192.168.42.0/24]
vyatta@vyatta#
[edit service dhcp-server shared-network-name DHCP-dp1 subnet 192.168.42.0/24]
vyatta@vyatta#
set exclude 192.168.42.150
set exclude 192.168.42.151
[edit service dhcp-server shared-network-name DHCP-dp1 subnet 192.168.42.0/24]
vyatta@vyatta#
[edit service dhcp-server shared-network-name DHCP-dp1 subnet 192.168.42.0/24]
vyatta@vyatta#
set lease 604800
set ntp-server 192.168.51.10
set domain-name acme.com
[edit service dhcp-server shared-network-name DHCP-dp1 subnet 192.168.42.0/24]
vyatta@vyatta#
[edit service dhcp-server shared-network-name DHCP-dp1]
vyatta@vyatta#
commit
save
AT&T Confidential and Proprietary Information-The information contained herein is for use by authorized persons only
under applicable nondisclosure terms and is not for general distribution 21
DHCP
AT&T Confidential and Proprietary Information-The information contained herein is for use by authorized persons only under
applicable nondisclosure terms and is not for general distribution 9 – 21
NFV 134- DHCP & DNS

The vRouter offers a failover feature to provide DHCP server redundancy on a given
segment.
In order to provide this feature, you must have two vRouters connected to the network
segment where you are providing DHCP service.
Both vRouters must be configured to peer each other. The devices will automatically
negotiate which device is the primary and which is serving as the backup DHCP server. The
primary will actively process DHCP requests, while the backup will keep track of DHCP
assignments, but not participate in the exchange. If the primary goes down, the secondary
will take over the active role.
In order for leases to be successfully processed by both systems, the device clocks must be
synchronized down to the second.
The easiest way to accomplish this is to use NTP. Please refer to AT&T 5600 vRouter System
Configuration module for information on NTP configuration.
vRouter DHCP Failover
RequirementsTwo vRouters on same subnet
Devices must be peers
Device clocks must be synchronized
– Use NTP
Primary
192.168.42.1
Secondary
192.168.42.2
AT&T Confidential and Proprietary Information-The information contained herein is for use by authorized persons only under applicable nondisclosure terms and is not for general distribution 22
DHCP
AT&T Confidential and Proprietary Information-The information contained herein is for use by authorized persons only under
applicable nondisclosure terms and is not for general distribution 9 – 22
NFV 134- DHCP & DNS

To configure a failover setup, you need to configure both vRouters with the failover
commands. First, use the edit command to enter the subnet section of the configuration
hierarchy.
Next, set the IP address of the local device. This is usually the address of the interface
associated with the DHCP subnet.
Next, set the IP address of the failover peer. This address must be on the same subnet. The
two peers will compare the configured addresses; that is, the peer address set on device 1
must match the local address set on device 2, and vice-versa.
Next, set the device status. One must be the primary and the other the secondary.
Finally, set a name for the failover group. The name must be the same on both devices.
DHCP Failover Commands
Configure failover at the subnet level of the hierarchy
edit service dhcp-server shared-network-name name subnet
addr/mask
Define the local IP address for DHCP failover
set failover local-address ip-address
Define the peer IP address for DHCP failover
set failover peer-address ip-address
Specify the role the DHCP server plays in the failover group
set failover status [primary | secondary]
Specify the name of the failover group
set failover name string
AT&T Confidential and Proprietary Information-The information contained herein is for use by authorized persons only under applicable nondisclosure terms and is not for general distribution 23
DHCP
AT&T Confidential and Proprietary Information-The information contained herein is for use by authorized persons only under
applicable nondisclosure terms and is not for general distribution 9 – 23
NFV 134- DHCP & DNS

Let’s compare the failover configurations for the two vRouters.
Note that the local address for router 1 is the same as the peer setting on router 2.
Likewise, the peer address for router 1 is the same as the local address on router 2.
The names are set to the same text string (DHCP-192.168.42)
Router 1 is the primary, while router 2 is the secondary.
Failover Configuration
Router 1
Router 2
[edit service dhcp-server shared-network-name DHCP-dp1 subnet 192.168.42.0/24]
vyatta@rtr1# show failover
local-address 192.168.42.1
name DHCP-192.168.42
peer-address 192.168.42.2
status primary
[edit service dhcp-server shared-network-name DHCP-dp1 subnet 192.168.42.0/24]
vyatta@rtr1#
[edit service dhcp-server shared-network-name DHCP-dp1 subnet 192.168.42.0/24]
vyatta@rtr2# show failover
local-address 192.168.42.2
name DHCP-192.168.42
peer-address 192.168.42.1
status secondary
[edit service dhcp-server shared-network-name DHCP-dp1 subnet 192.168.42.0/24]
vyatta@rtr2#
AT&T Confidential and Proprietary Information-The information contained herein is for use by authorized persons only under applicable nondisclosure terms and is not for general distribution 24
DHCP
AT&T Confidential and Proprietary Information-The information contained herein is for use by authorized persons only under
applicable nondisclosure terms and is not for general distribution 9 – 24
NFV 134- DHCP & DNS

If you need to disable the DHCP server for testing or other purposes, you can use the
dhcp-server disable command.
To re-enable the server, you need to delete the disable command.
Disabling DHCP Server
Disable without discarding configurationConfiguration mode command
set service dhcp-server disable
Re-enable DHCP serverConfiguration mode command
delete service dhcp-server disable
AT&T Confidential and Proprietary Information-The information contained herein is for use by authorized persons only under applicable nondisclosure terms and is not for general distribution 25
DHCP
AT&T Confidential and Proprietary Information-The information contained herein is for use by authorized persons only under
applicable nondisclosure terms and is not for general distribution 9 – 25
NFV 134- DHCP & DNS

Now we will look at DHCP relay.
DHCP Relay
26
DHCP
AT&T Confidential and Proprietary Information-The information contained herein is for use by authorized persons only under
applicable nondisclosure terms and is not for general distribution 9 – 26
NFV 134- DHCP & DNS

DHCP relay is a function that allows a vRouter to forward a DHCP request from one
segment to a DHCP server located elsewhere.
Remember, DHCP messages from an end station are broadcasts.
Normally, a router will not forward broadcasts, and it is not practical to deploy a DHCP
server on every segment in your network.
By enabling DHCP relay, the vRouter will encapsulate the broadcast in a packet destined for
the configured DHCP server. This packet also includes information about the originating
subnet, so the DHCP server knows which subnet to use for address assignment. Note that
the DHCP server does not need to be directly connected to the vRouter; the relayed packet
is routed, not broadcast.
The server will send the DHCP response back to the vRouter, which will forward it back to
the originating device.
DHCP Relay
DHCP relay allows a vRouter to forward a DHCP request from one segment to a DHCP server located elsewherevRouter encapsulates the broadcast in a packet destined for the configured DHCP server
Packet includes information about the originating subnet
Server sends DHCP response back to the vRouter, which forwards it back to the originating device
dp0p3p1
192.168.42.1/24
DHCP Server
192.168.51.150
I need an address!192.168.51.150 – from .42.0/24
192.168.42.51
is available192.168.51.150 – from .42.0/24
AT&T Confidential and Proprietary Information-The information contained herein is for use by authorized persons only under applicable nondisclosure terms and is not for general distribution 27
DHCP
AT&T Confidential and Proprietary Information-The information contained herein is for use by authorized persons only under
applicable nondisclosure terms and is not for general distribution 9 – 27
NFV 134- DHCP & DNS

To configure DHCP relay, first enable DHCP relay functionality. As with DHCP server
configuration, you will be setting parameters within the DHCP relay configuration, so we
recommend the use of the edit command.
Next, list the interfaces where DHCP relay will be active. These are the interfaces connected to
stations issuing DHCP requests and the interface connected to the DHCP server. You can enable
as many interfaces as you need to support your environment.
Next, set the address of the DHCP server that will be providing the addressing. You can list
multiple DHCP servers for redundancy. The vRouter will forward requests to the first server in
the list. If that server does not respond, it will try the second one, and so on.
The DHCP standard allows for additional relay settings using DHCP Option 82. You can
configure the following:
• Hop count – sets the time-to-live (TTL) header of a relayed packet, and limits the allowable distance
between the relay device and the DHCP server. The default is 10 hops; if the DHCP server is farther
than 10 routers away, the relayed packet TTL will expire. You can set this value up to 255 hops as
needed for your environment.
• Max-size – sets an MTU for forwarded DHCP requests. If you have varied MTU sizes in your network,
you should set this value to the lowest MTU.
• Port – specifies the UDP port to be used for relaying DHCP requests.
• Relay agents packet – sets the re-forwarding policy if the vRouter receives a DHCP packet that
already contains relay information. The default behavior is to forward it.
DHCP Relay Configuration Commands
Enable DHCP Relay
set service dhcp-relay
edit service dhcp-relay
Enable on interface
set interface dpxpypz
Set address of DHCP server
set server ip-address
Enable DHCP option 82 Relay Agent Information (Optional)
set relay-options [hop-count num | max-size size | port port]
set relay-options relay-agents-packet [forward | discard]
AT&T Confidential and Proprietary Information-The information contained herein is for use by authorized persons only under applicable nondisclosure terms and is not for general distribution 28
DHCP
AT&T Confidential and Proprietary Information-The information contained herein is for use by authorized persons only under
applicable nondisclosure terms and is not for general distribution 9 – 28
NFV 134- DHCP & DNS

In our scenario, the DHCP clients are connected to data plane interface 2, and the DHCP
server is reachable via data plane interface 1. We will enable DHCP relay on both interfaces.
The DHCP server address is 192.168.51.150.
DHCP Relay Scenario
Enable on interfaces dp0p1p1 and dp0p1p2
DHCP server address is 192.168.51.150
dp0p1p2
DHCP Server
192.168.51.150
dp0p1p1
AT&T Confidential and Proprietary Information-The information contained herein is for use by authorized persons only under applicable nondisclosure terms and is not for general distribution 29
DHCP
AT&T Confidential and Proprietary Information-The information contained herein is for use by authorized persons only under
applicable nondisclosure terms and is not for general distribution 9 – 29
NFV 134- DHCP & DNS

We start by enabling DHCP relay services with the edit command.
Enable the relay service on data plane interface 1 and 2, then set the server address.
We finish by committing and saving our changes.
DHCP Relay Scenario Configuration
Enable DHCP relay services with the edit commandEnable the relay service on data plane interface 1 and 2, then set the server address
Finish by committing and saving the changes
[edit]
vyatta@vyatta# edit service dhcp-relay[edit service dhcp-relay]
vyatta@vyatta# set interface dp0p1p1
[edit service dhcp-relay]
vyatta@vyatta#
[edit]
vyatta@vyatta#
[edit service dhcp-relay]
vyatta@vyatta#
[edit service dhcp-relay]
vyatta@vyatta#
commit
save
set interface dp0p1p2
[edit service dhcp-relay]
vyatta@vyatta# set server 192.168.51.150
AT&T Confidential and Proprietary Information-The information contained herein is for use by authorized persons only under applicable nondisclosure terms and is not for general distribution 30
DHCP
AT&T Confidential and Proprietary Information-The information contained herein is for use by authorized persons only under
applicable nondisclosure terms and is not for general distribution 9 – 30
NFV 134- DHCP & DNS

This concludes the AT&T 5600 vRouter DHCP module.
You should now be able to:
• Describe how DHCP works
• Configure the vRouter as a DHCP server
• Configure the vRouter as a DHCP relay device
• Verify DHCP functionality
Summary
You should now be able toDescribe how DHCP works
Configure the vRouter as a DHCP server
Configure the vRouter as a DHCP relay device
Verify DHCP functionality
AT&T Confidential and Proprietary Information-The information contained herein is for use by authorized persons only under applicable nondisclosure terms and is not for general distribution 31
DHCP
AT&T Confidential and Proprietary Information-The information contained herein is for use by authorized persons only under
applicable nondisclosure terms and is not for general distribution 9 – 31
NFV 134- DHCP & DNS

Domain Name System (DNS)
DNS
AT&T Confidential and Proprietary Information-The information contained herein is for use by authorized persons only under
applicable nondisclosure terms and is not for general distribution 10 – 32
NFV 134- DHCP & DNS

After completing this module, you will be able to:
• Configure system DNS attributes
• Configure DNS forwarding
• Verify correct operations of dynamic addressing and DNS
Please refer to Appendix A at the end of this module for information on configuring
Dynamic DNS (DDNS).
Objectives
After completing this module, you will be able toConfigure system DNS
Configure DNS forwarding
Verify correct operations of dynamic addressing and DNS
Note: Please refer to Appendix A at the end of this module for information on Dynamic DNS
(DDNS)
AT&T Confidential and Proprietary Information-The information contained herein is for use by authorized persons only under applicable nondisclosure terms and is not for general distribution 33
DNS
AT&T Confidential and Proprietary Information-The information contained herein is for use by authorized persons only under
applicable nondisclosure terms and is not for general distribution 10 – 33
NFV 134- DHCP & DNS

Let’s begin by looking at the Domain Name System.
Domain Name System (DNS)
34
DNS
AT&T Confidential and Proprietary Information-The information contained herein is for use by authorized persons only under
applicable nondisclosure terms and is not for general distribution 10 – 34
NFV 134- DHCP & DNS

The Domain Name System or (DNS) is an Internet-wide naming service which maps IP
addresses to host names. DNS uses a hierarchical set of domains, with delegated authority.
In this diagram, we see that there are several top level domain such as .com, .net, .org and
others. There are also country specific top level domains which are not shown here.
Each top level has a set of sub-domains. For example, under the .com domain, we see the
acme and the AT&T domains.
Acme, can further delegate the acme domain if it chooses to do so. For example, it might
decide to have sub-domains for sales and engineering. They can further choose whether to
advertise these sub-domains to the public or not.
Domain Name System (DNS)
Internet-wide naming service maps IP addresses to host names
Hierarchical domains, with delegated authority
Root
.com .net .org
eng sales
acme AT&T ARIN RIPE
AT&T Confidential and Proprietary Information-The information contained herein is for use by authorized persons only under applicable nondisclosure terms and is not for general distribution 35
DNS
AT&T Confidential and Proprietary Information-The information contained herein is for use by authorized persons only under
applicable nondisclosure terms and is not for general distribution 10 – 35
NFV 134- DHCP & DNS

When DNS was initially created, a name resolution request followed this basic procedure.
1. A requesting device sends a request to a designated root name server.
2. The root name server takes the most general information from the requested name – in
this case, .com, then refers the request to the server responsible for all .com domains.
3. The .com server responds with the address on record for the server responsible for all
sub-domains within AT&T.com.
4. The AT&T.com name server returns the actual address of www.AT&T.com.
This back-and-forth exchange is called a recursive query. In theory this works well, but in
practice it places an undue burden on the root servers.
DNS of the Past
.com name server
Resolve www.AT&T.com
.com
go to 172.16.42.99
AT&T.com
go to 144.49.210.80
www.AT&T.com
go to 144.49.210.33
root name server
AT&T.com name server
AT&T Confidential and Proprietary Information-The information contained herein is for use by authorized persons only
under applicable nondisclosure terms and is not for general distribution 36
DNS
AT&T Confidential and Proprietary Information-The information contained herein is for use by authorized persons only under
applicable nondisclosure terms and is not for general distribution 10 – 36
NFV 134- DHCP & DNS

What typically happens today is that an end station queries the local DNS server. That
server performs the initial recursive query, then caches all the returned information.
Subsequent queries can bypass part or all of the recursive lookup based on the cached
information in the local DNS server.
DNS of Today
root 10.1.2.3
.com 172.16.42.99
AT&T.com 144.49.210.80
www.AT&T.com 144.49.210.33
.com name server
Resolve www.AT&T.com
.com
go to 172.16.42.99
AT&T.com
go to 144.49.210.80
www.AT&T.com
go to 144.49.210.33
root name server
AT&T.com name server
Local name server
AT&T Confidential and Proprietary Information-The information contained herein is for use by authorized persons only
under applicable nondisclosure terms and is not for general distribution 37
DNS
AT&T Confidential and Proprietary Information-The information contained herein is for use by authorized persons only under
applicable nondisclosure terms and is not for general distribution 10 – 37
NFV 134- DHCP & DNS

Each DNS cache entry includes a time-to-live (TTL) value. This value is set by the server
performing the initial name resolution. The TTL prevents cache entries from becoming
stale.
If you have ever heard that it takes up to 48 hours for DNS changes to be propagated, you
now know that this is untrue based on how DNS works. There is no actual "propagation" of
DNS information.
The interval depends on the TTL associated with the DNS entry. If a server has a cached
entry for a given address, it will return the cached value, even if the information has
changed back at the source.
You should verify that whoever is responsible for your DNS entry (you or your service
provider) sets an appropriate TTL if you are using dynamic DNS.
Updating DNS Entries
“It takes up to 48 hours for DNS changes to be propagated.” –UNTRUE!There is no “propagation” of DNS information
Interval depends on cache time-to-live (TTL) value
Name Address TTL
root 10.1.2.3
.com 172.16.42.99 1d 9h 14m
AT&T.com 144.49.210.80 1d 22h 52m
www.AT&T.com 144.49.210.33 1d 22h 55m
AT&T Confidential and Proprietary Information-The information contained herein is for use by authorized persons only under applicable nondisclosure terms and is not for general distribution 38
DNS
AT&T Confidential and Proprietary Information-The information contained herein is for use by authorized persons only under
applicable nondisclosure terms and is not for general distribution 10 – 38
NFV 134- DHCP & DNS

A vRouter participates in DNS services in one of three ways.
The first way is system DNS.
With system DNS, the vRouter acts as a DNS client and resolves hostnames for its own
operations.
For example, a vRouter may use a hostname for its NTP server. In order to actually reach
this server, the vRouter needs to resolve the hostname pool.ntp.org to an IP address. You
can configure a static system DNS server, or the vRouter can acquire the address of its DNS
server using DHCP.
System DNS
vRouter acts as a DNS client and resolves hostnames for its own operationsFor example, a vRouter may use a hostname for its NTP server
– In order to reach this server, the vRouter needs to resolve the hostname pool.ntp.org to an IP address
– You can configure a static system DNS server, or the vRouter can acquire the address of its DNS server using DHCP
pool.ntp.org = ???
dp0p3p2 DHCP
AT&T Confidential and Proprietary Information-The information contained herein is for use by authorized persons only under applicable nondisclosure terms and is not for general distribution 39
DNS
AT&T Confidential and Proprietary Information-The information contained herein is for use by authorized persons only under
applicable nondisclosure terms and is not for general distribution 10 – 39
NFV 134- DHCP & DNS

Using DNS forwarding downstream end stations need to reach DNS services on the
Internet. Again, this scenario is common in environments where the vRouter acquires its
public addressing and DNS server address via DHCP. If the address of the vRouter changes,
the available DNS server address may also change. If clients have a static DNS server
configuration, they may not always be able to reach a DNS server. The solution is to
configure DNS forwarding on the vRouter. This solution requires the client-facing interface –
in this case, data plane interface 1 – to have a static IP address.
Clients use the static address of the vRouter as the address of their DNS server.
The vRouter relays client requests to its DNS server, either the system DNS server or one
learned via DHCP. Because the interface connected to the end stations has a static address,
those workstations will always use the same address for DNS. Because the vRouter can
learn DNS server addresses via DHCP, it can always relay DNS queries correctly.
DNS Forwarding
Downstream end stations need to reach DNS services on the Internet
The vRouter relays client requests to its DNS server, either the system DNS server or one learned via DHCPvRouter acquires its public addressing and DNS server address via DHCP
Client-facing interfaces must have a static IP address
DHCP – what’s my address?rtr1.acme.com = 10.1.1.1google.com = ???
dp0p3p2 DHCPdp0p3p1
google.com = ???
AT&T Confidential and Proprietary Information-The information contained herein is for use by authorized persons only under applicable nondisclosure terms and is not for general distribution 40
DNS
AT&T Confidential and Proprietary Information-The information contained herein is for use by authorized persons only under
applicable nondisclosure terms and is not for general distribution 10 – 40
NFV 134- DHCP & DNS

Use the set system name-server command to configure the system name server.
You will only set this if DNS server addresses are static.
You can configure multiple name servers for each vRouter. If you do configure multiple
servers, the order in which you configure the servers is important. The vRouter will use the
first server listed in the configuration file, and only use the next server in the list if the
previous one does not respond.
In this example, we have both a local DNS server and a DNS server at our service provider.
We want to query our local DNS server first, and only query the service provider DNS server
if our local server is unavailable.
So, when we configure our DNS servers, we add our local server address first, then the
address of the service provider DNS server.
Configuring System Name Server
Configure a name serverset system name-server address
vRouter will use the first server listed in the configurationTo first query the local DNS server, it has to be entered in the configuration first
[edit]
vyatta@vyatta# set system name-server 192.168.1.1
[edit]
vyatta@vyatta#
commit
[edit]
vyatta@vyatta#
[edit]
vyatta@vyatta#
set system name-server 8.8.8.8
8.8.8.8192.168.1.1
DNS
DNS
save
AT&T Confidential and Proprietary Information-The information contained herein is for use by authorized persons only under applicable nondisclosure terms and is not for general distribution 41
DNS
AT&T Confidential and Proprietary Information-The information contained herein is for use by authorized persons only under
applicable nondisclosure terms and is not for general distribution 10 – 41
NFV 134- DHCP & DNS

DNS Forwarding
42
Our next topic is DNS forwarding.
DNS
AT&T Confidential and Proprietary Information-The information contained herein is for use by authorized persons only under
applicable nondisclosure terms and is not for general distribution 10 – 42
NFV 134- DHCP & DNS

To configure DNS forwarding, you need to complete three steps.
The first step is to determine the location of the DNS server. By default, the vRouter will
first try to reach any configured system DNS servers. If no system server exists, or if the
configured server does not respond, the vRouter will next try any DNS servers learned via
DHCP.
You can override these defaults by selecting only system servers, only DHCP-learned
servers, or an explicitly-configured server address just for DNS forwarding.
The second step is to specify the interfaces where the vRouter will listen for DNS queries.
You can configure one or more interfaces to listen for DNS.
Finally, configure your end stations to use the address of the vRouter for DNS queries.
DNS Forwarding
Configuring DNS Forwarding is a 3 step process1. Acquire location of DNS server
a. Configured system DNS servers (default)
b. Servers learned via DHCP (default)
c. Servers explicitly configured for DNS forwarding
2. Configure interfaces to receive DNS queries
3. Configure clients to use vRouter address for DNS
AT&T Confidential and Proprietary Information-The information contained herein is for use by authorized persons only under applicable nondisclosure terms and is not for general distribution 43
DNS
AT&T Confidential and Proprietary Information-The information contained herein is for use by authorized persons only under
applicable nondisclosure terms and is not for general distribution 10 – 43
NFV 134- DHCP & DNS

The only required command for configuring DNS forwarding is specifying the interface that
will receive incoming DNS requests needing to be relayed.
Optionally, you can override the default DNS server settings.
If you only want to use the configured static system DNS servers and no other, set DNS
forwarding to system.
If you only want to use the DNS servers learned via DHCP, set forwarding to dhcp and
specify the interface configured by DHCP.
If you want to specify a server or servers to be used just for DNS forwarding, use the
forwarding name-server command and specify the IP address of the name server.
DNS Forwarding Commands
• Specify interfaces receiving DNS requestsset service dns forwarding listen-on dpxpypz
Specify DNS servers (optional)Use only configured system DNS server(s)
set service dns forwarding system
Use only DNS servers learned via specified interface DHCP
set service dns forwarding dhcp dpxpypz
Use a specific DNS server
set service dns forwarding name-server ip-addr
AT&T Confidential and Proprietary Information-The information contained herein is for use by authorized persons only under applicable nondisclosure terms and is not for general distribution 44
DNS
AT&T Confidential and Proprietary Information-The information contained herein is for use by authorized persons only under
applicable nondisclosure terms and is not for general distribution 10 – 44
NFV 134- DHCP & DNS

In this scenario, our vRouter is configured with a static DNS server address.
We want to use this address and only this address as the target for forwarded DNS
requests, and we expect to receive DNS client requests on data plane interface 1.
To configure this, we first set the DNS forwarding server to the system DNS server, then set
the device to listen for DNS requests on data plane interface 1.
We then commit our changes.
DNS Forwarding Scenario 1
Use defined system DNS server
Receive DNS client requests on interface dp0p3p1
System Defined DNS Server(s)
[edit]
vyatta@vyatta# set service dns forwarding system
[edit]
vyatta@vyatta#
commit
[edit]
vyatta@vyatta#
[edit]
vyatta@vyatta# save
set service dns forwarding listen-on dp0p3p1
dp0p3p2 DNSdp0p3p1
set system name-server 192.168.1.1
AT&T Confidential and Proprietary Information-The information contained herein is for use by authorized persons only under applicable nondisclosure terms and is not for general distribution 45
DNS
AT&T Confidential and Proprietary Information-The information contained herein is for use by authorized persons only under
applicable nondisclosure terms and is not for general distribution 10 – 45
NFV 134- DHCP & DNS

This scenario is a bit more complicated.
The vRouter is acquiring an IP address and DNS server address from the service provider via
DHCP.
The vRouter has two interfaces connected to end stations. The vRouter needs to provide
DHCP services to these end stations, assigning IP addresses, as well as the DNS server
address.
End stations connected to data plane 1 will receive the address of data plane 1 for their
DNS server
End stations connected to data plane 2 will receive the address of data plane 2 for their
DNS server.
DNS Forwarding Scenario 2
vRouter learns DNS server via DHCP
vRouter is a DHCP server for end stationsAssigns addresses
Assigns DNS server address
– Address of dp0p3p1 is DNS server for end stations on dp0p3p1
– Address of dp0p3p2 is DNS server for end stations on dp0p3p2
DNS Servers Defined by DHCP
dp0p3p3
DHCPclient
DHCP serverDNS
AT&T Confidential and Proprietary Information-The information contained herein is for use by authorized persons only under applicable nondisclosure terms and is not for general distribution 46
DNS
AT&T Confidential and Proprietary Information-The information contained herein is for use by authorized persons only under
applicable nondisclosure terms and is not for general distribution 10 – 46
NFV 134- DHCP & DNS

Let’s look closely at the complete DHCP and DNS configuration for this scenario.
We have configured data plane interface 3, the interface connected to our service provider,
for DHCP.
Data plane interface 1 and data plane interface 2 have static IP addresses
For our DHCP server configuration, we have configured an address pool for data plane
interface 1.
Notice that the DNS server address we are passing to the end stations is the address of
data plane interface 1.
Likewise, the address for the DNS server we are passing to end stations on data plane
interface 2 is the address of data plane interface 2.
We then configure DNS forwarding on data plane interfaces 1 and 2, using whatever DNS
server we learn via DHCP on data plane interface 3.
DNS Forwarding Scenario 2 Configuration
interfaces {
dataplane dp0p3p1{
address 10.1.2.1/24
}
dataplane dp0p3p2{
address 10.1.3.1/24
}
dataplane dp0p3p3{
address dhcp
}
}
service {
dhcp-server {
shared-network-name dp0p3p1{
subnet 10.1.2.0/24 {
default-router 10.1.2.1
dns-server 10.1.2.1
start 10.1.2.10 {
stop 10.1.2.100
}
shared-network-name dp0p3p2{
subnet 10.1.3.0/24 {
default-router 10.1.3.1
dns-server 10.1.3.1
start 10.1.3.10 {
stop 10.1.3.100
}
}
}
}
}
dns {
forwarding {
dhcp dp0p3p3
listen-on dp0p3p1
listen-on dp0p3p2
}
}
AT&T Confidential and Proprietary Information-The information contained herein is for use by authorized persons only
under applicable nondisclosure terms and is not for general distribution 47
DNS
AT&T Confidential and Proprietary Information-The information contained herein is for use by authorized persons only under
applicable nondisclosure terms and is not for general distribution 10 – 47
NFV 134- DHCP & DNS

You can view the DNS servers used for forwarded requests with the command show dns
forwarding nameservers.
The command output lists all available servers used for DNS forwarding, as well as the
source of the server information. In this case, the two available servers were learned via
DHCP on data plane interface 3. If the servers were statically configured, the source
information would read system.
We can double-check this information by looking at the DHCP client lease on the vRouter.
We can see the name server information delivered to us via DHCP.
Verifying DNS Forwarding Servers
Display name servers configured for DNS forwardingshow dns forwarding nameservers
Operational mode command
vyatta@vyatta:~$ show dns forwarding nameservers
-----------------------------------------------
Nameservers configured for DNS forwarding
-----------------------------------------------
10.0.0.30 available via 'dhcp dp0p3p3'
10.0.0.31 available via 'dhcp dp0p3p3'
vyatta@vyatta:~$ show dhcp client leases
interface : dp0p3p3
ip address : 10.224.7.189 [Active]
subnet mask: 255.255.255.0
router : 10.224.7.1
name server: 10.0.0.30 10.0.0.31
dhcp server: 10.224.7.1
lease time : 86400
last update: Wed Jul 26 21:40:51 GMT 2014
expiry : Thu Jul 27 21:40:50 GMT 2014
reason : BOUNDAT&T Confidential and Proprietary Information-The information contained herein is for use by authorized persons only under applicable nondisclosure terms and is not for general distribution 48
DNS
AT&T Confidential and Proprietary Information-The information contained herein is for use by authorized persons only under
applicable nondisclosure terms and is not for general distribution 10 – 48
NFV 134- DHCP & DNS

To view operational statistics, use the command show dns forwarding
statistics.
Note the queries answered locally. This means that the device responded directly to those
queries because it already had the DNS entry in the local cache.
Also note that individual server statistics only shows the first name server. The vRouter only
displays statistics for servers it has attempted to communicate with. Because the first
server in the list is 10.0.0.30, and this server has not experienced any failures, the vRouter
has never sent any queries to 10.0.0.31, so there are no statistics for the second server.
Verifying DNS Forwarding Operations
Verify DNS forwardingshow dns forwarding statistics
Operational mode command
vyatta@vyatta:~$ show dns forwarding statistics
----------------
Cache statistics
----------------
Cache size: 150
Queries forwarded: 5
Queries answered locally: 2
Total DNS entries inserted into cache: 23
DNS entries removed from cache before expiry: 0
---------------------
Nameserver statistics
---------------------
Server: 10.0.0.30
Queries sent: 5
Queries retried or failed: 0
AT&T Confidential and Proprietary Information-The information contained herein is for use by authorized persons only under applicable nondisclosure terms and is not for general distribution 49
DNS
AT&T Confidential and Proprietary Information-The information contained herein is for use by authorized persons only under
applicable nondisclosure terms and is not for general distribution 10 – 49
NFV 134- DHCP & DNS

You can clear cached DNS table entries with the command reset dns forwarding
cache.
Using the parameter cache clears dynamically learned host entries. Static host table
entries will remain in the table.
Using the parameter all will erase both dynamic DNS entries and the DNS forwarding
counters.
Clearing Cached DNS Entries
Clear cached DNS entriesreset dns forwarding [cache | all]
cache clears all locally-cached DNS entries
all clears both cached entries and DNS forwarding counters
AT&T Confidential and Proprietary Information-The information contained herein is for use by authorized persons only under applicable nondisclosure terms and is not for general distribution 50
DNS
AT&T Confidential and Proprietary Information-The information contained herein is for use by authorized persons only under
applicable nondisclosure terms and is not for general distribution 10 – 50
NFV 134- DHCP & DNS

If you are using private addressing within your network, and are using NAT for publicly-
reachable services, you may run into problems with DNS forwarding. In our network, our
company Web server has the private address 10.1.3.250.
However, we are using NAT, so the published address for www.acme.com is the public
address, 142.168.42.99. When internal users attempt to access www.acme.com, their DNS
query will return the public address, which may not be reachable via the vRouter.
What actually happens with DNS forwarding is that the vRouter searches the local host
table first. This means you can add static host entries to the vRouter host table, and the
device will never relay DNS queries for that host name.
This solves our problem with www.acme.com; we add a static host entry for the private
address. Now all end station queries for www.acme.com will get the private address.
Additionally, the vRouter stores resolved names from forwarded DNS requests. The first
user who tries to connect to www.google.com will have their request forwarded to the DNS
server. Subsequent requests for www.google.com will match the local host table, returning
the resolved address more quickly than relaying the request.
DNS Forwarding & Device Host Table
Device checks local host table before relaying DNS requestAdd static entries to host table
set system static-host-mapping host-name name inet ip-addr
DNS
Name Address
www.acme.com 142.168.42.99
Name Address
www.acme.com 10.1.3.250
www.acme.com10.1.3.250
www.google.com 74.125.155.106
AT&T Confidential and Proprietary Information-The information contained herein is for use by authorized persons only under applicable nondisclosure terms and is not for general distribution 51
DNS
AT&T Confidential and Proprietary Information-The information contained herein is for use by authorized persons only under
applicable nondisclosure terms and is not for general distribution 10 – 51
NFV 134- DHCP & DNS

Static Host Mapping
52
DNS
AT&T Confidential and Proprietary Information-The information contained herein is for use by authorized persons only under
applicable nondisclosure terms and is not for general distribution 10 – 52
NFV 134- DHCP & DNS
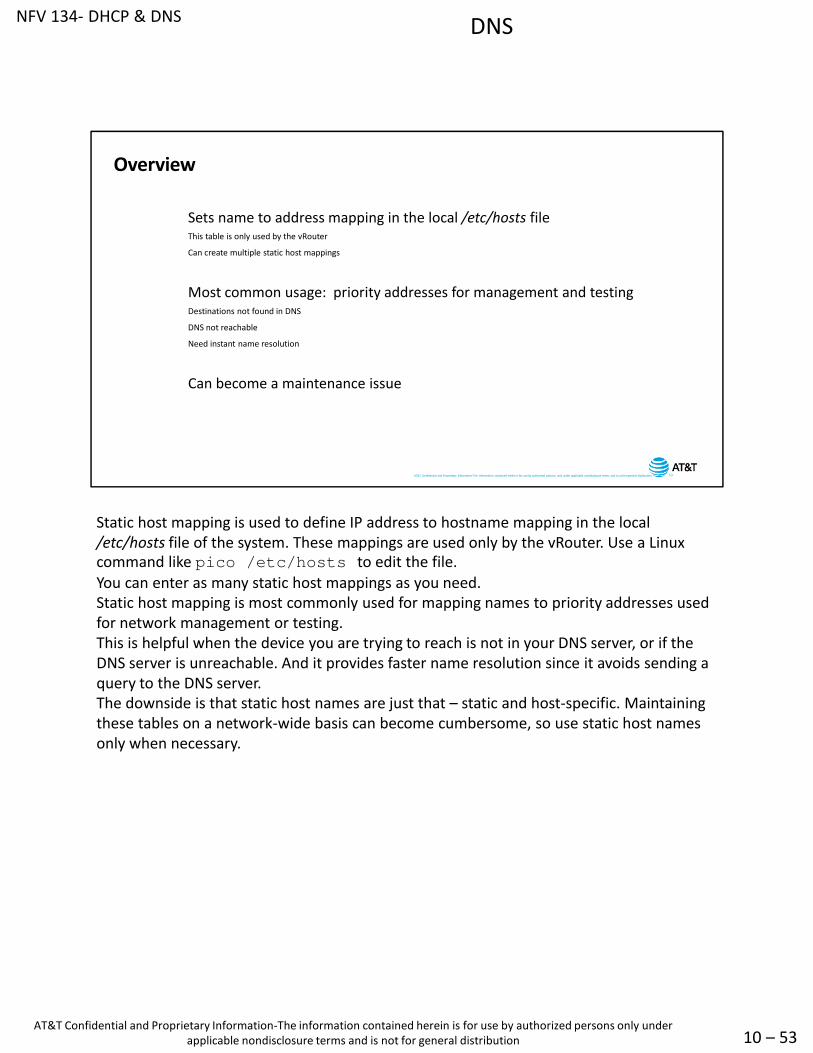
Static host mapping is used to define IP address to hostname mapping in the local
/etc/hosts file of the system. These mappings are used only by the vRouter. Use a Linux
command like pico /etc/hosts to edit the file.
You can enter as many static host mappings as you need.
Static host mapping is most commonly used for mapping names to priority addresses used
for network management or testing.
This is helpful when the device you are trying to reach is not in your DNS server, or if the
DNS server is unreachable. And it provides faster name resolution since it avoids sending a
query to the DNS server.
The downside is that static host names are just that – static and host-specific. Maintaining
these tables on a network-wide basis can become cumbersome, so use static host names
only when necessary.
Overview
Sets name to address mapping in the local /etc/hosts fileThis table is only used by the vRouter
Can create multiple static host mappings
Most common usage: priority addresses for management and testingDestinations not found in DNS
DNS not reachable
Need instant name resolution
Can become a maintenance issue
AT&T Confidential and Proprietary Information-The information contained herein is for use by authorized persons only under applicable nondisclosure terms and is not for general distribution 53
DNS
AT&T Confidential and Proprietary Information-The information contained herein is for use by authorized persons only under
applicable nondisclosure terms and is not for general distribution 10 – 53
NFV 134- DHCP & DNS

Use the set system static host mapping command to statically map a name
to an IP address.
Referring to our network diagram, we want to set up a static entry to our network
management server at 10.1.1.1.
We enter the command, specifying the fully-qualified domain name for the device and the
device IP address, then we commit our changes.
The highlight boxes emphasize the relationship between the parameters in the command,
and the device displayed on the screen.
Configuring Static Host Mapping
Configure a static host mappingset system static-host-mapping host-name name inet address
[edit]
vyatta@rtr1# set system static-host-mapping host-name nms.acme.com inet 10.1.1.1
[edit]
vyatta@rtr1# commit
192.168.1.1
69.59.150.135
loopback: 10.0.0.1
10.2.2.2
10.3.3.3
NTP
DNS
DNS
NTPInternet
DMZ
Intranet
NMS
10.1.1.1
rtr1.acme.com
AT&T Confidential and Proprietary Information-The information contained herein is for use by authorized persons only under applicable nondisclosure terms and is not for general distribution 54
DNS
AT&T Confidential and Proprietary Information-The information contained herein is for use by authorized persons only under
applicable nondisclosure terms and is not for general distribution 10 – 54
NFV 134- DHCP & DNS

To display statically mapped addresses, use the show system command.
Displaying Static Host Mapping
Display static host mappingsshow system static-host-mapping
vyatta@rtr1# show system static-host-mapping
host-name nms.acme.com {
inet 10.1.1.1
}
[edit]
vyatta@rtr1#
AT&T Confidential and Proprietary Information-The information contained herein is for use by authorized persons only under applicable nondisclosure terms and is not for general distribution 55
DNS
AT&T Confidential and Proprietary Information-The information contained herein is for use by authorized persons only under
applicable nondisclosure terms and is not for general distribution 10 – 55
NFV 134- DHCP & DNS

If you want to modify the address associated with a host name, use the set command
again. Each host name can only be associated with one address, so using the set
command overwrites the existing configuration.
If you use the delete command in this instance, then try to commit the configuration
without setting a new host address, the commit will fail and remind you to set the address
first.
If you want to delete a host entry, use the delete command, specifying the name of the
entry you want to delete.
Modifying Static Host Mappings
Enter the command again to modify the IP address
set system static-host-mapping host-name name inet address
Deleting an address without setting a new one generates an error
Then use the delete command to remove the incorrect mapping
delete system static-host-mapping host-name name
AT&T Confidential and Proprietary Information-The information contained herein is for use by authorized persons only under applicable nondisclosure terms and is not for general distribution 56
DNS
AT&T Confidential and Proprietary Information-The information contained herein is for use by authorized persons only under
applicable nondisclosure terms and is not for general distribution 10 – 56
NFV 134- DHCP & DNS

This concludes the AT&T 5600 vRouter DNS module.
You should now be able to:
• Configure System DNS
• Configure Dynamic DNS
• Configure DNS forwarding
• Verify correct operations of dynamic addressing and DNS
Summary
You should now be able toConfigure System DNS
Configure DNS forwarding
Verify correct operations of dynamic addressing and DNS
AT&T Confidential and Proprietary Information-The information contained herein is for use by authorized persons only under applicable nondisclosure terms and is not for general distribution 57
DNS
AT&T Confidential and Proprietary Information-The information contained herein is for use by authorized persons only under
applicable nondisclosure terms and is not for general distribution 10 – 57
NFV 134- DHCP & DNS

End of Domain Name System (DNS)
DNS
AT&T Confidential and Proprietary Information-The information contained herein is for use by authorized persons only under
applicable nondisclosure terms and is not for general distribution 10 – 58
NFV 134- DHCP & DNS

Appendix A: Dynamic DNS (DDNS)
DNS
AT&T Confidential and Proprietary Information-The information contained herein is for use by authorized persons only under
applicable nondisclosure terms and is not for general distribution 10 – 59
NFV 134- DHCP & DNS

Dynamic DNS (DDNS) is used when upstream devices use hostnames to reach an address
associated with the vRouter, but the address is assigned via DHCP.
In order for name resolution to work, a device needs to have a unique hostname and
address combination registered in DNS. If the vRouter has a static address, then the entry is
statically added to DNS.
However, if the vRouter is acquiring its address via DHCP, then it may not acquire the same
address every time. With a dynamic address, a static DNS entry will not work.
In this case, we need to configure dynamic DNS so the vRouter will update the configured
dynamic DNS server with its address and name whenever the address changes. As we
mentioned on the previous slide, the DDNS provider should set the time-to-live for your
dynamic DNS entry to an appropriately short duration.
Dynamic DNS (DDNS)
Used when upstream devices use hostnames to reach an address associated with the vRouter, but the address is assigned via DHCPIf the vRouter is acquiring its address via DHCP, then it may not acquire the same address every time
DDNS is used so the vRouter will update the configured DDNS server with its address and name whenever the address
changes
rtr1.acme.com
rtr1.acme.com = ???
DHCP – what’s my address?rtr1.acme.com = 10.1.1.1
dp0p3p2 DHCPdp0p3p1
AT&T Confidential and Proprietary Information-The information contained herein is for use by authorized persons only under applicable nondisclosure terms and is not for general distribution 60
DNS
AT&T Confidential and Proprietary Information-The information contained herein is for use by authorized persons only under
applicable nondisclosure terms and is not for general distribution 10 – 60
NFV 134- DHCP & DNS

Before you can configure dynamic DNS on your vRouter, you need to subscribe to a
dynamic DNS service provider. You will send your DNS information to the provider, who will
forward it to the appropriate authoritative server for your domain.
To find the providers supported by your vRouter release, use question mark (?) help in the
CLI.
If you are using NAT in your environment, you need to consider which host names you need
to update via dynamic DNS.
In this network, our public Web server is reachable via our vRouter, and we are using NAT
to replace the private address of our Web server with the public address of the vRouter.
This means that the address of data plane interface 1 is not only the address of the
vRouter, but is the public address of our Web server www.acme.com as well.
When we receive a new IP address, we need to not only update the address associated
with rtr1.acme.com, but the address associated with www.acme.com as well.
Dynamic DNS Requirements/Considerations
Must subscribe to supported DDNS providerUse ? help to view a list of supported providers
Any NAT in your environment?
NAT
www.acme.com = dp0p3p1
IP: 10.2.3.4
rtr1.acme.com = 10.2.3.4
www.acme.com = 10.2.3.4
dp0p3p1
rtr1.acme.com
www.acme.com
DDNS
AT&T Confidential and Proprietary Information-The information contained herein is for use by authorized persons only under applicable nondisclosure terms and is not for general distribution 61
DNS
AT&T Confidential and Proprietary Information-The information contained herein is for use by authorized persons only under
applicable nondisclosure terms and is not for general distribution 10 – 61
NFV 134- DHCP & DNS

To configure dynamic DNS, first enter the DDNS configuration level of the hierarchy using
the edit service dns dynamic interface dpxpypz service
provider command. The interface is the DHCP client interface – usually the interface
connected to the Internet. The provider is the DDNS service provider.
Set the login name and password for the DDNS service.
Next, set either the IP address or the hostname for the dynamic DNS server you need to
send the information to.
Finally, list the host names you want associated with the dynamic address on the interface.
There is no limit to the number of names you can associate with the address.
Configuring Dynamic DNS
Enter the edit DDNS configuration nodeedit service dns dynamic interface dpxpypz
service providername
Configure DDNS login
set login name
Configure DDNS password
set password password
Configure DDNS server
set server [ip-addr | fqdn]
Configure DDNS hostname
set host-name name
AT&T Confidential and Proprietary Information-The information contained herein is for use by authorized persons only under applicable nondisclosure terms and is not for general distribution 62
DNS
AT&T Confidential and Proprietary Information-The information contained herein is for use by authorized persons only under
applicable nondisclosure terms and is not for general distribution 10 – 62
NFV 134- DHCP & DNS

In this example, the vRouter is acquiring an Internet-facing IP address via DHCP. This means
we will need dynamic DNS in order for DNS to have the correct hostname/address
combination for our device.
Our dynamic DNS service provider has given us a login and password, and the hostnames
we need to register are the name of the router, and the name of our public Web server.
DDNS Scenario
DDNS informationLogin: rtr1.acme.com
Password: LetMeIn
Address: 192.168.42.99
Hostnamesrtr1.acme.com
www.acme.com
dp0p3p1
rtr1.acme.com
www.acme.com
DDNS
AT&T Confidential and Proprietary Information-The information contained herein is for use by authorized persons only under applicable nondisclosure terms and is not for general distribution 63
DNS
AT&T Confidential and Proprietary Information-The information contained herein is for use by authorized persons only under
applicable nondisclosure terms and is not for general distribution 10 – 63
NFV 134- DHCP & DNS

We begin our configuration by using the edit command. We use question mark help to
see which dynamic DNS providers are supported by our software release.
We have signed up with EasyDNS, so we will use that as the service provider name.
Next, we add our login information, password, and server address.
Finally, we add the hostnames we will update via dynamic DNS: first the router address,
then the address of our web server.
We commit our changes to make them take effect, then save them so they are permanent.
Scenario Configuration
[edit]
vyatta@rtr1# edit service dns dynamic interface dp0p3p1 service ?
dnspark dyndns namecheap zoneedit
dslreports easydns sitelutions
[edit]
vyatta@rtr1# edit service dns dynamic interface dp0p3p1 service[edit service dns dynamic interface dp0p3p1 service easydns]
vyatta@rtr1# set login rtr1.acme.com
easydns
[edit service dns dynamic interface dp0p3p1 service easydns]
vyatta@rtr1# set password LetMeIn
[edit service dns dynamic interface dp0p3p1 service easydns]
vyatta@rtr1#
[edit service dns dynamic interface dp0p3p1 service easydns]
vyatta@rtr1#
[edit service dns dynamic interface dp0p3p1 service easydns]
vyatta@rtr1#
[edit service dns dynamic interface dp0p3p1 service easydns]
vyatta@rtr1#
set host-name www.acme.com
commit
[edit service dns dynamic interface dp0p3p1 service easydns]
vyatta@rtr1#
set server 192.168.42.99
set host-name rtr1.acme.com
save
[edit service dns dynamic interface dp0p3p1 service easydns]
AT&T Confidential and Proprietary Information-The information contained herein is for use by authorized persons only
under applicable nondisclosure terms and is not for general distribution 64
DNS
AT&T Confidential and Proprietary Information-The information contained herein is for use by authorized persons only under
applicable nondisclosure terms and is not for general distribution 10 – 64
NFV 134- DHCP & DNS

To verify that dynamic DNS is functioning properly, use the Operational mode command
show dns dynamic status.
The output displays a separate listing for each updated host name, as well as the date
when the name was updated.
Verifying DDNS Operations
Verify DDNS operationshow dns dynamic status
Operational mode command
vyatta@rtr1:~$ show dns dynamic status
interface : dp0p3p1
ip address : 10.2.3.4
host-name : rtr1.acme.com
last update : Tue Jul 27 15:52:44 2014
update-status: good
interface : dp0p3p1
ip address : 10.2.3.4
host-name : www.acme.com
last update : Tue Jul 29 15:52:44 2014
update-status: good
vyatta@rtr1:~$
AT&T Confidential and Proprietary Information-The information contained herein is for use by authorized persons only under applicable nondisclosure terms and is not for general distribution 65
DNS
AT&T Confidential and Proprietary Information-The information contained herein is for use by authorized persons only under
applicable nondisclosure terms and is not for general distribution 10 – 65
NFV 134- DHCP & DNS

End of Course: DHCP & DNS
DNS
AT&T Confidential and Proprietary Information-The information contained herein is for use by authorized persons only under
applicable nondisclosure terms and is not for general distribution 10 – 66
NFV 134- DHCP & DNS