new york state electronic certificate of need applicant ... york state electronic certificate of...
TRANSCRIPT
New York State
Electronic Certificate of Need
Applicant Training:
Request Regional Office Review
Version 3.1
Health Commerce System

New York State Electronic Certificate of Need (NYSE-CON) Training/Reference Manual
HCS Applicant Training Page 2 of 51 11/01/2016
Request Regional Office Review
Revision History
Date Version Description Author
04/20/2015 1.0 Initial Release Payal Sareen
07/15/2015 2.0 Release 2: General information Functionality - with enhancements
Screen layout changed
Phase ID can be manually changed
Federal 855 does not default to yes or no.
Federal 855 expiration date field added
Data can be modified after submission Reviewer Schedules surveys-
Schedule, reschedule and confirm functionality provided
Changes in Survey schedule history table Added Secure and Non- secure general correspondence Added checklist functionality and checklist correspondence Correspondence can be filtered for focused search
Payal Sareen
2/23/2016 3.0 Release 3: Findings and CAPs functionality
Payal Sareen
11/01/2016 3.1 Release 6.0.4.0.0: Updated Steps and screens for “Adding a Phase”. Correspondence tab will not be available for a phase which is not saved/submitted
Sharanya Sekhar
New York State Electronic Certificate of Need (NYSE-CON) Training/Reference Manual
HCS Applicant Training Page 3 of 51 11/01/2016
Request Regional Office Review
Table of Contents Revision History ...................................................................................................................................................................................................... 2 Applicant initiates request for Regional Office review ....................................................................................................................................... - 6 - SUBMITTING A REQUEST FOR REVIEW .................................................................................................................................- 9 -
Create a Phase ............................................................................................................................................. - 9 - Add Contacts .............................................................................................................................................. - 12 - Attach / Delete Notice of Appearance (NOA) for contacts ...................................................................... - 15 - Modify contact information ....................................................................................................................... - 16 - Change Primary contact ............................................................................................................................ - 17 - Expire a Contact ......................................................................................................................................... - 19 - Reactivate a Contact .................................................................................................................................. - 20 - Submit a Request to Regional Office ....................................................................................................... - 21 - Modify the general information after submitting the request to RO. ..................................................... - 22 - Modify Target opening date ...................................................................................................................... - 22 - Modify Requested Survey Date range ...................................................................................................... - 24 - Modify Federal 855 expiration date .......................................................................................................... - 25 - Modify Federal Tax ID # ............................................................................................................................. - 26 - Add, Cancel, Delete a new phase ............................................................................................................. - 29 -
CHECKLIST DOCUMENTS......................................................................................................................................................- 32 - Uploading, Deleting, Saving and Submitting Checklist Documents ..................................................... - 32 - Changing status of a checklist item to N/A.............................................................................................. - 36 -
CORRECTIVE ACTION PLAN (CAP) ...................................................................................................................................- 37 - Add, Save and Submit CAP ....................................................................................................................... - 37 - Modify CAP ................................................................................................................................................. - 39 - Request Extension for CAP submission .................................................................................................. - 42 - Delete CAP .................................................................................................................................................. - 43 -
COMMENT ON FINDING..........................................................................................................................................................- 44 - NOTIFICATIONS.......................................................................................................................................................................- 45 -
Schedule Survey correspondence ........................................................................................................... - 45 - VIEW CORRESPONDENCE ....................................................................................................................................................- 46 - REPLY TO CORRESPONDENCE ............................................................................................................................................- 47 - APPENDIX _1 ..........................................................................................................................................................................- 49 -
Referencing the Survey Schedule History Table ..................................................................................... - 49 - Adding an Attachment ............................................................................................................................... - 50 -

New York State Electronic Certificate of Need (NYSE-CON) Training/Reference Manual
HCS Applicant Training Page 4 of 51 11/01/2016
Request Regional Office Review
Table of Figures Figure 1: Regional office: General Information page ....................................................................................................................................................- 6 - Figure 2: Creating a Phase ...........................................................................................................................................................................................- 9 - Figure 3: Saving a Phase ...........................................................................................................................................................................................- 11 - Figure 4: Add Contact –General Information page .....................................................................................................................................................- 12 - Figure 5: New Contact Information .............................................................................................................................................................................- 13 - Figure 6: Contact type ................................................................................................................................................................................................- 13 - Figure 7 Contacts have been added...........................................................................................................................................................................- 14 - Figure 8: Add NOA Attachment ..................................................................................................................................................................................- 15 - Figure 9: Add NOA Attachment ..................................................................................................................................................................................- 15 - Figure 10: Browse for document .................................................................................................................................................................................- 15 - Figure 11: Attachment path is reflected in the File .....................................................................................................................................................- 16 - Figure 12: Attachment Added and ‘Delete’ button visible. ..........................................................................................................................................- 16 - Figure 13: Name link in contact table on General Information page ..........................................................................................................................- 16 - Figure 14: Modify Contact Information ........................................................................................................................................................................- 17 - Figure 15: Modified Contact Information .....................................................................................................................................................................- 17 - Figure 16: Name link in contact table on General Information page ..........................................................................................................................- 17 - Figure 17: Select Primary in ‘Type’ .............................................................................................................................................................................- 18 - Figure 18: Type Changed: Changes reflected in contact table ...................................................................................................................................- 18 - Figure 19: ‘Name hyperlink - Expire the contact .........................................................................................................................................................- 19 - Figure 20: Contact Table- Contact Expired ................................................................................................................................................................- 19 - Figure 21: Contact Table- Contact Expired ................................................................................................................................................................- 19 - Figure 22: Click name marked ‘Expire’ .......................................................................................................................................................................- 20 - Figure 23: Reactivate contact information screen ......................................................................................................................................................- 20 - Figure 24: Reactivated contact: Expire marking removed ..........................................................................................................................................- 20 - Figure 25: Requested Survey Dates ...........................................................................................................................................................................- 21 - Figure 26: Federal 855 Information ............................................................................................................................................................................- 21 - Figure 27: Screen after submission ............................................................................................................................................................................- 22 - Figure 28: Screen to Modify........................................................................................................................................................................................- 23 - Figure 29: Select cell to modify Target opening date .................................................................................................................................................- 24 - Figure 30a: New date Saved- Toggle on the side. .....................................................................................................................................................- 24 - Figure 30b: New date Saved- Showing History toggle down......................................................................................................................................- 24 - Figure 31: Modify Survey date From ..........................................................................................................................................................................- 24 - Figure 32: Modify Survey Date TO .............................................................................................................................................................................- 25 - Figure 33: New survey dates saved ...........................................................................................................................................................................- 25 - Figure 34: On clicking Modify Fed 855 expiration date allows editing ........................................................................................................................- 25 - Figure 35a: Save. .......................................................................................................................................................................................................- 26 - Figure 35b: New Date Saved......................................................................................................................................................................................- 26 - Figure 35c: History accessible by toggle. ...................................................................................................................................................................- 26 - Figure 36a: Clearing the earlier entry .........................................................................................................................................................................- 27 - Figure 36b: Enter New Tax ID # .................................................................................................................................................................................- 27 - Figure 37: Click Save..................................................................................................................................................................................................- 28 - Figure 38: Adding new phase .....................................................................................................................................................................................- 29 - Figure 39: New phase –General Information screen ..................................................................................................................................................- 30 - Figure 40: New phase –General Information screen- Delete Phase ..........................................................................................................................- 31 - Figure 41: Selecting the Survey Checklist Tab ...........................................................................................................................................................- 32 - Figure 42: Environmental checklist table on the Environmental checklist page .........................................................................................................- 32 - Figure 43: Uploading document for building construction type. ..................................................................................................................................- 33 - Figure 44: Add Checklist Attachment. ........................................................................................................................................................................- 33 - Figure 45: Add Checklist Attachment. ........................................................................................................................................................................- 33 - Figure 46: Add Attachment. ........................................................................................................................................................................................- 33 - Figure 47: Document uploaded can be deleted before saving ...................................................................................................................................- 34 - Figure 48: Saving the Uploaded document ................................................................................................................................................................- 34 - Figure 49: Toggle appearing by the checklist item .....................................................................................................................................................- 35 -

New York State Electronic Certificate of Need (NYSE-CON) Training/Reference Manual
HCS Applicant Training Page 5 of 51 11/01/2016
Request Regional Office Review
Figure 50: Submission confirmation ...........................................................................................................................................................................- 35 - Figure 51: Drop down list of Status_ Selecting N/A ....................................................................................................................................................- 36 - Figure 52: Providing comments for N/A ......................................................................................................................................................................- 36 - Figure 53: Survey F&C tab .........................................................................................................................................................................................- 37 - Figure 54: Add CAP page ...........................................................................................................................................................................................- 38 - Figure 55: F&C table After Submitting the CAP..........................................................................................................................................................- 38 - Figure 57: Survey F&C tab .........................................................................................................................................................................................- 39 - Figure 58: Modify CAP................................................................................................................................................................................................- 40 - Figure 59: Survey F&C Table recording Modification Submission, with history .........................................................................................................- 41 - Figure 56: Survey F&C tab .........................................................................................................................................................................................- 42 - Figure 60: Survey F&C tab- Delete after Save ...........................................................................................................................................................- 43 - Figure 61: Comment for Finding. ................................................................................................................................................................................- 44 - Figure 62: Sample Notification Email for Schedule Survey correspondence .............................................................................................................- 45 - Figure 63: Correspondence Screen ............................................................................................................................................................................- 46 - Figure 64: View Survey Correspondence Screen.......................................................................................................................................................- 46 - Figure 65: Reply Button on View correspondence screen ..........................................................................................................................................- 47 - Figure 66: Reply Correspondence screen ..................................................................................................................................................................- 48 - Figure 67: Survey table...............................................................................................................................................................................................- 49 - Figure 68: Records created for Surveys Scheduled ...................................................................................................................................................- 49 - Figure 69: Add attachment .........................................................................................................................................................................................- 50 - Figure 70: Drop down selection of Document Type ....................................................................................................................................................- 50 - Figure 71: Description of attachment ..........................................................................................................................................................................- 50 - Figure 72: Browser Window for Attachments .............................................................................................................................................................- 50 - Figure 73: Attachment add to system .........................................................................................................................................................................- 51 -

New York State Electronic Certificate of Need (NYSE-CON) Training/Reference Manual
HCS Applicant Training Page 6 of 51 11/01/2016
Request Regional Office Review
Applicant initiates request for Regional Office review
Regional office tab has been added to NYSE-CON to facilitate the Regional office review and approval. The views and actions available will depend on the user’s role. To be able to login to NYSE-CON, the user must have a Health
Commerce System (HCS) account. The Regional Office module is reached via the ‘Regional office’ tab. This tab opens the “General Information” page for the Regional Office (Figure 1).
The “Regional Office” tab will be displayed for a project only after the CON project has been approved and all Contingencies have been satisfied. The Applicant should initiate contact with the Regional Office at least 60 days prior to the facility’s target opening date.
The “Regional Office” tab will be located between the “Post Approval” and “Summary” tabs.
Figure 1: Regional office: General Information page

New York State Electronic Certificate of Need (NYSE-CON) Training/Reference Manual
HCS Applicant Training Page 7 of 51 11/01/2016
Request Regional Office Review
General Information Page - Field Descriptions
Field Name Description
Application Number
CON number assigned to the application
Facility Name Name of the facility
Project description
The description entered by Project Management Unit (PMU) during initial review
Phase Tab Every project has one phase, but more phases may be added by Applicant. Surveys, Checklists Findings and Corrective Action Plans (CAPs) and Correspondences are organized by phase.
General Information Tab
Tab Title
Phase ID The phase number to identify the phase. A sequential number is assigned at creation by may be changed by the Applicant.
Phase Description
A general description of the phase entered by the Applicant.
Federal tax ID # The 9 digit Federal Tax Identification number.
Contacts Individuals identified by the Applicant who are authorized to take actions pertaining to the project.
*Target Opening date
The date on which the facility is expected to be open for services.
Note: Target opening date must be greater than Requested Survey Date.
*Requested survey Date ‘From’ and ‘To’
The date entered by the Applicant to provide the date range within which survey(s) should be scheduled. The date must be earlier than the ‘Target opening date’ entered
Federal 855 required?
Radio buttons to indicate if a Federal 855 is required.
*Approved Date This field indicates the date on which the Federal 855 was approved by CMS.
Expiration date This field indicates the date on which the Federal 855 will expire. The date is provided by CMS.
Buttons
Add Contact Button
Button used for navigating the Applicant to the “Add New Contact Information” screen.
Submit Sends a notification to the Regional Office that the Applicant is requesting regional office review. Information must be SUBMITTED for the Regional Office reviewer to take ANY action on a request. Once the Submit button is clicked, the functionalities available to the Applicant would be ‘Add contact’, ‘Modify’ and ‘Add Phase’.
Clear Clears any unsaved data
Save Entered and selected data is saved. Saved information may be modified. The regional office cannot take action and does not receive a notification.
Tables
Contacts Table listing the details of the ‘Primary’ and ‘Additional’ contacts, entered by the Applicant. Contacts on this list may be contacted via phone or email to facilitate the regional office review. Contacts must have a HCS account to work in NYSECON.
New York State Electronic Certificate of Need (NYSE-CON) Training/Reference Manual
HCS Applicant Training Page 8 of 51 11/01/2016
Request Regional Office Review
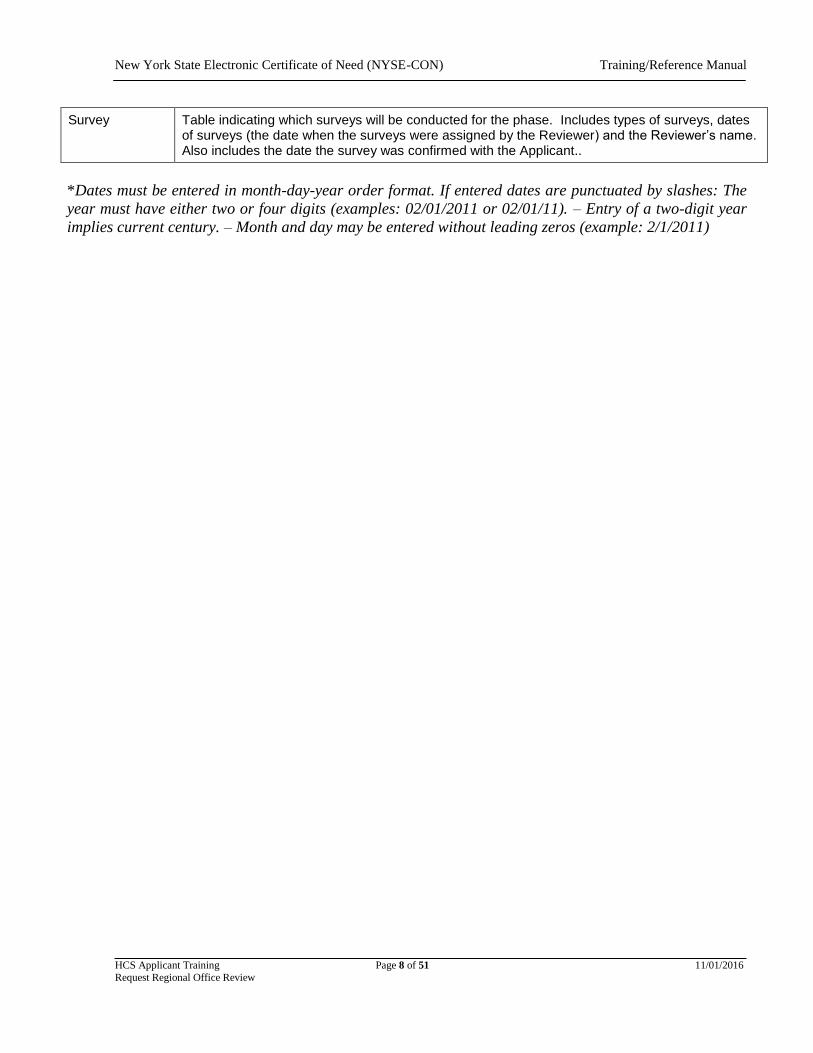
Survey Table indicating which surveys will be conducted for the phase. Includes types of surveys, dates of surveys (the date when the surveys were assigned by the Reviewer) and the Reviewer’s name. Also includes the date the survey was confirmed with the Applicant..
*Dates must be entered in month-day-year order format. If entered dates are punctuated by slashes: The
year must have either two or four digits (examples: 02/01/2011 or 02/01/11). – Entry of a two-digit year
implies current century. – Month and day may be entered without leading zeros (example: 2/1/2011)
New York State Electronic Certificate of Need (NYSE-CON) Training/Reference Manual
HCS Applicant Training Page 9 of 51 11/01/2016
Request Regional Office Review
Submitting a request for review
Submitting a review request to the Regional office
Only an Applicant can initiate the request for regional office review
Having received a “Contact the Regional Office” direction, the Applicant will access the Regional Office General Information page by selecting the Regional Office tab for the project.
In order to submit a request for review, the Applicant must do the following:
Create a phase
Provide contact details for the project
Provide Survey date range
Indicate Federal 855 requirement and provide the related information.
Refer to Figure 1 above for the screen and table above for the field descriptions
Create a Phase
Learning Objective
Step Action
How to Create and Save a Phase
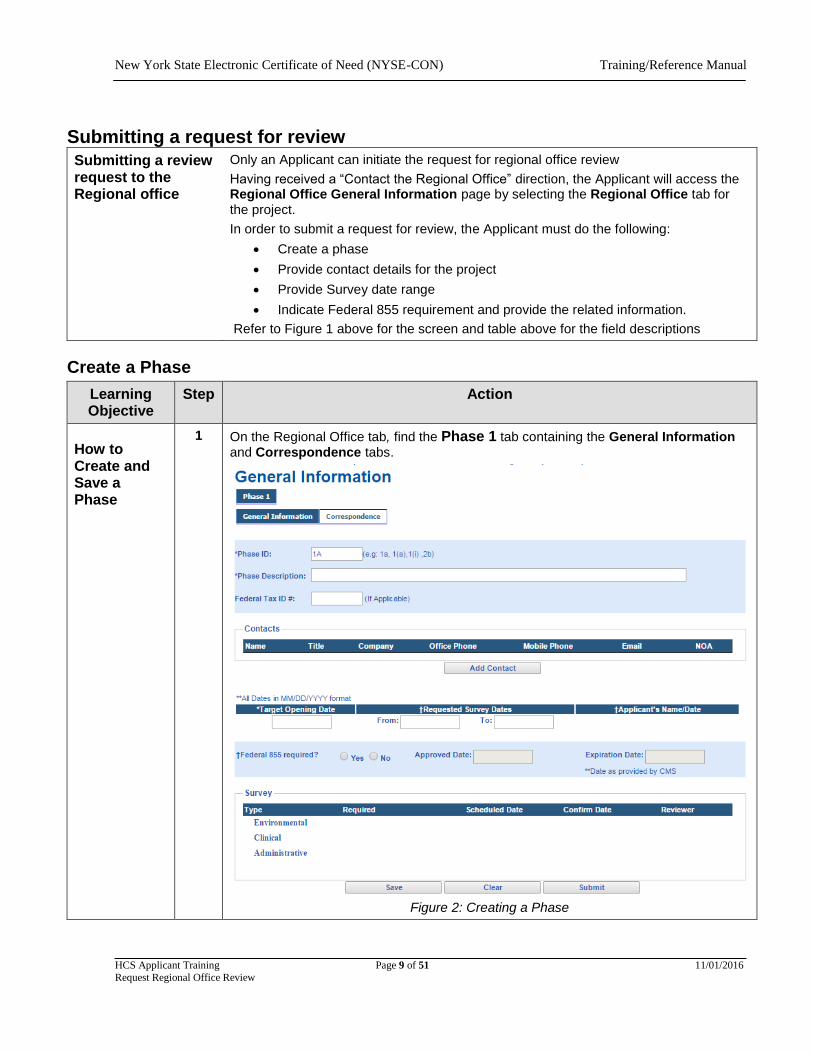
1 On the Regional Office tab, find the Phase 1 tab containing the General Information and Correspondence tabs.
Figure 2: Creating a Phase

New York State Electronic Certificate of Need (NYSE-CON) Training/Reference Manual
HCS Applicant Training Page 10 of 51 11/01/2016
Request Regional Office Review
2 1> Edit the Phase ID, if desired. The system will sequentially number the Phases
if the Applicant chooses not to change the ID.
2> Enter the Phase Description.
3> Enter the Federal Tax ID # (If applicable).
4> Enter the Target Opening Date.

New York State Electronic Certificate of Need (NYSE-CON) Training/Reference Manual
HCS Applicant Training Page 11 of 51 11/01/2016
Request Regional Office Review
3 Click Save button to save the phase
Figure 3: Saving a Phase
*Alternatively, clicking Add Contact button will also save the phase and navigate to
the New Contact Information screen at the same time.
The Applicant can then add the contacts associated with the project.
On clicking Save, the functionality to Add Phase will be activated.
Conditions that apply:
The Phase Description, and Target Opening Dates are mandatory fields and must be completed in order to create a phase and save it.
Once a phase has been created, the Applicant can save the information without submitting it to the Regional Office.
4 To clear any unsaved data Click Clear
Note:
If information has been ‘Saved’ then the entered data can be cleared by placing the cursor in the field and clearing the information using the Backspace/ Delete keys from the keyboard.

New York State Electronic Certificate of Need (NYSE-CON) Training/Reference Manual
HCS Applicant Training Page 12 of 51 11/01/2016
Request Regional Office Review
Add Contacts
Add Contacts Learning Objective
Step Action
How to Add a contact
1 On the Regional Office General Information page,
Click the Add Contact button
Figure 4: Add Contact –General Information page
New York State Electronic Certificate of Need (NYSE-CON) Training/Reference Manual
HCS Applicant Training Page 13 of 51 11/01/2016
Request Regional Office Review
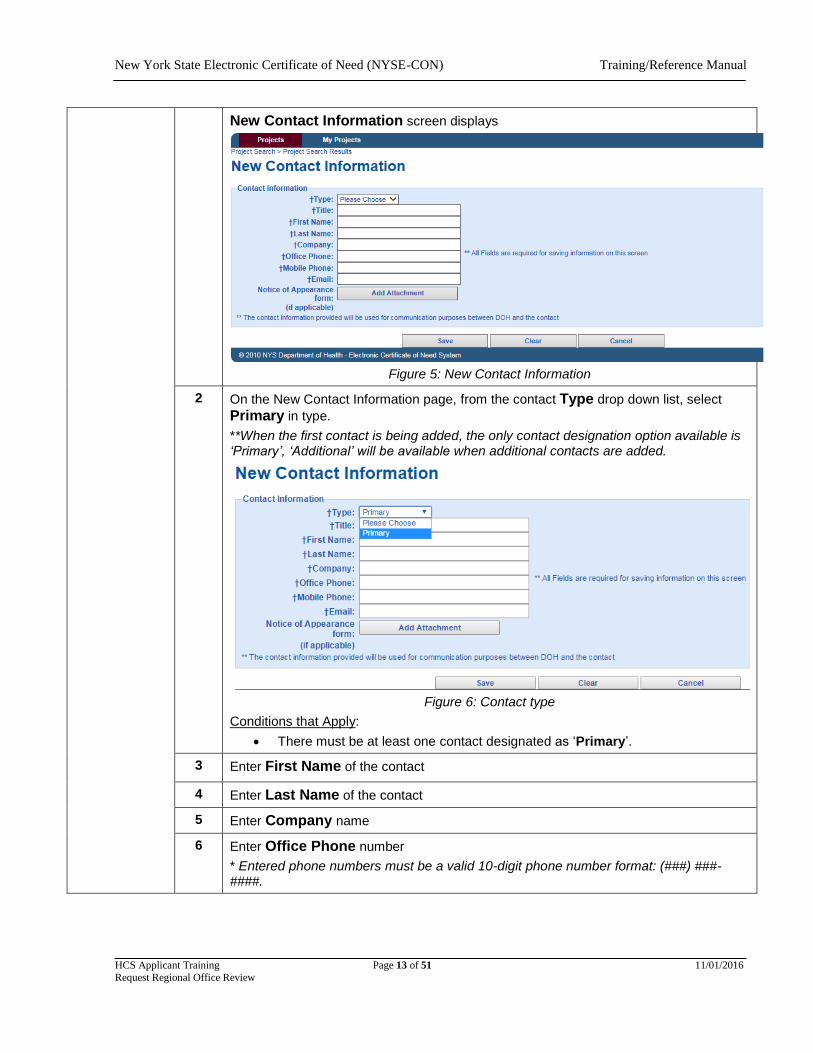
New Contact Information screen displays
Figure 5: New Contact Information
2 On the New Contact Information page, from the contact Type drop down list, select
Primary in type.
**When the first contact is being added, the only contact designation option available is ‘Primary’, ‘Additional’ will be available when additional contacts are added.
Figure 6: Contact type
Conditions that Apply:
There must be at least one contact designated as ‘Primary’.
3 Enter First Name of the contact
4 Enter Last Name of the contact
5 Enter Company name
6 Enter Office Phone number
* Entered phone numbers must be a valid 10-digit phone number format: (###) ###-####.

New York State Electronic Certificate of Need (NYSE-CON) Training/Reference Manual
HCS Applicant Training Page 14 of 51 11/01/2016
Request Regional Office Review
7 Enter Mobile Phone number (*As above)
*If the contact chooses not to enter a mobile number- enter the same number as “Office Phone” or any digit repeated 10 times on any sequential numbers entry e.g.: 222-222-2222 the Reviewer will know that the mobile number is a random entry.
8 Enter E-mail address
9 Notice of Appearance must be provided for a contact who is not an employee of the applicant. Refer to Attach Notice of Appearance [NOA] for contact section 2.1 below. Contact the Regional Office for questions regarding the NOA form.
10 Click Save.
The General information page is displayed. The new contact information will be
displayed in the contact table.
Figure 7 Contacts have been added
Note- The Primary contact is marked on the table –Suffixed as “Primary”.
If NOA has been attached, the document icon is displayed in the row of the contact name under the NOA column. The document can be accessed by clicking on the icon.

New York State Electronic Certificate of Need (NYSE-CON) Training/Reference Manual
HCS Applicant Training Page 15 of 51 11/01/2016
Request Regional Office Review
Attach / Delete Notice of Appearance (NOA) for contacts
Learning Objective
Step Action
Attach NOA for a contact
1 On the New Contact Information page, click Add Attachment
Figure 8: Add NOA Attachment
2 On the Add NOA Attachments page, select Choose File / Browse (Browser dependent label)
Figure 9: Add NOA Attachment
3 Choose the attachment from the local workstation.
Click Open
Figure 10: Browse for document

New York State Electronic Certificate of Need (NYSE-CON) Training/Reference Manual
HCS Applicant Training Page 16 of 51 11/01/2016
Request Regional Office Review
4 Click Add Attachment
Figure 11: Attachment path is reflected in the File
5 The New Contact Information screen is displayed
Note: The attachment has been added and the Add Attachment button changes to Delete button.
Figure 12: Attachment Added and ‘Delete’ button visible.
6 To Delete the Attachment, click Delete.
Note: NOA Attachment can be deleted even after saving the contact with the attachment. The Modify a Contact process must be used to delete attachments after saving or even after the Phase has been submitted.
Modify contact information
Learning Objective
Step Action
How to Modify a Contact
1 On the General Information page, click the Name link of the contact to be modified.
Figure 13: Name link in contact table on General Information page

New York State Electronic Certificate of Need (NYSE-CON) Training/Reference Manual
HCS Applicant Training Page 17 of 51 11/01/2016
Request Regional Office Review
2 The Modify Contact Information page will display.
The information previously entered is enabled for modifying.
Figure 14: Modify Contact Information
3 Enter information in the textboxes that require modification.
4 The Delete or Backspace buttons may be used to clear the previously entered information
5 Enter the new information
6 Click Save button on the screen. “General information” is now displayed with updates to the Contact Table.
Figure 15: Modified Contact Information
Change Primary contact
Learning Objective
Step Action
How to Change the Primary Contact
1 On the General Information page, click the Name link of the contact, to be assigned
as Primary.
Figure 16: Name link in contact table on General Information page

New York State Electronic Certificate of Need (NYSE-CON) Training/Reference Manual
HCS Applicant Training Page 18 of 51 11/01/2016
Request Regional Office Review
2 Select Primary from the contact Type drop down list
Figure 17: Select Primary in ‘Type’
3 Click Save. “General information” is now displayed with updates to the Contact Table.
Figure 18: Type Changed: Changes reflected in contact table
Note: The Contact previously set to Primary will be assigned ‘Additional’ by the system.
Contact which has the ‘Type’ set to ‘Primary’ cannot be changed to ‘Additional’ unless another
contact has been designated as “Primary” using the process above.
New York State Electronic Certificate of Need (NYSE-CON) Training/Reference Manual
HCS Applicant Training Page 19 of 51 11/01/2016
Request Regional Office Review
Expire a Contact
Learning Objective
Step Action
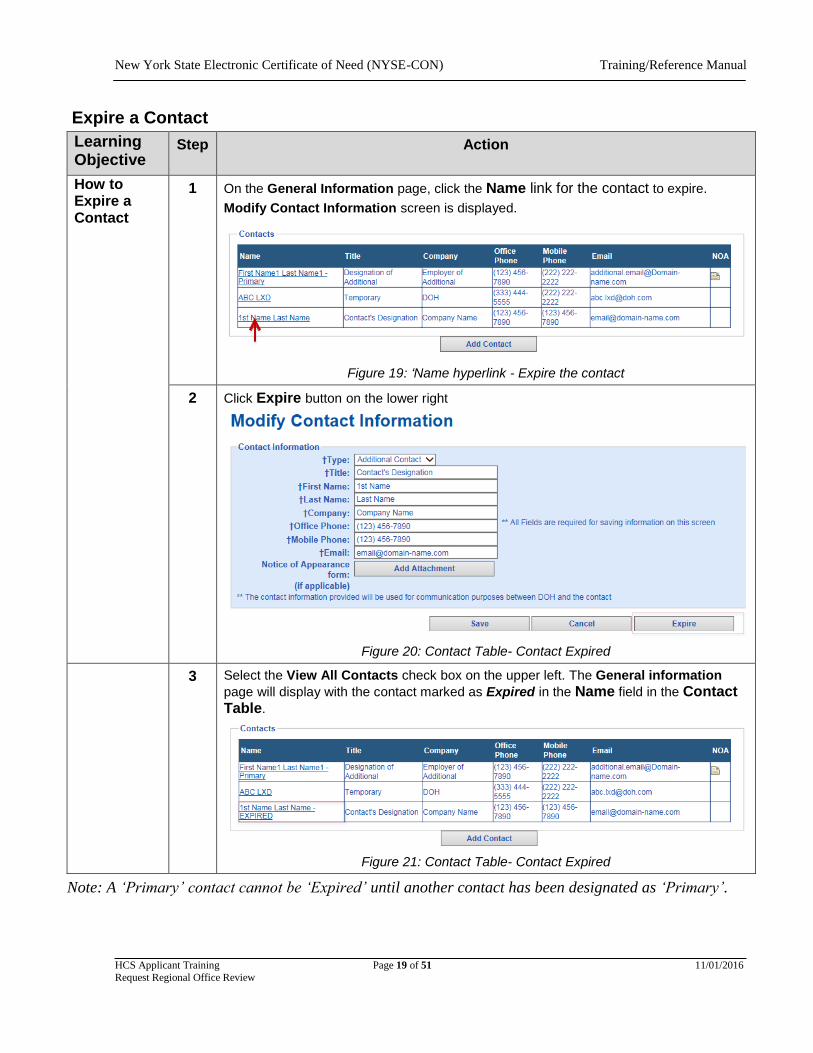
How to Expire a Contact
1 On the General Information page, click the Name link for the contact to expire.
Modify Contact Information screen is displayed.
Figure 19: ‘Name hyperlink - Expire the contact
2 Click Expire button on the lower right
Figure 20: Contact Table- Contact Expired
3 Select the View All Contacts check box on the upper left. The General information
page will display with the contact marked as Expired in the Name field in the Contact Table.
Figure 21: Contact Table- Contact Expired
Note: A ‘Primary’ contact cannot be ‘Expired’ until another contact has been designated as ‘Primary’.
New York State Electronic Certificate of Need (NYSE-CON) Training/Reference Manual
HCS Applicant Training Page 20 of 51 11/01/2016
Request Regional Office Review
Reactivate a Contact
Learning Objective
Step Action
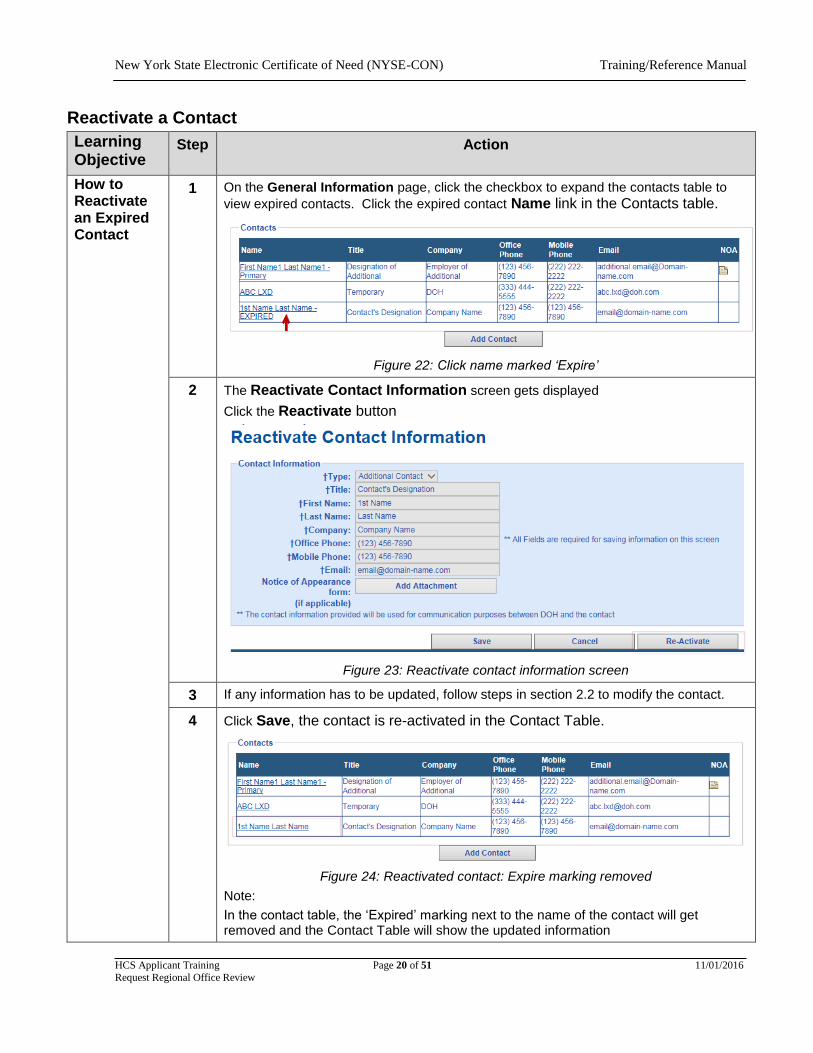
How to Reactivate an Expired Contact
1 On the General Information page, click the checkbox to expand the contacts table to
view expired contacts. Click the expired contact Name link in the Contacts table.
Figure 22: Click name marked ‘Expire’
2 The Reactivate Contact Information screen gets displayed
Click the Reactivate button
Figure 23: Reactivate contact information screen
3 If any information has to be updated, follow steps in section 2.2 to modify the contact.
4 Click Save, the contact is re-activated in the Contact Table.
Figure 24: Reactivated contact: Expire marking removed
Note:
In the contact table, the ‘Expired’ marking next to the name of the contact will get removed and the Contact Table will show the updated information
New York State Electronic Certificate of Need (NYSE-CON) Training/Reference Manual
HCS Applicant Training Page 21 of 51 11/01/2016
Request Regional Office Review
Submit a Request to Regional Office
Learning Objective
Step Action
How to Submit a Request to the Regional Office
1 On the General Information page, refer figure 1. Perform the steps to Create a Phase
2 Perform the steps to Add Contacts
To attach NOA for a contact, refer to Attach/Delete NOA.
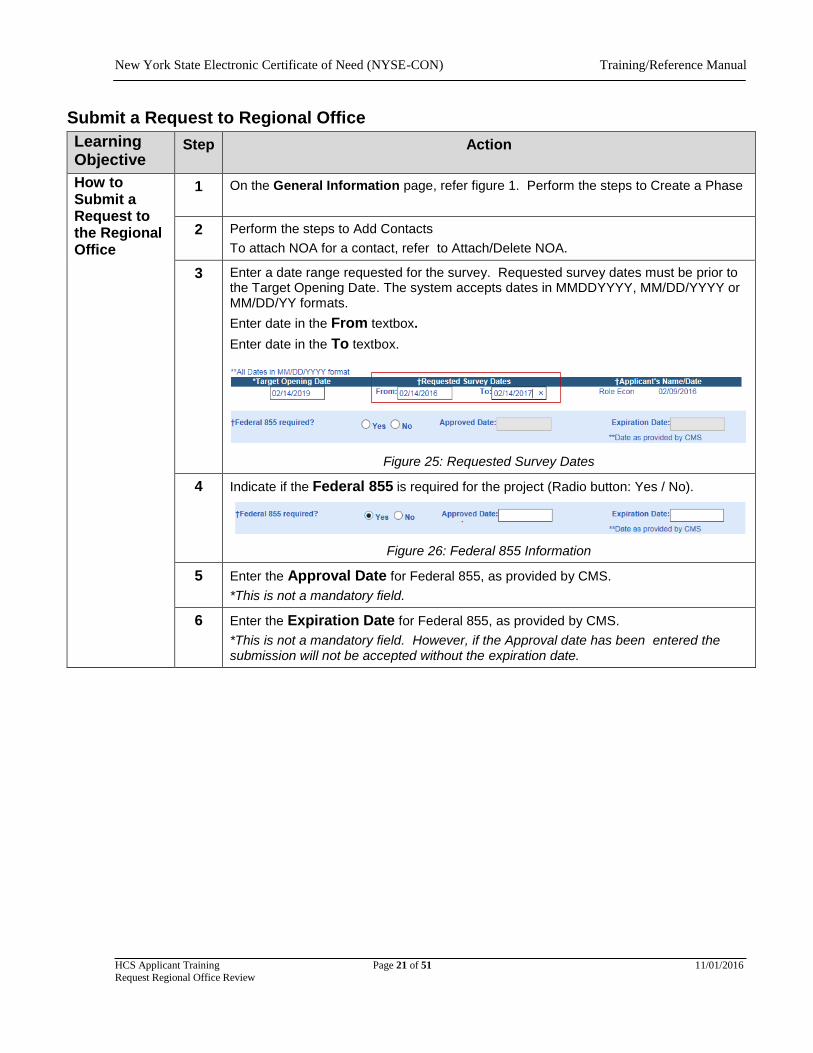
3 Enter a date range requested for the survey. Requested survey dates must be prior to the Target Opening Date. The system accepts dates in MMDDYYYY, MM/DD/YYYY or MM/DD/YY formats.
Enter date in the From textbox.
Enter date in the To textbox.
Figure 25: Requested Survey Dates
4 Indicate if the Federal 855 is required for the project (Radio button: Yes / No).
Figure 26: Federal 855 Information
5 Enter the Approval Date for Federal 855, as provided by CMS.
*This is not a mandatory field.
6 Enter the Expiration Date for Federal 855, as provided by CMS.
*This is not a mandatory field. However, if the Approval date has been entered the submission will not be accepted without the expiration date.

New York State Electronic Certificate of Need (NYSE-CON) Training/Reference Manual
HCS Applicant Training Page 22 of 51 11/01/2016
Request Regional Office Review
7 Click Submit.
Figure 27: Screen after submission
Modify the general information after submitting the request to RO.
Modify Target opening date
Learning Objective
Step Action
To modify the target
1 After the request for review has been submitted, the Modify button is displayed on the
General Information page (Refer to figure 27).

New York State Electronic Certificate of Need (NYSE-CON) Training/Reference Manual
HCS Applicant Training Page 23 of 51 11/01/2016
Request Regional Office Review
opening date on the general information page
2 Click Modify, refer figure 27. The Modification screen is displayed.
Figure 28: Screen to Modify
The Federal Tax ID, Target Opening date, the Requested Survey Date range, and
the Federal 855 information can be modified.

New York State Electronic Certificate of Need (NYSE-CON) Training/Reference Manual
HCS Applicant Training Page 24 of 51 11/01/2016
Request Regional Office Review
3 Clear the Target Opening Date and enter the new date in the provided textbox.
Figure 29: Select cell to modify Target opening date
4 Click Save, refer figure 29 above. On saving, the toggle appears next to the row.
Clicking the toggle will show previous survey and confirmation dates.
Figure 30a: New date Saved- Toggle on the side.
Figure 30b: New date Saved- Showing History toggle down.
Modify Requested Survey Date range
Learning Objective
Step Action
To modify the requested survey date range on the general information page
1 Click Modify on the General information page
Refer figure 27,28
2 Enter the new date in the Requested Survey Date From: textbox.
Figure 31: Modify Survey date From

New York State Electronic Certificate of Need (NYSE-CON) Training/Reference Manual
HCS Applicant Training Page 25 of 51 11/01/2016
Request Regional Office Review
3 Enter the new date in the Requested Survey Date To: textbox.
Figure 32: Modify Survey Date TO
4 Click Save. Refer figure 29.
* On saving, the toggle appears next to the row. Clicking the toggle expands to show the history of date changes.
Figure 33: New survey dates saved
Modify Federal 855 expiration date
Learning Objective
Step Action
To modify the Federal 855 Expiration date on the general information page
1 Click Modify on the General Information Page
Refer figure 27,28
2 Enter the new date in the Expiration Date textbox.
Figure 34: On clicking Modify Fed 855 expiration date allows editing

New York State Electronic Certificate of Need (NYSE-CON) Training/Reference Manual
HCS Applicant Training Page 26 of 51 11/01/2016
Request Regional Office Review
3 Click Save.
Figure 35a: Save.
Figure 35b: New Date Saved.
Figure 35c: History accessible by toggle.
* If there was a previous date submitted, a toggle will appear next to the row after saving. Clicking the toggle expands to show the history of date changes.
Modify Federal Tax ID #
Learning Objective
Step Action
To modify the Federal
1 Click Modify on the General Information page
Refer figures 27and 28.

New York State Electronic Certificate of Need (NYSE-CON) Training/Reference Manual
HCS Applicant Training Page 27 of 51 11/01/2016
Request Regional Office Review
Tax ID# on the general information page
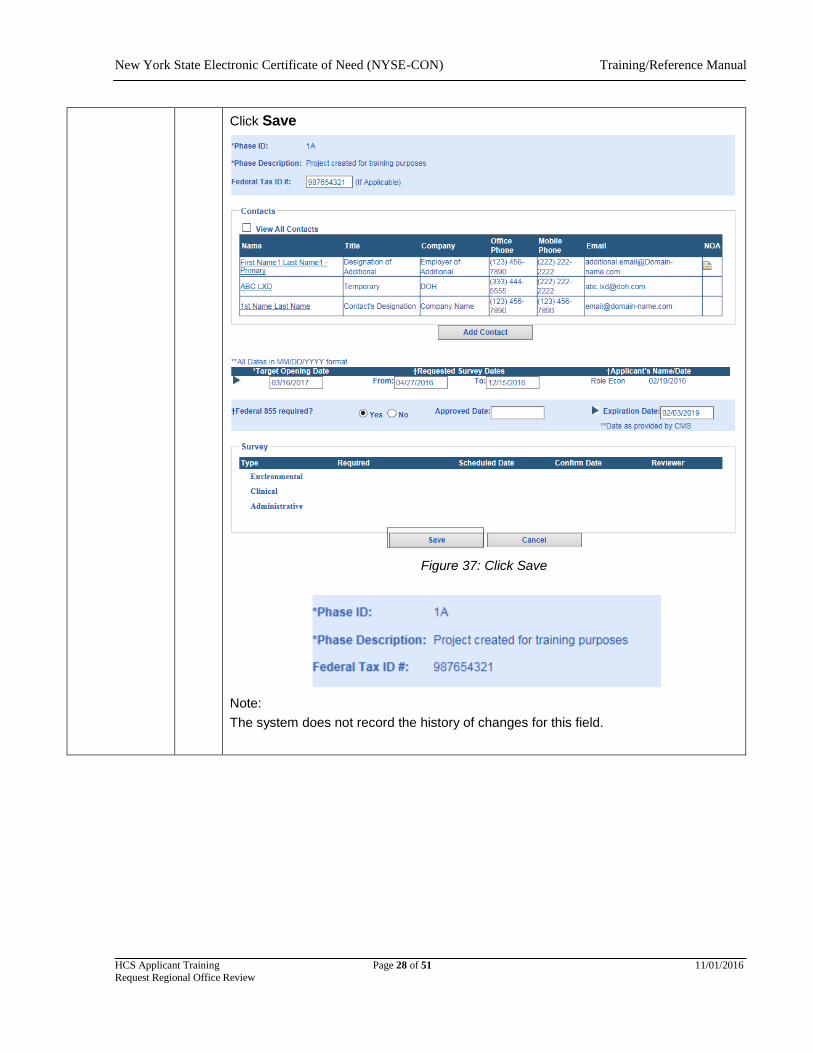
2 Enter the new or modified Federal Tax ID number in the Federal Tax ID # textbox.
Figure 36a: Clearing the earlier entry
(To clear select and Delete/ Backspace)
Figure 36b: Enter New Tax ID #
New York State Electronic Certificate of Need (NYSE-CON) Training/Reference Manual
HCS Applicant Training Page 28 of 51 11/01/2016
Request Regional Office Review
Click Save
Figure 37: Click Save
Note:
The system does not record the history of changes for this field.

New York State Electronic Certificate of Need (NYSE-CON) Training/Reference Manual
HCS Applicant Training Page 29 of 51 11/01/2016
Request Regional Office Review
Add, Cancel, Delete a new phase Add new phase
1 Once a phase has been saved, another phase can be created. To create another
phase: Click Add Phase.
* Note: Add Phase button is ONLY available on the General Information page of the
first Phase.
Figure 38: Adding new phase

New York State Electronic Certificate of Need (NYSE-CON) Training/Reference Manual
HCS Applicant Training Page 30 of 51 11/01/2016
Request Regional Office Review
2 Enter or modify the Phase ID if changing from default.
Enter the Phase Description (required).
Enter the Target Opening Date.
*Note: The Correspondence tab will not be visible for a phase that is not yet saved/submitted (Not applicable for the first phase). The following information remains constant for all phases of a project:
Phase ID: Can be altered for a specific phase numbering convention defined by the
Applicant. , Defaults to the next sequential number, if the Applicant does not change the Phase ID.
Federal Tax ID #: Any change made to this number will be reflected across phases.
Contacts: Any changes made on the contacts table will be reflected in the earlier
created phase(s).
Federal 855 information- Any change made to this information will be reflected
across phases.
Figure 39: New phase –General Information screen

New York State Electronic Certificate of Need (NYSE-CON) Training/Reference Manual
HCS Applicant Training Page 31 of 51 11/01/2016
Request Regional Office Review
3 To Cancel the creation of phase, click Cancel. (Creation of phase can be cancelled
before saving)
To Save the Phase, click Save.
*Note: The new phase can only be cancelled before the Phase is saved.
4 To delete a Phase: Click Delete Phase.
The Delete Phase button displays only after the Phase has been Saved.
*Note: A Phase cannot be deleted after Submission.
Figure 40: New phase –General Information screen- Delete Phase

New York State Electronic Certificate of Need (NYSE-CON) Training/Reference Manual
HCS Applicant Training Page 32 of 51 11/01/2016
Request Regional Office Review
Checklist Documents
Uploading, Deleting, Saving and Submitting Checklist Documents Learning Objective
Step Action
How to upload a checklist document
1 On the Regional Office tab, select the Checklist Tab(s) to view the list of
documents needed for the survey.
Figure 41: Selecting the Survey Checklist Tab
2 On the checklist tab, the checklist items are listed in the table format.
*Note: The hyperlink to the Environmental checklist guide is located above the table on the Environmental checklist page. Clicking the hyperlink opens the description of the checklist items (This is available only for the environmental checklist)
Figure 42: Environmental checklist table on the Environmental checklist page

New York State Electronic Certificate of Need (NYSE-CON) Training/Reference Manual
HCS Applicant Training Page 33 of 51 11/01/2016
Request Regional Office Review
3 Click the Upload Button in the row of the checklist item to upload document(s).
Figure 43: Uploading document for building construction type.
4 Add Checklist Attachment page displays. Click Browse.
Figure 44: Add Checklist Attachment.
5 The File upload browser displays. Select the file to be uploaded and click Open
Figure 45: Add Checklist Attachment.
6 Click Add Attachment
Figure 46: Add Attachment.

New York State Electronic Certificate of Need (NYSE-CON) Training/Reference Manual
HCS Applicant Training Page 34 of 51 11/01/2016
Request Regional Office Review
7 The added attachment is indicated by the document icon on the table.
*Note: The upload button changes to a Delete button to accommodate correction.
Figure 47: Document uploaded can be deleted before saving
8 To add any comments about the uploaded document, make entries in the Comments textbox in the corresponding row (Optional).
9 Click Save to save all work when complete. Checklist items may be saved as entered
or saved when all have been entered.
*Note: HOWEVER, If multiple documents must be added for an individual checklist item, each document must be saved after every upload.
Figure 48: Saving the Uploaded document

New York State Electronic Certificate of Need (NYSE-CON) Training/Reference Manual
HCS Applicant Training Page 35 of 51 11/01/2016
Request Regional Office Review
10 Repeat the steps listed above to upload more documents for the checklist.
*Note: If a single checklist item requires multiple files or documents, each file or document must be submitted every time the attachment is added. A toggle will appear next to the checklist item. Clicking the toggle will expand to show multiple document submissions.
Figure 49: Toggle appearing by the checklist item
11 To submit the uploaded documents: Click Submit. (Refer fig 48)
The submission confirmation screen displays. Click Confirm.
Figure 50: Submission confirmation

New York State Electronic Certificate of Need (NYSE-CON) Training/Reference Manual
HCS Applicant Training Page 36 of 51 11/01/2016
Request Regional Office Review
Changing status of a checklist item to N/A
Learning Objective
Step Action
How to change the Status of the Checklist item from Required to N/A
1 The default status for all items on the checklist table is set as Required.
Select N/A if the item is not applicable to the phase.
Figure 51: Drop down list of Status_ Selecting N/A
2 Provide the reason the checklist item is not applicable to the project phase in the
Comments column.
*Note: Providing a comment is required if the status is set to N/A, to submit the checklist.
Figure 52: Providing comments for N/A
3 Click Save to save the information or Submit to notify the Regional Office that the
required information has been provided.

New York State Electronic Certificate of Need (NYSE-CON) Training/Reference Manual
HCS Applicant Training Page 37 of 51 11/01/2016
Request Regional Office Review
Corrective Action Plan (CAP)
Add, Save and Submit CAP
Learning Objective
Step Action
How to Add and Submit CAP
1 On the F&C (Findings and CAP) tab, click CAP/ Ext Request
DO NOT ENTER CAPs in the Comments field.
Figure 53: Survey F&C tab
New York State Electronic Certificate of Need (NYSE-CON) Training/Reference Manual
HCS Applicant Training Page 38 of 51 11/01/2016
Request Regional Office Review
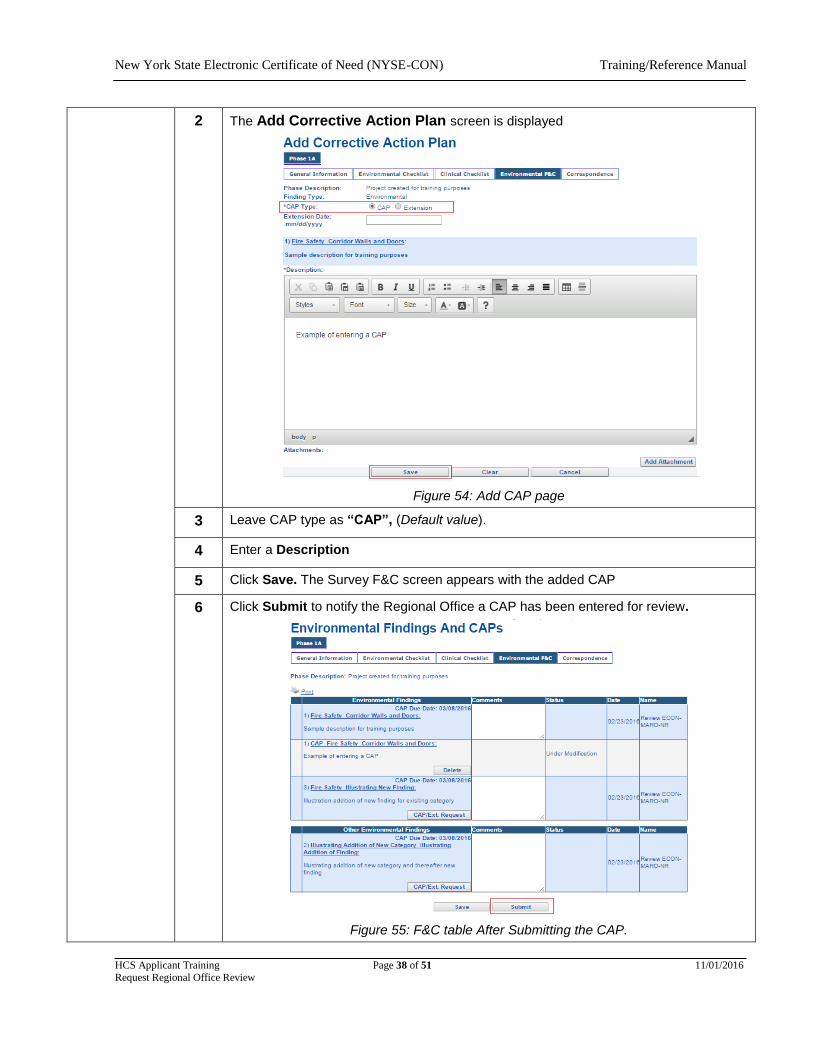
2 The Add Corrective Action Plan screen is displayed
Figure 54: Add CAP page
3 Leave CAP type as “CAP”, (Default value).
4 Enter a Description
5 Click Save. The Survey F&C screen appears with the added CAP
6 Click Submit to notify the Regional Office a CAP has been entered for review.
Figure 55: F&C table After Submitting the CAP.

New York State Electronic Certificate of Need (NYSE-CON) Training/Reference Manual
HCS Applicant Training Page 39 of 51 11/01/2016
Request Regional Office Review
Modify CAP
Learning Objective
Step Action
How to Modify CAP
1 CAPs can be modified before submission, or when rejected by the Regional Office reviewer.
On the Survey F&C tab, click on the Hyperlink of the CAP
Figure 57: Survey F&C tab

New York State Electronic Certificate of Need (NYSE-CON) Training/Reference Manual
HCS Applicant Training Page 40 of 51 11/01/2016
Request Regional Office Review
2 Modify Corrective Action Plan screen is displayed.
Figure 58: Modify CAP
3 Change the CAP Type selection, from CAP to Extension if an extension request is necessary. If there was an extension filed which requires a CAP submission, change selection to CAP.
4 Provide or modify the Extension Date, if applicable.
5 Modify the Description
6 Add Attachments, if any.
7 Click Save/ Request Extension

New York State Electronic Certificate of Need (NYSE-CON) Training/Reference Manual
HCS Applicant Training Page 41 of 51 11/01/2016
Request Regional Office Review
8 The Survey Findings and CAPs screen is displayed. If another CAP has to be modified, repeat steps 1-7 on this section. After all the modifications have been satisfactorily saved, click Submit to notify the Reviewer of the Modification(s).
Note: A modification can only be deleted before submission
Figure 59: Survey F&C Table recording Modification Submission, with history

New York State Electronic Certificate of Need (NYSE-CON) Training/Reference Manual
HCS Applicant Training Page 42 of 51 11/01/2016
Request Regional Office Review
Request Extension for CAP submission
Learning Objective
Step Action
How to request an Extension
1 On the Add Corrective Action plan page, or Modify Corrective action plan page,
select CAP type as Extension
Figure 56: Survey F&C tab
2 Enter the Extension Date
3 Enter / edit the Description
4 Click Request Extension

New York State Electronic Certificate of Need (NYSE-CON) Training/Reference Manual
HCS Applicant Training Page 43 of 51 11/01/2016
Request Regional Office Review
Delete CAP
Learning Objective
Step Action
How to Delete a CAP
1 On the Survey F&C tab, after the CAP has been saved (but not submitted), click Delete, to delete the saved CAP.
Figure 60: Survey F&C tab- Delete after Save
Note: CAP once submitted cannot be deleted.

New York State Electronic Certificate of Need (NYSE-CON) Training/Reference Manual
HCS Applicant Training Page 44 of 51 11/01/2016
Request Regional Office Review
Comment on Finding Learning Objective
Step Action
How to Comment on Findings
1 On the Survey F&C tab, select the Comments box, and type the text message (maximum 1000 character length). Comments are for supplemental information ONLY. CAPs cannot be accepted in the Comments column.
Figure 61: Comment for Finding.
2 Click Save to save the comment for later submission, or Click Submit to submit the comment and notify the Reviewer of the submission.
Note: Applicant can comment on the findings only.

New York State Electronic Certificate of Need (NYSE-CON) Training/Reference Manual
HCS Applicant Training Page 45 of 51 11/01/2016
Request Regional Office Review
Notifications
Schedule Survey correspondence
When the Reviewer schedules a survey for a regional office review, the following email notification is received. Select the link within the email notification to enter NYSE-CON and be directed to the Correspondence tab on the Regional Office Tab. If you are not logged into the system you will be redirected to the Login page. After you log in please select this link again to continue to the regional office information.
Email Notification Sent
1 Regional office Applicants
Figure 62: Sample Notification Email for Schedule Survey correspondence

New York State Electronic Certificate of Need (NYSE-CON) Training/Reference Manual
HCS Applicant Training Page 46 of 51 11/01/2016
Request Regional Office Review
View Correspondence (Survey, General, Checklist, Findings and CAP, Email Log and Phone Log)
Learning Objective
Step Action
How to view a correspond-ence
1 Select the Regional Office tab.
Select the Correspondence tab.
Figure 63: Correspondence Screen
2 The screen contains the hyperlinks to the correspondence created in chronological order of occurrence.
Click on the hyperlink to access the content of the correspondence.
3 The View Survey Correspondence screen is now displayed.
Figure 64: View Survey Correspondence Screen

New York State Electronic Certificate of Need (NYSE-CON) Training/Reference Manual
HCS Applicant Training Page 47 of 51 11/01/2016
Request Regional Office Review
Reply to Correspondence (Applies to Survey, Checklist, General, Finding and CAPs correspondence)
Learning Objective
Step Action
How to reply to correspond-ence
1 On the View Correspondence page, click Reply
Figure 65: Reply Button on View correspondence screen
New York State Electronic Certificate of Need (NYSE-CON) Training/Reference Manual
HCS Applicant Training Page 48 of 51 11/01/2016
Request Regional Office Review
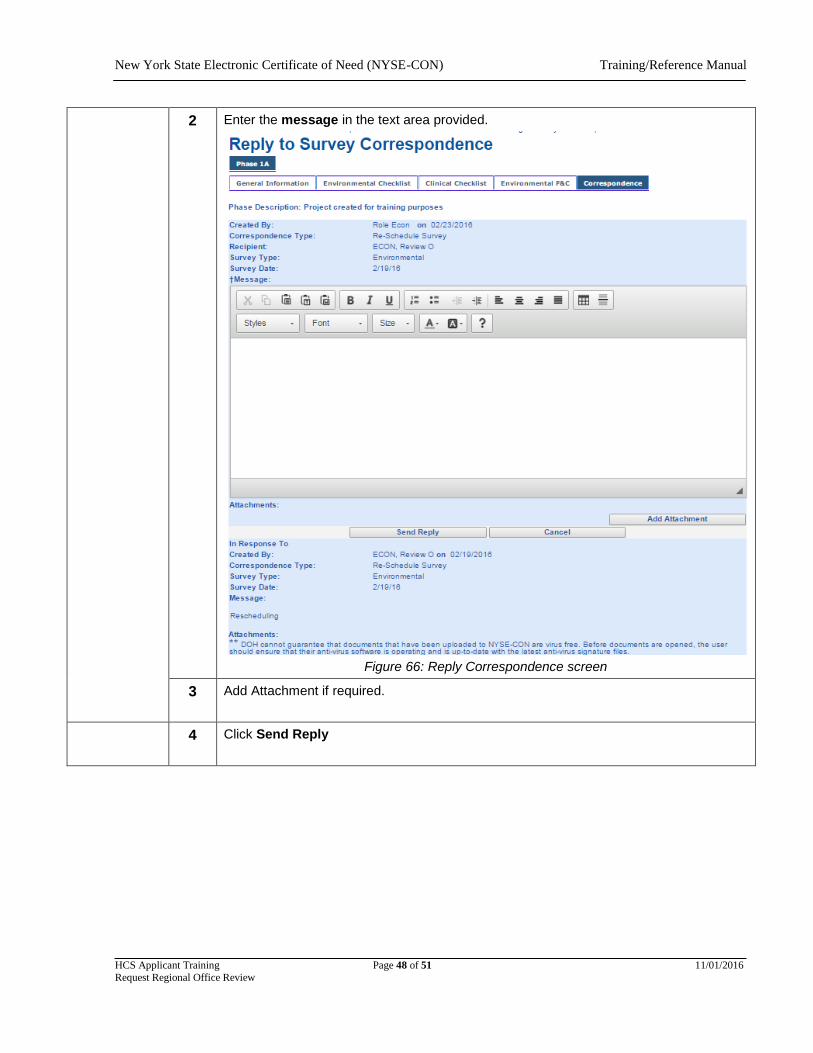
2 Enter the message in the text area provided.
Figure 66: Reply Correspondence screen
3 Add Attachment if required.
4 Click Send Reply

New York State Electronic Certificate of Need (NYSE-CON) Training/Reference Manual
HCS Applicant Training Page 49 of 51 11/01/2016
Request Regional Office Review
Appendix _1
Referencing the Survey Schedule History Table
Learning Objective
Step Action
How to View the History of survey activity
1 The Survey table (containing the history of schedules specific to each survey) is located in the bottom frame of the General Information Page.
Figure 67: Survey table
2 All survey activity (schedule, confirm, re-schedule, and cancel) appears in the survey table. The history of survey activity is maintained.
The survey information appears as follows:
Type of survey(s) selected by the Regional Office for the project (Marked with )
This tick mark appears even if the survey(s) are not scheduled yet. They are indicative of the survey(s) that are selected for the project by the Regional Office staff.
The Scheduled date - the date is created when the Reviewer first schedules the survey and is updated every time the survey is rescheduled.
Name of the Reviewer
*Note: A toggle { } button is provided so, when clicked, the survey history will be expanded.
Figure 68: Records created for Surveys Scheduled

New York State Electronic Certificate of Need (NYSE-CON) Training/Reference Manual
HCS Applicant Training Page 50 of 51 11/01/2016
Request Regional Office Review
Adding an Attachment
Learning Objective
Step Action
How to Add an Attachment
1 Click Add Attachment on the screen
Figure 69: Add attachment
2 Select Document Type
Figure 70: Drop down selection of Document Type
3 Enter the document Description
Figure 71: Description of attachment
4 Click Choose file / Browse
(As displayed on the browser)
5 Browser window pops up. Select the file to be attached. Click Open.
Figure 72: Browser Window for Attachments

New York State Electronic Certificate of Need (NYSE-CON) Training/Reference Manual
HCS Applicant Training Page 51 of 51 11/01/2016
Request Regional Office Review
6 The filename is shown as attachment on screen.
Figure 73: Attachment add to system
Click Add Attachment