new teacher of ladies' home tailoring (1910).pdf
TRANSCRIPT


Class JT52QBook -Hdo
Copyright!^ .
COPYRIGHT DEPOSIT;


New TeacherOF
Ladies' Home Tailoring
_£££6>o <c
By George HurwitzAuthor and Publisher
MASON CITY, ILLINOIS
AUTHOR OF "MEASURING CHART" FOR THIS WORK AND AUTHOROF "MASON MEASURING AND CUTTING SYSTEM"
Copyright 1910 by George Hurwitz

<\
)CI.A2C>705S

>i\
CONTENTS
Title 1
Author ......... 3
Introduction ........ 5
How to Shriuk Woolen Goods . . . . . .7Pressing and Sponging ....... 8
Interlining ......... 8
How to Measure ....... 9
The Skirt Measures . . . . . . . .10The Waist and Hip Divisioner— and How to Use It . .10The 9-Gore Skirt . . . . . . . .11To Draft the 9 -Gore Skirt ..... 10-12-13
Skirt for Stouts . . . . ... . 14-15-16
For Pleats or Fancy Skirts . . . . . .17The Circular Skirts ....... 18-19-20
The Plain Skirt Waist or Coat Sleeve ..... 20-21
The Bishop Sleeve ....... 22
The More Full Coat Sleeve . . . . . .23The One-Piece or Extreme Full Full Sleeve ... 23
How to Take a Measure for a Coat ..... 24
Tha Plain Tight-Fitting Coat ..... 24-25-26
The Semi-Fitting Coat ....... 26-27
The Single Breasted Fly Front Collar and Lapel . . . .28The Double Breasted Front ...... 29
How to Use the Tailor's Square . . . . . .29The Military Collars ....... 30


GEO. HURWITZThe Author and Inventor of the Mason Measuring and Cutting System
and Author of The New Teacher of Ladies' Home Tailoring


INTRODUCTION
With pleasure I introduce "The New Teacher of Ladies'
Home Tailoring" to the trade as a genuine, simple and accurate
tailor system for Drafting, Cutting and Designing for ladies'
garments. Very easy to learn for beginners, and old expe-
rienced cutters will find it very practical as well as technical
and instructive. It carries out all the points within the limits
of different measures and sizes, for slim as well as stout.
This system is technically figured on the tailors' division
square as all the ladies' cutters and designers are supposed
to know.Yours truly,
Geo. Hurwitz.


NEW TEACHER OF LADIES' HOME TAILORING
FOR BEGINNERS
Before startiog at the actual work it must be well understood, that the scholar must kuow
the character ot the material he is to work ou, so as to have good results and success. We will,
therefore, start from the beginning about woolen goods—how to shrink, press, sponge, etc.
Woolen goods must be truly shrunk before cutting and making into a garment.
There are several different methods ot shrinking the goods, or as is best known "Spong-
ing" but the proper name for this process is shrinking, because this is the main object, that the
goods should shrink all it needs, no matter how you do it whether by sponging or soaking in
water; therefore, we will call it by the right name, "Shrinking."
HOW TO SHRINK WOOLEN GOODS
Process No. 1.
Take a wide muslin cloth and soak it in water, then take the cloth and wring half the
water out of it. Next lay the wet cloth on the table and lay the woolen goods on the wet cloth,
(the usual way as the goods comes the wrong side out.) Then roll the wet cloth and goods
together so that the wet cloth comes from both sides of goods and then put it away in a warm
place over night. In the morning take it out and iron the woolen goods with a good hot flat-
iron until it is dry and smooth. This is the best method ot shinking woolen goods.
Process No. 2.
If the first process is too tedious or inconvenient or the person is in a hurry, then the
second process may be more conveniently used.
Lay the woolen goods on the table aud with a sprayer sprinkle the goods until it looks
like a heavy dew had fallen ou it. Do this on both the wrong sides of the goods. Then iron
it with a good hot iron until dry and smooth.
Process No. 3.
If the two former processes are inconvenient, then use this method: Sponge the goods as
evenly as possible; iron the goods while still wet so that the steam of the water gets through the
goods, thus making it shrink while ironing it. (Sometimes it will surprise you to see the goods
shrinking while you are spriukling or pressing.)

NEW TEACHER OF LADIES' HOME TAILORING
PRESSING AND SPONGING
It wouldn't be advisable for any person to start on a garment until he knows the nature
ot the material be is to work on. Tbe seams and every other part of a garment must be pressed
before it is finished. For iustance, when you try to press open the seams of Flannel goods or
Broadcloth in the right manner, that is by pressing the goods hard with a good hot iron; the
result will be that there will become a gloss on the other side of the seam or on the right side of
the goods; or when the garment is finished and ready for pressing, you take a piece of Silesia
and lay it on the garment while pressing it hard with a hot iron (which is the right way to do);
but after you remove the Silecia or Muslin from the garment you will find an undesirable gloss
shining on the goods.
This is the way to take the gloss off:
Have ready a piece of ducking or ticking. Make this damp by soaking it in water and
then wring it out by hand as much as possible. Then place the damp cloth on the shiny places
and run the hot iron over the damp cloth so as to produce a steam on the glossy place. Remove
the cloth from the goods before the material is too much softened from the steam or before the
damp cloth gets too dry. Thus the gloss is removed from the goods.
INTERLINING
Loose woolen goods as usual stretches either direction and it is very hard even for a
skilled workman to have it correctly basted and sewed right. Therefore it would be advisable to
cut first an interlining according to the paper patterns. Then baste the interlining on the goods
and trim the goods according to the interlining, then you are sure to have all the pieces alike.
Perhaps you have often heard your dress-maker complain about you having the right shoulder
a little lower than the left; that makes you think that you have one shoulder lower than the other
and at another time you will hear her complain that the left shoulder is the lowest. This is not
the fault of your shoulders but is the fault of the stretchy goods.
The interlining should be something soft and firm like muslin or Silesia, but whatever you
do don't use any starchy goods for interlinings for coats or jackets.

NEW TEACHER OF LADIES' HOME TAILORING
HOW TO MEASURE
After being posted how to shrink, press and steam goods, we will now try to take a
measure for the skirt. I will tell you how to take the measure and leave to you the accuracy.
Of course if you will take a loose waist measure, say one-half inch and make up accordingly, you
will undoubtedly have one-half inch loose in the waist, or the contrary the same; that is all the
accuracy you need.
Now let us take a measure for a skirt. Remove the belt and tie a cord around the waist.
No matter what style skirt you may want, with a dip in front or without one, the measures
should always be taken in the same way. Now measure 6 inches from the cord down the back,
in front, and ou the sides of the skirt aud stick pins in all these places. Then measure around
the waist and around the hips where the pins are sticking, that is 6 inches below the waist. Take
the length measure from the cord to the floor in the back, on the sides, and in the front. No
matter what length skirt you may want, always measure from waist to floor and then reduce the
amount as much shorter as you want. The drafting of the paper patterns are to be figured on
the same principles.

10 NEW TEACHER OF LADIES' HOME TAILORING
THE SKIRT MEASURES
From waist to floor: front length 40 inches
" " " " side length 42 & inches
" " " " back length 42 i inches
Around waist 26 inches
Around hip 41 inches
Notice the above measures; there is a difference of 2i inches in back and:side lengths than
in front. This indicates a very shapely form—flat at the abdomen and full at the back and side
of hips. The shape of the client has to be noticed in every case, so as to know exactly where to
distribute the fullness of the hip measures, and to know how much to raise the waist as will be
explained hereafter.
TO DRAFT
Diagram No. I
Notice:—The Skirt Diagram No. 1, in fact all the diagrams, are situated in the book as
they are to be drafted on the cutting board. Take a piece of paper and lay it on the table, draw
a straight line and mark on top of line point 1 for the top of skirt and 6 inches below for the
hip measure, point 2, and point 3 for the full length. Square out from 1, 2 and 3.
Notice:—When it states square out, that means place the Square with one arm to the
straight line and draw another straight line across the other arm of the Square, so that the next
point should be across on the Square, the same meaning if it states square up or down.
Now what we want is a waise measure 26 inches and divided into a 9 gore skirt. To
divide 26 into 9 times would be 2 8-9 inches, to use 1-2 of it for the front gore will be 1 4-9
inches. To have this accurate would be too much figures and fractious but so as to save time and
mistake^, use the waist divisioner as is explained below. * Apply the 9 gore waist measure, half
of 26., that is the mark between 12 and 14 for the front gore waist, as from 1 to 4. From 1 to 4
is front gore waist. From 2 to 5 is the same.
(Continued on page 12)
THE WAIST AND HIP DIVISIONER AND HOW TO USE IT
* After securing the waist and hip measures, the quantity of waist should be reduced from hip. For
example, as the above measures are 26 from 41 remains 15 inches, or a waist from 34 and hips 52, that is
a difference of 18 inches between waist and hip measures. (That difference) quantity is marked on the
Hip Divisioner numbering from 14 to 18 and the same in 1-2 and 1-4 so "as to enable for everybody to
divide and shape the skirt for any figure and any gored skirt, ranging from 5-gore to 13-gore on the HipDivisioner and from 5 to 1 5-gore skirt on the Waist Divisioner; but as for a 15-gored skirt the 13-gored
hip can be used as the quanity is very little the thickness of chalk or the pencil mark will make up the
quantity for the 1 5-gore. The Hip Divisioner is to be used the 1 -2 and 1-4 for different shapes and forms.
For instance, the client is full at the back and hips then use the fullness of the skirt according to the back andhips or the contrary. If the client is full at the abdomen then use the 1-2 or 1-4 according the degree to
the front of the construction. While the waist division is always used as a whole for each size and goredskirt as described in explanations in diagram 1, 2 and 3.

NEW TEACHER OF LADIES' HOME TAILORING 11
Diagram No. 1
12 NEW TEACHER OF LADIES' HOME TAILORING
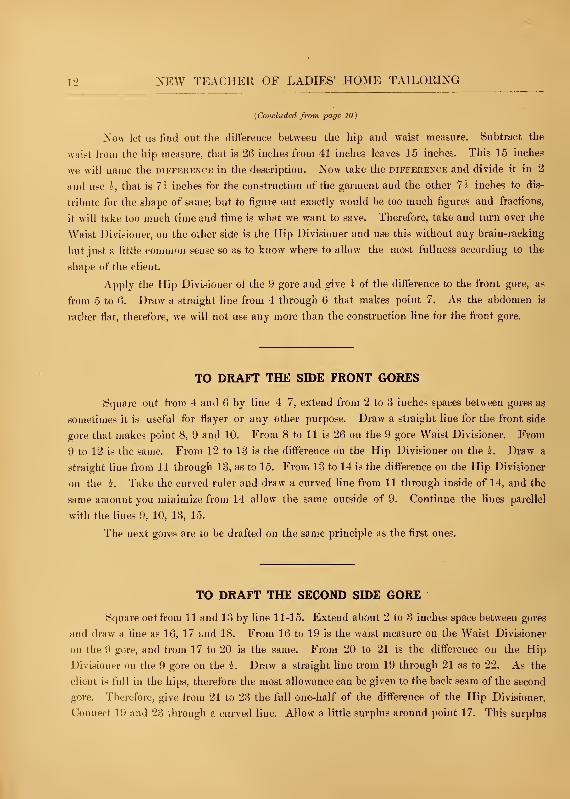
{Concluded from page 10)
Now let us find out the difference between the hip and waist measure. Subtract the
waist from the hip measure, that is 26 inches from 41 inches leaves 15 inches. This 15 inches
we will name the difference in the description. Now take the difference and divide it in 2
and use i, that is Ih inches for the construction of the garment and the other 7£ inches to dis-
tribute for the shape of same; but to figure out exactly would be too much figures and fractions,
it will take too much time and time is what we want to save. Therefore, take and turn over the
Waist Divisioner, on the other side is the Hip Divisioner and use this without any brain-racking
but just a little common sense so as to know where to allow the most fullness according to the
shape of the client.
Apply the Hip Divisioner of the 9 gore and give i of the difference to the front gore, as
from 5 to 6. Draw a straight line from 4 through 6 that makes point 7. As the abdomen is
rather fiat, therefore, we will not use any more than the construction line for the front gore.
TO DRAFT THE SIDE FRONT GORES
Square out from 4 and 6 by line 4 7, extend from 2 to 3 inches spaces between gores as
sometimes it is useful for flayer or any other purpose. Draw a straight line for the front side
gore that makes point 8, 9 and 10. From 8 to 11 is 26 on the 9 gore Waist Divisioner. From
9 to 12 is the same. From 12 to 13 is the difference on the Hip Divisioner on the 2. Draw a
straight line from 11 through 13, as to 15. From 13 to 14 is the difference on the Hip Divisioner
on the i. Take the curved ruler and draw a curved line from 11 through inside of 14, and the
same amount you minimize from 14 allow the same outside of 9. Coutinue the lines parellel
with the lines 9, 10, 13, 15.
The next gores are to be drafted on the same principle as the first ones.
TO DRAFT THE SECOND SIDE GORE
Square out from 11 and 13 by line 11-15. Extend about 2 to 3 inches space between gores
and draw a line as 16, 17 and 18. From 16 to 19 is the waist measure on the Waist Divisioner
on the 9 gore, and from 17 to 20 is the same. From 20 to 21 is the difference on the Hip
Divisioner on the 9 gore on the 2. Draw a straight line trom 19 through 21 as to 22. As the
client is full in the hips, therefore the most allowance can be given to the back seam of the second
gore. Therefore, give from 21 to 23 the full one-half of the difference of the Hip Divisioner.
Connect 19 and 23 through a curved line. Allow a little surplus around point 17. This surplus

NEW TEACHER OF LADIES' HOME TAILORING 13
we Ciin spare from the front gore what we did not use up, all it belonged there, a cpjantity again
as much as from 5 to 6; then we can distribute this for the 2 front seams of the 2 back gores, as
outside of point 17.
For a medium full bottom skirt, draw the lines from 23 to 24 parallel with the line 21 and 22
and outside of 17 the same.
Notice:—This diagram contains 7 gore and the division and measurements are figured
as for a 9 gore skirt, then we are missing 2 gores for this diagram but it is not necessary to draft
the third side gores as the second gore can be used twice while cutting the material.
THE BACK PART AND THE INVERTED PLEAT
The back part is to be drafted on the same principles as the side gores. Square out from
19 and 21 by line 19-22. Extend about 3 inch space between gores and draw a straight line as
25, 20 and 27. From 25 to 28 is 4 inches in most cases. From 28 to 29 is waist measure on
the Waist Divisioner of the 9 gore, or you can apply the actual waist measure from 1 to 4, 8 to
11, from 16 to 19 and again from 1(3 to 19 and 28 to 29 has to contain the waist measure 26
inches in this case. From 26 to 34 is as much as from 28 is to 29. From 34 to 30 is the difference
on the Hip Divisioner on the 9 gore, or apply the hip measure from 2 to 6 and from 9
to 14 and from outside 17 to 23 and again from outside 17 to 23 and from 26 to 30 is hip
measure 41 in this case. Draw a straight line from 29 through 30, as to 31. The inverted pleat
can be made out of 5 inches outside of 30 to 32 and 6 inches from 31 to 33, that makes a nice
pleat or it can be made any width desired. Draw a straight line from 33 through 32 and up.
The star on the first gore is half-way between 9 and 14. Measure from the star to 8 aud
apply the same length from star to above 11, that makes point A. Measure the length from 14
to A and apply the same from 17 to above 16 that makes point B. The star on the second gore
is i way between 17 and 23. Measure from the star to B and apply the same from the star to
above 19, that makes point C. From 26 to D is a little more than from 23 to C because the
third gore will have to gain a little in leugth between hip and waist line according these con-
structions. The waist has to be remeasured, from 8 to A should be the same as from 8 to 11, from
B to C should be the same as from 16 to 19, from D to E should be same as from 28 to 29.
Reshape the sides from C to 23 and from A to 14. The length from skirt should be measured
from a 2 inch below 1 to 3 for the front length and from C to 24 for the side lengths, from E to
31 for the back lengths. Finish as represented. The skirt should be notched and closed together
on the hip line. Notch each gore so as to identify the first, secoud aud third gores.

14 NEW TEACHER OF LADIES' HOME TAILORING
SKIRT FOR STOUT FIGURE
Diagram 2.
This diagram represents a stout measure skirt. The measures used for this diagram are
as follows:
Front length to floor 39s inches
Side length " " 39 i inches
Back length " " 38 inches
Around waist 34 inches
Around hips 48 inches
Compare the measures of this diagram to previous Diagram No. 1 and you will find the
reverse measurments as the previous one. Diagram 1 is the front, measure shorter by 2i inches,
and Diagram 2 is the back, measures shorter by lb inches. This distinguishes the shape of the
client without looking at the form; that the first is a shapely form while the second is a corpulant.
TO DRAFT
The best is to use a 30-inch wide paper for drafting the pattern and use the edge of paper
for the front gore.
THE 7 -GORE SKIRT
Draw the line 1 and 3 and square out from 1 and 3; 2 is 6 inches below 1. Square out
from 2. Take the Skirt Divisioner and apply the 7-gore waist 34 for this measure, but use half
of the 34 for the front gore, as from 1 to 4 is waist measure and from 2 to 5 is the same. Nowfind the difference between the hip and waist measure and subtract 34 from 48 remains 14; this
is what we call the difference. Now take the Hip Divisioner and apply the difference on
the 7 gore on the 4ths, as from 5 to 6. Draw a straight line from 4 through 6 to get point 7.
As this client is promanent at the abdomen therefore the other 1-4 of the Hip Divisioner should
be used for the shape for the front gore, as from 6 to 17.
Shape the front gore from 4 through 17 and down, parallel with line 6 and 7.
TO DRAFT THE SECOND GORE
For this kind of a skirt we will not have to square out from the bias lines of each gore
as we did for Diagram 1, but will run the hip and waist measure of each gore on the straight line
{Continued to Page 16)

NEW TEACHER OF LADIES' HOME TAILORING 15
Diagram No. 2

16 NEW TEACHER OF LADIES' HOME TAILORING
(Concluded from page lit)
as it is squared out from 1 and 2. Extend space between gores. Draw a straight line from 8 to
10 that makes poiut 9. From 8 to 11 is the waist division on the 7 gore, in this case 34 on the
Waist Divisioner. From 9 to 12 is the same. From 12 to 13 is the hip difference on the i, 14 in
this case. Draw a straight line from 11 through 13 to 15. From 13 to 14 and from 9 to 16 is the
other half of the difference on theHip Divisionerfor the shape of the gore. In fact all the gores are
constructed that way i of the difference is given for the construction as from 12 to 13 and the
other i of the difference is used for the shape. It all depends on the shape of the client. As
this client is rather full at the abdomen and sides therefore distribute the shape of the gore on
both sides as 16 and 14. Shape the gore with a curved rule from 11 to 14 and 8 to 16 and down
as represented. No more gores to be drafted are necessary as the first side gore can be used twice
while cutting the material.
The back part is to be drafted on the same waist and hip line. Extend space between
goies about 2 or 3 inches. Draw a straight line from 25 to 27 that makes point 26. From 25
to 28 is 1-2 inch. From 28 to 29 is the division waist measure on the 7 gore. From 26 to 22 is
the same. From 22 to 30 is the hip divisiou on the 1-2.
Apply the waist measure from 1 to 4 from 8 to 11 and again from 8 to 11 and from 28 to 29
is the actual waist measure. Apply the hip measure from 2 to 17 from 16 to 14 and again from
16 to 14 and from 26 to 30 is the hip measure 48 in this case. Draw a straight line from 29 through
30 that makes point 31. Square out from 30 to 32 and from 29 to 34 by line 29 and 31. Measure
5 inches from 30 to 32 and 6 inches from 31 to 33 for the inverted pleat. Measure from 1 to 3
for the front length and from 11 to 15 for the side length and from 29 to 31 for the back length
and finish as represented.
The two preceeding diagrams are almost the extreme contrast. Diagram 1 is 2h inches
shorter in front and diagram 2 is I2 inches shorter in the back, that doesn't mean the skirts
should be shorter in front or back but the client's shape requires those measures to have an even
length. I hope you understood the difference in the constructions of the two diagrams but when
the normal measures come or the even measures almost in any case proceed according to the
construction of diagram 1, but manage to have the waist down to the hip line one very goreas from
14 to 11 and from 23 to 19 on Diagram 1, according to the degree, and in some cases use half
the amount of 19 to C in Diagram 1. It all depends on what case it is, unless it is a very corpu-
lant form, then use the waist and hip lines as Diagram 2.

NEW TEACHER OF LADIES' HOME TAILORING 17
After having studied the construction lines and the shape of the skirt and after being
posted on the various measures as to the different lengths of the actual measures so as to know
from the measure lengths how much to raise the waist line, (that means the side gores above the
front gores), then it will be easy, in fact very easy for anybody to learn the different styles as they
may occur. For instance: If a flare is required from the knee down, that is easy to do. Allow to
every gore at the bottom as much flare you want from the knee down from one or both sides of
each gore, according to style.
If the style requires pleats in one-half of the gores, then you cut the skirt as usual and
set in pleats wherever you desire by cutting out the pattern where the pleats have to be. For
tancy skirts pleated or gatherings, as the style requires, cut a 5, 7 or 9 gore skirt, draft the same
way as explained for Diagram 1 or 2 without exteutions between gores, and the gores don't have
to be cut apart except to cut out the shape above the hip line as to the waist, as Diagram 3 will
indicate the one-piece skirt or fancy skirts.

18 NEW TEACHER OF LADIES' HOME TAILORING
THE CIRCULAR SKIRT
Diagram No. 3.
This diagram represents a oue piece skirt without any seams or darts. This skirt is drafted
on the 9 gore principle as the lines indicates. I suppose it is not necessary to repeat that the
figures and divisions are meant on the Hip and Waist Divisioner. This diagram is drafted
according to the following measures:—waist 24; hip 40; front length 39; side length 4H; back 42.
TO DRAFT
Draw the line 1-2 and square out to 4. From 1 to 3 is 6 inches; square out from 3.
From 1 to 4 is front 9 gore waist. From 3 to 5 is the same. Subtract the waist from the hip
measure aud find out the difference between hip and waist. 24 from 40 leaves the balance of 1
6
inches. In that kind of a skirt where it is supposed to be all the gores in one piece, therefore,
we are going to use up the 16 inches difference all it belongs to each gore to one side, but 1-2
of the difference to the front gore, therefore from 5 to 6 is 1-2 difference. Draw a line from
4 through 6 aud down to 21. Square from 4 to 7 by line 4-21. From 4 to 6 is 6 inches.
Square out from 4 and square out from 6. From 4 to 7 is the waist of a 9 gore skirt and from
6 to 8 is the same. From 8 to 9 is the difference of 16. Draw a line from 7 through 9 and
down to 22. From 7 to 9 is 6 inches; square out from 7 aud square out from 9; proceed with
the rest of all the gores the same way as with the first side gores, except the back gore and the
inverted pleat. Square out from 13 by line 13-15 for the back gore. From 13 to 17 is the 9
gore waist, from 15 to 18 is the same; from 18 to 19 is the 16 inch difference on the hip division.
Draw a straight line from 17 through 19 and down. To locate point 16 square back to 13 by
line 17-19, that raises the corner of the square up to 16. To locate point 20 for a dip in the
front square back from 7 by line 7-9. It not for a dip front square back from 7 by line half way
between 8 and 9. The inverted pleat measures about 5 inches at the top and about 6 inches at
the bottom. A skirt of that sort with an extreme full bottom is the proper way to allow about
two inches extra in the back length so as to keep a nice circle all the way arouud the bottom.
If the very same circular skirt is wanted narrow.at the bottom, then proceed as follows:
Decide how much narrower you want, say you want the skirt 20 inches narrow that makes
10 inches out of that pattern then take out the 10 inches from two places figuring in three parts.
Divide the amount or the 10 inches in three parts, 3J in. take off from point 25 as 24£ indicates,
3Jinch from 23 to 23* and 3J inch from 23 to 22i. Then open the pattern from 10 to 12; fold
{Continued to Page 20)

NEW TEACHER OF LADIES' HOME TAILORING 19
3 %0 I
DlAGKAM No. 3

20 NEW TEACHER OF LADIES' HOME TAILORING
(Concluded from page IS)
the pattern from 232 to 22£ creasing to 12 and let spread apart the slash from 12 to 10 as muchas it will. Draw a line from 24£ through 19 and up. Reshape the inverted pleat according
to the new line as 24£ and 19. Lay the pattern on the goods as it is pinned 23 to 22
and the cut open from 12 to 10 and cut according to the pattern, that will make a dart seam on
each side of the waist. That style of skirt can be made with all kinds of tunics desired, to a sharp
point in front or in sides; cut away in front or in sides or the tunic can be set in front gore as
desired, accordiug to style. To cut the tunic is just another piece of goods on the top of the skirt
without the inverted pleat and you can make it to any style you want.
If the tunic is wanted to be narrower than the skirt, then proceed with the skirt as ex-
plained above in making narrow by trimming pleats in the pattern, then have the tunic cut
according to the pattern, but in cutting the skirt unfold the pleats and cut the skirt the full width,
that will give you a full width skirt and a narrow tunic on the top of it to the very same waist.
Before starting the coat system it would be advisable for beginners to start on a smaller
diagram first so as to get more acquainted with the tailor's square in actual use.
THE SLEEVE
This diagram of the the sleeve represents the plain shirt waist or plain coat sleeve accord-
ing to actual measures. First obtain the full length from the front under arm to the bend of the
elbow and to full length wanted. Next measures are around the mucles below the elbow and
the fist while the top of the sleeve is always to be cut according to the arm hole of the coat or
shirt waist requires.
THE MEASURES
Around arm hole meaure 18 inches
Break of elbow 9 inches
Full length of sleeve 18 inches
Muscle 11 inches
Fist 8 inches
Diagram No. 4.
Draw a line as 1 and 4. From 1 to 2 is elbow length, 9 inches in this case. From 1 to
3 is full length, 18 inches in this case. 4 is 1 J inches from 3 in all cases for adults. Square out

NEW TEACHER OF LADIES' HOME TAILORING 21
from 4 and square out from 2. From 4 to 10 is the 1-2 fist measure, 4 inches in this case.
From 2 to 5 is 2 inches. Connect by curved line 1 and 5 and 3 and 5. Draw a straight line
from 3 through 10. From 10 to 1 1 is 1 i inches, always, and from 10 to 15 is the same.. Con-
nect 5 and 4 by a straight line. Square out from 5 by the line 4 and 5. From 5 to 12 is 1-2
of the muscle measure, 5i iuches in this case. From 12 to 17 is li inches and from 12 to 16 is
the same. Square up from 1 by line 5-1. From 1 to 6 is 2-3 arm-hole measure. 7 is 1-2 way
between 1 and 6. Square up from 7 by line 1 and (J. From 7 to 8 is 1-4 arm-hole measure. 9
is 1 inch from 7 Connect all the points with the curved ruler as illustrated in the diagram.
From 9 to 16 and 6 to 17 curve in the lines according the curved ruler and from 17 to 11 and
Diagram No. 4
from 16 to 15 curve the reverse as represented. The proceeding description of solid lines
represent the shirt waist sleeve, but as for a coat with a little more fullness at the top as it is to
be worn on an under-garment to be cut according to the same measures proceed as follows:
Have the sleeve drafted the same as described above, except the few allowances that are to be
made. A is 1 inch from 1; B is 1 inch from 5; C is 1-2 inch from 3 and D is 1 inch from 8.
Allow 1-2 inches outside of 16 to 15 to the under arm sleeve. Reshape the sleeve as the broken
lines indicate. First cut out the top sleeve. Next lay the top sleeve on another piece of paper
and trace out the under sleeve with a tracing wheel according to your pencil or chalk mark as
represented.

->•] NEW TEACHER OF LADIES' HOME TAILORING
THE BISHOP SLEEVE
Diagram No. 5
Measure the arm-hole of the garment you want the sleeve for. Take the measui'es of the
client's arm jnst the length and the size around the fist. Say full length 18 inches, around the
fist 8 inches and around the arm-hole 18 inches. Now take a piece of paper and lay it on the
cuttiug table and draw a straight line as 1 to 4. From 1 to 3 is 18 inches, the full length of the
sleeve; 2 is 1-2 way between 1 and 3; 4 is li inches from 3. Square out from 4 to 10; square
out from 2 to 5. From 4 to 10 is one-half of the fist measure. From 2 to 5 is 2 inches. Con-
nect 5 and 1; square out from I by line 5 and 1. From 1 to 6 is 1-2 arm-hole measure; 7 is one-
Diageam No. 5
halfway between 1 and 6; square up from 7 by line 6 and 1. From 7 to 8 is 1-4 arm-hole
measure; 9 is 1 inch from 7. Draw a curved line from 3 through 10, as to 11. From 10 to 11
is the fashiouable width wanted as to taste or style. (In this diagram is 5 inches from 10 to 11.)
Draw a straight line from 11 through 6, as to 12. From 6 to 12 is 3 inches; 14 is 1 inch from 2.
Now mark the sleeve from 1 about 1-2 inch above 8 to 12 and from 1 to 9, as shown on diagram.
Curve lines from 1 to 14 and to 3. Notice this kind of a sleeve is just the one seam in the
front; therefore fold the piece of paper as from 12 to 11 and cut out the paper double, then take
the tracing wheel and trace out the undersleeve from 1 to 9 and to 12, then take it apart and cut
out according to the tracing line as represented.

NEW TEACHER OF LADIES' HOME TAILORING 23
Diagram No. 6.
This diagram represents a coat sleeve with more fullness at the top than the regular coat
sleeve as the dotted lines represent while the solid lines represents a one-piece sleeve, a very
extreme top width or as it is known Leg o' Mutton Sleeve.
To draft the more full top sleeve proceed as follows:
—
Draft the pattern the same as explained for diagram 4, except point 13 and 14. Continue
the line straight up from 6 to 13. From 6 to 13 is 24 inches. Draw the line from 11 through 17
Diagram No. 6
until 14. The length from 17 to 14 is the same as from 17 to 6. Mark free handed from Apassing 8 about li inches through 13 aud to 14. All the rest of the sleeve and under-sleeve is
the same as explained for diagram 4 for the coat sleeve.
ONE-PIECE LEG O' MUTTON SLEEVE
This sleeve is drafted the same as Diagram 4, except extending the line as from (J to F is
34 inches and from 1 to D is 2 inches and from 8 to E is 14 inches. Trace out the under-sleeve
on another piece of paper and cut it out, then take the under-sleeve and set the elbow to the
elbow of the top sleeve as 16, 15 to 17, 11. Now continue markiug from B to D, D to E, E to
F, from F to the top of the under-sleeve. Mark around the under-sleeve so as the pattern should
be cut in one-piece as represented.

24 NEW TEACHEK OF LADIES' HOME TAILORING
HOW TO TAKE A MEASURE FOR A COAT
Diagram No. 7.
Pin on a strap over the blades, high up under the arms and around the fullest part of
bust. Take your tape measure and measure from collar bone to strap for the depth of arm-hole.
We will call this measure back depth, and from collar bone to waist and to full length wanted.
Next arouud the bust and around the waist, around the hips as explained for the skirt hip
measures iu diagram 1. The width of back and 1-2 of the neck, and from the collar bone to the
height of bust, and to depth of front waist and width of chest.
This diagram represents a plain, tight-fitting coat with a French dart, a standard and
very desirable coat for many occasions. Its instructions are very important to study for the
experienced cutters as well as for beginners as the foundation points and style harmonize together.
The measures used for this diagram are as follows:
Depth of back 71 inches Height of bust 15± inches
To waist 14i inches To front waist 221 inches
To full length wanted. Around bust 38s nch.es
Width of back 13£ inches Around waist 25s inches
Half neck 7 1 inches Around hip 41 inches
Width of chest 14i inches
TO DEAFT
This Diagram 7 to draft is rather hard for a beginner but we will try to make it as simple
as possible, just follow the instructions. To start the draft proceed this way:—Draw a line 1 and
5 and square out from 1 to 8. From 1 to 8 is bust measure and 3-4 inches. Square down from
8 as to 10. These 3 lines are the frame work of every garment. Now make construction lines
according to the actual measures. 2 is 1-2 inch from 1. From 2 to 3 is back depth, 7i inches
in this case. Square across from 3 to get 12. This is called the breast line. From 2 to 4 is the
waist line, 142 inches in this case. Square across from 4 to get 54. From 4 to 5 is 6 inches
always. Square out from 5, this is called the hip line. Next we are going to build the back
aud the shape of it. On the waist line from 4 to 32 is 1 inch. From 32 to 31 is 1-8 waist
measure ou the division square. On the hip line from 5 to 33 is 1-4 inch. Draw a straight
line from 32 to 1 and from 32 through 33; 6 is 1-2 way between 1 and 3. From 1 to 7 is 1-8
bust measure on the division square. From 8 to 9 is 1-6 bust measure less 1-4 inch. Connect
9 and 6 by a straight line. From 8 to 11 is 1-6 bust measure; 16 is 1-2 way between 12 and 11.
Square back from 16. From 16 to 15 is 1-2 of chest measure and 1-2 inches; 17 is 1-2 way

NEW TEACHER OF LADIES' HOME TAILORING 25
between 15 and 16. Connect 17 to 7 by a straight line. Square out from 6. From 6 to 45 is 1-2
back measure and 1-2 inch. Set your square to line 3-12 bust lines and square up through point
45, that makes point 47 and 41. From 9 to 49 is as much as from 7 to 41. Point 40 is not a stan-
dard point, some time is wanted to run that seam clear to the shoulder and some time closer to neck
point. Draw a nice curved line from 31 to 40; 33 to 35 is 1-4 inch more than 1-8 hip measure.
Connect 31 and 35 through a straight line. From 31 to 29 is 1-2 inch. From 29 to 28 is 1-6
waist; 30 is 1-2 way between 28 and 29. Square down from 30; that gives you point 36 and the
hip line. From 36 to 34 and 36 to 44 are each 1-12 hip and 1-4 inch. Connect 29 to 34 and
„W „/3
Diagram No. 7
28 to 44 by curved lines. Draw a curved line from 29 to 37. Next let us build the front ami
the French dart. Take your tape measure and measure from 1 to 7, apply the same to 9, draw the
tape to front line, as to 13 is the height of bust, 15i inches in this case. Continue the same
measuring until point 14 to the length of front waist, 224 inches in this case. Point 29 is direct
under the arm. Connect 13 and 39 through a straight line. Square back from 14. From 14
to 19 is as much as from 16 to 17. Draw a straight line from 17 through 19 and down, that
makes poiut 20. From 19 to 18 is 1 inch. Put your tape measure on 20, holding at 20, measure
to 18 and circle from 18 to 21. Find out the difference between bust and waist measure, that is
25i from 38J remains 13 inches. Now extend from 18 to 21, 13 on the 1-3 of the division

26 NEW TEACHER OF LADIES' HOME TAILORING
square, 53 is 1-2 way between 4 and 54. From 53 to 26 is 1J inches. Connect 21 and 26 by a
straight line. From 21 to 25 is 1-3 waist. Draw a straight line from 17 through 21, that will
give you point 22 on the straight line. From 21 to 22 is 6 inches. Square out from 25 to 45
by line 21 and 26. From 25 to 45 is 6 inches. Draw a straight Hue from 39 through 1-2 way
between 26 and 25 as to 42 on hip line. From 42 to 43 is 1-16 hip. From 43 to 50 is again as
much as from 26 to 27. Taper down 1-4 in. from the front line as 51 and 52 indicates. Now measure
the waist; apply tape measure from 32 to 31, 29 to 28, 51 to 18, 21 to 25 and 26 to 27, has to hold
waist measure and 1-2 inch. If you will find surplus then minimize from 18 and 27. Measure
the hip from 33 to 35, 34 to 44, 50 to 43, 45 to 22 and 23 to 52, it has to hold hip measure and
1 inch. Connect 27 and 28 to 38 by curved lines. Draw a nice curved line from 18, front waist,
to 48 and curve out free-handed from 20 to 21 as represented. Now shape all the curves and
lines as the neck and arm-holes as represented by the heavy lines. Take off 1-4 inch from 11
tapering down to 12. It would be advisable to trace out each piece with a tracing wheel and to
leave the pattern as a draft so as to compare after the try-on if there was any mistakes made.
Seams have to be allowed all over except to the arm-hole. The closing of the seams has to be
done on the waist notches.
THE SEMI -FITTING COAT
Diagram No. 8.
This diagram represents a semi-fitting coat drafted according to the same measurements as
Diagram 7, except that this diagram has 1 side piece less than the proceeding diagram and is
represented with a double breasted Revere to be buttoned up to the shoulder. All the measures,
construction lines and points are the same as Diagram 7, except the spaces between 32 and 31 and
29 and 26 and point 55. From 32 to 31 is 1 inch more as on proceeding diagram, that is 1-8
waist and 1 inch. From 31 to 29 is 3-4 inch; 29 to 26 is 1-3 waist. For the dart proceed the
same as for Diagram 7. Put your tape measure on 20, holding at 20, measure to 18 and circle
from 18 to 21, find out the difference between bust and waist measure, that is 25* from 38£
remains 13 inches. Now extend from 18 to 21, 13 on the 1-3 of the division square, but as this
is semi-fitting coat, therefore make point 55, 1-2 way between 21 and 18. Draw a straight line
from 17 through 55 to get 22. As this diagram is semi-fitting and we want more fullness lor the
bust, therefore about 1-2 inch can be taken off from 48 to 48x and the same quantity can be
allowed outside of 49 as 49x. All the rest of the points are the same as Diagram 7.
THE DOUBLE BREASTED REVEREThe double-breasted revere to draft proceed as follows: Notice the line 8 and 10; this is
the center front line. Double the piece of paper where the center front line runs aud take your

NEW TEACHER OF LADIES' HOME TAILORING 27
tracing wheel and trace it out as 9 to 48 to 18 to 23 and down to full length. Again from 9 to
Hi inside of 11, tapering down to 12. Take it apart and cut according to the tracing line.
Make as many button holes as you want. The notch will have to be sewed up from 12 to 11 so
as to have a close fit. Finish as represented.
Diagram No. 8
If a whole back is required without a seam iu the center, theu proceed as follows: Draw
the line from 2 through 32 straight as the broken line indicates. On the hip line A to B is as
much as from 33 to 35. Reshape from 31 through B as represented.

28 NEW TEACHER OF LADIES' HOME TAILORING
The Fly Front Coat Collar and Lapel
Diagram No. 9.
The Fy Front Coat Collar and Lapel: Line 8 and 10 is the center line. For a single-
breasted coat or a fly front garment the allowance to be made out side of the center line is from
H to 2 inches is the proper quantity, except in extreme styles.
THE COLLAR
Proceed as follows:—From 9 to A is 1 inch. Next it depends on the length of the lapel
you want, then draw the line from A to the crease of the lapel as to B, that gives you point D.
Diagram No. 9
C is 1-2 inch from A. Draw a line from D through C to E. From C to E is as much as the
top width of the back as 1 to 7 on Diagram 7 and 1-2 inch. From E to F is 1 inch and from
C to H is 1 inch. From E to G is 1^ inch. Draw a straight line from F to G and shape from
G to lapel as the style requires or as represented.

NEW TEACHER OF LADIES' HOME TAILORING 2'.)
THE DOUBLE BREASTED COAT
Diagram No. 10
For a double-breasted coat the proper allowance would be from 3 to 3s inches outside of
center line as outside of line 8 and 10. Make the length of the lapel as long or as short as you
want according to style, but from the break of lapel as from B have the lapel a little wider as the
Diagram No. 10
straight line runs, as a wider lapel makes a nicer appearance. Cut the notch from 11, 1-12 inch
from the notch to Q is H inch, and about 2 inches is the lapel or to style. The rest of the
collar is as on Diagram •'•
HOW TO USE THE TAILOR'S SQUARE
All the divisions of the inches as the 1-12. 1-6, 1-3 and 2-3 on the long arm of the square can be
used for the measures 24 to 48 sizes. For instance, say 1-6 waist measure and waist measure is 24
inches, but as garments are cut 1-2 of the size measures calls for by right figures a waist from 24 inches
ought to be called 12 inch waist, because you don't draft more than 12 inches for a 24 size. Therefore,
the No. 12 on the Square is used for a 24 size. Say waist 24 inches and the book calls for 1 -6 waist then
use 12 on the 6. If waist is 28 inches, 1-2 of the 28 is 14. then use No. 14 for the 6. If bust, waist or
hip measures are 48 inches and the book calls for a 1-6, then use the No. 12 of the thirds of the Square
what it indicates 48, for the 6th and 24 for the thirds as we figure on the full sizes. The same way is used
on the shorter arm of the Square. 32. 16. 8. 4ths and 1-2. In a case a smaller size than 24 inches, or a
larger size than 48 inches and the measure calls for a sixth, then you can figure back on the 1-12 for the
smaller sizes, say 22 inches waist, and the book calls for 1-6 waist then use No. 22 on the twelfths for a
sixth, if bust, waist or hips are 52 inches and it wants to be 1-6 then use No. 13 on the thirds for 1-6 of
the size. etc.

30 NEW TEACHEE OF LADIES' HOME TAILORING
THE MILITARY COLLAR
Diagram No. 11.
Make a frame like the length ot the collar measure and 1 inch wider as the collar wants
to be as 1, 2, 3 and 4. From 1 to 6 is 1 inch and from 4 to 5 is the same. Put your corner
square at 6 and long ar. at 2, holding that position, square up from 6 to upper line. Draw a
slight curved line to 5 a: he dotted line represents.
% .---Y»£—-"" %
<$'.
:vf.«<>
t& -^ --"" KDiagram No. 11.
THE MILITARY DOUBLE-COLLAR
Diagram No. 12.
To draft proceed the same as Diagram 11 but to build the double collar so as it should
stand up high around the neck proceed as follows: Make point 7, 1 inch from 3 and draw a
slight curved Hue from 5 to 7 and finish according to the width wanted as the heavier line indicates.
Diagram No. 12.


THE WAIST DIVISIONER
For the 5-gore skirt. From 1 to whatever your waist might be, say 24 inches; then from 1 to 24, Ave times is thewaist measure on the Waist Divisioner.
The same on the 7-gore for a 7-gore skirt.
For a 9-gore skirt, then the last number of the 7-gore is considered as 1 to the 9-gore. For instance, when yourwaist is, say 26 inches, then from 42 of the 7-gore to 26 of the 9-gore nine times will hold the waist i
And the same rule is for the 11, 13 and 15-gore.
si::i:tss!iis:s111111 Mill
! t S £ I!
11111II Ml Ml Ml M II II II II
J
3 a O O £ I 3BC3 T
I
moosWAIST DIVISIONER15 GORE 9 G O R E 7 ORE
SS£SS83g8ig88g£!S8S£ i S S g 8 Sf t f F f F f F T 1 Ml II II II II 1 111 MM II I'lll II II Ft! 7
ll1 1
I I1 1 ill 1 1 ill II ill II ll 1 II Mill Mill
THE HIP DIVISIONER
For
always larger than the waist measure. Then those numbers of the Hip Divisioner to be
iioner, that will fill out the hip measure on the hip line.
: your hips are larger by 14 inches than your waist measure and you want a 9-gore skirt, then you
i the hip line your waist of the 9-gore and add to it the hip division from the edge of chart to 14 on the 9-gore.
If you are cutting a 7-gore skirt and your hips are larger by 16 inches than your wa
the 7-gore waist division and hip division. But you will have to use the 18 of the 9-gore
for the 7-gore and mark on 16 of the 7-gore. If your hips are IS inches larger than your v
About the l/2s and the 1 4s which are marked on the Hip Divisioner of each gore i;
lion on pages 10, 11 and 12
These figures on the Hip Divisioner
measure or larger than 18 inches as waist
the chart.
for about normal £
then you can
, but i
st; then proceed the same on
nstead of the edge of the chart
aist, then mark on the is, etc?
all explained in the descrip-
ler hip than 14 inches as waist
up according to the distance of
MEASURING CHART
13 GORE 11 GORE
HIP DIVISIONER

E '10

wmmmmmm
NEW TEACHEROF
LADIES' HOMETAILORING
By GEORGE HURWITZAUTHOR AND PUBLISHER
MASON CITY, ILLINOIS
Copyright ItlO by Q*org« Hurwltx

'•'•
.
' .''>.?.


