new fepmis - us forest service fepmis “modify” property a step by step guide for use @ • all...
TRANSCRIPT
New FEPMIS
“Modify” Property
A Step by Step Guide For Use @ https://fam.nwcg.gov/fam-web/
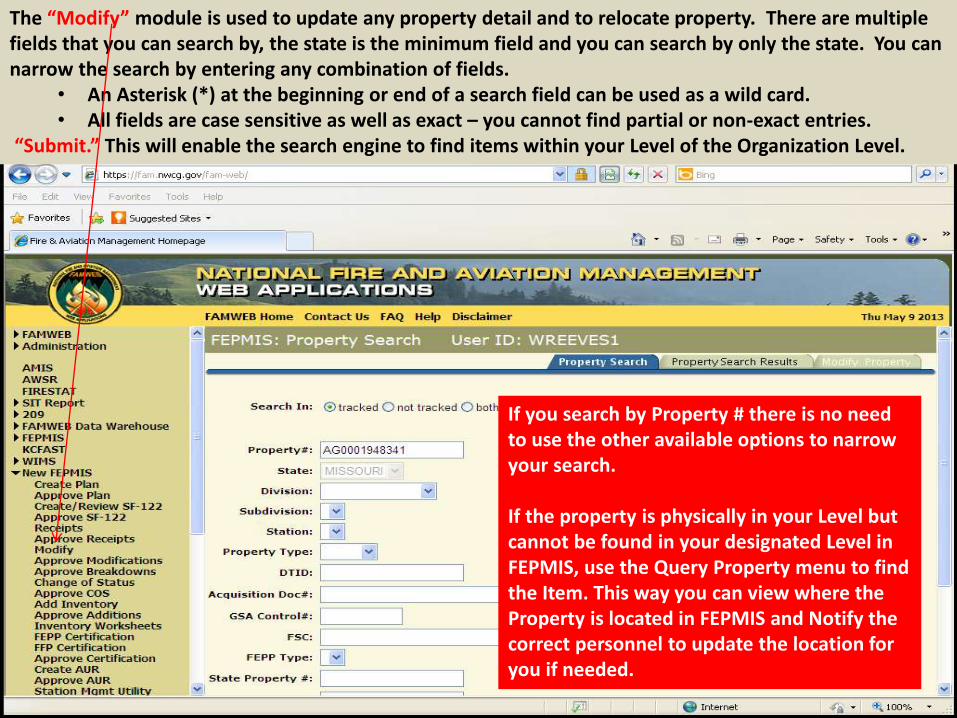
• All fields are case sensitive as well as exact – you cannot find partial or non-exact entries. “Submit.” This will enable the search engine to find items within your Level of the Organization Level.
• An Asterisk (*) at the beginning or end of a search field can be used as a wild card.
The “Modify”
narrow the search by entering any combination of fields. fields that you can search by, the state is the minimum field and you can search by only the state.
module is used to update any property detail and to relocate property. There are multiple You can
If you search by Property # there is no need to use the other available options to narrow your search.
If the property is physically in your Level but cannot be found in your designated Level in FEPMIS, use the Query Property menu to find the Item. This way you can view where the Property is located in FEPMIS and Notify the correct personnel to update the location for you if needed.

You will see a list of “Property #’s” in the “Property Search results” tab (depending on your search criteria). Only Items in “!ssigned” Status can be Modified, select the Property # you wish to Modify. If there are more than 25 results, additional pages may be viewed by selecting “Next”. Select any item that is underlined in blue to go to the next screen and modify the property details of the item.
If an item is not in Assigned status, it will be grayed out , hover over the status to see what level it is pending.

Hints for the fields in the MODIFY screen, see slide 5 to identify these the numbered items to fields in the Modify screen.
1. Images are added in this module, additional direction will be discussed on Slide 8 – 10. 2. If it is Federal Inventory it is Mandatory for it to Print Inventory Worksheets, otherwise you have an
option if you want to print an inventory worksheet for the item. 3. Any Property Detail that has a block around it is Changeable. 4. Any Property Detail that has an Asterisk in front of it is a mandatory field, you must have data in that field. 5. If there is a (check mark) after a blocked item that states approval required, the data that you entered in
that block will not appear in the database until the FS approves the change that has been made. In addition, the property item will be grayed out and no changes can be made to the property details until the FS approves the previous changes.
6. Where dates are required, you can type the date in the mm/dd/yyyy format or select from the calendar icon.
7. In Service Date is not a required field for FEPP but all FFP must have an In Service Date entered or the property will be inventoried in 2 years after date of acquisition and will be required to be returned to the DLADS.
8. When you select “Provide Description” as the FEPP Type, the “!dditional Description” data field will become mandatory for you to describe the property item.
9. States can relocate property anywhere within their State, Regions can relocate property anywhere within their Region, the WO can relocate property anywhere within the FEPP program. SF 122’s are not required to relocate FEPP, an AD 107 should be created for the asset file.
10.All property details and vehicle attributes should be entered as applicable. 11.When property details are unknown enter UNK, if the data field is required and the information isn’t
applicable, enter NA. 12.When the Model Year isn’t known or isn’t applicable, enter 0.

TOP PORTION OF MODIFY PROPERTY SCREEN
This is where you relocate the property in the state.
Item Attributes, used to identify and further describe an Item.
#1 #2
#4
#3
#5
#7
#6
#8
#10
#9
#12 #11
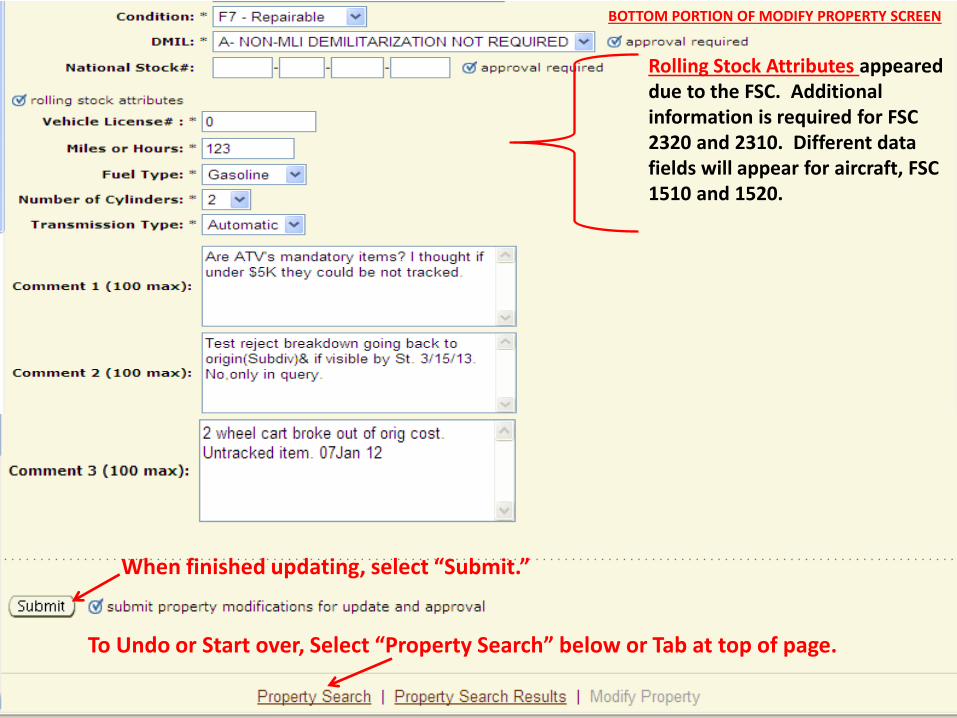
BOTTOM PORTION OF MODIFY PROPERTY SCREEN
Rolling Stock Attributes appeared due to the FSC. Additional information is required for FSC 2320 and 2310. Different data fields will appear for aircraft, FSC 1510 and 1520.
When finished updating, select “Submit.”
To Undo or Start over, Select “Property Search” below or Tab at top of page.

Images are identified to the left of the property number, the
property number. To add images you will click on the property number to go into the Modify tells you how many images are uploaded to that
“check mark” indicates that there is an image and the “number”
property details screen.

Select the Manage Images option from the menu bar.

Scroll down till you see the Browse button and select
images added will be the 2 that will appear on the Inventory images (up to 8) no more than 1 MG each.
Worksheet.
you enter the caption select the caption you want to have for the image you added.
“�rowse”, number and double click, it will show the address in the
locate the picture you want to add to the property
“�rowse line”. Before you select Upload make sure you enter After
“Upload”. Continue to add The first two

When you have uploaded all of your images for this property item you must select “Modify Property” and Submit from the “Modify Property” screen or your images will not be saved.

If you changed the location of the Property, you will have the option to Print a Shipping Document. You will come to this screen, the contact name and phone number for the new location will automatically be prefilled, both fields are changeableYou can enter information in the Shipping Information block. You have the option to Submit or Submit and Print.
• Make any corrections if needed and add any Shipping Information you want to be on the document.
• Submit if you do not want to print the Shipping Document at this time, Submit and Print if you do.
• Select back to start over.
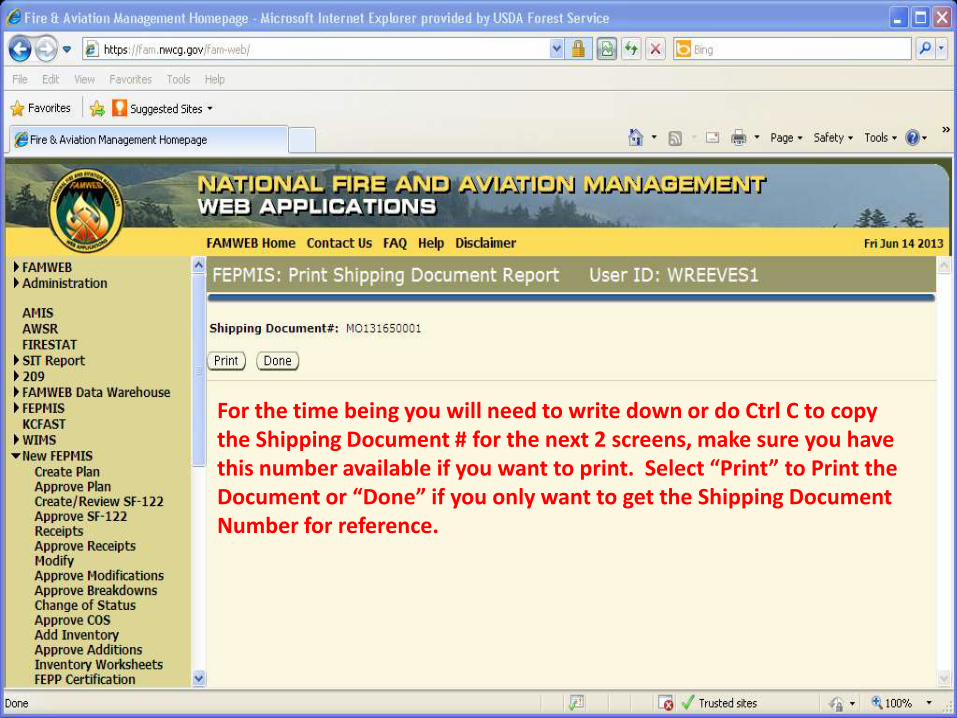
For the time being you will need to write down or do Ctrl C to copy the Shipping Document # for the next 2 screens, make sure you have this number available if you want to print. Select “Print” to Print the Document or “Done” if you only want to get the Shipping Document Number for reference.

Select the format you wish to retrieve your “Shipping Document” in by clicking appropriate boxes. PDF and Portrait are the Default and most preferred options.
Select “Run” to continue or “�ancel” to go back.

On the “Shipping Document Screen” you will type or paste (Ctrl V) the previously copied “Shipping Document #” or enter any of the other options to “Search” for the needed Document from COGNOS. The specific Document Number will take you directly to the document you want to print. Select Next.

Once you select “Next” from the previous screen, you must paste the Shipping Document Number again into the “Value �ox.”
Select “OK” to run the Report or Select �ancel to go Back.

For Security Purposes you may get the above Notice. Click on the Message and Select “Download File.”

The “Shipping Document” will then be Retrieved for you in the Format requested.
• Select “Open” to simply Print. • Select “Save” to save the file to your computer and/or then print. • Select “�ancel” to start over.

!fter Opening the file, you will have your completed “Shipping Document” to Print and get Signatures for filing.

!fter printing the “Shipping Document” Select “�lose” from the last FEPMIS page you were on.

Select “Done” and your “Menu Permission” on far left are available to select another process.
Any Modifications the had a check mark that require approval will be sent for “!pproval” before the changes will be visible in the database and the Property number will be grayed out for further action until the FS approves the change.