network printing guidesupport.ricoh.com/bb_v1oi/pub_e/oi/0001035/0001035046/vc... · 2008. 6....
TRANSCRIPT

Network Printing Guide
Windows 95/98/Me Configuration
Windows 2000 Configuration
Windows XP Configuration
Windows NT 4.0 Configuration
NetWare Configuration
Macintosh Configuration
Appendix
For safe and correct use of this machine, please be sure to read the Safety Information in theOperating Instructions that comes with the machine before you use it.

Introduction
To get maximum versatility from this machine all operators should carefully read and follow the instruc-tions in this manual. Please keep this manual in a handy place near the machine.
Important
Contents of this manual are subject to change without prior notice. In no event will the company be li-able for direct, indirect, special, incidental, or consequential damages as a result of handling or oper-ating the machine.
Software Version Conventions Used in this Manual
• NetWare 3.x means NetWare 3.12 and 3.2.
• NetWare 4.x means NetWare 4.1, 4.11 and IntranetWare.
Trademarks
Apple, AppleTalk, EtherTalk, LaserWriter, Macintosh and Mac are registered trademarks of AppleComputer, Inc.
Ethernet is a registered trademark of Xerox Corporation.
Microsoft, Windows and Windows NT are registered trademarks of Microsoft Corporation in the UnitedStates and/or other countries.
Netscape and Netscape Navigator are registered trademarks of Netscape Communications Corpora-tion.
Novell, NetWare and NDS are registered trademarks of Novell, Inc.
PostScript is a registered trademark of Adobe Systems, Incorporated.
Sun is a registered trademark of Sun Microsystems, Inc.
SunOS is a trademark of Sun Microsystems, Inc.
Other product names used herein are for identification purposes only and might be trademarks of theirrespective companies. We disclaim any and all rights in those marks.
Note
The proper names of the Windows operating systems are as follows:
• The product name of Windows® 95 is Microsoft® Windows 95.
• The product name of Windows® 98 is Microsoft® Windows 98.
• The product name of Windows® Me is Microsoft® Windows Millennium Edition (Windows Me).
• The product names of Windows® XP are as follows:Microsoft® Windows® XP ProfessionalMicrosoft® Windows® XP Home Edition
• The product names of Windows® 2000 are as follows:Microsoft® Windows® 2000 Advanced ServerMicrosoft® Windows® 2000 ServerMicrosoft® Windows® 2000 Professional
• The product names of Windows NT® 4.0 are as follows:Microsoft® Windows NT® Server 4.0
• Microsoft® Windows NT® Workstation 4.0

Manuals for This Machine
The following manuals describe the operational procedures and maintenance ofthis machine.To enhance safe and efficient operation of this machine, all users should readand follow the instructions carefully.
❖❖❖❖ Printer Reference 1Describes the system settings, procedures and functions for using this ma-chine. This manual is also included as a PDF file on the CD-ROM labeled“Printer Drivers and Utilities”.
❖❖❖❖ Printer Reference 2Describes the procedures and provides necessary information about usingthis machine. This manual is included as a PDF file on the CD-ROM labeled“Printer Drivers and Utilities”.
❖❖❖❖ Network Printing Guide (this manual)Describes the procedures and provides necessary information about settingup and using the machine under the network environment. We recommendthis manual as your first choice to read, and it is included as a PDF file on theCD-ROM labeled “Printer Drivers and Utilities”.
i

ii
How to Read This Manual
Symbols
In this manual, the following symbols are used:
R WARNING:This symbol indicates a potentially hazardous situation which, if instructionsare not followed, could result in death or serious injury.
R CAUTION:This symbol indicates a potentially hazardous situation which, if instructionsare not followed, may result in minor or moderate injury or damage to property.* The statements above are notes for your safety.
ImportantIf this instruction is not followed, paper might be misfed, originals might bedamaged, or data might be lost. Be sure to read this.
PreparationThis symbol indicates the prior knowledge or preparations required before op-erating.
NoteThis symbol indicates precautions for operation, or actions to take after misop-eration.
LimitationThis symbol indicates numerical limits, functions that cannot be used together,or conditions in which a particular function cannot be used.
ReferenceThis symbol indicates a reference.
[ ]Keys that appear on the machine's display panel.Keys and buttons that appear on the computer's display.
{ }Keys built into the machine's control panel.Keys on the computer's keyboard.

Introduction
This manual contains detailed instructions on configuring the machine as a net-work printer. Read the section appropriate to your network environment onhow to configure the machine correctly.
Important❒ The procedures written in this manual assume that you are a network admin-
istrator. If you are not, be sure to consult your network administrator beforeconfiguration.
❖❖❖❖ Features• Support for 100BASE-TX and 10BASE-T• The Network Interface Board is compatible with Windows 95/98/Me
(TCP/IP, NetBEUI, IPP *1 ), Windows 2000 (TCP/IP, NetBEUI, IPP *1 ), Win-dows XP (TCP/IP, IPP *1 ), Windows NT 4.0 (TCP/IP, NetBEUI, IPP *1 ),NetWare (IPX/SPX, TCP/IP) and Macintosh (AppleTalk) *2 protocols. Thisallows you to use the machine in a network that uses different protocolsand operating systems.
• A computer used as a dedicated print server is not required because theNetwork Interface Board can be configured as a NetWare print server.
• The Network Interface Board can connect the machine to the networkwithout requiring its own power supply because the Network InterfaceBoard is installed inside the machine.
*1 IPP (Internet Printing Protocol) is a protocol for printing via the Internet.*2 Only Type80 RCP80 can be used on Macintosh.
NetWare (Server)
Windows NT (Server)Windows 2000, Windows XP,
Windows 95/98/Me
Macintosh
Windows NT
NetWare (Client)
Windows XP
Windows 2000
GSTN001
iii

iv
Setting Up the Machine on a Network
Windows 95/98/Me
For setting up the machine as a network printer in a Windows 95/98/Me envi-ronment, see p.1 “Windows 95/98/Me Configuration”. There are two methodsfor using the machine as a network printer.

Windows 2000
For setting up the machine as a network printer in a Windows 2000 environ-ment, see p.13 “Windows 2000 Configuration”. There are two methods for usingthe machine as a network printer.
v

vi
Windows XP
For setting up the machine as a network printer in a Windows XP environment,see p.25 “Windows XP Configuration”. There are two methods for using the ma-chine as a network printer.

Windows NT 4.0
For setting up the machine as a network printer in a Windows NT 4.0 environ-ment, see p.37 “Windows NT 4.0 Configuration”. There are two methods for us-ing the machine as a network printer.
NetWare
For setting up the machine as a network printer in a NetWare environment, seep.51 “NetWare Configuration”. The Network Interface Board allows you to usethe machine as either a print server or a remote printer.For more information about setting up the clients, see the following pages.• When using Windows 95/98/Me, see p.70 “Windows 95/98/Me”.• When using Windows 2000, Windows XP, see p.71 “Windows 2000/Win-
dows XP”.• When using Windows NT 4.0, see p.72 “Windows NT 4.0”.
vii

viii
Configuring the machine as a print server
A dedicated NetWare print server is not required because the machine can beconfigured as a print server.
The actual procedures for configuring the machine depend on the NetWare version.• When using NetWare 3.x, see p.57 “Setting Up as a Print Server”.• When using NetWare 4.x, 5/5.1, see p.63 “Setting Up as a Print Server”.
Configuring the machine as a remote printer
If a dedicated NetWare print server is being used, the machine should be config-ured as a remote printer.
The actual procedures for configuring the machine depend on the NetWare version.• When using NetWare 3.x, see p.59 “Setting Up as a Remote Printer”.• When using NetWare 4.x, 5/5.1, see p.67 “Setting Up as a Remote Printer”.

Macintosh
For setting up the machine as a network printer in a Macintosh environment, seep.73 “Macintosh Configuration”.
Note❒ Only Type80 RCP80 can be used on Macintosh.
ix

x
TABLE OF CONTENTSManuals for This Machine ...................................................................................... iHow to Read This Manual ..................................................................................... iiIntroduction ........................................................................................................... iiiSetting Up the Machine on a Network................................................................. iv
Windows 95/98/Me.................................................................................................... ivWindows 2000............................................................................................................ vWindows XP.............................................................................................................. viWindows NT 4.0....................................................................................................... viiNetWare ................................................................................................................... viiMacintosh.................................................................................................................. ix
1. Windows 95/98/Me Configuration
Configuring Windows 95/98/Me............................................................................1Printing without a Print Server....................................................................................1Printing with a Windows 2000/Windows XP or Windows NT Print Server .................1
Configuring the Protocols.....................................................................................2Configuring TCP/IP and IPP for Printing ....................................................................2Configuring NetBEUI for Printing ...............................................................................3
Using SmartDeviceMonitor for Client ..................................................................5Installing SmartDeviceMonitor for Client ....................................................................5Setting Up the Printer Driver ......................................................................................7Changing Port Settings ..............................................................................................9
Setting Up a Client Computer ............................................................................10
2. Windows 2000 Configuration
Configuring Windows 2000.................................................................................13Printing without a Print Server..................................................................................13Printing with a Standard TCP/IP Port .......................................................................14Printing with a LPR Port ...........................................................................................14Printing with a Windows 2000 or Windows NT Print Server ....................................14
Configuring the Protocols...................................................................................15Configuring TCP/IP and IPP for Printing ..................................................................15Configuring NetBEUI for Printing .............................................................................16
Using SmartDeviceMonitor for Client ................................................................17Installing SmartDeviceMonitor for Client ..................................................................17Setting Up the Printer Driver ....................................................................................19Changing Port Settings ............................................................................................21
Configuring LPR Port Printing............................................................................22Setting Up a Client Computer .............................................................................23

3. Windows XP Configuration
Configuring Windows XP....................................................................................25Printing without a Print Server..................................................................................25Printing with a Standard TCP/IP Port .......................................................................26Printing with a LPR Port ...........................................................................................26Printing with a Windows 2000/Windows XP or Windows NT Print Server ...............26
Configuring the Protocols...................................................................................27Configuring TCP/IP and IPP for Printing ..................................................................27
Using SmartDeviceMonitor for Client ................................................................29Installing SmartDeviceMonitor for Client ..................................................................29Setting Up the Printer Driver ....................................................................................32Changing Port Settings ............................................................................................33
Configuring LPR Port Printing............................................................................34Setting Up a Client Computer .............................................................................35
4. Windows NT 4.0 Configuration
Configuring Windows NT 4.0 ..............................................................................37Printing without a Print Server..................................................................................37Printing with a LPR Port ...........................................................................................38Printing with a Windows 2000/Windows XP or Windows NT Print Server ...............38
Configuring the Protocols...................................................................................39Configuring TCP/IP and IPP for Printing ..................................................................39Configuring NetBEUI for Printing .............................................................................40
Using SmartDeviceMonitor for Client ................................................................42Installing SmartDeviceMonitor for Client ..................................................................42Setting Up the Printer Driver ....................................................................................44Changing Port Settings ............................................................................................46
Configuring LPR Port Printing............................................................................47Setting Up a Client Computer .............................................................................48
5. NetWare Configuration
Installing the NIB Setup Tool ..............................................................................51Installing SmartDeviceMonitor for Admin ................................................................51Running the NIB Setup Tool ...................................................................................52
Quick Setup Using the NIB Setup Tool Wizard .................................................53NetWare 3.x - Advanced Settings.......................................................................56
Setting Up as a Print Server.....................................................................................57Setting Up as a Remote Printer ...............................................................................59
NetWare 4.x, 5/5.1 - Advanced Settings.............................................................62Setting Up as a Print Server.....................................................................................63Setting Up as a Remote Printer ...............................................................................67
Setting Up a Client Computer .............................................................................70Windows 95/98/Me...................................................................................................70Windows 2000/Windows XP ....................................................................................71Windows NT 4.0.......................................................................................................72
xi

xii
6. Macintosh Configuration
Configuring Macintosh........................................................................................73Changing to EtherTalk .............................................................................................74Configuring the Printer .............................................................................................74Changing the Printer Name......................................................................................75Changing the Zone...................................................................................................75
7. Appendix
Using SmartDeviceMonitor for Admin ...............................................................77Changing the Network Interface Board Configuration..............................................78Managing the printed number of pages ...................................................................79
Configuring the Network Interface Board with a Web Browser ......................80Going to the Top Page .............................................................................................81Verifying the Network Interface Board Settings .......................................................82Configuring the Network Interface Board Settings ...................................................83
Monitoring and Configuring the Printer.............................................................85Changing Names and Comments ............................................................................85Displaying the Status of Printers ..............................................................................88
Assigning IP Address with ARP+PING ..............................................................90Remote Maintenance by telnet (mshell) ............................................................91
Using telnet ..............................................................................................................91Commands List ........................................................................................................92
SNMP...................................................................................................................102Understanding the Displayed Information ......................................................103
Network Statistical Information...............................................................................103Configuring the Network Interface Board ...............................................................104
Message List ......................................................................................................107System Log Information .........................................................................................107
Precautions ........................................................................................................113Connecting a Dial Up Router to a Network ............................................................113PostScript Printing from Windows..........................................................................114NetWare Printing....................................................................................................114When Using DHCP ................................................................................................115Configuring a WINS Server....................................................................................116When Using the NIB Setup Tool ............................................................................118When Using IPP with SmartDeviceMonitor for Client ............................................118System Configuration List (Network Configuration) ...............................................119
INDEX....................................................................................................... 121

1. Windows 95/98/MeConfiguration
Configuring Windows 95/98/Me
Printing without a Print Server
The following procedure describes how to configure Windows 95/98/Me to usethe machine on a network without a Windows 2000 Server, Windows 2000 Pro-fessional, Windows XP, Windows NT Server, Windows NT Workstation or Net-Ware based print server.
Printing with a Windows 2000/Windows XP or Windows NT Print Server
See p.10 “Setting Up a Client Computer” for configuring Windows 95/98/Mewith a Windows 2000/Windows XP or Windows NT print server.
1

Windows 95/98/Me Configuration
2
1
Configuring the Protocols
Configuring TCP/IP and IPP for Printing
These instructions are for configuring the Network Interface Board and Win-dows 95/98/Me to use the TCP/IP protocol and IPP.
Configuring the machine
Configure the machine to use the TCP/IP protocol.• Make sure that the TCP/IP protocol is set to active. (The default is active.)• Assign an IP address and make other settings required for using the TCP/IP
protocol.
ReferenceFor more information about how to make the above settings, see Printer Ref-erence 1.If DHCP is used to assign IP addresses, see p.115 “When Using DHCP”.
Note❒ After setting the IP address, use the ping command to make sure that it has
been set correctly.A Enable the use of the command prompt as follows:
• On Windows 95 or Windows 98Click [Start], point to [Programs], and then click [MS-DOS Prompt].
• On Windows MeClick [Start], point to [Programs], point to [Accessories], and then click[Command Prompt].
B Type the following: (192.168.15.16 is an example IP address.)C:\> ping 192.168.15.16If the address has been configured correctly, the following message ap-pears.Reply from 192.168.15.16 : bytes=32 time<10ms TTL=32If the address has been configured incorrectly, the following message ap-pears.Request timed out.

Configuring the Protocols
1
Configuring a Windows 95/98/Me computer
These steps are for configuring a Windows 95/98/Me computer to use theTCP/IP protocol.
AAAA Open the [Control Panel] and double-click the [Network] icon. Make sure that“TCP/IP” is listed in the [The following network components are installed:] box onthe [Configuration] tab.
Note❒ If the TCP/IP protocol is not installed, click the [Add] on the [Configuration]
tab to install it. For more information about installing the TCP/IP protocol,see Windows 95/98/Me Help.
BBBB Configure the TCP/IP protocol with the appropriate IP address, subnetmask and other settings.
Check with the network administrator that the settings are correct.
Configuring NetBEUI for Printing
These instructions are for configuring the Network Interface Board and Win-dows 95/98/Me to use the NetBEUI protocol.
Configuring the machine
Configure the machine to use the NetBEUI protocol.• Make sure that the NetBEUI protocol is set to active. (The default is active.)
Note❒ The NetBEUI settings are performed in Web Status Monitor or SmartDevice-
Monitor for Admin. See the corresponding online Help for details.
3

Windows 95/98/Me Configuration
4
1
Configuring a Windows 95/98/Me computer
Install the NetBEUI protocol on the Windows 95/98/Me computer and set it asthe default protocol.
AAAA Open the [Control Panel] and double-click the [Network] icon. Make sure that“NetBEUI” is listed in the [The following network components are installed:] boxon the [Configuration] tab.
Note❒ If the NetBEUI protocol is not installed, click [Add] on the [Configuration] tab
to install it. For more information about installing the NetBEUI protocol,see Windows 95/98/Me Help.
❒ If the “NetBEUI →Dial-Up Adaptor” is listed in the [The following networkcomponents are installed:] box, select it and click the [Remove] to remove thebinding.
BBBB Set the NetBEUI protocol as the default protocol. Click the [Configuration]tab, select the “NetBEUI” in the [The following network components are installed:]box, and click the [Properties].
CCCC Click the [Advanced] tab, select the [Set this protocol to be the default protocol],and click the [OK].
DDDD Click the [OK] to close the [Network] dialog box.
EEEE Check the message to restart, and then click the [Yes].

Using SmartDeviceMonitor for Client
1
Using SmartDeviceMonitor for Client
SmartDeviceMonitor for Client is a utility for printing with the network printerusing the TCP/IP, NetBEUI, and IPP protocols. The following features are avail-able when using SmartDeviceMonitor for Client.
❖❖❖❖ SmartDeviceMonitor for Client features• Sends a print job directly to the network printers without using a print
server.• Notifies when a printing error occurs.• That print did completion (data transmission is finished) is informed.
Note❒ Make sure to close all applications before beginning the installation process.
Installing SmartDeviceMonitor for Client may require the computer to be re-started.
Installing SmartDeviceMonitor for Client
Follow the procedure below to install SmartDeviceMonitor for Client.
Note❒ When there is a printing port used by PortNavi, Multi Direct Print and Print-
ing System95, SmartDeviceMonitor for Client will take over. ❒ When using SmartDeviceMonitor for Admin, install SmartDeviceMonitor for
Client after SmartDeviceMonitor for Admin is closed.❒ Make sure to close all applications before beginning the installation process.
Installing SmartDeviceMonitor for Client may require the computer to be re-started.
AAAA Insert the CD-ROM labeled “Printer Drivers and Utilities” into the CD-ROM drive.
BBBB Open [Control Panel], and double-click the [Add/Remove Programs] icon.
CCCC On the [Install/Uninstall] tab, click [Install].
DDDD Click [Next >].
EEEE Type the name of the CD-ROM drive in the [Command line for installation pro-gram] box, followed by “:\ NETWORK \ NETMON \ CLIENT \ DISK1 \SETUP.EXE” (do not include the quotation marks), and then click [Finish].
Note❒ An example would be “D:\ NETWORK \ NETMON \ CLIENT \ DISK1
\ SETUP.EXE” when the CD-ROM drive letter is “D”.
5

Windows 95/98/Me Configuration
6
1
FFFF From the [Choose Setup Language] list, select the language you want to use,and then click [OK].
GGGG After the [Welcome] dialog box appears, click [Next >].
Follow the instructions on the screen.After the installation is complete, configure the printer port with SmartDe-viceMonitor for Client. See p.7 “Setting Up the Printer Driver”
Note❒ If the dialog box asking if you want to restart the computer appears, select
[Yes, I want to restart my computer now.].
Deleting the port
The following procedure allows you to delete the printer port. If you want to de-lete the port which is currently used in Windows, switch the port to another suchas “FILE”, then delete it.
ReferenceFor more information about SmartDeviceMonitor for Client, see SmartDe-viceMonitor for Client Help.
AAAA From the [Printers] window, click the icon of the machine which uses Smart-DeviceMonitor for Client to print. On the [File] menu, click [Properties].
BBBB Click the [Details] tab and make sure that the SmartDeviceMonitor for Cli-ent port is shown in the [Print to the following port:] box.Remember the port name because this port should be deleted later.
CCCC From the [Print to the following port:] box, select [FILE].
DDDD Click [OK].
EEEE Click [Delete Port].
FFFF Click the SmartDeviceMonitor for Client port name as in step BBBB, and thenclick [OK].
The port is deleted.
GGGG Click [OK] to close the Printer Properties.

Using SmartDeviceMonitor for Client
1
Uninstalling SmartDeviceMonitor for Client
PreparationBefore uninstalling SmartDeviceMonitor for Client, make sure that:• The port settings dialog box is closed.• No printer is using the SmartDeviceMonitor for Client port as a printer
port.
AAAA Open [Control Panel], and double-click the [Add/Remove Programs] icon.
BBBB On the [Install/Uninstall] tab, click [SmartDeviceMonitor for Client], and click[Add/Remove].
CCCC After the confirmation message appears, click [Yes].
UninstallShield removes all of the components of SmartDeviceMonitor forClient.
DDDD After the confirmation message appears, click [Yes].
EEEE Acknowledge the [Question] dialog box.
FFFF When the uninstallation is complete, click [OK].
Setting Up the Printer Driver
The following procedure allows you to configure the printer port to use Smart-DeviceMonitor for Client.
PreparationThe target machine must be turned on before starting the installation process.
AAAA Install the printer driver of the machine you want to use.
BBBB From the [Printers] window, click the icon of the machine. On the [File]menu, click [Properties].
CCCC Click the [Details] tab, and then click [Add Port].
The [Add Port] dialog box appears.
DDDD Click [Other], click [SmartDeviceMonitor] from the list, and then click [OK].
The [Select Printer] dialog box appears.The displayed items are as follows:Model Name: The model name of the printer. Printer Name: The name of the printer.Comment: Additional information about the printer.
7

Windows 95/98/Me Configuration
8
1
Address: The IP address of the printer.
EEEE Select the machine.
TCP/IP
A Click [TCP/IP], and then click [search].
A list of printers that can be printed to by the TCP/IP protocol appears.B Click the machine you want to use, and then click [OK].
Note❒ Printers that respond to an IP broadcast from the computer will be dis-
played. To print to a printer not listed here, click [Specify Address], andthen type the IP address or host name.
NetBEUI
A Click the [NetBEUI], and then click the [search].A list of printers that can be printed to by the NetBEUI protocol appears.
B Click the machine you want to use, and then click the [OK].
Note❒ Printers that respond to a broadcast from the computer will be dis-
played. To print to a printer not listed here, click [Specify Address], andthen type the NetBEUI address. Make sure that the NetBEUI address ison the system configuration list. For information about the printing ofthe system configuration list, see Printer Reference 2.
❒ You cannot print to printers beyond routers.
IPP
A Click [IPP].
The IPP setting dialog box appears.B To specify the IP address of the machine, type “http://machine's-ip-ad-
dress/printer” or “ipp://machine's-ip-address/printer“ in the [Printer URL]field.
(192.168.15.16 is an example IP address)http://192.168.15.16/printer
ipp://192.168.15.16/printer
C If necessary, type a names to distinguish printers in [IPP Port Name]. Typea name different from any existing port names.
If you omit this, the address entered in [Printer URL] will be set as the IPPport name.

Using SmartDeviceMonitor for Client
1
D If using a proxy server and IPP user name, click [Detailed Settings] andconfigure the necessary settings.
ReferenceFor more information about these settings, see SmartDeviceMonitor forClient Help.
FFFF Click [OK].
GGGG Make sure that the specified printing port is displayed in the [Print to the fol-lowing Port:] box, and then click [OK].
This completes the settings.To print, select the specified printer. SmartDeviceMonitor for Client will nowdirect print data to the printer automatically.
Changing Port Settings
Follow these steps to change SmartDeviceMonitor for Client settings, such asTCP/IP, the proxy server and IPP URL.
Note❒ There are no settings for the NetBEUI protocol.❒ You can configure Timeout Settings for the TCP/IP protocol.
AAAA From the [Printers] window, click the icon of the machine you want to use.On the [File] menu, click [Properties].
BBBB Click the [Details] tab, and then click [Port Settings].
The [Port Settings] dialog box appears.• For TCP/IP protocol, you can configure Timeout Settings.• For IPP, you can configure User Settings or Proxy Settings.
ReferenceFor more information about these settings, see SmartDeviceMonitor forClient Help.
9

Windows 95/98/Me Configuration
10
1
Setting Up a Client Computer
This section describes the procedures for setting up a client on a network thatuses Windows 2000/Windows XP, Windows NT Server or Windows NT Work-station as a print server.When using a Windows 2000/Window XP or Windows NT print server, selecta shared printer on Windows 2000/Windows XP or Windows NT.
Note❒ This section assumes that the client has already been configured to communi-
cate with a Windows 2000 or Windows NT print server. Do not begin the fol-lowing procedure until the client has been set up and configured correctly.
AAAA Install the printer driver as a local printer.
ReferenceFor more information about installing the printer driver, see Printer Refer-ence 1.
Note❒ Any port can be selected during the installation, however, LPT1 is recom-
mended.
BBBB Click [Start], point to [Settings], and then click [Printers].
CCCC Click the icon of the machine you want to use. On the [File] menu, click[Properties].
DDDD Click the [Details] tab, and click [Add Port].
EEEE Click [Network], and click [Browse].

Setting Up a Client Computer
1
FFFF On the network tree, double-click the name of the computer used as a printserver.
The printers connected to the network are displayed.
GGGG Click the name of the machine you want to use, and click [OK].
HHHH Click [OK].
IIII Make sure that the port name is displayed in the [Print to the following port:]box, and click [OK].
11

Windows 95/98/Me Configuration
12
1

2. Windows 2000Configuration
Configuring Windows 2000
Printing without a Print Server
The following procedure describes how to configure Windows 2000 to use themachine on a network without a Windows 2000 Server, Windows 2000 Profes-sional, Window XP, Windows NT Server, Windows NT Workstation or Net-Ware based print server.
13

Windows 2000 Configuration
14
2
Printing with a Standard TCP/IP Port
Standard TCP/IP port is a standard port of Windows 2000 to enable Peer-to-Peer printing in a network environment.For more information about Standard TCP/IP port settings, see Windows 2000Help.
Note❒ If a device model selection dialog box appears during the procedure to add
the Standard TCP/IP port, select “RICOH Network Printer C Model”.
Printing with a LPR Port
See p.22 “Configuring LPR Port Printing” for configuring a LPR port in Win-dows 2000.
Printing with a Windows 2000 or Windows NT Print Server
See p.23 “Setting Up a Client Computer” for configuring Windows 2000 with aWindows 2000/Windows XP or Windows NT print server.

Configuring the Protocols
2
Configuring the Protocols
Configuring TCP/IP and IPP for Printing
These instructions are for configuring the Network Interface Board and Win-dows 2000 to use the TCP/IP protocol and IPP.
Configuring the machine
Configure the machine to use the TCP/IP protocol.• Make sure that the TCP/IP protocol is set to active. (The default is active.)• Assign an IP address and make other settings required for using the TCP/IP
protocol.
ReferenceFor more information about how to make the above settings, see Printer Ref-erence 1.If DHCP is used to assign IP addresses, see p.115 “When Using DHCP”.
Note❒ After setting the IP address, use the ping command to make sure that it has
been set correctly.A Click [Start], point to [Programs], point to [Accessories], and then click [Com-
mand Prompt].B Type the following: (192.168.15.16 is an example IP address.)
C:\> ping 192.168.15.16If the address has been configured correctly, the following message ap-pears.Reply from 192.168.15.16 : bytes=32 time<10ms TTL=32If the address has been configured incorrectly, the following message ap-pears.Request timed out.
Configuring a Windows 2000 computer
These steps are for configuring a Windows 2000 computer to use the TCP/IPprotocol.
AAAA Click [Start] on the taskbar, point to [Settings], and then click [Network andDial-up Connections].
BBBB Double-click [Local Area Connection]. On the [General] tab, click [Properties].
15

Windows 2000 Configuration
16
2
CCCC Make sure that “Internet Protocol (TCP/IP)” is selected in the [Componentschecked are used by this connection:] box on the [General] tab.
Note❒ Select the TCP/IP protocol box if it is not already selected.❒ If the TCP/IP protocol is not installed, click [Install] on the [General] tab to
install it. For more information about installing the TCP/IP protocol, seeWindows 2000 Help.
DDDD Configure the TCP/IP protocol with the appropriate IP address, subnetmask and other settings.Check with the network administrator that the settings are correct.
Configuring NetBEUI for Printing
These instructions are for configuring the Network Interface Board and Win-dows 2000 to use the NetBEUI protocol.
Configuring the machine
Configure the machine to use the NetBEUI protocol.• Make sure that the NetBEUI protocol is set to active. (The default is active.)
Note❒ The NetBEUI settings are performed in Web Status Monitor or SmartDevice-
Monitor for Admin. See the corresponding online Help for details.
Configuring a Windows 2000 computer
Follow these steps to configure a Windows 2000 computer to use the NetBEUIprotocol.
AAAA Click [Start] on the taskbar, point to [Settings], and then click [Network andDial-up Connections].
BBBB Double-click [Local Area Connection]. On the [General] tab, click [Properties].
CCCC Make sure that the “NetBEUI Protocol” is selected in the [Componentschecked are used by this connection:] box on the [General] tab.
Note❒ Select the NetBEUI protocol box if it is not already selected.❒ If the NetBEUI protocol is not installed, click [Install] on the [General] tab to
install it. For more information about installing the NetBEUI protocol, seeWindows 2000 Help.

Using SmartDeviceMonitor for Client
2
Using SmartDeviceMonitor for Client
SmartDeviceMonitor for Client is a utility for printing with the network printerusing the TCP/IP, NetBEUI, and IPP protocols. The following features are avail-able when using SmartDeviceMonitor for Client.
❖❖❖❖ SmartDeviceMonitor for Client features• Sends a print job directly to the network printers without using a print
server.• Notifies when a printing error occurs.• That print did completion (data transmission is finished) is informed.
Limitation❒ On a computer that is used as a print server, do not use the features such as
Notify. For more information about turning off these features, see SmartDe-viceMonitor for Client Help.
Note❒ Make sure to close all applications before beginning the installation process.
Installing SmartDeviceMonitor for Client may require the computer to be re-started.
Installing SmartDeviceMonitor for Client
Follow the procedure below to install SmartDeviceMonitor for Client.
Note❒ When there is a printing port used by PortNavi, Multi Direct Print and Print-
ing System95, SmartDeviceMonitor for Client will take over. ❒ When using SmartDeviceMonitor for Admin, install SmartDeviceMonitor for
Client after SmartDeviceMonitor for Admin is closed.❒ Make sure to close all applications before beginning the installation process.
Installing SmartDeviceMonitor for Client may require the computer to be re-started.
AAAA Insert the CD-ROM labeled “Printer Drivers and Utilities” into the CD-ROM drive.
BBBB Open [Control Panel], and double-click the [Add/Remove Programs] icon.
CCCC On the [Add New Programs] tab, click [CD or Floppy].
DDDD Click [Next >].
17

Windows 2000 Configuration
18
2
EEEE Type the name of the CD-ROM drive in the [Open] box, followed by “:\NETWORK \ NETMON \ CLIENT \ DISK1 \ SETUP.EXE” (do not in-clude the quotation marks), and then click [Finish].
Note❒ An example would be “D:\ NETWORK \ NETMON \ CLIENT \ DISK1
\ SETUP.EXE” when the CD-ROM drive letter is “D”.
FFFF From the [Choose Setup Language] list, select the language you want to use,and then click [OK].
GGGG After the [Welcome] dialog box appears, click [Next >].Follow the instructions on the screen.After the installation is complete, configure the printer port with SmartDe-viceMonitor for Client. See p.19 “Setting Up the Printer Driver”
Note❒ If the dialog box asking if you want to restart the computer appears, select
[Yes, I want to restart my computer now.].
Deleting the port
The following procedure allows you to delete the printer port. If you want to de-lete the port which is currently used in Windows, switch the port to another suchas “FILE”, then delete it.
ReferenceFor more information about SmartDeviceMonitor for Client, see SmartDe-viceMonitor for Client Help.
AAAA From the [Printers] window, click the icon of the machine which uses Smart-DeviceMonitor for Client to print. On the [File] menu, click [Properties].
BBBB Click the [Ports] tab and make sure that the SmartDeviceMonitor for Clientport is shown in the [Print to the following port(s)] box.
Remember the port name because this port should be deleted later.
CCCC Select the [FILE] check box in the [Port] column.
DDDD Click [OK] to close the Printer Properties.
The port which is currently in use is changed.
EEEE Open the Printer Properties of the same machine.
FFFF Select the [Ports] tab.
GGGG At the [Port] column in the [Print to the following port(s)] dialog box, click to se-lect the SmartDeviceMonitor for Client port name as in step BBBB.

Using SmartDeviceMonitor for Client
2
HHHH Click [Delete Port].
IIII After the confirmation message appears, click [Yes].The port is deleted.
JJJJ Click [Close] to close the Printer Properties.
Uninstalling SmartDeviceMonitor for Client
PreparationBefore uninstalling SmartDeviceMonitor for Client, make sure that:• The port settings dialog box is closed.• No printer is using the SmartDeviceMonitor for Client port as a printer
port.• You have performed login with the same user authority as that used to in-
stall SmartDeviceMonitor for Client.
AAAA Open [Control Panel], and double-click the [Add/Remove Programs] icon.
BBBB Click the [Change or Remove Programs] tab, click [SmartDeviceMonitor for Client],and click [Change/Remove].
CCCC After the confirmation message appears, click [Yes].
UninstallShield removes all of the components of SmartDeviceMonitor forClient.
DDDD After the confirmation message appears, click [Yes].
EEEE Acknowledge the [Remove Shared File?] dialog box.
FFFF When the uninstallation is complete, click [OK].
Setting Up the Printer Driver
The following procedure allows you to configure the printer port to use Smart-DeviceMonitor for Client.
PreparationThe target machine must be turned on before starting the installation process.
AAAA Install the printer driver of the machine you want to use.
BBBB From the [Printers] window, click the icon of the machine. On the [File]menu, click [Properties].
CCCC Click the [Ports] tab, and then click [Add Port].
The [Add Port] dialog box appears.
19

Windows 2000 Configuration
20
2
DDDD Click [SmartDeviceMonitor] in the [Available port types:] box, and then click [New Port].
The [Select Printer] dialog box appears. The displayed items are as follows: Model Name: The model name of the printer.Printer Name: The name of the printer.Comment: Additional information about the printer.Address: The IP address of the printer.
EEEE Select the machine.
TCP/IP
A Click [TCP/IP], and then click [search].
A list of printers that can be printed to by the TCP/IP protocol appears.B Click the machine you want to use, and then click [OK].
Note❒ Printers that respond to an IP broadcast from the computer will be dis-
played. To print to a printer not listed here, click [Specify Address] , andthen type the IP address or host name.
NetBEUI
A Click [NetBEUI], and then [search].A list of printers that can be printed by the NetBEUI protocol appears.
B Click the printer you want to use, and then click [OK].
Note❒ Printers that respond to a broadcast from the computer will be dis-
played. To print to a printer not listed here, click [Specify Address], andthen type the NetBEUI address. Make sure that the NetBEUI address ison the system configuration list. For information about the printing ofthe system configuration list, see Printer Reference 2.
❒ You cannot print to printers beyond routers.
IPP
A Click [IPP].
The IPP setting dialog box appears.B To specify the IP address of the machine, type “http://machine's-ip-ad-
dress/printer" or "ipp://machine's-ip-address/printer" in the [Printer URL] field.
(192.168.15.16 is an example IP address.)http://192.168.15.16/printer
ipp://192.168.15.16/printer

Using SmartDeviceMonitor for Client
2
C If necessary, type a name to distinguish printers in [IPP Port Name]. Typea name different from any existing port names.
If you omit this, the address entered in [Printer URL] will be set as the IPPport name.
D If using a proxy server and IPP user name, click [Detailed Settings] andconfigure the necessary settings.
ReferenceFor more information about these settings, see SmartDeviceMonitor forClient Help.
E Click [OK].
FFFF Click [OK].
GGGG Click [Close].
HHHH Make sure that the specified printing port is displayed in the [Print to the fol-lowing Port(s)] box, and then click [OK].This completes the settings.To print, select the specified printer. SmartDeviceMonitor for Client will nowdirect print data to the printer automatically.
Changing Port Settings
Follow these steps to change SmartDeviceMonitor for Client settings, such asTCP/IP, the proxy server and IPP URL.
Note❒ There are no settings for the NetBEUI protocol.
AAAA From the [Printers] window, click the icon of the machine you want to use.On the [File] menu, click [Properties].
BBBB Click the [Ports] tab, and then click [Configure Port].The [Port Configuration] dialog box appears.• For TCP/IP protocol, you can configure Timeout Settings.• For IPP, you can configure User Settings or Proxy Settings.
ReferenceFor more information about these settings, see SmartDeviceMonitor forClient Help.
21

Windows 2000 Configuration
22
2
Configuring LPR Port Printing
This section explains the procedure for printing to a LPR port from Windows2000.
Note❒ The following procedure assumes that the printer drivers have already been
installed. This is the procedure to change the printer port to LPR.❒ The TCP/IP protocols must be installed and configured correctly. For more
information about configuring the protocols, see p.15 “Configuring TCP/IPand IPP for Printing”.
AAAA Click [Start], point to [Settings], and then click [Printers].
BBBB Click the icon of the machine you want to use. On the [File] menu, click[Properties].
CCCC Click the [Ports] tab, and then click [Add Port].
DDDD In the [Available port types:] box, click “LPR Port”, and then click [New Port].
Note❒ If “LPR Port” does not appear, “Print Services for Unix” has not been in-
stalled.
EEEE Type the IP address of the Network Interface Board into the [Name or addressof server providing lpd:] box.
FFFF Type “lp” into the [Name of printer or print queue on that server:] box, and click[OK].
GGGG Click [Close].
HHHH Make sure that the port name is displayed in the [Print to the following port(s)]box and the check box is selected, and then click [OK].

Setting Up a Client Computer
2
Setting Up a Client Computer
This section describes the procedures for setting up a client on a network thatuses Windows 2000/Windows XP, Windows NT Server or Windows NT Work-station as a print server.When using a Windows 2000/Windows XP, Windows NT print server, select ashared printer on Windows 2000/Windows XP or Windows NT.
Note❒ This section assumes that the client has already been configured to communi-
cate with a Windows 2000 or Windows NT print server. Do not begin the fol-lowing procedure until the client has been set up and configured correctly.
Use the [Printers] window to set up the machine.
AAAA Click [Start], point to [Settings], and then click [Printers].
BBBB Double-click the [Add Printer] icon.This launches the Add Printer Wizard.
CCCC Click [Next >].
DDDD Click [Network printer], and click [Next >].
EEEE Click [Next >].
FFFF In the [Shared printers:] box, double-click the name of the computer used asa print server.
The printers attached to the network are displayed.
W2kNTP001E
23

Windows 2000 Configuration
24
2
GGGG Click the machine you want to use, and click [Next >].
Note❒ If the printer driver is not installed in the print server, a message appears.
If a driver has been installed on the client, click [OK], and follow the in-structions on the screen.
❒ There is a Windows 2000 printer driver on the CD-ROM labeled “PrinterDrivers and Utilities”.
HHHH Select whether to use this machine as the default printer, and click [Next >].
IIII After the installation is complete, click [Finish].
The icon of the newly installed printer appears in the [Printers] window.

3. Windows XP Configuration
Configuring Windows XP
Printing without a Print Server
The following procedure describes how to configure Windows XP to use the ma-chine on a network without a Windows 2000 Server, Windows 2000 Profession-al, Window XP, Windows NT Server, Windows NT Workstation or NetWarebased print server.
25

Windows XP Configuration
26
3
Printing with a Standard TCP/IP Port
Standard TCP/IP port is a standard port of Windows XP to enable Peer-to-Peerprinting in a network environment.For more information about Standard TCP/IP port settings, see Windows 2000Help.
Note❒ If a device model selection dialog box appears during the procedure to add
the Standard TCP/IP port, select “RICOH Network Printer C Model”.
Printing with a LPR Port
See p.34 “Configuring LPR Port Printing” for configuring a LPR port in Win-dows XP.
Printing with a Windows 2000/Windows XP or Windows NT Print Server
See p.35 “Setting Up a Client Computer” for configuring Windows XP with aWindows 2000/Windows XP or Windows NT print server.

Configuring the Protocols
3
Configuring the Protocols
Configuring TCP/IP and IPP for Printing
These instructions are for configuring the Network Interface Board and Win-dows XP to use the TCP/IP protocol and IPP.
Configuring the machine
Configure the machine to use the TCP/IP protocol.• Make sure that the TCP/IP protocol is set to active. (The default is active.)• Assign an IP address and make other settings required for using the TCP/IP
protocol.
ReferenceFor more information about how to make the above settings, see Printer Ref-erence 1.If DHCP is used to assign IP addresses, see p.115 “When Using DHCP”.
Note❒ After setting the IP address, use the ping command to make sure that it has
been set correctly.A Click [Start], point to [Programs], point to [Accessories], and then click [Com-
mand Prompt].B Type the following: (192.168.15.16 is an example IP address.)
C:\>ping 192.168.15.16If the address has been configured correctly, the following message ap-pears.Reply from 192.168.15.16 : bytes=32 time<10ms TTL=32If the address has been configured incorrectly, the following message ap-pears.Request timed out.
27

Windows XP Configuration
28
3
Configuring a Windows XP computer
These steps are for configuring a Windows XP computer to use the TCP/IP pro-tocol.
AAAA Click [Start] on the taskbar, point to [Settings], and then click [Network andDial-up Connections].
BBBB Double-click [Local Area Connection]. On the [General] tab, click [Properties].
CCCC Make sure that “Internet Protocol (TCP/IP)” is selected in the [Componentschecked are used by this connection:] box on the [General] tab.
Note❒ Select the TCP/IP protocol box if it is not already selected.❒ If the TCP/IP protocol is not installed, click [Install] on the [General] tab to
install it. For more information about installing the TCP/IP protocol, seeWindows XP Help.
DDDD Configure the TCP/IP protocol with the appropriate IP address, subnetmask and other settings.
Check with the network administrator that the settings are correct.

Using SmartDeviceMonitor for Client
3
Using SmartDeviceMonitor for Client
SmartDeviceMonitor for Client is a utility for printing with the network printerusing the TCP/IP, and IPP protocols. The following features are available whenusing SmartDeviceMonitor for Client.
❖❖❖❖ SmartDeviceMonitor for Client features• Sends a print job directly to the network printers without using a print
server.• Notifies when a printing error occurs.• That print did completion (data transmission is finished) is informed.
Limitation❒ On a computer that is used as a print server, do not use the features such as
Notify. For more information about turning off these features, see SmartDe-viceMonitor for Client Help.
Note❒ Make sure to close all applications before beginning the installation process.
Installing SmartDeviceMonitor for Client may require the computer to be re-started.
Installing SmartDeviceMonitor for Client
Follow the procedure below to install SmartDeviceMonitor for Client.
Note❒ When there is a printing port used by PortNavi, Multi Direct Print and Print-
ing System95, SmartDeviceMonitor for Client will take over. ❒ When using SmartDeviceMonitor for Admin, install SmartDeviceMonitor for
Client after SmartDeviceMonitor for Admin is closed.❒ Make sure to close all applications before beginning the installation process.
Installing SmartDeviceMonitor for Client may require the computer to be re-started.
AAAA Insert the CD-ROM labeled “Printer Drivers and Utilities” into the CD-ROM drive.
BBBB Open [Control Panel], and double-click the [Add/Remove Programs] icon.
CCCC On the [Add New Programs] tab, click [CD or Floppy].
DDDD Click [Next >].
29

Windows XP Configuration
30
3
EEEE Type the name of the CD-ROM drive in the [Open] box, followed by “:\NETWORK\NETMON\CLIENT\DISK1\SETUP.EXE” (do not includethe quotation marks), and then click [Finish].
Note❒ An example would be “D:\ NETWORK\NETMON\CLIENT\DISK1\SET-
UP.EXE” when the CD-ROM drive letter is “D”.
FFFF From the [Choose Setup Language] list, select the language you want to use,and then click [OK].
GGGG After the [Welcome] dialog box appears, click [Next >].Follow the instructions on the screen.After the installation is complete, configure the printer port with SmartDe-viceMonitor for Client. See p.32 “Setting Up the Printer Driver”.
Note❒ If the dialog box asking if you want to restart the computer appears, select
[Yes, I want to restart my computer now.].
Deleting the port
The following procedure allows you to delete the printer port. If you want to de-lete the port which is currently used in Windows, switch the port to another suchas “FILE”, then delete it.
ReferenceFor more information about SmartDeviceMonitor for Client, see SmartDe-viceMonitor for Client Help.
AAAA From the [Printers] window, click the icon of the machine which uses Smart-DeviceMonitor for Client to print. On the [File] menu, click [Properties].
BBBB Click the [Ports] tab and make sure that the SmartDeviceMonitor for Clientport is shown in the [Print to the following port(s)] box.
Remember the port name because this port should be deleted later.
CCCC Select the [FILE] check box in the [Port] column.
DDDD Click [OK] to close the Printer Properties.
The port which is currently in use is changed.
EEEE Open the Printer Properties of the same machine.
FFFF Select the [Ports] tab.
GGGG At the [Port] column in the [Print to the following port(s)] dialog box, click to se-lect the SmartDeviceMonitor for Client port name as in step BBBB.

Using SmartDeviceMonitor for Client
3
HHHH Click [Delete Port].
IIII After the confirmation message appears, click [Yes].The port is deleted.
JJJJ Click [Close] to close the Printer Properties.
Uninstalling SmartDeviceMonitor for Client
PreparationBefore uninstalling SmartDeviceMonitor for Client, make sure that:• The port settings dialog box is closed.• No printer is using the SmartDeviceMonitor for Client port as a printer
port.• You have performed login with the same user authority as that used to in-
stall SmartDeviceMonitor for Client.
AAAA Open [Control Panel], and double-click the [Add/Remove Programs] icon.
BBBB Click the [Change or Remove Programs] tab, click [SmartDeviceMonitor for Client],and click [Change/Remove].
CCCC After the confirmation message appears, click [Yes].
UninstallShield removes all of the components of SmartDeviceMonitor forClient.
DDDD After the confirmation message appears, click [Yes].
EEEE Acknowledge the [Remove Shared File?] dialog box.
FFFF When the uninstallation is complete, click [OK].
31

Windows XP Configuration
32
3
Setting Up the Printer Driver
The following procedure allows you to configure the printer port to use Smart-DeviceMonitor for Client.
PreparationThe target machine must be turned on before starting the installation process.
AAAA Install the printer driver of the machine you want to use.
BBBB From the [Printers] window, click the icon of the machine. On the [File]menu, click [Properties].
CCCC Click the [Ports] tab, and then click [Add Port].
The [Add Port] dialog box appears.
DDDD Click [SmartDeviceMonitor] in the [Available port types:] box, and then click [NewPort].
The [Select Printer] dialog box appears. The displayed items are as follows: Model Name: The model name of the printer.Printer Name: The name of the printer.Comment: Additional information about the printer.Address: The IP address of the printer.
EEEE Select the machine.
TCP/IP
A Click [TCP/IP], and then click [search].
A list of printers that can be printed to by the TCP/IP protocol appears.B Click the machine you want to use, and then click [OK].
Note❒ Printers that respond to an IP broadcast from the computer will be dis-
played. To print to a printer not listed here, click [Specify Address], andthen type the IP address or host name.
IPP
A Click [IPP].The IPP setting dialog box appears.

Using SmartDeviceMonitor for Client
3
B To specify the IP address of the machine, type "http://machine's-ip-ad-dress/printer" or "ipp://machine's-ip-address/printer" in the [Printer URL]field.(192.168.15.16 is an example IP address.)http://192.168.15.16/printer
ipp://192.168.15.16/printer
C If necessary, type a name to distinguish the printers in [IPP Port Name].Type a name different from any existing port names.If you omit this, the address entered in [Printer URL] will be set as the IPPport name.
D If using a proxy server and IPP user name, click [Detailed Settings] andconfigure the necessary settings.
ReferenceFor more information about these settings, see SmartDeviceMonitor forClient Help.
E Click [OK].
FFFF Click [OK].
GGGG Click [Close].
HHHH Make sure that the specified printing port is displayed in the [Print to the fol-lowing Port(s)] box, and then click [OK].
This completes the settings.To print, select the specified printer. SmartDeviceMonitor for Client will nowdirect print data to the printer automatically.
Changing Port Settings
Follow these steps to change SmartDeviceMonitor for Client settings, such asTCP/IP, the proxy server and IPP URL.
AAAA From the [Printers] window, click the icon of the machine you want to use.On the [File] menu, click [Properties].
BBBB Click the [Ports] tab, and then click [Configure Port].
The [Port Configuration] dialog box appears.• For TCP/IP protocol, you can configure Timeout Settings.• For IPP, you can configure User Settings or Proxy Settings.
ReferenceFor more information about these settings, see SmartDeviceMonitor forClient Help.
33

Windows XP Configuration
34
3
Configuring LPR Port Printing
This section explains the procedure for printing to a LPR port from WindowsXP.
Note❒ The following procedure assumes that the printer drivers have already been
installed. This is the procedure to change the printer port to LPR.❒ The TCP/IP protocols must be installed and configured correctly. For more
information about configuring the protocols, see p.27 “Configuring TCP/IPand IPP for Printing”.
AAAA Click [Start], point to [Settings], and then click [Printers].
BBBB Click the icon of the machine you want to use. On the [File] menu, click[Properties].
CCCC Click the [Ports] tab, and then click [Add Port].
DDDD In the [Available port types:] box, click “LPR Port”, and then click [New Port].
Note❒ If “LPR Port” does not appear, “Print Services for Unix” has not been in-
stalled.
EEEE Type the IP address of the Network Interface Board into the [Name or addressof server providing lpd:] box.
FFFF Type “lp” into the [Name of printer or print queue on that server:] box, and click[OK].
GGGG Click [Close].
HHHH Make sure that the port name is displayed in the [Print to the following port(s)]box and the check box is selected, and then click [OK].

Setting Up a Client Computer
3
Setting Up a Client Computer
This section describes the procedures for setting up a client on a network thatuses Windows 2000/Windows XP, Windows NT Server or Windows NT Work-station as a print server.When using a Windows 2000/Windows XP, Windows NT print server, select ashared printer on Windows 2000/Windows XP or Windows NT.
Note❒ This section assumes that the client has already been configured to communi-
cate with a Windows 2000/Windows XP or Windows NT print server. Do notbegin the following procedure until the client has been set up and configuredcorrectly.
Use the [Printers] window to set up the machine.
AAAA Click [Start], point to [Settings], and then click [Printers].
BBBB Double-click the [Add Printer] icon.
This launches the Add Printer Wizard.
CCCC Click [Next >].
DDDD Click [Network printer], and click [Next >].
EEEE Click [Next >].
FFFF In the [Shared printers:] box, double-click the name of the computer used asa print server.The printers attached to the network are displayed.
W2kNTP001E
35

Windows XP Configuration
36
3
GGGG Click the machine you want to use, and click [Next >].
Note❒ If the printer driver is not installed in the print server, a message appears.
If a driver has been installed on the client, click [OK], and follow the in-structions on the screen.
❒ There is a Windows XP printer driver on the CD-ROM labeled “PrinterDrivers and Utilities”.
HHHH Select whether to use this machine as the default printer, and click [Next >].
IIII After the installation is complete, click [Finish].
The icon of the newly installed printer appears in the [Printers] window.

4. Windows NT 4.0Configuration
Configuring Windows NT 4.0
Printing without a Print Server
The following procedure describes how to configure Windows NT 4.0 to use themachine on a network without a Windows 2000 Server, Windows 2000 Profes-sional, Windows XP, Windows NT Server, Windows NT Workstation or Net-Ware based print server.
37

Windows NT 4.0 Configuration
38
4
Printing with a LPR Port
See p.47 “Configuring LPR Port Printing” for configuring a LPR port in Win-dows NT 4.0.
Printing with a Windows 2000/Windows XP or Windows NT Print Server
See p.48 “Setting Up a Client Computer” for configuring Windows NT 4.0 witha Windows 2000/Windows XP or Windows NT print server.

Configuring the Protocols
4
Configuring the Protocols
Configuring TCP/IP and IPP for Printing
These instructions are for configuring the Network Interface Board and Win-dows NT to use the TCP/IP protocol and IPP.
Configuring the machine
Configure the machine to use the TCP/IP protocol.• Make sure that the TCP/IP protocol is set to active. (The default is active.)• Assign an IP address and make other settings required for using the TCP/IP
protocol.
ReferenceFor more information about how to make the above settings, see Printer Ref-erence 1.If DHCP is used to assign IP addresses, see p.115 “When Using DHCP”.
Note❒ After setting the IP address, use the ping command to make sure that it has
been set correctly.A Click [Start], point to [Programs], and then click [Command Prompt].B Type the following: (192.168.15.16 is an example IP address.)
C:\> ping 192.168.15.16If the address has been configured correctly, the following message ap-pears.Reply from 192.168.15.16 : bytes=32 time<10ms TTL=32If the address has been configured incorrectly, the following message ap-pears.Request timed out.
39

Windows NT 4.0 Configuration
40
4
Configuring a Windows NT computer
These steps are for configuring a Windows NT computer to use the TCP/IP pro-tocol.
AAAA Open [Control Panel] and double-click the [Network] icon. Make sure that“TCP/IP Protocol” is listed in the [Network Protocols:] box on the [Protocols]tab.
Note❒ If the TCP/IP protocol is not installed, click [Add] on the [Protocols] tab to
install it. For more information about installing the TCP/IP protocol, seeWindows NT Help.
BBBB Configure the TCP/IP protocols with the appropriate IP address, subnetmask and other settings.
Check with the network administrator that the settings are correct.
CCCC Click the [Services] tab, and make sure that “Microsoft TCP/IP Printing” isinstalled.
If “Microsoft TCP/IP Printing” is not installed, click [Add] on the [Services] tabto install it. For more information about installing and configuring networkservices, see Windows NT Help.
Configuring NetBEUI for Printing
These instructions are for configuring the Network Interface Board and Win-dows NT to use the NetBEUI protocol.
Configuring the machine
Configure the machine to use the NetBEUI protocol.• Make sure that the NetBEUI protocol is set to active. (The default is active.)
Note❒ The NetBEUI settings are performed in Web Status Monitor or SmartDevice-
Monitor for Admin. See the corresponding online Help for details.

Configuring the Protocols
4
Configuring a Windows NT computer
Install the NetBEUI protocol on the Windows NT computer, and change theLAN adapter number (Lana Number).
AAAA Open [Control Panel] and double-click the [Network] icon. Make sure that“NetBEUI Protocol” is listed in the [Network Protocols:] box on the [Protocols]tab.
Note❒ If the NetBEUI protocol is not installed, click [Add] on the [Protocols] tab to
install it. For more information about installing the NetBEUI protocol, seeWindows NT Help.
BBBB Change the Lana Number. Click the [Services] tab, click “NetBIOS Inter-face” in the [Services] tab, and click [Properties].
CCCC Click the Lana Number corresponding the Nbf protocol of the [NetworkRoute] headline, and click [Edit].
DDDD Type “0” as the Lana Number.
Note❒ If the other protocol's Lana Number is configured with “0”, you must
change the Lana Number to a number other than “0”.
EEEE Click [OK].
FFFF Click [Close] to close the [Network] dialog box.
GGGG Check the message to restart, and then click [Yes].
Note❒ After you change the Lana Number, you must restart the computer.
41

Windows NT 4.0 Configuration
42
4
Using SmartDeviceMonitor for Client
SmartDeviceMonitor for Client is a utility for printing with the network printerusing the TCP/IP, NetBEUI, and IPP protocols. The following features are avail-able when using SmartDeviceMonitor for Client.
❖❖❖❖ SmartDeviceMonitor for Client features• Sends a print job directly to the network printers without using a print
server.• Notifies when a printing error occurs.• That print did completion (data transmission is finished) is informed.
Limitation❒ On a computer that is used as a print server, do not use the features such as
Notify. For more information about turning off these features, see SmartDe-viceMonitor for Client Help.
Note❒ Make sure to close all applications before beginning the installation process.
Installing SmartDeviceMonitor for Client may require the computer to be re-started.
Installing SmartDeviceMonitor for Client
Follow the procedure below to install SmartDeviceMonitor for Client.
Note❒ When there is a printing port used by PortNavi, Multi Direct Print and Print-
ing System95, SmartDeviceMonitor for Client will take over.❒ When using SmartDeviceMonitor for Admin, install SmartDeviceMonitor for
Client after SmartDeviceMonitor for Admin is closed.❒ Make sure to close all applications before beginning the installation process.
Installing SmartDeviceMonitor for Client may require the computer to be re-started.
AAAA Insert the CD-ROM labeled “Printer Drivers and Utilities” into the CD-ROM drive.
BBBB Open [Control Panel], and double-click the [Add/Remove Programs] icon.
CCCC On the [Install/Uninstall] tab, click [Install].
DDDD Click [Next >].

Using SmartDeviceMonitor for Client
4
EEEE Type the name of the CD-ROM drive in the [Command line for installation pro-gram] box, followed by “:\ NETWORK\NETMON\CLIENT\DISK1\SET-UP.EXE” (do not include the quotation marks), and then click [Finish].
Note❒ An example would be “D:\ NETWORK \ NETMON \ CLIENT \ DISK1
\ SETUP.EXE” when the CD-ROM drive letter is “D”.
FFFF From the [Choose Setup Language] list, select the language you want to use,and then click [OK].
GGGG After the [Welcome] dialog box appears, click [Next >].Follow the instructions on the screen.After the installation is complete, configure the printer port with SmartDe-viceMonitor for Client. See p.44 “Setting Up the Printer Driver”.
Note❒ If the dialog box asking if you want to restart the computer appears, select
[Yes, I want to restart my computer now.].
Deleting the port
The following procedure allows you to delete the printer port. If you want to de-lete the port which is currently used in Windows, switch the port to another suchas “FILE”, then delete it.
ReferenceFor more information about SmartDeviceMonitor for Client, see SmartDe-viceMonitor for Client Help.
AAAA From the [Printers] window, click the icon of the machine which uses Smart-DeviceMonitor for Client to print. On the [File] menu, click [Properties].
BBBB Click the [Ports] tab and make sure that the SmartDeviceMonitor for Clientport is shown in the [Print to the following port(s)] box.
Remember the port name because this port should be deleted later.
CCCC From the [Print to the following port(s)] box, select [FILE].
DDDD Click [OK].
The port which is currently in use is changed.
EEEE Click [Delete Port].
FFFF After the confirmation message appears, click [Yes].
The port is deleted.
GGGG Click [OK] to close the Printer Properties.
43

Windows NT 4.0 Configuration
44
4
Uninstalling SmartDeviceMonitor for Client
PreparationBefore uninstalling SmartDeviceMonitor for Client, make sure that:• The port settings dialog box is closed.• No printer is using the SmartDeviceMonitor for Client port as a printer port.• You have performed login with the same user authority as that used to in-
stall SmartDeviceMonitor for Client.
AAAA Open [Control Panel], and double-click the [Add/Remove Programs] icon.
BBBB On the [Install/Uninstall] tab, click [SmartDeviceMonitor for Client], and click [Add/Re-move].
CCCC After the confirmation message appears, click [Yes].
UninstallShield removes all of the components of SmartDeviceMonitor for Client.
DDDD After the confirmation message appears, click [Yes].
EEEE Acknowledge the [Remove Shared File?] dialog box.
FFFF When the uninstallation is complete, click [OK].
Setting Up the Printer Driver
The following procedure allows you to configure the printer port to use Smart-DeviceMonitor for Client.
PreparationThe target machine must be turned on before starting the installation process.
AAAA Install the printer driver of the machine you want to use.
BBBB From the [Printers] window, click the icon of the machine. On the [File]menu, click [Properties].
CCCC Click the [Ports] tab, and then click [Add Port].
The [Add Port] dialog box appears.
DDDD Click [SmartDeviceMonitor] from the list, and then click [New Port...].The [Select Printer] dialog box appears and printers. The displayed items are as follows:Model Name: The model name of the printer. Printer Name: The name of the printer.Comment: Additional information about the printer.Address: The IP address of the printer.

Using SmartDeviceMonitor for Client
4
EEEE Select the machine.
TCP/IP
A Click [TCP/IP], and then click [search].
A list of printers that can be printed to by the TCP/IP protocol appears.B Click the machine you want to use, and then click [OK].
Note❒ Printers that respond to an IP broadcast from the computer will be dis-
played. To print to a printer not listed here, click [Specify Address], andthen type the IP address or host name.
NetBEUI
A Click [NetBEUI], and then click [search].
A list of printers that can be printed by the NetBEUI protocol appears.B Click the machine you want to use, and then click [OK].
Note❒ Printers that respond to a broadcast from the computer will be dis-
played. To print to a printer not listed here, click [Specify Address], andthen type the NetBEUI address. Make sure that the NetBEUI address ison the system configuration list. For information about the printing ofthe system configuration list, see Printer Reference 2.
❒ You cannot print to printers beyond routers.
IPP
A Click [IPP].The IPP setting dialog box appears.
B To specify the IP address of the machine, type "http://machine's-ip-ad-dress/printer" or "ipp://machine's-ip-address/printer" in the [Printer URL]field.(192.168.15.16 is an example IP address.)http://192.168.15.16/printer
ipp://192.168.15.16/printer
C If necessary, type a name to distinguish printers in [IPP Port Name]. Typea name different from any existing port names.If you omit this, the address entered in [Printer URL] will be set as the IPPport name.
45

Windows NT 4.0 Configuration
46
4
D If using a proxy server and IPP user name, click [Detailed Settings] andconfigure the necessary settings.
ReferenceFor more information about these settings, see SmartDeviceMonitor forClient Help.
E Click [OK].
FFFF Click [OK].
GGGG Click [Close].
HHHH Make sure that the specified printing port is displayed in the [Print to the fol-lowing Port(s)] box, and then click [OK].This completes the settings.To print, select the printer specified. SmartDeviceMonitor for Client will nowdirect print data to the printer automatically.
Changing Port Settings
Follow these steps to change SmartDeviceMonitor for Client settings, such asTCP/IP, the proxy server and IPP URL.
Note❒ There are no settings for the NetBEUI protocol.
AAAA From the [Printers] window, click the icon of the machine you want to use.On the [File] menu, click [Properties].
BBBB Click the [Ports] tab, and then click [Configure Port].The [Port Configuration] dialog box appears.• For TCP/IP protocol, you can configure Timeout Settings.• For IPP, you can configure User Settings or Proxy Settings.
ReferenceFor more information about these settings, see SmartDeviceMonitor forClient Help.

Configuring LPR Port Printing
4
Configuring LPR Port Printing
This section explains the procedure for printing to a LPR port from WindowsNT.
Note❒ The following procedure assumes that the printer drivers have already been
installed. This is the procedure to change the printer port to LPR.❒ The TCP/IP protocols must be installed and configured correctly. For more
information about configuring the protocols, see p.39 “Configuring TCP/IPand IPP for Printing”.
AAAA Click [Start], point to [Settings], and then click [Printers].
BBBB Click the icon of the machine you want to use. On the [File] menu, click[Properties].
CCCC Click the [Ports] tab, and then click [Add Port].
DDDD In the [Available Printer Ports:] box, click “LPR Port”, and then click [New Port].
Note❒ If “LPR Port” does not appear, “Microsoft TCP/IP Printing” has not been
installed.
EEEE Type the IP address of the Network Interface Board into the [Name or addressof server providing lpd:] box.
FFFF Type “lp” into the [Name of printer or print queue on that server:] box, and click[OK].
GGGG Click [Close].
HHHH Make sure that the port name is displayed in the [Print to the following port(s)]box and the check box is selected, and then click [OK].
47

Windows NT 4.0 Configuration
48
4
Setting Up a Client Computer
This section describes the procedures for setting up a client on a network thatuses Windows 2000/Windows XP, Windows NT Server or Windows NT Work-station as a print server.When using a Windows 2000/Windows XP or Windows NT print server, selecta shared printer on Windows 2000 or Windows NT.
Note❒ This section assumes that the client has already been configured to communi-
cate with a Windows 2000 or Windows NT print server. Do not begin the fol-lowing procedure until the client has been set up and configured correctly.
Use the [Printers] window to set up the machine.
AAAA Click [Start], point to [Settings], and then click [Printers].
BBBB Double-click the [Add Printer] icon.
This launches the Add Printer Wizard.
CCCC Click [Network printer server] and click [Next >].
DDDD In the [Shared Printers:] box, double-click the name of the computer used asa print server.
The printers attached to the network are displayed.

Setting Up a Client Computer
4
EEEE Click the machine you want to use and click [OK].
Note❒ If the printer driver is not installed in the print server, a message appears.
If a driver has been installed on the client, click [OK], and follow the in-structions on the screen.
❒ There is a Windows NT printer driver on the CD-ROM labeled “PrinterDrivers and Utilities”.
FFFF Select whether to use this machine as the default printer, and click [Next >].
GGGG After the installation is complete, click [Finish].
The icon of the newly installed printer appears in the [Printers] window.
49

Windows NT 4.0 Configuration
50
4

5. NetWare Configuration
This chapter describes how to configure the machine to use as a print server ora remote printer in a NetWare environment.
Note❒ The NetWare settings are performed in Web Status Monitor or SmartDevice-
Monitor for Admin. See the corresponding online Help for details.
Installing the NIB Setup Tool
A utility called the NIB Setup Tool is provided to configure the machine to workin a network environment. This section describes how to install the SmartDe-viceMonitor for Admin, and how to run the NIB Setup Tool.
Limitation❒ The NIB Setup Tool is supported to work with the following operating sys-
tems.• Microsoft Windows 95/98/Me• Microsoft Windows 2000/Microsoft Windows XP• Microsoft Windows NT 4.0
Installing SmartDeviceMonitor for Admin
Follow these steps to install the SmartDeviceMonitor for Admin.
PreparationYou should install the SmartDeviceMonitor for Admin on the computer. Ifyou install the SmartDeviceMonitor for Admin from a file server or run it viathe network, the SmartDeviceMonitor for Admin might not work correctly.Make sure to close all applications before starting the installation procedure.
AAAA Close all the applications that are currently running.
BBBB Insert the CD-ROM labeled “Printer Drivers and Utilities” into the CD-ROM drive.
CCCC Open [Control Panel], and double-click the [Add/Remove Programs] icon.
DDDD On the [Install/Uninstall] tab, click [Install].
EEEE Click [Next >].
51

NetWare Configuration
52
5
FFFF In the [Command line for installation program] box, type the name of the CD-ROM drive followed by “:\NETWORK\NETMON\ADMIN\DISK1\SET-UP.EXE” (do not include the quotation marks), and then click [Finish].
Note❒ An example would be “D:\NETWORK\NETMON\ADMIN\DISK1\SET-
UP.EXE” when the CD-ROM drive name is “D”.
GGGG From the [Choose Setup Language] list, select the language you want to use,and then click [OK].
HHHH After the [Welcome] dialog box appears, click [Next >].Follow the instructions on the screen.
Running the NIB Setup Tool
AAAA Click [Start], point to [Programs], and then click [NIB Setup Tool] in the [Smart-DeviceMonitor for Admin] program folder.

Quick Setup Using the NIB Setup Tool Wizard
5
Quick Setup Using the NIB Setup Tool Wizard
With the NIB Setup Tool, you can easily set up a NetWare printing environment.
ReferenceFor more information about installing the NIB Setup Tool, see p.51 “Installingthe NIB Setup Tool”.
You can select [Wizard] or [Property Sheet] as an installation method.When you configure the Network Interface Board for the first time, use the Wiz-ard method.If you want to use the Property Sheet method, see p.56 “NetWare 3.x - AdvancedSettings” or p.62 “NetWare 4.x, 5/5.1 - Advanced Settings”.
Note❒ This section assumes that NetWare is functional and that the necessary envi-
ronment for NetWare Print Services is available.❒ If you configure the Network Interface Board in a NetWare environment us-
ing the NIB Setup Tool, you should install the client software released fromNovell in the following cases.• Windows 95/98/Me in NDS mode configuration• Windows NT 4.0 in NDS mode configuration• Windows NT 4.0 in Bindery mode configuration• Windows 2000 in NDS mode configuration• Windows 2000 in Bindery mode configuration• Windows XP in NDS mode configuration• Windows XP in Bindery mode configuration
AAAA Log on to the Netware file server or the NDS tree as an Admin or Adminequivalent.
BBBB Run the NIB Setup Tool.
Reference p.52 “Running the NIB Setup Tool”
CCCC Click [Wizard] and click [OK].The [NIB Setup Tool - Network board list] dialog box of the Network InterfaceBoard appears.
DDDD Click [IPX protocol].
53

NetWare Configuration
54
5
EEEE Click to select the IPX address of the Network Interface Board you are con-figuring, and then click [Next >].
Note❒ If you do not know which Network Interface Board you are configuring,
print a system configuration list to check the MAC address (Network ad-dress).
FFFF Make sure that the MAC address and IPX address are correct, and click [Fin-ish].
GGGG Type the print server name into the [Device Name] box, and click [Next >].The default setting is “RDP_” followed by the 6 digit serial number. We rec-ommend that you change it to something that is easier to remember or some-thing based on the structure of the network.
HHHH In a dialog box for selecting a network environment, click to select the [Net-Ware] check box and click to clear the [TCP/IP] check box.
IIII Click [Next >].A dialog box for configuring the NetWare environment appears.
JJJJ Select [Bindery] when printing under Bindery mode, or select [NDS] whenprinting under NDS mode.
When you are using NetWare version 4.x, you should select [NDS].
KKKK If you selected [Bindery], type into the [File Server Name:] box the name of thefile server in which a print server is to be created.
After clicking [Browse], you can select a file server among those listed in the[Browse] dialog box.
LLLL If you selected [NDS], type into the [Tree:] box the name of the NDS tree inwhich the print server is created, and type the context into the [Context:] box.
Clicking [Browse], you can select an NDS tree and an NDS context amongthose listed in the [Browse] dialog boxes.As a context, object names are typed from a lower object and divided by a pe-riod. For example, if you want to create a print server into NET under DS,type “NET.DS”.
MMMM Click [Next >].

Quick Setup Using the NIB Setup Tool Wizard
5
NNNN Type the name of the machine into the [Printer Name] box, and the name ofthe print queue into the [Print Queue Name] box.
The default setting for Printer Name is “Print Server Name” followed by “_1”and for Print Queue Name is “Print Server Name” followed by “_Q” (quota-tion marks are not included). You can change them if necessary.
OOOO If you have selected the NDS mode, type the volume of the print queue intothe [Queue Volume] box. Clicking [Browse], you can select one of those shown in the [Browse] dialogbox.
PPPP Click [Next >].
A dialog box to acknowledge the printing environment appears.
QQQQ Check the environment, and then click [Next >].If you want to change the settings, click [< Back] and make the settings again.Clicking [Next >], the NIB Setup Tool automatically creates the Print Server,the Printer, and the Print Queue in the NetWare network.
RRRR After the confirmation dialog box appears, select [Quit] and click [Finish] toexit the NIB Setup Tool.
55

NetWare Configuration
56
5
NetWare 3.x - Advanced Settings
The actual procedures for configuring the machine vary depending on whetherthe Network Interface Board is configured as a print server or as a remote print-er. This section describes how to configure the machine in the NetWare 3.x en-vironment.
PreparationThe following procedures use the Property Sheet method in configuring theNetwork Interface Board. If you configure the Network Interface Board as aNetWare print server for the first time, we recommend you use the Wizardmethod. See p.53 “Quick Setup Using the NIB Setup Tool Wizard”.
Note❒ This section assumes NetWare is functional and that the necessary environ-
ment for the NetWare Print Service is available.

NetWare 3.x - Advanced Settings
5
Setting Up as a Print Server
AAAA Log on to the file server as a Supervisor or a Supervisor equivalent.
BBBB Run the NIB Setup Tool.
Reference p.52 “Running the NIB Setup Tool”
CCCC Click [Property Sheet] and click [OK].
The [NIB Setup Tool - Network board list] dialog box of the Network InterfaceBoard appears.
DDDD Click [IPX protocol].
EEEE Click the IPX address of the Network Interface Board which is to be config-ured, and then click [Next >].
Note❒ If you do not know which Network Interface Board you are configuring,
see the system configuration list to check the MAC address (Network Ad-dress).
FFFF Make sure that the MAC address and IPX address are correct, and click [Fin-ish].
The [NIB Setup Tool] window appears.
GGGG Click [Configure].The property sheet appears.
HHHH Click the [General] tab, and type the name of the print server into the [DeviceName] box.
IIII Click the [NetWare] tab, and make the following settings.
A Select [Bindery].B In the [File Server Name:] box, type the name of the file server in which a
print server is to be created.Click [Browse] to select a file server among those listed in the [Browse] dia-log box.
C Click [OK] to close the property sheet.
D After the confirmation dialog box appears, click [OK].
JJJJ On the [NIB] menu, click [Exit] to exit the NIB Setup Tool.
KKKK Type “PCONSOLE” from the command prompt.
F:> PCONSOLE
57

NetWare Configuration
58
5
LLLL Create a print queue as follows:
Note❒ If you use a currently defined print queue, go to step M.A From the [Available Options] menu, select [Print Queue Information] and press
the {{{{ENTER}}}} key.
B Press the {{{{INSERT}}}} key and type a print queue name.C Press the {{{{ESC}}}} key to return to the [Available Options] menu.
MMMM Create a printer as follows:
A From the [Available Options] menu, select [Print Server Information] and pressthe {{{{ENTER}}}} key.
B To create a new print server, press the {{{{INSERT}}}} key and type a print serv-er name.
If you use a currently defined print server, select one of the print serversshown in the [Print Server] list.
Important❒ Use the same name as that specified in the NIB Setup Tool. (Step H).
C From the [Print Server Information] menu, select [Print Server Configuration].
D From the [Print Server Configuration] menu, select [Printer Configuration].E Select the printer which is indicated as “Not Installed”.
F If you want to change the name of the printer, type a new name.
A name “Printer x” is assigned to the printer. “x” stands for the number ofthe selected printer.
G For type, select [Remote Other/Unknown].The IRQ, Buffer size, Starting form, and Queue service mode are automat-ically configured.
H Press the {{{{ESC}}}} key, and click [Yes] in the confirmation dialog box.
I Press the {{{{ESC}}}} key to return to the [Print Server Configuration] menu.
NNNN Assign print queues to the created printer as follows:A From the [Print Server Configuration] menu, select [Queues Serviced By Printer].
B Select the printer created in step MMMM.
C Press the {{{{INSERT}}}} key to select a queue serviced by the printer.
Note❒ You can select more than one queue at a time.
D Follow the instructions on the screen to make other necessary settings.
When you have finished the previous steps, make sure that the queues areassigned.

NetWare 3.x - Advanced Settings
5
OOOO Press the {{{{ESC}}}} key until “EXIT?” appears, and select [Yes] to exit PCON-SOLE.
Note❒ To make sure that the machine is correctly configured, type the following
from the command prompt.F:> USERLIST
❒ If the machine works as configured, the name of the print server appearsas an attached user.
Setting Up as a Remote Printer
AAAA Log on to the file server as a Supervisor or a Supervisor equivalent.
BBBB Run the NIB Setup Tool.
Reference p.52 “Running the NIB Setup Tool”
CCCC Click [Property Sheet] and click [OK].
The [NIB Setup Tool - Network board list] dialog box of the Network InterfaceBoard appears.
DDDD Click [IPX protocol].
EEEE Click the IPX address of the Network Interface Board to be configured, andclick [Next >].
Note❒ If you do not know which Network Interface Board you are configuring,
see the system configuration list to check the MAC address (Network Ad-dress).
FFFF Make sure that the MAC address and IPX address are correct, and click [Fin-ish].
The [NIB Setup Tool] window appears.
GGGG Click [Configure].The property sheet appears.
HHHH Click the [General] tab, and type the name of the print server into the [DeviceName] box.
59

NetWare Configuration
60
5
IIII Click the [NetWare] tab, and make the following settings.
A In the [Print Server Name:] box, type the name of the print server.B In the [File Server Name:] box, type the name of the file server in which a
print server is to be created.Click [Browse] to select a file server among those listed in the [Browse] dia-log box.
C In the [Print Server Operation Mode] group, click [As Remote Printer].
D In the [Remote Printer No.] box, type the printer number.
Important❒ Use the same printer number as that to be created in the print server.
E Click [OK] to close the property sheet.F After the confirmation dialog box appears, click [OK].
JJJJ On the [NIB] menu, click [Exit] to exit the NIB Setup Tool.
KKKK Type “PCONSOLE” from the command prompt.F:> PCONSOLE
LLLL Create a print queue as follows:
Note❒ If you use a currently defined print queue, go to step M.A From the [Available Options] menu, select [Print Queue Information] and press
the {{{{ENTER}}}} key.
B Press the {{{{INSERT}}}} key and type a print queue name.
C Press the {{{{ESC}}}} key to return to the [Available Options] menu.
MMMM Create a printer as follows.
A From the [Available Options] menu, select [Print Server Information] and pressthe {{{{ENTER}}}} key.
B To create a new print server, press the {{{{INSERT}}}} key and type a print serv-er name.
If you use a currently defined print server, select one of the print serversshown in the [Print Server] list.
Important❒ Use the same name as that specified in the NIB Setup Tool. (Step H).
C From the [Print Server Information] menu, select [Print Server Configuration].
D From the [Print Server Configuration] menu, select [Printer Configuration].E Select the printer which is indicated as “Not Installed”.
Important❒ Use the same number as that specified as Remote Printer No. using the
NIB Setup Tool. (Step I-D).

NetWare 3.x - Advanced Settings
5
F Type a new name, if you change the name of the printer, .
A name “Printer x” is assigned to the printer. “x” stands for the number ofthe selected printer.
G Select [Remote Parallel, LPT1,] for type.The IRQ, Buffer size, Starting form, and Queue service mode are automat-ically configured.
H Press the {{{{ESC}}}} key, and click [Yes] in the confirmation dialog box.
I Press the {{{{ESC}}}} key to return to [Print Server Configuration Menu].
NNNN Assign print queues to the created printer as follows:A From [Print Server Configuration Menu], select [Queues Serviced By Printer].
B Select the printer created in step MMMM.
C Press the {{{{INSERT}}}} key to select a queue serviced by the printer.
Note❒ You can select more than one queue at a time.
D Follow the instructions on the screen to make other necessary settings.
When you have finished the above steps, make sure that the queues are as-signed.
OOOO Press the {{{{ESC}}}} key until “Exit?” appears, and select [Yes] to exit PCON-SOLE.
PPPP Start the print server by typing the following from the console of the Net-Ware Server. If it is running, restart it after exiting it.
❖❖❖❖ To exitCAREE: unload pserver
❖❖❖❖ To startCAREE: load pserver print_server_name
Note❒ If the machine works as configured, “Waiting for job” appears.
61
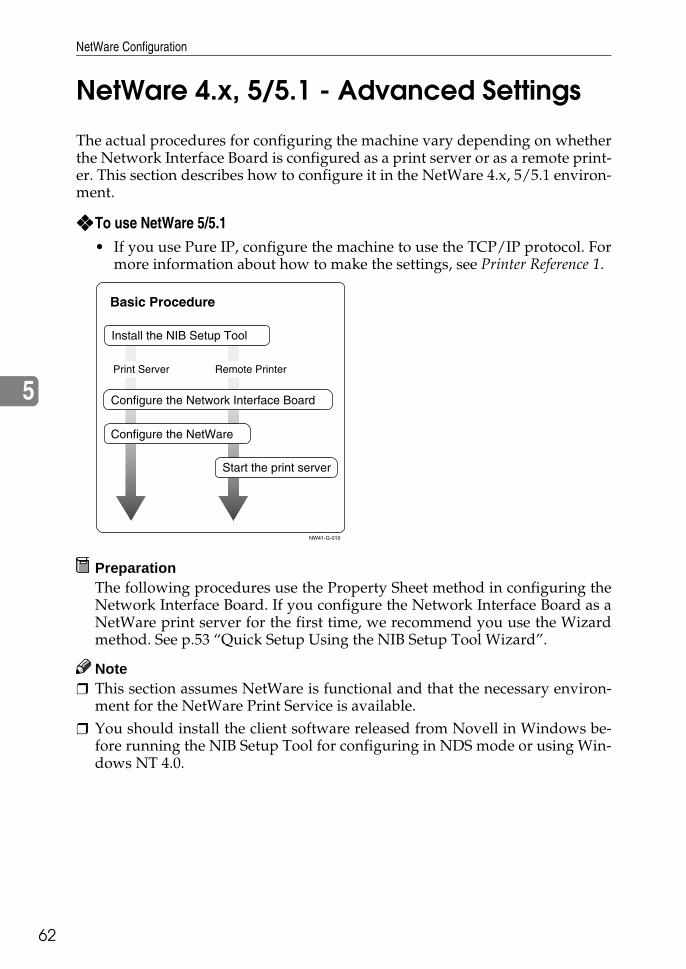
NetWare Configuration
62
5
NetWare 4.x, 5/5.1 - Advanced Settings
The actual procedures for configuring the machine vary depending on whetherthe Network Interface Board is configured as a print server or as a remote print-er. This section describes how to configure it in the NetWare 4.x, 5/5.1 environ-ment.
❖❖❖❖ To use NetWare 5/5.1• If you use Pure IP, configure the machine to use the TCP/IP protocol. For
more information about how to make the settings, see Printer Reference 1.
PreparationThe following procedures use the Property Sheet method in configuring theNetwork Interface Board. If you configure the Network Interface Board as aNetWare print server for the first time, we recommend you use the Wizardmethod. See p.53 “Quick Setup Using the NIB Setup Tool Wizard”.
Note❒ This section assumes NetWare is functional and that the necessary environ-
ment for the NetWare Print Service is available.❒ You should install the client software released from Novell in Windows be-
fore running the NIB Setup Tool for configuring in NDS mode or using Win-dows NT 4.0.

NetWare 4.x, 5/5.1 - Advanced Settings
5
Setting Up as a Print Server
Important❒ You can set up the print server using the NDS or Bindery mode in NetWare
4.x, 5/5.1. The following procedure is for setting up the print server using theNDS mode in NetWare 4.1. When you set up the print server using the Bind-ery mode, use the NIB Setup Tool Wizard. See p.53 “Quick Setup Using theNIB Setup Tool Wizard”.
Note❒ If you use Pure IP in NetWare 5/5.1, follow the procedure on p.65 “Using
Pure IP in the NetWare 5/5.1 environment”.
AAAA Log on to the file server as an Admin or an Admin equivalent.
BBBB Run the NIB Setup Tool.
Reference p.52 “Running the NIB Setup Tool”
CCCC Click [Property Sheet] and click [OK].The [NIB Setup Tool - Network board list] dialog box of the Network InterfaceBoard appears.
DDDD Click [IPX protocol].
EEEE Click the IPX address of the Network Interface Board which is to be config-ured, and then click [Next >].
Note❒ If you do not know which Network Interface Board you are configuring,
see the system configuration list to check the MAC address (Network Ad-dress).
FFFF Make sure that the MAC address and IPX address are correct, and click [Fin-ish].
The [NIB Setup Tool] window appears.
GGGG Click [Configure].
The property sheet appears.
HHHH Click the [General] tab, and type the name of the print server into the [DeviceName] box.
IIII Click the [NetWare] tab, and make the following settings.A In the [Print Sever Name:] box, type the name of the print sever.
63

NetWare Configuration
64
5
B In the [File Sever Name:] box, type the name of the file sever in which aprint server is to be created.
Click [Browse] to select a file server among those listed in the [Browse] dia-log box.
C In the [NDS Context:] box, type the context in which the print server is tobe created.
Click [Browse] to select a context among those listed in the [Browse] dialogbox.As a context, object names are typed from a lower object and divided by aperiod. For example, if you want to create a print server into NET underDS, type “NET.DS”.
D Click [OK] to close the property sheet.
E After the confirmation dialog box appears, click [OK].
JJJJ On the [NIB] menu, click [Exit] to exit the NIB Setup Tool.
KKKK From Windows, run NWAdmin.
ReferenceFor more information about NWAdmin, see the documentation that comeswith the NetWare.
LLLL Create a print queue as follows:
A Select the container object the print queue is located in among those inthe directory tree, and click [Create] on the [Object] menu.
B In the [Class of new object] box, click “Print Queue”, and click [OK].
C In the [Print Queue name] box, type the name of the print queue.D In the [Print Queue volume] box, click the [Browse] button.
E In the [Available objects] box, click the volume in which the print queue iscreated, and click [OK].
F Check the settings, and then click [Create].
MMMM Create a printer as follows:A Select the container object the printer is located in, and click [Create] on
the [Object] menu.B In the [Class of new object] box, click “Printer”, and click [OK]. When you
are using NetWare 5/5.1, click “Printer (Non NDPS)”.C In the [Printer name] box, type the name of the printer.
D Select the [Define additional properties] check box, and click [Create].

NetWare 4.x, 5/5.1 - Advanced Settings
5
NNNN Assign print queues to the created printer as follows:
A Click [Assignments], and click [Add] in the [Assignments] group.B In the [Available objects] box, click the queue created in step LLLL, and click
[OK].C Click [Configuration], and in the [Printer type] box, select [Parallel] using the
drop-down menu, and then click [Communication]. D Click [Manual load] in the [Communication type] group, and click [OK].
E Check the settings, and then click [OK].
OOOO Create a print server as follows:A Select the context specified using the NIB Setup Tool (step IIII-AAAA), and on
the [Object] menu, click [Create].B In the [Class of new object] box, click “Print Server”, and click [OK]. When
you are using NetWare 5/5.1, click “Print Server (Non NDPS)”.C In the [Print Server name] box, type the name of the print server.
Important❒ Use the same name as that specified using the NIB Setup Tool. (Step H)
D Select the [Define additional properties] check box, and click [Create].
PPPP Assign the printer to the created print server as follows:A Click [Assignments], and click [Add] in the [Assignments] group.
B In the [Available objects] box, click the printer created in step MMMM, and click[OK].
C Check the settings, and then click [OK].
Note❒ If the machine works as configured, the name of the print server ap-
pears as an attached user.
Using Pure IP in the NetWare 5/5.1 environment
AAAA Log on to the file server as an Admin or an Admin equivalent.
BBBB Run the NIB Setup Tool.
Reference p.52 “Running the NIB Setup Tool”
CCCC Click [Property Sheet] and click [OK].
The [Network board list] dialog box appears.
DDDD Click [TCP/IP protocol].
65

NetWare Configuration
66
5
EEEE Click the IP address of the Network Interface Board which is to be config-ured, and then click [Next >].
Note❒ If you do not know which Network Interface Board you are configuring,
see the system configuration list to check the MAC address (Network Ad-dress).
FFFF Make sure that the MAC address and IP address are correct, and click [Fin-ish].
The [NIB Setup Tool] window appears.
GGGG Click [Configure].
The property sheet appears.
HHHH Click the [General] tab, and type the name of the print server into the [DeviceName:] box.
IIII Click the [NetWare] tab, and make the following settings.A In the [Print Server Name:] box, type the name of the print server.
B In the [File Server Name:] box, type the name of the file server in which aprint server is to be created.
Click [Browse] to select a file server among those listed in the [Browse FileServer] dialog box.
C In the [NDS Context:] box, type the context of the print server.
Click [Browse] to select an NDS tree and an NDS context among those listedin the [Browse Context] dialog box.As a context, object names are typed from a lower object and divided by aperiod. For example, if you want to create a print server into NET underDS, type “NET.DS”.
D In the [Print Server Operation Mode] group, click [As Print Server].
E Click [OK] to close the property sheet.F After the confirmation dialog box appears, click [OK].
JJJJ On the [NIB] menu, click [Exit] to exit the NIB Setup Tool.
After this step, go to step K on p.63 “Setting Up as a Print Server”.

NetWare 4.x, 5/5.1 - Advanced Settings
5
Setting Up as a Remote Printer
AAAA Log on to the file server as an Admin or an Admin equivalent.
BBBB Run the NIB Setup Tool.
Reference p.52 “Running the NIB Setup Tool”
CCCC Click [Property Sheet] and click [OK].
The [NIB Setup Tool - Network board list] dialog box of the Network InterfaceBoard appears.
DDDD Click [IPX protocol].
EEEE Click the IPX address of the Network Interface Board to be configured, andclick [Next >].
Note❒ If you do not know which Network Interface Board you are configuring,
see the system configuration list to check the MAC address (Network Ad-dress).
FFFF Make sure that the MAC address and IPX address are correct, and click [Fin-ish].
The [NIB Setup Tool] window appears.
GGGG Click [Configure].The property sheet appears.
HHHH Click the [General] tab, and type the name of the print server into the [DeviceName] box.
IIII Click the [NetWare] tab, and make the following settings.
A In the [Print Server Name:] box, type the name of the print server.B In the [File Server Name:] box, type the name of the file server in which a
print server is to be created.Click [Browse] to select a file server among those listed in the [Browse] dia-log box.
67

NetWare Configuration
68
5
C In the [NDS Context:] box, type the context in which the print server is tobe created.
Click [Browse] to select a context among those listed in the [Browse] dialogbox.As a context, object names are typed from a lower level object and dividedby a period. For example, if you want to create a print server into NET un-der DS, type “NET.DS”.
D In the [Print Server Operation Mode] group, click [As Remote Printer].
E In the [Remote Printer No.] box, type the printer number.
Important❒ Use the same printer number as that of the printer to be created in the
print server.F Click [OK] to close the property sheet.
G After the confirmation dialog box appears, click [OK].
JJJJ On the [NIB] menu, click [Exit] to exit the NIB Setup Tool.
KKKK From Windows, run NWAdmin.
ReferenceFor more information about NWAdmin, see the documentation that comeswith the NetWare.
LLLL Create a print queue as follows:
A Select the container object the print queue is located in among those inthe directory tree, and click [Create] on the [Object] menu.
B In the [Class of new object] box, click “Print Queue”, and click [OK].C In the [Print Queue name] box, type the name of the print queue.
D In the [Print Queue Volume] box, click [Browse] button.
E In the [Available objects] box, click the volume in which the print queue iscreated, and click [OK].
F Check the settings, and then click [Create].
MMMM Create a printer as follows:
A Select the container object the printer is located in, and click [Create] inthe [Object] menu.
B In the [Class of new object] box, click “Printer”, and click [OK]. When youare using NetWare 5/5.1, click “Printer (Non NDPS)”.

NetWare 4.x, 5/5.1 - Advanced Settings
5
C In the [Printer name] box, type the name of the printer.
D Select the [Define additional properties] check box, and click [Create].
NNNN Assign print queues to the created printer as follows:
A Click [Assignments], and click [Add] in the [Assignments] group.
B In the [Available objects] box, click the queue created in step LLLL, and click[OK].
C Click [Configuration], and in the [Printer type] box, select [Parallel] using thedrop-down menu, and then click [Communication].
D Click [Manual load] in the [Communication type] group, and click [OK].E Check the settings, and then click [OK].
OOOO Create a print server as follows:
A Select the context specified using the NIB Setup Tool (Step IIII-AAAA), and onthe [Object] menu, click [Create].
B In the [Class of new object] box, click “Print Server”, and click [OK]. Whenyou are using NetWare 5/5.1, click “Print Server (Non NDPS)”.
C In the [Print Server name] box, type the name of the print server.
Important❒ Use the same name as that specified using the NIB Setup Tool. (Step H).
D Select the [Define additional properties] check box, and click [Create].
PPPP Assign the printer to the created print server as follows:
A Click [Assignments], and click [Add] in the [Assignments] group.
B In the [Available objects] box, click the queue created in the step MMMM, andclick [OK].
C In the [Printers] group, click the printer assigned in step BBBB, and click[Printer Number].
D Type the printer number and click [OK].
Important❒ Use the same number as that specified as Remote Printer No. using the
NIB Setup Tool. (Step I-E).E Check the settings, and then click [OK].
QQQQ Start the print server by typing the following from the console of the Net-Ware Server.If it is running, restart it after exiting it.
❖❖❖❖ To exitCAREE: unload pserver
❖❖❖❖ To startCAREE: load pserver print_server_name
69

NetWare Configuration
70
5
Setting Up a Client Computer
This section describes how to set up a client computer when using a NetWareprint server.
Note❒ This section assumes that the client has NetWare client applications installed
and is correctly configured to communicate with a NetWare print server. Ifnot, install the necessary applications before starting the setting up proce-dure.
Windows 95/98/Me
Follow the procedure to set up a Windows 95/98/Me client.
PreparationLog on to the NetWare file server before starting the following procedure.
AAAA Install the printer driver you want to use as “Local printer”.
ReferenceFor more information about installing the printer driver, see Printer Refer-ence 1.
Note❒ Any port can be selected during the installation, however, LPT1 is recom-
mended.
BBBB Click [Start], point to [Settings], and then click [Printers].
CCCC In the [Printers] window, click the icon of the machine you want to use.
DDDD On the [File] menu, click [Properties].
EEEE Click the [Details] tab, and click [Add Port].
FFFF Click [Network] and click [Browse].
GGGG On the network tree, double-click the name of the file server.
The queues are displayed.
HHHH Click the queue you want to print, and click [OK].
IIII Click [OK].
In the [Print to the following port:] box, a network path to the printer appears.
JJJJ Click [OK] to close the Printer Properties, and again, open it.

Setting Up a Client Computer
5
KKKK Click the [Printer Settings] tab.
LLLL Select to clear the [Form feed] and [Enable banner] check boxes.
Note❒ You should not select these boxes because they should be specified using
the printer driver. If they are selected, the printer might not print correctly.
When using the PostScript printer driver
Follow these steps to set up for the PostScript printer driver.A Click the [PostScript] tab.
B Click [Advanced].
C Click to clear the [Send CTRL+D before job] and [Send CTRL+D after job] checkboxes.
MMMM Click [OK] to close the Printer Properties.
Windows 2000/Windows XP
Follow the procedure to set up a Windows 2000/Windows XP client.
PreparationLog on to the NetWare file server before starting the following procedure.
AAAA Double-click the [My Network Places] icon on the desktop and navigate to thequeue you want to use, and then double-click it.The printers dialog box appears.
BBBB Click [No].
CCCC Close all the applications that are currently running.
DDDD Insert the CD-ROM labeled “Printer Drivers and Utilities” into the CD-ROM drive.
EEEE Install the printer driver.
ReferenceFor more information about installing the printer driver, see Printer Refer-ence 1.
FFFF From the [Port] list, select the queue you selected in step AAAA, and click [Next >].
GGGG Follow the instructions on the screen to complete the installation of theprinter driver.
71

NetWare Configuration
72
5
Windows NT 4.0
Follow the procedure to set up a Windows NT 4.0 client.
PreparationLog on to the NetWare file server before starting the following procedure.
AAAA Double-click the [Network Neighborhood] icon on the desktop and navigate tothe queue you want to use, and then double-click it.The [Printers] dialog box appears.
BBBB Click [No].
CCCC Close all the applications that are currently running.
DDDD Insert the CD-ROM labeled “Printer Drivers and Utilities” into the CD-ROM drive.
EEEE Install the printer driver.
ReferenceFor more information about installing the printer driver, see Printer Refer-ence 1.
FFFF From the [Port] list, select the queue you selected in step AAAA, and click [Next >].
GGGG Follow the instructions on the screen to complete the installation of theprinter driver.

6. Macintosh Configuration
Configuring Macintosh
Note❒ Only Type80 RCP80 can be used on Macintosh.This section describes how to configure a Macintosh computer to use EtherTalk.The actual procedures to configure a Macintosh may vary depending on the ver-sion of Mac OS. The following procedure describes how to configure Mac OS 9.1and Mac OS Χ version 10.1. If you are using other version of Mac OS and MacOS Χ, see the manual that comes with your version of Mac OS and Mac OS Χ formore information.
73

Macintosh Configuration
74
6
Changing to EtherTalk
The following procedure is for configuring a Macintosh computer to useEtherTalk.
ReferenceFor more information about installing the software required for EtherTalk,see the Macintosh manuals.
Mac OS
AAAA Open [Control Panels], and double-click the [AppleTalk] icon.
BBBB From the [Connect via:] pop-up menu, select “Ethernet”.
CCCC If you change zones, select a name from the [Current zone:] pop-up menu.
DDDD Close the [AppleTalk] control panels.
EEEE Restart the Macintosh.
Mac OS ΧΧΧΧ
PreparationYou need an administrator name and a password (phrase). For more informa-tion, consult your administrator.
AAAA Open [System Preference], and then click the [Network] icon.
BBBB Click the [AppleTalk] tab.
CCCC If you change zones, select a name from the [AppleTalk Zone:] pop-up menu.
DDDD When the setting is complete, click [Apply Now].
Configuring the Printer
Use the control panel to activate the EtherTalk protocol. (The default is active.)
ReferenceFor more information about configuration, see Printer Reference 1.

Configuring Macintosh
6
Changing the Printer Name
If the network has several same model printers, the names will be the same.Printers that have the same name will have their names changed slightly in theChooser on Mac OS or Printer list on Mac OS Χ . For example, three printersnamed “printer” will appear in the chooser as “printer0”, “printer1” and“printer2”. Use applications such as Apple Printer Utility or LaserWriter Utility to changeprinter names in the Macintosh EtherTalk environment. These utilities are dis-tributed by Apple Computer, Inc.
Changing the Zone
It may be necessary to change the zone configuration.Use applications such as Apple Printer Utility or LaserWriter Utility to changethe zone configuration in the Macintosh EtherTalk environment. These utilitiesare distributed by Apple Computer, Inc.
Note❒ If the Macintosh is configured to use TCP/IP, you can change the zone con-
figuration with a Web Browser. See p.80 “Configuring the Network InterfaceBoard with a Web Browser”.
Follow these steps to use the Apple Printer Utility.A Insert the CD-ROM into the CD-ROM drive.B Copy the “Zone Name.ps” file in the “Zone Name” folder to the hard disk.C Open the copied “Zone Name.ps” file using a text editor, and change “New-
Zone”, which is in the second line from the bottom, to the name of the newzone.%!PS-Adobe2.0%%Title: Changing Zone (EtherNet only)%%CreationDate: Tue Dec 16 1997%%EndCommentstrue 0 startjob not {ERROR} if(%EtherTalk%) << /EtherTalkZone (NewZone) >> setdevparams%%EOF
D Save “Zone Name.ps”.E Run the Apple Printer Utility, and select the printer for which the new zone
name is to be used.F Select [Send PostScript File] in the [Utilities] menu, and send “Zone Name.ps” to
the printer.
75

Macintosh Configuration
76
6

7. Appendix
Using SmartDeviceMonitor for Admin
Using SmartDeviceMonitor for Admin, you can not only monitor the status ofnetwork printers, but also change the configuration of the Network InterfaceBoard using the TCP/IP protocol or IPX/SPX protocol.SmartDeviceMonitor for Admin can do the following.• Limit the settings available from the control panel, and disable changes made
to some items.• Enable selecting the paper type loaded in the printer.• Check information about printing, paper exhaustion, and such on the compu-
ter.• Monitor multiple printers at the same time. When there are many printers,
you can create groups and classify the printers to facilitate management.• Check the printer's network settings and detailed information of devices.• Enable you to change the printer's network settings.• Check the number of pages printed for each computer using the user codes.
Note❒ Select the appropriate protocol stack for your operating system.
OS Protocol Stack
Microsoft Windows 95/98/Me TCP/IP provided with Windows 95/98/Me
IPX/SPX provided with Windows 95/98/Me
NetWare network client provided with Windows 95/98
Novell Client for Windows 95/98
Microsoft Windows 2000 TCP/IP provided with Windows 2000
IPX/SPX provided with Windows 2000
NetWare Client provided with Windows 2000
Novell Client for Windows NT/2000
Microsoft Windows XP TCP/IP provided with Windows 2000
IPX/SPX provided with Windows 2000
Microsoft Windows NT 4.0 TCP/IP provided with Windows NT
IPX/SPX provided with Windows NT
Client Service for NetWare provided with Windows NT
Novell Client for Windows NT/2000
77

Appendix
78
7
Changing the Network Interface Board Configuration
AAAA Run SmartDeviceMonitor for Admin.
BBBB Click the [Group] menu, point to [Open LAN], and then select [TCP/IP] or[IPX/SPX]. A list of printers appears.
Note❒ Select the protocol of the printer for which you want to change the config-
uration.
CCCC On the list, select a printer for which you want to change the configuration.
DDDD From the [Tools] menu, select [NIB Setup Tool].
The NIB Setup Tool starts up.
EEEE Select [Wizard] or [Property Sheet], and then click [Next].• When configuring the Network Interface Board for the first time, select
[Wizard].• When changing the configuration of the Network Interface Board or con-
figuring it in detail, select [Property Sheet].
Selecting [Wizard]
A Fill in the necessary items, and then click [Next].
Selecting [Property Sheet]
A A configuration list appears on the dialog box.
For more information about each item on the dialog box, see Help.

Using SmartDeviceMonitor for Admin
7
Managing the printed number of pages
AAAA Run SmartDeviceMonitor for Admin.
BBBB Click the [Group] menu, point to [Open LAN], and then select [TCP/IP] or[IPX/SPX].A list of printers appears.
Note❒ Select the protocol of the printer for which you want to change the config-
uration.
CCCC On the list, select a printer whose statistics information you want to man-age.
DDDD From the [Tools] menu, select [User Management Tool].
A dialog box prompting you to type a password appears.
EEEE Type the password, and then click [OK].
Note❒ The factory default password is “password”.The User Code Maintenance Tool starts up.For more information about using the User Management Tool, see SmartDe-viceMonitor for Admin Help.
79

Appendix
80
7
Configuring the Network Interface Board with a Web Browser
The Network Interface Board functions as a Web server in addition to allowingthe machine to function as a network printer. You can use a Web Browser toview the printer status and configure the Network Interface Board.
❖❖❖❖ Configuring the machineThis requires the TCP/IP protocol to be installed. After the machine has beenconfigured to use the TCP/IP protocol, it will be possible to adjust the settingsusing a Web Browser.
ReferenceFor more information about configuring the machine to use the TCP/IPprotocol, see Printer Reference 2.
❖❖❖❖ Operating system browser requirements
*1 Only Type80 RCP80 can be used on Macintosh.
Limitation❒ Sometimes after clicking [Back] , the previous page may not appear. In this
case, click [Refresh] or [Reload] .❒ The text on the screen may disappear or be aligned incorrectly if the font
size settings of the browser are too large. It is recommended that you usea font size equal to or smaller than “10 point” with Netscape Navigator,and “Medium” or smaller with Internet Explorer.
OS Browser
Windows 95/98/Me
Microsoft Internet Explorer 3.02/4.0 or later
Netscape Navigator 3.0/4.0 or later
Windows 2000
Windows XP
Windows NT 4.0
Mac OS 7.6.1 ∼ 9.2 *1
Mac OS Χ *1
Solaris 2.5 ∼ 2.6

Configuring the Network Interface Board with a Web Browser
81
7
Going to the Top Page
After launching the Web Browser, type the IP address of the machine. See theexample below. This example is for the English version.http://192.168.15.16/
(In this example, the IP address of the Network Interface Board is 192.168.15.16.)
Note❒ If a DNS server is used on the network, you can type the host name as an URL.
For example, http://webmonitor.netprinter.com/. In order to do this, youmust register the IP address and host name of the Network Interface Boardwith the DNS server. Consult the network administrator for informationabout how to do this.
❒ If you want to use any equipment in the proxy server network environment,stop the proxy server or temporarily stop access to the proxy server from theequipment.
1. Header ButtonsYou can register favorite URLs with[URL]. To view the Help section, click[Help].
Important❒ When connecting via a dial-up
connection, please be aware thatthere will be a communicationcharge as you are logging onto theInternet.
Note❒ Help is stored in the following folder
on the CD-ROM in HTML format. Thethird folder, “(Language)” may besubstituted by an appropriate lan-guage name.
\HELP\WSMHLP\(Language)\
2. Menu ButtonsButtons to configure the Network Inter-face Board and confirm the status of themachine.
Note❒ When you click [Network Config], a dia-
log box appears requesting the username and the password. Type onlythe password in this dialog box. Thefactory default password is “pass-word”.
❒ The password is the same as that usedfor remote maintenance and that usedin the NIB Setup Tool. If you change apassword with the Web Browser, theother passwords are also changed.
3. StatusDisplays the name and comments of theNetwork Interface Board, and the printerstatus.

Appendix
82
7
Verifying the Network Interface Board Settings
AAAA Start the Web browser.
BBBB Point your browser at the URL or IP address of the printer (e.g. ht-tp://XXX.XXX.XXX.XXX where the Xs are the numbers of the IP address).The status of the printer you chose appears on the Web browser.
CCCC Click [Config. Reference].
The dialog box for entering the password and user name is displayed.
DDDD Click the item you want to check.
The following items can be checked:
❖❖❖❖ [General]Shows the general settings for the machine.
❖❖❖❖ [TCP/IP]Shows the TCP/IP-related settings for the Network Interface Board.
❖❖❖❖ [NetWare]Shows the settings for printing in a NetWare environment.
❖❖❖❖ [AppleTalk]Shows the Network Interface Board settings related to the AppleTalk pro-tocol.
❖❖❖❖ [NetBEUI]Shows the Network Interface Board settings related to the NetBEUI proto-col.

Configuring the Network Interface Board with a Web Browser
7
----Linking the address (URL) to the [Help] buttonYou can link the address (URL) of the [Help] button to the Help files on the com-puter or on a Web server.A Copy the Help files on the CD-ROM to the desired location. The Help files are
located in folders labeled with abbreviated language names. For example,English Help files are in the [EN] folder. Be sure to copy the entire [EN] folderto the new location.
B Using a Web Browser, navigate to the Top Page and click [Network config.].C Type your password, (it is not necessary to type a user name) and click [OK].D Type the path to the Help files in the [Help URL] box.
If you copied the Help files to “C:\HELP\EN” , type “file://C:/HELP/”. Forexample if you copied the files to a web server and the index URL is “ht-tp://a.b.c.d/HELP/EN/index.html”, type “http://a.b.c.d/HELP/”.
E Click [Apply].When a warning message appears, select to continue configuration.
Configuring the Network Interface Board Settings
AAAA Start the Web browser.
BBBB Point your browser at the URL or IP address of the printer (e.g. ht-tp://XXX.XXX.XXX.XXX where the Xs are the number of the IP address).
The status of the printer you chose appears on the Web browser.
CCCC Click [Network Config].The dialog box for entering the password and user name is displayed.
DDDD Enter your user name and password, and then click [OK].
To use the factory default account, enter no user name and type “password”for the password.
EEEE Click the item you want to configure, and then make all the settings.The following items can be configured:
❖❖❖❖ [General]Configure the general settings for the machine here.
❖❖❖❖ [TCP/IP]Configure the TCP/IP-related settings for the Network Interface Board.
83

Appendix
84
7
❖❖❖❖ [SNMP]Configure the appropriate community settings here. Up to 10 types ofcommunity names can be registered.
❖❖❖❖ [NetWare]Configure the settings for printing in a NetWare environment here.
❖❖❖❖ [AppleTalk]Configure the Network Interface Board settings related to the AppleTalkprotocol.
❖❖❖❖ [NetBEUI]Configure the Network Interface Board settings related to the NetBEUIprotocol here.
❖❖❖❖ [IPP Authentication]If using the IPP protocol, configure the authentication settings for printinghere.
❖❖❖❖ [Password]Enter the password to change the network and machine settings or deletespooled print jobs.

Monitoring and Configuring the Printer
7
Monitoring and Configuring the Printer
Changing Names and Comments
You can change printer names and make comments for printers to easily identifythe printers listed on SmartDeviceMonitor for Client.The following utilities are used to change printer names and comments.
❖❖❖❖ SmartDeviceMonitor for AdminAllows you to change names and comments when the TCP/IP protocol orIPX/SPX protocol is available. You can install SmartDeviceMonitor for Ad-min from the CD-ROM that comes with the printer. For more informationabout installing SmartDeviceMonitor for Admin, see Setup Guide.
❖❖❖❖ Web BrowserAllows you to change names and comments when the TCP/IP protocol isavailable.
Note❒ Each of the names, one for the TCP/IP protocol form (printer name) and
NetBEUI protocol form, is changed individually. However comments arecommon to both of them.
❒ The factory default name consists of “RNP” and the last 3 bytes of theMAC address on the Network Interface Board. For example, when theMAC address is 00:00:74:62:7D:D5, the factory default name is“RNP627DD5”. Comments are not configured.
SmartDeviceMonitor for Admin
AAAA Run SmartDeviceMonitor for Admin.
BBBB Click the [Group] menu, point to [Open LAN], and select [TCP/IP] or [IPX/SPX].A list of printers appears.
Note❒ Select the protocol of the printer for which you want to change the config-
uration.
CCCC On the list, select a printer whose Network Interface Board configurationyou want to change.
DDDD From the [Tools] menu, select [NIB Setup Tool].The NIB Setup Tool starts up.
85
Appendix
86
7
EEEE Select [Property Sheet], and then click [OK].
TCP/IP
A Click the [General] tab, and then type the device name into the [DeviceName] box and a comment into the [Comment] box.• In the [Device Name] box, type the name of the printer using less than 13
characters. The factory default name consists of “RNP” and the last 3bytes of the MAC address on the Network Interface Board. For example,when the MAC address is 00:00:74:62:7D:D5, the factory default name is“RNP627DD5”. No name of 9 characters is permitted if the prefix is“RNP”. Also, when DHCP is selected as an IP address setting, thenumber of characters is limited to 13 characters.
• In the [Comment] box, type a comment about the printer using less than31 characters.
NetBEUI
A Click the [General] tab, and then type a comment into the [Comment] box.
In the [Comment] box, type a comment about the printer using less than 31characters.
B Click the [NetBEUI] tab.C Type the computer name into the [Computer Name] box.
• In the [Computer Name] box, type a name that helps you to identify aprinter using the NetBEUI protocol. The factory default name consistsof “RNP” and the last 3 bytes of the MAC address on the Network In-t e r f a c e B o a r d . F o r e x am p le , w h en t h e M A C a d d r e s s i s00:00:74:62:7D:D5, the factory default name is “RNP627DD5”. A maxi-mum of 13 characters consisting of uppercase English letters, numbers,or symbols (except "*+,/:;<=>?[\]|. and space) can be used. No name ispermitted if the prefix is “RNP”. You must avoid using a name alreadyused.
• In the [Comment] box, type a comment about the printer using less than31 characters.
FFFF Click [OK].
The NIB Setup Tool closes, and the settings are transmitted to the printer.
GGGG Exit SmartDeviceMonitor for Admin.

Monitoring and Configuring the Printer
87
7
Web Browser
AAAA Run the Web browser.
BBBB Type the address “http:// (IP address of the printer for which you want tochange the settings)”.The status of the selected printer is displayed on the Web browser.
CCCC Click [Configuration].
A dialog box that prompts you to type the user name and a password appears.
DDDD Type the user name and the password, and then click [OK].
Type only the password in this dialog box. The factory default password is“password”.
EEEE Change names and comments.
TCP/IP
A Click [General], and then type the name into the [Device Name:] box and acomment into the [Comment] box.
• In the [Device Name:] box, enter the name of the printer using less than 13characters. The factory default name consists of “RNP” and the last 3bytes of the MAC address on the Network Interface Board. For example,when the MAC address is 00:00:74:62:7D:D5, the factory default name is“RNP627DD5”. No name of 9 characters is permitted if the prefix is“RNP”. Also, when DHCP is selected as an IP address setting, thenumber of characters is limited to 13 characters.
• In the [Comment] box, type a comment about printer using less than 31characters.
NetBEUI
A Click [NetBEUI].
B Type the name into the [Computer Name] box and a comment into the [Com-ment] box.
• In the [Computer Name] box, type a name that helps you to identify print-ers using the NetBEUI protocol. The factory default name consists of“RNP” and the last 3 bytes of the MAC address on the Network Inter-face Board. For example, when the MAC address is 00:00:74:62:7D:D5,the factory default name is “RNP627DD5”. A maximum of 13 charactersconsisting of uppercase English letters, numbers, or symbols (except"*+,/:;<=>?[\]|. and space) can be used. No name is permitted if theprefix is “RNP”. You must avoid using a name already used.
• In the [Comment] box, type a comment about the printer using less than31 characters.

Appendix
88
7
FFFF Click [Apply].
The settings are transmitted to the printer.
GGGG Exit the Web browser.
Displaying the Status of Printers
You can view the status of printers using SmartDeviceMonitor for Admin,SmartDeviceMonitor for Client, or Web browser.
SmartDeviceMonitor for Admin
AAAA Run SmartDeviceMonitor for Admin.
BBBB Click the [Group] menu, point to [Open LAN], and then select [TCP/IP] or[IPX/SPX].
The status of printers is indicated with an icon in the list.
Note❒ For more information about the status icons, see SmartDeviceMonitor for
Admin Help.
CCCC For more information, click to select the desired printer from the list, andthen click [Open] on the [Device] menu.
The status of the printer is displayed in the dialog box.
Note❒ For more information about each item in the dialog box, see Help.
SmartDeviceMonitor for Client
To view the status of a printer using SmartDeviceMonitor for Client, you must,in advance, configure SmartDeviceMonitor for Client so it monitors the printerwhose status you want to view.
Monitoring Printers
AAAA Run SmartDeviceMonitor for Client.The “Welcome to SmartDeviceMonitor for Client” screen appears.
Note❒ Click on [Do not show this message again.] to stop the message being dis-
played each time you launch SmartDeviceMonitor for Client.❒ The remaining instructions in this manual assume that this screen is not
displayed.

Monitoring and Configuring the Printer
89
7
BBBB Click [OK].
The SmartDeviceMonitor for Client icon appears at the right end of the taskbar.
CCCC Right-click the SmartDeviceMonitor for Client icon, and check if the de-sired printer is configured on the pop-up menu that appears.If it is configured, see SmartDeviceMonitor for Client Help.
DDDD If the desired printer is not configured, click [Options] on the pop-up menu.
The [SmartDeviceMonitor for Client - Options] dialog box appears.
EEEE Click the printer to be monitored, and select the [To Be Monitored] check boxfrom the [Monitoring Information Settings] group.
Note❒ Selecting the [Displayed on Task Bar] check box will show the status of a print-
er with an icon on the SmartDeviceMonitor for Client icon on the task bar.
FFFF Click [OK].The dialog box closes and the configured printer is monitored.
Displaying the Status of Printers
AAAA Run SmartDeviceMonitor for Client.
BBBB The status of printers is displayed on the SmartDeviceMonitor for Clienticon on the task bar.
Note❒ For more information about the status icons, see SmartDeviceMonitor for
Client Help.
CCCC For more information on the status, right-click the SmartDeviceMonitor forClient icon, and then click the desired printer.
The status of the printer is displayed in the dialog box.
Note❒ For more information about each item in the dialog box, see Help.
Web Browser
AAAA Run the Web browser.
BBBB Type the address “http:// (IP address of the printer whose status you want to view)”.
The status of the selected printer is displayed in the Web browser.
CCCC Click [Status] and you can check the status of the printer.
Note❒ For more information about each item, see Help.

Appendix
90
7
Assigning IP Address with ARP+PING
Using TCP/IP, you can assign the IP address using ARP and PING. The follow-ing example is for a BSD UNIX workstation (SunOS 4.x).
PreparationARP+PING should be set to active on the network boot configuration beforeassigning the IP address using ARP+PING. For more information about set-ting it to active, see Printer Reference 1.
AAAA Log on to the workstation as root.
BBBB Use the arp command to assign the IP address to the MAC address of theNetwork Interface Board.
# arp -s 192.168.15.16 00:00:74:62:5C:65
Note❒ 192.168.15.16 is the IP address, 00:00:74:62:5C:65 is the MAC address.
CCCC Assign the IP address using the ping command.# ping 192.168.15.16
DDDD Use the ping command again to confirm the address.
# ping 192.168.15.16
If the address has been configured correctly, the following message appears.192.168.15.16 is alive
If the address has been configured incorrectly, the following message ap-pears.no answer from 192.168.15.16
----How to Confirm the MAC AddressThe MAC address (Ethernet address) of the Network Interface Board is requiredin order to use ARP and PING to assign the IP address.The MAC address can be seen on the system configuration list.
ReferenceFor how to print the system configuration list, see Printer Reference 2.
Note❒ The MAC address can also be seen on the system configuration list. For more
information about the system configuration list, see p.119 “System Configu-ration List (Network Configuration)”.

Remote Maintenance by telnet (mshell)
7
Remote Maintenance by telnet (mshell)
You can view the machine status and configure the Network Interface Board us-ing telnet.
Note❒ You should specify a password so that only the network administrator, or a
person having network administrator privileges, can use remote mainte-nance.
Using telnet
The following is a sample procedure in using telnet.
Limitation❒ Only one person at a time can be logged on to do remote maintenance.
AAAA Using the IP address or host name of the machine, start telnet.
% telnet IP_address
Note❒ In order to use the host name instead of the IP address, you must write it
to the /etc/hosts file.
BBBB Type the password.
Note❒ The factory default is “password”.
CCCC Type a command.
Reference For more information about telnet commands, see p.92 “Commands List”.
DDDD Exit telnet.
msh> logout
When the configuration is changed, a confirmation message requests whetheror not the changes should be saved.
EEEE Type “yes” to save the changes, and press the {{{{ENTER}}}} key.If you do not want to save the changes, type “no”and press the {{{{ENTER}}}} key.If you want to make additional changes, type “return” at the command line,and press the {{{{ENTER}}}} key.
Note❒ If the “Cannot write NVRAM information” message appears, the changes
are not saved. Repeat the steps above.
91

Appendix
92
7
❒ The Network Interface Board is reset automatically when the settings arechanged.
❒ When the Network Interface Board is reset, the active print job which hasalready been sent to the machine will finish printing. However, jobs thathave not been sent yet will be canceled.
Commands List
This is a list of commands that can be used via remote maintenance.
Note❒ Type “help” to see a list of commands that can be used.
msh> help
❒ Type “help command_name” to display information about the syntax of thatcommand.msh> help command_name
TCP/IP address
Use the ifconfig command to configure TCP/IP for the machine (IP address, sub-net mask, broadcast address, default gateway address).
❖❖❖❖ Referencemsh> ifconfig
❖❖❖❖ Configurationmsh> ifconfig le0 parameter address
The following is an example for configuring an IP address of 192.168.15.16.msh> ifconfig le0 192.168.15.16
The following is an example for configuring a subnet mask of 255.255.255.0.msh> ifconfig le0 netmask 255.255.255.0
Note❒ This affects the configuration of the Network Interface Board of the IP ad-
dress that is used.❒ To type an address using hexadecimal, prefix it by “0x”.
Parameter Meaning
(no parameter) IP address
netmask subnet mask
gateway default gateway address

Remote Maintenance by telnet (mshell)
7
----Address
❖❖❖❖ Subnet MaskA number used to mathematically “mask” or hide the IP address on the net-work by eliminating those parts of the address that are alike for all the ma-chines on the network.
❖❖❖❖ Default Gateway AddressA gateway is a connection or interchange point that connects two networks.A gateway address is for the router or host computer used as a gateway.
Note❒ To get the above addresses, contact your network administrator.
Access Control
Use the access command to view and configure access control.You can also configure multiple access controls with the multi command.
❖❖❖❖ Referencemsh> access
❖❖❖❖ Configurationmsh> access parameter address
Note❒ The Access Control Address and the Access Control Mask are used to limit
access to the computer used for printing by denying access to users based ontheir IP address. If it is not necessary to limit access, set the Access ControlMask to “0.0.0.0”.
❒ When the Access Control Address matches the masked result of the IP ad-dress computer attempting to print, print jobs from that IP address will be ac-cepted by the Network Interface Board.
Parameter Meaning
control Access Control Address
mask Access Control Mask
93

Appendix
94
7
❒ For example, if you assign 192.168.15.16 as the Access Control Address of theNetwork Interface Board, the IP addresses that can print are as follows. XXXmeans any number from 1 to 255 is acceptable.
❖❖❖❖ Configuration for multiple access controlsmsh> access multi {on | off} •“on” means active and “off” means inactive.msh> access {1 - 5} parameter address
Note❒ Up to 5 access controls are available. Specify the number (1 - 5) when con-
figuring some access controls. If this is not configured, the first setting isselected.
Network Boot
Use the set command to configure the boot method.msh> set parameter {on | off}
•“on” means active and “off” means inactive.
Note❒ When you use RARP+TFTP, BOOTP or DHCP, the server also needs to be
configured.❒ DHCP takes precedence over all other settings.
Access Control Mask IP addresses that can access the machine
0. 0. 0. 0 XXX.XXX.XXX.XXX
255. 0. 0. 0 192.XXX.XXX.XXX
255.255. 0. 0 192.168.XXX.XXX
255.255.255. 0 192.168. 15.XXX
255.255.255.255 192.168. 15. 16
Parameter Meaning
ping ARP+PING
tftp RARP+TFTP
bootp BOOTP
dhcp DHCP (Dynamic Host Configuration Protocol)

Remote Maintenance by telnet (mshell)
7
Protocol
Use the set command to allow/prevent remote access for each protocol.msh> set protocol {up | down}
Note❒ If you prohibit remote access using TCP/IP and then log out, you cannot use
remote access. If this was a mistake, you can use the machine's operation pan-el to allow access by TCP/IP.
❒ When you prevent access via TCP/IP, you are also prevented from using lpr,ftp, rsh, diprint, web, snmp, npmp, and ipp.
Machine status
The following commands can be used to get information about the current statusof the machine.msh> command
Note❒ More information about any print job is displayed when the ID number is
added after the prnlog command.
ReferenceFor more information about the meaning of the data returned with these com-mands, see p.104 “Configuring the Network Interface Board”.
Protocol
AppleTalk
tcpip
netware
netbeui
lpr
ftp
rsh
diprint
npmp
web
snmp
ipp
“up” means active and “down” means inactive.
Command Information that is displayed
info Information about the paper tray, output tray and printer language of the machine.
netstat Information about the Network Interface Board. (Network Statistical Information)
95

Appendix
96
7
Network Interface Board configuration settings information
Use the show command to display the Network Interface Board configurationsettings.msh> snmp [-p]
Note❒ Add “-p” to the show command to have the information displayed one screen
at a time.
ReferenceFor more information about the meaning of the data returned with this com-mand, see p.104 “Configuring the Network Interface Board”.
System log information
Use the syslog command to display information stored in the machine's systemlog. msh> syslog
ReferenceFor more information about the displayed information, see p.107 “SystemLog Information”.
SNMP
Use the snmp command to display and edit SNMP configuration settings suchas the community name.
Note❒ You can configure from ten SNMP access settings numbered 1–10.❒ Default access settings 1 and 2 are as follows.
❖❖❖❖ DisplayShows the SNMP information and available protocols.msh> snmp ?msh> snmp [-p] [registered_number]
Note❒ If the -p option is added, you can view the settings one by one.❒ Omitting the number displays all access settings.
Number 1 2
Community name public admin
IP address 0.0.0.0 0.0.0.0
Access type read-only
trap off
read-write
trap off

Remote Maintenance by telnet (mshell)
7
❖❖❖❖ Community name configurationYou can set the community name of the Network Interface Board.msh> snmp number name community_name
Note❒ The community name must consist of 15 characters or less.
❖❖❖❖ Access type configurationYou can select the access type from those listed below.msh> snmp number type access_type
❖❖❖❖ Protocol configurationYou should use the following command to set the protocols to active or inac-tive. If you set a protocol to inactive, all access settings set to use that protocolare disabled.msh> snmp {ip | ipx} {on | off}
• “on” means active and “off” means inactive
To change the protocol of an access settings, use the following command.However, if you disabled a protocol with the above command, making it ac-tive here will have no effect.msh> snmp number active {ip | ipx} {on | off}
❖❖❖❖ Access configurationYou can configure the address of a host depending on the protocols used. The Network Interface Board accepts requests only from hosts having ad-dresses with access types of “read-only” or “read-write”. Type “0” to have theNetwork Interface Board accept requests from any host without requiring aspecific type of access.
Command syntax:msh> snmp number {ip | ipx}address
Note❒ To specify the TCP/IP protocol, type ip followed by a space and then the
IP address.❒ To specify the IPX/SPX protocol, type ipx followed by a space and then the
IPX address followed by a decimal and then the MAC address of the Net-work Interface Board.
Access type Type of access which is permitted
read Read only
write Read and write
trap User is notified of trap messages.
no All access is denied.
97

Appendix
98
7
The following is an example of how to configure registration number 3 withthe IP address 192.168.15.16.msh> snmp 3 ip 192.168.15.16The following is an example of how to configure registration number 3 withthe IPX address 7390A448, and the MAC address 00:00:74:62:5C:65.msh> snmp 3 ipx 7390A448.000074625C65
IPP
Use the ipp command to configure the IPP settings.
❖❖❖❖ View settingsThe following command displays the current IPP settings.msh >ippExample output:timeout=900(sec)auth basic
• The “timeout” setting specifies how many seconds the computer keeps try-ing to access the network printer to send print jobs when no connectioncould be made.
• The “auth” setting indicates the user authorization mode.
❖❖❖❖ IPP timeout configuration Specify how many seconds to wait before canceling a print job if it has beeninterrupted for some reason. The range of time can be changed between 30 to65535 seconds.msh>ipp timeout {30 -65535}
❖❖❖❖ IPP user authorization configurationUse the IPP user authorization to restrict users that can print with IPP. Thefactory default is “off”.ipp auth {basic|digest|off}
• “basic” and “digest” are user authorization setting.• “off” removes a user's authorization.
Note❒ If you select “basic” or “digest”, see next sectionp.99 “Configuring IPP
user authorization” for how to configure the user name. Up to ten usernames are available.

Remote Maintenance by telnet (mshell)
7
❖❖❖❖ Configuring IPP user authorizationUse the following command:ipp userThe following message appears.Input user number (1 to 10):Type the number, user name and password.IPP user name:user1IPP password:*******"After configuring the settings, the following message appears.User configuration changed.
Changing the password
Use the passwd command to change the remote maintenance password.
Important❒ Be sure not to forget or lose the password.
Note❒ The default factory password is “password”.
AAAA Type “passwd”.
msh> passwd
BBBB Type the current password.
Old password:
CCCC Type the new password.New password:
Note❒ The password must consist of 3 to 8 alphanumeric characters and symbols.
Upper and lower case characters are considered unique. For example, R isdifferent from r.
❒ The password is the same as that used in the configuration of the NetworkInterface Board using a Web Browser and that used in the NIB Setup Tool.If you change a password from telnet, the other passwords are alsochanged.
DDDD Type the new password once again.
Retype new password:
99

Appendix
100
7
Changing the NetBIOS name
Use the hostname command to change the NetBIOS name of the machine.msh> hostname NetBIOS name of the machine
Note❒ The NetBIOS name consists of up to 13 alphanumeric characters.❒ You cannot use a name starting with “RNP” or “rnp”.
WINS
Use the wins command to configure the WINS server.
ReferenceFor how to configure the WINS server, see p.116 “Configuring a WINS Serv-er”.
❖❖❖❖ WINS configurationUse the set command to make WINS active or inactive.msh> set wins {on|off}
• “on” means active and “off” means inactive.
❖❖❖❖ View settingsThe following command displays the IP addresses of the WINS server.msh> winsExample output:wins: primary server 192.168.10.1 secondary server192.168.10.2wins server current config: secondary server 192.168.10.1secondary server 192.168.10.2 hostname 123456789abcd Sco-peID
Note❒ The current configuration appears on the second line when DHCP is ac-
tive. When DHCP is not active, there is no second line.❒ If the network boot setting is changed to another from DHCP, the WINS
server IP addresses that were saved on the machine may differ from thecurrent IP addresses.
❖❖❖❖ Address configurationSpecify the WINS server IP addresses.msh> wins {primary|secondary}IP_addressUse “primary” to specify the primary WINS server IP address, and use “sec-ondary” to specify the secondary WINS server IP address.

Remote Maintenance by telnet (mshell)
7
AutoNet
Use the set command to configure AutoNet.
ReferenceFor more information about AutoNet, see p.118 “Using AutoNet”.
msh> set autonet {on|off}
•“on” means active and “off” means inactive.
Changing the password
Use the passwd command to change the remote maintenance password.
Important❒ Be sure not to forget or lose the password.
Note❒ The default factory password is “password”.
AAAA Type “passwd”.
msh> passwd
BBBB Type the current password.Old password:
CCCC Type the new password.
New password:
Note❒ The password must consist of 3 to 8 alphanumeric characters and symbols.
Upper and lower case characters are considered unique. For example, R isdifferent from r.
❒ The password is the same as that used in the configuration of the NetworkInterface Board using a Web Browser and that used in the NIB Setup Tool.If you change a password from telnet, the other passwords are alsochanged.
DDDD Type the new password once again.Retype new password:
101

Appendix
102
7
SNMP
The Network Interface Board functions as a SNMP (Simple Network Manage-ment Protocol) agent using the UDP and IPX protocols. Using the SNMP man-ager you can get information about the machine.The factory default community names are “public” and “admin”. You can getMIB information using these community names.
ReferenceFor more information about configuring the community name, see p.96“SNMP” in “Remote Maintenance by telnet”.
Limitation❒ The kinds of supported MIBs differ depending on the printer.
❖❖❖❖ Supported MIBs• MIB-II• PrinterMIB• HostResourceMIB• RicohPrivateMIB

Understanding the Displayed Information
7
Understanding the Displayed Information
This section describes how to read status information returned by the NetworkInterface Board.
Network Statistical Information
Use the following command to view Network Interface Board network statistics.Detailed information about the words used to describe the status of the NetworkInterface Board are described below.• mshell : Use the info command. See p.95 “Machine status”.
Item name Meaning
System elapsed time The time that has passed since the Network Interface Board start-ed.
Total printing time The total time spent in processing the print data.
Total open count The total open (printing process) count that the application re-quired.
Current connection count The current number of open connections with the Network Inter-face Board.
Total connection count The total number of print jobs sent to the Network Interface Board.
Print error count The number of times the printing process sent an error message.
Access error count The number of times the connection was refused because of the access control value.
Print request full count The number of times a connection was refused because the number of print requests exceeded the number of allowed ses-sions.
103

Appendix
104
7
Configuring the Network Interface Board
The Network Interface Board settings can be displayed and confirmed using thecommands below.• mshell : Use the show command. See p.96 “Network Interface Board config-
uration settings information”.
Item name Meaning
Common
Mode
Protocol Up/Down
AppleTalk
TCP/IP
NetWare
NetBEUI
NVRAM version
Device name
Comment
Location
Contact
Soft switch
Up means active, Down means inactive.
Internal version number.
AppleTalk
Mode
Net
Object
Type
Zone
AppleTalk protocol in selection.
Network number.
Macintosh printer name.
The type of printer.
Name of the zone that the machine belongs to.

Understanding the Displayed Information
7
TCP/IP
Mode
ftp
lpr
rsh
diprint
web
telnet
download
npmp
snmp
ipp
wins
EncapType
Network boot
Filter
Max DSTs
Address
Netmask
Broadcast
Gateway
AccessCtrl
AccessMask
Primary WINS
Secondary WINS"
Time server
Home page URL
Home page link name
Help page URL
SNMP protocol
Up means active, Down means inactive.
Frame type.
Network boot.
Internal parameter.
Internal Information
IP address.
Subnet mask.
Broadcast address.
Default gateway address.
Access control address.
Access control mask.
Primary WINS server address
Secondary WINS server address
URL of homepage.
URL name of homepage.
URL of help page.
Protocol used with SNMP.
Item name Meaning
105

Appendix
106
7
NetWare
Mode
EncapType
RPRINTER number
RPRINTER name
Print server name
Fileservername
Context name
Switch
Mode
NDS/Bindery
Packet negotiation
Print job timeout
(this value is fixed)
Frame type.
Remote printer number.
Remote printer name.
Print server name.
Name of the connect file server.
Context of print server.
Active mode.
(this value is fixed)
Time of the job timeout.
NetBEUI
Mode
Switch
Mode
Directprint
Notification
Workgroup name
Computer name
Comment
Share name[1]
(this value is fixed)
(this value is fixed)
(this value is fixed)
Notification of print job completion.
Name of the workgroup.
Name of the computer.
Comment.
Share name (name of the printer type).
Shell mode Mode of the remote maintenance tool.
Item name Meaning

Message List
7
Message List
This is a list of messages written to the machine's system log. The system log canbe viewed using the syslog command.
System Log Information
You can use the following methods to view the system log.• mshell : Use the syslog command. See p.96 “System log information”.
Message when the Network Interface Board starts or restarts
Network Interface Board Ver.x.x.x The version number of the Network Interface Board.
PRINTER SYSTEM “system name” Ver.x.x.x The system name and version of the machine.
Attach FileServer=“file server name” The machine is attached to “file server name” as the nearest server.
Current Interface Speed:xxxMbps The speed of the network (10 Mbps or 100 Mb-ps).
Current IPX address The current IPX address.
Frametype=“frame type name” The “frame type name” is configured to be used on NetWare.
NetBEUI Computer Name=“computer name” The NetBEUI Computer Name is defined as “computer name”.
Start httpd The Web server has been started.
Start npmpd for IPX The npmpd for IPX protocol has been started.
Start npmpd for TCP/IP The npmpd for TCP/IP protocol has been started.
Start smbd direct print mode(NetBEUI) You can print from a client on the Windows network via the print server.
Start snmpd Ver.2.0 The SNMP agent of the displayed version has been started.
Vendor= , Country= , Lang= The vendor, the country code, and the lan-guage.
107

Appendix
108
7
NetWare (When the Network Interface Board is started)
❖❖❖❖ When working as a print server
❖❖❖❖ When working as a remote printer
Access to NetWare server “file server name” denied. Either there is no account for this print server on the NetWare server or the password was incorrect.
Cannot log in to the file server. Confirm that the print server is registered on the file serv-er. If a password is specified for the print server, delete it.
Attach to print queue “print queue name” Attached to the print queue.
Login to fileserver “file server name” (“NDS|BINDERY”)
Logged in to the file server with NDS or BINDERY mode.
Open log file “file name” The specified log file has been opened.
Printer “printer name” has no queue The print queue is not assigned to the ma-chine. Using NWAdmin, assign the print queue to the machine, and then restart it.
Print queue “print queue name” cannot be serviced by printer 0, “print server name”
Print services are not available for the print queue. Confirm that the volume of the print queue exists on the specified file server.
The print server received error “error number” during attempt to log in to the net-work. Access to the network was denied. Verify that the print server name and pass-word are correct.
Cannot log in to the file server. The print server is not registered or the password is specified. Register the print server without specifying a password.
Cannot create service connection Cannot establish a connection with the file server. Your request may exceed the maxi-mum number of connections that the file server can deal with at a time.
Cannot find the printer (“print server name”/”printer number”)
The printer having the number displayed on the print server does not exist. Confirm the number of the machine registered to the print server.
Establish a connection with the print server, “print server name”
A connection with the print server has been established.
No local target for “print server name” Cannot get routing information about the file server. If a different frame type is configured from that used on the network, you should select “Auto Select” as a frame type.
Required file server (“file server name”) not found
Cannot find the required file server.
Could not to attach to print server (“print server name”)
Cannot connect to the print server. The print server refuses a connection for some reason. Confirm the configuration of the print serv-er.

Message List
7
NetBEUI (When the Network Interface Board is started)
TCP/IP
❖❖❖❖ When the address is configured
❖❖❖❖ When using lpr
At the beginning of the message, the IP address of the client is displayed with-in parentheses.
Back to default name (<Computer name>) The same computer name is detected on the network. As unable to add computer name to the suffix, the computer name back to default name. Configure a new computer name that is unique.
Print session full Cannot accept the print session.
Required computer name (<Computer name>) is duplicated name
The same computer name is detected on the network. The start job determines the compu-ter name by adding the computer name to the suffix (0,1....). Configure a new computer name that is unique.
Invalid gateway address The gateway address is not correct for the specified IP address.
filter data error Some data cannot be handled by the filter option. Confirm the file code and the settings of the filter option.
lost connection The connection was cut by the other party. Check the machine to which you requested to print.
print requests full Cannot accept the print request (max. 5 ses-sions). Confirm the status of the machine with lpq, rsh, rcp or ftp, and print it again af-ter the print request becomes less than 5 ses-sions.
However, the maximum request when using ftp command is 3.
printer permission denied Cannot get permission to use the machine. Confirm the access rights with the access control address and the access control mask.
printer refuse Something is wrong with the machine. Con-firm the status of the machine.
109

Appendix
110
7
❖❖❖❖ When using rsh, rcp, ftp
At the beginning of the message, the IP address is displayed in parentheses.
Can't build data connection: “message” Cannot establish a connection for data trans-fer due to the displayed error. Check the ftp of the workstation that requested the print job, and start it again. When using ftp, this message remains only on the system log in-formation.
cmd_name:Command not supported The remote shell command using cmd_name is not supported. You should use only the print, stat, syslog and info, commands. You should access the machine only with rsh and rcp remote shell commands.
command line too long The command line is too long.
file_name:No such file or directory You must use a file name with the srat, sys-log, info and instal commands.
filter data error Some of the data cannot be handled with the filter option. Confirm the file code and the settings of the filter option.
get log busy Another machine is getting the log informa-tion. You should get it afterwards.
lost connection The connection was cut by the other party. Check the ftp of the workstation that re-quested the print job, and start it again. When using ftp, this message remains only on the system log information.
no more ftp execute More than three users at a time cannot log in using ftp. Since there are three other users that have already logged in, wait until the job is finished.
print requests full Cannot accept the print request.(max. five sessions) Confirm the status of the machine with lpq, rsh, rcp, and ftp commands, and print it again after the number of print re-quests (sessions) becomes less than five.
However, the maximum request when using ftp command is 3.
printer busy Cannot get the machine information. Anoth-er user may be accessing it. Wait a few min-utes before trying again.
printer permission denied Cannot get a permission to use the machine. Confirm the access right with the access con-trol address and the access control mask.
printer refuse Something is wrong with the machine. Con-firm the status of the machine.

Message List
7
❖❖❖❖ When using SNMP
Error numbers in the messages are codes for internal use.
❖❖❖❖ When using DHCP
Exit snmpd The agent is complete. Reset the machine or turn the machine off and on.
recvfrom:packet discarded,length(Reception packet length)> (Packet size),from addr <Ad-dress of partner point>
The received packet was ignored since the length of the packet exceeds the limit. Con-firm whether the administration station sent a packet is longer than 1025 bytes.
session <Community name appointed> not defined
The community name of the received packet is not defined. Confirm that the community name of the administration station is the same as that specified for the machine.
snmpin:Bad use of session <community Name> from <Address>
The community name of the received packet is not the same as that of the administration station. Confirm the community name spec-ified to the machine.
snmpin:error in snmpdecipher,code (<Error number>)
An error occurred with the received packet. Check if the number of the objects sent from the administration station is more than 31 and if there are wrong MIB requests.
snmpin:error in snmpservsend,code (<Error number>)
Cannot send a response packet. Normally, this message is followed by the messages.
snmpin:pkt too large,code (<Error number>) The response packet to the request is too big to send. Reduce the number of the objects per request.
nmpin:error in sending too large request back,code (<Error number>),giving up
The packet notifying the error is too big to send. Reduce the number of the objects per request.
snmpin:received bad version The version of the received packet is invalid. Confirm that the version of the administra-tion station is version-1(0).
Connected DHCP Server(<IP address as-signed by the DHCP server>)
The IP address is assigned by the DHCP server.
Current IP address(<Current IP address>) This IP address assigned by the DHCP serv-er is used.
DHCP lease time is infinity Lease time of the IP address assigned by the DHCP server is infinity.
Auto-configured IP address(<Current IP ad-dress>)
This IP address assigned by AutoNet is used.
111

Appendix
112
7
❖❖❖❖ When using WINS
The Error number is the number that is sent in response to the WINS servererror code.
WINS name registration/refresh error code=<IP address of the WINS server> Net-BIOS Name=<NetBIOS name>
Registering the NetBIOS name of the ma-chine with the WINS server is complete.
WINS server address 0.0.0.0 The WINS server IP addresses are not speci-fied. Specify the IP addresses.
WINS name registration/refresh error code (Error number)
Cannot register or refresh the NetBIOS name of the machine with a WINS server.
Check if the WINS server IP addresses are specified correctly.
Confirm that WINS server is available.
Configure a new NetBIOS name that is unique.
WINS name registration: Server No Re-sponse
WINS wrong scopeID
There is no reply on registration or refresh request from the WINS server.
Check if the WINS server IP addresses are specified correctly.
Confirm that WINS server is available.
WINS wrong scopeID The wrong scope ID is used.
Configure the correct scope ID.

Precautions
7
Precautions
Please pay attention to the following when using the Network Interface Board.When configuration is necessary, follow the appropriate procedures below.
Connecting a Dial Up Router to a Network
When the NetWare file server and the machine are on the opposite side of a rout-er, packets are continuously sent back and forth, possibly causing communica-tion charges to increase. Because the packet transmission is a specification ofNetWare, you need to change the configuration of the router. If the network youare using does not allow you to configure the router, configure the machine.
Configuring the router
Filter the packets so that they do not pass over the dial up router.
Note❒ The MAC address of the machine doing the filtering is printed on the system
configuration list. For more information about printing the system configura-tion list, see p.119 “System Configuration List (Network Configuration)”.
❒ For more information about configuring the machine if the router cannot beconfigured, see the instructions below.
Configuring the machine with NetWare
AAAA Following the setup method in this manual, configure the file server.
BBBB Set the frame type for a NetWare environment.
ReferenceFor more information about selecting a frame type, see Printer Reference 1.
Configuring the machine without NetWare
AAAA While not printing, the Network Interface Board sends packets on the net-work. Set the NetWare to inactive.
ReferenceFor more information about selecting a protocol, see Printer Reference 1.
113

Appendix
114
7
PostScript Printing from Windows
When printing PostScript from Windows, see Printer Reference 2 for how to con-figure the Network Interface Board and printer driver.
NetWare Printing
Form Feed
You should not configure the form feed on NetWare. The form feed is controlledby the printer driver on Windows. If the NetWare form feed is configured, themachine might not print properly. If you want to change the form feed setting,always configure it on Windows.• With Windows 95/98/Me, clear the [Form feed] check box on the [Printer Set-
tings] tab in the [Printer Properties] dialog box.• With Windows 2000, clear the [Form feed] check box on the [Netware Settings]
tab in the [Printer Properties] dialog box.• With Windows NT 4.0, clear the [Form feed] check box on the [Netware Settings]
tab in the [Printer Properties] dialog box.
Banner Page
You should not configure a banner page on NetWare. If you want to change thebanner page setting, always configure it on Windows. • With Windows 95/98/Me, clear the [Enable banner] check box on the [Printer
Settings] tab in the [Printer Properties] dialog box.• With Windows 2000, clear the [Enable banner] check box on the [Netware Set-
tings] tab in the [Printer Properties] dialog box.• With Windows NT 4.0, clear the [Enable banner] check box on the [Netware Set-
tings] tab in the [Printer Properties] dialog box.
Printing after resetting the machine
After resetting the remote printer, it will be cut off from the print server for about30-40 seconds before connecting again. Due to the NetWare specification, printjobs may be accepted, but they will not be printed during this interval.When using the machine as a remote printer, wait about 2 minutes after resettingthe machine before attempting to print.

Precautions
7
When Using DHCP
Note the following points when using DHCP (Dynamic Host Configuration Pro-tocol).
Supported systems
Windows 2000 Server, Windows NT Server 4.0 and NetWare 5 can be config-ured as a DHCP server.
Configure the machine with a reserved IP address
To always assign the same IP address, configure a reserved IP address using theDHCP server.
Note❒ When multiple DHCP servers are used, reserve the same address with each
DHCP server. The Network Interface Board needs to receive informationfrom the DHCP server that it contacts.
Follow these steps to configure the machine with a reserved IP address.
AAAA Start the DHCP manager.
BBBB Select the scope that will be used, and on the [Scope] menu, click [Reserva-tion].
CCCC Type the IP address into [IP Address].
DDDD Type the MAC address of the Network Interface Board into [Unique Identifi-er].
Note❒ Do not use hyphens to separate the numbers.❒ If you do not know the MAC address, it can be found on the system con-
figuration list. See p.119 “System Configuration List (Network Configura-tion)”.
EEEE Type a name and comment into the [Client Name] box and the [Client Comment]box.
Note❒ For more information about client names, see p.116 “Additional informa-
tion”.
FFFF Click [Add].An IP address is reserved.
GGGG Click [Close] to close the dialog box.
115

Appendix
116
7
Additional information
• When you click [Active Lease] on the [Scope] menu of DHCP manager, a list ofclient leases appears. When the reserved IP address is not active, the name ofthe reservation is the name entered in the Client Name field of the Add Re-served Clients dialog box. When the reserved IP address becomes active, theclient name changes to the printer name configured by the Network InterfaceBoard. Only the first 13 letters of the printer name appear here. When you usethe machine with SmartDeviceMonitor for Admin, use the host name of themachine as the [Client Properties] Client Properties dialog box.
• When the DHCP server does not assign an IP address, the Network InterfaceBoard uses 11.22.33.44 as a temporary IP address. You can confirm the ma-chine's IP address on the system configuration list.
• Because 11.22.33.44 is a special IP address, you cannot print using this ad-dress.
• When using the DHCP relay agent in a network environment that uses a dialup router to connect to the Network Interface Board, an increase in commu-nication fees can occur.
Configuring a WINS Server
The machine can be configured to register its NetBIOS name with a WINS serverwhen power is turned on. This enables the NetBIOS name of the machine to bespecified from SmartDeviceMonitor for Admin even in a DHCP environment.This section describes how to configure the WINS server.
Note❒ WINS Server is supported with Windows NT 4.0 Server Service Pack 4 or lat-
er, and Windows 2000 Servers WINS Manager.❒ For more information about settings of WINS Server, see Windows Help.❒ If there is no reply from the WINS Server, the NetBIOS name will be regis-
tered by broadcast.❒ The NetBIOS name consists of up to 13 alphanumeric characters.
Using a WWW browser
AAAA Start the Web browser.
BBBB Point your browser at the URL or IP address of the machine (e.g. “ht-tp://XXX.XXX.XXX” substituting the Xs with the IP address).The status of the machine you chose appears on the Web browser.
CCCC Click [Network Config.].
The dialog box for entering the password and user name is displayed.

Precautions
7
DDDD Enter your user name and password, and then click [OK].
To use the factory default account, enter no user name and type “password”for the password.
EEEE Click [TCP/IP].
FFFF Set [WINS] to active and enter the IP address of the WINS server in [PrimaryWINS Server] and [Secondary WINS Server].
GGGG Click [Refresh].
HHHH Exit the Web browser.
IIII Restart the machine.
Using telnet
AAAA Connect to the remote printer using telnet.
BBBB Use the set command to make WINS active.
msh> set wins on
CCCC Specify the IP addresses (primary and secondary) using the following com-mands.msh> wins primary IPaddress
msh> wins secondary IPaddress
Note❒ To confirm the current configuration, use the show command.
DDDD Log off from telnet.
EEEE Restart the machine.
Using DHCP
You can use the machine under a DHCP environment. You can also register theprinter NetBIOS name on a WINS server when it is running.
Note❒ Printers that register their NetBIOS name on a WINS server must be config-
ured for the WINS server.❒ Supported DHCP servers are Windows NT 4.0 Server Service Pack 4 or later,
Windows 2000 Server and NetWare 5.❒ If you do not use WINS server, reserve machine's IP address in DHCP server
so that the same IP address is assigned every time.
117

Appendix
118
7
❒ DHCP relay-agent is not supported. If you use DHCP relay-agent on a net-work via an ISDN line, it will result in expensive line charges. This is becauseyour computer connects to the ISDN line whenever a packet is transferredfrom the machine.
Using AutoNet
If the machine's IP address is not assigned by a DHCP server automatically, atemporary IP address starting with 169.254 which is not used on the network canbe selected automatically by the machine.
Note❒ The IP address assigned by the DHCP server is given priority to that selected
by AutoNet.❒ You can confirm the current IP address on the system configuration list.❒ When AutoNet is running, the NetBIOS name is not registered on the WINS
server.
When Using the NIB Setup Tool
If the Network Interface Board cannot browse using the TCP/IP protocol, con-firm that the TCP/IP environment is correctly configured in your computer.
When Using IPP with SmartDeviceMonitor for Client
When using IPP with SmartDeviceMonitor for Client, note the following:• The network printer can only receive one print job from SmartDeviceMonitor
for Client at a time. While the network printer is printing a job, another usercannot access the network printer until it completes the job. In this case,SmartDeviceMonitor for Client tries to access the network printer until the re-try interval expires.
• If SmartDeviceMonitor for Client cannot access the network printer and timesout, SmartDeviceMonitor for Client stops sending the print job. In this case,you should cancel the paused status from the print queue window. SmartDe-viceMonitor for Client will resume access to the network printer. You can de-lete the print job from the print queue window, but canceling a print job thathas been printed by the network printer might cause the next print job sentfrom another user to be incorrectly printed.
• If a print job that is sent from SmartDeviceMonitor for Client is interruptedand the network printer cancels the job because something went wrong,launch the print job again.
• Print jobs sent from another computer do not appear in the print queue win-dow regardless of the protocol.

Precautions
7
• If various users send print jobs using SmartDeviceMonitor for Client to net-work printers, the printing order might not be in the order in which the jobswere sent.
• An IP address cannot be used for the IPP port name because the IP address isused for the SmartDeviceMonitor for Client port name.
System Configuration List (Network Configuration)
You can confirm the network information on the system configuration list.
AAAA Confirm that the machine is online.
BBBB Print the system configuration list.
ReferenceFor more information about printing the system configuration list, seePrinter Reference 2.
Note❒ The following configuration list is an example of Type 80. Some of contents
are different when printed by Type 40.
119

Appendix
120
7
1. TCP/IPIP AddressSubnet MaskGateway AddressAccess ControlAccess MaskNetwork BootActiveProtocolsEthernet
2. MAC Address
3. Printer Name
4. NetWareOperation ModePrint Server NameFrame TypeFile Server NameNDS Context Name
5. NetBEUIWorkgroups NameNetwork Path Name
6. AppleTalkPrinter NameAppleTalk TypeAppleTalk Zone

INDEXA
access control address, 93access control mask, 93ARP+PING, 90, 94AutoNet, 101
B
BOOTP, 94
C
Changing Names and Comments, 85SmartDeviceMonitor for Admin, 85Web Browser, 87
changing the password, 99client computer, setup
Windows 2000, 23Windows 95/98/Me, 10Windows NT 4.0, 48Windows XP, 35
community name, 97configuration
LPR port printing, Windows 2000, 22, 34LPR port printing, Windows NT 4.0, 47Macintosh, 73NetWare, 51NetWare 3.x, 56NetWare 4.x, 5/5.1, 62Web Browser, 80Windows 2000, 13Windows 95/98/Me, 1Windows NT 4.0, 37Windows XP, 25
Configuring, 85
D
default gateway address, 93DHCP, 94, 115dial up router, 113Displaying the Status of Printer
SmartDeviceMonitor for Admin, 88SmartDeviceMonitor for Client, 88Web Browser, 89
Displaying the Status of Printers, 88
E
EtherTalk, 74
I
informationNetwork Interface Board
configuration, 96, 104Network Statistics, 103system log, 96, 107
installNIB Setup Tool, 51SmartDeviceMonitor for Client,
Windows 2000, 17SmartDeviceMonitor for Client,
Windows 95/98/Me, 5SmartDeviceMonitor for Client,
Windows NT 4.0, 42SmartDeviceMonitor for Client,
Windows XP, 29IP address, 90, 92IPP, 98, 118
L
LAN adapter number (Lana Number), 41LPR port printing, 22, 34, 47
M
MAC address, 90Machine status, 95Macintosh, 73message, 107MIB, 102Monitoring, 85
N
NetBIOS name, 100NetWare, 51NetWare 3.x, 56NetWare 4.x, 5, 62network boot, 94NIB Setup Tool, 53
install, 51install, SmartDeviceMonitor for Admin, 51precautions, 118Run NIB Setup Tool, 52
121

122
P
password, 81, 101precautions, 113printer name, 75Pure IP, 65
R
RARP+TFTP, 94remote printer, setup
NetWare 3.x, 59NetWare 4.x, 5/5.1, 67
S
setupclient computer, Windows 2000, 23client computer, Windows 95/98/Me, 10client computer, Windows NT 4.0, 48client computer, Windows XP, 35
SmartDeviceMonitor for Client, 118Windows 2000, 17Windows 95/98/Me, 5Windows NT 4.0, 42Windows XP, 29
SmartDeviceMonitor for Client, delete the portWindows 2000, 18Windows 95/98/Me, 6Windows NT 4.0, 43Windows XP, 30
SmartDeviceMonitor for Client, installWindows 2000, 17Windows 95/98/Me, 5Windows NT 4.0, 42Windows XP, 29
SmartDeviceMonitor for Client, printer portWindows 2000, 19Windows 95/98/Me, 7Windows NT 4.0, 44Windows XP, 32
SmartDeviceMonitor for Client, uninstallWindows 2000, 19Windows 95/98/Me, 7Windows NT 4.0, 44Windows XP, 31
SNMP, 96, 102subnet mask, 93System Configuration List
(Network Configuration), 119
T
telnet, 91
U
uninstallSmartDeviceMonitor for Client,
Windows 2000, 19SmartDeviceMonitor for Client,
Windows 95/98/Me, 7SmartDeviceMonitor for Client,
Windows NT 4.0, 44SmartDeviceMonitor for Client,
Windows XP, 31Using SmartDeviceMonitor for Admin, 77
W
Web Browser, 80Windows 2000, 13Windows 95/98/Me, 1Windows NT 4.0, 37Windows XP, 25WINS, 100WINS Server, 116
Z
zone, 75
EN USA GB GB C624-8630

Copyright © 2003

Ne
two
rk Printing G
uide
EN USA
GB GB C624-8630