network media player nmp-530 user guide, english · registration form you can print and mail or fax...
TRANSCRIPT
Network Media Player (NMP)NMP-530

This page is blank for dual-sided printing.

ViewSonic NMP-530 i
ENGLISH
Copyright © ViewSonic Corporation, 2006. All rights reserved.
ViewSonic and the three birds logo are registered trademarks of ViewSonic Corporation.
Microsoft Internet Explorer and Windows are registered trademarks of Microsoft Corporation in the United States and/or other countries.
Intel and Pentium are trademarks or registered trademarks of Intel Corporation or its subsidiaries in the United States and other countries
Tivella and the Tivella logo are trademarks of Tivella, Inc.
Cisco is a registered trademark and this document may include service marks of Cisco Systems, Inc. and/or its affiliates in the U.S. and other countries.
Corporate names and trademarks are the property of their respective companies.
Disclaimer: ViewSonic Corporation shall not be liable for technical or editorial errors or omissions contained herein; nor for incidental or consequential damages resulting from furnishing this material, or the performance or use of this product.
In the interest of continuing product improvement, ViewSonic Corporation reserves the right to change product specifications without notice. Information in this document may change without notice.
No part of this document may be copied, reproduced, or transmitted by any means, for any purpose without prior written permission from ViewSonic Corporation.
Product RegistrationTo meet your future needs, and to receive any additional product information as it becomes available, please register your product on the Internet at: www.viewsonic.com. The ViewSonic product may come with a CD-ROM that has a registration form you can print and mail or fax to ViewSonic Corporation.
Product disposal at end of product lifeViewSonic is concerned about the preservation of our environment. Please dispose of this product properly at the end of its useful life. Your local waste disposal company may provide information about proper disposal.
For Your Records
Model Name:Model Number:Document Number:Serial Number:Purchase Date:
NMP-530VS11681NMP-530_UG_ ENG_REV1B 13-FEB-07______________________________

ii ViewSonic NMP-530
ENGLISH
This page is blank for dual-sided printing.
ViewSonic NMP-530 iii
Contents
ENGLISH
INTRODUCTION
Packaged Contents . . . . . . . . . . . . . . . . . . . . . . . . . . . . 1
Requirements . . . . . . . . . . . . . . . . . . . . . . . . . . . . . . . . 2
System Requirements . . . . . . . . . . . . . . . . . . . . . . . . 2
PC Requirements (for basic server) . . . . . . . . . . . . . 2
Software Requirements . . . . . . . . . . . . . . . . . . . . . . . 2
Features . . . . . . . . . . . . . . . . . . . . . . . . . . . . . . . . . . . . 2
Two Modes of Operation . . . . . . . . . . . . . . . . . . . . . . . . 3
Standalone . . . . . . . . . . . . . . . . . . . . . . . . . . . . . . . . 3
TAS Managed . . . . . . . . . . . . . . . . . . . . . . . . . . . . . . 3
Front View . . . . . . . . . . . . . . . . . . . . . . . . . . . . . . . . . . . 4
Back View . . . . . . . . . . . . . . . . . . . . . . . . . . . . . . . . . . . 4
Remote Control . . . . . . . . . . . . . . . . . . . . . . . . . . . . . . . 4
SETUP
Connect To A Display . . . . . . . . . . . . . . . . . . . . . . . . . . 5
Connect To A Router . . . . . . . . . . . . . . . . . . . . . . . . . . 6
Turn Power On . . . . . . . . . . . . . . . . . . . . . . . . . . . . . . . 7
IP Address . . . . . . . . . . . . . . . . . . . . . . . . . . . . . . . . . . . 8
Login . . . . . . . . . . . . . . . . . . . . . . . . . . . . . . . . . . . . . . . 8
Start URL . . . . . . . . . . . . . . . . . . . . . . . . . . . . . . . . . . . 9
Set Video Output of NMP-530 . . . . . . . . . . . . . . . . . . . . 10
Put Batteries in Remote Control . . . . . . . . . . . . . . . . . . 11
MANAGEMENT
Startup URLs/Network Configuration . . . . . . . . . . . . . . 12
Browser Configuration . . . . . . . . . . . . . . . . . . . . . . . . . . 13
Video/Audio Configuration . . . . . . . . . . . . . . . . . . . . . . 15
TAS Configuration . . . . . . . . . . . . . . . . . . . . . . . . . . . . . 16
FTP Server . . . . . . . . . . . . . . . . . . . . . . . . . . . . . . . . . . 17
System Services Configuration . . . . . . . . . . . . . . . . . . . 18
iv ViewSonic NMP-530
ENGLISH
ACTIONS
Video UDP Multicast . . . . . . . . . . . . . . . . . . . . . . . . . . . 19
Video RTP Multicast . . . . . . . . . . . . . . . . . . . . . . . . . . . 20
Video HTTP . . . . . . . . . . . . . . . . . . . . . . . . . . . . . . . . . . 21
Video File . . . . . . . . . . . . . . . . . . . . . . . . . . . . . . . . . . . 22
Playing content from local storage . . . . . . . . . . . . . . 22
Video IPTV . . . . . . . . . . . . . . . . . . . . . . . . . . . . . . . . . . 23
Playlist . . . . . . . . . . . . . . . . . . . . . . . . . . . . . . . . . . . . . . 24
To create a playlist . . . . . . . . . . . . . . . . . . . . . . . . . . 24
Transparency . . . . . . . . . . . . . . . . . . . . . . . . . . . . . . . . 25
Go to URL . . . . . . . . . . . . . . . . . . . . . . . . . . . . . . . . . . . 26
ADMINISTRATION
Advanced Video Configuration . . . . . . . . . . . . . . . . . . . 27
Security . . . . . . . . . . . . . . . . . . . . . . . . . . . . . . . . . . . . . 28
Save Configuration . . . . . . . . . . . . . . . . . . . . . . . . . . . . 29
Default Settings . . . . . . . . . . . . . . . . . . . . . . . . . . . . . . . 29
Reboot . . . . . . . . . . . . . . . . . . . . . . . . . . . . . . . . . . . . . . 30
Firmware Upgrade . . . . . . . . . . . . . . . . . . . . . . . . . . . . 30
HELP
Status . . . . . . . . . . . . . . . . . . . . . . . . . . . . . . . . . . . . . . 31
License . . . . . . . . . . . . . . . . . . . . . . . . . . . . . . . . . . . . . 32
About . . . . . . . . . . . . . . . . . . . . . . . . . . . . . . . . . . . . . . . 32
APPENDIX
Compliance and Safety Notices . . . . . . . . . . . . . . . . . . 33
Screens . . . . . . . . . . . . . . . . . . . . . . . . . . . . . . . . . . . . . 36
Management . . . . . . . . . . . . . . . . . . . . . . . . . . . . . . . 36
Actions . . . . . . . . . . . . . . . . . . . . . . . . . . . . . . . . . . . . 37
Administration . . . . . . . . . . . . . . . . . . . . . . . . . . . . . . 38
Help . . . . . . . . . . . . . . . . . . . . . . . . . . . . . . . . . . . . . . 38
Customer Support . . . . . . . . . . . . . . . . . . . . . . . . . . . . . 39
Specifications . . . . . . . . . . . . . . . . . . . . . . . . . . . . . . . . 40
Limited Warranty . . . . . . . . . . . . . . . . . . . . . . . . . . . . . . 41

ViewSonic NMP-530 1
ENGLISH
INTRODUCTIONThank you for buying the ViewSonic® Network Media Player. This section introduces you to the NMP-530.
PACKAGED CONTENTSPlease check that all the following items are in the package:
NMP-530
Quick Start Guide
AC Power AdapterS-Video/YPbPr Adapter
Remote Control and Two Batteries
RJ-45 Ethernet CableRS-232 Cable
ViewSonic CD

2 ViewSonic NMP-530
ENGLISH
REQUIREMENTSThe NMP-530 requires the following:
SYSTEM REQUIREMENTSSystem requirements include a display, a network environment, and a PC with network capability.
PC REQUIREMENTS (FOR BASIC SERVER)• Operating System: Any Windows® or Linux OS capable of running a web server
• Processor: Intel® Pentium® 4, 1 GHz or higher (or compatible microprocessor)• Memory: 512 MB RAM or more• Network Interface: 100Base-TX
SOFTWARE REQUIREMENTS
Software applications need to be purchased separately in order to create material for playback, such as graphics, video, and Flash files, etc.
FEATURES• Replaces remote PC that drives a display screen.• Network ready for easy installation.• Standards-based design for high inter-operability with other network devices and software.• Pre-installed software application enables it to work right out of the box. No additional
software required.• Integrated Web browser with Flash plug-in, standalone Flash player, HD (High-Definition)
player.• Provides fast, efficient delivery of digital content using IP Technology.• MPEG1, MPEG2, MPEG4, and Macromedia Flash support.• Powerful combination of Sigma Design's EM8621L and Freescale's MPC8247 resulting in
smooth playback operation.• Supports multicast and unicast digital broadcast applications.• Small form factor for installation in tight spaces. Can easily be hidden from view.• Multiple video outputs enable flexibility.• Devices can be remotely controlled from virtually anywhere on a network or with an Internet
connection.
ViewSonic NMP-530 3
ENGLISH
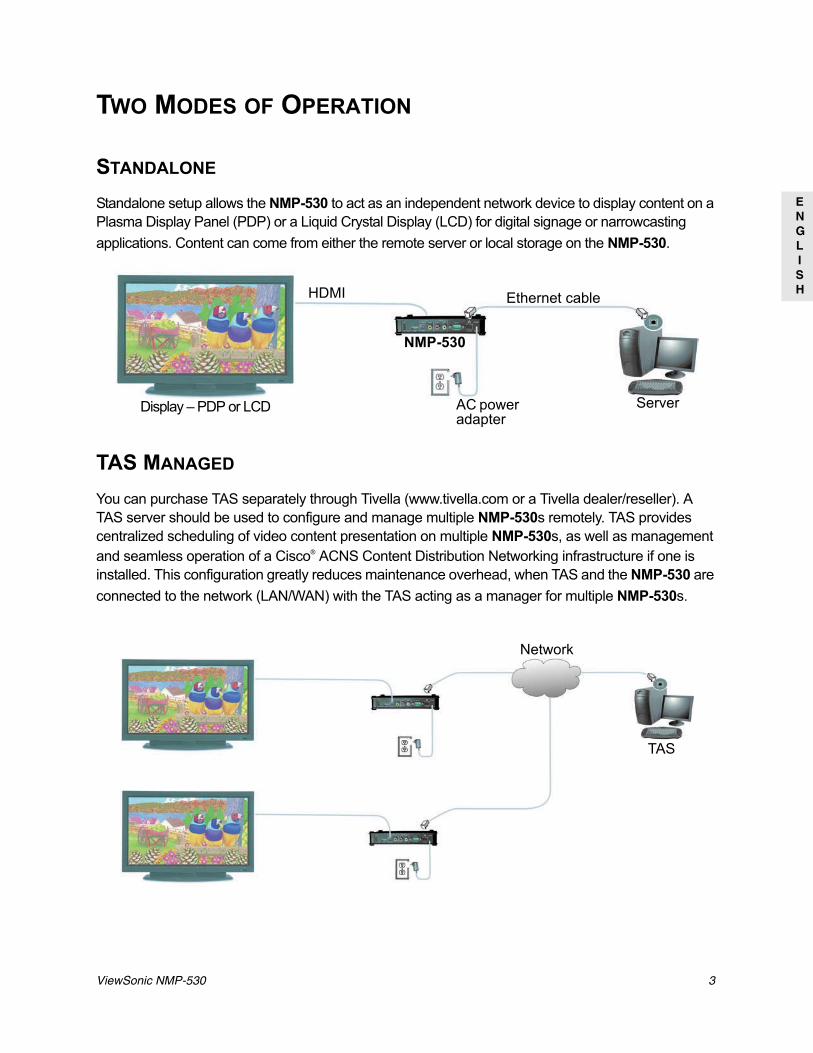
TWO MODES OF OPERATION
STANDALONE
Standalone setup allows the NMP-530 to act as an independent network device to display content on a Plasma Display Panel (PDP) or a Liquid Crystal Display (LCD) for digital signage or narrowcasting applications. Content can come from either the remote server or local storage on the NMP-530.
TAS MANAGED
You can purchase TAS separately through Tivella (www.tivella.com or a Tivella dealer/reseller). A TAS server should be used to configure and manage multiple NMP-530s remotely. TAS provides centralized scheduling of video content presentation on multiple NMP-530s, as well as management and seamless operation of a Cisco® ACNS Content Distribution Networking infrastructure if one is installed. This configuration greatly reduces maintenance overhead, when TAS and the NMP-530 are connected to the network (LAN/WAN) with the TAS acting as a manager for multiple NMP-530s.
Ethernet cable
AC power adapter
Server
NMP-530
Display – PDP or LCD
HDMI
TAS
Network

4 ViewSonic NMP-530
ENGLISH
FRONT VIEW
BACK VIEW
REMOTE CONTROL
Green LED: ActivityLED: Power
Ethernet 10/100POWER-5V DC
RS232AUDIO LEFT
AUDIO RIGHTCVBSS-VIDEO/YPbPr
USB
VIDEO
HDMI*Reset
AUDIO
*If your monitor has a DVI input, use an HDMI-to-DVI cable.
POWER buttonOn/Standby

ViewSonic NMP-530 5
ENGLISH
SETUPFor the initial setup, you need the following:
• A Router with DHCP services• A TV or Display with Composite or S-Video input for initial setup. During the setup, you can
change the NMP-530 output to the final display being used.• A PC with Internet Browser
1. CONNECT TO A DISPLAYConnect the S-Video or Composite output of the NMP-530 to the corresponding input on your TV or other display.
NMP-530
TV or other Display
S-Video/YPbPr Adapter(supplied)
6 ViewSonic NMP-530
ENGLISH
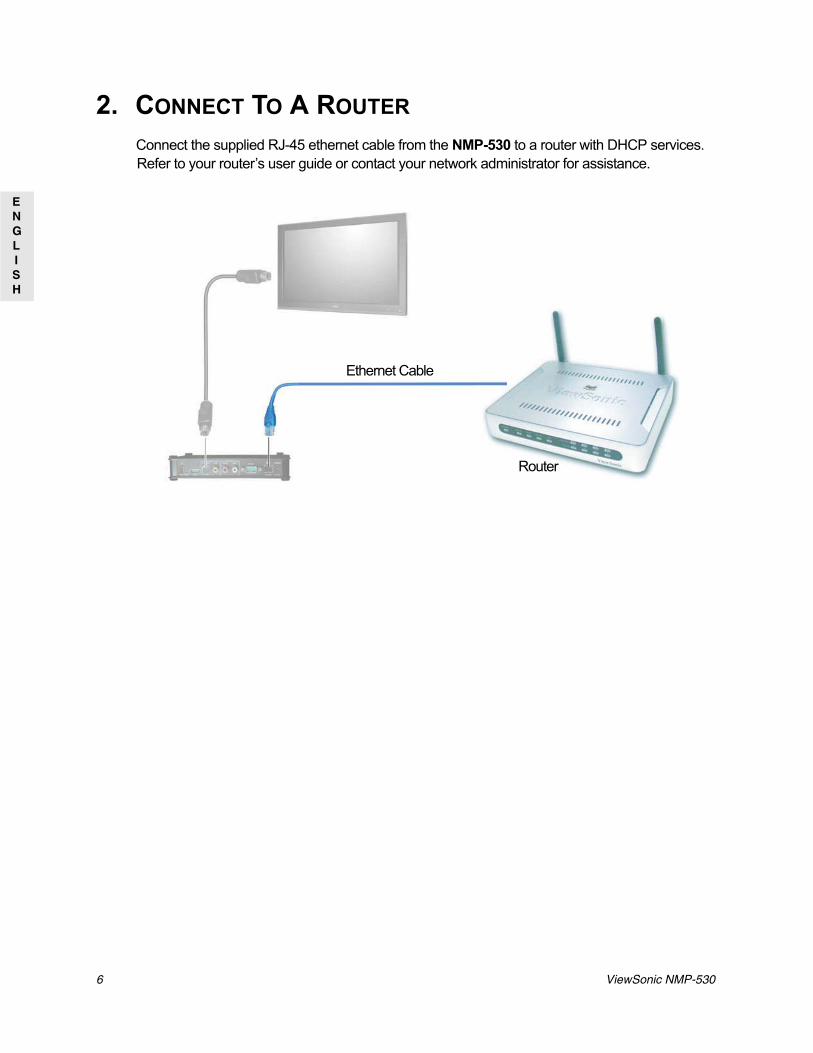
2. CONNECT TO A ROUTERConnect the supplied RJ-45 ethernet cable from the NMP-530 to a router with DHCP services. Refer to your router’s user guide or contact your network administrator for assistance.
Router
Ethernet Cable

ViewSonic NMP-530 7
ENGLISH
3. TURN POWER ONConnect the supplied DC Plug on the AC Power Adapter into the NMP-530. Turn the TV or the Display power on making sure that the Input is on the proper setting. Plug the AC Adapter to a wall outlet.
AC power(wall outlet)
AC Power Adapter(supplied)

8 ViewSonic NMP-530
ENGLISH
4. IP ADDRESSWait a few seconds and the IP Address of the NMP-530 appears on the screen. Make a note of the IP information as this will be used to login to the NMP-530.
5. LOGINOpen an Internet Browser, i.e., Internet Explorer on a PC in the same network. In the URLaddress field, type the IP address of the NMP-530 noted in the previous step > press Enter. The Login screen appears. Type the defaults Login: admin and Password: admin. For security purposes, we recommend that you change the Login and Password. For more information, see the Security section in this NMP-530 User Guide. After logging in successfully, the Network Configuration screen appears as shown in the next step. Note: The NMP-530 automatically logs you out after fives (5) minutes of inactivity.

ViewSonic NMP-530 9
ENGLISH
6. START URLUnder Management click Startup. The screen shown below appears. In the Video field, enter a valid URL. Or, in the Browser field, enter a valid web page.

10 ViewSonic NMP-530
ENGLISH
7. SET VIDEO OUTPUT OF NMP-530By default, the video output is set to S-Video. But, you can choose any one of the followingconnections if you prefer, depending on the type of display input you want to use.
HDMI: Connect a HDMI cable from the back of the NMP-530 to the HDMI interfaceon the back of the display.
S-Video: Default. Connect an S-Video cable from the S-Video interface on the backof the NMP-530 to the S-Video interface on the back of the display.
Component: Using the S-Video/YPbPr adapter.Composite: Using an RCA cable.
To change the output setting, login to the NMP-530, under Management click Video/Audio. The screen shown below appears. For more information, see the Video/Audio Configuration section in this guide.
1. In the TV Mode field, click the down arrow for the pull-down menu and select one of the resolutions required by your display (PDP or LCD).
2. If any changes were made to this screen, do the following:
• To enable the changes, click Apply• To save the changes, under Administration click Save Configuration > click Save.
Show IP
ViewSonic NMP-530 11
ENGLISH
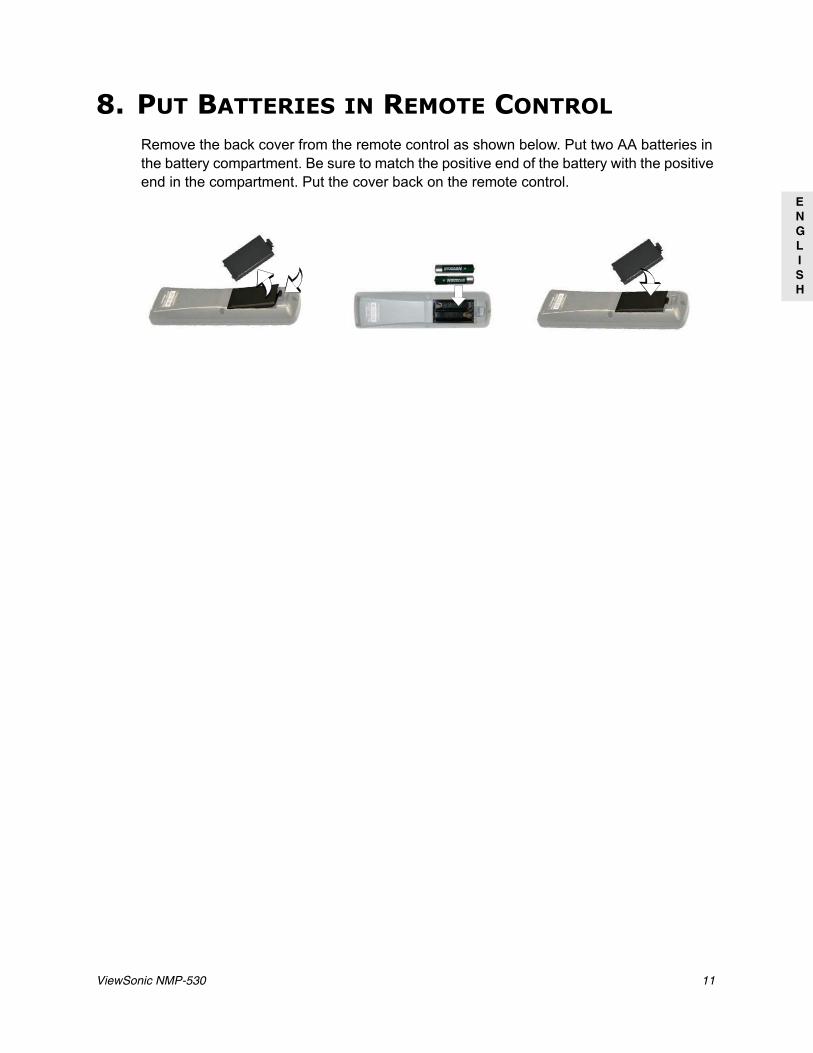
8. PUT BATTERIES IN REMOTE CONTROL
Remove the back cover from the remote control as shown below. Put two AA batteries in the battery compartment. Be sure to match the positive end of the battery with the positive end in the compartment. Put the cover back on the remote control.

12 ViewSonic NMP-530
ENGLISH
MANAGEMENT
STARTUP URLS/NETWORK CONFIGURATIONThe Network Configuration screen allows you to select the video that appears on-screen when you boot up the NMP-530. To go to the Network Configuration screen after logging into the NMP-530, under Management click Startup. The Startup URLs screen and the Network Configuration screen appears as shown below. Failover Video and Failover Browser - the URL entered on these fields will be enabled if the main Video and Browser Startup URL's failed to play.
1 To play a particular video at startup, in the Video field, enter a valid HTML page. Here are some examples:
• http://<ip-address->/<mpeg-1/2-file-located on WEB Server>• udp://<ip-multicast-address>/port• rtp://<multicast-address>/port• iptv://<ip-multicast-address>/videoport/audioport• playlist=http://<ip-address>/<playlist-file-located-on-WEB-server>
2. In the Browser field, enter a startup web screen (for example, http://www.viewsonic.com). Note: The MAC address is a read-only field that displays the built-in MAC address of the unit.
Continued . . .
Displays the IP addressDisplays the Video source
Displays the Browser
ViewSonic NMP-530 13
ENGLISH
3. In the DHCP field of the Network Configuration screen, tap the down arrow for the pull-down menu and select Enabled to dynamically get network parameters. Make sure there are values in the IP address, Mask, Gateway, and DNS fields although DHCP assigns values to these fields automatically. If you select Disabled, type valid network parameters in these fields.
4. If any changes were made to this screen, do the following:
• To enable the changes, click Apply• To save the changes, under Administration click Save Configuration > click Save.
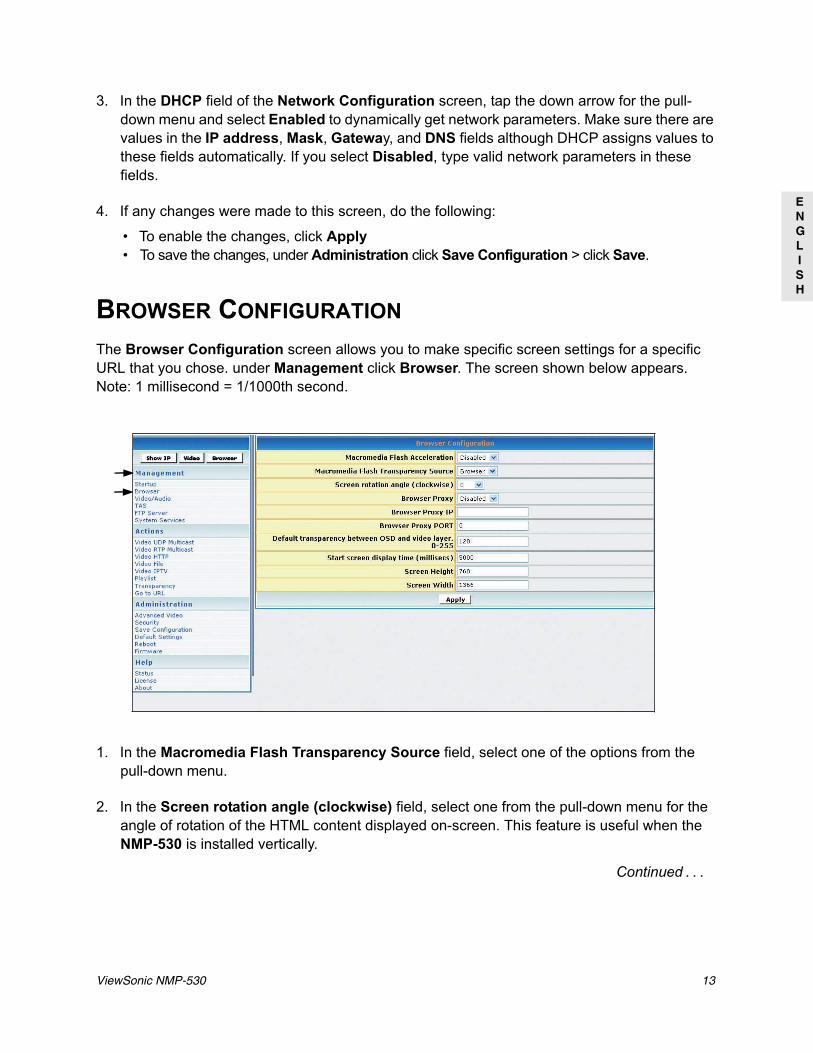
BROWSER CONFIGURATIONThe Browser Configuration screen allows you to make specific screen settings for a specific URL that you chose. under Management click Browser. The screen shown below appears. Note: 1 millisecond = 1/1000th second.
1. In the Macromedia Flash Transparency Source field, select one of the options from the pull-down menu.
2. In the Screen rotation angle (clockwise) field, select one from the pull-down menu for the angle of rotation of the HTML content displayed on-screen. This feature is useful when the NMP-530 is installed vertically.
Continued . . .

14 ViewSonic NMP-530
ENGLISH
3. In the Browser Proxy field, select Enabled or Disabled from the pull-down menu.
4. In the Browser Proxy IP field, type an IP address if the Browser Proxy was Enabled.
5. In the Browser Proxy PORT field, type the port if the Browser Proxy was Enabled.
6. In the Default transparency between OSD and video layer field, type a number that is between 0 to 255: (128 is average where video and graphics blend together). Also, see examples in the Transparency section of this guide.
• 0 = video only, no graphics• 255 = graphics only, no video
7. In the Start screen display time field, type the number of milliseconds you want the initial screen to be displayed at startup. (1 millisecond = 1/1000 second)
8. In the Screen Height field, type the height of the screen that is displaying your graphics image.
9. In the Screen Width field, type the width of the screen that is displaying your graphics image.
10. If any changes were made to this screen, do the following:
• To enable the changes, click Apply• To save the changes, under Administration click Save Configuration > click Save.

ViewSonic NMP-530 15
ENGLISH
VIDEO/AUDIO CONFIGURATIONThis screen is used to adjust the display and audio parameters. Under Management click Video/Audio. The screen shown below appears.
1. In the TV Mode field, click the down arrow for the pull-down menu and select one of the options.
2. Move the Brightness slider: values range between -128 and 127
3. Move the Contrast slider: values range between 0 and 255
4. Move the Saturation slider: values range between 0 and 255
5. Move the Audio Channel Volume (left) slider: values range between 0 and 100
6. Move the Audio Channel Volume (right) slider: values range between 0 and 100
7. If any changes were made to this screen, do the following:
• To enable the changes, click Apply• To save the changes, under Administration click Save Configuration > click Save.
16 ViewSonic NMP-530
ENGLISH
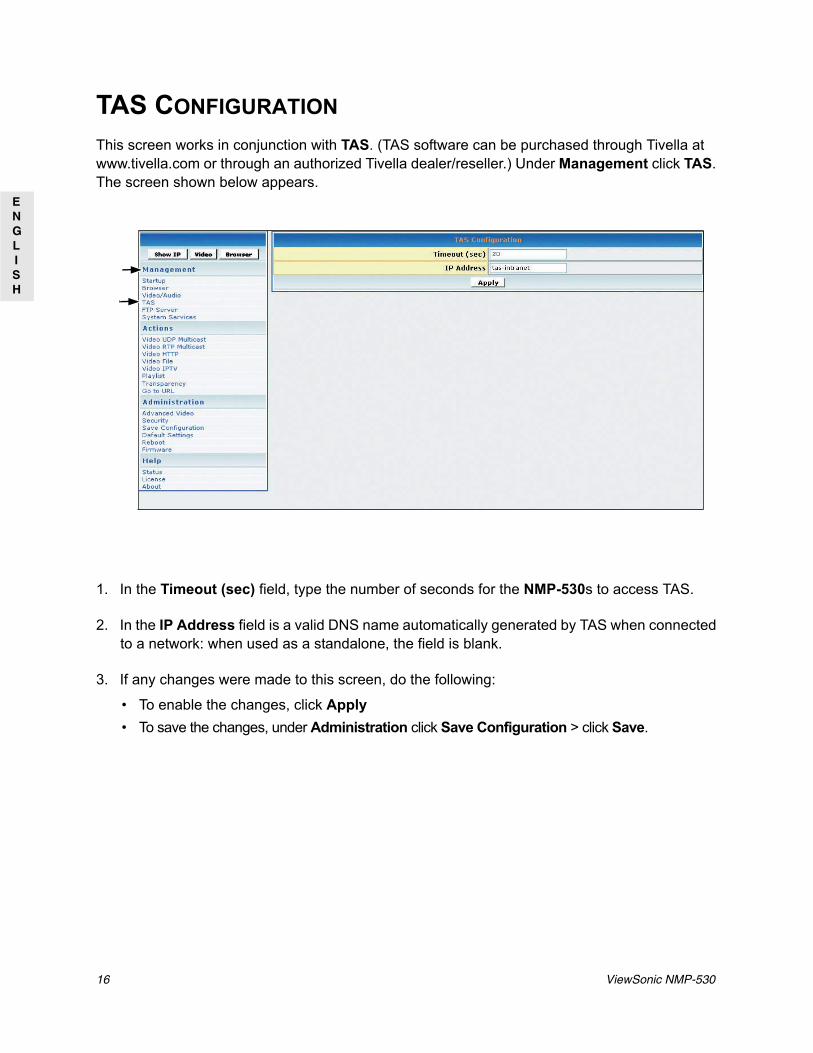
TAS CONFIGURATIONThis screen works in conjunction with TAS. (TAS software can be purchased through Tivella at www.tivella.com or through an authorized Tivella dealer/reseller.) Under Management click TAS. The screen shown below appears.
1. In the Timeout (sec) field, type the number of seconds for the NMP-530s to access TAS.
2. In the IP Address field is a valid DNS name automatically generated by TAS when connected to a network: when used as a standalone, the field is blank.
3. If any changes were made to this screen, do the following:
• To enable the changes, click Apply• To save the changes, under Administration click Save Configuration > click Save.
ViewSonic NMP-530 17
ENGLISH
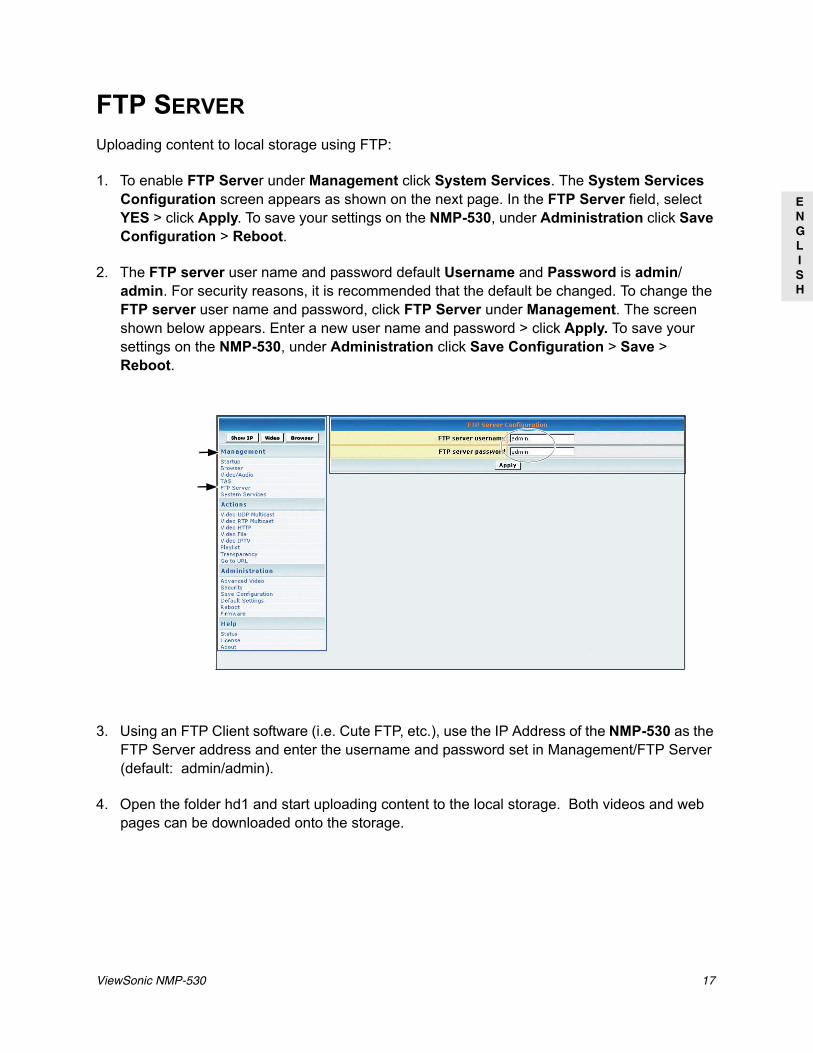
FTP SERVERUploading content to local storage using FTP:
1. To enable FTP Server under Management click System Services. The System Services Configuration screen appears as shown on the next page. In the FTP Server field, select YES > click Apply. To save your settings on the NMP-530, under Administration click Save Configuration > Reboot.
2. The FTP server user name and password default Username and Password is admin/admin. For security reasons, it is recommended that the default be changed. To change the FTP server user name and password, click FTP Server under Management. The screen shown below appears. Enter a new user name and password > click Apply. To save your settings on the NMP-530, under Administration click Save Configuration > Save > Reboot.
3. Using an FTP Client software (i.e. Cute FTP, etc.), use the IP Address of the NMP-530 as the FTP Server address and enter the username and password set in Management/FTP Server (default: admin/admin).
4. Open the folder hd1 and start uploading content to the local storage. Both videos and web pages can be downloaded onto the storage.

18 ViewSonic NMP-530
ENGLISH
SYSTEM SERVICES CONFIGURATIONConfigure System Services in the MIB (Management Information Base) to manage the following groups: Network, Browser, Video/Audio, TAS, and System Services. Under Management click System Services. The screen shown below appears.
1. In the (port 6666) field, select Yes to access the NMP-530 using a Telnet client on port 6666. If you do not want this, select No.
2. In the MIB Event Notification field, select Yes to be notified of changes that you made to the NMP-530 settings.
3. FTP Server - select YES to enable uploading of files to the local storage.
4. If any changes were made to this screen, do the following:
• To enable the changes, click Apply• To save the changes, under Administration click Save Configuration > click Save.
ViewSonic NMP-530 19
ENGLISH
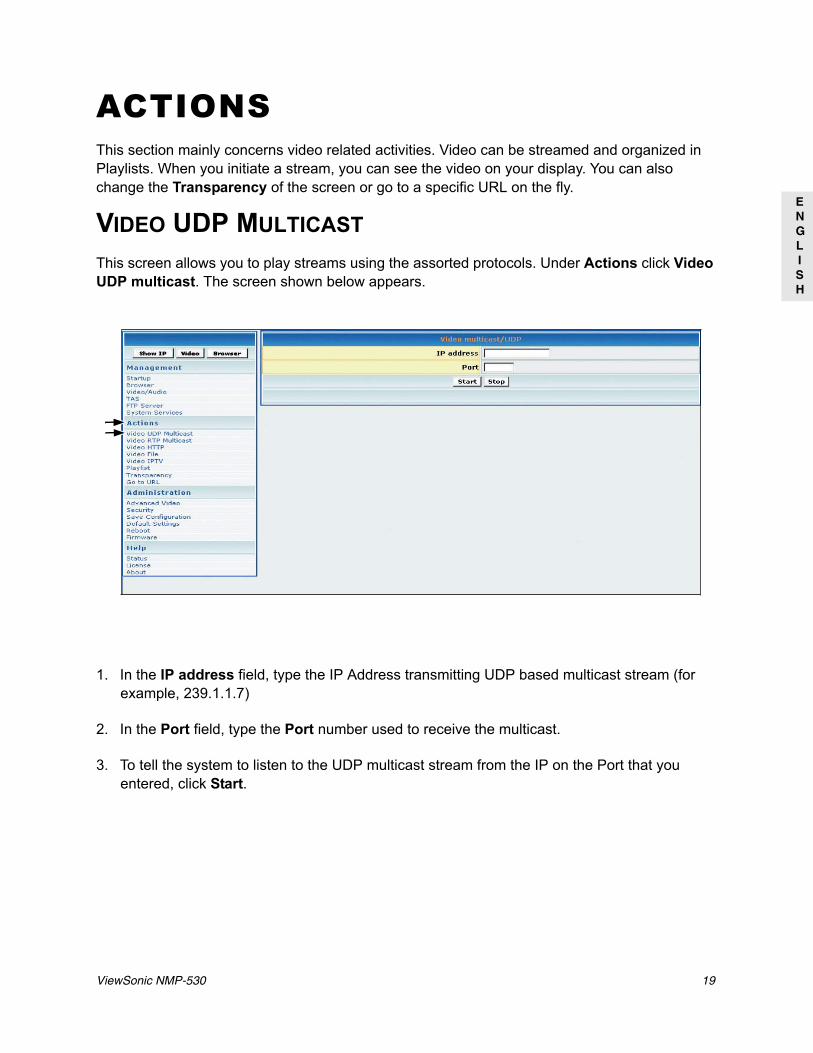
ACTIONSThis section mainly concerns video related activities. Video can be streamed and organized in Playlists. When you initiate a stream, you can see the video on your display. You can also change the Transparency of the screen or go to a specific URL on the fly.
VIDEO UDP MULTICASTThis screen allows you to play streams using the assorted protocols. Under Actions click Video UDP multicast. The screen shown below appears.
1. In the IP address field, type the IP Address transmitting UDP based multicast stream (for example, 239.1.1.7)
2. In the Port field, type the Port number used to receive the multicast.
3. To tell the system to listen to the UDP multicast stream from the IP on the Port that you entered, click Start.
20 ViewSonic NMP-530
ENGLISH
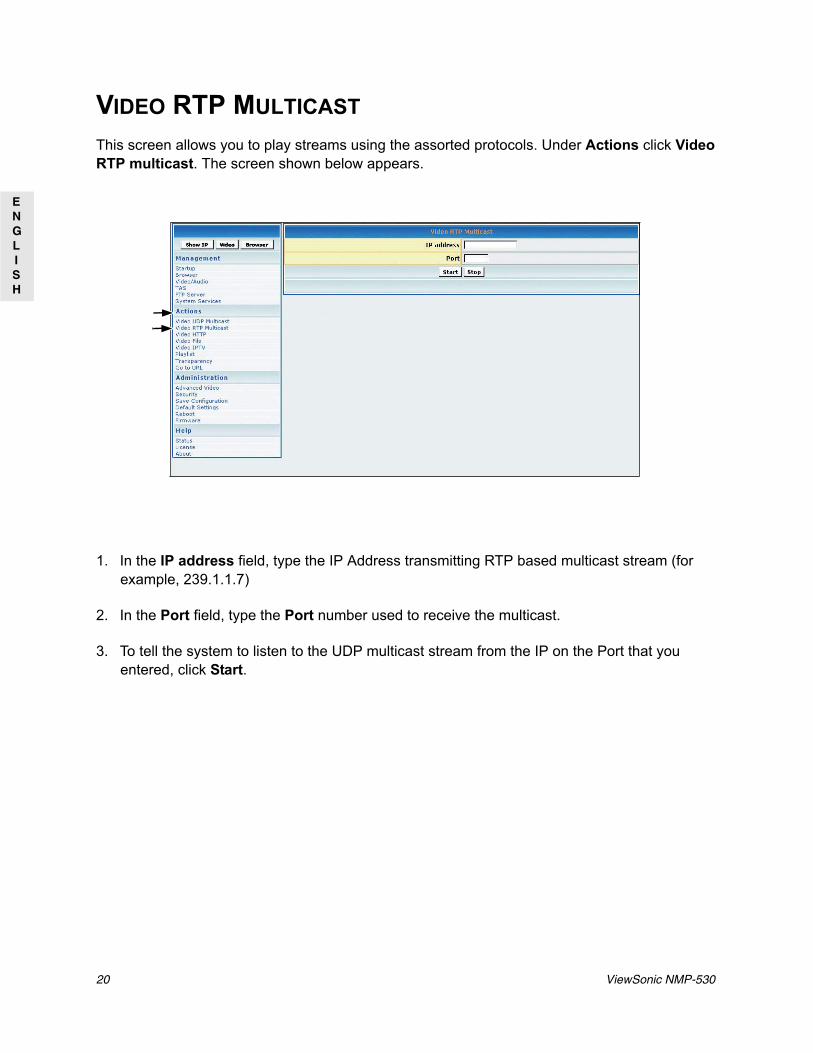
VIDEO RTP MULTICASTThis screen allows you to play streams using the assorted protocols. Under Actions click Video RTP multicast. The screen shown below appears.
1. In the IP address field, type the IP Address transmitting RTP based multicast stream (for example, 239.1.1.7)
2. In the Port field, type the Port number used to receive the multicast.
3. To tell the system to listen to the UDP multicast stream from the IP on the Port that you entered, click Start.
ViewSonic NMP-530 21
ENGLISH
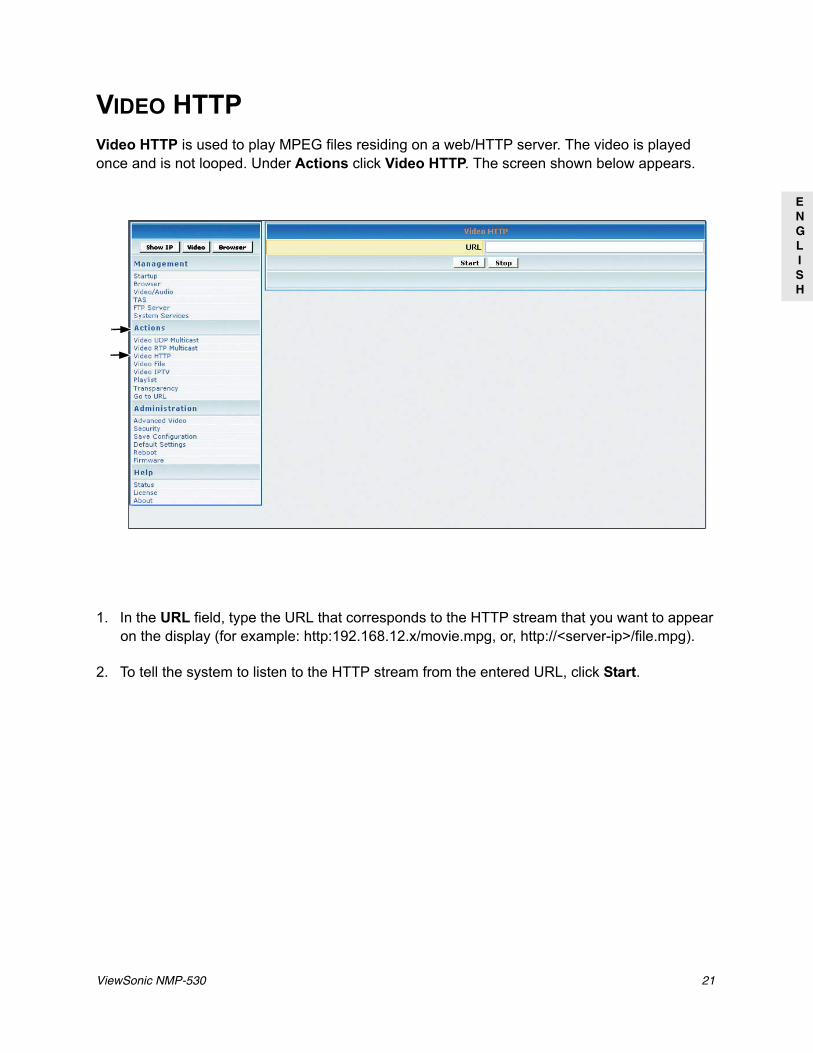
VIDEO HTTPVideo HTTP is used to play MPEG files residing on a web/HTTP server. The video is played once and is not looped. Under Actions click Video HTTP. The screen shown below appears.
1. In the URL field, type the URL that corresponds to the HTTP stream that you want to appear on the display (for example: http:192.168.12.x/movie.mpg, or, http://<server-ip>/file.mpg).
2. To tell the system to listen to the HTTP stream from the entered URL, click Start.
22 ViewSonic NMP-530
ENGLISH
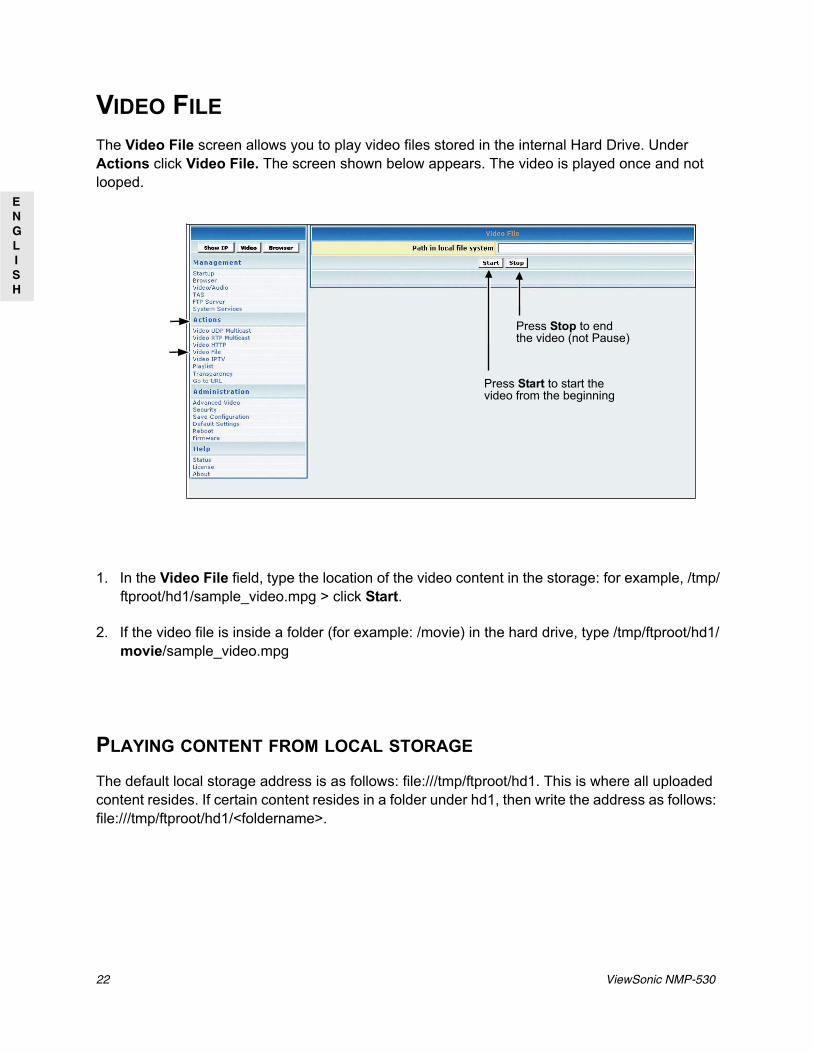
VIDEO FILEThe Video File screen allows you to play video files stored in the internal Hard Drive. Under Actions click Video File. The screen shown below appears. The video is played once and not looped.
1. In the Video File field, type the location of the video content in the storage: for example, /tmp/ftproot/hd1/sample_video.mpg > click Start.
2. If the video file is inside a folder (for example: /movie) in the hard drive, type /tmp/ftproot/hd1/movie/sample_video.mpg
PLAYING CONTENT FROM LOCAL STORAGE
The default local storage address is as follows: file:///tmp/ftproot/hd1. This is where all uploaded content resides. If certain content resides in a folder under hd1, then write the address as follows: file:///tmp/ftproot/hd1/<foldername>.
Press Stop to end the video (not Pause)
Press Start to start the video from the beginning
ViewSonic NMP-530 23
ENGLISH
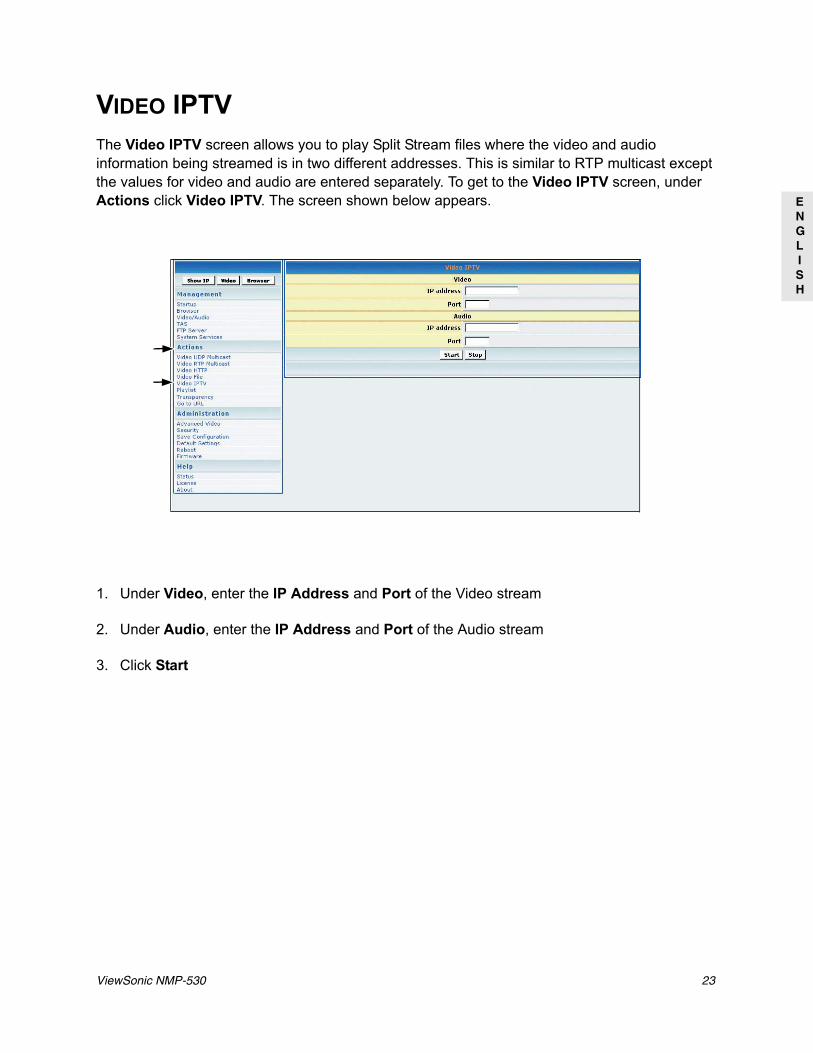
VIDEO IPTVThe Video IPTV screen allows you to play Split Stream files where the video and audio information being streamed is in two different addresses. This is similar to RTP multicast except the values for video and audio are entered separately. To get to the Video IPTV screen, under Actions click Video IPTV. The screen shown below appears.
1. Under Video, enter the IP Address and Port of the Video stream
2. Under Audio, enter the IP Address and Port of the Audio stream
3. Click Start
24 ViewSonic NMP-530
ENGLISH
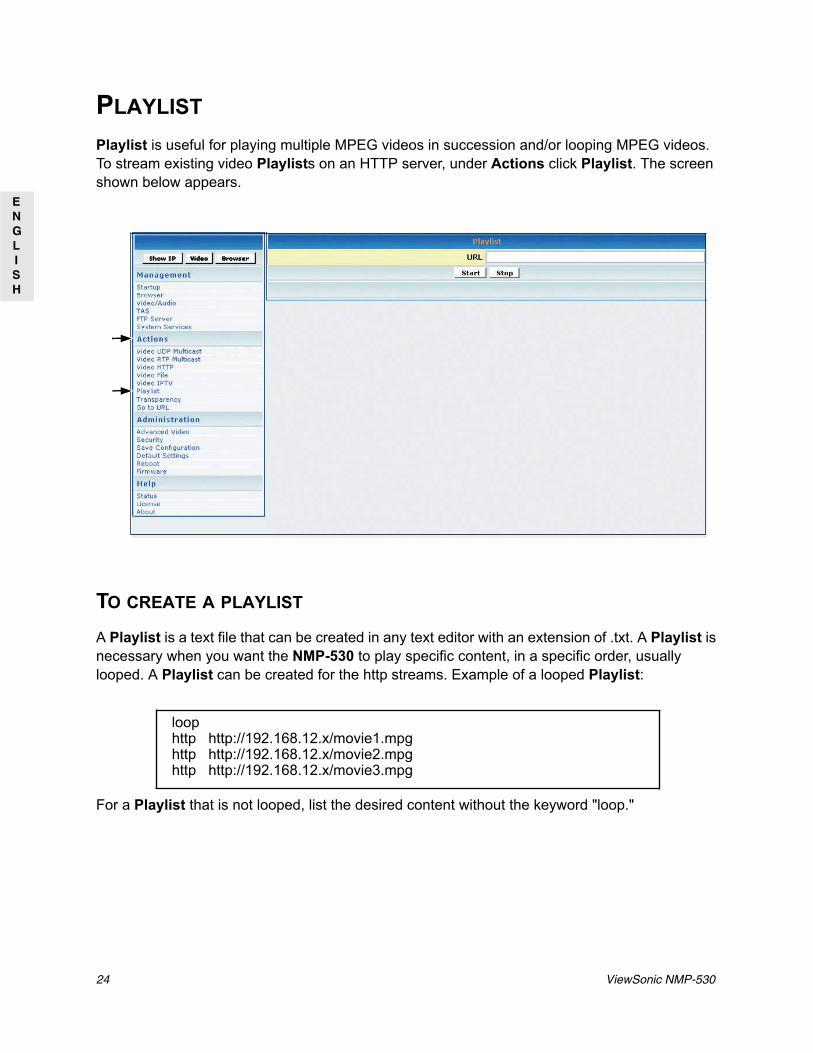
PLAYLISTPlaylist is useful for playing multiple MPEG videos in succession and/or looping MPEG videos. To stream existing video Playlists on an HTTP server, under Actions click Playlist. The screen shown below appears.
TO CREATE A PLAYLIST
A Playlist is a text file that can be created in any text editor with an extension of .txt. A Playlist is necessary when you want the NMP-530 to play specific content, in a specific order, usually looped. A Playlist can be created for the http streams. Example of a looped Playlist:
For a Playlist that is not looped, list the desired content without the keyword "loop."
loophttp http://192.168.12.x/movie1.mpghttp http://192.168.12.x/movie2.mpghttp http://192.168.12.x/movie3.mpg

ViewSonic NMP-530 25
ENGLISH
TRANSPARENCYTo change the transparency of the browser OSD (On-Screen Display) in relation to the video image in the background, under Actions click Transparency. The screen shown below appears.
1. In the Transparency between OSD and video layer field, type a number between 0 to 255 for a more or less transparent (translucent) browser image so you can still see through the browser as shown below on the right with your video or other images: 0 = no OSD, 255 = no video, 128 = equal transparency between video and OSD layers.
2. To apply the entered transparency value to the image on the NMP-530, click Apply.
OSD very transparentOSD not transparent

26 ViewSonic NMP-530
ENGLISH
GO TO URLThis screen is used to display HTML-based content. Under Actions click Go to URL. The screen shown below appears.
1. In the URL field, type the desired URL.
2. To redirect the browser to the URL that you entered, click Go. The web page appears on your display.
NOTE: Check the Transparency setting if the browser screen does not appear after a few seconds. You can also click the Browser button to maximize the browser transparency.

ViewSonic NMP-530 27
ENGLISH
ADMINISTRATIONADVANCED VIDEO CONFIGURATIONTo adjust the size and location of the video on the screen, under Administration click Advanced video. The screen shown below appears.
1. In the X of destination window, type the center point of the screen on the X axis.
2. In the Y of destination window, type the center point of the screen on the Y axis.
3. In the Width of destination window, type the width of the destination window.
4. In the Height of destination window, type the height of the destination window.
5. If any changes were made to this screen, do the following:
• To enable the changes, click Apply• To save the changes, under Administration click Save Configuration > click Save.
NOTE: X (max) = 4096, Y (max) = 4096 denotes height and width for X & Y destination
X = 2048 and Y = 2048 is actually the center point of the screen.

28 ViewSonic NMP-530
ENGLISH
SECURITYTo change the User name and Password of the NMP-530, under Administration click Security. Current settings automatically appear in each field as shown below: default User name/Password is admin/admin.
1. In the Password field, type a new password.
2. In the Repeat Password field, re-type the new password.
3. If any changes were made to this screen, do the following:
• To enable the changes, click Apply• To save the changes, under Administration click Save Configuration > click Save.
ViewSonic NMP-530 29
ENGLISH
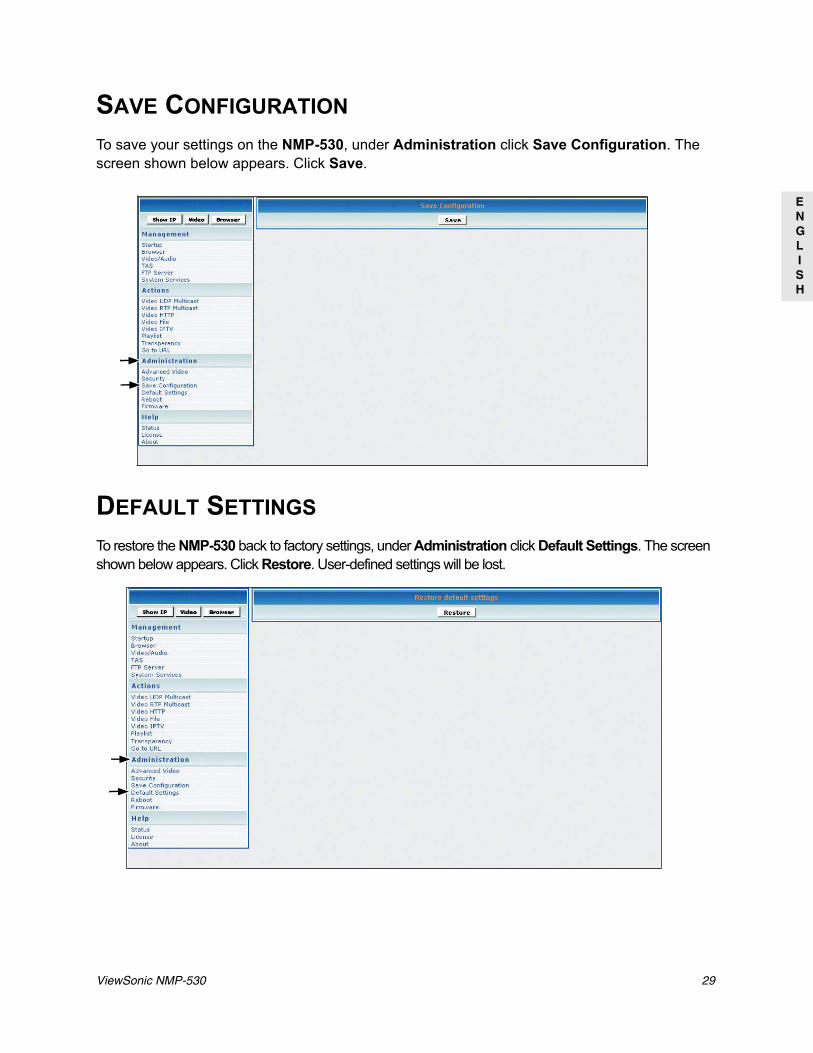
SAVE CONFIGURATIONTo save your settings on the NMP-530, under Administration click Save Configuration. The screen shown below appears. Click Save.
DEFAULT SETTINGSTo restore the NMP-530 back to factory settings, under Administration click Default Settings. The screen shown below appears. Click Restore. User-defined settings will be lost.
30 ViewSonic NMP-530
ENGLISH
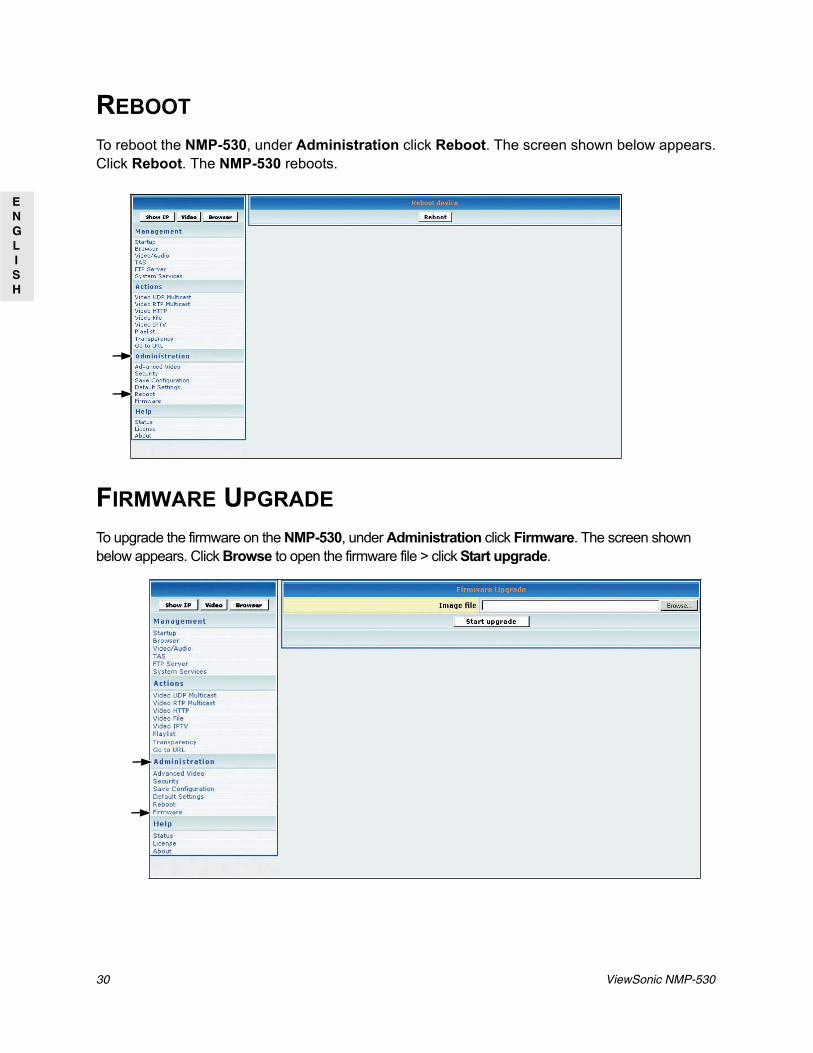
REBOOTTo reboot the NMP-530, under Administration click Reboot. The screen shown below appears. Click Reboot. The NMP-530 reboots.
FIRMWARE UPGRADETo upgrade the firmware on the NMP-530, under Administration click Firmware. The screen shown below appears. Click Browse to open the firmware file > click Start upgrade.
ViewSonic NMP-530 31
ENGLISH
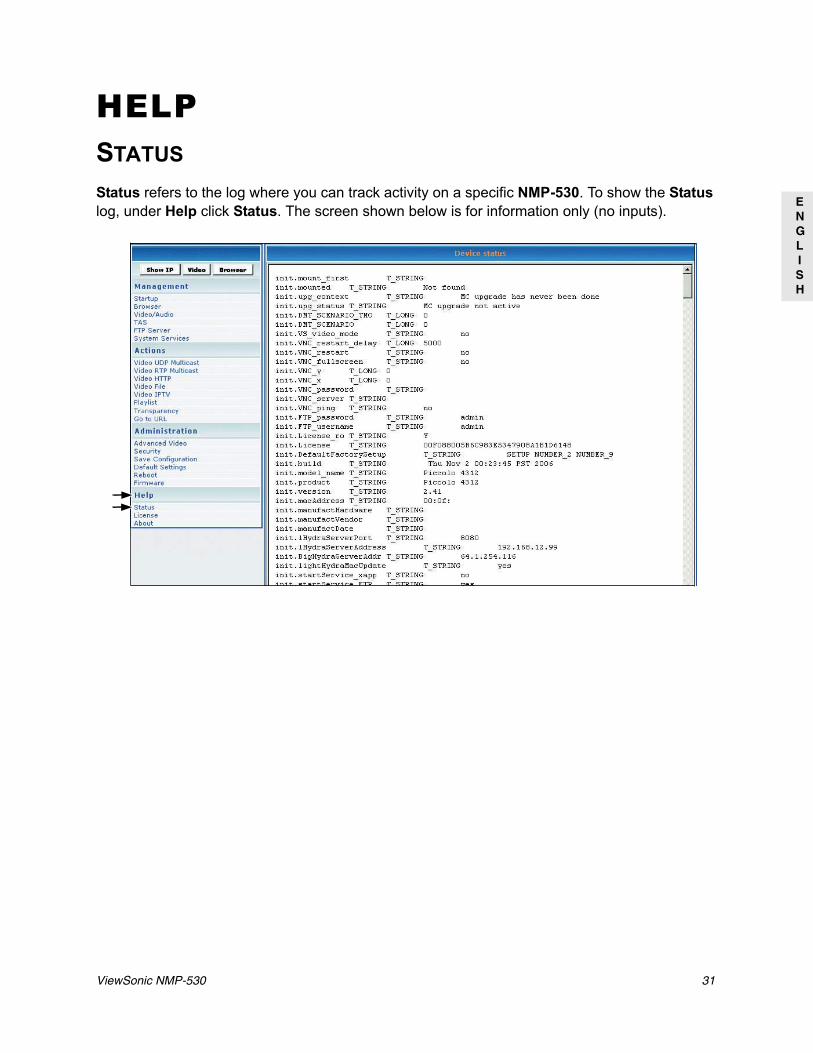
HELPSTATUSStatus refers to the log where you can track activity on a specific NMP-530. To show the Status log, under Help click Status. The screen shown below is for information only (no inputs).
32 ViewSonic NMP-530
ENGLISH
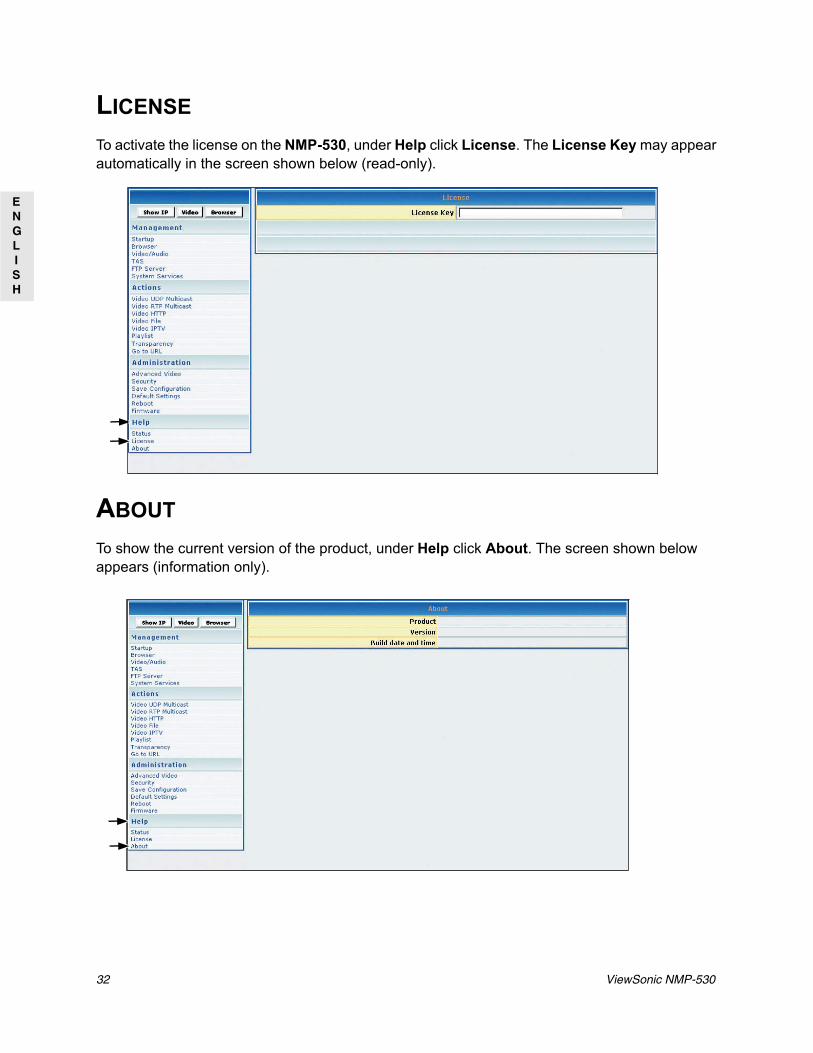
LICENSETo activate the license on the NMP-530, under Help click License. The License Key may appear automatically in the screen shown below (read-only).
ABOUTTo show the current version of the product, under Help click About. The screen shown below appears (information only).

ViewSonic NMP-530 33
ENGLISH
APPENDIX
COMPLIANCE AND SAFETY NOTICES
FCC CLASS B COMPLIANCE NOTICE (UNITED STATES)
This equipment has been tested and found to comply with the limits for a Class B digital device, pursuant to Part 15 of the FCC Rules. These limits are designed to provide reasonable protection against harmful interference when the equipment is operated in a commercial environment. This equipment generates, uses, and can radiate radio frequency energy and, if not installed and used in accordance with the instruction manual, may cause harmful interference to radio communications. Operation of this equipment in a residential area is likely to cause harmful interference in which case the user will be required to correct the interference at user’s own expense.
You can determine whether your equipment is causing interference by turning it off. If the interference stops, it was probably caused by this equipment or one of its peripheral devices. If the equipment causes interference to radio or television reception, try to correct the interference by using one or more of the following measures:
• Turn the television or radio antenna until the interference stops.• Move the equipment to one side or the other of the television or radio.• Move the equipment farther away from the television or radio.• Plug the equipment into an outlet that is on a different circuit from the television or radio.
(That is, make certain the equipment and the television or radios are on circuits controlled by different circuit breakers or fuses.)
Modifying the equipment without proper authorization may result in the equipment no longer complying with FCC requirements for Class A or Class B digital devices. In that event, your right to use the equipment may be limited by FCC regulations, and you may be required to correct any interference to radio or television communications at your own expense.

34 ViewSonic NMP-530
ENGLISH
Canadian compliance noticeEnglish: This digital apparatus does not exceed the Canada ICES-003 Class B limits for radionoise emissions from digital apparatus as set out in the radio interference regulations of theCanadian Department of Communications.
French: Le present appareil numerique nemet pas de bruits radioelectriques depassant leslimites applicables aux appareils numeriques de Canada ICES-003 Class B prescrites dans lereglement sur le brouillage radioelectrique edicte par le Ministere des Communications duCanada.
European compliance noticeProducts with the CE Marking comply with both the EMC Directive (89/336/EEC)and the Low Voltage Directive (73/23/EEC) issued by the Commission of theEuropean Community. Compliance with these directives implies conformity to thefollowing European Norms:
• EN55022 (CISPR 22) Radio Frequency Interference• EN55024 (IEC61000-4-2, -4-4, -4-5, -4-6, -4-11)• EN60950 (IEC950) Product Safety
Declaration of RoHS Compliance
This product has been designed and manufactured in compliance with Directive2002/95/EC of the European Parliament and the Council on restriction of theuse of certain hazardous substances in electrical and electronic equipment(RoHS Directive) and is deemed to comply with the maximum concentrationvalues issued by the European Technical Adaptation Committee (TAC) asshown below:
Substance Proposed Maximum Concentration
Actual Concentration
Lead (Pb) 0.1% < 0.1% Mercury (Hg) 0.1% < 0.1% Cadmium (Cd) 0.01% < 0.01% Hexavalent Chromium (Cr6+) 0.1% < 0.1% Polybrominated biphenyls (PBB) 0.1% < 0.1% Polybrominated diphenyl ethers (PBDE) 0.1% < 0.1%

ViewSonic NMP-530 35
ENGLISH
Certain components of products as stated above are exempted under the Annex of the RoHSDirectives as noted below. Examples of exempted components are:
1. Mercury in compact fluorescent lamps not exceeding 5 mg per lamp and in other lamps notspecifically mentioned in the Annex of RoHS Directive
2. Lead in glass of cathode ray tubes, electronic components, fluorescent tubes, and electronicceramic parts (e.g. piezoelectronic devices)
3. Lead in high temperature type solders (i.e. lead-based alloys containing 85% by weight ormore lead)
4. Lead as an allotting element in steel containing up to 0.35% lead by weight, aluminiumcontaining up to 0.4% lead by weight and as a cooper alloy containing up to 4% lead byweight.
For EU-member states only as follows:
The mark shown to the right is in compliance with the Waste Electrical andElectronic Equipment Directive 2002/96/EC (WEEE). The mark indicates therequirement NOT to dispose the equipment as unsorted municipal waste, butuse the return and collection systems according to local law.
Power supply safety noticeThe power supply provided with this device is for use with this device only. Replace only with thesame or equivalent type power supply as recommended by the manufacturer.
BSMI
(1) This is manufacturer address:
Manufactured by Universal Scientific Industrial Co.,Ltd.
USI Electronics Park, North of High-Tech Industrial Park, NanShan District,
ShenZhen, P.R.C
(2) This is the applicant information:
��������
� ��������� 351� 141�
(3) ���: ��������
!� 235"#$%&� 192� 9'

36 ViewSonic NMP-530
ENGLISH
SCREENSMANAGEMENT

ViewSonic NMP-530 37
ENGLISH
ACTIONS

38 ViewSonic NMP-530
ENGLISH
ADMINISTRATION
HELP
ViewSonic NMP-530 39
ENGLISH
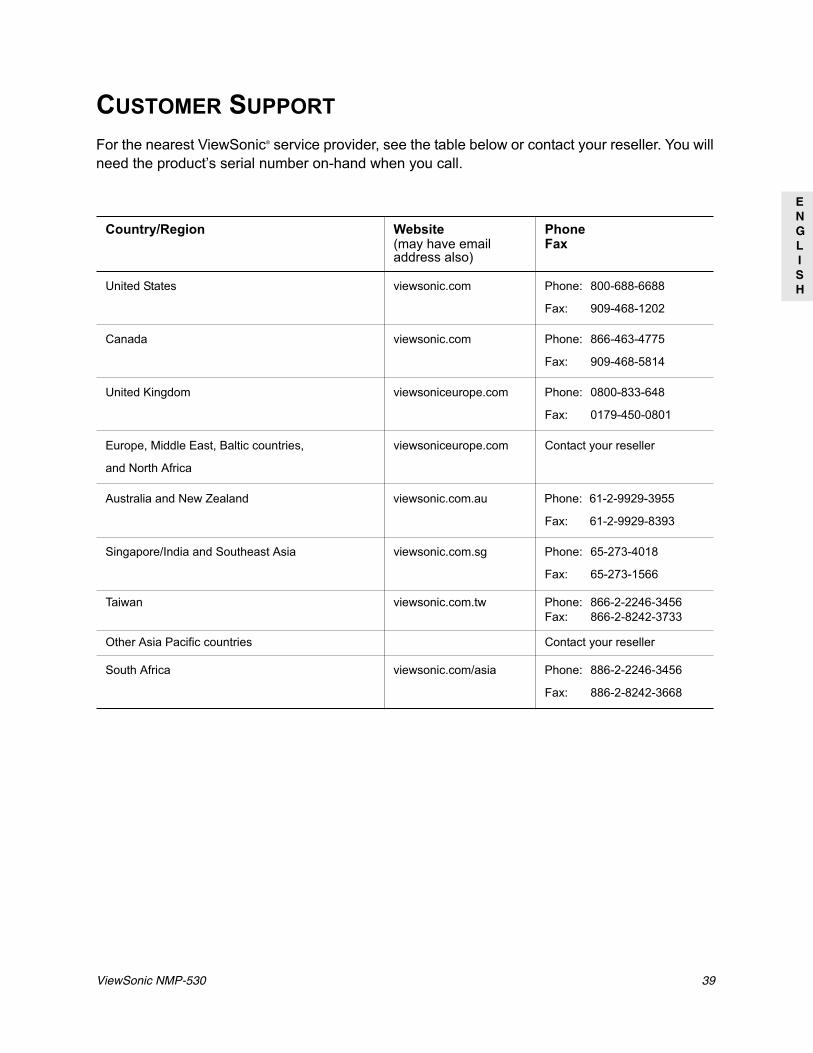
CUSTOMER SUPPORTFor the nearest ViewSonic® service provider, see the table below or contact your reseller. You will need the product’s serial number on-hand when you call.
Country/Region Website(may have email address also)
PhoneFax
United States viewsonic.com Phone: 800-688-6688
Fax: 909-468-1202
Canada viewsonic.com Phone: 866-463-4775
Fax: 909-468-5814
United Kingdom viewsoniceurope.com Phone: 0800-833-648
Fax: 0179-450-0801
Europe, Middle East, Baltic countries,
and North Africa
viewsoniceurope.com Contact your reseller
Australia and New Zealand viewsonic.com.au Phone: 61-2-9929-3955
Fax: 61-2-9929-8393
Singapore/India and Southeast Asia viewsonic.com.sg Phone: 65-273-4018
Fax: 65-273-1566
Taiwan viewsonic.com.tw Phone: 866-2-2246-3456Fax: 866-2-8242-3733
Other Asia Pacific countries Contact your reseller
South Africa viewsonic.com/asia Phone: 886-2-2246-3456
Fax: 886-2-8242-3668
40 ViewSonic NMP-530
ENGLISH
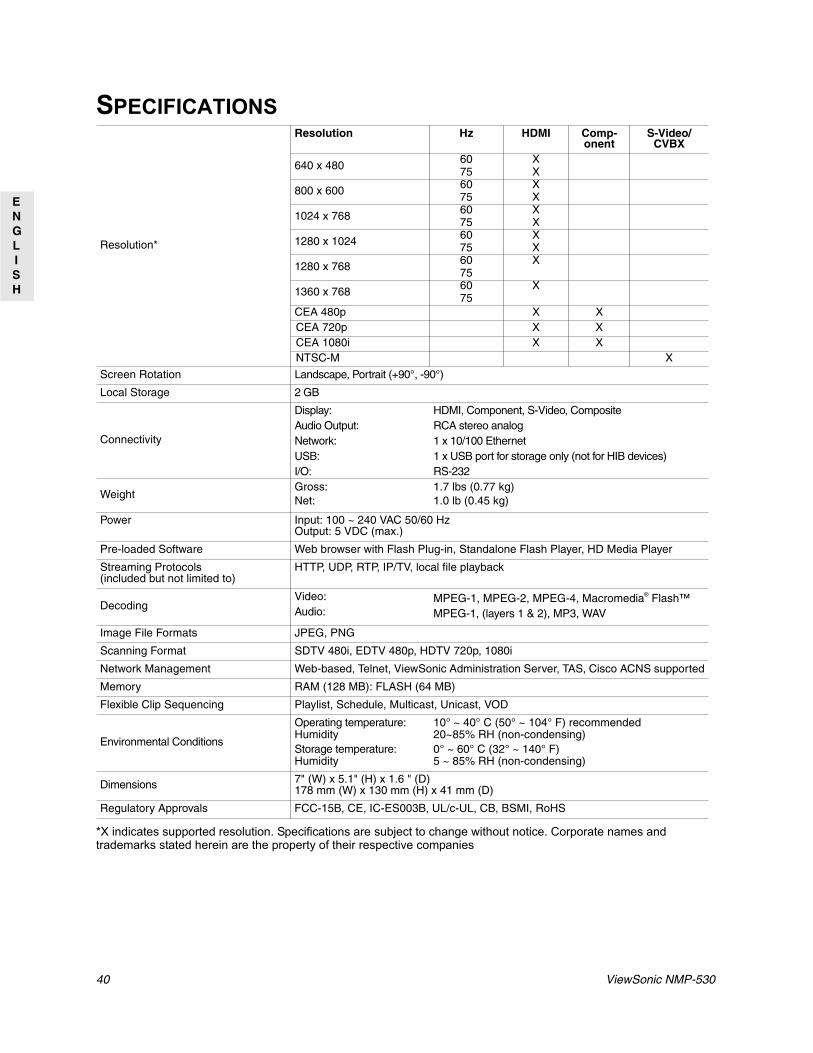
SPECIFICATIONS
*X indicates supported resolution. Specifications are subject to change without notice. Corporate names and trademarks stated herein are the property of their respective companies
Resolution*
Resolution Hz HDMI Comp-onent
S-Video/CVBX
640 x 480 60 X75 X
800 x 600 60 X75 X
1024 x 768 60 X75 X
1280 x 1024 60 X75 X
1280 x 768 60 X75
1360 x 768 60 X75
CEA 480p X XCEA 720p X XCEA 1080i X XNTSC-M X
Screen Rotation Landscape, Portrait (+90°, -90°)
Local Storage 2 GB
Connectivity
Display: HDMI, Component, S-Video, CompositeAudio Output: RCA stereo analogNetwork: 1 x 10/100 EthernetUSB: 1 x USB port for storage only (not for HIB devices)I/O: RS-232
WeightGross:Net:
1.7 lbs (0.77 kg)1.0 lb (0.45 kg)
Power Input: 100 ~ 240 VAC 50/60 HzOutput: 5 VDC (max.)
Pre-loaded Software Web browser with Flash Plug-in, Standalone Flash Player, HD Media Player
Streaming Protocols(included but not limited to)
HTTP, UDP, RTP, IP/TV, local file playback
DecodingVideo: Audio:
MPEG-1, MPEG-2, MPEG-4, Macromedia® Flash™ MPEG-1, (layers 1 & 2), MP3, WAV
Image File Formats JPEG, PNG
Scanning Format SDTV 480i, EDTV 480p, HDTV 720p, 1080i
Network Management Web-based, Telnet, ViewSonic Administration Server, TAS, Cisco ACNS supported
Memory RAM (128 MB): FLASH (64 MB)
Flexible Clip Sequencing Playlist, Schedule, Multicast, Unicast, VOD
Environmental Conditions
Operating temperature:HumidityStorage temperature:Humidity
10° ~ 40° C (50° ~ 104° F) recommended20~85% RH (non-condensing)0° ~ 60° C (32° ~ 140° F)5 ~ 85% RH (non-condensing)
Dimensions 7" (W) x 5.1" (H) x 1.6 " (D)178 mm (W) x 130 mm (H) x 41 mm (D)
Regulatory Approvals FCC-15B, CE, IC-ES003B, UL/c-UL, CB, BSMI, RoHS

ViewSonic NMP-530 41
ENGLISH
LIMITED WARRANTYPlease go to the Customer Support table in this guide for the ViewSonic website in your region to get warranty information.
