network devices - cisco.comnetwork devices added to the system configuration are added to a table of...
TRANSCRIPT

CiscOL-20604-01
C H A P T E R 8
Network DevicesTopics in this chapter include:
• Overview, page 8-1
• Network Infrastructure Device Administration, page 8-2
• Adding Network Infrastructure Device Groups, page 8-5
• Importing Network Infrastructure Devices, page 8-11
• Adding Individual Network Infrastructure Devices to the Configuration, page 8-17
• Managing Network Infrastructure Devices and Device Groups, page 8-23
• Adding/Managing Microsoft Active Directory Servers, page 8-30
OverviewAfter the Cisco NAC Profiler Server and Collectors have been configured as outlined in the previous two chapters, configuration efforts move onto adding devices on the network to the Cisco NAC Profiler configuration that the system will collect endpoint data from. In the current release those devices come from two general categories: 1. the network infrastructure devices (switches and routers) that provide connectivity to the endpoints on the network, and 2. Microsoft Active Directory (AD) Servers (if present) that can provide the Cisco NAC Profiler system with information about endpoints that are members of the Domain. Network infrastructure devices provide endpoint data via SNMP, and in environments where edge authentication is enabled, access switches may also forward RADIUS accounting data about endpoints for collection by NetRelay. As outlined previously, this collection is accomplished by the NetMap and NetRelay module(s) running on the Collector(s) in the system respectively. Collection of data from AD servers is performed by NetMap as well, but in this case the mechanism for data collection is LDAP queries to the Active Directory servers.
The steps outlined in this chapter for adding the switches and routers to the Cisco NAC Profiler configuration provides the NetMap Collector components throughout the system with the list of devices to be polled along with the information required for successful polling via SNMP such as the version and community string. The NAC Profiler system will periodically poll the network devices added to the system configuration to gather information about attached endpoints and their status. Frequency of polling is specified in the NAC Profiler Server configuration as outlined in Chapter 6, “Cisco NAC Profiler Server Configuration”. In addition to the regular polling, to ensure changes in the endpoint topology are learned in near real-time, the network devices are configured to send SNMP Traps to the NetTrap module (or modules) running on the Collectors. Doing so provides the system with near real-time indications when endpoints join or leave the network.
8-1o NAC Profiler Installation and Configuration Guide

Chapter 8 Network DevicesNetwork Infrastructure Device Administration
The network infrastructure devices added to the NAC Profiler system configuration should be those that comprise the network access layer, or ''edge'' of the network the system will be deployed on; that is, the devices (typically Layer 2 switches) that end-users, printers, copiers, FAXes, IP telephony devices and other network endpoints use for connectivity to the network infrastructure. Layer 3 devices (routers) should also be included so that their Address Resolution Protocol (ARP) and routing tables can be accessed. The NAC Profiler system uses information from Layer 3 devices to create a mapping between endpoint IP addresses and MAC (hardware) addresses. Layer 2 Source Address Tables (SAT) information from switches and switch/routers is used by the system to locate endpoints to the switch/port that connects them to the network.
This chapter is organized with the administration of network infrastructure devices covered first, as this is a task common to virtually all Cisco NAC Profiler implementations. Within this section the steps to configure SNMP communication for successful polling via NetMap, as well as that required to enable processing of RADIUS accounting data sent by edge switches performing authentication of endpoints.
Note Collection of RADIUS accounting data to enable Endpoint Profiling by authenticated username is performed by the NetRelay module and discussed in detail in Chapter 7, “Configuring Collector Modules” and Chapter 10, “Endpoint Profile Configuration: Part II”.
The configuration of Active Directory servers to be queried by NetMap for information about endpoints in the Domain in Microsoft environments is covered later in the Chapter.
Network Infrastructure Device AdministrationNetwork devices added to the system configuration are added to a Table of Network Devices commonly referred to as the Device List. To perform network device management tasks such as adding the network devices or device groups to the system configuration, navigate to the Configuration tab and select the Network Devices link in the secondary menu.
The Configure Network Devices page is displayed (Figure 8-1) which provides access to all the Cisco NAC Profiler Network Device configuration tasks.
8-2Cisco NAC Profiler Installation and Configuration Guide
OL-20604-01

Chapter 8 Network DevicesNetwork Infrastructure Device Administration
Figure 8-1 Configure Network Devices
The Configure Network Devices table lists a number of administrative task options for managing the network devices in the system configuration:
• Add Device – Enables adding a single network device to the system configuration. This operation is described in detail in “Adding Individual Network Infrastructure Devices to the Configuration” section on page 8-17.
• Add Group – Network devices with similar attributes may be grouped logically for easier administration. This option allows the configuration of groups. See “Adding Network Infrastructure Device Groups” section on page 8-5.
• List Network Devices – Displays a list of all network devices currently in the system configuration along with information including the time stamp of the last successful poll of the device via SNMP.
• List Device Groups - Displays a ''tree view'' of network device groups, in which each group can be expanded to display individual network devices. Groups and individual devices can be edited from this view.
• Find Network Device – A location tool for finding a specified network device.
• Import Devices – A utility to bulk-import a list of network devices into Cisco NAC Profiler using a CSV file.
• Add Active Directory - Provides the interface for adding Microsoft Active Directory Servers to the Cisco NAC Profiler configuration which will be queried for endpoint information. See “Adding/Managing Microsoft Active Directory Servers” section on page 8-30
• List Active Directory - Displays the list of Microsoft Active Directory Servers currently added to the Cisco NAC Profiler configuration.
Timesaver Creating network device groups and using the Import Device feature can greatly expedite the network device configuration tasks.
To initiate any of the network device list management functions, select the link in the left most column of the Configure Network Devices table. The remainder of this chapter provides instructions for using these functions to manage the network device list in the system configuration.
8-3Cisco NAC Profiler Installation and Configuration Guide
OL-20604-01
Chapter 8 Network DevicesNetwork Infrastructure Device Administration
Cisco NAC Profiler SNMP Version SupportCisco NAC Profiler can communicate with switches and routers via SNMP versions 1, 2c and 3 (via NetMap modules running on the Collectors) for the purposes of collecting endpoint information from these devices. The system will attempt to use the SNMP version provided in the device configuration, or if the device is assigned to a Device Group, the version specified for the group.
It is important to recall that devices configured for version 1 will not respond to version 2c queries. However, version 2c is backwards compatible with version 1. That means that if a device (or device group) configuration specifies version 2c in the Cisco NAC Profiler configuration but the device is running SNMP version 1, Cisco NAC Profiler will be unable to poll the device successfully.
Tip A common Cisco NAC Profiler configuration issue is the creation of Network Device Groups configured for SNMP version 2c which subsequently has devices running SNMP version 1 assigned to them. Devices running SNMP version 1 assigned to Device Groups running version 2c will not successfully poll. A solution to this issue is to configure the Device Group to use SNMP version 1. Version 2c is backwards compatible with version 1, so when Device Groups will contain devices running both version 1 and 2c, be sure to configure the group for version 1 to ensure compatibility with all devices in the group.
Cisco NAC Profiler also supports SNMP version 3 enabling the use of the Authentication and Privacy capabilities of the version. Cisco NAC Profiler supports the following common Authentication and Privacy combinations for the polling of devices configured for SNMPv3:
• MD5/AES128
• MD5/DES
• SHA/AES128
• SHA/DES
• SHA/NoPriv
• MD5/NoPriv
• NoAuth/NoPriv
Note The following options available in some vendors’ SNMP implementations are not currently supported by Cisco NAC Profiler. The unsupported options are: 3DES, AES192, and AES256. If network devices are configured with these options, they must be re-configured using one of the supported Auth/Priv combinations listed above in order to be successfully polled by NetMap.
Although Cisco NAC Profiler is capable of SNMP communications with devices using versions 1,2c and 3, the trap handling functionality provided by NetTrap described in Chapter 7, “Configuring Collector Modules” is limited to versions 1 and 2c only. Edge switches that are running SNMPv3 must be configured to send version 1 or 2c traps to NetTrap in order for the system to detect endpoints joining or leaving the network.
8-4Cisco NAC Profiler Installation and Configuration Guide
OL-20604-01
Chapter 8 Network DevicesAdding Network Infrastructure Device Groups
Adding Network Infrastructure Device Groups
Tip Defining device groups prior to adding network devices either individually or through the Import function can save significant time by entering/administering network device configuration parameters common to the group at the group level (e.g., for all devices in the group collectively instead for each device individually). In large networks with hundreds or thousands of network devices, the use of device groups is recommended if practical--see next tip.
Tip The use of Network Device Groups is optional and may not be usable in some environments where network devices do not share common configuration parameters such as community strings and version of SNMP. In addition if SNMPv3 is in use, this functionality is available, as long as all the devices belonging to the group use the same SNMPv3 parameters.
In many network environments, it may be desirable to define groups of devices to give a clearer picture of the network topology and to make the Cisco NAC Profiler network device configuration task easier. When the network devices in an environment use similar configuration parameters such as community string, SNMP version, etc., the use of groups can streamline the management of devices. If a network device is designated a member of a device group, that device inherits the General Settings, Access Method, VLAN Settings, and Endpoint Roles (if applicable) for the device group, and will not require these parameters to be specified individually for the devices belonging to the group. Network devices can be added to the system configuration individually (see “Adding Individual Network Infrastructure Devices to the Configuration” section on page 8-17), or can be bulk-imported either individually or into a group and inherit the group configuration parameters (see “Importing Network Infrastructure Devices” section on page 8-11).
Timesaver For most Cisco NAC Profiler systems, adding a device group requires the completion of steps 1-8 and 20. The remaining steps are specific to devices running SNMP version 3 and or Cisco NAC Profiler systems that will or be used in port provisioning mode.
To add a network device group to the system configuration, follow the steps outlined below:
Step 1 Select Add Group from the Configure Network Device table. This will open the Add Group form shown Figure 8-2 which allows the setting of the parameters for the group.
8-5Cisco NAC Profiler Installation and Configuration Guide
OL-20604-01

Chapter 8 Network DevicesAdding Network Infrastructure Device Groups
Figure 8-2 Add Network Device Group
Step 2 Enter a Group Name
Enter a unique name to identify this group of network devices.
Step 3 Specify the Type of device contained in this group
Select the device type (Layer 2 switches, Layer 3 routers) from the drop down list. The 'device' type can be used for other devices that run SNMP (some servers for example) but are not switches or routers.
Tip Devices that are running in switch-router mode should be designated Layer 3 type.
Step 4 Select Collector mapping module that will be assigned polling of devices in this group.
Select the name of the NetMap Module that should poll this device from the list of configured NetMap modules listed in the pull-down.
8-6Cisco NAC Profiler Installation and Configuration Guide
OL-20604-01
Chapter 8 Network DevicesAdding Network Infrastructure Device Groups
Note The ''default'' mapping module for a device group should only be used on Cisco NAC Profiler systems with a single Collector/NetMap module. For NAC Profiler systems with two or more Collectors running NetMap, select the NetMap Module assigned to poll the group from the drop-down menu. In systems with one or more NetMap modules, this parameter facilitates the distribution of polling responsibility amongst the NetMap modules.
Step 5 Set Save Configuration option as desired.
If the devices in this group have a mechanism for making configuration changes effected via SNMP persistent, selecting the 'save configuration' check box will configure the NAC Profiler system to save all configuration changes it makes to any devices in the group to the saved configuration file on the effected device(s).
Tip This feature is applicable when using Cisco NAC Profiler in the Port Provisioning mode to change port settings as described earlier. If the Cisco NAC Profiler Port Provisioning usage mode will not be used to make configuration changes on network devices, this parameter should be left at the default (disabled).
Step 6 Select the support for Cisco MAC notification traps provided by devices in the group.
Cisco MAC notification traps from switches contain information that Cisco NAC Profiler uses to make the polling resulting from an endpoint joining the network more efficient. Therefore, if MAC notification traps are expected, the system will wait some time after receipt of Link Up for the more descriptive MAC notification trap that follows. If the devices in the group do NOT support MAC notification traps, this checkbox should be checked to disable this behavior and begin the poll upon receipt of the link up. Some vendors do not support MAC notification traps and groups that contain these devices should have this option checked.
Step 7 Select the Proper SNMP Access Method for devices in this Group.
This parameter determines which version of SNMP will be used for communication with network devices in the group by NetMap. Select the radio button of the SNMP version that devices in this group are running. By default Cisco NAC Profiler will use SNMP version 1 for communication with network devices. SNMP version 2c or version 3 may be selected as options for groups of devices using one of these versions of SNMP.
Tip All devices assigned to a group must be running the same version of SNMP. For example, devices running version 1 cannot be added to a group designated as running version 2c as NetMap will attempt to poll all devices in the group using v2c only. Before assigning devices to a group, ensure that the SNMP version running on the devices is compatible with the group setting.
Step 8 Select Display clear text Passphrase option as desired.
Clicking on this check box will enable the Read-Only, Read-Write, and SNMPv3’s Passphrase to be displayed in clear text (unmasked) which may be helpful while adding the group to ensure accurate entry of the SNMP community Strings/Passphrase.
This feature can be toggled on/off by selecting/de-selecting the checkbox at any time.
Step 9 Enter the Read-Only Community String for all devices in this group.
Enter the read-only community string that has been configured on all devices in the group for read-only SNMP access.
8-7Cisco NAC Profiler Installation and Configuration Guide
OL-20604-01

Chapter 8 Network DevicesAdding Network Infrastructure Device Groups
Note Network Devices assigned to a group inherit the SNMP version and SNMP community string specified for the group. The individual device settings (if present for device) of these parameters is overridden. If a device is added to a group that does not have matching SNMP version and community string parameters, NetMap will not successfully poll the device.
Step 10 Set the Read-Write Community String for the device group.
Tip Providing the Read-Write Community string for the group is only applicable when using Cisco NAC Profiler Active Response Events and or in the Port Provisioning mode to change port settings as described earlier in this document. If Cisco NAC Profiler will not be used with Active Response events and or in the Port Provisioning mode, do not specify the Read-Write Community String.
Enter the read-write community string that has been configured on all devices in the group for read-write SNMP access. This parameter can be displayed in clear text if the ''Display clear text Passphrase'' check box is checked.
Steps11-16 below are necessary only for groups of network devices that are running SNMP v3. If the group will not contain devices running SNMP v3, skip directly to the Timesaver above Step #17 below and proceed accordingly.The fields for the parameters set in the following steps will be grayed-out and unavailable for input unless the radio button for SNMPv3 was selected for the Access Method as described above. When the SNMPv3 radio button is selected, the SNMP parameters appear as shown in Figure 8-3 and will require proper configuration to enable polling of the devices added to the group.
Figure 8-3 Access Parameters for SNMPv3 Device Groups
When configuring a Network Device group for devices using SNMPv3, provide the following parameters for the device group:
Step 11 Enter the SNMPv3 Username for devices in the group (SNMPv3 groups only)
Provide the SNMPv3 Username to use when authenticating a SNMPv3 session with devices in the group.
Step 12 Enter the SNMPv3 Authentication Passphrase for devices in the group (SNMPv3 groups only)
Provide the SNMPv3 authentication Passphrase for use for the Hash Type for the group as selected below. This parameter can be displayed in clear text if the ''Display clear text Passphrase'' check box is checked.
8-8Cisco NAC Profiler Installation and Configuration Guide
OL-20604-01

Chapter 8 Network DevicesAdding Network Infrastructure Device Groups
Note SNMPv3 Authentication Passphrase must be at least 8 characters in length. If the passphrase configured on the device is less than 8 characters it must be changed.
Step 13 Enter SNMPv3 Privacy Passphrase for devices in the group (SNMPv3 groups only)
The Privacy Passphrase required for privacy (encryption algorithm type) service that was selected. This parameter can be displayed in clear text if the ''Display clear text Passphrase'' check box is checked.
Note SNMPv3 Privacy Passphrase must be at least 8 characters in length. If the passphrase configured on the device is less than 8 characters it must be changed.
Step 14 Enter the SNMPv3 Security Level for devices in the group
Select the radio button of the SNMPv3 security level in use for SNMPv3 sessions with the devices in the group.
• NoAuthNoPriv – No authentication, no privacy (least secure)
• AuthNoPriv – Authentication, no privacy (more secure)
• AuthPriv – Authentication, Privacy (most secure)
Tip Note that the SNMPv3 Security Level selected will enable/disable the next parameters (Hash Type and Encryption Type) as required. If NoAuthNoPriv was selected, skip steps15 and 16 and review the Timesaver following step 16.
Step 15 Set SNMPv3 Hash Type -- if AuthNoPriv or AuthPriv were selected for the group in Step #13
Select the radio button of the SNMPv3 hash type in use for SNMPv3 sessions with the devices in the group: select either the MD5 or SHA1 protocol.
Both protocols are hashing algorithms, which given a message concatenated with a user's key, generate a fingerprint for the string. After the hash is performed, the fingerprint is added to the message (without the key). If any of the data in the packet is modified in-flight, it will be detected when the hash is performed on the received message (minus the fingerprint, plus the user's key), and then the result is compared to the fingerprint that was received. The two protocols are similar, although MD5 is somewhat faster and SHA is somewhat stronger.
Step 16 SNMPv3 Encryption Type - if AuthPriv was selected for the group in Step #13
Select the radio button of the SNMPv3 encryption type to use for SNMPv3 sessions with the devices in the group, select either DES or AES encryption.
Timesaver If Cisco NAC Profiler will not be used in the Port Provisioning mode, skip the steps below and proceed to Step #20 below.
Providing the Virtual LAN Settings for a device group is applicable only when using Cisco NAC Profiler in the Port Provisioning mode to change port settings as described earlier in this document. If the Cisco NAC Profiler system will not be employed in the Port Provisioning mode, do not enter these parameters for the device group.
Step 17 Enter the Default VLAN ID
8-9Cisco NAC Profiler Installation and Configuration Guide
OL-20604-01

Chapter 8 Network DevicesAdding Network Infrastructure Device Groups
Enter the VLAN ID that has been configured as the Default VLAN on devices in this group. The VLAN name, ''Default'', will be used in the Cisco NAC Profiler user interface when managing port parameters on devices in the group. Although the value presented to the user will be the VLAN name: 'Default', the setting of the VLAN ID on each interface of the device or devices in the group will be based on the configuration in this section. This allows Cisco NAC Profiler to be easily deployed and used in the Port Provisioning mode in environments where different VID values are used for the same VLAN in different parts of the enterprise network.
An example of this is the Printer VLAN, which can vary by floor, building, or campus in some environments. When the VLAN name Printer is selected for applications to a particular port, the specific VID appropriate for each port on each device will be applied according to the device configuration by Cisco NAC Profiler.
Step 18 Enter the Authorized VLAN ID
Enter the VLAN ID that has been configured as the Authorized VLAN on the devices in this group. The VLAN name, ''Authorized,'' and not the VID value will be used in the administrative screens for managing ports and endpoints when the user is configuring network access for groups of endpoints. Although the value presented to the user will be the VLAN name 'Authorized,' the setting of the VLAN ID parameter on each interface will be based on the configuration in this section for the specific device being configured. This allows Cisco NAC Profiler to be easily deployed and used in the Port Provisioning mode in environments where multiple VID values are used throughout the enterprise for similar endpoint types.
Step 19 Enter Other VLANs as Required
Define other VLANs which have been configured on the network devices in this group as applicable by specifying one per line in the format VLANname:vid. Like the Default and Authorized VLAN, VLANs specified as available on the device will be presented by VLAN name as pull-down options in the Port Control views enabling the setting of the VLAN parameter on network device ports. The VLAN name provides a level of abstraction in the user interface to allow for different VLAN IDs used for the same named VLAN in different areas of the network. Cisco NAC Profiler will track what VID is being used for each VLAN name on a per-switch basis, allowing assignment by VLAN name rather than VID in Port Provisioning mode.
Step 20 Configure RADIUS client parameters for the devices in the group (optional).
If the Network Device Group being added will contain switches running RADIUS accounting that will be sent to Cisco NAC Profiler for the purposes of collecting endpoint data via this method, the group must be configured with the following parameters matching those configured on the devices in the group
a. Enter the RADIUS shared secret for network devices in this group. Re-enter to verify.
b. Select the NetRelay module for this Network Device Group that has been configured to process RADIUS Accounting from assigned devices.
Step 21 Select the Add Group button
This action will save the new Network Device Group to the Cisco NAC Profiler configuration.
Tip Once Device Groups are added to the system configuration, they are accessible and can be used to assign added/imported network devices to a group. If device groups are to be used, they should be configured prior to adding/importing network devices.
8-10Cisco NAC Profiler Installation and Configuration Guide
OL-20604-01

Chapter 8 Network DevicesImporting Network Infrastructure Devices
Importing Network Infrastructure DevicesThe most efficient manner to add network infrastructure devices to the NAC Profiler system configuration is through the Import Device feature. Cisco NAC Profiler has the ability to import a device list from an external CSV file accessible by the computer accessing the Cisco NAC Profiler web user interface. When used in conjunction with the device group functionality covered in Adding/Managing Microsoft Active Directory Servers, page 8-30, the import function can greatly reduce the network device configuration for the NAC Profiler system.
Tip Many network management systems provide the ability to export the list of devices being managed via SNMP into a CSV file that can be edited using spreadsheet software such as Microsoft Excel. Alternatively, a list of the network devices to be added to the NAC Profiler system configuration can be created manually for import.
The procedure for importing network devices into the NAC Profiler system configuration is dependent on the version of SNMP the devices to be imported are running. For network devices running v1 and v2c of the SNMP protocol, the input file and import process are identical. For devices running SNMPv3, a different input file and import process are required to handle the additional parameters required in that version of the SNMP protocol.
The next two subsections outline the processes for importing network devices for the different SNMP versions.
Importing Network Infrastructure Devices running SNMPv1 and v2cThe Import Device utility for v1 and v2c devices requires that a list of devices to import into the Cisco NAC Profiler configuration be created using format illustrated in Figure 8-4, saved in a comma separated value (CSV) format. That format is a table easily created/edited using spreadsheet software. The table will have at a minimum three columns, each containing the following values (left to right, no column headings):
– Device Name
– Device IP Address
– SNMP Read Only Community string
As options, depending on what features are being used:
– For systems that will be used in the Port Provisioning mode or employ Active Response Events, a fourth column can be added to the table with the SNMP Read-Write community string for each device.
– For systems that will employ RADIUS accounting, the RADIUS passphrase can be added as the fifth column of the CSV import.
8-11Cisco NAC Profiler Installation and Configuration Guide
OL-20604-01

Chapter 8 Network DevicesImporting Network Infrastructure Devices
Figure 8-4 Network Device Spreadsheet: SNMPv1 & v2c Devices, mandatory parameters
Once the list of network devices has been edited to this format, save the file as a CSV file (in Microsoft Excel select Save As, Select Save as type CSV (comma delimited) noting the location and filename. Ensure the computer being used to manage the NAC Profiler system via the web interface can access the CSV file(s) that will be imported into the Cisco NAC Profiler configuration.
Timesaver During the import procedure, an import operation can be designated to import devices into a specified network device group created using the procedure in “Adding Network Infrastructure Device Groups” section on page 8-5. Devices imported into a group inherit the device type, SNMP version and Community string parameters as well as the designated NetMap module for the group.
For NAC Profiler systems with multiple Collectors employing NetMap, the easiest way to distribute polling of the network devices across the available NetMap modules is to create Network Device Groups, one for each NetMap module. Then create a separate CSV import file containing the devices to be polled by each NetMap module, and then import the devices into the groups using multiple imports.
Follow the procedure outlined below to import a list of devices in the CSV format into the NAC Profiler system configuration.
Step 1 From the Configuration Tab’s secondary menu select Network Devices, then from the Configure Network Devices table, select Import Devices.
The Import Network Devices form (Figure 8-5)will display in the main pane.
Figure 8-5 Import Network Devices Form
Step 2 Click the Browse… button to select the device list CSV file created earlier using the specified format.
After selecting the appropriate file, the full path to the file is entered into the 'CSV File Name' field in the form. Verify that the desired file has been selected for import.
8-12Cisco NAC Profiler Installation and Configuration Guide
OL-20604-01
Chapter 8 Network DevicesImporting Network Infrastructure Devices
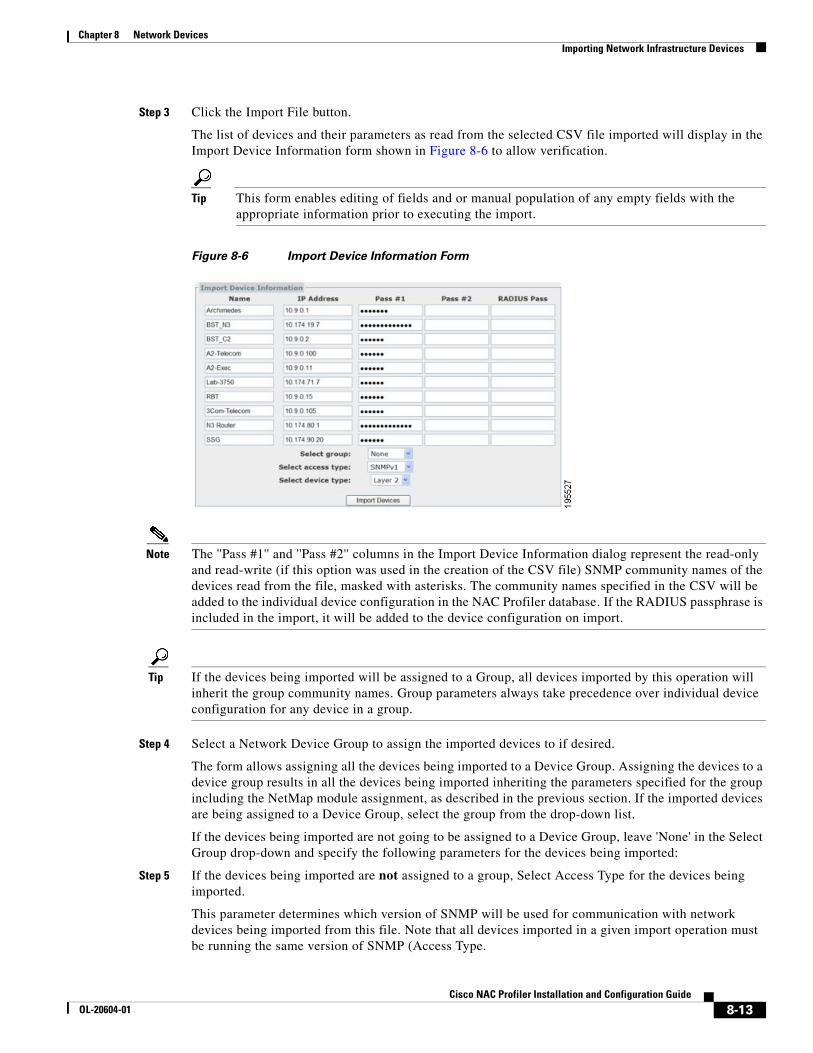
Step 3 Click the Import File button.
The list of devices and their parameters as read from the selected CSV file imported will display in the Import Device Information form shown in Figure 8-6 to allow verification.
Tip This form enables editing of fields and or manual population of any empty fields with the appropriate information prior to executing the import.
Figure 8-6 Import Device Information Form
Note The ''Pass #1'' and ''Pass #2'' columns in the Import Device Information dialog represent the read-only and read-write (if this option was used in the creation of the CSV file) SNMP community names of the devices read from the file, masked with asterisks. The community names specified in the CSV will be added to the individual device configuration in the NAC Profiler database. If the RADIUS passphrase is included in the import, it will be added to the device configuration on import.
Tip If the devices being imported will be assigned to a Group, all devices imported by this operation will inherit the group community names. Group parameters always take precedence over individual device configuration for any device in a group.
Step 4 Select a Network Device Group to assign the imported devices to if desired.
The form allows assigning all the devices being imported to a Device Group. Assigning the devices to a device group results in all the devices being imported inheriting the parameters specified for the group including the NetMap module assignment, as described in the previous section. If the imported devices are being assigned to a Device Group, select the group from the drop-down list.
If the devices being imported are not going to be assigned to a Device Group, leave 'None' in the Select Group drop-down and specify the following parameters for the devices being imported:
Step 5 If the devices being imported are not assigned to a group, Select Access Type for the devices being imported.
This parameter determines which version of SNMP will be used for communication with network devices being imported from this file. Note that all devices imported in a given import operation must be running the same version of SNMP (Access Type.
8-13Cisco NAC Profiler Installation and Configuration Guide
OL-20604-01

Chapter 8 Network DevicesImporting Network Infrastructure Devices
Select the SNMP version (v1 or v2c) that the network devices being imported are running from the drop-down list. By default Cisco NAC Profiler will use SNMP version 1 for communication with network devices. SNMP version 2c may be selected as an option for importing devices using SNMP v2c.
Step 6 Select Device Type for the devices being imported.
Select either Layer 2 or Layer 3 to designate the type of devices being imported (switch or router). Note that all devices being imported in a given operation will be given the same device type upon import. If a network device is running both layer2 and layer 3 functions, utilize the layer 3 device type designation.
Step 7 Click the Import Devices button at the bottom of the window to import the devices using the selected file and selected settings.
A message stating ''Imported device information saved'' will be presented. The list of imported devices will now be accessible in tabular format by selecting List Network Devices from the Configure Network Devices table.
If the devices were imported into a group, they can be viewed by using the List Group option described in “List Device Groups” section on page 8-25.
Importing Network Infrastructure Devices running SNMPv3 The Import Device utility for the bulk-importing of SNMPv3 devices into the Cisco NAC Profiler configuration requires that the list of devices have the format illustrated in Figure 8-7.
The format of the import source is a table with nine columns with no column headings that contains a row for each device to be imported containing the following device parameters for each, left to right:
– Device Name
– IP Address
– SNMPv3 Username
– SNMPv3 Authentication Password
– SNMPv3 Privacy Password
– SNMPv3 Security Level
– SNMPv3 Hash Type
– SNMPv3 Encryption Algorithm Type.
– RADIUS passphrase (optional)
Figure 8-7 Example Network Device Spreadsheet: SNMPv3 Devices
Once the source CSV file has been created according to these guidelines, perform the following steps to import the network devices using SNMP v3 in the CSV file into the Cisco NAC Profiler configuration:
8-14Cisco NAC Profiler Installation and Configuration Guide
OL-20604-01

Chapter 8 Network DevicesImporting Network Infrastructure Devices
Step 1 Navigate to the Configuration tab, select network devices link and then Select Import Device List from the Configure Network Devices table.
The Import Network Device form will display in the main pane which allows opening the CSV file containing the devices to be imported.
Figure 8-8 Import Network Device
Step 2 Click the Browse… button to select the device list CSV file created previously.
Step 3 After selecting the file it is entered into the 'CSV File Name' field in the form. Click the Import File button.
Step 4 The list of devices in the CSV file successfully imported will display in the Import Device Information form along with the parameters read from the file as shown in Figure 8-9.
Tip If the devices being imported will be assigned to a Group, all devices imported will inherit the SNMPv3 parameters configured for the device group. Group parameters always take precedence over individual device configuration for any device assigned to a group.
Figure 8-9 Import SNMPv3 Information Form
If a parameter for a device is left blank or requires edit prior to import, the appropriate entry can be made in the form prior to selecting Import Devices and proceeding with the import.
8-15Cisco NAC Profiler Installation and Configuration Guide
OL-20604-01

Chapter 8 Network DevicesImporting Network Infrastructure Devices
The SNMPv3 parameters for each network device are defined as follows:
User
The SNMPv3 Username to use when authenticating a SNMPv3 session with the device.
Authentication Password
The SNMPv3 authentication password for use for the Hash Type that is specified by the Hash parameter described below.
Privacy Password
The password required for privacy (encryption algorithm type) service that was selected.
Security Level
SNMPv3 security level in use for SNMPv3 sessions with the devices in the group.
• NoAuthNoPriv – No authentication, no privacy (least secure)
• AuthNoPriv – Authentication, no privacy (more secure)
• AuthPriv – Authentication, Privacy (most secure)
SNMPv3 Hash Type
The SNMPv3 hash type in use for SNMPv3 sessions with the device; either MD5 or SHA1 protocol should be specified.
Both protocols are hashing algorithms, which given a message concatenated with a user's key, generate a fingerprint for the string. After the hash is performed, the fingerprint is added to the message (without the key). If any of the data in the packet is modified in-flight, it will be detected when the hash is performed on the received message (minus the fingerprint, plus the user's key), and then the result is compared to the fingerprint that was received.
The two protocols are similar, although MD5 is somewhat faster and SHA is somewhat stronger.
SNMPv3 Encryption Algorithm Type
The SNMPv3 encryption type to use for SNMPv3 sessions with the device, select either DES or AES encryption.
Step 5 Once the device parameters have been verified, select a Group assignment for the devices being imported (if applicable).
Step 6 Select the Device Type of the network devices being imported: Layer 2 (switches) or Layer 3 (routers).
Step 7 Click the Import Devices button to execute the import.
A message stating ''Imported device information saved'' will be presented.
The imported network devices running SNMPv3 will now be accessible by selecting List Network Devices from the Configure Network Devices table, or if they have been assigned to a Group, by List Device Groups.
8-16Cisco NAC Profiler Installation and Configuration Guide
OL-20604-01

Chapter 8 Network DevicesAdding Individual Network Infrastructure Devices to the Configuration
Adding Individual Network Infrastructure Devices to the Configuration
As an option to the device import outlined in the last section, network devices can be entered into the configuration individually as well.
To enter an individual network device, follow the procedure outlined below:
Timesaver For most NAC Profiler systems, adding a device requires the completion of steps 1-12 and 24. The remaining steps are specific to devices running SNMP version 3 and or NAC Profiler systems that will be used in port provisioning mode.
Step 1 Select the Add Device option from the Configure Network Device table that is shown after navigating to the Configuration tab and selecting the Network Devices link. This will open the Add Network Device form shown in figure Figure 8-10.
8-17Cisco NAC Profiler Installation and Configuration Guide
OL-20604-01

Chapter 8 Network DevicesAdding Individual Network Infrastructure Devices to the Configuration
Figure 8-10 Add Network Device Form
Step 2 Enter the Device Name of the device to be added
Enter a unique name to identify this network device in the Cisco NAC Profiler configuration.
Tip Cisco NAC Profiler will show the location of endpoints by switch and port in the Endpoint Console views and Events—choosing a name for switches (e.g., Bldg10-floor8, etc.) may be useful to easily differentiate between multiple switches in a large enterprise network.
Step 3 Enter the IP Address of the device to be added
Enter the IP Address of the network device. This should be the address the SNMP agent on the device will respond to SNMP queries on.
Step 4 Specify an Alternate Addresses (optional)
8-18Cisco NAC Profiler Installation and Configuration Guide
OL-20604-01

Chapter 8 Network DevicesAdding Individual Network Infrastructure Devices to the Configuration
Allows the specification of other interface addresses that may be used by the network device (Layer 3 devices typically) for SNMP Management.
Step 5 Select Type of the device to be added
Select the device type (Layer 2 switches, Layer 3 routers) from the drop down list. The 'device' type can be used for other devices that run SNMP (some servers for example) but are not switches or routers. If a network device is running both layer2 and layer 3 functions in most cases it doesn’t matter if either Layer 2 or Layer 3 is selected, as Cisco NAC Profiler will automatically poll the CAM or SAT table, ARP cache if they are available on the device. If Layer 3 is selected and the device is a router, the route table will also be polled as well as the ARP cache.
Step 6 Select Collector mapping module for this device
Select the name of the NetMap Module that should poll this device from the list of configured NetMap modules listed in the pull-down. The default option will work to disperse network polling among configured modules.
Note The ''default'' mapping module for a device group should only be used on NAC Profiler systems with a single Collector/NetMap module. For NAC Profiler systems with two or more Collectors select the NetMap Module assigned to poll the group from the drop-down menu.
For systems with multiple Profiler Collectors deployed, this parameter allows the distribution of network device polling amongst the NetMap modules running on the Remote Collection appliances.
Step 7 Select Network Device Group for this device as desired
If network device groups have been defined, as described in the previous section entitled Add Network Device Groups; select the group that this device should belong to from the drop-down list if applicable for the device being added.
Note Designation a device to be a member of a group results in the override of settings made at the individual device level. For example, if the SNMP community strings set at the device level are different than those specified for the group, the community strings set for the group level are the strings that Cisco NAC Profiler (NetMap) will use to attempt SNMP communications with the device.
Step 8 Trunk Ports (Optional)
This parameter allows the administrator to designate known trunk ports on the network device. Trunk ports are ports providing connectivity to other infrastructure devices, not endpoints. When entering trunk port in this field use the IF index number for that port. This can be found at View/Manage Endpoints -> Display Endpoints by Device Ports -> Table of Devices -> then select the Network device to view. The IF index is the number under the Port column that is in parenthesis (10005), for example.
Step 9 Save Configuration (Optional)
Tip This parameter is applicable only when using Cisco NAC Profiler in the Port Provisioning mode to change port settings as described earlier in this document.
If this network device provides a mechanism for making configuration changes effected via SNMP by Cisco NAC Profiler in the Port Provisioning mode persistent to the device configuration, selecting the 'save configuration' check box will configure the NAC Profiler system to save all configuration changes it makes to the device, if the network device supports this feature.
8-19Cisco NAC Profiler Installation and Configuration Guide
OL-20604-01

Chapter 8 Network DevicesAdding Individual Network Infrastructure Devices to the Configuration
Step 10 Select the Proper SNMP Access Method (SNMP version).
This parameter determines which version of SNMP will be used for communication with the network device. Select the radio button of the SNMP version that this device is running. By default Cisco NAC Profiler will use SNMP version 1 for communication with network devices. SNMP version 2c or version 3 may be selected as options for groups of devices using one of these versions of SNMP.
Tip It is important to verify the SNMP version running on devices to avoid mismatches. For example, if version 2c is selected in the NAC Profiler configuration for a device and it is running v1, Cisco NAC Profiler will be unable to poll the device.
Step 11 Select Display clear text Passphrase option as desired.
Clicking on this check box will enable the Read-Only, Read-Write, and SNMPv3’s Passphrases to be displayed in clear text (unmasked) which may be helpful while adding the device to ensure accurate entry of the SNMP community Strings/Passphrase.
This feature can be toggled on/off by selecting/de-selecting the checkbox at any time.
Step 12 Enter the Read-Only Community String for this device.
Enter the read-only community string that has been configured on this device to enable SNMP polling.
Note Network Devices assigned to a group inherit the SNMP version and SNMP community string specified for the group. The individual device settings of these parameters is overridden. If a device is added to a group that does not have matching SNMP version and community string parameters, NetMap will not successfully poll the device.
Step 13 Set the Read-Write Community String for the device -- required only for Active Response Events and Port Provisioning Mode.
Tip Providing the Read-Write Community string for a device is only applicable when using Cisco NAC Profiler in the Port Provisioning mode to change port settings as described earlier in this document, or when employing Active Response Events. If Cisco NAC Profiler will not be used in the Port Provisioning mode and or Active Response Events will not be used, do not specify the Read-Write Community String.
Enter the read-write community string for this device. This parameter can be displayed in clear text if the ''Display clear text Passphrase'' check box is checked.
Timesaver The next several steps below are necessary only for network devices that are running SNMP v3 and or for Cisco NAC Profiler installations where the Port Provisioning mode will be used. If the device is not running SNMP v3 and Port Provisioning mode is not in use skip to Step #23 below
If the group does not contain network devices running SNMP v3, but will be used in Port Provisioning mode, skip to Step #20 below.
The fields for the parameters set in the following steps will be grayed-out and unavailable for input unless the radio button for SNMPv3 was selected for the Access Method as described above. When the SNMPv3 radio button is selected, the SNMP parameters appear as shown in Figure 8-11 and will require proper configuration to enable polling of a device running SNMPv3 by the NAC Profiler system.
8-20Cisco NAC Profiler Installation and Configuration Guide
OL-20604-01

Chapter 8 Network DevicesAdding Individual Network Infrastructure Devices to the Configuration
Figure 8-11 Access Parameters for Network Devices running SNMPv3
When adding a network device running SNMPv3, provide the following parameters for the device:
Step 14 Enter the SNMPv3 Username for the device
Provide the SNMPv3 Username to use when authenticating a SNMPv3 session with this device.
Step 15 Enter the SNMPv3 Authentication Passphrase
Provide the SNMPv3 authentication Passphrase for use with the Hash Type selected below (step #18). This parameter can be displayed in clear text if the ''Display clear text Passphrase'' check box is checked.
Step 16 Enter SNMPv3 Privacy Passphrase for this network device
The Privacy Passphrase required for privacy (encryption algorithm type) service that was selected. This parameter can be displayed in clear text if the ''Display clear text Passphrase'' check box is checked.
Step 17 Enter the SNMPv3 Security Level for the device
Select the radio button of the SNMPv3 security level in use for SNMPv3 sessions with the device.
• NoAuthNoPriv – No authentication, no privacy (least secure)
• AuthNoPriv – Authentication, no privacy (more secure)
• AuthPriv – Authentication, Privacy (most secure)
Tip Note that the SNMPv3 Security Level selected will enable/disable the next parameters (Hash Type and Encryption Type) as required. If NoAuthNoPriv was selected, skip to the Timesaver after Step #19.
Step 18 Set SNMPv3 Hash Type -- if AuthNoPriv or AuthPriv were selected for the device in Step #17
Select the radio button of the SNMPv3 hash type in use for SNMPv3 sessions with the device: select either the MD5 or SHA1 protocol.
Both protocols are hashing algorithms, which given a message concatenated with a user's key, generate a fingerprint for the string. After the hash is performed, the fingerprint is added to the message (without the key). If any of the data in the packet is modified in-flight, it will be detected when the hash is performed on the received message (minus the fingerprint, plus the user's key), and then the result is compared to the fingerprint that was received. The two protocols are similar, although MD5 is somewhat faster and SHA is somewhat stronger.
Step 19 SNMPv3 Encryption Type - if AuthPriv was selected for the group in Step #13
8-21Cisco NAC Profiler Installation and Configuration Guide
OL-20604-01

Chapter 8 Network DevicesAdding Individual Network Infrastructure Devices to the Configuration
Select the radio button of the SNMPv3 encryption type to use for SNMPv3 sessions with the devices in the group, select either DES or AES encryption.
Timesaver If Cisco NAC Profiler will not be used in the Port Provisioning mode, skip the steps below and proceed directly to Step 23.
Tip Providing the Virtual LAN Settings for a network device is applicable only when using Cisco NAC Profiler in the Port Provisioning mode to change port settings as described earlier in this document. If the NAC Profiler system will not be employed in the Port Provisioning mode, do not enter these parameters for network devices.
Step 20 Enter the Default VLAN ID
Enter the VLAN ID that has been configured as the Default VLAN on this device. The VLAN name, ''Default'', will be used in the Cisco NAC Profiler user interface when managing port parameters on this device. Although the value presented to the user will be the VLAN name: 'Default', the setting of the VLAN ID on each interface of the device will be based on the configuration in this section. This allows Cisco NAC Profiler to be easily deployed and used in the Port Provisioning mode in environments where different VID values are used for the same VLAN in different parts of the enterprise network.
An example of this is the Printer VLAN, which can vary by floor, building, or campus in some environments. When the VLAN name Printer is selected for applications to a particular port, the specific VID appropriate for each port on each device will be applied according to the device configuration by Cisco NAC Profiler.
Step 21 Enter the Authorized VLAN ID
Enter the VLAN ID that has been configured as the Authorized VLAN on this network device. The VLAN name, ''Authorized,'' and not the VID value will be used in the administrative screens for managing ports and endpoints when the user is configuring network access for groups of endpoints. Although the value presented to the user will be the VLAN name 'Authorized,' the setting of the VLAN ID parameter on each interface will be based on the configuration in this section for the specific device being configured. This allows NAC Profiler to be easily deployed and used in the Port Provisioning mode in environments where multiple VID values are used throughout the enterprise for similar endpoint types.
Step 22 Enter Other VLANs as Required
Define other VLANs which have been configured on this network device as applicable by specifying one per line in the format VLANname:vid. Like the Default and Authorized VLAN, VLANs specified as available on the device will be presented by VLAN name as pull-down options in the Port Control views enabling the setting of the VLAN parameter on network device ports. The VLAN name provides a level of abstraction in the user interface to allow for different VLAN IDs used for the same named VLAN in different areas of the network. Cisco NAC Profiler will track what VID is being used for each VLAN name on a per-switch basis, allowing assignment by VLAN name rather than VID in Port Provisioning mode.
Step 23 Configure RADIUS client parameters for the network device (optional).
If the Network Device being added is a switch running RADIUS accounting that will be sent to Cisco NAC Profiler for the purposes of collecting endpoint data via this method, the device must be configured with the following parameters:
a. Enter the RADIUS shared secret for the network device. Re-enter to verify.
8-22Cisco NAC Profiler Installation and Configuration Guide
OL-20604-01

Chapter 8 Network DevicesManaging Network Infrastructure Devices and Device Groups
b. Select the NetRelay module for this Network Device that has been configured to process RADIUS Accounting from this and other devices.
Step 24 Select the Add Device button
This action will save the new Network Device to the Cisco NAC Profiler configuration and polling will begin upon the next Apply Changes -> Update Modules or Re-map.
Managing Network Infrastructure Devices and Device GroupsNote that the Pie Chart shown on the Configuration Tab by default shows the status of the Network Infrastructure Device Connectivity. This pie chart shows the current status of every router and switch added to the configuration and that should be polled regularly by NetMap. Each device will have one of three possible statuses on this report:
• Contacted - Indicates that the device has been polled successfully recently (e.g., within last two attempts).
• Lost Contact - Indicates that the device has not been successfully polled in two or more attempts. Clicking on the Lost Contact slice will present a report of the network devices in this condition.
• No Contact - Indicates that the device has never been successfully polled by the system. Clicking on the Lost Contact slice will present a report of the network devices in this condition.
An example Configuration Tab with devices in the various states is shown in Figure 8-12.
Figure 8-13 is an example of a resulting tabular view of devices in a particular state (lost contact in the example)
Figure 8-12 Configuration Tab Showing Network Device Status
8-23Cisco NAC Profiler Installation and Configuration Guide
OL-20604-01

Chapter 8 Network DevicesManaging Network Infrastructure Devices and Device Groups
Figure 8-13 Device Status Report (lost contact devices)
List Network Infrastructure DevicesTo get a list of all network devices currently in the system configuration, and determine the last time the NAC Profiler Endpoint Profiler system has successfully polled the device, the Network Device List can be viewed from the Configuration tab.
To view the Network Device List navigate to the Configuration Tab, and select Network Devices link from the secondary menu of the tab. Selecting the List Network Devices link in the left most column of the Configure Network Devices table will provide a list of all the network devices currently in the system configuration. Figure 8-14 on page 8-25 is an example Table of Network Devices.
The Table of Network Devices has eight columns providing the following information for each network device in the configuration:
• Name – name assigned to the device when it was added to the configuration and the name that will appear throughout the NAC Profiler interface when referencing the network device.
• IP Address – address of the primary interface of the device. The IP address of each device is a link to the Edit Network Device form for the device. See “Edit a Network Device” section on page 8-26.
• System Description – Provides the current value of the SysDescr OID on the device which should contain a textual description of the entity. This value should include the full name and version identification of the system's hardware type, software operating-system, and networking software.
• Location – Provides the current value (if set on the device) of the SysLocation OID which can be used to describe the physical location of a device.
• Contact – Provides the current value (if set on the device) of the SysContact OID which can be used to describe the contact person for this device, together with information on how to contact the person.
• Type – device type, either Switch (layer 2) or Router (layer 3) as designated in the Cisco NAC Profiler configuration.
• Group – if the device is assigned to a group the group name is provided
• Last Scan – timestamp of last successful SNMP communication with the device
Note The Last Scan column of the table shows the timestamp of the last successful NetMap poll of the device. If this field displays 'No Contact' this an indication that Cisco NAC Profiler has never been able to communicate with the network device via SNMP and the assigned NetMap module.
8-24Cisco NAC Profiler Installation and Configuration Guide
OL-20604-01

Chapter 8 Network DevicesManaging Network Infrastructure Devices and Device Groups
In the upper right corner there is a ''Select View'' control with a pull-down menu which allows selection of the number of network devices to be viewed in each page of the Cisco NAC Profiler UI. The default setting is to view only 100 Devices per page which improves UI performance by keeping the table size small. Other selections that are available in the pull-down are 250, 500, 1000, and ''Show All''.
Figure 8-14 List Network Devices
Tip Note that the table sort order can be changed by selecting the column headings. For example, to sort the Table of Network Devices by Group, simply click on the Group column heading.
List Device GroupsWhen Network Device Groups are configured as described in “Adding Network Infrastructure Device Groups” section on page 8-5 a ''tree view'' of groups and the devices in the group is provided by List Group view. Upon clicking on the List Device Groups option in the Configure Network Devices table, the tree of existing Device Groups configured on the system is shown as illustrated in Figure 8-15.
Clicking on the ''+'' adjacent to the Device Group Name will expand the tree view to list the Network Devices currently in the device group (see Figure 8-16). The individual network device names listed when a group is expanded are links themselves, and when selected open the Edit Network Device form for the device. This allows the individual device configuration to be edited including changing the group assignment or deleted from the configuration. See “Edit a Network Device” section on page 8-26.
When the group is expanded, a Remove ALL Devices link appears at the top of the list of devices as shown in Figure 8-16. Selecting this link will delete all devices in the device group from the NAC Profiler configuration permanently after a confirmation.
8-25Cisco NAC Profiler Installation and Configuration Guide
OL-20604-01

Chapter 8 Network DevicesManaging Network Infrastructure Devices and Device Groups
Figure 8-15 List Device Groups
Figure 8-16 Click on the Group Name in the Tree to view Devices in the Group
Selecting a Device Group Name link will open Edit Group form for the selected group, allowing changes to be made to the group configuration. The group can also be deleted from that form. Deleting a group with devices assigned results in them returning to the un-grouped status.
Selecting a device name in the List of Device Groups tree will open the Edit Device form for the selected device, allowing changes to be made to the device configuration.
Edit a Network DeviceIt may be necessary from time-to-time to edit the parameters of network devices added to the system configuration. To edit a device already added to the system configuration, follow the procedure below.
Step 1 Open the Edit Network Device form for the device to be modified (see Figure 8-17 on page 8-28)
The IP address of the network device in the Table of Network Devices is a dynamic link that opens the Edit Network Device form. (The Edit Network Devices form can also be accessed by clicking on the device name in the expanded Network Device Group Tree as described in the last section).
Step 2 Verify current network device configuration parameters
Tip The IP address of a network device cannot be edited. If the primary IP address of the device needs to be changed, the device must be deleted and re-added.
Step 3 Make the necessary configuration changes to the network device.
8-26Cisco NAC Profiler Installation and Configuration Guide
OL-20604-01

Chapter 8 Network DevicesManaging Network Infrastructure Devices and Device Groups
For a detailed explanation of each network device configuration parameter, see “Adding Individual Network Infrastructure Devices to the Configuration” section on page 8-17.
Step 4 Select the Update Device button to save the configuration changes.
To remove an individual device from the configuration, display the Edit Network Device form and select the Remove Device button.
Tip The Clear Device Ports button on the Edit Network Device form is used when additional line cards/switch modules are added to a chassis-based device after Cisco NAC Profiler has begun polling it via NetMap. This button forces the Cisco NAC Profiler system to reset the port number/ifIndices in the database for the chassis when additional ports are added so they can be rediscovered on the next poll by NetMap.
8-27Cisco NAC Profiler Installation and Configuration Guide
OL-20604-01

Chapter 8 Network DevicesManaging Network Infrastructure Devices and Device Groups
Figure 8-17 Edit Network Device Form
Edit a Network Device GroupIt may be necessary from time-to-time to edit the parameters of network device groups added to the system configuration, such as when community strings are changed. To edit a device group already added to the system configuration, follow the procedure below.
Step 1 Open the Edit Group form for the device group to be modified
Navigate to the Configuration tab, select Network Devices then click on the List Device Groups link to display the existing group names. Click on the group name link to open the Edit Group form, which is a variation of the Add Group form (Figure 8-2 on page 8-6)
8-28Cisco NAC Profiler Installation and Configuration Guide
OL-20604-01

Chapter 8 Network DevicesManaging Network Infrastructure Devices and Device Groups
Step 2 Verify current device group configuration parameters
Step 3 Make the necessary configuration changes to the device group.
For a detailed explanation of each network device configuration parameter, see “Adding Network Infrastructure Device Groups” section on page 8-5.
Step 4 Select the Update Group button to save the configuration changes.
To remove an individual group from the configuration, display the Edit Group form and select the Delete Group button.
Find Network DeviceThe Find Network Device option available from the Configure Network Devices table enables searching for switch or router saved to the NAC Profiler configuration using the using its IP address and/or device name-system description. Follow the steps below to search for a network device in the configuration:
Step 1 Navigate to the Configuration tab, select Network Devices link, then click on Find Network Device link in the Configure Network Devices table. The Find Network Device form (Figure 8-18) is displayed
Figure 8-18 Find Network Device Form
Step 2 Specify all or part of the Device Name/system description MIB information to search on (optional)
If the exact name of the device is unknown, enter a portion of the name. Cisco NAC Profiler will search based on the input character string and return all matches of that string. For example, if searching for a Cisco Catalyst 3750 for which the device name is unknown, simply enter '3750' in the 'Device name' field. Cisco NAC Profiler will return every record in the database containing '3750'.
Step 3 Specify an IP Address to search Network Devices for
Enter the complete 32-bit host IP address of the device to search the database for.
Tip When a device search returns results (devices matching search criteria are found), the IP addresses in the result table are links to the Edit Network Device form.
8-29Cisco NAC Profiler Installation and Configuration Guide
OL-20604-01

Chapter 8 Network DevicesAdding/Managing Microsoft Active Directory Servers
Adding/Managing Microsoft Active Directory ServersAs outlined in the beginning of the chapter, Cisco NAC Profiler can also query Microsoft Active Directory Servers on the network in order to gather information about endpoints that are Domain members. This allows for collection of not only the fact that a given endpoint is a domain member, but other details such as the Operating System (e.g., Windows XP, Windows 2000, etc.), the OS version number and the Service Pack level. This data can then be used in Profile Rules as described in the following chapters outlining the configuration of endpoint profiles.
Similar to infrastructure devices covered in Adding/Managing Microsoft Active Directory Servers, page 8-30, the NAC Profiler system, must be provided with the information necessary to successfully query each AD server on the network for domain member information. The query of Active Directory Servers is provided by the NetMap module which uses the LDAP protocol to gather information about endpoints that are domain members.
Follow the procedures in the following sections to configure the system for collection of endpoint data from Microsoft Active Directory Servers.
Note As of version 3.1, Active Directory Servers must be managed individually. Bulk import of Active Directory Servers is planned for a later Cisco NAC Profiler release.
Add Active Directory ServersTo add an AD Server to the configuration, navigate to the Configuration Tab, select Network Devices from the secondary menu, then select the Add Active Directory link to open the Add Active Directory form shown in Figure 8-19.
Figure 8-19 Add Active Directory Form
Complete the following steps to add an Active Directory server to the system configuration:
Step 1 Enter the AD Server Name.
Step 2 Select the desired NetMap module that will poll this Active Directory server for endpoint information.
8-30Cisco NAC Profiler Installation and Configuration Guide
OL-20604-01

Chapter 8 Network DevicesAdding/Managing Microsoft Active Directory Servers
Note Unless this is a single Collector system, the default Collector Mapping Module (default) should not be selected. In a multiple Collector system, the desired mapping module should be selected from the list of configured NetMap component modules on the system.
Tip AD Servers are queried via LDAP by the assigned NetMap module every 10 minutes.
Step 3 Enter a valid username for a user with admin privileges on the AD Server.
Step 4 Enter the password for the user
Step 5 Enter the Base DN for the LDAP lookup
Step 6 Select the Add Active Directory button to save the AD Server to the Configuration
List Active Directory ServersThe Active Directory servers currently added to the configuration can be viewed, edited and deleted using this choice from the Configure Network Devices menu. When List Active directory is selected, the table of active directory servers saved to the system is displayed as shown in
Figure 8-20 List Active Directory Servers
To view, edit and delete a selected Active Directory Server, select the Server Name which is a link. This will open the Edit Active Directory form for the selected AD Server, as shown in Figure 8-21.
8-31Cisco NAC Profiler Installation and Configuration Guide
OL-20604-01

Chapter 8 Network DevicesAdding/Managing Microsoft Active Directory Servers
Figure 8-21 Edit Active Directory Form
To edit the configuration of an AD server added to the configuration, make the desired changes to parameters as required, then select the Edit Active Directory server button to save the changes.
To remove an Active Directory server, select the Delete Active Directory server button which removes the AD Server from the configuration and ceases LDAP queries to that Server.
8-32Cisco NAC Profiler Installation and Configuration Guide
OL-20604-01