network camera camera management tool user manual
TRANSCRIPT

This User Manual should be read before using the network camera. ENGLISH
Network Camera
Camera Management Tool User Manual

2
This manual describes how to configure and operate Camera Management Tool (hereafter referred to as “this tool”). Carefully read this manual before use to ensure correct use of this tool.
* The cameras described in this manual may include models not available in your country and/or region.
For the latest information on this product (firmware and software, user manuals, operating environment, etc.), please refer to the Canon website.
Precautions for Use (Disclaimer)
Network SecurityThe user is responsible for the network security of this product and its use.Take appropriate network security measures to avoid security breaches. To the full extent permitted by laws and regulations, neither Canon Inc. nor any of its subsidiaries or affiliates shall be liable for any losses, direct, incidental or consequential damages, or liabilities that may be incurred as a result of network security incidents such as unauthorized accesses.
<Network Security Recommendations>• Register a strong administrator password that cannot be easily guessed by a third party.• Change the HTTP or HTTPS port number of the camera.• Limit access to the camera by network devices.For additional network security recommendations, please refer to the Canon website.
License Agreement of SoftwareFor the license agreement of the software, please refer to the text file provided along with the installer.
Trademarks
• Microsoft, Windows, Windows Server, Excel and Internet Explorer are registered trademarks of Microsoft Corporation in the United States and other countries.
• Windows is legally recognized as the Microsoft Windows Operating System.• ONVIF® is a trademark of Onvif, Inc.• All other company or product names used in this manual are trademarks or registered trademarks of their
respective holders.
Introduction
3
Before using this tool, please read the user manuals included with the camera in addition to this manual.
Notes1. Any unauthorized reproduction of this manual is prohibited.2. The contents of this manual are subject to change without any prior notice.3. This manual has been prepared with the utmost attention to accuracy. If you have any comments, however, please
contact a Canon sales representative.4. Canon shall assume no liability for any outcome of using this product, notwithstanding items 2 and 3 above.
How to Use This Manual
The assumed reading format of this manual is on a computer screen.
Software ScreenshotsThe software screenshots samples shown in this manual are for illustration only. The screenshots may differ from the actual screens displayed. Most of the screenshots used in this manual are from Windows 10.
Symbols Indicating Precautions
User Manuals
Symbol Description
Important Cautions and restrictions during operation. Make sure to read these carefully.
Note Supplementary descriptions and reference information.

4
Table of Contents
Introduction...................................................................................................................... 2
Precautions for Use (Disclaimer) ............................................................................................ 2
Trademarks ............................................................................................................................. 2
User Manuals................................................................................................................... 3
How to Use This Manual ......................................................................................................... 3
Chapter 1 Before UseFunctions of the Camera Management Tool ................................................................... 8
Flow of Operation.................................................................................................................... 8
Operating Environment.................................................................................................. 11
System Requirements ........................................................................................................... 11
Supported Cameras.............................................................................................................. 11
Limitations ............................................................................................................................. 11
Installation...................................................................................................................... 13
Chapter 2 Detecting/Setting CamerasLaunching Camera Management Tool .......................................................................... 16
Launching ............................................................................................................................. 16
Names of Main Window Components................................................................................... 16
Detecting the Camera ................................................................................................... 18
Detecting Cameras with the Search Function ...................................................................... 18
Registering the Administrator Account ................................................................................. 20
Viewing the Camera List ....................................................................................................... 21
Searching in the Camera List................................................................................................ 23
Operations in the Camera List .............................................................................................. 24
Authenticating a Camera............................................................................................... 27
Setting Common Authentication Information ........................................................................ 27
Authenticating a Detected Camera ...................................................................................... 28
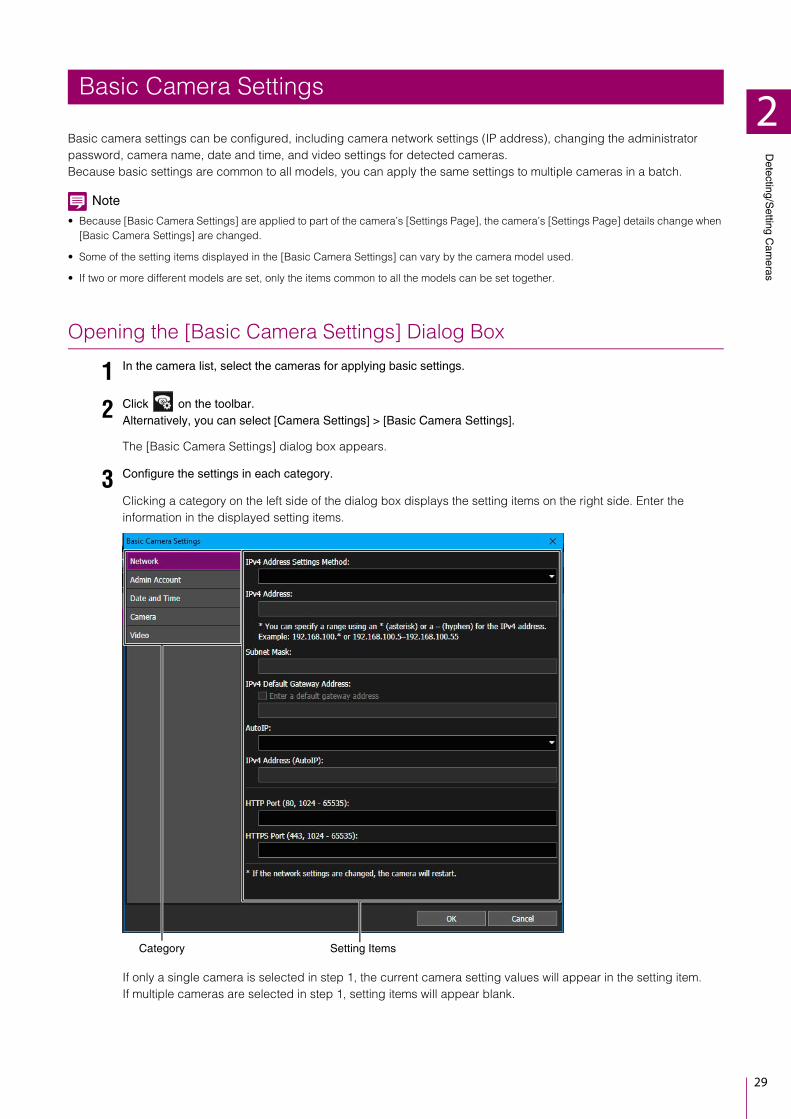
Basic Camera Settings .................................................................................................. 29
Opening the [Basic Camera Settings] Dialog Box ............................................................... 29
[Basic Camera Settings] Dialog Box Settings ...................................................................... 30
Launching the Settings Page/Viewer............................................................................. 36
Adding a Camera as a Trusted Site...................................................................................... 36
Displaying the Settings Page for a Camera.......................................................................... 36
Launching Viewer ................................................................................................................. 37
Accessing Camera Tools .............................................................................................. 38
Launching Camera Angle Setting Tool ................................................................................. 38
Launching Admin Tools ........................................................................................................ 38

5
Chapter 3 Camera Specification File UseSaving a Camera Specification File............................................................................... 42
Saving When Exiting the Tool ............................................................................................... 42
Saving Using the Menu......................................................................................................... 43
Editing a Camera Specification File .............................................................................. 44
Camera Specification File Configuration .............................................................................. 44
Loading a Camera Specification File ............................................................................ 47
Importing When This Tool Starts ........................................................................................... 47
Automatically Importing When This Tool Starts .................................................................... 47
Chapter 4 Camera Detection/Configuration TechniquesSpecifying an IP Address to Detect a Camera.............................................................. 50
Detecting a Single Camera................................................................................................... 50
Detecting Multiple Cameras ................................................................................................. 51
Configuring Cameras Using a Settings File .................................................................. 52
Creating a Settings File......................................................................................................... 52
Importing a Settings File ....................................................................................................... 53
Advanced Camera Settings .......................................................................................... 54
Loading Advanced Settings from a Camera and Save to a Camera ................................... 54
Saving Advanced Settings as a File ..................................................................................... 55
Loading Advanced Settings from a File................................................................................ 56
Editing the Advanced Camera Setting Information .............................................................. 56
Chapter 5 Camera MaintenanceUpdating the Software................................................................................................... 60
Updating the Firmware ......................................................................................................... 60
Updating the Mobile Camera Viewer.................................................................................... 62
Backing Up Setting Values............................................................................................ 63
Specifying the Save Location for Backup Files .................................................................... 63
Performing a Backup ............................................................................................................ 63
Restoring Settings ......................................................................................................... 65
Mounting/Unmounting Memory Cards .......................................................................... 67
Restarting the Camera................................................................................................... 68
Restoring the Camera to the Default Settings ............................................................... 69
Downloading Logs......................................................................................................... 70
Chapter 6 TroubleshootingLists of Messages.......................................................................................................... 72
Warning Messages ............................................................................................................... 72
Error Messages..................................................................................................................... 75
Troubleshooting............................................................................................................. 77
Camera Administrator Accounts ................................................................................... 78
Index.............................................................................................................................. 79

6
Chapter
Before Use
This chapter provides an overview of the functions and an outline of actual operation of this tool and explains
the operating environment, installation procedure, and other things you should know when using this tool.

8
This tool is software for the initial setup and maintenance of Canon network cameras (hereafter referred to as “cameras”). It allows you to efficiently execute IP address settings and other basic settings required when installing cameras, and perform backup and restoration of camera settings after installation, and firmware updates to multiple cameras.
Flow of Operation
1. Initial settings
2. Camera installation
Functions of the Camera Management Tool
Before installing the camera in the final location, set the camera in a temporary space to carry out the initial settings. Connect the cameras to the same network as the computer.
DetectionDetect the cameras on the network (P. 18).
Basic settingsConfigure settings such as the IP address, date and time, camera name, and video settings for the camera (P. 29).
Video confirmationLaunch Viewer to immediately check the video for a camera (P. 37).
Install the camera in the final location (for details, please refer to the Installation Guide).
Angle settingsAngle settings can be configured for select camera models by starting the Camera Angle Setting from this tool (P. 38).
Temporary space
Installation location
Before U
se
1
9
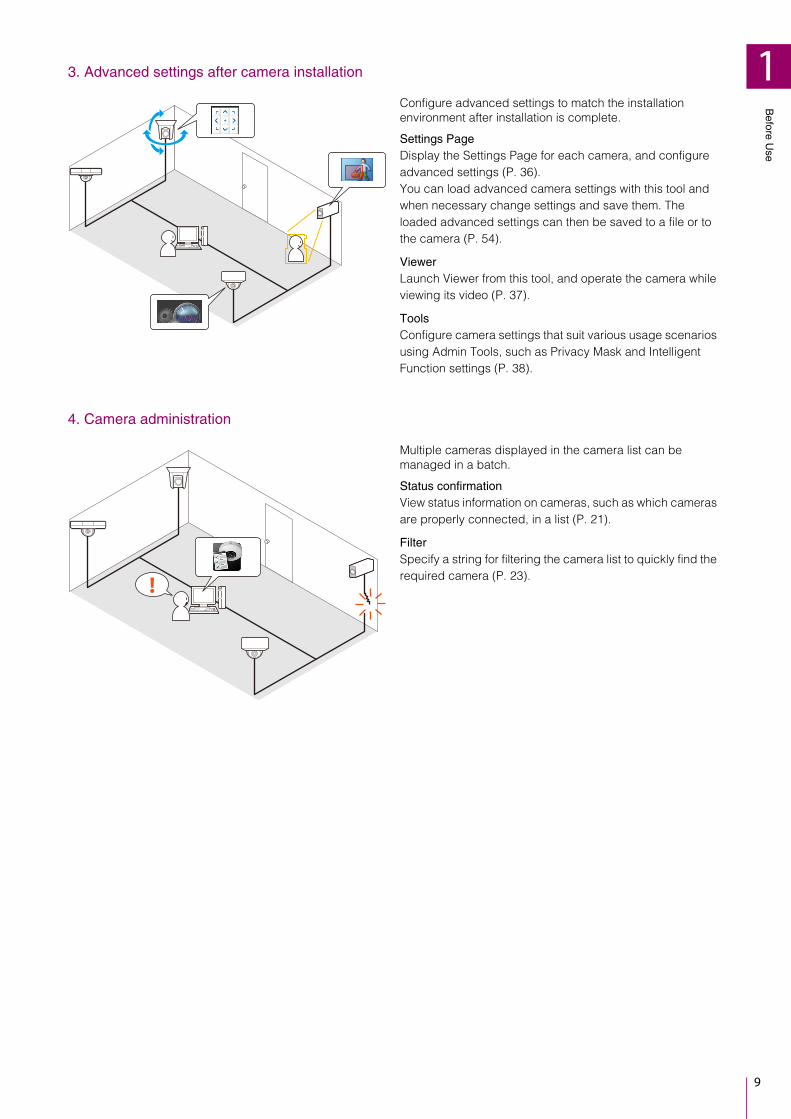
3. Advanced settings after camera installation
4. Camera administration
Configure advanced settings to match the installation environment after installation is complete.
Settings PageDisplay the Settings Page for each camera, and configure advanced settings (P. 36).You can load advanced camera settings with this tool and when necessary change settings and save them. The loaded advanced settings can then be saved to a file or to the camera (P. 54).
ViewerLaunch Viewer from this tool, and operate the camera while viewing its video (P. 37).
ToolsConfigure camera settings that suit various usage scenarios using Admin Tools, such as Privacy Mask and Intelligent Function settings (P. 38).
Multiple cameras displayed in the camera list can be managed in a batch.
Status confirmationView status information on cameras, such as which cameras are properly connected, in a list (P. 21).
FilterSpecify a string for filtering the camera list to quickly find the required camera (P. 23).!

10
5. Camera maintenance
The following maintenance procedures can be performed on cameras that are in operation. Maintenance can be performed on multiple cameras at the same time.• Updating the firmware (P. 60)
• Backing up the setting values (P. 63)
• Restoring backed up setting values (P. 65)
• Operating the memory card (P. 67)
• Restarting (P. 68)
• Restoring the camera to the default settings (P. 69)
• Downloading logs (P. 70)
Camera Specification File UseThe information in the list of cameras for this tool can be saved as a camera specification file (P. 42). You can use this file to perform the following advanced operations.• Edit the content of a camera specification file, and
configure the initial settings for cameras in a different
location.
• When managing more than 256 cameras, you can save
the camera specification files by area, for example, and
switch between files during operation.
BKUP/RSTR
Ver. x.x.1
Ver. x.x.0
1234
5678
1
3
4
2
5
7
8
6
Before U
se
1
11
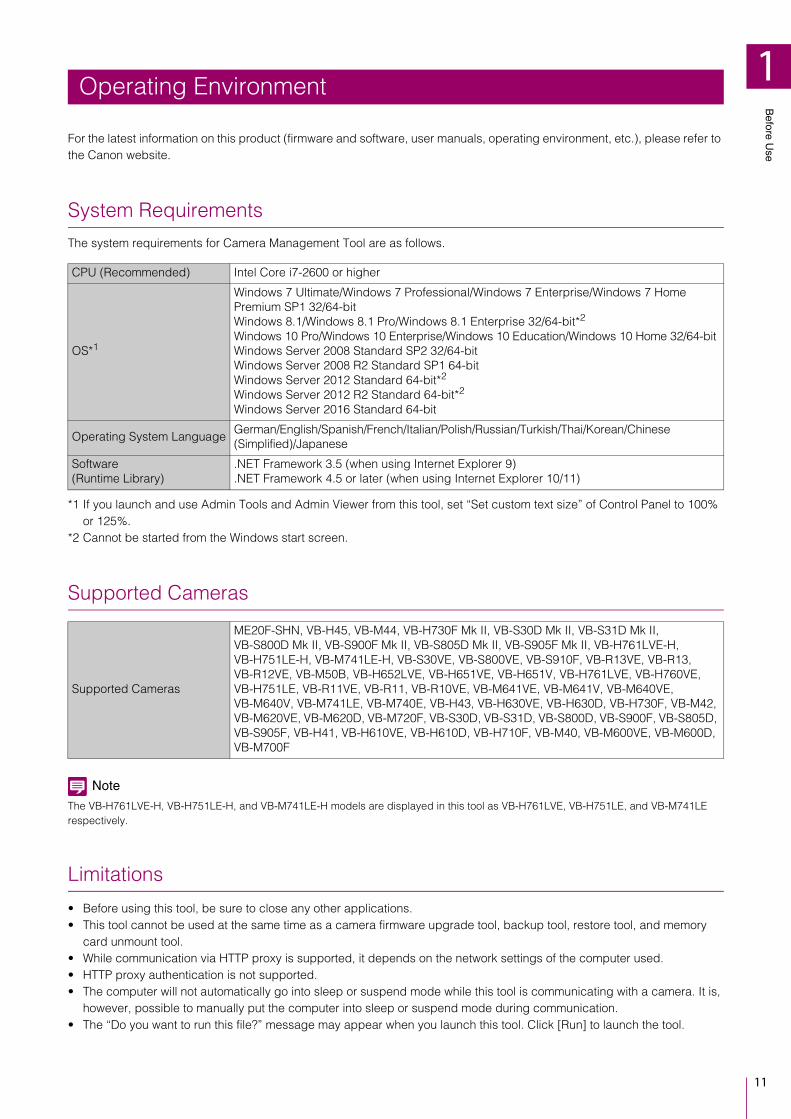
For the latest information on this product (firmware and software, user manuals, operating environment, etc.), please refer to the Canon website.
System Requirements
The system requirements for Camera Management Tool are as follows.
*1 If you launch and use Admin Tools and Admin Viewer from this tool, set “Set custom text size” of Control Panel to 100% or 125%.
*2 Cannot be started from the Windows start screen.
Supported Cameras
Note
The VB-H761LVE-H, VB-H751LE-H, and VB-M741LE-H models are displayed in this tool as VB-H761LVE, VB-H751LE, and VB-M741LE respectively.
Limitations
• Before using this tool, be sure to close any other applications.• This tool cannot be used at the same time as a camera firmware upgrade tool, backup tool, restore tool, and memory
card unmount tool.• While communication via HTTP proxy is supported, it depends on the network settings of the computer used.• HTTP proxy authentication is not supported.• The computer will not automatically go into sleep or suspend mode while this tool is communicating with a camera. It is,
however, possible to manually put the computer into sleep or suspend mode during communication.• The “Do you want to run this file?” message may appear when you launch this tool. Click [Run] to launch the tool.
Operating Environment
CPU (Recommended) Intel Core i7-2600 or higher
OS*1
Windows 7 Ultimate/Windows 7 Professional/Windows 7 Enterprise/Windows 7 Home Premium SP1 32/64-bitWindows 8.1/Windows 8.1 Pro/Windows 8.1 Enterprise 32/64-bit*2
Windows 10 Pro/Windows 10 Enterprise/Windows 10 Education/Windows 10 Home 32/64-bitWindows Server 2008 Standard SP2 32/64-bitWindows Server 2008 R2 Standard SP1 64-bitWindows Server 2012 Standard 64-bit*2
Windows Server 2012 R2 Standard 64-bit*2
Windows Server 2016 Standard 64-bit
Operating System LanguageGerman/English/Spanish/French/Italian/Polish/Russian/Turkish/Thai/Korean/Chinese (Simplified)/Japanese
Software (Runtime Library)
.NET Framework 3.5 (when using Internet Explorer 9)
.NET Framework 4.5 or later (when using Internet Explorer 10/11)
Supported Cameras
ME20F-SHN, VB-H45, VB-M44, VB-H730F Mk II, VB-S30D Mk II, VB-S31D Mk II, VB-S800D Mk II, VB-S900F Mk II, VB-S805D Mk II, VB-S905F Mk II, VB-H761LVE-H, VB-H751LE-H, VB-M741LE-H, VB-S30VE, VB-S800VE, VB-S910F, VB-R13VE, VB-R13, VB-R12VE, VB-M50B, VB-H652LVE, VB-H651VE, VB-H651V, VB-H761LVE, VB-H760VE, VB-H751LE, VB-R11VE, VB-R11, VB-R10VE, VB-M641VE, VB-M641V, VB-M640VE, VB-M640V, VB-M741LE, VB-M740E, VB-H43, VB-H630VE, VB-H630D, VB-H730F, VB-M42, VB-M620VE, VB-M620D, VB-M720F, VB-S30D, VB-S31D, VB-S800D, VB-S900F, VB-S805D, VB-S905F, VB-H41, VB-H610VE, VB-H610D, VB-H710F, VB-M40, VB-M600VE, VB-M600D, VB-M700F
12
• If the Windows firewall is enabled, it may block this tool. If this happens, it is necessary to register this tool as a trusted program. For details, please refer to “Operation Guide” > “Checking Firewall Settings”.
• When using multiple network cards, communication may not be performed correctly if multiple IPv4 addresses (excluding AutoIP) are specified on a single computer. In this case, it is necessary to temporarily use only one IPv4 address or configure the computer so that it can communicate with the camera using IPv6.
• Before applying a service pack or updating the operating system, please refer to the Canon website for information on the latest operating environments.

Before U
se
1
13
This tool can be installed from the installer (installer name: VBToolsInstall.exe). For details on installation, please refer to the camera’s “Operation Guide”.
The icon of this tool appears on the desktop after installation.
Installation

14
Chapter
Detecting/Setting Cameras
This chapter explains the initial setup of cameras (from detection of the cameras connected to the network,
through configuration of the basic settings). It also explains how to access the camera functions after the
setup is complete.
16
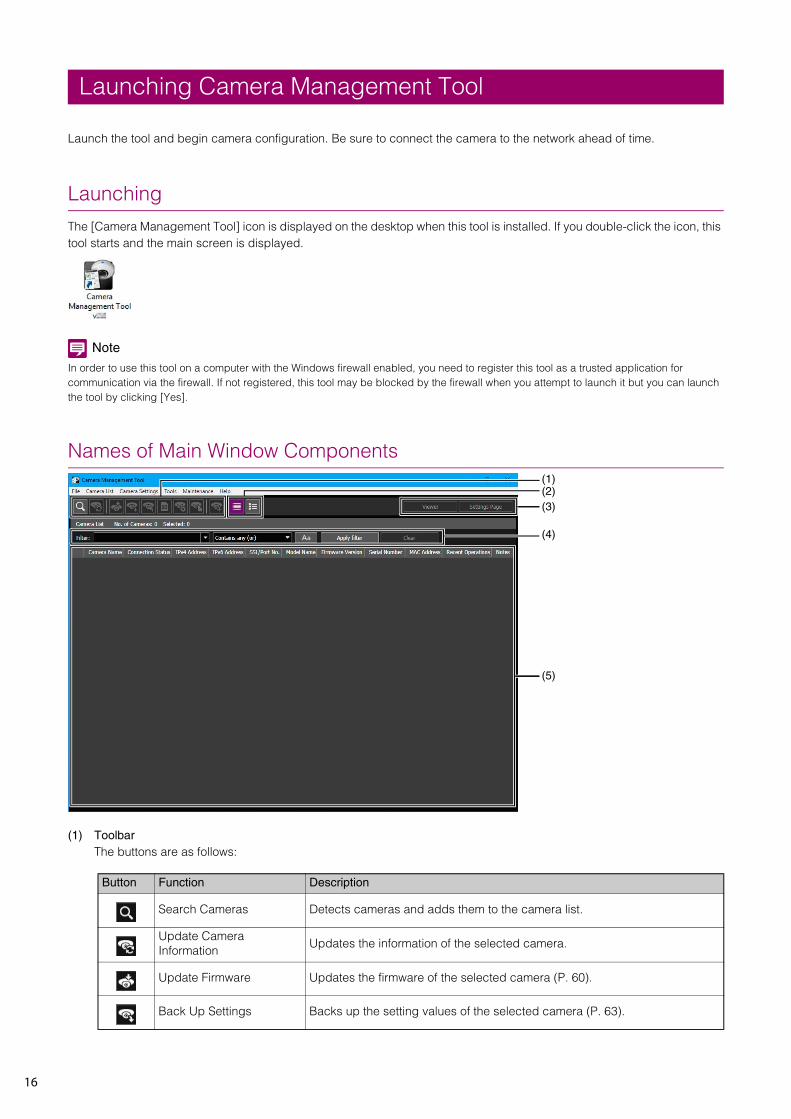
Launch the tool and begin camera configuration. Be sure to connect the camera to the network ahead of time.
Launching
The [Camera Management Tool] icon is displayed on the desktop when this tool is installed. If you double-click the icon, this tool starts and the main screen is displayed.
Note
In order to use this tool on a computer with the Windows firewall enabled, you need to register this tool as a trusted application for communication via the firewall. If not registered, this tool may be blocked by the firewall when you attempt to launch it but you can launch the tool by clicking [Yes].
Names of Main Window Components
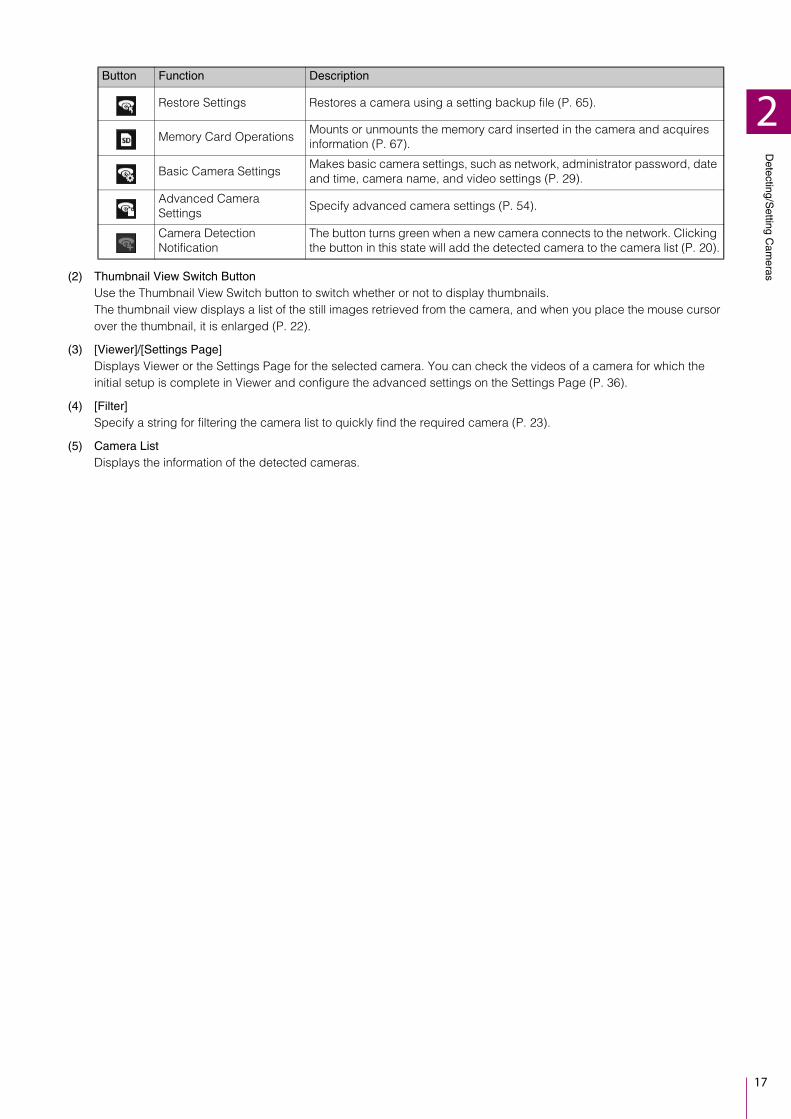
(1) ToolbarThe buttons are as follows:
Launching Camera Management Tool
Button Function Description
Search Cameras Detects cameras and adds them to the camera list.
Update Camera Information
Updates the information of the selected camera.
Update Firmware Updates the firmware of the selected camera (P. 60).
Back Up Settings Backs up the setting values of the selected camera (P. 63).
(1)(2)
(5)
(3)
(4)
Detecting/S
etting Cam
eras
2
17
(2) Thumbnail View Switch ButtonUse the Thumbnail View Switch button to switch whether or not to display thumbnails.The thumbnail view displays a list of the still images retrieved from the camera, and when you place the mouse cursor over the thumbnail, it is enlarged (P. 22).
(3) [Viewer]/[Settings Page]Displays Viewer or the Settings Page for the selected camera. You can check the videos of a camera for which the initial setup is complete in Viewer and configure the advanced settings on the Settings Page (P. 36).
(4) [Filter]Specify a string for filtering the camera list to quickly find the required camera (P. 23).
(5) Camera ListDisplays the information of the detected cameras.
Restore Settings Restores a camera using a setting backup file (P. 65).
Memory Card OperationsMounts or unmounts the memory card inserted in the camera and acquires information (P. 67).
Basic Camera SettingsMakes basic camera settings, such as network, administrator password, date and time, camera name, and video settings (P. 29).
Advanced Camera Settings
Specify advanced camera settings (P. 54).
Camera Detection Notification
The button turns green when a new camera connects to the network. Clicking the button in this state will add the detected camera to the camera list (P. 20).
Button Function Description
18
Detect the cameras connected to the network and then display them in the camera list in the main window. You can detect cameras of factory default setting, or automatically detect cameras connected later to add them to the camera list.
Detecting Cameras with the Search Function
Detect cameras that are connected to the same network as the computer in which this tool is installed, and add them to the camera list.
Note
Camera detection by this tool is only available for cameras in the same network segment. Cameras connected to different network segments need to be added manually (P. 50).
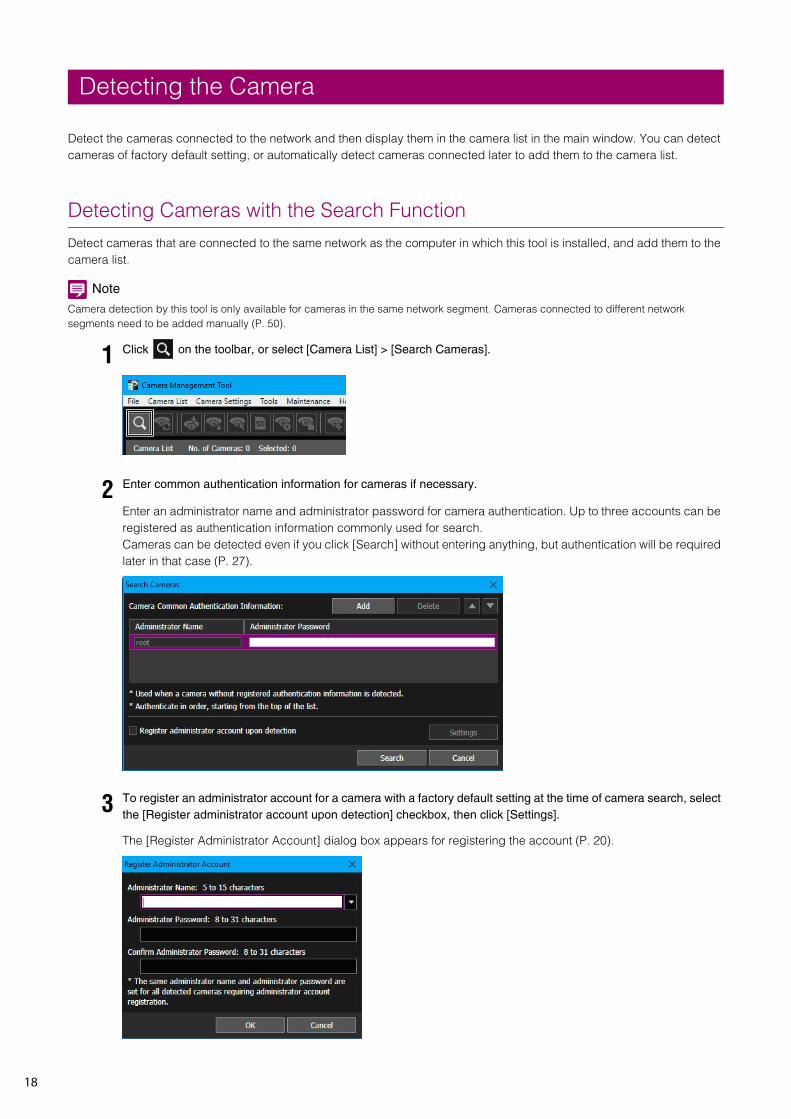
Enter an administrator name and administrator password for camera authentication. Up to three accounts can be registered as authentication information commonly used for search.Cameras can be detected even if you click [Search] without entering anything, but authentication will be required later in that case (P. 27).
The [Register Administrator Account] dialog box appears for registering the account (P. 20).
Detecting the Camera
1 Click on the toolbar, or select [Camera List] > [Search Cameras].
2 Enter common authentication information for cameras if necessary.
3 To register an administrator account for a camera with a factory default setting at the time of camera search, select the [Register administrator account upon detection] checkbox, then click [Settings].
Detecting/S
etting Cam
eras
2
19
Note
Note the following when registering an administrator account upon detection in this dialog box.– These settings are only enabled for cameras that can register an administrator account. The settings may be disabled,
depending on the camera you are using.– In this dialog box, [Administrator Name] can be set with 5 to 15 characters, and [Administrator Password] can be set with 8 to 31
characters.– The number of characters that can be set for [Administrator Name] and [Administrator Password] differs according to the model
and firmware version of the camera. Therefore, the settings in the dialog box may be invalid if they are outside the number of characters that can be set. For details on the number of characters that can be set, please refer to "Camera Administrator Accounts" (P. 78).
– When the settings are specified in this dialog box, the same administrator account is set for multiple cameras (excluding cameras with a fixed administrator name). If you want to set a different [Administrator Name] and [Administrator Password] for each camera, do not specify the settings here and instead register an administrator account after detection.
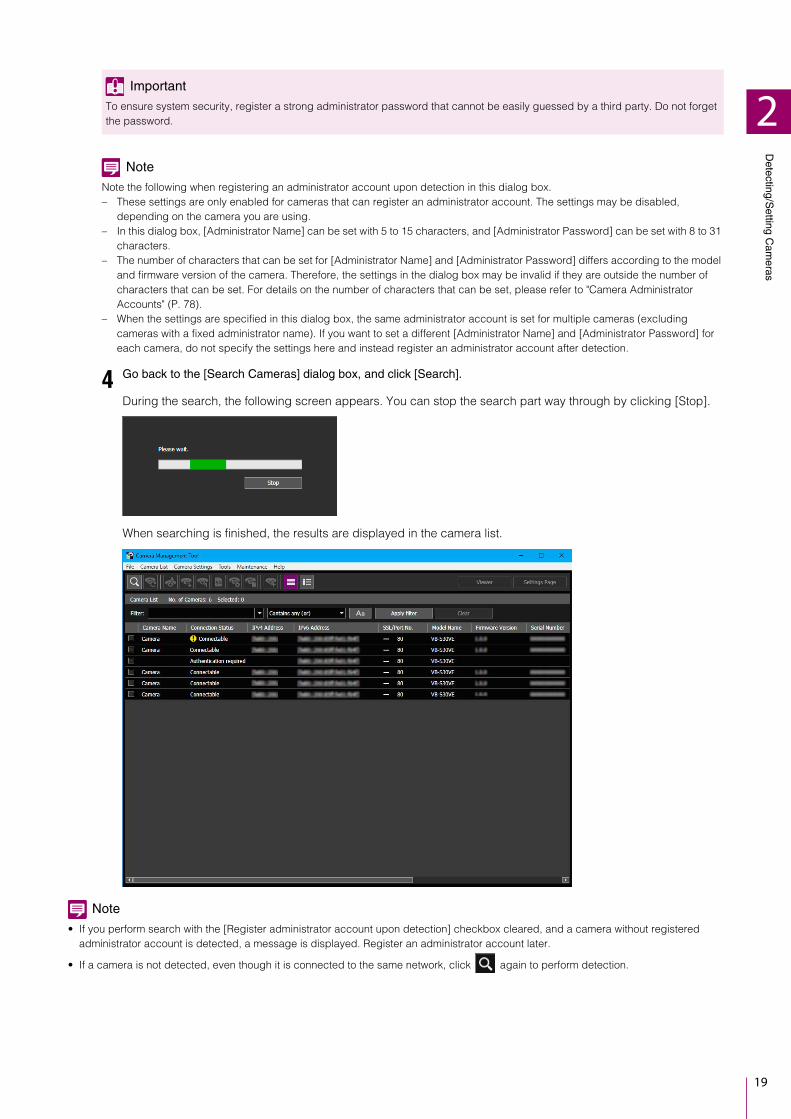
During the search, the following screen appears. You can stop the search part way through by clicking [Stop].
When searching is finished, the results are displayed in the camera list.
Note
• If you perform search with the [Register administrator account upon detection] checkbox cleared, and a camera without registered administrator account is detected, a message is displayed. Register an administrator account later.
• If a camera is not detected, even though it is connected to the same network, click again to perform detection.
Important
To ensure system security, register a strong administrator password that cannot be easily guessed by a third party. Do not forget the password.
4 Go back to the [Search Cameras] dialog box, and click [Search].

20
Adding Already Detected CamerasAfter executing [Search Cameras], cameras connected to the same network are automatically detected. When a camera is detected, on the toolbar is displayed in green. If you have the mouse pointer over the button, it will display the number of detected cameras.
A message appears for confirming whether or not to add the detected camera.
All the cameras that were automatically detected are added to the camera list.
If you try to add a new detected camera to the list, making the number of cameras on the list exceed the maximum of 256, an error message will appear. If a camera could not be added to the list because the maximum number was exceeded, will remain green. When you carry out , the detection status is cleared and the button changes back to .
Note
A maximum of 256 cameras can be added to the camera list. If the maximum number (256) is exceeded when you try to add cameras, no camera can be added until one or more cameras are deleted from the camera list (P. 25).
Registering the Administrator Account
The administrator account can be registered for cameras with [Admin Required] displayed for [Connection Status] in the camera list.
Note
For cameras with the [Connection Status] set to [Admin Required] in the camera list, you can use their basic settings and advanced settings only after registering an administrator account for them.
The [Register Administrator Account] dialog box is displayed.
(1) [Administrator Name]Enter the administrator name using alphanumeric characters, hyphens “-”, and underscores “_”.
(2) [Administrator Password]Enter the administrator password.
(3) [Confirm Administrator Password]Enter the administrator password again for confirmation.
1 Click on the toolbar.
2 Click [Yes].
1 Select a camera whose [Connection Status] is [Admin Required] in the camera list.
2 Select [Camera Settings] > [Register Administrator Account].Alternatively, you can double-click [Admin Required] for [Connection Status].
(1)
(2)
(3)
Detecting/S
etting Cam
eras
2
21
The administrator account is registered, and the camera restarts.
Note
• The number of characters that can be set for [Administrator Name] and [Administrator Password] differs according to the model and firmware version of the camera. Enter the number of characters indicated on the screen.
• [Administrator Name] and [Administrator Password] cannot be set when cameras with a different number of characters are selected. For details on the number of characters that can be set, please refer to "Camera Administrator Accounts" (P. 78).
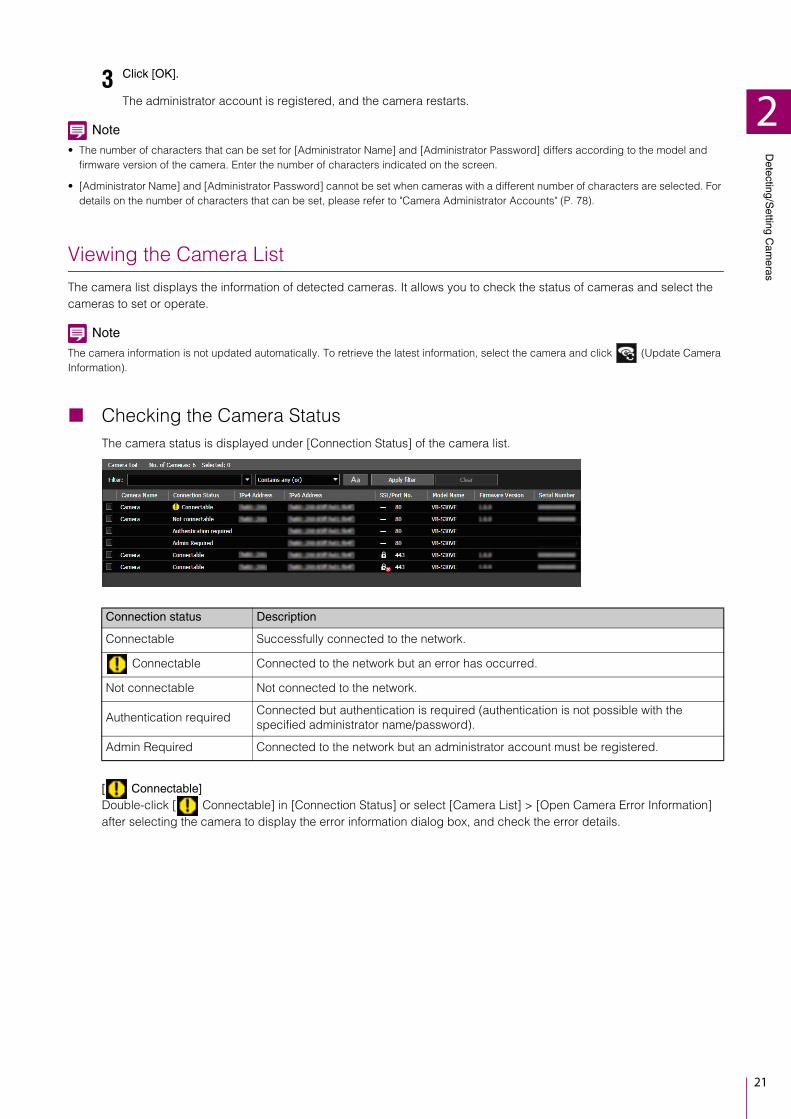
Viewing the Camera List
The camera list displays the information of detected cameras. It allows you to check the status of cameras and select the cameras to set or operate.
Note
The camera information is not updated automatically. To retrieve the latest information, select the camera and click (Update Camera Information).
Checking the Camera StatusThe camera status is displayed under [Connection Status] of the camera list.
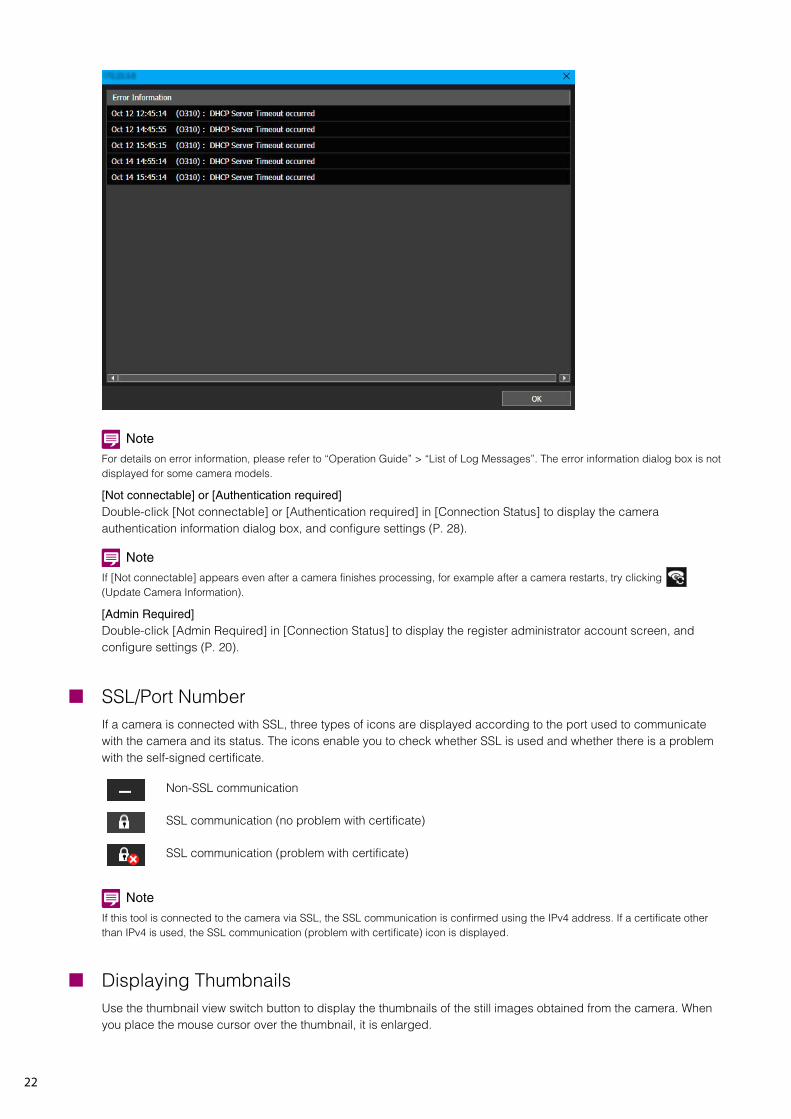
[ Connectable]Double-click [ Connectable] in [Connection Status] or select [Camera List] > [Open Camera Error Information] after selecting the camera to display the error information dialog box, and check the error details.
3 Click [OK].
Connection status Description
Connectable Successfully connected to the network.
Connectable Connected to the network but an error has occurred.
Not connectable Not connected to the network.
Authentication requiredConnected but authentication is required (authentication is not possible with the specified administrator name/password).
Admin Required Connected to the network but an administrator account must be registered.
22
Note
For details on error information, please refer to “Operation Guide” > “List of Log Messages”. The error information dialog box is not displayed for some camera models.
[Not connectable] or [Authentication required]Double-click [Not connectable] or [Authentication required] in [Connection Status] to display the camera authentication information dialog box, and configure settings (P. 28).
Note
If [Not connectable] appears even after a camera finishes processing, for example after a camera restarts, try clicking (Update Camera Information).
[Admin Required]Double-click [Admin Required] in [Connection Status] to display the register administrator account screen, and configure settings (P. 20).
SSL/Port NumberIf a camera is connected with SSL, three types of icons are displayed according to the port used to communicate with the camera and its status. The icons enable you to check whether SSL is used and whether there is a problem with the self-signed certificate.
Note
If this tool is connected to the camera via SSL, the SSL communication is confirmed using the IPv4 address. If a certificate other than IPv4 is used, the SSL communication (problem with certificate) icon is displayed.
Displaying ThumbnailsUse the thumbnail view switch button to display the thumbnails of the still images obtained from the camera. When you place the mouse cursor over the thumbnail, it is enlarged.
Non-SSL communication
SSL communication (no problem with certificate)
SSL communication (problem with certificate)
Detecting/S
etting Cam
eras
2
23
Note
Thumbnails can only be displayed for cameras with [Connectable] or [ Connectable] displayed for [Connection Status]. Thumbnails cannot be displayed when the camera is creating a panorama image or setting the camera angle.
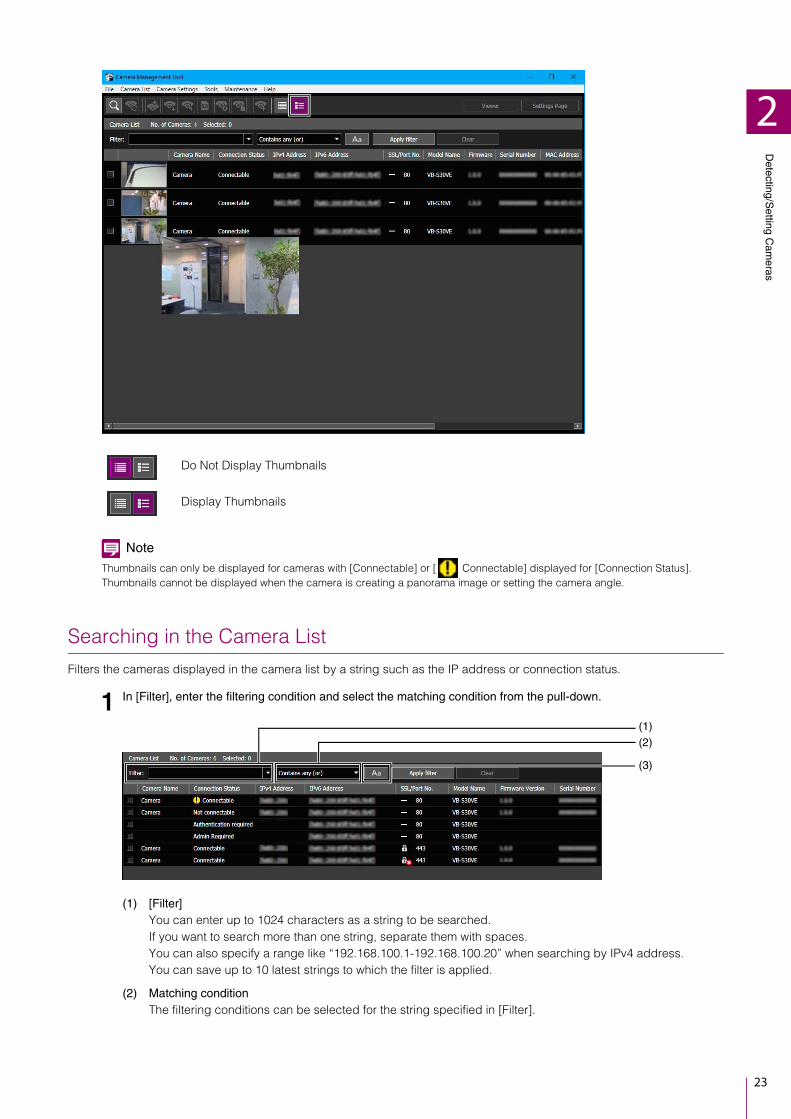
Searching in the Camera List
Filters the cameras displayed in the camera list by a string such as the IP address or connection status.
(1) [Filter]You can enter up to 1024 characters as a string to be searched.If you want to search more than one string, separate them with spaces.You can also specify a range like “192.168.100.1-192.168.100.20” when searching by IPv4 address.You can save up to 10 latest strings to which the filter is applied.
(2) Matching conditionThe filtering conditions can be selected for the string specified in [Filter].
Do Not Display Thumbnails
Display Thumbnails
1 In [Filter], enter the filtering condition and select the matching condition from the pull-down.
(1)(2)
(3)
24
(3)Sets whether the string specified in [Filter] is case-sensitive or not.
The specified filtering conditions are applied and the filtered camera list is displayed.Click [Clear] to clear the filter. The specified filtering conditions are cleared and all cameras appear in the camera list.
Note
You cannot apply another filter to the cameras that have already been filtered with [Apply filter]. [Apply filter] applies to all the cameras displayed in the camera list before filtering.
Operations in the Camera List
Selecting a CameraTo select a camera to be set or operated, click a camera displayed in the camera list. The checkbox at the beginning of the line for the selected camera is selected and the line is highlighted.You can click the checkbox at the beginning of the line or choose the camera names using the Ctrl key or Shift key to select multiple cameras.
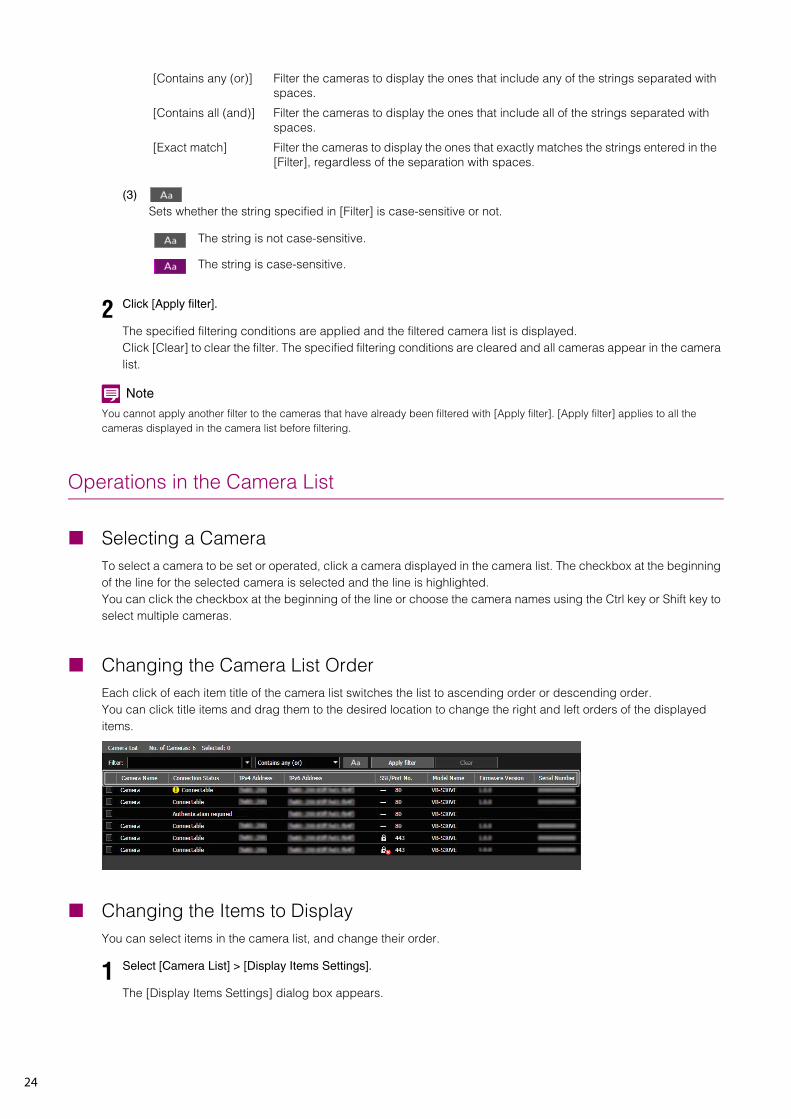
Changing the Camera List OrderEach click of each item title of the camera list switches the list to ascending order or descending order.You can click title items and drag them to the desired location to change the right and left orders of the displayed items.
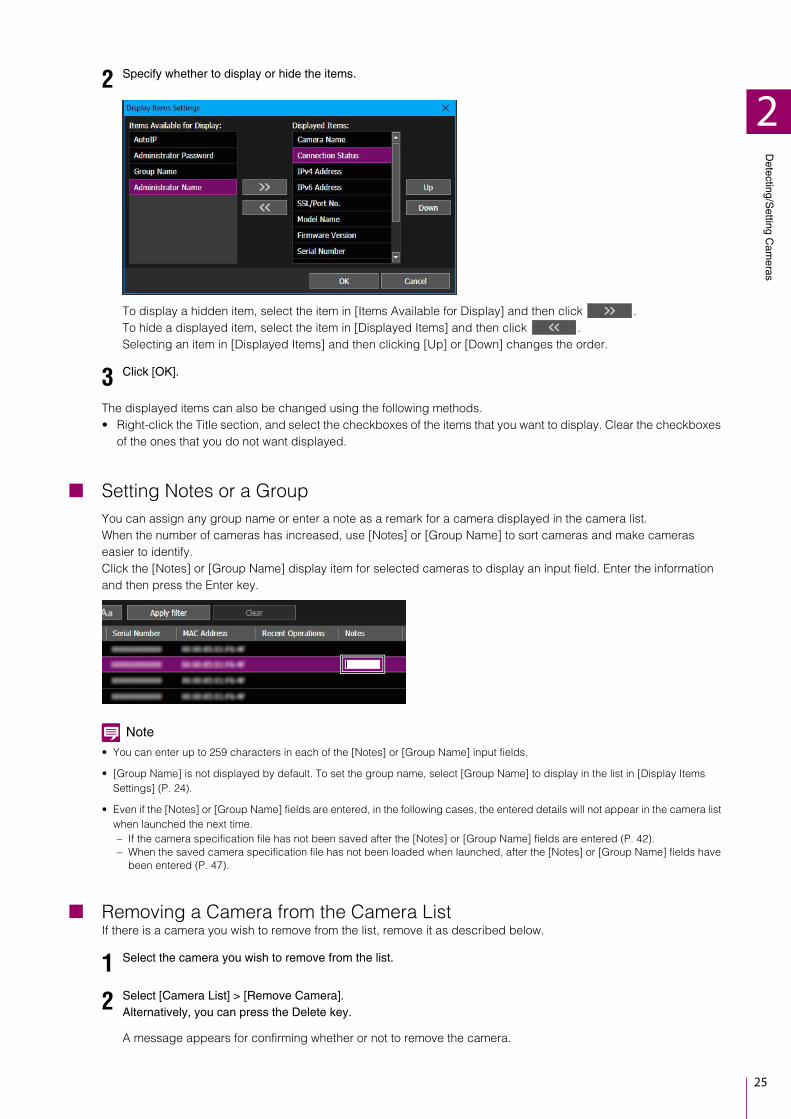
Changing the Items to DisplayYou can select items in the camera list, and change their order.
The [Display Items Settings] dialog box appears.
[Contains any (or)] Filter the cameras to display the ones that include any of the strings separated with spaces.
[Contains all (and)] Filter the cameras to display the ones that include all of the strings separated with spaces.
[Exact match] Filter the cameras to display the ones that exactly matches the strings entered in the [Filter], regardless of the separation with spaces.
The string is not case-sensitive.
The string is case-sensitive.
2 Click [Apply filter].
1 Select [Camera List] > [Display Items Settings].
Detecting/S
etting Cam
eras
2
25
To display a hidden item, select the item in [Items Available for Display] and then click .To hide a displayed item, select the item in [Displayed Items] and then click .Selecting an item in [Displayed Items] and then clicking [Up] or [Down] changes the order.
The displayed items can also be changed using the following methods.• Right-click the Title section, and select the checkboxes of the items that you want to display. Clear the checkboxes
of the ones that you do not want displayed.
Setting Notes or a GroupYou can assign any group name or enter a note as a remark for a camera displayed in the camera list.When the number of cameras has increased, use [Notes] or [Group Name] to sort cameras and make cameras easier to identify.Click the [Notes] or [Group Name] display item for selected cameras to display an input field. Enter the information and then press the Enter key.
Note
• You can enter up to 259 characters in each of the [Notes] or [Group Name] input fields.
• [Group Name] is not displayed by default. To set the group name, select [Group Name] to display in the list in [Display Items Settings] (P. 24).
• Even if the [Notes] or [Group Name] fields are entered, in the following cases, the entered details will not appear in the camera list when launched the next time.– If the camera specification file has not been saved after the [Notes] or [Group Name] fields are entered (P. 42).– When the saved camera specification file has not been loaded when launched, after the [Notes] or [Group Name] fields have
been entered (P. 47).
Removing a Camera from the Camera ListIf there is a camera you wish to remove from the list, remove it as described below.
A message appears for confirming whether or not to remove the camera.
2 Specify whether to display or hide the items.
3 Click [OK].
1 Select the camera you wish to remove from the list.
2 Select [Camera List] > [Remove Camera].Alternatively, you can press the Delete key.

26
The camera is removed from the camera list.
Right-Click Operations for the Camera ListRight-click the camera list to carry out the following operations in the menu.
Note
Grayed out items cannot be operated due to the [Connection Status] of the camera or camera model.
3 Click [Yes].
Menu name Description
Update Camera Information Reacquire the settings of the selected camera, and update them.
Camera Authentication Changes the authentication information of the camera used with this tool (P. 28).
Remove Camera The selected camera will be removed from the camera list (P. 25).
Open Camera Error Information Displays the error information of selected cameras (P. 21).
Camera Settings
• Displaying the Settings Page (P. 36)• Basic camera settings (P. 29)• Advanced camera settings (P. 54)• Registering the Administrator Account (P. 20)
Tools Activate the selected tool (P. 38)
Maintenance
• Restarting the Camera (P. 68)• Restoring the Camera to the Default Settings (P. 69)• Downloading Logs (P. 70)• Mounting/Unmounting Memory Cards (P. 67)• Updating the Software (P. 60)• Backing Up Setting Values (P. 63)• Restoring Settings (P. 65)• Adding a Camera as a Trusted Site (P. 36)
Detecting/S
etting Cam
eras
2
27
Those cameras (P. 18) that could not be authenticated with the common authentication information at the time of camera search can be authenticated later. You can either use common authentication information or specify administrator name and administrator password individually.The administrator name and administrator password should be the ones set in [Camera Settings] > [Basic Camera Settings] > [Admin Account] (P. 32) or [Camera Settings] > [Register Administrator Account] (P. 20).
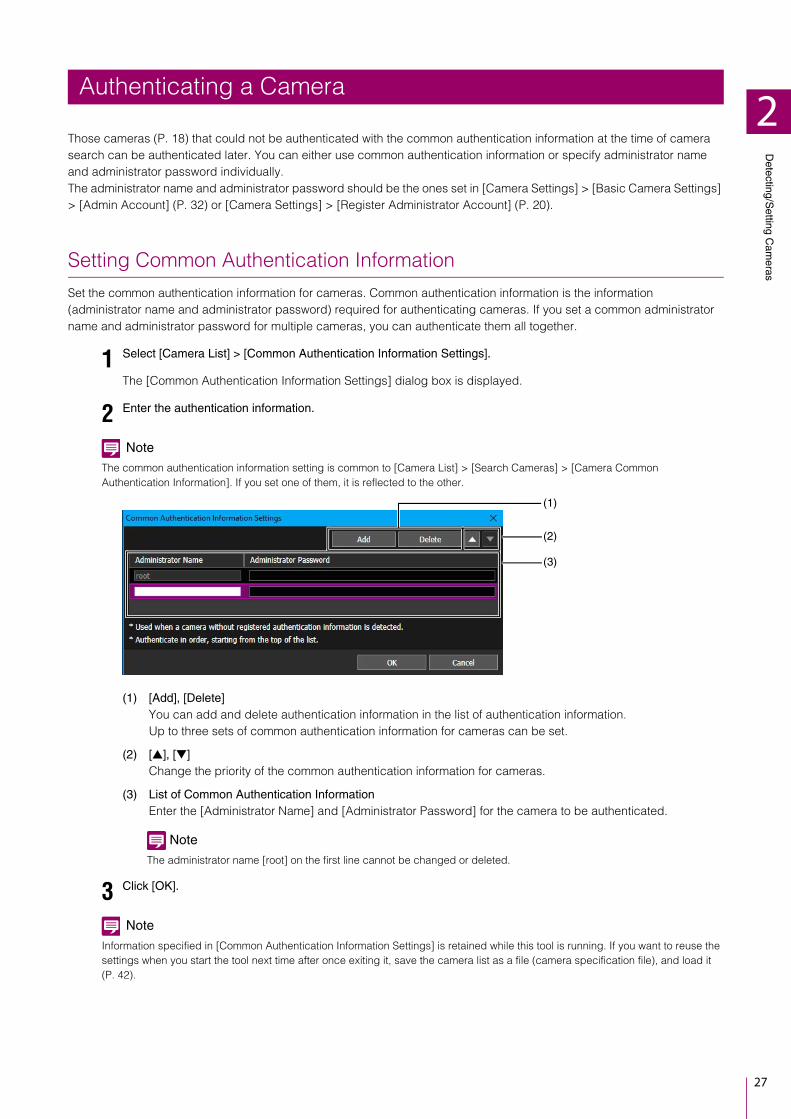
Setting Common Authentication Information
Set the common authentication information for cameras. Common authentication information is the information (administrator name and administrator password) required for authenticating cameras. If you set a common administrator name and administrator password for multiple cameras, you can authenticate them all together.
The [Common Authentication Information Settings] dialog box is displayed.
Note
The common authentication information setting is common to [Camera List] > [Search Cameras] > [Camera Common Authentication Information]. If you set one of them, it is reflected to the other.
(1) [Add], [Delete]You can add and delete authentication information in the list of authentication information.Up to three sets of common authentication information for cameras can be set.
(2) [▲], [▼]Change the priority of the common authentication information for cameras.
(3) List of Common Authentication InformationEnter the [Administrator Name] and [Administrator Password] for the camera to be authenticated.
Note
The administrator name [root] on the first line cannot be changed or deleted.
Note
Information specified in [Common Authentication Information Settings] is retained while this tool is running. If you want to reuse the settings when you start the tool next time after once exiting it, save the camera list as a file (camera specification file), and load it (P. 42).
Authenticating a Camera
1 Select [Camera List] > [Common Authentication Information Settings].
2 Enter the authentication information.
3 Click [OK].
(1)
(2)
(3)

28
Authenticating a Detected Camera
Cameras with the [Connection Status] set to [Authentication required] or [Not connectable] in the camera list require authentication. Camera settings cannot be configured in this tool until the authentication is completed.
The [Camera Authentication] dialog box is displayed.
(1) [Administrator Name]Enter the administrator name for the camera. This is grayed out and cannot be entered if [Authenticate using common authentication information] is selected.
(2) [Administrator Password]Enter the administrator password for the camera. This is grayed out and cannot be entered if [Authenticate using common authentication information] is selected.
(3) [Authenticate using common authentication information]Select this checkbox to perform authentication using the common authentication information (P. 27). If you select this checkbox, the administrator name and administrator password specified in the above (1) and (2) are canceled.
(4) [Use SSL Communication]Select this to connect to the camera using SSL communication. If you select [Use SSL Communication], the self-signed certificate is checked. A message is displayed if you authenticate a camera that has a problem with its self-signed certificate and has not been connected before.
(5) Port number input fieldSpecify the HTTP port to be used for camera connection. It is typically left as default.
Note
You can confirm whether the camera is authenticated by the password specified in the common authentication information or by the password specified in the [Camera Authentication] dialog box, by checking the [Administrator Password] in the camera list.
The [Administrator Password] is hidden by default. To display it in the camera list, change the settings in the [Display Items Settings] dialog box (P. 24).
1 In the camera list, select the cameras for which you want to set the authentication information individually.
2 Select [Camera List] > [Camera Authentication].Alternatively, you can double-click [Not connectable] or [Authentication required] for [Connection Status].
3 Enter the authentication information.
4 Click [OK].
(1)
(2)
(3)
(4)
(5)
Authentication Performed with Common PasswordPassword Specified in [Camera Authentication] Dialog Box
Detecting/S
etting Cam
eras
2
29
Basic camera settings can be configured, including camera network settings (IP address), changing the administrator password, camera name, date and time, and video settings for detected cameras.Because basic settings are common to all models, you can apply the same settings to multiple cameras in a batch.
Note
• Because [Basic Camera Settings] are applied to part of the camera’s [Settings Page], the camera’s [Settings Page] details change when [Basic Camera Settings] are changed.
• Some of the setting items displayed in the [Basic Camera Settings] can vary by the camera model used.
• If two or more different models are set, only the items common to all the models can be set together.
Opening the [Basic Camera Settings] Dialog Box
The [Basic Camera Settings] dialog box appears.
Clicking a category on the left side of the dialog box displays the setting items on the right side. Enter the information in the displayed setting items.
If only a single camera is selected in step 1, the current camera setting values will appear in the setting item.If multiple cameras are selected in step 1, setting items will appear blank.
Basic Camera Settings
1 In the camera list, select the cameras for applying basic settings.
2 Click on the toolbar.Alternatively, you can select [Camera Settings] > [Basic Camera Settings].
3 Configure the settings in each category.
Category Setting Items

30
Note
The setting fields of some setting items can be left blank. In that case, the camera settings are not changed and are left set to their original values.
Note
Depending on the [Video] category’s [Video Size Set], the [Admin Account] category’s [Administrator Name], and items in the [Network] category, the progress bar appears and the camera automatically restarts after changing settings and clicking [OK]. When the message [Settings have been set. Wait for the camera to restart.] appears, click [OK].The [Connection Status] of a camera may remain as [Not connectable], even after the camera restarts. Try clicking (Update Camera Information).
[Basic Camera Settings] Dialog Box Settings
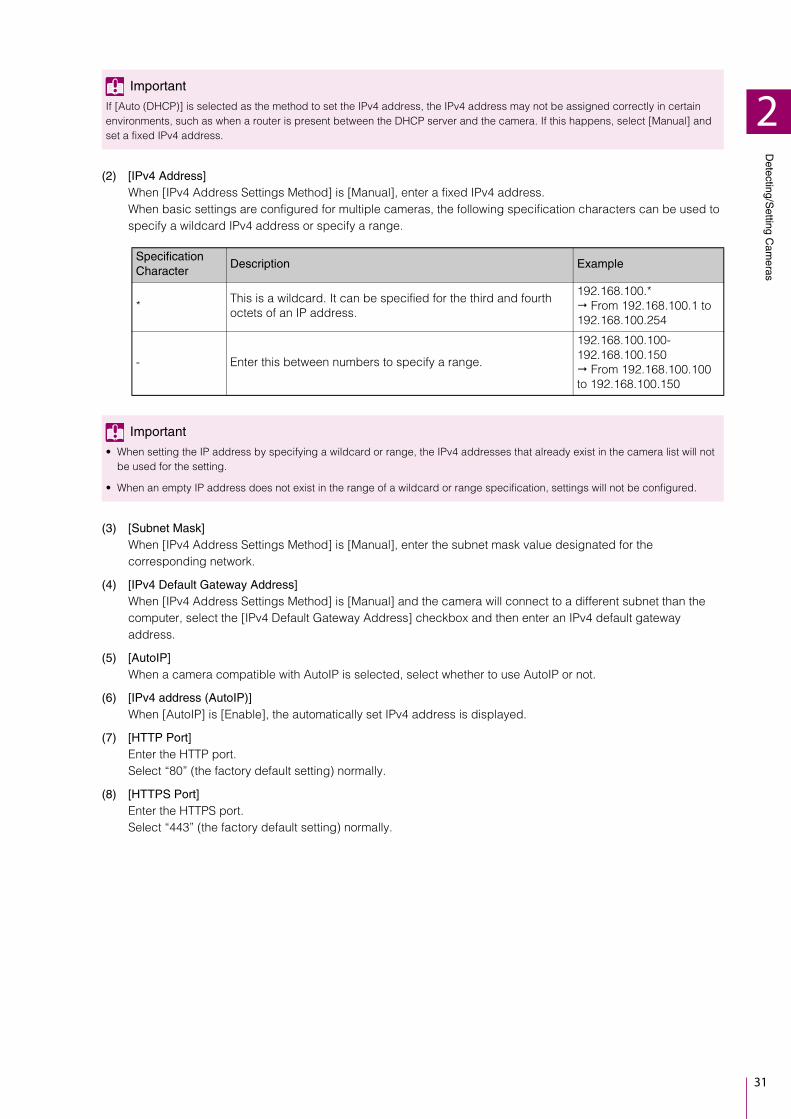
Network
(1) [IPv4 Address Settings Method]Select the IPv4 address Settings method.If you select [Manual], enter the fixed IPv4 address in [IPv4 Address].If you select [Auto (DHCP)], the values obtained from the DHCP server are automatically set to [IPv4 Address], [Subnet Mask], and [IPv4 Default Gateway Address].
4 Click [OK].
Important
You may become unable to access a camera if the network settings are incorrect. In this case, restore the camera to the default settings (including network settings) (P. 69) or refer to “Operation Guide” for the camera to restore the camera to the factory default settings and then configure the network settings again. However, since this causes all the settings to return to the factory default settings, including the administrator account, network information, and time information, it is necessary to use this tool to configure the initial settings of the camera.
(1)
(2)
(3)
(4)
(5)
(6)
(7)
(8)
Detecting/S
etting Cam
eras
2
31
(2) [IPv4 Address]When [IPv4 Address Settings Method] is [Manual], enter a fixed IPv4 address.When basic settings are configured for multiple cameras, the following specification characters can be used to specify a wildcard IPv4 address or specify a range.
(3) [Subnet Mask]When [IPv4 Address Settings Method] is [Manual], enter the subnet mask value designated for the corresponding network.
(4) [IPv4 Default Gateway Address]When [IPv4 Address Settings Method] is [Manual] and the camera will connect to a different subnet than the computer, select the [IPv4 Default Gateway Address] checkbox and then enter an IPv4 default gateway address.
(5) [AutoIP]When a camera compatible with AutoIP is selected, select whether to use AutoIP or not.
(6) [IPv4 address (AutoIP)]When [AutoIP] is [Enable], the automatically set IPv4 address is displayed.
(7) [HTTP Port]Enter the HTTP port.Select “80” (the factory default setting) normally.
(8) [HTTPS Port]Enter the HTTPS port.Select “443” (the factory default setting) normally.
Important
If [Auto (DHCP)] is selected as the method to set the IPv4 address, the IPv4 address may not be assigned correctly in certain environments, such as when a router is present between the DHCP server and the camera. If this happens, select [Manual] and set a fixed IPv4 address.
Specification Character
Description Example
*This is a wildcard. It can be specified for the third and fourth octets of an IP address.
192.168.100.* From 192.168.100.1 to 192.168.100.254
- Enter this between numbers to specify a range.
192.168.100.100-192.168.100.150 From 192.168.100.100 to 192.168.100.150
Important
• When setting the IP address by specifying a wildcard or range, the IPv4 addresses that already exist in the camera list will not be used for the setting.
• When an empty IP address does not exist in the range of a wildcard or range specification, settings will not be configured.
32
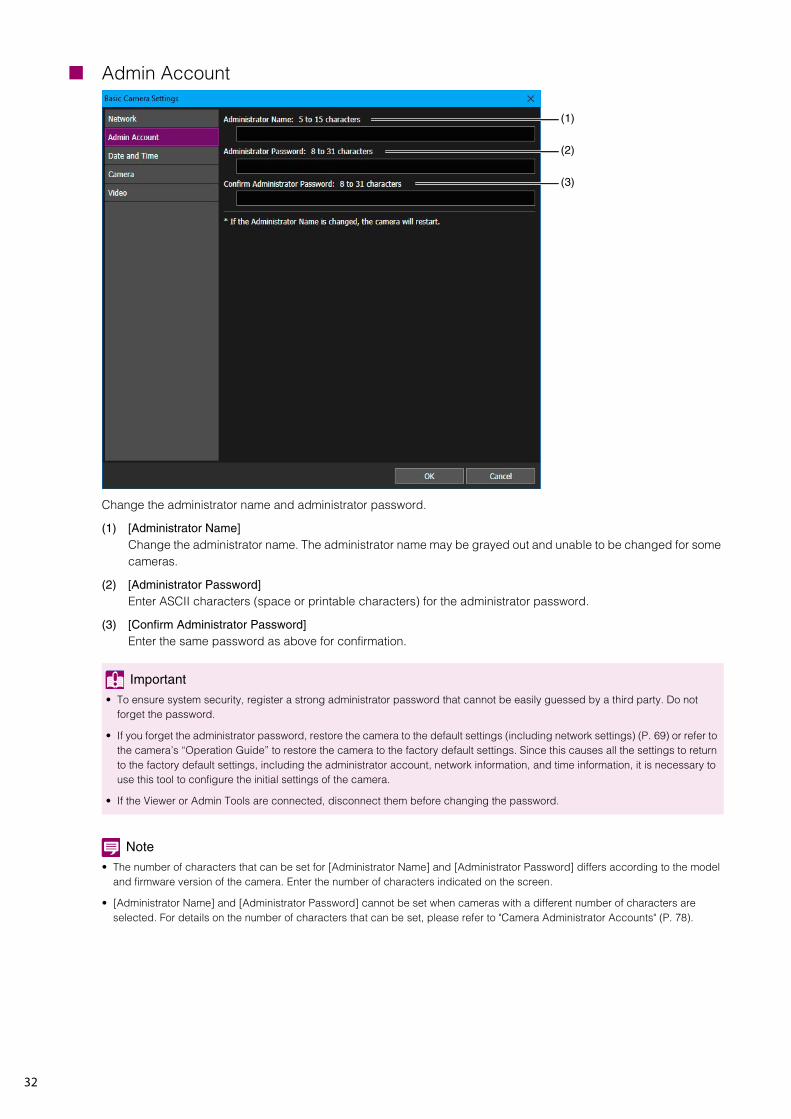
Admin Account
Change the administrator name and administrator password.
(1) [Administrator Name]Change the administrator name. The administrator name may be grayed out and unable to be changed for some cameras.
(2) [Administrator Password]Enter ASCII characters (space or printable characters) for the administrator password.
(3) [Confirm Administrator Password]Enter the same password as above for confirmation.
Note
• The number of characters that can be set for [Administrator Name] and [Administrator Password] differs according to the model and firmware version of the camera. Enter the number of characters indicated on the screen.
• [Administrator Name] and [Administrator Password] cannot be set when cameras with a different number of characters are selected. For details on the number of characters that can be set, please refer to "Camera Administrator Accounts" (P. 78).
Important
• To ensure system security, register a strong administrator password that cannot be easily guessed by a third party. Do not forget the password.
• If you forget the administrator password, restore the camera to the default settings (including network settings) (P. 69) or refer to the camera’s “Operation Guide” to restore the camera to the factory default settings. Since this causes all the settings to return to the factory default settings, including the administrator account, network information, and time information, it is necessary to use this tool to configure the initial settings of the camera.
• If the Viewer or Admin Tools are connected, disconnect them before changing the password.
(1)
(2)
(3)
Detecting/S
etting Cam
eras
2
33
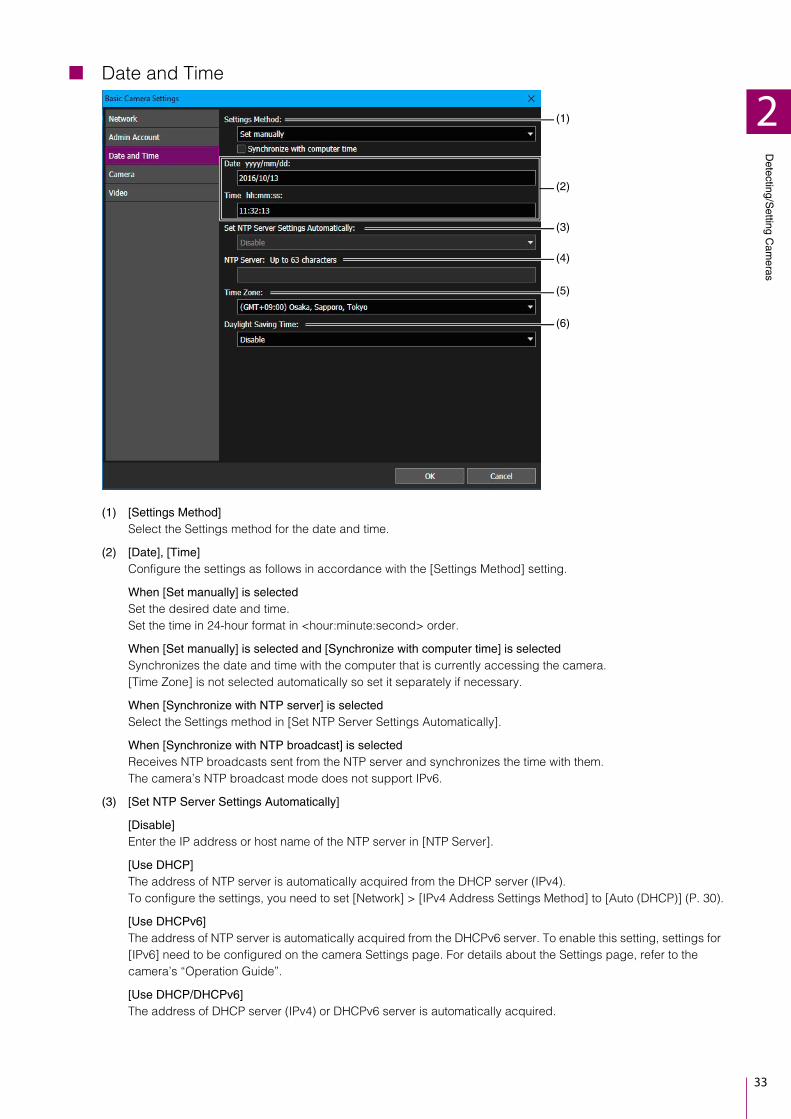
Date and Time
(1) [Settings Method]Select the Settings method for the date and time.
(2) [Date], [Time]Configure the settings as follows in accordance with the [Settings Method] setting.
When [Set manually] is selectedSet the desired date and time.Set the time in 24-hour format in <hour:minute:second> order.
When [Set manually] is selected and [Synchronize with computer time] is selectedSynchronizes the date and time with the computer that is currently accessing the camera.[Time Zone] is not selected automatically so set it separately if necessary.
When [Synchronize with NTP server] is selectedSelect the Settings method in [Set NTP Server Settings Automatically].
When [Synchronize with NTP broadcast] is selectedReceives NTP broadcasts sent from the NTP server and synchronizes the time with them.The camera’s NTP broadcast mode does not support IPv6.
(3) [Set NTP Server Settings Automatically]
[Disable]Enter the IP address or host name of the NTP server in [NTP Server].
[Use DHCP]The address of NTP server is automatically acquired from the DHCP server (IPv4).To configure the settings, you need to set [Network] > [IPv4 Address Settings Method] to [Auto (DHCP)] (P. 30).
[Use DHCPv6]The address of NTP server is automatically acquired from the DHCPv6 server. To enable this setting, settings for [IPv6] need to be configured on the camera Settings page. For details about the Settings page, refer to the camera’s “Operation Guide”.
[Use DHCP/DHCPv6]The address of DHCP server (IPv4) or DHCPv6 server is automatically acquired.
(1)
(2)
(3)
(4)
(5)
(6)
34
Note
• If a connection to the NTP server cannot be established because, for example, the IP address of the NTP server is incorrect, the date and time are not changed.
• The NTP server query interval is 300 seconds. The query interval can be set on the camera settings page for some camera models. If the time of camera and that of NTP server are substantially different, it takes time to complete synchronization.
(4) [NTP Server]If you select [Set NTP Server Settings Automatically] > [Disable], enter the IP address or host name of the NTP server.
(5) [Time Zone]Select the appropriate time zone.If the time zone setting is changed, the date and time display will update automatically according to the specified time zone.
(6) [Daylight Saving Time]Select whether or not to automatically adjust the daylight saving time according to the time zone.
Camera
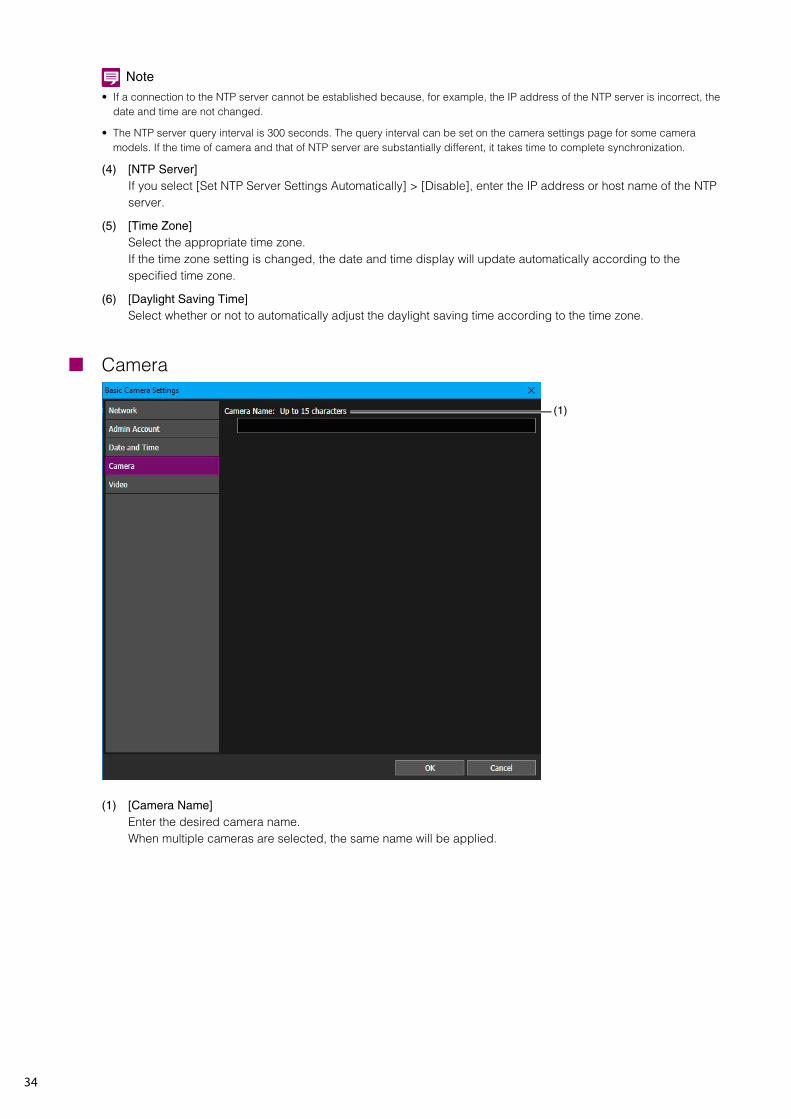
(1) [Camera Name]Enter the desired camera name.When multiple cameras are selected, the same name will be applied.
(1)

Detecting/S
etting Cam
eras
2
35
Video
(1) [Video Size Set]Set the set of video sizes to use with the camera.
(2) [H.264(2)]Select [Disable] to transmit only one stream of H.264 video.Select [Enable] to transmit two streams of H.264 video.
(3) [H.264(1)]/[H.264(2)]Configure on each tab the settings for the H.264(1) and H.264(2) video to be transmitted from the camera to the Viewer.
(4) [Video Size]Select the size for video transmitted from the camera.
(5) [Bit Rate Control]Set the bit rate for video.When [Use bit rate control] is selected, also set [Target Bit Rate (kbps)].If [Do not use bit rate control] is selected, set [Video Quality].
(6) [Target Bit Rate]If the [Bit Rate Control] is set to [Use bit rate control], select the target bit rate.
(7) [Video Quality]If the [Bit Rate Control] is set to [Do not use bit rate control], select the video quality.
(8) [Frame Rate]Select the video frame rate for video.
(9) [I Frame Interval]Select the I frame interval (sec) for H.264 video.
(1)
(2)
(3)
(4)
(5)
(6)
(7)
(8)
(9)

36
You can use this tool to display the camera’s Settings Page or start Viewer. You can also check the operation and advanced settings of cameras whose basic settings have been configured.Depending on the computer environment, you may need to add the camera’s IP address as a trusted site in order to launch the Settings Page and Viewer. This tool can be used for the registration process.
Note
Regardless of which browser is set as the standard browser, Internet Explorer is started to display the Settings page/viewer of the specified camera.
Adding a Camera as a Trusted Site
When the security level for internet sites and intranet sites is set to [High] in Internet Explorer, it is necessary to add the IP address of the camera to the list of trusted sites.You can individually add the cameras to the list of trusted sites in the settings of Internet Explorer, but if you use this tool, you can select multiple cameras in the camera list and add them all as trusted sites at one time.
A message appears for confirming adding to the trusted sites.
A message appears for notifying that adding to the trusted sites is complete.
Note
Adding to the trusted sites is applied after Internet Explorer restarts. If Internet Explorer was running during the above operation, exit it and then restart it.
Displaying the Settings Page for a Camera
To set the advanced settings for a camera for which the basic settings are finished, you can open the Settings Page for the camera from this tool.Perform this operation by selecting and setting one camera at a time.
Internet Explorer launches and the [Windows Security] dialog box appears.
The Settings Page for the camera appears.For Settings Page details, please refer to the camera’s “Operation Guide”.
Launching the Settings Page/Viewer
Important
To ensure security, exit the web browser after completing settings on the Settings Page and after using Viewer.
1 In the camera list, select the cameras to add as trusted sites.
2 Select [Maintenance] > [Add to Trusted Sites].
3 Click [Yes].
4 Click [OK].
1 In the camera list, select the camera for opening the Settings Page.
2 Click [Settings Page].
3 Enter the administrator name and administrator password for the camera and click [OK].
Detecting/S
etting Cam
eras
2
37
Note
The settings configured on the Settings Page are saved to only the camera and are not reflected in this tool. After configuring the settings, select the camera in the camera list of this tool and then click (Update Camera Information) on the toolbar to update the settings in this tool.
Launching Viewer
You can launch Viewer to check the video of a camera for which the basic settings and the settings of [Settings Page] are finished.Perform this operation by selecting and setting one camera at a time.
Viewer appears.For details on how to operate the Viewer, please refer to the camera’s “Operation Guide”.
Note
It may be necessary to enter the authentication information (user name and password), depending on the camera model and settings.
1 In the camera list, select the camera for opening Viewer.
2 Click [Viewer].Alternatively, you can select [Tools] > [Viewer].
38
You can access Camera Angle Setting Tool and admin tools from this tool.This operation can only be done with one camera at a time.
Note
The tools in the [Tools] menu that are not supported by the selected camera will appear grayed out. The tools may be included in a Settings Page or as software that must be installed to the computer, depending on the camera model. If they are included in a Settings Page, the corresponding Settings Page is displayed after entering the administrator account when you click a tool in the [Tools] menu. If they are included as software installed to the computer, the corresponding software starts.
Launching Camera Angle Setting Tool
Camera Angle Setting Tool allows you to set the camera angle from a computer after installing a camera or changing a camera’s location. When setting the camera angle for an installed camera, you can launch Camera Angle Setting Tool from this tool.
A message appears for confirming whether or not to launch Camera Angle Setting Tool.
For details on setting the camera angle, please refer to the camera’s “Operation Guide”.
Note
Even if you click [No] in step 3, Camera Angle Setting Tool will launch but it will not connect to any camera. You need to connect to a camera again with Camera Angle Setting Tool.
Launching Admin Tools
When actually using a camera, the camera Admin Tools can be used to configure various operation settings. The Admin Tools of the selected cameras can be launched from this tool.
You can select any of the following tools.• Privacy Mask Setting Tool• Panorama Creation Tool• View Restriction Setting Tool• Preset Setting Tool• Intelligent Function Setting Tool• Log Viewer• Recorded Video UtilityWhen you select a tool, the selected tool dialog box appears.For details on how to configure settings using Admin Tools, please refer to the camera’s “Operation Guide”.
Accessing Camera Tools
Important
When the security level for internet sites and intranet sites is set to [High] in Internet Explorer, it is necessary to add the IP address of the camera to the list of trusted sites (P. 36).
1 In the camera list, select the camera for setting the camera angle.
2 Select [Tools] > [Camera Angle Setting Tool].
3 Click [Yes].
1 In the camera list, select the camera to launch and be configured by Admin Tools.
2 Click [Tools] to choose which tool to launch.

Detecting/S
etting Cam
eras
2
39
Important
To ensure security, exit Internet Explorer after completing the settings with Admin Tools.

40
Chapter
Camera Specification File Use
The information displayed in the camera list of this tool can be saved and edited as a camera specification file.
You can load camera specification files when the tool is launched, and use them to manage more than 256
cameras.
42
The content of the camera list can be saved as a camera specification file in the CSV format. Saved camera specification files can be configured to be loaded automatically upon next startup, or edited to be used for setting the camera.
Saving When Exiting the Tool
You can save a camera specification file when exiting this tool. You can also specify whether to load the camera specification file the next time the tool launches.
Note
If the [Enable camera specification file] checkbox is selected in [File] > [Environmental Settings] (P. 47) and the [Do not save on exit] checkbox is not selected, the camera specification files can be saved when exiting this tool.
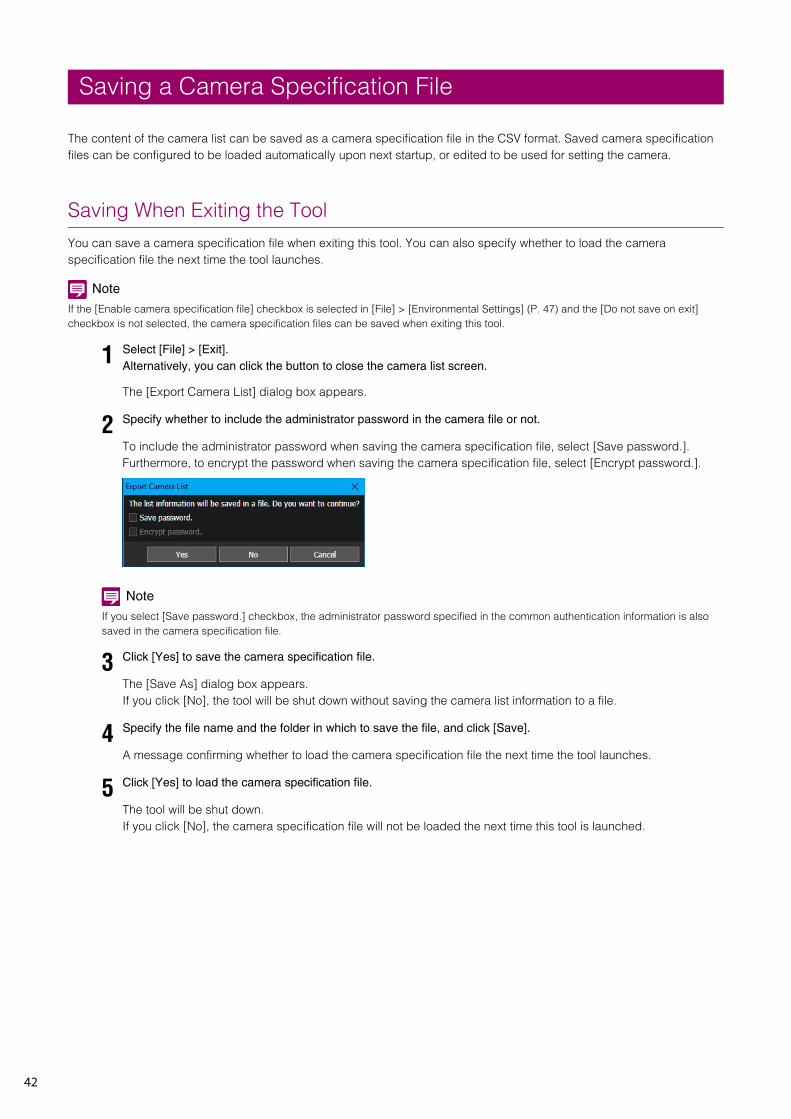
The [Export Camera List] dialog box appears.
To include the administrator password when saving the camera specification file, select [Save password.].Furthermore, to encrypt the password when saving the camera specification file, select [Encrypt password.].
Note
If you select [Save password.] checkbox, the administrator password specified in the common authentication information is also saved in the camera specification file.
The [Save As] dialog box appears.If you click [No], the tool will be shut down without saving the camera list information to a file.
A message confirming whether to load the camera specification file the next time the tool launches.
The tool will be shut down.If you click [No], the camera specification file will not be loaded the next time this tool is launched.
Saving a Camera Specification File
1 Select [File] > [Exit].Alternatively, you can click the button to close the camera list screen.
2 Specify whether to include the administrator password in the camera file or not.
3 Click [Yes] to save the camera specification file.
4 Specify the file name and the folder in which to save the file, and click [Save].
5 Click [Yes] to load the camera specification file.
Cam
era Specification F
ile Use
3
43
Saving Using the Menu
Camera specification files can be saved using the following procedures while the tool is running.
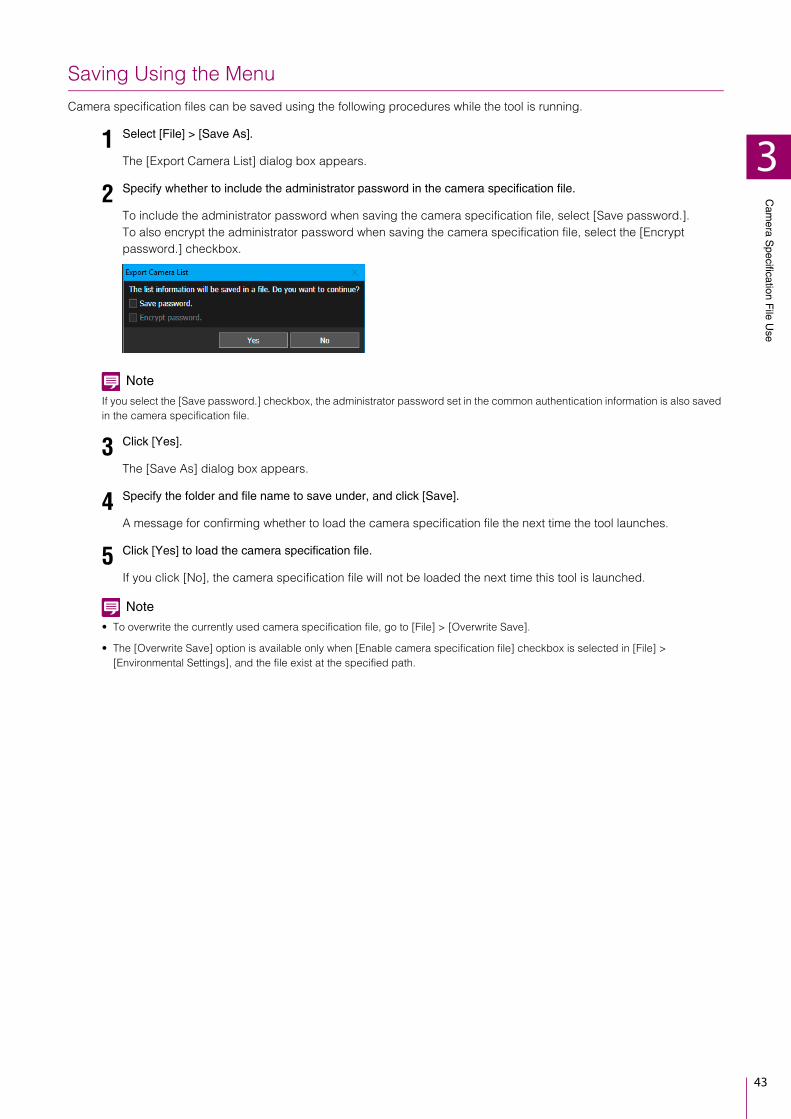
The [Export Camera List] dialog box appears.
To include the administrator password when saving the camera specification file, select [Save password.].To also encrypt the administrator password when saving the camera specification file, select the [Encrypt password.] checkbox.
Note
If you select the [Save password.] checkbox, the administrator password set in the common authentication information is also saved in the camera specification file.
The [Save As] dialog box appears.
A message for confirming whether to load the camera specification file the next time the tool launches.
If you click [No], the camera specification file will not be loaded the next time this tool is launched.
Note
• To overwrite the currently used camera specification file, go to [File] > [Overwrite Save].
• The [Overwrite Save] option is available only when [Enable camera specification file] checkbox is selected in [File] > [Environmental Settings], and the file exist at the specified path.
1 Select [File] > [Save As].
2 Specify whether to include the administrator password in the camera specification file.
3 Click [Yes].
4 Specify the folder and file name to save under, and click [Save].
5 Click [Yes] to load the camera specification file.
44
Camera specification files saved in CSV can be edited with a spreadsheet software such as Excel, or a text editor such as Notepad.
Camera Specification File Configuration
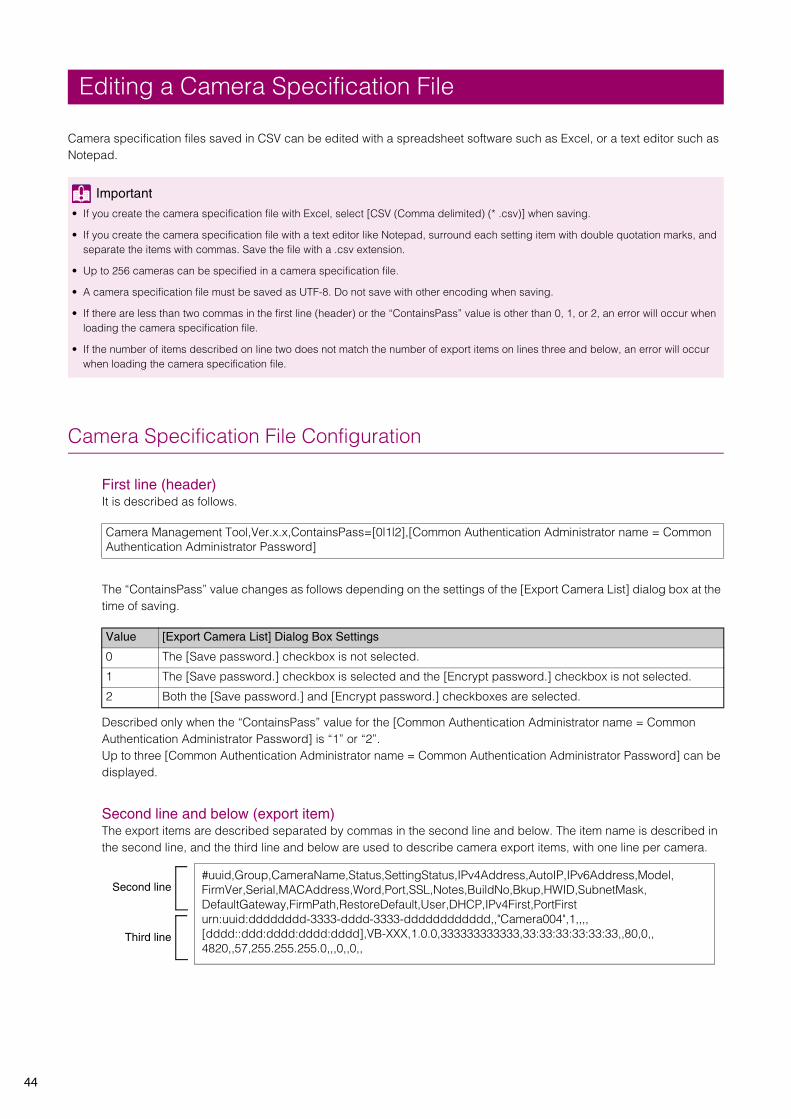
First line (header)It is described as follows.
The “ContainsPass” value changes as follows depending on the settings of the [Export Camera List] dialog box at the time of saving.
Described only when the “ContainsPass” value for the [Common Authentication Administrator name = Common Authentication Administrator Password] is “1” or “2”.Up to three [Common Authentication Administrator name = Common Authentication Administrator Password] can be displayed.
Second line and below (export item)The export items are described separated by commas in the second line and below. The item name is described in the second line, and the third line and below are used to describe camera export items, with one line per camera.
Editing a Camera Specification File
Important
• If you create the camera specification file with Excel, select [CSV (Comma delimited) (* .csv)] when saving.
• If you create the camera specification file with a text editor like Notepad, surround each setting item with double quotation marks, and separate the items with commas. Save the file with a .csv extension.
• Up to 256 cameras can be specified in a camera specification file.
• A camera specification file must be saved as UTF-8. Do not save with other encoding when saving.
• If there are less than two commas in the first line (header) or the “ContainsPass” value is other than 0, 1, or 2, an error will occur when loading the camera specification file.
• If the number of items described on line two does not match the number of export items on lines three and below, an error will occur when loading the camera specification file.
Camera Management Tool,Ver.x.x,ContainsPass=[0|1|2],[Common Authentication Administrator name = Common Authentication Administrator Password]
Value [Export Camera List] Dialog Box Settings
0 The [Save password.] checkbox is not selected.
1 The [Save password.] checkbox is selected and the [Encrypt password.] checkbox is not selected.
2 Both the [Save password.] and [Encrypt password.] checkboxes are selected.
#uuid,Group,CameraName,Status,SettingStatus,IPv4Address,AutoIP,IPv6Address,Model,FirmVer,Serial,MACAddress,Word,Port,SSL,Notes,BuildNo,Bkup,HWID,SubnetMask,DefaultGateway,FirmPath,RestoreDefault,User,DHCP,IPv4First,PortFirsturn:uuid:dddddddd-3333-dddd-3333-dddddddddddd,,"Camera004",1,,,,[dddd::ddd:dddd:dddd:dddd],VB-XXX,1.0.0,333333333333,33:33:33:33:33:33,,80,0,,4820,,57,255.255.255.0,,,0,,0,,
Second line
Third line
Cam
era Specification F
ile Use
3
45
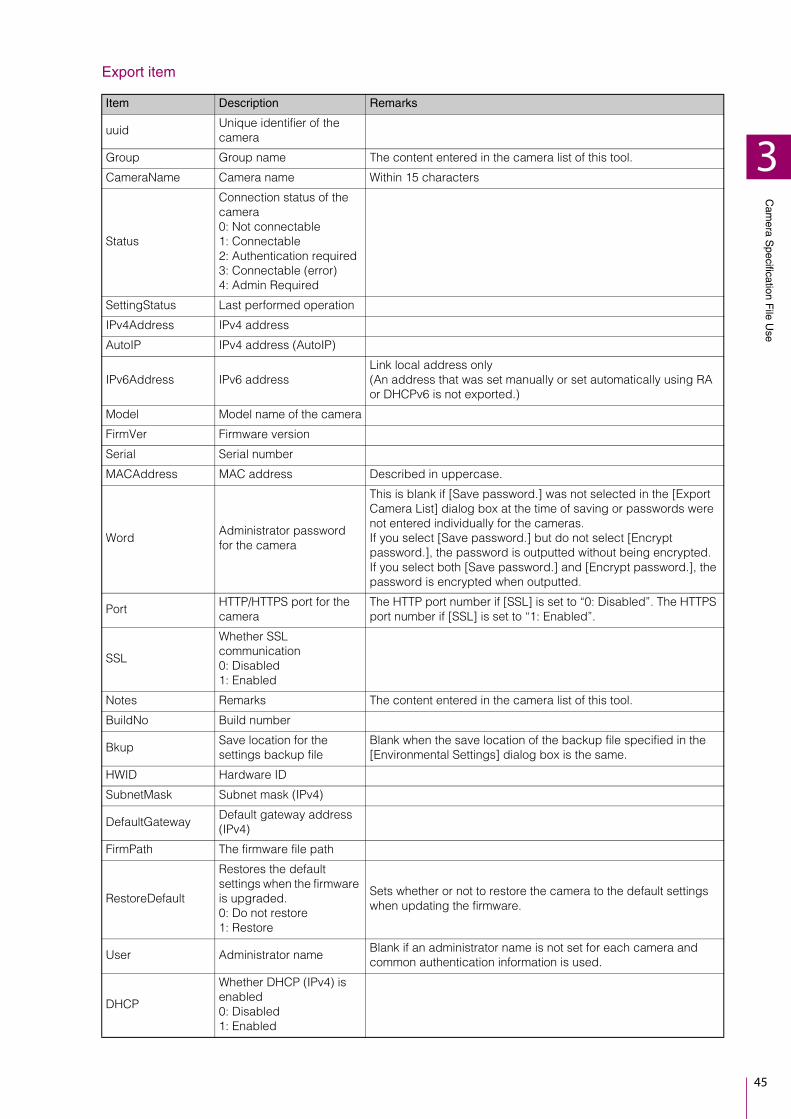
Export item
Item Description Remarks
uuidUnique identifier of the camera
Group Group name The content entered in the camera list of this tool.
CameraName Camera name Within 15 characters
Status
Connection status of the camera0: Not connectable1: Connectable2: Authentication required3: Connectable (error)4: Admin Required
SettingStatus Last performed operation
IPv4Address IPv4 address
AutoIP IPv4 address (AutoIP)
IPv6Address IPv6 addressLink local address only(An address that was set manually or set automatically using RA or DHCPv6 is not exported.)
Model Model name of the camera
FirmVer Firmware version
Serial Serial number
MACAddress MAC address Described in uppercase.
WordAdministrator password for the camera
This is blank if [Save password.] was not selected in the [Export Camera List] dialog box at the time of saving or passwords were not entered individually for the cameras.If you select [Save password.] but do not select [Encrypt password.], the password is outputted without being encrypted.If you select both [Save password.] and [Encrypt password.], the password is encrypted when outputted.
PortHTTP/HTTPS port for the camera
The HTTP port number if [SSL] is set to “0: Disabled”. The HTTPS port number if [SSL] is set to “1: Enabled”.
SSL
Whether SSL communication0: Disabled1: Enabled
Notes Remarks The content entered in the camera list of this tool.
BuildNo Build number
BkupSave location for the settings backup file
Blank when the save location of the backup file specified in the [Environmental Settings] dialog box is the same.
HWID Hardware ID
SubnetMask Subnet mask (IPv4)
DefaultGatewayDefault gateway address (IPv4)
FirmPath The firmware file path
RestoreDefault
Restores the default settings when the firmware is upgraded.0: Do not restore1: Restore
Sets whether or not to restore the camera to the default settings when updating the firmware.
User Administrator nameBlank if an administrator name is not set for each camera and common authentication information is used.
DHCP
Whether DHCP (IPv4) is enabled0: Disabled1: Enabled
46
IPv4FirstIPv4 address (when adding manually)
The IPv4 address specified when adding a camera via [Camera List] > [Add Camera] (P. 50), or adding a camera by loading a camera specification file (P. 52). Blank when the IPv4 address set in the camera is the same.
PortFirstCamera HTTP/HTTPS port number (when adding manually)
The port number specified when adding a camera via [Camera List] > [Add Camera] (P. 50), or adding a camera by loading a camera specification file (P. 52). Blank when the port number set in the camera is the same.
Item Description Remarks
Cam
era Specification F
ile Use
3
47
You can load a saved camera specification file after starting this tool, or configure it to be automatically loaded when this tool is started.
Importing When This Tool Starts
After starting this tool, the following two methods are available for loading the camera specification file.• Select the [File] > [Open], and load the camera specification file from the [Open] dialog box.• Drag and drop the camera specification file to the camera list.
If you load a camera specification file, its content is displayed in the camera list, and a message is displayed confirming whether to update the information in the camera list. If you click [Yes], authentication with the camera is performed, and the information is updated. To display the loaded file in the camera list without updating, click [No].
Note
• Even if you did not update the information in the camera list when loading, you can update it afterward by selecting the camera in the camera list and clicking (Update Camera Information).
• If the common authentication information saved in the camera specification file satisfies both of the following conditions, it can be loaded by the [Common Authentication Information Settings] dialog box of this tool.– No cameras are displayed in the camera list before loading.– The [Common Authentication Information Settings] dialog box is at default settings.
Automatically Importing When This Tool Starts
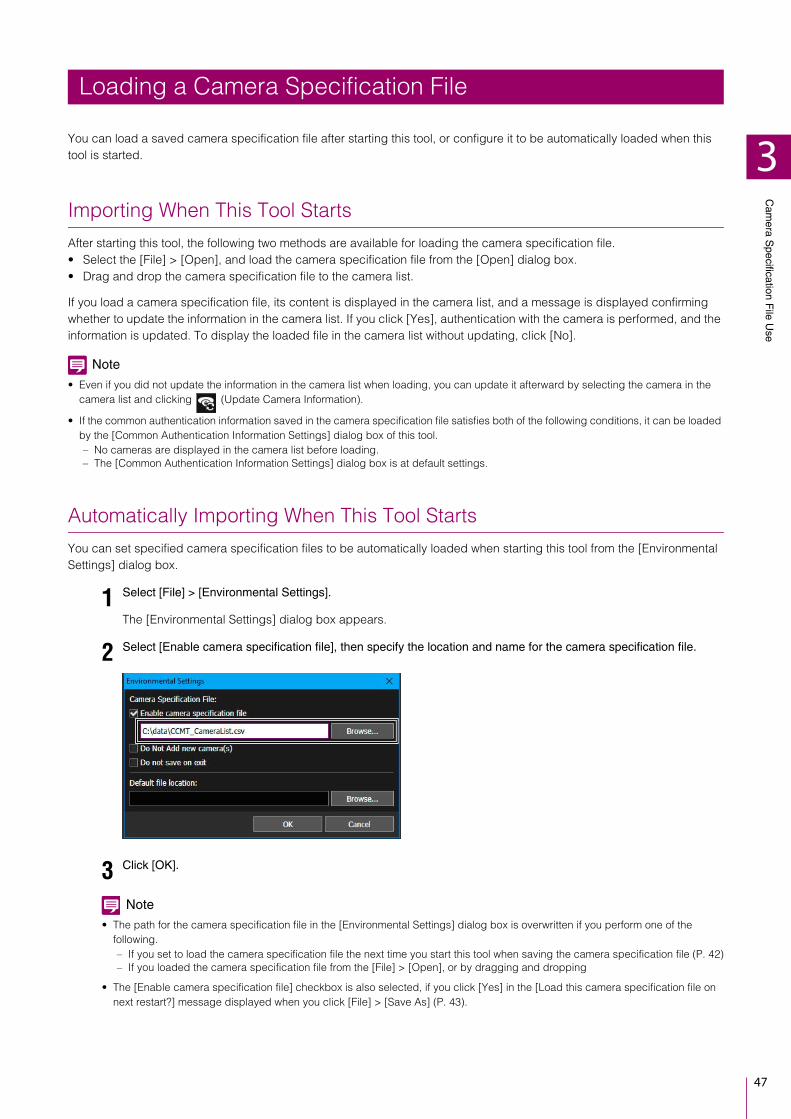
You can set specified camera specification files to be automatically loaded when starting this tool from the [Environmental Settings] dialog box.
The [Environmental Settings] dialog box appears.
Note
• The path for the camera specification file in the [Environmental Settings] dialog box is overwritten if you perform one of the following.– If you set to load the camera specification file the next time you start this tool when saving the camera specification file (P. 42)– If you loaded the camera specification file from the [File] > [Open], or by dragging and dropping
• The [Enable camera specification file] checkbox is also selected, if you click [Yes] in the [Load this camera specification file on next restart?] message displayed when you click [File] > [Save As] (P. 43).
Loading a Camera Specification File
1 Select [File] > [Environmental Settings].
2 Select [Enable camera specification file], then specify the location and name for the camera specification file.
3 Click [OK].

48
Environmental Settings and Other Items[Do Not Add new camera(s)]Select this when you want to limit cameras displayed in the list to those described in the camera specification file.If you select this, you cannot add cameras to the camera list by detection, or manually add or delete cameras. If you load a different camera specification file, the current camera list and common authentication information are discarded and replaced with the camera list and common authentication information of the newly load camera specification file.This setting is only enabled when the [Enable camera specification file] checkbox is selected. When this checkbox is selected, [Enable camera specification file] is grayed out and the setting cannot be changed.
[Do not save on exit]If you select this, the [Export Camera List] dialog box is not displayed, and the camera specification file is not output or saved when exiting this tool. This is available when [Enable camera specification file] is selected.
Camera specification file input fieldEnter the save location and file name of the camera specification file in the input field.
[Default file location]Specify a default location to save files, such as camera specification files and backup files, created with this tool.

Chapter
Camera Detection/Configuration Techniques
This chapter covers the procedure for assigning IP addresses using a camera specification file. It also
explains how to load the settings of a camera and then copy them to another camera, or save them to a file
and then apply them to multiple cameras.

50
Specify the IPv4 address to detect cameras in your currently operating system, and add them to the camera list. You can either detect them one by one manually, or load the CSV file to detect multiple cameras at once.
Note
A maximum of 256 detected cameras can be added to the camera list. If you exceed the maximum number of cameras (256) when you try to add cameras, an error message is displayed. In this case, a camera cannot be added until you delete cameras from the camera list (P. 25).
Detecting a Single Camera
Specify an IPv4 address to manually detect a camera connected to a different network segment.
The [Add Camera] dialog box is displayed.
(1) [IPv4 Address]Enter the IPv4 address of the camera to add.
(2) [Administrator Name]Enter the camera’s administrator name. The field will be grayed out and cannot be filled in if the [Authenticate using common authentication information] checkbox is selected.
(3) [Administrator Password]Enter the administrator password for the camera. The field will be grayed out and cannot be filled in if the [Authenticate using common authentication information] checkbox is selected.
(4) [Authenticate using common authentication information]Select this checkbox to perform authentication using the common authentication information (P. 27). If you select this checkbox, the administrator name and administrator password specified in the above (2) and (3) are canceled and grayed out.
(5) [Use SSL Communication]Select this to connect to the camera using SSL communication. If you select the [Use SSL Communication] checkbox, the self-signed certificate is checked. A message is displayed if you authenticate a camera that has a problem with its self-signed certificate and has not been connected before.
(6) Port number input fieldSpecify the port number to be used for camera connection. Normally, leave this set to the default.
Specifying an IP Address to Detect a Camera
1 Select [Camera List] > [Add Camera].
2 Enter the authentication information.
(1)
(2)
(3)
(4)
(5)
(6)
Cam
era Detection/C
onfiguration Techniques
4
51
The camera is added to the camera list.
Detecting Multiple Cameras
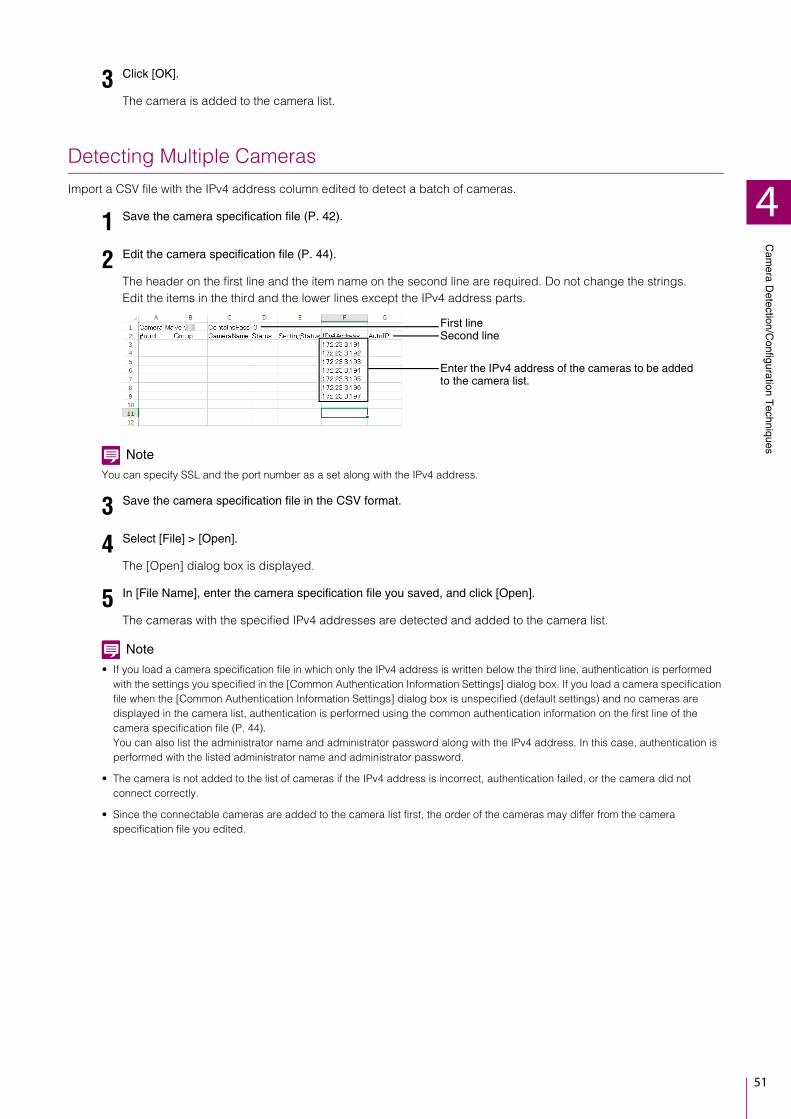
Import a CSV file with the IPv4 address column edited to detect a batch of cameras.
The header on the first line and the item name on the second line are required. Do not change the strings.Edit the items in the third and the lower lines except the IPv4 address parts.
Note
You can specify SSL and the port number as a set along with the IPv4 address.
The [Open] dialog box is displayed.
The cameras with the specified IPv4 addresses are detected and added to the camera list.
Note
• If you load a camera specification file in which only the IPv4 address is written below the third line, authentication is performed with the settings you specified in the [Common Authentication Information Settings] dialog box. If you load a camera specification file when the [Common Authentication Information Settings] dialog box is unspecified (default settings) and no cameras are displayed in the camera list, authentication is performed using the common authentication information on the first line of the camera specification file (P. 44).You can also list the administrator name and administrator password along with the IPv4 address. In this case, authentication is performed with the listed administrator name and administrator password.
• The camera is not added to the list of cameras if the IPv4 address is incorrect, authentication failed, or the camera did not connect correctly.
• Since the connectable cameras are added to the camera list first, the order of the cameras may differ from the camera specification file you edited.
3 Click [OK].
1 Save the camera specification file (P. 42).
2 Edit the camera specification file (P. 44).
3 Save the camera specification file in the CSV format.
4 Select [File] > [Open].
5 In [File Name], enter the camera specification file you saved, and click [Open].
First lineSecond line
Enter the IPv4 address of the cameras to be added to the camera list.
52
You can batch configure multiple cameras by loading a “settings file” based on camera specification files for each camera displayed in the camera list.
Creating a Settings File
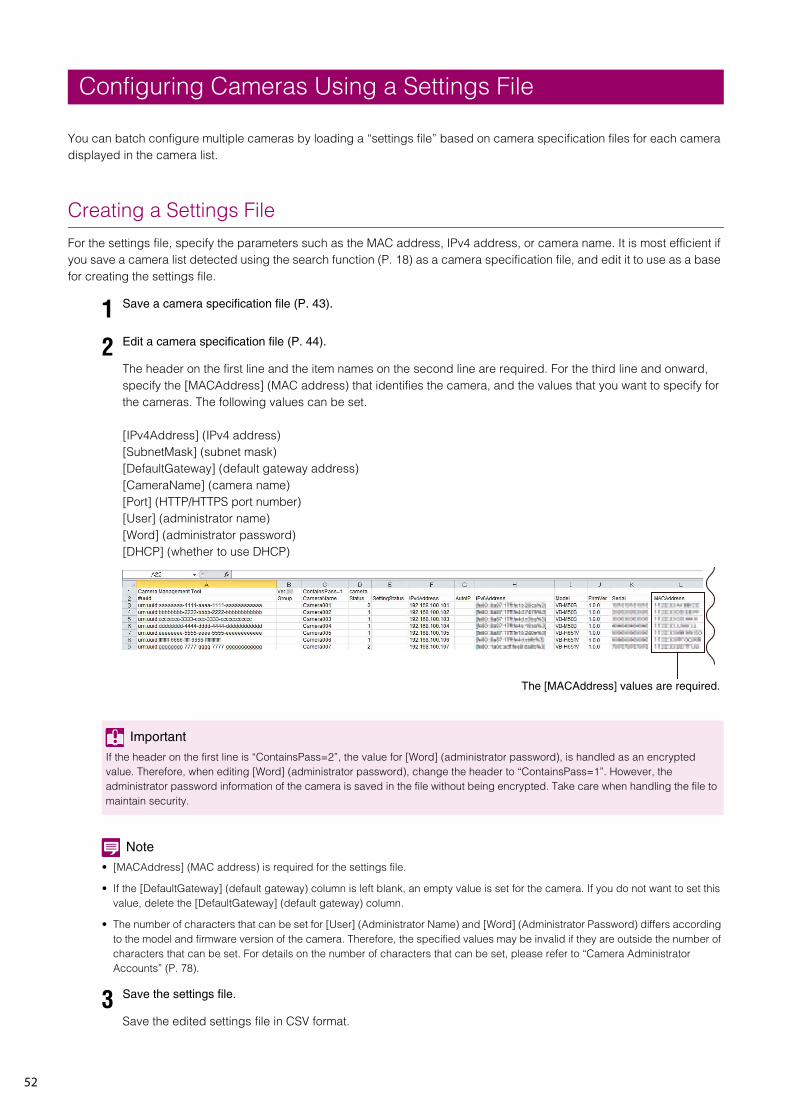
For the settings file, specify the parameters such as the MAC address, IPv4 address, or camera name. It is most efficient if you save a camera list detected using the search function (P. 18) as a camera specification file, and edit it to use as a base for creating the settings file.
The header on the first line and the item names on the second line are required. For the third line and onward, specify the [MACAddress] (MAC address) that identifies the camera, and the values that you want to specify for the cameras. The following values can be set.
[IPv4Address] (IPv4 address)[SubnetMask] (subnet mask)[DefaultGateway] (default gateway address)[CameraName] (camera name)[Port] (HTTP/HTTPS port number)[User] (administrator name)[Word] (administrator password)[DHCP] (whether to use DHCP)
Note
• [MACAddress] (MAC address) is required for the settings file.
• If the [DefaultGateway] (default gateway) column is left blank, an empty value is set for the camera. If you do not want to set this value, delete the [DefaultGateway] (default gateway) column.
• The number of characters that can be set for [User] (Administrator Name) and [Word] (Administrator Password) differs according to the model and firmware version of the camera. Therefore, the specified values may be invalid if they are outside the number of characters that can be set. For details on the number of characters that can be set, please refer to “Camera Administrator Accounts” (P. 78).
Save the edited settings file in CSV format.
Configuring Cameras Using a Settings File
1 Save a camera specification file (P. 43).
2 Edit a camera specification file (P. 44).
Important
If the header on the first line is “ContainsPass=2”, the value for [Word] (administrator password), is handled as an encrypted value. Therefore, when editing [Word] (administrator password), change the header to “ContainsPass=1”. However, the administrator password information of the camera is saved in the file without being encrypted. Take care when handling the file to maintain security.
3 Save the settings file.
The [MACAddress] values are required.

Cam
era Detection/C
onfiguration Techniques
4
53
Importing a Settings File
Match the MAC address in the camera list and the MAC address in the settings file edited in the “Creating a Settings File” section above, and apply the values of the settings file to the camera that matched.
Enter the folder in which the settings file is saved and the file name in the input field. Alternatively, you can click [Browse] and specify the settings file in the dialog box that appears.Select [Do not set an IP address already in use] to ensure the IP address is not the same as an IP address that has already been assigned.
Note
• Settings are only applied for cameras with [Connectable] or [ Connectable] displayed for [Connection Status] in the camera list.
• An administrator account can be registered for cameras with [Admin Required] displayed for [Connection Status] in the camera list by specifying an administrator name and administrator password in the settings file. [Connection Status] changes to [Connectable] or [ Connectable] after the camera is restarted, and the other items can also be set by importing the settings file again.
1 Select [Camera Settings] > [Set from file], and specify the edited settings file.
2 Click [OK].
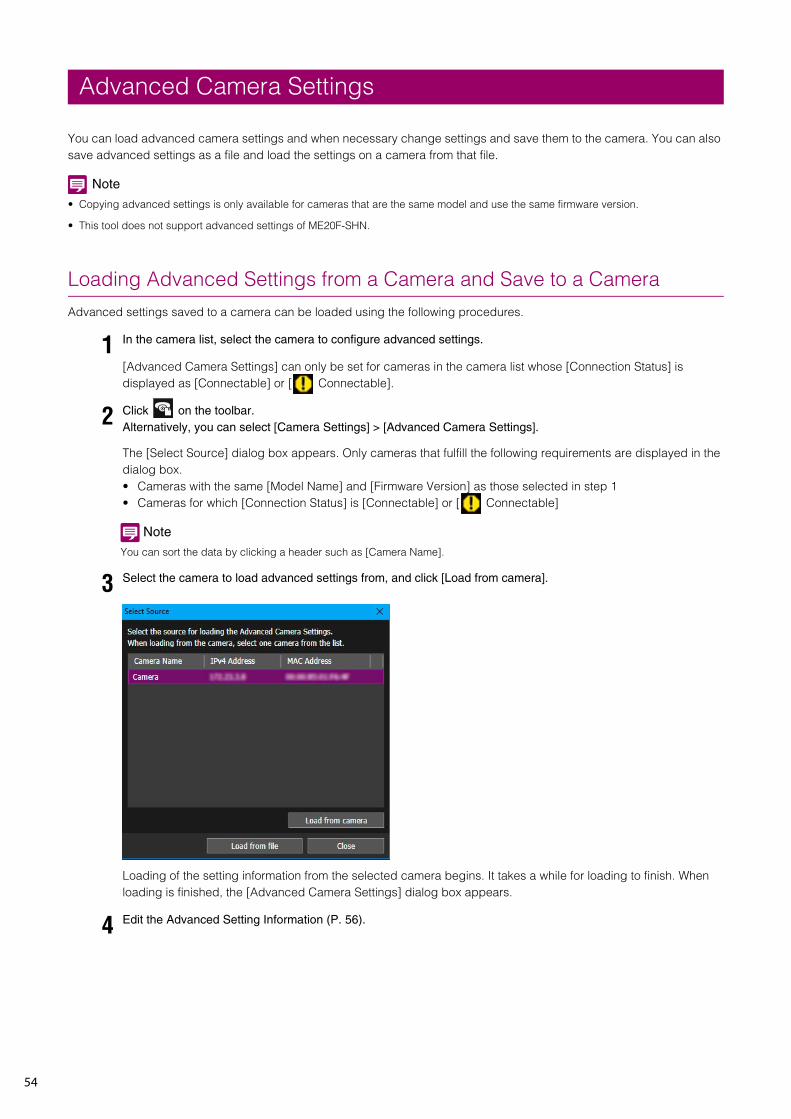
54
You can load advanced camera settings and when necessary change settings and save them to the camera. You can also save advanced settings as a file and load the settings on a camera from that file.
Note
• Copying advanced settings is only available for cameras that are the same model and use the same firmware version.
• This tool does not support advanced settings of ME20F-SHN.
Loading Advanced Settings from a Camera and Save to a Camera
Advanced settings saved to a camera can be loaded using the following procedures.
[Advanced Camera Settings] can only be set for cameras in the camera list whose [Connection Status] is displayed as [Connectable] or [ Connectable].
The [Select Source] dialog box appears. Only cameras that fulfill the following requirements are displayed in the dialog box.• Cameras with the same [Model Name] and [Firmware Version] as those selected in step 1• Cameras for which [Connection Status] is [Connectable] or [ Connectable]
Note
You can sort the data by clicking a header such as [Camera Name].
Loading of the setting information from the selected camera begins. It takes a while for loading to finish. When loading is finished, the [Advanced Camera Settings] dialog box appears.
Advanced Camera Settings
1 In the camera list, select the camera to configure advanced settings.
2 Click on the toolbar.Alternatively, you can select [Camera Settings] > [Advanced Camera Settings].
3 Select the camera to load advanced settings from, and click [Load from camera].
4 Edit the Advanced Setting Information (P. 56).

Cam
era Detection/C
onfiguration Techniques
4
55
Edited advanced settings are saved to the camera selected in step 1.
The [Advanced Camera Settings] dialog box closes.
Saving Advanced Settings as a File
Settings loaded in [Advanced Camera Settings] can be saved as a file. For example, you can save the advanced camera settings of a particular moment from the camera to a file, and recall these settings later by saving them back to a camera.
The [Save As] dialog box appears.
The [Save As] dialog box closes and the [Advanced Camera Settings] dialog box is redisplayed.
The [Advanced Camera Settings] dialog box closes.
Note
Advanced camera settings are saved in XML format. Note that if you change the content of the XML file, the file will not be loaded properly when saving it to a camera using this tool.
5 Click [Save to camera].
6 Click [Close] in the [Advanced Camera Settings] dialog box.
1 Carry out steps 1 – 4 in “Loading Advanced Settings from a Camera and Save to a Camera” (P. 54).
2 Click [Save to file].
3 Specify the save location and file name of the file and click [Save].
4 Click [Close] in the [Advanced Camera Settings] dialog box.
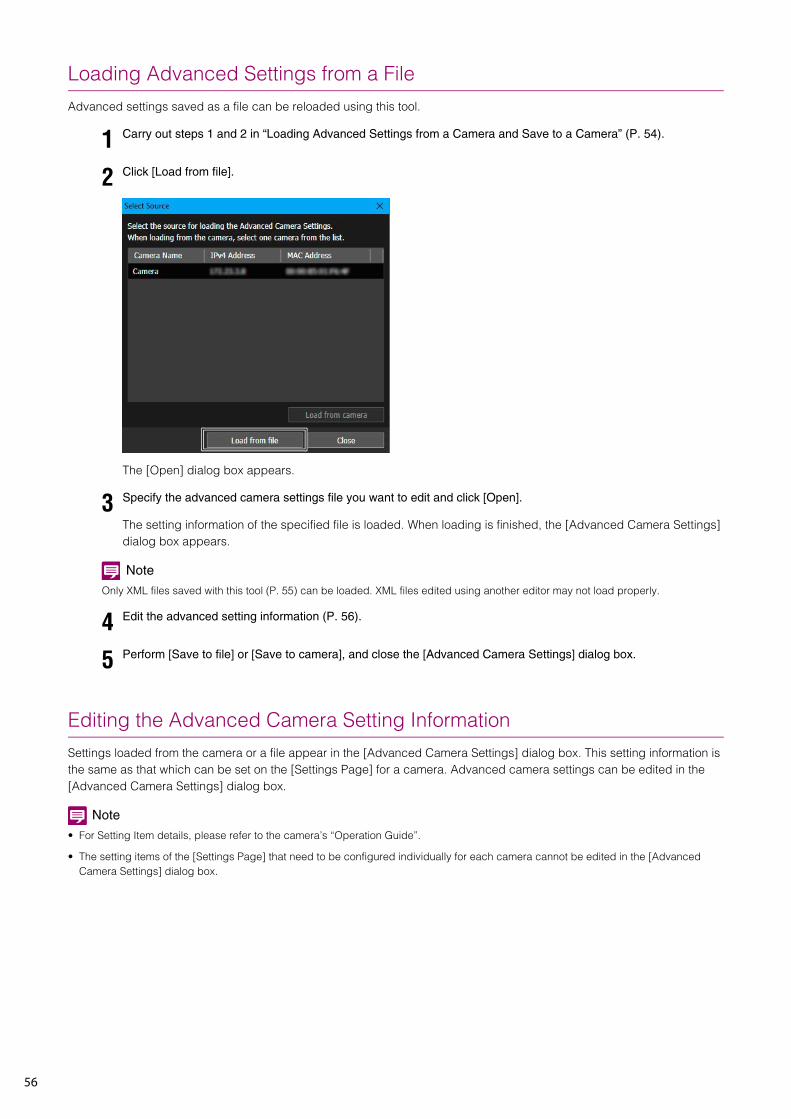
56
Loading Advanced Settings from a File
Advanced settings saved as a file can be reloaded using this tool.
The [Open] dialog box appears.
The setting information of the specified file is loaded. When loading is finished, the [Advanced Camera Settings] dialog box appears.
Note
Only XML files saved with this tool (P. 55) can be loaded. XML files edited using another editor may not load properly.
Editing the Advanced Camera Setting Information
Settings loaded from the camera or a file appear in the [Advanced Camera Settings] dialog box. This setting information is the same as that which can be set on the [Settings Page] for a camera. Advanced camera settings can be edited in the [Advanced Camera Settings] dialog box.
Note
• For Setting Item details, please refer to the camera’s “Operation Guide”.
• The setting items of the [Settings Page] that need to be configured individually for each camera cannot be edited in the [Advanced Camera Settings] dialog box.
1 Carry out steps 1 and 2 in “Loading Advanced Settings from a Camera and Save to a Camera” (P. 54).
2 Click [Load from file].
3 Specify the advanced camera settings file you want to edit and click [Open].
4 Edit the advanced setting information (P. 56).
5 Perform [Save to file] or [Save to camera], and close the [Advanced Camera Settings] dialog box.
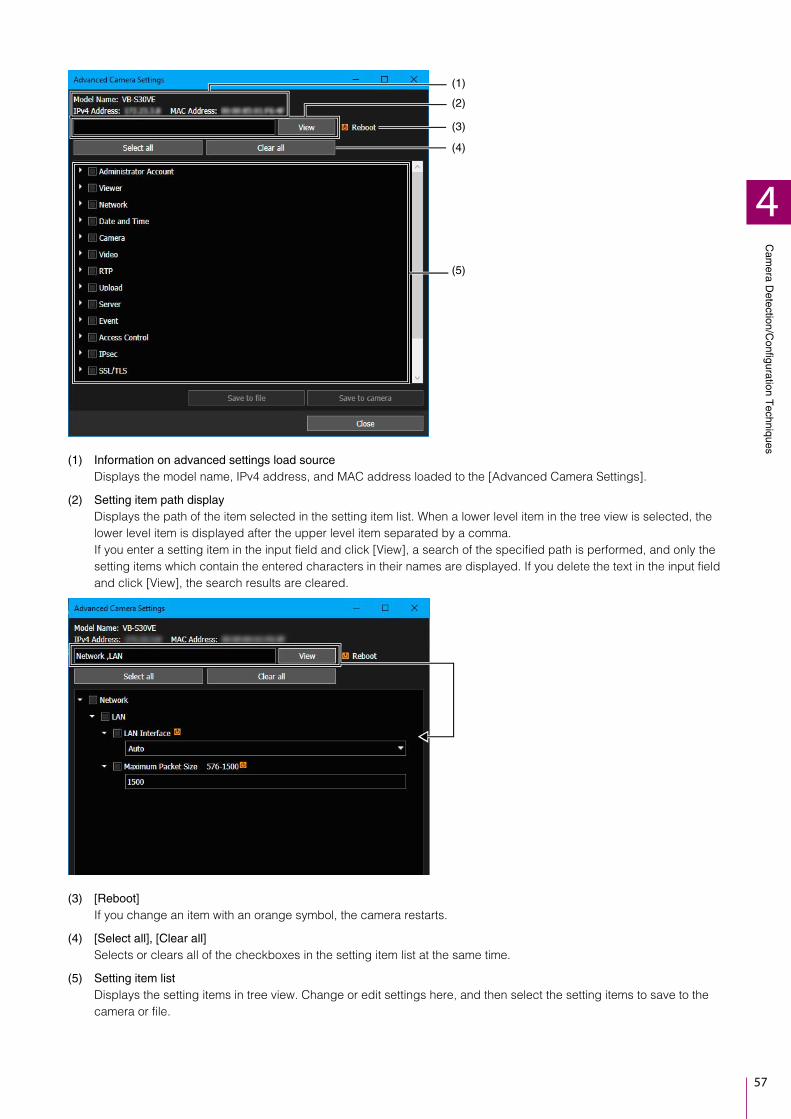
Cam
era Detection/C
onfiguration Techniques
4
57
(1) Information on advanced settings load sourceDisplays the model name, IPv4 address, and MAC address loaded to the [Advanced Camera Settings].
(2) Setting item path displayDisplays the path of the item selected in the setting item list. When a lower level item in the tree view is selected, the lower level item is displayed after the upper level item separated by a comma.If you enter a setting item in the input field and click [View], a search of the specified path is performed, and only the setting items which contain the entered characters in their names are displayed. If you delete the text in the input field and click [View], the search results are cleared.
(3) [Reboot]If you change an item with an orange symbol, the camera restarts.
(4) [Select all], [Clear all]Selects or clears all of the checkboxes in the setting item list at the same time.
(5) Setting item listDisplays the setting items in tree view. Change or edit settings here, and then select the setting items to save to the camera or file.
(1)
(2)
(3)
(5)
(4)

58
Chapter
Camera Maintenance
This chapter explains how to perform various maintenance work for cameras such as updating the firmware,
backing up and restoring the settings, and mounting and unmounting memory cards.

60
You can update the firmware for multiple cameras or only update the Mobile Camera Viewer for multiple cameras without updating the firmware.
Updating the Firmware
When updating the firmware, you can specify the firmware file and set to restore the camera settings to the factory default settings.
A message appears to display precautions on updating the firmware.
The [Update Firmware] dialog box appears.
Updating the Software
Important
• Do not use an update file that has been edited or manipulated.
• After updating the software, the camera will restart, temporarily interrupting all connections.
• Cameras cannot be operated or set while updating the software.
Important
• Do not disconnect a network cable or turn off the power of a camera during the firmware update process. Doing so may cause a camera to malfunction.
• If there is a power failure during the update process or the firmware update does not finish normally, the camera firmware may be corrupted. If a camera cannot be accessed after recovery from a failure, contact the retailer.
• Do not launch this tool on multiple computers and then perform a software update simultaneously from multiple computers. Doing so may cause a camera to malfunction.
1 In the camera list, select the cameras for updating the firmware.
2 Click on the toolbar.Alternatively, you can select [Maintenance] > [Software Update] > [Update Firmware].
3 Carefully read the message and then click [Yes] to continue the procedure.

Cam
era Maintenance
5
61
Click [Browse] and then specify the firmware file in the dialog box that appears.
Note
You can copy and paste the path of the [File Name]. Copy the target by pressing the Ctrl+C keys, and paste by selecting the destination row and pressing the Ctrl+V keys. You can select multiple copy destinations by holding the Ctrl key while clicking.
If you select [Restore], the user settings except the administrator account and network settings, etc. will be restored to the factory default settings after the firmware is updated. For details on the items that are not initialized, please refer to the camera’s “Operation Guide”.To keep the current settings of the cameras, select [Do Not Restore] for [Default Settings].
Enter the time to wait for a response from the camera before transferring the firmware. The firmware is not updated for cameras that do not respond within the time entered here due to a slow network speed, etc. In this case, specify a longer waiting time and then execute the operation again.
Updating of the firmware begins.During update, a progress bar appears in the [Message] field. If you are performing a firmware update, and the update fails for some cameras, the message is displayed. Confirm the message displayed in the [Message] field.
Note
You can stop the firmware update part way through by clicking [Stop]. However, the process cannot be canceled for cameras that have entered the restarting stage.
4 Specify the firmware file.
5 To restore the cameras to the default settings when updating the firmware, select [Restore] for [Default Settings].
6 If necessary, specify [Network Timeout] in seconds (30 – 36,000 seconds).
7 Click [Run].
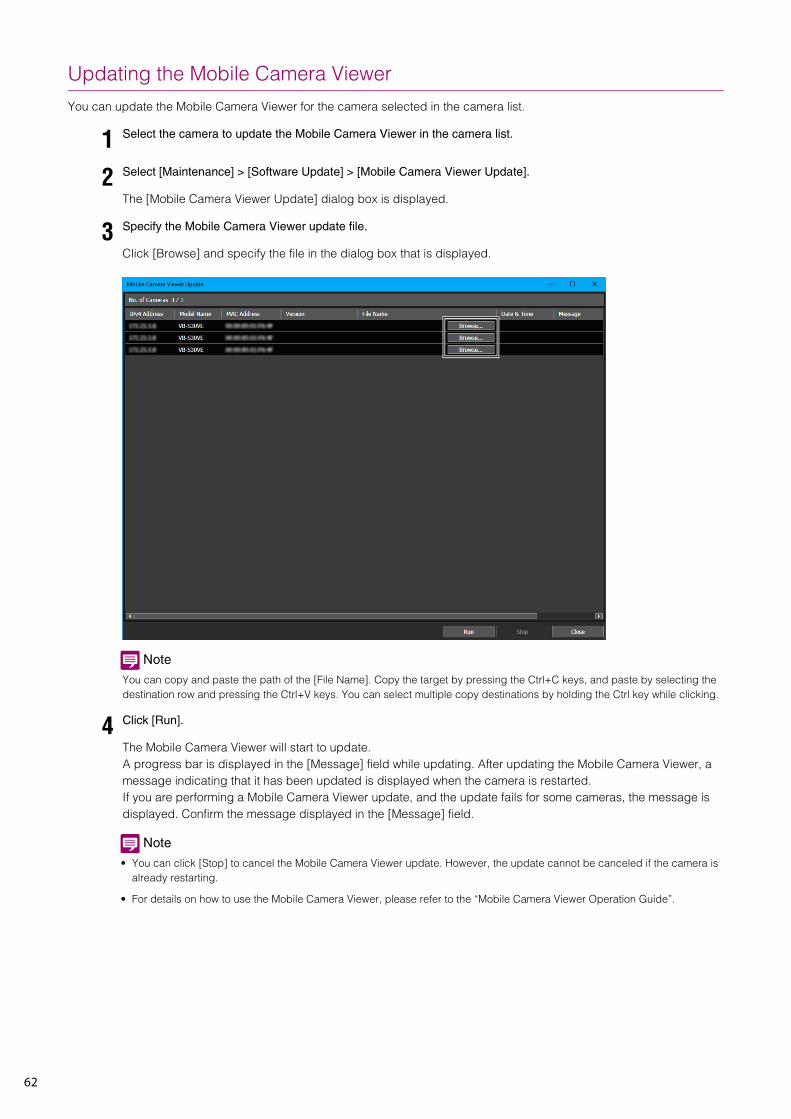
62
Updating the Mobile Camera Viewer
You can update the Mobile Camera Viewer for the camera selected in the camera list.
The [Mobile Camera Viewer Update] dialog box is displayed.
Click [Browse] and specify the file in the dialog box that is displayed.
Note
You can copy and paste the path of the [File Name]. Copy the target by pressing the Ctrl+C keys, and paste by selecting the destination row and pressing the Ctrl+V keys. You can select multiple copy destinations by holding the Ctrl key while clicking.
The Mobile Camera Viewer will start to update.A progress bar is displayed in the [Message] field while updating. After updating the Mobile Camera Viewer, a message indicating that it has been updated is displayed when the camera is restarted.If you are performing a Mobile Camera Viewer update, and the update fails for some cameras, the message is displayed. Confirm the message displayed in the [Message] field.
Note
• You can click [Stop] to cancel the Mobile Camera Viewer update. However, the update cannot be canceled if the camera is already restarting.
• For details on how to use the Mobile Camera Viewer, please refer to the “Mobile Camera Viewer Operation Guide”.
1 Select the camera to update the Mobile Camera Viewer in the camera list.
2 Select [Maintenance] > [Software Update] > [Mobile Camera Viewer Update].
3 Specify the Mobile Camera Viewer update file.
4 Click [Run].
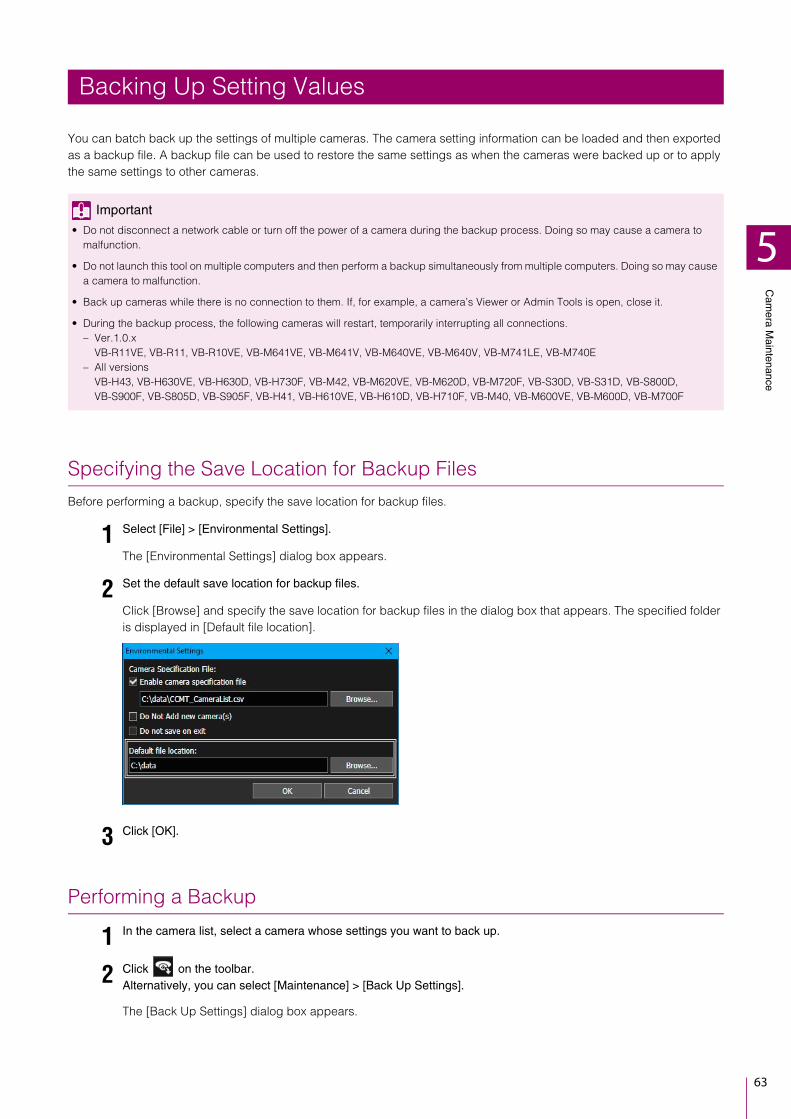
Cam
era Maintenance
5
63
You can batch back up the settings of multiple cameras. The camera setting information can be loaded and then exported as a backup file. A backup file can be used to restore the same settings as when the cameras were backed up or to apply the same settings to other cameras.
Specifying the Save Location for Backup Files
Before performing a backup, specify the save location for backup files.
The [Environmental Settings] dialog box appears.
Click [Browse] and specify the save location for backup files in the dialog box that appears. The specified folder is displayed in [Default file location].
Performing a Backup
The [Back Up Settings] dialog box appears.
Backing Up Setting Values
Important
• Do not disconnect a network cable or turn off the power of a camera during the backup process. Doing so may cause a camera to malfunction.
• Do not launch this tool on multiple computers and then perform a backup simultaneously from multiple computers. Doing so may cause a camera to malfunction.
• Back up cameras while there is no connection to them. If, for example, a camera’s Viewer or Admin Tools is open, close it.
• During the backup process, the following cameras will restart, temporarily interrupting all connections.– Ver.1.0.x
VB-R11VE, VB-R11, VB-R10VE, VB-M641VE, VB-M641V, VB-M640VE, VB-M640V, VB-M741LE, VB-M740E– All versions
VB-H43, VB-H630VE, VB-H630D, VB-H730F, VB-M42, VB-M620VE, VB-M620D, VB-M720F, VB-S30D, VB-S31D, VB-S800D, VB-S900F, VB-S805D, VB-S905F, VB-H41, VB-H610VE, VB-H610D, VB-H710F, VB-M40, VB-M600VE, VB-M600D, VB-M700F
1 Select [File] > [Environmental Settings].
2 Set the default save location for backup files.
3 Click [OK].
1 In the camera list, select a camera whose settings you want to back up.
2 Click on the toolbar.Alternatively, you can select [Maintenance] > [Back Up Settings].
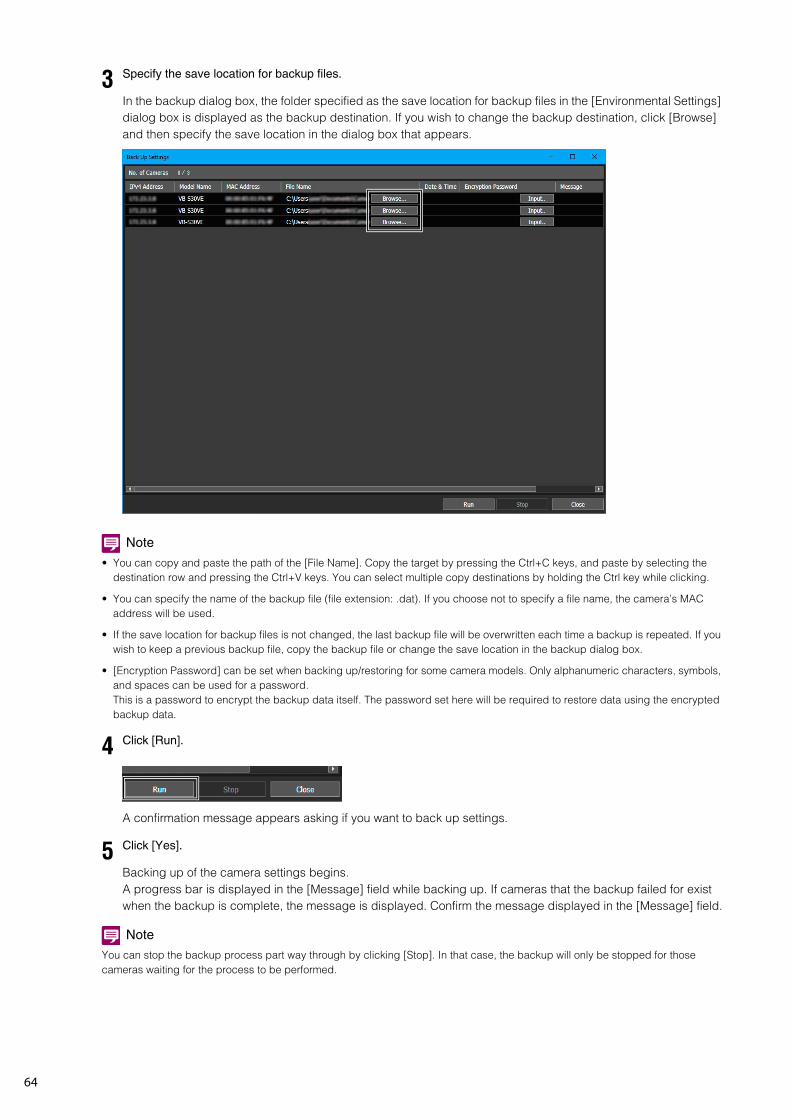
64
In the backup dialog box, the folder specified as the save location for backup files in the [Environmental Settings] dialog box is displayed as the backup destination. If you wish to change the backup destination, click [Browse] and then specify the save location in the dialog box that appears.
Note
• You can copy and paste the path of the [File Name]. Copy the target by pressing the Ctrl+C keys, and paste by selecting the destination row and pressing the Ctrl+V keys. You can select multiple copy destinations by holding the Ctrl key while clicking.
• You can specify the name of the backup file (file extension: .dat). If you choose not to specify a file name, the camera’s MAC address will be used.
• If the save location for backup files is not changed, the last backup file will be overwritten each time a backup is repeated. If you wish to keep a previous backup file, copy the backup file or change the save location in the backup dialog box.
• [Encryption Password] can be set when backing up/restoring for some camera models. Only alphanumeric characters, symbols, and spaces can be used for a password.This is a password to encrypt the backup data itself. The password set here will be required to restore data using the encrypted backup data.
A confirmation message appears asking if you want to back up settings.
Backing up of the camera settings begins.A progress bar is displayed in the [Message] field while backing up. If cameras that the backup failed for exist when the backup is complete, the message is displayed. Confirm the message displayed in the [Message] field.
Note
You can stop the backup process part way through by clicking [Stop]. In that case, the backup will only be stopped for those cameras waiting for the process to be performed.
3 Specify the save location for backup files.
4 Click [Run].
5 Click [Yes].
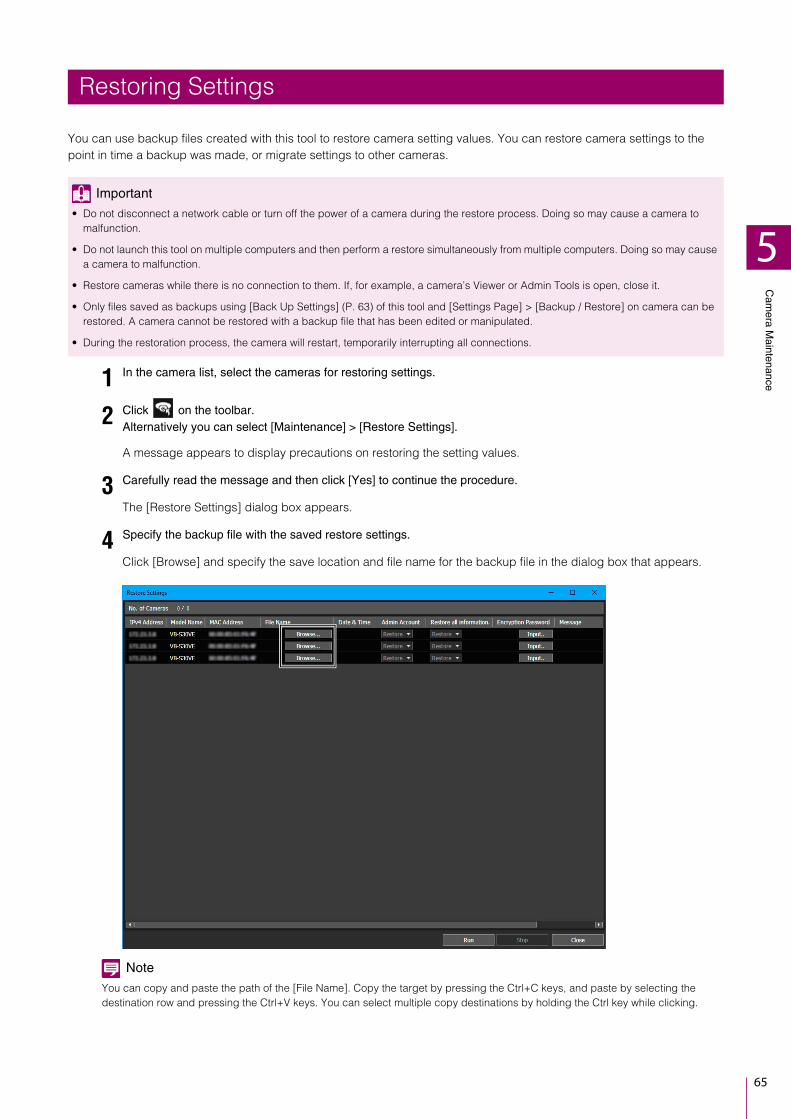
Cam
era Maintenance
5
65
You can use backup files created with this tool to restore camera setting values. You can restore camera settings to the point in time a backup was made, or migrate settings to other cameras.
A message appears to display precautions on restoring the setting values.
The [Restore Settings] dialog box appears.
Click [Browse] and specify the save location and file name for the backup file in the dialog box that appears.
Note
You can copy and paste the path of the [File Name]. Copy the target by pressing the Ctrl+C keys, and paste by selecting the destination row and pressing the Ctrl+V keys. You can select multiple copy destinations by holding the Ctrl key while clicking.
Restoring Settings
Important
• Do not disconnect a network cable or turn off the power of a camera during the restore process. Doing so may cause a camera to malfunction.
• Do not launch this tool on multiple computers and then perform a restore simultaneously from multiple computers. Doing so may cause a camera to malfunction.
• Restore cameras while there is no connection to them. If, for example, a camera’s Viewer or Admin Tools is open, close it.
• Only files saved as backups using [Back Up Settings] (P. 63) of this tool and [Settings Page] > [Backup / Restore] on camera can be restored. A camera cannot be restored with a backup file that has been edited or manipulated.
• During the restoration process, the camera will restart, temporarily interrupting all connections.
1 In the camera list, select the cameras for restoring settings.
2 Click on the toolbar.Alternatively you can select [Maintenance] > [Restore Settings].
3 Carefully read the message and then click [Yes] to continue the procedure.
4 Specify the backup file with the saved restore settings.
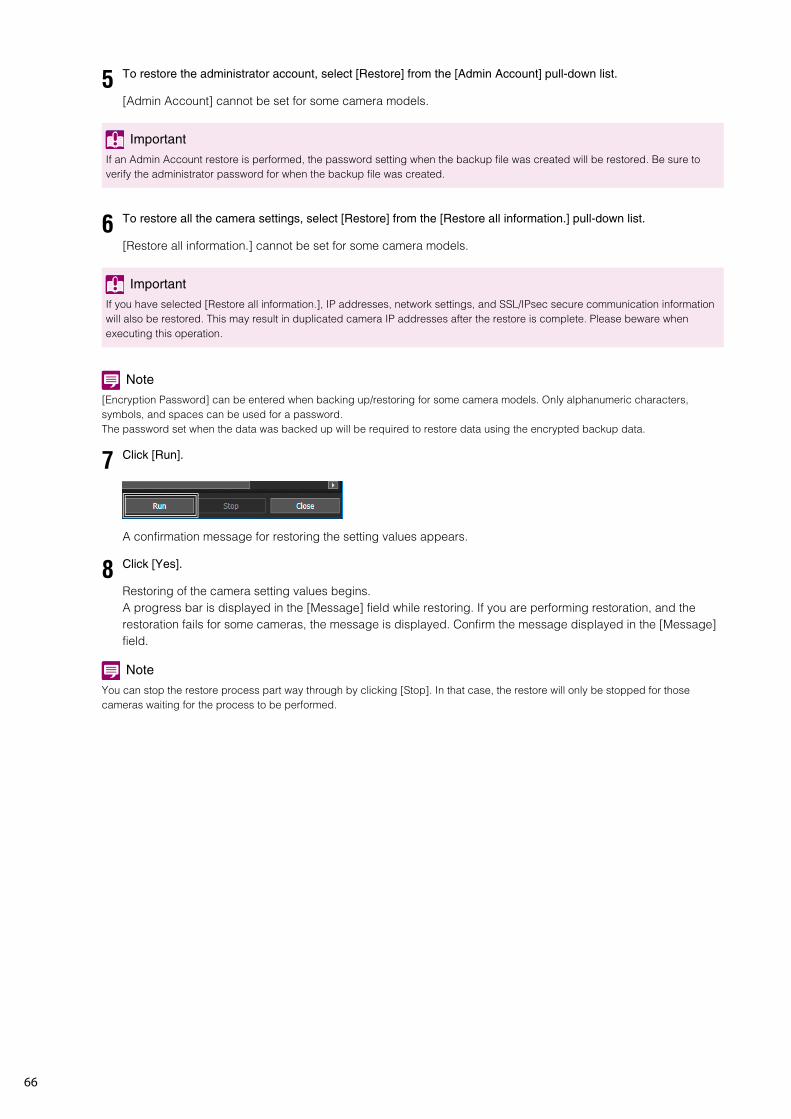
66
[Admin Account] cannot be set for some camera models.
[Restore all information.] cannot be set for some camera models.
Note
[Encryption Password] can be entered when backing up/restoring for some camera models. Only alphanumeric characters, symbols, and spaces can be used for a password.The password set when the data was backed up will be required to restore data using the encrypted backup data.
A confirmation message for restoring the setting values appears.
Restoring of the camera setting values begins.A progress bar is displayed in the [Message] field while restoring. If you are performing restoration, and the restoration fails for some cameras, the message is displayed. Confirm the message displayed in the [Message] field.
Note
You can stop the restore process part way through by clicking [Stop]. In that case, the restore will only be stopped for those cameras waiting for the process to be performed.
5 To restore the administrator account, select [Restore] from the [Admin Account] pull-down list.
Important
If an Admin Account restore is performed, the password setting when the backup file was created will be restored. Be sure to verify the administrator password for when the backup file was created.
6 To restore all the camera settings, select [Restore] from the [Restore all information.] pull-down list.
Important
If you have selected [Restore all information.], IP addresses, network settings, and SSL/IPsec secure communication information will also be restored. This may result in duplicated camera IP addresses after the restore is complete. Please beware when executing this operation.
7 Click [Run].
8 Click [Yes].
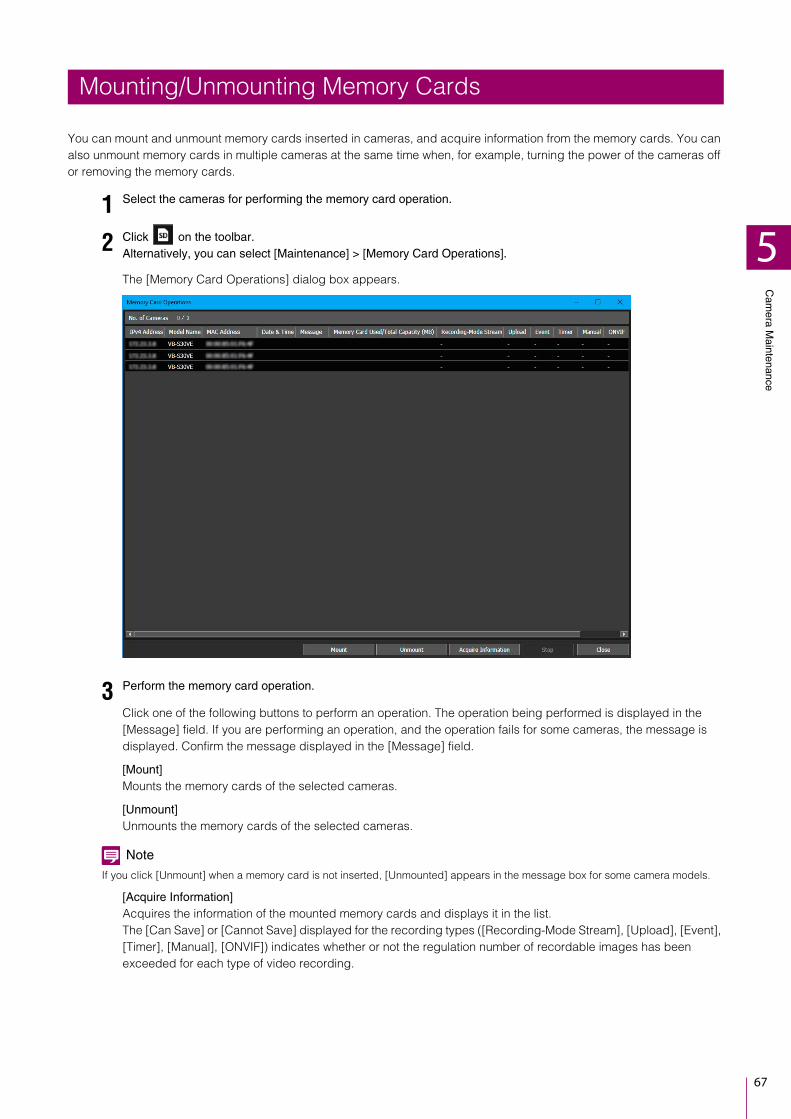
Cam
era Maintenance
5
67
You can mount and unmount memory cards inserted in cameras, and acquire information from the memory cards. You can also unmount memory cards in multiple cameras at the same time when, for example, turning the power of the cameras off or removing the memory cards.
The [Memory Card Operations] dialog box appears.
Click one of the following buttons to perform an operation. The operation being performed is displayed in the [Message] field. If you are performing an operation, and the operation fails for some cameras, the message is displayed. Confirm the message displayed in the [Message] field.
[Mount]Mounts the memory cards of the selected cameras.
[Unmount]Unmounts the memory cards of the selected cameras.
Note
If you click [Unmount] when a memory card is not inserted, [Unmounted] appears in the message box for some camera models.
[Acquire Information]Acquires the information of the mounted memory cards and displays it in the list.The [Can Save] or [Cannot Save] displayed for the recording types ([Recording-Mode Stream], [Upload], [Event], [Timer], [Manual], [ONVIF]) indicates whether or not the regulation number of recordable images has been exceeded for each type of video recording.
Mounting/Unmounting Memory Cards
1 Select the cameras for performing the memory card operation.
2 Click on the toolbar.Alternatively, you can select [Maintenance] > [Memory Card Operations].
3 Perform the memory card operation.
68
You can batch restart multiple cameras.
A dialog box appears for confirming whether to restart the selected cameras.
The cameras restart.
Note
Even after a camera is restarted, [Connection Status] may still not change to [Connectable]. Click (Update Camera Information) to update camera information.
Restarting the Camera
1 In the camera list, select the cameras to restart.
2 Select [Maintenance] > [Restart Camera].
3 Click [Yes].
Cam
era Maintenance
5
69
You can batch restore default settings to multiple cameras.
[Default Settings (excluding Network Settings)]The user settings except the administrator account and network settings, etc. will be restored to the factory default settings. For details on the items that are not initialized, please refer to the camera’s “Operation Guide”.
[Default Settings (including Network Settings)]Data including the administrator account and network settings will be restored to the factory default settings.Connection to camera is disabled because the administrator account is erased as well. Use this tool to configure the default settings.
Note
[Default Settings (including Network Settings)] cannot be selected for some camera models.
A dialog box confirming whether you want to restore to the default settings of the selected cameras is displayed.
The default settings selected in step 2 are restored after restarting the cameras.
Restoring the Camera to the Default Settings
Important
• Never turn the power of a camera off during the process to restore the default settings. If the power is turned off, the camera may no longer operate normally.
• The process to restore the default settings cannot be stopped.
• You should back up the current settings before restoring the default settings (P. 63).
1 In the camera list, select the cameras to restore to default settings.
2 Select [Maintenance] > [Restore the camera to the default settings].
3 Click [Yes].

70
The operation logs recorded in a camera unit or memory card can be downloaded and saved as a text file.
The [Browse For Folder] dialog box is displayed.
The message [The log file has been saved. Open the folder?] is displayed.
The following sub folder is created in the destination folder you selected.log\YYYYMMDDHHMMSSThe downloaded file is saved with the following file name.MAC address (XX-XX-XX-XX-XX-XX)_category_serial number.txt
CategoryB:Camera Internal MemoryC:Memory Card
Note
The memory card log is not retrieved if the memory card is unmounted.
Downloading Logs
1 In the camera list, select the cameras to download logs.
2 Click [Maintenance] > [Download Log].
3 Select the folder to save the log to, and select [OK].
4 Click [Yes] or [No].
Chapter
Troubleshooting
This chapter covers message lists and troubleshooting.

72
Three types of messages are displayed in this tool.• Information messages (information display level messages)• Warning messages (messages urging caution)• Error messages (message indicating errors)When warning messages and error messages appear, take the corresponding measures as described in the following tables.
Warning Messages
Lists of Messages
Message Description
The specified backup file is invalid or broken. This message is displayed in the following cases. Specify a correct backup file.• You have specified a file which is not a backup file.• You have specified a backup file in a different format.• The backup file has been revised.If a backup file created with this tool is modified, it will no longer be able to be restored properly. If a backup file has been modified, create it again.
The specified backup file cannot be restored because it is incompatible with the specified camera.
The model of the restore destination does not match the model for which the backup file was created. Specify a backup file for a model that is the same as the camera to be restored.If you try to restore a new model using a backup file of an older model, or in the reverse case, the format of the backup file can vary by models. In this case, as the file cannot be recognized as a backup file, you will see a message “The specified backup file is invalid or broken.” instead of this message.
The specified backup file cannot be found. A file that does not exist is specified as the backup file in the restore dialog box. Check the file name and save location of the backup file.
The firmware file format is invalid or the file is corrupt. The firmware of a different model is specified. Specify the correct firmware file.The firmware cannot be updated with a modified firmware file. If the firmware file is corrupted, download it again.
The firmware could not be updated, because the file is the same as the firmware on the camera or it is an older version.
You cannot update to a firmware of the same version as the current one or of an older version. Check the version of the firmware.
The firmware file is not for use with this camera. The model name of the firmware file and the model name of the camera do not match. Check the combination of the camera in the camera list and the target model of the firmware file. If both models do not match, the firmware cannot be updated.
Memory Card Not Inserted. A memory card operation (mount, unmount, or acquire information) was executed while a memory card was not inserted in the camera. Insert a memory card in the camera.
Could not connect to the camera. • A camera that cannot be connected to was selected, and an operation that communicates with the camera was performed. Check the connection with the camera.
• The time specified in [Network Timeout] on the [Update Firmware] screen elapsed. In this case, specify a longer waiting time and then execute the operation again.
• An error occurred when communicating with the camera. Check the connection with the camera.
• An error occurred when restoring the camera settings. Check the backup file.
Could not connect to the camera. Please verify that the IP address, port number, user name, and password are correct.
The connection to the camera failed when trying to change the camera settings using [Basic Camera Settings], [Advanced Camera Settings], or [Set from file]. Or the connection to the camera failed when trying to add cameras to the camera list using [Add Camera]. Specify the IPv4 address and port number, user name and password correctly.

Troubleshooting
6
73
• Install the firmware to the camera as directed in the entered camera information. Be sure to check the details of the camera information before installation.
• This tool overwrites the Flash ROM. If the upgrade completes unsuccessfully, the camera may not operate properly. Take particular care when you proceed with the upgrade process.
• Do not unplug the LAN cable or turn off the camera during installation.
• All settings of the cameras for which you ticked “Restore Default Settings” will be restored to the factory default settings except the network and date configuration.
This message is always displayed when a firmware update is executed. Check the details of the message. If you click [Yes], the firmware update will start.
Update the firmware?The update takes a while. Do not turn off the power during the update.
The format of the value is invalid. This is a message displayed when the input value is invalid even though the format is fixed, like the IP address specified in the [Basic Camera Settings]. Make sure the input values are in the correct format.
Cannot add camera. Maximum number of cameras reached. You are trying to add a new camera when 256 cameras exist in the camera list. Cancel adding a new camera, or delete camera(s) from the camera list so that the number of cameras will be 256 or less after addition.
User authentication failed. Incorrect authentication information (administrator name and administrator password) was entered. Enter the correct authentication information.
Not found. When you click [View] in [Advanced Camera Settings], the input setting items are searched. If a relevant setting item cannot be found, this message will be displayed. Make sure the name of setting items are correct.
Invalid file. This message is displayed in the following cases. Make sure that the file contents are written in the correct format.• The file contents specified in [Set from file] or [Advanced
Camera Settings] are invalid.• When you select [File] > [Open], or drag and drop a camera
specification file onto the camera list, there is no camera that can be added to the camera list because the third line onward in the camera specification file is blank, and the common authentication information in the camera specification file is not specified to be loaded.
Please enter the file name. You have not specified the file to be loaded when selecting [Set from file], [Advanced Camera Settings], updating firmware or restoring from backup file. Specify a file and try the operation again.
A camera with this IP address has already been registered. Do you want to update the camera information?
The camera with the IPv4 address specified in [Add Camera] already exists in the camera list. Click [Yes] to update the relevant camera information, or click [No] not to update it.
The specified firmware file cannot be found. The specified firmware file could not be found. Check that the firmware file exists in the specified folder and then specify the correct save location folder and file name.
Failed to create a backup file under the specified path. A nonexistent folder name or file name has been specified as the save location folder of the backup file. Specify the correct save location folder and file name.
Please enter the port number. (80, 1024-65535) The port number has not been specified in [Add Camera] or [Camera Authentication]. Or a numerical value other than 80, 443, or 1024 – 65535 has been specified. Specify a correct port number.
Please enter the port number. (443, 1024-65535)
The file name is duplicated. When backing up setting values, the same backup file name is specified for multiple cameras. Please specify a different file name.
Operation failed camera(s) exist. Please recheck your recent operations.
Changed settings could not be applied to some cameras. Please recheck [Recent Operations] in the camera list.
Message Description
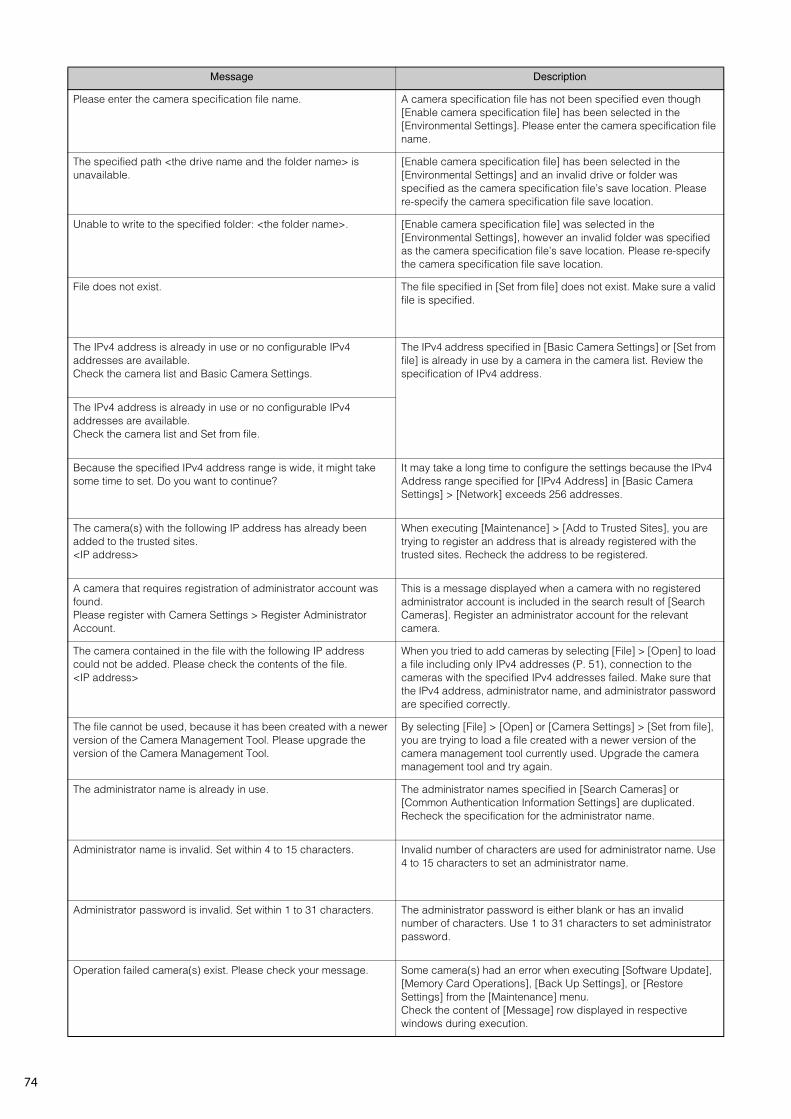
74
Please enter the camera specification file name. A camera specification file has not been specified even though [Enable camera specification file] has been selected in the [Environmental Settings]. Please enter the camera specification file name.
The specified path <the drive name and the folder name> is unavailable.
[Enable camera specification file] has been selected in the [Environmental Settings] and an invalid drive or folder was specified as the camera specification file’s save location. Please re-specify the camera specification file save location.
Unable to write to the specified folder: <the folder name>. [Enable camera specification file] was selected in the [Environmental Settings], however an invalid folder was specified as the camera specification file’s save location. Please re-specify the camera specification file save location.
File does not exist. The file specified in [Set from file] does not exist. Make sure a valid file is specified.
The IPv4 address is already in use or no configurable IPv4 addresses are available.Check the camera list and Basic Camera Settings.
The IPv4 address specified in [Basic Camera Settings] or [Set from file] is already in use by a camera in the camera list. Review the specification of IPv4 address.
The IPv4 address is already in use or no configurable IPv4 addresses are available.Check the camera list and Set from file.
Because the specified IPv4 address range is wide, it might take some time to set. Do you want to continue?
It may take a long time to configure the settings because the IPv4 Address range specified for [IPv4 Address] in [Basic Camera Settings] > [Network] exceeds 256 addresses.
The camera(s) with the following IP address has already been added to the trusted sites.<IP address>
When executing [Maintenance] > [Add to Trusted Sites], you are trying to register an address that is already registered with the trusted sites. Recheck the address to be registered.
A camera that requires registration of administrator account was found.Please register with Camera Settings > Register Administrator Account.
This is a message displayed when a camera with no registered administrator account is included in the search result of [Search Cameras]. Register an administrator account for the relevant camera.
The camera contained in the file with the following IP address could not be added. Please check the contents of the file.<IP address>
When you tried to add cameras by selecting [File] > [Open] to load a file including only IPv4 addresses (P. 51), connection to the cameras with the specified IPv4 addresses failed. Make sure that the IPv4 address, administrator name, and administrator password are specified correctly.
The file cannot be used, because it has been created with a newer version of the Camera Management Tool. Please upgrade the version of the Camera Management Tool.
By selecting [File] > [Open] or [Camera Settings] > [Set from file], you are trying to load a file created with a newer version of the camera management tool currently used. Upgrade the camera management tool and try again.
The administrator name is already in use. The administrator names specified in [Search Cameras] or [Common Authentication Information Settings] are duplicated. Recheck the specification for the administrator name.
Administrator name is invalid. Set within 4 to 15 characters. Invalid number of characters are used for administrator name. Use 4 to 15 characters to set an administrator name.
Administrator password is invalid. Set within 1 to 31 characters. The administrator password is either blank or has an invalid number of characters. Use 1 to 31 characters to set administrator password.
Operation failed camera(s) exist. Please check your message. Some camera(s) had an error when executing [Software Update], [Memory Card Operations], [Back Up Settings], or [Restore Settings] from the [Maintenance] menu.Check the content of [Message] row displayed in respective windows during execution.
Message Description
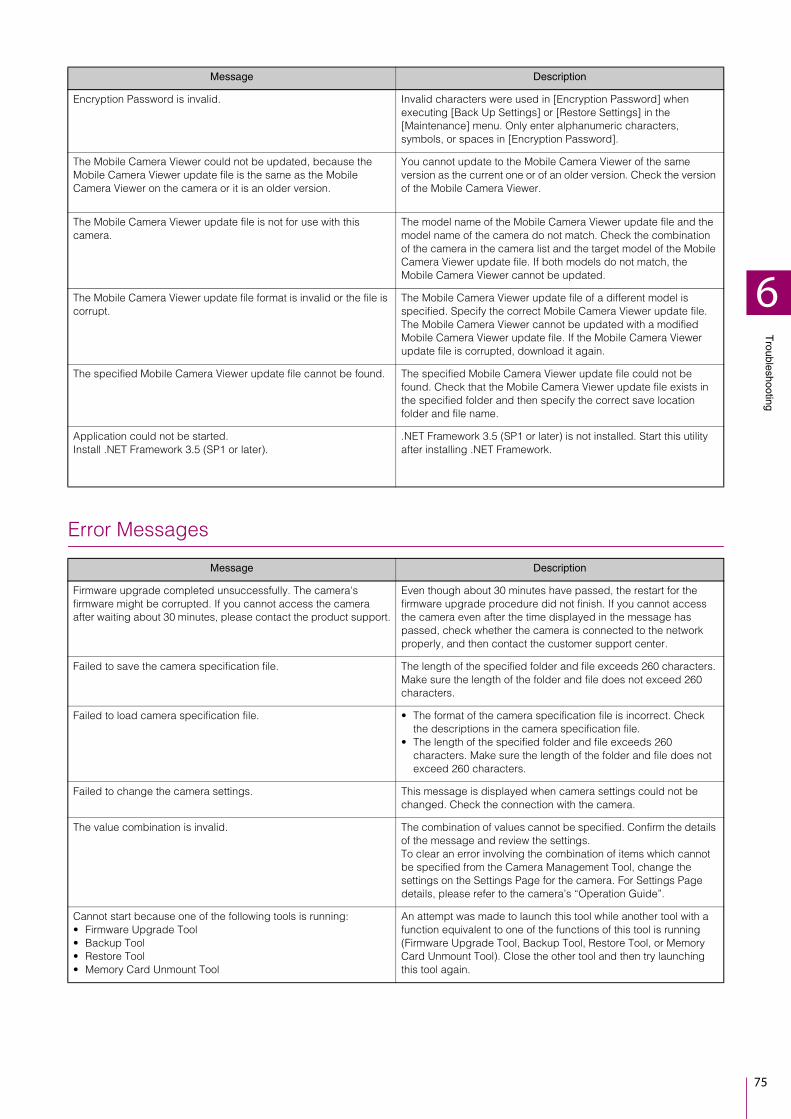
Troubleshooting
6
75
Error Messages
Encryption Password is invalid. Invalid characters were used in [Encryption Password] when executing [Back Up Settings] or [Restore Settings] in the [Maintenance] menu. Only enter alphanumeric characters, symbols, or spaces in [Encryption Password].
The Mobile Camera Viewer could not be updated, because the Mobile Camera Viewer update file is the same as the Mobile Camera Viewer on the camera or it is an older version.
You cannot update to the Mobile Camera Viewer of the same version as the current one or of an older version. Check the version of the Mobile Camera Viewer.
The Mobile Camera Viewer update file is not for use with this camera.
The model name of the Mobile Camera Viewer update file and the model name of the camera do not match. Check the combination of the camera in the camera list and the target model of the Mobile Camera Viewer update file. If both models do not match, the Mobile Camera Viewer cannot be updated.
The Mobile Camera Viewer update file format is invalid or the file is corrupt.
The Mobile Camera Viewer update file of a different model is specified. Specify the correct Mobile Camera Viewer update file.The Mobile Camera Viewer cannot be updated with a modified Mobile Camera Viewer update file. If the Mobile Camera Viewer update file is corrupted, download it again.
The specified Mobile Camera Viewer update file cannot be found. The specified Mobile Camera Viewer update file could not be found. Check that the Mobile Camera Viewer update file exists in the specified folder and then specify the correct save location folder and file name.
Application could not be started.Install .NET Framework 3.5 (SP1 or later).
.NET Framework 3.5 (SP1 or later) is not installed. Start this utility after installing .NET Framework.
Message Description
Firmware upgrade completed unsuccessfully. The camera's firmware might be corrupted. If you cannot access the camera after waiting about 30 minutes, please contact the product support.
Even though about 30 minutes have passed, the restart for the firmware upgrade procedure did not finish. If you cannot access the camera even after the time displayed in the message has passed, check whether the camera is connected to the network properly, and then contact the customer support center.
Failed to save the camera specification file. The length of the specified folder and file exceeds 260 characters. Make sure the length of the folder and file does not exceed 260 characters.
Failed to load camera specification file. • The format of the camera specification file is incorrect. Check the descriptions in the camera specification file.
• The length of the specified folder and file exceeds 260 characters. Make sure the length of the folder and file does not exceed 260 characters.
Failed to change the camera settings. This message is displayed when camera settings could not be changed. Check the connection with the camera.
The value combination is invalid. The combination of values cannot be specified. Confirm the details of the message and review the settings.To clear an error involving the combination of items which cannot be specified from the Camera Management Tool, change the settings on the Settings Page for the camera. For Settings Page details, please refer to the camera’s “Operation Guide”.
Cannot start because one of the following tools is running:• Firmware Upgrade Tool• Backup Tool• Restore Tool• Memory Card Unmount Tool
An attempt was made to launch this tool while another tool with a function equivalent to one of the functions of this tool is running (Firmware Upgrade Tool, Backup Tool, Restore Tool, or Memory Card Unmount Tool). Close the other tool and then try launching this tool again.
Message Description

76
When using H.264(2) and selecting the maximum video size, set the frame rate for both H.264(1) and (2) to 15 fps or lower.
A setting combination that cannot be used has been set. Check the details of the message and adjust the settings.
If the frame rate is 1 fps, the I frame interval cannot be set to 0.5 seconds.
Cannot be set because H.264 in [ADSR] is used.
When using Video Record (upload/memory card) with H.264, set the bit rate to 3072 kbps or lower.
When using Video Record (upload/memory card) with H.264, set the I frame interval to 1.5 seconds or less.
Automatic setting of the NTP server is enabled in [Date and Time].
Either DHCP or DHCPv6 is not enabled in [Network].
Select [Camera] and change the Day/Night mode to “Day Mode” or “Night Mode”.
“Day/Night” cannot be set to “Auto”, because “Switch Day/Night” is set in [Event].
The specified path is too long:<Path name>
When downloading logs, length of the specified folder and file is more than 260 characters. Make sure to keep the length of the folder and file less than 260 characters.
Failed to save the log files of one or more cameras. Check the camera list.
Some camera(s) failed when completing log download (when download has been executed with multiple cameras, the message is displayed if any of them fail). Check the connection with the camera.
Application could not be started (tool name). Failed to start the tool selected in the [Tools] menu. Check the connection to the camera.Only the camera angle setting tool will start, but you will not be able to set angles. Check the connection and retry operation.
Camera cannot be detected.Please confirm network settings and restart the tool.IPv6 must be enabled when configuring the camera’s network.
This is a message displayed when cameras with duplicated IPv4 address are detected in an IPv6-disabled network environment. Enable IPv6 for both the camera and computer, restart the tool, then click again.
Does not match the encryption password used at backup. The encryption password specified upon restoration is different from the one set at backup time. Make sure the encryption password is correct.
Message Description
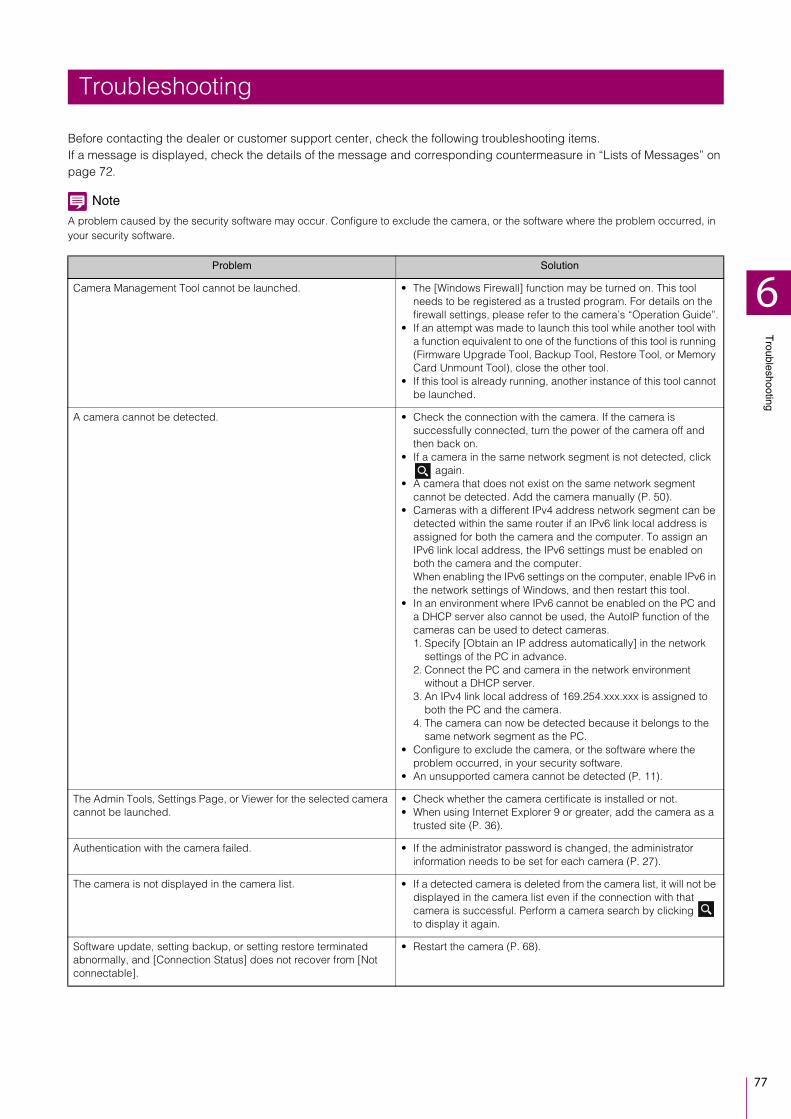
Troubleshooting
6
77
Before contacting the dealer or customer support center, check the following troubleshooting items.If a message is displayed, check the details of the message and corresponding countermeasure in “Lists of Messages” on page 72.
Note
A problem caused by the security software may occur. Configure to exclude the camera, or the software where the problem occurred, in your security software.
Troubleshooting
Problem Solution
Camera Management Tool cannot be launched. • The [Windows Firewall] function may be turned on. This tool needs to be registered as a trusted program. For details on the firewall settings, please refer to the camera’s “Operation Guide”.
• If an attempt was made to launch this tool while another tool with a function equivalent to one of the functions of this tool is running (Firmware Upgrade Tool, Backup Tool, Restore Tool, or Memory Card Unmount Tool), close the other tool.
• If this tool is already running, another instance of this tool cannot be launched.
A camera cannot be detected. • Check the connection with the camera. If the camera is successfully connected, turn the power of the camera off and then back on.
• If a camera in the same network segment is not detected, click again.
• A camera that does not exist on the same network segment cannot be detected. Add the camera manually (P. 50).
• Cameras with a different IPv4 address network segment can be detected within the same router if an IPv6 link local address is assigned for both the camera and the computer. To assign an IPv6 link local address, the IPv6 settings must be enabled on both the camera and the computer.When enabling the IPv6 settings on the computer, enable IPv6 in the network settings of Windows, and then restart this tool.
• In an environment where IPv6 cannot be enabled on the PC and a DHCP server also cannot be used, the AutoIP function of the cameras can be used to detect cameras.1. Specify [Obtain an IP address automatically] in the network
settings of the PC in advance.2. Connect the PC and camera in the network environment
without a DHCP server.3. An IPv4 link local address of 169.254.xxx.xxx is assigned to
both the PC and the camera.4. The camera can now be detected because it belongs to the
same network segment as the PC.• Configure to exclude the camera, or the software where the
problem occurred, in your security software.• An unsupported camera cannot be detected (P. 11).
The Admin Tools, Settings Page, or Viewer for the selected camera cannot be launched.
• Check whether the camera certificate is installed or not.• When using Internet Explorer 9 or greater, add the camera as a
trusted site (P. 36).
Authentication with the camera failed. • If the administrator password is changed, the administrator information needs to be set for each camera (P. 27).
The camera is not displayed in the camera list. • If a detected camera is deleted from the camera list, it will not be displayed in the camera list even if the connection with that camera is successful. Perform a camera search by clicking to display it again.
Software update, setting backup, or setting restore terminated abnormally, and [Connection Status] does not recover from [Not connectable].
• Restart the camera (P. 68).

78
The number of characters that can be set for [Administrator Name] and [Administrator Password] differs according to the model and firmware version of the camera. When registering the administrator account, set each item within the number of characters for the camera.
*1 When using the [Search Cameras] > [Register administrator account upon detection] > [Settings] > [Register Administrator Account] dialog box (P. 18), a minimum of five characters must be set.
*2 When using the [Search Cameras] > [Register administrator account upon detection] > [Settings] > [Register Administrator Account] dialog box (P. 18), a minimum of eight characters must be set.
Camera Administrator Accounts
Model Firmware Version
Number of Characters
Administrator Name
Administrator Password
ME20F-SHN, VB-H45, VB-M44, VB-H730F Mk II, VB-S30D Mk II, VB-S31D Mk II, VB-S800D Mk II, VB-S900F Mk II, VB-S805D Mk II, VB-S905F Mk II, VB-S30VE, VB-S800VE, VB-S910F, VB-R13VE, VB-R13, VB-R12VE, VB-M50B, VB-H652LVE, VB-H651VE, VB-H651V, VB-H761LVE-H, VB-H761LVE, VB-H760VE, VB-H751LE-H, VB-H751LE
All versions 5 to 15 8 to 31
VB-R11VE, VB-R11, VB-R10VE, VB-M641VE, VB-M641V, VB-M640VE, VB-M640V, VB-M741LE-H, VB-M741LE, VB-M740E
Ver.1.1.8 or later 4 to 15*1 1 to 31*2
Ver.1.1.0 to 1.1.7 4 to 15 1 to 31
Ver.1.0.x Cannot be set 1 to 8
VB-H43, VB-H630VE, VB-H630D, VB-H730F, VB-M42, VB-M620VE, VB-M620D, VB-M720F
Ver.1.2.9 or later Cannot be set 1 to 15*2
Ver.1.0.0 to 1.2.8 Cannot be set 1 to 8
VB-S30D, VB-S31D, VB-S800D, VB-S900F, VB-S805D, VB-S905F
Ver.1.3.8 or later Cannot be set 1 to 15*2
Ver.1.0.0 to 1.3.7 Cannot be set 1 to 8
VB-H41, VB-H610VE, VB-H610D, VB-H710F, VB-M40, VB-M600VE, VB-M600D, VB-M700F
All versions Cannot be set 1 to 8
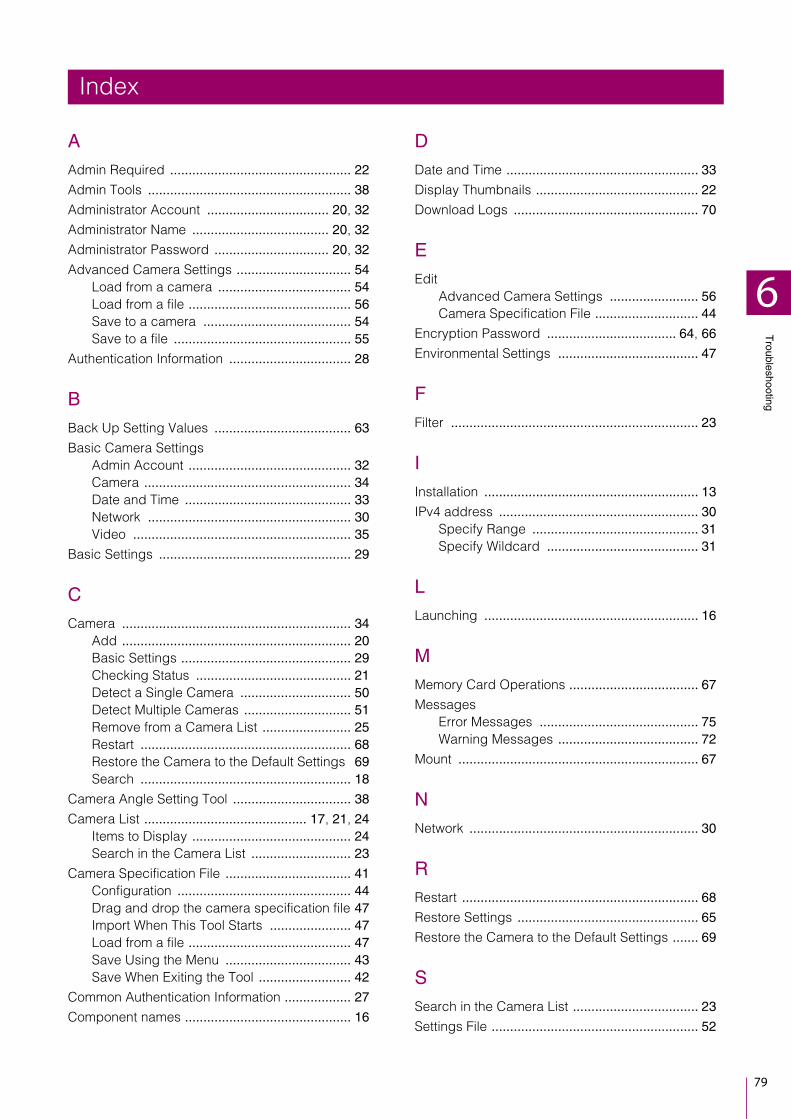
79
6
Troubleshooting
A
Admin Required ................................................. 22
Admin Tools ....................................................... 38
Administrator Account ................................. 20, 32
Administrator Name ..................................... 20, 32
Administrator Password ............................... 20, 32
Advanced Camera Settings ............................... 54Load from a camera .................................... 54Load from a file ............................................ 56Save to a camera ........................................ 54Save to a file ................................................ 55
Authentication Information ................................. 28
B
Back Up Setting Values ..................................... 63
Basic Camera SettingsAdmin Account ............................................ 32Camera ........................................................ 34Date and Time ............................................. 33Network ....................................................... 30Video ........................................................... 35
Basic Settings .................................................... 29
C
Camera .............................................................. 34Add .............................................................. 20Basic Settings .............................................. 29Checking Status .......................................... 21Detect a Single Camera .............................. 50Detect Multiple Cameras ............................. 51Remove from a Camera List ........................ 25Restart ......................................................... 68Restore the Camera to the Default Settings 69Search ......................................................... 18
Camera Angle Setting Tool ................................ 38
Camera List ............................................ 17, 21, 24Items to Display ........................................... 24Search in the Camera List ........................... 23
Camera Specification File .................................. 41Configuration ............................................... 44Drag and drop the camera specification file 47Import When This Tool Starts ...................... 47Load from a file ............................................ 47Save Using the Menu .................................. 43Save When Exiting the Tool ......................... 42
Common Authentication Information .................. 27
Component names ............................................. 16
D
Date and Time .................................................... 33
Display Thumbnails ............................................ 22
Download Logs .................................................. 70
E
EditAdvanced Camera Settings ........................ 56Camera Specification File ............................ 44
Encryption Password ................................... 64, 66
Environmental Settings ...................................... 47
F
Filter ................................................................... 23
I
Installation .......................................................... 13
IPv4 address ...................................................... 30Specify Range ............................................. 31Specify Wildcard ......................................... 31
L
Launching .......................................................... 16
M
Memory Card Operations ................................... 67
MessagesError Messages ........................................... 75Warning Messages ...................................... 72
Mount ................................................................. 67
N
Network .............................................................. 30
R
Restart ................................................................ 68
Restore Settings ................................................. 65
Restore the Camera to the Default Settings ....... 69
S
Search in the Camera List .................................. 23
Settings File ........................................................ 52
Index

80
Settings Page ..................................................... 36
Specify Range .................................................... 31
Specify Wildcard ................................................ 31
SSL/Port Number ............................................... 22
Supported Cameras ........................................... 11
System Requirements ........................................ 11
T
Toolbar ............................................................... 16
Tools ................................................................... 38
Trusted Site ........................................................ 36
U
Unmount ............................................................. 67
Update the Firmware ......................................... 60
Update the Mobile Camera Viewer .................... 62
Update the Software .......................................... 60
V
Video .................................................................. 35
Viewer ................................................................ 37

BIE-7050-010 © CANON INC. 2018