netiq servicenow driver implementation guide
TRANSCRIPT

NetIQ® Identity ManagerDriver for ServiceNow Implementation
Guide
2015

Legal Notice
For information about NetIQ legal notices, disclaimers, warranties, export and other use restrictions, U.S. Government restricted rights, patent policy, and FIPS compliance, see https://www.netiq.com/company/legal/.
Copyright (C) 2015 NetIQ Corporation. All rights reserved.
For information about NetIQ trademarks, see https://www.netiq.com/company/legal/. All third-party trademarks are the property of their respective owners.

Contents
About NetIQ Corporation 5About This Guide 7About this Book and the Library 9
1 Understanding the ServiceNow Driver 11
1.1 How the Driver Works . . . . . . . . . . . . . . . . . . . . . . . . . . . . . . . . . . . . . . . . . . . . . . . . . . . . . . . . . . . . 111.1.1 SOAP. . . . . . . . . . . . . . . . . . . . . . . . . . . . . . . . . . . . . . . . . . . . . . . . . . . . . . . . . . . . . . . . . . 121.1.2 HTTP . . . . . . . . . . . . . . . . . . . . . . . . . . . . . . . . . . . . . . . . . . . . . . . . . . . . . . . . . . . . . . . . . . 121.1.3 HTTPS . . . . . . . . . . . . . . . . . . . . . . . . . . . . . . . . . . . . . . . . . . . . . . . . . . . . . . . . . . . . . . . . . 12
1.2 Data Transfer Between Systems . . . . . . . . . . . . . . . . . . . . . . . . . . . . . . . . . . . . . . . . . . . . . . . . . . . . 121.3 Supported Operations . . . . . . . . . . . . . . . . . . . . . . . . . . . . . . . . . . . . . . . . . . . . . . . . . . . . . . . . . . . . 121.4 Planning to Install the Driver . . . . . . . . . . . . . . . . . . . . . . . . . . . . . . . . . . . . . . . . . . . . . . . . . . . . . . . 13
1.4.1 Installation Requirements . . . . . . . . . . . . . . . . . . . . . . . . . . . . . . . . . . . . . . . . . . . . . . . . . . 131.4.2 Options for Installing the Driver Shim . . . . . . . . . . . . . . . . . . . . . . . . . . . . . . . . . . . . . . . . . 14
2 Installing the Driver Files 15
2.1 Prerequisites for Installing the Driver . . . . . . . . . . . . . . . . . . . . . . . . . . . . . . . . . . . . . . . . . . . . . . . . 152.2 Installing the ServiceNow Driver . . . . . . . . . . . . . . . . . . . . . . . . . . . . . . . . . . . . . . . . . . . . . . . . . . . . 15
2.2.1 Using the Wizard to Install the Driver . . . . . . . . . . . . . . . . . . . . . . . . . . . . . . . . . . . . . . . . . 152.2.2 Performing a Silent Installation . . . . . . . . . . . . . . . . . . . . . . . . . . . . . . . . . . . . . . . . . . . . . . 16
3 Creating a New Driver Object 17
3.1 Creating the Driver Object in Designer . . . . . . . . . . . . . . . . . . . . . . . . . . . . . . . . . . . . . . . . . . . . . . . 173.1.1 Importing the Driver Packages in Designer . . . . . . . . . . . . . . . . . . . . . . . . . . . . . . . . . . . . . 173.1.2 Installing the Driver Packages . . . . . . . . . . . . . . . . . . . . . . . . . . . . . . . . . . . . . . . . . . . . . . . 183.1.3 Configuring the Driver Object . . . . . . . . . . . . . . . . . . . . . . . . . . . . . . . . . . . . . . . . . . . . . . . 203.1.4 Deploying the Driver Object . . . . . . . . . . . . . . . . . . . . . . . . . . . . . . . . . . . . . . . . . . . . . . . . . 203.1.5 Starting the Driver . . . . . . . . . . . . . . . . . . . . . . . . . . . . . . . . . . . . . . . . . . . . . . . . . . . . . . . . 20
3.2 Activating the Driver . . . . . . . . . . . . . . . . . . . . . . . . . . . . . . . . . . . . . . . . . . . . . . . . . . . . . . . . . . . . . . 21
4 Customizing the Driver 23
4.1 Customizing the Referenced Attributes Using Policies . . . . . . . . . . . . . . . . . . . . . . . . . . . . . . . . . . . 234.2 Customizing the ServiceNow Application Schema. . . . . . . . . . . . . . . . . . . . . . . . . . . . . . . . . . . . . . . 25
5 Securing Driver Communication 29
5.1 Configuring the Subscriber Channel . . . . . . . . . . . . . . . . . . . . . . . . . . . . . . . . . . . . . . . . . . . . . . . . . 29
6 Managing the Driver 31
A Driver Properties 33
A.1 Driver Configuration . . . . . . . . . . . . . . . . . . . . . . . . . . . . . . . . . . . . . . . . . . . . . . . . . . . . . . . . . . . . . . 33A.1.1 Driver Module . . . . . . . . . . . . . . . . . . . . . . . . . . . . . . . . . . . . . . . . . . . . . . . . . . . . . . . . . . . 34A.1.2 Driver Object Password . . . . . . . . . . . . . . . . . . . . . . . . . . . . . . . . . . . . . . . . . . . . . . . . . . . . 34A.1.3 Authentication . . . . . . . . . . . . . . . . . . . . . . . . . . . . . . . . . . . . . . . . . . . . . . . . . . . . . . . . . . . 34
Contents 3

A.1.4 Startup Option . . . . . . . . . . . . . . . . . . . . . . . . . . . . . . . . . . . . . . . . . . . . . . . . . . . . . . . . . . . 35A.1.5 Driver Parameters . . . . . . . . . . . . . . . . . . . . . . . . . . . . . . . . . . . . . . . . . . . . . . . . . . . . . . . . 35A.1.6 ECMA Script . . . . . . . . . . . . . . . . . . . . . . . . . . . . . . . . . . . . . . . . . . . . . . . . . . . . . . . . . . . . 36A.1.7 Global Configuration . . . . . . . . . . . . . . . . . . . . . . . . . . . . . . . . . . . . . . . . . . . . . . . . . . . . . . 36
A.2 Global Configuration Values. . . . . . . . . . . . . . . . . . . . . . . . . . . . . . . . . . . . . . . . . . . . . . . . . . . . . . . . 36A.2.1 Password Synchronization . . . . . . . . . . . . . . . . . . . . . . . . . . . . . . . . . . . . . . . . . . . . . . . . . 37A.2.2 Entitlements . . . . . . . . . . . . . . . . . . . . . . . . . . . . . . . . . . . . . . . . . . . . . . . . . . . . . . . . . . . . . 37
B Trace Levels 39
4 NetIQ ServiceNow Driver Implementation Guide

About NetIQ Corporation
We are a global, enterprise software company, with a focus on the three persistent challenges in your environment: Change, complexity and risk—and how we can help you control them.
Our ViewpointAdapting to change and managing complexity and risk are nothing new
In fact, of all the challenges you face, these are perhaps the most prominent variables that deny you the control you need to securely measure, monitor, and manage your physical, virtual, and cloud computing environments.
Enabling critical business services, better and faster
We believe that providing as much control as possible to IT organizations is the only way to enable timelier and cost effective delivery of services. Persistent pressures like change and complexity will only continue to increase as organizations continue to change and the technologies needed to manage them become inherently more complex.
Our PhilosophySelling intelligent solutions, not just software
In order to provide reliable control, we first make sure we understand the real-world scenarios in which IT organizations like yours operate—day in and day out. That's the only way we can develop practical, intelligent IT solutions that successfully yield proven, measurable results. And that's so much more rewarding than simply selling software.
Driving your success is our passion
We place your success at the heart of how we do business. From product inception to deployment, we understand that you need IT solutions that work well and integrate seamlessly with your existing investments; you need ongoing support and training post-deployment; and you need someone that is truly easy to work with—for a change. Ultimately, when you succeed, we all succeed.
Our Solutions Identity & Access Governance
Access Management
Security Management
Systems & Application Management
Workload Management
Service Management
About NetIQ Corporation 5

Contacting Sales SupportFor questions about products, pricing, and capabilities, contact your local partner. If you cannot contact your partner, contact our Sales Support team.
Contacting Technical SupportFor specific product issues, contact our Technical Support team.
Contacting Documentation SupportOur goal is to provide documentation that meets your needs. The documentation for this product is available on the NetIQ Web site in HTML and PDF formats on a page that does not require you to log in. If you have suggestions for documentation improvements, click Add Comment at the bottom of any page in the HTML version of the documentation posted at www.netiq.com/documentation. You can also email [email protected]. We value your input and look forward to hearing from you.
Contacting the Online User CommunityNetIQ Communities, the NetIQ online community, is a collaborative network connecting you to your peers and NetIQ experts. By providing more immediate information, useful links to helpful resources, and access to NetIQ experts, NetIQ Communities helps ensure you are mastering the knowledge you need to realize the full potential of IT investments upon which you rely. For more information, visit community.netiq.com.
Worldwide: www.netiq.com/about_netiq/officelocations.asp
United States and Canada: 1-888-323-6768
Email: [email protected]
Web Site: www.netiq.com
Worldwide: www.netiq.com/support/contactinfo.asp
North and South America: 1-713-418-5555
Europe, Middle East, and Africa: +353 (0) 91-782 677
Email: [email protected]
Web Site: www.netiq.com/support
6 NetIQ ServiceNow Driver Implementation Guide

About This Guide
This guide explains how to install and configure the Identity Manager Driver for ServiceNow. The guide includes the following information:
Audience
This guide is intended for administrators implementing Identity Manager, application server developers, Web services administrators, and consultants. You should also have an understanding of DSML/SPML, and HTML.
Feedback
We want to hear your comments and suggestions about this manual and the other documentation included with this product. Please use the User Comments feature at the bottom of each page of the online documentation, or go to www.novell.com/documentation/feedback.html and enter your comments there.
Documentation Updates
For the most recent version of this document, see the Identity Manager Drivers Documentation Web site (http://www.netiq.com/documentation/idm45drivers/index.html).
Additional Documentation
For information on Identity Manager, see the Identity Manager Documentation Web site (http://www.netiq.com/documentation/idm45drivers).
About This Guide 7

8 NetIQ ServiceNow Driver Implementation Guide
About this Book and the Library
The Identity Manager Driver for ServiceNow Implementation Guide explains how to install and configure the Identity Manager Driver for ServiceNow.
Intended AudienceThis book provides information for administrators implementing Identity Manager, application server developers, Web services administrators, and consultants, who also have an understanding of DSML/SPML, and HTML.
Other Information in the LibraryThe library provides the following information resources:
Identity Manager Setup Guide
Provides overview of Identity Manager and its components. This book also provides detailed planning and installation information for Identity Manager.
Designer Administration Guide
Provides information about designing, testing, documenting, and deploying Identity Manager solutions in a highly productive environment.
User Application: Administration Guide
Describes how to administer the Identity Manager User Application.
User Application: User Guide
Describes the user interface of the Identity Manager User Application and how you can use the features it offers, including identity self-service, the Work Dashboard, role and resource management, and compliance management.
User Application: Design Guide
Describes how to use the Designer to create User Application components, including how to work with the Provisioning view, the directory abstraction layer editor, the provisioning request definition editor, the provisioning team editor, and the role catalog.
Identity Reporting Module Guide
Describes the Identity Reporting Module for Identity Manager and how you can use the features it offers, including the Reporting Module user interface and custom report definitions, as well as providing installation instructions.
Analyzer Administration Guide
Describes how to administer Analyzer for Identity Manager.
Identity Manager Common Driver Administration Guide
Provides information about administration tasks that are common to all Identity Manager drivers.
About this Book and the Library 9

Identity Manager Driver Guides
Provides implementation information about Identity Manager drivers.
10 NetIQ ServiceNow Driver Implementation Guide

1 1Understanding the ServiceNow Driver
The NetIQ Identity Manager driver for ServiceNow can seamlessly provision and de-provision users to the ServiceNow cloud application. ServiceNow provides cloud based services that allow users to manage the software through a web service.
The ServiceNow driver supports the following features:
Supports provisioning users and groups from the Identity Vault
Supports password synchronization from the Identity Vault
Supports the creation of user accounts based on policies and entitlements
IMPORTANT: The ServiceNow driver is a Subscriber channel only driver.
Section 1.1, “How the Driver Works,” on page 11
Section 1.2, “Data Transfer Between Systems,” on page 12
Section 1.3, “Supported Operations,” on page 12
Section 1.4, “Planning to Install the Driver,” on page 13
1.1 How the Driver WorksFigure 1-1 illustrates the data flow between Identity Manager and a ServiceNow driver.
Figure 1-1 ServiceNow Driver Data Flow
The Identity Manager engine uses XDS, a specialized form of XML (Extensible Markup Language), to represent events in the Identity Vault. Identity Manager passes the XDS to the driver policy which can consist of basic policies, DirXML Script, and XSLT (Extensible Stylesheet Language Transformation) style sheets. The ServiceNow driver uses SOAP (Simple Object Access Protocol) protocol to handle the HTTP (Hypertext Transfer Protocol) transport of data between the Identity Vault and ServiceNow. The Subscriber channel receives XDS command documents from the Identity Manager engine, converts them to ServiceNow API (Application Program Interface) calls, and executes them.
The driver shim translates the XDS to XML payload on the Subscriber channel and then invokes the appropriate SOAP endpoints exposed by ServiceNow for Object CRUD (Create, Read, Update, and Delete) operations.
The driver uses the following Internet protocols and languages to exchange data between Identity Manager and ServiceNow.
Section 1.1.1, “SOAP,” on page 12
Section 1.1.2, “HTTP,” on page 12
Section 1.1.3, “HTTPS,” on page 12
Identity Manager Engine
DriverPolicy
DriverShim
ServiceNowXDS XML SOAP XML
Understanding the ServiceNow Driver 11

1.1.1 SOAP
SOAP is an XML-based protocol for exchanging messages. It defines the message exchange but not the message content. The driver supports SOAP 1.1.
SOAP documents are organized into three elements:
Envelope: The root XML node.
Header: Provides context knowledge such as a transaction ID and security information.
Body: The method-specific information.
SOAP follows the HTTP request/response message model, which provides SOAP request parameters in an HTTP request and SOAP response parameters in an HTTP response.
1.1.2 HTTP
HTTP is a protocol used to request and transmit data over the Internet or other computer network. The protocol works well in an Internet infrastructure and with firewalls.
HTTP is a stateless request/response system because the connection is usually maintained only for the immediate request. The client establishes a TCP connection with the server and sends a request command. The server then sends back its response.
1.1.3 HTTPS
HTTPS is the HTTP protocol over SSL (Secure Socket Layer) as a sub-layer under the regular HTTP application layering. HTTPS encrypts and decrypts user page requests as well as the pages that are returned by the Web server.
ServiceNow processes the request and returns a SOAP response to the driver shim. The shim receives the response as an array of bytes and converts it to an XML document before passing it back to the driver policies. The input transformation style sheet processes the response and converts it into appropriate XDS that is reported back to the Identity Manager engine.
1.2 Data Transfer Between SystemsThe data is transferred between the Identity Vault and the ServiceNow driver only on the Subscriber channel. Communication is one-way only.
The Subscriber channel does the following:
Watches for additions and modifications to the Identity Vault objects.
Makes changes to ServiceNow's internal representation of user identities that reflect those changes.
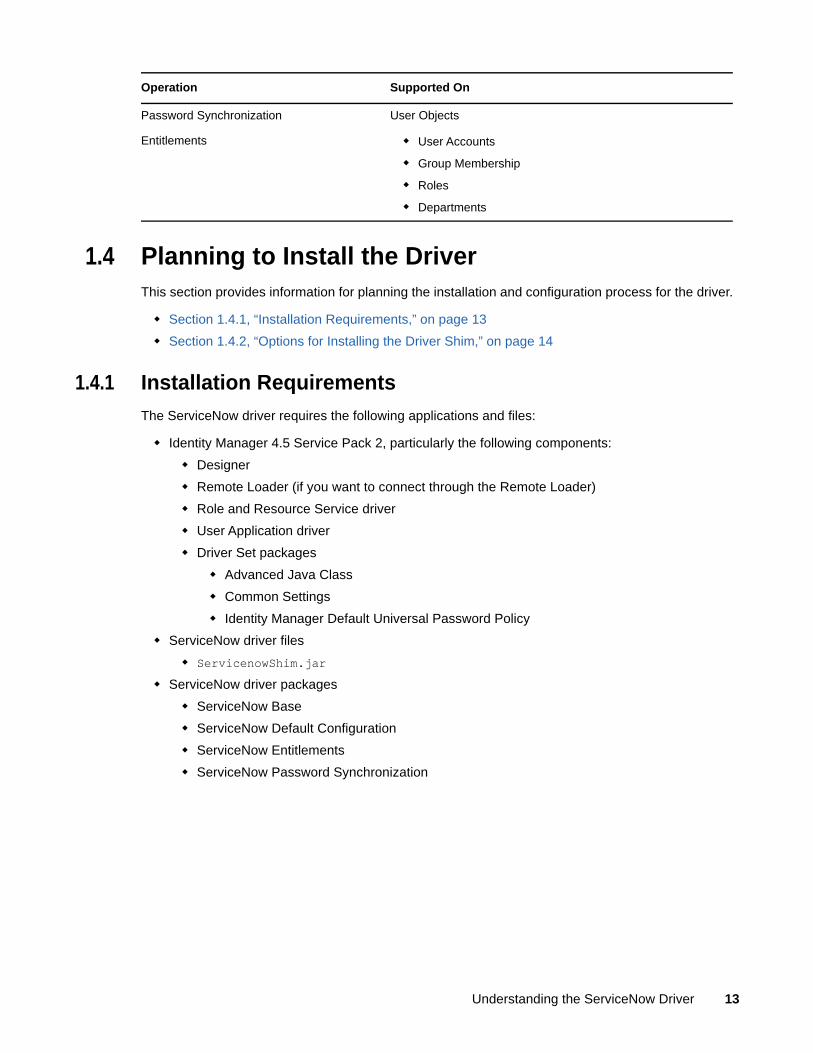
1.3 Supported OperationsThe ServiceNow driver supports the following operations on the Subscriber channel:
Operation Supported On
Add, Modify, Delete, Migrate, and Query User and Group Objects
12 NetIQ ServiceNow Driver Implementation Guide
1.4 Planning to Install the DriverThis section provides information for planning the installation and configuration process for the driver.
Section 1.4.1, “Installation Requirements,” on page 13
Section 1.4.2, “Options for Installing the Driver Shim,” on page 14
1.4.1 Installation Requirements
The ServiceNow driver requires the following applications and files:
Identity Manager 4.5 Service Pack 2, particularly the following components:
Designer
Remote Loader (if you want to connect through the Remote Loader)
Role and Resource Service driver
User Application driver
Driver Set packages
Advanced Java Class
Common Settings
Identity Manager Default Universal Password Policy
ServiceNow driver files
ServicenowShim.jar ServiceNow driver packages
ServiceNow Base
ServiceNow Default Configuration
ServiceNow Entitlements
ServiceNow Password Synchronization
Password Synchronization User Objects
Entitlements User Accounts
Group Membership
Roles
Departments
Operation Supported On
Understanding the ServiceNow Driver 13

1.4.2 Options for Installing the Driver Shim
You can install the driver shim on the Identity Manager server. Alternatively, you can use the Remote Loader service to run the driver on a server other than the Identity Manager server. In this case, the driver and the Remote Loader service run on the same server. The Remote Loader loads drivers and communicates with the Identity Manager engine on behalf of drivers installed on remote servers.
For more information about supported platforms for installing Identity Manager or the Remote Loader, see one of the following sections in the NetIQ Identity Manager Setup Guide.
System Requirements for the Identity Manager Engine
System Requirements for the Remote Loader
For information about configuring the Identity Manager drivers with the Remote Loader, see Configuring the Remote Loader and Drivers in the NetIQ Identity Manager Setup Guide.
14 NetIQ ServiceNow Driver Implementation Guide

2 2Installing the Driver Files
To create and configure the driver, you must install the driver shim. The installation and configuration process for the ServiceNow driver requires access to the ServiceNow application, Identity Manager, the Remote Loader in case of a remote installation, and Designer for Identity Manager. NetIQ supports installing the ServiceNow driver on the Identity Manager server and on a remote server using the Remote Loader.
Section 2.1, “Prerequisites for Installing the Driver,” on page 15
Section 2.2, “Installing the ServiceNow Driver,” on page 15
2.1 Prerequisites for Installing the Driver Before installing the driver, your Identity Manager environment must have the following software:
Identity Manager 4.5 Service Pack (SP) 2
Download Identity Manager 4.5 SP2 as instructed in the “NetIQ Identity Manager 4.5 Service Pack 2 Release Notes”.
For Identity Manager 4.5 prerequisites and installation information, see “Considerations and Prerequisites for Installation” in the NetIQ Identity Manager Setup Guide.
Designer packages - Download the required packages from the Designer Update channel and upgrade your designer to Designer 4.5 SP 2 Hot Fix 1.
NIdM_Driver_4.5_ServiceNow.zip file - Download this file from the Downloads Web site.
The NIdM_Driver_4.5_ServiceNow.zip file contains the installer and the schema file for the ServiceNow driver:
install.exe: Run this file for installing the driver in Windows.
install_linux.bin: Run this command for installing the driver in Linux.
ServiceNow_schema.xml: The entire schema file for the ServiceNow driver.
2.2 Installing the ServiceNow DriverYou can install the ServiceNow driver as a guided process (wizard) or silently.
Section 2.2.1, “Using the Wizard to Install the Driver,” on page 15
Section 2.2.2, “Performing a Silent Installation,” on page 16
2.2.1 Using the Wizard to Install the Driver
This section describes the guided process for using the installation wizard to install the ServiceNow driver on a Linux or Windows computer. Use one of the following installation program for your platform:
Windows: install.exe Linux: install_linux.bin
Installing the Driver Files 15

To install the driver:
1 Copy and extract the NIdM_Driver_4.5_ServiceNow.zip file to a temporary location on the server.
2 Navigate to the NIdM_Driver_4.5_ServiceNow/Installer folder.
3 To install the ServiceNow driver, perform one of the following actions on your computer, which is either the Identity Manger server or the Remote Loader host.
Linux: Run the ./install_linux.bin command.
Windows: Run install.exe.
4 To complete the installation, follow the wizard.
2.2.2 Performing a Silent Installation
To run a silent installation of the ServiceNow driver, create a properties file with the parameters required to complete the installation.
To perform a silent installation
1 In the installation directory, create a properties file or edit the sample silent.properties file.
2 In a text editor, specify the values for following parameters in the file:
For Metadirectory Server
USER_INPUT_RESULTS = “Metadirectory server”
EDIR_RESTART = "Yes"
This option specifies whether you want the Identity Manager server to restart after the installation. Valid values are Yes and No. For example, if you want the Identity Manager server to restart after the installation, specify Yes. If you specify No, the installation fails.
For Remote Loader
USER_INPUT_RESULTS = “Remote Loader”
USER_INSTALL_DIR = C:\\NetIQ\\IdentityManager\\RemoteLoader\\32bitSet the path of the installation files for Remote Loader.
NOTE: In Linux, the USER_INSTALL_DIR path is not required. The binaries are installed through RPM.
3 To run the silent installation, issue one of the following commands from the installation directory for the properties file:
Linux: ./install_linux.bin -i silent -f /trace/silent.properties Windows: install.exe -i silent -f silent.properties
16 NetIQ ServiceNow Driver Implementation Guide

3 3Creating a New Driver Object
You install the ServiceNow driver files on the server where you want to run the driver, and then proceed to create the driver in the Identity Vault. You create the ServiceNow driver by installing the driver packages or importing the basic driver configuration file and then modifying the driver configuration to suit your environment.
The following sections provide instructions to create and activate the driver:
Section 3.1, “Creating the Driver Object in Designer,” on page 17
Section 3.2, “Activating the Driver,” on page 21
3.1 Creating the Driver Object in DesignerYou create the ServiceNow driver by importing the driver’s packages and then modifying the configuration to suit your environment. After you have created and configured the driver, you need to deploy and start it.
Section 3.1.1, “Importing the Driver Packages in Designer,” on page 17
Section 3.1.2, “Installing the Driver Packages,” on page 18
Section 3.1.3, “Configuring the Driver Object,” on page 20
Section 3.1.4, “Deploying the Driver Object,” on page 20
Section 3.1.5, “Starting the Driver,” on page 20
3.1.1 Importing the Driver Packages in Designer
The driver packages contain the items required to create a driver, such as policies, entitlements, filters, and schema mapping policies. These packages are only available in Designer and can be updated after they are installed. You should use the most current version of the packages in the Package Catalog before you can create a new driver object.
To verify that you have the most recent version of the driver packages in the Package Catalog:
1 Open Designer.
2 In the toolbar, click Help > Check for Package Updates.
3 Click OK to update the packages.
4 In the Outline view, right-click Package Catalog.
5 Click Import Package.
Creating a New Driver Object 17

6 Select any ServiceNow driver packages.
or
Click Select All to import all of the packages displayed.
By default, only the base packages are displayed. Deselect Show Base Packages Only to display all packages.
7 Click OK to import the selected packages, then click OK in the successfully imported packages message.
8 After the current packages are imported, continue with Section 3.1.2, “Installing the Driver Packages,” on page 18.
NOTE: Designer does not display the name of the driver or the driver symbol when you import the ServiceNow driver from Identity Vault. This issue is seen in Modeler only.
3.1.2 Installing the Driver Packages
1 In Designer, open your project.
2 In the Modeler, right-click the driver set where you want to create the driver, then click New > Driver.
3 Select ServiceNow Base, then click Next.
4 Select the optional features to be installed, then click Next. The options are:
ServiceNow Default Configuration: This package contains the default policies required to enable the driver to create user and group accounts. Leave this option selected.
ServiceNow Password Synchronization: This package contains the policies that enable the ServiceNow driver to synchronize passwords.To synchronize passwords, verify that this option is selected. For more information, see the NetIQ Identity Manager Password Management Guide.
ServiceNow Driver Entitlements: This package contains configuration information and policies for synchronizing user accounts, group membership, roles, and departments. If you want account creation and auditing enabled through entitlements, verify that this option is selected. For more information, see the NetIQ Identity Manager Entitlements Guide.
5 (Conditional) If there are package dependencies for the packages you selected to install, you must install these dependencies to install the selected package. Click OK to install the package dependencies listed.
6 (Conditional) The Common Settings page is only displayed if the Common Settings package is installed as a dependency. On the Install Common Settings page, fill in the following fields, then click Next:
18 NetIQ ServiceNow Driver Implementation Guide

User Container: Select the Identity Vault container where ServiceNow user accounts will be added if they do not already exist in the vault. This value becomes the default for all drivers in the driver set.
Group Container: Select the Identity Vault container where ServiceNow groups will be added if they do not already exist in the vault. This value becomes the default for all drivers in the driver set.
7 On the Install ServiceNow Base page, specify a name for the driver that is unique within the driver set, and then click Next.
8 On the new Install ServiceNow Base page, fill in the following fields, then click Next:
ServiceNow Base URL: Specify the URL to connect to ServiceNow.
ServiceNow Login ID: Specify a ServiceNow account with administrative privileges to be used by Identity Manager.
ServiceNow Login Password: Provide the password for the specified ServiceNow account.
Always Accept Server Certificate: This option eliminates the need for manually maintaining a truststore. If you select No, you must have a truststore configured with the appropriate certificates.
Truststore File Path: Specify the name and path of the truststore file containing the trusted certificates. For example, c:\security\truststore.
Proxy host and port: Specify the proxy host address and port. For example, 192.10.1.3:18180. Otherwise, leave the field blank.
Set Proxy Authentication Parameters: Select Show to display the proxy authentication parameters.
Proxy User ID: Specify the user name for authentication.
Proxy User Password: Specify the proxy user password.
Use Custom Application Schema: To use a custom schema with the driver, select Yes. By default, the value is set to No, which allows Identity Manager to load the default schema with the driver.
Custom Schema File Path: To use a custom schema file, provide the local directory path where the entire schema file exists. For the driver to use the new schema, restart the driver. The default ServiceNow schema file is bundled with the NIdM_Driver_4.5_ServiceNow.zip file.
9 Connect to Remote Loader: Select Yes or No to determine if the driver will use the Remote Loader. If you select No, skip to Step 10. If you select Yes, use the following information to complete the Remote Loader configuration, then click Next:
Host Name: Specify the host name or IP address of the server where the Remote Loader Service is installed and running for this driver.
Port: Specify the port number where the Remote Loader Service is installed and running for the ServiceNow driver. The default port is 8090.
Remote Password: Specify the Remote Loader password as defined in the Remote Loader service. The Identity Manager engine (or Remote Loader shim) requires this password to authenticate to the Remote Loader.
Driver Password: Specify the driver object password that is defined in the Remote Loader service. The Remote Loader requires this password to authenticate to the Identity Manager server.
10 On the Confirm Installation Tasks page, review the summary of tasks and click Finish.
Creating a New Driver Object 19

The driver is now created. You can modify the configuration settings, by continuing with the next section, Configuring the Driver Object. If you do not need to configure the driver, continue with Deploying the Driver Object.
3.1.3 Configuring the Driver Object
Configuring the Driver Parameters: There are many settings that can help you customize and optimize the driver. The settings are divided into categories such as Driver Configuration, Engine Control Values, Global Configuration Values (GCVs), Health, Log Level, Packages, and so on. Although it is important for you to understand all of the settings, your first priority should be to review the Driver Properties located on the Driver Configuration page. The Driver Parameters and the Global Configuration Values let you configure the ServiceNow login information and other parameters associated with the driver. These settings must be configured properly for the driver to start and function correctly.
The driver requires an account with ServiceNow that is an administrator for your ServiceNow subscription. You should create a new account in your ServiceNow specifically for this purpose. Make sure that this new account is set to administer your ServiceNow application.
After completing the configuration tasks, continue with Section 3.1.4, “Deploying the Driver Object,” on page 20.
3.1.4 Deploying the Driver Object
After the driver is created in Designer, it must be deployed into the Identity Vault.
1 In Designer, open your project.
2 In the Modeler, right-click the driver icon or the driver connection, then select Live > Deploy.
3 Read through the deployment summary, then click Deploy.
4 Read the success message, and then click OK.
5 Click Define Security Equivalence to assign rights to the driver.
The driver requires rights to objects within the Identity Vault. The Admin user object is most often used to supply these rights.
5a Click Add, then browse and select the object with the correct rights.
5b Click OK twice.
6 Click Exclude Administrative Roles to exclude users that should not be synchronized.
6a Click Add, then browse to and select the user object you want to exclude, then click OK.
6b Repeat Step 6a for each object you want to exclude, then click OK.
7 Click OK.
3.1.5 Starting the Driver
After you create the driver, you should start the driver in order to start the processing of the events. Identity Manager is an event-driven system, so after the driver is started, it won’t do anything until an event occurs.
To start the driver by using Designer:
1 In Designer, open your project.
2 In the Modeler, right-click the driver icon or the driver line, then select Live > Start Driver.
20 NetIQ ServiceNow Driver Implementation Guide

NOTE: The driver cannot initialize completely unless it successfully connects to the Remote Loader and loads the ServiceNow driver shim.
To start the driver using iManager:
1 In iManager, click to display the Identity Manager Administration page.
2 Click Identity Manager Overview.
3 Browse to and select the driver set object that contains the driver you want to start.
4 Click the driver set name to access the Driver Set Overview page.
5 Click the upper right corner of the driver, then click Start driver.
For information about performing management tasks with the driver, see Chapter 6, “Managing the Driver,” on page 31.
3.2 Activating the DriverTo activate the ServiceNow driver, activate the Identity Manager engine, then activate the driver by using the separate ServiceNow activation key. If you created the driver in a driver set that has not been activated, you must activate the Identity Manager engine and the driver before the trial version expires. Otherwise, the driver stops working.
If driver activation has expired, ndstrace displays an error message indicating that you need to reactivate the driver to use it.
For information on activation, refer to “Activating Identity Manager” in the NetIQ Identity Manager Setup Guide.
Creating a New Driver Object 21

22 NetIQ ServiceNow Driver Implementation Guide

4 4Customizing the Driver
This section explains how to use and modify policies and filters to synchronize data between the Identity Vault and ServiceNow according to your specific business rules. It is also possible to customize the driver using the entitlements shipped with the driver.
The ServiceNow driver synchronizes data and events from the Identity Vault through a series of policies. The policies in this section are examples of the many possible solutions for your company’s business rules. The code segments show simple and partial solutions and do not cover all situations and conditions. In addition, the code segments only process the attributes of interest and do not handle other attributes.
You set defaults for policies and filters when you import the driver configuration.
Section 4.1, “Customizing the Referenced Attributes Using Policies,” on page 23
Section 4.2, “Customizing the ServiceNow Application Schema,” on page 25
4.1 Customizing the Referenced Attributes Using PoliciesServiceNow uses references to refer an attribute value from a different table. These references act like foreign keys in the ServiceNow database. If the value of an attribute does not exist in ServiceNow's table of attributes, you need to create the attribute in ServiceNow before adding a user to reference the value of that attribute.
Referenced attributes can be handled by customizing the policies in ServiceNow. Company, Location, and Building are examples of some of the referenced attributes in ServiceNow.
The following example policy (in Designer) looks at the value of the Company attribute being added to the Identity Vault and checks if an object of that name exists in ServiceNow’s table of Company names. If the object is not found, it creates the object for the reference to work.
To change the reference for an attribute, change the object class of that object in Service Now and the name of the attribute in the Identity Vault.
To add a custom policy:
1 In Designer, add the Company attribute to the ServiceNow driver filter and select Synchronize under the Subscribe settings.
2 Right-click the Output Transformation Policy, click New, and then click DirXML Script.
3 Add the below DirXML script to the policy you just created.
Customizing the Driver 23

<rule> <description>Company attribute Verification</description> <conditions> <and> <if-class-name op="equal">sys_user</if-class-name> <if-attr name="company" op="available"/> <if-operation mode="nocase" op="equal">modify</if-operation> </and> </conditions> <actions> <do-set-local-variable name="companyName" scope="policy"> <arg-string> <token-xpath expression="./modify-attr[@attr-name='company']/add-value/value/text()
"/> </arg-string> </do-set-local-variable> <do-set-local-variable name="companyInstance" scope="policy"> <arg-node-set> <token-query class-name="core_company" scope="entry"> <arg-match-attr name="name"> <arg-value> <token-local-variable name="companyName"/> </arg-value> </arg-match-attr> </token-query> </arg-node-set> </do-set-local-variable> <do-if> <arg-conditions> <and> <if-xpath op="not-true">$companyInstance/../instance</if-xpath> </and> </arg-conditions> <arg-actions> <do-add-dest-object class-name="core_company" when="before"> <arg-dn> <token-text xml:space="preserve">Companyattr</token-text> </arg-dn> </do-add-dest-object> <do-add-dest-attr-value class-name="core_company" name="name" when="before"> <arg-dn> <token-text xml:space="preserve">Companyattr</token-text> </arg-dn> <arg-value type="string"> <token-xpath expression="./modify-attr[@attr-name='company']/add-value/
24 NetIQ ServiceNow Driver Implementation Guide

value/text()"/> </arg-value> </do-add-dest-attr-value> <do-add-dest-attr-value class-name="sys_user" name="company"> <arg-value type="string"> <token-xpath expression="./modify-attr[@attr-name='company']/add-value/value/text()"/> </arg-value> </do-add-dest-attr-value> </arg-actions> <arg-actions/> </do-if> </actions> </rule>
4 Deploy the driver along with the policy.
In the above example, when the driver is deployed to the Identity Vault, the policy checks whether the company name exists in the ServiceNow database and performs one of the following actions:
If the company name exists, the policy links the company with the user.
If the company name does not exist in the database, the policy updates ServiceNow with the company name and links it with the user.
4.2 Customizing the ServiceNow Application SchemaThe Schema Mapping policy is contained in the driver object and applies to the Subscriber channel. The purpose of the Schema Mapping policy is to map schema names (particularly attribute names and class names) between the Identity Vault namespace and the ServiceNow namespace. Do not modify or remove existing entries in the Schema Mapping policy. You can, however, add entries to the Schema Mapping policy.
Table 4-1 and Table 4-2 list the default attributes that are supported in ServiceNow.
Table 4-1 sys_user
Attributes Type
Accumulated roles String
Active True/False
Building reference to Building
Business phone Phone Number
Calendar Integration Integer
City String
Class System Class Name
Company reference to Company
Cost center reference to Cost Center
Country code String
Created date/Time
Customizing the Driver 25

Created by String
Date Format String
Default perspective reference to Menu List
Department reference to Department
Domain Domain ID
EDU Status String
Email Email
Employee number String
Failed login attempts Integer
First name String
Email Email
Employee number String
Failed login attempts Integer
First name String
Gender String
Home Phone Phone Number
internal Integration User True/False
LDAP Server reference to LDAP Server
Language String
Last login Date
Last login device String
Last login time date/Time
last name String
Last password String
Location reference to Location
Locked out True/False
Manager reference to User
Middle name String
Mobile phone Phone Number
Name String
Notification Integer
Password Password (1 Way Encrypted)
Password needs reset True/False
Attributes Type
26 NetIQ ServiceNow Driver Implementation Guide
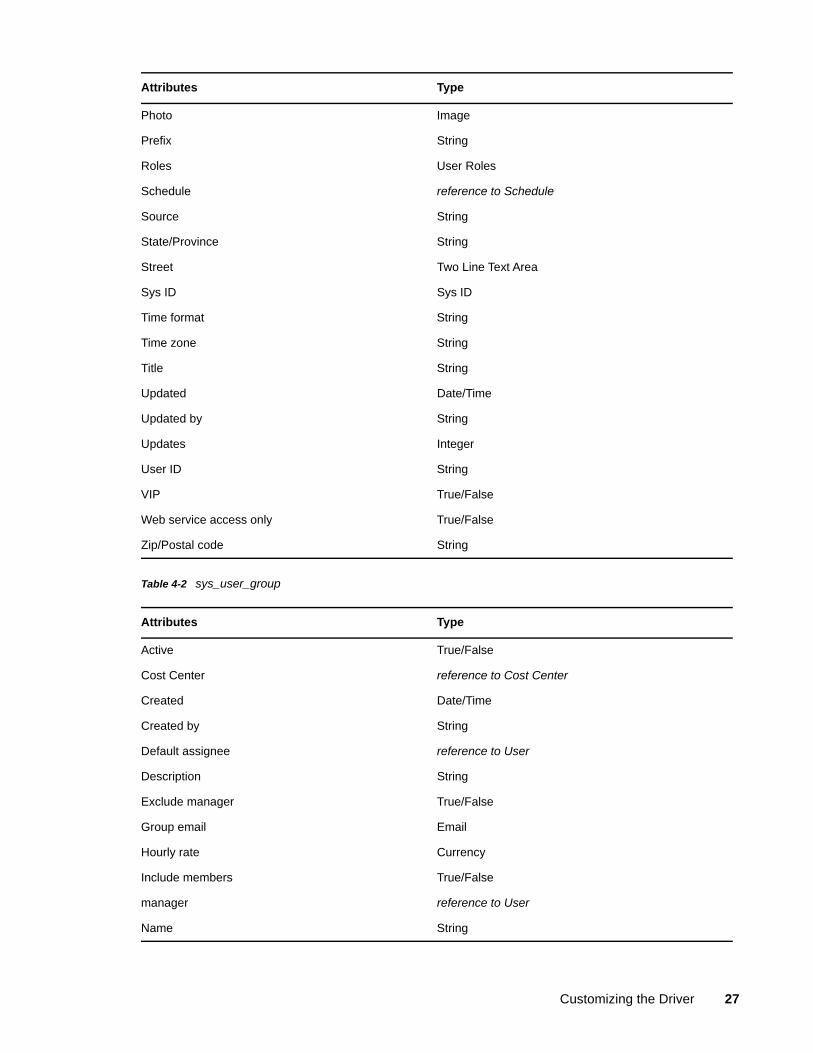
Table 4-2 sys_user_group
Photo Image
Prefix String
Roles User Roles
Schedule reference to Schedule
Source String
State/Province String
Street Two Line Text Area
Sys ID Sys ID
Time format String
Time zone String
Title String
Updated Date/Time
Updated by String
Updates Integer
User ID String
VIP True/False
Web service access only True/False
Zip/Postal code String
Attributes Type
Active True/False
Cost Center reference to Cost Center
Created Date/Time
Created by String
Default assignee reference to User
Description String
Exclude manager True/False
Group email Email
Hourly rate Currency
Include members True/False
manager reference to User
Name String
Attributes Type
Customizing the Driver 27

ServiceNow also supports other attributes in addition to the default attributes. The attributes are available in the custom schema file packaged in the NIdM_Driver_4.5_ServiceNow.zip file. For more information about using the schema file, see Use Custom Application Schema.
Parent reference to Group
Roles User Roles
Source String
Sys ID Sys ID
Type List
Updated Date/Time
Updated by String
Updates Integer
Attributes Type
28 NetIQ ServiceNow Driver Implementation Guide

5 5Securing Driver Communication
If the remote Web service you are accessing allows HTTPS connections, you can configure the driver to take advantage of this increased security.
5.1 Configuring the Subscriber ChannelThe Subscriber channel sends information from the Identity Vault to the Web service. To establish a secure connection for the Subscriber channel, you need a truststore containing a certificate issued by the certificate authority that signed the server’s certificate.
1 Make sure you have a server certificate signed by a certificate authority.
2 Import the certificate into your truststore or create a new trust store by entering the following command at the command prompt:
keytool -import -file name_of_cert_file -trustcacerts -noprompt -truststore filename -storepass passwordFor example:
keytool -import -file tree_ca_root.b64 -trustcacerts -noprompt -truststore dirxml.truststore -storepass novell
3 Configure the Subscriber channel to use the trust store you created in step 2:
3a In iManager, in the Roles and Tasks view, click Identity Manager > Identity Manager Overview.
3b Locate the driver set containing the ServiceNow driver, then click the driver’s icon to display the Identity Manager Driver Overview page.
3c On the Identity Manager Driver Overview page, click the driver’s icon again, then scroll to Driver Settings.
3d Select No in the Always accept server certificate field.
3e In the Truststore File Path, specify the path to the trust store you created in step 2.
4 Click Apply, then click OK.
Securing Driver Communication 29

30 NetIQ ServiceNow Driver Implementation Guide
6 6Managing the Driver
As you work with the ServiceNow driver, there are a variety of management tasks you might need to perform, including the following:
Starting, stopping, and restarting the driver
Viewing driver version information
Using Named Passwords to securely store passwords associated with the driver
Monitoring the driver’s health status
Backing up the driver
Inspecting the driver’s cache files
Viewing the driver’s statistics
Using the DirXML Command Line utility to perform management tasks through scripts
Securing the driver and its information
Because these tasks, as well as several others, are common to all Identity Manager drivers, they are included in one reference, the NetIQ Identity Manager Driver Administration Guide.
Managing the Driver 31

32 NetIQ ServiceNow Driver Implementation Guide
A ADriver Properties
This section provides information about the Driver Configuration and Global Configuration Values properties for the ServiceNow driver. These are the only unique properties for drivers. All other driver properties (Named Password, Engine Control Values, Log Level, and so forth) are common to all drivers. Refer to “Driver Properties” in the NetIQ Identity Manager Driver Administration Guide for information about the common properties.
The information is presented from the viewpoint of iManager. If a field is different in Designer, it is marked with a Designer icon.
Section A.1, “Driver Configuration,” on page 33
Section A.2, “Global Configuration Values,” on page 36
A.1 Driver ConfigurationIn iManager:
1 Click to display the Identity Manager Administration page.
2 Open the driver set that contains the driver whose properties you want to edit:
2a In the Administration list, click Identity Manager Overview.
2b If the driver set is not listed on the Driver Sets tab, use the Search In field to search for and display the driver set.
2c Click the driver set to open the Driver Set Overview page.
3 Locate the driver icon, then click the upper right corner of the driver icon to display the Actions menu.
4 Click Edit Properties to display the driver’s properties page.
By default, the Driver Configuration page displays.
In Designer:
1 Open a project in the Modeler.
2 Right-click the driver icon or line, then select click Properties > Driver Configuration.
The Driver Configuration options are divided into the following sections:
Section A.1.1, “Driver Module,” on page 34
Section A.1.2, “Driver Object Password,” on page 34
Section A.1.3, “Authentication,” on page 34
Section A.1.4, “Startup Option,” on page 35
Section A.1.5, “Driver Parameters,” on page 35
Section A.1.6, “ECMA Script,” on page 36
Section A.1.7, “Global Configuration,” on page 36
Driver Properties 33
A.1.1 Driver Module
The driver module changes the driver from running locally to running remotely or the reverse.
Java: Use this option to specify the name of the Java class that is instantiated for the shim component of the driver. This class can be located in the classes directory as a class file, or in the lib directory as a .jar file. If this option is selected, the driver is running locally. Select this option to run the driver locally.
The Java class name is: com.novell.nds.dirxml.driver.ServiceNow.ServiceNowDriverShimNative: This option is not used with the ServiceNow driver.
Connect to Remote Loader: Used when the driver is connecting remotely to the connected system. Designer includes two sub options:
Remote Loader Client Configuration for Documentation: Includes information on the Remote Loader client configuration when Designer generates documentation for the driver.
Driver Object Password: Specifies a password for the Driver object. If you are using the Remote Loader, you must enter a password on this page. Otherwise, the remote driver does not run. The Remote Loader uses this password to authenticate itself to the remote driver shim.
Name: Displays the java class name.
A.1.2 Driver Object Password
Use this option to set a password for the driver object. If you are using the Remote Loader, you must enter a password on this page. This password is used by the Remote Loader to authenticate itself to the remote driver shim.
A.1.3 Authentication
The authentication section describes the parameters required for authentication to the connected system.
Authentication ID: Specify the authentication ID to connect to the application.
Authentication Context: Add text here.
Remote Loader Connection Parameters: The syntax for the parameter is hostname=xxx.xxx.xxx.xxx port=xxxx kmo=certificatename, where the hostname is the IP address of the application server running the Remote Loader server and the port is the port the Remote Loader is listening on. The default port for the Remote Loader is 8090.
The kmo entry is optional. It is only used when there is an SSL connection between the Remote Loader and the Metadirectory engine.
Example: hostname=10.0.0.1 port=8090 kmo=IDMCertificateDriver Cache Limit (KB): Specify the maximum event cache file size. If the value is set to zero, the file size is unlimited.
Application Password: Specify the password to connect to the application.
Remote Loader Password: Specify the password to connect to the application through the remote loader. The password should match with the password specified during the configuration of the Remote Loader on the connected system.
34 NetIQ ServiceNow Driver Implementation Guide

A.1.4 Startup Option
The Startup Option section allows you to set the driver state when the Identity Manager server is started.
Auto start: The driver starts every time the Identity Manager server is started.
Manual: The driver does not start when the Identity Manager server is started. The driver must be started through Designer or iManager.
Disabled: The driver has a cache file that stores all of the events. When the driver is set to Disabled, this file is deleted and no new events are stored in the file until the driver state is changed to Manual or Auto Start.
A.1.5 Driver Parameters
The Driver Parameters section lets you configure the driver-specific parameters. When you change driver parameters, you tune driver behavior to align with your network environment.
The parameters are presented by category:
“Driver Settings” on page 35
“Publisher Options” on page 36
Driver Settings
ServiceNow Base URL: Specify the URL to connect to ServiceNow.
ServiceNow Login ID: Specify the login ID to connect to ServiceNow.
Select Remove existing password to clear the password.
Always Accept Server Certificate: This option eliminates the need for manually maintaining a truststore. If you select No, you must have a truststore configured with the appropriate certificates.
Truststore File Path: Specify the name and path of the truststore file containing the trusted certificates used when the remote server is configured to provide server authentication. For example, c:\security\truststore. Leave this field empty when server authentication is not used.
Proxy Host and Port: When an HTTP proxy is used, specify the host address and the host port. For example, 192.10.1.3:18180. Otherwise, leave the field blank.
Set Proxy Authentication Parameters: Select Show to display the proxy authentication parameters:
Proxy User ID: Specify the user name for authentication. Leave the field blank for anonymous authentication.
Proxy User Password: Specify the password for the user.
Use Custom Application Schema: To use a custom schema with the driver, select Yes. By default, the value is set to No, which allows Identity Manager to load the default schema with the driver.
Custom Schema File Path: To use a custom schema file, provide the local directory path where the entire schema file exists. For the driver to use the new schema, restart the driver.
Driver Properties 35

Publisher Options
Publisher Heartbeat interval: Specify the heartbeat interval in seconds.
Leave this field empty to turn off the heartbeat.
A.1.6 ECMA Script
The ECMAScript section enables you to add ECMAScript resource files. The resources extend the driver’s functionality when Identity Manager starts the driver.
A.1.7 Global Configuration
Displays an ordered list of Global Configuration objects. The objects contain extension GCV definitions for the driver that Identity Manager loads when the driver is started. You can add or remove the Global Configuration objects, and you can change the order in which the objects are executed.
A.2 Global Configuration ValuesGlobal configuration values (GCVs) are values that can be used by the driver to control functionality. GCVs are defined on the driver or on the driver set. Driver set GCVs can be used by all drivers in the driver set. Driver GCVs can be used only by the driver on which they are defined.
The ServiceNow driver includes several predefined GCVs. You can also add your own GCVs, on a need basis, while you implement policies in the driver.
To access the driver’s GCVs in iManager:
1 Click to display the Identity Manager Administration page.
2 Open the driver set that contains the driver whose properties you want to edit:
2a In the Administration list, click Identity Manager Overview.
2b If the driver set is not listed on the Driver Sets tab, use the Search In field to search for and display the driver set.
2c Click the driver set to open the Driver Set Overview page.
3 Locate the driver icon, click the upper right corner of the driver icon to display the Actions menu, then click Edit Properties.
or
To add a GCV to the driver set, click Driver Set, then click Edit Driver Set properties.
To access the driver’s GCVs in Designer:
1 Open a project in the Modeler.
2 Right-click the driver icon or line, then select Properties > GCVs.
or
To add a GCV to the driver set, right-click the driver set icon , then click Properties > GCVs.
36 NetIQ ServiceNow Driver Implementation Guide

A.2.1 Password Synchronization
Use the following GCVs to configure the driver to synchronize passwords to ServiceNow.
Application accepts passwords from Identity Manager: This option is used to determine whether the application accepts passwords from Identity Manager. Selecting True allows the passwords to flow from the Identity Manager data store to connected system.
Notify the user of password synchronization failure via e-mail: Select this option if you want to notify the user through e-mail.
A.2.2 Entitlements
There are multiple sections in the Entitlements tab. Depending on which packages you installed, different options are enabled or displayed.
“Entitlements Configuration” on page 37
“Role Mapping” on page 37
“Resource Mapping” on page 38
“Entitlement Extensions” on page 38
Entitlements Configuration
Use Entitlements to control ServiceNow accounts: Select True to enable the driver to manage user accounts based on the driver’s defined entitlements. Select False to disable management of user accounts based on the entitlements.
Enable Login Disabled Attribute Sync: Select True if the changes made to the LoginDisabled attribute in the Identity Vault should be synchronized even if the User Account entitlement (Account) is enabled.
When Account Entitlement Revoked: Select an appropriate action when a user account entitlement is revoked. The options are Disable User or Delete User. By default, Disable User is selected.
Use Group Entitlement: Select True to enable the driver to manage group membership based on the driver’s defined entitlements.
Use Role Entitlement: Select True to enable the driver to manage user roles based on the driver’s defined entitlements.
Use Department Entitlement: Select True to enable the driver to manage department based on the driver’s defined entitlements.
Advanced Settings: Select Show to display the entitlement options that allow or deny additional functionality like role mapping, resource mapping and others. These settings should rarely be changed.
Parameter Format: Specify the parameter format the entitlement agent must use when granting this entitlement.
Role Mapping
The Identity Manager Catalog Administrator allows you to map business roles with IT roles. For more information, see the NetIQ Identity Manager Catalog Administrator User Guide .
Driver Properties 37

Enable role mapping: Select Yes to make this driver visible to the Role Mapping Administrator.
Allow mapping of user accounts: Select Yes if you want to allow mapping of user accounts in the Role Mapping Administrator.
Allow mapping of groups: Select Yes if you want to allow mapping of groups in the Role Mapping Administrator.
Allow mapping of roles: Select Yes if you want to allow mapping of roles in the Role Mapping Administrator.
Allow mapping of departments: Select Yes if you want to allow mapping of departments in the Role Mapping Administrator.
Resource Mapping
The Roles Based Provisioning Module allows you to map resources to users. For more information, see the NetIQ User Application: User Guide.
Enable resource mapping: Select Yes to make this driver visible to the Roles Based Provisioning Module.
Allow mapping of user accounts: Select Yes if you want to allow mapping of user accounts in the Roles Based Provisioning Module.
Allow mapping of groups: Select Yes if you want to allow mapping of groups in the Roles Based Provisioning Module.
Allow mapping of roles: Select Yes if you want to allow mapping of roles in the Roles Based Provisioning Module.
Allow mapping of departments: Select Yes if you want to allow mapping of departments in the Roles Based Provisioning Module.
Entitlement Extensions
The Roles Based Provisioning Module allows you to map resources to users. For more information, see the NetIQ User Application: User Guide.
User account extensions: The content of this field is added below the entitlement elements in the EntitlementConfiguration resource object.
Group extensions: The content of this field is added below the entitlement elements in the EntitlementConfiguration resource object.
Role extensions: The content of this field is added below the entitlement elements in the EntitlementConfiguration resource object.
Department extensions: The content of this field is added below the entitlement elements in the EntitlementConfiguration resource object.
38 NetIQ ServiceNow Driver Implementation Guide

B BTrace Levels
The driver supports the following trace levels:
Table B-1 Supported Trace Levels
Level Description
0 No debugging
1-2 Identity Manager messages. Higher trace levels provide more detail.
3 Previous level plus driver parameters, Remote Loader, driver shim, and driver connection messages
4-5 Previous level plus Remote Loader, driver, driver shim, and driver connection messages, driver parameters, driver security, driver schema, request and response XML
Trace Levels 39

40 NetIQ ServiceNow Driver Implementation Guide