netezza advanced security admin guide
TRANSCRIPT

IBM Netezza 6.0.3
IBM Netezza Advanced Security Administrator’s GuideRevised: October 7, 2011
20493 Rev. 3

Note: Before using this information and the product that it supports, read the information in “Notices and Trademarks” on page D-1.
© Copyright IBM Corporation 2011.US Government Users Restricted Rights – Use, duplication or disclosure restricted by GSA ADP Schedule Contract with IBM Corp.
Table of Contents
Preface
1 OverviewBasic Security Model . . . . . . . . . . . . . . . . . . . . . . . . . . . . . . . . . . . . . . . . . . . . . . . 1-1
Advanced Security . . . . . . . . . . . . . . . . . . . . . . . . . . . . . . . . . . . . . . . . . . . . . . . . . 1-1
System Security . . . . . . . . . . . . . . . . . . . . . . . . . . . . . . . . . . . . . . . . . . . . . . . . . . 1-2
Viewing Security Setup . . . . . . . . . . . . . . . . . . . . . . . . . . . . . . . . . . . . . . . . . . . . . 1-2
2 User Login ControlSession Context. . . . . . . . . . . . . . . . . . . . . . . . . . . . . . . . . . . . . . . . . . . . . . . . . . . 2-1
Concurrent Sessions . . . . . . . . . . . . . . . . . . . . . . . . . . . . . . . . . . . . . . . . . . . . . . . 2-2
Access Time Control . . . . . . . . . . . . . . . . . . . . . . . . . . . . . . . . . . . . . . . . . . . . . . . 2-2
Password Restrictions . . . . . . . . . . . . . . . . . . . . . . . . . . . . . . . . . . . . . . . . . . . . . . 2-3
3 MasqueradingOverview. . . . . . . . . . . . . . . . . . . . . . . . . . . . . . . . . . . . . . . . . . . . . . . . . . . . . . . . 3-1
Nesting and Stored Procedures . . . . . . . . . . . . . . . . . . . . . . . . . . . . . . . . . . . . . . . . 3-2
4 Key ManagementOverview. . . . . . . . . . . . . . . . . . . . . . . . . . . . . . . . . . . . . . . . . . . . . . . . . . . . . . . . 4-1
Encrypting Passwords . . . . . . . . . . . . . . . . . . . . . . . . . . . . . . . . . . . . . . . . . . . 4-1
Changing Keys . . . . . . . . . . . . . . . . . . . . . . . . . . . . . . . . . . . . . . . . . . . . . . . . 4-1
Digital Signing . . . . . . . . . . . . . . . . . . . . . . . . . . . . . . . . . . . . . . . . . . . . . . . . 4-2
Creating and Managing Keys. . . . . . . . . . . . . . . . . . . . . . . . . . . . . . . . . . . . . . . . . . 4-2
5 Advanced Query HistoryOverview. . . . . . . . . . . . . . . . . . . . . . . . . . . . . . . . . . . . . . . . . . . . . . . . . . . . . . . . 5-1
Collect History. . . . . . . . . . . . . . . . . . . . . . . . . . . . . . . . . . . . . . . . . . . . . . . . . . . . 5-1
Controlling History Collection For Users . . . . . . . . . . . . . . . . . . . . . . . . . . . . . . . 5-2
Controlling History Collection For Databases. . . . . . . . . . . . . . . . . . . . . . . . . . . . 5-2
Audit Database . . . . . . . . . . . . . . . . . . . . . . . . . . . . . . . . . . . . . . . . . . . . . . . . . . . 5-3
Audit Data Flow. . . . . . . . . . . . . . . . . . . . . . . . . . . . . . . . . . . . . . . . . . . . . . . . . . . 5-4
Audit Configuration . . . . . . . . . . . . . . . . . . . . . . . . . . . . . . . . . . . . . . . . . . . . . . . . 5-4
Outputs . . . . . . . . . . . . . . . . . . . . . . . . . . . . . . . . . . . . . . . . . . . . . . . . . . . . . 5-9
Description . . . . . . . . . . . . . . . . . . . . . . . . . . . . . . . . . . . . . . . . . . . . . . . . . . . 5-9
iii

Usage. . . . . . . . . . . . . . . . . . . . . . . . . . . . . . . . . . . . . . . . . . . . . . . . . . . . . . 5-10
Audit Data Digital Signing . . . . . . . . . . . . . . . . . . . . . . . . . . . . . . . . . . . . . . . . . . 5-11
Audit Data Capture . . . . . . . . . . . . . . . . . . . . . . . . . . . . . . . . . . . . . . . . . . . . . . . 5-11
Service Commands . . . . . . . . . . . . . . . . . . . . . . . . . . . . . . . . . . . . . . . . . . . . 5-11
System State Changes . . . . . . . . . . . . . . . . . . . . . . . . . . . . . . . . . . . . . . . . . . 5-12
Authentication Events . . . . . . . . . . . . . . . . . . . . . . . . . . . . . . . . . . . . . . . . . . 5-13
6 Multi-Level Security and Row-Secure TablesOverview. . . . . . . . . . . . . . . . . . . . . . . . . . . . . . . . . . . . . . . . . . . . . . . . . . . . . . . . 6-1
Security Labels . . . . . . . . . . . . . . . . . . . . . . . . . . . . . . . . . . . . . . . . . . . . . . . . . . . 6-1
Security Label Syntax . . . . . . . . . . . . . . . . . . . . . . . . . . . . . . . . . . . . . . . . . . . . . . 6-2
Usage. . . . . . . . . . . . . . . . . . . . . . . . . . . . . . . . . . . . . . . . . . . . . . . . . . . . . . . . . . 6-3
Row-Secure Tables . . . . . . . . . . . . . . . . . . . . . . . . . . . . . . . . . . . . . . . . . . . . . . . . 6-8
RST Caveats . . . . . . . . . . . . . . . . . . . . . . . . . . . . . . . . . . . . . . . . . . . . . . . . . . 6-9
RST Backup and Restore . . . . . . . . . . . . . . . . . . . . . . . . . . . . . . . . . . . . . . . . . 6-9
RSTs and External Tables. . . . . . . . . . . . . . . . . . . . . . . . . . . . . . . . . . . . . . . . . 6-9
Appendix A: CommandsSQL Changes . . . . . . . . . . . . . . . . . . . . . . . . . . . . . . . . . . . . . . . . . . . . . . . . . . . . A-1
ALTER CATEGORY . . . . . . . . . . . . . . . . . . . . . . . . . . . . . . . . . . . . . . . . . . . . . A-3
ALTER COHORT . . . . . . . . . . . . . . . . . . . . . . . . . . . . . . . . . . . . . . . . . . . . . . . A-4
ALTER DATABASE . . . . . . . . . . . . . . . . . . . . . . . . . . . . . . . . . . . . . . . . . . . . . A-6
ALTER GROUP . . . . . . . . . . . . . . . . . . . . . . . . . . . . . . . . . . . . . . . . . . . . . . . . A-7
ALTER HISTORY CONFIGURATION . . . . . . . . . . . . . . . . . . . . . . . . . . . . . . . . . A-9
ALTER SECURITY LEVEL. . . . . . . . . . . . . . . . . . . . . . . . . . . . . . . . . . . . . . . . A-13
ALTER USER . . . . . . . . . . . . . . . . . . . . . . . . . . . . . . . . . . . . . . . . . . . . . . . . A-15
CREATE CATEGORY . . . . . . . . . . . . . . . . . . . . . . . . . . . . . . . . . . . . . . . . . . . A-18
CREATE COHORT . . . . . . . . . . . . . . . . . . . . . . . . . . . . . . . . . . . . . . . . . . . . . A-19
CREATE DATABASE . . . . . . . . . . . . . . . . . . . . . . . . . . . . . . . . . . . . . . . . . . . A-21
CREATE GROUP . . . . . . . . . . . . . . . . . . . . . . . . . . . . . . . . . . . . . . . . . . . . . . A-22
CREATE SECURITY LEVEL. . . . . . . . . . . . . . . . . . . . . . . . . . . . . . . . . . . . . . . A-24
CREATE TABLE . . . . . . . . . . . . . . . . . . . . . . . . . . . . . . . . . . . . . . . . . . . . . . A-26
CREATE USER . . . . . . . . . . . . . . . . . . . . . . . . . . . . . . . . . . . . . . . . . . . . . . . A-27
DROP CATEGORY . . . . . . . . . . . . . . . . . . . . . . . . . . . . . . . . . . . . . . . . . . . . . A-30
DROP COHORT . . . . . . . . . . . . . . . . . . . . . . . . . . . . . . . . . . . . . . . . . . . . . . . A-31
DROP HISTORY CONFIGURATION . . . . . . . . . . . . . . . . . . . . . . . . . . . . . . . . . A-33
DROP SECURITY LEVEL . . . . . . . . . . . . . . . . . . . . . . . . . . . . . . . . . . . . . . . . A-34
EXECUTE AS . . . . . . . . . . . . . . . . . . . . . . . . . . . . . . . . . . . . . . . . . . . . . . . . A-35
iv

REVERT . . . . . . . . . . . . . . . . . . . . . . . . . . . . . . . . . . . . . . . . . . . . . . . . . . . . A-36
SET HISTORY CONFIGURATION . . . . . . . . . . . . . . . . . . . . . . . . . . . . . . . . . . A-37
SHOW CATEGORY . . . . . . . . . . . . . . . . . . . . . . . . . . . . . . . . . . . . . . . . . . . . . A-39
SHOW COHORT . . . . . . . . . . . . . . . . . . . . . . . . . . . . . . . . . . . . . . . . . . . . . . A-40
SHOW HISTORY CONFIGURATION . . . . . . . . . . . . . . . . . . . . . . . . . . . . . . . . . A-42
SHOW SECURITY LEVEL . . . . . . . . . . . . . . . . . . . . . . . . . . . . . . . . . . . . . . . . A-43
CLI Commands . . . . . . . . . . . . . . . . . . . . . . . . . . . . . . . . . . . . . . . . . . . . . . . . . . A-44
nzhistcleanupdb . . . . . . . . . . . . . . . . . . . . . . . . . . . . . . . . . . . . . . . . . . . . . . A-44
nzverifyauditsig . . . . . . . . . . . . . . . . . . . . . . . . . . . . . . . . . . . . . . . . . . . . . . . A-45
Appendix B: ExamplesCreating a Database Security Officer and Database Administrator. . . . . . . . . . . . . . . . B-1
Creating a Security Model as Database Security Officer . . . . . . . . . . . . . . . . . . . . . . . B-2
Creating Sample Users. . . . . . . . . . . . . . . . . . . . . . . . . . . . . . . . . . . . . . . . . . . . . . B-2
Creating a Database and Granting Access . . . . . . . . . . . . . . . . . . . . . . . . . . . . . . . . B-3
Creating a Row-Secure Table With Permissions . . . . . . . . . . . . . . . . . . . . . . . . . . . . B-3
Using the engmgr Role. . . . . . . . . . . . . . . . . . . . . . . . . . . . . . . . . . . . . . . . . . . . . . B-4
Using the sw2 Role . . . . . . . . . . . . . . . . . . . . . . . . . . . . . . . . . . . . . . . . . . . . . . . . B-5
Using the sw1 Role . . . . . . . . . . . . . . . . . . . . . . . . . . . . . . . . . . . . . . . . . . . . . . . . B-5
Showing Restrictions . . . . . . . . . . . . . . . . . . . . . . . . . . . . . . . . . . . . . . . . . . . . . . . B-6
Appendix C: Enabling and Disabling Security CommandsEnable_execute_as . . . . . . . . . . . . . . . . . . . . . . . . . . . . . . . . . . . . . . . . . . . . . . . . C-1
Enable_login_constraints . . . . . . . . . . . . . . . . . . . . . . . . . . . . . . . . . . . . . . . . . . . . C-1
Enable_collect_history . . . . . . . . . . . . . . . . . . . . . . . . . . . . . . . . . . . . . . . . . . . . . . C-1
Enable_row_security . . . . . . . . . . . . . . . . . . . . . . . . . . . . . . . . . . . . . . . . . . . . . . . C-2
Enable_audit. . . . . . . . . . . . . . . . . . . . . . . . . . . . . . . . . . . . . . . . . . . . . . . . . . . . . C-2
Appendix D: Notices and TrademarksNotices. . . . . . . . . . . . . . . . . . . . . . . . . . . . . . . . . . . . . . . . . . . . . . . . . . . . . . . . . D-1
Trademarks. . . . . . . . . . . . . . . . . . . . . . . . . . . . . . . . . . . . . . . . . . . . . . . . . . . . . . D-3
Open Source Notifications . . . . . . . . . . . . . . . . . . . . . . . . . . . . . . . . . . . . . . . . . . . D-4
Electronic Emission Notices . . . . . . . . . . . . . . . . . . . . . . . . . . . . . . . . . . . . . . . . . . D-6
Regulatory and Compliance . . . . . . . . . . . . . . . . . . . . . . . . . . . . . . . . . . . . . . . . . . D-9
Index
v

vi

PrefaceThis document describes the IBM® Netezza® functionality for Multi-Level Security.
Audience for This Guide
The IBM Netezza Advanced Security Administrator’s Guide is written for administrators using IBM® Netezza® Multi-Level Security features.
Purpose of This Guide
This guide assists you in understanding how to use the Multi-Level Security feature. It explains the capabilities now available.
Since there are many ways of using Multi-Level Security, and because each system config-uration is different, the information presented here is general in nature, without step-by-step instructions for every possible connection and use case.
Symbols and Conventions
This guide uses the following typographical conventions:
Italics for emphasis on terms and user-defined values such as user input
Upper case for SQL commands; for example INSERT, DELETE
Bold for command line input; for example, nzsystem stop
Topics See …
Introduction to Security Features Chapter 1, “Overview”
Controlling Access Chapter 2, “User Login Control”
Running Processes as Another User Chapter 3, “Masquerading”
Managing Keys Chapter 4, “Key Management”
Auditing Chapter 5, “Advanced Query History”
Applying Security to Row-Secure Tables Chapter 6, “Multi-Level Security and Row-Secure Tables”
SQL and CLI changes Appendix A, “Commands”
Command and Task Examples Appendix B, “Examples”
Turning on security features Appendix C, “Enabling and Disabling Security Commands”
vii

If You Need Help
If you are having trouble using the Netezza appliance, you should:
1. Retry the action, carefully following the instructions given for that task in the documentation.
2. Go to the Netezza Knowledge Base at https://knowledge.netezza.com. Enter your sup-port username and password. You can search the knowledge base or the latest updates to the product documentation. Click Netezza HelpDesk to submit a support request.
3. If you are unable to access the Netezza Knowledge Base, you can also contact Netezza Support at the following telephone numbers:
North American Toll-Free: +1.877.810.4441
United Kingdom Free-Phone: +0.800.032.8382
International Direct: +1.508.620.2281
Refer to your Netezza maintenance agreement for details about your support plan choices and coverage.
Comments on the Documentation
We welcome any questions, comments, or suggestions that you have for the Netezza docu-mentation. Please send us an e-mail message at [email protected] and include the following information:
The name and version of the manual that you are using
Any comments that you have about the manual
Your name, address, and phone number
We appreciate your comments on the documentation.
viii

C H A P T E R 1
OverviewWhat’s in this chapter Basic Security Model
Advanced Security
System Security
Viewing Security Setup
This chapter provides general information about the Advanced Security features now avail-able. For more information on system security, see the NPS System Administrator’s Guide.
Basic Security Model
The Netezza security model is a combination of administrator privileges given to users and/or groups, plus object privileges associated with specific objects and object privileges asso-ciated with classes of objects. As part of the model, any privilege granted to a group is automatically granted to (that is, inherited by) any user in that group. Privileges are addi-tive, which means that you cannot remove a privilege from a user who has been granted that privilege as a group member.
Each object has an owner. Individual owners automatically have full access to their objects and do not require individual object privileges to manage them.
In the Netezza system, the admin user owns all predefined objects. The admin user has full access to all functions and objects, which is similar to the super user (root) in UNIX. There are no privilege records associated with the admin user. You cannot delete the admin user or change its name. Unlike all other objects, admin user has no owner.
The PUBLIC group is also predefined. All users automatically are members of the group. You cannot delete the PUBLIC group or change its name. Its owner is the admin user.
Advanced Security
The advanced security on the Netezza system is made up of different areas:
User Login Control – Provides session context and access restrictions.
Masquerading – Provides a way for a user to operate as another user, with all the per-missions of that user.
Advanced Query History – Query history captures details about the user activity on the Netezza system, such as the queries that are run, query plans, table access, column access, session creation, and failed authentication requests.
1-1
Netezza Advanced Security Administrator’s Guide
Multi-Level Security (MLS) – An abstract security model, which Netezza uses to define rules to control access to table rows.
System Security
The most important aspect of security with the system is control of physical access to the Netezza appliance. This is required before software security measures can function as they are supposed to.
Database security, including Multi-Level Security, is dependent on access through the database interfaces. Access to the Linux host other than through Netezza-supplied client software is strongly discouraged; any access should be minimized and carefully controlled. Any process not installed and qualified by Netezza and running as root or as nz can cause denial of service and gain access to data without database access controls.
User-defined functions (UDFs) and user-defined aggregates (UDAs) run from within the Netezza security domain and may gain access to data without database access controls. UDFs and UDAs installed on the system should be carefully controlled.
Using the Netezza host for purposes other than running the Netezza database software is a security issue, and could create denial-of-service situations. For example, filling the host disks with non-Netezza data will eventually prevent audit logging from happening and stop activity on the system. Creating demand on the processors, memory and/or disk subsystem can all interfere with provision of database services.
The admin user is the super user in the Netezza system database. It is necessary to have such a user for initial configuration and to sort out configuration and security problems. However, the admin user can control all users and see all data – if not directly, then by vir-tue of the ability to create objects that allow such access. The admin user login should not be used in normal operations. Other user identities should be given explicit privileges to manage the system and perform DBA and operations tasks on the system.
For example, to control the multi-level security model and create users, create an Netezza database user account for a Database Security Officer (DSO) with only certain privileges, as in the following example (for more information, see Appendix B, “Examples”):
SYSTEM(ADMIN)=> CREATE USER dso;CREATE USERSYSTEM(ADMIN)=> GRANT MANAGE SECURITY TO dso;GRANTSYSTEM(ADMIN)=> GRANT USER TO dso;GRANT
Viewing Security Setup
While various SHOW commands allow you to display security information, such as catego-ries, cohorts, and levels, the system also has the following views available:
_v_security_category
_v_security_cohort
_v_security_cohort_hierarchy
_v_security_level
_v_user_security
1-2 20493 Rev.3
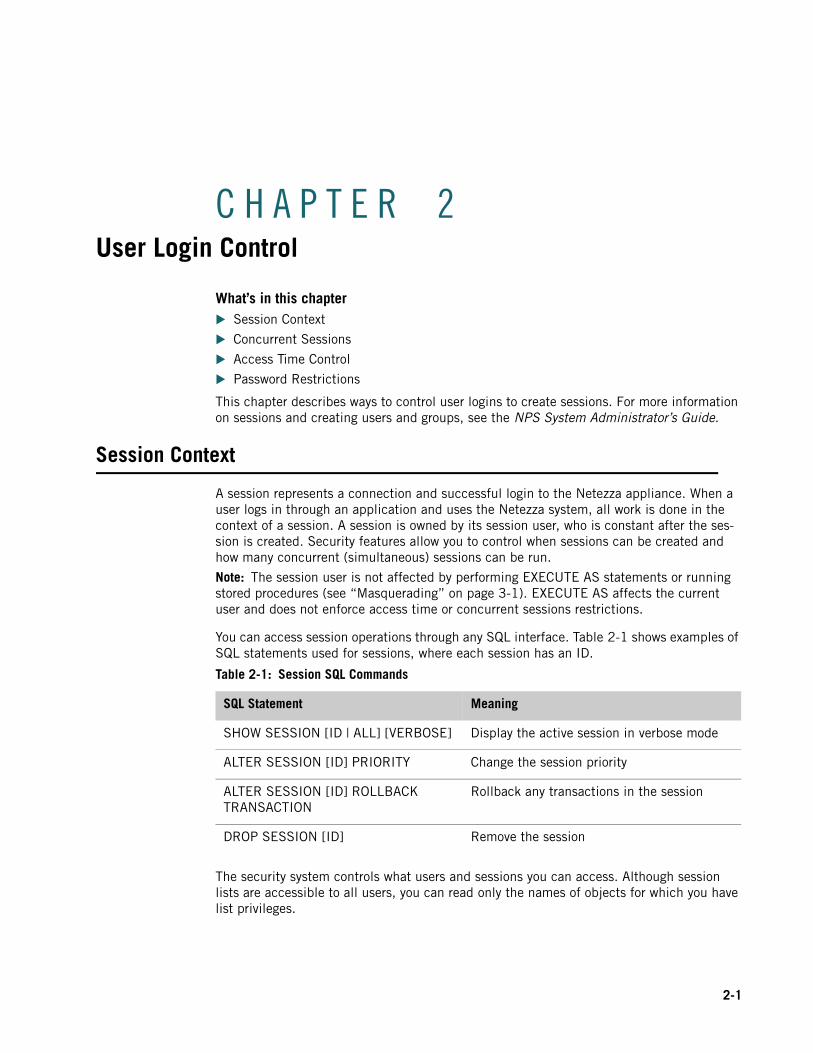
C H A P T E R 2
User Login ControlWhat’s in this chapter Session Context
Concurrent Sessions
Access Time Control
Password Restrictions
This chapter describes ways to control user logins to create sessions. For more information on sessions and creating users and groups, see the NPS System Administrator’s Guide.
Session Context
A session represents a connection and successful login to the Netezza appliance. When a user logs in through an application and uses the Netezza system, all work is done in the context of a session. A session is owned by its session user, who is constant after the ses-sion is created. Security features allow you to control when sessions can be created and how many concurrent (simultaneous) sessions can be run.
Note: The session user is not affected by performing EXECUTE AS statements or running stored procedures (see “Masquerading” on page 3-1). EXECUTE AS affects the current user and does not enforce access time or concurrent sessions restrictions.
You can access session operations through any SQL interface. Table 2-1 shows examples of SQL statements used for sessions, where each session has an ID.
The security system controls what users and sessions you can access. Although session lists are accessible to all users, you can read only the names of objects for which you have list privileges.
Table 2-1: Session SQL Commands
SQL Statement Meaning
SHOW SESSION [ID | ALL] [VERBOSE] Display the active session in verbose mode
ALTER SESSION [ID] PRIORITY Change the session priority
ALTER SESSION [ID] ROLLBACK TRANSACTION
Rollback any transactions in the session
DROP SESSION [ID] Remove the session
2-1

Netezza Advanced Security Administrator’s Guide
Concurrent Sessions
You can limit the number of concurrent sessions owned by a single user, and you can set different concurrent session values for each user. A user may be limited by inherited restrictions from a group.
If the number of concurrent sessions is not set for a user, the system uses the mini-mum value specified for the groups to which the user belongs.
If the neither the user nor any of the groups have a concurrent session limit, then the number of concurrent sessions is unlimited.
For example, to set the number of concurrent sessions to 3 for user John Doe, enter the following:
SYSTEM(ADMIN)=> CREATE USER jdoe CONCURRENT SESSIONS 3;
Access Time Control
You can restrict session creation to certain times of the day and/or days of the week. Ses-sion restrictions are defined by the ACCESS TIME clause.
If the USER has a specific setting, that setting is used.
If the USER has no setting, but the user’s GROUP has a specific setting, the group set-ting is used.
If any GROUP of the user explicitly disallows access, then the session creation is rejected.
If a USER belongs to different GROUPS with different access times, the most restric-tive GROUP setting is used. So a USER is allowed access as long as none of the GROUPS restricts the time.
Table 2-2 shows command examples for different restrictions on a user. Notice that days are numbered from 1 to 7, beginning with Sunday as 1.
Note: Note that the times define when users can login, but users can remain on the system past the restriction time, as long as they logged in during the allowed timeframe and do not log out.
Table 2-2: Restriction Setting Examples
Restriction Definition
ACCESS TIME ALL; No restriction on access.
ACCESS TIME DEFAULT; Restrictions are defined by GROUP settings.
ACCESS TIME (DAY ALL START '8:00' END '18:00');
Access is allowed every day from 8:00 AM to 6:00 PM.
ACCESS TIME (DAY 3,4,5 START '7:00' END '18:00', DAY 2, 6 START '6:00' END '15:00');
Access is allowed Tuesday, Wednesday, and Thursday from 7:00 AM to 6:00 PM, and on Monday and Friday from 6:00 AM to 3:00 PM.
2-2 20493 Rev.3

Password Restrictions
The following example creates a new user with a concurrent session limit of 2 and an access time that ranges from 7:00 AM to 7:00 PM:
SYSTEM(ADMIN)=> CREATE USER jdoe CONCURRENT SESSIONS 2 ACCESS TIME (DAY ALL START '7:00' END '19:00');
CREATE USER
The following example creates a new group with a concurrent session limit of 8 and an access time that ranges from Tuesday to Thursday, from 9:00 AM to 6:00 PM:
SYSTEM(ADMIN)=> CREATE GROUP finance CONCURRENT SESSIONS 8 ACCESS TIME (DAY 3,4,5 START '9:00' END '18:00');
CREATE GROUP
Password Restrictions
The following new features in the Netezza 6.0 release allow for greater control in password setup for users:
Password expiration – You can select whether to expire a user password immediately, or globally for all users upon a set number of days.
To expire a user password immediately, use the EXPIRE PASSWORD option for CREATE USER or ALTER USER. If this is set while the user is logged in, it does not affect the current session, but will require the user to change their password the next time they log in.
To globally expire all passwords after a set number of days, use the PASSWORDEX-PIRY option (SET SYSTEM DEFAULT PASSWORDEXPIRY to <days>). The number of days count begins with the date of the last password change for that user. A 0 indicates that the passwords do not expire. (To see the current value, use SHOW SYSTEM DEFAULT PASSWORDEXPIRY.)
Password authentication – To set the password authentication for a user to LOCAL, use the AUTH LOCAL option for CREATE USER or ALTER USER. This sets the overriding authentication for the user to LOCAL (checks the password against the local data-base/catalog), regardless of the connection setting. To revert this setting to the default setting, use the AUTH DEFAULT option.
Password string restrictions – You can set a password strength check, based on restric-tions. For more information, see “Setting Password Content Controls” in the IBM Netezza System Administrator’s Guide.
For more information on the specific usage of SQL command line options, see the IBM Netezza Database User’s Guide.
20493 Rev.3 2-3

Netezza Advanced Security Administrator’s Guide
2-4 20493 Rev.3
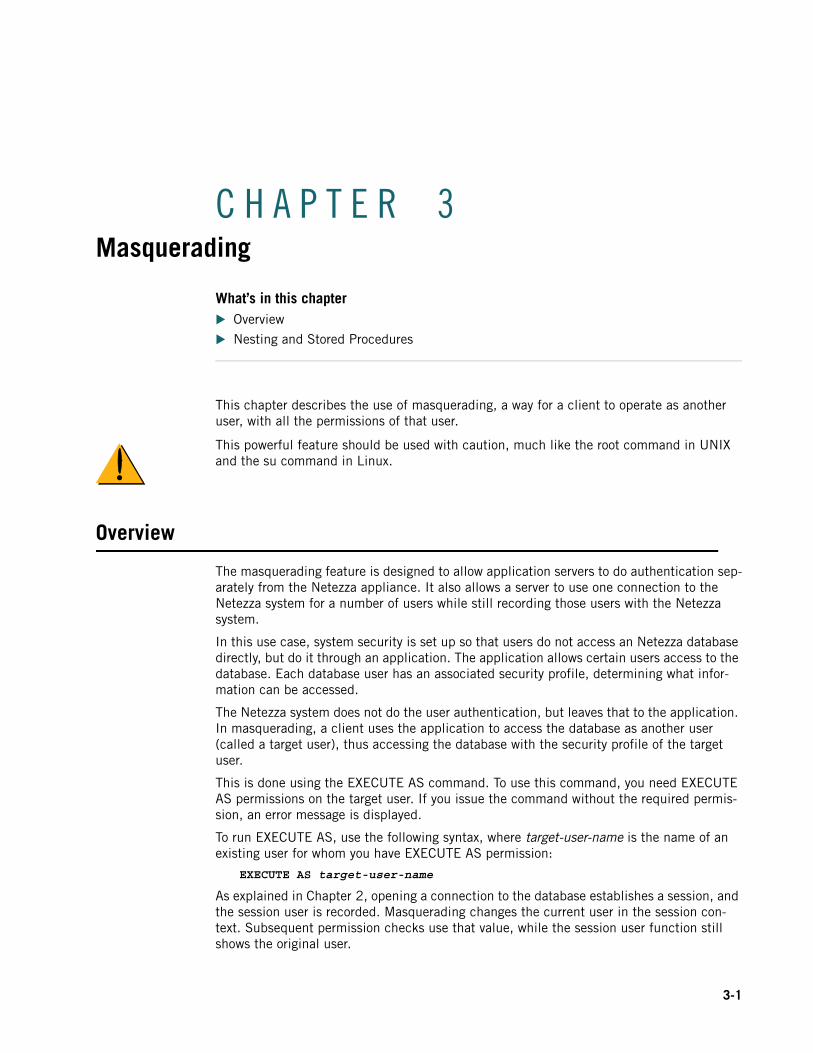
C H A P T E R 3
MasqueradingWhat’s in this chapter Overview
Nesting and Stored Procedures
This chapter describes the use of masquerading, a way for a client to operate as another user, with all the permissions of that user.
This powerful feature should be used with caution, much like the root command in UNIX and the su command in Linux.
Overview
The masquerading feature is designed to allow application servers to do authentication sep-arately from the Netezza appliance. It also allows a server to use one connection to the Netezza system for a number of users while still recording those users with the Netezza system.
In this use case, system security is set up so that users do not access an Netezza database directly, but do it through an application. The application allows certain users access to the database. Each database user has an associated security profile, determining what infor-mation can be accessed.
The Netezza system does not do the user authentication, but leaves that to the application. In masquerading, a client uses the application to access the database as another user (called a target user), thus accessing the database with the security profile of the target user.
This is done using the EXECUTE AS command. To use this command, you need EXECUTE AS permissions on the target user. If you issue the command without the required permis-sion, an error message is displayed.
To run EXECUTE AS, use the following syntax, where target-user-name is the name of an existing user for whom you have EXECUTE AS permission:
EXECUTE AS target-user-name
As explained in Chapter 2, opening a connection to the database establishes a session, and the session user is recorded. Masquerading changes the current user in the session con-text. Subsequent permission checks use that value, while the session user function still shows the original user.
3-1

Netezza Advanced Security Administrator’s Guide
The following command example begins a session for user John, using the password ABCD, and accessing the database BIZ:
nzsql -u JOHN -pw ABCD -db BIZ
BIZ(JOHN)=>
John uses the EXECUTE AS command to masquerade as the user Hank:
BIZ(JOHN)=> EXECUTE AS HANK;
EXECUTE AS
To see which is the session user and which is the current user, run the following:
BIZ(JOHN)=> SELECT session_user, current_user;
SESSION_USER | CURRENT_USER
--------------+--------------
JOHN | HANK
(1 row)
To reverse the EXECUTE AS command, use the REVERT command, which changes the cur-rent user back:
BIZ(JOHN)=> REVERT;
REVERT
BIZ(JOHN)=> SELECT session_user, current_user;
SESSION_USER | CURRENT_USER
--------------+--------------
JOHN | JOHN
(1 row)
Nesting and Stored Procedures
You can nest EXECUTE AS and REVERT commands to switch the current user. In the fol-lowing example, John masquerades as Hank, then masquerades as Tom, and reverts back:
BIZ (JOHN) => EXECUTE AS HANK;
EXECUTE AS
BIZ (JOHN) => SELECT session_user, current_user;
SESSION_USER | CURRENT_USER
--------------+--------------
JOHN | HANK
(1 row)
BIZ (JOHN) => EXECUTE AS TOM;
EXECUTE AS
BIZ (JOHN) => SELECT session_user, current_user;
SESSION_USER | CURRENT_USER
--------------+--------------
JOHN | TOM
(1 row)
3-2 20493 Rev.3

Nesting and Stored Procedures
BIZ(JOHN)=> REVERT
REVERT
BIZ (JOHN) => SELECT session_user, current_user;
SESSION_USER | CURRENT_USER
--------------+--------------
JOHN | HANK
(1 row)
BIZ(JOHN)=> REVERT
REVERT
BIZ (JOHN) => SELECT session_user, current_user;
SESSION_USER | CURRENT_USER
--------------+--------------
JOHN | JOHN
(1 row)
You can create stored procedures to use nested masquerading commands. For the next example, first login as Admin and set up a group of users and permissions.
BIZ(ADMIN)=> CREATE USER john PASSWORD 'john';
CREATE USER
BIZ(ADMIN)=> CREATE USER hank PASSWORD 'hank';
CREATE USER
BIZ(ADMIN)=> CREATE USER tom PASSWORD 'tom123';
CREATE USER
BIZ(ADMIN)=> GRANT EXECUTE AS ON tom to hank;
GRANT
BIZ(ADMIN)=> GRANT LIST ON john,hank,tom to john, hank, tom;
GRANT
BIZ(ADMIN)=> GRANT CONNECT ON dev to john, hank, tom;
GRANT
BIZ(ADMIN)=> GRANT CREATE PROCEDURE to hank;
GRANT
Login as Hank and create a stored procedure. Depending on the inputs, it will run as HANK (proc_as 1) or as TOM (proc_as 6).
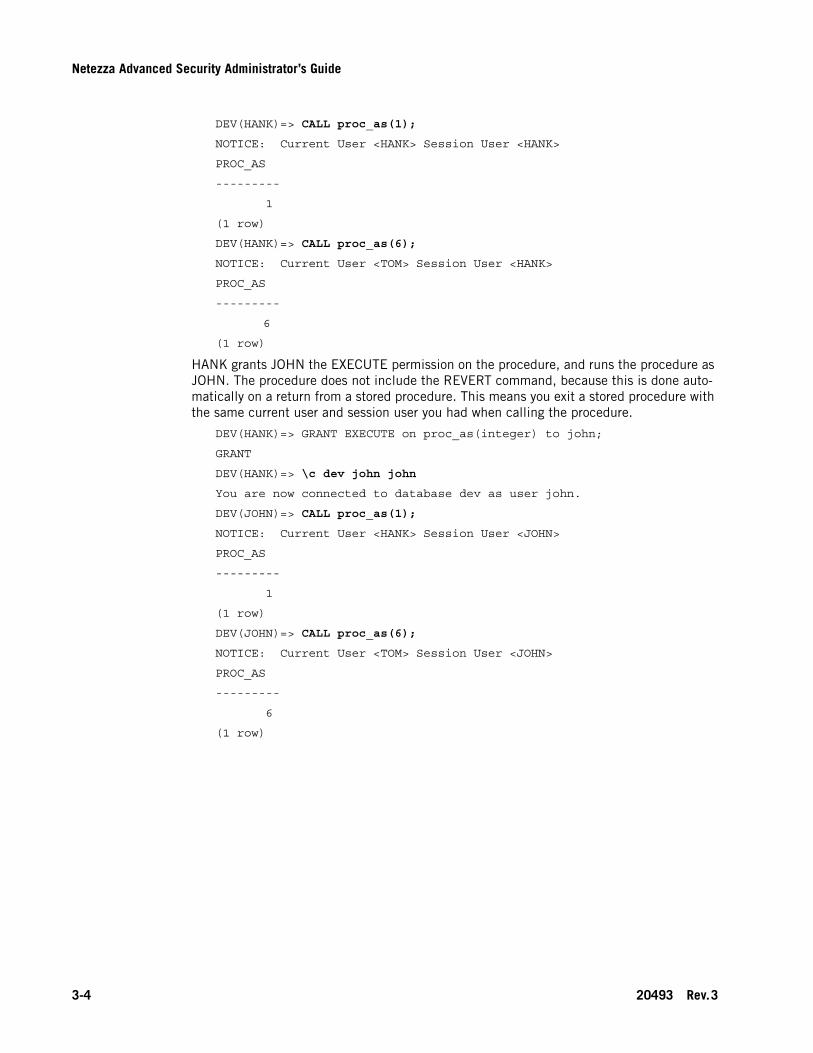
DEV(ADMIN)=> \c dev hank hank
You are now connected to database dev as user hank.
DEV(HANK)=> CREATE OR REPLACE PROCEDURE proc_as(INTEGER) RETURNS INTEGER LANGUAGE NZPLSQL AS BEGIN_PROC DECLARE inval ALIAS FOR $1; cuser VARCHAR(128); suser VARCHAR(128); BEGIN IF (inval > 5) THEN EXECUTE IMMEDIATE 'EXECUTE AS TOM'; END IF; SELECT CURRENT_USER INTO cuser; SELECT SESSION_USER INTO suser; RAISE NOTICE 'Current User <%> Session User <%>', cuser, suser; RETURN inval; END; END_PROC;
CREATE PROCEDURE
20493 Rev.3 3-3
Netezza Advanced Security Administrator’s Guide
DEV(HANK)=> CALL proc_as(1);
NOTICE: Current User <HANK> Session User <HANK>
PROC_AS
---------
1
(1 row)
DEV(HANK)=> CALL proc_as(6);
NOTICE: Current User <TOM> Session User <HANK>
PROC_AS
---------
6
(1 row)
HANK grants JOHN the EXECUTE permission on the procedure, and runs the procedure as JOHN. The procedure does not include the REVERT command, because this is done auto-matically on a return from a stored procedure. This means you exit a stored procedure with the same current user and session user you had when calling the procedure.
DEV(HANK)=> GRANT EXECUTE on proc_as(integer) to john;
GRANT
DEV(HANK)=> \c dev john john
You are now connected to database dev as user john.
DEV(JOHN)=> CALL proc_as(1);
NOTICE: Current User <HANK> Session User <JOHN>
PROC_AS
---------
1
(1 row)
DEV(JOHN)=> CALL proc_as(6);
NOTICE: Current User <TOM> Session User <JOHN>
PROC_AS
---------
6
(1 row)
3-4 20493 Rev.3

C H A P T E R 4
Key ManagementWhat’s in this chapter Overview
Creating and Managing Keys
This chapter describes the key management features used with the security capabilities. For more information on creating encrypted passwords, see the IBM Netezza System Administrator’s Guide.
Overview
In the Netezza system, keys are used to encrypt passwords and for digital signing of audit data.
Encrypting PasswordsIn the Netezza system, passwords now can be encrypted for both the host and the client using the AES_256 algorithm (AES with a 256-bit key).
On the host side, passwords can be encrypted (and decrypted for verification during authentication) using a host key, a symmetric key stored on the host in encrypted form. You can choose an encryption key in a key store to be the host key.
On the client side, the nzpassword command is used to store the user passwords. Indi-vidual clients have unique client keys to encrypt the user passwords. For more information about nzpassword usage, see the IBM Netezza Database User’s Guide.
When nzpassword is used for the first time, it generates a native client key, which is stored on the client machine and serves to encrypt the user passwords on the client. The adminis-trator does not choose this key, it is generated by the system.
Changing KeysOn the host, you can change the key used for encrypting and decrypting passwords by using the syntax as in the following example:
SET SYSTEM DEFAULT HOSTKEY TO <keystore name>.<key name>;
<keystore name> is the name of the key store
<key name> is the name of the key, which must be of type AES_256
4-1

Netezza Advanced Security Administrator’s Guide
Or you can set the default to NONE, which reencrypts the format on the host side, as in the following example:
SET SYSTEM DEFAULT HOSTKEY TO NONE;
Since some users may have a mix of host and client versions, the .nzpassword file on the client may need to be accessed by different clients, some that understand the old Blowfish format, and some that understand both the Blowfish format and the AES_256 format. In such cases, the .nzpassword file needs to be maintained in the old format. If you are using the Blowfish format, you can continue to add passwords in that format.
To enforce the improved security available with the AES_256 format, you can convert old format passwords to new by running nzpassword resetkey. You can also run nzpassword resetkey to change the client key if the passwords are already in AES_256 format. This cre-ates a new client key and re-encrypts all the user passwords stored on the client with a newly auto-generated client key. For information on this command, see the IBM Netezza Database User’s Guide.
To convert all AES_256-encrypted passwords to Blowfish-encrypted passwords, such as for a major downgrade, run nzpassword resetkey -none. This re-encrypts the user passwords in the old format and stores them. For more information, see the IBM Netezza System Admin-istrator’s Guide.
Digital SigningDigital signing of audit data is used to expose attempts at log tampering and provide for non-repudiation of the audit log. Each file within each load gets a digital "signature." The signature and the sequence information are stored in the audit database.
Digital signing on the system is done by setting up a public/private cryptographic pair of keys and setting the history configuration to use that key pair.
To set the audit digital signature key, use the syntax as in the following example:
ALTER HISTORY CONFIG
KEY <keystore name>.<key name>;
To turn off signing, use the following command:
ALTER HISTORY CONFIG
KEY NONE
To verify the signature, in addition to displaying the keys, Netezza provides the following sample script that checks the key against the signature:
nzverifyauditsig.sh
The output returns a verification or a failure message, as in the following:
signature verified
signature could not be verified
Creating and Managing Keys
Keys and key-related data are associated with a keystore. You can create multiple keystores and keys, which are managed through any SQL interface, such as ODBC. Before creating or importing a key, you must first create the keystore to hold the key.
4-2 20493 Rev.3

Creating and Managing Keys
Because a key is stored like an external table, it is not captured by a regular backup/restore function, and you should back it up after you create it. You must save all keys, either in the keystore or by exporting them using SHOW, to verify the signatures in the audit database.
To create a keystore, use the syntax as in the following example:
CREATE KEYSTORE <name> TYPE <type> PASSWORD <password>;
<name> is the name you give the keystore
<type> is LOCAL, the only type currently supported
<password> is the password you give to encrypt the keys held in that keystore
To create or import a key on the Netezza host, use the syntax as in the following example:
CREATE CRYPTO KEY <keystore name>.<key name> TYPE <type> {VALUE <value> PASSWORD <password>}
<keystore name> is the name of the keystore
<key name> is the name of the key
<type> currently supported types are asymmetric keys of type DSA_KEYPAIR, and sym-metric keys of type AES_256
<value> is the value of the key/key pair (encrypted form). Only used for importing keys into the key store
<password> is used to decrypt the key value, if one is specified
SQL language extensions have been added for the key and key store operations, as shown in Table 4-1. You must have MANAGE SECURITY permissions to use these commands.
Table 4-1: SQL Language Extensions
Command Meaning
CREATE KEYSTORE Creates a key store
SHOW KEYSTORE Displays the key store configuration in sum-mary or detail (VERBOSE) format
ALTER KEYSTORE Changes the key store parameters
DROP KEYSTORE Deletes a key store
CREATE CRYPTO KEY Sets a key entry
SHOW CRYPTO KEY Displays key-entry details
DROP CRYPTO KEY Deletes a key entry
20493 Rev.3 4-3
Netezza Advanced Security Administrator’s Guide
4-4 20493 Rev.3
C H A P T E R 5
Advanced Query HistoryWhat’s in this chapter Overview
Collect History
Audit Database
Audit Data Flow
Audit Configuration
Audit Data Digital Signing
Audit Data Capture
This chapter describes the advanced query features used with the new security capabilities. For more information on query history, see the IBM Netezza System Administrator’s Guide.
Overview
Query history captures details about the user activity on the Netezza system, such as the queries that are run, query plans, table access, column access, session creation, and failed authentication requests. The history information is saved in a history database. Users with the proper permissions can review the query history information for details about the users and activity on the Netezza system. These features enhance the query history with auditing and the following benefits:
Guaranteed audit capture of all operations
Digital signing of audit data
Audit data stored in row-secure tables
Secure data offload to a different Netezza system, lowering the impact on a production system and improving the security of the audit
Capture of state changes and CLI operations
Collect History
In some high-security environments, the activities of all users must be logged at all times. In other environments, it is not necessary to capture all activity all of the time. The COL-LECT HISTORY feature enables the security administrator to control which users, groups and databases are subject to having history collected.
5-1

Netezza Advanced Security Administrator’s Guide
The user session is the unit of history collection control. The setting is calculated on ses-sion creation and is not altered after that time. The session user and the connected database both must be set to collect history or no history will be collected for the session.
History in a session is collected if both the user setting and the database setting are COL-LECT HISTORY ON, which is the default. In the case of conflicting group specifications, history is collected. If the security administrator does not want to collect history, he or she can ALTER the database and set COLLECT HISTORY OFF.
Controlling History Collection For UsersA user is set to collect history based on the following:
Session user
Groups the session user belongs to
The connected database
The user setting is based on the following:
If the user’s COLLECT HISTORY is explicitly set, that is the user setting.
If the user‘s COLLECT HISTORY is not set, then the groups to which the user belongs are examined.
If the user’s groups are not set, then the setting defaults to COLLECT HISTORY ON.
If any of the user’s groups is set to COLLECT HISTORY ON, then the setting is COL-LECT HISTORY ON.
Otherwise, the setting is COLLECT HISTORY OFF.
These rules allow you to avoid collecting history on operations against a development or test database, while allowing identified users (or users in an identified group) to have their work audited.
Thus groups can be used as “roles.” For example, a GROUP might be granted update access on a table and also be set to collect history. A different group might be created for table readers that does not collect history.
Controlling History Collection For DatabasesWhile the database administrator controls whether history is collected for a database, the session is the unit of collection. The default is to collect history for the user and the data-base. Use the COLLECT HISTORY clause on the CREATE DATABASE or ALTER DATABASE statements to disable or enable history collection for a database.
To create the database and turn on the COLLECT HISTORY feature, use the following syntax:
CREATE DATABASE database-name [create-db-clause]...
create-db-clause ::=
... existing clauses ...
| COLLECT HISTORY ON
5-2 20493 Rev.3

Audit Database
Note that with cross-database access, settings may be different. The history collection set-ting of the session creation determines access.
For example, if the session setting is set to ON, history is collected, even if the cross-data-base setting is OFF. If the session setting is OFF, history is not collected, even if the cross-database settings are set to ON.
Audit Database
The audit database is stored in tables that use row-level security. Each row is given a label derived from combining the label of the user performing the action and the audit categories associated with that user. The label of the user is used so that someone viewing audit data is able to see the original data as well, since what is captured for the operations may con-tain some of the original data.
Access to the data is restricted by adding in audit categories, which can prevent the user doing the action from viewing the audit data. It also allows the audit data to be partitioned among auditors.
There can be two Netezza systems, the source system where the audit data is captured, and the target system, where the audit data is stored. These can be the same system.
To create the audit database, run the following command aimed at the target system, con-figuring desired options. If an option is not specified, the associated environment variable is used.
/nz/kit/bin/adm/nzhistcreatedb [options]
Table 5-1 explains the options available.
Table 5-1: Audit History Database Options
OptionEnvironment Variable
Description
-d | --db= [DBNAME] The name of the history database to create.
-n | --host=[HOST] NZ_HOST The hostname of the target Netezza system.
-t | --db-type=[DBTYPE] The type of history database to create:query (query history)audit (audit)
-o | --OWNER=[USER] NZ_USER User flag which is the username on the target Netezza system, which becomes the owner of the new history database. For best practice, do not use ADMIN as the owner.
-p | --pwd=[PASSWORD] NZ_PASSWORD User flag which is the password of the user on the target Netezza system.
-v | --schema=[VER] The schema version of the history data-base to be created. The version is 1.
20493 Rev.3 5-3

Netezza Advanced Security Administrator’s Guide
Audit Data Flow
Components which generate audit log information reside on the host. The data flow is as follows:
1. Host processes send log information to the audit capture process.
2. The audit capture process stores the log information in buffers, and periodically sends the data to disk.
3. The disk files are read by a separate audit loader process.
4. The data is loaded into an Netezza database. This database can be on the same or a different Netezza system, but if different, both systems must have an identical security configuration of security levels, cohorts, and categories.
Since loading requires that the Netezza database be online and available, loading is sepa-rate from the capture function.
If the size of staged audit data exceeds the set limit, the audit capture server cannot write more log data, and returns errors. All new activity requiring audit logging fails until the audit data can be loaded and disk space freed. If audit logging fails, the Netezza system goes offline. Be aware that excessive loading of auditing information may affect performance.
Audit Configuration
You can configure a system for audit logging or query history, but not both. Audit logging provides a superset of the information collected by query history. Audit configuration is done in the following steps:
1. Determine the username of the user on the target Netezza system to write the audit. The best practice is to use a user with no permissions. nzhistcreatedb gives the audit-writing user permissions to write to the tables in the audit database, but not to read from them.
2. If using a remote system as the target system, verify that the security model of the source system matches the target system for level, cohort, and category. An Netezza target system can support audit databases loading from several source Netezza systems.
-h | --help Display the help text.
-u | --USER=[USER] The username on the target system used to load audit data to the database. The command configures permissions to allow the user to write to the audit database, but not to read from it.
Table 5-1: Audit History Database Options
OptionEnvironment Variable
Description
5-4 20493 Rev.3

Audit Configuration
3. Run nzhistcreatedb on the target Netezza system.
4. Define the configuration on the source Netezza system.
5. Set the configuration to be active.
6. Stop and start the source system using nzstop and nzstart.
The following information must be specified to configure audit logging:
Target database to use for logging.
Target database credentials.
Maximum disk space to use for buffering audit data.
Maximum time between when data is written to the buffer file and when it is loaded into the audit database.
After data is captured, it is signed, even if the data does not get loaded. Signing is done with the history configuration that is current during the capture phase of the operation, not the load phase.
The following is the syntax for configuring the audit history:
CREATE HISTORY CONFIGURATION <config-name> <hist-clause> …
<hist-clause> ::=
| HISTTYPE {QUERY | AUDIT | NONE}
| NPS { LOCALHOST | <hostname> }
| DATABASE <dbname>
| USER <writer-username>
| PASSWORD <writer-password>
| COLLECT <history-item> ,...
| INCLUDING [ONLY] { SUCCESS | FAILURE | ALL }
| LOADINTERVAL {number}
| LOADMINTHRESHOLD {number}
| LOADMAXTHRESHOLD {number}
| STORAGELIMIT {number}
| LOADRETRY {number}
| ENABLEHIST {boolean}
| ENABLESYSTEM {boolean}
| VERSION <version>
| KEY { NONE | <cryto-key-name> }
<history-item>
QUERY
| PLAN
| TABLE
| COLUMN
| SERVICE
| STATE
20493 Rev.3 5-5
Netezza Advanced Security Administrator’s Guide
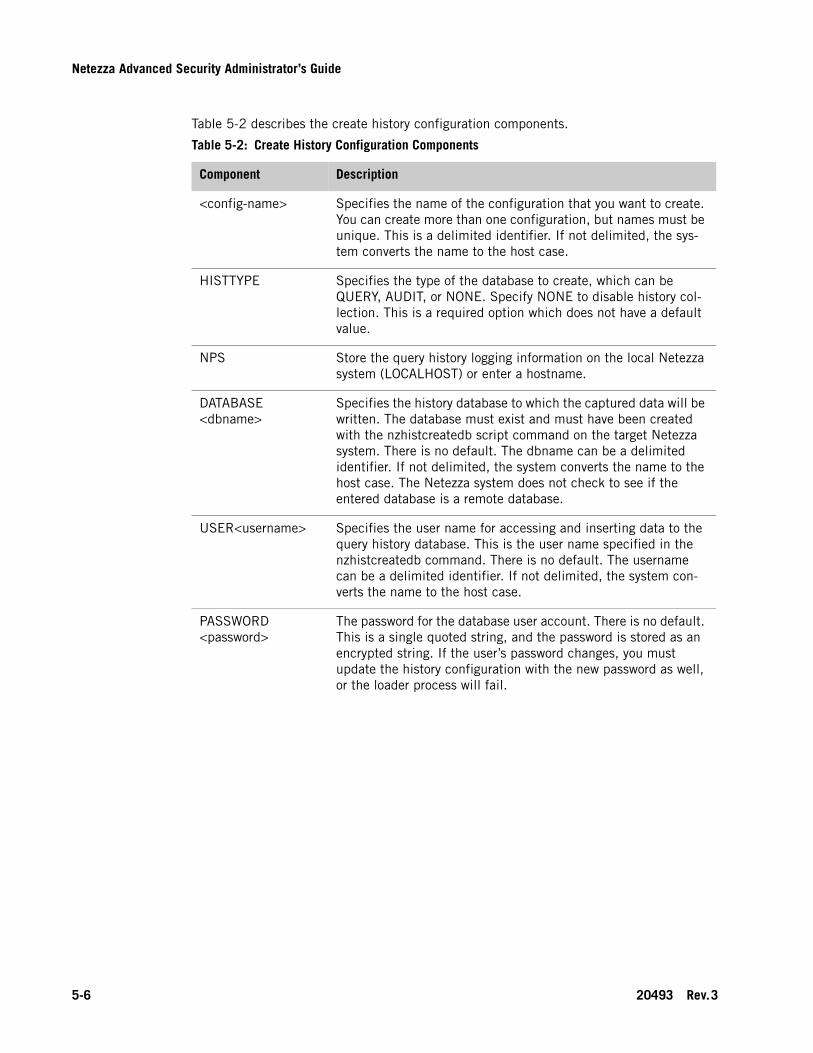
Table 5-2 describes the create history configuration components.
Table 5-2: Create History Configuration Components
Component Description
<config-name> Specifies the name of the configuration that you want to create. You can create more than one configuration, but names must be unique. This is a delimited identifier. If not delimited, the sys-tem converts the name to the host case.
HISTTYPE Specifies the type of the database to create, which can be QUERY, AUDIT, or NONE. Specify NONE to disable history col-lection. This is a required option which does not have a default value.
NPS Store the query history logging information on the local Netezza system (LOCALHOST) or enter a hostname.
DATABASE <dbname>
Specifies the history database to which the captured data will be written. The database must exist and must have been created with the nzhistcreatedb script command on the target Netezza system. There is no default. The dbname can be a delimited identifier. If not delimited, the system converts the name to the host case. The Netezza system does not check to see if the entered database is a remote database.
USER<username> Specifies the user name for accessing and inserting data to the query history database. This is the user name specified in the nzhistcreatedb command. There is no default. The username can be a delimited identifier. If not delimited, the system con-verts the name to the host case.
PASSWORD <password>
The password for the database user account. There is no default. This is a single quoted string, and the password is stored as an encrypted string. If the user’s password changes, you must update the history configuration with the new password as well, or the loader process will fail.
5-6 20493 Rev.3

Audit Configuration
COLLECT Specifies the history data to collect. After enabling query history collection, the system always collects login failure, session cre-ation, session termination, and the startup of the log capture (alcapp) process. You can specify additional information to col-lect using this clause:• QUERY—collect the query data.• PLAN—collect plan data from queries. If you specify PLAN, you automatically collect QUERY as well.• TABLE—collect table detail data from queries. If you specify TABLE, you automatically collect QUERY as well.• COLUMN —collect column detail data from queries. If you specify COLUMN, you automatically collect QUERY and TABLE as well.• SERVICE — collect CLI commands• STATE — collect system state changesYou can specify multiple values using comma-separated values. For more information, refer to the chapter on query history in the IBM Netezza System Administrator’s Guide.
INCLUDING Specifies the capture operations for query_prolog, query_epilog, plan_prolog, and plan_epilog. This does not apply to session_prolog, session_eplilog, and failed authentication.• ONLY — Use this with either SUCCESS or FAILURE to capture the desired set of operations.• SUCCESS — Used with ONLY, captures only successful queries.• FAILURE — Used with ONLY, captures only failed operations.• ALL — Captures successful and failed operations.
LOADINTERVAL Specifies the number of minutes to wait before checking the staged area for history data to transfer to the loading area. The valid values are 0 (to disable the timer), or 1 to 60 minutes. There is no default value.Note: This value works in conjunction with LOADMINTHRESH-OLD and LOADMAXTHRESHOLD to configure the loading process. For more information about the settings, refer to the chapter on query history in the IBM Netezza System Administra-tor’s Guide.
Table 5-2: Create History Configuration Components
Component Description
20493 Rev.3 5-7

Netezza Advanced Security Administrator’s Guide
LOADMINTHRESH-OLD
Specifies the minimum amount of history data in MB to collect before transferring the staged batch files to the loading area. A value of 0 disables the min threshold check. The maximum value is 102400MB (100GB).Note: This value works in conjunction with the LOADINTERVAL and LOADMAXTHRESHOLD inputs to configure the loading pro-cess timers. For more information about the settings, refer to the chapter on query history in the IBM Netezza System Administra-tor’s Guide.
LOADMAXTHRESH-OLD
Specifies the amount of history data in MB to collect before automatically transferring the staged batch files to the loading area. A value of 0 disables the max threshold check. The maxi-mum value is 102400MB (100GB).Note: This value works in conjunction with the LOADMIN-THRESHOLD and LOADINTERVAL inputs to configure the loading process timers. For more information about the settings, refer to the chapter on query history in the IBM Netezza System Administrator’s Guide.
DISKFULLTHRESH-OLD
Specified in MB, this is the threshold below which if the total free disk space in /nz/data, it is treated just like reaching STORAGELIMIT.
STORAGELIMIT Specifies the maximum size of the history data staging area in MB. If the size of the staging area reaches or exceeds this threshold, history data collection stops until disk space can be freed. The STORAGELIMIT value must be greater than LOADMAXTHRESHOLD.There is no default. Valid values are 0 to any positive integer. If you specify 0, storage limit checking is disabled. The maximum value is 102400MB (100GB).
LOADRETRY Specifies the number of times that the load operation will be retried. The valid values are 0 (no retry), 1 or 2. There is no default.
ENABLEHIST Specifies whether to log information about queries to the audit history database, if the history database in on LOCALHOST. A value of TRUE enables history collection for these queries, and FALSE disables the history collection. There is no default. If you specify FALSE, note that any queries against the history data-base which have syntax errors will be captured.
Table 5-2: Create History Configuration Components
Component Description
5-8 20493 Rev.3

Audit Configuration
Outputs The CREATE HISTORY CONFIGURATION command has the following outputs:
DescriptionThis command creates a configuration definition for query or audit history logging on an Netezza system. You must create at least one configuration for the current schema version to enable query or audit history logging. This operation itself is not logged in the query or audit history database if it is being set up for the first time for the current query or audit history schema version or if the current history configuration points to a type NONE. The CREATE HISTORY CONFIGURATION command has the following characteristics:
ENABLESYSTEM Specifies whether to log information about system queries. A system queries accesses at least one system table but no user tables. A value of TRUE enables history collection for these que-ries, and FALSE disables the history collection. There is no default. If you specify FALSE, note that any queries against sys-tem tables which have syntax errors will be captured.
VERSION <version> Specifies the audit history schema version of the configuration. By default, this is the audit history schema version of the cur-rent image. For Release 4.6, the version number is 1. The version must match the version number specified in the nzhist-createdb command; otherwise, the loader process will fail.
KEY NONE Only applies to HISTTYPE AUDIT. If NONE is specified, then no crypto key is associated with the configuration, and no digital signing is done.
KEY <crypto-key-name>
The specified crypto key must be an existing public-private key pair. That crypto key is used to digitally sign the audit history data.
Table 5-2: Create History Configuration Components
Component Description
Table 5-3: CREATE HISTORY CONFIGURATION Output
Output Description
CREATE HISTORY CONFIGURATION
Message returned if the command is successful.
ERROR: permission denied You must have Manage Security permission to configure query history logging.
ERROR: database <dbname> not found.
The query history database was not found on the Netezza system.
ERROR: login failed The credentials provided for the writer did not work. Note that there will be no password check.
20493 Rev.3 5-9

Netezza Advanced Security Administrator’s Guide
Privileges RequiredYou must have Manage Security permissions to configure query history logging.
Related CommandsSee the “ALTER HISTORY CONFIGURATION” on page A-9 to modify configurations.
See the “DROP HISTORY CONFIGURATION” on page A-33 to drop configurations.
See the “SET HISTORY CONFIGURATION” on page A-37 to specify a configuration for query history logging.
See the “SHOW HISTORY CONFIGURATION” on page A-42 to display information about a configuration.
UsageSome sample usages of the CREATE HISTORY CONFIGURATION command follow.
The following command creates a history configuration named all_hist which enables the capture of all history information:
SYSTEM(ADMIN)=> CREATE HISTORY CONFIGURATION all_hist HISTTYPE QUERY DATABASE histdb USER histusr PASSWORD histusrpw COLLECT PLAN,COLUMN LOADINTERVAL 5 LOADMINTHRESHOLD 4 LOADMAXTHRESHOLD 20 VERSION 1;
The following command creates a history configuration named hist_mincollect which col-lects the basic level of history data (login failure, session creation, and termination, and the startup of the alcapp process):
SYSTEM(ADMIN)=> CREATE HISTORY CONFIGURATION hist_mincollect HISTTYPE QUERY DATABASE histdb USER histusr PASSWORD histusrpw COLLECT LOADINTERVAL 5 LOADMINTHRESHOLD 4 LOADMAXTHRESHOLD 20 VERSION 1;
The following command creates a history configuration named hist_queryonly which col-lects query and plan details and the basic level of information:
SYSTEM(ADMIN)=> CREATE HISTORY CONFIGURATION hist_mincollect HISTTYPE QUERY DATABASE "query db" USER histusr PASSWORD histusrpw COLLECT QUERY,PLAN LOADINTERVAL 5 LOADMINTHRESHOLD 4 LOADMAXTHRESHOLD 20 VERSION 1;
The following command creates a history configuration named hist_disabled that disables history collection:
SYSTEM(ADMIN)=> CREATE HISTORY CONFIGURATION hist_disabled HISTTYPE NONE;
To control visibility of the audit data, do the following:
The creator of the audit database must have CREATE DATABASE privileges, but should not hold MANAGE SECURITY or MANAGE SYSTEM permissions on the target, so as not to have the ability to change the audit tables to see unauthorized audit data.
The user configured for audit writing should only be used as the audit writer. No actual person should log in using those credentials. The audit writer user should be given only the minimum access needed to write the audit, which is automatically set by the nzhistcreatedb script. The audit writer user should be distinct from the creator of the audit database or the user configuring the audit on the source database.
5-10 20493 Rev.3

Audit Data Digital Signing
The user with MANAGE SECURITY permissions on the source database should have no access to the audit database. That user can manipulate things on the source system to expose data, but cannot affect the existing contents of the audit database.
Audit Data Digital Signing
Digital signing of audit data is used to expose attempts at log tampering and provide for non-repudiation of the audit log. Each file within each load gets a digital "signature." The signature and the sequence information are stored in the audit database.
Digital signing on the system is done by setting up a public/private cryptographic pair of keys and setting the history configuration to use that key pair.
Audit Data Capture
The query history extensions allow you to capture additional data in the following areas:
Service commands
System state changes
Authentication events
Service CommandsA subset of the CLI can be audited by setting the SERVICE collect flag in the History Con-figuration. The CLI commands in Table 5-4 are captured, and the SERVICETYPE values are used in the history database.
Note that all the commands in Table 5-4 are associated with an Netezza “system user” login and password. Audited data relates each command invocation to the invoker session.
Table 5-4: Audited Commands
Command SERVICETYPE
nzbackup 1
nzrestore 2
nzreclaim 3
nzsfi 4
nzspu 5
nzstate 6
nzstats 7
nzsystem 8
nzevent (-dump option) 9
20493 Rev.3 5-11

Netezza Advanced Security Administrator’s Guide
Even if a service command fails due to lack of privileges, it is still captured. The data does not indicate whether the service finished successfully or not. Service attempts that fail at login based on username/password are captured as failed authentications.
The following list shows certain CLI commands that are not captured, because they are already audited through SQL or they do not connect to the database.
nzcontents
nzconvert
nzhostbackup
nzhostrestore
nzstart/nzstop
nzwebstart/nzwebstop
nzload
nzpassword
nzsession
nzsql
nztopology
nzrev
nzinventory
nzevent (options other than dump)
System State ChangesState changes are captured with the default 'PUBLIC::' security label (for more information on security labels, see Chapter 6, “Multi-Level Security and Row-Secure Tables”) and are not related to a user account. State change capture is determined by the STATE collect flag in the History Configuration. Whenever any state change event is captured, the current ver-sion of the system is included as part of the captured data, to allow for tracking upgrades and downgrades.
Table 5-5 lists the state change events that are captured.
Table 5-5: State Change Events
Event CHANGETYPE
System has changed to Online 1
System has changed to a Paused state 2
System has changed to an Offline state 3
System has changed to a Stopped state 4
5-12 20493 Rev.3
Audit Data Capture
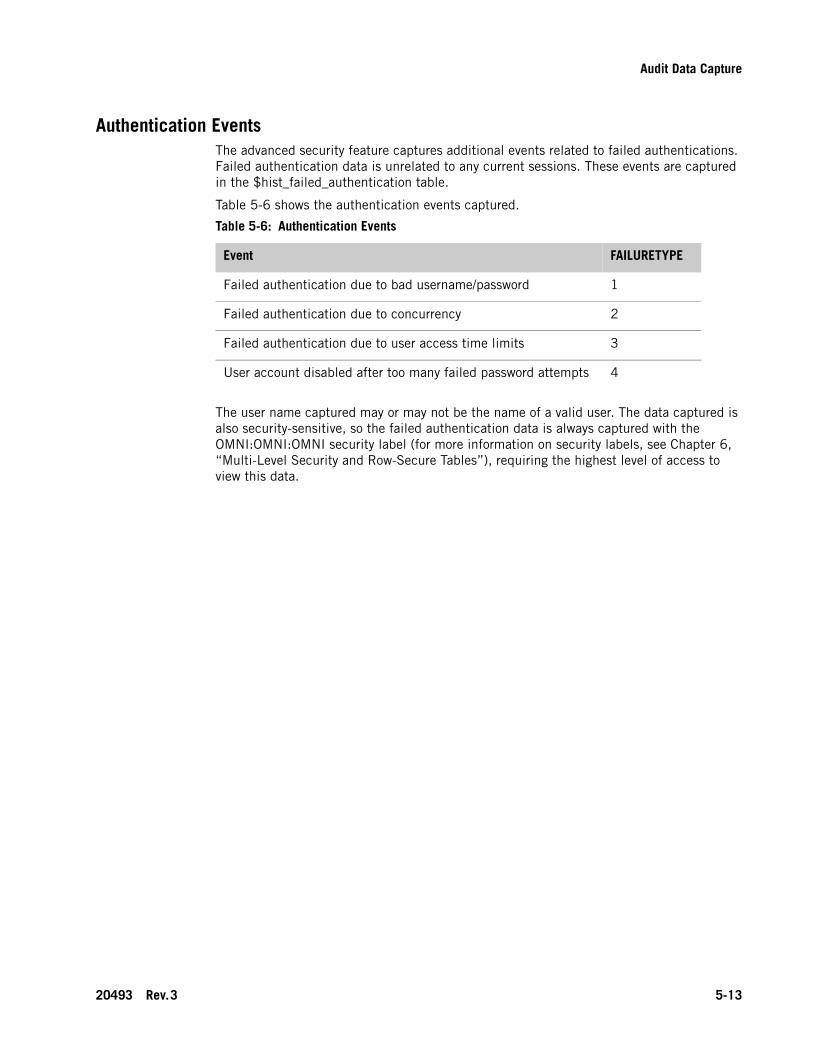
Authentication EventsThe advanced security feature captures additional events related to failed authentications. Failed authentication data is unrelated to any current sessions. These events are captured in the $hist_failed_authentication table.
Table 5-6 shows the authentication events captured.
The user name captured may or may not be the name of a valid user. The data captured is also security-sensitive, so the failed authentication data is always captured with the OMNI:OMNI:OMNI security label (for more information on security labels, see Chapter 6, “Multi-Level Security and Row-Secure Tables”), requiring the highest level of access to view this data.
Table 5-6: Authentication Events
Event FAILURETYPE
Failed authentication due to bad username/password 1
Failed authentication due to concurrency 2
Failed authentication due to user access time limits 3
User account disabled after too many failed password attempts 4
20493 Rev.3 5-13

Netezza Advanced Security Administrator’s Guide
5-14 20493 Rev.3

C H A P T E R 6
Multi-Level Security and Row-Secure TablesWhat’s in this chapter Overview
Security Labels
Security Label Syntax
Usage
Row-Secure Tables
This chapter describes ways of using Multi-Level Security. For more information on SQL, see the IBM Netezza Database User’s Guide.
Overview
Multi-Level Security (MLS) is an abstract security model, which Netezza uses to define rules to control user access to row-secure tables (RSTs). A row-secure table is a database table with security labels on rows to filter out users without the proper privileges. The results returned on queries differ based upon the privileges of the user making the query.
The set of user access privileges is called a security profile. Every user (also called a princi-pal) created on the system gets at least the default security profile, at the lowest possible level. When a user attempts to access a table row, the system checks the user’s profile against the row security label; if the profile allows, the user can access the row.
The following sections explain the components of the access rules and how they interact with each other.
Security Labels
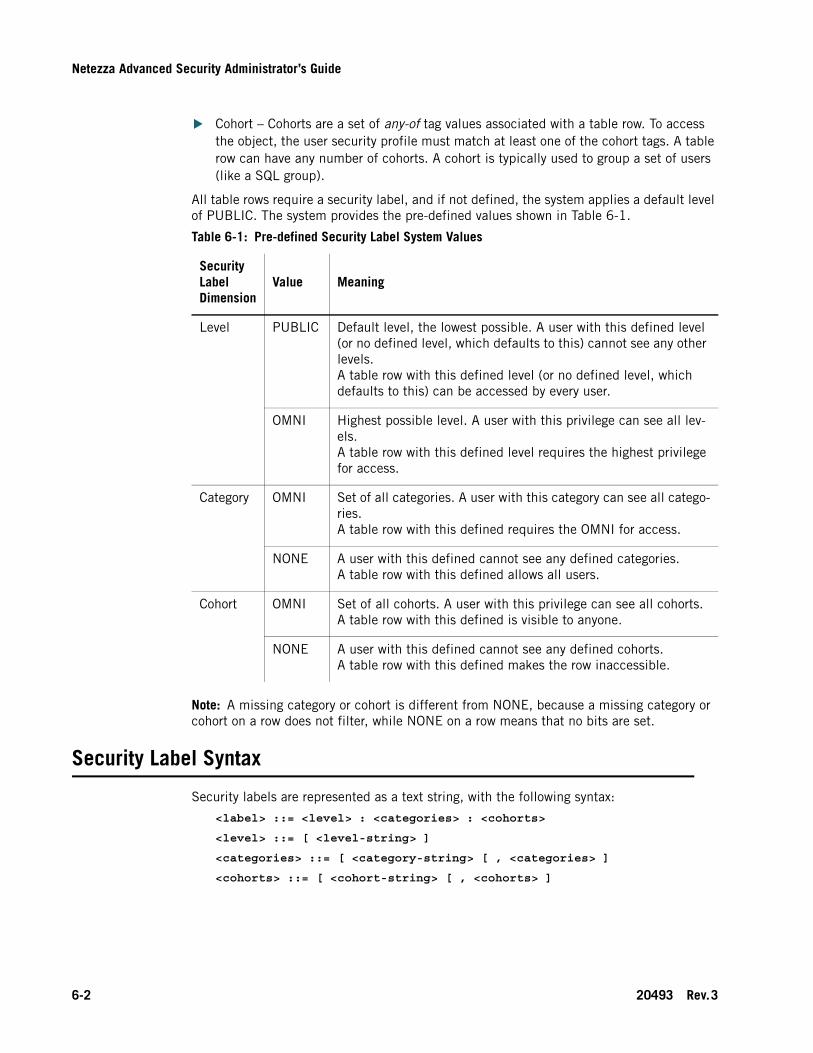
The security label has three dimensions: level, category, and cohort. You can apply one, two, or all three dimensions to a row.
Level – Levels are ordered, from a less secure lower level (such as “PUBLIC”), to a more secure higher level (such as “Top Secret”). Every table row and user has only one level.
Category – Categories are a set of all-of tag values associated with a table row. To access the object, the user security profile must match against the entire set of cate-gory tags. A table row can have a number of categories (the system limit is 64K, and the size limit on the label string is 4000). A category is typically used to group a set of data.
6-1
Netezza Advanced Security Administrator’s Guide
Cohort – Cohorts are a set of any-of tag values associated with a table row. To access the object, the user security profile must match at least one of the cohort tags. A table row can have any number of cohorts. A cohort is typically used to group a set of users (like a SQL group).
All table rows require a security label, and if not defined, the system applies a default level of PUBLIC. The system provides the pre-defined values shown in Table 6-1.
Note: A missing category or cohort is different from NONE, because a missing category or cohort on a row does not filter, while NONE on a row means that no bits are set.
Security Label Syntax
Security labels are represented as a text string, with the following syntax:
<label> ::= <level> : <categories> : <cohorts>
<level> ::= [ <level-string> ]
<categories> ::= [ <category-string> [ , <categories> ]
<cohorts> ::= [ <cohort-string> [ , <cohorts> ]
Table 6-1: Pre-defined Security Label System Values
Security Label Dimension
Value Meaning
Level PUBLIC Default level, the lowest possible. A user with this defined level (or no defined level, which defaults to this) cannot see any other levels. A table row with this defined level (or no defined level, which defaults to this) can be accessed by every user.
OMNI Highest possible level. A user with this privilege can see all lev-els.A table row with this defined level requires the highest privilege for access.
Category OMNI Set of all categories. A user with this category can see all catego-ries.A table row with this defined requires the OMNI for access.
NONE A user with this defined cannot see any defined categories. A table row with this defined allows all users.
Cohort OMNI Set of all cohorts. A user with this privilege can see all cohorts. A table row with this defined is visible to anyone.
NONE A user with this defined cannot see any defined cohorts.A table row with this defined makes the row inaccessible.
6-2 20493 Rev.3
Usage
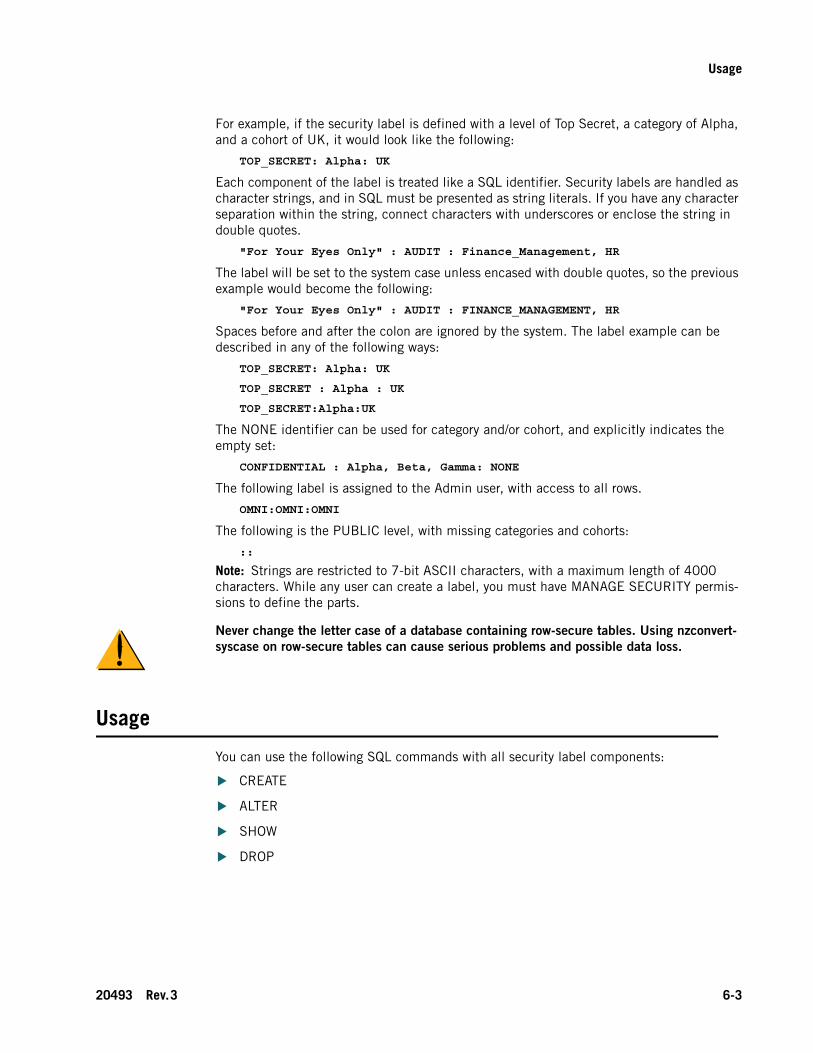
For example, if the security label is defined with a level of Top Secret, a category of Alpha, and a cohort of UK, it would look like the following:
TOP_SECRET: Alpha: UK
Each component of the label is treated like a SQL identifier. Security labels are handled as character strings, and in SQL must be presented as string literals. If you have any character separation within the string, connect characters with underscores or enclose the string in double quotes.
"For Your Eyes Only" : AUDIT : Finance_Management, HR
The label will be set to the system case unless encased with double quotes, so the previous example would become the following:
"For Your Eyes Only" : AUDIT : FINANCE_MANAGEMENT, HR
Spaces before and after the colon are ignored by the system. The label example can be described in any of the following ways:
TOP_SECRET: Alpha: UK
TOP_SECRET : Alpha : UK
TOP_SECRET:Alpha:UK
The NONE identifier can be used for category and/or cohort, and explicitly indicates the empty set:
CONFIDENTIAL : Alpha, Beta, Gamma: NONE
The following label is assigned to the Admin user, with access to all rows.
OMNI:OMNI:OMNI
The following is the PUBLIC level, with missing categories and cohorts:
::
Note: Strings are restricted to 7-bit ASCII characters, with a maximum length of 4000 characters. While any user can create a label, you must have MANAGE SECURITY permis-sions to define the parts.
Never change the letter case of a database containing row-secure tables. Using nzconvert-syscase on row-secure tables can cause serious problems and possible data loss.
Usage
You can use the following SQL commands with all security label components:
CREATE
ALTER
SHOW
DROP
20493 Rev.3 6-3

Netezza Advanced Security Administrator’s Guide
The following is an example of how to create and display levels:
DEV(ADMIN)=> CREATE SECURITY LEVEL conf VALUE 500;
CREATE SECURITY LEVEL
DEV(ADMIN)=> CREATE SECURITY LEVEL greater VALUE 600;
CREATE SECURITY LEVEL
DEV(ADMIN)=> CREATE SECURITY LEVEL secret VALUE 800;
CREATE SECURITY LEVEL
DEV(ADMIN)=> SHOW SECURITY LEVEL ALL;
NAME | LEVEL----------+--------PUBLIC | 0CONF | 500GREATER | 600SECRET | 800OMNI | 32767(5 rows)
Note that since SECRET has a higher value than CONF and GREATER, a user with SECRET can access CONF and GREATER levels, but a user with CONF or GREATER cannot access SECRET levels. A GREATER level can access a CONF level, and any other levels with lesser values.
You cannot change level values or drop any security levels, cohorts, or categories if you have any row-secure tables defined in the system.
To alter a security level, you rename it and give it the new value, as in the following exam-ple using the name and value of CONF from the previous example:
DEV(ADMIN)=> ALTER SECURITY LEVEL conf RENAME TO TOP_SECRET VALUE 1000;
ALTER SECURITY LEVEL
So now a user with the altered TOP_SECRET level can access SECRET levels, but a user with SECRET levels cannot access TOP_SECRET levels.
The following is an example of how to create and display categories. The system automati-cally generates IDs.
DEV(ADMIN)=> CREATE CATEGORY super;
CREATE CATEGORY
DEV(ADMIN)=> CREATE CATEGORY insider;
CREATE CATEGORY
DEV(ADMIN)=> CREATE CATEGORY audit;
CREATE CATEGORY
DEV(ADMIN)=> SHOW CATEGORY ALL;
NAME | ID----------+--------AUDIT | 3INSIDER | 2SUPER | 1OMNI | 0(4 rows)
6-4 20493 Rev.3

Usage
To alter a category, rename it and give it the new value, as in the following example:
DEV(ADMIN)=> ALTER CATEGORY SUPER RENAME TO TOP_SECRET;
ALTER CATEGORY
Cohorts are a strict set of hierarchies, and you can put cohorts into other cohorts for a finer control of access, as in the following:
DEV(ADMIN)=> CREATE COHORT TOP;
CREATE COHORT
DEV(ADMIN)=> CREATE COHORT SALES IN COHORT TOP;
CREATE COHORT
The following is an example of how to create and display different cohorts. The system automatically generates the IDs:
DEV(ADMIN)=> CREATE COHORT "NA" in COHORT sales;
CREATE COHORT
DEV(ADMIN)=> CREATE COHORT "EUROPE" in COHORT sales;
CREATE COHORT
DEV(ADMIN)=> CREATE COHORT "Asia" in COHORT sales;
CREATE COHORT
DEV(ADMIN)=> CREATE COHORT DIST in COHORT top;
CREATE COHORT
DEV(ADMIN)=> CREATE COHORT ENG in COHORT "Europe";
CREATE COHORT
DEV(ADMIN)=> CREATE COHORT FRA in COHORT "Europe";
CREATE COHORT
DEV(ADMIN)=> CREATE COHORT GER in COHORT "Europe";
CREATE COHORT
DEV(ADMIN)=> CREATE COHORT NE in COHORT dist;
CREATE COHORT
DEV(ADMIN)=> SHOW COHORT ALL;
NAME | ID | CLOSURE
--------+----+----------------------------------------------------
Asia | 5 | "Asia"
DIST | 6 | DIST,NE
ENG | 8 | ENG
Europe | 4 | "Europe",ENG,FRA,GER
FRA | 9 | FRA
GER | 10 | GER
NA | 3 | "NA"
NE | 7 | NE
OMNI | 0 |
SALES | 2 | SALES,"NA","Europe","Asia",ENG,FRA,GER
TOP | 1 | TOP,SALES,"NA","Europe","Asia",DIST,NE,ENG,FRA,GER
(11 rows)
20493 Rev.3 6-5
Netezza Advanced Security Administrator’s Guide
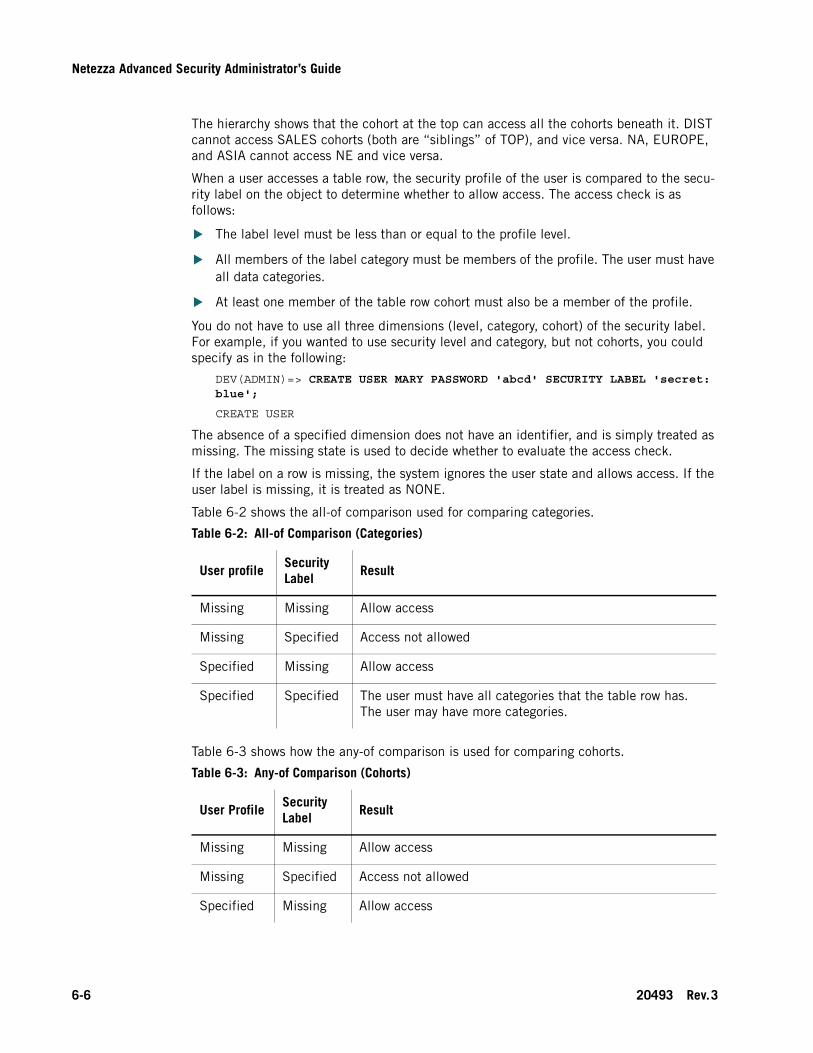
The hierarchy shows that the cohort at the top can access all the cohorts beneath it. DIST cannot access SALES cohorts (both are “siblings” of TOP), and vice versa. NA, EUROPE, and ASIA cannot access NE and vice versa.
When a user accesses a table row, the security profile of the user is compared to the secu-rity label on the object to determine whether to allow access. The access check is as follows:
The label level must be less than or equal to the profile level.
All members of the label category must be members of the profile. The user must have all data categories.
At least one member of the table row cohort must also be a member of the profile.
You do not have to use all three dimensions (level, category, cohort) of the security label. For example, if you wanted to use security level and category, but not cohorts, you could specify as in the following:
DEV(ADMIN)=> CREATE USER MARY PASSWORD 'abcd' SECURITY LABEL 'secret: blue';
CREATE USER
The absence of a specified dimension does not have an identifier, and is simply treated as missing. The missing state is used to decide whether to evaluate the access check.
If the label on a row is missing, the system ignores the user state and allows access. If the user label is missing, it is treated as NONE.
Table 6-2 shows the all-of comparison used for comparing categories.
Table 6-3 shows how the any-of comparison is used for comparing cohorts.
Table 6-2: All-of Comparison (Categories)
User profileSecurity Label
Result
Missing Missing Allow access
Missing Specified Access not allowed
Specified Missing Allow access
Specified Specified The user must have all categories that the table row has. The user may have more categories.
Table 6-3: Any-of Comparison (Cohorts)
User ProfileSecurity Label
Result
Missing Missing Allow access
Missing Specified Access not allowed
Specified Missing Allow access
6-6 20493 Rev.3

Usage
From the previous examples, create a user:
DEV(ADMIN)=> CREATE USER GRETA SECURITY LABEL 'SECRET : INSIDER, AUDIT : DIST, Europe, Asia';
CREATE USER
From the examples given, Table 6-4 shows how a match against the created user GRETA determines which access is allowed.
When security labels are combined, the rules of multi-level security determine that the result is the most restrictive combination, defined as the following:
The maximum of the levels.
The union of the all-of tag sets (categories).
The intersection of the any-of tag sets (cohorts).
The Netezza system does not automatically calculate combinations of labels. You can define functions and aggregates to enforce rules.
The following built-in functions can be used to calculate the combination of two or more security labels:
combine_label(label1, label2) – this is a scalar function that combines two or more labels and returns the most restrictive combination.
max_label(label) – this is an aggregate function that combines a set of labels and returns a single, most restrictive label.
Specified Specified The user must have at least one cohort in common with the table row. Both the user and the table row may have other cohorts.
Table 6-4: Labels and Access
LevelCategory (all-of)
Cohort (any-of)
Can Access
CONF INSIDER Asia Yes.
CONF INSIDER SALES No. User is restricted because none of the user’s cohort is SALES.
AUDIT OMNI Asia No. User is restricted because OMNI equals all categories, and INSIDER and AUDIT are not all_of all categories.
GREATER AUDIT FRA Yes. FRA belongs to cohort Europe.
TOP_SECRET SUPER GER No. Level is too low and user ID does not have SUPER as a category.
Table 6-3: Any-of Comparison (Cohorts)
User ProfileSecurity Label
Result
20493 Rev.3 6-7

Netezza Advanced Security Administrator’s Guide
In the following example, SECRET is more restrictive than PUBLIC, so the result is SECRET. Two categories are more restrictive than one, and since you have to have both cat-egories to see the data, the result is BLUE and GREEN. Cohorts are more restrictive because of the intersection. In this case, the intersection of PSG and QA is empty, so the result is explicitly NONE. Note that an explicit NONE means the data is not visible to any-one except OMNI.
DEV(ADMIN)=> SELECT combine_label('secret: blue:psg', 'public: green: qa');
COMBINE_LABEL
------------------------
SECRET:GREEN,BLUE:NONE
(1 row)
To label query results or use for CTAS, you may combine labels with max_label and combine_label, which calculates the most restrictive label. Joins have no label, just the result.
Row-Secure Tables
A row-secure table (RST) looks like a normal database table, but returns different answers to queries, based upon the user’s security label. Only user tables can have row security, which can be specified when a table is created.
To create a row-secure table, you must have CREATE TABLE permission. Even a table owner might not have the rights to see all the table rows. To create a row-secure table, use the following syntax:
create table rst ... row security;
The following are row-secure table permissions:
LABEL ACCESS – Allows visibility of the label column.
LABEL RESTRICT – Allows the user to update the label to a more restrictive value.
LABEL EXPAND – Allows the user to update the label to a less restrictive value.
The resulting created table has an extra column named “_sec_label” of type varchar, with a 4000 character limit and Latin9 support. To access the _sec_label column you must have LABEL ACCESS permission.
Note the following additional RST information:
Users can INSERT information they are not allowed to view if they have the LABEL RESTRICT permissions.
UPDATE and DELETE can only be done on rows the user can select.
If there are RSTs in the system, you can rename objects and create new levels, categories, and cohorts, but you cannot drop levels, categories, or cohorts, and you cannot alter any level value.
6-8 20493 Rev.3

Row-Secure Tables
RST CaveatsWhen using the advanced security features, note the following operational considerations:
Never change the letter case of a database containing row-secure tables. Using nzcon-vert -syscase on row-secure tables can cause serious problems and possible data loss.
You cannot change the name of a database that has row-secure tables defined within it. You must drop all row secure tables from the database before you can rename it. You can then recreate the tables in the newly renamed database.
You cannot restore a Release 4.6.5 database backup that includes a row-secure table to a prior release.
RST Backup and RestoreExisting backup and restore commands work with RSTs. The target database of a restore must have a compatible model of levels, categories, and cohorts. All of the security descriptors referenced by tables in a database backup must be present on a machine that is a restore target or the restore will fail. Backup captures the security descriptor informa-tion with each backup. Restore compares the security descriptors in the backup against those in the restore target system.
The nzrestore command checks for compatibility before beginning to insert data. The com-parison shows any security discrepancies early in the restore operation, rather than during the data load phase. The compatibility check can be disabled if desired.
RSTs and External TablesThere are no row-secure external tables, as the Netezza system does not apply row security filtering on external tables. The file contents are not secure, and anyone with file access can view the data. External tables can have string columns containing label strings in the label column, and can be used to load and unload RSTs.
To capture the label with a SELECT statement, you must be explicit, as in the following example:
DEV(ADMIN)=> CREATE TABLE rst (id int, name varchar(80), metric int) ROW SECURITY;
CREATE TABLE
DEV(ADMIN)=> CREATE EXTERNAL TABLE 'TMP/XT’ AS SELECT *, _SEC_LABEL FROM rst;
INSERT 0 0
20493 Rev.3 6-9
Netezza Advanced Security Administrator’s Guide
6-10 20493 Rev.3

A P P E N D I X A
CommandsThis appendix includes reference information for Netezza SQL and CLI commands and functions implemented in the new security features.
SQL Changes
This section describes the changes in Netezza SQL commands. Table A-1 describes the commands supported.
Table A-1: Netezza SQL Commands
Command Description More Information
ALTER CATEGORY Changes the name of the category.
See “ALTER CATEGORY” on page A-3.
ALTER COHORT Changes the name or the hierarchy position of the cohort.
See “ALTER COHORT” on page A-4.
ALTER DATABASE... COLLECT HISTORY
Assigns the collect history to the database object.
See “ALTER DATABASE” on page A-6.
ALTER GROUP Changes the security label and audit categories, the collect history, concurrent session, and access time attributes of the group.
See “ALTER GROUP” on page A-7.
ALTER HISTORY CONFIGURATION
Modifies the configuration of query or audit history logging.
See “ALTER HISTORY CONFIGU-RATION” on page A-9.
ALTER SECURITY LEVEL
Changes the name or value of a security level.
See “ALTER SECURITY LEVEL” on page A-13.
ALTER USER Changes the security label and audit categories, the collect history, concurrent session, and access time attributes of the user object.
See “ALTER USER” on page A-15.
CREATE CATEGORY Creates a new security category.
See “CREATE CATEGORY” on page A-18.
A-1

Netezza Advanced Security Administrator’s Guide
CREATE COHORT Creates a new security cohort.
See “CREATE COHORT” on page A-19.
CREATE DATABASE... COLLECT HISTORY
Assigns the collect history to the database object.
See “CREATE DATABASE” on page A-21.
CREATE GROUP Assigns the security label and audit categories, the collect history, concurrent session, and access time attributes to the group.
See “CREATE GROUP” on page A-22.
CREATE SECURITY LEVEL
Creates a security level. See “CREATE SECURITY LEVEL” on page A-24.
CREATE TABLE... ROW SECURITY
Specifies that the table should be created with row security support.
See “CREATE TABLE” on page A-26.
CREATE USER Assigns the security label and audit categories, the collect history, concurrent session, and access time attributes to the user object.
See “CREATE USER” on page A-27.
DROP CATEGORY Removes the category from the label security configuration.
See “DROP CATEGORY” on page A-30.
DROP COHORT Removes the cohort from the label security configuration.
See “DROP COHORT” on page A-31.
DROP HISTORY CONFIGURATION
Drop the configuration for query or audit history logging.
See “DROP HISTORY CONFIGU-RATION” on page A-33.
DROP SECURITY LEVEL
Removes a security level from the label security configuration.
See “DROP SECURITY LEVEL” on page A-34.
EXECUTE AS... Allows a suitably privileged user to set the CURRENT USER of their session to a different user.
See “EXECUTE AS” on page A-35.
REVERT Reverses the action of the last EXECUTE AS statement.
See “REVERT” on page A-36.
Table A-1: Netezza SQL Commands (continued)
Command Description More Information
A-2 20493 Rev.3

SQL Changes
ALTER CATEGORYUse the ALTER CATEGORY command to change the name of the category.
SynopsisSyntax for altering a category:
ALTER CATEGORY <category-name> RENAME TO <new-name>
Inputs The ALTER CATEGORY command has the following inputs:
SET HISTORY CONFIGURATION
Sets the current history configuration to the named configuration.
See “SET HISTORY CONFIGURA-TION” on page A-37.
SHOW CATEGORY Displays one or more categories.
See “SHOW CATEGORY” on page A-39.
SHOW COHORT Displays one or more cohorts or the cohort hierarchy.
See “SHOW COHORT” on page A-40.
SHOW HISTORY CONFIGURATION
Displays the query or audit history configuration settings.
See “SHOW HISTORY CONFIGU-RATION” on page A-42.
SHOW SECURITY LEVEL
Displays one or all security levels.
See “SHOW SECURITY LEVEL” on page A-43.
Table A-1: Netezza SQL Commands (continued)
Command Description More Information
Table A-2: ALTER CATEGORY Inputs
Input Description
category-name The identifier of an existing category.
new-name An identifier to be the new name of the category. The name must be unique among category names. Due to the total size limitation of the system security label field, short names are recommended. For compatibil-ity with other vendors, Netezza recommends that you do not use delimited identifiers, only ASCII charac-ters, and limit name length to 30 characters.
20493 Rev.3 A-3

Netezza Advanced Security Administrator’s Guide
Outputs The ALTER CATEGORY command has the following output:
Description The ALTER CATEGORY command changes the name of the category.
Privileges Required You must have MANAGE SECURITY privilege to create security categories.
Common Tasks Use the ALTER CATEGORY command to change the name of the category.
Related Commands See “CREATE CATEGORY” on page A-18.
See “DROP CATEGORY” on page A-30.
See “SHOW CATEGORY” on page A-39.
Usage The following provides sample usage:
ALTER CATEGORY ARGON RENAME TO BORON;
ALTER COHORTUse the ALTER COHORT command to change the name or the hierarchy position of the cohort.
SynopsisSyntax for altering a cohort:
ALTER COHORT <cohort-name>
{ RENAME TO <new-name> | IN COHORT <parent-cohort> | IN NONE }...
Table A-3: ALTER CATEGORY Output
Output Description
ALTER CATEGORY The message that the system returns if the command is successful.
ERROR: permission denied. You must have MANAGE SECURITY permission to create a security category.
ERROR: object <category-name> not found.
The specified category was not found.
ERROR: object <new-name> already exists.
The new category name must be different from all other category names.
A-4 20493 Rev.3

SQL Changes
Inputs The ALTER COHORT command has the following inputs:
Outputs The ALTER COHORT command has the following output:
Description The ALTER COHORT command has the following characteristics:
Privileges Required You must have MANAGE SECURITY privilege to create security levels.
Common Tasks Use the ALTER COHORT command to change the name or the hierarchy position of the cohort.
Table A-4: ALTER COHORT Inputs
Input Description
cohort-name The identifier of an existing cohort.
new-name An identifier to be the new name of the cohort. The name must be unique among cohort names. Due to the total size limitation of the system security label field, short names are recommended. For compatibil-ity with other vendors, Netezza recommends that you do not use delimited identifiers, only ASCII charac-ters, and limit name length to 30 characters.
IN NONE Removes this cohort from its parent. The cohort no longer has a parent cohort.
IN <parent-cohort> Places the cohort in the cohort hierarchy as a child of <parent-cohort> replacing any previous parent.
Table A-5: ALTER COHORT Output
Output Description
ALTER COHORT The message that the system returns if the command is successful.
ERROR: permission denied. You must have MANAGE SECURITY permission to create a security cohort.
ERROR: object <cohort-name> not found.
The specified cohort or parent cohort was not found.
ERROR: object <new-name> already exists.
The new cohort name must be different from all other cohort names.
20493 Rev.3 A-5

Netezza Advanced Security Administrator’s Guide
Related Commands See “CREATE COHORT” on page A-19.
See “DROP COHORT” on page A-31.
See “SHOW COHORT” on page A-40.
Usage The following provides sample usage:
ALTER COHORT SECRET RENAME TO CONIFDENTIAL IN COHORT HR;
ALTER DATABASEUse the ALTER DATABASE command with the added COLLECT HISTORY clause.
SynopsisSyntax for altering a DATABASE:
ALTER DATABASE <database-name> [<ALTER-db-clause>]...
<ALTER-db-clause> ::=
... existing clauses ...
| COLLECT HISTORY { ON | OFF | DEFAULT }
Inputs The ALTER DATABASE command has the following inputs:
Outputs The ALTER DATABASE command has the following output:
Description The ALTER DATABASE command has the following characteristics:
Privileges Required You must have MANAGE SECURITY permission to alter a database’s history collection attribute.
Table A-6: ALTER DATABASE Inputs
Input Description
COLLECT HISTORY [ ON | OFF | DEFAULT ]
Determines whether sessions attached to this data-base will collect history. ON indicates history will be collected for this database when connect to by a user who also has COLLECT HISTORY ON. OFF indicates history will not be collected for this database.
Table A-7: ALTER DATABASE Output
Output Description
ERROR: permission denied. You must have MANAGE SECURITY permission to set a database history collection attribute.
A-6 20493 Rev.3

SQL Changes
Common Tasks In addition to its previous functions, the command assigns the collect his-tory to the database object.
Related Commands See “CREATE DATABASE” on page A-21.
Usage The following provides sample usage:
ALTER DATABASE SECRET COLLECT HISTORY ON;
ALTER GROUPUse the ALTER GROUP command to alter a group with additional clauses.
SynopsisSyntax for altering a security group:
ALTER GROUP <group-name> [WITH] [<alter_group_clause>]...
<alter_group_clause> ::=
ROWSETLIMIT <limit>
| SESSIONTIMEOUT <limit>
| QUERYTIMEOUT <limit>
| DEFPRIORITY <priority_type>
| MAXPRIORITY <priority_type>
| RESOURCELIMIT <percent>
| [ADD] USER { <user-name> },...
| DROP USER { <user-name> },...
| SYSID <id-number>
| OWNER TO <group-name>
| RENAME TO <group-name>
| COLLECT HISTORY { ON | OFF | DEFAULT }
| CONCURRENT SESSIONS <limit>
| ALLOW CROSS JOIN [TRUE|FALSE|NULL]
| ACCESS TIME { ALL | DEFAULT | ( <access-time>,... )
<access-time> ::= DAY { ALL | <day>, ... } [ <time-bound> ]
<time-bound> ::= START <time-literal> END <time-literal> ]
20493 Rev.3 A-7

Netezza Advanced Security Administrator’s Guide
Inputs The ALTER GROUP command has the following additional inputs:
Table A-8: ALTER GROUP Inputs
Input Description
COLLECT HISTORY [ ON | OFF | DEFAULT ]
Determines whether this group’s sessions will collect history. ON indicates history will be collected for this group when connected to a database that also has COLLECT HISTORY ON. OFF indicates history will not be collected for this group. DEFAULT means to exam-ine groups this group is a member of to determine whether to collect history. If any group has COLLECT HISTORY ON, then history is collected when con-nected to a database that also has COLLECT HISTORY ON. If no group has COLLECT HISTORY ON, but a group has COLLECT HISTORY OFF, then no history is collected. If all groups have DEFAULT his-tory collection, the history is collected. DEFAULT is the default for a group, if the COLLECT HISTORY clause is not specified.
CONCURRENT SESSIONS <limit>
Sets the maximum number of concurrent sessions this group can have. A value of 0 means no limit to the number of concurrent sessions, unless a limit is imposed by a group. In that case, the minimum limit of concurrent sessions across all such groups is used.
ALLOW CROSS JOIN [TRUE | FALSE | NULL]
Sets user or group permission to allow explicit cross joins. If NULL is defined for a user, the system checks against the group permission, and takes the lowest non-null value, where FALSE is lower than TRUE.
Note: This setting involves a system-wide change, so notify all affected users before making this change.
ACCESS TIME ALL Indicates that this group may start sessions on the Netezza system at any time on any day.
ACCESS TIME DEFAULT Indicates that access time restrictions are taken from the groups. If no groups have access time restrictions, then the user may start sessions at any time on any day. The access time restriction is evaluated for every group that has one. If any group restricts access, the user may not create a session. That is, the most restrictive access policy is applied.
A-8 20493 Rev.3

SQL Changes
Outputs The ALTER GROUP command has the following output:
Description The ALTER GROUP command has the following characteristics:
Privileges Required You must have MANAGE SECURITY privilege to alter a group.
Common Tasks Use the ALTER GROUP command to alter a group with additional clauses.
Related Commands See “CREATE GROUP” on page A-22.
Usage The following provides sample usage:
ALTER GROUP FLIGHT WITH COLLECTHISTORY OFF;
ALTER HISTORY CONFIGURATIONUse the ALTER HISTORY CONFIGURATION command to modify the configuration of query or audit history logging. This is executed on the source Netezza system. Note that you can-not alter the current history configuration.
SynopsisSyntax for altering a history configuration:
access-time Specifies one access time sub-clause; several may be specified. An access time sub-clause defines one or more days by the standard SQL day number (1 = Sun-day, 7 = Saturday). The keyword ALL can be use to specify all days of the week; it is equivalent to 1,2,3,4,5,6,7. An access time sub-clause optionally contains one time bound. If no time bound is speci-fied, then the group may create a session at any time on the specified day.
time-bound Specifies a time range from a start time to an end time. The times can be specified as any valid SQL time literal. It is possible to repeat the same day spec-ification multiple times with different time bounds.
Table A-9: ALTER GROUP Output
Output Description
ERROR: permission denied. You must have MANAGE SECURITY permission to alter a group.
Table A-8: ALTER GROUP Inputs
Input Description
20493 Rev.3 A-9

Netezza Advanced Security Administrator’s Guide
ALTER HISTORY CONFIGURATION <config-name> <hist-clause>...<hist-clause> ::=
| HISTTYPE {QUERY | AUDIT | NONE}
| NPS { LOCALHOST | <hostname> }
| DATABASE <dbname>
| USER <username>
| PASSWORD <writer-password>
| COLLECT <history-item> ,...
| INCLUDING [ONLY] { SUCCESS | FAILURE | ALL }
| LOADINTERVAL {number }
| LOADMINTHRESHOLD {number}
| LOADMAXTHRESHOLD {number}
| DISKFULLTHRESHOLD {number}
| STORAGELIMIT {number}
| LOADRETRY {number}
| ENABLEHIST {boolean}
| ENABLESYSTEM {boolean}
| VERSION <version>
| KEY { NONE | <cryto-key-name>
Inputs The ALTER HISTORY CONFIGURATION command has the following inputs:
Table A-10: ALTER HISTORY CONFIGURATION Inputs
Input Description
config_name Name of the configuration altered. There can be many configurations per schema version of query or audit history in the catalog of the source Netezza system. Note that the configuration name itself cannot be altered. Do a DROP and CREATE instead. This config-uration name MUST exist on the system. This is a delimited identifier. If not delimited the name will be converted to host case.
LOCALHOST Use this Netezza system as the target system for query or audit history logging. If not specified, the current value is retained.
DATABASE <dbname> Specifies the database to use for query or audit his-tory logging. The database must have been created with the CREATE HISTORY DATABASE command on the target Netezza system. If not specified, the cur-rent value is retained. This is a delimited identifier. If not delimited, the name will be converted to host case.
A-10 20493 Rev.3
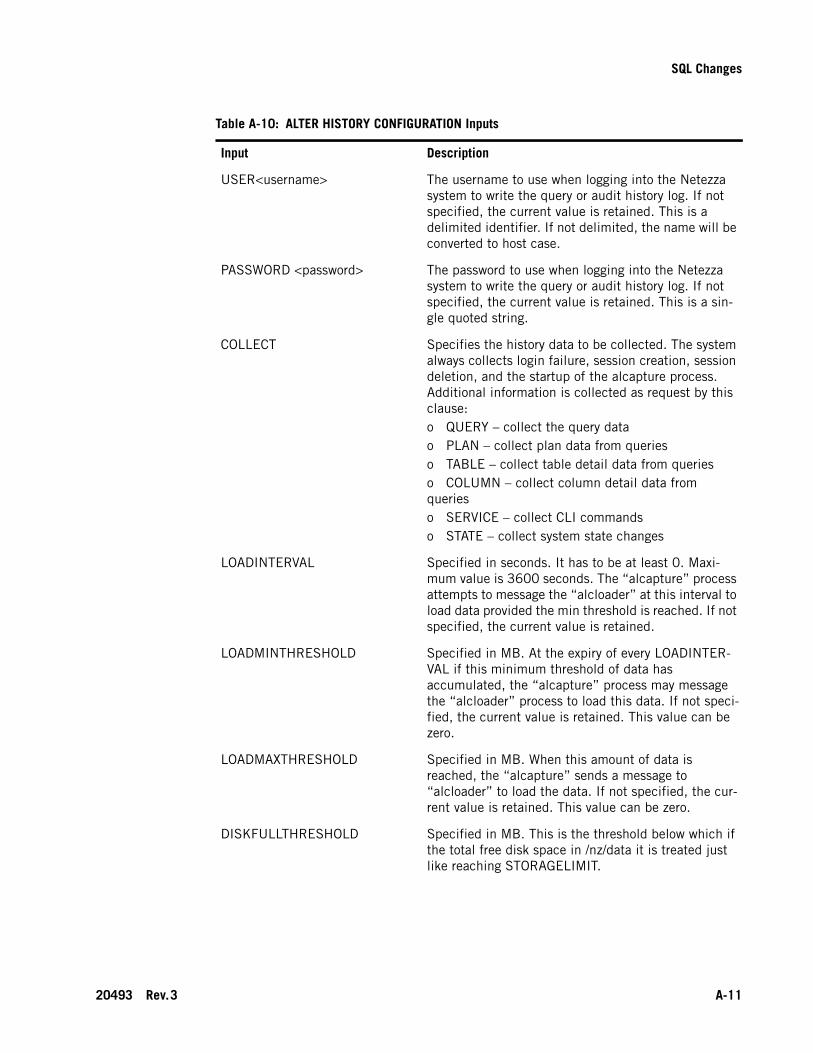
SQL Changes
USER<username> The username to use when logging into the Netezza system to write the query or audit history log. If not specified, the current value is retained. This is a delimited identifier. If not delimited, the name will be converted to host case.
PASSWORD <password> The password to use when logging into the Netezza system to write the query or audit history log. If not specified, the current value is retained. This is a sin-gle quoted string.
COLLECT Specifies the history data to be collected. The system always collects login failure, session creation, session deletion, and the startup of the alcapture process. Additional information is collected as request by this clause:o QUERY – collect the query datao PLAN – collect plan data from querieso TABLE – collect table detail data from querieso COLUMN – collect column detail data from querieso SERVICE – collect CLI commandso STATE – collect system state changes
LOADINTERVAL Specified in seconds. It has to be at least 0. Maxi-mum value is 3600 seconds. The “alcapture” process attempts to message the “alcloader” at this interval to load data provided the min threshold is reached. If not specified, the current value is retained.
LOADMINTHRESHOLD Specified in MB. At the expiry of every LOADINTER-VAL if this minimum threshold of data has accumulated, the “alcapture” process may message the “alcloader” process to load this data. If not speci-fied, the current value is retained. This value can be zero.
LOADMAXTHRESHOLD Specified in MB. When this amount of data is reached, the “alcapture” sends a message to “alcloader” to load the data. If not specified, the cur-rent value is retained. This value can be zero.
DISKFULLTHRESHOLD Specified in MB. This is the threshold below which if the total free disk space in /nz/data it is treated just like reaching STORAGELIMIT.
Table A-10: ALTER HISTORY CONFIGURATION Inputs
Input Description
20493 Rev.3 A-11

Netezza Advanced Security Administrator’s Guide
Outputs The ALTER HISTORY CONFIGURATION command has the following output:
STORAGELIMIT Specified in MB. If this limit is reached in the staging area then the query or audit history data collection is stopped until manual intervention occurs. For audit history, the system is stopped. If not specified, the current value is retained. This value can be zero. If zero, the storage limit checking is disabled.
LOADRETRY The number of times the load operation is retried by the “alcloader” process. Minimum is 0 and maximum is 2. If not specified, the current value is retained.
ENABLEHIST This TRUE / FALSE flag enables or disables the inclu-sion of queries on query or audit history database in query or audit history. If not specified, the current value is retained. Even if this is specified as FALSE, if queries against history database have syntax errors they are captured.
ENABLESYSTEM This TRUE / FALSE flag enables or disables the inclu-sion of queries on system tables in query or audit history. If not specified, the current value is retained. Even if this is set to FALSE, a query with syntax error against system tables is captured.
VERSION <version> The query or audit history schema version of the con-figuration. If not specified, the current value is retained.
KEY NONE Only applies to HISTTYPE AUDIT. If NONE is speci-fied, then no crypto key is associated with the configuration and no digital signing is done.
KEY <crypto-key-name> The specified crypto key must be an existing public-private key pair. That crypto key is used to digitally sign the audit history data.
Table A-11: ALTER HISTORY CONFIGURATION Output
Output Description
ALTER HISTORY CONFIGURATION
The message that the system returns if the command is successful.
ERROR: permission denied. You must have MANAGE SECURITY permission.
Table A-10: ALTER HISTORY CONFIGURATION Inputs
Input Description
A-12 20493 Rev.3
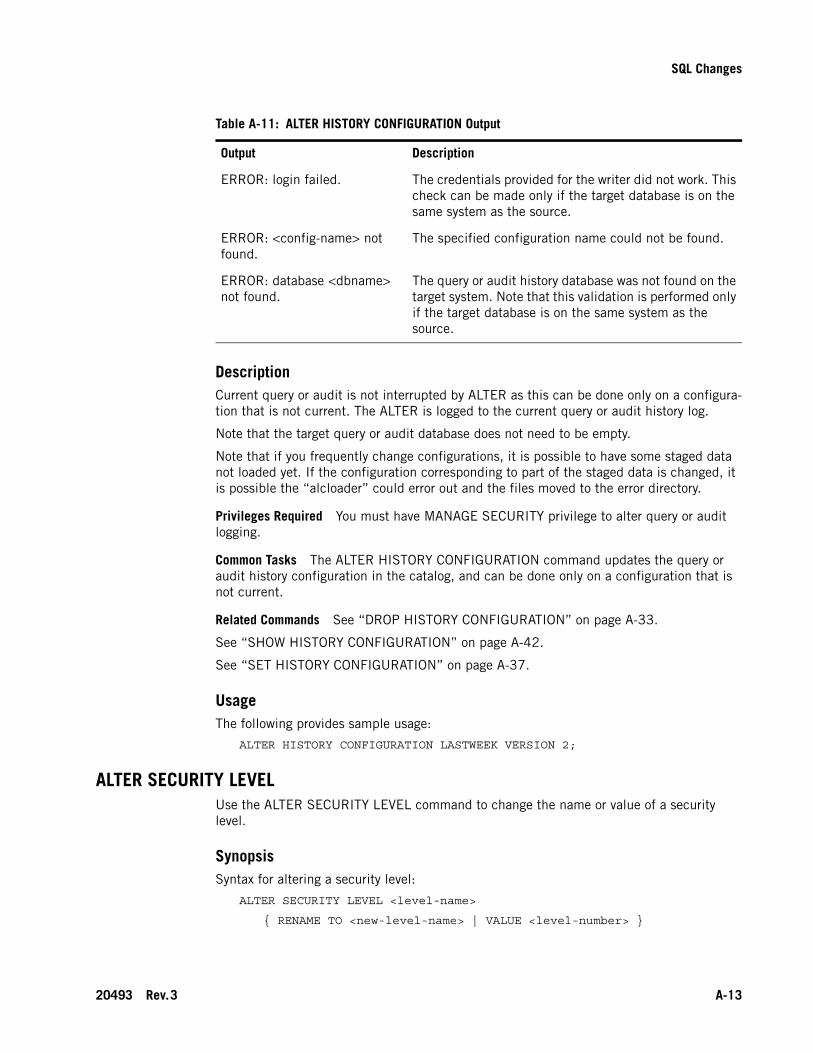
SQL Changes
Description Current query or audit is not interrupted by ALTER as this can be done only on a configura-tion that is not current. The ALTER is logged to the current query or audit history log.
Note that the target query or audit database does not need to be empty.
Note that if you frequently change configurations, it is possible to have some staged data not loaded yet. If the configuration corresponding to part of the staged data is changed, it is possible the “alcloader” could error out and the files moved to the error directory.
Privileges Required You must have MANAGE SECURITY privilege to alter query or audit logging.
Common Tasks The ALTER HISTORY CONFIGURATION command updates the query or audit history configuration in the catalog, and can be done only on a configuration that is not current.
Related Commands See “DROP HISTORY CONFIGURATION” on page A-33.
See “SHOW HISTORY CONFIGURATION” on page A-42.
See “SET HISTORY CONFIGURATION” on page A-37.
Usage The following provides sample usage:
ALTER HISTORY CONFIGURATION LASTWEEK VERSION 2;
ALTER SECURITY LEVELUse the ALTER SECURITY LEVEL command to change the name or value of a security level.
SynopsisSyntax for altering a security level:
ALTER SECURITY LEVEL <level-name>
{ RENAME TO <new-level-name> | VALUE <level-number> }
ERROR: login failed. The credentials provided for the writer did not work. This check can be made only if the target database is on the same system as the source.
ERROR: <config-name> not found.
The specified configuration name could not be found.
ERROR: database <dbname> not found.
The query or audit history database was not found on the target system. Note that this validation is performed only if the target database is on the same system as the source.
Table A-11: ALTER HISTORY CONFIGURATION Output
Output Description
20493 Rev.3 A-13

Netezza Advanced Security Administrator’s Guide
Inputs The ALTER SECURITY LEVEL command has the following inputs:
Outputs The ALTER SECURITY LEVEL command has the following output:
Table A-12: ALTER SECURITY LEVEL Inputs
Input Description
level_name The identifier of an existing level name.
new-level-name An identifier to be the new name of the level. The name must be unique among security level names. Due to the total size limitation of the system security label field, short level names are recommended. For compatibility with other vendors, Netezza recom-mends that you do not use delimited identifiers, use only ASCII characters, and limit name length to 30 characters.
level_number A positive integer level value between 1 and 32766. Higher levels are more secure; lower values are less secure.
Table A-13: ALTER SECURITY LEVEL Output
Output Description
ALTER SECURITY LEVEL The message that the system returns if the command is successful.
ERROR: permission denied. You must have MANAGE SECURITY permission to alter a security level.
ERROR: level number <num-ber> already exists.
The specified level number already exists. A level num-ber can only have one name.
ERROR: level number <num-ber> is out of range.
The level number must be between 1 and 32766. Level number 0 is pre-defined by the system as level PUBLIC. Level number 32767 is pre-defined by the system as level OMNI. Negative level numbers are not allowed.
ERROR: object <new-level-name> already exists.
The new level name must be different from all other security level names.
ERROR: object <level-name> not found.
The level name must exist.
ERROR: label security in use. You cannot change the value of a security level after there is user data that might reference that level.
A-14 20493 Rev.3

SQL Changes
Description The ALTER SECURITY LEVEL command either renames a security level or changes the value of the security level. You can rename a security level at any time. However, you can only change the value of the level if there are no ROW SECURITY tables defined in any database in the system.
Netezza recommends that you develop and review your label security configuration before you create any ROW SECURITY tables. After tables are defined, you can add levels to the system or rename levels, but you cannot change the value of or remove levels.
Privileges Required You must have MANAGE SECURITY privilege to alter security levels.
Common Tasks Use the ALTER SECURITY LEVEL command to update the system catalog to add the new object, and update the security level name to value mapping.
Related Commands See “CREATE SECURITY LEVEL” on page A-24.
See “DROP SECURITY LEVEL” on page A-34.
See “SHOW SECURITY LEVEL” on page A-43.
Usage The following provides sample usage:
ALTER SECURITY LEVEL SECRET { RENAME TO CONFIDENTIAL VALUE 22 };
ALTER USERUse the ALTER USER command to change user settings.
SynopsisSyntax for altering a user:
ALTER USER <user-name> [WITH] [<alter_user_clause>]...
<alter_user_clause> ::=
PASSWORD { <password> | NULL }
| IN GROUP { <group-name> },...
| VALID UNTIL <valid-date>
| ROWSETLIMIT <limit>
| SESSIONTIMEOUT <limit>
| QUERYTIMEOUT <limit>
| DEFPRIORITY <priority_type>
| MAXPRIORITY <priority_type>
| SYSID <id-number>
| IN RESOURCEGROUP <group-name>
| SECURITY LABEL <label-string>
| AUDIT CATEGORY { NONE | { <category> },... }
| RESET ACCOUNT
| OWNER TO <user-name>
| RENAME TO <group-name>
20493 Rev.3 A-15
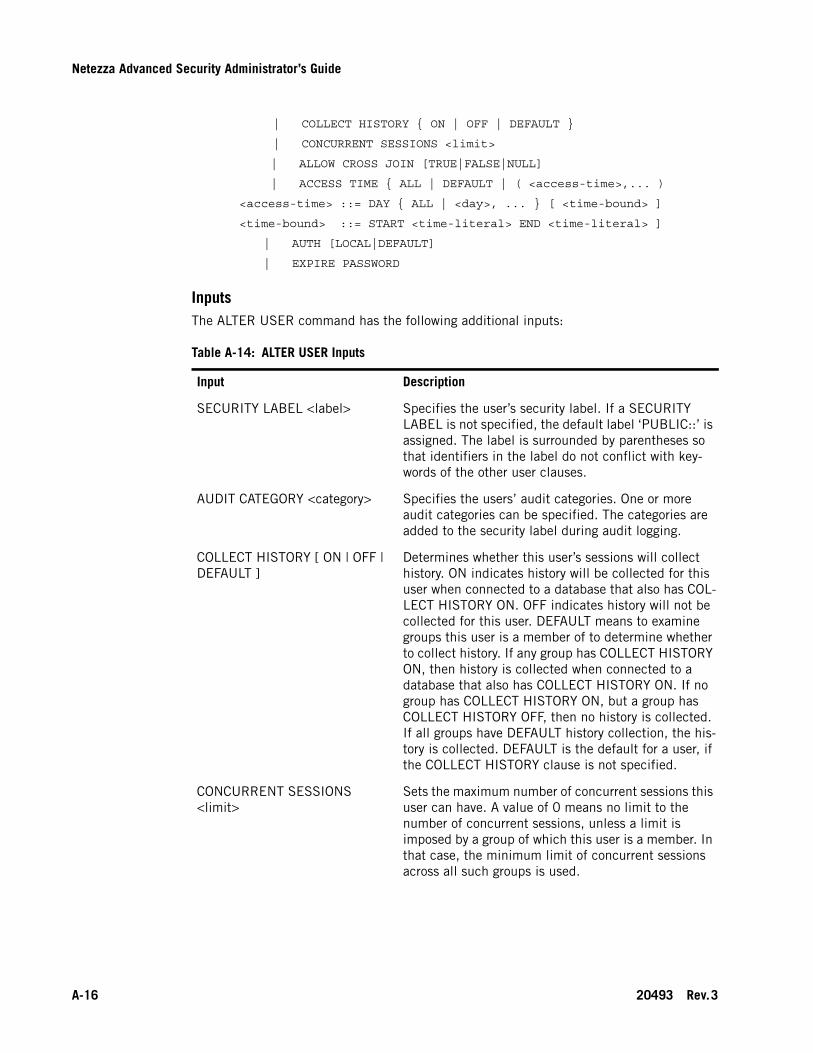
Netezza Advanced Security Administrator’s Guide
| COLLECT HISTORY { ON | OFF | DEFAULT }
| CONCURRENT SESSIONS <limit>
| ALLOW CROSS JOIN [TRUE|FALSE|NULL]
| ACCESS TIME { ALL | DEFAULT | ( <access-time>,... )
<access-time> ::= DAY { ALL | <day>, ... } [ <time-bound> ]
<time-bound> ::= START <time-literal> END <time-literal> ]
| AUTH [LOCAL|DEFAULT]
| EXPIRE PASSWORD
Inputs The ALTER USER command has the following additional inputs:
Table A-14: ALTER USER Inputs
Input Description
SECURITY LABEL <label> Specifies the user’s security label. If a SECURITY LABEL is not specified, the default label ‘PUBLIC::’ is assigned. The label is surrounded by parentheses so that identifiers in the label do not conflict with key-words of the other user clauses.
AUDIT CATEGORY <category> Specifies the users’ audit categories. One or more audit categories can be specified. The categories are added to the security label during audit logging.
COLLECT HISTORY [ ON | OFF | DEFAULT ]
Determines whether this user’s sessions will collect history. ON indicates history will be collected for this user when connected to a database that also has COL-LECT HISTORY ON. OFF indicates history will not be collected for this user. DEFAULT means to examine groups this user is a member of to determine whether to collect history. If any group has COLLECT HISTORY ON, then history is collected when connected to a database that also has COLLECT HISTORY ON. If no group has COLLECT HISTORY ON, but a group has COLLECT HISTORY OFF, then no history is collected. If all groups have DEFAULT history collection, the his-tory is collected. DEFAULT is the default for a user, if the COLLECT HISTORY clause is not specified.
CONCURRENT SESSIONS <limit>
Sets the maximum number of concurrent sessions this user can have. A value of 0 means no limit to the number of concurrent sessions, unless a limit is imposed by a group of which this user is a member. In that case, the minimum limit of concurrent sessions across all such groups is used.
A-16 20493 Rev.3
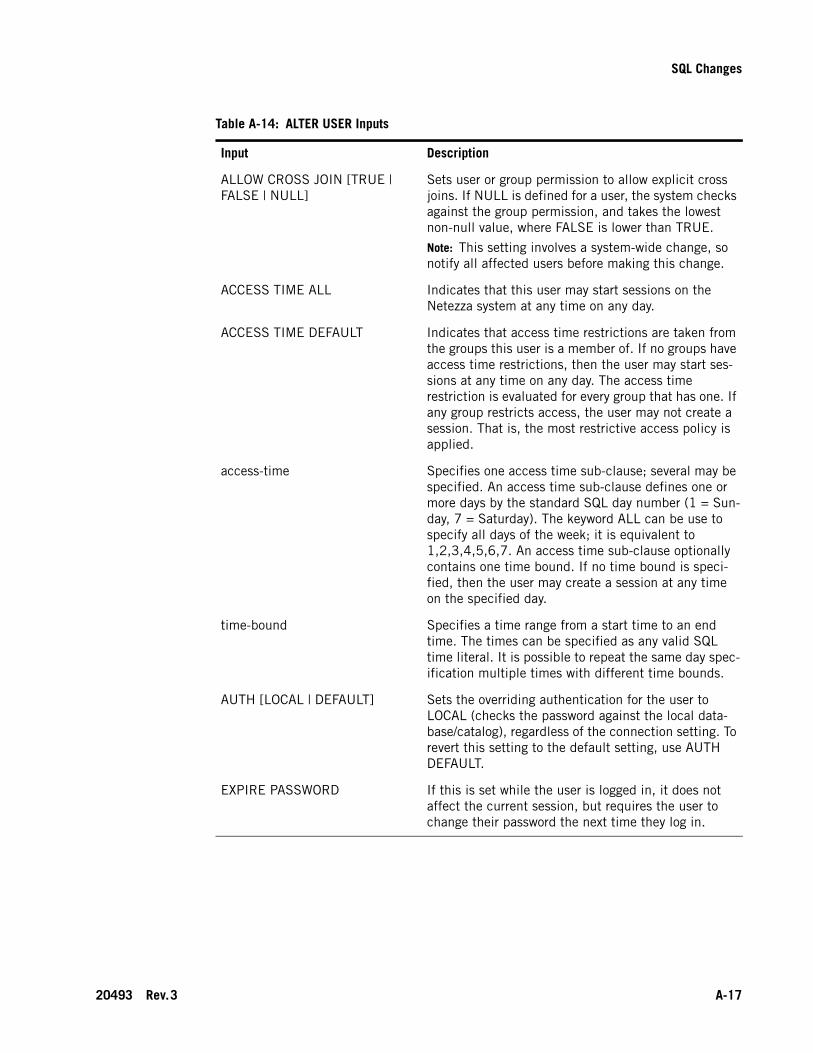
SQL Changes
ALLOW CROSS JOIN [TRUE | FALSE | NULL]
Sets user or group permission to allow explicit cross joins. If NULL is defined for a user, the system checks against the group permission, and takes the lowest non-null value, where FALSE is lower than TRUE.
Note: This setting involves a system-wide change, so notify all affected users before making this change.
ACCESS TIME ALL Indicates that this user may start sessions on the Netezza system at any time on any day.
ACCESS TIME DEFAULT Indicates that access time restrictions are taken from the groups this user is a member of. If no groups have access time restrictions, then the user may start ses-sions at any time on any day. The access time restriction is evaluated for every group that has one. If any group restricts access, the user may not create a session. That is, the most restrictive access policy is applied.
access-time Specifies one access time sub-clause; several may be specified. An access time sub-clause defines one or more days by the standard SQL day number (1 = Sun-day, 7 = Saturday). The keyword ALL can be use to specify all days of the week; it is equivalent to 1,2,3,4,5,6,7. An access time sub-clause optionally contains one time bound. If no time bound is speci-fied, then the user may create a session at any time on the specified day.
time-bound Specifies a time range from a start time to an end time. The times can be specified as any valid SQL time literal. It is possible to repeat the same day spec-ification multiple times with different time bounds.
AUTH [LOCAL | DEFAULT] Sets the overriding authentication for the user to LOCAL (checks the password against the local data-base/catalog), regardless of the connection setting. To revert this setting to the default setting, use AUTH DEFAULT.
EXPIRE PASSWORD If this is set while the user is logged in, it does not affect the current session, but requires the user to change their password the next time they log in.
Table A-14: ALTER USER Inputs
Input Description
20493 Rev.3 A-17

Netezza Advanced Security Administrator’s Guide
Outputs The ALTER USER command has the following output:
Description The ALTER USER command has the following characteristics:
Privileges Required You must have MANAGE SECURITY privilege to alter a user’s security group.
Common Tasks Use the ALTER USER command to change user settings.
Related Commands See “CREATE USER” on page A-27.
Usage The following provides sample usage:
ALTER USER BOB CONCURRENT SESIONS 3;
CREATE CATEGORYUse the CREATE CATEGORY command to create a new security category.
SynopsisSyntax for creating a category:
CREATE CATEGORY <category-name>
Table A-15: ALTER USER Output
Output Description
ERROR: permission denied. You must have MANAGE SECURITY permission to set a user’s security group.
ERROR: invalid security label. The security label is either incorrectly formatted or refers to a security level, cohort or category that does not exist.
ERROR: object <category-name> not found.
The specified audit category must exist in order to asso-ciate it with the user.
A-18 20493 Rev.3
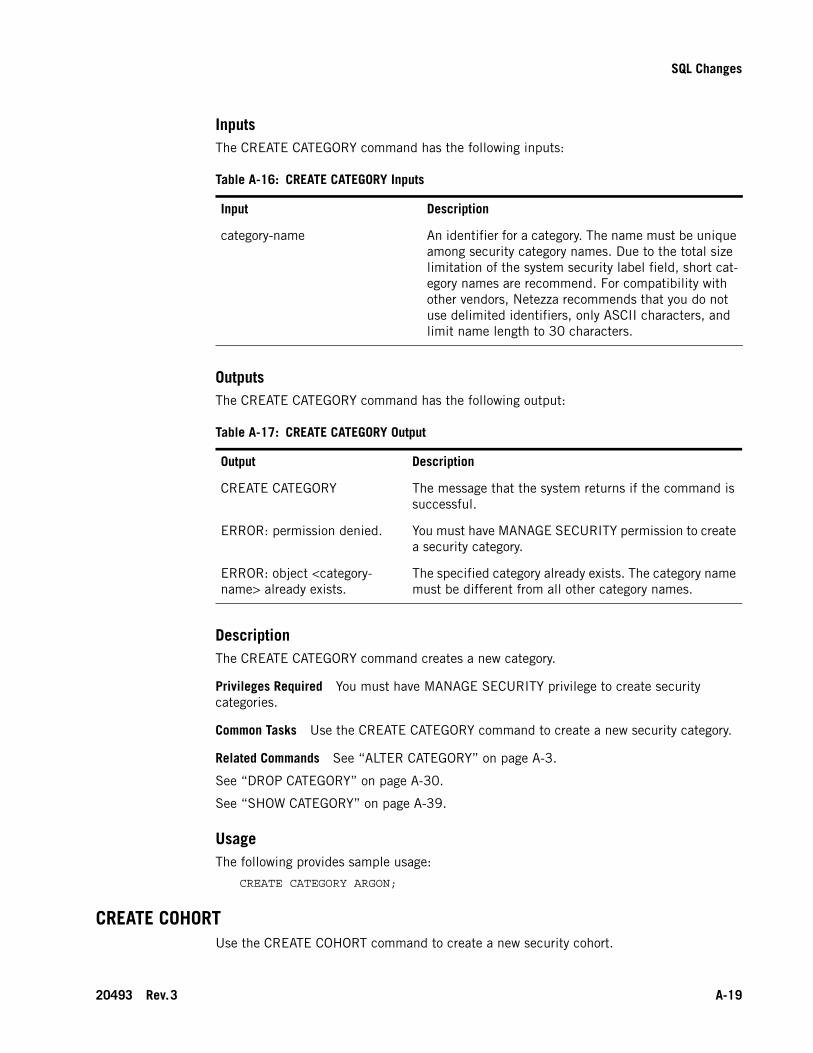
SQL Changes
Inputs The CREATE CATEGORY command has the following inputs:
Outputs The CREATE CATEGORY command has the following output:
Description The CREATE CATEGORY command creates a new category.
Privileges Required You must have MANAGE SECURITY privilege to create security categories.
Common Tasks Use the CREATE CATEGORY command to create a new security category.
Related Commands See “ALTER CATEGORY” on page A-3.
See “DROP CATEGORY” on page A-30.
See “SHOW CATEGORY” on page A-39.
Usage The following provides sample usage:
CREATE CATEGORY ARGON;
CREATE COHORTUse the CREATE COHORT command to create a new security cohort.
Table A-16: CREATE CATEGORY Inputs
Input Description
category-name An identifier for a category. The name must be unique among security category names. Due to the total size limitation of the system security label field, short cat-egory names are recommend. For compatibility with other vendors, Netezza recommends that you do not use delimited identifiers, only ASCII characters, and limit name length to 30 characters.
Table A-17: CREATE CATEGORY Output
Output Description
CREATE CATEGORY The message that the system returns if the command is successful.
ERROR: permission denied. You must have MANAGE SECURITY permission to create a security category.
ERROR: object <category-name> already exists.
The specified category already exists. The category name must be different from all other category names.
20493 Rev.3 A-19

Netezza Advanced Security Administrator’s Guide
SynopsisSyntax for creating a security cohort:
CREATE COHORT <cohort-name> [ IN COHORT <parent-cohort> | IN NONE ]
Inputs The CREATE COHORT command has the following inputs:
Outputs The CREATE COHORT command has the following output:
Description The CREATE COHORT command creates a new security cohort.
Privileges Required You must have MANAGE SECURITY privilege to create security cohorts.
Table A-18: CREATE COHORT Inputs
Input Description
<cohort-name> An identifier for a cohort. The name must be unique among security cohort names. Due to the total size limitation of the system security label field, short cohort names are recommended. For compatibility with other vendors, Netezza recommends that you do not use delimited identifiers, only ASCII characters, and limit name length to 30 characters.
IN NONE Specifies that the cohort does not have a parent cohort. IN NONE is the default if no IN clause is specified.
IN <parent-cohort> Places the new cohort in the cohort hierarchy as a child of <parent-cohort>.
Table A-19: CREATE COHORT Output
Output Description
CREATE COHORT The message that the system returns if the command is successful.
ERROR: permission denied. You must have MANAGE SECURITY permission to create a security cohort.
ERROR: object <cohort-name> already exists.
The specified cohort already exists. The cohort name must be different from all other security cohorts.
ERROR: object <parent-cohort> not found.
The parent cohort must exist before defining children.
A-20 20493 Rev.3

SQL Changes
Common Tasks Use CREATE COHORT to create a new security cohort.
Related Commands See “ALTER COHORT” on page A-4.
See “DROP COHORT” on page A-31.
See “SHOW COHORT” on page A-40.
Usage The following provides sample usage:
CREATE COHORT FINANCE IN COHORT HR;
CREATE DATABASEUse the CREATE DATABASE command with the added COLLECT HISTORY clause.
SynopsisSyntax for creating a DATABASE:
CREATE DATABASE <database-name> [<create-db-clause>]...
<create-db-clause> ::=
... existing clauses ...
| COLLECT HISTORY { ON | OFF | DEFAULT }
Inputs The CREATE DATABASE command has the following inputs:
Outputs The CREATE DATABASE command has the following output:
Table A-20: CREATE DATABASE Inputs
Input Description
COLLECT HISTORY [ ON | OFF | DEFAULT ]
Determines whether sessions attached to this data-base will collect history. ON indicates history will be collected for this database when connect to by a user who also has COLLECT HISTORY ON. OFF indicates history will not be collected for this database. If not specified, the default is ON.
Table A-21: CREATE DATABASE Output
Output Description
ERROR: permission denied. You must have MANAGE SECURITY permission to set a database history collection attribute.
20493 Rev.3 A-21

Netezza Advanced Security Administrator’s Guide
Description The CREATE DATABASE command has the following characteristics:
Privileges Required None.
Common Tasks In addition to its previous functions, the command assigns the collect his-tory to the database object.
Related Commands See “ALTER DATABASE” on page A-6.
Usage The following provides sample usage:
CREATE DATABASE SECRET COLLECT HISTORY ON;
CREATE GROUPUse the CREATE GROUP command to create a new group with additional clauses.
SynopsisSyntax for creating a security group:
CREATE GROUP <group-name> [WITH] [<create_group_clause>]...
<create_group_clause> ::=
ROWSETLIMIT <limit>
| SESSIONTIMEOUT <limit>
| QUERYTIMEOUT <limit>
| DEFPRIORITY <priority_type>
| MAXPRIORITY <priority_type>
| SYSID <id-number>
| RESOURCELIMIT <percent>
| [ADD] USER { <user-name> },...
| COLLECT HISTORY { ON | OFF | DEFAULT }
| CONCURRENT SESSIONS <limit>
| ALLOW CROSS JOIN [TRUE|FALSE|NULL]
| ACCESS TIME { ALL | DEFAULT | ( <access-time>,... )
<access-time> ::= DAY { ALL | <day>, ... } [ <time-bound> ]
<time-bound> ::= START <time-literal> END <time-literal> ]
A-22 20493 Rev.3

SQL Changes
Inputs The CREATE GROUP command has the following additional inputs:
Table A-22: CREATE GROUP Inputs
Input Description
COLLECT HISTORY [ ON | OFF | DEFAULT ]
Determines whether this group’s sessions will collect history. ON indicates history will be collected for this group when connected to a database that also has COLLECT HISTORY ON. OFF indicates history will not be collected for this group. DEFAULT means to exam-ine groups this group is a member of to determine whether to collect history. If any group has COLLECT HISTORY ON, then history is collected when con-nected to a database that also has COLLECT HISTORY ON. If no group has COLLECT HISTORY ON, but a group has COLLECT HISTORY OFF, then no history is collected. If all groups have DEFAULT his-tory collection, the history is collected. DEFAULT is the default for a group, if the COLLECT HISTORY clause is not specified.
CONCURRENT SESSIONS <limit>
Sets the maximum number of concurrent sessions this group can have. A value of 0 means no limit to the number of concurrent sessions, unless a limit is imposed by a group of which this group is a member. In that case, the minimum limit of concurrent ses-sions across all such groups is used.
ALLOW CROSS JOIN [TRUE | FALSE | NULL]
Sets user or group permission to allow explicit cross joins. If NULL is defined for a user, the system checks against the group permission, and takes the lowest non-null value, where FALSE is lower than TRUE.
Note: This setting involves a system-wide change, so notify all affected users before making this change.
ACCESS TIME ALL Indicates that this group may start sessions on the Netezza system at any time on any day.
ACCESS TIME DEFAULT If the group has no access time restrictions, then a user may start sessions at any time on any day. The access time restriction is evaluated for every group that has one. If any group restricts access, the user may not create a session. That is, the most restrictive access policy is applied.
20493 Rev.3 A-23

Netezza Advanced Security Administrator’s Guide
Outputs The CREATE GROUP command has the following output:
Description The CREATE GROUP command has the following characteristics:
Privileges Required You must have MANAGE SECURITY privilege to create a new group with additional clauses.
Common Tasks Use the CREATE GROUP command to create a new group with additional clauses.
Related Commands See “ALTER GROUP” on page A-7.
Usage The following provides sample usage:
CREATE GROUP FLIGHT;
CREATE SECURITY LEVELUse the CREATE SECURITY LEVEL command to create a new security level, giving it a name and a value.
access-time Specifies one access time sub-clause; several may be specified. An access time sub-clause defines one or more days by the standard SQL day number (1 = Sun-day, 7 = Saturday). The keyword ALL can be use to specify all days of the week; it is equivalent to 1,2,3,4,5,6,7. An access time sub-clause optionally contains one time bound. If no time bound is speci-fied, then the group may create a session at any time on the specified day.
time-bound Specifies a time range from a start time to an end time. The times can be specified as any valid SQL time literal. It is possible to repeat the same day spec-ification multiple times with different time bounds.
Table A-23: CREATE GROUP Output
Output Description
ERROR: permission denied. You must have MANAGE SECURITY permission to set a group’s security label audit category or history collection.
Table A-22: CREATE GROUP Inputs
Input Description
A-24 20493 Rev.3
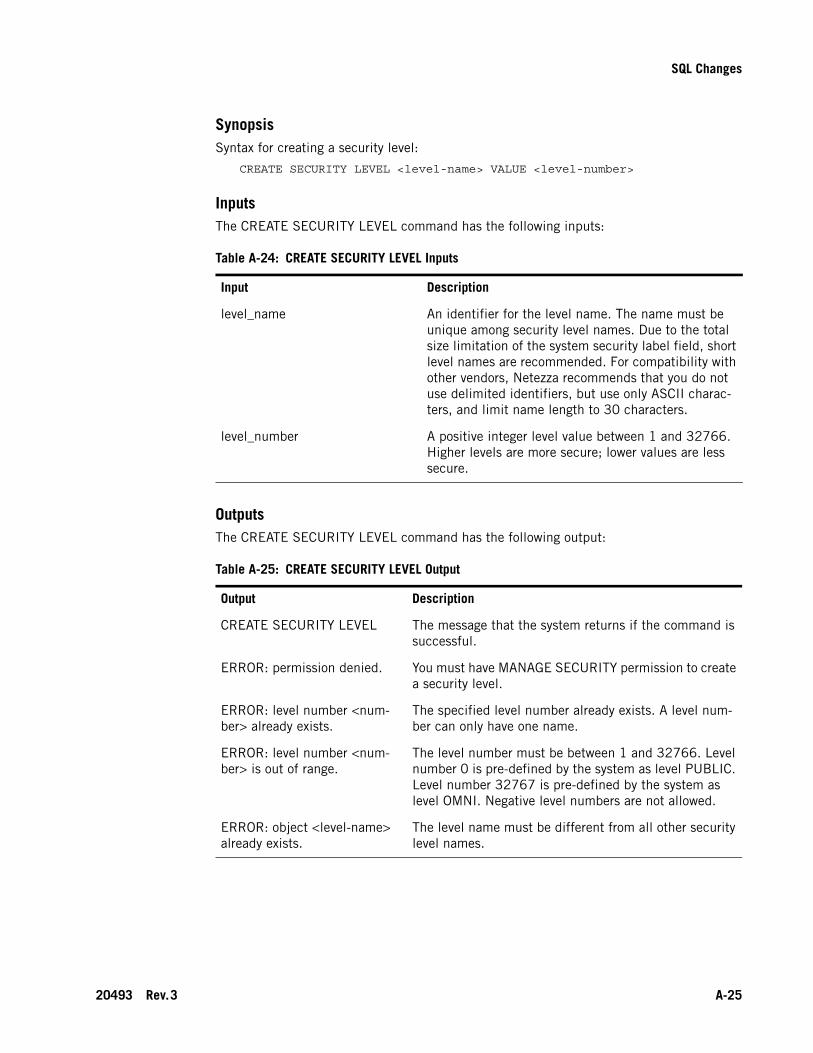
SQL Changes
SynopsisSyntax for creating a security level:
CREATE SECURITY LEVEL <level-name> VALUE <level-number>
Inputs The CREATE SECURITY LEVEL command has the following inputs:
Outputs The CREATE SECURITY LEVEL command has the following output:
Table A-24: CREATE SECURITY LEVEL Inputs
Input Description
level_name An identifier for the level name. The name must be unique among security level names. Due to the total size limitation of the system security label field, short level names are recommended. For compatibility with other vendors, Netezza recommends that you do not use delimited identifiers, but use only ASCII charac-ters, and limit name length to 30 characters.
level_number A positive integer level value between 1 and 32766. Higher levels are more secure; lower values are less secure.
Table A-25: CREATE SECURITY LEVEL Output
Output Description
CREATE SECURITY LEVEL The message that the system returns if the command is successful.
ERROR: permission denied. You must have MANAGE SECURITY permission to create a security level.
ERROR: level number <num-ber> already exists.
The specified level number already exists. A level num-ber can only have one name.
ERROR: level number <num-ber> is out of range.
The level number must be between 1 and 32766. Level number 0 is pre-defined by the system as level PUBLIC. Level number 32767 is pre-defined by the system as level OMNI. Negative level numbers are not allowed.
ERROR: object <level-name> already exists.
The level name must be different from all other security level names.
20493 Rev.3 A-25

Netezza Advanced Security Administrator’s Guide
Description This command creates a new security level of the given name. The security manager must carefully allocate level numbers. Netezza suggests leaving gaps between levels so that a level can be added if needed later.
Privileges Required You must have MANAGE SECURITY privilege to create security levels.
Common Tasks Use the CREATE SECURITY LEVEL command to update the system cata-log to add the new object, and update the security level name to value mapping.
Related Commands See “ALTER SECURITY LEVEL” on page A-13.
See “DROP SECURITY LEVEL” on page A-34.
See “SHOW SECURITY LEVEL” on page A-43.
Usage The following provides sample usage:
CREATE SECURITY LEVEL SECRET VALUE 99;
CREATE TABLEUse the CREATE TABLE command to create a new table with the option of row security support.
SynopsisSyntax for creating a table:
CREATE TABLE <table-name> ( <element-list> )
[ DISTRIBUTE ON { RANDOM | [HASH] ( <distribution-list> ) } ]
[ ROW SECURITY ]
Inputs The CREATE TABLE command has the following input:
Outputs There is no changed output.
Description The CREATE TABLE command has the following characteristics:
Privileges Required You must have CREATE TABLE permission to create a table. No addi-tional privilege is required to create a table with row-level security.
Table A-26: CREATE TABLE Inputs
Input Description
ROW SECURITY Create a table with row-level security.
A-26 20493 Rev.3

SQL Changes
Common Tasks Use the CREATE TABLE command to create a new table with the option of row security support.
Related Commands None.
Usage The following provides sample usage:
CREATE TABLE NEWTABLE DISTRIBUTE ON RANDOM ROW SECURITY;
CREATE USERUse the CREATE USER command to create a new user with additional clauses.
SynopsisSyntax for creating a new user:
CREATE USER <user-name> [WITH] [<create_user_clause>]...
<create_user_clause> ::=
PASSWORD { 'string' | NULL }
| IN GROUP { <group-name> },...
| VALID UNTIL <valid-date>
| ROWSETLIMIT <limit>
| SESSIONTIMEOUT <limit>
| QUERYTIMEOUT <limit>
| DEFPRIORITY [critical|high|normal|low|none]
| MAXPRIORITY [critical|high|normal|low|none]
| SYSID <id-number>
| IN RESOURCEGROUP <group-name>
| SECURITY LABEL <label-string>
| SECURITY LABEL ' [<level>] : [<category>,]... : [<cohort>,]...'
| AUDIT CATEGORY { NONE | ' <category> ,...’ }
| COLLECT HISTORY { ON | OFF | DEFAULT }
| CONCURRENT SESSIONS <limit>
| ALLOW CROSS JOIN [TRUE|FALSE|NULL]
| ACCESS TIME { ALL | DEFAULT | ( <access-time>,... )
<access-time> ::= DAY { ALL | <day>, ... } [ <time-bound> ]
<time-bound> ::= START <time-literal> END <time-literal> ]
| AUTH [LOCAL|DEFAULT]
| EXPIRE PASSWORD
20493 Rev.3 A-27

Netezza Advanced Security Administrator’s Guide
Inputs The CREATE USER command has the following additional inputs:
Table A-27: CREATE USER Inputs
Input Description
SECURITY LABEL Specifies the user’s security label. If a SECURITY LABEL is not specified, the default label ‘PUBLIC::’ is assigned. The label is surrounded by parentheses so that identifiers in the label do not conflict with key-words of the other user clauses.
AUDIT CATEGORY <category> Specifies the users’ audit categories. One or more audit categories can be specified. The categories are added to the security label during audit logging.
COLLECT HISTORY [ ON | OFF | DEFAULT ]
Determines whether this user’s sessions will collect history. ON indicates history will be collected for this user when connected to a database that also has COL-LECT HISTORY ON. OFF indicates history will not be collected for this user. DEFAULT means to examine groups this user is a member of to determine whether to collect history. If any group has COLLECT HISTORY ON, then history is collected when connected to a database that also has COLLECT HISTORY ON. If no group has COLLECT HISTORY ON, but a group has COLLECT HISTORY OFF, then no history is collected. If all groups have DEFAULT history collection, the his-tory is collected. DEFAULT is the default for a user, if the COLLECT HISTORY clause is not specified.
CONCURRENT SESSIONS <limit>
Sets the maximum number of concurrent sessions this user can have. A value of 0 means no limit to the number of concurrent sessions, unless a limit is imposed by a group of which this user is a member. In that case, the minimum limit of concurrent sessions across all such groups is used.
ALLOW CROSS JOIN [TRUE | FALSE | NULL]
Sets user or group permission to allow explicit cross joins. If NULL is defined for a user, the system checks against the group permission, and takes the lowest non-null value, where FALSE is lower than TRUE.
Note: This setting involves a system-wide change, so notify all affected users before making this change.
ACCESS TIME ALL Indicates that this user may start sessions on the Netezza system at any time on any day.
A-28 20493 Rev.3
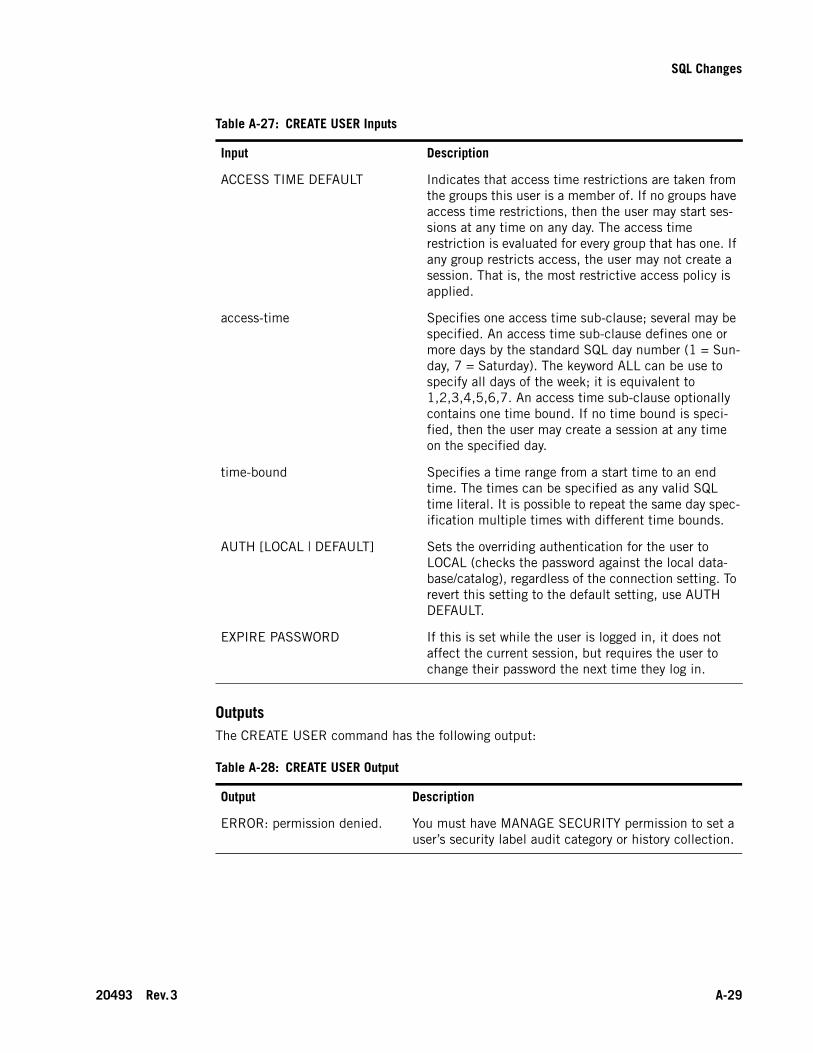
SQL Changes
Outputs The CREATE USER command has the following output:
ACCESS TIME DEFAULT Indicates that access time restrictions are taken from the groups this user is a member of. If no groups have access time restrictions, then the user may start ses-sions at any time on any day. The access time restriction is evaluated for every group that has one. If any group restricts access, the user may not create a session. That is, the most restrictive access policy is applied.
access-time Specifies one access time sub-clause; several may be specified. An access time sub-clause defines one or more days by the standard SQL day number (1 = Sun-day, 7 = Saturday). The keyword ALL can be use to specify all days of the week; it is equivalent to 1,2,3,4,5,6,7. An access time sub-clause optionally contains one time bound. If no time bound is speci-fied, then the user may create a session at any time on the specified day.
time-bound Specifies a time range from a start time to an end time. The times can be specified as any valid SQL time literal. It is possible to repeat the same day spec-ification multiple times with different time bounds.
AUTH [LOCAL | DEFAULT] Sets the overriding authentication for the user to LOCAL (checks the password against the local data-base/catalog), regardless of the connection setting. To revert this setting to the default setting, use AUTH DEFAULT.
EXPIRE PASSWORD If this is set while the user is logged in, it does not affect the current session, but requires the user to change their password the next time they log in.
Table A-28: CREATE USER Output
Output Description
ERROR: permission denied. You must have MANAGE SECURITY permission to set a user’s security label audit category or history collection.
Table A-27: CREATE USER Inputs
Input Description
20493 Rev.3 A-29
Netezza Advanced Security Administrator’s Guide
Description The CREATE USER command has the following characteristics:
Privileges Required You must have MANAGE SECURITY privilege to set a user’s security label, audit category, or history collection.
Common Tasks Use the CREATE USER command to create a new user with additional clauses.
Related Commands See “ALTER USER” on page A-15.
Usage The following provides sample usage:
CREATE USER BOB WITH AUDIT CATEGORY TOP;
DROP CATEGORYUse the DROP CATEGORY command to remove the category from the label security configuration.
SynopsisSyntax for removing a category:
DROP CATEGORY <category-name>
Inputs The DROP CATEGORY command has the following inputs:
Outputs The DROP CATEGORY command has the following output:
Table A-29: DROP CATEGORY Inputs
Input Description
category-name The identifier of an existing category.
Table A-30: DROP CATEGORY Output
Output Description
DROP CATEGORY The message that the system returns if the command is successful.
ERROR: permission denied. You cannot drop a category after there is user data that might reference it.
ERROR: label security in use. The specified category was not found.
A-30 20493 Rev.3

SQL Changes
Description The DROP CATEGORY removes the category from the label security configuration.
Privileges Required You must have MANAGE SECURITY privilege to drop security categories.
Common Tasks Use the DROP CATEGORY command to remove the category from the label security configuration.
Related Commands See “CREATE CATEGORY” on page A-18.
See “ALTER CATEGORY” on page A-3.
See “SHOW CATEGORY” on page A-39.
Usage The following provides sample usage:
DROP CATEGORY ARGON;
DROP COHORTUse the DROP COHORT command to remove a cohort.
SynopsisSyntax for dropping a cohort:
DROP COHORT <cohort-name>
Inputs The DROP COHORT command has the following inputs:
Outputs The DROP COHORT command has the following output:
Table A-31: DROP COHORT Inputs
Input Description
cohort-name The identifier of an existing cohort.
Table A-32: DROP COHORT Output
Output Description
DROP COHORT The message that the system returns if the command is successful.
ERROR: permission denied. You must have MANAGE SECURITY permission to create a security level.
ERROR: label security in use. You cannot drop a cohort after there is user data that might reference it.
20493 Rev.3 A-31

Netezza Advanced Security Administrator’s Guide
Description The DROP COHORT command removes the cohort from the label security configuration. Any children of this cohort are modified so they have no parent cohort.
Privileges Required You must have MANAGE SECURITY privilege to create security levels.
Common Tasks Use the DROP COHORT command to remove a cohort.
Related Commands See “CREATE COHORT” on page A-19.
See “ALTER COHORT” on page A-4.
See “SHOW COHORT” on page A-40.
Usage The following provides sample usage:
DROP COHORT SECRET;
A-32 20493 Rev.3

SQL Changes
DROP HISTORY CONFIGURATIONUse the DROP HISTORY CONFIGURATION command to drop the configuration for query or audit history logging.
SynopsisSyntax for dropping a history configuration:
DROP HISTORY CONFIGURATION <config-name> [ PASSPHRASE <phrase> ]
Inputs The DROP HISTORY CONFIGURATION command has the following inputs:
Outputs The DROP HISTORY CONFIGURATION command has the following output:
Description This command will not allow the current query or audit history configuration to be dropped. If you want to drop the current configuration you have to SET HISTORY CONFIGURATION to another configuration, restart the Netezza system and then DROP HISTORY CONFIGURATION.
Privileges Required You must have MANAGE SECURITY privilege to drop a history configuration.
Table A-33: DROP HISTORY CONFIGURATION Inputs
Input Description
config_name This configuration name must exist.
PASSPHRASE <phrase> The character string phrase of the configuration. If the configuration is TYPE AUDIT then you must specify the matching phrase of the configuration for the DROP to succeed.
Table A-34: DROP HISTORY CONFIGURATION Output
Output Description
DROP HISTORY CONFIGURATION
The message that the system returns if the command is successful.
ERROR: permission denied. You must have MANAGE SECURITY permission.
ERROR: <config-name> not found.
The specified configuration name could not be found.
ERROR: invalid passphrase. The passphrase provided is not correct.
20493 Rev.3 A-33

Netezza Advanced Security Administrator’s Guide
Common Tasks The DROP HISTORY CONFIGURATION command does the following:
Checks if the configuration is current configuration and if so, it errors out.
If the configuration is not current, it proceeds to drop the configuration.
Related Commands See “ALTER HISTORY CONFIGURATION” on page A-9.
See “SHOW HISTORY CONFIGURATION” on page A-42.
See “SET HISTORY CONFIGURATION” on page A-37.
Usage The following provides sample usage:
DROP HISTORY CONFIGURATION LASTWEEK VERSION 2;
DROP SECURITY LEVELUse the DROP SECURITY LEVEL command to remove a security level.
SynopsisSyntax for removing a security level:
DROP SECURITY LEVEL <level-name>
Inputs The DROP SECURITY LEVEL command has the following inputs:
Outputs The DROP SECURITY LEVEL command has the following output:
Table A-35: DROP SECURITY LEVEL Inputs
Input Description
level_name The identifier of an existing level name.
Table A-36: DROP SECURITY LEVEL Output
Output Description
DROP SECURITY LEVEL The message that the system returns if the command is successful.
ERROR: permission denied. You must have MANAGE SECURITY permission to create a security level.
ERROR: object <level-name> not found.
The level name must exist.
ERROR: label security in use. You cannot remove a security level after there is user data that might reference that level.
A-34 20493 Rev.3

SQL Changes
Description The DROP SECURITY LEVEL command removes a security level as long as there are no ROW SECURITY tables defined in any database in the system.
Privileges Required You must have MANAGE SECURITY privilege to drop security levels.
Common Tasks Use the DROP SECURITY LEVEL command to remove a security level.
Related Commands See “CREATE SECURITY LEVEL” on page A-24.
See “ALTER SECURITY LEVEL” on page A-13.
See “SHOW SECURITY LEVEL” on page A-43.
Usage The following provides sample usage:
DROP SECURITY LEVEL SECRET;
EXECUTE ASUse the EXECUTE AS command to set the CURRENT USER of the session.
SynopsisSyntax for setting the current user:
EXECUTE AS <target-user-name>
Inputs The EXECUTE AS command has the following inputs:
Outputs The EXECUTE AS command has the following output:
Table A-37: EXECUTE AS Inputs
Input Description
target-user-name The name of an existing user.
Table A-38: EXECUTE AS Output
Output Description
EXECUTE AS The message that the system returns if the command is successful.
ERROR: permission denied. You must have EXECUTE AS permission on the target user.
20493 Rev.3 A-35

Netezza Advanced Security Administrator’s Guide
Description This statement allows a suitably privileged user to set the CURRENT USER of their session to a different user. On successful completion of this statement, the CURRENT USER is the target user specified in the syntax. Security checks are based on the CURRENT USER’s security profile.
The current_user function will return the target user. The session_user function will return the original session user.
Note that EXECUTE AS operates outside of the transaction scope, just like SET statements. Performing EXECUTE AS while in an explicit transaction is allowed. Rolling back the trans-action does not affect the EXECUTE AS setting. For example, suppose you are running as jdoe and perform the following:
BEGIN;
EXECUTE AS dd;
ROLLBACK;
SELECT current_user;
CURRENT_USER --------------DD(1 row)
Privileges Required You must have EXECUTE AS permission on the target user.
Common Tasks Use the EXECUTE AS command to set the CURRENT USER of the session.
Related Commands See “REVERT” on page A-36.
Usage The following provides sample usage:
EXECUTE AS BOB;
REVERTResets the CURRENT USER of the session back to the previous EXECUTE AS user; if none, then revert to the SESSION USER.
SynopsisSyntax for using the command:
REVERT
Inputs None.
A-36 20493 Rev.3

SQL Changes
Outputs The REVERT command has the following output:
Description The REVERT command has the following characteristics:
Privileges Required No specific privilege is needed to issue this statement. However, you must have EXECUTE AS permission on the current user to need a REVERT statement.
Common Tasks Reset the CURRENT USER of the session back to the previous EXECUTE AS user.
Related Commands See “EXECUTE AS” on page A-35.
Usage The following provides sample usage:
REVERT;
SET HISTORY CONFIGURATIONUse the SET HISTORY CONFIGURATION command to create the initial configuration for query or audit history logging on a system. This is executed on the source Netezza system.
SynopsisSyntax for this command:
SET HISTORY CONFIGURATION <config-name> [ PASSPHRASE <phrase> ]
Inputs The SET HISTORY CONFIGURATION command has the following inputs:
Table A-39: REVERT Output
Output Description
REVERT The message that the system returns if the command is successful.
ERROR: REVERT without pre-ceding EXECUTE AS.
You must have executed a successful EXECUTE AS to execute a REVERT.
Table A-40: SET HISTORY CONFIGURATION Inputs
Input Description
config_name Sets the current history configuration to this one on the next Netezza start.
20493 Rev.3 A-37

Netezza Advanced Security Administrator’s Guide
Outputs The SET HISTORY CONFIGURATION command has the following output:
Description This command sets the current history configuration to the one specified for the next Netezza start.
Privileges Required You must have MANAGE SECURITY privilege to set the history configuration.
Common Tasks Use SET HISTORY CONFIGURATION to do the following:
Check if user has permissions to execute this command.
Check if the named configuration exists.
Set the named configuration as the next configuration. This will be the current config-uration in the next Netezza system start.
Related Commands See “ALTER HISTORY CONFIGURATION” on page A-9.
See “DROP HISTORY CONFIGURATION” on page A-33.
See “SHOW HISTORY CONFIGURATION” on page A-42.
Usage The following provides sample usage:
SET HISTORY CONFIGURATION LASTWEEK;
PASSPHRASE <phrase> The character string phrase of the configuration. If the configuration is TYPE AUDIT then you must specify the matching phrase of the configuration for the SET to succeed.
Table A-41: SET HISTORY CONFIGURATION Output
Output Description
SET HISTORY CONFIGURATION
The message that the system returns if the command is successful.
ERROR: permission denied. You must have MANAGE SECURITY permission to set the query or audit history setting.
ERROR: <config-name> not found.
The specified configuration name could not be found.
ERROR: invalid passphrase. The passphrase provided is not correct.
Table A-40: SET HISTORY CONFIGURATION Inputs
Input Description
A-38 20493 Rev.3
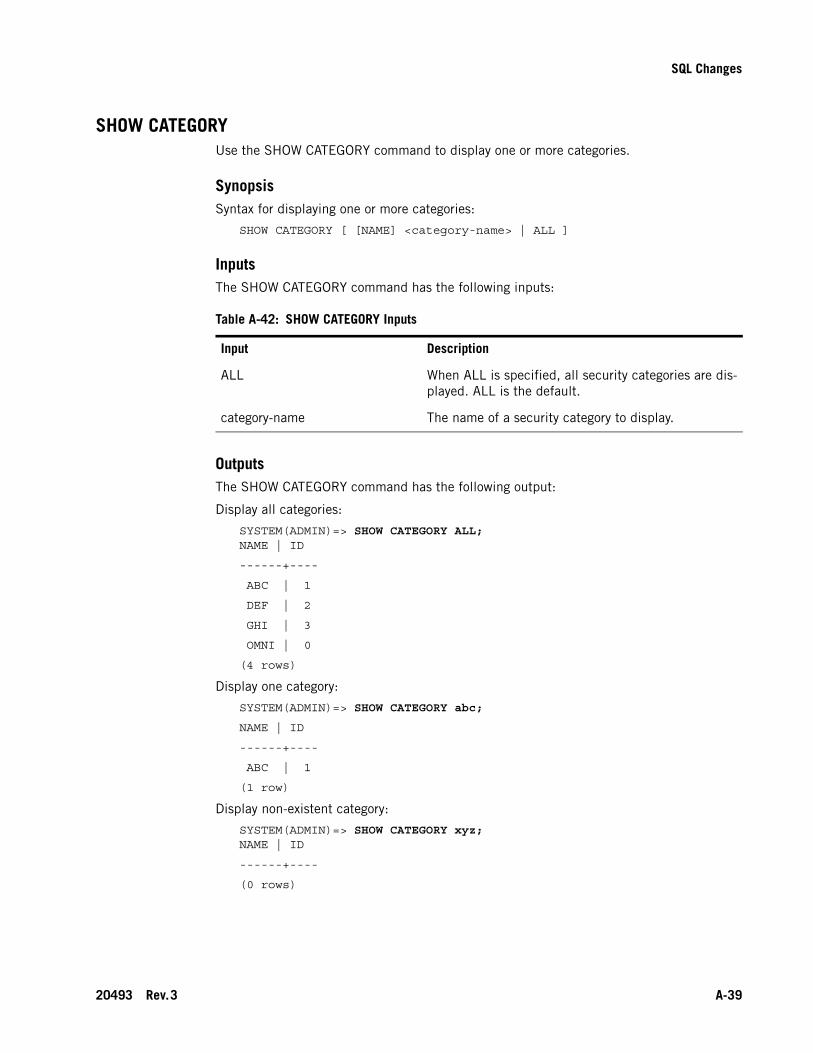
SQL Changes
SHOW CATEGORYUse the SHOW CATEGORY command to display one or more categories.
SynopsisSyntax for displaying one or more categories:
SHOW CATEGORY [ [NAME] <category-name> | ALL ]
Inputs The SHOW CATEGORY command has the following inputs:
Outputs The SHOW CATEGORY command has the following output:
Display all categories:
SYSTEM(ADMIN)=> SHOW CATEGORY ALL;NAME | ID
------+----
ABC | 1
DEF | 2
GHI | 3
OMNI | 0
(4 rows)
Display one category:
SYSTEM(ADMIN)=> SHOW CATEGORY abc;
NAME | ID
------+----
ABC | 1
(1 row)
Display non-existent category:
SYSTEM(ADMIN)=> SHOW CATEGORY xyz;NAME | ID
------+----
(0 rows)
Table A-42: SHOW CATEGORY Inputs
Input Description
ALL When ALL is specified, all security categories are dis-played. ALL is the default.
category-name The name of a security category to display.
20493 Rev.3 A-39
Netezza Advanced Security Administrator’s Guide
Attempt to display categories by a user without MANAGE SECURITY permissions:
DEV(DD)=> SHOW CATEGORY All;
NAME | ID
------+----
(0 rows)
Description The SHOW CATEGORY command displays one or more categories.
Privileges Required You must have MANAGE SECURITY privilege to show security categories.
Common Tasks Use the SHOW CATEGORY command to display one or more categories.
Related Commands See “CREATE CATEGORY” on page A-18.
See “ALTER CATEGORY” on page A-3.
See “DROP CATEGORY” on page A-30.
Usage The following provides sample usage:
SHOW CATEGORY ALL;
SHOW COHORTUse the SHOW COHORT command to display one or more cohorts or to display the cohort hierarchy.
SynopsisSyntax for displaying cohorts:
SHOW COHORT [ [NAME] <cohort-name> | ALL ] [ HIERARCHY ]
Inputs The SHOW COHORT command has the following inputs:
Outputs The SHOW COHORT command has the following outputs:
Table A-43: SHOW COHORT Inputs
Input Description
ALL When ALL is specified, all security cohorts are dis-played. ALL is the default.
cohort_name The name of a security cohort to display.
HIERARCHY When HIERARCHY is specified, the parent-child hier-archy of cohorts is displayed.
A-40 20493 Rev.3
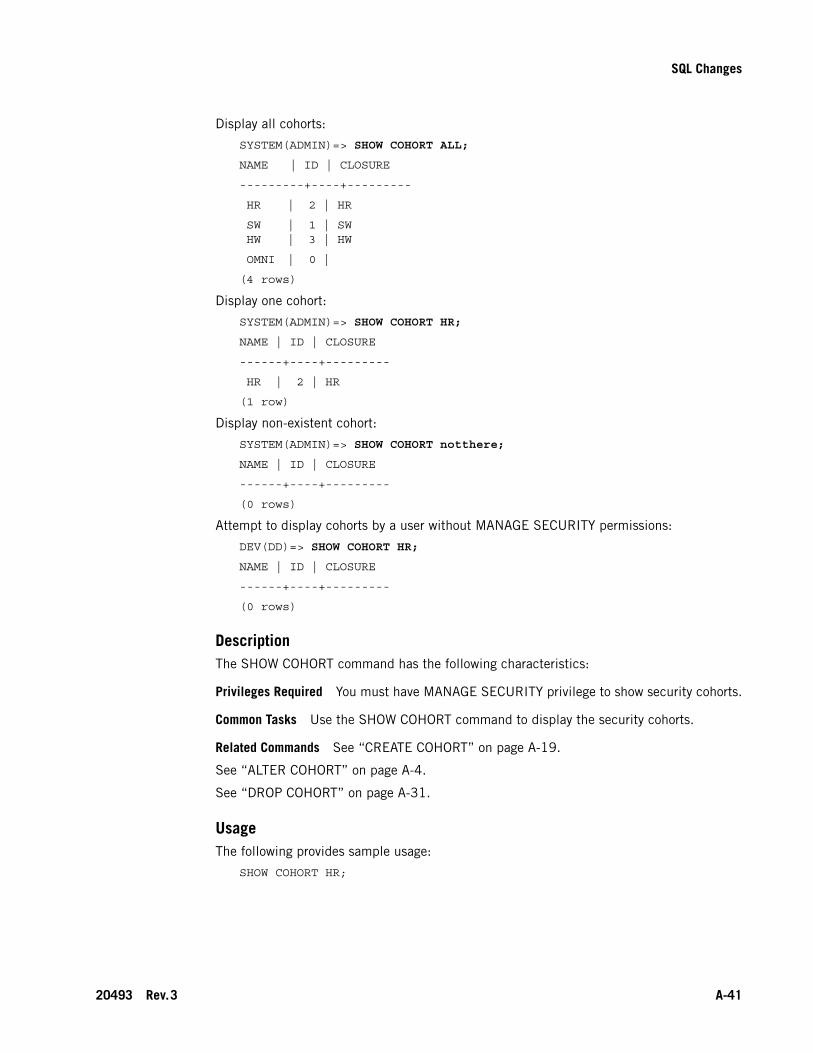
SQL Changes
Display all cohorts:
SYSTEM(ADMIN)=> SHOW COHORT ALL;
NAME | ID | CLOSURE
---------+----+---------
HR | 2 | HR
SW | 1 | SW HW | 3 | HW
OMNI | 0 |
(4 rows)
Display one cohort:
SYSTEM(ADMIN)=> SHOW COHORT HR;
NAME | ID | CLOSURE
------+----+---------
HR | 2 | HR
(1 row)
Display non-existent cohort:
SYSTEM(ADMIN)=> SHOW COHORT notthere;
NAME | ID | CLOSURE
------+----+---------
(0 rows)
Attempt to display cohorts by a user without MANAGE SECURITY permissions:
DEV(DD)=> SHOW COHORT HR;
NAME | ID | CLOSURE
------+----+---------
(0 rows)
Description The SHOW COHORT command has the following characteristics:
Privileges Required You must have MANAGE SECURITY privilege to show security cohorts.
Common Tasks Use the SHOW COHORT command to display the security cohorts.
Related Commands See “CREATE COHORT” on page A-19.
See “ALTER COHORT” on page A-4.
See “DROP COHORT” on page A-31.
Usage The following provides sample usage:
SHOW COHORT HR;
20493 Rev.3 A-41

Netezza Advanced Security Administrator’s Guide
SHOW HISTORY CONFIGURATIONUse the SHOW HISTORY CONFIGURATION command to display the query or audit history configuration settings. This is executed on the source Netezza system. By default with no arguments it gives the current query or audit history configuration.
SynopsisSyntax for the command:
SHOW HISTORY CONFIGURATION [ <config-name> ALL ]
Inputs The SHOW HISTORY CONFIGURATION command has the following inputs:
Outputs The SHOW HISTORY CONFIGURATION command has the following output:
Description This command displays the current or ALL or a specific query or audit configuration settings.
Privileges Required You must have MANAGE SECURITY privilege to show the settings.
Common Tasks Use the SHOW HISTORY CONFIGURATION command to display the query or audit history configuration settings.
Table A-44: SHOW HISTORY CONFIGURATION Inputs
Input Description
ALL Displays the details of all the query or audit history configurations.
config_name Displays the details of the specific query or audit his-tory configuration.
Table A-45: SHOW HISTORY CONFIGURATION Output
Output Description
SHOW HISTORY CONFIGURATION
The message that the system returns if the command is successful.
ERROR: permission denied. You must have MANAGE SECURITY permission to con-figure query or audit history logging.
ERROR: <config-name> not found.
The specified configuration name could not be found.
A-42 20493 Rev.3

SQL Changes
Related Commands See “ALTER HISTORY CONFIGURATION” on page A-9.
See “DROP HISTORY CONFIGURATION” on page A-33.
See “SET HISTORY CONFIGURATION” on page A-37.
Usage The following provides sample usage:
SHOW HISTORY CONFIGURATION ALL;
SHOW SECURITY LEVELUse the SHOW SECURITY LEVEL command to display one or all security levels.
SynopsisSyntax for showing a security level:
SHOW SECURITY LEVEL [ [NAME] <level-name> | ALL ]
Inputs The SHOW SECURITY LEVEL command has the following inputs:
Outputs The SHOW SECURITY LEVEL command has the following outputs:
Display all security levels:
DEV(ADMIN)=> SHOW SECURITY LEVEL ALL;
NAME | LEVEL
--------+-------
PUBLIC | 0
LOW | 10
MED | 20
HIGH | 30
OMNI | 32767
(5 rows)
Table A-46: SHOW SECURITY LEVEL Inputs
Input Description
ALL When ALL is specified, all security levels are dis-played. ALL is the default.
level_name The name of a security level to display.
20493 Rev.3 A-43

Netezza Advanced Security Administrator’s Guide
Display one security level:
DEV(ADMIN)=> SHOW SECURITY LEVEL med;
NAME | LEVEL
------+-------
MED | 20
(1 row)
Display non-existent security level:
DEV(ADMIN)=> SHOW SECURITY LEVEL xyzzy;
NAME | LEVEL
------+-------
(0 rows)
Attempt to display security levels by a user without MANAGE SECURITY permissions:
DEV(DD)=> SHOW SECURITY LEVEL ;
NAME | LEVEL
------+-------
(0 rows)
Description The SHOW SECURITY LEVEL command has the following characteristics:
Privileges Required You must have MANAGE SECURITY privilege to show security levels.
Common Tasks Use the SHOW SECURITY LEVEL command to display the security levels.
Related Commands See “CREATE SECURITY LEVEL” on page A-24.
See “ALTER SECURITY LEVEL” on page A-13.
See “DROP SECURITY LEVEL” on page A-34.
Usage The following provides sample usage:
SHOW SECURITY LEVEL ALL;
CLI Commands
This section describes the CLI commands for the security feature.
nzhistcleanupdbUse this command to periodically delete old history information from a history database.
SynopsisSyntax for deleting old history information from a history database:
nzhistcleanupdb [options]
A-44 20493 Rev.3
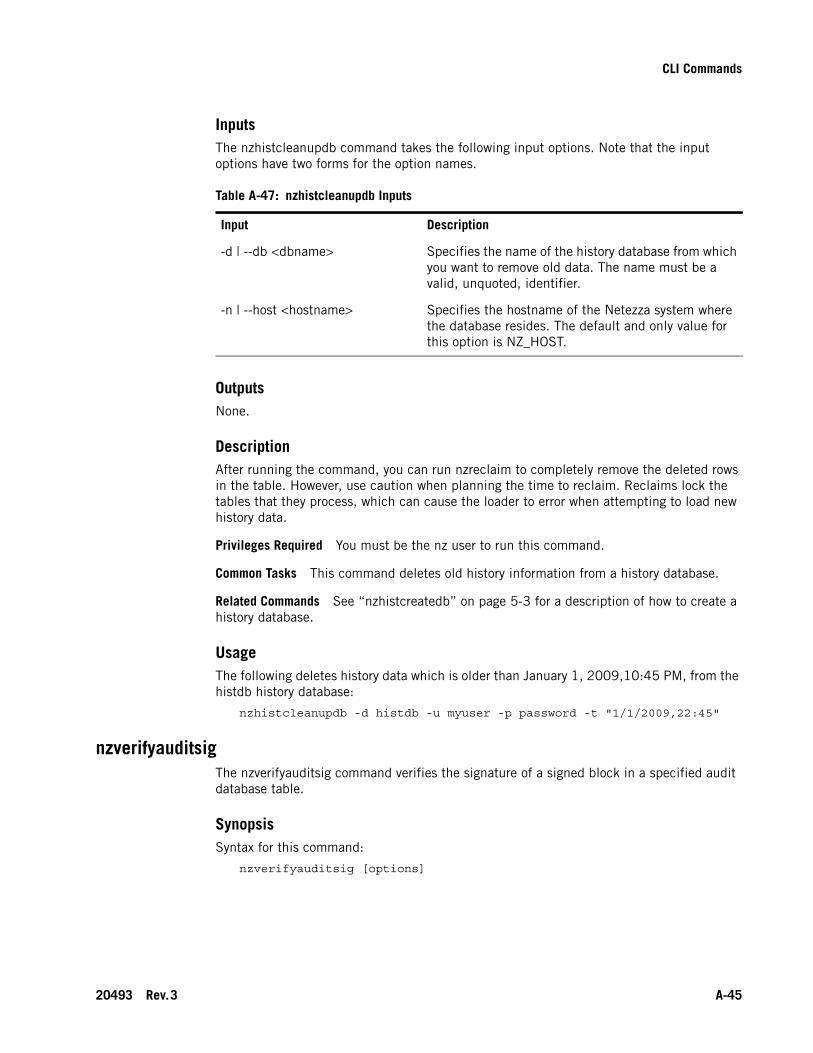
CLI Commands
Inputs The nzhistcleanupdb command takes the following input options. Note that the input options have two forms for the option names.
Outputs None.
Description After running the command, you can run nzreclaim to completely remove the deleted rows in the table. However, use caution when planning the time to reclaim. Reclaims lock the tables that they process, which can cause the loader to error when attempting to load new history data.
Privileges Required You must be the nz user to run this command.
Common Tasks This command deletes old history information from a history database.
Related Commands See “nzhistcreatedb” on page 5-3 for a description of how to create a history database.
Usage The following deletes history data which is older than January 1, 2009,10:45 PM, from the histdb history database:
nzhistcleanupdb -d histdb -u myuser -p password -t "1/1/2009,22:45"
nzverifyauditsigThe nzverifyauditsig command verifies the signature of a signed block in a specified audit database table.
SynopsisSyntax for this command:
nzverifyauditsig [options]
Table A-47: nzhistcleanupdb Inputs
Input Description
-d | --db <dbname> Specifies the name of the history database from which you want to remove old data. The name must be a valid, unquoted, identifier.
-n | --host <hostname> Specifies the hostname of the Netezza system where the database resides. The default and only value for this option is NZ_HOST.
20493 Rev.3 A-45
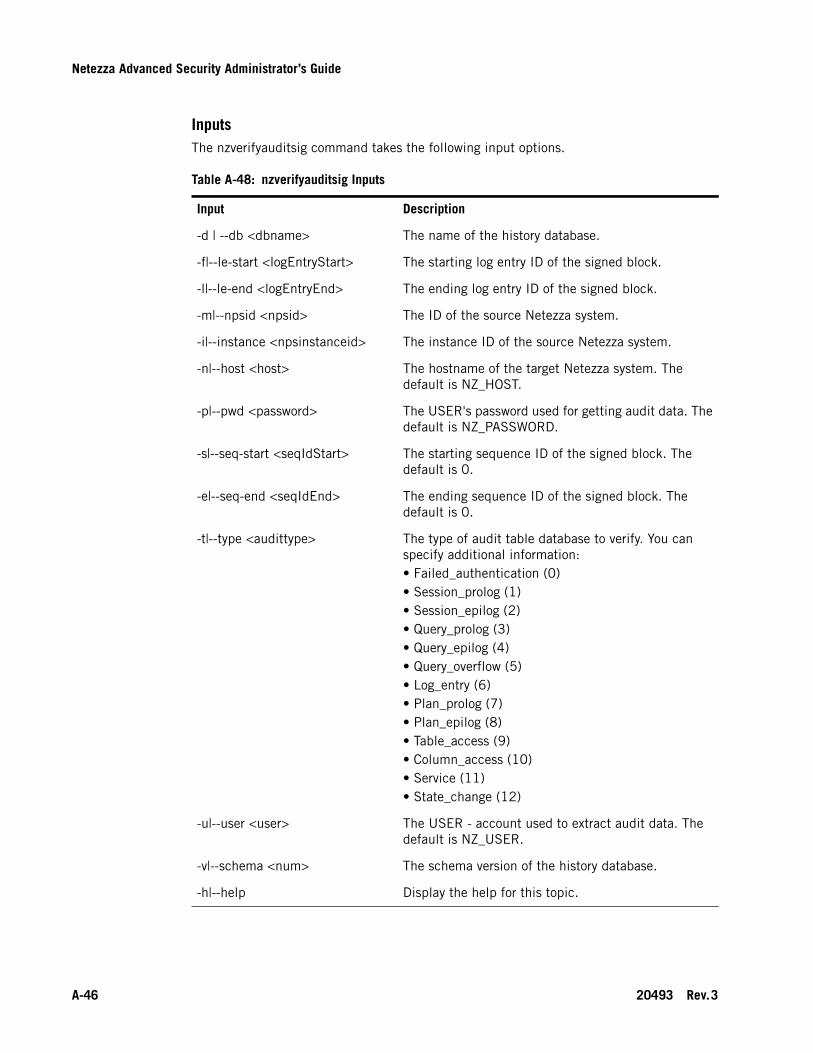
Netezza Advanced Security Administrator’s Guide
Inputs The nzverifyauditsig command takes the following input options.
Table A-48: nzverifyauditsig Inputs
Input Description
-d | --db <dbname> The name of the history database.
-f|--le-start <logEntryStart> The starting log entry ID of the signed block.
-l|--le-end <logEntryEnd> The ending log entry ID of the signed block.
-m|--npsid <npsid> The ID of the source Netezza system.
-i|--instance <npsinstanceid> The instance ID of the source Netezza system.
-n|--host <host> The hostname of the target Netezza system. The default is NZ_HOST.
-p|--pwd <password> The USER's password used for getting audit data. The default is NZ_PASSWORD.
-s|--seq-start <seqIdStart> The starting sequence ID of the signed block. The default is 0.
-e|--seq-end <seqIdEnd> The ending sequence ID of the signed block. The default is 0.
-t|--type <audittype> The type of audit table database to verify. You can specify additional information:• Failed_authentication (0) • Session_prolog (1)• Session_epilog (2)• Query_prolog (3)• Query_epilog (4)• Query_overflow (5)• Log_entry (6)• Plan_prolog (7)• Plan_epilog (8)• Table_access (9)• Column_access (10)• Service (11)• State_change (12)
-u|--user <user> The USER - account used to extract audit data. The default is NZ_USER.
-v|--schema <num> The schema version of the history database.
-h|--help Display the help for this topic.
A-46 20493 Rev.3

CLI Commands
Outputs The nzverifyauditsig command has the following output:
Description Verifies the signature of a signed block in a specified audit database table.
Privileges Required None.
Common Tasks Verify a signed block.
Related Commands None.
Usage The following provides sample usage:
nzverifyauditsig -d auditdb -t query_epilog -v 1 -u histusr -p admpw -i 2 -m 1
Table A-49: nzverifyauditsig Output
Output Description
Signature verified. The digital signature and key used were checked and verified.
Signature could not be verified. The digital signature and key used were checked and could not be verified.
20493 Rev.3 A-47

Netezza Advanced Security Administrator’s Guide
A-48 20493 Rev.3

A P P E N D I X B
ExamplesWhat’s in this appendix Creating a Database Security Officer and Database Administrator
Creating a Security Model as Database Security Officer
Creating Sample Users
Creating a Database and Granting Access
Creating a Row-Secure Table With Permissions
Using the engmgr Role
Using the sw2 Role
Using the sw1 Role
Showing Restrictions
This section contains examples to aid you in understanding advanced security tasks.
Creating a Database Security Officer and Database Administrator
Login as administrator (ADMIN) and create a Database Administrator (DBA) with the mini-mum security label:
SYSTEM(ADMIN)=> CREATE USER dba 'PASSWORD 'dddd' SECURITY LABEL '::';
CREATE USER
SYSTEM(ADMIN)=> GRANT CREATE DATABASE to dba;
GRANT
The DBA will not be able to see any data above 'PUBLIC::' even in tables that they create.
As administrator, create a Database Security Officer (DSO) with the minimum security label. Note that giving Manage Security permission allows the DSO to change their setting.
SYSTEM(ADMIN)=> CREATE USER dso PASSWORD 'dddd' SECURITY LABEL '::';
CREATE USER
SYSTEM(ADMIN)=> GRANT MANAGE SECURITY to dso;
GRANT
SYSTEM(ADMIN)=> GRANT CREATE USER to dso;
GRANT
SYSTEM(ADMIN)=> GRANT LIST ON dba to dso;
GRANT
B-1

Netezza Advanced Security Administrator’s Guide
Creating a Security Model as Database Security Officer
For this example, login as the newly-created DSO and create a security model, using levels, categories, and cohorts.
SYSTEM(ADMIN)=> \c system dso dddd
You are now connected to database system as user dso.
SYSTEM(DSO)=> CREATE SECURITY LEVEL confidential VALUE 100;
CREATE SECURITY LEVEL
SYSTEM(DSO)=> CREATE SECURITY LEVEL secret VALUE 200;
CREATE SECURITY LEVEL
SYSTEM(DSO)=> CREATE SECURITY LEVEL "Top Secret" VALUE 300;
CREATE SECURITY LEVEL
SYSTEM(DSO)=> CREATE CATEGORY red;
CREATE CATEGORY
SYSTEM(DSO)=> CREATE CATEGORY green;
CREATE CATEGORY
SYSTEM(DSO)=> CREATE CATEGORY blue;
CREATE CATEGORY
SYSTEM(DSO)=> CREATE COHORT corp;
CREATE COHORT
SYSTEM(DSO)=> CREATE COHORT hr in COHORT corp;
CREATE COHORT
SYSTEM(DSO)=> CREATE COHORT fin in COHORT corp;
CREATE COHORT
SYSTEM(DSO)=> CREATE COHORT eng in COHORT corp;
CREATE COHORT
SYSTEM(DSO)=> CREATE COHORT qa in COHORT eng;
CREATE COHORT
SYSTEM(DSO)=> CREATE COHORT sw in COHORT eng;
CREATE COHORT
SYSTEM(DSO)=> CREATE COHORT hw in COHORT eng;
CREATE COHORT
Creating Sample Users
For this example, login as the DSO and create sample users. Then grant the DBA List privi-leges on the users created.
SYSTEM(DSO)=> CREATE USER sw1 PASSWORD 'swsw' SECURITY LABEL 'confidential:green:sw';
CREATE USER
B-2 20493 Rev.3
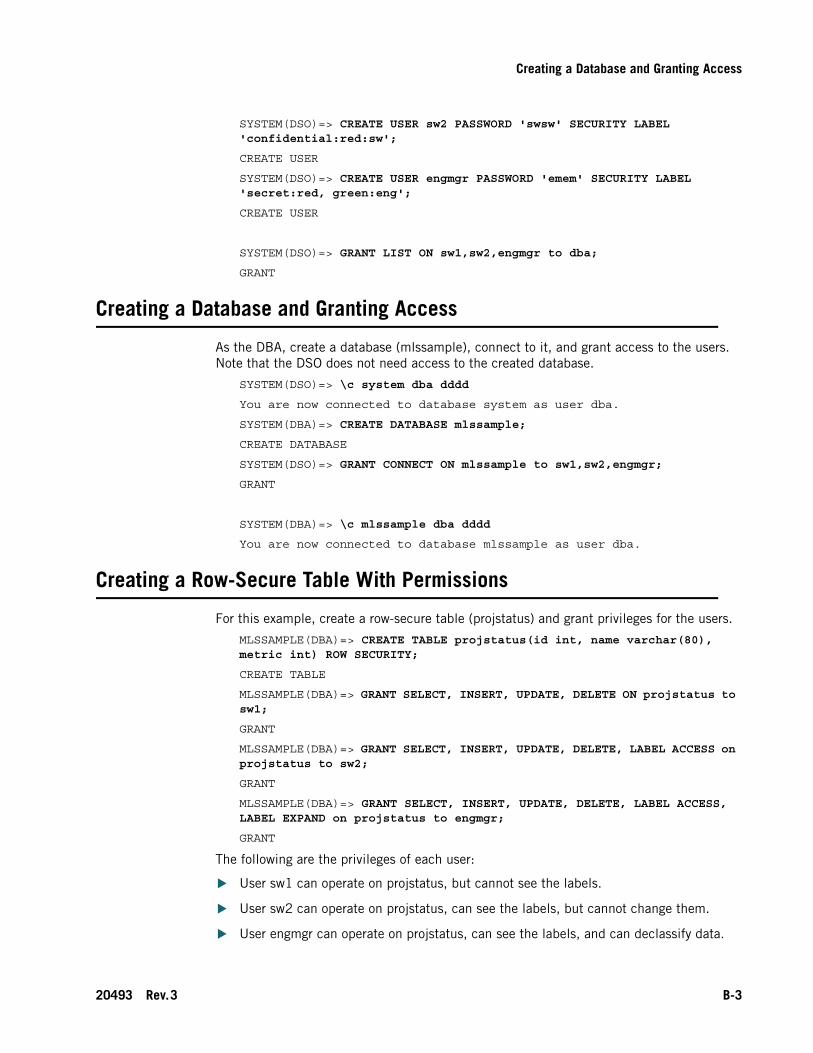
Creating a Database and Granting Access
SYSTEM(DSO)=> CREATE USER sw2 PASSWORD 'swsw' SECURITY LABEL 'confidential:red:sw';
CREATE USER
SYSTEM(DSO)=> CREATE USER engmgr PASSWORD 'emem' SECURITY LABEL 'secret:red, green:eng';
CREATE USER
SYSTEM(DSO)=> GRANT LIST ON sw1,sw2,engmgr to dba;
GRANT
Creating a Database and Granting Access
As the DBA, create a database (mlssample), connect to it, and grant access to the users. Note that the DSO does not need access to the created database.
SYSTEM(DSO)=> \c system dba dddd
You are now connected to database system as user dba.
SYSTEM(DBA)=> CREATE DATABASE mlssample;
CREATE DATABASE
SYSTEM(DSO)=> GRANT CONNECT ON mlssample to sw1,sw2,engmgr;
GRANT
SYSTEM(DBA)=> \c mlssample dba dddd
You are now connected to database mlssample as user dba.
Creating a Row-Secure Table With Permissions
For this example, create a row-secure table (projstatus) and grant privileges for the users.
MLSSAMPLE(DBA)=> CREATE TABLE projstatus(id int, name varchar(80), metric int) ROW SECURITY;
CREATE TABLE
MLSSAMPLE(DBA)=> GRANT SELECT, INSERT, UPDATE, DELETE ON projstatus to sw1;
GRANT
MLSSAMPLE(DBA)=> GRANT SELECT, INSERT, UPDATE, DELETE, LABEL ACCESS on projstatus to sw2;
GRANT
MLSSAMPLE(DBA)=> GRANT SELECT, INSERT, UPDATE, DELETE, LABEL ACCESS, LABEL EXPAND on projstatus to engmgr;
GRANT
The following are the privileges of each user:
User sw1 can operate on projstatus, but cannot see the labels.
User sw2 can operate on projstatus, can see the labels, but cannot change them.
User engmgr can operate on projstatus, can see the labels, and can declassify data.
20493 Rev.3 B-3

Netezza Advanced Security Administrator’s Guide
Using the engmgr Role
For this example, insert values into the projstatus database using the engmgr role. Note that by default, the insert command uses the security label of the inserter. Also note that _sec_label does not automatically expand from the asterisk, you must specifically request it.
MLSSAMPLE(DBA)=> \c mlssample engmgr emem
You are now connected to database mlssample as user engmgr.
MLSSAMPLE(ENGMGR)=> INSERT INTO projstatus VALUES (1, 'Secret Project', 105);
INSERT 0 1
MLSSAMPLE(ENGMGR)=> SELECT *, _SEC_LABEL FROM projstatus;
ID | NAME | METRIC | _SEC_LABEL
----+----------------+--------+----------------------
1 | Secret Project | 105 | SECRET:RED,GREEN:ENG
(1 row)
The next example explicitly fills in a label, which is allowed because the engmgr has Label Expand permission, which allows insertion of a label less restrictive than their own.
MLSSAMPLE(ENGMGR)=> INSERT INTO projstatus(id,name,metric,_SEC_LABEL) VALUES (2, 'Project Red', 113) 'confidential:red:eng');
INSERT 0 1
The next example explicitly fills in a label that sw1 can see.
MLSSAMPLE(ENGMGR)=> INSERT INTO projstatus(id,name,metric,_SEC_LABEL) VALUES (3, 'Project Green', 113) 'confidential:green:eng');
INSERT 0 1
The next example fails because sw is a subset of eng, making it a more restrictive label. This would be allowed if engmgr had Label Restrict permission.
MLSSAMPLE(ENGMGR)=> INSERT INTO projstatus(id,name,metric,_SEC_LABEL) VALUES (4, 'Manhattan', 102) 'secret:red:sw');
ERROR: Security Label : Permission denied.
The next example fails because the category name does not exist.
MLSSAMPLE(ENGMGR)=> INSERT INTO projstatus(id,name,metric,_SEC_LABEL) VALUES (4, 'General', 164) 'confidential:eng');
ERROR: Security Label : Category name does not exist.
Use select to see the results.
MLSSAMPLE(ENGMGR)=> SELECT *, _SEC_LABEL FROM projstatus;
ID | NAME | METRIC | _SEC_LABEL
----+----------------+--------+------------------------
3 | Project Green | 113 | CONFIDENTIAL:GREEN:ENG
1 | Secret Project | 105 | SECRET:RED,GREEN:ENG
2 | Project Red | 113 | CONFIDENTIAL:RED:ENG
(3 rows)
B-4 20493 Rev.3
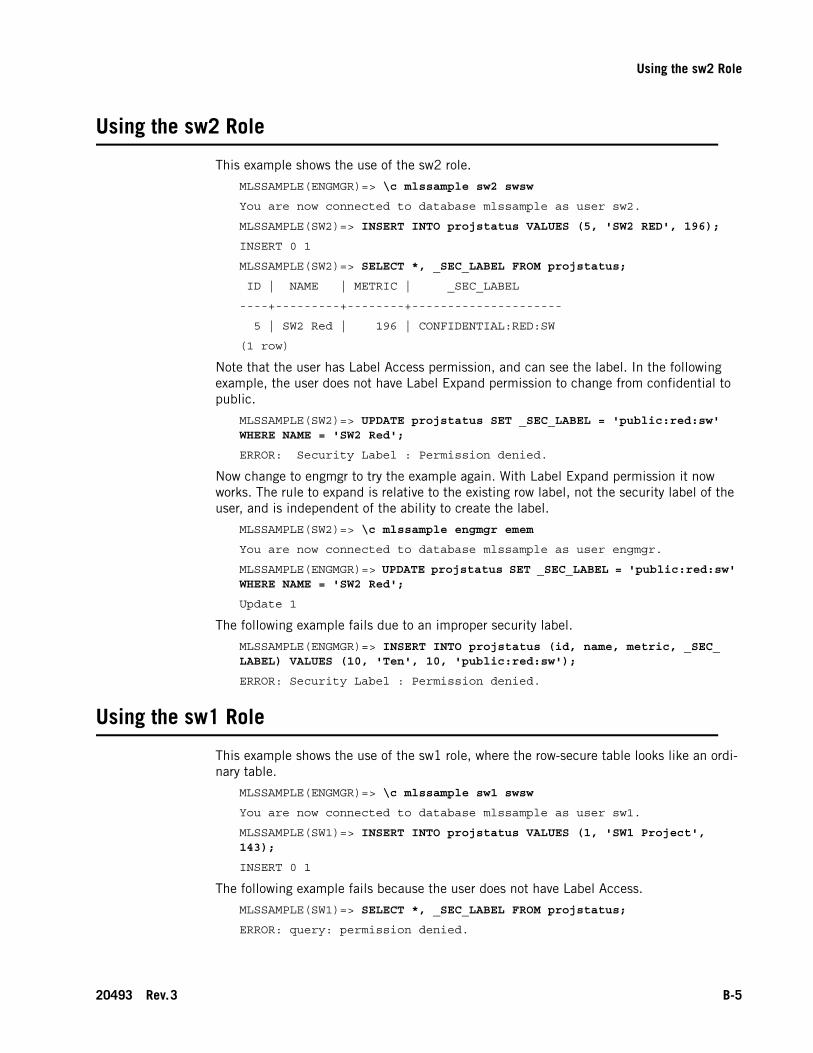
Using the sw2 Role
Using the sw2 Role
This example shows the use of the sw2 role.
MLSSAMPLE(ENGMGR)=> \c mlssample sw2 swsw
You are now connected to database mlssample as user sw2.
MLSSAMPLE(SW2)=> INSERT INTO projstatus VALUES (5, 'SW2 RED', 196);
INSERT 0 1
MLSSAMPLE(SW2)=> SELECT *, _SEC_LABEL FROM projstatus;
ID | NAME | METRIC | _SEC_LABEL
----+---------+--------+---------------------
5 | SW2 Red | 196 | CONFIDENTIAL:RED:SW
(1 row)
Note that the user has Label Access permission, and can see the label. In the following example, the user does not have Label Expand permission to change from confidential to public.
MLSSAMPLE(SW2)=> UPDATE projstatus SET _SEC_LABEL = 'public:red:sw' WHERE NAME = 'SW2 Red';
ERROR: Security Label : Permission denied.
Now change to engmgr to try the example again. With Label Expand permission it now works. The rule to expand is relative to the existing row label, not the security label of the user, and is independent of the ability to create the label.
MLSSAMPLE(SW2)=> \c mlssample engmgr emem
You are now connected to database mlssample as user engmgr.
MLSSAMPLE(ENGMGR)=> UPDATE projstatus SET _SEC_LABEL = 'public:red:sw' WHERE NAME = 'SW2 Red';
Update 1
The following example fails due to an improper security label.
MLSSAMPLE(ENGMGR)=> INSERT INTO projstatus (id, name, metric, _SEC_LABEL) VALUES (10, 'Ten', 10, 'public:red:sw');
ERROR: Security Label : Permission denied.
Using the sw1 Role
This example shows the use of the sw1 role, where the row-secure table looks like an ordi-nary table.
MLSSAMPLE(ENGMGR)=> \c mlssample sw1 swsw
You are now connected to database mlssample as user sw1.
MLSSAMPLE(SW1)=> INSERT INTO projstatus VALUES (1, 'SW1 Project', 143);
INSERT 0 1
The following example fails because the user does not have Label Access.
MLSSAMPLE(SW1)=> SELECT *, _SEC_LABEL FROM projstatus;
ERROR: query: permission denied.
20493 Rev.3 B-5

Netezza Advanced Security Administrator’s Guide
MLSSAMPLE(SW1)=> SELECT * FROM projstatus;
ID | NAME | METRIC
----+-------------+--------
1 | SW1 Project | 143
(1 row)
The following examples work normally.
MLSSAMPLE(SW1)=> UPDATE projstatus SET METRIC = 145 WHERE NAME = 'SW1 Project';
UPDATE 1
MLSSAMPLE(SW1)=> DELETE projstatus WHERE NAME = 'SW1 Project';
DELETE 1
In the following example, the project cannot be deleted, because it cannot be seen with the available permissions.
MLSSAMPLE(SW1)=> DELETE projstatus WHERE NAME = 'Project Red';
DELETE 0
Showing Restrictions
This example shows that the DBA, who owns the table, cannot see any of the row-secure rows. The DBA's security label is PUBLIC::, and the data in the row-secure table has more restrictive labels.
MLSSAMPLE(SW1)=> \c mlssample dba dddd
You are now connected to database mlssample as user dba.
MLSSAMPLE(DBA)=> SELECT * FROM projstatus;
ID | NAME | METRIC
----+-------------+--------
(0 rows)
B-6 20493 Rev.3
A P P E N D I X C
Enabling and Disabling Security CommandsWhat’s in this appendix Enable_execute_as
Enable_login_constraints
Enable_collect_history
Enable_row_security
Enable_audit
This section explains the security commands that may need to be enabled or disabled. To change the features, you must login to the Netezza system host, set the history configura-tion to QUERY or NONE and edit the postgresql.conf file. Once the flags are specified, restart the system (nzstop, nzstart) to make the flags take effect.
Enable_execute_as
When the flag is set to true, you can use the EXECUTE AS and REVERT statements; and GRANT and REVOKE the EXECUTE AS permission.
When the flag is set to false, the system returns an error if you use EXECUTE AS and REVERT.
Enable_login_constraints
When the flag is set to true, you can specify the CONCURRENT SESSIONS and ACCESS TIME clauses on users and groups. The system enforces those settings when users connect to the system.
When the flag is set to false, the system no longer enforces those settings; for example, a user with CONCURRENT SESSIONS set to 1 before the flag was set to false will be able to have any number of concurrent sessions.
Enable_collect_history
When the flag is set to true, you can specify the COLLECT HISTORY clause on users, groups, and databases. The system enforces those settings when users connect to the system.
C-1

Netezza Advanced Security Administrator’s Guide
Suppose you have set up a history configuration, with some users and some databases to have COLLECT HISTORY OFF.
When the flag is true, the collect history setting is enforced and history is not collected for those users and databases.
When the flag is set to false, the system no longer enforces those settings, so history is collected for all users on all databases.
Enable_row_security
When the ENABLE_ROW_SECURITY flag is set to true, the following is true:
ROW SECURITY tables can be created, accessed, and dropped.
The security model (level, category, cohort) can be created and managed.
The security label and audit attributes of users are calculated and enforced.
When the flag is set to false, the following happens:
All users get the security label ‘PUBLIC::’ and no audit category. Admin gets ‘OMNI:OMNI:OMNI’.
ROW SECURITY tables cannot be created, accessed, or dropped with the following exceptions:
nzbackup continues to function to allow the row secure tables to be backed up.
Creation of compressed external tables from row secure tables is permitted, to allow nzbackup to function properly.
SELECT of row secure tables continues to operate and enforces security. However, since all users have the lowest access label, any sensitive labeled data is not visible.
Enable_audit
If the ENABLE_ROW_SECURITY is false, this flag is treated as though it is false. So if row security is disabled, audit is implicitly disabled.
If row security is enabled, audit may be enabled or disabled.
When ENABLE_ROW_SECURITY is true and ENABLE_AUDIT is true, then you can create audit configurations with digital signing keys and collect SERVICE and STATE information. In addition, you can create keystores containing keys for digital signing.
C-2 20493 Rev.3

A P P E N D I X D
Notices and TrademarksWhat’s in this appendix Notices
Trademarks
Open Source Notifications
Electronic Emission Notices
Regulatory and Compliance
This section describes some important notices, trademarks, and compliance information.
Notices
This information was developed for products and services offered in the U.S.A.
IBM may not offer the products, services, or features discussed in this document in other countries. Consult your local IBM representative for information on the products and ser-vices currently available in your area. Any reference to an IBM product, program, or service is not intended to state or imply that only that IBM product, program, or service may be used. Any functionally equivalent product, program, or service that does not infringe any IBM intellectual property right may be used instead. However, it is the user's responsibility to evaluate and verify the operation of any non-IBM product, program, or service.
IBM may have patents or pending patent applications covering subject matter described in this document. The furnishing of this document does not grant you any license to these patents. You can send license inquiries, in writing, to: This information was developed for products and services offered in the U.S.A.
IBM Director of LicensingIBM CorporationNorth Castle DriveArmonk, NY 10504-1785 U.S.A.
For license inquiries regarding double-byte (DBCS) information, contact the IBM Intellec-tual Property Department in your country or send inquiries, in writing, to:
IBM World Trade Asia CorporationLicensing 2-31 Roppongi 3-chome, Minato-kuTokyo 106-0032, Japan
The following paragraph does not apply to the United Kingdom or any other country where such provisions are inconsistent with local law: INTERNATIONAL BUSINESS MACHINES CORPORATION PROVIDES THIS PUBLICATION "AS IS" WITHOUT WARRANTY OF ANY
D-1

Netezza Advanced Security Administrator’s Guide
KIND, EITHER EXPRESS OR IMPLIED, INCLUDING, BUT NOT LIMITED TO, THE IMPLIED WARRANTIES OF NON-INFRINGEMENT, MERCHANTABILITY OR FITNESS FOR A PARTICULAR PURPOSE. Some states do not allow disclaimer of express or implied war-ranties in certain transactions, therefore, this statement may not apply to you.
This information could include technical inaccuracies or typographical errors. Changes are periodically made to the information herein; these changes will be incorporated in new edi-tions of the publication. IBM may make improvements and/or changes in the product(s) and/or the program(s) described in this publication at any time without notice.
Any references in this information to non-IBM Web sites are provided for convenience only and do not in any manner serve as an endorsement of those Web sites. The materials at those Web sites are not part of the materials for this IBM product and use of those Web sites is at your own risk.
IBM may use or distribute any of the information you supply in any way it believes appropri-ate without incurring any obligation to you.
Licensees of this program who wish to have information about it for the purpose of enabling: (i) the exchange of information between independently created programs and other programs (including this one) and (ii) the mutual use of the information which has been exchanged, should contact:
IBM CorporationSoftware Interoperability Coordinator, Department 49XA3605 Highway 52 NRochester, MN 55901U.S.A.
Such information may be available, subject to appropriate terms and conditions, including in some cases, payment of a fee.
The licensed program described in this document and all licensed material available for it are provided by IBM under terms of the IBM Customer Agreement, IBM International Pro-gram License Agreement or any equivalent agreement between us.
Any performance data contained herein was determined in a controlled environment. Therefore, the results obtained in other operating environments may vary significantly. Some measurements may have been made on development-level systems and there is no guarantee that these measurements will be the same on generally available systems. Fur-thermore, some measurements may have been estimated through extrapolation. Actual results may vary. Users of this document should verify the applicable data for their specific environment.
Information concerning non-IBM products was obtained from the suppliers of those prod-ucts, their published announcements or other publicly available sources. IBM has not tested those products and cannot confirm the accuracy of performance, compatibility or any other claims related to non-IBM products. Questions on the capabilities of non-IBM products should be addressed to the suppliers of those products.
All statements regarding IBM's future direction or intent are subject to change or with-drawal without notice, and represent goals and objectives only.
All IBM prices shown are IBM's suggested retail prices, are current and are subject to change without notice. Dealer prices may vary.
D-2 20493 Rev.3

Trademarks
This information contains examples of data and reports used in daily business operations. To illustrate them as completely as possible, the examples include the names of individu-als, companies, brands, and products. All of these names are fictitious and any similarity to the names and addresses used by an actual business enterprise is entirely coincidental.
COPYRIGHT LICENSE:
This information contains sample application programs in source language, which illustrate programming techniques on various operating platforms. You may copy, modify, and distrib-ute these sample programs in any form without payment to IBM, for the purposes of developing, using, marketing or distributing application programs conforming to the appli-cation programming interface for the operating platform for which the sample programs are written. These examples have not been thoroughly tested under all conditions. IBM, there-fore, cannot guarantee or imply reliability, serviceability, or function of these programs.
Each copy or any portion of these sample programs or any derivative work, must include a copyright notice as follows:
© your company name) (year). Portions of this code are derived from IBM Corp. Sample Programs.
© Copyright IBM Corp. _enter the year or years_.
If you are viewing this information softcopy, the photographs and color illustrations may not appear.
Trademarks
IBM, the IBM logo, ibm.com and Netezza are trademarks or registered trademarks of Inter-national Business Machines Corporation in the United States, other countries, or both. If these and other IBM trademarked terms are marked on their first occurrence in this infor-mation with a trademark symbol (® or ™), these symbols indicate U.S. registered or common law trademarks owned by IBM at the time this information was published. Such trademarks may also be registered or common law trademarks in other countries. A current list of IBM trademarks is available on the Web at “Copyright and trademark information” at ibm.com/legal/copytrade.shtml.
Adobe is a registered trademark of Adobe Systems Incorporated in the United States, and/or other countries.
Linux is a registered trademark of Linus Torvalds in the United States, other countries, or both.
Microsoft, Windows, Windows NT, and the Windows logo are trademarks of Microsoft Corpo-ration in the United States, other countries, or both.
NEC is a registered trademark of NEC Corporation.
UNIX is a registered trademark of The Open Group in the United States and other countries.
Java and all Java-based trademarks are trademarks of Sun Microsystems, Inc. in the United States, other countries, or both.
Red Hat is a trademark or registered trademark of Red Hat, Inc. in the United States and/or other countries.
D-CC, D-C++, Diab+, FastJ, pSOS+, SingleStep, Tornado, VxWorks, Wind River, and the Wind River logo are trademarks, registered trademarks, or service marks of Wind River Sys-tems, Inc. Tornado patent pending.
20493 Rev.3 D-3

Netezza Advanced Security Administrator’s Guide
APC and the APC logo are trademarks or registered trademarks of American Power Conver-sion Corporation.
Other company, product or service names may be trademarks or service marks of others.
Open Source Notifications
PostgreSQL
Portions of this publication were derived from PostgreSQL documentation. For those por-tions of the documentation that were derived originally from PostgreSQL documentation, and only for those portions, the following applies:
PostgreSQL is copyright © 1996-2001 by the PostgreSQL global development group and is distributed under the terms of the license of the University of California below.
Postgres95 is copyright © 1994-5 by the Regents of the University of California.
Permission to use, copy, modify, and distribute this documentation for any purpose, with-out fee, and without a written agreement is hereby granted, provided that the above copyright notice and this paragraph and the following two paragraphs appear in all copies.
In no event shall the University of California be liable to any party for direct, indirect, spe-cial, incidental, or consequential damages, including lost profits, arising out of the use of this documentation, even if the University of California has been advised of the possibility of such damage.
The University of California specifically disclaims any warranties, including, but not limited to, the implied warranties of merchantability and fitness for a particular purpose. The doc-umentation provided hereunder is on an "as-is" basis, and the University of California has no obligations to provide maintenance, support, updates, enhancements, or modifications.
ICU Library
The Netezza implementation of the ICU library is an adaptation of an open source library Copyright (c) 1995-2003 International Business Machines Corporation and others.
ICU License - ICU 1.8.1 and laterCOPYRIGHT AND PERMISSION NOTICE
Copyright (c) 1995-2003 International Business Machines Corporation and othersAll rights reserved.
Permission is hereby granted, free of charge, to any person obtaining a copy of this software and associated documentation files (the "Software"), to deal in the Software without restric-tion, including without limitation the rights to use, copy, modify, merge, publish, distribute, and/or sell copies of the Software, and to permit persons to whom the Software is furnished to do so, provided that the above copyright notice(s) and this permission notice appear in all copies of the Software and that both the above copyright notice(s) and this permission notice appear in supporting documentation.
THE SOFTWARE IS PROVIDED "AS IS", WITHOUT WARRANTY OF ANY KIND, EXPRESS OR IMPLIED, INCLUDING BUT NOT LIMITED TO THE WARRANTIES OF MERCHANT-ABILITY, FITNESS FOR A PARTICULAR PURPOSE AND NONINFRINGEMENT OF THIRD PARTY RIGHTS. IN NO EVENT SHALL THE COPYRIGHT HOLDER OR HOLDERS INCLUDED IN THIS NOTICE BE LIABLE FOR ANY CLAIM, OR ANY SPECIAL INDIRECT OR CONSEQUENTIAL DAMAGES, OR ANY DAMAGES WHATSOEVER RESULTING FROM
D-4 20493 Rev.3
Open Source Notifications
LOSS OF USE, DATA OR PROFITS, WHETHER IN AN ACTION OF CONTRACT, NEGLI-GENCE OR OTHER TORTIOUS ACTION, ARISING OUT OF OR IN CONNECTION WITH THE USE OR PERFORMANCE OF THIS SOFTWARE.
Except as contained in this notice, the name of a copyright holder shall not be used in advertising or otherwise to promote the sale, use or other dealings in this Software without prior written authorization of the copyright holder.
ODBC Driver
The Netezza implementation of the ODBC driver is an adaptation of an open source driver, Copyright © 2000, 2001, Great Bridge LLC. The source code for this driver and the object code of any Netezza software that links with it are available upon request to [email protected]
Botan License
Copyright (C) 1999-2008 Jack Lloyd
2001 Peter J Jones2004-2007 Justin Karneges2005 Matthew Gregan2005-2006 Matt Johnston2006 Luca Piccarreta2007 Yves Jerschow2007-2008 FlexSecure GmbH2007-2008 Technische Universitat Darmstadt2007-2008 Falko Strenzke2007-2008 Martin Doering2007 Manuel Hartl2007 Christoph Ludwig2007 Patrick Sona
All rights reserved.
Redistribution and use in source and binary forms, for any use, with or without modifica-tion, of Botan (http://botan.randombit.net/license.html) is permitted provided that the following conditions are met:
1. Redistributions of source code must retain the above copyright notice, this list of condi-tions, and the following disclaimer.
2. Redistributions in binary form must reproduce the above copyright notice, this list of conditions, and the following disclaimer in the documentation and/or other materials pro-vided with the distribution.
THIS SOFTWARE IS PROVIDED BY THE AUTHOR(S) "AS IS" AND ANY EXPRESS OR IMPLIED WARRANTIES, INCLUDING, BUT NOT LIMITED TO, THE IMPLIED WARRAN-TIES OF MERCHANTABILITY AND FITNESS FOR A PARTICULAR PURPOSE, ARE DISCLAIMED.
IN NO EVENT SHALL THE AUTHOR(S) OR CONTRIBUTOR(S) BE LIABLE FOR ANY DIRECT, INDIRECT, INCIDENTAL, SPECIAL, EXEMPLARY, OR CONSEQUENTIAL DAM-AGES (INCLUDING, BUT NOT LIMITED TO, PROCUREMENT OF SUBSTITUTE GOODS OR SERVICES; LOSS OF USE, DATA, OR PROFITS; OR BUSINESS INTERRUPTION) HOW-EVER CAUSED AND ON ANY THEORY OF LIABILITY, WHETHER IN CONTRACT, STRICT LIABILITY, OR TORT (INCLUDING NEGLIGENCE OR OTHERWISE) ARISING IN ANY WAY OUT OF THE USE OF THIS SOFTWARE, EVEN IF ADVISED OF THE POSSIBILITYOF SUCH DAMAGE.
20493 Rev.3 D-5

Netezza Advanced Security Administrator’s Guide
Electronic Emission Notices
When you attach a monitor to the equipment, you must use the designated monitor cable and any interference suppression devices that are supplied with the monitor.
Federal Communications Commission (FCC) Statement
Note: This equipment has been tested and found to comply with the limits for a Class A digital device, pursuant to Part 15 of the FCC Rules. These limits are designed to provide reasonable protection against harmful interference when the equipment is operated in a commercial environment. This equipment generates, uses, and can radiate radio frequency energy and, if not installed and used in accordance with the instruction manual, may cause harmful interference to radio communications. Operation of this equipment in a residential area is likely to cause harmful interference, in which case the user will be required to cor-rect the interference at his own expense.
Properly shielded and grounded cables and connectors must be used in order to meet FCC emission limits. IBM is not responsible for any radio or television interference caused by using other than recommended cables and connectors or by unauthorized changes or mod-ifications to this equipment. Unauthorized changes or modifications could void the user's authority to operate the equipment.
This device complies with Part 15 of the FCC Rules. Operation is subject to the following two conditions: (1) this device may not cause harmful interference, and (2) this device must accept any interference received, including interference that might cause undesired operation.
Industry Canada Class A Emission Compliance Statement
This Class A digital apparatus complies with Canadian ICES-003.
Avis de conformité à la réglementation d'Industrie Canada
Cet appareil numérique de la classe A est conforme à la norme NMB-003 du Canada.
Australia and New Zealand Class A Statement
Attention: This is a Class A product. In a domestic environment this product may cause radio interference in which case the user may be required to take adequate measures.
European Union EMC Directive Conformance Statement
This product is in conformity with the protection requirements of EU Council Directive 2004/108/EC on the approximation of the laws of the Member States relating to electro-magnetic compatibility. IBM cannot accept responsibility for any failure to satisfy the protection requirements resulting from a nonrecommended modification of the product, including the fitting of non-IBM option cards.
Attention: This is an EN 55022 Class A product. In a domestic environment this product may cause radio interference in which case the user may be required to take adequate measures.
Responsible manufacturer:
International Business Machines Corp.New Orchard RoadArmonk, New York 10504914-499-1900
D-6 20493 Rev.3

Electronic Emission Notices
European Community contact:
IBM Technical Regulations, Department M456IBM-Allee 1, 71137 Ehningen, GermanyTelephone: +49 7032 15-2937Email: [email protected]
Germany Class A Statement
Deutschsprachiger EU Hinweis: Hinweis für Geräte der Klasse A EU-Richtlinie zur Elektro-magnetischen Verträglichkeit
Dieses Produkt entspricht den Schutzanforderungen der EU-Richtlinie 2004/108/EG zur Angleichung der Rechtsvorschriften über die elektromagnetische Verträglichkeit in den EU-Mitgliedsstaaten und hält die Grenzwerte der EN 55022 Klasse A ein.
Um dieses sicherzustellen, sind die Geräte wie in den Handbüchern beschrieben zu instal-lieren und zu betreiben. Des Weiteren dürfen auch nur von der IBM empfohlene Kabel angeschlossen werden. IBM übernimmt keine Verantwortung für die Einhaltung der Schut-zanforderungen, wenn das Produkt ohne Zustimmung der IBM verändert bzw. wenn Erweiterungskomponenten von Fremdherstellern ohne Empfehlung der IBM gesteckt/einge-baut werden.
EN 55022 Klasse A Geräte müssen mit folgendem Warnhinweis versehen werden: “Warnung: Dieses ist eine Einrichtung der Klasse A. Diese Einrichtung kann im Wohnbere-ich Funk-Störungen verursachen; in diesem Fall kann vom Betreiber verlangt werden, angemessene Maßnahmen zu ergreifen und dafür aufzukommen.”
Deutschland: Einhaltung des Gesetzes über die elektromagnetische Verträglichkeit von Geräten
Dieses Produkt entspricht dem “Gesetz über die elektromagnetische Verträglichkeit von Geräten (EMVG)”. Dies ist die Umsetzung der EU-Richtlinie 2004/108/EG in der Bundes-republik Deutschland.
Zulassungsbescheinigung laut dem Deutschen Gesetz über die elektromagnetische Verträglichkeit von Geräten (EMVG) (bzw. der EMC EG Richtlinie 2004/108/EG) für Geräte der Klasse A
Dieses Gerät ist berechtigt, in Übereinstimmung mit dem Deutschen EMVG das EG-Konfor-mitätszeichen - CE - zu führen.
Verantwortlich für die Einhaltung der EMV Vorschriften ist der Hersteller:
International Business Machines Corp.New Orchard RoadArmonk, New York 10504914-499-1900
Der verantwortliche Ansprechpartner des Herstellers in der EU ist:
IBM DeutschlandTechnical Regulations, Department M456IBM-Allee 1, 71137 Ehningen, GermanyTelephone: +49 7032 15-2937Email: [email protected]
Generelle Informationen:
Das Gerät erfüllt die Schutzanforderungen nach EN 55024 und EN 55022 Klasse A.
20493 Rev.3 D-7

Netezza Advanced Security Administrator’s Guide
Japan VCCI Class A Statement
This is a Class A product based on the standard of the Voluntary Control Council for Inter-ference (VCCI). If this equipment is used in a domestic environment, radio interference may occur, in which case the user may be required to take corrective actions.
Japan Electronics and Information Technology Industries Association (JEITA) Statement
Japan Electronics and Information Technology Industries Association (JEITA) Confirmed Harmonics Guidelines (products less than or equal to 20 A per phase)
Japan Electronics and Information Technology Industries Association (JEITA) Statement
Japan Electronics and Information Technology Industries Association (JEITA) Confirmed Harmonics Guidelines (products greater than 20 A per phase)
Korea Communications Commission (KCC) Statement
This is electromagnetic wave compatibility equipment for business (Type A). Sellers and users need to pay attention to it. This is for any areas other than home.
Russia Electromagnetic Interference (EMI) Class A Statement
People's Republic of China Class A Electronic Emission Statement
D-8 20493 Rev.3

Regulatory and Compliance
Taiwan Class A Compliance Statement
Regulatory and Compliance
Regulatory Notices
Install the NPS system in a restricted-access location. Ensure that only those trained to operate or service the equipment have physical access to it. Install each AC power outlet near the NPS rack that plugs into it, and keep it freely accessible.
Provide approved circuit breakers on all power sources.
Product may be powered by redundant power sources. Disconnect ALL power sources before servicing.
High leakage current. Earth connection essential before connecting supply. Courant de fuite élevé. Raccordement à la terre indispensable avant le raccordement au réseau.
Homologation Statement
Attention: This product is not intended to be connected directly or indirectly by any means whatsoever to interfaces of public telecommunications networks, neither to be used in a Public Services Network.
WEEE
Netezza Corporation is committed to meeting the requirements of the European Union (EU) Waste Electrical and Electronic Equipment (WEEE) Directive. This Directive requires pro-ducers of electrical and electronic equipment to finance the takeback, for reuse or recycling, of their products placed on the EU market after August 13, 2005.
20493 Rev.3 D-9

Netezza Advanced Security Administrator’s Guide
D-10 20493 Rev.3

Index
Index
Aaccess control, time 2-2access time control 2-2advanced query history 5-1advanced security 1-1AES_256 algorithm 4-1ALTER
CATEGORY A-3COHORT A-4DATABASE A-6GROUP A-7HISTORY CONFIGURATION A-9SECURITY LEVEL A-13USER A-15
auditconfiguration 5-4data capture 5-11data digital signing 5-11data flow 5-4database 5-3
authentication events 5-13
Bbasic security model 1-1Blowfish format 4-2
CCATEGORY
ALTER A-3CREATE A-18DROP A-30SHOW A-39
category 6-1changing keys 4-1COHORT
ALTER A-4CREATE A-19DROP A-31SHOW A-40
cohort 6-2collect history 5-1commands, service 5-11concurrent sessions 2-2context, session 2-1control
access time 2-2user login 2-1
CREATECATEGORY A-18COHORT A-19DATABASE A-21GROUP A-22SECURITY LEVEL A-24USER A-27
CREATE HISTORY CONFIGURATION 5-9
CREATE TABLE A-26crypto key
create 4-3drop 4-3show 4-3
Ddata capture, audit 5-11data flow, audit 5-4DATABASE
ALTER A-6CREATE A-21
Digital Signing 4-2DROP
CATEGORY A-30COHORT A-31HISTORY CONFIGURATION A-33SECURITY LEVEL A-34
DSA_KEYPAIR 4-3
Eenabling security commands C-1events, authentication 5-13EXECUTE AS 3-1external tables 6-9
GGROUP
ALTER A-7CREATE A-22
Hhistory 5-1
collect 5-1HISTORY CONFIGURATION
ALTER A-9CREATE 5-9DROP A-33SET A-37SHOW A-42
Kkeys
changing 4-1creating 4-2managing 4-1, 4-2
keystorealter 4-3create 4-3drop 4-3show 4-3
Index-1

Index
Llabel
access 6-8expand 6-8restrict 6-8
level 6-1login control, user 2-1
Mmasquerading 3-1multi-level security 6-1
Nnesting 3-2NONE 6-2nzhistcreatedb 5-3nzpassword 4-1
Ppassword
authentication 2-3encrypting 4-1expiration 2-3restrictions 2-3string restrictions 2-3
PUBLIC 6-2public 1-1
Qquery history 5-1
Rresetkey 4-2REVERT 3-2, A-36row-secure tables 6-1RST, See row-secure tables 6-8
Ssecurity
advanced 1-1basic model 1-1model 1-1multi-level 6-1system 1-2
security label syntax 6-2security labels 6-1SECURITY LEVEL
ALTER A-13CREATE A-24DROP A-34SHOW A-43
SERVICE collect flag 5-11service commands 5-11
session context 2-1sessions, concurrent 2-2SET HISTORY CONFIGURATION A-37SHOW
CATEGORY A-39COHORT A-40HISTORY CONFIGURATION A-42SECURITY LEVEL A-43
stored procedures 3-2system security 1-2system state changes 5-12
Ttables
external 6-9row secure 6-1
UUSER
ALTER A-15CREATE A-27
user login control 2-1
Index-2