netbeans platform 6.9 developer's guide - packt publishing · pdf filethe netbeans...
TRANSCRIPT
P U B L I S H I N G
community experience dist i l led
NetBeans Platform 6.9 Developer's Guide
Jürgen Petri
Chapter No.3
"Window System"
In this package, you will find: A Biography of the author of the book
A preview chapter from the book, Chapter NO.3 "Window System"
A synopsis of the book’s content
Information on where to buy this book
About the Author Jürgen Petri is a Sun Certified Enterprise Architect with more than 12 years experience
in developing enterprise Java applications.
He provides consulting services on Java and Java EE technology, and he also trains
architects and developers on software engineering, enterprise architectures, and Java-
related technologies. Although he is interested in many areas of software development,
Jürgen has a distinct focus on great UI technologies like the NetBeans Platform.
Currently, he puts his knowledge in migrating the UI of a core banking system with a
broad spectrum of technical cross cutting aspects into a web application using GWT.
Additionally, Jürgen is the author of NetBeans RCP - Das Entwicklerheft published in
2008 by O'Reilly.
For More Information: www.PacktPub.com/netbeans-platform-6-8-developers-guide/book
NetBeans Platform 6.9
Developer's Guide The NetBeans Platform is the world's only modular Swing application framework. It aims
to drastically simplify desktop application development by providing a number of
techniques, patterns, and full-blown Swing components.
Most desktop applications have very similar technical requirements, such as the
following:
• Consistent user interface • Extensibility • Data display • Configuration settings • Help
system • Distribution mechanisms • Online update function • Cross-operating system
support
Fulfilling these technical requirements over and over again for each new application is
expensive, superfluous, and boring. The NetBeans Platform gives the developer a
transparent, open source, extensible, and free framework that addresses all of these
technical requirements.
This book doesn't aim to explicate all that the NetBeans Platform offers or to explore
each and every corner of its many features. Rather, this book guides you through the
development of a specific Java desktop application, while showing you everything that is
relevant in the context of the particular application itself. That process, in turn, will lead
you through the main features relevant to the development of most general applications
on the NetBeans Platform.
The central driver of the book is, therefore, the creation of a complete Java desktop
application, chapter by chapter, step-by-step, sequentially through the progression of
chapters in this book
What This Book Covers Chapter 1, Module: A module is the basic building block of a NetBeans Platform
application. In the chapter dealing with this theme, you learn why it makes sense to
develop modular applications, while examining the features of modules, as well as their
interdependencies. Moreover, you examine module versioning and the lifecycle of
modules, as well as the entry points into that lifecycle.
Chapter 2, Forms: Almost every large desktop application needs to provide a number of
forms that accept data from the user. You learn how forms are created for usage on the
NetBeans Platform, how their layout is set, and how to implement the related handling of
events.
For More Information: www.PacktPub.com/netbeans-platform-6-8-developers-guide/book
Chapter 3, Window System: The NetBeans Window System, together with the API that it
exposes, lets you arrange forms on the screen within a docking framework. You learn
how to create windows, what their lifecycle looks like, and how to infl uence that
lifecycle. In addition, you examine how a window is positioned within the layout of the
application, how to influence the window layout, and how to create groups of related
windows.
Chapter 4, Lookup: The Lookup API provides a communication mechanism, comparable
to an event bus, which is of central significance in the creation of NetBeans Platform
applications. You learn how to use the Lookup to find services so that loosely-coupled
communication between modules can be established. You also learn how to listen to the
Lookup so that content can be added dynamically to a NetBeans Platform application.
You examine how a Lookup can act as a proxy for another Lookup and how this
functions as the basis of context sensitivity, also known as "selection management", in
NetBeans Platform applications.
Chapter 5, Actions: You learn how to create global actions and how to invoke them from
menus and toolbars. You also examine how to connect actions to shortcuts, allowing
them to be invoked from a keyboard.
Chapter 6, Nodes and Explorer Views: A sophisticated MVC implementation for
displaying business objects is made available via a set of extensible Swing components,
which you can use without very much work at all. You explore how generic hierarchical
models, known as "nodes", can represent and display business objects in advanced Swing
components called "explorer views". You use fl at as well as hierarchical structures and
are shown how easily one view can be exchanged for another and how they can be
synchronized with each other. You also spend some time learning about the
asynchronous creation of nodes and how context sensitive actions are attached to a node.
Last but not least, you learn how the properties of a node can be displayed in property
views and how to create the related property editors.
Chapter 7, File System: The File System API lets you access a NetBeans Platform's
virtual filesystem, which serves as the application's central registry. You learn how to
access the configuration system, as well as other systems that can be created on top of the
same API. Finishing up, you create new folders, fi les, and attributes in the filesystem.
Chapter 8, Data System: The Datasystems API gives you access to the content of fi les.
You learn how to extend a NetBeans Platform application to provide support for custom
data types. You also discover how the features available to data content can change in
relation to the current status of the underlying fi le.
Chapter 9, Dialogs: The responsibilities of dialogs in an application extend from the
display of simple messages to the management of step-by-step procedural wizards. In that
context, you learn how to display simple messages, standard dialogs, and sophisticated
multi-step wizards to the user.
For More Information: www.PacktPub.com/netbeans-platform-6-8-developers-guide/book
Chapter 10, Settings: Large applications, such as those based on the NetBeans Platform,
typically have many different kinds of users. Not all of them need all the application's
features and not all of them use those features in the same way. As the application
becomes larger, a centralized approach is needed, so that each module added to the
application can contribute to a centralized Options window. That is the theme of this
chapter, which introduces you to the most important APIs and the entry points into the
centralized Options window.
Chapter 11, Help: HTML fi les constituting your documentation can be integrated into
the application. When the user clicks on the Help buttons in the application, or when they
invoke an Action to display the entire help content, your HTML fi les can be displayed to
them. This chapter shows you how to configure the help system and gets you started with
a few help topics, a table of contents, and an indexing system.
Chapter 12, Branding: Branding enables the application's ancillary details, such as icons
and splash screens, to be customized. For example, you learn how to exchange the
custom splash screen with your own.
Chapter 13, Distribution and Updates: To let you distribute applications, you examine
the various distribution mechanisms for NetBeans Platform applications. You generate a
distribution and an installer, with a special focus on how to let an application be updated
online.
For More Information: www.PacktPub.com/netbeans-platform-6-8-developers-guide/book
Window SystemLarge desktop applications need to provide many different views for visualizing data. These views have to be managed and shown and the NetBeans Platform handles these requirements for you out of the box via its docking framework.
While it once might have been suffi cient for a docking framework to provide static fi xed window layouts, today the user expects far more fl exibility. Windows should be able to be opened, movable, and, generally, customizable at runtime. The user tends to assume that the positions of views are modifi able and that they persist across restarts of the application. Not only that, but applications are assumed to be so fl exible that views should be detachable from the application's main window, enabling them to be displayed on multiple monitors at the same time. While once the simple fact of the availability of menus and toolbars was suffi cient, today a far more dynamic handling is needed so that window content can be adapted dynamically. Connected to these expectations of fl exibility, plugins are increasingly becoming a standard technology, with the user assuming their windows to be pluggable, too.
In short, the requirements for window management have become quite complex and can only be met by means of an external docking framework, otherwise all these various concerns would need to be coded (and debugged, tested, and maintained) by hand. The NetBeans Platform provides all of these features via its docking framework, known as the NetBeans Window System. It also provides an API to let you programmatically access the window system. Together, the window system and its API fulfi ll all the requirements described above, letting you concentrate on your domain knowledge and business logic rather than on the work of creating a custom window management facility for each of your applications.
For More Information: www.PacktPub.com/netbeans-platform-6-8-developers-guide/book
Window System
[ 38 ]
This chapter teaches you the following:
How to defi ne viewsHow to position views in the main windowHow to customize the default window layoutHow to group views so that they open and close as a unitHow to change the persistence of views across restarts of the application
Creating a windowThe NetBeans Window System simplifi es window management by letting you use a default component for displaying windows. The default component, that is, the superclass of all windows, is the TopComponent class, which is derived from the standard JComponent class. It defi nes many methods for controlling a window and handles notifi cation of main window system events.
The WindowManager is the central class controlling all the windows in the application. Though you can implement this class yourself, this is seldom done as normally the default WindowManager is suffi cient. Similarly, you typically use the standard TopComponent class, rather than creating your own top-level Swing components. In contrast to the TopComponent class, the default WindowManager cannot manage your own top-level Swing components, so these cannot take advantage of the Window System API.
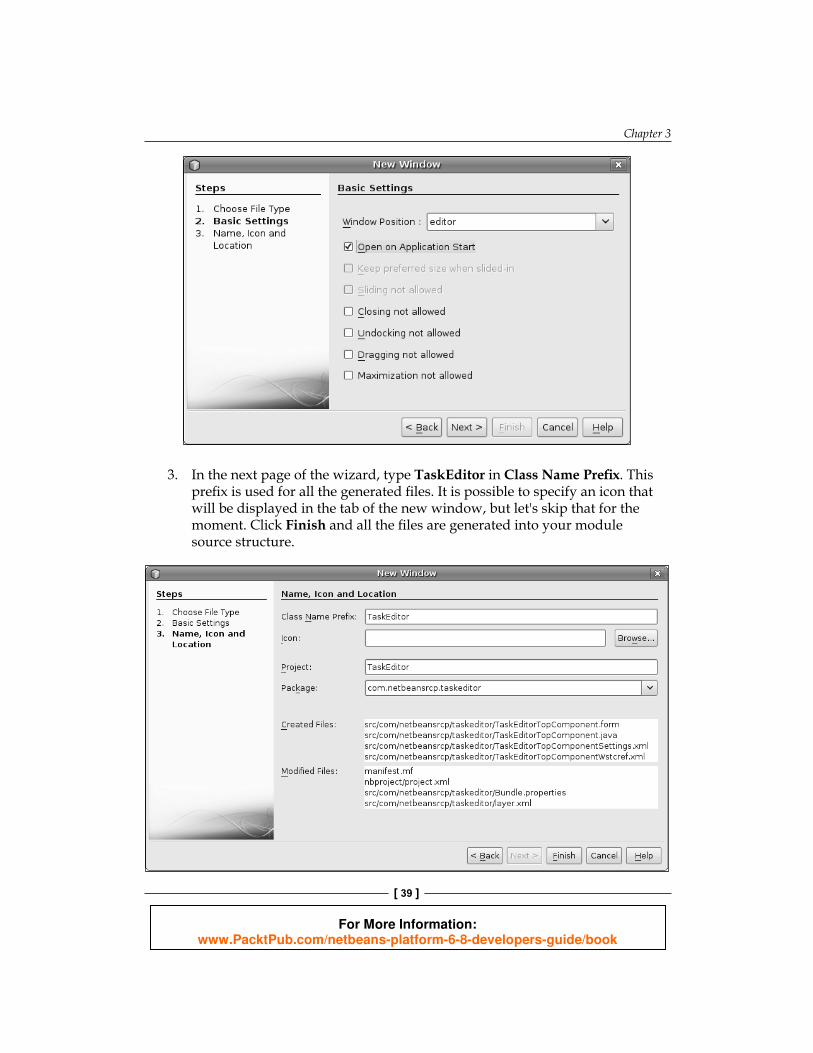
Now let's create a TopComponent and let it be an editor for working with tasks. This is done easily by using the New Window wizard.
1. In the Projects window, right-click the TaskEditor module project node and choose New | Window.
2. On the fi rst page of the wizard select Editor for Window Position and Open on Application Start. Click Next.
•
•
•
•
•
For More Information: www.PacktPub.com/netbeans-platform-6-8-developers-guide/book
Chapter 3
[ 39 ]
3. In the next page of the wizard, type TaskEditor in Class Name Prefi x. This prefi x is used for all the generated fi les. It is possible to specify an icon that will be displayed in the tab of the new window, but let's skip that for the moment. Click Finish and all the fi les are generated into your module source structure.
For More Information: www.PacktPub.com/netbeans-platform-6-8-developers-guide/book
Window System
[ 40 ]
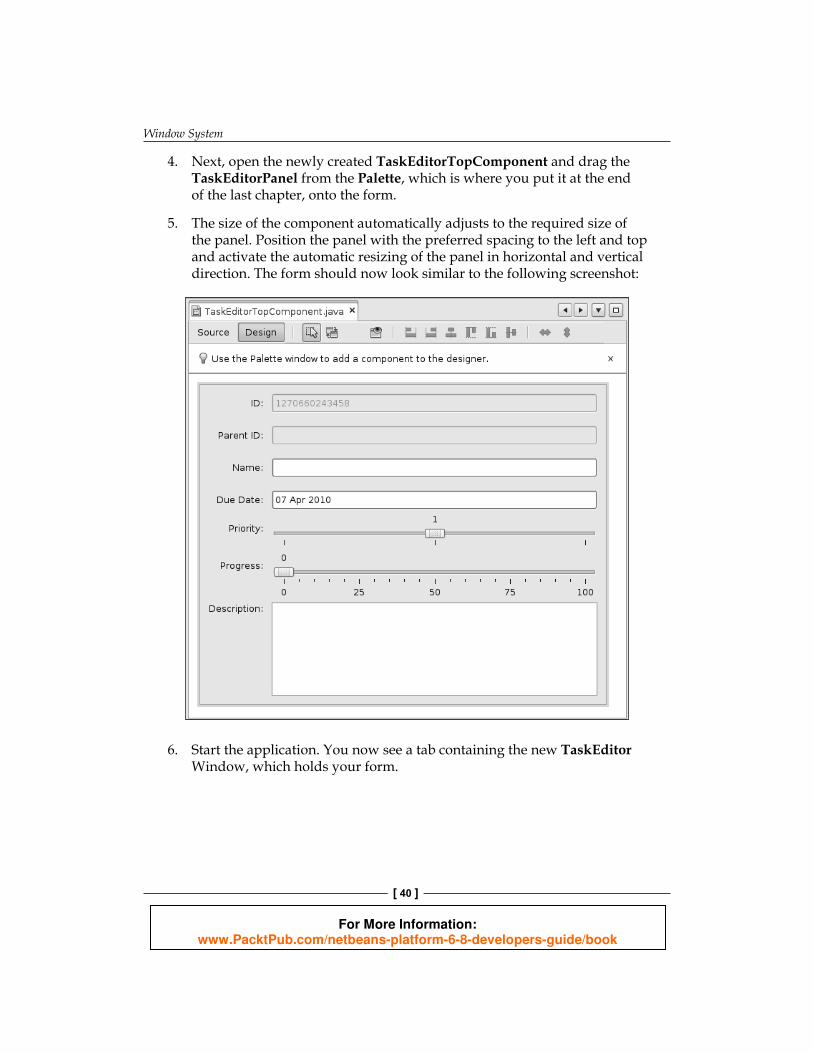
4. Next, open the newly created TaskEditorTopComponent and drag the TaskEditorPanel from the Palette, which is where you put it at the end of the last chapter, onto the form.
5 . The size of the component automatically adjusts to the required size of the panel. Position the panel with the preferred spacing to the left and top and activate the automatic resizing of the panel in horizontal and vertical direction. The form should now look similar to the following screenshot:
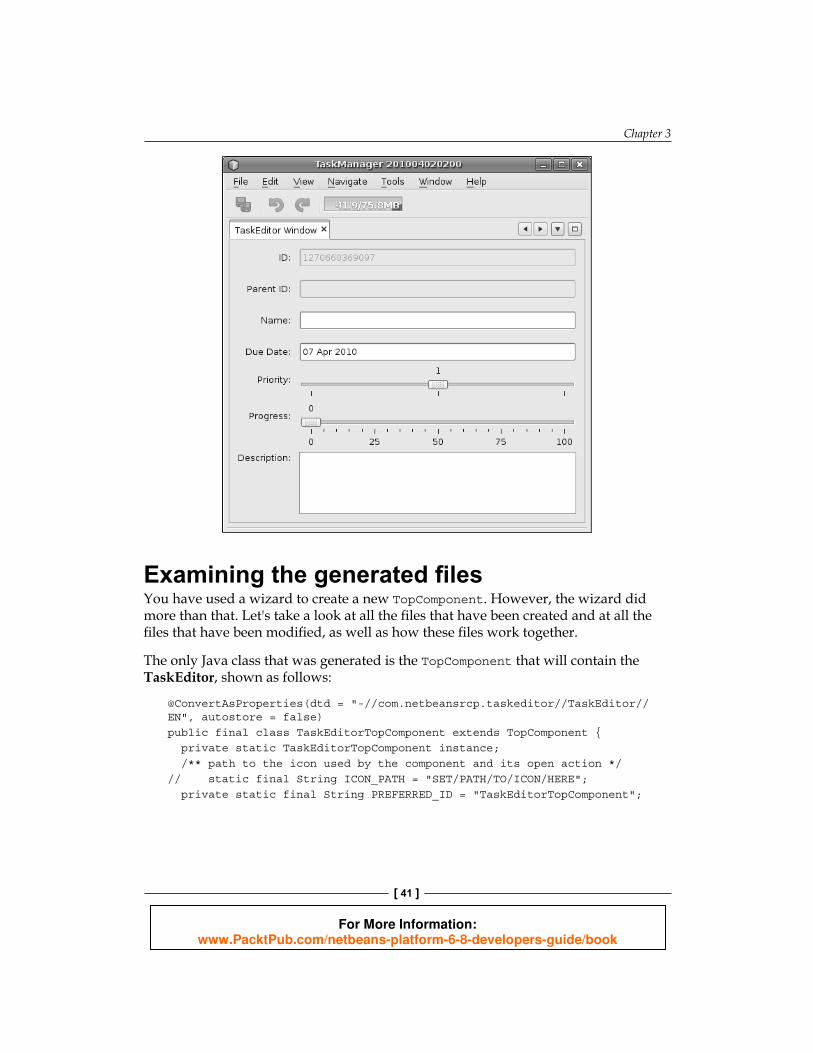
6. Sta rt the application. You now see a tab containing the new TaskEditor Window, which holds your form.
For More Information: www.PacktPub.com/netbeans-platform-6-8-developers-guide/book
Chapter 3
[ 41 ]
Examining the generated filesYou have used a wizard to create a new TopComponent. However, the wizard did more than that. Let's take a look at all the fi les that have been created and at all the fi les that have been modifi ed, as well as how these fi les work together.
The only Java class that was generated is the TopComponent that will contain the TaskEditor, shown as follows:
@Co nvertAsProperties(dtd = "-//com.netbeansrcp.taskeditor//TaskEditor//EN", autostore = false)public final class TaskEditorTopComponent extends TopComponent { private static TaskEditorTopComponent instance; /** path to the icon used by the component and its open action */// static final String ICON_PATH = "SET/PATH/TO/ICON/HERE"; private static final String PREFERRED_ID = "TaskEditorTopComponent";
For More Information: www.PacktPub.com/netbeans-platform-6-8-developers-guide/book

Window System
[ 42 ]
public TaskEditorTopComponent() { initComponents(); setName(NbBundle.getMessage(TaskEditorTopComponent.class, "CTL_TaskEditorTopComponent")); setToolTipText(NbBundle.getMessage(TaskEditorTopComponent.class, "HINT_TaskEditorTopComponent"));// setIcon(ImageUtilities.loadImage(ICON_PATH, true));
}
/**This method is called from within the constructor to * initialize the form. * WARNING: Do NOT modify this code. The content of this method is * always regenerated by the Form Editor. */ // <editor-fold defaultstate="collapsed" desc="Generated Code"> private void initComponents() {
javax.swing.GroupLayout layout = new javax.swing. GroupLayout(this); this.setLayout(layout); layout.setHorizontalGroup( layout.createParallelGroup(javax.swing.GroupLayout. Alignment.LEADING).addGap(0, 555, Short.MAX_VALUE)); layout.setVerticalGroup(layout.createParallelGroup( javax.swing.GroupLayout.Alignment.LEADING) .addGap(0, 442, Short.MAX_VALUE) ); }// </editor-fold>
// Variables declaration - do not modify // End of variables declaration /** * Gets default instance. Do not use directly: reserved for *.settings files only, * i.e. deserialization routines; otherwise you could get a non-deserialized instance. * To obtain the singleton instance, use {@link #findInstance}. */ public static synchronized TaskEditorTopComponent getDefault() { if (instance == null) { instance = new TaskEditorTopComponent(); } return instance; }
For More Information: www.PacktPub.com/netbeans-platform-6-8-developers-guide/book
Chapter 3
[ 43 ]
/** * Obtain the TaskEditorTopComponent instance. Never call { @link #getDefault} directly! */ public static synchronized TaskEditorTopComponent findInstance() { TopComponent win = WindowManager.getDefault().findTopComponent (PREFERRED_ID); if (win == null) { Logger.getLogger(TaskEditorTopComponent.class.getName()). warning("Cannot find " + PREFERRED_ID + " component. It will not be located properly in the window system."); return getDefault(); } if (win instanceof TaskEditorTopComponent) { return (TaskEditorTopComponent) win; } Logger.getLogger(TaskEditorTopComponent.class.getName()). warning("There seem to be multiple components with the '" + PREFERRED_ID + "' ID. That is a potential source of errors and unexpected behavior."); return getDefault(); }
@Override public int getPersistenceType() { return TopComponent.PERSISTENCE_ALWAYS; }
@Override public void componentOpened() { // TODO add custom code on component opening } @Override public void componentClosed() { // TODO add custom code on component closing }
void writeProperties(java.util.Properties p) { // better to version settings since initial version as advocated at // http://wiki.apidesign.org/wiki/PropertyFiles p.setProperty("version", "1.0"); // TODO store your settings }
Object readProperties(java.util.Properties p) { if (instance == null) { instance = this;
For More Information: www.PacktPub.com/netbeans-platform-6-8-developers-guide/book

Window System
[ 44 ]
} instance.readPropertiesImpl(p); return instance; }
private void readPropertiesImpl(java.util.Properties p) { String version = p.getProperty("version"); // TODO read your settings according to their version }
@Override protected String preferredID() { return PREFERRED_ID; } }
As expected, the class TaskEditorTopComponent extends the TopComponent class.
Let's look at it more closely:
F or effi cient resource usage, the generated TopComponent is implemented as a singleton. A private constructor prohibits its incorrect usage from outside by disallowing direct instantiation of the class. The static attribute instance holds the only instance in existence. The static method getDefault creates and returns this instance if necessary on demand. Typically, getDefault should never be called directly. Instead of this, you should use findInstance, which delegates to getDefault if necessary. findInstance tries to retrieve the instance using the Window Manager and the ID of the TopComponent before falling back to the singleton instance. This ensures the correct usage of persistent information.The constructor creates the component tree for the TaskEditorTopComponent by calling the method ini t Components(). This method contains only code generated via the NetBeans "Matisse" Form Builder and is read-only in the NetBeans Java editor. You can change the code in this method using the Form Builder's Property Sheet, as will be shown later.The static property PreferredID holds the TopComponent ID used for identifi cation of the TopComponent. As indicated by its name, the ID can be changed by the Window System, if name clashes occur. The ID is used throughout all the confi guration fi les.The methods comp onentOpened() and componentClosed() are part of the lifecycle of the TopComponent.You learn about the method getPersistenceType() later, in the section about the persistence of TopComponents.
•
•
•
•
•
For More Information: www.PacktPub.com/netbeans-platform-6-8-developers-guide/book
Chapter 3
[ 45 ]
Wha t does the Java code do and not do? The Java code only defi nes the visual aspects of the TaskEditorTopComponent and manages the singleton instance of this component. In no way does the code describe how and where the instance is shown. That's the task of the two XML fi les, described below.
Two small XML fi les are created by the wizard. The fi rst is the TopComponent's settings fi le:
<?xml version="1.0" encoding="UTF-8"?><!DOCTYPE settings PUBLIC "-//NetBeans//DTD Session settings 1.0//EN" "http://www.netbeans.org/dtds/sessionsettings-1_0.dtd"><settings version="1.0"> <module name="com.netbeansrcp.taskeditor" spec="1.0"/> <instanceof class="org.openide.windows.TopComponent"/> <instanceof class="com.netbeansrcp.taskeditor. TaskEditorTopComponent"/> <instance class="com.netbeansrcp.taskeditor.TaskEditorTopComponent" method="getDefault"/></settings>
The settings fi le describes the persistent instance of the TopComponent. As you can see, the preceding confi guration describes that the TopComponent belongs to the module TaskEditor in the specifi cation version "1.0" and that it is an instance of the types TopComponent and TaskEditorTopComponent. Also described is that the instance that is created is done so using the method call TaskEditorTopComponent.getDefault().
<?x ml version="1.0" encoding="UTF-8"?><!DOCTYPE tc-ref PUBLIC "-//NetBeans//DTD Top Component in Mode Properties 2.0//EN" "http://www.netbeans.org/dtds/tc-ref2_0.dtd"><tc-ref version="2.0" > <module name="com.netbeansrcp.taskeditor" spec="1.0"/> <tc-id id="TaskEditorTopComponent"/> <state opened="true"/></tc-ref>
The WSTCREF (window system creation fi le) describes the position of the TopComponent within the main window. This becomes clearer with the following fi le. The other important information in the WSTCREF fi le is the opened state at application start.
For More Information: www.PacktPub.com/netbeans-platform-6-8-developers-guide/book
Window System
[ 46 ]
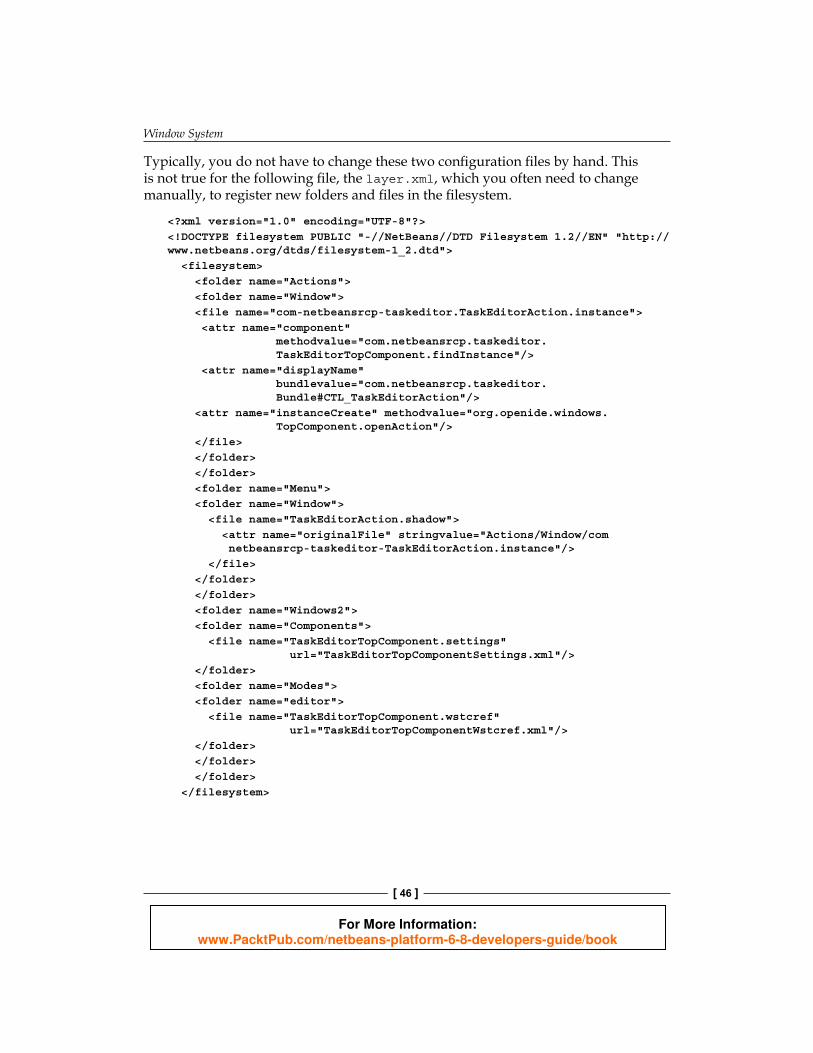
Typically, you do not have to change these two confi guration fi les by hand. This is not true for the following fi le, the layer.xml, which you often need to change manually, to register new folders and fi les in the fi lesystem.
<?xml version="1.0" encoding="UTF-8"?><!DOCTYPE filesystem PUBLIC "-//NetBeans//DTD Filesystem 1.2//EN" "http://www.netbeans.org/dtds/filesystem-1_2.dtd"> <filesystem> <folder name="Actions"> <folder name="Window"> <file name="com-netbeansrcp-taskeditor.TaskEditorAction.instance"> <attr name="component" methodvalue="com.netbeansrcp.taskeditor. TaskEditorTopComponent.findInstance"/> <attr name="displayName" bundlevalue="com.netbeansrcp.taskeditor. Bundle#CTL_TaskEditorAction"/> <attr name="instanceCreate" methodvalue="org.openide.windows. TopComponent.openAction"/> </file> </folder> </folder> <folder name="Menu"> <folder name="Window"> <file name="TaskEditorAction.shadow"> <attr name="originalFile" stringvalue="Actions/Window/com netbeansrcp-taskeditor-TaskEditorAction.instance"/> </file> </folder> </folder> <folder name="Windows2"> <folder name="Components"> <file name="TaskEditorTopComponent.settings" url="TaskEditorTopComponentSettings.xml"/> </folder> <folder name="Modes"> <folder name="editor"> <file name="TaskEditorTopComponent.wstcref" url="TaskEditorTopComponentWstcref.xml"/> </folder> </folder> </folder> </filesystem>
For More Information: www.PacktPub.com/netbeans-platform-6-8-developers-guide/book
Chapter 3
[ 47 ]
The layer.xml is integrated into the central registry (also known as the SystemFileSystem) using the via a registration entry in the module's manifest fi le. The SystemFileSystem is a virtual fi lesystem for user settings. Each module can supply a layer fi le for merging confi guration data from the module into the SystemFileSystem.
The Window System API and the Actions API reserve a number of folders in the central registry for holding its confi guration data. These folders enable specifi c subfolders and fi les relating to window system registration to be added to the fi lesystem.
Let's have a look at the folder Windows2. Windows2 contains a folder named Components, which contains a virtual fi le with the name of the TopComponent and the extension .settings. This .settings fi le redirects to the real settings fi le. It is used to make the confi guration known to the Window System.In addition, the Windows2 folder contains a folder named Modes, which contains a folder named editor. Modes represent the possible positions at which TopComponents can be shown in the application. The editor folder contains a .wstcref fi le for our TopComponent, which refers to the real WSTCREF fi le. This registers the TopComponent in the mode editor, so it shows up where typically editor windows are opened, which is the central part of the main window.Next , take a look at the folder Actions. It contains a folder named Window which contains a fi le declaring the action opening the TaskEditorTopComponent. The name is typically following Java class naming conventions with dots replaced by dashes and ending in .instance. The declaration of the virtual fi le itself consists of three critical parts. The attribute component describes how to create the component (methodvalue declares which method to call). The attribute displayName describes the default action name as shown in the example, in menu items. A possible declaration is the bundle value which describes the bundle and key to use to retrieve the display name. The attribute instanceCreate uses a static method call to create a real action to use.The folder Menu describes the application main menu. The folder Window contains a .shadow fi le. The attribute originalFile uses the full path in the SystemFileSytem to delegate to the original action declaration. As described above, .shadow fi les are used as symbolic links to real-defi ned virtual fi les. This declaration adds the action to the real menu bar of the application.
•
•
•
•
For More Information: www.PacktPub.com/netbeans-platform-6-8-developers-guide/book
Window System
[ 48 ]
As a result, important parts of the Window System API are not called programmatically, but are simply used declaratively. Declarative aspects include confi guration and the positioning of windows, as well as the construction of the menu.
In addition, you discovered that the wizard for creating TopComponents always creates singleton views. If you would like to change that, you need to adapt the code created by the wizard. For the time being, it is suffi cient to use the singleton approach, particularly as it is more resource-friendly.
Automatic window lifecycle managementA fu rther major advantage of the NetBeans Window System is that it provides a WindowManager that controls the lifecycle of all the windows defi ned in the application. The WindowManager notifi es all TopComponents about state changes using callback methods, listed as follows:
componentOpened() It is called after the TopComponent has been opened. If multiple TopComponents are opened into the same position (called mode), the NetBeans Window System uses a tabbed container, with one TopComponent per tab. Of all available TopComponents found within a shared tabbed container, only the content of the selected TopComponent is visible.
componentShowing() It notifi es the component that its content is now visible. This TopComponent is now either selected or is the only component in a separate container.
componentActivated () It is called after the TopComponent has gained the input focus or has become the selected component.
componentDeactivated () It is called after the TopComponent has lost the input focus. componentHidden() It notifi es the TopComponent that its content is no
longer visible. componentClosed () It is called after the TopComponent has been closed.
Let's illustrate this lifecycle via an example that logs all the callback methods to the output window of NetBeans IDE, which is your development environment on top of the NetBeans Platform.
1. Create a new NetBeans Platform application and name it WindowSystemExamples.
2. Add a new module named LifeCycle, with Code Name Base com.netbeansrcp.lifecycle.
For More Information: www.PacktPub.com/netbeans-platform-6-8-developers-guide/book
Chapter 3
[ 49 ]
3. Add a TopComponent, with Class Name Prefi x prefi x LifeCycleDemo, making sure to indicate that it should be automatically opened in the editor area at application startup.
4. Override the lifecycle methods as follows:public void componentOpened() { super.componentOpened(); System.out.println("componentOpened()");}
protected void componentShowing() { super.componentShowing(); System.out.println("componentShowing()");}
protected void componentActivated() { super.componentActivated(); System.out.println("componentActivated()");
}
@Overrideprotected void componentDeactivated() { super.componentDeactivated(); System.out.println("componentDeactivated()");}
@Override protected void componentHidden() { super.componentHidden(); System.out.println("componentHidden()");}
@Override public void componentClosed() { super.componentClosed(); System.out.println("componentClosed()");}
Start the new application. The TopComponent LifeCyleDemoTopComponent is automatically opened at startup. Select the TopComponent and inspect the output in the NetBeans IDE Output Window. You should see the following:
componentOpened()componentShowing()componentActivated()
For More Information: www.PacktPub.com/netbeans-platform-6-8-developers-guide/book

Window System
[ 50 ]
The TopComponent has passed the fi rst half of its lifecycle and is now activated.
Close the LifeCyleDemoTopComponent and inspect the output again, to understand the second half of the TopComponent lifecycle. You should see the following output:
componentHidden()componentDeactivated()componentClosed()
You have learned that the TopComponent's lifecycle is automatically controlled by the NetBeans Platform. Between the start and the end of the TopComponent's lifecycle are six different states, all managed by the NetBeans Platform, and with notifi cations sent via callbacks.
Programmatically managing the Window lifecycleYou can manage the lifecycle of a TopComponent programmatically. For this purpose, the TopComponent provides the following methods:
open(): Opens the TopComponentrequestVisible(): Requests to select to TopComponent requestActive(): Requests to transfer the input focus to the TopComponent
Let's now modify the LifeCycleDemoTopComponent for demonstration purposes.
1. Add a JButton to the TopComponent, as follows:
•
•
•
For More Information: www.PacktPub.com/netbeans-platform-6-8-developers-guide/book

Chapter 3
[ 51 ]
2. Implement an ActionEventListener as follows: private void jButton1ActionPerformed(java.awt.event.ActionEvent evt) {
this.close(); RequestProcessor.getDefault().post(new java.lang.Runnable() { public void run() { java.awt.EventQueue.invokeLater(new java.lang.Runnable() { public void run() { com.netbeansrcp.lifecycle.LifeCycleDemoTopComponent.this.open(); } }); } }, 3000);
RequestProcessor.getDefault().post(new java.lang.Runnable() {
public void run() { java.awt.EventQueue.invokeLater(new java.lang.Runnable() {
public void run() { com.netbeansrcp.lifecycle. LifeCycleDemoTopComponent.this.requestActive(); } }); } }, 6000); }
3. Restart the application. When you click the button, the LifecycleDemoTopComponent is closed via the close() method, called above in the fi rst line of the code you entered.
T he RequestProcessor provides a thread pool. The default instance of this pool lets you execute a Runnable after a short delay, thanks to the post() method. As the TopComponent's lifecycle method should be called from the AWT event thread, you do not call them directly in the run() method, but by posting a new Runnable to the EventQueue, which in the end calls the Window System API methods.
The argument 3000 ensures that the execution of the Runnable is delayed for 3000 ms so that the TopComponent is opened again after 3 s.
A fter six seconds the second Runnable posted to the EventQueue is executed and requestActive() is called for your LifecycleDemoTopComponent. Your TopComponent is now shown in the foreground, if it had been behind other windows previously.
For More Information: www.PacktPub.com/netbeans-platform-6-8-developers-guide/book
Window System
[ 52 ]
You have learned how to manage the lifecycle of a TopComponent. Via the example you have seen how to open a TopComponent and make it focusable.
Positioning of windowsT he NetBeans Window System divides the available space in the main window into areas that are called "modes". Each mode represents a specifi c area of the main window, providing a container for windows in a predefi ned position in the frame. You can add windows, that is, TopComponents, to a mode, either declaratively or programmatically.
A standard layout is provided by the NetBeans Window System, corresponding to the layout of NetBeans IDE. For example, the predefi ned modes correspond to the names used in the corresponding positions in NetBeans IDE, such as "editor" and "explorer". If needed, you can defi ne your own modes, too. No wizard is provided for this purpose in NetBeans IDE, so you need to create the mode defi nition fi les yourself manually.
In the previous section you learned about the layer.xml fi le. To create a default layout for an application, each TopComponent needs to be declaratively registered within the Windows2 | Modes folder, within a subfolder named after the mode in which the TopComponent should be docked.
T o demonstrate declarative registration of TopComponents, edit the layer.xml in the LifeCycle module, changing the folder name Windows2 | Modes | editor to Windows | Modes | rightSlidingSide, as shown in the following code snippet:
layer.xml
// <folder name="Windows2"> <folder name="Components"> <file name="LifecycleDemoTopComponent.settings" url="LifecycleDemoTopComponentSettings.xml"/> </folder> <folder name="Modes"> <folder name="rightSlidingSide"> <file name="LifecycleDemoTopComponent.wstcref" url="LifecycleDemoTopComponentWstcref.xml"/> </folder> </folder> </folder>//
For More Information: www.PacktPub.com/netbeans-platform-6-8-developers-guide/book

Chapter 3
[ 53 ]
Select Clean and Build on the application node in the Projects window, to remove the build folder containing the last used window layout, and start the application again. When the application starts up, notice that the LifecycleDemoTopComponent is not opened in the editor mode. Instead, it is represented by a button on the right sidebar of the application (as shown in the screenshot below). That is the rightSlidingSide mode, providing a container for minimized windows.
As you have seen, providing a default layout via declarative registrations of TopComponents is rather easy. You only need to create an entry in the layer.xml for the TopComponent, in a folder with the name of the desired mode, within the Windows2 | Modes folder.
Sometimes declarative registration alone is too static for your business needs. Fortunately, positioning of TopComponents can also be done programmatically. In the next example, you create a TopComponent that moves to new modes via a click of a button.
1. Add to the WindowSystemExamples application a new module named Modes, with the Code Name Base com.netbeansrcp.modes.
2. Within the module, create a TopComponent called ModesDemo, which is opened when the application starts into the "editor" mode.
For More Information: www.PacktPub.com/netbeans-platform-6-8-developers-guide/book
Window System
[ 54 ]
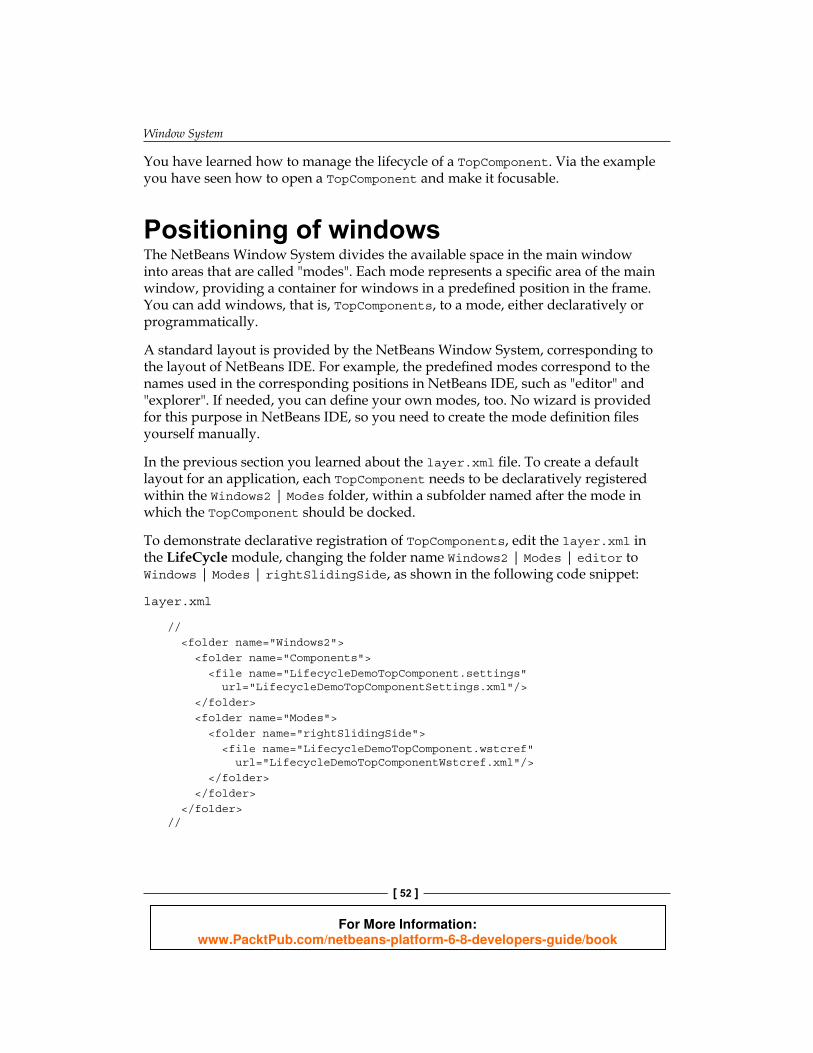
Add two JButtons to the TopComponent with the texts Back and Forward, as well as a JLabel with an empty initial text. The TopComponent should look as shown in the following screenshot:
In the Source view, add the following code:
private static final String[] MODES = new String[] { "properties", "commonpalette", "rightSlidingSide", "bottomSlidingSide", "output", "debugger", "navigator", "explorer", "leftSlidingSide", "editor"}; private void changeMode(boolean next) { Mode currentMode = WindowManager.getDefault().findMode(this); String currentModeName = currentMode.getName();
String nextModeName = "editor"; for (int i = 0; i < MODES.length; i++) { String modeName = MODES[i]; if (modeName.equals(currentModeName)) { if (next) { nextModeName = (i + 1 < MODES.length) ? MODES[i + 1] : MODES[0]; } else { nextModeName = (i - 1 >= 0) ? MODES[i - 1] : MODES[MODES.length - 1]; }
For More Information: www.PacktPub.com/netbeans-platform-6-8-developers-guide/book
Chapter 3
[ 55 ]
break; } }
Mode nextMode = WindowManager.getDefault().findMode(nextModeName); if (nextMode != null) { this.jLabel1.setText(nextModeName); nextMode.dockInto(this); this.open(); this.requestActive(); }}private void jButton2ActionPerformed(java.awt.event.ActionEvent evt) { this.changeMode(true);} private void jButton1ActionPerformed(java.awt.event.ActionEvent evt) { this.changeMode(false);}
The static string array contains the names of the most important modes. These modes can also be identifi ed dynamically, by calling WindowManager.getDefault().getModes().
The ActionListener delegates the call to the method changeMode() and gives the desired back/forward direction. This method determines via WindowManager.getDefault ().findMode (this) the mode in which the TopComponent is displayed, as well as the name of the current mode.
The string array is then searched and dockInto(this) is called to dock the TopComponent into a different mode.
How to revert to the default layout? As the layout of the NetBeans Platform is persisted when the application shuts down, fi rst perform a Clean and Build on the application project. With the removal of the build folder, the layout settings are also deleted, so that the default layout is used when the application starts again.
For More Information: www.PacktPub.com/netbeans-platform-6-8-developers-guide/book

Window System
[ 56 ]
Using the two buttons, you can let the TopComponent be docked in some of the most commonly used modes (as shown in the screenshot below).
You have programmatically docked a TopComponent into various places within the available modes in the application. In the process, you have learned how TopComponents can be docked dynamically, that is, at runtime, into desired positions. Both the declarative and the programmatic approaches to docking should now be familiar to you.
Creating custom modesYou can get quite far with the standard modes provided by the NetBeans Platform. Still, sometimes you may need to provide a custom mode, to provide a new position for the TopComponents within the application. A custom mode is created declaratively in XML fi les, rather than programmatically in Java code.
In the following example, you create two new modes that are positioned side by side in the lower part of the application using a specifi c location relative to each other.
1. Create a new module named CustomModes, with Code Name Base com.netbeansrcp.custommodes, within the existing WindowSystemExamples application.
For More Information: www.PacktPub.com/netbeans-platform-6-8-developers-guide/book
Chapter 3
[ 57 ]
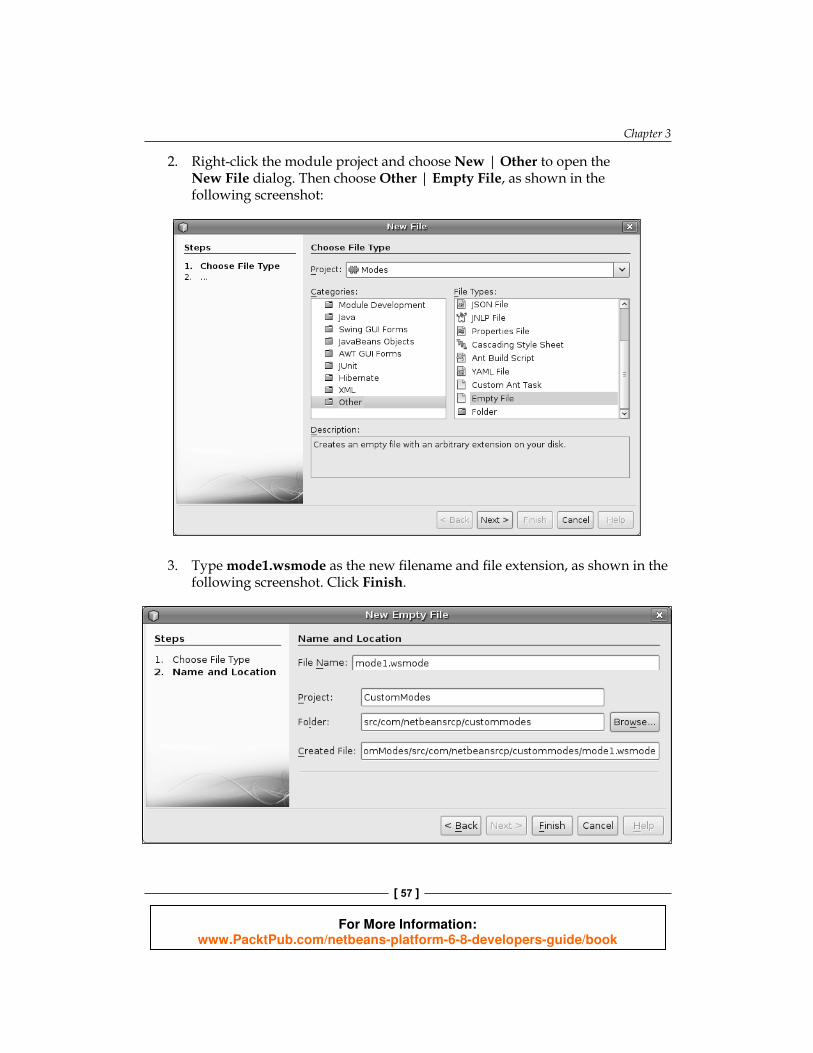
2. Right-click the module project and choose New | Other to open the New File dialog. Then choose Other | Empty File, as shown in the following screenshot:
3. Type mode1.wsmode as the new fi lename and fi le extension, as shown in the following screenshot. Click Finish.
For More Information: www.PacktPub.com/netbeans-platform-6-8-developers-guide/book
Window System
[ 58 ]
4. Defi ne the content of the new mode1.wsmode as follows:<?xml version="1.0" encoding="UTF-8"?>
<!DOCTYPE mode PUBLIC
"-//NetBeans//DTD Mode Properties 2.3//EN"
"http://www.netbeans.org/dtds/mode-properties2_3.dtd">
<mode version="2.3">
<name unique="mode1" />
<kind type="view" />
<state type="joined" />
<constraints>
<path orientation="vertical" number="20" weight="0.2"/>
<path orientation="horizontal" number="20" weight="0.5"/>
</constraints>
</mode>
5. Create another fi le to defi ne the second mode and name it mode2.wsmode. Add this content to the new fi le:<?xml version="1.0" encoding="UTF-8"?>
<!DOCTYPE mode PUBLIC
"-//NetBeans//DTD Mode Properties 2.3//EN"
"http://www.netbeans.org/dtds/mode-properties2_3.dtd">
<mode version="2.3">
<name unique="mode2" />
<kind type="view" />
<state type="joined" />
<constraints>
<path orientation="vertical" number="20" weight="0.2"/>
<path orientation="horizontal" number="40" weight="0.5"/>
</constraints>
</mode>
Via th e two wsmode fi les described above, you have defi ned two custom modes. The fi rst mode has the unique name mode1, with the second named mode2. Both are created for normal TopComponents (view instead of editor) that are integrated into the main window, rather than being undocked by default (joined instead of separated).
The constraints elements in the fi les are comparable to GridBagLayout, with a relative horizontal and vertical position, as well as a relative horizontal and vertical weight. You place mode1 in position 20/20 with a weighting of 0,5/0,2, while mode2 is placed in position 20/40 with the same weighting.
For More Information: www.PacktPub.com/netbeans-platform-6-8-developers-guide/book
Chapter 3
[ 59 ]
If all the other defi ned modes have TopComponents opened within them, the TopComponents in the two new modes should lie side by side, right above the status bar, taking up 20% of the available vertical space, with the horizontal space shared between them.
1. Let us now create two new TopComponents and register them in the layer.xml fi le so that they will be displayed in your new modes. Do this by using the New Window wizard twice in the CustomModes module, fi rst creating a window called Class Name Prefi x Red and then a window with Class Name Prefi x Blue.
What should I set the window position to?In the wizard, in both cases, it does not matter what you set to be the window position, as you are going to change that setting manually afterwards. Let both of them open automatically when the application starts.
2. In the Design mode of both TopComponents, add a JPanel to each of the TopComponents. Change the background property of the panel in the RedTopComponent to red and in the BlueTopComponent to blue.
3. Edit the layer.xml of CustomModes module, registering the two .wsmode fi les and ensuring that the two new TopComponents open in the new modes:<folder name="Windows2"> <folder name="Components"> <file name="BlueTopComponent.settings" url="BlueTopComponentSettings.xml"/> <file name="RedTopComponent.settings" url="RedTopComponentSettings.xml"/> </folder> <folder name="Modes"> <file name="mode1.wsmode" url="mode1.wsmode"/> <file name="mode2.wsmode" url="mode2.wsmode"/> <folder name="mode1"> <file name="RedTopComponent.wstcref" url="RedTopComponentWstcref.xml"/> </folder> <folder name="mode2"> <file name="BlueTopComponent.wstcref" url="BlueTopComponentWstcref.xml"/> </folder> </folder></fol der>
For More Information: www.PacktPub.com/netbeans-platform-6-8-developers-guide/book
Window System
[ 60 ]
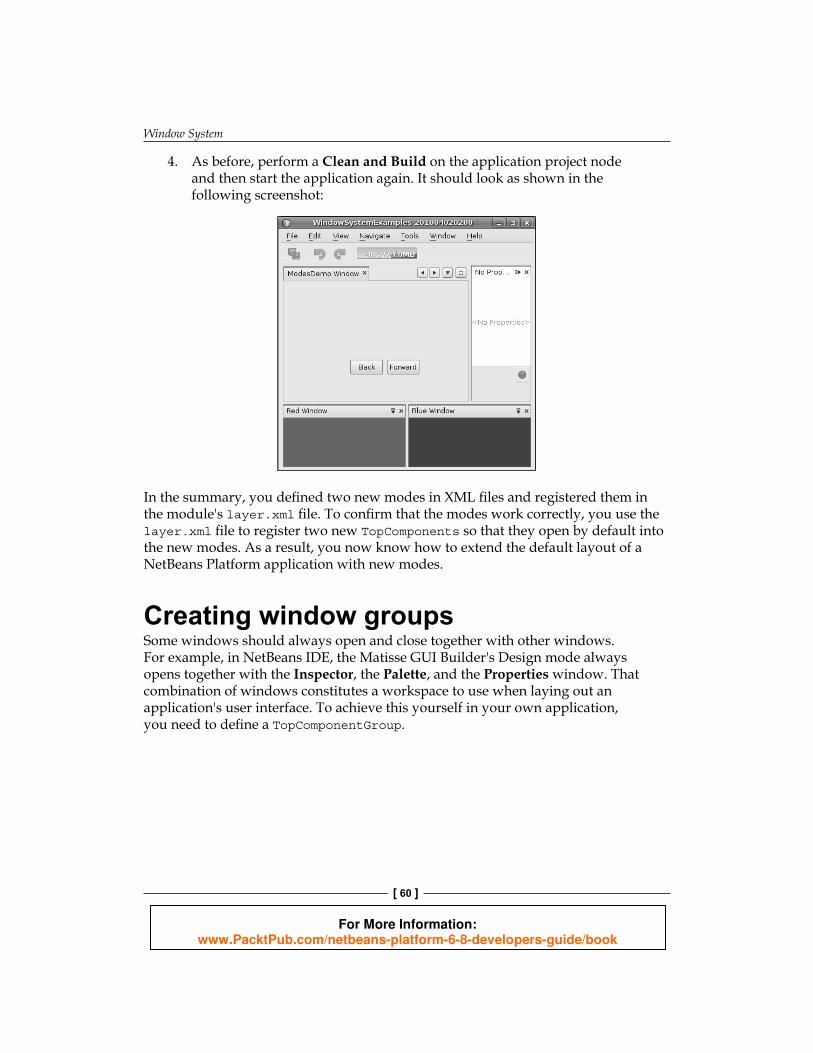
4. As before, perform a Clean and Build on the application project node and then start the application again. It should look as shown in the following screenshot:
In the summary, you defi ned two new modes in XML fi les and registered them in the module's layer.xml fi le. To confi rm that the modes work correctly, you use the layer.xml fi le to register two new TopComponents so that they open by default into the new modes. As a result, you now know how to extend the default layout of a NetBeans Platform application with new modes.
Creating window groupsSome wi ndows should always open and close together with other windows. For example, in NetBeans IDE, the Matisse GUI Builder's Design mode always opens together with the Inspector, the Palette, and the Properties window. That combination of windows constitutes a workspace to use when laying out an application's user interface. To achieve this yourself in your own application, you need to defi ne a TopComponentGroup.
For More Information: www.PacktPub.com/netbeans-platform-6-8-developers-guide/book
Chapter 3
[ 61 ]
In the following example, you group the two TopComponents you have created in the previous sections and open and close them together as a single unit.
1. To get started, within the CustomModes module, create a new empty fi le named colorgroup.wsgrp, with the following content:<?xml version="1.0" encoding="UTF-8"?>
<!DOCTYPE group PUBLIC "-//NetBeans//DTD Group Properties 2.0//EN" "http://www.netbeans.org/dtds/group-properties2_0.dtd"> <group version="2.0"> <name unique="colorgroup" /> <state opened="false" /></group>
You have now defi ned a group named colorgoup and you have specifi ed that initially the TopComponents within the group are closed.
2. Let us now specify which TopComponents belong to the group. Create two new fi les called RedTopComponentWstcgrp.xml and BlueTopComponentWstcgrp.xml, with the content shown in the following code snippets:<?xml version="1.0" encoding="UTF-8" ?><!DOCTYPE tc-group PUBLIC "-//NetBeans//DTD Top Component in Group Properties 2.0//EN" "http://www.netbeans.org/dtds/tc-group2_0.dtd"><tc-group version="2.0"> <module name="com.netbeansrcp.custommodes" spec="1.0"/> <tc-id id="RedTopComponent" /> <open-close-behavior open="true" close="true" /></tc-group><?xml version="1.0" encoding="UTF-8"?><!DOCTYPE tc-ref PUBLIC "-//NetBeans//DTD Top Component in Mode Properties 2.0//EN" "http://www.netbeans.org/dtds/tc-ref2_0.dtd"><tc-ref version="2.0" > <module name="com.netbeansrcp.custommodes" spec="1.0"/> <tc-id id="BlueTopComponent"/> <open-close-behavior open="true" close="true" /></tc-ref>
You now have a fi le per TopComponent, providing the TopComponent's unique ID, while declaring the state of the TopComponent when the group to which it belongs is opened or closed.
For More Information: www.PacktPub.com/netbeans-platform-6-8-developers-guide/book
Window System
[ 62 ]
3. N ow modify the layer.xml to register the two fi les created in the previous step, within the Windows2 | Groups folder:<folder name="Groups"> <file name="colorgroup.wsgrp" url="colorgroup.wsgrp"/> <folder name="colorgroup"> <file name="RedTopComponent.wstcgrp" url="RedTopComponentWstcgrp.xml"/> <file name="BlueTopComponent.wstcgrp" url="BlueTopComponentWstcgrp.xml"/> </folder></folder>
The fi le colorgroup.wsgrp declares the group to the Window System and refers to the group defi nition fi le of the same name. The subfolder color-group describes the contents of the group and adds references to the fi le for each TopComponent, so that they now belong to the group.
4. Use the New Action wizard to create two new Always Enabled actions, OpenRedBlueAction and CloseRedBlueAction, with display names OpenRedBlue and CloseRedBlue, for opening/closing the group. Within the ActionListener classes generated by the New Action wizard, defi ne the code to be invoked as follows:public void actionPerformed(ActionEvent evt) { TopComponentGroup myGroup WindowManager.getDefault().findTopComponentGroup("colorgroup"); if (myGroup != null) { myGroup.open(); } }
public void actionPerformed(ActionEvent evt) { TopComponentGroup myGroup = WindowManager.getDefault() .findTopComponentGroup("colorgroup"); if (myGroup != null) { myGroup.close(); } }
5. Modify the fi les BlueTopComponentWstcref.xml and RedTopComponentWstcref.xml, to ensure that their individual default states are set to closed:
<state opened="false"/>
6. Choose Clean and Build on the application to remove the build folder that contains the user settings persisted from the last deployment of the application. Start the application again. Select Window | OpenRedBlue and notice that both TopComponents open. Then select Window | CloseRedBlue and notice that both TopComponents close.
For More Information: www.PacktPub.com/netbeans-platform-6-8-developers-guide/book
Chapter 3
[ 63 ]
In the summary, you have learned how to defi ne a group of TopComponents that open and close together as a unit.
Extending the default TopComponent persistenceYou've probably noticed that when you restart the application, its layout is not reset to its default state. Instead, the layout settings from the last deployment are reused whenever you restart the application. That is what the user typically expects, though this may be inconvenient during development. During development, if you'd like the default layout to be used when you run the application, you need to select Clean and Build on the application node. This menu item deletes the application's build folder, which contains the testuserdir folder, where the settings from the previous deployment are stored.
It is this feature, that of automatic persistence, that we now look at more closely. In this section, we extend the persistence of our application, as the NetBeans Platform allows us to access the persistence feature and to save additional data when the application is closed.
In the next example, we create a simple form with content that is restored when the application restarts.
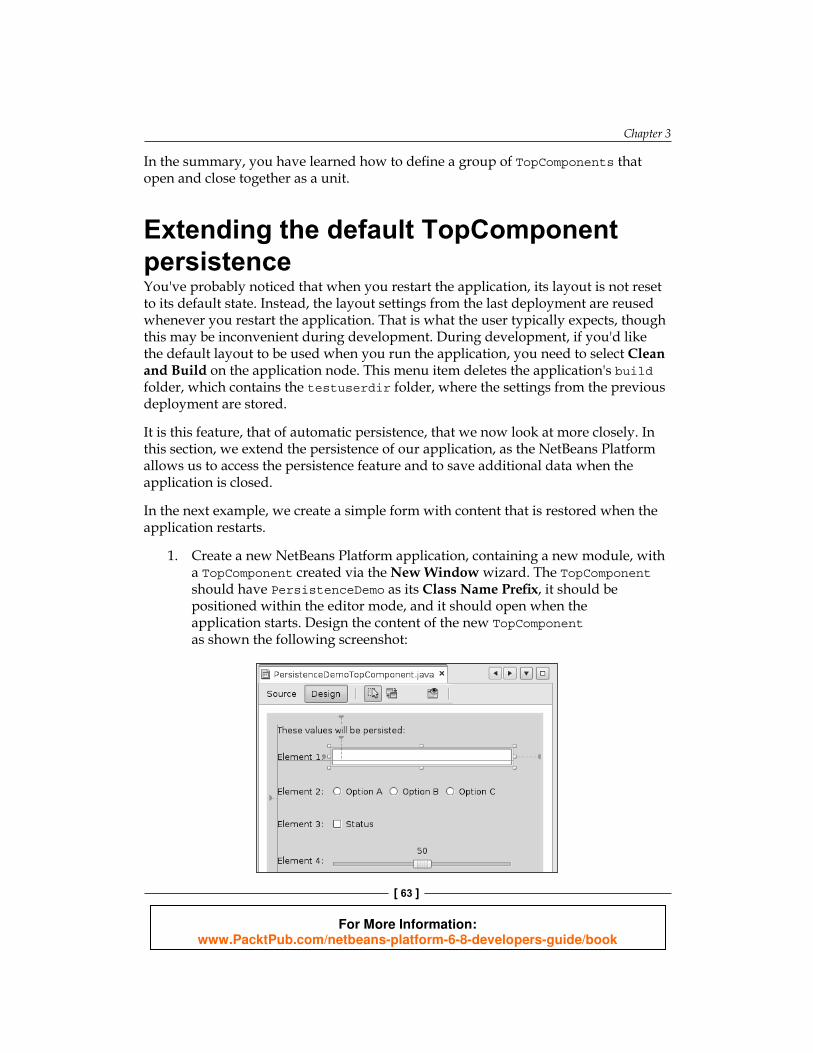
1. Create a new NetBeans Platform application, containing a new module, with a TopComponent created via the New Window wizard. The TopComponent should have PersistenceDemo as its Class Name Prefi x, it should be positioned within the editor mode, and it should open when the application starts. Design the content of the new TopComponent as shown the following screenshot:
For More Information: www.PacktPub.com/netbeans-platform-6-8-developers-guide/book
Window System
[ 64 ]
The Window System API provides special support for serialization of con-fi guration data. To store confi guration data, and to reload them at restart, we need to override the methods writeProperties and readProperties, which are generated by the New Window wizard when you created the Top-Component. These methods are required so that the @ConvertAsProperties annotation, declared at the top of the TopComponent class, is able to generate the code at compile time, persisting the specifi ed settings.To fi ne-tune the TopComponent persistence outlined above, you have two ad-ditional values that need to be set, but which are set by default when you use the New Window wizard to create your TopComponent:
The value returned by the preferredID() method. T he returned value uniquely identifi es the TopComponent to the window system. The value returned by the getPersistenceType method. This value determines the conditions under which the TopComponent is persisted. The value TopComponent.PERSISTENCE_ALWAYS specifi es that the content of the TopComponent will be persisted, in so far as you have specifi ed settings for persistence. PERSISTENCE_NEVER specifi es that when the application closes, nothing set in the TopComponent will be persisted. Finally, PERSISTENCE_ONLY_OPENED specifi es that a TopComponent is only persisted if it is open when the application shuts down. The latter is useful if the TopComponent is some kind of editor, for example, as in the cases of the editor windows in NetBeans IDE, which reopen on startup if they had been closed when the application shut down.
2. Specify that the PersistenceDemoTopComponent should persist if it was open when the application shut down. Next, defi ne the writeProperties and readProperties methods as follows:void writeProperties(java.util.Properties p) { // better to version settings since initial version as advocated // at http://wiki.apidesign.org/wiki/PropertyFilesp.setProperty("version", "1.0"); p.setProperty("element1", jTextField1.getText()); if (jRadioButton1.isSelected()) {
p.setProperty("element2", "1"); } if (jRadioButton2.isSelected()) { p.setProperty("element2", "2"); } if (jRadioButton3.isSelected()) { p.setProperty("element2", "3"); } p.setProperty("element3", String.valueOf(jCheckBox1.isSelected())); p.setProperty("element4", String.valueOf(jSlider1.getValue())); }
•
•
For More Information: www.PacktPub.com/netbeans-platform-6-8-developers-guide/book
Chapter 3
[ 65 ]
Object readProperties(java.util.Properties p) { if (instance == null) { instance = this;
} instance.readPropertiesImpl(p); return instance; }
private void readPropertiesImpl(java.util.Properties p) { String version = p.getProperty("version"); jTextField1.setText(p.getProperty("element1","empty")); if (p.getProperty("element2").equals("1")) { jRadioButton1.setSelected(true); } if (p.getProperty("element2").equals("2")) { jRadioButton2.setSelected(true); } if (p.getProperty("element2").equals("3")) { jRadioButton3.setSelected(true); } if (p.getProperty("element3").equals("true")) { jCheckBox1.setSelected(true); } else { jCheckBox1.setSelected(false); } jSlider1.setValue(Integer.parseInt(p.getProperty("element4"))); }
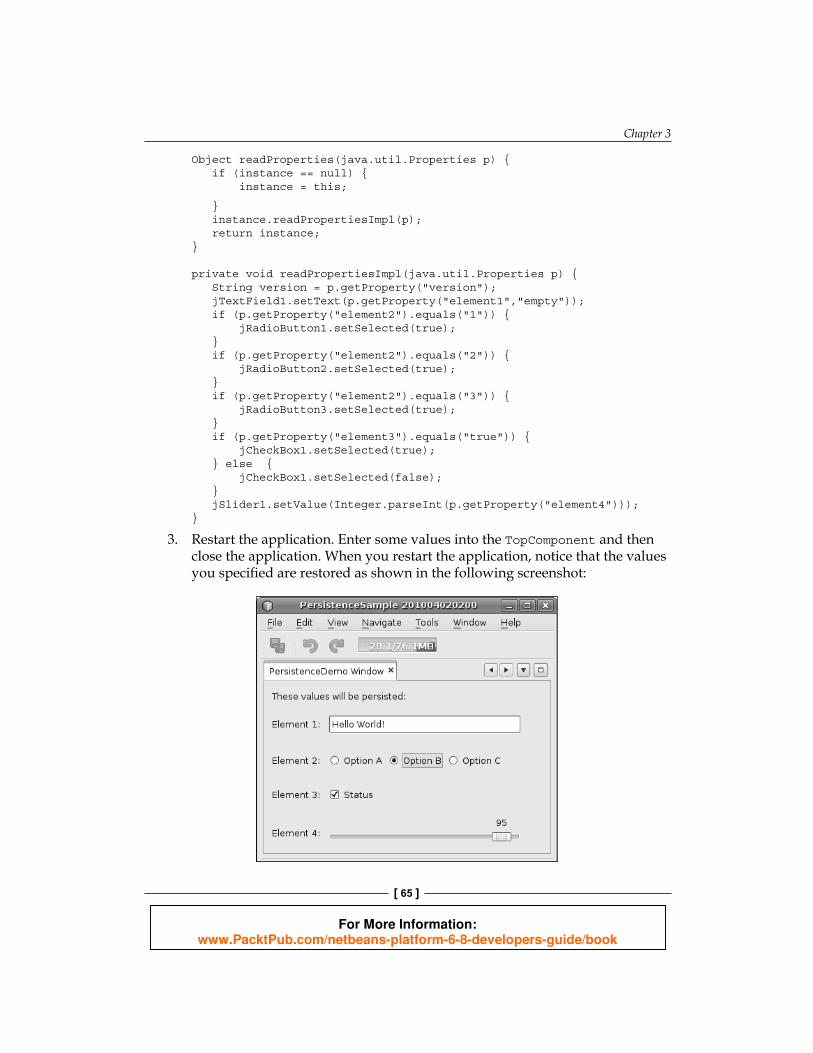
3. Restart the application. Enter some values into the TopComponent and then close the application. When you restart the application, notice that the values you specifi ed are restored as shown in the following screenshot:
For More Information: www.PacktPub.com/netbeans-platform-6-8-developers-guide/book
Window System
[ 66 ]
When you close the application, do a Clean and Build on the TaskManager project node. Then, now that the application user directory is removed, restart the application and notice that all the values are set back to their defaults.
In summary, you have extended the persistence of the TopComponent, so that the values specifi ed in the TopComponent at the time the application shuts down are restored when the application is restarted.
S ummaryYou have been introduced to all of the most important topics relating to working with the NetBeans Window System. Not only did you learn how to create new windows, that is, TopComponents, but you also learned how to position them, group them, and extend their persistence.
In the next chapter, you focus on one of the key topics of modular architectures, that is, how a module can communicate with another module, without even the need to know that it exists! This is a key requirement for modular architectures ensuring that modules are loosely coupled from each other.
For More Information: www.PacktPub.com/netbeans-platform-6-8-developers-guide/book

Where to buy this book You can buy NetBeans Platform 6.9 Developer's Guidefrom the Packt Publishing
website: https://www.packtpub.com/netbeans-platform-6-8-
developers-guide/book.
Free shipping to the US, UK, Europe and selected Asian countries. For more information, please
read our shipping policy.
Alternatively, you can buy the book from Amazon, BN.com, Computer Manuals and
most internet book retailers.
P U B L I S H I N G
community experience dist i l led
www.PacktPub.com
For More Information: www.PacktPub.com/netbeans-platform-6-8-developers-guide/book