neptune kitchen fitting guide
TRANSCRIPT

Contents
1
2
3
4
5
6
Overview of Cabinets/Features
Levelling & Marking
End panel fitting
Fitting the cornice
Handle fitting
Re-painting
Section
2
5
7
7
8
8
Page
Welcome to your Neptune Kitchen Fitting Guide.
Please read through this fitting guide thoroughly prior to fitting. This guide is designed to help you fit your Neptune
Kitchen easily and accurately.
For your own safety do not attempt to lift heavy items by yourself.
7
8
9
Worksurface & Upstand Fitting
Care & Maintenance
Contact Information
Section
9
10
10
Page
Welcome
�
Neptune Kitchen Fitting Guide
Tools needed
l Belt sander l Long Spirit levels l Tape measure l Mitre saw l General hand tools

This section will explain the cabinets and their features.
1. Overview of Cabinets/Features
�
�. Overview of Cabinets/Features
a. Base Cabinets
Adjustable feet
Rear metal feet are easily adjusted from inside the
cabinet using the allen key provided to allow for
easy levelling.
Base cabinet standard depth
500mm. Cabinets are designed to be
set at 600mm from the wall to give
you a 40mm void for services.
Base cabinet standard height890mm
40mm Void
Cabinet ‘ears’
At the back of each cabinet
there are 30mm “ears” that
project out to the rear.
This allows for a robust
construction process.
These “ears” are removable
where you have services
that require extra space.
Front Feet
All cabinets are fully framed from worksurface to
floor. This is part of our bespoke look.
b. Wall Cabinets
Wall cabinet standard depth 338mm
Wall cabinet standard height800mm
End panels
The side cheeks allow for end panels to be
fitted. These end panels fit into the cheeks
behind the front face and are secured to the
cabinets using a grab adhesive.
Wall battens need to be cut flush at the end
of a run in order to fit the end panel.
Battens are supplied separately to your wall
cabinets.
Wall Fixing
At the top of each cabinet is a 3�mm
rim which allows each cabinet to
attach to the wall by fitting through
the back rim with two adequate wall
fixings.

3
�. Overview of Cabinets/Features
c. Full Height Cabinets
Adjustable feet
Rear metal feet are easily adjusted from inside the
cabinet using the allen key provided to allow for
easy levelling.
Full height cabinets standard depth is650mm including 50mm void
Base cabinet standard height��70mm
��5mm VoidCabinet ‘ears’
At the back of each cabinet
there are 30mm “ears” that
project out to the rear.
This allows for a robust
construction process.
These “ears” are removable
where you have services
that require extra space.
Front Feet
All cabinets are fully framed from worksurface to
floor. This is part of our bespoke look.
d. Plan View of Cabinets
Wall
Void
Cabinet ‘ears’
Cabinet
600mm
70 40mm Standard depth :
We suggest base cabinets are set at 600mm
from the wall as standard.
We suggest full Height cabinets are set from
600mm to 7�5mm from the wall.
Standard height :
We suggest base cabinets are set 890mm high.
We suggest full height cabinets are set at
���0mm tall including cornice.
Void :
The maximum void (70mm) can be achieved by
cutting back the cabinet ‘ears’.
Adjustable wall bracket
Wall
Cabinet338mm
Standard depth :
We suggest all cabinets are set at 338mm from
the wall as standard.
Standard height :
We suggest wall cabinets are set 450mm above
a work surface as standard giving a total height
of ���0mm including cornice from the floor.
65mm
65m
m
65mm
Cornice
403 mm
50mm 60mm
Base Cabinets
Wall Cabinets
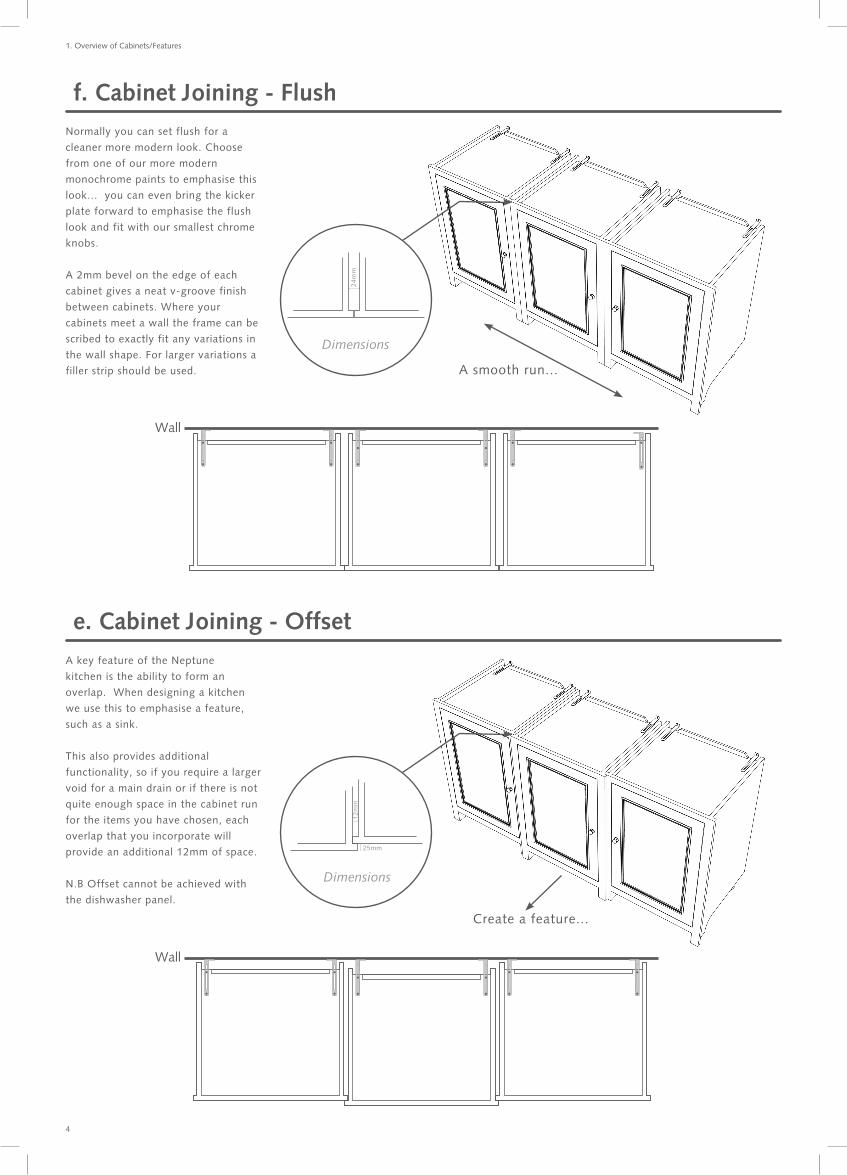
e. Cabinet Joining - Offset
4
�. Overview of Cabinets/Features
Create a feature...
A key feature of the Neptune
kitchen is the ability to form an
overlap. When designing a kitchen
we use this to emphasise a feature,
such as a sink.
This also provides additional
functionality, so if you require a larger
void for a main drain or if there is not
quite enough space in the cabinet run
for the items you have chosen, each
overlap that you incorporate will
provide an additional ��mm of space.
N.B Offset cannot be achieved with
the dishwasher panel.
Wall
��m
m
�5mm
Dimensions
f. Cabinet Joining - Flush
A smooth run...
Normally you can set flush for a
cleaner more modern look. Choose
from one of our more modern
monochrome paints to emphasise this
look... you can even bring the kicker
plate forward to emphasise the flush
look and fit with our smallest chrome
knobs.
A �mm bevel on the edge of each
cabinet gives a neat v-groove finish
between cabinets. Where your
cabinets meet a wall the frame can be
scribed to exactly fit any variations in
the wall shape. For larger variations a
filler strip should be used.
�4m
mDimensions
Wall

5
�. Overview of Cabinets/Features & �. Levelling & Marking
g. Plan View of Joining Cabinets
Joining Cabinets - Explained
Wall
full height cabinetfull heightcabinetend panel
50mm overhang �5mm overhang
base cabinetend panel
base cabinet
Worksurface
With your base cabinets set at the standard depth of 650mm your worksurface will overhang by 50mm. This allows you to
overlap your cabinets forward and still have an overhang of �5mm. Please see diagram below.
2. Levelling & Marking
1. The most important area to check is that you have adequate space. It is important to remember that every one of our
pieces is hand made, so measurements may vary by a small amount. Please do not attempt to fit to the millimetre!
2. Mark a line on the floor to which the front of the cabinets are to be fitted (we suggest 600mm from the wall at
worktop height. See diagram below. Please note that this measurement must be calculated at worktop height so that the
worktops overlap correctly. At floor level you may have skirting or a sagging plaster wall which will set the cabinets at the
wrong distance from the wall).
3. Find the lowest point along the 600mm fitting line you created in Section � above.
4. Fit the first cabinet at this point.

Diagram 1
5. IT IS VITAL THAT YOU NOW LEVEL EACH CABINET THOROUGHLY.
This is done as follows:
Place the cabinet as near to its final location in the kitchen as possible, whilst still giving yourself enough room to access
the rear adjustable feet.
Turn the adjustable feet until each side of the cabinet is level when checked with a spirit level as in Diagram �.
Then move the spirit level to the position shown in Diagram �. Continue to make small adjustments to the feet until the
unit is level in this direction.
Finally check all the leveling of the cabinet by placing the spirit level across the unit and vertically on the side. Shown in
Diagram 3. You may find that you have to go back and forth between the two legs several times.
If the cabinet is not in its final location, trying not to disturb the adjustable feet. After making any minor adjustments fix to
the wall using the two rear adjustable brackets.
TIME SPENT IN LEVELLING IS NEVER WASTED AND WILL RESULT IN A BEAUTIFUL FIT!
6
3. Levelling & Marking
Diagram 3 Diagram 2
Special case leveling
In some cases the floor level change is too much for the adjustable feet to compensate for. In such cases it may be
necessary to use a belt sander to shorten the front feet of the cabinet. This will mean that the feet can accurately follow
the contours of the floor and remain flush at worktop height.
The integrated kickboard may also need to sanded if the adjustment to the feet is significant.
This highlights the importance of beginning the kitchen installation at the lowest point in the room.
You will find that when the first piece is thoroughly leveled the result is an immaculate fit.

6. Levelling & fitting the second Cabinet
Level the second cabinet following the same process as before.
Before fixing the second cabinet to the wall attach it to the first cabinet. To do this you will need the threaded bolt
system.
This fixing system is used to attach the cabinets together, allowing the vertical gap between the cabinets to be accurately
maintained.
The threaded bar and 4 nuts and washers need to be threaded through the holes on the cabinet carcass and tightened. Be
careful not to damage the carcass by over tightening the fixings.
When the cabinets are secured together, check that they are maintaining the 600mm depth from the wall, and secure the
second carcass to the wall.
TIME SPENT IN LEVELLING IS NEVER WASTED AND WILL RESULT IN A BEAUTIFUL FIT!
3. End Panel Fitting
End panels should be scribed and glued in position. We suggest the use of a strong grab adhesive to fix them in place.
4. Fitting the cornice
The final stage of fitting is to add the cornice. This needs to be cut accurately using a mitre saw.
IMPORTANT NOTE:
The only element of fitting a Neptune kitchen that requires careful work is the levelling process. Once the chosen
worksurface is fitted, cupboard doors may move over time if cabinets are not levelled correctly during the initial installation
process.
7
�. Levelling & Marking 3. End Panel Fitting 4. Fitting the Cornice

5. Handles Fitting & 6. Re-Painting
5. Handles Fitting
6. Re-Painting
Each chrome knob comes with two bolts. The long bolt is designed for fitting to drawers and the short bolt is designed for
fitting to doors.
The oak knobs similarly come with a long and short screw which secure into the back of the oak knob. The cup handle
comes with a central bolt that guarantees that your cup handle is correctly positioned. Once secured into place there are
four finishing screws to give the cup handle its authentic look.
Please note that it is necessary to remove the cabinet doors and all hardware before you begin painting.
In order to get a perfect finish to your kitchen, we recommend a final topcoat to the outside of your kitchen. This is easily
achieved and should take � to � days depending on the size of your kitchen or your choice of paint colour.
Even if you choose to retain our wonderful Limestone finish it is likely that you will need a final topcoat. This may be
because during final fitting some bespoke panels are included or during the fitting process detailed scribing is required. It
is also possible that the production of your cabinets has come from separate batches and therefore the final finish may be
from different colour batches. These minor variations are unnoticeable on freestanding items, but may not be perfect on
your fitted kitchen
You therefore should allow for a final topcoat, which is easy to achieve. All that is needed is a light rubdown on the
outsides of the cabinets only followed by a light topcoat to achieve the desired result. The interior calico finish will suit
whatever colour you choose.
8
Small Chrome Medium Chrome Large Chrome Chrome Cup Handle Small Oak Large Oak

9
Please note that it is not recommended that your Oak worksurfaces be used in a run up to a cooker or sink. Extremes in
temperature or moisture can cause damage to your Oak worksurface. We also supply stone tops which we recommend for
these kinds of conditions.
We have also supplied you Oak tops with transit bars to prevent warping. These will need to be removed before fitting
and securing your worktop as detailed below.
When your oak tops have been cut and scribed as required please use the 50mm stainless steel screws and washers
provided to fix them in place.
We suggest the worktop is fixed down at regular intervals using screws along the front and back edges.
To allow natural movement within the oak a ��mm hole should be drilled for each screw in the top panel of the cabinet.
The hole should be positioned 30mm away from the side panel (not in the centre of the top panel) to prevent warping and
damage to your cabinet.
Position the screw in the centre of the ��mm hole and screw up into the worktop from the inside of the cabinet. (see
drawing below)
Screws & Washers
Worksurface Front
This section will explain how to fit the worksurfaces and upstands.
For your own safety do not attempt to lift heavy items by yourself!
7. Worksurface & Upstand Fitting
Worksurfaces
7. Worksurface & Upstand Fitting
b. Granite & Marble Worksurfaces
These are supplied plus or minus �mm. We strongly advise that you provide measurements for your granite or marble
worktops after the kitchen has been fitted.
Granite or marble worktops should be secured using grip fill or a similar adhesive and should be joined using stone
bonding components which are available from www.stonetools.co.uk, tel: 0�0 8309 5533
a. Oak
Your oak worktops have been finished using our oak seal product. For maintenance we suggest a re-application from time
to time depending on usage.
��mm Holes30mm inset

8. Care & Maintenance
Painted Cabinets
Your Neptune painted furniture is manufactured from a combination of bass wood and birch faced plywood. This gives
the cabinets great strength and stability. Over time the cabinets moisture content will adjust to suit the ambient humidity
of the room they are placed in. This means that the cabinet may move with some minor hairline cracking as it stabalises in
this environment. This will not affect the structure of your furniture in any way.
The cabinets are hand painted with 3 coats of Neptune water based eggshell paint. The hand painting process is used to
give the natural feel of the brushstrokes in the surface of the paint. This water based paint is manufactured using organic
pigments, which give a very natural deep colour. These natural paint batches can vary slightly in tone from one batch to
the next. For over-painting any WATER BASED eggshell paint may be used.
All Neptune furniture is designed to last the test of time, and give years of enjoyable use. However in extreme household
environments where hairline cracks have appeared on some joints due to very low humidity, it can occasionally be
necessary to over-paint after 6 months to ensure a long term perfect finish.
In order to over-paint Neptune offer a furniture painting kit. Available from www.neptune.co.uk
.
Oak Worksurface re-sealing:
Your oak worksurface is manufactured from solid oak which is likely to move over time in response to the humidity of the
environment around it. Some hairline cracks may develop. This is part of the natural character of the material and allows
it to improve with age. This will not affect the structure of your furniture in any way.
The oak surface is treated with three coats of water based matt seal. We find that this gives a natural look whilst giving
good protection to normal wear and tear. We do however suggest the use of coasters & table mats. We also suggest you
promptly clean any spillages.
For care and maintenance of your Furniture we offer a FURNITURE OIL TREATMENT KIT. This kit will give additional
stain resistance and should be used where furniture is likely to require extra protection. This kit is available from www.
neptune.co.uk
8. Care & Maintenance
�0
9. Contact Information
If you have any questions regarding the fitting of your kitchen please feel free to contact us on the below.
Neptune Classics
Unit �, Lydiard Fields
Swindon
Wiltshire
SN5 8UY
t : 0�793 88��44
f : 0�793 88��55
w : www.neptune.co.uk

Lydiard F ie lds, Great Western Way, Swindon, Wiltshire SN5 8UY
t : +44 (0) �793 88��44 f : +44 (0) �793 88��55 e : [email protected]
www.neptune.co.ukSept �008