neptune handheld system user’s manual - ti-sales · information of neptune . ... le type...
TRANSCRIPT

Neptune Handheld System User’s Manual


Neptune Handheld System User’s Manual

Proprietary Rights Notice
This manual is an unpublished work and contains the trade secrets and confidential information of Neptune Technology Group Inc., which are not to be divulged to third parties and may not be reproduced or transmitted in whole or part, in any form or by any means, electronic or mechanical for any purpose, without the express written permission of Neptune Technology Group Inc. All rights to designs or inventions disclosed herein, including the right to manufacture, are reserved to Neptune Technology Group Inc.
The information contained in this document is subject to change without notice. Neptune reserves the right to change the product specifications at any time without incurring any obligations.
Trademarks Used in This Manual
R900 is a registered trademark of Neptune Technology Group Inc. N_SIGHT R900 is a trademark of Neptune Technology Group Inc. R900 Belt Clip Receiver is a trademark of Neptune Technology Group Inc. MRX920 is a trademark of Neptune Technology Group Inc. ARB is a registered trademark of Neptune Technology Group Inc.
Trimble Nomad s a registered trademark of Trimble Navigation Limited.
CE Net Windows, Windows 6.1, and Windows Mobile Device Center are registered trademarks of Microsoft Corporation.
Other brands or product names are the trademarks or registered trademarks of their respective holders.
FCC Conformity
CE5320B Handheld Computer
“NOTE: This equipment has been tested and found to comply with the limits for a Class A digital device, pursuant to part 15 of the FCC rules. These limits are designed to provide reasonable protection against harmful interference when the equipment is operated in a commercial environment. This equipment generates, uses, and can radiate radio frequency energy and, if not installed and used in accordance with the instruction manual, may cause harmful interference to radio communications. Operation of this equipment in a residential area is likely to cause harmful interference
in which case the user will be required to correct the interference at his own expense.”
Warning: Changes or modifications to this device not expressly approved by Neptune Technology Group Inc. could void the user's authority to operate the equipment.

Trimble Nomad Handheld Computer
U.S.A.
This device complies with Part 15 of the FCC Rules. It is tested to comply with FCC standards for home or office use. Operation is subject to the following two conditions: (1) this device may not cause harmful interference, and (2) this device must accept any interference received, including interference that may cause undesired operation.
This equipment has been tested and found to comply with the limits for a Class B digital device, pursuant to Part 15 of the FCC Rules. These limits are designed to provide reasonable protection against harmful interference in a residential installation. This equipment generates, uses and can radiate radio frequency energy and, if not installed and used in accordance with the instructions, may cause harmful interference to radio communications. However, there is no guarantee that interference will not occur in a particular installation. If this equipment does cause harmful interference to radio or television reception, which can be determined by turning the equipment off and on, the user is encouraged to try to correct the interference by one or more of the following measures:
• Reorient or relocate the receiving antenna.
• Increase the separation between the equipment and receiver.
• Connect the equipment to an outlet on a circuit different from that to which thereceiver is connected.
• Consult the dealer or an experienced radio/TV technician for help.
R900 Belt Clip Receiver
NOTE: This equipment has been tested and found to comply with the limits for a Class B digital device, pursuant to part 15 of the FCC Rules. These limits are designed to provide reasonable protection against harmful interference in a residential installation. This equipment generates, uses and can radiate radio frequency energy and, if not installed and used in accordance with the instructions, may cause harmful interference to radio communications. However, there is no guarantee that interference will not occur in a particular installation. If this equipment does cause harmful interference to radio or television reception, which can be determined by turning the equipment off and on, the user is encouraged to try to correct the interference by one or more of the following measures
• Reorient or relocate the receiving antenna
• Increase the separation between the equipment and receiver.
• Connect the equipment into an outlet on a circuit different from that to which thereceiver is connected.
• Consult the dealer or an experienced radio/TV technician for help.

Neptune HR2650i
"NOTE: This equipment has been tested and found to comply with the limits for a Class A digital device, pursuant to Part 15 of the FCC Rules. These limits are designed to provide reasonable protection against harmful interference in a residential installation. This equipment generates, uses and can radiate radio frequency energy and, if not installed and used in accordance with the instructions, may cause harmful interference to radio communications. However, there is no guarantee that interference will not occur in a particular installation. If this equipment does cause harmful interference to radio or television reception, which can be determined by turning the equipment off and on, the user is encouraged to try to correct the interference by one or more of the following measures:
• Increase the separation between the equipment and receiver.
• Connect the equipment into an outlet on a circuit different from that to which thereceiver is connected.
• Consult the dealer or an experienced radio/TV technician for help.”
RF Exposure (Intentional Radiators Only)
This device has been tested and complies with FCC SAR (Specific Absorption Rate) RF exposure compliance requirements for body-worn operation.
This equipment complies with FCC radiation exposure limits set forth for an uncontrolled environment. This equipment is in direct contact with the body of the user under normal operating conditions. This transmitter must not be co-located or operating in conjunction with any other antenna or transmitter.
Industry Canada
CE5320B Handheld Computer
This Class A digital apparatus meets all requirements of the Canadian Interference Causing Equipment Regulations. Operation is subject to the following two conditions: (1) this device may not cause harmful interference, and (2) this device must accept any interference received, including interference that may cause undesired operation.
Cet appareillage numérique de la classe A répond à toutes les exigences de l'interférence canadienne causant des règlements d'équipement. L'opération est sujette aux deux conditions suivantes: (1) ce dispositif peut ne pas causer l'interférence nocive, et (2) ce dispositif doit accepter n'importe quelle interférence reçue, y compris l'interférence qui peut causer l'opération peu désirée.
Warning: Changes or modifications to this device not expressly approved by Neptune Technology Group Inc., could void the user's authority to operate the equipment.

Trimble Nomad
This digital apparatus does not exceed the Class B limits for radio noise emissions from digital apparatus as set out in the radio interference regulations of the Canadian Department of Communications.
Le présent appareil numérique n'émet pas de bruits radioélectriques dépassant les limites applicables aux appareils numériques de Classe B prescrites dans le règlement sur le brouillage radioélectrique édicté par le Ministère des Communications du Canada.
R900 Belt Clip Receiver
This Class B digital apparatus meets all requirements of the Canadian Interference Causing Equipment Regulations. Operation is subject to the following two conditions: (1) this device may not cause harmful interference, and (2) this device must accept any interference received, including interference that may cause undesired operation.
Cet appareillage numérique de la classe B répond à toutes les exigences de l'interférence canadienne causant des règlements d'équipement. L'opération est sujette aux deux conditions suivantes: (1) ce dispositif peut ne pas causer l'interférence nocive, et (2) ce dispositif doit accepter n'importe quelle interférence reçue, y compris l'interférence qui peut causer l'opération peu désirée.
Under Industry Canada regulations, this radio transmitter may only operate using an antenna of a type and maximum (or lesser) gain approved for the transmitter by Industry Canada. To reduce potential radio interference to other users, the antenna type and its gain should be so chosen that the equivalent isotropically radiated power (e.i.r.p.) is not more than that necessary for successful communication.
Conformément à la réglementation d'Industrie Canada, cet émetteur radio ne peut fonctionner à l'aide d'une antenne d'un type et maximum (ou moins) Gain approuvé pour l'émetteur par Industrie Canada. Pour réduire le risque d'interférence avec d'autres utilisateurs, le type d'antenne et son gain doivent être choisis afin que la puissance isotrope rayonnée équivalente n'est pas plus que ce qui est nécessaire pour une communication réussie.
Neptune HR2650i
This Class A digital apparatus meets all requirements of the Canadian Interference Causing Equipment Regulations. Operation is subject to the following two conditions: (1) this device may not cause harmful interference, and (2) this device must accept any interference received, including interference that may cause undesired operation.
Cet appareillage numérique de la classe A répond à toutes les exigences de l'interférence canadienne causant des règlements d'équipement. L'opération est sujette aux deux conditions suivantes: (1) ce dispositif peut ne pas causer l'interférence nocive, et (2) ce dispositif doit accepter n'importe quelle interférence reçue, y compris l'interférence qui peut causer l'opération peu désirée.

CE ConformityThe CE5320B meets the 89/336/EEC directive intent for Electromagnetic Compatibility Compliance when used with appropriate accessories. These are Class B products. In a domestic environment, these products may cause radio interference, in which case, the user may be required to take adequate measures.
The compliance was demonstrated to the following specifications as listed in the official Journal of the European Communities:
Copyright © 2005-2013
Neptune Technology Group Inc.
All Rights Reserved.
EN 50081-2, Emissions
EN 55022: Radiated, Class B
EN 55022: Conducted, Class B
EN 50082-2, Immunity
EN 61000-4-2: Electrostatic discharge
EN 61000-4-3: RF radiated
EN 61000-4-4: Fast transients
EN 61000-4-6: RF conducted
Neptune Handheld System User’s Manual
Literature No. UM Handheld System 12.13
Part No. 11769-016
Neptune Technology Group Inc.
1600 Alabama Highway 229
Tallassee, AL 36078
Tel: (334) 283-6555
Fax: (334) 283-7293

Contents
1 Introduction
Conventions Used in this Manual . . . . . . . . . . . . . . . . . . . . . . . . . . . . . . . . . . . . . . . . . . . . . . 1-1
Screen Shots Used in this Manual . . . . . . . . . . . . . . . . . . . . . . . . . . . . . . . . . . . . . . . . . . . . . 1-2
Differences in Screen Appearances. . . . . . . . . . . . . . . . . . . . . . . . . . . . . . . . . . . . . . . . . 1-2
Product Support within the United States . . . . . . . . . . . . . . . . . . . . . . . . . . . . . . . . . . . . . . . . 1-3
Finding the Software Version Number . . . . . . . . . . . . . . . . . . . . . . . . . . . . . . . . . . . . . . 1-3
When Not Logged In . . . . . . . . . . . . . . . . . . . . . . . . . . . . . . . . . . . . . . . . . . . . . . . . . 1-4
When Logged On to N_SIGHT R900 . . . . . . . . . . . . . . . . . . . . . . . . . . . . . . . . . . . . 1-4
Contacting Customer Support . . . . . . . . . . . . . . . . . . . . . . . . . . . . . . . . . . . . . . . . . . . . . . . . . 1-5
Finding Information within the Manual. . . . . . . . . . . . . . . . . . . . . . . . . . . . . . . . . . . . . . . . . . . 1-7
Where to Start . . . . . . . . . . . . . . . . . . . . . . . . . . . . . . . . . . . . . . . . . . . . . . . . . . . . . . . . . . . . . 1-7
Meter Readers . . . . . . . . . . . . . . . . . . . . . . . . . . . . . . . . . . . . . . . . . . . . . . . . . . . . . . . . . 1-8
Operators . . . . . . . . . . . . . . . . . . . . . . . . . . . . . . . . . . . . . . . . . . . . . . . . . . . . . . . . . . . . . 1-9
2 Overview of the Neptune Handheld System
Typical Meter Reading Process. . . . . . . . . . . . . . . . . . . . . . . . . . . . . . . . . . . . . . . . . . . . . . . . 2-1
Daily Use of the Neptune Handheld System . . . . . . . . . . . . . . . . . . . . . . . . . . . . . . . . . . . . . . 2-2
Meter Readers . . . . . . . . . . . . . . . . . . . . . . . . . . . . . . . . . . . . . . . . . . . . . . . . . . . . . . . . . 2-3
Operators . . . . . . . . . . . . . . . . . . . . . . . . . . . . . . . . . . . . . . . . . . . . . . . . . . . . . . . . . . . . . 2-3
Basic Features of the CE5320. . . . . . . . . . . . . . . . . . . . . . . . . . . . . . . . . . . . . . . . . . . . . . . . . 2-4
Operating Environment . . . . . . . . . . . . . . . . . . . . . . . . . . . . . . . . . . . . . . . . . . . . . . . . . . 2-7
Rain and Water Resistance . . . . . . . . . . . . . . . . . . . . . . . . . . . . . . . . . . . . . . . . . . . . . . . 2-7
Electromagnetic Resistance. . . . . . . . . . . . . . . . . . . . . . . . . . . . . . . . . . . . . . . . . . . . . . . 2-7
Shock Resistance. . . . . . . . . . . . . . . . . . . . . . . . . . . . . . . . . . . . . . . . . . . . . . . . . . . . . . . 2-8
N_SIGHT R900 User’s Manual for the Neptune Handheld System vii

Contents
Use of the CE5320 . . . . . . . . . . . . . . . . . . . . . . . . . . . . . . . . . . . . . . . . . . . . . . . . . . . . . . . . . 2-8
Basic Features of the Nomad. . . . . . . . . . . . . . . . . . . . . . . . . . . . . . . . . . . . . . . . . . . . . . . . . 2-9
Operating Environment . . . . . . . . . . . . . . . . . . . . . . . . . . . . . . . . . . . . . . . . . . . . . . . . . 2-12
Rain and Water Resistance . . . . . . . . . . . . . . . . . . . . . . . . . . . . . . . . . . . . . . . . . . . . . 2-12
Electromagnetic Resistance . . . . . . . . . . . . . . . . . . . . . . . . . . . . . . . . . . . . . . . . . . . . . 2-13
Shock Resistance . . . . . . . . . . . . . . . . . . . . . . . . . . . . . . . . . . . . . . . . . . . . . . . . . . . . . 2-13
Use of the Nomad . . . . . . . . . . . . . . . . . . . . . . . . . . . . . . . . . . . . . . . . . . . . . . . . . . . . . . . . 2-13
The Display on the Handhelds . . . . . . . . . . . . . . . . . . . . . . . . . . . . . . . . . . . . . . . . . . . . . . 2-13
The Handheld Display. . . . . . . . . . . . . . . . . . . . . . . . . . . . . . . . . . . . . . . . . . . . . . . . . . 2-14
Menu Screens . . . . . . . . . . . . . . . . . . . . . . . . . . . . . . . . . . . . . . . . . . . . . . . . . . . . 2-15
Data-Entry Screens . . . . . . . . . . . . . . . . . . . . . . . . . . . . . . . . . . . . . . . . . . . . . . . . 2-16
Message Screens . . . . . . . . . . . . . . . . . . . . . . . . . . . . . . . . . . . . . . . . . . . . . . . . . 2-17
Navigating Through Screens. . . . . . . . . . . . . . . . . . . . . . . . . . . . . . . . . . . . . . . . . . . . . 2-17
Icon Bar . . . . . . . . . . . . . . . . . . . . . . . . . . . . . . . . . . . . . . . . . . . . . . . . . . . . . . . . . 2-19
3 Using the CE5320 Handheld
Determining the System Configuration. . . . . . . . . . . . . . . . . . . . . . . . . . . . . . . . . . . . . . . . . . 3-1
Local and Remote Communications . . . . . . . . . . . . . . . . . . . . . . . . . . . . . . . . . . . . . . . . 3-2
Unpacking and Inspecting Equipment . . . . . . . . . . . . . . . . . . . . . . . . . . . . . . . . . . . . . . . . . . 3-2
Setting Up the CE5320. . . . . . . . . . . . . . . . . . . . . . . . . . . . . . . . . . . . . . . . . . . . . . . . . . . . . . 3-3
One CE5320 and a Communication Cradle . . . . . . . . . . . . . . . . . . . . . . . . . . . . . . . . . . 3-3
The Router . . . . . . . . . . . . . . . . . . . . . . . . . . . . . . . . . . . . . . . . . . . . . . . . . . . . . . . . 3-4
Connecting to the Host Computer and Power Supply. . . . . . . . . . . . . . . . . . . . . . . . . . . 3-5
Connecting the Router, CE Handheld Cradle, and Power Supplies . . . . . . . . . . . . 3-5
Configuring the CE5320 Handheld . . . . . . . . . . . . . . . . . . . . . . . . . . . . . . . . . . . . . . . . . 3-9
On the Host Computer . . . . . . . . . . . . . . . . . . . . . . . . . . . . . . . . . . . . . . . . . . . . . . . 3-9
On the CE5320 Handheld . . . . . . . . . . . . . . . . . . . . . . . . . . . . . . . . . . . . . . . . . . . . 3-9
viii N_SIGHT R900 User’s Manual for the Neptune Handheld System

Contents
The Display and Keyboard . . . . . . . . . . . . . . . . . . . . . . . . . . . . . . . . . . . . . . . . . . . . . . . . . . 3-11
Learning the Keyboard . . . . . . . . . . . . . . . . . . . . . . . . . . . . . . . . . . . . . . . . . . . . . . 3-11
Function Keys . . . . . . . . . . . . . . . . . . . . . . . . . . . . . . . . . . . . . . . . . . . . . . . . . . . . 3-13
Number Keys . . . . . . . . . . . . . . . . . . . . . . . . . . . . . . . . . . . . . . . . . . . . . . . . . . . . . 3-14
Direction Keys . . . . . . . . . . . . . . . . . . . . . . . . . . . . . . . . . . . . . . . . . . . . . . . . . . . . . 3-14
Letter/Character Keys . . . . . . . . . . . . . . . . . . . . . . . . . . . . . . . . . . . . . . . . . . . . . . . 3-15
Information Keys . . . . . . . . . . . . . . . . . . . . . . . . . . . . . . . . . . . . . . . . . . . . . . . . . . 3-16
Quick Keys . . . . . . . . . . . . . . . . . . . . . . . . . . . . . . . . . . . . . . . . . . . . . . . . . . . . . . . 3-19
Adjusting System Settings. . . . . . . . . . . . . . . . . . . . . . . . . . . . . . . . . . . . . . . . . . . . . . . . . . . 3-20
Calibrating the Stylus . . . . . . . . . . . . . . . . . . . . . . . . . . . . . . . . . . . . . . . . . . . . . . . . . . . 3-20
Changing the Handheld Properties . . . . . . . . . . . . . . . . . . . . . . . . . . . . . . . . . . . . . . . . 3-22
Working with the Properties Screen . . . . . . . . . . . . . . . . . . . . . . . . . . . . . . . . . . . . 3-22
Configuring RF/Serial Properties . . . . . . . . . . . . . . . . . . . . . . . . . . . . . . . . . . . . . . . . . . 3-24
Logging In and Out of the N_SIGHT R900 . . . . . . . . . . . . . . . . . . . . . . . . . . . . . . . . . . . . . . 3-26
Logging Into N_SIGHT R900 on the CE5320 . . . . . . . . . . . . . . . . . . . . . . . . . . . . . . . . 3-26
Logging Out of N_SIGHT R900 . . . . . . . . . . . . . . . . . . . . . . . . . . . . . . . . . . . . . . . . . . . 3-30
4 Using the Nomad Handheld
Unpacking the Nomad . . . . . . . . . . . . . . . . . . . . . . . . . . . . . . . . . . . . . . . . . . . . . . . . . . . . . . . 4-1
Setting Up the Nomad . . . . . . . . . . . . . . . . . . . . . . . . . . . . . . . . . . . . . . . . . . . . . . . . . . . . . . . 4-3
One Nomad and a Communication Cradle . . . . . . . . . . . . . . . . . . . . . . . . . . . . . . . . . . . 4-3
The Router . . . . . . . . . . . . . . . . . . . . . . . . . . . . . . . . . . . . . . . . . . . . . . . . . . . . . . . . 4-4
Connecting to the Host Computer and Power Supply . . . . . . . . . . . . . . . . . . . . . . . . . . . 4-4
Connecting the Router, Nomad Handheld Cradle, and Power Supplies. . . . . . . . . . 4-5
Configuring the Nomad Handheld . . . . . . . . . . . . . . . . . . . . . . . . . . . . . . . . . . . . . . . . . . 4-7
On the Host Computer . . . . . . . . . . . . . . . . . . . . . . . . . . . . . . . . . . . . . . . . . . . . . . . 4-7
On the Nomad Handheld . . . . . . . . . . . . . . . . . . . . . . . . . . . . . . . . . . . . . . . . . . . . . 4-7
N_SIGHT R900 User’s Manual for the Neptune Handheld System ix

Contents
The Display and Keyboard . . . . . . . . . . . . . . . . . . . . . . . . . . . . . . . . . . . . . . . . . . . . . . . . . . . 4-9
Learning the Keyboard. . . . . . . . . . . . . . . . . . . . . . . . . . . . . . . . . . . . . . . . . . . . . . . 4-9
Buttons and Keys . . . . . . . . . . . . . . . . . . . . . . . . . . . . . . . . . . . . . . . . . . . . . . . . . . . . . 4-10
Buttons. . . . . . . . . . . . . . . . . . . . . . . . . . . . . . . . . . . . . . . . . . . . . . . . . . . . . . . . . . 4-11
Direction Buttons. . . . . . . . . . . . . . . . . . . . . . . . . . . . . . . . . . . . . . . . . . . . . . . . . . 4-12
Number Buttons . . . . . . . . . . . . . . . . . . . . . . . . . . . . . . . . . . . . . . . . . . . . . . . . . . 4-12
Nomad Screen Keyboard . . . . . . . . . . . . . . . . . . . . . . . . . . . . . . . . . . . . . . . . . . . . . . . 4-13
Changing the Size of the Keys. . . . . . . . . . . . . . . . . . . . . . . . . . . . . . . . . . . . . . . . 4-13
Large Keys. . . . . . . . . . . . . . . . . . . . . . . . . . . . . . . . . . . . . . . . . . . . . . . . . . . . . . . 4-14
Small Keys . . . . . . . . . . . . . . . . . . . . . . . . . . . . . . . . . . . . . . . . . . . . . . . . . . . . . . . 4-14
Lowercase Keys. . . . . . . . . . . . . . . . . . . . . . . . . . . . . . . . . . . . . . . . . . . . . . . . . . . 4-14
Uppercase Keys. . . . . . . . . . . . . . . . . . . . . . . . . . . . . . . . . . . . . . . . . . . . . . . . . . . 4-14
Numeric and Symbols Keys. . . . . . . . . . . . . . . . . . . . . . . . . . . . . . . . . . . . . . . . . . 4-15
Information Keys . . . . . . . . . . . . . . . . . . . . . . . . . . . . . . . . . . . . . . . . . . . . . . . . . . 4-15
Direction Keys . . . . . . . . . . . . . . . . . . . . . . . . . . . . . . . . . . . . . . . . . . . . . . . . . . . . 4-18
Combination Keys . . . . . . . . . . . . . . . . . . . . . . . . . . . . . . . . . . . . . . . . . . . . . . . . . 4-19
Adjusting System Settings . . . . . . . . . . . . . . . . . . . . . . . . . . . . . . . . . . . . . . . . . . . . . . . . . . 4-22
Calibrating the Stylus . . . . . . . . . . . . . . . . . . . . . . . . . . . . . . . . . . . . . . . . . . . . . . . . . . 4-23
Changing the Handheld Properties . . . . . . . . . . . . . . . . . . . . . . . . . . . . . . . . . . . . . . . . 4-26
Working with the Properties Screen. . . . . . . . . . . . . . . . . . . . . . . . . . . . . . . . . . . . 4-26
Configuring RF/Serial Properties . . . . . . . . . . . . . . . . . . . . . . . . . . . . . . . . . . . . . . . . . 4-28
Turning On and Off the Nomad . . . . . . . . . . . . . . . . . . . . . . . . . . . . . . . . . . . . . . . . . . . . . . 4-30
Turning the Nomad On . . . . . . . . . . . . . . . . . . . . . . . . . . . . . . . . . . . . . . . . . . . . . 4-30
Turning the Nomad Off . . . . . . . . . . . . . . . . . . . . . . . . . . . . . . . . . . . . . . . . . . . . . 4-30
Logging In and Out of the N_SIGHT R900. . . . . . . . . . . . . . . . . . . . . . . . . . . . . . . . . . . . . . 4-31
Logging Into N_SIGHT R900 on the Nomad. . . . . . . . . . . . . . . . . . . . . . . . . . . . . . . . . 4-31
Logging Out of N_SIGHT R900 . . . . . . . . . . . . . . . . . . . . . . . . . . . . . . . . . . . . . . . . . . 4-36
x N_SIGHT R900 User’s Manual for the Neptune Handheld System

Contents
5 Setting Up the R900 Belt Clip Receiver
R900 Belt Clip Receiver . . . . . . . . . . . . . . . . . . . . . . . . . . . . . . . . . . . . . . . . . . . . . . . . . . . . . 5-1
R900 Belt Clip Receiver Overview . . . . . . . . . . . . . . . . . . . . . . . . . . . . . . . . . . . . . . . . . . 5-1
Nomad Handheld and R900 Belt Clip Receiver . . . . . . . . . . . . . . . . . . . . . . . . . . . . . . . . . . . 5-2
Unpacking and Inspecting Equipment . . . . . . . . . . . . . . . . . . . . . . . . . . . . . . . . . . . . . . . . . . . 5-2
R900 Belt Clip Receiver Components . . . . . . . . . . . . . . . . . . . . . . . . . . . . . . . . . . . . . . . 5-3
Using the R900 Belt Clip Receiver . . . . . . . . . . . . . . . . . . . . . . . . . . . . . . . . . . . . . . . . . . . . . 5-4
Understanding the R900 Belt Clip Receiver Modes . . . . . . . . . . . . . . . . . . . . . . . . . . . . . 5-4
Accessing the R900 Belt Clip Receiver Status Screen . . . . . . . . . . . . . . . . . . . . . . . . . . 5-7
Understanding the R900 Belt Clip Receiver LED Operating Modes . . . . . . . . . . . . . . . . 5-8
Understanding the External Battery Charger Status . . . . . . . . . . . . . . . . . . . . . . . . . . . 5-10
Pairing the Trimble Nomad to the R900 Belt Clip Receiver through the Bluetooth . . . . 5-10
Pairing the Trimble Nomad . . . . . . . . . . . . . . . . . . . . . . . . . . . . . . . . . . . . . . . . . . . 5-10
Using the R900 Belt Clip Receiver to Read a Route . . . . . . . . . . . . . . . . . . . . . . . . . . . . . . . 5-11
R900 Belt Clip Receiver Status Screen in N_SIGHT R900 . . . . . . . . . . . . . . . . . . . . . . 5-11
RF Performance Modes . . . . . . . . . . . . . . . . . . . . . . . . . . . . . . . . . . . . . . . . . . . . . 5-12
Selecting the R900 Belt Clip Receiver Reading Mode . . . . . . . . . . . . . . . . . . . . . . 5-13
Using the R900 Belt Clip Receiver RF Test Mode . . . . . . . . . . . . . . . . . . . . . . . . . . . . . 5-13
From the Login Screen . . . . . . . . . . . . . . . . . . . . . . . . . . . . . . . . . . . . . . . . . . . . . . 5-13
From the Route Screen. . . . . . . . . . . . . . . . . . . . . . . . . . . . . . . . . . . . . . . . . . . . . . 5-14
R900 Belt Clip Receiver SD Card Functionality . . . . . . . . . . . . . . . . . . . . . . . . . . . . . . . 5-14
Updating R900 Belt Clip Receiver Firmware . . . . . . . . . . . . . . . . . . . . . . . . . . . . . . . . . . . . . 5-15
How the Firmware Update Works . . . . . . . . . . . . . . . . . . . . . . . . . . . . . . . . . . . . . . . . . 5-16
N_SIGHT R900 User’s Manual for the Neptune Handheld System xi

Contents
6 Gathering Route Data
The Reading Entry Screen . . . . . . . . . . . . . . . . . . . . . . . . . . . . . . . . . . . . . . . . . . . . . . . . . . . 6-2
Manually Collecting Meter Readings . . . . . . . . . . . . . . . . . . . . . . . . . . . . . . . . . . . . . . . . . . . 6-3
Entering a Reading . . . . . . . . . . . . . . . . . . . . . . . . . . . . . . . . . . . . . . . . . . . . . . . . . . . . . 6-3
Entering a Skip Code . . . . . . . . . . . . . . . . . . . . . . . . . . . . . . . . . . . . . . . . . . . . . . . . . . . 6-5
Entering Comment Codes. . . . . . . . . . . . . . . . . . . . . . . . . . . . . . . . . . . . . . . . . . . . . . . . 6-7
Adding Free-Form Notes. . . . . . . . . . . . . . . . . . . . . . . . . . . . . . . . . . . . . . . . . . . . . . . . . 6-9
Leaving a Reading Blank . . . . . . . . . . . . . . . . . . . . . . . . . . . . . . . . . . . . . . . . . . . . . . . 6-11
Collecting RR Readings . . . . . . . . . . . . . . . . . . . . . . . . . . . . . . . . . . . . . . . . . . . . . . . . . . . . 6-12
Collecting an RF Reading . . . . . . . . . . . . . . . . . . . . . . . . . . . . . . . . . . . . . . . . . . . . . . . 6-13
Working with Accounts . . . . . . . . . . . . . . . . . . . . . . . . . . . . . . . . . . . . . . . . . . . . . . . . . . . . . 6-14
Changing the Route Direction, Forward or Reverse . . . . . . . . . . . . . . . . . . . . . . . . . . . 6-14
Tagging an Account . . . . . . . . . . . . . . . . . . . . . . . . . . . . . . . . . . . . . . . . . . . . . . . . . . . 6-15
Finding Information . . . . . . . . . . . . . . . . . . . . . . . . . . . . . . . . . . . . . . . . . . . . . . . . . . . . 6-17
Validating Readings . . . . . . . . . . . . . . . . . . . . . . . . . . . . . . . . . . . . . . . . . . . . . . . . . . . . . . . 6-20
Hi/Low Fails. . . . . . . . . . . . . . . . . . . . . . . . . . . . . . . . . . . . . . . . . . . . . . . . . . . . . . . . . . 6-20
Removing a Reading . . . . . . . . . . . . . . . . . . . . . . . . . . . . . . . . . . . . . . . . . . . . . . . . . . . . . . 6-22
Clearing a Skip Code . . . . . . . . . . . . . . . . . . . . . . . . . . . . . . . . . . . . . . . . . . . . . . . . . . . . . . 6-24
Clearing a Comment Code, Customer Note, or Trouble Code. . . . . . . . . . . . . . . . . . . . . . . 6-26
Adding a New Meter to a Route . . . . . . . . . . . . . . . . . . . . . . . . . . . . . . . . . . . . . . . . . . . . . . 6-27
Correcting or Changing Meter Information . . . . . . . . . . . . . . . . . . . . . . . . . . . . . . . . . . . . . . 6-29
Finding and Displaying Reading-Entry Screens. . . . . . . . . . . . . . . . . . . . . . . . . . . . . . . . . . 6-31
Moving Through Reading Entry Screens . . . . . . . . . . . . . . . . . . . . . . . . . . . . . . . . . . . 6-32
Reviewing Additional Information for an Account . . . . . . . . . . . . . . . . . . . . . . . . . 6-32
Location or Hazard Codes . . . . . . . . . . . . . . . . . . . . . . . . . . . . . . . . . . . . . . . . . . . 6-32
Statistics for Loaded Routes . . . . . . . . . . . . . . . . . . . . . . . . . . . . . . . . . . . . . . . . . 6-34
Moving Around Routes . . . . . . . . . . . . . . . . . . . . . . . . . . . . . . . . . . . . . . . . . . . . . . . . . 6-35
xii N_SIGHT R900 User’s Manual for the Neptune Handheld System

Contents
Resequencing Routes . . . . . . . . . . . . . . . . . . . . . . . . . . . . . . . . . . . . . . . . . . . . . . . . . . . . . . 6-37
Resequence an Order . . . . . . . . . . . . . . . . . . . . . . . . . . . . . . . . . . . . . . . . . . . . . . . . . . 6-37
Resequence While Collecting Readings . . . . . . . . . . . . . . . . . . . . . . . . . . . . . . . . . . . . 6-39
Confirming the Resequencing . . . . . . . . . . . . . . . . . . . . . . . . . . . . . . . . . . . . . . . . . . . . 6-39
7 Communicating with the Host Computer
Exchanging Information. . . . . . . . . . . . . . . . . . . . . . . . . . . . . . . . . . . . . . . . . . . . . . . . . . . . . . 7-1
Exiting the Software . . . . . . . . . . . . . . . . . . . . . . . . . . . . . . . . . . . . . . . . . . . . . . . . . . . . . 7-1
Sending and Receiving . . . . . . . . . . . . . . . . . . . . . . . . . . . . . . . . . . . . . . . . . . . . . . . . . . 7-4
8 Using the Field Programmer
Connecting the Mouse. . . . . . . . . . . . . . . . . . . . . . . . . . . . . . . . . . . . . . . . . . . . . . . . . . . . . . . 8-1
Connecting the Mouse to the CE5320 . . . . . . . . . . . . . . . . . . . . . . . . . . . . . . . . . . . . . . . 8-2
Connecting the Mouse to the Nomad. . . . . . . . . . . . . . . . . . . . . . . . . . . . . . . . . . . . . . . . 8-4
Verifying the Handheld Recognizes the Mouse . . . . . . . . . . . . . . . . . . . . . . . . . . . . . . . . 8-6
Starting Field Programmer . . . . . . . . . . . . . . . . . . . . . . . . . . . . . . . . . . . . . . . . . . . . . . . . . . . 8-6
Changing Your Password. . . . . . . . . . . . . . . . . . . . . . . . . . . . . . . . . . . . . . . . . . . . . . . . . 8-8
Programming the ProRead . . . . . . . . . . . . . . . . . . . . . . . . . . . . . . . . . . . . . . . . . . . . . . . . . . . 8-9
Configuring the ProRead . . . . . . . . . . . . . . . . . . . . . . . . . . . . . . . . . . . . . . . . . . . . . . . . . 8-9
Querying the ProRead. . . . . . . . . . . . . . . . . . . . . . . . . . . . . . . . . . . . . . . . . . . . . . . . . . . . . . 8-14
Reading the ProRead Register . . . . . . . . . . . . . . . . . . . . . . . . . . . . . . . . . . . . . . . . . . . . . . . 8-15
Viewing Software and Firmware Information . . . . . . . . . . . . . . . . . . . . . . . . . . . . . . . . . 8-17
Programming the R900G Endpoint . . . . . . . . . . . . . . . . . . . . . . . . . . . . . . . . . . . . . . . . . . . . 8-18
Configuring Gas . . . . . . . . . . . . . . . . . . . . . . . . . . . . . . . . . . . . . . . . . . . . . . . . . . . . . . . 8-18
Collecting the Initial Reading . . . . . . . . . . . . . . . . . . . . . . . . . . . . . . . . . . . . . . . . . . . . . 8-19
Querying the R900G Endpoint . . . . . . . . . . . . . . . . . . . . . . . . . . . . . . . . . . . . . . . . . . . . 8-21
N_SIGHT R900 User’s Manual for the Neptune Handheld System xiii

Contents
Using Command Gas . . . . . . . . . . . . . . . . . . . . . . . . . . . . . . . . . . . . . . . . . . . . . . . . . . . . . . 8-23
Reading the R900G Endpoint Register . . . . . . . . . . . . . . . . . . . . . . . . . . . . . . . . . . . . . . . . 8-24
Viewing Software and Firmware Information . . . . . . . . . . . . . . . . . . . . . . . . . . . . . . . . 8-25
Networking Two Registers . . . . . . . . . . . . . . . . . . . . . . . . . . . . . . . . . . . . . . . . . . . . . . . . . . 8-26
Programming Registers . . . . . . . . . . . . . . . . . . . . . . . . . . . . . . . . . . . . . . . . . . . . . . . . 8-26
Programming the Network Primary Register . . . . . . . . . . . . . . . . . . . . . . . . . . . . . 8-26
Programming the Network Secondary Register. . . . . . . . . . . . . . . . . . . . . . . . . . . 8-27
Network Wiring . . . . . . . . . . . . . . . . . . . . . . . . . . . . . . . . . . . . . . . . . . . . . . . . . . . . . . . 8-27
Wiring the Registers. . . . . . . . . . . . . . . . . . . . . . . . . . . . . . . . . . . . . . . . . . . . . . . . 8-28
Managing Formats . . . . . . . . . . . . . . . . . . . . . . . . . . . . . . . . . . . . . . . . . . . . . . . . . . . . . . . . 8-28
Managing Formats for ProRead Registers . . . . . . . . . . . . . . . . . . . . . . . . . . . . . . . . . . 8-28
Selecting ProRead Preferences. . . . . . . . . . . . . . . . . . . . . . . . . . . . . . . . . . . . . . . 8-29
Selecting a ProRead Format . . . . . . . . . . . . . . . . . . . . . . . . . . . . . . . . . . . . . . . . . 8-31
Editing a ProRead Format . . . . . . . . . . . . . . . . . . . . . . . . . . . . . . . . . . . . . . . . . . . 8-32
Using the New ProRead Format . . . . . . . . . . . . . . . . . . . . . . . . . . . . . . . . . . . . . . 8-34
Deleting a Format for ProRead Registers . . . . . . . . . . . . . . . . . . . . . . . . . . . . . . . 8-34
Creating a New ProRead Format. . . . . . . . . . . . . . . . . . . . . . . . . . . . . . . . . . . . . . 8-35
Using the Custom Format Screens . . . . . . . . . . . . . . . . . . . . . . . . . . . . . . . . . . . . 8-37
Saving the Custom ProRead Format . . . . . . . . . . . . . . . . . . . . . . . . . . . . . . . . . . . 8-39
Creating Formats for R900G Endpoints . . . . . . . . . . . . . . . . . . . . . . . . . . . . . . . . . . . . 8-39
Configuring Gas . . . . . . . . . . . . . . . . . . . . . . . . . . . . . . . . . . . . . . . . . . . . . . . . . . . 8-40
Selecting a Gas Format . . . . . . . . . . . . . . . . . . . . . . . . . . . . . . . . . . . . . . . . . . . . . 8-41
Adding or Editing a Gas Format . . . . . . . . . . . . . . . . . . . . . . . . . . . . . . . . . . . . . . . . . . 8-43
Using the Gas Format . . . . . . . . . . . . . . . . . . . . . . . . . . . . . . . . . . . . . . . . . . . . . . 8-48
Deleting a Format for R900G Endpoints . . . . . . . . . . . . . . . . . . . . . . . . . . . . . . . . 8-48
xiv N_SIGHT R900 User’s Manual for the Neptune Handheld System

Contents
9 Maintaining and Repairing the Neptune Handheld System
Recommended Maintenance. . . . . . . . . . . . . . . . . . . . . . . . . . . . . . . . . . . . . . . . . . . . . . . . . . 9-1
Maintaining the CE5320 . . . . . . . . . . . . . . . . . . . . . . . . . . . . . . . . . . . . . . . . . . . . . . . . . . . . . 9-1
Cleaning the CE5320 . . . . . . . . . . . . . . . . . . . . . . . . . . . . . . . . . . . . . . . . . . . . . . . . . . . . 9-1
Storing the CE5320 . . . . . . . . . . . . . . . . . . . . . . . . . . . . . . . . . . . . . . . . . . . . . . . . . . . . . 9-2
Short-term Storage. . . . . . . . . . . . . . . . . . . . . . . . . . . . . . . . . . . . . . . . . . . . . . . . . . . . . . 9-2
Long-term Storage . . . . . . . . . . . . . . . . . . . . . . . . . . . . . . . . . . . . . . . . . . . . . . . . . . . . . . 9-2
Checking the Battery Status. . . . . . . . . . . . . . . . . . . . . . . . . . . . . . . . . . . . . . . . . . . . . . . 9-3
Transporting the CE5320 . . . . . . . . . . . . . . . . . . . . . . . . . . . . . . . . . . . . . . . . . . . . . . . . . 9-4
Repairing the CE5320 . . . . . . . . . . . . . . . . . . . . . . . . . . . . . . . . . . . . . . . . . . . . . . . . . . . . . . . 9-4
Recharging the Battery. . . . . . . . . . . . . . . . . . . . . . . . . . . . . . . . . . . . . . . . . . . . . . . . . . . 9-5
Calibrating the CE5320 Battery . . . . . . . . . . . . . . . . . . . . . . . . . . . . . . . . . . . . . . . . . . . . 9-5
Replacing the Battery . . . . . . . . . . . . . . . . . . . . . . . . . . . . . . . . . . . . . . . . . . . . . . . . . . . . 9-9
Removing or Replacing the Handstrap . . . . . . . . . . . . . . . . . . . . . . . . . . . . . . . . . . . . . 9-11
Equipment . . . . . . . . . . . . . . . . . . . . . . . . . . . . . . . . . . . . . . . . . . . . . . . . . . . . . . . . 9-11
Removing . . . . . . . . . . . . . . . . . . . . . . . . . . . . . . . . . . . . . . . . . . . . . . . . . . . . . . . . 9-11
Replacing . . . . . . . . . . . . . . . . . . . . . . . . . . . . . . . . . . . . . . . . . . . . . . . . . . . . . . . . 9-13
Maintaining the Nomad . . . . . . . . . . . . . . . . . . . . . . . . . . . . . . . . . . . . . . . . . . . . . . . . . . . . . 9-14
Battery Life . . . . . . . . . . . . . . . . . . . . . . . . . . . . . . . . . . . . . . . . . . . . . . . . . . . . . . . . . . . 9-14
Tips for Extending the Battery Life . . . . . . . . . . . . . . . . . . . . . . . . . . . . . . . . . . . . . 9-14
Charging the Battery . . . . . . . . . . . . . . . . . . . . . . . . . . . . . . . . . . . . . . . . . . . . . . . . . . . 9-15
Checking the Battery Status. . . . . . . . . . . . . . . . . . . . . . . . . . . . . . . . . . . . . . . . . . . . . . 9-15
Replacing the Battery . . . . . . . . . . . . . . . . . . . . . . . . . . . . . . . . . . . . . . . . . . . . . . . . . . . 9-16
Calibrating the Nomad Battery . . . . . . . . . . . . . . . . . . . . . . . . . . . . . . . . . . . . . . . . . . . . 9-17
Notification LEDs . . . . . . . . . . . . . . . . . . . . . . . . . . . . . . . . . . . . . . . . . . . . . . . . . . . . . . 9-18
Maintaining the R900 Belt Clip Receiver . . . . . . . . . . . . . . . . . . . . . . . . . . . . . . . . . . . . . . . . 9-19
Recommended Maintenance . . . . . . . . . . . . . . . . . . . . . . . . . . . . . . . . . . . . . . . . . . . . . 9-19
Battery Life . . . . . . . . . . . . . . . . . . . . . . . . . . . . . . . . . . . . . . . . . . . . . . . . . . . . . . . . . . . 9-19
Tips for Extending the Battery Life . . . . . . . . . . . . . . . . . . . . . . . . . . . . . . . . . . . . . 9-20
N_SIGHT R900 User’s Manual for the Neptune Handheld System xv

Contents
Charging the Battery . . . . . . . . . . . . . . . . . . . . . . . . . . . . . . . . . . . . . . . . . . . . . . . . . . . 9-20
Using the USB Port . . . . . . . . . . . . . . . . . . . . . . . . . . . . . . . . . . . . . . . . . . . . . . . . 9-20
Charging Considerations . . . . . . . . . . . . . . . . . . . . . . . . . . . . . . . . . . . . . . . . . . . . 9-21
Using the Charger . . . . . . . . . . . . . . . . . . . . . . . . . . . . . . . . . . . . . . . . . . . . . . . . . . . . . 9-22
Replacing the R900 Belt Clip Receiver Battery. . . . . . . . . . . . . . . . . . . . . . . . . . . . . . . 9-23
Removing the Battery . . . . . . . . . . . . . . . . . . . . . . . . . . . . . . . . . . . . . . . . . . . . . . 9-23
Replacing the Battery. . . . . . . . . . . . . . . . . . . . . . . . . . . . . . . . . . . . . . . . . . . . . . . 9-24
LED Status Indication . . . . . . . . . . . . . . . . . . . . . . . . . . . . . . . . . . . . . . . . . . . . . . . . . . 9-25
Checking the Battery Status . . . . . . . . . . . . . . . . . . . . . . . . . . . . . . . . . . . . . . . . . . . . . 9-26
Recommended Spare Parts . . . . . . . . . . . . . . . . . . . . . . . . . . . . . . . . . . . . . . . . . . . . . . . . . 9-26
Ordering Parts. . . . . . . . . . . . . . . . . . . . . . . . . . . . . . . . . . . . . . . . . . . . . . . . . . . . . . . . 9-26
CE5320 Spare Parts . . . . . . . . . . . . . . . . . . . . . . . . . . . . . . . . . . . . . . . . . . . . . . . 9-26
Nomad Spare Parts . . . . . . . . . . . . . . . . . . . . . . . . . . . . . . . . . . . . . . . . . . . . . . . . 9-26
R900 Belt Clip Receiver Spare Parts. . . . . . . . . . . . . . . . . . . . . . . . . . . . . . . . . . . 9-27
Returning your Neptune Handheld System . . . . . . . . . . . . . . . . . . . . . . . . . . . . . . . . . . . . . 9-28
10 Troubleshooting
Troubleshooting the Handheld . . . . . . . . . . . . . . . . . . . . . . . . . . . . . . . . . . . . . . . . . . . . . . . 10-1
Basic Tasks for the CE5320B Handheld. . . . . . . . . . . . . . . . . . . . . . . . . . . . . . . . . . . . 10-2
Basic Tasks for the Nomad Handheld. . . . . . . . . . . . . . . . . . . . . . . . . . . . . . . . . . . . . . 10-4
Reading-Entry Tasks. . . . . . . . . . . . . . . . . . . . . . . . . . . . . . . . . . . . . . . . . . . . . . . . . . . 10-5
Communication Tasks. . . . . . . . . . . . . . . . . . . . . . . . . . . . . . . . . . . . . . . . . . . . . . . . . . 10-6
Starting the N_SIGHT R900 Program. . . . . . . . . . . . . . . . . . . . . . . . . . . . . . . . . . . . . . 10-6
Loading Data Initially. . . . . . . . . . . . . . . . . . . . . . . . . . . . . . . . . . . . . . . . . . . . . . . . . . . 10-6
Missing Route Files . . . . . . . . . . . . . . . . . . . . . . . . . . . . . . . . . . . . . . . . . . . . . . . . 10-7
Resetting the CE5320B . . . . . . . . . . . . . . . . . . . . . . . . . . . . . . . . . . . . . . . . . . . . . . 10-7
Rebooting the CE5320B . . . . . . . . . . . . . . . . . . . . . . . . . . . . . . . . . . . . . . . . . . . . . 10-9
Rebooting When Logged into a Route in N_SIGHT R900. . . . . . . . . . . . . . . . . . . 10-9
Rebooting When Logged off N_SIGHT R900 . . . . . . . . . . . . . . . . . . . . . . . . . . . 10-11
xvi N_SIGHT R900 User’s Manual for the Neptune Handheld System

Contents
A Changing Volume Settings 1
Adjusting Customized Sounds. . . . . . . . . . . . . . . . . . . . . . . . . . . . . . . . . . . . . . . . . . . . . . . . .A-1
Changing the Volume Setting on the CE5320 . . . . . . . . . . . . . . . . . . . . . . . . . . . . . . . . .A-1
Changing the Volume Setting on the Nomad . . . . . . . . . . . . . . . . . . . . . . . . . . . . . . . . . .A-5
B Tokens List for Custom Format Screen 1
C Pressure Configuration Factor Indexes 1
Available Formats . . . . . . . . . . . . . . . . . . . . . . . . . . . . . . . . . . . . . . . . . . . . . . . . . . . . . . . . . .C-1
Glossary
Index
N_SIGHT R900 User’s Manual for the Neptune Handheld System xvii

Contents
Notes:
xviii N_SIGHT R900 User’s Manual for the Neptune Handheld System

Figures
Figure Title Page
1.1 Sample Screens on the Neptune Handheld System . . . . . . . . . . . . . . . . . . . . . . . . . 1-3
1.2 Login Screens on the Neptune Handheld System . . . . . . . . . . . . . . . . . . . . . . . . . . . 1-4
1.3 Screen Information . . . . . . . . . . . . . . . . . . . . . . . . . . . . . . . . . . . . . . . . . . . . . . . . . . . . . . . . . 1-5
1.4 Customer Support . . . . . . . . . . . . . . . . . . . . . . . . . . . . . . . . . . . . . . . . . . . . . . . . . . . . . . . . . 1-6
2.1 Typical Meter Reading Process . . . . . . . . . . . . . . . . . . . . . . . . . . . . . . . . . . . . . . . . . . . . . 2-2
2.2 CE5320B Handheld Features . . . . . . . . . . . . . . . . . . . . . . . . . . . . . . . . . . . . . . . . . . . . . . 2-4
2.3 Back of CE5320 Handheld . . . . . . . . . . . . . . . . . . . . . . . . . . . . . . . . . . . . . . . . . . . . . . . . . 2-6
2.4 Nomad Handheld Features . . . . . . . . . . . . . . . . . . . . . . . . . . . . . . . . . . . . . . . . . . . . . . . . . 2-9
2.5 Back of Nomad Handheld . . . . . . . . . . . . . . . . . . . . . . . . . . . . . . . . . . . . . . . . . . . . . . . . . 2-11
2.6 Menu and Data-Entry Screen . . . . . . . . . . . . . . . . . . . . . . . . . . . . . . . . . . . . . . . . . . . . . . 2-14
2.7 Message Screens . . . . . . . . . . . . . . . . . . . . . . . . . . . . . . . . . . . . . . . . . . . . . . . . . . . . . . . . . 2-15
2.8 Meter Position within Route . . . . . . . . . . . . . . . . . . . . . . . . . . . . . . . . . . . . . . . . . . . . . . . 2-16
2.9 Navigating Screens . . . . . . . . . . . . . . . . . . . . . . . . . . . . . . . . . . . . . . . . . . . . . . . . . . . . . . . 2-18
2.10 Search Screen . . . . . . . . . . . . . . . . . . . . . . . . . . . . . . . . . . . . . . . . . . . . . . . . . . . . . . . . . . . . 2-20
2.11 GoTo Screen . . . . . . . . . . . . . . . . . . . . . . . . . . . . . . . . . . . . . . . . . . . . . . . . . . . . . . . . . . . . . 2-21
3.1 Cradle and Charging Kit . . . . . . . . . . . . . . . . . . . . . . . . . . . . . . . . . . . . . . . . . . . . . . . . . . . . 3-3
3.2 Cradle, Router, and Cables Needed . . . . . . . . . . . . . . . . . . . . . . . . . . . . . . . . . . . . . . . . 3-4
3.3 Connecting RJ-45 Ethernet Cable to Router, Port 1 . . . . . . . . . . . . . . . . . . . . . . . . . . 3-6
3.4 Connecting the Power Cable to the Communications Cradle . . . . . . . . . . . . . . . . . 3-6
3.5 Connecting the Ethernet RJ-45 Cable to the Cradle . . . . . . . . . . . . . . . . . . . . . . . . . 3-7
3.6 Network Cable Connection . . . . . . . . . . . . . . . . . . . . . . . . . . . . . . . . . . . . . . . . . . . . . . . . . 3-7
3.7 Connecting Multiple Handheld Cradles to Router . . . . . . . . . . . . . . . . . . . . . . . . . . . . 3-8
3.8 N_SIGHT R900 Main Menu . . . . . . . . . . . . . . . . . . . . . . . . . . . . . . . . . . . . . . . . . . . . . . . 3-10
3.9 N_SIGHT R900 Admin Menu . . . . . . . . . . . . . . . . . . . . . . . . . . . . . . . . . . . . . . . . . . . . . . 3-10
3.10 Learning the Keyboard . . . . . . . . . . . . . . . . . . . . . . . . . . . . . . . . . . . . . . . . . . . . . . . . . . . . 3-12
3.11 N_SIGHT R900 Main Menu . . . . . . . . . . . . . . . . . . . . . . . . . . . . . . . . . . . . . . . . . . . . . . . 3-21
3.12 N_SIGHT R900 Stylus Calibration Screen . . . . . . . . . . . . . . . . . . . . . . . . . . . . . . . . . 3-21
3.13 Stylus at Another Location on Screen . . . . . . . . . . . . . . . . . . . . . . . . . . . . . . . . . . . . . . 3-22
3.14 Handheld Properties Screen . . . . . . . . . . . . . . . . . . . . . . . . . . . . . . . . . . . . . . . . . . . . . . . 3-23
3.15 N_SIGHT R900 F1 Menu . . . . . . . . . . . . . . . . . . . . . . . . . . . . . . . . . . . . . . . . . . . . . . . . . 3-25
3.16 N_SIGHT R900 System Menu . . . . . . . . . . . . . . . . . . . . . . . . . . . . . . . . . . . . . . . . . . . . . 3-25
N_SIGHT R900 User’s Manual for the Neptune Handheld System xix

Figures
Figure Title Page
3.17 RF/Serial Properties Screen . . . . . . . . . . . . . . . . . . . . . . . . . . . . . . . . . . . . . . . . . . . . . . 3-263.18 N_SIGHT R900 Message Area . . . . . . . . . . . . . . . . . . . . . . . . . . . . . . . . . . . . . . . . . . . . 3-27
3.19 N_SIGHT R900 Clock Error Screen . . . . . . . . . . . . . . . . . . . . . . . . . . . . . . . . . . . . . . . 3-27
3.20 N_SIGHT R900 Set Date / Time Screen . . . . . . . . . . . . . . . . . . . . . . . . . . . . . . . . . . . 3-28
3.21 N_SIGHT R900 Handheld Login Screen . . . . . . . . . . . . . . . . . . . . . . . . . . . . . . . . . . . 3-28
3.22 N_SIGHT R900 Select Route Screen . . . . . . . . . . . . . . . . . . . . . . . . . . . . . . . . . . . . . . 3-29
3.23 N_SIGHT R900 Initializing Message . . . . . . . . . . . . . . . . . . . . . . . . . . . . . . . . . . . . . . . 3-29
3.24 N_SIGHT R900 Reading Entry Screen . . . . . . . . . . . . . . . . . . . . . . . . . . . . . . . . . . . . 3-30
4.1 Nomad and Cradle Charger . . . . . . . . . . . . . . . . . . . . . . . . . . . . . . . . . . . . . . . . . . . . . . . . 4-3
4.2 Connecting RJ-45 Ethernet Cable to Router, Port 1 . . . . . . . . . . . . . . . . . . . . . . . . . 4-5
4.3 Nomad Communications Cradle Connections . . . . . . . . . . . . . . . . . . . . . . . . . . . . . . . 4-6
4.4 Network Cable Connection . . . . . . . . . . . . . . . . . . . . . . . . . . . . . . . . . . . . . . . . . . . . . . . . . 4-6
4.5 N_SIGHT R900 Main Menu . . . . . . . . . . . . . . . . . . . . . . . . . . . . . . . . . . . . . . . . . . . . . . . . 4-7
4.6 N_SIGHT R900 Admin Menu . . . . . . . . . . . . . . . . . . . . . . . . . . . . . . . . . . . . . . . . . . . . . . 4-8
4.7 Learning the Keyboard . . . . . . . . . . . . . . . . . . . . . . . . . . . . . . . . . . . . . . . . . . . . . . . . . . . . 4-10
4.8 Nomad Large Keyboard . . . . . . . . . . . . . . . . . . . . . . . . . . . . . . . . . . . . . . . . . . . . . . . . . . 4-14
4.9 Nomad Small Keyboard . . . . . . . . . . . . . . . . . . . . . . . . . . . . . . . . . . . . . . . . . . . . . . . . . . . 4-14
4.10 Nomad Lowercase Keyboard . . . . . . . . . . . . . . . . . . . . . . . . . . . . . . . . . . . . . . . . . . . . . 4-14
4.11 Nomad Uppercase Keyboard . . . . . . . . . . . . . . . . . . . . . . . . . . . . . . . . . . . . . . . . . . . . . 4-15
4.12 Nomad Numeric and Symbols Keyboard . . . . . . . . . . . . . . . . . . . . . . . . . . . . . . . . . . . 4-15
4.13 N_SIGHT R900 Main Menu . . . . . . . . . . . . . . . . . . . . . . . . . . . . . . . . . . . . . . . . . . . . . . . 4-23
4.14 N_SIGHT R900 Stylus Calibration Screen . . . . . . . . . . . . . . . . . . . . . . . . . . . . . . . . . 4-24
4.15 Stylus at Another Location on Screen . . . . . . . . . . . . . . . . . . . . . . . . . . . . . . . . . . . . . 4-25
4.16 Handheld Properties Screen . . . . . . . . . . . . . . . . . . . . . . . . . . . . . . . . . . . . . . . . . . . . . . 4-26
4.17 N_SIGHT R900 F1 Menu . . . . . . . . . . . . . . . . . . . . . . . . . . . . . . . . . . . . . . . . . . . . . . . . . 4-28
4.18 N_SIGHT R900 System Menu . . . . . . . . . . . . . . . . . . . . . . . . . . . . . . . . . . . . . . . . . . . . 4-29
4.19 RF/Serial Properties Screen . . . . . . . . . . . . . . . . . . . . . . . . . . . . . . . . . . . . . . . . . . . . . . 4-29
4.20 N_SIGHT R900 Message Area . . . . . . . . . . . . . . . . . . . . . . . . . . . . . . . . . . . . . . . . . . . . 4-32
4.21 N_SIGHT R900 Clock Error Screen . . . . . . . . . . . . . . . . . . . . . . . . . . . . . . . . . . . . . . . 4-33
4.22 N_SIGHT R900 Set Date / Time Screen . . . . . . . . . . . . . . . . . . . . . . . . . . . . . . . . . . . 4-33
4.23 N_SIGHT R900 Handheld Login Screen . . . . . . . . . . . . . . . . . . . . . . . . . . . . . . . . . . . 4-34
4.24 N_SIGHT R900 Select Route Screen . . . . . . . . . . . . . . . . . . . . . . . . . . . . . . . . . . . . . . 4-35
xx N_SIGHT R900 User’s Manual for the Neptune Handheld System

Figures
Figure Title Page
4.25 N_SIGHT R900 Initializing Message . . . . . . . . . . . . . . . . . . . . . . . . . . . . . . . . . . . . . . . 4-35
4.26 N_SIGHT R900 Reading Entry Screen . . . . . . . . . . . . . . . . . . . . . . . . . . . . . . . . . . . . . 4-36
5.1 Meter Reading Cycle . . . . . . . . . . . . . . . . . . . . . . . . . . . . . . . . . . . . . . . . . . . . . . . . . . . . . . . 5-2
5.2 R900 Belt Clip Receiver Components . . . . . . . . . . . . . . . . . . . . . . . . . . . . . . . . . . . . . . . 5-3
5.3 R900 Belt Clip Receiver Status Screen . . . . . . . . . . . . . . . . . . . . . . . . . . . . . . . . . . . . 5-11
5.4 R900 Belt Clip Receiver RF Mode Screen . . . . . . . . . . . . . . . . . . . . . . . . . . . . . . . . . . 5-13
5.5 R900 BCR RF Mode Screen from Route . . . . . . . . . . . . . . . . . . . . . . . . . . . . . . . . . . . 5-14
5.6 Tab within N_SIGHT R900 Utilities . . . . . . . . . . . . . . . . . . . . . . . . . . . . . . . . . . . . . . . . 5-15
5.7 R900 Belt Clip Receiver Firmware Tab with Update Options . . . . . . . . . . . . . . . . 5-16
6.1 N_SIGHT R900 Reading Entry Screen . . . . . . . . . . . . . . . . . . . . . . . . . . . . . . . . . . . . . . 6-2
6.2 N_SIGHT R900 Reading Entry Field . . . . . . . . . . . . . . . . . . . . . . . . . . . . . . . . . . . . . . . . 6-4
6.3 N_SIGHT R900 Skip Order Screen . . . . . . . . . . . . . . . . . . . . . . . . . . . . . . . . . . . . . . . . . 6-5
6.4 N_SIGHT R900 Skip Order Reason Codes . . . . . . . . . . . . . . . . . . . . . . . . . . . . . . . . . 6-6
6.5 N_SIGHT R900 Skipped Read . . . . . . . . . . . . . . . . . . . . . . . . . . . . . . . . . . . . . . . . . . . . . 6-6
6.6 N_SIGHT R900 Coded Notes Screen . . . . . . . . . . . . . . . . . . . . . . . . . . . . . . . . . . . . . . . 6-7
6.7 Drop-down Selection List of Coded Notes . . . . . . . . . . . . . . . . . . . . . . . . . . . . . . . . . . . 6-8
6.8 N_SIGHT R900 Comment Code . . . . . . . . . . . . . . . . . . . . . . . . . . . . . . . . . . . . . . . . . . . . 6-8
6.9 Viewing Comment Codes . . . . . . . . . . . . . . . . . . . . . . . . . . . . . . . . . . . . . . . . . . . . . . . . . . 6-9
6.10 N_SIGHT R900 Free Form Notes Screen . . . . . . . . . . . . . . . . . . . . . . . . . . . . . . . . . . 6-10
6.11 Leaving a Meter Reading Blank . . . . . . . . . . . . . . . . . . . . . . . . . . . . . . . . . . . . . . . . . . . 6-11
6.12 N_SIGHT R900 Manual Reading Screen . . . . . . . . . . . . . . . . . . . . . . . . . . . . . . . . . . . 6-12
6.13 N_SIGHT R900 RF Reading Screen . . . . . . . . . . . . . . . . . . . . . . . . . . . . . . . . . . . . . . . 6-13
6.14 Left to Right Route Direction Icon . . . . . . . . . . . . . . . . . . . . . . . . . . . . . . . . . . . . . . . . . . 6-14
6.15 Right to Left Route Direction Icon . . . . . . . . . . . . . . . . . . . . . . . . . . . . . . . . . . . . . . . . . . 6-15
6.16 Tag Account Icon . . . . . . . . . . . . . . . . . . . . . . . . . . . . . . . . . . . . . . . . . . . . . . . . . . . . . . . . . 6-16
6.17 Tagged Account . . . . . . . . . . . . . . . . . . . . . . . . . . . . . . . . . . . . . . . . . . . . . . . . . . . . . . . . . . 6-16
6.18 N_SIGHT R900 Find Order Screen . . . . . . . . . . . . . . . . . . . . . . . . . . . . . . . . . . . . . . . . 6-17
6.19 Search Display Fields . . . . . . . . . . . . . . . . . . . . . . . . . . . . . . . . . . . . . . . . . . . . . . . . . . . . . 6-18
6.20 Search Screen Enter Multiple Values . . . . . . . . . . . . . . . . . . . . . . . . . . . . . . . . . . . . . . 6-18
6.21 Search Screen Multiple Values to Match . . . . . . . . . . . . . . . . . . . . . . . . . . . . . . . . . . . 6-19
6.22 Reading Outside High/Low Range . . . . . . . . . . . . . . . . . . . . . . . . . . . . . . . . . . . . . . . . . 6-20
6.23 N_SIGHT R900 Hi / Lo / No / Inact Screen . . . . . . . . . . . . . . . . . . . . . . . . . . . . . . . . . 6-21
N_SIGHT R900 User’s Manual for the Neptune Handheld System xxi

Figures
Figure Title Page
6.24 Reading to be Cleared . . . . . . . . . . . . . . . . . . . . . . . . . . . . . . . . . . . . . . . . . . . . . . . . . . . . 6-226.25 N_SIGHT R900 Reset Order Screen . . . . . . . . . . . . . . . . . . . . . . . . . . . . . . . . . . . . . . 6-23
6.26 Reset Reading . . . . . . . . . . . . . . . . . . . . . . . . . . . . . . . . . . . . . . . . . . . . . . . . . . . . . . . . . . . 6-23
6.27 Reading to be Unskipped . . . . . . . . . . . . . . . . . . . . . . . . . . . . . . . . . . . . . . . . . . . . . . . . . 6-24
6.28 N_SIGHT R900 Undo Skipped Order Screen . . . . . . . . . . . . . . . . . . . . . . . . . . . . . . 6-25
6.29 Reading Field after Unskipped . . . . . . . . . . . . . . . . . . . . . . . . . . . . . . . . . . . . . . . . . . . . 6-25
6.30 Screen Showing Code Attached . . . . . . . . . . . . . . . . . . . . . . . . . . . . . . . . . . . . . . . . . . . 6-26
6.31 Screen Where Code Was Entered . . . . . . . . . . . . . . . . . . . . . . . . . . . . . . . . . . . . . . . . . 6-27
6.32 N_SIGHT R900 Meter Process Menu . . . . . . . . . . . . . . . . . . . . . . . . . . . . . . . . . . . . . 6-28
6.33 N_SIGHT R900 New Meter Screen . . . . . . . . . . . . . . . . . . . . . . . . . . . . . . . . . . . . . . . . 6-28
6.34 Meter Information to Change . . . . . . . . . . . . . . . . . . . . . . . . . . . . . . . . . . . . . . . . . . . . . . 6-29
6.35 N_SIGHT R900 Meter Process Menu . . . . . . . . . . . . . . . . . . . . . . . . . . . . . . . . . . . . . 6-30
6.36 N_SIGHT R900 Change Meter Info Screen . . . . . . . . . . . . . . . . . . . . . . . . . . . . . . . . 6-30
6.37 Additional Meter Information to View . . . . . . . . . . . . . . . . . . . . . . . . . . . . . . . . . . . . . . 6-33
6.38 Location and Hazard Codes Screen . . . . . . . . . . . . . . . . . . . . . . . . . . . . . . . . . . . . . . . 6-33
6.39 For Statistics for Loaded Routes . . . . . . . . . . . . . . . . . . . . . . . . . . . . . . . . . . . . . . . . . . 6-34
6.40 Statistics for Loaded Routes Screen . . . . . . . . . . . . . . . . . . . . . . . . . . . . . . . . . . . . . . . 6-35
6.41 N_SIGHT R900 GoTo Screen . . . . . . . . . . . . . . . . . . . . . . . . . . . . . . . . . . . . . . . . . . . . . 6-36
6.42 Account to Resequence . . . . . . . . . . . . . . . . . . . . . . . . . . . . . . . . . . . . . . . . . . . . . . . . . . 6-37
6.43 Resequence Screen . . . . . . . . . . . . . . . . . . . . . . . . . . . . . . . . . . . . . . . . . . . . . . . . . . . . . . 6-38
6.44 Inline Resequencing Screen . . . . . . . . . . . . . . . . . . . . . . . . . . . . . . . . . . . . . . . . . . . . . . 6-39
6.45 Confirm Resequencing Screen . . . . . . . . . . . . . . . . . . . . . . . . . . . . . . . . . . . . . . . . . . . . 6-40
7.1 Confirm Resequencing Screen . . . . . . . . . . . . . . . . . . . . . . . . . . . . . . . . . . . . . . . . . . . . . 7-2
7.2 N_SIGHT R900 Handheld Logout Screen . . . . . . . . . . . . . . . . . . . . . . . . . . . . . . . . . . 7-3
7.3 Hold Routes Screen . . . . . . . . . . . . . . . . . . . . . . . . . . . . . . . . . . . . . . . . . . . . . . . . . . . . . . . 7-3
7.4 N_SIGHT R900 Login Screen . . . . . . . . . . . . . . . . . . . . . . . . . . . . . . . . . . . . . . . . . . . . . . 7-4
7.5 Synchronize Button . . . . . . . . . . . . . . . . . . . . . . . . . . . . . . . . . . . . . . . . . . . . . . . . . . . . . . . . 7-5
8.1 Field Programmer Mouse for the CE5320 . . . . . . . . . . . . . . . . . . . . . . . . . . . . . . . . . . . 8-2
8.2 Connecting Mouse to CE5320 . . . . . . . . . . . . . . . . . . . . . . . . . . . . . . . . . . . . . . . . . . . . . 8-3
8.3 Field Programmer Mouse for the Nomad . . . . . . . . . . . . . . . . . . . . . . . . . . . . . . . . . . . 8-4
8.4 Connecting Mouse to Nomad . . . . . . . . . . . . . . . . . . . . . . . . . . . . . . . . . . . . . . . . . . . . . . 8-5
8.5 Field Programmer Menu . . . . . . . . . . . . . . . . . . . . . . . . . . . . . . . . . . . . . . . . . . . . . . . . . . . 8-7
xxii N_SIGHT R900 User’s Manual for the Neptune Handheld System

Figures
Figure Title Page
8.6 Field Programmer Password Screen . . . . . . . . . . . . . . . . . . . . . . . . . . . . . . . . . . . . . . . . 8-7
8.7 Change Password Screen . . . . . . . . . . . . . . . . . . . . . . . . . . . . . . . . . . . . . . . . . . . . . . . . . . 8-8
8.8 ProRead Configuration Screen . . . . . . . . . . . . . . . . . . . . . . . . . . . . . . . . . . . . . . . . . . . . 8-10
8.9 Format Name Selection List . . . . . . . . . . . . . . . . . . . . . . . . . . . . . . . . . . . . . . . . . . . . . . . 8-10
8.10 Otr Selection List . . . . . . . . . . . . . . . . . . . . . . . . . . . . . . . . . . . . . . . . . . . . . . . . . . . . . . . . . 8-11
8.11 Program Result -- Pass Screen . . . . . . . . . . . . . . . . . . . . . . . . . . . . . . . . . . . . . . . . . . . . 8-12
8.12 ProRead Program Details Screen . . . . . . . . . . . . . . . . . . . . . . . . . . . . . . . . . . . . . . . . . . 8-13
8.13 ProRead Query Screen . . . . . . . . . . . . . . . . . . . . . . . . . . . . . . . . . . . . . . . . . . . . . . . . . . . 8-14
8.14 ProRead Query Results . . . . . . . . . . . . . . . . . . . . . . . . . . . . . . . . . . . . . . . . . . . . . . . . . . . 8-15
8.15 ProRead Read Screen . . . . . . . . . . . . . . . . . . . . . . . . . . . . . . . . . . . . . . . . . . . . . . . . . . . . 8-16
8.16 ProRead Reading Result Screen . . . . . . . . . . . . . . . . . . . . . . . . . . . . . . . . . . . . . . . . . . 8-16
8.17 ProRead Software and Firmware Information . . . . . . . . . . . . . . . . . . . . . . . . . . . . . . . 8-17
8.18 Gas Meter Configuration Screen . . . . . . . . . . . . . . . . . . . . . . . . . . . . . . . . . . . . . . . . . . . 8-18
8.19 Gas Program Screen . . . . . . . . . . . . . . . . . . . . . . . . . . . . . . . . . . . . . . . . . . . . . . . . . . . . . 8-19
8.20 Format Name Selection List . . . . . . . . . . . . . . . . . . . . . . . . . . . . . . . . . . . . . . . . . . . . . . . 8-19
8.21 Program Result – Sending Data . . . . . . . . . . . . . . . . . . . . . . . . . . . . . . . . . . . . . . . . . . . 8-20
8.22 Program Result – Pass Screen . . . . . . . . . . . . . . . . . . . . . . . . . . . . . . . . . . . . . . . . . . . . 8-20
8.23 Gas Query Screen . . . . . . . . . . . . . . . . . . . . . . . . . . . . . . . . . . . . . . . . . . . . . . . . . . . . . . . . 8-21
8.24 Gas Query Results . . . . . . . . . . . . . . . . . . . . . . . . . . . . . . . . . . . . . . . . . . . . . . . . . . . . . . . . 8-22
8.25 Command Gas Screen . . . . . . . . . . . . . . . . . . . . . . . . . . . . . . . . . . . . . . . . . . . . . . . . . . . . 8-23
8.26 Gas Read Screen . . . . . . . . . . . . . . . . . . . . . . . . . . . . . . . . . . . . . . . . . . . . . . . . . . . . . . . . . 8-24
8.27 Gas Reading Result Screen . . . . . . . . . . . . . . . . . . . . . . . . . . . . . . . . . . . . . . . . . . . . . . . 8-25
8.28 Gas Software and Firmware Information . . . . . . . . . . . . . . . . . . . . . . . . . . . . . . . . . . . 8-26
8.29 Field Programmer Menu . . . . . . . . . . . . . . . . . . . . . . . . . . . . . . . . . . . . . . . . . . . . . . . . . . 8-29
8.30 ProRead Preferences Screen . . . . . . . . . . . . . . . . . . . . . . . . . . . . . . . . . . . . . . . . . . . . . 8-30
8.31 Select Formats Screen . . . . . . . . . . . . . . . . . . . . . . . . . . . . . . . . . . . . . . . . . . . . . . . . . . . . 8-31
8.32 ProRead New Format Screen . . . . . . . . . . . . . . . . . . . . . . . . . . . . . . . . . . . . . . . . . . . . . 8-32
8.33 Default ProRead New Format Screen . . . . . . . . . . . . . . . . . . . . . . . . . . . . . . . . . . . . . . 8-35
8.34 New Button Available . . . . . . . . . . . . . . . . . . . . . . . . . . . . . . . . . . . . . . . . . . . . . . . . . . . . . 8-36
8.35 Custom Format 1 Screen . . . . . . . . . . . . . . . . . . . . . . . . . . . . . . . . . . . . . . . . . . . . . . . . . . 8-37
8.36 Custom Format 2 Screen . . . . . . . . . . . . . . . . . . . . . . . . . . . . . . . . . . . . . . . . . . . . . . . . . . 8-38
8.37 Configure Gas Password Screen . . . . . . . . . . . . . . . . . . . . . . . . . . . . . . . . . . . . . . . . . . 8-40
N_SIGHT R900 User’s Manual for the Neptune Handheld System xxiii

Figures
Figure Title Page
8.38 Gas New Format Screen . . . . . . . . . . . . . . . . . . . . . . . . . . . . . . . . . . . . . . . . . . . . . . . . . . 8-418.39 Gas New Format Selection List . . . . . . . . . . . . . . . . . . . . . . . . . . . . . . . . . . . . . . . . . . . 8-43
8.40 Gas Values Shown on New Format Screen . . . . . . . . . . . . . . . . . . . . . . . . . . . . . . . . 8-44
8.41 Gas New Format Screen – Blank . . . . . . . . . . . . . . . . . . . . . . . . . . . . . . . . . . . . . . . . . . 8-47
9.1 Battery Status Indicator on CE5320 . . . . . . . . . . . . . . . . . . . . . . . . . . . . . . . . . . . . . . . . 9-3
9.2 Handheld Battery Information . . . . . . . . . . . . . . . . . . . . . . . . . . . . . . . . . . . . . . . . . . . . . . 9-6
9.3 N_SIGHT R900 Main Menu . . . . . . . . . . . . . . . . . . . . . . . . . . . . . . . . . . . . . . . . . . . . . . . . 9-7
9.4 N_SIGHT R900 Admin Menu . . . . . . . . . . . . . . . . . . . . . . . . . . . . . . . . . . . . . . . . . . . . . . 9-7
9.5 N_SIGHT R900 Calibrate Battery Screen . . . . . . . . . . . . . . . . . . . . . . . . . . . . . . . . . . . 9-8
9.6 Remove the Captive Screws . . . . . . . . . . . . . . . . . . . . . . . . . . . . . . . . . . . . . . . . . . . . . . . 9-9
9.7 Inserting the Battery . . . . . . . . . . . . . . . . . . . . . . . . . . . . . . . . . . . . . . . . . . . . . . . . . . . . . . 9-10
9.8 Removing Screw From Back Panel . . . . . . . . . . . . . . . . . . . . . . . . . . . . . . . . . . . . . . . . 9-11
9.9 Removing the Captive Screws . . . . . . . . . . . . . . . . . . . . . . . . . . . . . . . . . . . . . . . . . . . . 9-12
9.10 Opening the Velcro Closure . . . . . . . . . . . . . . . . . . . . . . . . . . . . . . . . . . . . . . . . . . . . . . . 9-13
9.11 Battery Status Indicator on Nomad . . . . . . . . . . . . . . . . . . . . . . . . . . . . . . . . . . . . . . . . 9-15
9.12 Changing the Nomad Battery . . . . . . . . . . . . . . . . . . . . . . . . . . . . . . . . . . . . . . . . . . . . . 9-16
9.13 External Battery Charger . . . . . . . . . . . . . . . . . . . . . . . . . . . . . . . . . . . . . . . . . . . . . . . . . . 9-22
9.14 R900 Belt Clip Receiver Side View . . . . . . . . . . . . . . . . . . . . . . . . . . . . . . . . . . . . . . . . 9-23
9.15 Latch Direction to Open . . . . . . . . . . . . . . . . . . . . . . . . . . . . . . . . . . . . . . . . . . . . . . . . . . . 9-23
9.16 Battery Inside Compartment . . . . . . . . . . . . . . . . . . . . . . . . . . . . . . . . . . . . . . . . . . . . . . 9-24
9.17 R900 Belt Clip Receiver Battery Inside Compartment . . . . . . . . . . . . . . . . . . . . . . 9-25
10.1 N_SIGHT R900 Login Screen . . . . . . . . . . . . . . . . . . . . . . . . . . . . . . . . . . . . . . . . . . . . . 10-7
10.2 N_SIGHT R900 Main Menu . . . . . . . . . . . . . . . . . . . . . . . . . . . . . . . . . . . . . . . . . . . . . . . 10-8
10.3 N_SIGHT R900 Admin Menu . . . . . . . . . . . . . . . . . . . . . . . . . . . . . . . . . . . . . . . . . . . . . 10-8
10.4 Reset Warning Message . . . . . . . . . . . . . . . . . . . . . . . . . . . . . . . . . . . . . . . . . . . . . . . . . . 10-9
10.5 N_SIGHT R900 F1 Menu . . . . . . . . . . . . . . . . . . . . . . . . . . . . . . . . . . . . . . . . . . . . . . . . 10-10
10.6 N_SIGHT R900 Handheld Menu . . . . . . . . . . . . . . . . . . . . . . . . . . . . . . . . . . . . . . . . . 10-10
10.7 Reboot Handheld Screen . . . . . . . . . . . . . . . . . . . . . . . . . . . . . . . . . . . . . . . . . . . . . . . . 10-11
A.1 N_SIGHT R900 Main Menu . . . . . . . . . . . . . . . . . . . . . . . . . . . . . . . . . . . . . . . . . . . . . . . . A-1
A.2 N_SIGHT R900 Admin Menu . . . . . . . . . . . . . . . . . . . . . . . . . . . . . . . . . . . . . . . . . . . . . . A-2
A.3 CE.Net Windows Explorer Screen . . . . . . . . . . . . . . . . . . . . . . . . . . . . . . . . . . . . . . . . . . A-2
A.4 Windows CE Main Screen . . . . . . . . . . . . . . . . . . . . . . . . . . . . . . . . . . . . . . . . . . . . . . . . . A-3
xxiv N_SIGHT R900 User’s Manual for the Neptune Handheld System

Figures
Figure Title Page
A.5 Selecting Control Panel . . . . . . . . . . . . . . . . . . . . . . . . . . . . . . . . . . . . . . . . . . . . . . . . . . . . A-3
A.6 Windows Control Panel Menu . . . . . . . . . . . . . . . . . . . . . . . . . . . . . . . . . . . . . . . . . . . . . . A-3
A.7 Volume & Sounds Properties Screen . . . . . . . . . . . . . . . . . . . . . . . . . . . . . . . . . . . . . . . A-4
A.8 Nomad Volume Control . . . . . . . . . . . . . . . . . . . . . . . . . . . . . . . . . . . . . . . . . . . . . . . . . . . . A-6
A.9 Nomad Scrollbar and Radio Buttons . . . . . . . . . . . . . . . . . . . . . . . . . . . . . . . . . . . . . . . . A-6
N_SIGHT R900 User’s Manual for the Neptune Handheld System xxv

Figures
Notes:
xxvi N_SIGHT R900 User’s Manual for the Neptune Handheld System

Tables
Table Title Page
2.1 N_SIGHT R900 Display Icons . . . . . . . . . . . . . . . . . . . . . . . . . . . . . . . . . . 2-194.1 Nomad Functionality . . . . . . . . . . . . . . . . . . . . . . . . . . . . . . . . . . . . . . . . . . 4-205.1 R900 Belt Clip Receiver Power . . . . . . . . . . . . . . . . . . . . . . . . . . . . . . . . . . 5-45.2 R900 Belt Clip Receiver Modes . . . . . . . . . . . . . . . . . . . . . . . . . . . . . . . . . . 5-55.3 R900 Belt Clip Receiver Software Functions . . . . . . . . . . . . . . . . . . . . . . . . 5-75.4 R900 Belt Clip Receiver LED Operating Modes . . . . . . . . . . . . . . . . . . . . . . 5-85.5 External Battery Charger LED . . . . . . . . . . . . . . . . . . . . . . . . . . . . . . . . . . 5-107.6 Meter Input Drive Rotation . . . . . . . . . . . . . . . . . . . . . . . . . . . . . . . . . . . . . 8-459.1 Calibration Error Messages . . . . . . . . . . . . . . . . . . . . . . . . . . . . . . . . . . . . 9-189.2 Calibration Error Messages . . . . . . . . . . . . . . . . . . . . . . . . . . . . . . . . . . . . 9-188.3 Charging Considerations . . . . . . . . . . . . . . . . . . . . . . . . . . . . . . . . . . . . . . 9-219.4 LED Status Indicators . . . . . . . . . . . . . . . . . . . . . . . . . . . . . . . . . . . . . . . . . 9-258.5 CE5320 Part Numbers . . . . . . . . . . . . . . . . . . . . . . . . . . . . . . . . . . . . . . . . 9-269.6 Nomad Part Numbers . . . . . . . . . . . . . . . . . . . . . . . . . . . . . . . . . . . . . . . . . 9-278.7 R900 Belt Clip Receiver Part Numbers . . . . . . . . . . . . . . . . . . . . . . . . . . . 9-27B.1 Custom Format Tokens . . . . . . . . . . . . . . . . . . . . . . . . . . . . . . . . . . . . . . . . B-1C.1 Pressure Configuration Factor Index Table . . . . . . . . . . . . . . . . . . . . . . . . C-1
N_SIGHT R900 User’s Manual for the Neptune Handheld System xxvii

Tables
Notes:
xxviii N_SIGHT R900 User’s Manual for the Neptune Handheld System
1 Introduction
The Neptune Handheld System User’s Manual describes how to use the following components of the Neptune handheld system to collect route data. It also explains how to exchange route and account data with the host computer for the N_SIGHT™ R900® host software. Descriptions for the following devices and procedures for using them are included in this manual.
• CE5320 Handheld (CE5320)
• Trimble® Nomad® (Nomad)
• Neptune Field Programmer
• R900® Belt Clip Receiver (BCR)
This manual also describes how to maintain these devices, also referred to as the Neptune handheld system.
Conventions Used in this Manual
This manual uses the following icons and typographic conventions to identify special information.
The Warning icon identifies actions that can injure the user or permanently damage the product.
The Caution icon identifies important information that is critical to successfully operating N_SIGHT R900.
N_SIGHT R900 User’s Manual for the Neptune Handheld System 1-1
Introduction
Screen Shots Used in this ManualIn order to be consistent with the representation of all the screens in this manual. the screens used in this guide are captured on the Nomad. However, they appear very similarly on the other handheld device.
Differences in Screen AppearancesThe most predominant differences in the appearances of the screens on both handheld devices are the following.
• CE5320 screens appear in a landscape or horizontal format.
• The Nomad screens appear in a portrait or vertical format.
The Note icon identifies information that clarifies a point within the text.
The Setup icon identifies a part of the application program that needs only periodic adjustment.
The Meter Reader icon identifies tasks that are usually performed by a meter reader.
The Operator icon identifies tasks that are usually performed by a N_SIGHT R900 operator.
Save data Messages that appear in the display of the handheld are in Courier type.
Admin Keyboard entries are in Courier bold type.
Save As Menu titles and menu selections shown in the display of the handheld are in bold type.
enter Keys that appear on the face of the handheld are in SMALL CAPS.
Except for the chapter dedicated to setting up and using the CE5320B, this manual uses the Nomad screens. However, the CE5320B screens are very similar.
1-2 N_SIGHT R900 User’s Manual for the Neptune Handheld System

Introduction
Figure 1.1 demonstrates the differences in the screen appearances.
Figure 1.1 Sample Screens on the Neptune Handheld System
Although the style of the screens appear differently, the information on both the CE5320B and the Nomad screens is identical.
Product Support within the United StatesNeptune offers you different ways to obtain high-quality, responsive technical support. However, before contacting Neptune, it is important that you know the version number of the software that your handheld uses. This information is useful to the support technician who helps you.
Finding the Software Version Number The procedures for finding the software version number differ depending on whether or you have logged on to N_SIGHT R900.
Version Number
Version Number
Sample CE5320 ScreenSample Nomad Handheld Screen
N_SIGHT R900 User’s Manual for the Neptune Handheld System 1-3

Introduction
When Not Logged In
If you have not yet logged on to N_SIGHT R900, complete the following.
1 Turn ON the handheld.
The handheld initializes N_SIGHT R900, and this process can take a few minutes.
2 Go to the Login screen.
The Login screen displays the version number at the bottom of the screen as shown in Figure 1.3.
Figure 1.2 Login Screens on the Neptune Handheld System
When Logged On to N_SIGHT R900
When you have logged on to N_SIGHT R900, you can find the version number by completing the following from any screen.
• From any N_SIGHT R900 screen, press Ctrl + I.
The Screen Information appears as shown in Figure 1.3.
Version Number
1-4 N_SIGHT R900 User’s Manual for the Neptune Handheld System

Introduction
Figure 1.3 Screen Information
• View the version number which appears directly below the handheld ID on this screen.
This screen contains all the vital information you need to know about the handheld.
Contacting Customer SupportWithin North America, Neptune Customer Support is available Monday through Friday, 8:00 AM to 7:00 PM Eastern Standard Time by telephone, email, or fax.
To contact Customer Support by phone, call (800) 647-4832. You will be directed to the appropriate team of specialists. These specialists are dedicated to assisting you until the issue is resolved to your satisfaction.
Version Number
N_SIGHT R900 User’s Manual for the Neptune Handheld System 1-5

Introduction
When placing a call, be prepared to give the following information:
• The exact wording of any message that appears on the screen of the computer or the handheld device
• A description of what happened and what you were doing when the problem occurred
• A description of how you tried to solve the problem
• Your utility’s name
You will be directed according to the options shown in Figure 1.4.
Figure 1.4 Customer Support
To contact Customer Support by fax, send a description of your problem to (334) 283-7497. Please include on the fax cover sheet the best time of day for a Customer Support Specialist to contact you.
To contact Customer Support by e-mail, send your information to [email protected].
1-6 N_SIGHT R900 User’s Manual for the Neptune Handheld System

Introduction
Finding Information within the ManualThis manual is written for two basic types of users: meter readers and operators. To help both types of users find the information they need, this manual uses the following symbols to identify different types of tasks:
• Tasks usually performed by meter readers are indicated by the Meter Reader icon.
• Tasks usually performed by N_SIGHT R900 operators are indicated by the Operator icon.
• Tasks that are performed occasionally are indicated by the Setup icon.
In addition to looking for these symbols, use the following sections to find information quickly:
• If you have a specific task or item in mind, look in the Index.
• Look through the Contents to find tasks and topics whose titles are not familiar to you.
• If you are unsure of a term, look it up in the Glossary.
Where to StartThe best way for you to use this manual depends upon your responsibilities in your company’s meter reading process and how familiar you are with using a handheld computer.
• Meter readers typically gather meter readings and other information about meters on a route. They most likely use the Neptune handheld system to gather meter readings and route data and to get route assignments.
• Operators typically manage the daily tasks of a meter reading process. They most likely use a one of the Neptune handheld devices to upload route data from it to their computer and to download billing and customer information from their computer to the handheld device.
N_SIGHT R900 User’s Manual for the Neptune Handheld System 1-7

Introduction
Meter ReadersIf this is the first time that you have used the handheld, read one of the following chapters to get a general understanding of how the display and keys work.
You will probably find the following chapters of the manual most useful.
• Chapter 2, "Overview of the Neptune Handheld System" describes the basic features and functions of the handhelds; introduces you to the Nomad handheld computer; how the handheld is incorporated into the Neptune handheld system host software; and how it is used by both meter readers and operators.
• Chapter 3, "Using the CE5320 Handheld" provides help to set up and get started with your CE5320 handheld so that you can begin collecting information from the field and exchanging information with the host computer.
• Chapter 4, "Using the Nomad Handheld" provides help to set up and get started with your Nomad handheld so that you can begin collecting information from the field and exchanging information with the host computer.
• Chapter 5, "Setting Up the R900 Belt Clip Receiver" provides basic instructions for unpacking and inspecting the Belt Clip. It also gives instructions for setting it up and becoming familiar with the display, pairing it with the handheld, and usage.
• Chapter 6, "Gathering Route Data" provides instructions for using the handheld device to collect meter readings and route data.
• Chapter 7, "Communicating with the Host Computer" provides procedures for exchanging information with the host computer and exiting the software.
• Chapter 8, "Using the Field Programmer" provides fundamental instructions for operating the Field Programmer including how to connect the mouse, programming the device, and operating the Field Programmer.
1-8 N_SIGHT R900 User’s Manual for the Neptune Handheld System

Introduction
• Chapter 10, "Troubleshooting" helps you solve any issues or problems that can occur when using the Neptune handheld system.
• Appendix A, "Changing Volume Settings" provides instructions for adjusting customized sounds and the volume control setting.
• Appendix B, "Tokens List for Custom Format Screen" provides a list of the tokens that are constants and special characters used with the Field Programmer as part of a ProRead™ format.
• Appendix C, "Pressure Configuration Factor Indexes" provides a list used for selecting gas formats available from American Meter, Sensus, and Actaris when using the Field Programmer.
• "Glossary" provides a list of terms used in this manual that can be useful when reading and learning how to use the handheld device and software.
OperatorsIf this is the first time that you have used the CE5320, read Chapter 2, "Overview of the Neptune Handheld System" to get a general understanding of how the display and keys work. You will probably find the following chapters of the manual most useful.
• Chapter 3, "Using the CE5320 Handheld" provides help to set up and get started with your CE5320 handheld so that you can begin collecting information from the field and exchanging information with the host computer.
• Chapter 4, "Using the Nomad Handheld" provides help to set up and get started with your Nomad handheld so that you can begin collecting information from the field and exchanging information with the host computer.
• Chapter 5, "Setting Up the R900 Belt Clip Receiver" provides basic instructions for unpacking and inspecting the R900 BCR. It also gives instructions for setting it up and becoming familiar with the display, pairing it with the handheld, and usage.
N_SIGHT R900 User’s Manual for the Neptune Handheld System 1-9

Introduction
• Chapter 7, "Communicating with the Host Computer" provides procedures for exchanging information with the host computer and exiting the software.
• Chapter 9, "Maintaining and Repairing the Neptune Handheld System" provides instructions for maintaining and repairing the CE5320, the Nomad, and the R900 BCR and includes recommended spare parts. It also gives instructions for packing and shipping a device to Neptune should you ever need to return any unit for repair.
• Chapter 10, "Troubleshooting" helps you to solve any issues or problems that can occur when using the Neptune handheld system.
• Appendix A, "Changing Volume Settings" provides instructions for adjusting customized sounds and the volume control setting.
• "Glossary" provides a list of terms used in this manual that can be useful when reading and learning how to use the handheld device and software.
1-10 N_SIGHT R900 User’s Manual for the Neptune Handheld System

2 Overview of the Neptune Handheld System
This chapter is designed to introduce you to the Neptune handheld system handheld computer. It will explain how the handheld is incorporated into the N_SIGHT R900 host software, and how it will be used by both meter readers and operators. It will also help you become familiar with the basic features and functions the handheld computer offers.
Typical Meter Reading ProcessBy using the handheld computer in conjunction with N_SIGHT R900 software, the meter reading process has an effective tool in collecting and distributing information that is critical to managing daily tasks.
Meter readers use the handheld to gather route information. Operators use N_SIGHT R900 to collect route information from the handheld and to collect billing information from the billing computer. Once this information is stored on an operator’s computer, called the host computer, operators use N_SIGHT R900 to make route assignments and to send updated information to the handheld and to the billing computer.
N_SIGHT R900 User’s Manual for the Neptune Handheld System 2-1

Overview of the Neptune Handheld System
Figure 2.1 Typical Meter Reading Process
Daily Use of the Neptune Handheld SystemBecause the Neptune handheld system helps users collect and pass on different types of information needed by a meter reading process, how you use it depends upon your responsibilities in your meter reading process. The following topics describe how meter readers and operators typically use the handheld to complete their work.
Transfer billing information to the host computer.
Load routes onto meter reading devices.
Collect meter readings and route data using a handheld computer.
Post meter readings and route data to customer accounts for billing.
Transfer files containing meter readings and route data to the billing computer.
Upload meter readings and route data from the handheld computers to a host computer.
Assign routes to meter readers.
1.
2.
3.
4.
7.
6.
5.
2-2 N_SIGHT R900 User’s Manual for the Neptune Handheld System

Overview of the Neptune Handheld System
Meter ReadersDuring a typical day, meter readers use the handheld to get route assignments and to gather route data. Meter readers pick up a handheld in the morning and review route assignments that were downloaded the previous afternoon by an operator. Then, they use it to gather meter readings and other data from the assigned routes. After they complete their routes, meter readers return the handheld to the office where an operator uploads the readings and route data onto the computer and then downloads route assignments and other data to it.
OperatorsTypically, operators connect the handheld so that it can communicate with their computer. Once the handheld is connected, operators set up the software so that it can exchange information with their computer, called the host computer.
During a typical day, operators make route assignments and collect billing information from the billing computer. Toward the end of the day, after meter readers complete their routes and return the handhelds to the office, operators exchange information with them. During a typical information exchange, route data is unloaded from the handheld at the same time that the next day’s assignments and updated billing information are loaded to it.
The operator makes sure that the handheld is fully charged and ready for use by a meter reader.
N_SIGHT R900 User’s Manual for the Neptune Handheld System 2-3

Overview of the Neptune Handheld System
Basic Features of the CE5320In addition to an environmental seal that protects the unit from dust, dirt, and water, the CE5320 includes the following features:
Figure 2.2 CE5320B Handheld Features
• Display—shows up to 33 lines of text and allows touch-screen entry. In addition, you have the option of backlighting the display so that information is visible in low light.
• Keyboard—uses 51 multifunctional keys that include letter, number, character, task, and menu keys. The tactile design of the keys and the tone that sounds when a key is pressed help to reduce errors. In addition, if you have the Keyboard Backlight option, the keys can be illuminated making them easy to read in low light.
Display
Keyboard
Battery status light
Keyboard functions
Alphanumeric keys
Editing functions
Blue key
Special characters
2-4 N_SIGHT R900 User’s Manual for the Neptune Handheld System

Overview of the Neptune Handheld System
• Ethernet Communication Port—an RJ-45 Ethernet connector on the cradle allows you to connect the CE5320 using an RJ-45 Ethernet cable to a variety of devices. This capability provides for route assignments and route data to be sent to the CE5320, and meter readings and route information to be retrieved from it.
• Battery Status Light—lets you know when the battery is fully charged. If the light is red, the battery needs recharging and if the light is green, the battery is charged and the handheld is operational.
Do not attempt to remove the back panel of the CE5320. Attempting to repair the unit on your own voids the warranty by breaking the warranty label which covers a screw on the back of the unit. If the CE5320 does not function, contact a Neptune support technician for assistance. For help in contacting Neptune, refer to the topic “Contacting Customer Support,” on page 1-5.
N_SIGHT R900 User’s Manual for the Neptune Handheld System 2-5

Overview of the Neptune Handheld System
Figure 2.3 Back of CE5320 Handheld
• Handstrap—makes it easy to carry the CE5320.
• Stylus—allows for ease of use for the touch screen on the CE5320.
• Battery Compartment—holds a lithium-ion battery pack that is rated for a usage up to 500 charge cycles or 2 years - whichever occurs first.
• Battery Recharge Contacts—recharges the battery when the CE5320 rests in a communication cradle.
Cover
Handstrap
Battery compartment
Battery recharge contacts
Stylus
2-6 N_SIGHT R900 User’s Manual for the Neptune Handheld System

Overview of the Neptune Handheld System
The CE5320 also offers the following:
• Suspend Mode—puts the CE5320B into a low-power state.
• Manual Off Feature—allows operators to turn the CE5320 off immediately.
• Automatic Return Feature—shows the information that was last in the display after the handheld is turned off manually or automatically.
• Customized Sounds—can be used as warning signals or as a prompt.
Operating Environment
The recommended temperature range for operating the CE5320 is from -20°C to +50°C (-4°F to +122°F). Short exposure to temperatures lower or higher than these can cause the display to turn very dark or very light until the unit returns to the recommended operating temperature range.
Rain and Water Resistance
The handheld withstands exposure to rain without allowing water to seep inside the unit. It is designed to endure occasional immersions, and the unit floats making it easy to retrieve if dropped in water.
Electromagnetic ResistanceThe CE5320 performs well in most common environments where electromagnetic fields are present. Examples of these environments include areas near power-transmission lines, electric motors, transformers, compressors, and low-power radio transmitters.
Performance can be degraded when using a communication cable, a peripheral, such as a printer, or a battery charger under these conditions.
Long exposure to temperatures below -20°C (-4°F) can damage the display. Prolonged exposure to temperatures above 50°C (122°F) will damage the battery and above 60°C (140°F) can permanently damage the unit.
Water resistance can be impaired if the door of the battery compartment or top cover is improperly closed or if the gaskets have deteriorated.
N_SIGHT R900 User’s Manual for the Neptune Handheld System 2-7

Overview of the Neptune Handheld System
Shock ResistanceWhen the unit is operated within the specified temperature range, it can withstand occasional drops from up to two meters (six feet) onto a hard surface.
Use of the CE5320To set up and begin using your CE5320 handheld, go to “Using the CE5320 Handheld,” on page 3-1.
2-8 N_SIGHT R900 User’s Manual for the Neptune Handheld System

Overview of the Neptune Handheld System
Basic Features of the NomadIn addition to an environmental seal that protects the unit from dust, dirt, and water, the Nomad includes the following features.
Figure 2.4 Nomad Handheld Features
• Display—shows up to 33 lines of text and allows touch-screen entry. In addition, you have the option of backlighting the display so that information is visible in low light.
• Keyboard—uses 51 multifunctional keys that include letter, number, character, task, and menu keys. The tactile design of the keys and the tone that sounds when a key is pressed help to reduce
Display
Keyboard
Battery status indicator
Left application soft key
Function key
Start
Tab
Power
OK
Backspace
Today
Notification LED
Right application soft key
Enter
Arrow keys (used with function key)
Charging LED
N_SIGHT R900 User’s Manual for the Neptune Handheld System 2-9

Overview of the Neptune Handheld System
errors. In addition, if you have the Keyboard Backlight option, the keys can be illuminated making them easy to read in low light.
• Ethernet Communication Port—an RJ-45 Ethernet connector on the cradle allows you to connect the Nomad using an Ethernet cable to a variety of devices. This capability provides for route assignments and route data to be sent to the Nomad, and meter readings and route information to be retrieved from it.
• Battery Status Light—lets you know when the battery is fully charged. If the light is red, the battery needs recharging and if the light is green, the battery is charged and the handheld is operational.
Do not attempt to remove the back panel of the Nomad. Attempting to repair the unit on your own voids the warranty by breaking the warranty label which covers a screw on the back of the unit. If the Nomad does not function, contact a Neptune support technician for assistance. For help in contacting Neptune, refer to the topic “Contacting Customer Support,” on page 1-5.
2-10 N_SIGHT R900 User’s Manual for the Neptune Handheld System

Overview of the Neptune Handheld System
Figure 2.5 Back of Nomad Handheld
• Handstrap—makes it easy to carry the Nomad.
• Battery Compartment—holds a lithium-ion battery pack that is rated for up to 500 charge cycles or 2 years - whichever occurs first.
• Stylus—makes is easy to use the touchscreen display. Can be calibrated for the user’s own personal touch.
Handstrap
Stylus
Battery door screws
Battery compartment
N_SIGHT R900 User’s Manual for the Neptune Handheld System 2-11

Overview of the Neptune Handheld System
The Nomad also offers the following:
• Suspend Mode—puts the Nomad into a low-power state.
• Manual Off Feature—allows operators to turn the Nomad off immediately.
• Automatic Return Feature—shows the information that was last in the display after the handheld is turned off manually or automatically.
• Customized Sounds—can be used as warning signals or as a prompt.
Operating Environment
The recommended temperature range for operating the Nomad is from --30C to 60C (-22F to 140F). Short exposure to temperatures lower or higher than these can cause the display to turn very dark or very light until the unit returns to the recommended operating temperature range.
Rain and Water Resistance
The handheld withstands exposure to rain without allowing water to seep inside the unit. It is designed to endure occasional immersions, and the unit floats making it easy to retrieve if dropped in water.
The Trimble Nomad has gone through multiple tests and meets MIL-STD-810F military standards. Long exposure to temperatures below -20°C (-4°F) can damage the display. Prolonged exposure to temperatures above 50°C (122°F) will damage the battery and above 60°C (140°F) can permanently damage the unit.
Water resistance can be impaired if the door of the battery compartment or top cover is improperly closed or if the gaskets have deteriorated.
2-12 N_SIGHT R900 User’s Manual for the Neptune Handheld System

Overview of the Neptune Handheld System
Electromagnetic ResistanceThe Nomad performs well in most common environments where electromagnetic fields are present. Examples of these environments include areas near power-transmission lines, electric motors, transformers, compressors, and low-power radio transmitters.
Performance can be degraded when using a communication cable, a peripheral, such as a printer, or a battery charger under these conditions.
Shock ResistanceWhen the unit is operated within the specified temperature range, it can withstand occasional drops from up to 1.22 meters (4 feet) onto a hard surface.
Use of the NomadTo set up and begin using your Nomad handheld, go to “Using the Nomad Handheld,” on page 4-1.
The Display on the Handhelds
This section describes the display on the Neptune handheld system.
• The types of information that are shown in the display of the handheld.
• An overview of how to use the screens to access different types of information.
Except for the chapter dedicated to setting up and using the CE5320B, this manual uses the Nomad screens. However, the CE5320B screens are very similar.
N_SIGHT R900 User’s Manual for the Neptune Handheld System 2-13

Overview of the Neptune Handheld System
The Handheld DisplayInformation in the display of the handheld is shown in three formats: menu screens, data-entry screens, and message screens.
Figure 2.6 Menu and Data-Entry Screen
Menu screens allow you to choose from the icon options.
Data-entry screens prompts you to select or enter data, such as the meter number.
2-14 N_SIGHT R900 User’s Manual for the Neptune Handheld System

Overview of the Neptune Handheld System
Figure 2.7 Message Screens
Menu Screens
Menu screens typically display a list of options within a box and prompt you to select one. To select an option from a menu screen, do one of the following:
• From the keypad, press the key whose number corresponds to the item that you want to select. For example, if the menu displays a list of trouble codes and the code that you want to select is number 3 in the list, then press the THREE key on the keyboard or keypad. Your selection appears in the display.
• Use the UP or DOWN key to move up or down the list until the item that you want is highlighted. Then press the ENTER key on the CE5320 or the ENTER
key or on the Nomad. Your selection appears in the display. You can also use the TAB or to move forward, and the SHIFT + TAB to move backward.
Message screens display information or prompt you to make a selection. They also can tell you how to exit the current screen or how to access other screens.
ENTER
N_SIGHT R900 User’s Manual for the Neptune Handheld System 2-15

Overview of the Neptune Handheld System
The procedures in this manual will instruct you to follow one or the other method. Use the method most comfortable for you.
Data-Entry Screens
Typically, data-entry screens prompt you to enter information. Whenever a data-entry screen is displayed, the handheld automatically disables inappropriate keys. For example, when prompted to enter a meter reading, it allows you to enter numbers only. However, if you are prompted to enter a new trouble code, it enables the letter and number keys because codes can use letters and numbers.
On each of the reading-entry screens the meter reader can tell the position of the meter within the route. See Figure 2.8 on Page 2-16.
Figure 2.8 Meter Position within Route
A key that can be used to select an item from a list is called a hot key.
Meter position
Number of accounts within route
UR = unread
2-16 N_SIGHT R900 User’s Manual for the Neptune Handheld System

Overview of the Neptune Handheld System
In this example, the number 1/5show us that the position of this meter is 1 out of 5 accounts contained on the route.
The reader can use and to navigate to other accounts on the
route.
Message Screens
Typically, message screens display messages as well as instructions for exiting the message screen. For example, when a message, such as Return handheld to office by 4pm to download routes, is displayed, the instruction Press ESC key is also shown to tell you how to exit the message screen. Sometimes you can be given options for accessing other screens that contain information related to the message shown in the display.
Some message screens only display information such as the number of the meter whose reading-entry screen is shown. Because the information displayed in message screens is linked to a particular meter or route, pressing any key from this screen always returns you to the reading-entry screen of the meter or route to which the message belongs.
Navigating Through ScreensThere are two primary screens meter readers and operators use that give them access to the screens they need: the Reading-Entry screen (a data-entry screen) and the F1 Menu (a menu screen).
N_SIGHT R900 User’s Manual for the Neptune Handheld System 2-17

Overview of the Neptune Handheld System
Figure 2.9 Navigating Screens
You can display a reading-entry screen after routes have been downloaded to the handheld by logging into the route. From the F1 menu or the Start key menu, you can access other screens, configure probes, and check or change settings that control how the CE5320 and Nomad exchanges information with the host computer.
To display screens that allow you to view or change information about a meter or route, you must first
You can now make changes from the current meter you are on from the Reading Entry screen and make changes to the route as well.
Generally, meter-readers use the reading-entry screen to access information they need to perform their tasks.
Meter readers also use the Start key or the F1 menu to access information and functions they need to perform their tasks.
2-18 N_SIGHT R900 User’s Manual for the Neptune Handheld System

Overview of the Neptune Handheld System
Icon Bar
The icon bar allows you to work with the Reading Entry screens. It appears at the top of the screen similar to the one shown in Table 2.1.
Table 2.1 N_SIGHT R900 Display Icons
Display Icons
Main menu
Battery indicator
Next unread account
Route direction: points
Tag account
Customer notes
Trouble codes
Comment Code
Cycles between one of these icon displays
depending on the reading:
Keyed Read (Manual)
R900
Probe
Changes per type of account:
Read parameters (manual accounts)
Edit (radio and probe accounts)
If an icon appears as gray rather than black, it means that this icon is not available.
N_SIGHT R900 User’s Manual for the Neptune Handheld System 2-19

Overview of the Neptune Handheld System
While you are on a reading entry screen, if you want to search to find a
specific account, you must first press or press Start, then
Route, then Find Order.to display the Search screen.
Figure 2.10 Search Screen
You can then select which field to search through, then enter the search criteria to locate a specific account or group of accounts.
2-20 N_SIGHT R900 User’s Manual for the Neptune Handheld System

Overview of the Neptune Handheld System
Press or click Start, then Move, then GoTo to quickly maneuver through a route, such as going to the beginning of a route or to the end of a route to display the GoTo screen. The handheld goes to that point.
Figure 2.11 GoTo Screen
On this screen you can go to the following points on a route:
• Position of the meter within the route
• Sequence number of the meter
• Previous route
• Next route
• Beginning of the route
• End of the route
• First incomplete read
• Last incomplete read
N_SIGHT R900 User’s Manual for the Neptune Handheld System 2-21

Overview of the Neptune Handheld System
Notes
2-22 N_SIGHT R900 User’s Manual for the Neptune Handheld System

3 Using the CE5320 Handheld
This chapter provides basic instructions for unpacking and inspecting the CE5320 handheld. It also gives instructions for setting up the CE5320 handheld and becoming familiar with the keyboard and display. This chapter also provide help to get started with your CE5320 handheld so that you can begin collecting information from the field and exchanging information with the host computer.
In addition, this chapter gives procedures for changing the system settings, which affects how the handheld displays and accesses data. Although these settings are preset by Neptune to meet the needs of most meter reading processes, you can change some of the settings so that they better suit your needs.
Determining the System ConfigurationAlthough the handheld requires no installation, you do need to connect the unit to a power supply to charge its battery and to a host computer to allow it to communicate. How you make these connections depends upon how you have configured your meter reading system.
The CE5320 handheld has one basic system configuration that is used for local communications. A communication cradle is the most commonly used method to charge and exchange data with a handheld. See “Setting Up the CE5320,” on page 3-3. With this configuration,
If you want to set up and configure the Nomad handheld, see “Using the Nomad Handheld,” on page 4-1
N_SIGHT R900 User’s Manual for the Neptune Handheld System 3-1

Using the CE5320 Handheld
whenever the handheld is placed in a communication cradle, its battery begins recharging, and it is ready to exchange data with the host computer.
Local and Remote CommunicationsThe configuration previously described is used for local operations, where the handheld and its communications equipment are directly connected to the host computer. The cradle can also be used for remote operations where the handheld and its communications equipment are in an office remote from the host computer. In this situation, the remote units are connected through the Internet to the host computer by an Ethernet cable. After the connection is established, only the software on the host computer and on the handheld need to be set up to manage a communications exchange.
Unpacking and Inspecting EquipmentBesides using normal care, you need no special instructions to unpack the handheld or the equipment that you purchased with it.
Check that you have received all the items you need for the type of system configuration that you are using and inspect the items for shipping damage. If you detect any damage, return the damaged equipment to Neptune. Instructions for shipping the handheld to Neptune are given in “Returning your Neptune Handheld System,” on page 9-28 of this manual.
Save the packing box that was used to ship the handheld. Should you ever need to ship the handheld, you need to repack the unit in its original shipping box. The handling involved in land and air transport often subjects the handheld to impact beyond that which occurs during normal use. The packing box is designed to absorb shocks and protect the handheld during shipping.
3-2 N_SIGHT R900 User’s Manual for the Neptune Handheld System

Using the CE5320 Handheld
Setting Up the CE5320The following section describes how to set up your CE5320 so that you can begin using it.
One CE5320 and a Communication CradleIf you are using a communication cradle to power and exchange information with one handheld at a time, check that you have received the following items.
Figure 3.1 Cradle and Charging Kit
• One CE5320 handheld computer.
• A cradle-charging kit, which is required for operation and is usually ordered with the unit. It includes an AC adapter/battery charger cable.
An Ethernet cable is required for communication; however, it is not included in the kit.
N_SIGHT R900 User’s Manual for the Neptune Handheld System 3-3

Using the CE5320 Handheld
The Router
If you are using a router to link cradles to exchange information with more than one CE5320 at a time, check that you have the following
items.
Figure 3.2 Cradle, Router, and Cables Needed
• One or more CE5320 handheld computers.
• One communication cradle for each CE5320.
• One AC adapter/battery charger cable.
• One RJ45 Ethernet cable for each communication cradle.
• One RJ45 Ethernet cable to connect the router to the Personal Computer (PC).
• One AC power supply cable.
It is important that the router you use has the capability to work as a switch.
In order for the Communications function to work properly, a stan-dard RJ45 Ethernet cable must be used.
3-4 N_SIGHT R900 User’s Manual for the Neptune Handheld System

Using the CE5320 Handheld
Connecting to the Host Computer and Power Supply
The procedures in this chapter describe how to connect the CE5320 to the host computer so that it can exchange information with the host. The procedures also describe how to connect a power supply to the communications cradle so that you can recharge the battery. Complete the following procedures to connect the equipment you have.
Connecting the Router, CE Handheld Cradle, and Power Supplies
You need no special tools to connect the devices that were shipped with your handheld. Follow this procedure to connect the router, communication cradles, and power supplies.
1 If you have not already done so, make sure that you have all of the equipment you need. If necessary, refer to the preceding section “Unpacking and Inspecting Equipment,” on page 3-2.
2 With the host computer OFF, connect the power supply to the router.
This configuration is for handhelds not connected to a system network. If you are connected to a system network, see the network specialist or your System Administrator for assistance.
It is important that the router you use has the capability to work as a switch.
N_SIGHT R900 User’s Manual for the Neptune Handheld System 3-5

Using the CE5320 Handheld
3 Leaving the far left port empty, connect one end of the RJ-45 Ethernet cable into one of the four slots in the router. See Figure 3.3.
Figure 3.3 Connecting RJ-45 Ethernet Cable to Router, Port 1
4 Connect the other end of the Ethernet cable to the host computer.
5 Push the single-hole connector of the 110V AC adapter/battery charger onto the single-prong connector on the back of the communication cradle.
Secure the connector by turning its grooved lock-nut clockwise until you feel resistance. See Figure 3.4.
Figure 3.4 Connecting the Power Cable to the Communications Cradle
6 Connect the other end of the AC adapter/battery charger into a power source.
Always leave far left port empty
RJ-45 Ethernet cable
3-6 N_SIGHT R900 User’s Manual for the Neptune Handheld System

Using the CE5320 Handheld
7 With an additional Ethernet cable, insert one of its connectors into the back of the cradle and the other the other end into the back of the router. See Figure 3.5.
Figure 3.5 Connecting the Ethernet RJ-45 Cable to the Cradle
8 Connect the network cable to the single router.
Figure 3.6 Network Cable Connection
RJ-45 Ethernet cable to host computer
Network cable from cradle
N_SIGHT R900 User’s Manual for the Neptune Handheld System 3-7

Using the CE5320 Handheld
9 To connect additional cradles to a router, repeat steps 7 and 8, using the available ports on the router. See Figure 3.7.
Figure 3.7 Connecting Multiple Handheld Cradles to Router
Network cable from cradle 1
RJ-45 Ethernet cable to another handheld cradle or another router
Always leave far left port empty
RJ-45 Ethernet cable to host computer
Port number 1 is always reserved for the network cable, and the port marked Internet is always kept empty.
You can connect another router to the main router you are using by connecting one end of an additional Ethernet cable into an open port on the main router and the other end to an open port on the additional router.
3-8 N_SIGHT R900 User’s Manual for the Neptune Handheld System

Using the CE5320 Handheld
Configuring the CE5320 Handheld
On the Host Computer
1 On the Host Computer, right-click on My Computer.
2 Select Properties
3 Click Computer Name.
4 Record the computer name for the Host Computer here: ___________________________________________________
5 Click Start, then Run.
6 Type CMD and press Enter.
A DOS window appears.
7 Type ipconfig and press Enter.
8 Write the IP address here: _____________________________
9 Type exit and press Enter to close the DOS window.
On the CE5320 Handheld
1 On the N_SIGHT R900 Login screen, press M or touch Menu.
Before proceeding with this section, you must complete the information for the handhelds in two tables within the N_SIGHT R900 host software: Handhelds and Reader ID. Refer to the N_SIGHT R900 Online HTML Help for the steps to complete this information in these tables.
N_SIGHT R900 User’s Manual for the Neptune Handheld System 3-9

Using the CE5320 Handheld
The N_SIGHT R900 Main Menu screen appears.
Figure 3.8 N_SIGHT R900 Main Menu
2 Select 1, Admin.
The Admin Menu appears as illustrated in Figure 3.9.
Figure 3.9 N_SIGHT R900 Admin Menu
3 Select 4, Reset Handheld.
4 Click Yes.
5 Leave the password field blank, or if required, type BUBBA.
6 Click OK.
Do not press Reset Handheld if the handheld is not in the communica-tions cradle.
3-10 N_SIGHT R900 User’s Manual for the Neptune Handheld System

Using the CE5320 Handheld
The Communications Configuration screen appears.
7 Tab to the HHU ID field, and type the ID of the handheld.
8 Type the IP address in the Server Name field.
9 Be sure the Port is 25100.
10 Touch Connect or OK.
The N_SIGHT R900 Login screen appears.
The Display and KeyboardThis section describes the display and keyboard on the CE5320.
• The types of information that are shown in the display of the handheld.
• An overview of how to use the keys to access different types of information.
Learning the Keyboard
The CE5320 handheld uses 51 keys to give you access to all the stored information and to allow you to enter new data. Most keys perform more than one function.
The HHU ID number is located on the back of the CE5320 handheld under the top part of the strap. It must also match exactly with what has been entered in the host software for that particular handheld.
N_SIGHT R900 User’s Manual for the Neptune Handheld System 3-11

Using the CE5320 Handheld
Figure 3.10 Learning the Keyboard
• Function Keys or Hot Keys—allow you to perform special tasks quickly.
• Direction Keys—allow you to move up or down a list of items and to move forward or backward in a data-entry space or through the meters of a route.
• Number Keys—allow you to enter a number in the display or to select an item from a list of items shown.
• Quick Keys—allow you to execute a task quickly by pressing certain keys at once or in a particular order.
• Letter/Character Keys—allow you to enter a letter or character in a screen or to select an item from a list of items shown.
• Information Keys—allow you to enter, change, or view information about a meter or a route.
Function keys
Direction keys
Number keys
Quick keys
Letter/character keys
Information keys
3-12 N_SIGHT R900 User’s Manual for the Neptune Handheld System
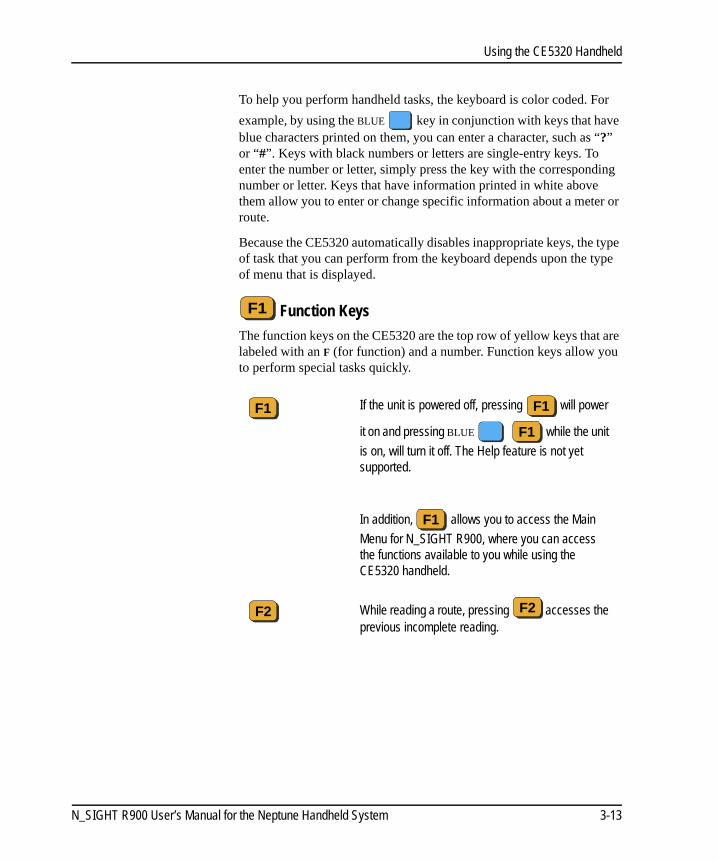
Using the CE5320 Handheld
To help you perform handheld tasks, the keyboard is color coded. For
example, by using the BLUE key in conjunction with keys that have blue characters printed on them, you can enter a character, such as “?” or “#”. Keys with black numbers or letters are single-entry keys. To enter the number or letter, simply press the key with the corresponding number or letter. Keys that have information printed in white above them allow you to enter or change specific information about a meter or route.
Because the CE5320 automatically disables inappropriate keys, the type of task that you can perform from the keyboard depends upon the type of menu that is displayed.
Function Keys
The function keys on the CE5320 are the top row of yellow keys that are labeled with an F (for function) and a number. Function keys allow you to perform special tasks quickly.
If the unit is powered off, pressing will power
it on and pressing BLUE while the unit
is on, will turn it off. The Help feature is not yet supported.
In addition, allows you to access the Main
Menu for N_SIGHT R900, where you can access the functions available to you while using the CE5320 handheld.
While reading a route, pressing accesses the previous incomplete reading.
F1
F1 F1
F1
F1
F2 F2
N_SIGHT R900 User’s Manual for the Neptune Handheld System 3-13

Using the CE5320 Handheld
Number Keys
The number keys on the handheld are used most often for entering readings. Because entering readings is the primary function of users, the number keys are larger than other keys and are placed near the top of the keypad. Number keys enable you to complete one of two tasks:
• Enter a number in the display, such as for a reading.
• Select an item by pressing the number key that corresponds to a numbered item in a list of items.
The type of task that you can perform using a number key depends upon the type of screen that is displayed.
• Menu Screen—select a numbered item from the list by pressing the key whose number corresponds to the item that you want to select. (When used this way, the number key is called a hotkey.)
• Data-Entry Screen—enter a number in the data-entry screen by pressing the key with the number that you want to appear in the field.
Direction Keys
The direction keys on the handheld are used to move up or down through a list of items displayed in a menu screen and to move forward or backward within a data-entry space or through the meters of a route. Pressing the direction key up or down displays additional screens for the account, such as an account-specific hazard.
While reading a route, pressing accesses the next incomplete reading.
In addition, pressing BLUE while the
unit is on accesses the backlight.
F3 F3
F3
3
3-14 N_SIGHT R900 User’s Manual for the Neptune Handheld System

Using the CE5320 Handheld
The type of task that you can perform using a number key depends upon the type of screen displayed.
• Menu Screen—highlights a numbered item in the list of items displayed by pressing the UP or DOWN key to move through the list of items. You can also use the BACKWARD or FORWARD keys to jump to the first or last item in the menu. As you reach an item, it becomes highlighted.
• Data-Entry Screen—moves forward or backward within a data-entry space by pressing the FORWARD or BACKWARD key to move forward or backward within the space.
• Reading-Entry Screen—display the reading-entry screen of the next or previous meter by pressing the FORWARD or BACKWARD
key.
Letter/Character Keys
The letter/character keys on the handheld are the keys that are labeled with the letters of the alphabet and with special characters, which are printed in blue to the right of each letter. Letter/character keys enable you to complete one of three tasks:
• Enter a letter in a data-entry screen.
• Enter a character in a data-entry screen.
• Select an item by pressing the key whose letter corresponds to the item that you want to select.
Moving over existing letters or numbers will not erase them.
A<
Use the color coding to remember which keys to use with character keys: press the BLUE key followed by a letter/character key (characters are shown in blue on these keys) to display the character in the screen.
N_SIGHT R900 User’s Manual for the Neptune Handheld System 3-15

Using the CE5320 Handheld
• Menu Screen—select an item from the list by pressing the key whose letter corresponds to the item that you want to select. (When used this way, the letter/character key is called a hotkey.)
• Data-Entry Screen—enter a letter in the data-entry screen by pressing the key of the letter that you want to appear in the data-entry screen or by pressing the BLUE key followed by the letter you want to appear in the display.
• Reading-Entry Screen—perform a function by pressing the key over which the name of the function is printed in white (detailed next).
Information Keys
The information keys on the handheld are the letter/character keys that have information printed in white above them. You can enter, change, or view the following information about a meter or a route by pressing the appropriate key whenever a reading-entry screen is shown in the display.
Information keys only work when logged into the handheld (Production Mode).
Toggles between the Automatic Meter Reading (AMR) mode: R900 Keyed Advantage
R300.
Accesses the Codes menu allowing you to enter trouble codes or customer notes depending upon the type of import file you are using.
Allows you to turn the Edit mode ON. In edit mode, you can type information on screens that allow text entry.
A<
C=
E[
3-16 N_SIGHT R900 User’s Manual for the Neptune Handheld System

Using the CE5320 Handheld
Allows you to access the Search screen where you can select criteria to look for information you need:
• Coded note• Route• Meter number• Name• Meter type• Account status• Sequence number• Skip code• Instruction code• Account number• Constant• Tag
Allows you to access the GoTo screen. On this screen, you can access the following information for a meter or a route:
• Position of the meter within the route• Sequence number of the meter• Previous route• Next route• Beginning of the route• End of the route• First incomplete read• Last incomplete read
Allows you to view summary information about the route. When pressed with the CTL key, this key allows you to view screen information for the handheld, such as the version number, Internet Protocol (IP) Address, Random Access Memory (RAM), and storage.
Allows you to enter a reading manually.
Allow you enter List mode where the account addresses are presented in list form, a convenient way to browse through the accounts.
F]
G"
I@
K{
L}
N_SIGHT R900 User’s Manual for the Neptune Handheld System 3-17

Using the CE5320 Handheld
You can use these keys only when a reading-entry screen is displayed. For example, if the you need more information about this meter,
pressing the INFORMATION or keys while reading the account, will take you to additional information. Once you display the information you need, pressing these keys again returns you to meter’s reading-entry screen.
Allows you to access the Meter Menu where you can skip a reading, change meter information, and enter information for a found meter.
Allows you to view the Properties information for the handheld:
• Read direction• Route dir• Battery key clicks • Date • Time
Allows you to skip the reading for this account.
Allows you to tag the account, so that you can come back to it later.
Allows you to log out of N_SIGHT R900 after completing the required information.
Allows you to search for the accounts already tagged.
Allows you to perform an RF test.
M:
P%
S’
T –
W;
Y `
Z ´
3-18 N_SIGHT R900 User’s Manual for the Neptune Handheld System

Using the CE5320 Handheld
Quick Keys
By pressing specific keys at once, or in a particular order, you can execute a task quickly. Certain quick key tasks can be performed no matter what type of screen is shown. The following table summarizes tasks that you can perform using quick keys.
DEL.
Use the color coding to remember which keys to use with quick keys that have two functions: to activate the function printed in blue, press the BLUE key first, and then press the key with a function printed in blue.
Press To turn on the CE5320.
Press BLUE , To turn off the CE5320.
Press To enter a reading or select an item from a menu screen.
Press To enter a decimal point. (This is typically required only by “floating point” meters.)
Press To return to the preceding screen.
Press To enter a space when entering a special message or other data.
Press To erase a letter, number, or character that you have entered. As you backspace over each letter, number, or character, each is erased.
Press + To show meter information on the screen.
F1
F1
ENTER
DEL.DEL.
ESCINS
CTLALT I
@
N_SIGHT R900 User’s Manual for the Neptune Handheld System 3-19

Using the CE5320 Handheld
Adjusting System SettingsSystem settings affect how the handheld displays and accesses data. Although these settings are factory-set to meet the needs of most meter reading processes, you can change some of the settings so that they better suit your needs. These settings are typically set once and never changed; however, you can adjust these settings any time.
Calibrating the StylusThe CE5320 handheld has a touchscreen display that uses a stylus for ease-of-use. Because each person’s touch differs, it is important to calibrate the stylus to the touchscreen for the user’s own personal touch.
To calibrate the stylus, complete the following procedure.
1 On the N_SIGHT R900 Login screen, press M or touch Menu.
Press BLUE , To backlight the display and the keys, if your CE5320 Handheld has the keyboard backlight option. Pressing these keys again will turn off the backlight. These keys work as a toggle.
Press , , then To reboot the CE5320 Handheld.
F3
F1
Backlighting can drain the battery rapidly. To conserve the battery, use this feature only in low light.
If you do not press a key within 45 seconds of activating this feature, the CE5320 automatically deactivates the backlight to conserve battery power.
All functions are available without the stylus by using keyboard.
3-20 N_SIGHT R900 User’s Manual for the Neptune Handheld System

Using the CE5320 Handheld
The N_SIGHT R900 Main Menu screen appears.
Figure 3.11 N_SIGHT R900 Main Menu
2 Press 6 or touch item 6: Handheld.
3 Press 9 or touch 9: Stylus.
The Stylus Calibration screen appears like Figure 3.12.
Figure 3.12 N_SIGHT R900 Stylus Calibration Screen
Calibration is simply done by touching the center of the cross with the stylus for a couple of seconds. When the cross moves to another place, repeat the operation.
4 Hold your stylus on the cross until it moves.
Remember just to touch the screen; there is no need to press hard or to punch it.
N_SIGHT R900 User’s Manual for the Neptune Handheld System 3-21

Using the CE5320 Handheld
The cross moves to another location on the screen similar to that illustrated in Figure 3.13.
Figure 3.13 Stylus at Another Location on Screen
5 Repeat holding the stylus on the cross until it moves.
6 When finished, press .
The handheld returns to N_SIGHT R900 Main Login screen.
Changing the Handheld PropertiesThe section allows you to adjust or change the following properties for the handheld:
• Key clicks
• Reading entry direction
• Route direction
Working with the Properties Screen
To access the Properties screen, complete these steps.
ENTER
3-22 N_SIGHT R900 User’s Manual for the Neptune Handheld System
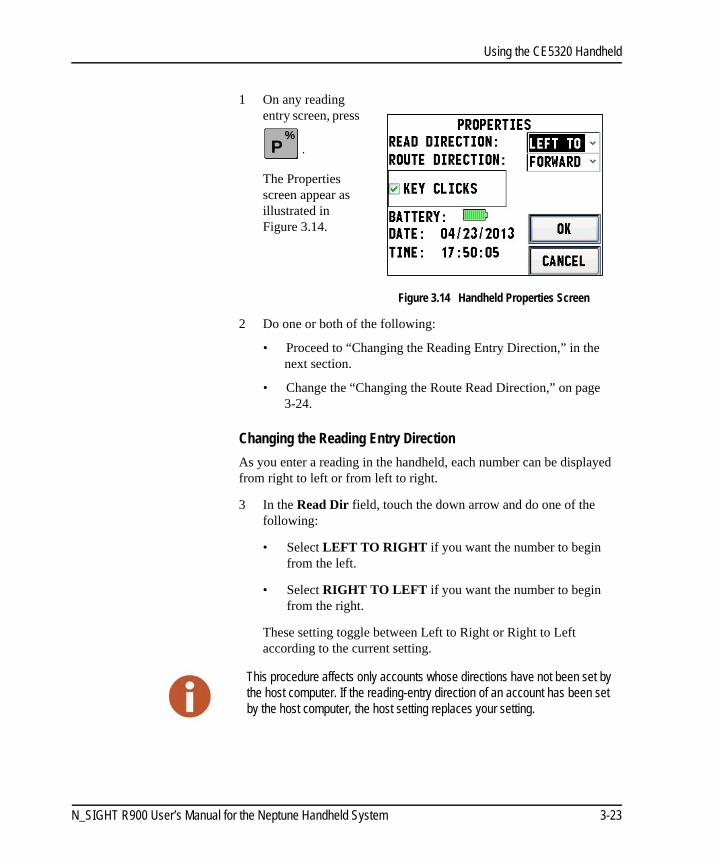
Using the CE5320 Handheld
1 On any reading entry screen, press
.
The Properties screen appear as illustrated in Figure 3.14.
Figure 3.14 Handheld Properties Screen
2 Do one or both of the following:
• Proceed to “Changing the Reading Entry Direction,” in the next section.
• Change the “Changing the Route Read Direction,” on page 3-24.
Changing the Reading Entry Direction
As you enter a reading in the handheld, each number can be displayed from right to left or from left to right.
3 In the Read Dir field, touch the down arrow and do one of the following:
• Select LEFT TO RIGHT if you want the number to begin from the left.
• Select RIGHT TO LEFT if you want the number to begin from the right.
These setting toggle between Left to Right or Right to Left according to the current setting.
P%
This procedure affects only accounts whose directions have not been set by the host computer. If the reading-entry direction of an account has been set by the host computer, the host setting replaces your setting.
N_SIGHT R900 User’s Manual for the Neptune Handheld System 3-23

Using the CE5320 Handheld
Changing the Route Read Direction
The handheld typically displays meters of a route from the first meter to the last meter. However, you can change the order that meters are displayed so that they are shown from the last meter to the first meter.
4 In the Route Dir field, touch the down arrow and do one of the following:
• Select FORWARD if you want the readings to advance to the next unread account in the route.
• Select BACKWARD if you want to change the directions of the readings to go backward to the previous unread account in the route.
These settings toggles between Forward or Backward according to the current setting.
Turning Key Clicks On and Off
The Key Clicks feature allows you to control how the handheld responds when you press a key. When this feature is ON, the handheld beeps whenever you press a key. Turning the Key Clicks feature on can help you reduce errors by making sure that you press each key fully. If you do not press a key fully, the handheld does not acknowledge your entry. You can turn the Key Clicks feature on or off at any time.
5 Do one of the following:
• Select the checkbox to enable Key Clicks.
• Leave the checkbox empty to disable the Key Clicks.
These settings toggles between on (checked) or off (unchecked) according to the current setting.
6 Touch OK to save your settings.
You return to the reading-entry screen or your previous screen.
Configuring RF/Serial PropertiesDepending on the type of accounts on your route, you may have to configure the RF antenna, the type of probe, or serial properties you are using. Follow this procedure to configure or change the RF antenna, the type of probe, or serial properties.
3-24 N_SIGHT R900 User’s Manual for the Neptune Handheld System

Using the CE5320 Handheld
1 Press .
The F1 Menu appears as illustrated in Figure 3.15.
Figure 3.15 N_SIGHT R900 F1 Menu
2 Touch .
The System Menu appears as illustrated in Figure 3.16.
Figure 3.16 N_SIGHT R900 System Menu
3 Touch .
F1
N_SIGHT R900 User’s Manual for the Neptune Handheld System 3-25

Using the CE5320 Handheld
The RF/Serial Properties screen appears as illustrated in Figure 3.17.
Figure 3.17 RF/Serial Properties Screen
Logging In and Out of the N_SIGHT R900This section explains how to log into N_SIGHT R900 on the handheld to access the screens needed to complete meter reading tasks.
Logging Into N_SIGHT R900 on the CE5320 After you have loaded a route, or after you have exchanged meter readings and route data with the host computer, you need to log into N_SIGHT R900 on the handheld. Signing on gives you access to the screens you need to collect and exchange route and meter data.
Complete the following steps to log into N_SIGHT R900 on the CE5320.
1 If you have not already done so, press turn on the CE5320.F1
If you see the message Not Uploaded, this means the handheld has been loaded but not yet been unloaded. This is normal if a new route was just loaded to the handheld.
Touch or Synchronize to start Communications. For more information, refer to “Communicating with the Host Computer,” on page 7-1.
S’
3-26 N_SIGHT R900 User’s Manual for the Neptune Handheld System

Using the CE5320 Handheld
You can see a message like the one illustrated in Figure 3.18.
Figure 3.18 N_SIGHT R900 Message Area
2 Click .
A Clock Error screen appears, prompting you to log on to manually set the clock, as illustrated in Figure 3.19.
Figure 3.19 N_SIGHT R900 Clock Error Screen
Version number
Message area
There may be times when the Clock Error screen appears when you are attempting to log in. When this screen appears, continue with the following steps.
N_SIGHT R900 User’s Manual for the Neptune Handheld System 3-27

Using the CE5320 Handheld
3 Click Yes.
After you click Yes, the Set Date/Time screen appears as illustrated in Figure 3.20.
Figure 3.20 N_SIGHT R900 Set Date / Time Screen
4 If applicable, make any changes to the date and time.
The correct date and time to use is the date and time that the handheld last synchronized.
5 When the date and time are accurate, click OK.
The Handheld Login screen appears as illustrated in Figure 3.22.
Figure 3.21 N_SIGHT R900 Handheld Login Screen
The Reader ID field displays the information contained in the N_SIGHT R900 software.
6 Complete the following information as applicable:
• Password (Determined by N_SIGHT R900 setup)
• Vehicle # (Optional)
• Mileage (Optional)
If you answer NO to the clock error message, the Login screen appears again.
3-28 N_SIGHT R900 User’s Manual for the Neptune Handheld System

Using the CE5320 Handheld
7 Click .
The Select Route screen appears as illustrated in Figure 3.22.
Figure 3.22 N_SIGHT R900 Select Route Screen
8 Highlight the route you want, and click OK.
A message appears similar to the one illustrated in Figure 3.23.
Figure 3.23 N_SIGHT R900 Initializing Message
When the software has finished initializing, a Reading Entry screen indicating that the sign on process is complete and that the unit is ready for use in collecting readings. See Figure 3.24.
N_SIGHT R900 User’s Manual for the Neptune Handheld System 3-29

Using the CE5320 Handheld
For assistance in using the CE5320 to collect meter readings, refer to “Gathering Route Data,” on page 6-1.
Figure 3.24 N_SIGHT R900 Reading Entry Screen
Logging Out of N_SIGHT R900The only time that you need to log out of N_SIGHT R900 on the handheld is just before you begin exchanging information with the host computer. Logging out gives you access to the communication features of the handheld. Instructions for logging out on the handheld are included in the procedures that describe how to exchange information with the host computer. For more information, see “Exiting the Software,” on page 7-1.
If you allow the handheld to remain inactive for the factory-set delay of 45 seconds or for the delay time specified by the host computer, it turns off automatically. After this period of inactivity, the screen of the handheld goes blank and the unit turns off to conserve the battery.
3-30 N_SIGHT R900 User’s Manual for the Neptune Handheld System

4 Using the Nomad Handheld
This chapter provides basic instructions for unpacking and inspecting the Nomad. It also gives instructions for setting up the Nomad and becoming familiar with the keyboard and display. This chapter also provides help to get started with your Nomad, so that you can begin collecting information from the field and exchange information with the host computer.
In addition, this chapter gives procedures for changing the system settings, which affects how the handheld displays and accesses data. Although these settings are preset by Neptune to meet the needs of most meter reading processes, you can change some of the settings so that they better suit your needs.
Unpacking the NomadBesides using normal care, you need no special instructions to unpack the handheld or the equipment that you purchased with it.
Check that you have received all the items you need and inspect the items for shipping damage. If you detect any damage, return the damaged equipment to Neptune. Instructions for shipping the handheld to Neptune are given in “Returning your Neptune Handheld System,” on page 9-28 of this manual.
If you want to set up and configure the CE5320 handheld, see “Using the CE5320 Handheld,” on page 3-1.
N_SIGHT R900 User’s Manual for the Neptune Handheld System 4-1

Using the Nomad Handheld
Inside the box with the Nomad is an Orientation Guide that exhibits the contents:
• Hand strap
• Battery
• Trimble Nomad getting started disk
• AC adapter
• USB cable
• Stylus
• Screen protectors
• 4GB SD card (also included in the box)
The Guide shows you how to do the following:
• Install the battery
• Attach the hand strap
• Insert the SD card
4-2 N_SIGHT R900 User’s Manual for the Neptune Handheld System

Using the Nomad Handheld
Setting Up the NomadThe following section describes how to set up your Nomad so that you can begin using it.
One Nomad and a Communication CradleIf you are using a communication cradle to power and exchange information with one handheld at a time, check that you have received the following items.
Figure 4.1 Nomad and Cradle Charger
• One Nomad handheld computer.
• The charger that is included with the Nomad can be used to power the Communications Cradle. If you want a separate charger, you can order it as an accessory.
Battery LED
USB host
N_SIGHT R900 User’s Manual for the Neptune Handheld System 4-3

Using the Nomad Handheld
The Router
If you are using a router to link cradles to exchange information with more than one Nomad at a time, check that you have the following items:
• One or more Nomad handheld computers.
• One communication cradle for each Nomad.
• One AC adapter/battery charger cable for each cradle.
• One RJ45 Ethernet cable for each communication cradle.
• One RJ45 Ethernet cable to connect the router to the PC.
• One router/switch with one AC power supply cable.
Connecting to the Host Computer and Power Supply
The procedures in this chapter describe how to connect the Nomad to the host computer so that it can exchange information with the host. The procedures also describe how to connect a power supply to the communications cradle so that you can recharge the battery. Complete the following procedures to connect the equipment you have.
It is important that the router you use has the capability to work as a switch.
In order for the Communications function to work properly, a stan-dard RJ45 Ethernet cable must be used.
This configuration is for handhelds not connected to a system network. If you are connected to a system network, see the network specialist or your system administrator for assistance.
4-4 N_SIGHT R900 User’s Manual for the Neptune Handheld System

Using the Nomad Handheld
You need no special tools to connect the devices that were shipped with your handheld.
Connecting the Router, Nomad Handheld Cradle, and Power Supplies
Follow this procedure to connect the router, communication cradles, and power supplies.
1 If you have not already done so, make sure that you have all of the equipment you need. If necessary, refer to the preceding section “Unpacking the Nomad,” on page 4-1.
2 With the host computer OFF, connect the power supply to the router.
3 Leaving the far left port empty, connect one end of the RJ-45 Ether-net cable into one of the four slots in the router. See Figure 4.2.
Figure 4.2 Connecting RJ-45 Ethernet Cable to Router, Port 1
4 Connect the other end of the Ethernet cable to the host computer.
5 Push the single-hole connector of the 110V AC adapter/battery charger onto the single-prong connector on the back of the commu-nication cradle.
You need a network switch or it is important that the router you use has the capability to work as a switch.
Always leave far left port empty
RJ-45 Ethernet cable
N_SIGHT R900 User’s Manual for the Neptune Handheld System 4-5

Using the Nomad Handheld
Figure 4.3 Nomad Communications Cradle Connections
6 Connect the other end of the AC adapter/battery charger into a power source. See Figure 4.3.
7 With an additional Ethernet cable, insert one of its connectors into the back of the cradle and the other into the back of the router. See Figure 4.3.
8 Connect the network cable to the single router.
Figure 4.4 Network Cable Connection
Power input RJ45 Ethernet USB client
Ethernet connection/ data transfer
RJ-45 Ethernet cable to the host comput-
Network cable from the cradle
4-6 N_SIGHT R900 User’s Manual for the Neptune Handheld System

Using the Nomad Handheld
Configuring the Nomad Handheld
On the Host Computer
1 On the host computer, click Start.
2 Type CMD and press Enter.
A DOS window appears.
3 Type ipconfig and press Enter.
4 Write the IP address here: _____________________________
5 Type exit and press Enter to close the DOS window.
On the Nomad Handheld
1 On the N_SIGHT R900 Login screen, press M or touch .
The N_SIGHT R900 Main Menu screen appears.
Figure 4.5 N_SIGHT R900 Main Menu
Before proceeding with this section, you must complete the information for the handhelds in two tables within the N_SIGHT R900 host software: Handhelds and Reader ID. Refer to the N_SIGHT R900 Online HTML Help for the steps to complete this information in these tables.
N_SIGHT R900 User’s Manual for the Neptune Handheld System 4-7

Using the Nomad Handheld
2 Select , Admin.
The Admin Menu appears as illustrated in Figure 4.6.
Figure 4.6 N_SIGHT R900 Admin Menu
3 Select , Reset Handheld.
4 Click Yes.
5 Leave the password field blank, or if required, type BUBBA.
6 Click OK.
The Communications Configuration screen appears.
Do not press Reset Handheld if the handheld is not in the communica-tions cradle.
4-8 N_SIGHT R900 User’s Manual for the Neptune Handheld System

Using the Nomad Handheld
7 Tab to the HHU ID field, and type the ID of the handheld.
8 Type the IP address of the PC which you want the Nomad to synchronize within the Server Name field.
9 Be sure the Port is 25101.
10 Click OK.
The handheld resets, and the N_SIGHT R900 Login screen appears.
The Display and Keyboard
This section describes the display and keyboard on the Nomad.
• The types of information that are shown in the display of the handheld.
• An overview of how to use the keys to access different types of information.
Learning the Keyboard
The Nomad handheld uses 51 keys to give you access to all the stored information and to allow you to enter new data. Most keys perform more than one function.
The HHU ID for the Nomad can be found four ways: • On the outside of the box in which the Nomad is packaged. • In the battery compartment on the right side.• Navigate to Windows Icon, Settings, System Tab at bottom of the
screen, and then scroll to System Information and Info Tab at bottom of screen.
• Navigate to Windows Icon, Settings, System Tab at bottom of the screen and click About then Device ID at the bottom of the screen.
If the message DB Uninitialized flashes on the screen press Synchronize once more to complete Database Synchronization
N_SIGHT R900 User’s Manual for the Neptune Handheld System 4-9

Using the Nomad Handheld
Figure 4.7 Learning the Keyboard
Buttons and KeysIn addition to an environmental seal that protects the unit from dust, dirt, and water, the Nomad includes the following features.
• Function Button—allows you to perform special tasks quickly., such as navigate through a screen when you use the yellow arrow keys
• Direction Buttons—allow you to navigate and move up or down a list of items and to move forward or backward in a data-entry space or through the meters of a route.
• Number Buttons—allow you to access accounts while reading meters.
Function keyDirection keys
Number keys
Quick keys
Letter/character keys
Application soft keys
4-10 N_SIGHT R900 User’s Manual for the Neptune Handheld System

Using the Nomad Handheld
• Letter/Character Keys—allow you to enter a letter or character in a screen or to select an item from a list of items shown.
• Application Soft Buttons—allow you to enter, change, or view information about a meter or a route.
• Combination Keys—allow you to execute a task quickly by pressing certain keys at once or in a particular order.
Buttons
To help you perform handheld tasks, the keyboard is color coded. For
example, by using the yellow function button in conjunction with keys that are marked in yellow, you can navigate around a screen. Buttons with white numbers or symbols are single-entry keys. To enter the number, simply press the button with the corresponding number or letter.
Function Button
Because the Nomad automatically disables inappropriate buttons, the type of task that you can perform from the keyboard depends upon the type of menu that is displayed.
On the numeric keypad, the yellow function button (clicky key sounds) accesses the tasks in yellow, including the navigation arrows. Several settings can be changed under Keyboard Options.
Auto release: Press and release to access a yellow task for one use. It then goes back to the original key tasks.
Manual release: This is the default. Press to toggle it on and off. Yellow tasks remain active until the function key is pressed again.
Disabled: must be held down while pressing any other key to access the yellow task.
Play Sticky Key Sounds: To disable clicky key sounds, remove the check in the box.
N_SIGHT R900 User’s Manual for the Neptune Handheld System 4-11

Using the Nomad Handheld
Direction Buttons
In conjunction with the yellow function button, the yellow direction arrows are enabled by the number buttons closest to them. You can use these buttons on the handheld to move up or down through a list of items displayed in a menu screen, and to move forward or backward
within a data-entry space or through the meters of a route. Using and pressing the arrow/number button up or down displays additional screens for the account.
The type of task that you can perform using an arrow/number button depends upon the type of screen displayed.
• Data-Entry Screen—moves forward or backward within a data-entry space by pressing + BACKWARD or + FORWARD buttons.
• Reading-Entry Screen—displays the reading-entry screen of the next or previous meter by pressing the + FORWARD or + BACKWARD buttons.
Number Buttons
The number buttons on the handheld are used most often for entering readings. Because entering readings is the primary function of users, the number buttons are smaller than the other buttons and are placed in the center of the keypad. Number buttons enable you to complete one of two tasks:
• Enter a number in the display, such as for a reading.
• Select an item by pressing the number key that corresponds to a numbered item in a list of items.
Moving over existing letters or numbers will not erase them.
4-12 N_SIGHT R900 User’s Manual for the Neptune Handheld System

Using the Nomad Handheld
The type of task that you can perform using a number key depends upon the type of screen that is displayed.
• Menu Screen—select a numbered item from the list by pressing the key whose number corresponds to the item that you want to select. (When used this way, the number key is called a hotkey.)
• Data-Entry Screen—enter a number in the data-entry screen by pressing the key with the number that you want to appear in the field.
Nomad Screen Keyboard
When you tap the keyboard icon located at the bottom of the screen, an on-screen keyboard appears with 60 keys to use. There are three views of this keyboard.
Changing the Size of the Keys
There are two ways you can change the size of the keys that display on the screen keyboard.
Using the Windows Icon.
1 Click the at the top left of the screen.
2 Click Settings, and then click Input.
3 Select Large Keys. (The default is Small Keys.)
4 Click OK.
Using the Keyboard Icon.
1 Click at the bottom center of the screen.
2 Click to the right of the Icon.
3 Click Options.
4 Select Large or Small Keys. See Figure 4.8 and Figure 4.9 on Page 4-14.
5 Click OK.
N_SIGHT R900 User’s Manual for the Neptune Handheld System 4-13

Using the Nomad Handheld
Large Keys
The following figure illustrates the large keyboard.
Figure 4.8 Nomad Large Keyboard
Small Keys
The following figure illustrates the small keyboard.
Figure 4.9 Nomad Small Keyboard
Lowercase Keys
The following figure illustrates the lowercase QWERTY keyboard.
Figure 4.10 Nomad Lowercase Keyboard
Uppercase Keys
The following figure illustrates the uppercase QWERTY keyboard.
4-14 N_SIGHT R900 User’s Manual for the Neptune Handheld System

Using the Nomad Handheld
To use the uppercase keys, tap or .
Figure 4.11 Nomad Uppercase Keyboard
Numeric and Symbols Keys
The following figure illustrates the keyboard with numeric and symbols keys.
To use the numeric and symbols keys, tap .
Figure 4.12 Nomad Numeric and Symbols Keyboard
Information Keys
The information keys on the handheld screen are the letter/character keys that allow you to perform specific tasks while in N_SIGHT R900. You can enter, change, or view the following information about a meter or a route by pressing the appropriate key whenever you are logged into a route and a reading-entry screen is shown in the display.
Information keys only work when logged into the handheld (Production Mode).
N_SIGHT R900 User’s Manual for the Neptune Handheld System 4-15

Using the Nomad Handheld
Toggles between the Automatic Meter Reading (AMR) mode: R900 Keyed Advantage
R300.
Accesses the Codes menu, allowing you to enter trouble codes or customer notes depending upon the type of import file you are using.
Allows you to turn the Edit mode ON. In edit mode, you can type information on screens that allow text entry.
Allows you to access the Search screen where you can select criteria to look for information you need:
• Coded note• Route• Meter number• Name• Meter type• Account status• Sequence number• Skip code• Instruction code• Account number• Constant• Tag
Allows you to access the GoTo screen. On this screen, you can access the following information for a meter or a route:
• Position of the meter within the route• Sequence number of the meter• Previous route• Next route• Beginning of the route• End of the route• First incomplete read• Last incomplete read
4-16 N_SIGHT R900 User’s Manual for the Neptune Handheld System

Using the Nomad Handheld
Allows you to view summary information about the route. When pressed with the CTL key, this key allows you to view screen information for the handheld, such as the version number, Internet Protocol (IP) Address, Random Access Memory (RAM), and storage.
Allows you to enter a reading manually.
Allows you enter List mode where the account addresses are presented in list form, a convenient way to browse through the accounts.
Allows you to access the Meter Menu where you can skip a reading, change meter information, and enter information for a found meter.
Allows you to view the Properties information for the handheld:
• Read direction• Route dir• Battery key clicks • Date • Time
Allows you to skip the reading for this account.
Allows you to tag the account so that you can come back to it later.
Allows you to log out of N_SIGHT R900 after completing the required information.
Allows you to search for the accounts already tagged.
Allows you to perform an RF test.
N_SIGHT R900 User’s Manual for the Neptune Handheld System 4-17

Using the Nomad Handheld
You can use these keys when a reading-entry screen is displayed. For example, if the you need to find more information about this meter, do the following:
Press UP or DOWN keys while reading the account.
This takes you to additional information. Once you display the information you need, pressing these keys again returns you to meter’s reading-entry screen.
Direction Keys
The direction keys on the handheld are used to move up or down through a list of items displayed in a menu screen and to move forward or backward within a data-entry space or through the meters of a route. Pressing the direction key up or down displays additional screens for the account, such as an account-specific hazard.
The type of task that you can perform using a number key depends upon the type of screen displayed.
• Menu Screen—highlights a numbered item in the list of items displayed by pressing the UP or DOWN keys to move through the list of items. You can also use the BACKWARD or FORWARD keys to jump to the first or last item in the menu. As you reach an item, it becomes highlighted.
• Data-Entry Screen—moves forward or backward within a data-entry space by pressing the FORWARD or BACKWARD keys to move forward or backward within the space.
4-18 N_SIGHT R900 User’s Manual for the Neptune Handheld System

Using the Nomad Handheld
Combination Keys
By pressing specific keys at once, or in a particular order, you can execute a task quickly. Certain quick key tasks can be performed no matter what type of screen is shown. The following table summarizes tasks that you can perform using quick keys.
Use the color coding to remember which keys to use with quick keys that have two functions: to activate the function printed in yellow, press the YELLOW
function button first and then press the key with a function printed in yellow.
Press once. To turn on the Nomad.
Press and hold for five seconds, then release. Choose Shut Down.
To turn off the Nomad.
Press To enter a reading or select an item from a menu screen.
Press To enter a decimal point. (This is typically required only by “floating point” meters.)
Press To return to the preceding screen.
Press To enter a space when entering a special message or other data.
Press To erase a letter, number, or character that you have entered. As you backspace over each letter, number, or character, each is erased.
Press + To show meter information on the screen.
N_SIGHT R900 User’s Manual for the Neptune Handheld System 4-19

Using the Nomad Handheld
Table 4.1 Nomad Functionality
Press , PROGRAMS,
SYSTEM TAB,
To minimize the amount of time the backlight stays on and dim it to only as bright as required to view the display.
Press , ,
then
To perform a soft reboot of the Nomad handheld.
Backlighting can drain the battery rapidly. To conserve the battery, use this feature only in low light.
If you do not press a key within 45 seconds of activating this feature, the Nomad automatically deactivates the backlight to conserve battery power.
Function Explanation
Power ONPress once.
Power OFFPress and hold for five seconds, then release. Choose Shut down.
Turn screen OFFPress once.
Turn backlight ON/OFF Press and hold for two seconds
RebootHold down for five seconds, then release. Choose Reset.
4-20 N_SIGHT R900 User’s Manual for the Neptune Handheld System

Using the Nomad Handheld
Today Press to escape from any screen.
Tab Press to advance to the next field on the screen.
Next and previous account
Press + FORWARD or
BACKWARD
Next unread Press .
Previous unread Press , , then .
Resequence Press + .
Reset order/ delete read Press , , then .
Previous menu/ back
Press .
Field Programmer Do one of the following:
• Logged into route:
Tap , , , then .• Not logged in route:
Tap , , then .
Function Explanation
N_SIGHT R900 User’s Manual for the Neptune Handheld System 4-21

Using the Nomad Handheld
Adjusting System SettingsSystem settings affect how the handheld displays and accesses data. Although these settings are factory-set to meet the needs of most meter reading processes, you can change some of the settings so that they better suit your needs. These settings are typically set once and never changed; however, you can adjust these settings any time.
Data Logger Do one of the following:
• Logged into route:
Tap , , , then .• Not logged in route:
Tap , , then .
Bluetooth Pairing (with the R900 Belt Clip Receiver)
Do the following:
1 Power on the R900 BCR by pressing for two seconds on the R900 Belt Clip Receiver.
2 Tap , , on the Nomad.
3 Click .
4 Select the Belt Clip in the drop-down selec-tion list.
5 Click .
Function Explanation
4-22 N_SIGHT R900 User’s Manual for the Neptune Handheld System
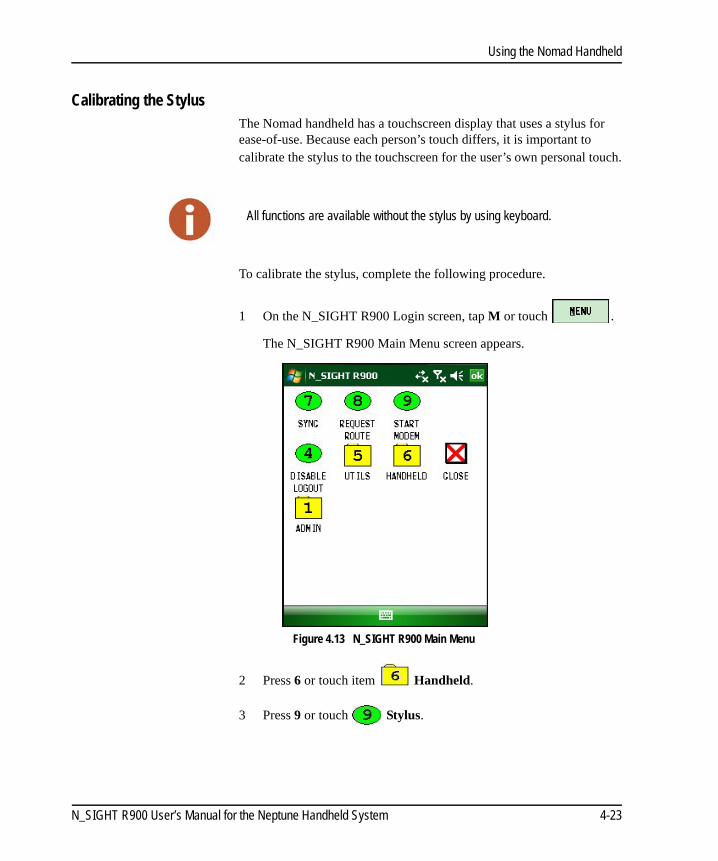
Using the Nomad Handheld
Calibrating the StylusThe Nomad handheld has a touchscreen display that uses a stylus for ease-of-use. Because each person’s touch differs, it is important to calibrate the stylus to the touchscreen for the user’s own personal touch.
To calibrate the stylus, complete the following procedure.
1 On the N_SIGHT R900 Login screen, tap M or touch .
The N_SIGHT R900 Main Menu screen appears.
Figure 4.13 N_SIGHT R900 Main Menu
2 Press 6 or touch item Handheld.
3 Press 9 or touch Stylus.
All functions are available without the stylus by using keyboard.
N_SIGHT R900 User’s Manual for the Neptune Handheld System 4-23

Using the Nomad Handheld
The Stylus Calibration screen appears like Figure 4.14.
Figure 4.14 N_SIGHT R900 Stylus Calibration Screen
Calibration is simply done by touching the center of the target with the stylus for a couple of seconds and releasing. When the target moves to another place, repeat the operation.
4 Press the stylus on the center of the target until it moves, and then release.
Once released the target moves to the next corner of the screen.
Remember just to touch the screen; there is no need to press hard or to punch it.
4-24 N_SIGHT R900 User’s Manual for the Neptune Handheld System

Using the Nomad Handheld
The target moves to another location on the screen similar to that illustrated in Figure 4.15.
Figure 4.15 Stylus at Another Location on Screen
5 Repeat pressing the stylus on the center of the target until it moves, and then release.
6 When finished, press .
The handheld returns to N_SIGHT R900 Main Login screen.
N_SIGHT R900 User’s Manual for the Neptune Handheld System 4-25

Using the Nomad Handheld
Changing the Handheld PropertiesThe section allows you to adjust or change the following properties for the handheld:
• Key clicks
• Reading entry direction
• Route direction
Working with the Properties Screen
To access the Properties screen, complete these steps:
1 On any reading entry screen, press
on the expandable key-pad.
The Properties screen appear as illustrated in Figure 4.16.
Figure 4.16 Handheld Properties Screen
4-26 N_SIGHT R900 User’s Manual for the Neptune Handheld System

Using the Nomad Handheld
Changing the Reading Entry Direction
As you enter a reading in the handheld, each number can be displayed from right to left or from left to right.
2 In the Read Dir field, touch the down arrow and do one of the following:
• Select LEFT TO RIGHT if you want the number to begin from the left.
• Select RIGHT TO LEFT if you want the number to begin from the right.
These setting toggle between Left to Right or Right to Left according to the current setting.
Changing the Route Read Direction
The handheld typically displays meters of a route from the first meter to the last meter. However, you can change the order that meters are displayed so that they are shown from the last meter to the first meter.
3 In the Route Dir field, touch the down arrow and do one of the fol-lowing:
• Select FORWARD if you want the readings to advance to the next unread account in the route.
• Select BACKWARD if you want to change the directions of the readings to go backward to the previous unread account in the route.
These settings toggles between Forward or Backward according to the current setting.
Turning Key Clicks On and Off
The Key Clicks feature allows you to control how the handheld responds when you press a key. When this feature is ON, the handheld beeps whenever you press a key. Turning the Key Clicks feature on can
This procedure affects only accounts whose directions have not been set by the host computer. If the reading-entry direction of an account has been set by the host computer, the host setting replaces your setting.
N_SIGHT R900 User’s Manual for the Neptune Handheld System 4-27
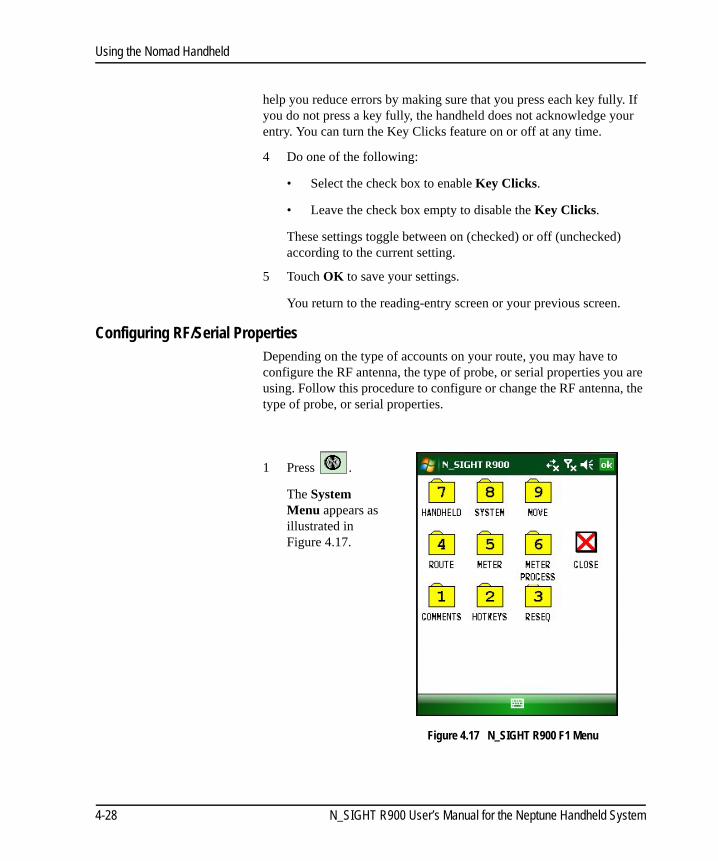
Using the Nomad Handheld
help you reduce errors by making sure that you press each key fully. If you do not press a key fully, the handheld does not acknowledge your entry. You can turn the Key Clicks feature on or off at any time.
4 Do one of the following:
• Select the check box to enable Key Clicks.
• Leave the check box empty to disable the Key Clicks.
These settings toggle between on (checked) or off (unchecked) according to the current setting.
5 Touch OK to save your settings.
You return to the reading-entry screen or your previous screen.
Configuring RF/Serial PropertiesDepending on the type of accounts on your route, you may have to configure the RF antenna, the type of probe, or serial properties you are using. Follow this procedure to configure or change the RF antenna, the type of probe, or serial properties.
1 Press .
The System Menu appears as illustrated in Figure 4.17.
Figure 4.17 N_SIGHT R900 F1 Menu
4-28 N_SIGHT R900 User’s Manual for the Neptune Handheld System

Using the Nomad Handheld
2 Touch .
The System Menu appears as illustrated in Figure 4.18.
Figure 4.18 N_SIGHT R900 System Menu
3 Touch .
The RF/Serial Properties screen appears as illustrated in Figure 4.19.
Figure 4.19 RF/Serial Properties Screen
N_SIGHT R900 User’s Manual for the Neptune Handheld System 4-29

Using the Nomad Handheld
Turning On and Off the NomadThis section explains how to turn the handheld on and off, and then how to sign on to access the screens needed to complete meter reading tasks.
Whenever the handheld is in a communication cradle, it is on. This is because, when connected properly, the cradle supplies power. However, once the handheld is taken out of the cradle, the unit runs on its battery. When powered by the battery, you can manually turn on the handheld and you can turn it off automatically or manually.
Use the following procedures to turn the handheld on or to turn it off manually.
Turning the Nomad On
Turn on the Nomad Handheld by pressing and releasing the button. The Nomad shows a menu, data-entry, or message screen depending upon the last activity performed with the unit.
One of the most convenient features is suspend/resume. There is no waiting for the unit to boot up every time it is turned on. (This does not occur the first time the unit is powered ON.)
Turning the Nomad Off
Manually turn off the handheld by pressing and holding down the
button for five seconds, then release. Choose Shut Down. The display goes blank indicating that the handheld is off.
A message indicating low battery can appear on the battery LED located on right side of the unit. For a new Nomad, be sure to connect the plug to the power cord and attach to the power supply. The unit will be charged in about 4.5 hours. Neptune recommends that you fully charge the unit prior to your first use.
4-30 N_SIGHT R900 User’s Manual for the Neptune Handheld System

Using the Nomad Handheld
If you allow the handheld to remain inactive for the factory-set delay of 45 seconds or for the delay time specified by the host computer, it turns off automatically. After this period of inactivity, the screen of the handheld goes blank and the unit turns off to conserve the battery. Just tap the screen to use the Nomad again.
Logging In and Out of the N_SIGHT R900 This section explains how to log into N_SIGHT R900 on the handheld to access the screens needed to complete meter reading tasks.
Logging Into N_SIGHT R900 on the NomadAfter you have loaded a route, or after you have exchanged meter readings and route data with the host computer, you need to log into N_SIGHT R900 on the handheld. Signing on gives you access to the screens you need to collect and exchange route and meter data.
Complete the following steps to log into N_SIGHT R900 on the Nomad.
1 If you have not already done so, press to turn on the Nomad.
If you see the message Not Uploaded, this means the handheld has been loaded but has not yet been uploaded. This is normal if a new route was just loaded to the handheld.
Touch or Synchronize to start Communications. For more information, refer to “Communicating with the Host Computer,” on page 7-1.
N_SIGHT R900 User’s Manual for the Neptune Handheld System 4-31

Using the Nomad Handheld
You can see a message like the one illustrated in Figure 4.20.
Figure 4.20 N_SIGHT R900 Message Area
2 Click .
Version number
Message area
There may be times that the Clock Error screen appears when you are attempting to log in. When this screen appears, continue with the following steps.
4-32 N_SIGHT R900 User’s Manual for the Neptune Handheld System

Using the Nomad Handheld
A Clock Error screen appears, prompting you to log on and manually set the clock, as illustrated in Figure 4.21.
Figure 4.21 N_SIGHT R900 Clock Error Screen
3 Click Yes.
After you click Yes, the Set Date/Time screen appears as illustrated in Figure 4.22.
Figure 4.22 N_SIGHT R900 Set Date / Time Screen
If you answer NO to the clock error message, the Login screen appears again.
N_SIGHT R900 User’s Manual for the Neptune Handheld System 4-33

Using the Nomad Handheld
4 If applicable, make any changes to the date and time.
The correct date and time to use is the date and time that the handheld last synchronized.
5 When the date and time are accurate, click OK.
The Handheld Login screen appears as illustrated in Figure 4.24.
Figure 4.23 N_SIGHT R900 Handheld Login Screen
The Reader ID field displays the information contained in the N_SIGHT R900 system.
6 Complete the following information as applicable:
• Password (Determined by N_SIGHT R900 setup)
• Vehicle # (Optional)
• Mileage (Optional)
4-34 N_SIGHT R900 User’s Manual for the Neptune Handheld System

Using the Nomad Handheld
7 Click .
The Select Route screen appears as illustrated in Figure 4.24.
Figure 4.24 N_SIGHT R900 Select Route Screen
8 Highlight the route you want, and click OK.
A message appears similar to the one illustrated in Figure 4.25.
Figure 4.25 N_SIGHT R900 Initializing Message
N_SIGHT R900 User’s Manual for the Neptune Handheld System 4-35

Using the Nomad Handheld
When the software has finished initializing a Reading Entry screen indicating that the sign on process is complete and that the unit is ready for use in collecting readings. See Figure 4.26.
For assistance in using the Nomad to collect meter readings, refer to Figure 6 on Page 6-1.
Figure 4.26 N_SIGHT R900 Reading Entry Screen
Logging Out of N_SIGHT R900The only time that you need to log out of N_SIGHT R900 on the handheld is just before you begin exchanging information with the host computer. Logging out gives you access to the communication features of the handheld. Because logging out of N_SIGHT R900, instructions for logging out on the handheld are included in the procedures that describe how to exchange information with the host computer. For more information, see “Exiting the Software,” on page 7-1.
If you allow the handheld to remain inactive for the factory-set delay of 45 seconds or for the delay time specified by the host computer, it turns off automatically. After this period of inactivity, the screen of the handheld goes blank and the unit turns off to conserve the battery.
4-36 N_SIGHT R900 User’s Manual for the Neptune Handheld System

5 Setting Up the R900 Belt Clip Receiver
R900 Belt Clip Receiver
This section introduces you to the R900® Belt Clip Receiver (R900 BCR). It will explain how the R900 BCR is incorporated into the N_SIGHT R900 host software, and how it will be used by both meter readers and operators. It will also help you become familiar with the basic features and functions the handheld computer offers.
This chapter provides basic instructions for unpacking and inspecting the R900 BCR. It also gives instructions for setting up the R900 BCR, becoming familiar with the display, pairing it with the handheld, and usage.
R900 Belt Clip Receiver Overview The R900 BCR is a software-defined receiver capable of simultaneously receiving R900, Advantage, and Pocket Pro Reader RF transmissions. The R900 BCR collects readings and then transfers these readings to the handheld through the Bluetooth connection. The R900 BCR also has the capability to receive and store R900 readings that can be imported into the billing system without the use of a handheld. Because the R900 BCR is software-defined, you can apply firmware updates in order to keep your R900 BCR current with new products introduced to the market.
N_SIGHT R900 User’s Manual for the Neptune Handheld System 5-1

Setting Up the R900 Belt Clip Receiver
Nomad Handheld and R900 Belt Clip ReceiverThe Trimble® Nomad® (Nomad) handheld utilizes Bluetooth connectivity to Neptune’s R900 BCR to receive the meter readings.
Figure 5.1 Meter Reading Cycle
Unpacking and Inspecting EquipmentBesides using normal care, you need no special instructions to unpack the handheld or the equipment that you purchased with it.
Check that you have received all the items you need for the type of system configuration that you are using and inspect the items for shipping damage. If you detect any damage, return the damaged equipment to Neptune. Instructions for shipping the handheld to Neptune are given in “Returning your R900 Belt Clip Receiver,” on page 2-7 of this manual.
CIS/billingsoftware
Host management
software
Field data collection
hardware
RF AMR endpoint
Save the packing box that was used to ship the handheld. Should you ever need to ship the handheld, you need to repack the unit in its original shipping box. The handling involved in land and air transport often subjects the handheld to impact beyond that which occurs during normal use. The packing box is designed to absorb shocks and protect the handheld device during shipping.
5-2 N_SIGHT R900 User’s Manual for the Neptune Handheld System

Setting Up the R900 Belt Clip Receiver
R900 Belt Clip Receiver ComponentsFigure 5.2 shows the basic components of the R900 BCR.
Figure 5.2 R900 Belt Clip Receiver Components
LEDs
SD/USB
Battery door
Power buttons
SD card/battery door
Side view
Side view
Top view
Front view
N_SIGHT R900 User’s Manual for the Neptune Handheld System 5-3

Setting Up the R900 Belt Clip Receiver
Using the R900 Belt Clip Receiver The following section explains how to use the R900 BCR.
Understanding the R900 Belt Clip Receiver ModesThe following tables describe the R900 BCR modes of operation. You change modes on the R900 BCR with a combination of the Mode and Enter buttons. To cycle through available modes, you press the Mode button. The Mode indicator will flash with the color for the mode to enter. To enter the Mode, you press the Enter button within two seconds of pressing the Mode button. If entered, the Mode indicator displays the newly-entered mode. If you do not press Enter within two seconds, the R900 BCR stays in the previous mode. This combination of Mode and the Enter button is done to prevent accidental mode changes during operation.
Table 5.1 R900 Belt Clip Receiver Power
Function Explanation
Power ON
Press for two seconds. The backlight turns orange when the power is applied.
The unit takes approximately one minute to fully boot. The Mode and RF lights are white during most of boot-up. The unit is fully booted when the Mode and Enter light turn off and the Mode LED displays the previous mode of operation
Power OFF
Press for two seconds.The mode and RF lights blink until off.
Setting Date/Time The R900 BCR synchronizes the time with the Nomad when the two are paired. The time on the R900 BCR defaults to the time from the last Nomad synchronization.
5-4 N_SIGHT R900 User’s Manual for the Neptune Handheld System

Setting Up the R900 Belt Clip Receiver
Table 5.2 R900 Belt Clip Receiver Modes
Function LED Color Explanation
Reading Modes
Normal (Green) Normal Mode is used to connect through Bluetooth to a host device. Selection between Route (filtered) and RF Test (unfiltered) is made in the host device software.
To enter this mode from other modes.
1 Press until the Mode LED flashes green.
2 Press , and the Mode LED turns green.
Unattended (Yellow) Unfiltered Operations Mode can operate using the battery or when connected to vehicle power.
To enter this mode with battery power:
1 Press until Mode LED is yellow.
2 Press .
continued on next page
MODE
ENT
MODE
ENT
N_SIGHT R900 User’s Manual for the Neptune Handheld System 5-5

Setting Up the R900 Belt Clip Receiver
To enter from when connected to vehicle power:
1 Press until the Mode LED is yellow.
2 Press and release.
3 Press again and hold for five seconds, then release. The Mode LED is Magenta.
4 Connect the USB.
The USB charger must be capable of suppling 1A of current.
USB mass storage
(White) The SD card appears as an external drive to the PC.
To enter this mode:
1 Connect the USB to the R900 BCR and to the PC.
The USB must be connected before the unit can enter the USB mass storage mode.
2 Press until Mode LED flashes white.
3 Press . The SD Card now shows as an external drive attached to the PC.
Table 5.2 R900 Belt Clip Receiver Modes
Function LED Color Explanation
MODE
ENT
ENT
MODE
ENT
5-6 N_SIGHT R900 User’s Manual for the Neptune Handheld System

Setting Up the R900 Belt Clip Receiver
Accessing the R900 Belt Clip Receiver Status ScreenThe R900 BCR must first be set to Normal Mode to access the R900 BCR Status screen. The following tables explains how to access the status screen on the handheld.
Table 5.3 R900 Belt Clip Receiver Software Functions
Accessing R900 Belt Clip Receiver Status Screen
While in route Neptune Key, System, UTILS, AMR Status =
, , ,
1 Select Advanced Options.
2 Select the check box.
3 Select Belt Clip Status.
From the Synchronize screen
TAB twice, UTILS, Belt Clip Status =
Click , , .
1 Select .
2 Select Utils.
3 Select Belt Clip Status.
8 2 8
5 8
5
8
N_SIGHT R900 User’s Manual for the Neptune Handheld System 5-7

Setting Up the R900 Belt Clip Receiver
Understanding the R900 Belt Clip Receiver LED Operating ModesTo help you better interpret the different colors for the flashing Mode LED, refer to the following table.
Table 5.4 R900 Belt Clip Receiver LED Operating Modes
State LED Colors
Unit powered OFF No color; LEDs off.
Power
On-Battery 100% – 31% Green
On-Battery 30% – 16% Yellow
On-Battery 15% – 6% Red
On-Battery 5% – Critical Flashes red
Battery – Charging Flashes yellow
Mode
Normal mode Green
Unattended mode Yellow
Installed mode Magenta
Mass storage mode White
continued on next page
5-8 N_SIGHT R900 User’s Manual for the Neptune Handheld System
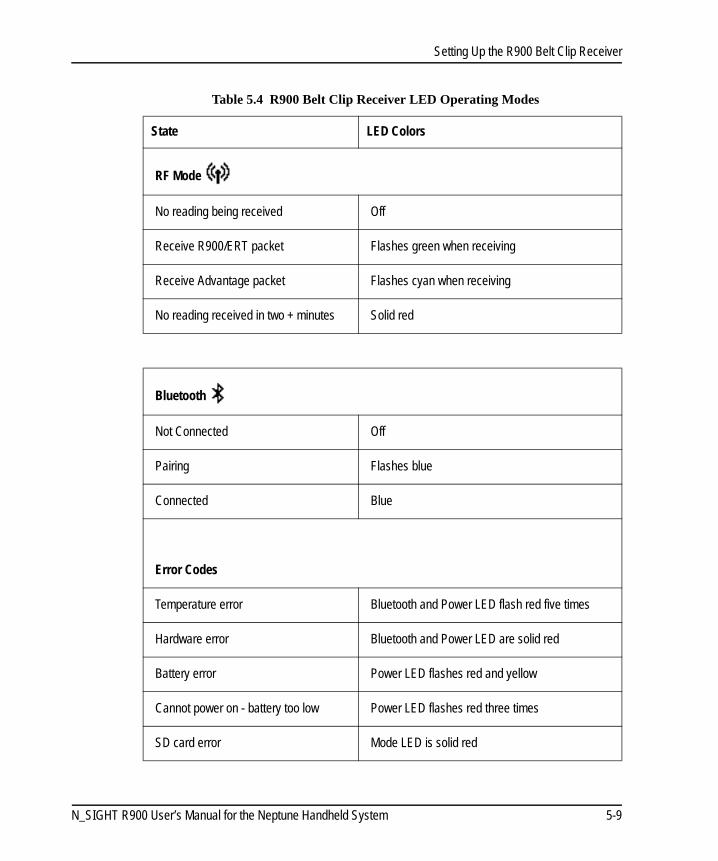
Setting Up the R900 Belt Clip Receiver
RF Mode
No reading being received Off
Receive R900/ERT packet Flashes green when receiving
Receive Advantage packet Flashes cyan when receiving
No reading received in two + minutes Solid red
Bluetooth
Not Connected Off
Pairing Flashes blue
Connected Blue
Error Codes
Temperature error Bluetooth and Power LED flash red five times
Hardware error Bluetooth and Power LED are solid red
Battery error Power LED flashes red and yellow
Cannot power on - battery too low Power LED flashes red three times
SD card error Mode LED is solid red
Table 5.4 R900 Belt Clip Receiver LED Operating Modes
State LED Colors
N_SIGHT R900 User’s Manual for the Neptune Handheld System 5-9

Setting Up the R900 Belt Clip Receiver
Understanding the External Battery Charger StatusRefer to the following table for a description of the external battery LED.
Pairing the Trimble Nomad to the R900 Belt Clip Receiver through the BluetoothComplete these steps only if you are pairing the Nomad to the R900 BCR for the first time.
Pairing the Trimble Nomad
To pair the Nomad to the R900 BCR, complete the following steps.
1 Power ON the R900 BCR and set to Normal Node, if not already set. See “Understanding the R900 Belt Clip Receiver LED Operat-ing Modes,” on page 5-8.
2 On the Nomad, click .
3 Click – UTILS.
4 Click – Belt Clip Status.
The AMR Connection screen appears. The R900 BCR is visible in the Broadcasting Device drop-down selection list.
5 Choose the device from the drop-down selection list and click Bluetooth.
Table 5.5 External Battery Charger LED
LED Indicates
Red, yellow, green or OFF
Startup initialization when applying power
OFF No battery inserted
Yellow Battery charging
Solid green Battery charged successfully
Red Error condition
8
5-10 N_SIGHT R900 User’s Manual for the Neptune Handheld System

Setting Up the R900 Belt Clip Receiver
N_SIGHT R900 User’s Manual for the Neptune Handheld System 5-11
The R900 Belt Clip Receiver Status screen now displays the device details.
• If you have previously paired a device, go to the R900 BCR Status screen and not the AMR Connection screen.
• If you want to Change Devices, you can click this option on the bottom of the R900 BCR Status screen. You then see the AMR Connection screen and can choose the device from the drop-down selection list.
Using the R900 Belt Clip Receiver to Read a RouteTo begin reading a route using the R900 BCR, you first need to load a route to the Nomad. See “Loading and Unloading Data for Handhelds” in the N_SIGHT™ R900® Online Help.
Once the route is loaded and the pairing is complete, you can log in and the unit can receive readings from the R900 BCR.
R900 Belt Clip Receiver Status Screen in N_SIGHT R900
While the Nomad and the R900 BCR are paired, you can access a screen showing the status of the R900 BCR. You can see a message like the one illustrated in Figure 5.3.
Figure 5.3 R900 Belt Clip Receiver Status Screen
Click to load a route when you are working in the N_SIGHT R900 host software.Press F1 to see the instructions for loading a route to a handheld.

Setting Up the R900 Belt Clip Receiver
The following information appears on this screen.
RF Performance Modes
This Mode can be changed from the R900 BCR Status screen. The unit has three options for the RF performance during a reading:
Connection Displays the type of connection used to pair the R900 BCR, such as Bluetooth
Device Displays the name of the R900 BCR
Temperature Displays the temperature of the R900 BCR, such as normal.
SD MEM Free Displays the amount of available memory for the SD card.
Date Displays the date and time as follows:
• Date: MM/DD/YYYY• Time: HH:MM
Firmware Displays the version of the firmware on the R900 BCR
Battery Displays the available battery percentages
RF Mode Allows you to change the reading mode for the R900 BCR by clicking the drop-down selection list.
• Efficiency –reduced RF performanceand best battery life
• Moderate – default RF performance• Performance – best RF performance
and decreased battery life
1 Efficiency Reduces RF performance* and best battery life
2 Moderate Default RF performance*
2 Performance Best RF performance* and decreased battery life
*RF performance refers specifically to the throughput of the receiverwhich can impact the speed with which readings are processed in high density areas. Range is not impacted by these modes.
5-12 N_SIGHT R900 User’s Manual for the Neptune Handheld System

Setting Up the R900 Belt Clip Receiver
Selecting the R900 Belt Clip Receiver Reading Mode
To choose the reading mode, complete the following steps.
1 On the Nomad, click .
2 Click – Utilities.
3 Click – R900 Belt Clip Receiver Status.
The R900 Belt Clip Receiver Status screen appears.
4 Tap the drop-down selection list for RF Mode and you can choose the reading mode. See the modes listed above.
Using the R900 Belt Clip Receiver RF Test ModeRF Test Mode allows the R900 BCR to go into a continuous receive mode and listens for any and all R900 transmissions.
From the Login Screen
To access RF Test Mode from the Login screen, complete the following steps.
1 On the Nomad, click
.
2 Click – Utilities.
3 Click – RF Test.
The RF Test Mode screen appears as illustrated in Figure 5.4.
Figure 5.4 R900 Belt Clip Receiver RF Mode Screen
5
8
5
7
N_SIGHT R900 User’s Manual for the Neptune Handheld System 5-13

Setting Up the R900 Belt Clip Receiver
From the Route Screen
To access RF Test Mode from the Route screen, complete the following steps.
1 In the route, click .
2 Click – System.
3 Click – Utilities.
4 Click – RF Test.
The RF Test Mode screen appears as illustrated in Figure 5.4.
Figure 5.5 R900 BCR RF Mode Screen from Route
R900 Belt Clip Receiver SD Card FunctionalityAny data that is read by the R900 BCR and sent to the handheld is stored on its internal SD card.
The SD card also handles the firmware updates explained in “Using the R900 Belt Clip Receiver,” on page 5-4.
8
2
7
5-14 N_SIGHT R900 User’s Manual for the Neptune Handheld System

Setting Up the R900 Belt Clip Receiver
Updating R900 Belt Clip Receiver Firmware
When there is an update to the R900 BCR firmware, it is available from Neptune through the web updates in the N_SIGHT R900 software, or it can be obtained from Neptune Customer Support through email or direct upload to an FTP site.
With either choice for receiving the firmware update; the firmware is updated in the N_SIGHT R900 database and then sent to the R900 BCR through the USB transfer cable or saved to the SD card and installed on the R900 BCR.
To update the R900 BCR firmware, complete the following steps.
1 Connect the R900 BCR to the PC and place in Mass Storage Mode.
2 In the N_SIGHT R900 host software, select Utilities.
3 Select the Beltclip Firmware tab.
Figure 5.6 Tab within N_SIGHT R900 Utilities
You cannot update multiple R900 BCRs at once; they must be updated individually.
To update the R900 BCR firmware update with the USB cable, the R900 BCR must first be connected to the PC and be in Mass Storage Mode. To update through the SD Card, the Firmware Update File can be transferred to the SD card by using an SD Card Reader
N_SIGHT R900 User’s Manual for the Neptune Handheld System 5-15

Setting Up the R900 Belt Clip Receiver
Figure 5.7 R900 Belt Clip Receiver Firmware Tab with Update Options
How the Firmware Update WorksThe following explains how the firmware update works.
Web Update—looks to the Neptune servers for an updated version of R900 BCR firmware and downloads it to the database
Local File—allows you to import updated firmware from a thumb drive, network drive, or FTP site into the database
Belt Clip Update—locates the updated firmware file after the updated firmware has been downloaded and sends it to the R900 BCR through the USB transfer cable
The Web Update and Local File buttons perform the same task of updating the database with the updated firmware version depending on where the updated firmware file is located.
5-16 N_SIGHT R900 User’s Manual for the Neptune Handheld System

6 Gathering Route Data
This chapter provides instructions for using the handheld to collect meter readings and route data. The procedures in this chapter assume that route assignments have already been loaded onto the handheld.
When using this chapter, keep in mind that a sample reading-entry screen is shown throughout the manual. The reading-entry screen of your handheld may not resemble the one shown here. This inconsistency is caused when the N_SIGHT R900 operator customizes the screen so that it better suits the needs of your company.
N_SIGHT R900 User’s Manual for the Neptune Handheld System 6-1
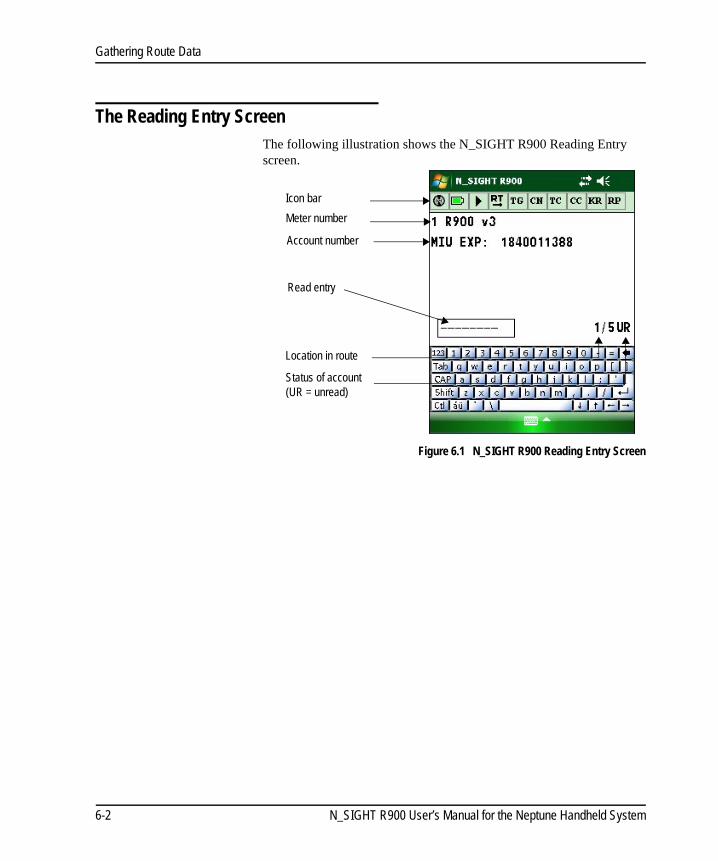
Gathering Route Data
The Reading Entry ScreenThe following illustration shows the N_SIGHT R900 Reading Entry screen.
Figure 6.1 N_SIGHT R900 Reading Entry Screen
Meter number
Icon bar
Account number
Location in route
Read entry
Status of account (UR = unread)
6-2 N_SIGHT R900 User’s Manual for the Neptune Handheld System

Gathering Route Data
Manually Collecting Meter ReadingsWhen using the CE5320 to collect meter readings, typically you need to enter only the reading for each meter. However, sometimes you may need to also enter a trouble code or comment concerning conditions at the account. Additionally, you may “skip” an account by inserting a “skip code” and indicating why you skipped the account. The procedures in this topic give you the information you need to manually collect or skip readings:
• “Entering a Reading,” which follows
• "Entering a Skip Code" on page 5
• "Entering Comment Codes" on page 7
• "Adding Free-Form Notes" on page 9
Entering a ReadingFollow this procedure to enter a meter reading in the handheld.
1 If you have not already done so, first log into N_SIGHT R900 on the handheld, so that a reading-entry screen is appears in the dis-play. See Figure 6.1 on Page 6-2.
For help with this task, refer to “Logging Into N_SIGHT R900 on the CE5320,” on page 3-26 or “Logging Into N_SIGHT R900 on the Nomad,” on page 4-31.
If this is the first time that you have accessed a route, the reading-entry screen of the first meter in the route appears in the display. If the read direction is set for , “Left to Right,” then after the reading for the first meter is taken the screen advances to the second meter in the route. By clicking this icon, you can change the read direction to , “Right to Left.” The read direction toggles between these two read directions.
N_SIGHT R900 User’s Manual for the Neptune Handheld System 6-3

Gathering Route Data
2 Using the number keys, enter the reading in the space provided.
Figure 6.2 N_SIGHT R900 Reading Entry Field
3 Touch or press .
The N_SIGHT R900 software displays the next meter in the route, according to the route direction or . Touching this icon and temporarily change the direction for the route. However, to change it for future uses, refer to the procedure for “Changing the Route Direction, Forward or Reverse,” on page 6-14.
4 Continue entering readings for each meter until you have com-pleted all routes assigned to you.
As you complete each route, a message appears in the display to let you know that you have completed the route and are moving to a new one. Follow the instructions shown in the display to access the reading-entry screen of the next route.
Reading entry field
The number of hyphens in the reading entry field indicate the number of reading digits required.
6-4 N_SIGHT R900 User’s Manual for the Neptune Handheld System

Gathering Route Data
Entering a Skip CodeIn some cases, you may be unable to collect a reading. If you are unable to collect a reading, you can enter a skip code, giving the reason that the reading could not be obtained.
Follow this procedure to enter a skip code instead of a reading.
1 From the reading-entry screen of the meter for which you want to enter a
skip code, press on the CE5320 keypad or the Nomad screen keypad.
A screen appears prompting you to enter a skip code in place of the reading. See Figure 6.3.
Figure 6.3 N_SIGHT R900 Skip Order Screen
In the V4 file format, screens can appear differently depending on the file format you are using. For example, you could have either Coded Notes or Comment Codes.
N_SIGHT R900 User’s Manual for the Neptune Handheld System 6-5

Gathering Route Data
2 Click the drop-down selec-tion list as illustrated in Figure 6.4 to choose the appropriate reason code.
Figure 6.4 N_SIGHT R900 Skip Order Reason Codes
The actual codes that are available to you are determined by the host operator.
3 In Comment, type any notes for this account.
4 Click Skip.
The account is marked as skipped, as illustrated in Figure 6.5. The N_SIGHT R900 software displays the next meter in the route.
Figure 6.5 N_SIGHT R900 Skipped Read
5 Continue entering readings within this route.
Skipped read
6-6 N_SIGHT R900 User’s Manual for the Neptune Handheld System

Gathering Route Data
Entering Comment Codes
In some cases, you may need to enter a comment code (a coded note) for trouble or another reason for a meter. For example, if the glass is broken or the seal is broken, the meter is leaking or frozen, or has a bad dial. If you notice trouble while collecting a reading, you can enter a trouble code. Follow this procedure to enter a trouble code.
1 From the reading-entry screen of the meter for which you want to enter a
trouble code, touch .
A Coded Notes screen appears prompting you to enter coded notes. See Figure 6.6.
Figure 6.6 N_SIGHT R900 Coded Notes Screen
In the V4 file format, screens can appear differently depending on the file format you are using. For example, you could have either Coded Notes or Comment Codes.
N_SIGHT R900 User’s Manual for the Neptune Handheld System 6-7

Gathering Route Data
2 Touch the DOWN arrow to view the list of codes, as illustrated in Fig-ure 6.7.
3 Select the appropriate code for the trouble found.
4 Select one or two addi-tional codes, if applicable.
Figure 6.7 Drop-down Selection List of Coded Notes
1. Touch to save the trouble codes associated with the meter.
The icon changes to , as illustrated in
Figure 6.8 to show that there is a comment code attached to this account. This works as a toggle.
Figure 6.8 N_SIGHT R900 Comment Code
Marked Comment Code
6-8 N_SIGHT R900 User’s Manual for the Neptune Handheld System

Gathering Route Data
5 To view the trouble codes entered for this account, click the red icon.
6 Click to return to the Route.
7 Continue entering read-ings within this route.
Figure 6.9 Viewing Comment Codes
Adding Free-Form Notes
In some cases, you might want to add some free-form notes to inform your office about a change to an account. When the N_SIGHT R900 operator uploads data from your handheld, your message is sent to the N_SIGHT R900 host software and may also be sent to your company’s billing computer. You can also use this feature to create reminders for yourself. For example, you might use this feature to specify the exact location of a meter. Follow this procedure to enter a special message.
Note to Pat! After you load the V2 format, this changes to Customer Notes and the appearance also change.
N_SIGHT R900 User’s Manual for the Neptune Handheld System 6-9

Gathering Route Data
1 From the reading entry screen of the meter for which you want to enter free-form notes, press
.
2 Touch .
A screen appears prompting you to enter a free-form notes. See Figure 6.10.
Figure 6.10 N_SIGHT R900 Free Form Notes Screen
3 Begin typing your note in the first blank line.
4 At the end of the line, tab to the second line to continue.
5 When you’ve completed your notes, touch .
6-10 N_SIGHT R900 User’s Manual for the Neptune Handheld System

Gathering Route Data
Leaving a Reading BlankIn some cases, you need to leave a reading blank. For example, if a meter’s reading is to be estimated by your company’s billing computer. Follow this procedure to skip over a meter without entering a reading or a skip code.
1 Access the read-ing entry screen of the meter you want to skip.
Figure 6.11 Leaving a Meter Reading Blank
2 Using the direction keys, press the FORWARD or BACKWARD
key to display the next meter in the route without entering a reading.
The next meter in the route appears in the display.
Blank read
Your ability to use this feature can be restricted by your company. In such cases, the handheld will inform you that you must enter either a reading or a skip code.
N_SIGHT R900 User’s Manual for the Neptune Handheld System 6-11

Gathering Route Data
Collecting RR ReadingsWhen you receive your Neptune handheld, it is factory-set to collect readings manually using the keyboard. When you begin readings manually, the handheld screen appears similar to the one illustrated in Figure 6.12.
Figure 6.12 N_SIGHT R900 Manual Reading Screen
Manual keyed read
Manual entry
While on a keyed account or an R900 account the handheld reads R900s within range, holds these reads in a buffer, and distributes them to the correct accounts in the route once an R900 account appears on the display.
6-12 N_SIGHT R900 User’s Manual for the Neptune Handheld System

Gathering Route Data
Collecting an RF ReadingWhen you approach an RF account while collecting meter readings on a route, the screen similar to the one illustrated in Figure 6.13 appears.
Figure 6.13 N_SIGHT R900 RF Reading Screen
If the account you are reading is an R900 account, the reading icon at the top right of the screen displays as R9. If the account is an R300 account, the reading icon displays as R3. See Figure 6.13.
At an RF account, the unit is ready to receive a reading transmitted from an RF transmitter, like an R900. If the account is set up properly and the RF transmitter is transmitting properly, you should receive a reading for the account once you are in range of the transmitter.
357 FOREST COURTRF entry
RF read; If current account is R300, R3 displays.
While on a Keyed account or an R900 account, the handheld collects R900 meter readings in the background.
N_SIGHT R900 User’s Manual for the Neptune Handheld System 6-13

Gathering Route Data
Working with AccountsWhile you are reading meters and when you are working with accounts, there are certain tasks that you need to perform to help you with your data collection.
Changing the Route Direction, Forward or ReverseThis icon is used for changing the Route Direction from a Forward direction (advancing from account 1 to account 2) to reverse direction (advancing from account 2 to account 1) as readings are being recording in the handheld.
On the Reading Entry screen, click
.
Figure 6.14 Left to Right Route Direction Icon
Right route direction icon
6-14 N_SIGHT R900 User’s Manual for the Neptune Handheld System

Gathering Route Data
The icon changes to , as illustrated in Figure 6.15. This works as a toggle between the two read directions, forward and reverse.
Figure 6.15 Right to Left Route Direction Icon
Tagging an AccountWhile you are reading meters, there may be a need to tag an account and come back to it later. Follow this procedure to tag or untag accounts within the route for which you want to complete the readings later on.
Left route direction icon
N_SIGHT R900 User’s Manual for the Neptune Handheld System 6-15

Gathering Route Data
1 On the Reading Entry screen, do one of the follow-ing:
• Click . or
• Press .
Figure 6.16 Tag Account Icon
The icon changes to , as illustrated in Figure 6.17. This works as a toggle between tagged and untagged accounts.
Figure 6.17 Tagged Account
Tag account icon
Tag icon
6-16 N_SIGHT R900 User’s Manual for the Neptune Handheld System
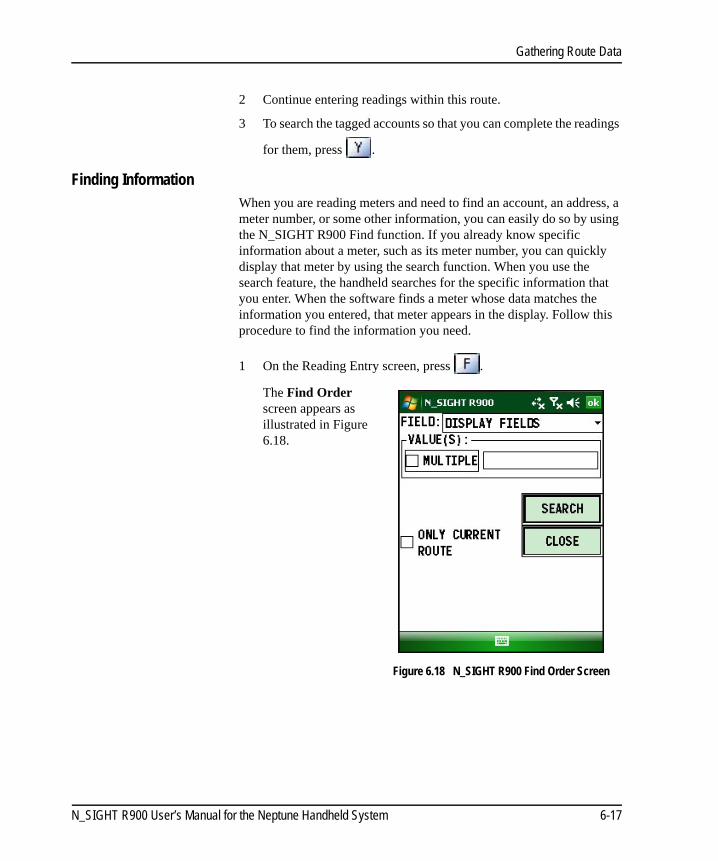
Gathering Route Data
2 Continue entering readings within this route.
3 To search the tagged accounts so that you can complete the readings
for them, press .
Finding InformationWhen you are reading meters and need to find an account, an address, a meter number, or some other information, you can easily do so by using the N_SIGHT R900 Find function. If you already know specific information about a meter, such as its meter number, you can quickly display that meter by using the search function. When you use the search feature, the handheld searches for the specific information that you enter. When the software finds a meter whose data matches the information you entered, that meter appears in the display. Follow this procedure to find the information you need.
1 On the Reading Entry screen, press .
The Find Order screen appears as illustrated in Figure 6.18.
Figure 6.18 N_SIGHT R900 Find Order Screen
N_SIGHT R900 User’s Manual for the Neptune Handheld System 6-17

Gathering Route Data
2 Touch .
The list of fields displays for you to select the type of information you want to find. See Figure 6.19.
Figure 6.19 Search Display Fields
3 Select Multiple to enter more than one value for the search. See Figure 6.20.
Figure 6.20 Search Screen Enter Multiple Values
6-18 N_SIGHT R900 User’s Manual for the Neptune Handheld System

Gathering Route Data
Figure 6.21 Search Screen Multiple Values to Match
4 Touch the field for the information you want to find.
Your selection appears in the field.
5 Type a value for the information you want to find in the Value field, if applicable.
6 If you selected more than one route when you logged into N_SIGHT R900, do one of the following:
• Touch Only Current Route if you only want to search within the current route to find the information.
• Leave the Only Current Route checkbox empty if you want to search within all the routes you selected when you logged into N_SIGHT R900.
You can find information within only the current route, or within any of the routes you selected when you logged into N_SIGHT R900. The field named Display Fields are typically where your address information is located. Use Display Fields as your address search field.
N_SIGHT R900 User’s Manual for the Neptune Handheld System 6-19

Gathering Route Data
7 Touch one of the following to begin your search.
• Search> if you want to search forward in the route
• <Search is you want to search backward in the route
If only one exact match to your entered search criteria is found, it is displayed. If multiple accounts match your entered criteria, they will appear in a list form. You should browse the list and select the desired account.
Validating ReadingsIf the audit feature has been set on the host computer, the handheld validates each reading you enter against the high/low range selected for the audit feature.
Hi/Low FailsIf the reading falls within the high/low range, the handheld accepts the reading and advances to the next meter in the route. If the reading is outside the high/low range, the handheld does not accept the reading and the Hi /Lo/No/Inact Check screen appears. Use this procedure to complete a reading that falls outside the high/low range.
1 On the reading entry screen, enter the reading that falls outside the high/low range. See Figure 6.22.
Figure 6.22 Reading Outside High/Low Range
6-20 N_SIGHT R900 User’s Manual for the Neptune Handheld System

Gathering Route Data
The handheld sounds and the Hi/Lo/No/Inact Check screen appears as illustrated in Figure 6.23.
Figure 6.23 N_SIGHT R900 Hi / Lo / No / Inact Screen
N_SIGHT R900 wants you to be sure that you entered the number correctly.
2 If you are sure this is the correct reading, then enter the numbers again on the Hi/Lo/No/Inact Check screen.
3 Touch .
The reading is accepted as the next account appears.
You must enter the same digits in the reading to pass the high/low audit during the second attempt. If a different reading is entered during the second attempt, the system will fail the audit. This failure mode will continue until you enter the same reading digits twice.
N_SIGHT R900 User’s Manual for the Neptune Handheld System 6-21

Gathering Route Data
Removing a Reading In some cases, you may need to clear or delete a reading. For example, if you make a mistake entering a reading and need to enter it again. Follow this procedure to clear an existing reading from the handheld.
1 Display the reading entry screen of the meter whose read-ing you want to clear. See Figure 6.24.
Figure 6.24 Reading to be Cleared
2 Press . Then touch , and touch .
You can only clear or reset readings for the same day. If you completed readings for a previous day, you cannot reset the readings.
6-22 N_SIGHT R900 User’s Manual for the Neptune Handheld System

Gathering Route Data
The Reset Order screen appears as illustrated in Figure 6.25.
Figure 6.25 N_SIGHT R900 Reset Order Screen
3 Press Y or touch Yes to reset the reading.
Figure 6.26 Reset Reading
The reading is then reset back to UR (unread).
N_SIGHT R900 User’s Manual for the Neptune Handheld System 6-23

Gathering Route Data
You can now enter a new reading or skip code, or leave the reading blank and display the reading entry screen of the next meter on the route.
Clearing a Skip CodeIn some cases, you may need to clear a skip code. For example, if you can now revisit the account you skipped and enter the reading. Follow this procedure to unskip a skip code from the handheld.
1 Display the reading entry screen of the meter whose reading you skipped. See Figure 6.27.
Figure 6.27 Reading to be Unskipped
2 Touch Unskip.
If you reset a created found meter account, the found meter account is cleared in its entirety.
6-24 N_SIGHT R900 User’s Manual for the Neptune Handheld System

Gathering Route Data
The Undo Skipped Order screen appears as illustrated in Figure 6.28.
Figure 6.28 N_SIGHT R900 Undo Skipped Order Screen
3 Press Y or touch Yes to unskip the reading.
The reading is then reset back to UR (unread) as illustrated in Figure 6.29.
Figure 6.29 Reading Field after Unskipped
You can now continue with a new reading, or leave the reading blank and display the reading entry screen of the next meter on the route.
N_SIGHT R900 User’s Manual for the Neptune Handheld System 6-25

Gathering Route Data
Clearing a Comment Code, Customer Note, or Trouble CodeIn some cases, you may need to clear a code that you’ve entered for a comment code, customer note, or a trouble code. Follow this procedure to clear the code you entered on the handheld.
1 Identify the account that has the code or note you want to clear.
The icon, as illustrated in Figure 6.30, shows that there is a code or note attached to this account.
Figure 6.30 Screen Showing Code Attached
Marked comment code
6-26 N_SIGHT R900 User’s Manual for the Neptune Handheld System

Gathering Route Data
2 Go to the screen where you entered the code or note. See Figure 6.31.
3 Press .
The code or note is then cleared from this account.
Figure 6.31 Screen Where Code Was Entered
Adding a New Meter to a RouteIf you find a meter on your route that has not yet been loaded on the handheld, you can add the new meter and information about it to the current route. Follow this procedure to add a new meter to an existing route.
N_SIGHT R900 User’s Manual for the Neptune Handheld System 6-27

Gathering Route Data
1 Press .
The Meter Process Menu appears as illustrated in Figure 6.32.
Figure 6.32 N_SIGHT R900 Meter Process Menu
2 Touch .
The New Meter screen appears as illustrated in Figure 6.33.
Figure 6.33 N_SIGHT R900 New Meter Screen
3 Using the letter and number keys, type the meter number for the new meter in the ID EXP field.
6-28 N_SIGHT R900 User’s Manual for the Neptune Handheld System

Gathering Route Data
4 In the MTR TYPE field, touch the DOWN arrow and select the type of meter just found.
5 Touch the DIALS field, and enter the number of dials that the new meter uses.
6 Touch the DECIMALS field, and enter the number of decimals that the meter uses.
7 Touch the ADDRESS field, and type the address for the account.
8 Touch the notes field and type any notes, if applicable.
9 Touch to add the found meter.
The found meter is now added to the route.
Correcting or Changing Meter InformationDepending upon the options selected by the host operator, you can correct or change some information that was loaded from the host computer. Follow this procedure to access the Change Meter Info screen so that you can change information about a meter.
Follow this procedure to correct meter information.
1 Make sure that the meter whose data you want to change is shown in the dis-play.
Figure 6.34 Meter Information to Change
N_SIGHT R900 User’s Manual for the Neptune Handheld System 6-29

Gathering Route Data
2 Press .
The Meter Process Menu appears as illustrated in Figure 6.35.
Figure 6.35 N_SIGHT R900 Meter Process Menu
3 Touch .
The Change Meter Info screen appears as illustrated in Figure 6.36.
Figure 6.36 N_SIGHT R900 Change Meter Info Screen
6-30 N_SIGHT R900 User’s Manual for the Neptune Handheld System

Gathering Route Data
4 Correct any of the following information.
• Using the letter and number keys, correct the meter number in the ID EXP field, if applicable.
• In the MTR TYPE field, touch the arrow, and select the type of meter just found, if applicable.
• Touch the DIALS field, and enter the number of dials that the new meter uses, if applicable.
• Touch the DECIMALS field, and enter the number of deci-mals that the meter uses, if applicable.
• Touch the notes field and type any notes, if applicable.
5 Touch to accept the changes you made to the meter.
The changes made to the meter is reflected in the current route with which you are working.
Finding and Displaying Reading-Entry ScreensThe procedures in this section explain how to move within a single route, change routes, search for specific meters, and use the bookmark feature. The following tasks are explained in this section.
• “Moving Through Reading Entry Screens,” on page 6-32
• “Moving Around Routes,” on page 6-35
You will need to print these changes in a standard report. Usually, when the information is transferred from N_SIGHT R900 to the billing system, this information is not updated by the billing system.
N_SIGHT R900 User’s Manual for the Neptune Handheld System 6-31

Gathering Route Data
Moving Through Reading Entry ScreensThe handheld moves from one reading-entry screen to the next in one of two ways:
• When reading meters, the N_SIGHT R900 software automatically advances to next meter in the route after you enter a reading or a skip code for the current meter on the route. See “Entering a Reading,” on page 6-3.
• you can move FORWARD or BACKWARD when you are on the reading entry screen to display the next meter or previous meter in the route without entering a reading. The key that you press depends upon the route direction icon that you establish. Refer to “Entering a Reading,” on page 6-3.
Reviewing Additional Information for an Account
Each reading entry screen has two additional screens you can view by
simply pressing the or arrow keys. These screens contain location and hazard codes, and the statistics for the loaded routes.
Location or Hazard Codes
To view location or hazard codes, follow this procedure.
Continually pressing the up or down arrow keys while on an account cycles between the three available screens, the Main Reading screen, the Hazard screen and the Route Statistics screen.
6-32 N_SIGHT R900 User’s Manual for the Neptune Handheld System

Gathering Route Data
1 Make sure that the meter for which you want to view additional infor-mation is shown in the display.
Figure 6.37 Additional Meter Information to View
2 Press twice.
The Location and Hazard Codes screen appears as illustrated in Figure 6.38.
Figure 6.38 Location and Hazard Codes Screen
You can view two location codes and two hazard codes for each account.
N_SIGHT R900 User’s Manual for the Neptune Handheld System 6-33
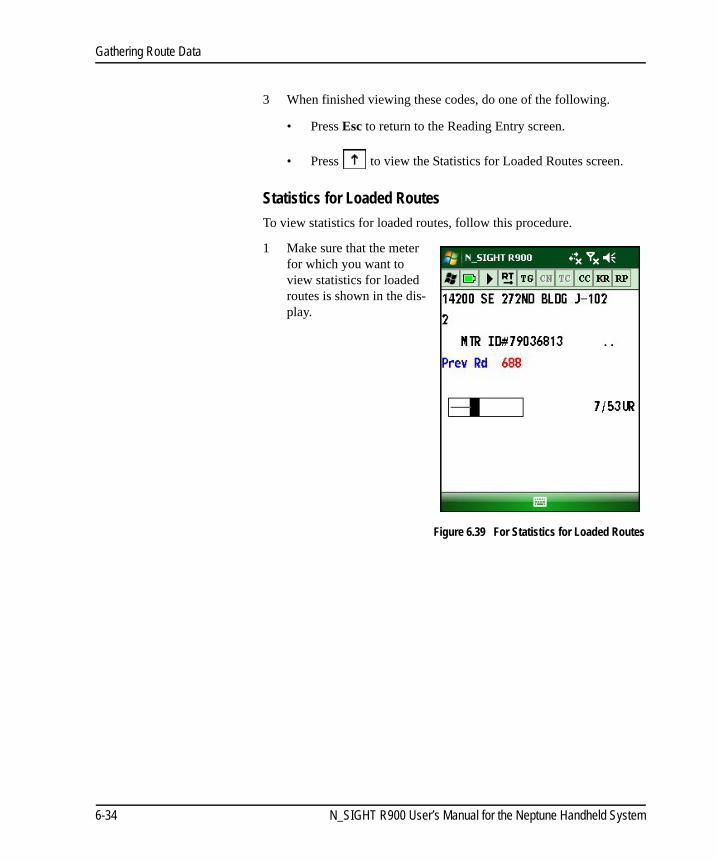
Gathering Route Data
3 When finished viewing these codes, do one of the following.
• Press Esc to return to the Reading Entry screen.
• Press to view the Statistics for Loaded Routes screen.
Statistics for Loaded Routes
To view statistics for loaded routes, follow this procedure.
1 Make sure that the meter for which you want to view statistics for loaded routes is shown in the dis-play.
Figure 6.39 For Statistics for Loaded Routes
6-34 N_SIGHT R900 User’s Manual for the Neptune Handheld System

Gathering Route Data
2 Press .
The Statistics for Loaded Routes screen appears as illustrated in Figure 6.40.
Figure 6.40 Statistics for Loaded Routes Screen
You can view the number of unread accounts, skipped accounts, and read accounts for each of the loaded routes.
3 When finished viewing these statistics, do one of the following.
• Press Esc to return to the Reading Entry screen.
• Press again to view the Location and Hazard Codes screen.
Moving Around RoutesWhile reading meters, you can move around within the current route, or another route if you selected it at the time you logged in. The GoTo feature allows you to go to the:
• Previous or next route, if selected at login
• Beginning or end of the current route
• First or last incomplete account in the route
Use the following procedure to move around within a route as well as to move from one route to another.
N_SIGHT R900 User’s Manual for the Neptune Handheld System 6-35

Gathering Route Data
1 Press .
The GoTo screen appears as illustrated in Figure 6.41.
Figure 6.41 N_SIGHT R900 GoTo Screen
2 On this screen, do one of the following to move to where you want to go.
• Press or touch Prev Route to go to the previous route.
• Press or touch Next Route to go to the next route.
• Press or touch Beg of Route to go to the beginning of the current route.
• Press or touch End of Route to go to the end of the cur-rent route.
• Press or First Incompl to go to the first incomplete within the route.
• Press or Last Incompl to go to the last incomplete within the route.
3 Depending upon your selection, N_SIGHT R900 moves to the account you chose.
6-36 N_SIGHT R900 User’s Manual for the Neptune Handheld System

Gathering Route Data
Resequencing Routes
Resequencing allows you to sort meters by the sequence numbers or by the timestamp of when readings were collected. Whenever you exit the N_SIGHT R900 software, you are given the option to resequence. However, you can resequence while you are reading meters on your route. Complete the following procedures to resequence your route.
Resequence an OrderFollow this procedure to resequence an order.
1 Display the reading entry screen that you want to resequence. See Figure 6.42.
Figure 6.42 Account to Resequence
Before selecting to resequence a route, you should confirm with your Utility Office Manager that your billing system can accept the route in a resequenced order.
N_SIGHT R900 User’s Manual for the Neptune Handheld System 6-37

Gathering Route Data
2 Press .
3 Then touch , and
touch .
The Resequence screen appears as illustrated in Figure 6.43.
Figure 6.43 Resequence Screen
4 Make your selections for the following.
• Resequence After – if you want the account to resequence after the current account
• Reseq After – if you want to specify a certain position in the route.
• Resequence To – if you want to resequence all account to a certain position in the route.
5 Press Resequence after you make your selection.
The resequencing is completed for you.
6-38 N_SIGHT R900 User’s Manual for the Neptune Handheld System

Gathering Route Data
Resequence While Collecting ReadingsFollow this procedure to turn on or off resequencing while collecting readings.
1 Press .
2 Then touch , and
touch .
The Resequencing screen appears as illustrated in Figure 6.44.
Figure 6.44 Inline Resequencing Screen
This function works as a toggle either on or off. Use this screen to turn it on or off, when applicable.
Confirming the ResequencingWhen you exit the N_SIGHT R900 software you must first confirm the resequencing for the routes you have just read. Three options are available to you.
• Timestamp resequencing
• Accept resequencing
• Reject resequencing
N_SIGHT R900 User’s Manual for the Neptune Handheld System 6-39

Gathering Route Data
Follow this procedure to confirm resequencing.
1 When you press to exit the N_SIGHT R900 software, the Confirm Resequencing screen appears as illustrated in Figure 6.45.
Figure 6.45 Confirm Resequencing Screen
2 Touch the to select one of the following options.
• Timestamp Reseq
• Accept Reseq
• Reject Reseq
6-40 N_SIGHT R900 User’s Manual for the Neptune Handheld System

7 Communicating with the Host Computer
Once the software for the Neptune handheld system is set up and the hardware is connected as described in either “Setting Up the CE5320,” on page 3-3 or “Setting Up the Nomad,” on page 4-3, use the procedures of this chapter to exchange information with the host computer. During a typical information exchange, assignments and other route data, such as code tables, are sent to the handheld, and meter readings and route information are sent to the host.
Exchanging Information There are several methods you can use to exchange information with the host computer. The method for exchanging information is called synchronize.
Synchronize—initiates a two-way communication between the handheld and the host computer in which the handheld sends information to the host computer and also receives information from the host computer.
Exiting the SoftwareWhen you have completed all the reads in your routes, you exit the software, and upload the route information to the N_SIGHT R900 host software. To exit the software, complete the following procedure.
N_SIGHT R900 User’s Manual for the Neptune Handheld System 7-1

Communicating with the Host Computer
1 Exit N_SIGHT R900 by
pressing .
The Confirm Resequencing screen appears as illustrated in Figure 7.1.
Figure 7.1 Confirm Resequencing Screen
2 Touch the in the Change Reseq Status to select one of the fol-lowing options, if applicable:
• Timestamp Reseq
• Accept Reseq
• Reject Reseq
If you have more than one route, select the next route, and repeat step 2.
7-2 N_SIGHT R900 User’s Manual for the Neptune Handheld System

Communicating with the Host Computer
3 Touch to confirm your resequencing choice.
The Handheld Logout screen appears as illustrated in Figure 7.2.
Figure 7.2 N_SIGHT R900 Handheld Logout Screen
4 Type any notes, if applicable.
5 Touch Logout.
The Hold Routes screen appears as illustrated in Figure 7.3.
Figure 7.3 Hold Routes Screen
N_SIGHT R900 User’s Manual for the Neptune Handheld System 7-3

Communicating with the Host Computer
6 Touch the in Change Hold Status to select one of the following options, if applicable.
All of these hold functions determine which accounts are left in the handheld after the route is uploaded.
7 Select the route to hold, if applicable.
8 Touch .
The N_SIGHT R900 Login screen appears as illustrated in Figure 7.4.
Figure 7.4 N_SIGHT R900 Login Screen
Sending and Receiving When ready to communicate or synchronize with the host computer, use this procedure to send and receive information. Follow this procedure for each handheld that you are using.
None Hold none of the accounts in the handheld.
Unread/Skipped Hold all unread accounts and all skipped accounts in the handheld.
Unread Hold only the unread accounts in the handheld.
7-4 N_SIGHT R900 User’s Manual for the Neptune Handheld System

Communicating with the Host Computer
1 Do one of the following.
• Place the CE5320B handheld in the cradle by sliding it bottom first into the cradle.
• Place the Nomad handheld into the Charging/Communications Cradle or connect the Nomad to the PC with the USB Cable.
2 On the N_SIGHT R900 Login screen,
press or touch Synchronize.
Figure 7.5 Synchronize Button
If your handheld system is set to AutoSync, the handheld will indicate with the audible message "Connected" when it is starting the communications process.
When the handheld is removed from the Cradle, it will indicate with the audible message "Disconnected" (regardless of sync mode).
The hour glass appears on the screen to show that the communications process in underway.
Touch Synchronize to start communications. An Xappears until Network Connection is established
N_SIGHT R900 User’s Manual for the Neptune Handheld System 7-5

Communicating with the Host Computer
Notes:
7-6 N_SIGHT R900 User’s Manual for the Neptune Handheld System

8 Using the Field Programmer
This chapter provides fundamental instructions for operating the Field Programmer including how to connect the mouse to the CE5320 and the Nomad handheld devices, programming the device, and more. This chapter contains basic features of the Field Programmer and it also gives instructions for setting it up, so that it can be used to collect information from the field.
Connecting the MouseThe Field Programmer mouse, when connected to the to the CE5320 or the Nomad handhelds, allows you to query or program a ProRead register by using one of the following methods.
• Touch-read
• Use of the alligator clip to connect red, green, and black wires.
It also allows you to program an R900G endpoint through an infrared programming LED.
N_SIGHT R900 User’s Manual for the Neptune Handheld System 8-1

Using the Field Programmer
Connecting the Mouse to the CE5320The following illustration displays some of the features of the mouse that connects to the CE5320.
Figure 8.1 Field Programmer Mouse for the CE5320
To connect the mouse to the CE5320, complete the following steps.
1 Locate the small red dot at the end of the mouse connector cable. See Figure 8.1.
2 Locate the small red mark on the port at the right of the display on the Field Programmer. See Figure 8.2 on page 8-3.
3 Push the mouse connector into the lemo port, lining up the red marks.
Touch-read inductive coupling
Small red dot on mouse connector
IR Programming LED for R900G endpoint
Programming button
Alligator clips to connect red, green, and black wires on register
8-2 N_SIGHT R900 User’s Manual for the Neptune Handheld System

Using the Field Programmer
Figure 8.2 Connecting Mouse to CE5320
Alligator clips to connect red, green, and black wires on register
N_SIGHT R900 User’s Manual for the Neptune Handheld System 8-3

Using the Field Programmer
Connecting the Mouse to the NomadThe following illustration displays some of the features of the mouse
Figure 8.3 Field Programmer Mouse for the Nomad
To connect the mouse to the Nomad Field Programmer, complete the following steps.
1 Locate the USB connector at the end of the mouse cable. See Figure 8.3.
2 Locate the USB port on the bottom of the Nomad. See Figure 8.4 on page 8-5.
3 Push the USB connector into the USB port.
Touch-read inductive coupling
IR Programming LED for R900G endpoint
Programming button
Alligator clips to connect red, green, and black wires on register
USB mouse connector
8-4 N_SIGHT R900 User’s Manual for the Neptune Handheld System

Using the Field Programmer
Figure 8.4 Connecting Mouse to Nomad
Alligator clips to connect red, green, and black wires on register
N_SIGHT R900 User’s Manual for the Neptune Handheld System 8-5

Using the Field Programmer
Verifying the Handheld Recognizes the MouseIf the handheld does not recognize the mouse, complete the following steps.
1 Exit the NHPSProSys software. See “Exiting the Software,” on page 7-1.
2 Verify that the mouse and/or receiver are connected to the handheld device.
3 Run InstallEngine_HH.exe and wait for it to finish.
4 Restart the handheld using the Software Reset located in Options in the CE window.
5 When the handheld is running, select NHPSProSys.exe.
6 Verify that the program recognizes the mouse or receiver.
Starting Field ProgrammerTo start the Field Programmer, complete the following steps.
This can take some time for the handheld to check for the mouse. Wait atleast 30 seconds for the handheld to recognize the mouse.
8-6 N_SIGHT R900 User’s Manual for the Neptune Handheld System

Using the Field Programmer
1 From the N_SIGHT R900 Login screen, touch Menu.
2 Touch .
3 Select , Field Programmer.
The Field Programmer Menu appears.
Figure 8.5 Field Programmer Menu
4 Touch the option you want to use.
• Program Pro Read
• Configure ProRead
• Program Gas
• Configure Gas
The Field Programmer Password screen appears.
Figure 8.6 Field Programmer Password Screen
N_SIGHT R900 User’s Manual for the Neptune Handheld System 8-7

Using the Field Programmer
5 Type your password.
On this screen, you can also change your password as described in “Changing Your Password,” on page 8-8 or you can cancel logging in to the system
6 Click .
Changing Your Password
Complete the following steps to change your password.
1 On the Field Programmer Password screen, touch
.
The Change Password screen appears. See Figure 8.7.
Figure 8.7 Change Password Screen
2 In Old Password, type the old password.
3 In New Password, type your new password.
If you cannot remember your password, you can touch or click to display a clue.
8-8 N_SIGHT R900 User’s Manual for the Neptune Handheld System

Using the Field Programmer
4 In Confirm, type your new password again.
5 Touch .
Your password is now changed.
Programming the ProRead
The first time you use the Field Programmer software after the installation, you need to configure both the ProRead and the gas functionality.
Congfiguring the ProRead
To program the ProRead, use the Neptune Field Programmer and complete the following steps.
What you enter in New Password and Confirm must match in order for you to change the password. If they do not, you will receive an error message.
N_SIGHT R900 User’s Manual for the Neptune Handheld System 8-9

Using the Field Programmer
1 Select Program ProRead from the Field Programmer Menu. See “Starting Field Programmer,” on page 8-6.
The ProRead Programming screen appears. See Figure 8.8.
Figure 8.8 ProRead Configuration Screen
2 Touch for Format Name.
A selection list similar to Figure 8.9 appears.
Figure 8.9 Format Name Selection List
3 Touch or click the format you want, and double click or press Enter.
8-10 N_SIGHT R900 User’s Manual for the Neptune Handheld System

Using the Field Programmer
4 For Connectivity, touch one of the following.
• Coil – if you are using the touchpad
• 2W – (2-wire) if you are using the alligator clip
5 For Dial Code, touch one of the following to adjust the number of meter read-ing digits returned from the register to a reading device:
• 49
• 59
• 65
• otr – to choose another value from a selection list. See Figure 8.10. (To return to the screen from this list, select None.)
Figure 8.10 Otr Selection List
6 In Register ID, type the ID or serial number of the register.
7 For Cus Char, enter the additional information you want to have for that meter, such as size or location.
• M N L (upper case, alphanumeric)
• 1 2 S (numeric digits.)
The water utility often requires modification so that a reading matches its standard billing units, such as 1000s of gallons.
N_SIGHT R900 User’s Manual for the Neptune Handheld System 8-11

Using the Field Programmer
8 Connect in one of the following ways.
• For coil, align the mouse coil with the receptacle, then proceed to step 9.
• For alligator clips, attach the clips to the corresponding wire color, then proceed to step 9.
9 Start Programming in one of the following ways.
• Touch or click .
(This button can only be used for programming; it cannot be used for Read or Query.)
• Press the program button on the mouse.
• Press Enter.
An audible tone signals the Program Result.
• PASS
• FAIL See Figure 8.11.
Figure 8.11 Program Result -- Pass Screen
10 If you want to view detailed information, touch or click Details.
8-12 N_SIGHT R900 User’s Manual for the Neptune Handheld System

Using the Field Programmer
Details display the data in raw format. See Figure 8.12.
Figure 8.12 ProRead Program Details Screen
11 Touch or click to return to the ProRead Configuration screen.
12 You can program a similar register that can automatically generate
a new ID number by pressing again.
13 You can program a different type of register by repeating steps 1 through 10.
14 When finished programming, choose one of the following.
• Touch or click Read to take a reading.
• Touch or click Query to query the register.
• Touch or click to return to the main screen.
N_SIGHT R900 User’s Manual for the Neptune Handheld System 8-13

Using the Field Programmer
Querying the ProReadUse the query function to determine the current programming configuration of a ProRead register. You can determine the format type, Dial Code setting, Network Numbers, ID number, and other important settings from the query results. This information is especially critical when using the Field Programmer to read registers, because the programmer must first be configured with the proper settings before it can read successfully.
To query a register, place the appropriate adapter on the register or receptacle, and complete the following steps.
1 Select Program ProRead from the Field Programmer menu.
2 Select the Query tab.
The ProRead Query screen appears. See Figure 8.13.
Figure 8.13 ProRead Query Screen
3 Touch or click to perform a query.
8-14 N_SIGHT R900 User’s Manual for the Neptune Handheld System

Using the Field Programmer
The query results appear similar to that of Figure 8.14.
Figure 8.14 ProRead Query Results
The query results should confirm that the ProRead register is programmer correctly.
4 Repeat steps 1 through 3 to query another register or choose one of the following.
• Touch or click Read to take a reading.
• Touch or click Program to program the register.
• Touch or click to return to the main screen.
Reading the ProRead RegisterThe Field Programmer is designed to be used as a programming and troubleshooting tool rather than a reading device. However, the Field Programmer is capable of collecting readings.
To read a ProRead register, complete the following steps:
N_SIGHT R900 User’s Manual for the Neptune Handheld System 8-15

Using the Field Programmer
1 Select ProRead from the Field Programmer menu.
2 Select the Read tab.
The ProRead Read screen appears. See Figure 8.15
Figure 8.15 ProRead Read Screen
3 Select Network Type.
4 Select the Connectivity.
• Align the mouse with the register. Touch or click Coil to collect a reading.
• Select 2W to use without receptacle.
• Select 3W for pro-grammed registers.
5 Touch or click to collect the reading. See Figure 8.16.
Figure 8.16 ProRead Reading Result Screen
8-16 N_SIGHT R900 User’s Manual for the Neptune Handheld System

Using the Field Programmer
6 Repeat steps 1 through 5 to read another register, or choose one of the following.
• Touch or click Program to program the register.
• Touch or click Query to query the register.
• Touch or click to return to the main screen.
Viewing Software and Firmware InformationIt is important to know which version of the Field Programmer software you are using when you contact Neptune Customer Support. To identify the version of Field Programmer software or the firmware version of the Field Programmer mouse you are using, complete the following steps.
1 Select Program Pro-Read from the Field Programmer menu.
2 Select the Info tab.
The software and firmware information appears. See Figure 8.17.
Figure 8.17 ProRead Software and Firmware Information
3 Touch or click to return to the Field Programmer Menu.
If an error message appears during a read attempt, it is most likely due to improper format information.
N_SIGHT R900 User’s Manual for the Neptune Handheld System 8-17

Using the Field Programmer
Programming the R900G EndpointYou need to configure the gas functionality in the Field Programmer software after the installation.
Configuring GasTo program the R900G endpoint, use Neptune’s N_SIGHT R900 and complete the following steps.
1 Select Configure Gas from the Field Programmer Menu. See “Starting Field Programmer,” on page 8-6.
2 When prompted, enter your password. See Figure 8.6 on page 8-7.
The Gas Preferences screen appears as illustrated in Figure 8.18.
Figure 8.18 Gas Meter Configuration Screen
3 Select one of the following for receiving a confirmation.
• OFF – to turn off some confirmation dialogs for actions.
• ON – to allow all confirmation dialogs for actions.
4 Touch to return to the Field Programmer Menu.
8-18 N_SIGHT R900 User’s Manual for the Neptune Handheld System

Using the Field Programmer
Collecting the Initial ReadingTo use the Field Programmer for R900G endpoints, complete the following steps.
1 Select Program Gas from the Field Programmer Menu.
The Program Gas screen appears as illustrated in Figure 8.19.
Figure 8.19 Gas Program Screen
2 Touch for Format Name.
A selection list similar to Figure 8.20 appears.
Figure 8.20 Format Name Selection List
N_SIGHT R900 User’s Manual for the Neptune Handheld System 8-19

Using the Field Programmer
3 Touch or click the format you want and press Enter.
4 For Initial Reading, type a value.
5 Align the IR LED to Gas Programming post, and do one of the fol-lowing to program gas:
• Press the program button on the mouse
• Press Enter.
• Touch or click .
(This button can only be used for programming; it cannot be used for Read or Query.)
The Program Result area of the screen displays that it is Confirming Data, and a progress bar at the bottom of the screen shows you the progress. See Figure 8.21.
Figure 8.21 Program Result – Sending Data
An audible tone signals the Program Result.
• PASS
• FAIL
The MIU ID displays the ID or serial number of the MIU. See Figure 8.22.
Figure 8.22 Program Result – Pass Screen
8-20 N_SIGHT R900 User’s Manual for the Neptune Handheld System

Using the Field Programmer
6 You can program another gas register by repeating steps 1 through
5, or touch to return to the main screen.
Querying the R900G EndpointUse the query function to check the current configuration of the R900G. Perform a query after you program the endpoint, or anytime you want to verify that the correct parameters are programmed in the unit.
To query an R900G endpoint, place the mouse on the R900G endpoint and complete the following steps.
1 Select Program Gas from the Field Programmer Menu.
2 Select the Query tab.
The Gas Query screen appears. See Figure 8.23.
Figure 8.23 Gas Query Screen
N_SIGHT R900 User’s Manual for the Neptune Handheld System 8-21

Using the Field Programmer
3 Touch .
The query results appear similar to that of Figure 8.24.
Figure 8.24 Gas Query Results
The query results should confirm that the R900G endpoint is programmed correctly.
4 Repeat steps 1 through 3 to query another endpoint or choose one of the following:.
• Touch or click Read to take a reading.
• Touch or click Program to program the register.
• Touch or click Command to do the following: - Place the R900G endpoint in Sleep mode. - Refresh the data for the R900G endpoint. - Wake up the R900G endpoint from sleep mode.
5 Touch or click to close the Gas Query tab return to the main screen.
8-22 N_SIGHT R900 User’s Manual for the Neptune Handheld System

Using the Field Programmer
Using Command GasThe Command Gas tab allows you to perform the following functions at any time you are using the Field Programmer for gas functionality.
• Refresh the data for the R900G endpoint.
• Place the R900G endpoint in Sleep mode.
• Wake up the R900G endpoint from sleep mode.
• Close the Program Gas screen and return to the start screen.
To use Command Gas, complete the following instructions.
1 Start the Neptune Field Programmer software; refer to “Starting Field Programmer,” on page 8-6.
2 Select Program Gas from the Field Programmer Menu.
3 Select Command.
The Command Gas screen appears as illustrated in Figure 8.25.
Figure 8.25 Command Gas Screen
In order to perform these commands, align the mouse with the unit.
N_SIGHT R900 User’s Manual for the Neptune Handheld System 8-23

Using the Field Programmer
4 Do one of the following:
• Touch or click Refresh to force the R900G to transmit the most current reading.
• Touch or click Sleep to place the R900G endpoint in sleep mode to be used for shipping.
• Touch or click Wakeup to activate the R900G endpoint from sleep mode.
• Click Close to exit the Program Gas screen and return to the start screen.
Reading the R900G Endpoint RegisterThe Field Programmer is designed to be used as a programming and troubleshooting tool rather than a reading device. However, the Field Programmer is capable of collecting readings.
To read a gas register, com-plete the following steps.
1 Select GAS from the Neptune Programmer System start screen.
2 Select the Read Gas tab.
The Gas Read screen appears. See Figure 8.26.
Figure 8.26 Gas Read Screen
Any time you are using the Field Programmer gas program you can use the functions on the Command Gas screen.
8-24 N_SIGHT R900 User’s Manual for the Neptune Handheld System

Using the Field Programmer
3 Enter the MIU ID to read a specific unit.
Leaving the MIU ID blank allows you to received all readings in a range.
Figure 8.27 Gas Reading Result Screen
4 Touch or click on the Field Programmer to collect a read-ing.
5 Press Clear to clear the reading and repeat steps 1 through 4 to read another MIU.
Viewing Software and Firmware InformationIt is important to know which version of the Field Programmer software you are using when you contact Neptune Customer Support. To identify the version of Field Programmer software or the firmware version of the Field Programmer mouse you are using, complete the following steps.
If an error message appears during a read attempt, it is most likely due to improper format information.
N_SIGHT R900 User’s Manual for the Neptune Handheld System 8-25

Using the Field Programmer
1 Select Program Gas from the Field Programmer menu.
2 Select the Info tab.
The software and firmware information appears. See Figure 8.28.
Figure 8.28 Gas Software and Firmware Information
3 Touch or click to return to the Field Programmer menu.
Networking Two RegistersThe term Networking is used to refer to the process of connecting multiple registers to a single receptacle.
Programming RegistersTo network two registers, you must first program a primary register and a secondary register.
Programming the Network Primary Register
To program the network primary register, complete the following steps.
You cannot program ProRead registers while connected together in a network. You must program each register separately prior to making the network connections.
8-26 N_SIGHT R900 User’s Manual for the Neptune Handheld System

Using the Field Programmer
1 Select the appropriate High Side programming format, such as,
STD 8ID HIGH
2 Enter the following information.
• Dial Code
• User Characters
• ID Number
3 When you have properly entered all information, press PROG to program the primary register.
Programming the Network Secondary Register
To program the network secondary register, complete the following steps.
1 Select the appropriate Low Side programming format such as:
STD 8ID LOW
2 Enter the following information.
• Dial Code
• User Characters
• ID Number
3 When you have properly entered all information, press PROG to program the secondary register.
4 Repeat for any additional secondary registers.
Network WiringAfter you properly program the registers for networking, they can then be connected to the receptacle. Be sure to use weatherproof crimp connectors for all wiring splices in order to prevent corrosion and other moisture-related problems. Also, observe proper polarity when wiring the registers, so that you interconnect all red terminals and interconnect all black terminals.
N_SIGHT R900 User’s Manual for the Neptune Handheld System 8-27
Using the Field Programmer
Wiring the Registers
Refer to the following Neptune guides for complete instructions on wiring the registers.
• E-Coder Quick Install Guide, Part Number 12563-001
• Encoder Quick Install Guide, Part Number 12572-001
Managing FormatsThe Neptune Field Programmer allows you to manage formats for programming ProRead registers and R900G endpoints.
Managing Formats for ProRead RegistersWhen you program a ProRead register, you can work with the format you need. You can do the following:
• Set your preferences for the programming process.
• Select formats from the list of available formats supplied by Neptune.
• Edit or create a new format that is added to the list of available formats.
8-28 N_SIGHT R900 User’s Manual for the Neptune Handheld System

Using the Field Programmer
Selecting ProRead Preferences
To select preferences for programming a ProRead register, complete the following steps.
1 On the Field Programmer Menu, touch or click Configure ProRead. See Figure 8.29.
Figure 8.29 Field Programmer Menu
2 When the Field Programmer Password screen appears, type your password and do one of the following.
• Touch .
• Click
• Press Enter.
On this screen, you can also change your password as described in “Changing Your Password,” on page 8-8 or you can cancel logging in to the system.
If you cannot remember your password, you can touch or click Hint to display a clue.
N_SIGHT R900 User’s Manual for the Neptune Handheld System 8-29

Using the Field Programmer
After entering your password, the Preferences screen appears as illustrated in Figure 8.30.
Figure 8.30 ProRead Preferences Screen
On this screen, select one for each of the following.
3 Do one of the following.
• Touch or click SelectFMT to select a format that is already available for the Field Programmer.
• Touch or click NewFMT to create a new format and add it to the list of available formats.
• Touch or click Close to close the ProRead configuration and return to the previous screen.
Auto Increment Allows the system to automatically increment the ID numbering by one digit.
Auto Decrement Allows the system to automatically decrement the ID numbering by one digit.
Confirmation Allows additional dialog to confirm the action to be performed.
8-30 N_SIGHT R900 User’s Manual for the Neptune Handheld System

Using the Field Programmer
Selecting a ProRead Format
Selecting formats allows you to see a list of only the formats used by your utility. This eliminates unused formats which makes it easier to select formats and reduce errors.
To select the formats for programming a ProRead register, complete the following steps.
1 Touch or click SelectFMT to view the available formats used for programming ProRead registers. See Figure 8.31.
Figure 8.31 Select Formats Screen
Most user-created formats are simple modifications to the Neptune standard formats.
N_SIGHT R900 User’s Manual for the Neptune Handheld System 8-31

Using the Field Programmer
Editing a ProRead Format
To make changes to an existing format, complete the following steps.
1 On the Field Programmer Menu, touch or click Configure Pro-Read.
2 Select NewFMT.
The New Format screen appears as illustrated in Figure 8.32.
Figure 8.32 ProRead New Format Screen
The following information appears.
• Available Formats display at the top of the screen (both stan-dard and custom).
• User Selected shows the formats already selected.
3 On this screen, do any the following:
Add Allows you to select from the Available Formats, and touch or click Add to place it in the User Selected list.
Remove Allows you to select a format from the User Selected list and touch or click Remove to remove it.
8-32 N_SIGHT R900 User’s Manual for the Neptune Handheld System

Using the Field Programmer
4 Touch .
5 Touch or click to select the format to edit from the list of avail-able in Format Name.
6 Make any necessary changes on this screen, if applicable.
• Touch to make changes to Stop Bits, Clock Divisor, or Tokens. See “Creating a New ProRead Format,” on page 8-35. (These changes are rarely needed.)
• From the Custom screen, touch twice to return to the
NewFMT screen.
7 Touch to save the changes for the new format created.
A confirmation dialog appears asking you if you want to save the changes to the present format.
8 Touch or click Yes to save the format or No to cancel.
9 If you selected a standard format and made changes to it, you must save it as a new format. Touch Save As.
A dialog appears asking you to enter a different name for the format.
10 Touch Close, and then type the name of the new format in Format Name.
Although you can remove a format from the User Selected list, it remains in the Available Formats list.
Close Allows you to close the ProRead Configuration and return to the previous screen.
NewFMT Allows you to edit or create a ProRead Format.
N_SIGHT R900 User’s Manual for the Neptune Handheld System 8-33

Using the Field Programmer
Using the New ProRead Format
To use the newly created format to program ProRead registers, complete the following steps.
1 Select the SelectFMT tab.
2 Complete the steps outlined in “Selecting a ProRead Format,” on page 8-31.
3 Refer to “Programming the ProRead,” on page 8-9 to program, query, or read the ProRead register using the newly created format.
Deleting a Format for ProRead Registers
To delete a user-defined format used for programming ProRead registers, complete the following steps.
1 Log in to the Field Programmer by completing steps 1 through 3 in “Selecting ProRead Preferences,” beginning on page 8-29.
2 Select NewFMT.
The New Format screen appears as illustrated in Figure 8.32 on page 8-32.
3 Touch since the NewFMT screen now defaults to New,
then shift the numbers to compensate.
4 Touch or click to delete the format from the list of avail-
able formats.
A confirmation dialog similar to the following appears asking if you are sure you want to delete this file format.
5 Touch or click Yes to save the format or No to cancel.
The format is no longer available for selection on the Field Programmer.
You cannot delete a standard format from the list of available formats.
8-34 N_SIGHT R900 User’s Manual for the Neptune Handheld System

Using the Field Programmer
Creating a New ProRead Format
To create a new format and have it appear in the Available Formats list, complete the following steps.
1 On the Field Programmer Menu, touch or click Configure Pro-Read.
2 Select NewFMT.
The New Format screen appears as illustrated in Figure 8.33.
Figure 8.33 Default ProRead New Format Screen
3 Touch since the NewFMT screen now defaults to it.
There are very few cases where a new format is required. Creating a new format requires detailed knowledge of the ProRead register and Neptune data collectors. You should first see if you can edit an existing format before creating a new format from scratch.
N_SIGHT R900 User’s Manual for the Neptune Handheld System 8-35

Using the Field Programmer
4 Touch to select the format to edit from the list of available in For-mat Name.
5 Touch . See Figure 8.34.
Figure 8.34 New Button Available
6 Type a name that identifies the type of format you are creating in Format Name. See “Editing a ProRead Format,” on page 8-32. Select one of the following:
• Receptacle
• MIU
7 Select one of the following:
• Single
• Network
Touch to view a format from the list of available formats. The screen then displays all the values associated with that format. You can select to copy this format by clicking or touching Edit. To save the copied format as a new format, touch or click Save As and give the format a new name.
8-36 N_SIGHT R900 User’s Manual for the Neptune Handheld System

Using the Field Programmer
8 Touch to select from the list of available values of 1 to 10 for ID Digits.
9 Type three alphanumeric character for User Char.
10 Type the number for the Network No.
11 Enter the size, if applica-ble.
12 On the NewFMT screen,
select .
The Cus_FMT1 screen appears as illustrated in Figure 8.35.
Figure 8.35 Custom Format 1 Screen
Using the Custom Format Screens
Complete the following steps to use the custom format screens.
If Network is selected, you can enter the Network No. and Size. If the network number is less than 99, the network size defaults to 0 and cannot be edited. You can only configure the network size when the network number is 99.
N_SIGHT R900 User’s Manual for the Neptune Handheld System 8-37

Using the Field Programmer
1 Select 2 or 1 for Stop Bits.
2 Select 1 or 16 for Clock Divisor.
3 Touch or the Cus_FMT2 tab.
The Cus_FMT2 screen appears as illustrated in Figure 8.36.
Figure 8.36 Custom Format 2 Screen
4 Type an alphanumeric character in Character, if applicable.
5 From the selection list of Tokens, touch the token you want to add to the custom format.
6 Touch .
The token you selected now appears in the User Selected list.
7 Repeat steps 5 and 6 to add more characters and tokens.
8 If there is a character or token in the User Selected list that you no
longer need, touch .
The item is removed from the User Selected list.
9 Touch twice to return to the NewFMT screen.
For a list of tokens and their explanations, refer to Appendix B,Chapter , "Tokens List for Custom Format Screen" on page -1.
8-38 N_SIGHT R900 User’s Manual for the Neptune Handheld System

Using the Field Programmer
Saving the Custom ProRead Format
1 Touch or click to save the changes to the new format cre-ated.
A confirmation dialog appears asking you to confirm the changes to the present format.
2 Click Yes to save the format, or No to cancel.
Creating Formats for R900G EndpointsWhen you program an R900G endpoint, you have the flexibility to work with the format you need by doing the following:
• Set your preferences for the type of endpoint you will be programming.
• Select a format from the list of available formats supplied by Neptune.
• Create a new format that is added to the list of available formats.
To select preferences for programming an R900G endpoint, complete the following steps.
N_SIGHT R900 User’s Manual for the Neptune Handheld System 8-39

Using the Field Programmer
Configuring Gas
To select preferences for programming a gas endpoint, complete the following steps.
1 On the Field Programmer Menu, touch or click Configure Gas. See Fig-ure 8.5 on page 8-7.
The Field Programmer Password screen appears as shown in Figure 8.37.
Figure 8.37 Configure Gas Password Screen
2 On the Field Programmer Password screen, type your password and do one of the following:
• Touch .
• Click
• Press Enter.
On this screen, you can also change your password as described in “Changing Your Password,” on page 8-8 or you can cancel logging in to the system
After entering your password, the Preferences screen appears as illustrated in Figure 8.30.
3 Select your preferences as described in “Configuring Gas,” on page 8-18.
If you cannot remember your password, you can touch or click Hint to display a clue.
8-40 N_SIGHT R900 User’s Manual for the Neptune Handheld System

Using the Field Programmer
4 Do one of the following:
• Touch Close to close the gas configuration screen and return to the previous screen.
• Touch SelectFMT to select a format that is already available for the Field Programmer.
• Touch NewFMT to create a new format and add it to the list of available formats.
Selecting a Gas Format
This feature allows an administrator to select formats that will be available to field personnel for programming, as described in “Programming the R900G Endpoint,” on page 8-18
To select a format for programming an R900G endpoint, complete the following steps.
1 Select Configure Gas from the Field Programmer Menu. See “Starting Field Programmer,” on page 7-4.
2 When prompted, type your password and press Enter. See Figure 8.37
The Gas Preferences screen appears as illustrated in Figure 7.15.
3 Touch NewFMT.
The New Format screen appears as illustrated in Figure 8.38.
Figure 8.38 Gas New Format Screen
4 Touch .
N_SIGHT R900 User’s Manual for the Neptune Handheld System 8-41

Using the Field Programmer
5 Touch to select a format from the list of available in Format
Name.
The following information appears:
• Available Formats display at the top of the screen.
• User Selected shows the formats already selected.
6 On this screen, do any the following by selecting the corresponding button or tab.
The formats preceded by (NTG) are standard ProRead formats from Neptune. The formats without (NTG) are custom formats defined by the user.
Add Allows you to select from the Available Formats, and touch or click Add to place it in the User Selected list.
Remove Allows you to select a format from the User Selected list and touch or click Remove to remove it from the User Selected list.
Although you can remove a format from the User Selected list, it remains in the Available Formats list.
Close Allows you to close the Gas Configuration screen and return to the previous screen.
NewFMT Allows you to add a new format for Gas Configuration.
8-42 N_SIGHT R900 User’s Manual for the Neptune Handheld System

Using the Field Programmer
Adding or Editing a Gas FormatTo add a new format and have it appear in the Available Formats list, you can either edit an existing format, or add a new format.
Editing an Existing Gas Format
To edit an existing gas format, complete the following steps.
1 Touch NewFMT.
The New Format screen appears as illustrated in Figure 8.38 on page 8-41.
2 Touch .
3 Touch in Format Name to select a format from the available gas formats.
A selection list similar to Figure 8.39 appears.
Figure 8.39 Gas New Format Selection List
4 Select the format you want from the available gas formats.
N_SIGHT R900 User’s Manual for the Neptune Handheld System 8-43

Using the Field Programmer
Notes:After you select a format, all the values associated with it appear as shown in Figure 8.40.
You can then make any necessary changes.
Figure 8.40 Gas Values Shown on New Format Screen
5 Touch or click in MULTIPLIER to select the correct value from 0.01 to 1000 to be use for the format.
6 Type a value for INPUT to enter the input rate. This is controlled by the index.
7 Type the 9-digit number for the Pressure Configuration Factor index in PCF.
Refer to the listing of PCF indexes, refer to “Pressure Configuration Factor Indexes,” in Appendix C.These are examples only. This list does not include every index a utility has in its system. If there are any questions about the correct pressure configuration factor, contact the meter manufacturer.
8 Touch in DispDigits to select one of the following:
• 4 = Initial Reading will be in range of 0000 - 9999
• 5 = Initial Reading will be in range of 00000 - 99999
• 6 = Initial Reading will be in range of 000000 - 999999
8-44 N_SIGHT R900 User’s Manual for the Neptune Handheld System

Using the Field Programmer
9 Type the actual meter reading in Initial Reading.
10 Select AB for clockwise rotation or BA for counter-clockwise rota-tion. Use the table on “Meter Input Drive Rotation,” on page 8-45.
.
Saving the Format
To save the format and add it to the list of available formats, complete the following steps.
1 Complete the steps for “Editing an Existing Gas Format,” on page 8-43.
2 Touch .
A dialog appears asking you to enter a different name for the format.
Table 7.6 Meter Input Drive Rotation
Meter Rotation
American 250-630 12759-000 BA
Sensus R275 - #415 12821-XXX AB
Actaris Metris, 250, 400A 12861-000 AB
American AL800 - AL5000 12882-000 BA
Sensus #750 - #10000 12882-200 AB
Actaris 675A - 1000A 12882-100 BA
Dresser AMR adapter kit for American
BA
Instrument Drive - CW AB
Instrument Drive CCW BA
N_SIGHT R900 User’s Manual for the Neptune Handheld System 8-45

Using the Field Programmer
3 Touch or click Yes to save the changes to the new format or No to cancel.
4 Type the name of the new format in Format Name.
If you selected a standard format, and made changes to it, you must type a new name for the format.
A dialog appears asking you to enter a different name for the format.
5 Touch or click , and type the name of the new format in For-mat Name.
6 Touch or click .
The new format is saved to the list of available gas formats.
Adding a New Gas Format
To add a new gas format, complete the following steps.
1 Select Configure Gas from the Field Programmer Menu. See Figure 8.5 on page 8-7.
2 When prompted, enter your password. See “Starting Field Programmer,” on page 8-6.
8-46 N_SIGHT R900 User’s Manual for the Neptune Handheld System

Using the Field Programmer
3 Touch NewFMT.
The New Format screen appears as illustrated in Figure 8.38 on page 8-41.
4 Touch since the NewFMT screen now defaults to New to select an existing format name. See Figure 8.39 on page 8-43.
5 Touch .
The New Format screen appears with the fields and selections empty.
Figure 8.41 Gas New Format Screen – Blank
6 Type the name of the new format in Format Name.
7 Complete information for the following items, where applicable.
• Multiplier
• Input
• PCF See “Pressure Configuration Factor Indexes,” on page C-1. Contact the meter manufacturer if you have any questions.
• DispDigits
• Initial Reading
• Rotation (see Table 7.6 on page 8-45.)
8 Touch .
A dialog appears asking you to enter a different name for the format.
9 Touch or click Yes to save the changes to the new format or No to cancel.
10 Type the name of the new format in Format Name.
N_SIGHT R900 User’s Manual for the Neptune Handheld System 8-47

Using the Field Programmer
Using the Gas Format
To use the newly created gas format to program gas registers, complete the following steps.
1 Select Configure Gas from the Field Programmer Menu. See Figure 8.5 on page 8-7.
2 When prompted, enter your password. See “Starting Field Programmer,” on page 8-6.
3 Select the SelectFMT tab.
4 Complete the steps outlined in “Selecting a Gas Format,” on page 8-41.
5 Refer to “Programming the R900G Endpoint,” on page 8-18 to pro-gram or read the R900G endpoint using the newly created format.
Deleting a Format for R900G Endpoints
To delete a gas format used for programming R900G endpoints, complete the following steps.
1 Select Configure Gas from the Field Programmer Menu. See Figure 8.5 on page 8-7.
2 When prompted, enter your password. See “Starting Field Programmer,” on page 8-6.
3 Select NewFMT.
The New Format screen appears as illustrated in Figure 8.39 on page 8-43.
4 Touch since the NewFMT screen now defaults to New, then shift the numbers to compensate.
5 Touch to delete the format from the list of available for-mat.
A confirmation dialog asking you to confirm the deletion.
8-48 N_SIGHT R900 User’s Manual for the Neptune Handheld System
Using the Field Programmer
6 Touch or click Yes to save the format or No to cancel.
The format is no longer available for selection on the Field Programmer.
You cannot delete a standard format from the list of available formats. You can only delete user defined formats.
N_SIGHT R900 User’s Manual for the Neptune Handheld System 8-49

Using the Field Programmer
Notes:
8-50 N_SIGHT R900 User’s Manual for the Neptune Handheld System

9 Maintaining and Repairing the Neptune Handheld System
This chapter provides instructions for maintaining and repairing the CE5320, the Nomad, and the R900 Belt Clip Receiver, and includes recommended spare parts. This chapter also gives instructions for packing and shipping the Neptune handheld system to Neptune should you ever need to return any unit for repair.
Recommended MaintenanceThe CE5320 and the Nomad require little maintenance. Only occasional cleaning of these handhelds or replacement of their batteries and handstrap are required. If you store the CE5320 for one week or more, there are some precautions you need to take to keep it in good working order. Also, when carrying or shipping either handheld, follow the precautions given in this chapter.
Maintaining the CE5320
Cleaning the CE5320
If you do not want the handstrap to become wet during cleaning, remove the strap. Or, if you want to clean the strap, leave it on. Clean the CE5320 and its handstrap, using a soft cloth and mild soap. Do not use abrasives which can damage the finish and scratch the display making it hard to see the information shown.
Before cleaning the handheld, make sure that the top cover door and battery compartment are correctly closed. Otherwise, water can seep into those compartments and damage the unit.
N_SIGHT R900 User’s Manual for the Neptune Handheld System 9-1

Maintaining and Repairing the Neptune Handheld System
Storing the CE5320If you intend to store the CE5320 for more than one week, there are precautions you need to take to ensure that the unit functions properly when you are ready to use it:
• If you are storing the CE5320 for one to three weeks, refer to “Short-term Storage,” on this page.
• If you are storing the CE5320 for longer than three weeks, refer to “Long-term Storage,” on this page.
Short-term StorageFollow these steps to store the CE5320 for one to three weeks.
1 Fully recharge the CE5320. For help with this task, refer to the pro-cedure “Recharging the Battery,” on page 9-5.
2 After the CE5320 is fully charged, turn it off by pressing the BLUE
key followed by the I/O key.
3 Store the CE5320 at a temperature of 3°C to 25°C (55°F to 77°F).
Long-term StorageTo store the CE5320 for longer than three weeks, keep both the CE5320 and the battery at a temperature of 13°C to 25°C (55°F to 77°F).
To clean the display, Neptune recommends using pre-moistened lens cloths typically used for cleaning lenses and computer screens. These lens cloths can be found at any store that carries eyeglasses or computer supplies.
F1
When not in use, put the CE5320 in the cradle to charge at least one 24-hour period out of each week.
9-2 N_SIGHT R900 User’s Manual for the Neptune Handheld System

Maintaining and Repairing the Neptune Handheld System
To prepare the CE5320 for use after long-term storage, use one of the following methods:
• Typical method—to ensure that the battery is fully charged, allow the CE5320 to recharge at least 24 hours.
• Quick method—if your company routinely recharges the CE5320 each business day, allow the CE5320 to recharge for 12 hours.
Checking the Battery StatusTo check the status of the battery, place the CE5320 in a communication cradle. Then, check the battery indicator in the bottom-right corner of the unit, shown in Figure 9.1, and refer to the following list.
Figure 9.1 Battery Status Indicator on CE5320
• Red—the battery is low and is charging.
• Green—the battery is fully charged.
• Yellow—the temperature of the battery is too high or too low to be recharged. When this occurs, the charging system is disabled. The battery can be recharged when it reaches a temperature of 0ºC to 45ºC (32ºF to 113ºF).
• No color—the charging device (communication cradle) is not receiving power.
battery status indicator
N_SIGHT R900 User’s Manual for the Neptune Handheld System 9-3

Maintaining and Repairing the Neptune Handheld System
Transporting the CE5320When transporting the CE5320, keep the following precautions in mind:
• The recommended temperature range for operating the CE5320 is from -30°C to +50°C (-22°F to 122°F). Short exposure to temperatures lower or higher than these can cause the display to turn very dark or very light until the unit returns to the recommended operating temperature range. This usually occurs if the CE5320 is left in a vehicle during a hot or cold day.
• The CE5320 can withstand occasional drops from up to two meters (six feet) onto a hard surface when the unit is operated within the specified temperature range.
• The CE5320 withstands exposure to rain without allowing water to seep inside the unit. It is designed to endure occasional immersions. The unit floats making it easy to retrieve if dropped in water.
• The CE5320 performs well in most environments where electromagnetic fields are present. Examples of these environments include areas near power-transmission lines, electric motors, transformers, compressors, and low-power radio transmitters. Performance can be degraded when using a communication cable; a peripheral, such as a printer; or a battery charger under these conditions.
Repairing the CE5320
Refer to the following procedures to repair the CE5320. Do not attempt to perform repairs other than those described in this chapter. Opening the back panel of the CE5320 voids your warranty.
Do not attempt to remove the back panel of the CE5320. Attempting to repair the unit on your own voids the warranty by breaking the warranty label which covers a screw on the back panel of the unit.
9-4 N_SIGHT R900 User’s Manual for the Neptune Handheld System

Maintaining and Repairing the Neptune Handheld System
Recharging the BatteryThe CE5320 uses a high-quality, lithium ion battery. It can be recharged more than 500 times. When used under normal conditions, the battery should last about 24 months, although its life is reduced by repeated or prolonged total discharges.
Follow this procedure to recharge the battery.
1 Make sure that the communication cradle, router, or Ethernet cables are connected as described in Chapter 3.
2 Place the CE5320 in a communication cradle.
3 Check the battery indicator in the bottom right corner of the CE5320 to see if the unit is charged. Refer to the following list to recharge the battery.
• Red—the battery is low. Recharge the battery by allowing the CE5320 to remain in the cradle until the indicator turns green. If the CE5320 has been used under normal conditions, recharg-ing usually takes about three hours.
• Green—the battery is fully charged. Remove the CE5320 from the cradle.
• Yellow—the temperature of the battery is too high or too low to be recharged. When this occurs, the charging system is dis-abled. Wait for the battery of the CE5320 to reach a tempera-ture of 0ºC to 45ºC (32ºF to 113ºF). Then, place the CE5320 in the cradle. The battery indicator should now turn red.
Calibrating the CE5320 BatteryWhen the handheld first arrives from the factory, the battery must be fully charged before use. The battery in the CE5320 has been calibrated at the factory; however, you may want to periodically calibrate the battery to maintain the accuracy of battery status indicators. Neptune recommends calibrating the battery if the battery is deeply discharged, if it is replaced with a new battery, or once every three months.
Do not attempt to recharge the battery if the CE5320 is not within a temperature of 0ºC to 45ºC (32ºF to 113ºF). Doing so can damage the battery.
N_SIGHT R900 User’s Manual for the Neptune Handheld System 9-5

Maintaining and Repairing the Neptune Handheld System
.
Follow this procedure to display the Battery Management function.
1 With the handheld out of the cradle, turn it ON.
2 Go to the N_SIGHT R900 Login screen.
The N_SIGHT R900 Login screen appears with the Battery Manager status information on the display, as illustrated in Figure 9.2.
Figure 9.2 Handheld Battery Information
The battery status indicator, located at the bottom right of the handheld keyboard as shown in Figure 9.1 on Page 9-3, changes color to notify the meter reader of the battery charge status. A red light indicates that the battery is low while a green light indicates that the battery is fully charged.
This procedure could take up to 16 hours to complete. Be sure the hand-held can be available for that amount of time before beginning the cali-bration.
ON BATTERY 87%
9-6 N_SIGHT R900 User’s Manual for the Neptune Handheld System

Maintaining and Repairing the Neptune Handheld System
3 Place the handheld in the cradle.
4 On the N_SIGHT R900 Login screen, press M or touch Menu.
The N_SIGHT R900 Main Menu screen appears.
Figure 9.3 N_SIGHT R900 Main Menu
5 Press 1 or touch Admin.
The Admin Menu appears.
Figure 9.4 N_SIGHT R900 Admin Menu
N_SIGHT R900 User’s Manual for the Neptune Handheld System 9-7

Maintaining and Repairing the Neptune Handheld System
6 Press 5 or touch Config Battery.
The Calibrate Battery screen appears.
Figure 9.5 N_SIGHT R900 Calibrate Battery Screen
7 Press Y or touch Yes.
8 Type your password when prompted.
The battery calibration begins and will take approximately 24 hours to complete.
After the battery has been calibrated, the battery status indicator blinks a red light when the battery level is depleted to 10% of its full capacity. This means that if a battery lasts for 15 hours on full charge, the indicator light begins blinking 90 minutes before Low Battery Warning appears and the handheld runs out of battery power.
This feature can be used by meter readers in the field to warn them ahead of the final message that appears on the display.
Neptune recommends calibrating the battery if the battery is deeply discharged, if it is replaced with a new battery, or once every three months.
9-8 N_SIGHT R900 User’s Manual for the Neptune Handheld System

Maintaining and Repairing the Neptune Handheld System
Replacing the BatteryIf you find that the battery does not last for eight hours after having been recharged, you need to replace it.
To replace the battery, you need the following equipment:
• One small, flat-blade screwdriver
• One lithium-ion replacement battery, part number 8136-015
Follow this procedure to remove the battery from the CE5320 and replace it with a new one.
1 Turn the CE5320 off by pressing the BLUE , .
2 Using a small, flat-blade screwdriver, turn each of the four captive screws that secure the door of the battery compartment counter-clockwise to loosen them. See Figure 9.6.
Figure 9.6 Remove the Captive Screws
3 Lift the door from the back panel.
Do not attempt to remove the battery while the CE5320 is turned on. Otherwise, data can be lost.
F1
N_SIGHT R900 User’s Manual for the Neptune Handheld System 9-9

Maintaining and Repairing the Neptune Handheld System
To install a new battery, use the following procedure.
1 Fold the foam flap back and remove the old battery.
2 Position the new battery over the compartment so that the label of
the battery faces down and the arrow ( ) on the top of the battery
points to the right.
3 Lower the left side of the battery — the side that is across from the
arrow ( ) — into the battery compartment.
4 Then, lower the rest of the battery into the compartment, pushing firmly until the battery is fully seated as shown in Figure 9.7.
Figure 9.7 Inserting the Battery
5 Fold the protective foam flap over the battery and replace the door of the battery compartment.
6 Secure the door of the battery compartment to the back panel of the CE5320 by turning each of the four captive screws clockwise until you feel some resistance.
Because the CE5320 uses captive screws, you cannot remove the screws, but can only loosen them until they detach from the back panel.
9-10 N_SIGHT R900 User’s Manual for the Neptune Handheld System
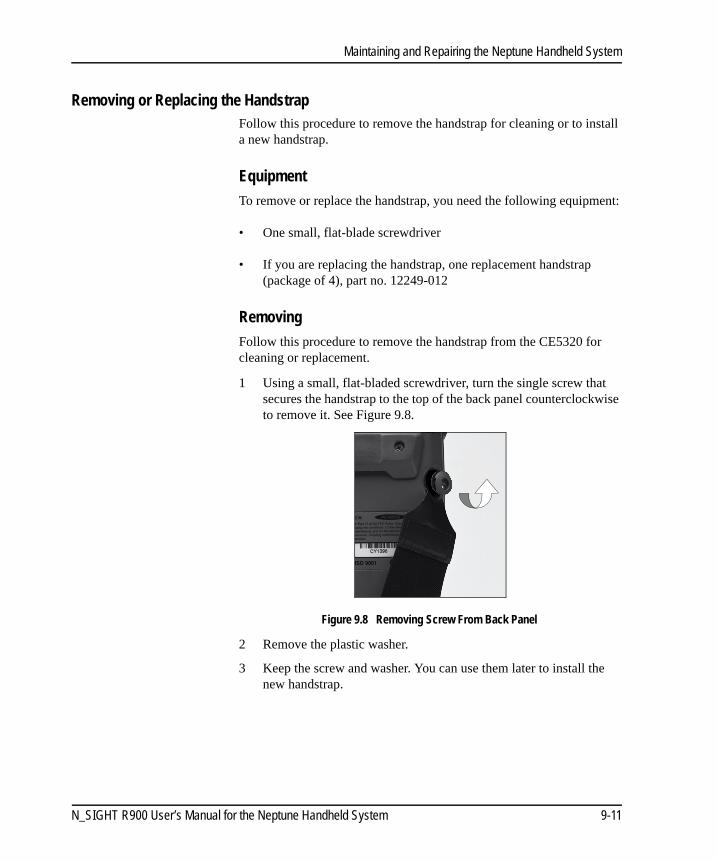
Maintaining and Repairing the Neptune Handheld System
Removing or Replacing the HandstrapFollow this procedure to remove the handstrap for cleaning or to install a new handstrap.
Equipment
To remove or replace the handstrap, you need the following equipment:
• One small, flat-blade screwdriver
• If you are replacing the handstrap, one replacement handstrap (package of 4), part no. 12249-012
Removing
Follow this procedure to remove the handstrap from the CE5320 for cleaning or replacement.
1 Using a small, flat-bladed screwdriver, turn the single screw that secures the handstrap to the top of the back panel counterclockwise to remove it. See Figure 9.8.
Figure 9.8 Removing Screw From Back Panel
2 Remove the plastic washer.
3 Keep the screw and washer. You can use them later to install the new handstrap.
N_SIGHT R900 User’s Manual for the Neptune Handheld System 9-11

Maintaining and Repairing the Neptune Handheld System
4 Using a small, flat-blade screwdriver, turn each of the four captive screws that secure the door of the battery compartment counter-clockwise to loosen them. See Figure 9.9.
Figure 9.9 Removing the Captive Screws
5 Lift the door from the back panel.
6 Remove the handstrap from the door of the battery compartment by removing the small metal pin that holds the handstrap in place. You can find it easier to perform this operation by opening the hand-strap’s Velcro™ closure, shown in Figure 9.10, and pushing a por-tion of the handstrap through the two holes in the door of the battery compartment, loosening the metal pin. See Figure 9.10 on Page 9-13.
Because the CE5320 uses captive screws, you cannot remove the screws, but can only loosen them until they detach from the back panel.
9-12 N_SIGHT R900 User’s Manual for the Neptune Handheld System

Maintaining and Repairing the Neptune Handheld System
Figure 9.10 Opening the Velcro Closure
Replacing
To replace the existing strap or to install a new one, use the following procedure.
1 Fold the slotted end of the handstrap back to form a hinge and loosely secure the Velcro closure.
2 Hold the door of the battery compartment so that the screws face you. Then, push the slotted ends of the handstrap through the two holes on the door.
3 Turn the door over so that the inside of the door is facing you, and slide the small metal pin that you removed earlier through the slots of the handstrap. If you have difficulty inserting the pin, try loosen-ing the Velcro tab and pushing more of the handstrap through the holes on the door.
4 Fold the protective foam flap over the battery and replace the door of the battery compartment.
5 Secure the door of the battery compartment to the back panel of the CE5320 by turning each of the four captive screws clockwise until you feel some resistance.
N_SIGHT R900 User’s Manual for the Neptune Handheld System 9-13

Maintaining and Repairing the Neptune Handheld System
6 Align the hole in the other end of the handstrap with the screw hole on the back panel of the CE5320. Then, replace the plastic washer and screw that you removed earlier.
7 Tighten the screw by turning it clockwise until you feel some resis-tance.
8 Secure the Velcro closure, adjusting its tightness to your preference.
Maintaining the Nomad
Battery Life The lithium-ion battery life is dependent upon the usage and operating environment.
Tips for Extending the Battery Life
• Keypad backlight: The default is OFF. Using this backlight could reduce your battery life by up to 25%. Display backlight: Tap Start | Settings | System | Backlight to minimize the amount of time the backlight stays on, and dim it to only as bright as required to view the display.
• WiFi, Bluetooth, camera, or barcode scanner: If your unit comes with any of these options installed, use ONLY when necessary. Turn off when not needed. Minimize the Flash intensity and the use of the flashlight.
• Cold temperatures: Keep the unit as warm as possible. If feasible, keep it inside your coat or a vehicle when not in use.
• GPS: Ensure that the GPS-aware applications that communicate with the GPS are closed when not in use.
• Expansion ports: Select low-power consumption CF and SD cards and use them only when necessary.
• Auto features: Tap Start | Settings | System | Power | Advanced. To conserve battery power, specify your unit to turn off in a short time if not in use.
9-14 N_SIGHT R900 User’s Manual for the Neptune Handheld System

Maintaining and Repairing the Neptune Handheld System
Other factors that may have some impact on battery life include heavy usage of the Bluetooth radio and heavy processing by the CPU, but these factors are typically less significant.
Charging the Battery You can charge the battery in the unit or apart from the unit with an external battery charger (sold separately as an accessory). Connect the power adapter for your country to the power cord and attach to the power supply. Plug into an electrical outlet and plug the barrel end of the power supply into the unit. The unit will be charged in about 4.5 hours.
A full charge is indicated by the battery LED (right side of the unit) turning green. The recommended temperature range for charging is between +32 °F and +113 °F (0 °C and +45 °C). If the battery temperature is outside of this range, the battery will not charge.
Checking the Battery StatusTo check the status of the battery, place the Nomad in a communication cradle. Then, check the battery indicator in the upper right portion of the unit, shown in Figure 9.11.
Figure 9.11 Battery Status Indicator on Nomad
Be sure to only use the power supply included with your unit. Use of other adapters may void the product warranty.
Battery LED
N_SIGHT R900 User’s Manual for the Neptune Handheld System 9-15

Maintaining and Repairing the Neptune Handheld System
Replacing the Battery The unit was designed to be able to replace the battery quickly without resetting it. The unit saves enough power (in Replace Battery mode) that if you swap the battery within approximately one minute, it will not trigger a reset.
.
Figure 9.12 Changing the Nomad Battery
To replace a battery, perform the following steps.
1 Close open applications and save data in case the battery exchange takes too long.
2 Remove the hand strap from the unit.
3 Enter the Replace Battery mode.
This ensures that alarms will not wake up the unit while changing the battery.
4 Press and hold the Power key until you see the five-second prompt then release. The menu appears and allows you to tap Replace Bat-tery.
5 Use the supplied stylus or a small #1 Philips head screwdriver to loosen the four screws in the battery door.
6 Remove the battery from the unit.
7 Quickly insert the replacement battery into the unit.
If the saved power runs out before the new battery is installed, the unit will reset. This will not impact saved data, programs, or configuration, however unsaved data will be lost and the time settings will need to be reset.
9-16 N_SIGHT R900 User’s Manual for the Neptune Handheld System

Maintaining and Repairing the Neptune Handheld System
8 Place the battery door over the battery, with the flat side of the bat-tery door at the top of the unit. Use the stylus or screwdriver to fin-ger-tighten the four screws.
9 Replace the hand strap.
10 Power on the unit to resume operation.
Calibrating the Nomad Battery
The battery has an internal gauge that provides an estimate of the amount of energy in the battery as it charges and discharges. If your battery is showing inaccuracy in the power gauge or large jumps in capacity (such as the power is reading 50% and goes dead shortly thereafter), it may need calibration.
Tap Start | Settings | System | Power | Calibration to see if the message reads Calibration recommended or Calibration not necessary. If calibration is recommended or the battery is reporting inaccurately, perform the following steps.
1. Use the plug to connect the power supply, or place the handheld in the cradle.
2. Ensure the temperature is between +32 °F and +113 °F (0 °C and +45 °C) while charging.
3. Tap Start Calibration.
Neptune recommends calibrating the battery if the battery is deeply discharged, if it is replaced with a new battery, or once every three months.
The unit must remain connected to the power during the calibration or you may need to restart the process.
N_SIGHT R900 User’s Manual for the Neptune Handheld System 9-17

Maintaining and Repairing the Neptune Handheld System
During the calibration process, the Power key is disabled temporarily and the backlight is turned up to 100%.
4. To stop the calibration process, tap Start | Settings | System | Power | Calibration | Stop Calibration.
Refer to Table 9.1 for possible error messages that can occur during calibration.
Notification LEDsAt the top of the Nomad are two LEDs that provide status information. The LED states are shown in the following table.
It takes up to 24 hours to complete the calibration. When finished, a notification message states that the calibration is complete. Neptune recommends not using your unit during the calibration process.
Table 9.1 Calibration Error Messages
Error Message Part Solution
Battery is not charging, aborting
Battery temperature may be out of range. Wait until battery temperature settles and try again.
Discharge became invalid, restarting
Calibration will restart itself.
AC power is in an unknown or uncontrolled state; aborting
Plug in unit and restart calibration. Try a different power supply and restart calibration. If it continues to fail, have the unit serviced.
Table 9.2 Calibration Error Messages
Right LED Function
Off On battery power
Solid yellow Charging on power supply
Solid green Fully charged on power supply
9-18 N_SIGHT R900 User’s Manual for the Neptune Handheld System
Maintaining and Repairing the Neptune Handheld System
Maintaining the R900 Belt Clip Receiver
Recommended MaintenanceTo ensure a watertight seal occasionally inspect the battery door gasket and bottom plug door to make sure they are free from dust and debris. These can be cleaned by wiping with a damp cloth. If any wear or tear is observed please contact Neptune Customer Support for repair. Refer to “Contacting Customer Support,” on page 1-5.
Battery Life The lithium ion battery life is dependent upon the usage and operating environment. Under normal operating conditions, the battery should be replaced every two years.
Blinking yellow Battery problem during charging (temperature out of range, defective or missing battery)
Left LED Function
Off No notifications and phone off
Blinking yellow Microsoft notifications
Table 9.2 Calibration Error Messages
If the left LED is blinking green, the battery power is being consumed due to the cellular modem being turned on, even when the device is suspended.
N_SIGHT R900 User’s Manual for the Neptune Handheld System 9-19

Maintaining and Repairing the Neptune Handheld System
Tips for Extending the Battery Life
Neptune suggests the following tips for the lithium ion battery in your R900 BCR.
• Room temperature: Try to store the battery at room temperature at all times.
• Cold temperatures: Keep the unit as warm as possible. If feasible, keep it inside your coat or a vehicle when not in use.
• Keeping a charge: Try to maintain at least a 40% charge on the battery to extend battery life.
Charging the Battery You can charge the battery in the unit or apart from the unit with an external battery charger (sold separately as an accessory). Connect the power adapter for your country to the power cord and attach to the power supply. Plug into an electrical outlet and plug the barrel end of the power supply into the unit. The unit will be charged in about 4.5 hours.
You can charge the battery for the unit R900 BCR in one of two ways:
• Through the USB port
• Using the external battery charger, (sold separately as an accessory PN: 13148-001).
Using the USB Port
To charge the battery using the USB port, complete the following steps.
1 Using the supplied USB cable, connect the R900 BCR to a USB wall or car charger.
The charger must be capable of supplying at least 500 mA to charge the battery while OFF, and 1A to charge the battery while running. For instructions on using the standalone charger see the manual included with it.
9-20 N_SIGHT R900 User’s Manual for the Neptune Handheld System

Maintaining and Repairing the Neptune Handheld System
2 Connect the power adapter for your country to the power cord and attach to the power supply.
3 Plug the power adapter into an electrical outlet.
4 Plug the micro USB into the R900 BCR.
The unit is charged in about eight hours.
Charging Considerations
Refer to the following table for charging considerations.
Be sure to only use the power supply included with your unit. Use of other adapters may void the product warranty.
Table 8.3 Charging Considerations
Consideration Description
Green LED Full charge
Temperature range Recommended between +32 °F and +113 °F (0 °C and +45 °C)
Outside range Battery will not charge
N_SIGHT R900 User’s Manual for the Neptune Handheld System 9-21

Maintaining and Repairing the Neptune Handheld System
Using the ChargerThe supported lithium ion battery charger is designed to charge the Neptune 3.7VDC 5000mAh Li-Ion battery P/N 13143-001. The following illustration shows the supported external battery charger, sold separately as an accessory PN: 13148-001.
Figure 9.13 External Battery Charger
To charge the battery using the external battery charger, complete the following steps.
1 Place the charger on a flat and stable surface.
2 Connect the charger to an AC wall plug using the AC cable deliv-ered together with the device.
The three colors of the LED flash for about 1 second each (red – yellow – green). After that, the LED sequence flashes, and the charger is ready for use.
3 Remove the charger from the wall plug if it will not be used for long period time.
Do not try to charge any other battery with this device.
If an error is identified, the LED turns red. Immediately remove the battery from the charger.
9-22 N_SIGHT R900 User’s Manual for the Neptune Handheld System

Maintaining and Repairing the Neptune Handheld System
Replacing the R900 Belt Clip Receiver BatteryThe following section explains how to replace the battery for the R900 BCR.
Removing the Battery
To remove the battery from the R900 BCR, complete the following steps.
1 Hold the R900 BCR firmly with left side facing up. See Figure 9.14.
Figure 9.14 R900 Belt Clip Receiver Side View
2 Push the lock latch down toward the unlock symbol. See Figure 9.15.
3 Once the latch is in place, push the latch button inward to open the battery compartment door.
Figure 9.15 Latch Direction to Open
Be sure the battery is free of dust and debris, and only replace the battery in a dry environment.
Battery door latch
N_SIGHT R900 User’s Manual for the Neptune Handheld System 9-23

Maintaining and Repairing the Neptune Handheld System
4 Pull the door toward you to access the battery.
5 Hold the R900 BCR vertically, right side facing up, with one hand over the open compartment.
The battery is located on the right side. See Figure 9.16.
Figure 9.16 Battery Inside Compartment
6 Vigorously tap the top of the R900 BCR until the battery loosens for removal
Replacing the Battery
To replace the battery in its compartment, complete the following steps.
1 Open the battery door of the R900 BCR. See Steps 1 through 4 of “Removing the Battery,” on page 9-23.
2 Have the front view of the R900 BCR facing up.
3 Hold the battery horizontally with the label facing down.
Battery inside
The battery can be difficult to remove when fully charged.
9-24 N_SIGHT R900 User’s Manual for the Neptune Handheld System

Maintaining and Repairing the Neptune Handheld System
4 Inset the battery into the R900 BCR until the battery snaps in place.
Figure 9.17 R900 Belt Clip Receiver Battery Inside Compartment
5 Close the battery door, and lock it.
LED Status IndicationThe battery charging starts immediately after inserting a battery pack into the charging cradle. The LED color indicates the status of the charger and charge process. The LED states are shown in the following table.
Battery inside
compartment
Battery
Battery label underneath
The battery should be replaced every two years.
Table 9.4 LED Status Indicators
LED Indicates
Red, yellow, green, or OFF
Startup initialization when applying power
OFF No battery inserted
Yellow Battery charging
Solid green Battery charged successfully
Red Error condition
N_SIGHT R900 User’s Manual for the Neptune Handheld System 9-25

Maintaining and Repairing the Neptune Handheld System
Checking the Battery StatusThe battery indicator is one of the four visible on the front of the R900 BCR. The battery percentage can also be seen on the status screen for the R900 BCR.
Recommended Spare Parts
Ordering PartsTo order new parts for one of the Neptune handheld system devices, refer to the following tables to find the part number that you need. Then, place an order for the parts by contacting your local Neptune Distributor. You may also contact Neptune Customer Service at (800) 645-1892. Business hours are Monday through Friday, 7:30 a.m. to 4:30 p.m. Central time.
CE5320 Spare Parts
Neptune recommends that you keep the following spare parts on hand for each CE5320 that you have. Use Table 8.5 to find the part number of the item that you need.
Nomad Spare Parts
Neptune recommends that you keep the following spare parts on hand for each Nomad that you have. Use Table 9.6 on Page 9-27 to find the part number of the item that you need.
Table 8.5 CE5320 Part Numbers
Description Part Number
Lithium ion battery 12249-047
Spare hand straps (package of 4)
13245-008
Spare shoulder strap 12249-014
9-26 N_SIGHT R900 User’s Manual for the Neptune Handheld System

Maintaining and Repairing the Neptune Handheld System
To obtain a replacement stylus, Neptune recommends that you purchase one from a local electronics store. A Belkin model P45470 for the HP iPAQ 2200 fits into the stylus slot of the handheld.
R900 Belt Clip Receiver Spare Parts
Neptune recommends that you keep the following spare parts on hand for each R900 BCR that you have. Use Table 8.7 to find the part number of the item that you need.
Table 9.6 Nomad Part Numbers
Description Part Number
Lithium ion battery 13245-002
Spare hand straps (package of 4)
13245-008
Table 8.7 R900 Belt Clip Receiver Part Numbers
Description Part Number
R900 BCR spare battery charger 13148-001
R900 BCR replacement battery 13143-001
N_SIGHT R900 User’s Manual for the Neptune Handheld System 9-27

Maintaining and Repairing the Neptune Handheld System
Returning your Neptune Handheld SystemUse the following procedure to pack the Neptune handheld system so that it can be shipped without damage to Neptune.
1 Contact a Neptune Customer Support Specialist to confirm whether or not the handheld should be shipped. Contact Customer Support at (800) 647-4832 to request a Return Material Authorization (RMA) number. The RMA number must be legibly printed on the outside of the box.
2 Turn the handheld off by doing the following:
• Pressing BLUE , on the CE5320 handheld
• Pressing and holding the I/O key on the Nomad handheld until the five-second message appears then release. Now press power on the menu and then select Yes to confirm.
3 Repack the handheld in the original packing box that you received from Neptune, making certain to use plenty of packing material to absorb shocks and vibrations caused during shipping.
4 Send the package to the address of the repair facility as directed by Neptune.
F1
Use the original packing box that you received from Neptune. The handling involved in land and air transport often subjects the handheld to impact beyond that which occurs during normal use. The original packing box is designed to reduce the vibrations and shocks caused during shipping. If the handheld is not properly packaged, it can be damaged during shipping.
9-28 N_SIGHT R900 User’s Manual for the Neptune Handheld System

10 Troubleshooting
Use the information in this chapter to solve any problems. If you still cannot solve the problem, contact a Neptune Customer Support Specialist. For help in contacting Neptune, refer to the topic “Contacting Customer Support,” on page 1-5.
Troubleshooting the HandheldThis section contains questions and answers for troubleshooting the Neptune handheld system. It is in the format of questions that can arise if a problem occurs. Answers represent possible solutions to these problems.
N_SIGHT R900 User’s Manual for the Neptune Handheld System 10-1

Troubleshooting
Basic Tasks for the CE5320B Handheld
Question Answer
The display is empty, and the CE5320B does not beep when I press a key.
The CE5320B can be turned off. Press the I/O key to turn
the unit on.
When I press the I/O key, the
CE5320B does not turn on.
The battery can be too low. Place the CE5320B handheld in a communication cradle. Then, check the color of the battery indicator in the bottom right corner of the CE5320B handheld. The indicator turns red if the battery is low.
WARNING: On Battery ___ % (indicating a very low battery life remaining).
If this message appears, place the CE5320B Handheld in the cradle and allow it to remain until the indicator turns green, indicating that the battery is fully charged. Recharging the battery can take from three to six hours.
The CE5320B does not refresh when I place it in a communication cradle.
If the battery indicator is not red, make sure that the communication cradle is connected to a proper electrical outlet.
Check that all cables are secure.
When trying to log in, I receive the error “DB Uninitialized.”
Check that a route is loaded to the handheld and the Reader ID is set up in the N_SIGHT R900 host software.
Reload the handheld.
Add a bullet stating Press Synchronize to communicate with the database.
The CE5320B handheld locks and does not respond when I press keys.
Press .
Reset the unit. For help with this task, refer to the procedure “Resetting the CE5320B,” on page 10-7.
F1
F1
ESCINS
10-2 N_SIGHT R900 User’s Manual for the Neptune Handheld System

Troubleshooting
Question Answer
The display contrast is weak or the display background is very dark.
Press and to brighten the display.
The CE5320B handheld has been exposed to temperatures outside the range of -30ºC to +50ºC (-22ºF to 122ºF). Short exposure to temperatures lower or higher than these can cause the display to turn very dark or very light until the unit returns to the recommended operating temperature.
The CE5320B handheld does not turn off automatically or manually.
The CE5320B handheld is in a communication cradle, in which case the CE5320B handheld remains on until you remove it from the cradle and then turn it off.
When I try to communicate with the host computer, I receive the error “Last Sync Failed.”
I am unable to load or unload data to or from the host computer.
Make sure that you have set up the communications peripheral you are using according to the directions provided in “Connecting to the Host Computer and Power Supply,” on page 3-5 or “Connecting to the Host Computer and Power Supply,” on page 4-4.
Check that all the cables are correctly attached and secure.
At the Synchronize screen (N_SIGHT R900 Login screen), confirm that the server name is correct.
F3
N_SIGHT R900 User’s Manual for the Neptune Handheld System 10-3

Troubleshooting
Basic Tasks for the Nomad Handheld
Question Answer
The display is empty and the Nomad does not beep when I press a key.
The Nomad can be turned off. Press the I/O key to turn the unit on.
When I press the I/O key, the Nomad does not turn on.
The battery can be too low. Connect the Nomad to its power. Then, check the color of the battery indicator in the bottom right corner of the Nomad. The indicator turns red if the battery is low.
WARNING: On Battery ___ % (indicating a very low battery life remaining).
If this message appears, place the Nomad in the cradle, and allow it to remain until the indicator turns green, indicating that the battery is fully charged. Recharging the battery can take from three to six hours.
The Nomad does not refresh when I place it in a communication cradle.
If the battery indicator is not red, make sure that the communication cradle is connected to a proper electrical outlet.
Check that all cables are secure.
When trying to log in, I receive the error “DB Uninitialized.”
Check that the Reader ID is set up in the N_SIGHT R900 host software.
Reload the handheld.
Press Synchronize to communicate with the DB.
The Nomad Handheld locks and does not respond when I press keys.
Press .
Reset the unit. For help with this task, refer to the procedure “Resetting the CE5320B,” on page 10-7.
10-4 N_SIGHT R900 User’s Manual for the Neptune Handheld System

Troubleshooting
Reading-Entry Tasks
Question Answer
The display contrast is weak or the display background is very dark.
Click in the upper left corner. - Click Settings. - Click the System tab at the bottom of the screen. - Click Backlight at top center. - Click the Brightness tab at the bottom of the screen. - Adjust with the slider bar.
The Nomad handheld has been exposed to temperatures outside the range of -30ºC to +50ºC (-22ºF to 122ºF). Short exposure to temperatures lower or higher than these can cause the display to turn very dark or very light until the unit returns to the recommended operating temperature.
The Nomad does not turn off automatically or manually.
Check the screen timeout in the Settings |System |Backlight. - Select "Turn off backlight if device is not used for." - Select a time from the drop down.
The Nomad is in a communication cradle in which case the Nomad remains on until you remove it from the cradle and then turn it off.
When I try to communicate with the host computer, I receive the error “Last Sync Failed.”
I am unable to load or unload data to or from the host computer.
Make sure that you have set up the communications peripheral you are using according to the directions provided in “Connecting to the Host Computer and Power Supply,” on page 3-5 or “Connecting to the Host Computer and Power Supply,” on page 4-4.
Check that all the cables are correctly attached and secure.
At the Synchronize screen (N_SIGHT R900 Login screen), confirm that the server name is correct.
Question Answer
When I try to tag an account, the tag
indicator does not appear on the display.
If your display does not show the tag indicator after you tag an account, the tag option is not selected on the host computer. For help in selecting this option, the host operator should refer to the N_SIGHT R900 Online HTML Help.
N_SIGHT R900 User’s Manual for the Neptune Handheld System 10-5

Troubleshooting
Communication Tasks
Starting the N_SIGHT R900 ProgramIf you quit the N_SIGHT R900 application program by clicking OK in the upper right corner of the screen, the handheld automatically returns to the N_SIGHT R900 Login screen.
Loading Data InitiallyWhen your handheld arrives, it should contain the file to load N_SIGHT R900 and necessary data files to support that executable with those data files already in their proper locations.
If any of these files are missing when you receive the handheld, or if any are subsequently erased, several scenarios are possible.
Question Answer
I cannot get routes to load or readings to unload.
The problem can be hardware or software based. Try the following solutions.
Hardware
Make certain that your system is set up as described in Chapter 3.
Check that cables and connectors are secure.
Software
Make certain that the software is set up as described in Chapter 3.
Check with the operator of the host computer to make sure that the Communications Manager function or SQL Anywhere service is running.
Check that routes are properly assigned.
These files do not include your route data that is downloaded from the host system during the communications process.
10-6 N_SIGHT R900 User’s Manual for the Neptune Handheld System

Troubleshooting
Missing Route Files
If a complete system is loaded but there are no route data files present, the DB Uninitialized message appears when N_SIGHT R900 is executed. Check the Reader ID in the N_SIGHT R900 host software. Then, reload the handheld.
Resetting the CE5320B
Follow these steps to reset the CE5320B.
1 From the N_SIGHT R900 Login screen, touch Menu or press M. See Figure 10.1.
Figure 10.1 N_SIGHT R900 Login Screen
Never reset the CE5320B without first checking with your supervisor. Under certain circumstances, resetting the CE5320B will cause you to lose data.
N_SIGHT R900 User’s Manual for the Neptune Handheld System 10-7

Troubleshooting
The N_SIGHT R900 Main Menu appears, as illustrated in Figure 10.2.
2 Touch ONE for
ADMIN.
Figure 10.2 N_SIGHT R900 Main Menu
The Handheld Menu appears as illustrated in Figure 10.3.
3 Touch FOUR for RESET HANDHELD.
Figure 10.3 N_SIGHT R900 Admin Menu
10-8 N_SIGHT R900 User’s Manual for the Neptune Handheld System

Troubleshooting
A warning message appears as illustrated in Figure 10.4.
4 Touch YES to proceed.
Figure 10.4 Reset Warning Message
5 Select YES to proceed.
This action clears all routes from the handheld.
Rebooting the CE5320B
Rebooting When Logged into a Route in N_SIGHT R900
Follow these steps to reboot the CE5320B when logged on to N_SIGHT R900.
Rebooting the handheld differs from resetting the handheld because it does not delete the routes off the handheld. Only resetting deletes routes from the handheld.
N_SIGHT R900 User’s Manual for the Neptune Handheld System 10-9
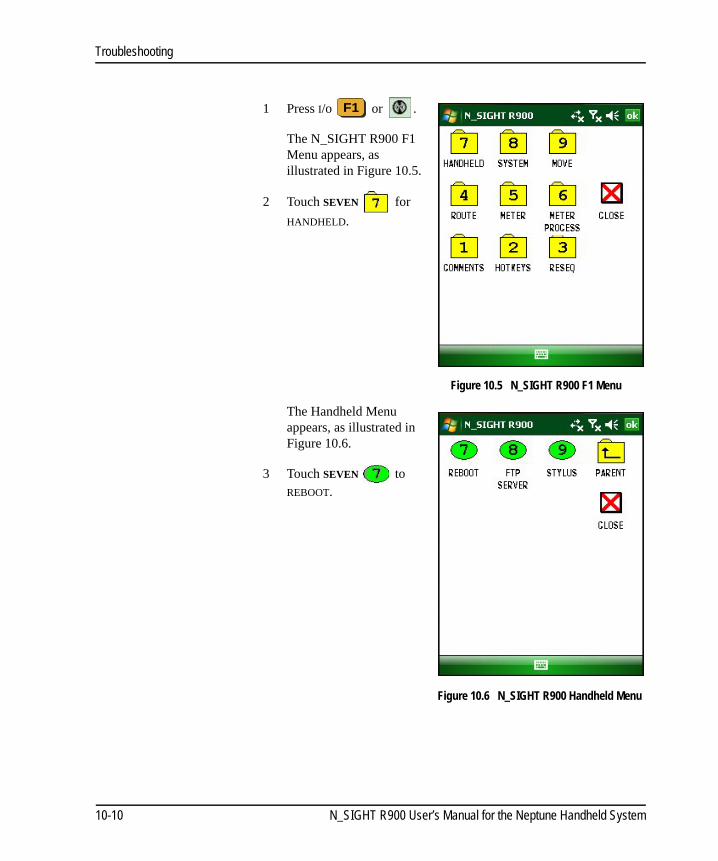
Troubleshooting
1 Press I/o or .
The N_SIGHT R900 F1 Menu appears, as illustrated in Figure 10.5.
2 Touch SEVEN for
HANDHELD.
Figure 10.5 N_SIGHT R900 F1 Menu
The Handheld Menu appears, as illustrated in Figure 10.6.
3 Touch SEVEN to REBOOT.
Figure 10.6 N_SIGHT R900 Handheld Menu
F1
10-10 N_SIGHT R900 User’s Manual for the Neptune Handheld System

Troubleshooting
A warning message appears as illustrated in Figure 10.7.
4 Touch YES to proceed.
Figure 10.7 Reboot Handheld Screen
A beep sounds and the N_SIGHT R900 Login screen appears as illustrated in Figure 10.1 on Page 10-7.
Rebooting When Logged off N_SIGHT R900
Follow these steps to reboot the CE5320B when logged off N_SIGHT R900.
1 From the N_SIGHT R900 Login screen, touch Menu or press M. See Figure 10.1 on Page 10-7.
2 The N_SIGHT R900 Main Menu appears as illustrated in Figure 10.2 on Page 10-8.
3 Touch SIX for HANDHELD.
4 Touch FOUR for REBOOT.
A beep sounds and the N_SIGHT R900 Login screen appears as illustrated in Figure 10.1 on Page 10-7.
N_SIGHT R900 User’s Manual for the Neptune Handheld System 10-11


Appendix A Changing Volume Settings
Adjusting Customized SoundsThe volume of the CE5320 is actually controlled through N_SIGHT host software and the handheld-specific settings. If you changes the volume on the handheld, it reverts to the default setting the next time that the unit synchronizes. The volume on the Nomad is controlled by a scroll bar.
Changing the Volume Setting on the CE5320
To adjust the volume control setting on the CE5320, complete the following steps.
1 On the N_SIGHT R900 Login screen, press M or touch Menu.
The N_SIGHT R900 Main Menu screen appears.
Figure A.1 N_SIGHT R900 Main Menu
The following instructions are for the CE5320 handheld only. To adjust the volume on the Nomad, see “Changing the Volume Setting on the Nomad,” on page A-5.
N_SIGHT R900 User’s Manual for the Neptune Handheld System A-1

Appendix A: Changing Volume Settings
2 Select , Admin.
The Admin Menu appears as illustrated in Figure A.2.
Figure A.2 N_SIGHT R900 Admin Menu
3 Select , Exit.
The CE.Net Windows Explorer screen appears.
Figure A.3 CE.Net Windows Explorer Screen
A-2 N_SIGHT R900 User’s Manual for the Neptune Handheld System

Appendix A: Changing Volume Settings
4 Click the in the upper right corner of the screen.
The Windows C. main screen appears as illustrated in Figure A.4.
Figure A.4 Windows CE Main Screen
5 Touch .
6 Select Settings, and Con-trol Panel, as illustrated in Figure A.5.
Figure A.5 Selecting Control Panel
The Control Panel menu appears as illustrated in Figure A.6.
Figure A.6 Windows Control Panel Menu
On the CE5320, if the screen backlight goes off, turn it on by pressing + .F3
N_SIGHT R900 User’s Manual for the Neptune Handheld System A-3

Appendix A: Changing Volume Settings
7 Scroll to and touch this icon.
The Volume & Sounds Properties screen appears as illustrated in Figure A.7.
Figure A.7 Volume & Sounds Properties Screen
8 On the Volume tab, enable sounds for the following:
• Events (warnings, system events)
• Applications
• Notifications (alarms, reminders)
• Key clicks: (then select soft or loud) - Soft - Loud
• Screen taps: (then select soft or loud) - Soft - Loud
9 Move the scroll bar to the appropriate volume level, soft or loud.
As you move the scroll bar, you can hear the volume level you select.
10 Touch OK.
On this screen you are enabling the volume level of the key clicks and screen tabs to be loud or soft. To turn key clicks on or off in N_SIGHT R900, refer to “Turning Key Clicks On and Off,” on page A-24 or“Turning Key Clicks On and Off,” on page A-27.
A-4 N_SIGHT R900 User’s Manual for the Neptune Handheld System

Appendix A: Changing Volume Settings
11 The Windows Control Panel screen appears.
12 Touch , to return to the Windows menu.
13 Touch .
14 Select Programs | Windows Explorer.
15 Touch to start N_SIGHT R900.
Changing the Volume Setting on the Nomad
To adjust the volume control setting on the Nomad, complete the following steps.
1 On any screen in N_SIGHT R900, click the volume icon at the top of the screen. The following drop-down scrollbar appears. See Fig-ure A.8.
The following instructions are for the Nomad handheld only. To adjust the volume on the CE5320, see “Changing the Volume Setting on the CE5320,” on page A-1.
N_SIGHT R900 User’s Manual for the Neptune Handheld System A-5

Appendix A: Changing Volume Settings
Figure A.8 Nomad Volume Control
2 Referring to Figure A.9, do one of the following.
• Move the scrollbar up or down to adjust the level of sound.
• Click one of the radio buttons to turn the sound on or off.
Figure A.9 Nomad Scrollbar and Radio Buttons
3 Click OK.
Volume control
Volume icon
Volume scrollbar
ON/OFFradio buttons
Volume scrollbar
ON/OFFradio buttons
A-6 N_SIGHT R900 User’s Manual for the Neptune Handheld System

Appendix B Tokens List for Custom Format Screen
With the Field Programmer, tokens are constants and special characters used as part of a ProRead format to do the following:
• Indicate a constant value
• Indicate where an inserted value, such as reading or check sum, goes.
The following table describes tokens used on the Custom Format screen.
Table B.1 Custom Format Tokens
Token Explanation
STX Starting character (0x02)
ETB End of text block constant (0x17)
CKS Check Sum (programming byte checksum after eliminating tokens)
ETX End of programming frame
MRT Meter reading token (0x7B)
ID Register ID based on the selection of ID digits on NewFMT tab (1-10 digits)
NULL Null (0x00)
N_SIGHT R900 User’s Manual for the Neptune Handheld System B-1

Appendix B: Tokens List for Custom Format Screen
USR USR User characters (USR1, USR2, USR3)
CR Carriage returns (0x0D)
LF Line Feed (0x0A)
SP Space Character (0x20)
MID Meter ID (0x4E ('N')
FT Flow Token (0xA0)
NIDS Network ID Size (Two nibbles of values 00 to 99 that provide network number)
NN Network Number (Net ID constant. Upper digit of network ID sent to reading equipment, Net ID constant. Lower digit of network ID sent to reading equipment. Primary register usually has size of network in these digits)
MR Mode Flag
RF Read Flag (dial code)
CKST Check sum token (0xFC)
FC Format Constant (0x31 '1'))
MT Meter type (0x57)
Printable character
Any printable ASCII value can be entered in the character box and it can be added to the list
Table B.1 Custom Format Tokens
Token Explanation
B-2 N_SIGHT R900 User’s Manual for the Neptune Handheld System

R900G: 12750-000
Appendix C Pressure Configuration Factor Indexes
Available FormatsThe following table is used for selecting gas formats available from American Meter, Sensus, and Actaris when using the Field Programmer.
Table C.1 Pressure Configuration Factor Index Table
Index Part Number Drive
GaugePressure
Atmospheric Pressure
Base Pressure
Actual Gear Ratio
Pressure Compensation
FactorAmerican Meter - AL/AR/AC/AM/AT 175/210/250/350/425/63052180G066 1 ft3 2 psig 14.40 14.73 900 1.111111
28538G151 1 ft3 2 psig 14.73 14.73 883.333333 1.132075
52180G067 2 ft3 2 psig 14.40 14.73 450 1.111111
04972G116 2 ft3 2 psig 14.73 14.91 443.055556 1.128527
04972G122 2 ft3 2 psig 14.40 14.65 445.454545 1.122449
04972G118 2 ft3 2 psig 14.73 14.73 442.000000 1.131222
04972G124 2 ft3 2 psig 14.55 14.73 443.055556 1.128527
04972G120 2 ft3 5 psig 14.40 14.73 381.944444 1.309091
04972G117 2 ft3 5 psig 14.73 14.91 376.125000 1.329345
04972G119 2 ft3 5 psig 14.73 14.73 374.305556 1.335807
04972G127 2 ft3 5 psig 14.40 14.65 376.125000 1.329345
04972G121 2 ft3 10 psig 14.40 14.73 303.333333 1.648352
Sensus/Equimeter - R-275 / R-315:001-63-537-48 2 ft3 2 psig 14.40 14.73 445.867 1.121411
001-63-537-41 2 ft3 5 psig 14.40 14.73 379.911 1.316098
001-63-537-49 2 ft3 10 psig 14.40 14.73 300.781 1.662339
Sensus/Equimeter - # 415: 001-41-537-48 2 ft3 2 psig 14.40 14.73 445.867 1.121411
001-41-537-41 2 ft3 5 psig 14.40 14.73 379.911 1.316098
001-41-537-49 2 ft3 10 psig 14.40 14.73 300.781 1.662339
R900G: 12821-000
R900G: 12821-100
N_SIGHT R900 User’s Manual for the Neptune Handheld System C-1

Appendix C: Pressure Configuration Factor Indexes
R900G: 12861-000
Sensus/Equimeter - S-275:
Propane 1 ft3 36.3025 2.7546296
Sprague/Schlumberger/Actaris - 175/240/250/Metris/400A 017289 2 ft3 2 psig 447.619050 1.1170213
018207 2 ft3 14” W.C 491.666700 1.0169491
017228 2 ft3 5 psig 375.000000 1.3333333
017308 2 ft3 2 psig 447.916700 1.1162790
135543 2 ft3 2 psig 447.619050 1.1170213
017308 2 ft3 2 psig 447.916700 1.1162790
037223 2 ft3 10 psig 293.333300 1.7045456
037234 5 ft3 2 psig 178.800000 1.1185682
037237 5 ft3 10 psig 120.000000 1.6666667
017317 2 ft3 2 psig 447.619050 1.1170213
017318 2 ft3 14” W.C 491.666700 1.0169491
017366 2 ft3 2 psig 447.619050 1.1170213
017367 2 ft3 14” W.C 491.666700 1.0169491
091238 2 ft3 2 psig 447.619050 1.1170213
091240 2 ft3 14” W.C 491.666700 1.0169491
135547 2 ft3 2 psig 447.619050 1.1170213
Index Part Number Drive
GaugePressure
Atmospheric Pressure
Base Pressure
Actual Gear Ratio
Pressure Compensation
Factor
R900G: 12821-200
C-2 N_SIGHT R900 User’s Manual for the Neptune Handheld System

Glossary
alphanumeric Having or using both alphabetical and numerical symbols. For example, an alphanumeric password contains both letters and numbers.
application program Usually referred to as an application, rather than an application program, it is a type of software program that performs a specific task useful to the user. Examples include database management applications, such as N_SIGHT R900, or word processing applications, such as Microsoft® Word®.
bit Short for binary digit, the smallest unit of information on a machine. A single bit can hold only one of two values: 0 or 1. More meaningful information is obtained by combining consecutive bits into larger units.
blank route A route made up entirely of meters for which readings have not been attempted. Compare with skip route.
broadcast message A statement that is sent from the HOST COMPUTER along with an assigned route to all handhelds of a specific office. The statement appears on the displays of each handheld when each meter reader completes the initial daily LOGIN pro-cedure. Compare with route message and survey message.
central-processing unit Often abbreviated as CPU, the CPU is the brains of the computer. Sometimes referred to simply as the processor or central processor, the CPU is where most calculations take place. In terms of computing power, the CPU is the most important element of a computer system.
code table A group of codes that are classified according to the type of information they capture. For example, a skip code table contains all of the skip codes used by a company. Codes allow you to pass on detailed information about a cus-tomer, meter, or route in an abbreviated form. For example the SKIP CODE “s1” might indicate that a meter was skipped because the glass of the meter was fogged and the meter reader could not see the reading.
N_SIGHT R900 User’s Manual for the Neptune Handheld System G-1

Glossary
communication cradle A device used to charge and exchange data with a handheld. Whenever a handheld is placed in a communication cradle, the battery of the hand-held begins recharging, and it is ready to exchange data with the HOST COMPUTER.
company code In the N_SIGHT R900 APPLICATION PROGRAM, company codes are used to indicate which company a field office belongs to or to indicate the employees of an company. Company codes can be two digits, two letters, or a digit and a letter.
constant A multiplier used to determine the customer’s final bill.
cycle A group of routes that is always processed together. Most utility companies process 21 cycles each month.
data-entry screen A type of SCREEN used by the handheld. Whenever a data-entry screen is dis-played, the handheld enables the appropriate keys so that you can enter data in the handheld.
default setting A computer term that is similar in meaning to factory setting. The default set-ting is one that the handheld automatically applies to an item. For example, the default setting for the direction that routes are read is “top to bottom.” Routes are always displayed in this order unless a meter reader or N_SIGHT R900 operator changes the setting.
direction key A special key on the handheld keyboard that allows you to move up or down a list of items and left or right in a data-entry space or through the meters of a route. This is actually a single key shaped like a cross with arrowheads printed on it indicating the direction of movement.
display The area at the top of the handheld where information about routes and meters are shown.
download The process of sending readings and route information from the HOST COM-PUTER to the handheld.
export A function of the N_SIGHT R900 APPLICATION PROGRAM or the HOST COM-PUTER. The export function creates a file containing readings and route infor-mation that is UPLOADED from the handheld. The export file is then sent to your company’s billing computer.
function key Special keys on the CE5320B keyboard that allow you to perform tasks quickly. Function keys are the top row of yellow keys labeled F1 to F5.
G-2 N_SIGHT R900 User’s Manual for the Neptune Handheld System
Glossary
GB An abbreviation for gigabyte. One gigabyte is equal to 1,024 megabytes.
highlighted Describes an item that is selected. When you select an item in a menu, the handheld lets you know that it has been selected by accenting the item with a black band. See also select.
host computer A computer that is accessed by a user working on another PC or WORKSTATION, for example, the N_SIGHT R900 host computer contains all N_SIGHT R900 data to which the billing computer and other PC operators can connect.
hot key A type of key that allows you to select an item from a list of items by pressing a single key. The key that you should press is shown next to each item on the list.
information keys A type of handheld key that allows you to get information about a meter or a route. Information keys are the letter/character keys that have information printed in white above them.
LAN See local-area network.
letter/character keys Keys on the keypad of the handheld that allow you to enter a letter or a charac-ter in the handheld display. Letter/character keys are the small, rectangular keys on the bottom portion of the keypad.
local-area network A computer network that spans a relatively small area. Most local-area net-works (LANs) are confined to a single building or group of buildings. However, one LAN can be connected to other LANs over any distance via telephone lines and radio waves. A system of LANs connected in this way is called a wide-area network (WAN).
Most LANs connect WORKSTATIONS and PERSONAL COMPUTERS. Each node (individual computer) in a LAN has its own central processing unit with which it carries out programs, but it is also able to access data and devices anywhere on the LAN. This means that many users can share expensive devices, such as laser printers, as well as data. Users can also use the LAN to communicate with each other by sending e-mail.
location code An arrangement of up to four numbers, letters, or both numbers and letters that tell where a meter is located. For example, a code of “carp” might be used to indicate that a meter is located in the carport of a home. See also code tables.
menu screen A type of SCREEN that contains a list of items from which to choose.
message screen A type of SCREEN that displays a message.
N_SIGHT R900 User’s Manual for the Neptune Handheld System G-3

Glossary
meter number The number by which a utility identifies a meter.
MHz Abbreviation for megahertz. One MHz represents one million cycles per sec-ond. The speed of MICROPROCESSORS, called the clock speed, is measured in megahertz.
microprocessor A chip that contains a central processing unit. At the heart of all personal com-puters and most workstations sits a microprocessor. Microprocessors also control the logic of almost all digital devices from clock radios to fuel-injection systems for automobiles.
MIU ID An abbreviation for meter interface unit identifier, which is a discrete number used to identify a specific meter interface unit.
modem A device that allows two computers to communicate via telephone lines by modulating and demodulating the signals from each. The name modem is a contraction of the words modulate and demodulate.
MS-DOS An abbreviation for Microsoft Disk Operating System. Originally developed by Microsoft for IBM, MS-DOS was the standard operating system for IBM-com-patible PERSONAL COMPUTERS.
The initial versions of DOS were very simple. However, MS-DOS is still a 16-BIT operating system and does not support multiple users or MULTITASKING as do newer OPERATING SYSTEMS such as WINDOWS 95 or WINDOWS NT.
multiple-route assignment A type of assignment in which more than one route is assigned to one meter reader.
multitasking The ability to carry out more than one task at the same time, a task being an APPLICATION PROGRAM.
N_SIGHT R900 database server
A type of software that receives, stores, and passes on information. Because handheld computers cannot send information directly to your company’s billing computer (and the system cannot send information directly to each handheld computer), the server is needed to translate information from one source to another.
number keys Keys that allow you to enter a number in the display of the handheld. Number keys are the large, white oval keys in upper portion of the keypad.
office code In the N_SIGHT R900 APPLICATION PROGRAM, office codes are used to indicate the office to which a meter belongs or to indicate the employees of an office. Office codes can be two digits, two letters, or a digit and a letter.
G-4 N_SIGHT R900 User’s Manual for the Neptune Handheld System

Glossary
operating system The most important program that runs on a computer. Every general-purpose computer must have an operating system to run other programs. Operating systems perform basic tasks, such as recognizing input from the keyboard, sending output to the display screen, keeping track of files and directories on the disk, and controlling peripheral devices, such as disk drives and printers. Usually, users interact with the operating system through a set of commands. For example, graphical user interfaces, such as WINDOWS 95 and WINDOWS NT, allow you to enter commands by pointing and clicking at objects that appear on the screen. The MS-DOS operating system contains commands such as COPY and RENAME for copying files and changing the names of files, respectively.
order A meter reading, service order, or similar transaction that takes place on the handheld.
PC An abbreviation for PERSONAL COMPUTER.
pop-up A special message that appears (pops up) automatically just before the read-ing entry screen that is associated with the message. You can control whether the special message appears as a pop-up message or does not appear.
prompt A symbol, such as “c:\>” that appears on a display, indicating that the com-puter is waiting for the operator to enter information. Once the computer has displayed a prompt, it waits for you to enter some information. Generally, it will wait forever, but some programs have built-in time-outs that cause the pro-gram to continue after it has waited a specified amount of time.
quick keys Keys that allow you to execute a task quickly by pressing specific keys at once or in a particular order.
reading-entry screen A specific type of DATA-ENTRY SCREEN used by the handheld. The reading-entry screen is used to enter readings.
read-type code An arrangement of up to four numbers, letters, or both numbers and letters that explain how the reading is obtained. For example, a code of “r0” might be used to indicate that the reading is entered manually. See also code tables.
region code In the N_SIGHT R900 APPLICATION PROGRAM, region codes are used to indi-cate the regional headquarters for a field office or to indicate the employees of a regional headquarters. Region codes can be two digits, two letters, or a digit and a letter.
N_SIGHT R900 User’s Manual for the Neptune Handheld System G-5

Glossary
route message A free-form statement sent from N_SIGHT R900 operators to the handheld computers of meter readers assigned to a specific route. A route message can contain as many as 80 characters. Compare with broadcast message and survey message.
router One of the most commonly used devices to connect several handheld at a time. The router device allows you to connect as many communication cradles to the HOST COMPUTER. Because the router provides communication connec-tions for the cradles, whenever a handheld is placed in a communication cra-dle, it is ready to exchange data with the HOST COMPUTER.
screens The graphic portion of a display. N_SIGHT R900 uses three different types of screens to present the information shown in the display: a MENU SCREEN, a DATA-ENTRY SCREEN, and a MESSAGE SCREEN.
select To choose an item by using the arrow keys or by using a HOTKEY. N_SIGHT R900 indicates that an item is selected by highlighting the item. See also highlighted.
sequence number A number assigned to each meter indicating the location of the meter in rela-tion to other meters in the route. For example, a sequence number of 000003 indicates that the meter is the third meter of a route. The meter reader may change the sequence number on the handheld computer, indicating a pre-ferred placement of that meter within the route.
sign off The act of exiting the meter reading portion of the handheld APPLICATION PRO-GRAM. By exiting the meter reading portion, you can access the communica-tion function and send information to or receive information from the HOST COMPUTER.
sign on The act of accessing the meter reading portion of the handheld so that you can obtain route assignments or collect readings.
skip code An arrangement of up to four numbers, letters, or both numbers and letters that explain why a reading was skipped. For example, a code of “s1” might be used to indicate that a reading was skipped because the glass of the meter was fogged and the meter reader could not see the usage display. See also code tables
skip route A route made up entirely of meters for which readings were attempted but could not be obtained. For example, the glass on the meter may have been fogged and the meter reader could not see the usage display. Compare with blank route.
G-6 N_SIGHT R900 User’s Manual for the Neptune Handheld System

Glossary
survey message A free-form question sent along with assigned routes to the handheld of a spe-cific CYCLE. A survey message can contain up to 40 characters. Compare with broadcast message and route message.
synchronize The process of communications to send readings and route data to and from the handheld and the HOST COMPUTER.
tag A handheld feature that allows you to tag one or more meters in a route and then have the handheld display only the tagged meters.
tag indicatorAn icon that appears in the display of the handheld to indicate that the
meter is tagged. When this symbol appears, the is hidden.
trouble code An arrangement of up to four numbers, letters, or both numbers and letters that explain why there is trouble with a meter. For example, a code of “t10” might be used to indicate that the battery of a meter is low. See also code tables.
upload The process of sending readings and route data from the handheld to the HOST COMPUTER.
user ID An identifier that is assigned to each user of the handheld. Entering a user ID number when you LOG IN ensures that only someone with a user ID can use the handheld. A user ID can contain up to ten digits, ten characters, or a com-bination of ten digits and characters There can be no spaces in a user ID.
Windows Microsoft Windows OPERATING SYSTEM. Windows supports 32-BIT and 64-BIT applications, which means that application programs written specifically for these operating systems run much faster.
workstation A type of computer used for engineering applications, desktop publishing, soft-ware development, and other types of applications that require a moderate amount of computing power and relatively high quality graphics capabilities. Like personal computers, most workstations are single-user computers. How-ever, workstations are typically linked together to form a LOCAL-AREA NETWORK, although they can also be used as stand-alone systems.
In networking, workstation refers to any computer connected to a local-area network. It could be a workstation or a PERSONAL COMPUTER.
N_SIGHT R900 User’s Manual for the Neptune Handheld System G-7

Glossary
Notes:
G-8 N_SIGHT R900 User’s Manual for the Neptune Handheld System

Index
AA key 3-16, 4-16access
reading mode 5-13RF test mode 5-13
access Codes menu 3-16, 4-16actual gear ratio A-1add, gas format 8-44, 8-47adding
meters to routes 6-29adding meters to routes 6-28 to 6-29alphanumerics
defined G-1AMR mode key 3-16, 4-16application programs
defined G-1atmospheric pressure A-1audit failed error message 6-21auto increment 8-31automatic off
described 2-7, 2-12automatic return
described 2-7, 2-12
BB key 3-16, 4-16backward keys
illustrated 3-15, 4-12, 4-18base pressure A-1batteries
calibrating 9-5, 9-8charging 9-3checking status of 9-3, 9-15compartment (illus.) 9-9, 9-10conserving 3-20, 4-20described 2-6, 2-11life of 9-5low charge warning 4-30ordering replacement 9-18, 9-21, 9-25 to 9-27recharging 9-5replacing 9-9 to 9-10status indicator (illus.) 9-3, 9-15using 4-30
batterycharger 9-4for CE5320 charger 3-6Nomad cable 4-6
battery error 5-9battery recharge contacts 2-6, 2-11battery status indicators
color of 9-3described 2-5, 2-10illustrated 9-3location (illus.) 2-5, 2-10using 9-3, 9-15
beepers, described 2-7, 2-12bits, defined G-1BKSP key 3-19, 4-19blank readings, entering 6-11blank routes
See also skip routesdefined G-1
blue keysfunction 3-19, 3-20, 4-19 to 4-20using 3-13
bluetooth, LED 5-9bookmarks, problems with 10-5broadcast messages 3-27, 4-32, 5-11
See also route messages, survey messagesdefined G-1
browse key 3-17, 4-17button, mouse 8-20
CC key 3-16, 4-16cable 4-6
charger 4-4for Bulverde charger 3-4
cable, USB transfer 5-17calibrating, battery 9-5, 9-8CE5320
features 2-4, 2-8, 2-13illustrated 2-4keyboard 2-4
CE5320, charger 3-3, 3-4, 3-6central processing units, defined G-1change modes, R900 BCR 5-4
N_SIGHT R900 User’s Manual for the Neptune Handheld System I-1
Index
changingkeyboard click setting 3-24, 4-27keyin direction 6-14meter information 6-30 to 6-32route direction 3-24, 4-27
character keysdefined G-3described 3-15
characters, entering 3-13, 3-15 to 3-16charger
battery 9-4cable 4-4CE5320 3-3, 3-4, 3-6CE5320 cable 3-4Nomad 4-3Nomad battery 4-5, 4-6Nomad illus. 4-3Nomad 4-4, 4-5, 4-6
charger, CE5320 battery 3-6checklist 8-27clearing readings and skip codes 6-22, 6-24, 6-26,
6-39, 6-41code tables, defined G-1codes, see specific codeCodes key 3-16, 4-16Codes menu, key 3-16, 4-16collecting meter readings 6-3color-coding, on keyboard 3-15, 3-19, 4-19colors, of battery status indicator 9-3command gas 8-24communication cradles
as part of system 3-2defined G-2with cradle-charging kit 3-3, 4-3
communication methods 7-1, 8-29, 8-40company codes, defined G-2components, R900 BCR 5-3confirmation, off/Level1 8-31connect to receptacle 8-29connect, wiring 8-29connecting
communication cable (illus.) 3-7multiple devices 3-8power cable to device (illus.) 3-6, 4-6power supply 3-5, 4-4router 3-5, 3-8, 4-5
constants, defined G-2conventions, used in the manual 1-1 to 1-2correcting
See also changingmeter information 6-30, 6-32
CPUs, see central processing units G-1cradle and charging kits
illustrated 3-3 to 3-4, 4-3 to 4-4, 9-15with communication cradle (illus.) 3-4, 4-4
create format 8-36custom formats 8-29customer support 1-5cycles, defined G-2
Ddamage
inspecting for 3-2, 4-1repairing instructions 9-4
damage, inspecting for 5-2data-entry screens
defined G-2described 2-14, 2-16example (illus.) 2-14
decimalentering points 3-19, 4-19using key 3-19, 4-19
default settings, defined G-2delete
gas format 8-50ProRead format 8-35
description ofautomatic off 2-7, 2-12automatic return 2-7, 2-12batteries 2-6, 2-11battery status indicators 2-5, 2-10character keys 3-15communication ports 2-5, 2-10data-entry screens 2-14, 2-16direction keys 3-15, 4-12, 4-18displays 2-14function keys 3-13handstraps 2-6hot keys 3-14, 4-13information keys 3-16 to 3-18, 4-16 to 4-18keyboard backlights 2-4, 2-10
I-2 N_SIGHT R900 User’s Manual for the Neptune Handheld System

Index
description of (continued)keyboards 2-4, 2-9letter keys 3-15main screens 2-14 to 2-15menu screens 2-14, 2-15message screens 2-17meter reader tasks 2-3meter readers 1-7number keys 3-14, 4-12operator tasks 2-3operators 1-7quick keys 3-19, 4-19
devicesconnecting 3-5, 4-5defined G-6
direction keysdefined G-2described 3-15, 4-12, 4-18
displayingbookmarked meters 3-19, 4-19meter information 2-18, 3-19, 4-19meters 3-15, 4-12, 4-18meters of a route 2-18, 3-15, 4-12reading-entry screens 2-17, 2-19, 3-15, 4-12, 6-33route information 2-18screens 2-17 to 2-21
displaysdefined G-2described 2-14problems with 10-2, 10-3 to 10-4, 10-5
down keys, illustrated 2-15, 3-15, 4-18downloading
defined G-2problems with 10-6
downloading informationSee sending and receiving information
drive A-1
Eedit
gas format 8-44ProRead format 8-32
Edit key 3-16, 4-16efficiency 5-14efficiency, performance 5-12
electromagnetic resistance 2-7, 2-13e-mail, customer support 1-6ENTER key 3-19, 4-19entering
blank readings 6-11characters 3-15 to 3-16decimals 3-19, 4-19letters 3-15 to 3-16skip codes 6-5 to 6-6
entry key 3-17, 4-17error codes, LEDs 5-9error messages, see also troubleshootingethernet ports, described 2-5, 2-10exchanging information
methods of 8-40exchanging information, see also sending and
receiving informationexchanging information, methods of 7-1, 8-29, 8-40export, defined G-2exposure, to temperatures 2-7
FF key 3-17, 4-16F1 key 3-13F2 key 3-13F3 key 3-13F4 key 3-13F5 key 3-13fax, customer support 1-6features
automatic off 2-7, 2-12automatic return 2-7, 2-12battery 2-6battery recharge contacts 2-6battery status indicator 2-5, 2-10beeper 2-7, 2-12CE5320B 2-4, 2-8, 2-13display 2-4, 2-9handstrap 2-6keyboard 3-11, 4-9keyboard backlight 2-4, 2-9LEMO communication port 2-5, 2-10manual off 2-7, 2-12optical-infrared port 2-6, 2-11
Find key 3-17, 4-16
N_SIGHT R900 User’s Manual for the Neptune Handheld System I-3

Index
firmwareupdate 5-17web update 5-16
firmware updates, R900 BCE 5-1firmware, update 5-15format
add gas 8-44, 8-47create 8-36custom 8-29delete gas 8-50delete ProRead 8-35edit gas 8-44edit ProRead 8-32gas 8-46manage 8-29name 8-37save ProRead 8-40select gas 8-42select ProRead 8-35standard 8-34
forward keysillustrated 3-15, 4-12, 4-18
found metersfound meters, see also adding meters to routesfunction keys
defined G-2described 3-13
GG key 3-17, 4-16Gas
preferences 8-41gas
command 8-24preferences 8-40program 8-18program register 8-40readings 8-26
gauge pressure A-1GBs, defined G-3gear ratio, actual A-1GoTo key 3-17, 4-16
Hhandhelds
dropping 2-8, 2-13durability 2-7, 2-12illustrated 2-4, 2-9, 4-10inspecting 3-2, 4-1, 5-2shipping to Neptune 3-2, 5-2, 9-28use with RouteMAPS 2-1using 2-1
handstrapsdescribed 2-6on handheld (illus.) 9-11 to 9-13replacing 9-11 to 9-14
highlightingSee also selectingdefined G-3
host computersconnecting equipment to 3-5, 4-4defined G-3exchanging information with 7-1
host computers, exchanging information with 8-29, 8-40
hot keysdefined G-3described 3-14, 4-13
II/O key 3-19, 4-19index part number A-1information exchange 7-1information key 3-17, 4-17information keys
defined G-3described 3-16, 3-18, 4-16, 4-18
INS/ESC key 3-19, 4-19inspecting, equipment 3-2, 4-1, 5-2installing
battery 9-10battery, CE5320B 9-10handstrap 9-11, 9-14LEMO cable 3-8power supply 3-5, 4-4router 3-5, 4-5
interconnect wires, networking 8-29
I-4 N_SIGHT R900 User’s Manual for the Neptune Handheld System

Index
JJ key 3-17, 4-17
Kkey
browse 3-17, 4-17edit 3-16, 4-16entry, manual 3-17, 4-17for screen information 3-17, 4-17for Search 3-17, 4-16GoTo 3-17, 4-16information 3-17, 4-17list 3-17, 4-17Logout 3-18, 4-17manual entry 3-17, 4-17Meter 3-18, 4-17Properties 3-18, 4-17RF test 3-18, 4-17Skip 3-18, 4-17Tag 3-18, 4-17Tag search 3-18, 4-17to exit 3-18, 4-17W, to logout 3-18, 4-17
key AMR mode 3-16, 4-16key, Find 3-17, 4-16keyboard backlights, described 2-10keyboard click, selecting 3-24, 4-28keyboards
backlight 2-4, 2-10backlights described 2-4CE5320B (illus) 2-4character keys 3-15 to 3-16character keys (illus.) 3-12, 4-10color coding 3-13, 3-15, 4-11described 2-4, 2-9direction keys 3-14 to 3-15, 4-12, 4-18\direction keys (illus.) 3-12, 4-10enabling Keyboard Click 3-24, 4-27function keys 3-13function keys (illus.) 3-12, 4-10illustrated 3-12, 4-11information keys 3-16 to 3-18, 4-15, 4-18information keys (illus.) 3-12letter keys 3-15 to 3-16letter keys (illus.) 3-12, 4-11
number keys 3-14, 4-12number keys (illus.) 3-12quick keys 3-19, 4-19quick keys (illus.) 3-12, 4-10, 4-11selecting Keyboard Click 3-24, 4-27 to 4-28Trimble Nomad (illus) 2-9
keyin direction, selecting 3-23, 4-27keys, color-coding 3-15, 3-19, 4-19
LL key 3-18, 4-17LANs, see local area networksLED operating modes 5-8LEDs
bluetooth 5-9error codes 5-9explained 5-8mode 5-8power 5-8RF mode 5-9
LEMO connectors, as part of system 3-2letter keys
defined G-3described 3-15illustrated 3-12, 4-11
letter, entering 3-15list key 3-17, 4-17local area networks, defined G-3location codes, defined G-3login screen 8-30, 8-41Logout key 3-18, 4-17long-term storage, preparing the unit for 9-2low-power state 2-7, 2-12
MM key 3-18, 4-17Main Menu screen, illustrated 6-8, 6-16, 6-26, 6-37main screens
described 2-14 to 2-15illustrated 2-14 to 2-15
maintenancefrequency of 9-1proper storage 9-2 to 9-3recommended 9-1
manage formats 8-29
N_SIGHT R900 User’s Manual for the Neptune Handheld System I-5

Index
manual entry key 3-17, 4-17manual OFF, described 2-7, 2-12menu screens 2-15
defined G-3described 2-14, 2-15example (illus.) 2-14example of (illus.) 2-14
menusMain 6-37Utility 3-25, 4-28
message screensdefined G-3described 2-17example (illus.) 2-15
messagese-mail 1-6See route messages, survey messages, error
messages, broadcast messagesMeter 2-1meter information, displaying screens with 2-18Meter key 3-18, 4-17meter numbers, defined G-4meter reader tasks
defined 1-7described 2-3
meter readersdescribed 1-7responsibilities 1-8
meter reading cycle, illustrated 5-2meter readings
See also readingscollecting manually 6-3
meterschanging information about 2-21, 6-30 to 6-32displaying information 3-19, 4-19
MHz, defined G-4microprocessors
See also central processing unitsdefined G-4
MIU IDs, defined G-4mode LED 5-8mode, suspend 2-7, 2-12modems, defined G-4moderate performance 5-12, 5-14modes
access RF test mode 5-13bluetooth 5-9error codes LEDs 5-9LED 5-8LED operating 5-8normal filtered reading 5-5RF 5-9RF performance 5-11RF test 5-13SD card error, LED 5-9unattended 5-5unfiltered reading 5-5
mouse, button 8-20moving
in a data-entry space 3-15, 4-12, 4-18through screens 2-17within a route 6-33, 6-35
MS-DOSSee also Windows 95, Windows NT, operating
systemsdefined G-4
MTR INFO key 3-18, 4-17multiple-route assignments, defined G-4multiplier, gas 8-45multitasking, defined G-4
NN_SIGHT R900 database server, defined G-4N_SIGHT R900 status screen 5-7, 5-11navigating screens 2-17Neptune key, illustrated 5-7networking 8-28new meters
adding 6-28 to 6-29NEW MTR key 3-18, 4-17Nomad
charger 4-3, 4-4, 4-5, 4-6charger illus. 4-3display 2-9
Nomad, basic features 2-9, 2-12normal filtered reading mode 5-5number keys
defined G-4described 3-14, 4-12illustrated 3-12, 4-10
I-6 N_SIGHT R900 User’s Manual for the Neptune Handheld System

Index
Ooffice codes, defined G-4operating mode, LED 5-8operating systems
See also Windows 95, Windows NT, MS-DOSdefined G-5
operating temperatures 2-7, 2-12operator tasks
defined 1-7described 2-3
operatorsdescribed 1-7responsibilities 1-9
options, Customer Support 1-6order
defined G-5ordering parts 9-26overview, R900 BCR 5-1
PP key 3-18, 4-17packing the handheld 9-28pair, R900 BCE 5-10parts
list of replaceable 9-26ordering 9-26recommended spare 9-26
passwordGas login (Field Programmer) 8-41ProRead login 8-30, 8-41
PCF 8-45PCs
See also personal computersdefined G-5
performance RF 5-14performance, best 5-12, 5-14pop-ups, defined G-5power supply, connecting 3-5, 4-4preferences
Gas 8-41preferences, ProRead 8-30pressure
atmospheric A-1base A-1gauge A-1
pressure compensation factors, table of A-1Pressure Configuration Factor 8-45problems
See also troubleshootingsolving 10-1 to 10-6
programgas 8-18gas register 8-40network secondary register 8-28R900G 8-18
program result, gas 8-20prompts
defined G-5Properties key 3-18, 4-17ProRead
preferences 8-30query 8-14read 8-15select format 8-32
QQ key 3-18, 4-17query ProRead 8-14query, results 8-15quick keys
defined G-5described 3-19, 4-19illustrated 3-12, 4-11
RR key 3-18, 4-17R900 BCR
change modes 5-4components 5-3firmware updates 5-1overview 5-1pair bluetooth 5-10read route 5-11SD card 5-14status screen 5-11update firmware 5-15USB transfer cable 5-17
R900 BCR firmware 5-15R900 BCR modes
explanation 5-5
N_SIGHT R900 User’s Manual for the Neptune Handheld System I-7

Index
LED operating 5-8operation 5-4, 5-7summary 5-4, 5-7
R900 Belt Clip Receiveroverview 5-1USB transfer cable 5-17
R900G, program 8-18ratio A-1read
gas 8-26ProRead 8-15
reading a route 5-11reading mode
access 5-13reading-entry screens
defined G-5displaying 2-17, 2-19example (illus.) 2-18sample used in manual 6-1
readingsbypassing 6-3clearing 6-22, 6-24, 6-26, 6-39, 6-41collecting 6-3entering into the handheld 6-3 to 6-4entering skip code 6-5leaving blank 6-11problems with uploading 10-6validating 6-20
readings, store 5-1readings, validate 6-20read-type codes, defined G-5reboot
handheld 10-9logged off 10-11logged on 10-9
receiving information from host 7-4 to 7-5recharging the battery 9-5refresh, R900G 8-24region codes, defined G-5register, program secondary 8-28registers, network 8-28removing
battery 9-9 to 9-10handstrap 9-11 to 9-12
replacingbattery 9-9\ to 9-10handstrap 9-11, 9-13 to 9-14
reset handheld 10-7, 10-9resistance
electromagnetic 2-7, 2-13shock 2-8, 2-13water 2-7, 2-12
returning CE5320B 9-28RF mode 5-9RF performance 5-14RF test
mode 5-13RF Test key 3-18, 4-17RF test mode
access 5-13rotation, clockwise or counter-clockwise 8-46route directions, changing 3-24, 4-27route information, displaying screens with 2-18route messages
See also broadcast messages, survey messagesdefined G-6
router, connecting 3-5, 3-8, 4-5routes, problems with downloading 10-6
Ssave
gas format 8-46ProRead format 8-40
screensBeeper Menu (illus.) A-2data-entry 2-16data-entry example (illus.) 2-14defined G-6entering information in 2-17GoTo 6-37Main Menu (illus.) 6-37menu 2-15menu example (illus.) 2-14message 2-17message example (illus.) 2-15navigating through 2-17overview 2-14, 2-17reading-entry example 2-18types 2-14, 2-17
I-8 N_SIGHT R900 User’s Manual for the Neptune Handheld System

Index
screens (continued)Utility Menu (illus.) 3-25, 4-28with meter or route information 2-18
SD card 5-6, 5-14SD card error 5-9search, Y key for Tag search 3-18, 4-17select format
gas 8-42ProRead 8-32, 8-35
select preferencesgas 8-40, 8-41ProRead 8-30
selectingSee also highlightingdefined G-6items from menu screens 3-14, 3-15, 3-16, 4-13,
4-18Keyboard Click 3-24, 4-27 to 4-28keyin direction 3-23, 4-27, 6-14menu items 3-14, 4-12search feature 6-17
selection listgas 8-19gas formats 8-44ProRead 8-10tokens 8-39
sending and receiving informationdescribed 7-1with device 7-4
sequence numbers, defined G-6setting up, hardware for communication 3-5, 3-8, 4-4shipping
damage 3-2, 4-1, 5-2instructions for 9-28packing required for 9-28packing requirements 3-2, 5-2to Neptune 9-28
shock resistance 2-8, 2-13short-term storage
preparing for 9-2signing off
defined G-6how to 3-30, 4-36
signing on 3-26, 4-31defined G-6
skip code 6-24
skip codesclearing 6-22, 6-24, 6-26, 6-39, 6-41defined G-6entering 6-5
Skip key 3-18, 4-17skip routes
See also blank routesdefined G-6
sleep mode, gas 8-24software
finding version number 1-3resetting 10-7, 10-9starting from MS-DOS 10-6
SP key 3-19, 4-19standard format 8-34status screen, N_SIGHT R900 5-7, 5-11store R900 readings 5-1storing
long-term 9-2short-term 9-2
support, customer 1-5survey messages
See also broadcast messages, route messagesdefined G-7
suspend mode 2-7, 2-12symbols, used in manual 1-1synchronize screen 5-7synchronize, defined G-7system configuration
communication cradle 3-2determining 3-1equipment needed 3-3, 4-3LEMO connector 3-2
system settingsadjustment options 3-20, 4-22overview 3-20, 4-22
Ttag
defined G-7indicators, defined G-7
Tag key 3-18, 4-17Tag search key 3-18, 4-17temperatures, operating 2-7, 2-12test hand, gas 8-45
N_SIGHT R900 User’s Manual for the Neptune Handheld System I-9

Index
tokens, custom format 8-39TOTAL key 3-17, 4-16transporting the PC9800 9-4Trimble Nomad
keyboard 2-9trouble codes, defined G-7troubleshooting
Audit Failed error message 6-20bookmark feature 10-5display 10-2, 10-3, 10-4, 10-5non-responsive unit 10-2, 10-4unit won't turn off 10-3, 10-5upload/download unsuccessful 10-6
turning offautomatic return 2-7, 2-12automatically 3-30, 4-31, 4-36handheld 4-31keyboard backlight 3-20, 4-20manually 3-19, 4-19problems with 10-3, 10-5
turning onautomatic return 2-7, 2-12handheld 3-19, 4-19, 4-30keyboard backlight 3-20, 4-20
Uunattended mode 5-5unfiltered reading mode 5-5unloading information, see sending and receiving
informationunpacking, equipment 3-2, 4-1, 5-2
up key, illustrated 3-15, 4-18uploading
defined G-7overview 2-1problems with 10-6
USB mass storage 5-6USB transfer cable 5-17user IDs, defined G-7Utility Menu screen, illustrated 3-25, 4-28
Vvalidate readings 6-20validating readings 6-20version number 3-17, 4-17volume control
CE5320 A-1Nomad A-5
WW key, to exit 3-18, 4-17wake up, gas 8-24warranty, voiding 2-5, 2-10water resistance 2-7, 2-12Windows
CE.Net screen, illustrated A-2Windows, defined G-7workstations, defined G-7
Yyellow keys, using 4-11
I-10 N_SIGHT R900 User’s Manual for the Neptune Handheld System


Neptune Technology Group Inc.1600 Alabama Highway 229Tallassee, AL 36078USATel: (800) 633-8754Fax: (334) 283-7293
Neptune Technology Group (Canada) Ltd.7275 West Credit AvenueMississauga, OntarioL5N 5M9CanadaTel: (905) 858-4211Fax: (905) 858-0428
Neptune Technology Group Inc.Ejército Nacional No. 418Piso 12, Desp. 1201-1202Col. Chapultepec MoralesDelegación Miguel Hidalgo11570 México, Distrito FederalTel: (525) 55203 5294 / (525) 55203 5708Fax: (525) 55203 6503
UM Handheld System 12.13 Part No. 11769-016 © Copyright 2005-2013, Neptune Technology Group Inc. Neptune is a registered trademark of Neptune Technology Group Inc
neptunetg.comTAKE CONTROL