neonatal intensive care unit clinical guideline lines and... · babies with umbilical lines can be...
TRANSCRIPT
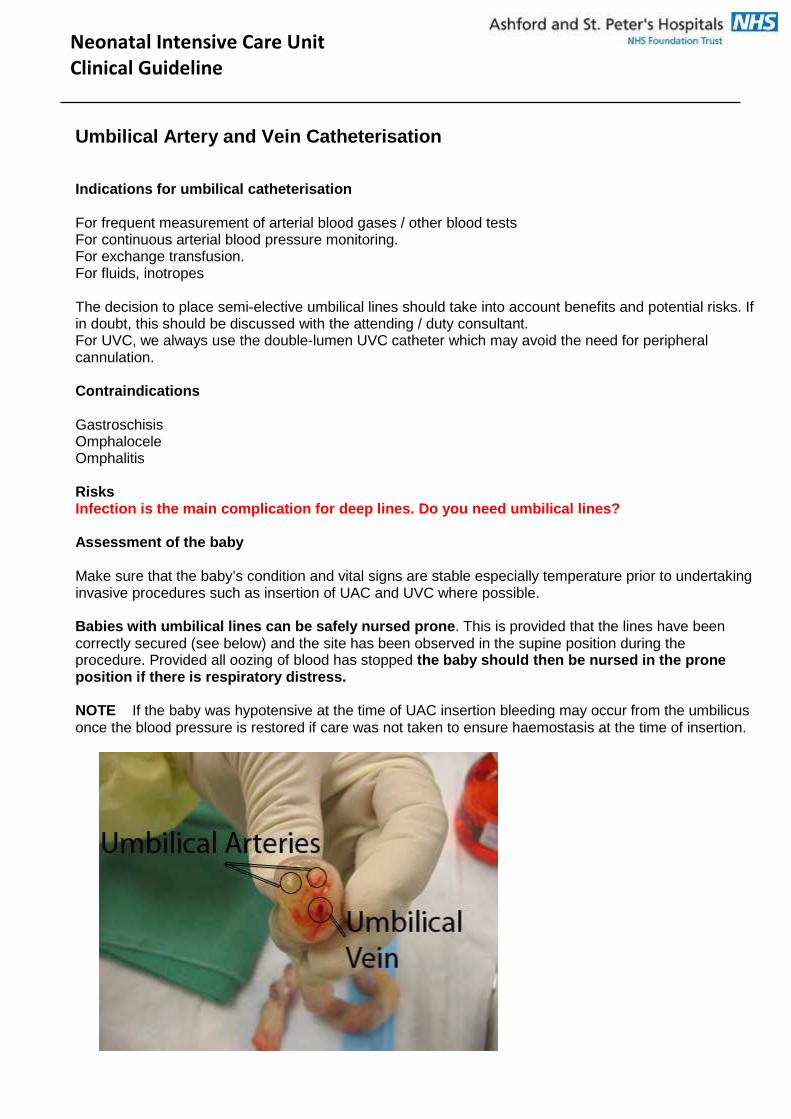
Umbilical Artery and Vein Catheterisation
Indications for umbilical catheterisation For frequent measurement of arterial blood gases / other blood tests For continuous arterial blood pressure monitoring. For exchange transfusion. For fluids, inotropes The decision to place semi-elective umbilical lines should take into account benefits and potential risks. If in doubt, this should be discussed with the attending / duty consultant. For UVC, we always use the double-lumen UVC catheter which may avoid the need for peripheral cannulation. Contraindications Gastroschisis Omphalocele Omphalitis Risks Infection is the main complication for deep lines. Do you need umbilical lines? Assessment of the baby Make sure that the baby’s condition and vital signs are stable especially temperature prior to undertaking invasive procedures such as insertion of UAC and UVC where possible. Babies with umbilical lines can be safely nursed pr one . This is provided that the lines have been correctly secured (see below) and the site has been observed in the supine position during the procedure. Provided all oozing of blood has stopped the baby should then be nursed in the prone position if there is respiratory distress. NOTE If the baby was hypotensive at the time of UAC insertion bleeding may occur from the umbilicus once the blood pressure is restored if care was not taken to ensure haemostasis at the time of insertion.
Neonatal Intensive Care Unit
Clinical Guideline
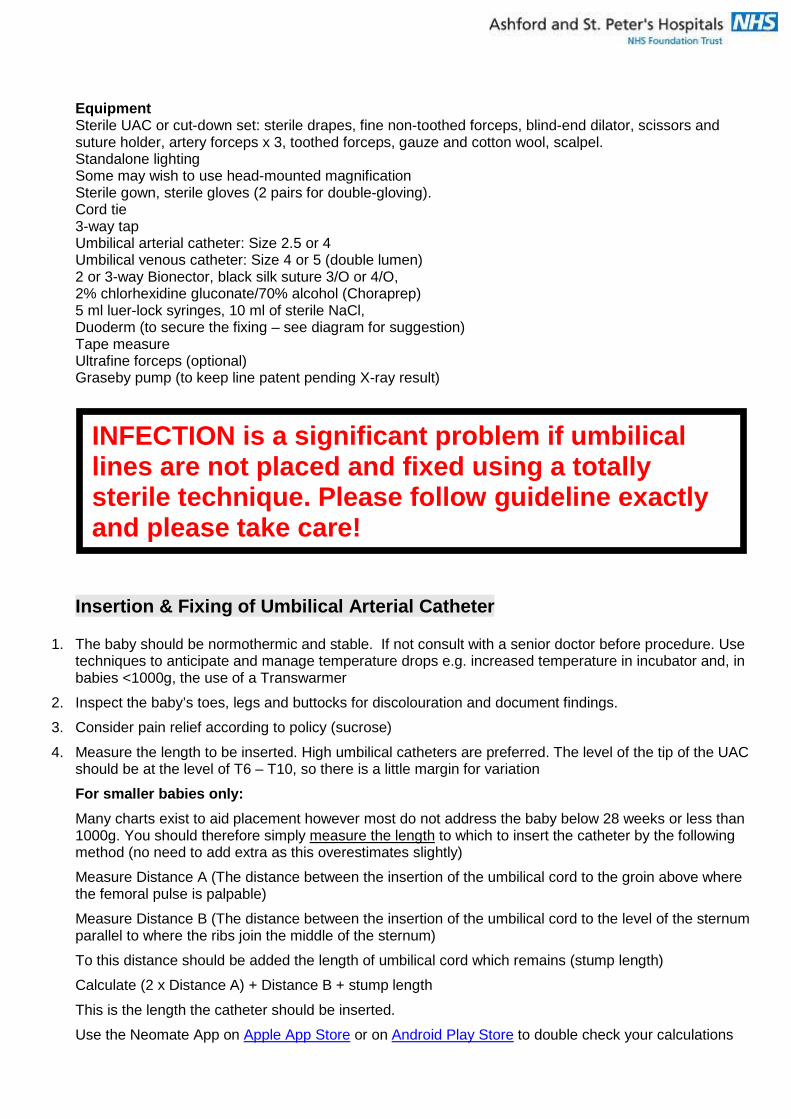
Equipment Sterile UAC or cut-down set: sterile drapes, fine non-toothed forceps, blind-end dilator, scissors and suture holder, artery forceps x 3, toothed forceps, gauze and cotton wool, scalpel. Standalone lighting Some may wish to use head-mounted magnification Sterile gown, sterile gloves (2 pairs for double-gloving). Cord tie 3-way tap Umbilical arterial catheter: Size 2.5 or 4 Umbilical venous catheter: Size 4 or 5 (double lumen) 2 or 3-way Bionector, black silk suture 3/O or 4/O, 2% chlorhexidine gluconate/70% alcohol (Choraprep) 5 ml luer-lock syringes, 10 ml of sterile NaCl, Duoderm (to secure the fixing – see diagram for suggestion) Tape measure Ultrafine forceps (optional) Graseby pump (to keep line patent pending X-ray result)
Insertion & Fixing of Umbilical Arterial Catheter
1. The baby should be normothermic and stable. If not consult with a senior doctor before procedure. Use techniques to anticipate and manage temperature drops e.g. increased temperature in incubator and, in babies <1000g, the use of a Transwarmer
2. Inspect the baby’s toes, legs and buttocks for discolouration and document findings.
3. Consider pain relief according to policy (sucrose)
4. Measure the length to be inserted. High umbilical catheters are preferred. The level of the tip of the UAC should be at the level of T6 – T10, so there is a little margin for variation
For smaller babies only:
Many charts exist to aid placement however most do not address the baby below 28 weeks or less than 1000g. You should therefore simply measure the length to which to insert the catheter by the following method (no need to add extra as this overestimates slightly)
Measure Distance A (The distance between the insertion of the umbilical cord to the groin above where the femoral pulse is palpable)
Measure Distance B (The distance between the insertion of the umbilical cord to the level of the sternum parallel to where the ribs join the middle of the sternum)
To this distance should be added the length of umbilical cord which remains (stump length)
Calculate (2 x Distance A) + Distance B + stump length
This is the length the catheter should be inserted.
Use the Neomate App on Apple App Store or on Android Play Store to double check your calculations
INFECTION is a significant problem if umbilical lines are not placed and fixed using a totally sterile technique. Please follow guideline exactly and please take care!

For bigger babies:
The shoulder tip-umbilicus length should be converted using this chart, and then the length of the stump should be added.
5. The procedure is a sterile one . First wash hands and dry with a sterile towel and put on a sterile gown and gloves. Use of double gloving , where the first set are used to prepare the area, is needed.
6. Attach the 3-way tap to the catheter. Prime the catheter with sterile 0.9% NaCl using the 5 ml syringe
7. It may be necessary in larger infants to ask for assistance to hold the baby’s limbs.
8. Clean the umbilical cord area with Chloroprep solution. Ensure that there is no pooling of solution as this can cause rapid cooling of the baby as well as chemical irritation of the skin. Chloroprep contains 70% alcohol as well as 2% chlorhexidine, which can cause skin burns in premature babies, so minimise the amount and contact necessary.
9. Place the sterile towels around the umbilicus, leaving the feet and head exposed. Observe the baby closely during the procedure for vasospasm in the leg or signs of distress.
10. Tie a cord tie around the base of the umbilical cord, tight enough to minimise blood loss but loosely enough so that the catheter can be passed easily through the vessel. Cleanly cut the umbilical cord with the scalpel, leaving a stump of about 2 cm.
11. Identify the arteries – there are normally two arteries and one vein; the arteries have relatively thick walls and a small lumen when compared with the vein. Careful identification is important and mistakes are possible, so check carefully.
12. Using the curved artery forces, grasp the end of the umbilicus to hold it upright and steady.
13. Using fine forceps and/or a blunt-ended dilator, gently tease open the artery.
14. Once the artery is sufficiently dilated, gently insert the catheter and advance the catheter slowly.
15. Gently insert the UAC into the artery to the measured length. Blood should flow back freely.
16. Obstruction may be encountered at:
1 - 2 cm: This is where the vessels turn downwards. Try turning the umbilical stump towards the baby’s head.
4 - 5 cm: This is probably due to spasm and kinking of the artery at the origin of the iliac vessels. The use of gentle sustained pressure should overcome this.
17. Secure the catheter as recommended in Appendix 1.
18. Inspect the baby’s legs and buttocks for any new discolouration. If the leg or toes are blue or white, observe carefully for a short time, and if not improving remove the catheter. It may be possible to try the other artery

19. Request a single X-ray of “chest and abdomen for UAC position” (one of the few times we request
the 2 combined, using the unique PAS request code). If the UAC is in the artery, the catheter will dip down first towards the pelvic bone then turn upwards as it enters the iliac artery, finally lying to the left of the spine. A high UAC should lie at or above the level of the diaphragm (T6-T10 vertebrae on CXR) and a low UAC between L3 and L5. Never leave a UAC at the level of L1, i.e. opposite the origin of the renal arteries.
20. Document the details of the line insertion, X-ray position and any adjustments in the line insertion documentation. If both UAC and UVC are inserted at the same time, then follow the protocol for checking position.
21. Attach the UAC to an infusion (see 21, below, for suitable infusions) which is normally run at 0.5mL/hr. In infants less then 1000g, the infusion can often be successfully run at a lower rate (0.3ml/hr) to minimise sodium intake. An invasive BP monitoring system should also be attached.
Infusions for UAC
Premature babies <1000g
Normally use a sodium bicarbonate infusion to minimise chloride intake (hyperchloraemia). Bicarbonate supplementation can in theory cause the PaCO2 to rise; therefore monitor the blood gas and the baby’s respiratory drive. The small flushes given when the UAC is sampled from are safe. Sodium bicarbonate is compatible with heparin.
The ‘weak’ infusion gives approximately the same sodium intake as 0.45% saline, the ‘strong’ gives approximately the same sodium intake as 0.9% saline.
‘Weak’ Sodium Bicarbonate Infusion .
To 46.2mls of sterile water for injection, add 3.8mls of 8.4% sodium bicarbonate to a total of 50ml, and add 50 units (0.05ml) of heparin. Run at 0.5ml/hr this gives a sodium intake of 0.9mmol/day (at 0.3ml/hr = 0.54mmol/day).
‘Strong’ Sodium Bicarbonate .
To 42.5mls of sterile water for injection, add 7.5mls of 8.4% sodium bicarbonate to a total of 50ml, and add 50 units (0.05ml) of heparin. Run at 0.5ml/hr this gives a sodium intake of 1.8mmol/day (at 0.3mml/hr = 1.08mmol/day).
Larger babies
The most commonly used infusion is 0.45% saline 50ml, to which 50 units (0.05ml) of heparin is added. At 0.5ml/hr this gives a sodium infusion rate of 0.9mmol/day (at 0.3 ml/hr = 0.54mmol/day).
If normal saline (0.9%) is used, with 50 units heparin in 50mls, the sodium infusion at 0.5ml/hr is 1.8mmol/day (at 0.3ml/hr = 1.08mmol/day).
22. Babies with a UAC in situ may be safely nursed pron e. However, it is the responsibility of the doctor placing the UAC to ensure it is securely fixed in position and that bleeding has stopped. The umbilical tape should be tightened around the umbilical cord stump being careful not to catch the normal skin around the umbilicus while tightening the tape. The tape should be removed the next day when the cord is checked and there is no oozing.
23. BEWARE If the baby was hypotensive at the time of UAC insertion bleeding may occur from the umbilicus once the blood pressure is restored if care was not taken to ensure homeostasis at the time of insertion. This appears, in practice, to be rare.
24. Attach a Curos to any unused port.

Insertion & Fixing of Umbilical Venous Catheter
1. The baby should be normothermic and stable. If not consult with a senior doctor before procedure. Use techniques to anticipate and manage temperature drops e.g. increased temperature in incubator and, in babies <1000g, the use of a Transwarmer
2. Inspect the baby’s toes, legs and buttocks for discoloration and document findings.
3. Consider giving pain relief according to policy (sucrose)
4. Measure the length to be inserted. The level of the tip of the UVC should be at or just below the diaphragm i.e. not in the heart and not in the liver. There is very little margin for variation, and placement of a UVC correctly is difficult (more difficult than a UAC).
5. You should measure the length to which to insert the catheter by the following method:
For estimating the insertion length for a UVC
Use the Neomate App on Apple App Store or on Android Play Store to calculate
To doublecheck manually, measure the distance between the insertion of the umbilical cord to the xiphisternum. To this distance should be added the length of umbilical cord which remains depending on how far the cord has been cut from its point of insertion. This is the length the catheter should be inserted from the cut end of the cord into the baby
6. The procedure is an aseptic one. First wash hands and dry with a sterile towel and put on a sterile gown and gloves. Use of double gloving, where the first set are used to prepare the area, is recommended.
7. Prime the catheter with sterile 0.9% NaCl using the 5 ml syringe. Ensure the catheter is closed to minimise the risk of air embolism.
8. It may be necessary in larger infants to ask for assistance to hold the baby’s limbs.
9. Clean the umbilical cord area with Chloroprep solution. Ensure that there is no pooling of solution as this can cause rapid cooling of the baby as well as chemical irritation of the skin. Chloroprep contains 70% alcohol as well as 2% chlorhexidine, which can cause skin burns in premature babies, so minimise the amount and contact necessary.
10. Place the sterile towels around the umbilicus, leaving the feet and head exposed. Observe the baby closely during the procedure for signs of distress.
11. Tie an umbilical tape around the base of the umbilical cord, tight enough to minimise blood loss but loosely enough so that the catheter can be passed easily through the vessel. Cleanly cut (do not “saw”) the umbilical cord with the scalpel, leaving a stump of about 2 cm.
12. Identify the vein – there are normally two arteries and one vein. The vein is thin-walled and may ooze when the cord is cut. Careful identification is important and mistakes are possible, so check carefully.
13. Using the curved artery forceps, grasp the end of the umbilicus to hold it upright and steady.
14. With a second forceps, grasp one wall of the vein.
15. Gently insert the catheter and advance it slowly, aiming slightly towards the head.
16. Obstruction may be encountered at the level of the ductus venosus. There are some manoeuvres that can assist in placement. These include:
pulling the catheter back to about 4-5cm, then advancing the catheter whilst rotating the catheter clockwise
passing another catheter down beside the already mal-placed catheter. The path of the second catheter may be through the ductus venosus.
Do not force a catheter in if there is resistance.
In an emergency, a UVC that remains in the portal circulation may be withdrawn until it lies in the umbilical vein (about 3-5cm from insertion of cord).
17. Secure the catheter as suggested in Appendix 1.
18. Attach the Bionector to the catheter.
19. Inspect the baby’s legs for any new discoloration.
20. Consider using ultrasound for line placement checks prior to X-ray.
21. Request a single X-ray of “chest and abdomen for UVC position” (one of the few times we request the 2 combined using the unique PAS request code). If the UVC is in the vein, the catheter will pass upwards as it enters the umbilical vein, finally lying to the right of the spine on X-ray. A high (preferred position) UVC should lie at or just above the level of the diaphragm but not in the right atrium, and a low UVC between L3 and L5. Never leave a UVC in the liver/portal circulation.
22. Document the details of the line insertion, X-ray position and any adjustments in the line insertion documentation. If both UAC and UVC are inserted at the same time, then follow the protocol for checking position.
23. It is not always possible to aspirate venous blood from an umbilical venous line, but if this is attempted and found to be possible then this should be documented.
24. Infusions for UVC
[a] Dextrose concentrations >10% should not be used until it has been checked that the UVC tip is not in the liver.
[b] Antibiotics, blood products, TPN, sedation and inotropes can all be administered via the UVC
25. Babies with a UVC in situ may be safely nursed prone. However, it is the responsibility of the doctor placing the UVC to ensure it is securely fixed in position and that bleeding has stopped. The umbilical tape should be tightened around the umbilical cord stump being careful not to catch the normal skin around the umbilicus while tightening the tape. The tape should be removed the next day when the cord is checked and there is no oozing.
26. Attach a Curos to any unused port.

Nursing Management of a baby with an Umbilical Cath eter Ensure that the baby is comfortably positioned, is normothermic and is stable before the procedure starts. Anticipate temperature drops in babies, especially ELBW <1000g and use incubator temperature increases and transwarmer to prevent accidental hypothermia Babies can be safely nursed prone with umbilical ca theters in place provided that
1. the method of fixation is secure 2. oozing of blood has ceased
Alarm limits are set appropriately including mean blood pressure alarm. Connections are checked at beginning of each shift to ensure they are secure and there are no kinks in the lines. Observation of toes, legs and buttocks for (at least) 6 hours after insertion for changes in colour, circulation and warmth is important. Cyanosis or pallor of toes/feet/buttock discoloration is reported to doctor immediately. Blood Pressure Transduction Calibration checks are performed - at the beginning of each shift or if having problems with the readout of blood pressure. Ensure there is no blood or bubbles present in the blood pressure line causing damping of the reading. Check umbilicus for oozing of blood regularly UAC and UVC infusions are changed daily or as prescribed. The attachment of the umbilicus to the baby, the se curity of the line must be checked at cares and as part of routine examinations.
Umbilical cord separation is an increased risk afte r 72 hours of age. If the line is to remain in place, then additi onal fixation is needed to prevent accidental dislodgement due to co rd separation .

Appendix 1 Securing and Repositioning Umbilical Catheters The catheter should be fixed securely in order to prevent skin damage and avoid pain. The process involves both the physical securing of the catheter and ensuring good haemostasis. The following are required to satisfactorily fix either an umbilical arterial or venous catheter:
• Black silk suture • Needle holder • Scissors • Duoderm • Cord tie
Method of fixation These are suggestions for successful placement:
• Take a good “bite” of umbilical cord with the suture
• Use Duoderm to secure the lines. Steristrips can be used to temporarily hold prior to X-ray in case adjustment is needed, but are not suitable for longer use as they do not stick firmly in high humidity, placing the baby at risk of haemorrhage and catheter slippage
• Ensure catheter does not slide in or out of umbilical cord once fixed
• Elastoplast and zinc oxide tape are non-sterile and should not be used. They may also damage
vulnerable skin
INFECTION is a significant problem if umbilical lines are not placed and fixed using a totally sterile technique Repositioning of lines increases the risk of infection
2 people should turn babies with umbilical lines whenever possible
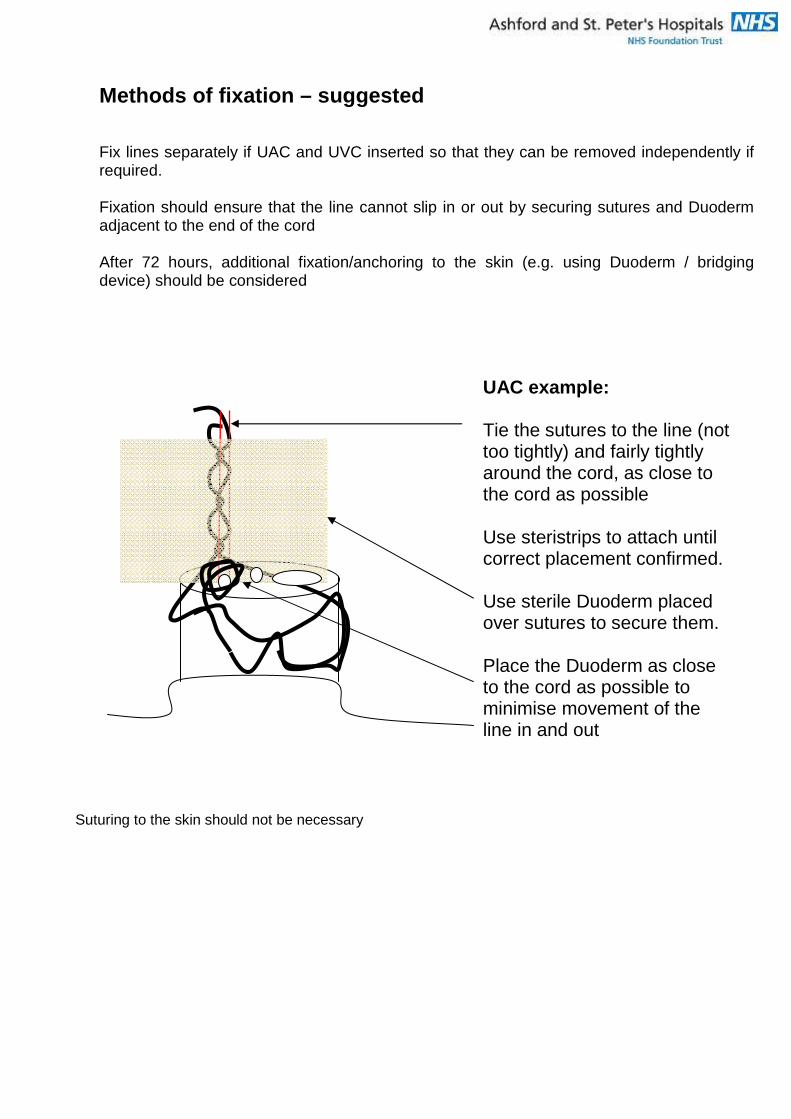
Methods of fixation – suggested Fix lines separately if UAC and UVC inserted so that they can be removed independently if required. Fixation should ensure that the line cannot slip in or out by securing sutures and Duoderm adjacent to the end of the cord After 72 hours, additional fixation/anchoring to the skin (e.g. using Duoderm / bridging device) should be considered
Suturing to the skin should not be necessary
UAC example: Tie the sutures to the line (not too tightly) and fairly tightly around the cord, as close to the cord as possible Use steristrips to attach until correct placement confirmed. Use sterile Duoderm placed over sutures to secure them. Place the Duoderm as close to the cord as possible to minimise movement of the line in and out
Checking Line position Umbilical Line position is checked using X-rays. Some doctors are also able to use ultrasound to adjust line positions, but the default method is X-ray and at least one X-ray is necessary. Any ultrasound adjustments must be stored on the US machine and carefully documented in the notes If only one umbilical line is present (venous or arterial), request a combined CXR/AXR for position. It is good practice that an arterial line should be on the left side of the baby, and an umbilical venous line should be on the right side of the baby If there are two umbilical lines placed at the same time, the external venous marker and layout of lines must be used as detailed on the next page, with arterial on the left and venous on the right , with the radio-opaque venous marker used as described. Request a combined CXR/AXR for position Repositioning an umbilical line Never push a catheter in if it is too short; discuss the need to replace it with a senior colleague or consultant. If the catheter is inserted too far it can be safely pulled back providing the following method is used. This procedure is sterile. 1. Decide the length to be withdrawn and identify this with the markings on the catheter. 2. Carefully remove the Duoderm if it has been applied 3. Pull back the catheter by applying a steady but gentle pressure just above the suture. 4. Gradually withdraw until the desired length is reached. 5. Fix as above 6. If the suture has been displaced while withdrawing the catheter and it cannot be pulled tight it must
be replaced. NOTE: If the catheter cannot be moved the suture will need to be cut and the catheter re-secured as described above. Documentation of line insertion Write in the (blue) lines documentation chart to confirm the size, details and type, and insertion length, the X-ray findings and any adjustments made. For an arterial catheter, it is worth documenting:
• the presence of an arterial pulsation in the line / arterial waveform on transduction • the ease of sampling of blood • the checking of buttocks and legs/toes
The date of line removal should also be documented as well as the reason for their removal.
All line adjustments should be imaged.

X-raying umbilical lines when both arterial and ven ous lines are placed and X-rayed at the same time. Confusion can arise as to which catheter is in which vessel. In order to minimise this, please ensure that the radio-opaque marker with a letter ‘V’ on it, on a transparent green plastic block is loosely attached to the catheter which is thought to be inserted in the umbilical vein and placed next to the baby’s right side, as shown below when the X-ray is taken to confirm position. This venous catheter should be draped to the baby’s right side with the apparent arterial catheter draped to the baby’s left side. The radio-opaque marker needs to be within the field of the X-ray but not over any part of the baby’s body. The marker should not be removed until after the X-ray has been looked at and confirmation has been given that the catheter with the ‘V’ is the UVC.
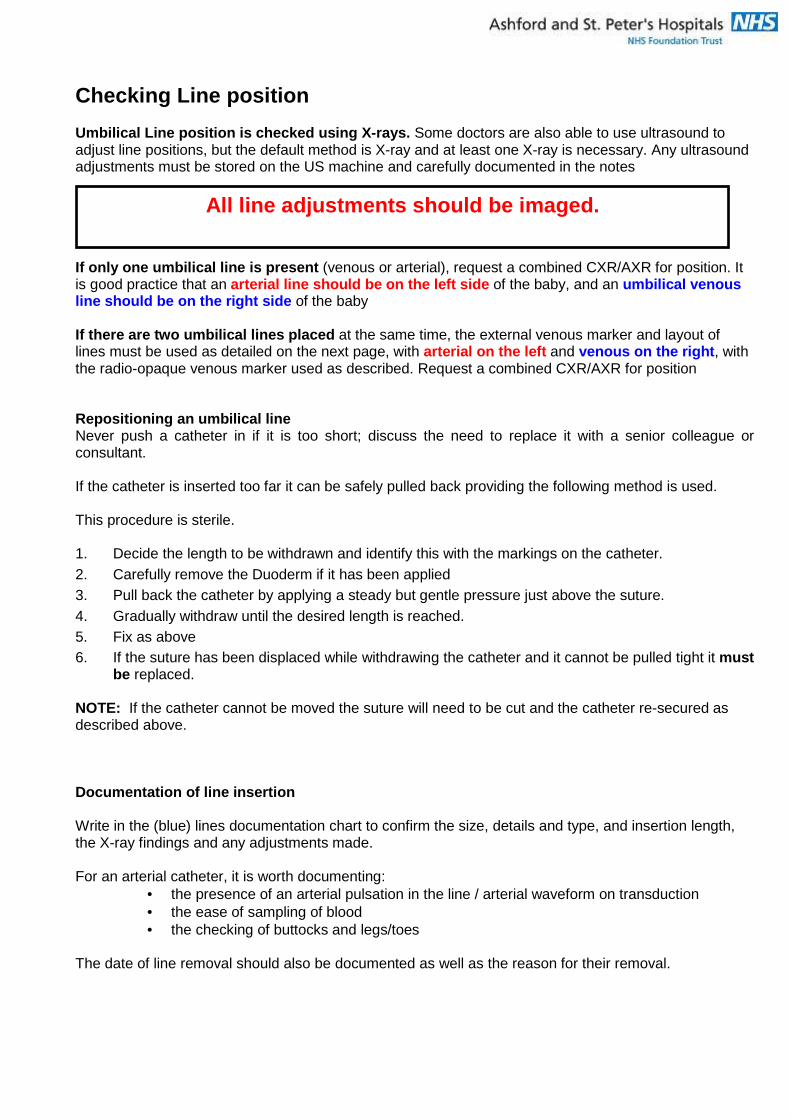
Adequate placement and correct annotation of UVC and UAC in an extremely preterm baby.
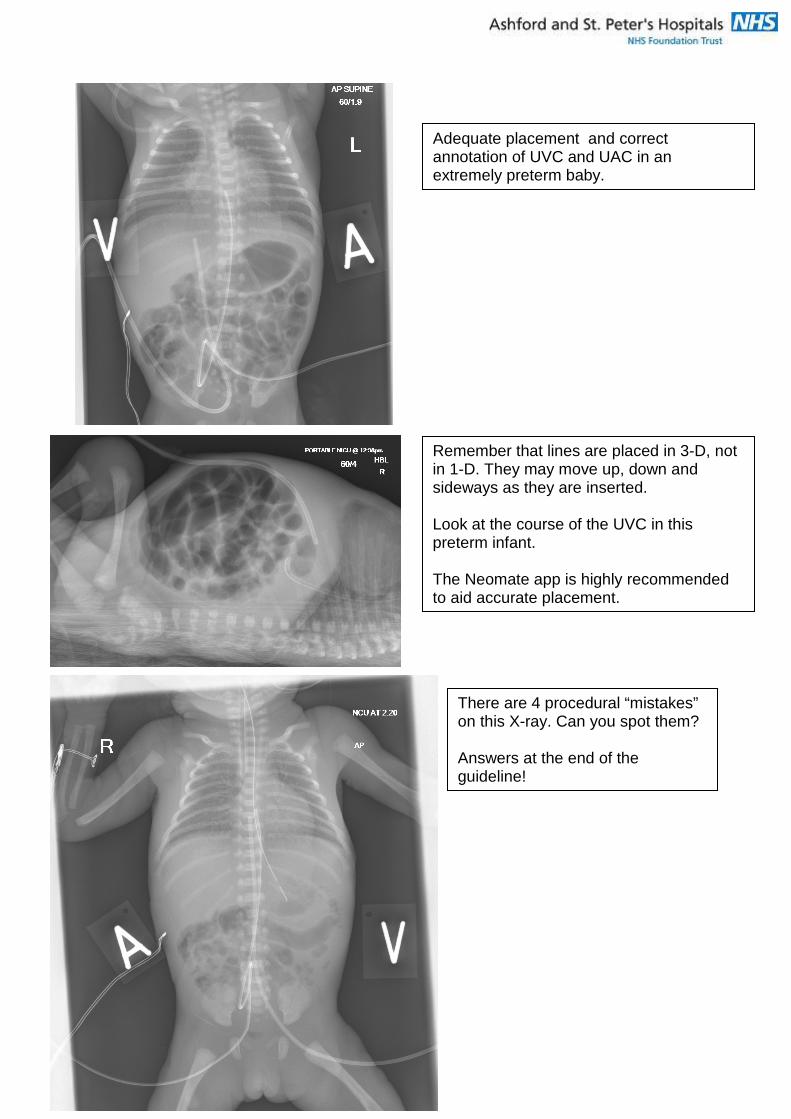
Remember that lines are placed in 3-D, not in 1-D. They may move up, down and sideways as they are inserted. Look at the course of the UVC in this preterm infant. The Neomate app is highly recommended to aid accurate placement.
There are 4 procedural “mistakes” on this X-ray. Can you spot them? Answers at the end of the guideline!

Limb Ischaemia Umbilical arterial catheters have the potential to contribute to limb ischaemia. However limb ischaemia can result from many causes. It is important to understand the anatomy of the pelvic arterial supply. The umbilical artery joins the internal iliac artery, therefore it is the pelvic region (buttocks) which should be carefully inspected for evidence of poor perfusion, as this is the territory supplied by the internal iliac artery. The femoral artery continues distally from the external iliac artery, therefore it is not realistically possible for an umbilical arterial catheter to “go down the femoral artery” – a common misconception. Once an umbilical catheter has entered the common iliac artery or above, flow can be adversely affected in both the internal and external iliac arteries, and the buttocks and the legs should be regularly inspected for signs of ischaemia Concerns about or signs of ischaemia (e.g. poor perfusion, discolouration) must be reported to the medical team promptly. Prompt attempts to improve perfusion should be made including: 1. Can the line be safely removed? If perfusion is not improving or is worsening, it would be normal to promptly remove an umbilical arterial line. 2. Is there a role for topical GTN patches? 3. Is there a role for intravenous low dose dobutamine? 4. Could this be a thrombus requiring heparinisation / thrombolysis? All discussions to be noted, with times, in the notes. If there is no improvement in perfusion within a short period of time, consider if heparinisation/ thrombolysis are indicated. These normally require the supervision of an experienced paediatric haematologist. Cases should be discussed with the attending neonatal consultant at Evalina NICU (St. Thomas’s Hospital, London) as transfer may be indicated for ongoing specialist management. Dr Jayanthi Alamelu, Consultant Paediatric Haematologist at Evalina [email protected] previously provided the following information, but should only be used after discussion:
UNFRACTIONATED HEPARIN: Load: 75 units/kg intravenous injection
Initial Maintenance dose: Neonates & Infants: 28units/kg/hr Target: APTT 60 – 85 sec or APTT ratio 2 - 2.5 then titrated according to heparin protocol.
Children under 5 kg and sick PICU patients on UFH may require monitoring of anti-Xa levels
(Target UFH anti-Xa: 0.35 – 0.7 units/ml - Please discuss with Evalina Paed haematology SpR Bleep 1621)
APTT may be prolonged even prior to heparin treatment due to prematurity and other factors in which case monitor using anti-xa. APTT monitoring to be done and check anti-xa if APTT very variable. If anti-xa monitoring is not available at St. Peter's, they could spin the samples and courier to Evalina or another lab.
Guideline written/updated by Dr. Peter Reynolds
Approved by Clinical Management Group November 2006
Ratified by Dr. Haddad, Chair Children’s Clinical Governance Committee November 2006
Amended April 2007, March 2008, June 2009, July 2012, February 2015
Discussed and updated Feb 2017 CMG
Next update by Feb 2022
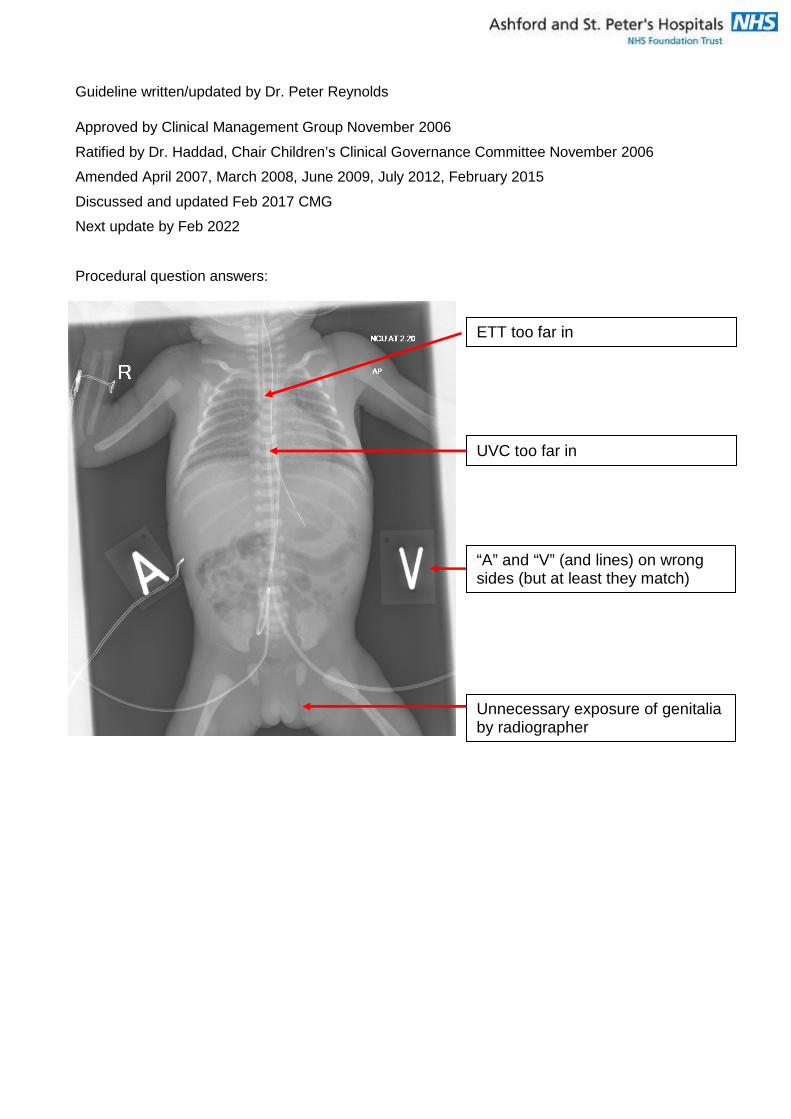
Procedural question answers:
ETT too far in
UVC too far in
“A” and “V” (and lines) on wrong sides (but at least they match)
Unnecessary exposure of genitalia by radiographer