neokey emoji keyboard - cdn-learn.adafruit.com
TRANSCRIPT

NeoKey Emoji Keyboard
Created by Liz Clark
https://learn.adafruit.com/neokey-emoji-keyboard
Last updated on 2022-01-25 05:35:09 PM EST
©Adafruit Industries Page 1 of 27
3
4
7
7
9
11
12
14
14
15
15
15
16
16
16
17
17
19
19
20
20
20
21
21
21
22
22
23
23
24
24
25
25
26
26
27
27
27
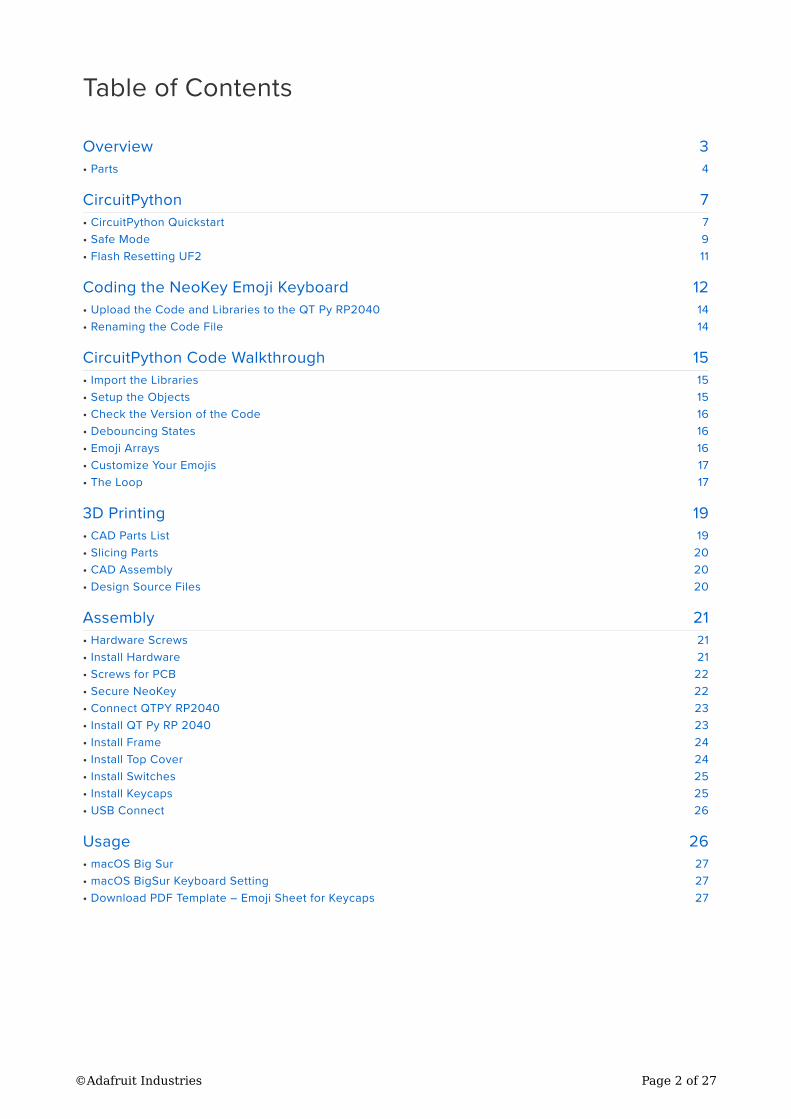
Table of Contents
Overview
• Parts
CircuitPython
• CircuitPython Quickstart
• Safe Mode
• Flash Resetting UF2
Coding the NeoKey Emoji Keyboard
• Upload the Code and Libraries to the QT Py RP2040
• Renaming the Code File
CircuitPython Code Walkthrough
• Import the Libraries
• Setup the Objects
• Check the Version of the Code
• Debouncing States
• Emoji Arrays
• Customize Your Emojis
• The Loop
3D Printing
• CAD Parts List
• Slicing Parts
• CAD Assembly
• Design Source Files
Assembly
• Hardware Screws
• Install Hardware
• Screws for PCB
• Secure NeoKey
• Connect QTPY RP2040
• Install QT Py RP 2040
• Install Frame
• Install Top Cover
• Install Switches
• Install Keycaps
• USB Connect
Usage
• macOS Big Sur
• macOS BigSur Keyboard Setting
• Download PDF Template – Emoji Sheet for Keycaps
©Adafruit Industries Page 2 of 27

Overview
Emojis are super fun to use, but can be annoying to type when you're not on your
phone. This guide will show you how to create a macro keyboard to send your
favorite emojis with the press of a satisfying mechanical keyboard switch.
The code is written in CircuitPython. This
makes it possible to edit your code on
the go and customize your emoji choices
depending on your mood.
The keyboard uses a 1x4 NeoKey
STEMMA board. This connects to a QT Py
RP2040 via I2C with a STEMMA cable,
which means no soldering required!
©Adafruit Industries Page 3 of 27

Parts
Parts list for building this project.
Adafruit QT Py RP2040 (https://
adafru.it/RWE)
NeoKey 1x4 QT I2C (https://
adafru.it/TDb)
4x Kailh Switches (https://adafru.it/
U5E)
4x Keycaps (https://adafru.it/U5F)
Stemma QT Cable - 50mm (https://
adafru.it/Tff)
USB-C Cable (https://adafru.it/U6a)
M2.5 Hardware Kit (https://adafru.it/
wsc)
NeoKey 1x4 QT I2C - Four Mechanical Key
Switches with NeoPixels
The only thing better than a nice
mechanical key is, perhaps, FOUR
mechanical keys that also can glow any
color of the rainbow - and that's what
the Adafruit...
https://www.adafruit.com/product/4980
•
•
•
•
•
•
•
©Adafruit Industries Page 4 of 27

Adafruit QT Py RP2040
What a cutie pie! Or is it... a QT Py? This
diminutive dev board comes with one of
our new favorite chip, the RP2040. It's
been made famous in the new
https://www.adafruit.com/product/4900
STEMMA QT / Qwiic JST SH 4-Pin Cable
This 4-wire cable is 50mm / 1.9" long and
fitted with JST SH female 4-pin
connectors on both ends. Compared with
the chunkier JST PH these are 1mm pitch
instead of 2mm, but...
https://www.adafruit.com/product/4399
Kailh Mechanical Key Switches - 10 packs
- Cherry MX Compatible
For crafting your very own custom
keyboard, these Kailh mechanical key
switches are deeee-luxe!Come in a pack
of 10 switches, plenty to make a...
https://www.adafruit.com/product/4996
DSA Keycaps for MX Compatible Switches
in Various Colors
Dress up your mechanical keys in your
favorite colors, with a wide selection of
stylish DSA key caps. Here is a 10 pack
different colored keycaps for your next
mechanical keyboard or...
https://www.adafruit.com/product/5097
©Adafruit Industries Page 5 of 27

Relegendable Plastic Keycaps for MX
Compatible Switches 10 pack
Get ready to customize your keeb with a
10 pack of two-part plastic keycaps for
your next mechanical keyboard or
https://www.adafruit.com/product/5039
Pink and Purple Woven USB A to USB C
Cable - 1 meter long
This cable is not only super-fashionable,
with a woven pink and purple Blinka-like
pattern, it's also made for USB C for our
modernized breakout boards, Feathers,
and...
https://www.adafruit.com/product/5153
Black Nylon Machine Screw and Stand-off
Set – M2.5 Thread
Totaling 380 pieces, this M2.5 Screw
Set is a must-have for your
workstation. You'll have enough screws,
nuts, and hex standoffs to fuel your
maker...
https://www.adafruit.com/product/3299
©Adafruit Industries Page 6 of 27
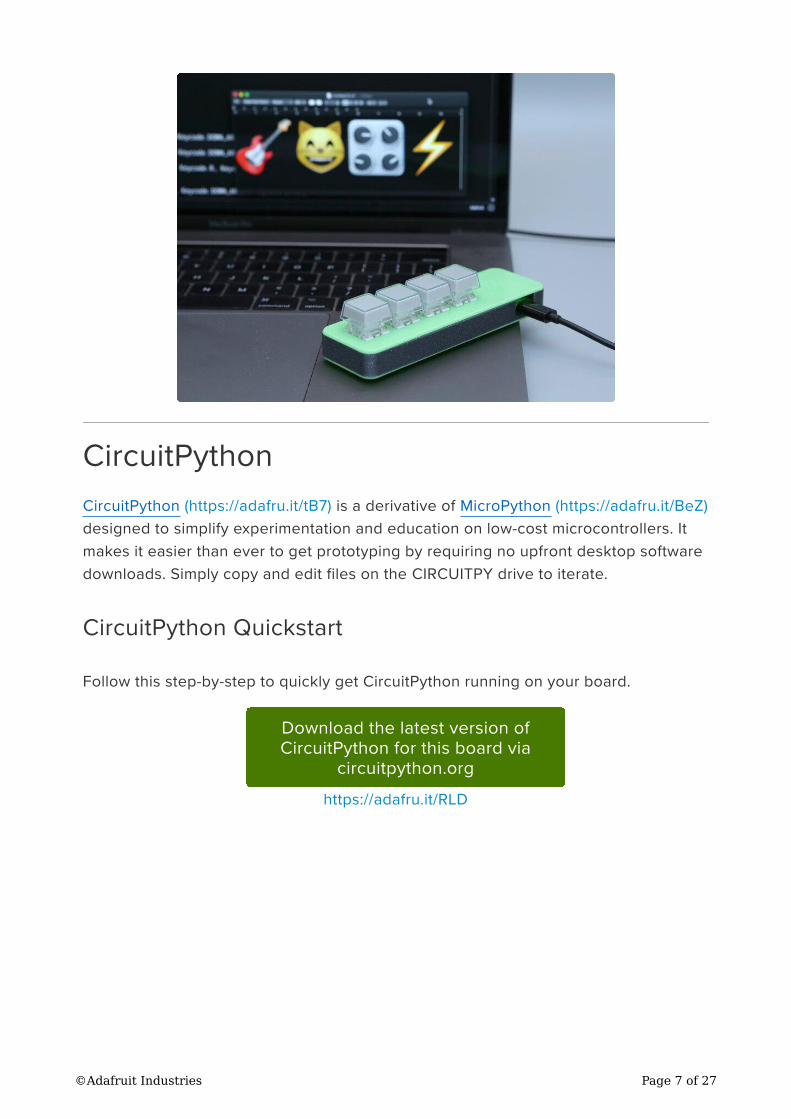
CircuitPython
CircuitPython (https://adafru.it/tB7) is a derivative of MicroPython (https://adafru.it/BeZ)
designed to simplify experimentation and education on low-cost microcontrollers. It
makes it easier than ever to get prototyping by requiring no upfront desktop software
downloads. Simply copy and edit files on the CIRCUITPY drive to iterate.
CircuitPython Quickstart
Follow this step-by-step to quickly get CircuitPython running on your board.
Download the latest version of
CircuitPython for this board via
circuitpython.org
https://adafru.it/RLD
©Adafruit Industries Page 7 of 27

Click the link above to download the
latest CircuitPython UF2 file.
Save it wherever is convenient for you.
To enter the bootloader, hold down the BOOT/BOOTSEL button (highlighted in red
above), and while continuing to hold it (don't let go!), press and release the reset
button (highlighted in blue above). Continue to hold the BOOT/BOOTSEL button until
the RPI-RP2 drive appears!
If the drive does not appear, release all the buttons, and then repeat the process
above.
You can also start with your board unplugged from USB, press and hold the BOOTSEL
button (highlighted in red above), continue to hold it while plugging it into USB, and
wait for the drive to appear before releasing the button.
A lot of people end up using charge-only USB cables and it is very frustrating! Make
sure you have a USB cable you know is good for data sync.
©Adafruit Industries Page 8 of 27

You will see a new disk drive appear
called RPI-RP2.
Drag the adafruit_circuitpython_etc.uf2
file to RPI-RP2.
The RPI-RP2 drive will disappear and a
new disk drive called CIRCUITPY will
appear.
That's it, you're done! :)
Safe Mode
You want to edit your code.py or modify the files on your CIRCUITPY drive, but find
that you can't. Perhaps your board has gotten into a state where CIRCUITPY is read-
only. You may have turned off the CIRCUITPY drive altogether. Whatever the reason,
safe mode can help.
©Adafruit Industries Page 9 of 27

Safe mode in CircuitPython does not run any user code on startup, and disables auto-
reload. This means a few things. First, safe mode bypasses any code in boot.py
(where you can set CIRCUITPY read-only or turn it off completely). Second, it does not
run the code in code.py. And finally, it does not automatically soft-reload when data is
written to the CIRCUITPY drive.
Therefore, whatever you may have done to put your board in a non-interactive state,
safe mode gives you the opportunity to correct it without losing all of the data on the
CIRCUITPY drive.
Entering Safe Mode in CircuitPython 6.x
To enter safe mode when using CircuitPython 6.x, plug in your board or hit reset
(highlighted in red above). Immediately after the board starts up or resets, it waits
700ms. On some boards, the onboard status LED (highlighted in green above) will
turn solid yellow during this time. If you press reset during that 700ms, the board will
start up in safe mode. It can be difficult to react to the yellow LED, so you may want to
think of it simply as a slow double click of the reset button. (Remember, a fast double
click of reset enters the bootloader.)
This section explains entering safe mode on CircuitPython 6.x.
©Adafruit Industries Page 10 of 27

Entering Safe Mode in CircuitPython 7.x
To enter safe mode when using CircuitPython 7.x, plug in your board or hit reset
(highlighted in red above). Immediately after the board starts up or resets, it waits
1000ms. On some boards, the onboard status LED (highlighted in green above) will
blink yellow during that time. If you press reset during that 1000ms, the board will
start up in safe mode. It can be difficult to react to the yellow LED, so you may want to
think of it simply as a slow double click of the reset button. (Remember, a fast double
click of reset enters the bootloader.)
In Safe Mode
Once you've entered safe mode successfully in CircuitPython 6.x, the LED will pulse
yellow.
If you successfully enter safe mode on CircuitPython 7.x, the LED will intermittently
blink yellow three times.
If you connect to the serial console, you'll find the following message.
Auto-reload is off.
Running in safe mode! Not running saved code.
CircuitPython is in safe mode because you pressed the reset button during boot.
Press again to exit safe mode.
Press any key to enter the REPL. Use CTRL-D to reload.
You can now edit the contents of the CIRCUITPY drive. Remember, your code will not
run until you press the reset button, or unplug and plug in your board, to get out of
safe mode.
Flash Resetting UF2
If your board ever gets into a really weird state and doesn't even show up as a disk
drive when installing CircuitPython, try loading this 'nuke' UF2 which will do a 'deep
clean' on your Flash Memory. You will lose all the files on the board, but at least you'll
be able to revive it! After loading this UF2, follow the steps above to re-install
CircuitPython.
This section explains entering safe mode on CircuitPython 7.x.
©Adafruit Industries Page 11 of 27
Download flash erasing "nuke" UF2
https://adafru.it/RLE
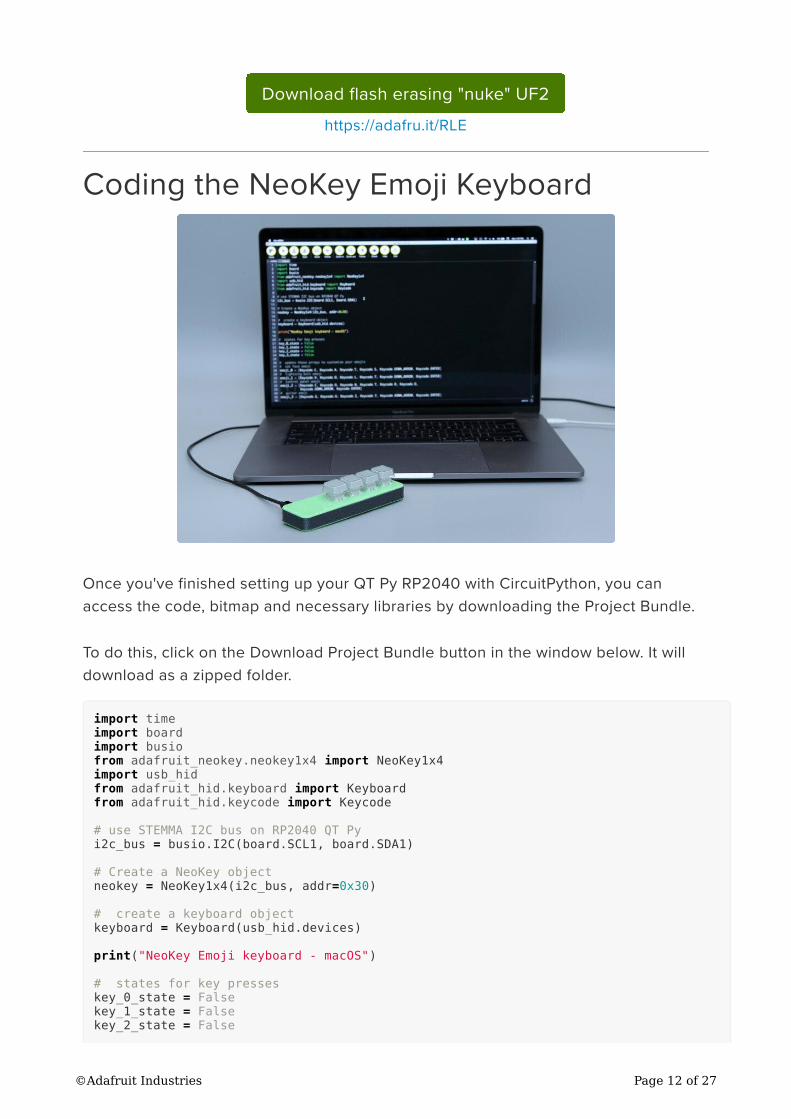
Coding the NeoKey Emoji Keyboard
Once you've finished setting up your QT Py RP2040 with CircuitPython, you can
access the code, bitmap and necessary libraries by downloading the Project Bundle.
To do this, click on the Download Project Bundle button in the window below. It will
download as a zipped folder.
import timeimport boardimport busiofrom adafruit_neokey.neokey1x4 import NeoKey1x4import usb_hidfrom adafruit_hid.keyboard import Keyboardfrom adafruit_hid.keycode import Keycode
# use STEMMA I2C bus on RP2040 QT Py
i2c_bus = busio.I2C(board.SCL1, board.SDA1)
# Create a NeoKey object
neokey = NeoKey1x4(i2c_bus, addr=0x30)
# create a keyboard object
keyboard = Keyboard(usb_hid.devices)
print("NeoKey Emoji keyboard - macOS")
# states for key presses
key_0_state = Falsekey_1_state = Falsekey_2_state = False
©Adafruit Industries Page 12 of 27
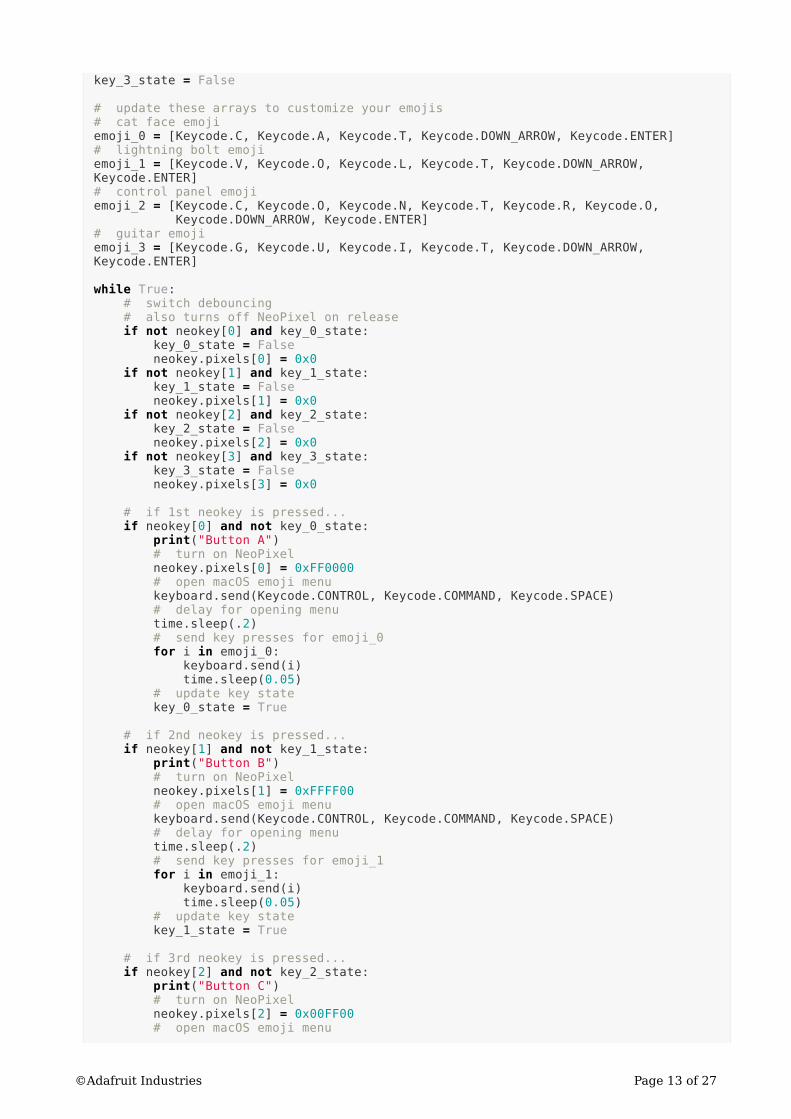
key_3_state = False
# update these arrays to customize your emojis
# cat face emoji
emoji_0 = [Keycode.C, Keycode.A, Keycode.T, Keycode.DOWN_ARROW, Keycode.ENTER]# lightning bolt emoji
emoji_1 = [Keycode.V, Keycode.O, Keycode.L, Keycode.T, Keycode.DOWN_ARROW, Keycode.ENTER]
# control panel emoji
emoji_2 = [Keycode.C, Keycode.O, Keycode.N, Keycode.T, Keycode.R, Keycode.O, Keycode.DOWN_ARROW, Keycode.ENTER]
# guitar emoji
emoji_3 = [Keycode.G, Keycode.U, Keycode.I, Keycode.T, Keycode.DOWN_ARROW, Keycode.ENTER]
while True: # switch debouncing
# also turns off NeoPixel on release
if not neokey[0] and key_0_state: key_0_state = False neokey.pixels[0] = 0x0 if not neokey[1] and key_1_state: key_1_state = False neokey.pixels[1] = 0x0 if not neokey[2] and key_2_state: key_2_state = False neokey.pixels[2] = 0x0 if not neokey[3] and key_3_state: key_3_state = False neokey.pixels[3] = 0x0
# if 1st neokey is pressed...
if neokey[0] and not key_0_state: print("Button A") # turn on NeoPixel
neokey.pixels[0] = 0xFF0000 # open macOS emoji menu
keyboard.send(Keycode.CONTROL, Keycode.COMMAND, Keycode.SPACE)
# delay for opening menu
time.sleep(.2)
# send key presses for emoji_0
for i in emoji_0: keyboard.send(i)
time.sleep(0.05)
# update key state
key_0_state = True
# if 2nd neokey is pressed...
if neokey[1] and not key_1_state: print("Button B") # turn on NeoPixel
neokey.pixels[1] = 0xFFFF00 # open macOS emoji menu
keyboard.send(Keycode.CONTROL, Keycode.COMMAND, Keycode.SPACE)
# delay for opening menu
time.sleep(.2)
# send key presses for emoji_1
for i in emoji_1: keyboard.send(i)
time.sleep(0.05)
# update key state
key_1_state = True
# if 3rd neokey is pressed...
if neokey[2] and not key_2_state: print("Button C") # turn on NeoPixel
neokey.pixels[2] = 0x00FF00 # open macOS emoji menu
©Adafruit Industries Page 13 of 27

keyboard.send(Keycode.CONTROL, Keycode.COMMAND, Keycode.SPACE)
# delay for opening menu
time.sleep(.2)
# send key presses for emoji_2
for i in emoji_2: keyboard.send(i)
time.sleep(0.05)
# update key state
key_2_state = True
# if 4th neokey is pressed...
if neokey[3] and not key_3_state: print("Button D") # turn on NeoPixel
neokey.pixels[3] = 0x00FFFF # open macOS emoji menu
keyboard.send(Keycode.CONTROL, Keycode.COMMAND, Keycode.SPACE)
# delay for opening menu
time.sleep(.2)
# send key presses for emoji_3
for i in emoji_3: keyboard.send(i)
time.sleep(0.05)
# update key state
key_3_state = True
Upload the Code and Libraries to the QT Py RP2040
After downloading the Project Bundle, plug your QT Py RP2040 into the computer
USB port. You should see a new flash drive appear in the computer's File Explorer or
Finder (depending on your operating system) called CIRCUITPY. Unzip the folder and
copy the following items to the QT Py RP2040's CIRCUITPY drive.
lib folder
macOS_code.py
windows_code.py
Renaming the Code File
There are two versions of the emoji code: one for macOS (macOS_code.py) and one
for Windows (windows_code.py). Choose the version for your operating system and
rename it to code.py. You can delete the version that you are not using from your CIR
CUITPY drive.
Your QT Py RP2040 CIRCUITPY drive should look like this after copying the lib folder
and renaming the code.py file.
•
•
•
©Adafruit Industries Page 14 of 27

CircuitPython Code Walkthrough
Import the Libraries
First, the libraries are imported.
import timeimport boardimport busiofrom adafruit_neokey.neokey1x4 import NeoKey1x4import usb_hidfrom adafruit_hid.keyboard import Keyboardfrom adafruit_hid.keycode import Keycode
Setup the Objects
Objects are setup for I2C, the NeoKey 1x4 and USB HID so that the QT Py RP2040
can be used as an HID keyboard over USB.
©Adafruit Industries Page 15 of 27

Since you're using the NeoKey with a STEMMA QT cable, the QT Py RP2040's board
.SCL1 and board.SDA1 pins are used for I2C.
# use STEMMA I2C bus on RP2040 QT Py
i2c_bus = busio.I2C(board.SCL1, board.SDA1)
# Create a NeoKey object
neokey = NeoKey1x4(i2c_bus, addr=0x30)
# create a keyboard object
keyboard = Keyboard(usb_hid.devices)
Check the Version of the Code
A quick debugging message prints to the REPL that denotes whether you are using
the version of the code for macOS or Windows. This will let you know that you've
loaded up the correct version of the code for your chosen operating system.
# for Windows
print("NeoKey Emoji keyboard - Windows")
# for macOS
print("NeoKey Emoji keyboard - macOS")
Debouncing States
For debouncing, each of the four switches on the NeoKey have a state that will be
tracked in the loop.
# states for key presses
key_0_state = Falsekey_1_state = Falsekey_2_state = Falsekey_3_state = False
Emoji Arrays
The last portion of the code before the loop are the emoji arrays. The way that the
emojis are being sent is by searching for them by name in your operating system's
default emoji menu.
Each array has a sequence of keycodes that searches for the name of the emoji,
selects the emoji and then exits the emoji menu. These arrays are iterated through in
the loop so that each keycode is sent one at a time.
©Adafruit Industries Page 16 of 27
The reason that there are different versions of the code for macOS and Windows
since both operating systems have different ways to navigate the emoji menu.
# Windows emoji arrays
# update these arrays to customize your emojis
# cat face emoji
emoji_0 = [Keycode.C, Keycode.A, Keycode.T, Keycode.SPACE, Keycode.F, Keycode.ENTER, Keycode.ESCAPE]
# lightning bolt emoji
emoji_1 = [Keycode.V, Keycode.O, Keycode.L, Keycode.T, Keycode.ENTER, Keycode.ESCAPE]
# control panel emoji
emoji_2 = [Keycode.K, Keycode.N, Keycode.O, Keycode.ENTER, Keycode.ESCAPE]# guitar emoji
emoji_3 = [Keycode.G, Keycode.U, Keycode.I, Keycode.T, Keycode.ENTER, Keycode.ESCAPE]
# macOS emoji arrays
# update these arrays to customize your emojis
# cat face emoji
emoji_0 = [Keycode.C, Keycode.A, Keycode.T, Keycode.DOWN_ARROW, Keycode.ENTER]
# lightning bolt emoji
emoji_1 = [Keycode.V, Keycode.O, Keycode.L, Keycode.T, Keycode.DOWN_ARROW,
Keycode.ENTER]
# control panel emoji
emoji_2 = [Keycode.C, Keycode.O, Keycode.N, Keycode.T, Keycode.R, Keycode.O,
Keycode.DOWN_ARROW, Keycode.ENTER]
# guitar emoji
emoji_3 = [Keycode.G, Keycode.U, Keycode.I, Keycode.T, Keycode.DOWN_ARROW,
Keycode.ENTER]
Customize Your Emojis
If you wanted to change the emojis, you would need to open your operating system's
emoji menu, find the official name of your desired emoji and update an emoji array
with the needed keycodes.
Most emojis can be brought up by entering a portion of its name, which can help you
to keep the length of your arrays fairly short.
The Loop
Switch Debouncing and Turning Off NeoPixels
The loop begins with debouncing for the four neokey inputs. Additionally, logic is
setup so that when a neokey is released, its corresponding NeoPixel is turned off.
©Adafruit Industries Page 17 of 27

# switch debouncing
# also turns off NeoPixel on release
if not neokey[0] and key_0_state:
key_0_state = False
neokey.pixels[0] = 0x0
if not neokey[1] and key_1_state:
key_1_state = False
neokey.pixels[1] = 0x0
if not neokey[2] and key_2_state:
key_2_state = False
neokey.pixels[2] = 0x0
if not neokey[3] and key_3_state:
key_3_state = False
neokey.pixels[3] = 0x0
Open the Emoji Menu
The rest of the loop contains if statements for each neokey . If a neokey is
pressed, then its corresponding NeoPixel is turned on with its assigned color. Then,
depending on your operating system, the keyboard macro to open the emoji menu is
opened.
For Windows, this key sequence is Windows Key + Period and for macOS, it is Control
+ Command + Space.
A longer than normal pause is required after sending the macro to open the menu.
This differs between operating systems, with Windows requiring almost a full second
to fully open.
# Windows version of the code
# if 1st neokey is pressed...
if neokey[0] and not key_0_state: print("Button A") # turn on NeoPixel
neokey.pixels[0] = 0xFF0000 # open windows emoji menu
keyboard.send(Keycode.WINDOWS, Keycode.PERIOD)
# delay for opening menu
time.sleep(0.75)
# macOS version of the code
# if 1st neokey is pressed...
if neokey[0] and not key_0_state: print("Button A") # turn on NeoPixel
neokey.pixels[0] = 0xFF0000 # open macOS emoji menu
keyboard.send(Keycode.CONTROL, Keycode.COMMAND, Keycode.SPACE)
# delay for opening menu
time.sleep(.2)
©Adafruit Industries Page 18 of 27

Send the Emoji
After this, a for statement is setup to iterate through the corresponding emoji array.
keyboard.send() is used to send each individual keycode in the emoji array with a
slight delay between each message.
keyboard.send() has the benefit of both pressing and releasing the keycode
compared to keyboard.press() and keyboard.release() .
Finally, the state of the neokey is updated for debouncing.
# send key presses for emoji_0
for i in emoji_0: keyboard.send(i)
time.sleep(0.05)
# update key state
key_0_state = True
3D Printing
CAD Parts List
STL files for 3D printing are oriented to
print "as-is" on FDM style machines. Parts
are designed to 3D print without any
support material. Original design source
may be downloaded using the links
below:
top-cover.stl
bottom-cover.stl
frame.stl
Fusion 360 Share Link
https://adafru.it/U6b
Download Fusion Archive
https://adafru.it/U6c
Download STLs.zip
https://adafru.it/U6d
•
•
•
©Adafruit Industries Page 19 of 27
Download STEP file
https://adafru.it/U6e
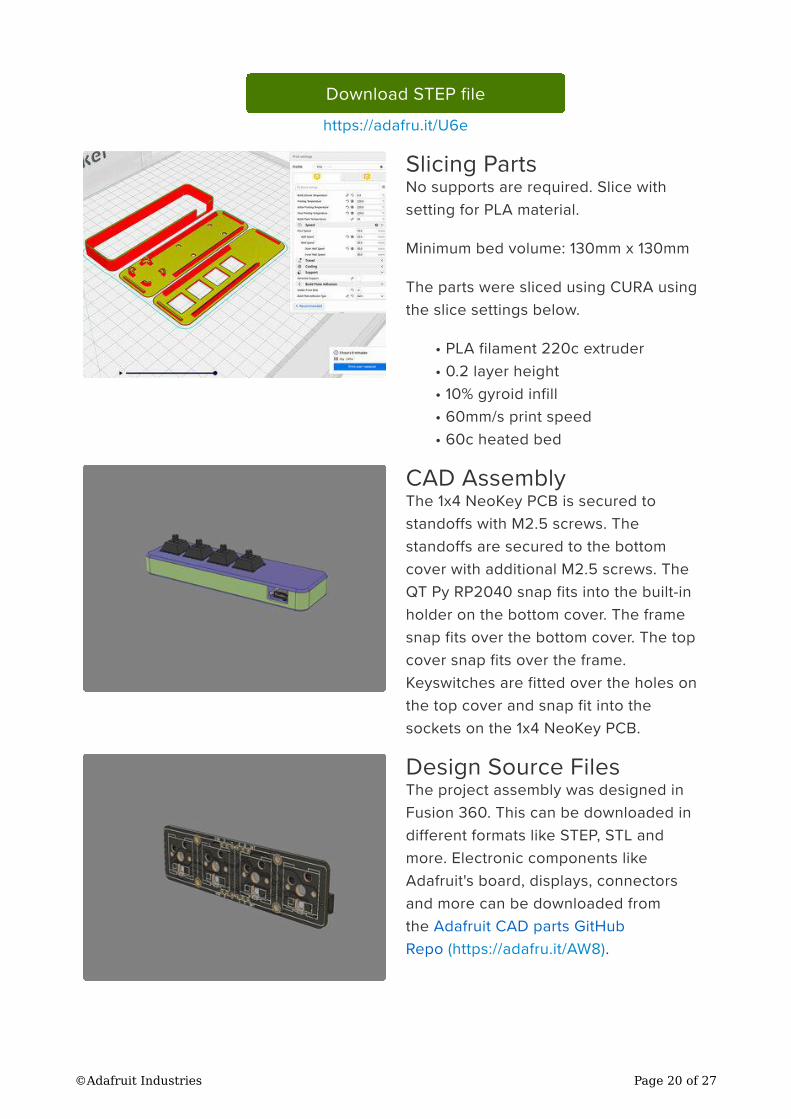
Slicing Parts
No supports are required. Slice with
setting for PLA material.
Minimum bed volume: 130mm x 130mm
The parts were sliced using CURA using
the slice settings below.
PLA filament 220c extruder
0.2 layer height
10% gyroid infill
60mm/s print speed
60c heated bed
CAD Assembly
The 1x4 NeoKey PCB is secured to
standoffs with M2.5 screws. The
standoffs are secured to the bottom
cover with additional M2.5 screws. The
QT Py RP2040 snap fits into the built-in
holder on the bottom cover. The frame
snap fits over the bottom cover. The top
cover snap fits over the frame.
Keyswitches are fitted over the holes on
the top cover and snap fit into the
sockets on the 1x4 NeoKey PCB.
Design Source Files
The project assembly was designed in
Fusion 360. This can be downloaded in
different formats like STEP, STL and
more. Electronic components like
Adafruit's board, displays, connectors
and more can be downloaded from
the Adafruit CAD parts GitHub
Repo (https://adafru.it/AW8).
•
•
•
•
•
©Adafruit Industries Page 20 of 27

Assembly
Hardware Screws
Use the following hardware for securing
the NeoKey 1x4 PCB to the bottom cover.
8x M2.5 screws - 4mm long
4x M2.5 FF standoffs – 6mm long
Install Hardware
Start by inserting an M2.5 x 4mm screw
through the top side of the PCB. Fasten
an M2.5 x 6mm standoff to the thread of
the screw on the bottom of the PCB.
Repeat process for the remaining
mounting holes. Double check the
standoffs are installed on the top side of
the PCB.
•
•
©Adafruit Industries Page 21 of 27

Screws for PCB
Use the remaining M2.5 screws to secure
the 1x4 NeoKey to the bottom cover.
Place the 1x4 NeoKey over the bottom
cover and line up the mounting holes.
The orientation of the 1x4 NeoKey and
bottom cover doesn't matter but you
should take note. You'll need to ensure
the key switches are oriented correctly
before installing.
Secure NeoKey
While holding the 1x4 NeoKey in place,
insert and fasten an M2.5 x 4mm screw
through the mounting holes on the
bottom cover.
Repeat process for the remaining
mounting holes. Ensure the screws are
secure but not over tightened.
©Adafruit Industries Page 22 of 27
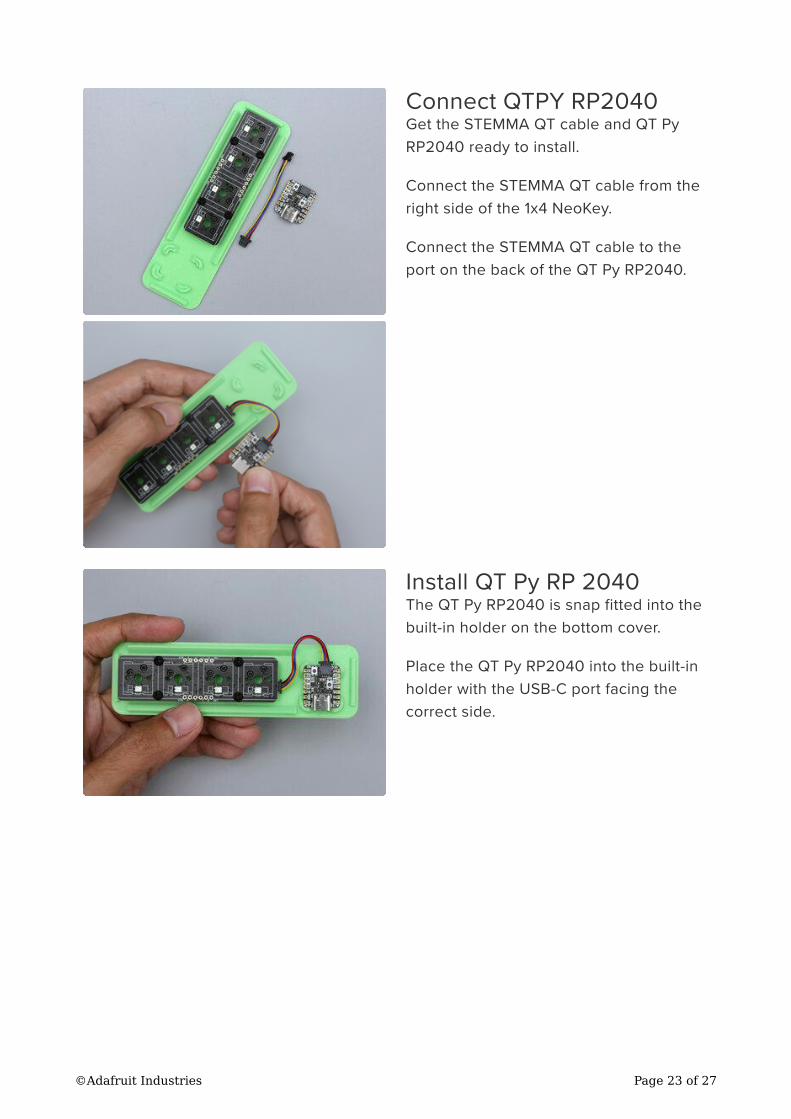
Connect QTPY RP2040
Get the STEMMA QT cable and QT Py
RP2040 ready to install.
Connect the STEMMA QT cable from the
right side of the 1x4 NeoKey.
Connect the STEMMA QT cable to the
port on the back of the QT Py RP2040.
Install QT Py RP 2040
The QT Py RP2040 is snap fitted into the
built-in holder on the bottom cover.
Place the QT Py RP2040 into the built-in
holder with the USB-C port facing the
correct side.
©Adafruit Industries Page 23 of 27

Install Frame
The frame snap fits over the bottom
cover. The nubs lock onto the edges of
the bottom cover.
Orient the frame with the cutout line up
with the USB-C port on the QT Py
RP2040.
The opening should be facing above the
QT Py with the bridge going across the
bottom of the PCB.
Install Top Cover
The top cover is snap fitted over the
frame. The edges lock onto the nubs on
the frame.
Orient the top cover so the key holes are
lined up with key sockets on the 1x4
NeoKey.
Firmly press the top cover onto the frame
to snap fit closed.
©Adafruit Industries Page 24 of 27

Install Switches
The 4x Kailh switches (or Cherry MX
compatibles) must be lined correctly in
order to properly fit onto the 1x4 NeoKey.
Use the slots for the LED on the keys as
an indicator for correctly orienting the
keys. The slot should be facing the
reverse mounted NeoPixel.
Snap fit the switches into the key holes
on the top cover with the switches
oriented correctly.
Install Keycaps
Install your preferred keycaps by press
fitting them onto the stem of the key
switches. Firmly press the keycaps down
to fully seat them.
©Adafruit Industries Page 25 of 27

USB Connect
Use the cutout on the side of the case to connect a USB-C type cable.
Usage
©Adafruit Industries Page 26 of 27

macOS Big Sur
In order for the emoji's to work properly on mac OS Big Sur, the window will need to
be changed to a popup.
By default, emoji's are accessible in the Character Viewer. Use the Control +
Command + Spacebar shortcut to open the Character View.
Click on the menu icon on the far right (next to the search box) to change the window
to a popup.
macOS BigSur Keyboard
Setting
By default, macOS BigSur uses the Globe
key to open the emoji window. This will
need to be changed in the Settings >
Keyboard preferences. Under the "Press
:globe_with_meridians: to" dropdown
menu, click and select "Start Dictation
(Press Twice)". This option will enable the
emoji window to open with Control +
Command + Spacebar." add this image to
it.
Download PDF Template – Emoji Sheet for Keycaps
keycaps_emojis.pdf
https://adafru.it/Uka
©Adafruit Industries Page 27 of 27