nebulizer adjustment fixture - chemical analysis, life ... · use this kit to adjust these...
TRANSCRIPT

Nebulizer Adjustment Fixture
User GuideBefore you begin 2To inspect the nebulizer 3To adjust or replace the nebulizer needle 6Troubleshooting 12
This guide applies to the Nebulizer Adjustment Fixture Kit (p/n G1960-67470).
Use this kit to adjust these nebulizers:
Microflow Nebulizer Assembly (G1946-67260) ES Tested Nebulizer (G1958-67098)
Tested ESI Nebulizer Assembly (G1946-67098)Tested APCI Nebulizer Assembly (G1946-67037)
Before you begin
2 Nebulizer Adjustment Fixture User Guide
Before you begin
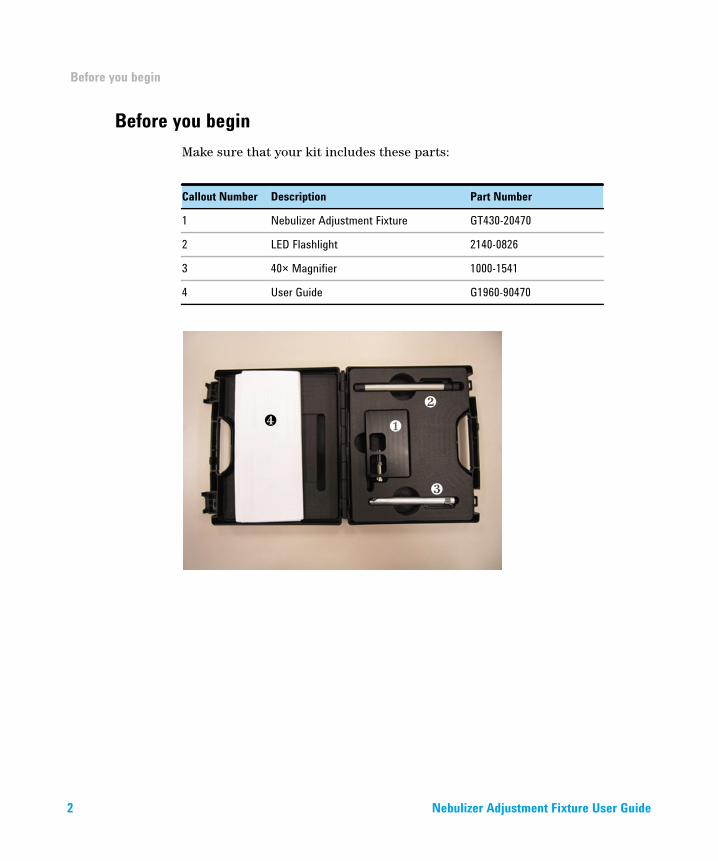
Make sure that your kit includes these parts:
Callout Number Description Part Number
1 Nebulizer Adjustment Fixture GT430-20470
2 LED Flashlight 2140-0826
3 40× Magnifier 1000-1541
4 User Guide G1960-90470
❸
❹❷
❶
To inspect the nebulizer
Nebulizer Adjustment Fixture User Guide 3
To inspect the nebulizer
1 Insert the nebulizer into the Nebulizer Adjustment Fixture:
a Carefully insert the tip of the nebulizer into the end of the Nebulizer Adjustment Fixture.
b Slide the heads of the two spring loaded socket head cap screws through the mounting holes on the body of the nebulizer.
c Turn the nebulizer body 1/8 turn counter-clockwise.
If the nebulizer is too tight or too loose, loosen or tighten the nut on the captured screws to adjust the tension on the spring.
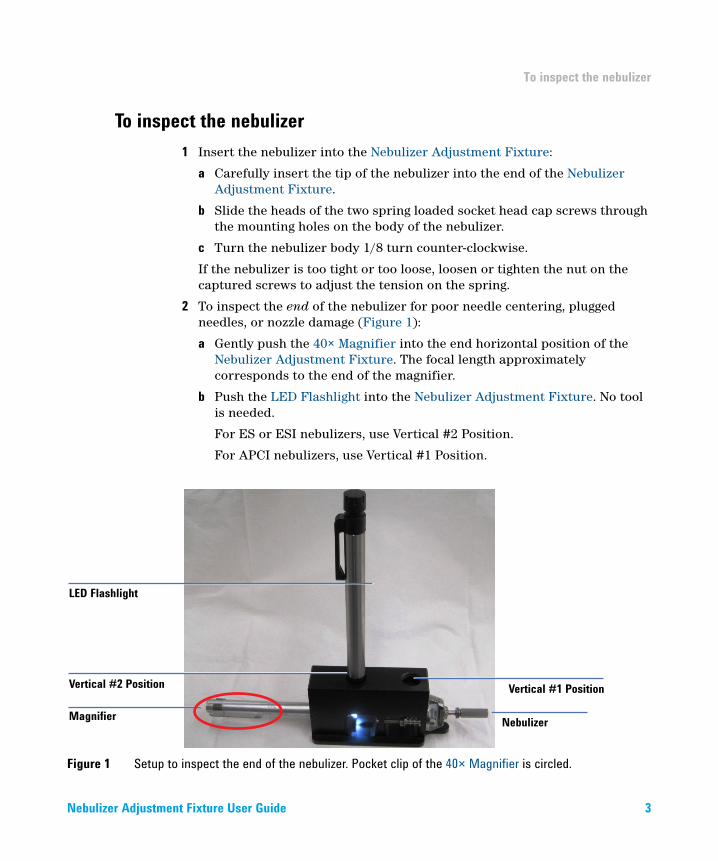
2 To inspect the end of the nebulizer for poor needle centering, plugged needles, or nozzle damage (Figure 1):
a Gently push the 40× Magnifier into the end horizontal position of the Nebulizer Adjustment Fixture. The focal length approximately corresponds to the end of the magnifier.
b Push the LED Flashlight into the Nebulizer Adjustment Fixture. No tool is needed.
For ES or ESI nebulizers, use Vertical #2 Position.
For APCI nebulizers, use Vertical #1 Position.
Figure 1 Setup to inspect the end of the nebulizer. Pocket clip of the 40× Magnifier is circled.
LED Flashlight
MagnifierNebulizer
Vertical #1 PositionVertical #2 Position
To inspect the nebulizer
4 Nebulizer Adjustment Fixture User Guide
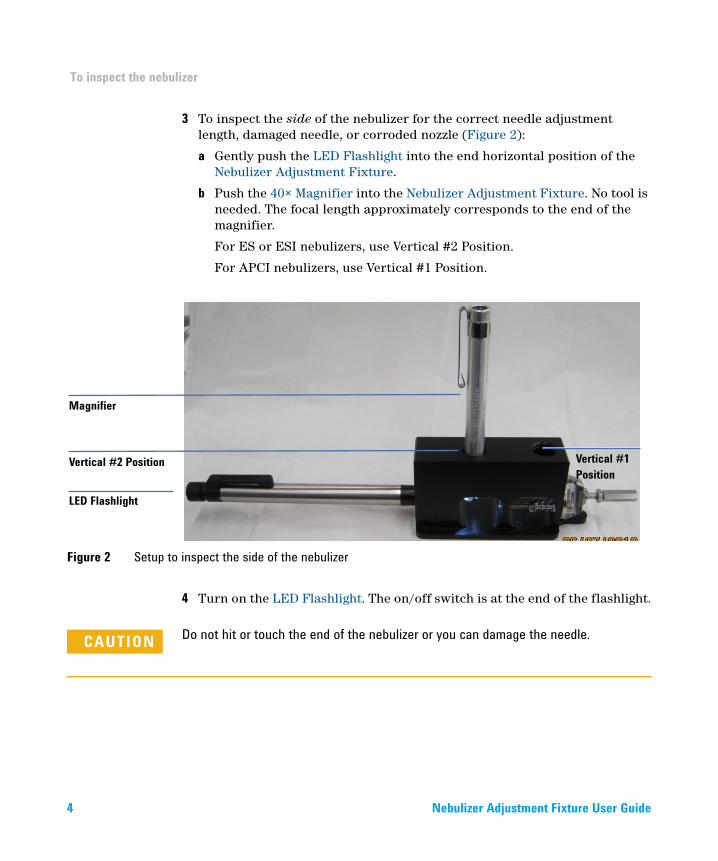
3 To inspect the side of the nebulizer for the correct needle adjustment length, damaged needle, or corroded nozzle (Figure 2):
a Gently push the LED Flashlight into the end horizontal position of the Nebulizer Adjustment Fixture.
b Push the 40× Magnifier into the Nebulizer Adjustment Fixture. No tool is needed. The focal length approximately corresponds to the end of the magnifier.
For ES or ESI nebulizers, use Vertical #2 Position.
For APCI nebulizers, use Vertical #1 Position.
4 Turn on the LED Flashlight. The on/off switch is at the end of the flashlight.
Do not hit or touch the end of the nebulizer or you can damage the needle.
Figure 2 Setup to inspect the side of the nebulizer
Magnifier
LED Flashlight
Vertical #2 Position Vertical #1
Position
CAUTION
To inspect the nebulizer
Nebulizer Adjustment Fixture User Guide 5
5 Gently slide and rotate the 40× Magnifier into or out of the Nebulizer Adjustment Fixture to focus the magnifier on the end of the nebulizer nozzle and needle. For the APCI nebulizer, if needed, remove the pocket clip to focus properly. See Table 2 for correct needle position.
If the needle is not in the correct position or shows signs of wear or damage, continue to “To adjust or replace the nebulizer needle” on page 6.
To adjust or replace the nebulizer needle
6 Nebulizer Adjustment Fixture User Guide
To adjust or replace the nebulizer needle
When needed • When the needle is plugged. Common symptoms of a plugged needle are:
• increased LC back pressure
• off-axis spraying
• dripping from the nebulizer
• reference nebulizer needle is not spraying.
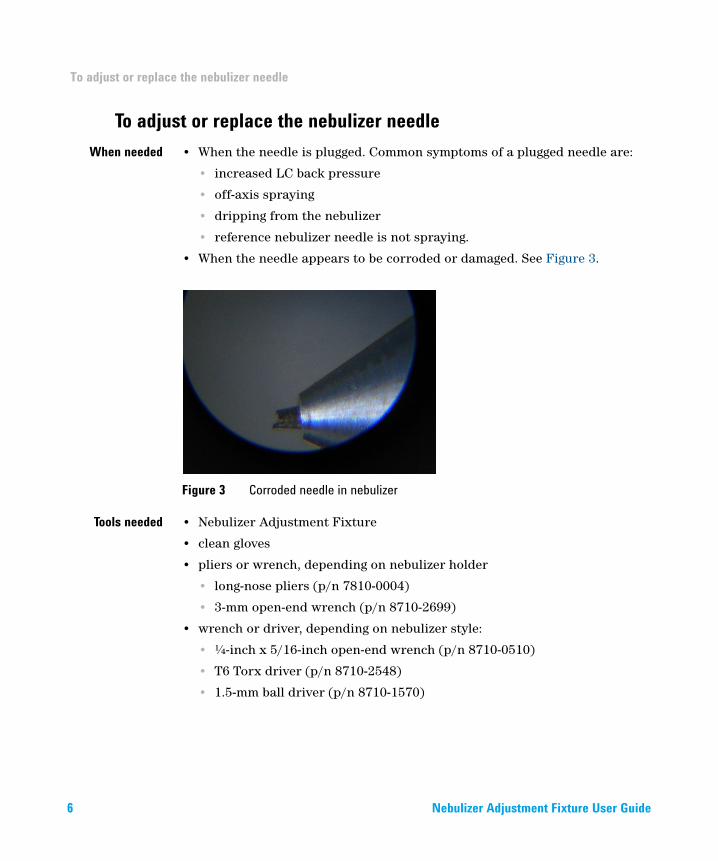
• When the needle appears to be corroded or damaged. See Figure 3.
Figure 3 Corroded needle in nebulizer
Tools needed • Nebulizer Adjustment Fixture
• clean gloves
• pliers or wrench, depending on nebulizer holder
• long-nose pliers (p/n 7810-0004)
• 3-mm open-end wrench (p/n 8710-2699)
• wrench or driver, depending on nebulizer style:
• ¼-inch x 5/16-inch open-end wrench (p/n 8710-0510)
• T6 Torx driver (p/n 8710-2548)
• 1.5-mm ball driver (p/n 8710-1570)
To adjust or replace the nebulizer needle
Nebulizer Adjustment Fixture User Guide 7
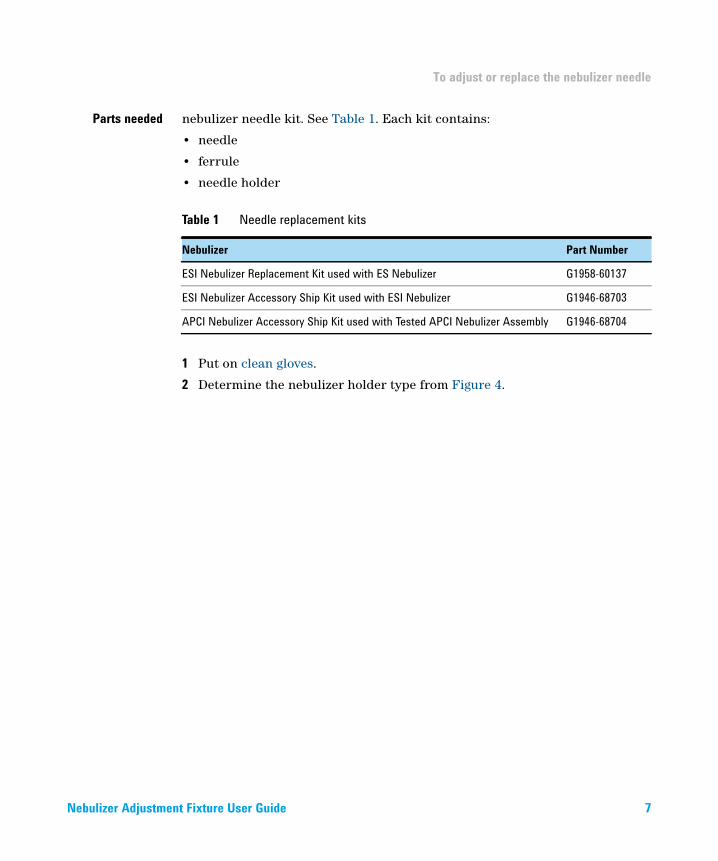
Parts needed nebulizer needle kit. See Table 1. Each kit contains:
• needle
• ferrule
• needle holder
1 Put on clean gloves.
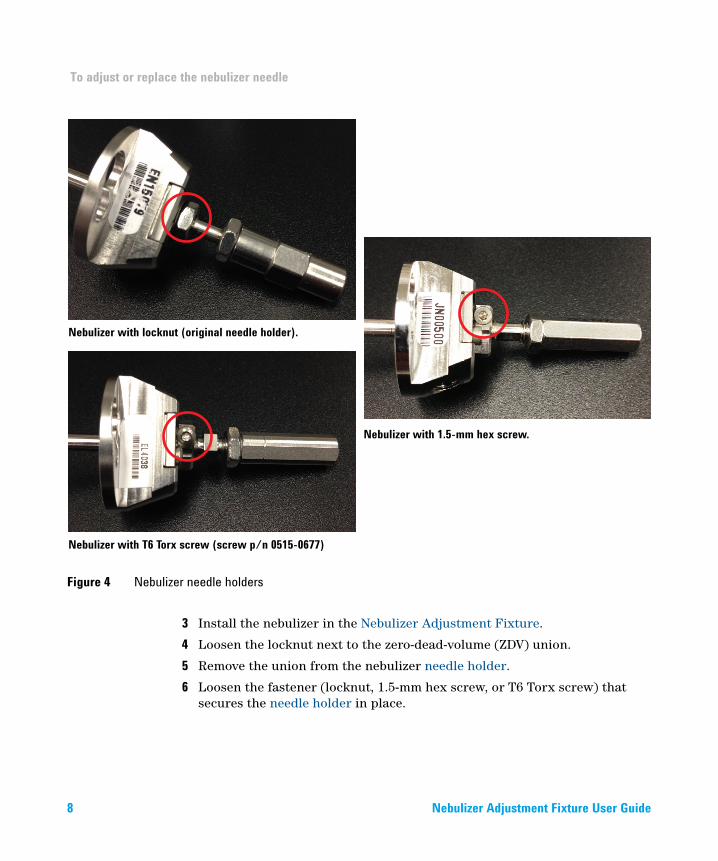
2 Determine the nebulizer holder type from Figure 4.
Table 1 Needle replacement kits
Nebulizer Part Number
ESI Nebulizer Replacement Kit used with ES Nebulizer G1958-60137
ESI Nebulizer Accessory Ship Kit used with ESI Nebulizer G1946-68703
APCI Nebulizer Accessory Ship Kit used with Tested APCI Nebulizer Assembly G1946-68704
To adjust or replace the nebulizer needle
8 Nebulizer Adjustment Fixture User Guide
3 Install the nebulizer in the Nebulizer Adjustment Fixture.
4 Loosen the locknut next to the zero-dead-volume (ZDV) union.
5 Remove the union from the nebulizer needle holder.
6 Loosen the fastener (locknut, 1.5-mm hex screw, or T6 Torx screw) that secures the needle holder in place.
Figure 4 Nebulizer needle holders
Nebulizer with locknut (original needle holder).
Nebulizer with 1.5-mm hex screw.
Nebulizer with T6 Torx screw (screw p/n 0515-0677)
To adjust or replace the nebulizer needle
Nebulizer Adjustment Fixture User Guide 9
7 If you need to replace the needle:
a Loosen the needle holder and pull it out of the nebulizer body. Dispose of the used needle properly.
b Rinse the inside of the nebulizer body with water and an organic solvent (methanol is preferred) to remove any contamination inside the nebulizer body.
c Thread the new needle holder into the nebulizer body.
d While holding the adjustment fixture in a vertical position, install the new ferrule in the needle holder. The wider end goes into the needle holder.
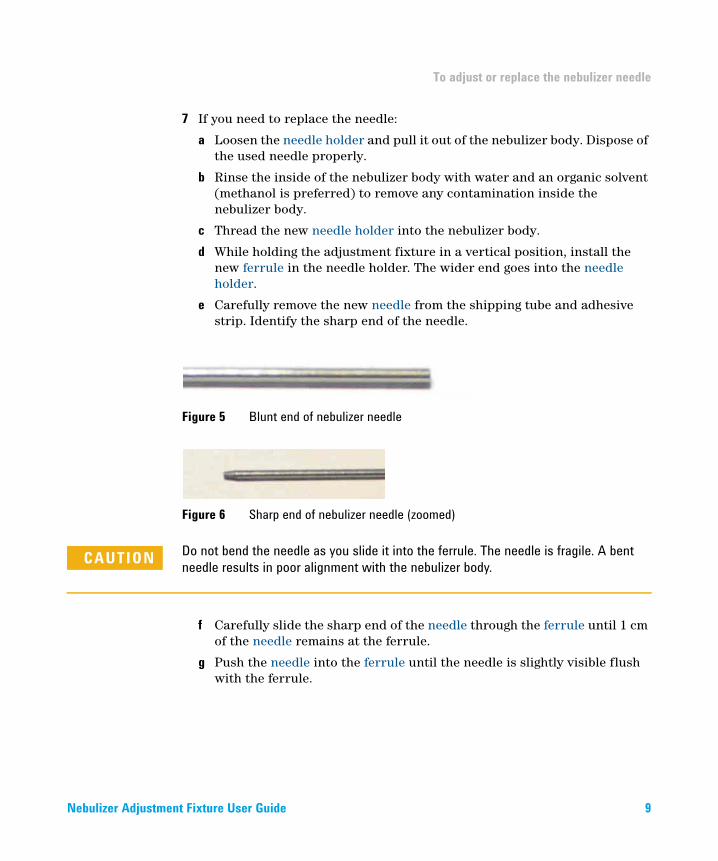
e Carefully remove the new needle from the shipping tube and adhesive strip. Identify the sharp end of the needle.
Figure 5 Blunt end of nebulizer needle
Figure 6 Sharp end of nebulizer needle (zoomed)
Do not bend the needle as you slide it into the ferrule. The needle is fragile. A bent needle results in poor alignment with the nebulizer body.
f Carefully slide the sharp end of the needle through the ferrule until 1 cm of the needle remains at the ferrule.
g Push the needle into the ferrule until the needle is slightly visible flush with the ferrule.
CAUTION
To adjust or replace the nebulizer needle
10 Nebulizer Adjustment Fixture User Guide
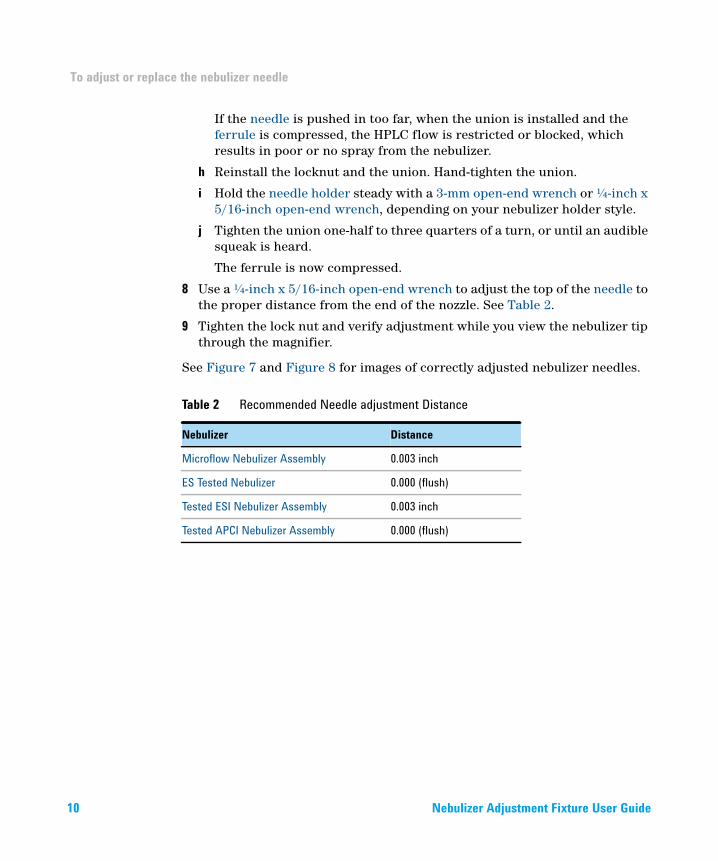
If the needle is pushed in too far, when the union is installed and the ferrule is compressed, the HPLC flow is restricted or blocked, which results in poor or no spray from the nebulizer.
h Reinstall the locknut and the union. Hand-tighten the union.
i Hold the needle holder steady with a 3-mm open-end wrench or ¼-inch x 5/16-inch open-end wrench, depending on your nebulizer holder style.
j Tighten the union one-half to three quarters of a turn, or until an audible squeak is heard.
The ferrule is now compressed.
8 Use a ¼-inch x 5/16-inch open-end wrench to adjust the top of the needle to the proper distance from the end of the nozzle. See Table 2.
9 Tighten the lock nut and verify adjustment while you view the nebulizer tip through the magnifier.
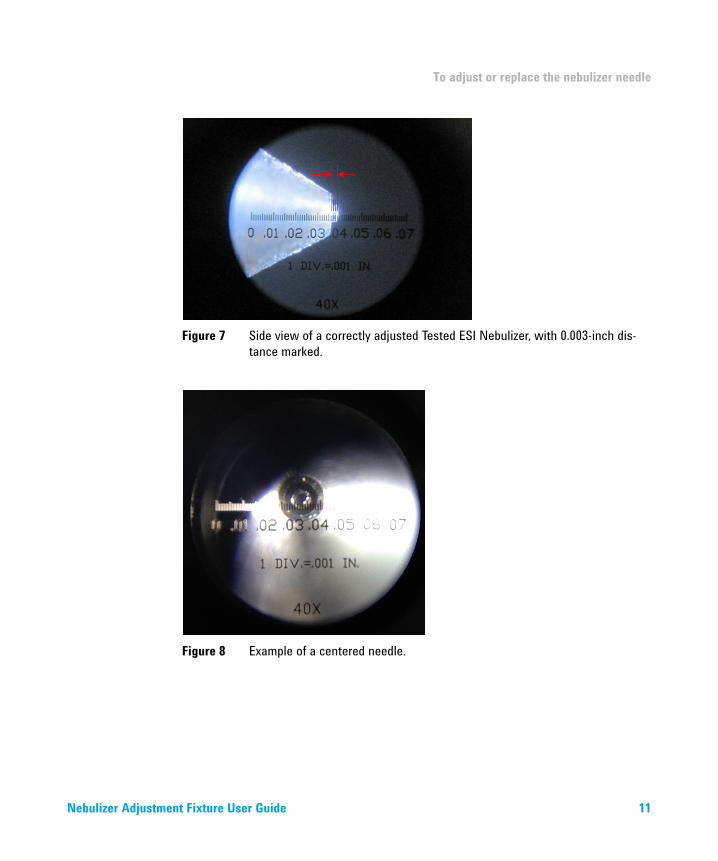
See Figure 7 and Figure 8 for images of correctly adjusted nebulizer needles.
Table 2 Recommended Needle adjustment Distance
Nebulizer Distance
Microflow Nebulizer Assembly 0.003 inch
ES Tested Nebulizer 0.000 (flush)
Tested ESI Nebulizer Assembly 0.003 inch
Tested APCI Nebulizer Assembly 0.000 (flush)
To adjust or replace the nebulizer needle
Nebulizer Adjustment Fixture User Guide 11
Figure 7 Side view of a correctly adjusted Tested ESI Nebulizer, with 0.003-inch dis-tance marked.
Figure 8 Example of a centered needle.

Troubleshooting
12 Nebulizer Adjustment Fixture User Guide
Troubleshooting
The figures below show badly adjusted or damaged nebulizers.
Problem Solution
Concentricity of needle is poor
Replace the needle. If the replacement needle is still out of concentricity, the nebulizer body or the needle holder is damaged or bent. Replace the complete assembly.
Nozzle body is damaged Replace the entire nebulizer assembly.

Troubleshooting
Nebulizer Adjustment Fixture User Guide 13
Needle is clogged with salt. Sonicate the nebulizer assembly in water and methanol. When sonicating, do not allow the tip of the nozzle to touch the beaker or flask. After sonication, if the needle is still clogged, replace the needle.
Problem Solution

Troubleshooting
14 Nebulizer Adjustment Fixture User Guide
Needle is touching the nozzle
Replace the needle. If the replacement needle is still out of concentricity, the nebulizer body is bent. Replace the nebulizer.
Needle is too far out of the nozzle.
Adjust the needle to the appropriate distance. See Table 2.
Problem Solution

Troubleshooting
Nebulizer Adjustment Fixture User Guide 15
Agilent Technologies, Inc. 2013
Printed in USA Revision A, December 2013
*G1960-90470*G1960-90470
www.agilent.com
In This Book
This book contains instructions to inspect and adjust your nebulizer using the Nebulizer Adjustment Fixture.