nc cost accounting 6 - navax · pdf filenavax consulting gmbh 2013 ... microsoft sharepoint,...
TRANSCRIPT

DOCUMENTATION
NC Cost Accounting 6.10 Microsoft Dynamics NAV 2013 Windows Client

NAVAX Consulting GmbH 2013
Page 2 # 126
DISCLAIMER This documentation serves for information purposes only. In case of using the documentation for other purposes NAVAX Consulting GmbH rejects each guarantee because of special and defective titles. NAVAX Consulting GmbH rejects each adhesion for direct and indirect damage – no matter if it is from contract or from law -, which can develop in connection with application and other use of the documentation, and any errors and omissions in this publication. This documentation can be changed at any time if necessary without previous announcements by NAVAX Consulting GmbH. The content of this documentation is protected by copyright. Without written permission of NAVAX Consulting GmbH no part of this documentation may be multiplied or transferred for any purposes no matter which way, electronically or mechanically, it happens. Microsoft Dynamics NAV, Microsoft Dynamics AX, Microsoft Dynamics CRM, Microsoft SharePoint, QlikView and Corporate Planner are registered trademarks. Further mentioned product and company names may be protected by copyright terms of their legal owners. In this document is a version whose contents may change yet. These changes occur without prior notice. This documentation may be used only for internal purposes. Disclosure to third parties.
COPYRIGHT NOTICE The content of this Handbook is copyrighted. Without written permission of NAVAX Consulting GmbH no part of this Handbook may be multiplied or transferred for any purposes no matter which way, electronically or mechanically, it happens.
TRADEMARK NOTICE Microsoft, Great Plains, NAV, FRx, AssistButton, C/AL, C/FRONT, N/ODBC, C/SIDE, FlowField, FlowFilter, NAV Application Server, NAV Database Server, NAV Debugger, NAV Financials, Microsoft Business Solutions–NAV, SIFT, SIFTWARE, SQL Server, SumIndex, SumIndexField, Windows, Windows 2000, Windows 2000 Server, Windows XP, Windows Vista are either FastTabed trademarks or trademarks of Microsoft Corporation or Great Plains Software, Inc., FRx Software Corporation, or Microsoft Business Solutions ApS or their affiliates in the United States and/or other countries. Great Plains Software, Inc., FRx Software Corporation, and Microsoft Business Solutions ApS are subsidiaries of Microsoft Corporation. NAVAX Consulting GmbH rejects each adhesion for errors and omissions in this publication.

NAVAX Consulting GmbH 2013
Page 3 # 126
NC COST ACCOUNTING 6.10 | MANUAL
Publisher| NAVAX Author | Wolfgang Wolf Datum | 2013 Copyright © 2013 NAVAX Consulting GmbH Manual NAVAX Consulting GmbH Liebenauer Hauptstraße 2-6 A-8041 Graz Telefon: +43 316 4682-264 Telefax: +43 316 4682-110 e-mail: [email protected] Head Office: NAVAX Consulting GmbH EURO PLAZA | Lehrbachgasse 2 A-1120 Wien Telefon: +43 1 804 38 38-0 Telefax: +43 1 804 38 38-199 e-mail: [email protected]

NAVAX Consulting GmbH 2013
Page 4 # 126
Table of Contents
Table of Contents ______________________________________________________________ 4
Chapter 1 Overview ___________________________________________________________ 7
Introduction _______________________________________________________________________ 8
Chapter 2 Overview ___________________________________________________________ 12 Description of functionality and modules of Cost Accounting _______________________________________ 13 1.001.760 NC Cost Accounting – Base __________________________________________________________ 13 1.001.770 NC Cost Accounting – Project ________________________________________________________ 15 1.001.780 NC Cost Accounting – NaviCalc _______________________________________________________ 15 1.001.790 NC Cost Accounting – Budget ________________________________________________________ 16 1.001.800 NC Cost Accounting – Allocation ______________________________________________________ 17 1.001.810 NC Cost Accounting – Section ________________________________________________________ 17
Chapter 3 Setup ______________________________________________________________ 19
Cost Accounting Setup ______________________________________________________________ 20 Creation of Costs Accounts ___________________________________________________________________ 23 Cost Account Mapping ______________________________________________________________________ 25 Editing and Deleting Cost Account _____________________________________________________________ 30 Cost Account Authorizations __________________________________________________________________ 30 Referencing Back to Transactions ______________________________________________________________ 32
Create the integration dimensions _____________________________________________________ 34
Chapter 4 Work with the Cost Accounting _________________________________________ 36
Transferring Primary Postings from the General Ledger ____________________________________ 37
Cost Accounting Correction __________________________________________________________ 38
Chart of Departments _______________________________________________________________ 40
Chart of Projects ___________________________________________________________________ 43
Chart of Sub-Accounts ______________________________________________________________ 45
Chart of Sections ___________________________________________________________________ 50
Overview of types of works and units __________________________________________________ 53 Setting Up Work Types ______________________________________________________________________ 53 Setup of Units _____________________________________________________________________________ 54
Cost Account Authorizations _________________________________________________________ 55
Transfer Prices _____________________________________________________________________ 56
Create dimensions _________________________________________________________________ 57
Cost Accounting Journals ____________________________________________________________ 58 Overview _________________________________________________________________________________ 58 Filling in and Posting Journals _________________________________________________________________ 58 Journal Templates __________________________________________________________________________ 59 Journal Names _____________________________________________________________________________ 60 Journal Lines ______________________________________________________________________________ 61 Posting a Cost Journal _______________________________________________________________________ 61 Posting Reports ____________________________________________________________________________ 61
Cost Journals ______________________________________________________________________ 61 Overview _________________________________________________________________________________ 61 Filling In and Posting Cost Journals _____________________________________________________________ 62 Importing External Data into a Cost Accounting spreadsheet. _______________________________________ 63

NAVAX Consulting GmbH 2013
Page 5 # 126
Performance Journals _______________________________________________________________ 65 Overview _________________________________________________________________________________ 65 Filling In and Posting Performance Journals ______________________________________________________ 65
Recurring Transactions ______________________________________________________________ 67 Special Fields in Recurring Journals ____________________________________________________________ 67
Chapter 5 Working with the Cost Accounting Tasks _________________________________ 69
Searching for Cost Ledger Entries ______________________________________________________ 70 Searching for Documents ____________________________________________________________________ 70
Cost Accounting Schedules ___________________________________________________________ 72 Creating Cost Account Schedules ______________________________________________________________ 72 Copying Cost Accounts into a Cost Account Schedule ______________________________________________ 75
Evaluating Cost Ledger Entries ________________________________________________________ 75 Entering a Cost Account _____________________________________________________________________ 75 Entries of all Cost Accounts ___________________________________________________________________ 76 Displaying Balances _________________________________________________________________________ 76 Chart of Cost Accounts Window _______________________________________________________________ 76 Displaying Net Changes for all Cost Accounts ____________________________________________________ 76 Cost Acc. Registers __________________________________________________________________________ 77 Cost Ledger Entries _________________________________________________________________________ 79 Source Entries _____________________________________________________________________________ 79 Canceling Cost Acc. Registers _________________________________________________________________ 80
Closing a fiscal Year _________________________________________________________________ 81 Closing Cost Accounting _____________________________________________________________________ 81 Cost Ledger Entries compression ______________________________________________________________ 82
Cost allocation in Cost Accounting _____________________________________________________ 85 Overview _________________________________________________________________________________ 85 Structure of a Cost Allocation _________________________________________________________________ 85 Cost Allocation Methods _____________________________________________________________________ 86 Cost Allocation Journals _____________________________________________________________________ 90 Filling In and Posting Cost Allocation Journals ____________________________________________________ 90
Budget Cost allocations _____________________________________________________________ 94 Recording Budget Cost Allocations _____________________________________________________________ 94 Recurring Cost Allocation Journals _____________________________________________________________ 95
Chapter 6 Budgets ____________________________________________________________ 97
Overview _________________________________________________________________________ 98
Setting up and administering Budgets __________________________________________________ 99
Budget Header ___________________________________________________________________ 100 Changing Budget Amounts __________________________________________________________________ 101 Multiple Budgets __________________________________________________________________________ 101 Budget Comparison ________________________________________________________________________ 104
Quantity Budgets _________________________________________________________________ 107 Cost Budget Journals _______________________________________________________________________ 108
Chapter 7 Calculatory Fixed Assets ______________________________________________ 110 Overview ________________________________________________________________________________ 111 Fixed Asset Setup __________________________________________________________________________ 111 Transfer of cost-accounting depreciation_______________________________________________________ 112
Chapter 8 Navi Calc __________________________________________________________ 114 Overview ________________________________________________________________________________ 115 Construction of a NaviCalc __________________________________________________________________ 115 NaviCalc Set Up ___________________________________________________________________________ 118

NAVAX Consulting GmbH 2013
Page 6 # 126
Inserting Comments to a NaviCalc ____________________________________________________ 121
Working with NaviCalc _____________________________________________________________ 121 Viewing the NaviCalc Results on the Screen ____________________________________________________ 121 Printing a NaviCalc _________________________________________________________________________ 122
Canceling a NaviCalc _______________________________________________________________ 123
Copying a NaviCalc ________________________________________________________________ 124

NAVAX Consulting GmbH 2013
Page 7 # 126
Chapter 1
Overview
This Chapter:
Introduction
Target Group
Structure
Naming and commands
Profile Overview
UI RTC

NAVAX Consulting GmbH 2013
Page 8 # 126
Introduction
Processes and scenarios defined in this manual have been developed using NC Cost Accounting 6.10 Add On. This manual describes NC Cost Accounting solution created by NAVAX Consulting GmbH for Microsoft Dynamics NAV 2013.
Dear User,
The manual has been carefully checked and the samples tested, but there’s no manual without any mistakes. Let us know if something does not work the way you expect it. Any suggestions and compliments are welcome as well.
We wish you happy reading Visit our website www.navax.at
Target Group
This manual is first line of help for users who works with the NC Cost Accounting 6.10 Add On. The user should have an appropriate knowledge and experience in financial accounting, accounting and basic knowledge of data processing.
Structure
This user manual has been prepared using a process–oriented approach. Each chapter refers to several NC Cost Accounting areas. Each section contains a step-by-step description of certain NC Accounting processes. In order to help you to perform all important operations, the manual consists of practical examples prepared on a demo dataset. Due to the process-oriented structure of this manual doesn’t show all details of the application. If you would like to find more detailed information about a particular field or window, please refer to the Index. The Manual consists of 8 chapters. Each chapter consists of the following sections:
Introduction,
Example data and requirements,
Step-by-step workflow description,
Professional tips. Naming and commands
In this manual you will see multiple commands using names from Role Center, Lists and Action Tabs, which will inform you about which window will be open or what function will run. If requested window is currently not open, manual will suggest the entire sequence (e.g. „Departments“, „Sales & Marketing“, „Sales“, „Lists“, Customers“). Note, so first command is always a name of Navigation Pane. Navigation Pane consists of panels which are at your disposal due to the definition of Your Role Center. In order to open the window or call the Microsoft Dynamics NAV function, you can use the mouse or keyboard as well. If for a given command some keyboard shortcut is defined, the appropriate letter is underlined in function name. You can call this

NAVAX Consulting GmbH 2013
Page 9 # 126
command using combination ALT + underlined letter (e.g. action to open Menu is ALT + A).
Note:
Profile Overview
All of examples and screenshots in this manual was prepared based on Profile - NC KOSTENRECHNUNG and thus use Role Page ID 1002300. Note you will have to register this profile in „User Setup“ window in order to use the same Role Center page, as shown on the attached screenshots.
UI RTC
Following screenshots shows an overview of designations of application.
Role Center Page
Note: In this manual you can find information marked by BOX like this. They contain information of particular importance.

NAVAX Consulting GmbH 2013
Page 10 # 126
Task Page

NAVAX Consulting GmbH 2013
Page 11 # 126
Demo database
Demo database for NC Cost Accounting 6.10 has been prepared based on CRONUS International demo for Dynamics NAV 2013 W1. Postings in CRONUS database was made between 20113 and 2014, work date for Cronus DB is set to 23.04.2014. Using other dates can cause unexpected system behavior.

NAVAX Consulting GmbH 2013
Page 12 # 126
Chapter 2
Overview
This Chapter:
Overview of Cost Accounting

NAVAX Consulting GmbH 2013
Page 13 # 126
Description of functionality and modules of Cost Accounting
The costing for Microsoft Dynamics NAV is a fully integrated application module, which is subdivided into individual modules. These individual sub-modules are:
1.001.760 NC Cost Accounting - Base
1.001.770 NC Cost Accounting - Project
1.001.780 NC Cost Accounting - NaviCalc
1.001.790 NC Cost Accounting - Budget
1.001.800 NC Cost Accounting - Allocation
1.001.810 NC Cost Accounting - Section
1.001.820 NC Cost Accounting - Page
The following sections describe demonstratively the scope of functions and the properties of the individual modules (with a reference to the optional extras). For a deeper description please refer to the respective chapter of the manual.
1.001.760 NC Cost Accounting – Base
This basic module is the base of NC Cost Accounting for Microsoft Dynamics NAV. On the level of Cost Accounts and Cost Centers, costs of activities in any organizational area are recognized. The initial posting on Cost Center is performed in Finance & Accounting module. Cost Accounting offers additional analytical dimensions and ability to separate cost analysis from initial cost posting.
Master Data
The module allows the setup of any departments and cost accounts (or revenue types). In general ledger accounts of the general ledger module of the Microsoft Dynamics NAV standard application, cost accounts can be created automatically. The user can work with and complete these cost accounts in cost accounting. A chart of cost accounts and a chart of departments are available to the user for organizing cost accounts and departments in a hierarchy. By maintaining master data you can accommodate the structure of cost accounts and departments for the specific informational needs of your operation. With group assignments you can define large groupings and hierarchies as additional evaluation levels of cost account and department accounting.
Cost Accounting Dimensions
Cost accounts and departments are two dimensions of cost accounting that allow for the allocation of postings as they relate to cost accounting. Each posting line in cost accounting contains at least one cost account. Each posting in the basic department accounting module additionally contains at least one department. This information is also contained in the posted net change data, which results from the posting line. The posted net change data are designated in Microsoft Dynamics NAV as entries. Entries in cost accounting are called cost ledger entries; those in the General Ledger are called general ledger entries.
Transfer of Primary Costs from the General Ledger
Cost accounting allows you to assign particular general ledger accounts to one or more cost accounts. Individual general ledger accounts can be summarized to cost accounts or split over deposited percentage relationships to cost accounts. The cross reference is the foundation of the automatic transfer of primary postings from the general ledger into cost accounting.

NAVAX Consulting GmbH 2013
Page 14 # 126
Essential for the transfer of postings from the general ledger is the relevant cost accounting allocation of the postings in the general ledger. This means that for department accounting a department must be specified when posting to a general ledger account. The transfer into cost accounting can alternatively be drawn by individual entries or balanced following the allocation (i.e. it will be transferred one balance per general ledger account and department). An informative reference to the postings in the general ledger from the posted cost ledger entries is possible at any time. Each transfer operation can be cancelled individually. Postings that were not yet transferred can be posted to cost accounting through a repeated transfer.
Manual Cost Postings
Primary costs can also be recorded and posted by manual postings in cost accounting. These manual cost postings (additional and calculated cost postings, transfers) can be carried out to cost accounts and departments in the cost journals.
Recurring Cost Postings
As a supplement to the manual postings by cost journals, recurring postings can be used for postings. In the recurring cost journals, time intervals can be implemented with date formulas that control the posting date. With recurring journals you can automate activities without new entries; which, for example, periodically repeat in the same way within the frame of the monthly balance. As a rule, these postings remain unchanged over a long period of time.
Cost Account Authorization
Authorizations can be set up for each individual cost account. As a result, postings to these cost accounts in the cost journals will only be authorized for particular departments.
Performance Accounting
Various tools are available for performance accounting. With the included performance journal you can post work type-oriented activities between departments in department accounting by making reference to price transfers that are implemented in the departments by work type. The performance journal can only be set up with either the basic department accounting module or the supplementary project accounting. You can see this in the next sub-section. For periodical recurring postings in performance accounting, the recurring performance journal is available with similar functions as the recurring cost journal.
Calculated Fixed Assets
Taking already calculated depreciation from Fixed Assets ledger is used to calculate the depreciation in Cost Accounting module independently of FA module and take over the FA accounting from standard FA module into Cost Accounting. You can specify Cost Elements for the transfer by FA posting groups.
Evaluations
The evaluation of the postings to cost accounts and departments takes place either with various standard reports, with cost account and department schedules, or optionally with the NaviCalc-Report generator (see the section "NaviCalc" in this chapter). The evaluation schedule for cost accounts offers the possibility of creating multiple compressions from cost account postings based on the chart of cost accounts. This also applies to the evaluation schedule for departments.

NAVAX Consulting GmbH 2013
Page 15 # 126
The standard reports available in cost accounting are not described in detail in this manual. If you want to learn more about individual reports you can use the online help.
1.001.770 NC Cost Accounting – Project
The project accounting module supplements the basic department accounting module of cost accounting for Microsoft Dynamics NAV. Project accounting shows which costs and revenues have incurred for which product areas and activities. Within the frame of this formulation there are various necessary time and result comparisons. You can use this module for the costing process for projects as well as for the setup of Sub-Accounts as a further allocation dimension. With Sub-Accounts, projects of the standard application can be integrated into cost accounting. The module allows for the setup of any projects and Sub-Accounts. For an overview of all projects as well as for further groupings and compressions of the individual projects, a chart of projects is available. (With the maintenance of the master data, the projects and Sub-Accounts can be assigned individual groups and evaluated on this basis.)
Cost Accounting Dimensions
Projects and Sub-Accounts, along with cost accounts and departments, define two further cost accounting dimensions to which relevant cost accounting postings can be allocated. Each posting line in project accounting contains at least one project as well as a Sub-Account.
Transfer of the Primary Postings
Transfer of the primary postings to projects, or jobs, takes place with the automatic transfer of postings to general ledger accounts of the general ledger as described in the section "Department Accounting." Using the Microsoft Dynamics NAV General Ledger, it is possible at the G/L postings to transfer this information into cost accounting with projects, or jobs.
Manual Cost Postings
For additional manual postings, the cost journals are available for postings to cost accounts, projects, or Sub-Accounts. The basic module also makes it possible not only to define quantity units (e.g. hours, square meters) with corresponding rates to the posting of money amounts, but also to post these units.
Performance Accounting
Performance journals can also be set up within project accounting when there is an expanded performance accounting available. With performance journals, you can post work type-oriented activities between departments and projects.
1.001.780 NC Cost Accounting – NaviCalc
The NaviCalc module supplements the basic cost accounting module and the individual extensions of cost accounting for Microsoft Dynamics NAV. NaviCalc lets the user create, manage, and re-use flexible and multi-dimensional evaluations based on schedule structures. Most of the tasks in the controlling area are reported efficiently. Most standard reports may be modified to meet individual users' needs.

NAVAX Consulting GmbH 2013
Page 16 # 126
Schedules
In order to allow you free space and flexibility in organizing and defining evaluations, NaviCalc falls back upon the combination of schedule structures that are easy to adapt, may be created as often as you like, and are simple to manage. Evaluations can be analyzed on paper, viewed on the screen, or copied from screen lists into other application programs, i.e. spread sheets. The NaviCalc module allows the user to choose combinations of schedules based on cost accounts, departments, projects, and Sub-Accounts in lines, columns, and column segments of an evaluation matrix. For evaluations, NaviCalc uses not only posted actual costs in a defined time breakdown (the period under review also allows, for example, previous year comparisons), but also budgeted costs with filters to individual periods and allocations. Therefore, budgeted-actual-comparisons by cost-accounts, departments, projects, or Sub-Accounts are possible. These are displayed by choice as column or line dimensions in the evaluation matrix. The actual and budgeted aspect of NaviCalc supports both the amount and quantity dimensions of performance accounting. Costs and performances can be compared to budgeted values by period. At the same time NaviCalc lets you carry out your own calculations based on actual or budgeted values of individual evaluation columns. The user can also align individual columns with each other using the four basic arithmetic operations, or with absolute value in ratios. Formulas may be entered in extended form just as in many spread sheets. With different dimensions of NaviCalc, most report demands can be displayed. So for example, with the use of a line structure from cost accounts and a column structure based on a department schedule, a cost structure can be created. The line structure in NaviCalc can be completed with line formulas. This structure can include actual and budgeted values of different periods and can be enhanced with formulas so that a budgeted-actual-comparison, a previous year comparison, and a percentage difference can be printed out. The evaluation does not have to be calculated at each report printing. Evaluation results will be saved analogous to the posted net change data in NaviCalc entries. These entries are accessed by a report that defines for the user the information to be displayed by line and that also automatically begins a new page after each column. The individual departments of our example will be printed one after the other. After defining an evaluation in NaviCalc, the user can make a copy by simply changing the date. For example, the January cost structure may be copied to become the basis of the February cost structure.
1.001.790 NC Cost Accounting – Budget
The budgeted cost accounting module supplements the basic department accounting module and the project accounting module of cost accounting for Microsoft Dynamics NAV regarding cost budgeting and performance budgeting. With the budgeted costs module, it is possible to budget to the four cost accounting dimensions (cost accounts, departments, projects, and Sub-Accounts) depending on the extent of the set up module. Budgets are based on value sizes or quantity sizes. In order to budget performances (quantity dimension) it is necessary to specify a work type. The definition of a unit is behind the work type so that performance quantities can be budgeted by units in the budgeted costs module. Any number of budgets can be defined for every allocation and period. This allows the user of the budgeted costs module to display different versions of the cost accounting and performance accounting, e.g. normal cost accounting. Budgets for value or quantity sizes are set up in separate windows where the user can freely specify the cost accounts to be budgeted, and eventually the different cost accounting dimensions such as periods. You can apply as many budgets as you like, each containing particular filters depending on their intended purpose. You can create your own functions to copy or allocate an existing budget.

NAVAX Consulting GmbH 2013
Page 17 # 126
The cost budget journals offer an alternative way to record budgeted values. In a cost budget journal, value and quantity sizes can be recorded for individual budgets and periods. As in the budget windows you can record and post budgeted values for departments, projects, and Sub-Accounts in the cost budget journals. To evaluate and compare actual and budgeted values you can use standard reports as well as the NaviCalc report generator. Additional features in the system allow the user to compare differences between posted and budgeted values by filter.
1.001.800 NC Cost Accounting – Allocation
This module provides in Cost Accounting possibility of comfortable cost allocation in frame of given posted cost entry. Posting of allocation is performed in special Cost Allocation Ledger, which has additional, in comparison with standard Cost Ledger, possibilities:
To relief cost type, project or department.
To limit the validation of cost posting to chosen scope of dates.
Allocation using fixed or variable rate, variable can be provided by value or other numerical figure.
Defining of allocation keys using percent or other ratios.
Automatically balancing of allocated costs in frames of given cost entry.
Simultaneous loading and unloading booking within a transaction.
Iteration allocation.
1.001.810 NC Cost Accounting – Section
With this module, another dimension from the accounting cost accounting may be applied.

NAVAX Consulting GmbH 2013
Page 18 # 126
Structure of Cost Accounting
The following illustration shows the principal structure of the cost accounting and value flow from outside within the cost accounting and cost accounting. Some master data (cost centers, cost objects, work types and units) used equally by the default application and cost accounting. For other master data must or can be set (G/L Accounts and cost elements, projects and subaccounts) mappings. The detailed description of the structures and functions, see the corresponding chapters of this manual.
Cost Accounts
Departments
Projects
Sub-Accounts
Area
Work Types
Units
Transfer Prices
Fixed Assets
Work Types
Units
G/L Account
Department
(Global Dimension 1 Code)
Project
(Global Dimension 2 Code)
Job or
Shortcut Dimension 1-8
Shortcut Dimension 1-8
Records
RecordingG/L Entries
G/L Transfer
Journals
Costs
Perfrmances
Cost Allocations
Cost Budget
Posting
Registers
Entries (Net Change Data)
Cost Ledger Cost Budget Entries
Log
Recording
Evaluating
Reporting
NaviCalc
Reports
Schedules
Budgets
Legend:
NC Cost Accounting
NAV
AfA
Transfer
Import
Import
Export

NAVAX Consulting GmbH 2013
Page 19 # 126
Chapter 3
Setup
This Chapter:
Setup of Cost Accounting

NAVAX Consulting GmbH 2013
Page 20 # 126
Cost Accounting Setup
Before you can start posting transactions, you must perform some basic settings in cost accounting. 1. Select Departments -> NC Cost Accounting -> Setup -> Cost Accounting Setup. 2. Cost Accounting Setup windows.
In this window, you first set the required settings for the date-dependent release of bookings, e.g. the posting periods in cost accounting. Also need to make certain information when you access accounts as a dimension of cost accounting and / or NaviCalc want to use the module. The following table shows the fields in this window. A large number of tables in this manual are structured according to this pattern. The symbol in the column "Filling out" indicates whether the field must be filled in: The field must be filled in principle. The field can be filled out if necessary. No data entry is possible in the field. It will be filled in automatically. In the column of "Remarks" you will find a short description or a note. A chapter or section of this manual is specified in the note where the field is used in which situations and what has to be observed is described. In the online help, see a detailed description of all the fields (he also in this manual detailed not described).

NAVAX Consulting GmbH 2013
Page 21 # 126
Field Fill In Explanation
FastTab: General
Allow postings from
Allow posting to
Entry of the starting date and/or ending date to limit the time period in which postings are possible in cost accounting.
Max. Iteration Steps In accounting, it is possible to conduct assessments in the iteration procedure.
The iteration will be repeated up to the max.
Number of iteration steps is reached or no iteration is possible.
The installation is done in the field "Max iteration steps", here is max.
Set the number of iteration steps
FastTab: Integration
G/L Posting Integration
To enable the immediate transfer to cost accounting, you place a check mark here.
I.e., with the creation of the thing post is also a cost item created, or assumed the thing posts in cost accounting.
Dimension Controlled G/L Account– Cost Account Mapping
It is possible to specify a dimension code that allows for the clipping of the institution in the "G/L Account cost elements map" window in cost accounting.
It used the cost elements as the dimension value of the dimension code.
The specified dimension is used when you create a reservation and thus associated with the thing post, considered the dimension value the system for the transfer of the thing posts in cost accounting and uses it to the Association as a cost element.
Integration (cost center / cost)
Here you can specify which type of dimension is to be applied in the cost accounting dimensions.
In relation to the institutions in financial accounting, the dimension code for the cost center or cost object is given here.
Typically, the cost center is the global dimension code 2 the global dimension code 1 and the cost objects.
Dimension code (cost center / cost)
In the dimension code field, the corresponding cost center or cost object is selected then the dimension overview.
Synchronization (cost center / cost)
Here, you specify when you want to apply the dimension values from the accounting in cost accounting.
In Butch: only if you enable the feature acquisition cost, the cost centers in cost accounting are applied.
Permanent: Once a new cost center will be created in the accounting, it is applied also in cost accounting.
At Posting: as soon as a booking is made on a

NAVAX Consulting GmbH 2013
Page 22 # 126
cost center in financial accounting it is applied also in cost accounting.
Integration
Sub-Account
When the Sub-Account can choose whether you have a link to the module projects or would like to have another dimension:
Job and Dimension
Dimension Code Have they chosen projects, no additional dimension information is necessary to choose dimension, you specify here the dimension code, you want to use in the Sub-Accounts.
Synchronization Here, you specify when you want to apply the dimension values from the accounting in cost accounting.
In Butch: only if you enable the feature acquisition cost, the cost centers in cost accounting are applied.
Permanent: Once a new cost center will be created in the accounting, it is applied also in cost accounting.
At Posting: as soon as a booking is made on a cost center in the financial accounting, it is applied also in the cost accounting and projects cost accounting is applied.
Integration (area) Here you can specify a fourth dimension to which you want to perform evaluations and calculations in cost accounting.
Dimension code (Area)
Here, enter the dimension code to which you want to use.
Synchronization Area Here, you specify when you want to apply the dimension values from the accounting in cost accounting.
In Butch: only if you enable the feature acquisition cost, the cost centers in cost accounting are applied.
Permanent: Once a new cost center will be created in the accounting, it is applied also in cost accounting.
At Posting: as soon as a booking is made on a cost center in financial accounting it is applied also in cost accounting and projects cost accounting are applied.
FastTab: Fixed Assets
Calculatory Depr. book.
Here, you specify the code of the imputed depreciation book, which includes the imputed depreciation postings.

NAVAX Consulting GmbH 2013
Page 23 # 126
FastTab: Numbering
NaviCalc numbers Voters from the overview one number range if you want an automatic assignment of transaction numbers for the module NaviCalc.
How numbers series to set up, learn in the manual "Financial accounting".
For more information, compare the chapter "NaviCalc" in this manual.
FastTab: Version
Contains the version of the costing.
Creation of Costs Accounts
A central component of the cost is the Chart of Cost Account. The Chart of Cost Account is used as center for collecting and organization of all costs registered during posting routines. The corresponding cost in cost accounting accounts in financial accounting. The corresponding cost in cost accounting accounts in financial accounting. The cost elements are used to record costs, whose outlining primarily depends on the kind of consumed resources. Accounts of the cost type plan are also to be used for revenue types, which you can identify by the number sequence or by a corresponding entry in the group mapping (see below) as such. In financial accounting, booking records with G/L accounts are posted in cost accounting with cost. The cost type plan is an overview of all cost elements specified in the cost accounting. He serves on the one hand the fast overview of the applied cost elements and their balances and movements on the other hand logical subdivision and the design of the reporting by headings and different sums. This chapter describes how to set up cost and build up a cost type plan. You have two ways to build a new cost type plan in cost accounting. You can manually set the cost elements; this procedure is described in the section creating the types of costs. You can also use Chart of Accounts from financial modules as the basis for Chart of Cost Accounts, by automatic importing of financial Chart of Accounts: this procedure is described in chapter "Takeover of the G/L accounts in financial accounting". Movements and on the other hand the logical breakdown and design of reporting by headings and various sums. Movements, and on the other hand the logical breakdown and design of the if you want to build a new plan of cost element, you can apply using a batch of G/L accounts in cost. To do this proceed as follows: 1. Select Role Center -> Actions -> Create Cost Accounts.

NAVAX Consulting GmbH 2013
Page 24 # 126
2. The request form of the batch Create Cost Accounts opens.
3. In the options pane, you can set conditions for the batch:
Field Entry
Length G/L Account
Enter how many places the numbers of the G/L accounts in your chart of accounts should have. In the demo company the G/L accounts are 4-digits.
Length of Cost Account
Enter the number of spaces needed to hold the cost accounts that will be generated with the transfer of G/L accounts from the general ledger. In the demo company the cost accounts are 5-digits. If Length of Cost Account is larger than Length G/L Account then a corresponding number 0 is added to the G/L Account numbers in order to produce the cost account numbers. In the opposite case, the G/L Account numbers will be shortened.
Make Cross Reference
Insert a if you would like to automatically create a cross reference of the cost account to the corresponding G/L Account (see sub-section "Cross Referencing Cost Accounts to G/L Accounts" in this chapter).
Convert Balance Enter a standard for how the postings of the G/L accounts should be transferred into automatically create a cross reference of the cost account to the corresponding G/L account. The field has two options: Sum and Detailed Posting. The value can still be changed manually after the transfer (see the sub-section "Cross Reference of Cost Accounts to G/L Accounts" in this chapter).

NAVAX Consulting GmbH 2013
Page 25 # 126
4. In the field G/L Account you can set filters, which G/L accounts in cost elements are applied. In terms of G/L Account, you can set filters which G/L Accounts in cost elements are applied. In the G/L Account register, you can establish with filters which G/L accounts will be transferred into cost accounts. 5. In the ID field, you can set the number range of the G/L Account to be applied. Keep in mind that only G/L Account of the account type account in cost will be applied. In the No. field you can specify the number series of the G/L accounts to be transferred. Be aware that only G/L accounts of the type account will be transferred into cost accounts. 6. In box Income/Balance you can choose whether you want to take income statement or balance sheet accounts. In the Income/Balance field you can specify whether you want to transfer income/balance and/or balance accounts. If you want to apply, for example, all profit and loss accounts of the demo clients in cost, then you can either in the field no. 6000..9999 or enter into the field of income statement / balance sheet income statement. If you would like to transfer all income/balance-accounts of your company into the cost accounts then you can enter either 6000..9999 in the No. field or Income Statement in the Income/Balance field. If you do not set a filter, all G/L accounts will be transferred into cost accounts. If you use no filters, all G/L Account including headings etc. are transferred to the cost elements. 7. If you have used this batch processing to build of a cost type plan, so a 1:1 between the selected G/L Account and the applied cost first-relation, i.e. each G/L Account is just a cost element, and vice versa. You can define but also other relations between G/L Account and cost elements in the cost accounting. This is described in the following section "Assignment of cost to G/L accounts".
Cost Account Mapping
To take over the thing items booked in the accounting, cost accounting, you must set which G/L Account directly in the cost accounting are applied and which G/L Account is equivalent to the cost element. This selection and assignment will be deposited in the G/L account / cost assignment table. 1. Select Role Center -> Actions -> G/L Account -> Cost Account Mapping. The G/L Account cost elements mapping window opens. If the option from Cost Accounting Setup „G/L Posting Integration“ is set to „Yes“, the relation between G/L accounts and Cost Accounts are by default set as 1:1, e.g. each G/L Account is just a Cost Account and vice versa.

NAVAX Consulting GmbH 2013
Page 26 # 126
The following illustration shows this mapping:
You can define other relationships between G/L Accounts and cost elements in the cost accounting by manually editing of the table. On the one hand, you may summarize several G/L accounts with their postings to a cost account as they are transferred into cost accounting. In this case there is an n:1 ratio between G/L accounts and a cost account. This is illustrated in the following figure: the three accounts 8710, 8720 and 8730 are transferred into cost account 87100. The following illustration shows this mapping:

NAVAX Consulting GmbH 2013
Page 27 # 126
Separate revenue accounts for individual tax cases are a further example (20%, sales revenue 10%, etc.). Since it is not necessary in the cost accounting to separate the revenue accounts, according to the selected VAT as in financial accounting you can combine these accounts to a kind of revenue. On the other hand, you can distribute the postings of a G/L Account in the acquisition cost accounting on several types of costs. In this case 1 is a relation between the G/L Account and the cost. The distribution is based on a fixed percentage distribution. This is illustrated in the following figure: the G/L Account 8140 is transferred to cost accounting in the two cost elements 81300 and 81400 divided.

NAVAX Consulting GmbH 2013
Page 28 # 126
Cross Reference of Cost Accounts to G/L Accounts To assign a G/L account to a cost account proceed in the G/L Account/Cost Account- Cross Reference window as follows: 1. Click on the G/L Account No. field and enter the number of the G/L account.
2. Click on the Cost Account No. field and enter the number of the cost account. The
informative fields G/L Account Name and Cost Account Name will be automatically filled in from the master data.
3. In the Convert Balance field enter how the G/L account should be transferred into cost accounting during the G/L-Transfer. There are two options:
Sum: The option Sum transfers the postings from the general ledger for this line of
the account cross reference table in a sum per target, account and date filter. All entries that were posted to the chosen G/L account with a particular target, i.e. with department, project, and a possible sub-target (job), will be transferred per target as a balance entry. Single Postings: If you choose Single Postings, then each posting will be transferred from the general ledger into cost accounting. In other words, for each G/L entry a cost ledger entry is created.
4. If you have chosen the option Sum in the Convert Balance field and want to allocate the postings of the corresponding G/L account, enter in the %-Split field the percentage that should be posted to the cost account of this cross reference line during the G/L-transfer.
Summary of G/L Accounts to a Cost Account
Example described the totaling of several accounts to a one cost account.
1. Enter into „G/L Account No.“ column the number of first account that should to go
into the sum. In this example it will be account 7210.
2. Then insert into „Cost Account No.“ column the number of cost account which will be loaded. In this example it will be 71100 cost account.
3. In the balance field, select „sum“ or „detailed“ converting balance method. In this example, select the „detailed“ option.
4. Press the line the ENTER button, or press above the next number and press F3 to create new line. This is necessary only if the corresponding row in the acquisition is not yet created.
5. Enter into „G/L Account No.“ column the number of next account that should to go into the sum. I.e. in this example it will be account 7220 and assign this to the same Cost Account No. as in the previous assignment row. Repeat steps 1 through 4 (if necessary) for the G/L Account 7230.
The postings in financial accounting on these three accounts are now summarized on same cost element and booked.

NAVAX Consulting GmbH 2013
Page 29 # 126
Split of a G/L Account to Cost Accounts The split of a G/L Account on several types of costs should the example of the breakdown of the G/L Account 8140 on the cost of 81300 (Repairs and Maintenance), 81400 (Other Repairs) be demonstrated. To do this proceed as follows: 1. Select G/L Account. The number of the G/L Account that you divide i.e. 8140.
2. Then type in the Cost Account No. field the number of the first cost element, which
should be posted, i.e. 81300.
3. In the balance field, select apply the option sum; the option single booking is not possible in this case.
4. Enter the percentage of bookings in the field % splits shall be booked to the selected cost element. Inn this example 50 for the cost.
5. Press at the end of the line of the ENTER key.
6. Select G/L Account number of the previous assignment row (8140), in the field of Cost Account number of the next type of cost, which posted should be i.e. 81300 and 81400, and in the balance field, select accept sum.
7. Again enter the percentage of bookings in the field % splits to be booked on the current cost. The system the rest share 100% proposes to you, i.e. 50 select in this example 50.
8. Enter additional lines, as long as you have not yet reached the 100% for all assignment rows for the thing account distribution.
Repeat steps 1 through 6 until you have set up a line for each type of cost, which should be posted.

NAVAX Consulting GmbH 2013
Page 30 # 126
Editing and Deleting Cost Account
You can best change the fields of a cost account in the cost account card. Choose Role Center -> Chart of Cost Accounts -> Cost Account Card.
You can change the number of a cost account by entering a new number and confirming the message that follows. To change the number the same instructions apply as in the general ledger.
You can change all other entry fields as needed. These changes will only apply to transactions that follow within the system. You can delete a cost account in the Chart of Cost Accounts window or in the cost account card. In both cases choose Delete from the menu bar. Cost accounts can only be deleted if the balance is zero and there are no entries in the current fiscal year. Already posted cost account entries are not deleted from closed fiscal years, however, the cost account number from this entry is removed (the field Cost Account No. in the cost entry ledgers is then blank).
Cost Account Authorizations
If you want a cost account to only be posted from particular departments then you can enter an authorization code for this cost account. In this authorization code you specify which departments are allowed to post the cost account. If you want to set up cost account authorizations, proceed as follows: 1. Choose Departments -> NC Cost Accounting -> Setup -> General -> Cost Account
Authorization. The Cost Account Authorization window appears.

NAVAX Consulting GmbH 2013
Page 31 # 126
2. Fill in the Code field with a clearly defined cost account code. In the Description
field you can enter whatever description you like. In the demo company, a cost account authorization code DE1 is set up for calculated costs.
3. Enter in the lines of the Department Code field the first department that may post the cost account. Click on the AssistButton and choose the corresponding department with OK. The Description field will then be automatically filled out with the description of the department. Repeat this step until you have completed all departments that may post the cost account.
For the cost account authorization code DE1, the departments, including the sales departments, of the area Sales/Marketing have already been set up
After setting up authorization codes you can then assign each individual cost account an authorization code. Click in the Chart of Cost Accounts window on the desired cost account and choose Cost Account Card. You can now assign an authorization code to the cost account in the Authorization Code field in the Posting register of the cost account card. Click on the AssistButton. The Cost Acc. Authorization List window appears. Choose the authorization code from this list by clicking on the OK button.

NAVAX Consulting GmbH 2013
Page 32 # 126
1. If you have set up authorization codes, then you can assign a permission code every single cost element
2. Do this in the cost type plan window, click the desired type of cost and select Actions -> Edit.
3. In the demo client, choose the cost element of 92900 for imputed interest.
4. Enter the authorization code in the FastTab booking of cost elements map you can now assign the cost element an authorization code.
5. To enter the authorization code, click on the drop-down button.
6. The cost type permissions window appears.
7. From this overview, select the permission code line by clicking OK button.
Referencing Back to Transactions
A source code is automatically assigned to all posted entries in cost accounting just as in the general ledger so that the completed transactions can always be re-traced. You can also assign a reason code to transactions.

NAVAX Consulting GmbH 2013
Page 33 # 126
Fill in cost accounting as follows the fields in the FastTab when needed:
Reason code If you want to assign additional, complementary
information to the post, you can use reason codes for this purpose. Reason code indicates why a post was created. To set up reason codes, choose Financial Management -> Setup -> Trial Codes. The reason codes window appears.
Field Entry
Cost Acc. Journal Enter the source code that should be automatically filled in at a cost journal posting.
Performance Journal Enter the source code that should be automatically filled in for the performance journal.
Transfer Journal Enter the source code that should be automatically filled in at the posting in the transfer journal.
Cost Acc. G/L-Transfer
Enter the source code that should be automatically filled in at a G/L-transfer.
Cost Acc. Closing Enter the source code that should be automatically filled in at a cost account closing.
Cost Acc. FastTab Cancellation
Enter the source code that should be automatically filled in at the cancellation of a cost account register.

NAVAX Consulting GmbH 2013
Page 34 # 126
Learn more about the setting up of and you can work with countries of origin and reason codes the band of "Financial accounting" of the user's Guide of the Microsoft Dynamics NAV standard applications.
Create the integration dimensions
The window cost accounting setup in the FastTab integration set integration dimensions can be created now automatically using batch processing in cost accounting. 1. Select Role Center -> Actions -> Integration and then one of the desired
dimensions of the integration, in this example create cost centers.
2. Create Cost Center window will open.
3. Click OK button. Repeat the steps 1 through 3 for each dimension of integration (cost object create, create Sub-Accounts, create areas) that you want to create.

NAVAX Consulting GmbH 2013
Page 35 # 126
The establishment of cost accounting is now over. In the next chapter, you will learn how the thing posts which serve as a data basis for cost accounting can be applied in the cost accounting as a primary booking.

NAVAX Consulting GmbH 2013
Page 36 # 126
Chapter 4
Work with the Cost Accounting
This Chapter:
Chart of Departments
Chart of Projects
Sub-Accounts
Chart of Sections
Other Actions
Cost Accounting Journals
Recurring transaction

NAVAX Consulting GmbH 2013
Page 37 # 126
Transferring Primary Postings from the General Ledger
In order to complete the necessary basic data for monthly cost results based on cost accounting, you have to carry over the primary postings from the general ledger (G/L) into cost accounting. The control of the G/L transfer of the table G/L Account/Cost Account-Cross Reference is described in the section "Chart of Cost Accounts" of the chapter "Setup of the Master Data" of this handbook. The G/L entries of all G/L accounts of the general ledger, which are listed in the table G/L Account/Cost Account-Cross Reference and assigned cost accounts, will be transferred within the entered date filter. Depending on the choice in the Transfer Balance field the entries are transferred in sums or in individual postings. In order to transfer the primary postings from the general ledger into cost accounting, proceed as follows: 1. Choose Cost Accounting -> Periodic Activities -> G/L-Transfer. The request window of
the batch job G/L-Transfer appears.
2. In the Options FastTab, you can make a set of entries:
With help of the fields Posting Time Period from and Posting Time Period to, you specify the date filter for the G/L entries to be transferred into cost accounting. These fields contain the starting and ending dates of the past month but they can be manually changed. They absolutely have to be filled out. The G/L-Transfer content is suggested in the Posting Text field; it can be manually changed. In the field Document No. you can fill in a document number for the G/L transfer. In the field Reason Code you can choose a reason code. The document number and reason code are transferred into cost ledger entries created with the G/L-transfer; the G/L entries are transferred singly. In this case the cost ledger entries are posted with the document number of the G/L entry.
Note: Only those G/L Account postings produced in the G/L Account/Cost Account-Cross Reference table, which have a compression relevant for cost accounting, will be transferred into cost accounting. For such postings, a department or a project, or both, have to be stated

NAVAX Consulting GmbH 2013
Page 38 # 126
3. Click OK in order to start the transfer. The G/L entries from the general ledger are set up internally in a cost journal at transfer and automatically posted (see the structural diagram of cost accounting in the section "Performance Description and Modules of Cost Accounting" in the "Introduction" chapter). The process is the same as at direct posting with cost journals; for example, it will also run through the same tests Each posting from the general ledger, i.e. each G/L entry, will only be transferred once into cost accounting. Each transferred G/L entry is numbered. Also if you include in the date filter another back date for the transfer, i.e. a date range that was already transferred, then only postings that were not yet numbered will be transferred. Therefore, prior year entries in the general ledger can be transferred into cost accounting at a later date
Cost Accounting Correction
If not all the dimension information for a G/L entry are available because they are not recorded in the financial accounting and therefore a transfer to cost accounting is not possible, the application tagged this post with the budget line item No. No.-1 and you receive the following message.
Now you have the opportunity to revise the G/L entry that cannot be applied immediately and to complete the missing information, or alternatively perform the revision at a later date. 1. If Yes, click the button to see the thing posts in the window thing item cost accounting
correction and to revise the thing item cost accounting correction window opens.
2. Enter the required information, in this example the Department Code. The application
takes the information from the G/L entry and remove the value „-1“ from „Cost Ledger Entry No.“ Field.

NAVAX Consulting GmbH 2013
Page 39 # 126
Click OK button to perform the transfer again and to accept the corrected thing post now.

NAVAX Consulting GmbH 2013
Page 40 # 126
Chart of Departments
Departments are internal divisions that can be calculated independently as a target unit. They correspond to most of the functional, spatial, or organizational sub-divisions in internal areas or organizational units. When defining and constructing departments you should keep in mind that a department is an independent area of responsibility. For each department further clear reference quantities should be defined for the cost origin and cost transfer. Beyond that, the department in the general ledger has to be clear to allocate. The chart of departments shows the system the hierarchy of individual departments. Primary and subsidiary departments should be filtered from one another with corresponding number definitions. In the chart of departments corresponding compressions are already pre-defined by summation. These are available to you for further analysis, or simply as information to entry levels.
Checklist for the Setup of Departments
1. Choose Role Center -> Chart of Departments.
The Chart of Departments window appears:
Choose Role Center -> Chart of Departments -> Department Card. The Department Card window appears. If you have chosen one Department (i.e. ADM), you will get the following results:

NAVAX Consulting GmbH 2013
Page 41 # 126
Field Fill In Explanation
General FastTab
Code
Name
Responsible Person Here the department can be assigned to a person responsible.
Account Type
Totaling
No. of Blank Lines Enter here the number of blank lines, which should be inserted in the chart of departments above the current department.
New Page Insert a if at the printing of the chart of departments a page break should be inserted after this department.
Search Descriptions The department description is already given but can also be changed.
Balance
Direct Posting Remove the if no entries should be directly posted to this department.
Blocked Insert a if the department should be blocked against postings.
Last Date Modified Is automatically filled out with the date of the last change of the department.
Group FastTab
Group 1 – Group 8 In this field you can assign each department to a defined group. This cross reference will help you later for evaluation purposes.

NAVAX Consulting GmbH 2013
Page 42 # 126
Insert Page Break In order to insert a page break after a department while printing a chart of departments, proceed as follows: Click in the Chart of Departments window on the line of the department after which the page break should be inserted. Choose Department -> Card. The department card appears. Click in the General FastTab in the New Page field, in order to activate it with a ▼ Inserting Comments to a Department You can assign Comments to a department. For the desired department in the chart of departments or on the department card Comments. The Comments appears.:
You can enter as many notes lines as you like for each department. Besides that, you can optionally fill in a date for each text line included. If there are notes to a department, all notes appear on the department card. Changing and Deleting Departments
You can most easily change the fields of a department in the department card. Choose Department Card. You can change the number. The procedure is the same as that described for changing a number in the general ledger. For the changing of the number, the same information is valid as in the general ledger. Consult the "General Ledger" volume of the Microsoft Dynamics NAV standard application user handbook. You can change all other entry fields as needed. These changes only affect transactions that take place after the fields are modified. You can delete a department using either the Chart of Departments window or the department card. In both cases you choose “Delete” from the menu bar. Departments can only be deleted when the corresponding balance is zero and there are no entries in the current fiscal year. Entries previously posted for the department will not be deleted from the closed fiscal years, however, the department code from these entries is removed (the Department Code field in the cost ledger entries is then empty).

NAVAX Consulting GmbH 2013
Page 43 # 126
Chart of Projects
The projects represent your company’s cost objects. Projects are activities that support costs in relationship to revenues. The definition and relationship of the projects to individual items as product groups or as order groups depends on how these will be allocated in Microsoft Dynamics NAV. Projects can also represent the production of internal activities as well as of sales/marketing activities, if these are taken into account, for example, at the posting to jobs (see also the section "Sub-Accounts" in this chapter). The central question of project accounting asks: Why have certain costs accrued so much and how far do accumulating revenues cover these costs? Checklist for the Setup of Projects Choose Role Center -> Chart of Projects.
The Chart of Projects window appears:
Fields in the project card (for fields that were already described in the Chart of Projects window, no descriptions will be given):

NAVAX Consulting GmbH 2013
Page 44 # 126
Field Fill In Explanation
General FastTab
Code
Name
Responsible Person Here the department can be assigned to a person responsible.
Account Type
Totaling
No. of Blank Lines Enter here the number of blank lines, which should be inserted in the chart of departments above the current department.
New Page Insert a if at the printing of the chart of departments a page break should be inserted after this department.
Search Descriptions The department description is already given but can also be changed.
Balance
Direct Posting Remove the if no entries should be directly posted to this department.
Blocked Insert a if the department should be blocked against postings.
Last Date Modified Is automatically filled out with the date of the last change of the department.
Group FastTab
Group 1 – Group 8 In this field you can assign each department to a defined group. This cross reference will help you later for evaluation purposes.
Inserting a page break
To insert a page break after a project in the printed chart of projects, carry out the following steps: 1. Click in the Chart of Projects on the project line after which the page break should
be inserted. 2. Choose Project -> Card. The project card appears. 3. Click in the General FastTab in the New Page field in order to activate it with a .

NAVAX Consulting GmbH 2013
Page 45 # 126
Inserting Comments a Project You can assign comments to a project. To do this, choose in the chart of projects, or on the project card, Project, Comments. The Comments window appears.
Changing and Deleting Projects
You can best change the fields of a project in the project card. To do this, choose Chart of Projects, Project Card. You can change the number of a project by entering a new number and confirming it with the message that follows. To change the number, the same instructions apply as in the general ledger. You can also change any other entry as needed. These changes only affect transactions that take place after your changes are confirmed. You can delete a project either in the Chart of Projects window or in the project card. In both cases, you choose “Delete” from the menu list. Projects can only be deleted if the corresponding balance is zero and there are no entries in the current fiscal year. Previously posted project entries will not be deleted from closed fiscal years, however, the project code will be removed from these entries (the project code field in the cost ledger entries is then empty).
Chart of Sub-Accounts
The Sub-Accounts in cost accounting offer you another assignment dimension cost center and cost object (and the extensions by grouping or compression). The accounts can be assigned only together with cost center or cost object. The purpose of this action is to create another filter option for cost and revenue postings below the allocation to cost centers or cost objects. Cost accounting offers you two different ways of Sub-Accounts. This choice is determined by the field of integration in establishing cost accounting (see Chapter 3 Setup):

NAVAX Consulting GmbH 2013
Page 46 # 126
Project integration Project is entered in the field of integration so all projects be used as Sub-Accounts in cost accounting. This approach is useful if you want to pursue internal investment projects or customer projects in the cost or charge services on them there. So internal investment orders or internal orders can be tracked, for example, with the assignment of cost center and account delineated by the pure costs of places.
No project integration If you want to manually build Sub-Accounts, so the further definitions are available. If You like to set up Sub-Accounts manually, you can apply any definition you like. Select dimensions, in the field of integration, define new account assignments for the accounting of deferred as Sub-Accounts, if you want to book costs a cost center to an internal order or similar.
Setup Sub-Accounts
1. Role Center -> Chart of Sub-Accounts. The below chart of accounts window will
open.
Fields in chart of accounts:
Field Filling
Description
Nr. Here you can enter both numbers and letters
Decription of Customer name
Customer No. Here, a customer can associate the Sub-Account. When automatically creating of a Sub-Account by means of the acquisition of financial accounting, the customer will be here handled the project that is associated with the current account.
Customer name If a customer has been assigned to the current account, the name of the customer appears here automatically.

NAVAX Consulting GmbH 2013
Page 47 # 126
Search name The cost label is given, but can be changed.
Balance
Direct posting Remove, if no items directly to the cost objects are to be posted.
Blocked You insert a if the cost against reservations should be blocked.
You can mark this field if posting on given Sub–account is forbidden.
Last Date Modified Is filled in automatically with the date of the last modification of the cost object.
Group 1 to Group 8 Here, you can associate each Sub-Account of a freely definable group. This mapping will be used you for evaluation purposes.
Chart of Sub-Account Setup
If you want to manually set a new subplan account or add an existing subplan account-new account, you must enter each account individually. Sub-Accounts can be set in the window account subplan or a Sub-Account card. It is recommended to create a new Sub-Account in Chart of Sub-Accounts window. Window Sub-Account Card is designed for modification or adding detail data of particular Sub-Account.
Set up Sub-Accounts in the window Chart of Sub-Accounts
To create a new Sub-Account plan, proceed as follows: 1. Select Role Center -> Chart of Sub-Accounts.
2. If still no accounts have been set up, begin with the file command on the first line
of the window and click New on the action. 3. The Sub-Account card window opens.
4. Click the field code, and give the Sub-Account code.
Keep in mind that a unique code assigned must be each Sub-Account (even the Sub-Account be used exclusively as a header and total rows).
5. In the name box, type the name.
6. In the account type field, enter the type of the associated account. Click on AssistButton in the account type field, select one of the below described options. Keep in mind that only the first type of account to book is suitable; all others are required only to create totals and headers in the Sub-Account.
Account type Function
Account Posting
Heading A headline for a cost account group.
Total A total that is defined with the Totaling field.
Begin-Total A beginning point for a totaling cost account row that ends with a cost

NAVAX Consulting GmbH 2013
Page 48 # 126
account End-Total.
End-Total An ending point for a totaling cost account row that begins with a cost account Begin-Total. The final total is defined with the Totaling field.
7. Sub-Accounts the way up sum this field is filled in automatically by the Indent
function (see below).
8. In this field you define which accounts should be taken into account in the calculation of the total; the application then automatically counts the items of the Sub-Accounts in the used filter.
9. In the fields of Group 1 to group 8, you can enter groupings or classifications of the
Sub-Accounts. These groups can be used for filter and evaluations in subplan Sub-Account Schedules and NaviCalc.
10. If you filled out the last field in the line you then steps 2 through 8 for each Sub-
Account more.
11. If you want to insert blank lines when you print the below chart of accounts between two Sub-Accounts, you can enter the number of the desired blank lines above the Sub-Accounts.
12. This is done in the field of blank lines in the SubAccount Card.
13. After you have set up all the Sub-Accounts, select action indentation of the below chart of accounts. Then, in the message window, select the option Yes.
Then, all Sub-Accounts of an account type on the same position are indented.
Usually, all accounts of the type of account to a level are indented.
For Sub-Accounts of the type Total, you have to fill out the Totaling field. For Sub-Accounts of the type End-Total this field will be automatically filled out with the indentation function. In this field you define which cost accounts should be indented when calculated; the application automatically totals the entries of the cost accounts within the set filter. If there is not the same number of sum-up subaccounts and from sums Sub-Accounts, the indentation cannot be made. In a message window appears indicating which accounts cannot be indented. Add a comment to a Sub-Account You can assign comments to a Sub-Account.
1. In the Sub-Account card, click related information -> Sub-Account -> Comments.
The window appears.
NAVAX Consulting GmbH 2013
Page 49 # 126
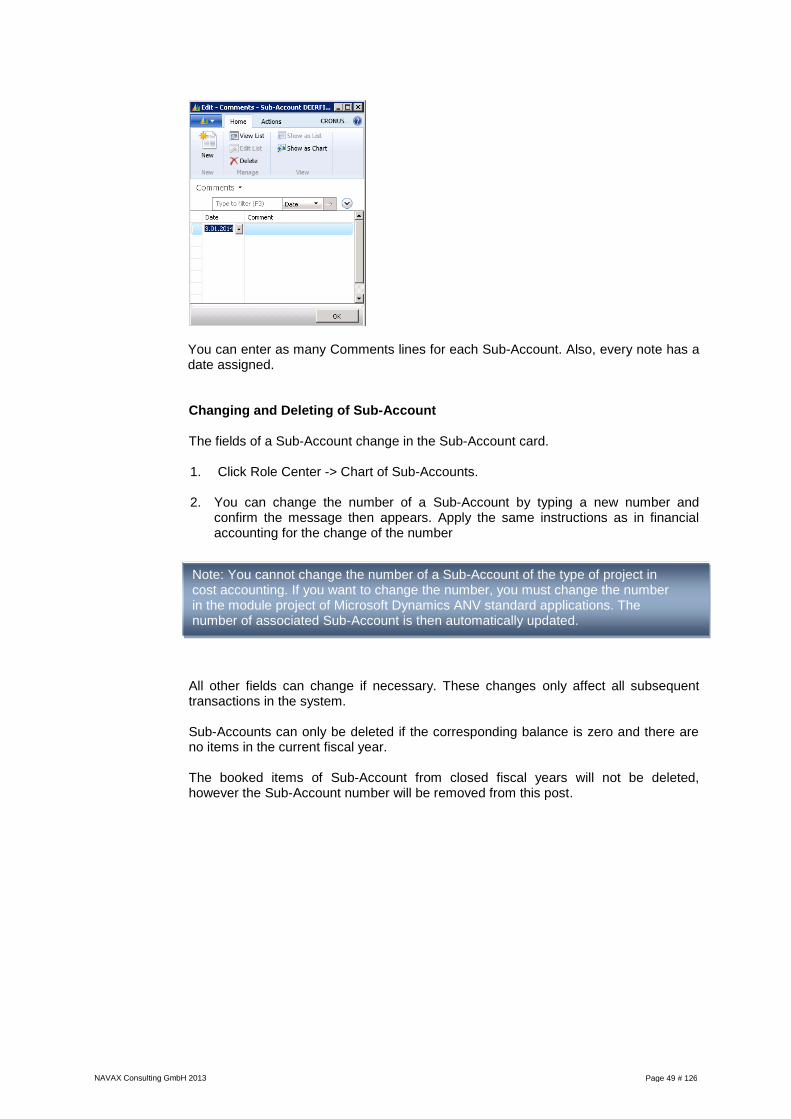
You can enter as many Comments lines for each Sub-Account. Also, every note has a date assigned.
Changing and Deleting of Sub-Account The fields of a Sub-Account change in the Sub-Account card.
1. Click Role Center -> Chart of Sub-Accounts.
2. You can change the number of a Sub-Account by typing a new number and
confirm the message then appears. Apply the same instructions as in financial accounting for the change of the number
All other fields can change if necessary. These changes only affect all subsequent transactions in the system. Sub-Accounts can only be deleted if the corresponding balance is zero and there are no items in the current fiscal year. The booked items of Sub-Account from closed fiscal years will not be deleted, however the Sub-Account number will be removed from this post.
Note: You cannot change the number of a Sub-Account of the type of project in cost accounting. If you want to change the number, you must change the number in the module project of Microsoft Dynamics ANV standard applications. The number of associated Sub-Account is then automatically updated.

NAVAX Consulting GmbH 2013
Page 50 # 126
Chart of Sections
The field accounts in cost accounting offer another assignment dimension cost center and cost object (and the extensions by grouping or consolidation) and Sub-Accounts. The area accounts can be assigned only together with cost center or cost object. The purpose of this action is to create another filter option for cost and revenue postings below the allocation to cost centers or cost objects. Hierarchical seen are the area accounts therefore below the account assignment cost center or cost object. Cost accounting offers you the opportunity to take on another dimension from the accounting cost accounting by means of field accounts. This choice is determined by the field of integration in establishing cost accounting (see Chapter 3 Setup): If you want to manually build area accounts, so the further definitions are available. If You like to set up SectionAccounts manually, you can apply any definition. In the field of integration you can assign an available dimension from the accounting dimensions as the area account.
Chart of Sections Setup 1. Choose Role Center -> Chart of Sections.
The fields in the window Chart of Sections:
Field Fill In Explanation
Code
Description
Search Description The Section description is already entered; however, you can change it.
Balance
Direct Posting Remove theif entries should not be directly posted to the Section.
Blocked Enter a if the section should be blocked against postings.
Last Date Modified Will be automatically filled out with the

NAVAX Consulting GmbH 2013
Page 51 # 126
date (of the last change to the section).
Group 1 to Group 8 Here, you can associate each Section of a freely definable group. This mapping will be used for evaluation purposes.
If you want to manually set up a new area plan or add an existing field plan new sector accounts, you must enter each area account individually. Can set range account in the window area account plan or on a field map. To establish a new area plan in the window area plan. Area maps are better suited to modify or add data of single area accounts. Section accounts set up in the window „Chart of Sections“
To create a new Chart of Sections, proceed as follows: 1. Select Role Center -> Chart of Sections.
If still no area account established, begin select the first line of the window and click New on the action. The window pane card is opened. Click the field code, and type the area code. Keep in mind that a unique code must be assigned to each account of the field (even, the area accounts that are used exclusively as a header and total rows). In the name box, type the name. In the account type field, type the kind of the area account. Click on AssistButton in the account type field, select one of the below described options. Keep in mind that only the first type of account to book is suitable; all others are required only to create totals and headers in the area account plan.
Account Type Function
Account Posting.
Headline A header line for an area group.
Total A sum, which is defined over the Totaling field
Begin-Total A beginning point for a totaling project row, which ends with an account type End-Total.
End-Total An ending point for a totaling row, which begins with a cost account Begin-Total. The total is defined over the Totaling field.
Field account type total fill the field of confusions. Section Accounts the way up sum this field is filled in automatically by the Indent function (see below). In this field you define which Section Accounts should be taken into account in the calculation of the total; the application then automatically counts the items of the field accounts in the used filter. In the fields of Group 1 to group 8, you can enter groupings or classifications of the Section Accounts. If you filled in the last field in the line you can repeat steps 2 through 8 for each Section Account.

NAVAX Consulting GmbH 2013
Page 52 # 126
If you want to insert blank lines when you print the area plan between two Section Accounts, you can enter the number of the desired blank lines above the Section Accounts. This is done in the box of blank lines in the area map.
After you have set up all the SectionAccounts, select action Indentation of the Chart of Sections. Then, in the message window, select the option Yes. If there is not the same number of End-Total Section Accounts and of total Section Accounts, the indentation cannot be made. In a message window appears indicating what Section Accounts cannot be indented.
Inserting Comments to a Section Account
You can assign comments to a Section Account 1. In the Section Account -> Navigate -> Comments.
2. The Comments window appears.
You can enter as many notes for each Section Account. Also, you can optionally assign a date for each collected line of text.
Note: If you have already made are the End-Total Section Accounts entries in the fields before executing the Indent function, you must enter the values again because the function overwrites the values.

NAVAX Consulting GmbH 2013
Page 53 # 126
Changing and Deleting Section Accounts
You can best change the fields of a project in the project card. To do this, choose Chart of Sections -> Section -> Card. You can change the code of a Section by entering a new code and confirming it with the message that follows. To change the code, the same instructions apply as in the general ledger. You can also change any other entry as needed. These changes only affect transactions that take place after your changes are confirmed. You can delete a section either in the Chart of Section window or in the section card. In both cases, you choose Delete from the menu. Section can only be deleted if the corresponding balance is zero and there are no entries in the current fiscal year. Previously posted section entries will not be deleted from closed fiscal years, however, the section code will be removed from these entries (the section code field in the cost ledger entries is then empty).
Overview of types of works and units
Work types help define reference quantities, which you can use to transfer costs in the performance and cost journals. In contrast to the transfer of calculated sizes, costs differentiated by use can be transferred with reference quantities. Individual reference quantities are the basis of an internal performance transfer, which should take the place of an overhead cost distribution. For the further debiting of costs not only between individual departments, but also from departments to projects, costs can be transferred depending on the quantity-oriented output and the performance demands under the declaration of work type. In this context, individual work types define transfer prices (see section "Transfer Prices" in this chapter). In cost accounting, work types and units are differentiated. Work types and units are administered separately in order to allow a definition of performance independent of the unit. For example, it is possible to add various work types with the unit hour (hours of production, hours of maintenance, etc.). The units are connected with the cost account in order to assure that the same quantity units are posted with a cost account. Otherwise, no significant additions of quantity transfers can take place to cost postings.
Setting Up Work Types
The work types in cost accounting refer back to the work types in the Microsoft Dynamics NAV standard application. In order to set up work types in cost accounting, do the following: 1. Choose Departments -> NC Cost Accounting -> Setup -> General -> Work
Types. The Work Types window appears.
Note: You cannot change the number of a field account of the type of project in cost accounting. If you want to change the number, you must change the number in the module project of Microsoft Dynamics ANV standard applications. The number of the corresponding area account is then automatically updated

NAVAX Consulting GmbH 2013
Page 54 # 126
Fill In Fill In Explanation
Code Enter here the Work Type Code.
Decription
Unit of Measure Code
Choose here the unit with which this work type should be posted.
Cost Account
Credit
Enter here the cost account that should be suggested for crediting when the current work types are posted in the journal.
Cost Account
Debit
Enter here the cost account that should be suggested for debiting when the current work types are posted in the journal.
Setup of Units
The units in cost accounting refer back to the units in the Microsoft Dynamics NAV standard application. In order to set up units in cost accounting, do the following:
1. Choose Departments -> NC Cost Accounting -> Setup -> General -> Units of
Measure. The Units of Measure window appears.
.
2. Enter a clear code in the Code field. In the Description field you may enter a descriptive text.

NAVAX Consulting GmbH 2013
Page 55 # 126
Cost Account Authorizations
If you want that a cost element only by specific cost centers can be posted, you can create a cost Account Authorizations code for this type of cost. This Authorizations code explicitly set which cost centers may post cost element. If you want to set up cost type permissions, follow these steps:
1. Choose Departments -> NC Cost Accounting -> Setup -> General -> Cost Account Authorization.
2. In the FastTab generally, you assign a unique cost element authorization code in
the code field. In the description box, you can enter any description. In the demo client is a cost element permission code lime for imputed costs.
3. In the rows, enter the first cost center box cost job code which allowed the cost of
post. To do,, click the AssistButton and select the appropriate cost center. The description field is automatically named the cost center filled.
4. Repeat this step until you have entered all cost centers, which allowed the cost of
post.
If you have set up authorization codes, then can assign a permission code every single cost element. Enter the authorization code in the FastTab booking of cost elements map, you can assign a cost element an authorization code.

NAVAX Consulting GmbH 2013
Page 56 # 126
Transfer Prices
Transfer Prices are defined according to department, work type, and period. You can use transfer prices to define the components of the internal performance transfer in terms of value. Like transfer prices, budgeted experience values to be transferred should be defined from cost volume based on yearly performance according to work type.
Transfer prices can be defined in the individual departments according to work type. You can specify the price of a work type unit if the department produces performances to be further transferred. During the performance transfer the departments are debited/credited with the product of the transfer price and the work type quantity. The work type quantity is calculated with specific filters. In order to set up transfer prices, proceed as follows: 1. Choose Departments -> NC Cost Accounting -> Setup -> General -> Department
Transfer Price. The Department Transfer Price window appears.
You can also call up the same window from the Chart of Departments window and from the department card. Choose Department Transfer Prices. The window appears with a filter to the current department. If you have chosen i.e. the department ADM, you will get the following results:

NAVAX Consulting GmbH 2013
Page 57 # 126
Field Entry
Department Code Posting.
Work Typing Code A header line for a department group.
Starting Date A sum that is defined with the Totaling field.
Transfer Price A beginning point for a totaling department row, which ends with a cost account End-Total.
Create dimensions
If necessary you can take over the various integration units of cost accounting in the accounting or in the accounting update.
1. Choose Departments -> NC Cost Accounting -> Setup -> Integration -> Create
Dimensions.
The Create Dimensions window appears:
2. In the options FastTab, you can use a check mark in the box for each integration
unit (cost element, cost center, cost object, Sub-Account and scope) that you want created in the financial accounting.
3. You can use only for dimensions that is costing facility set a check mark in the window.

NAVAX Consulting GmbH 2013
Page 58 # 126
4. Should you have used in the window cost accounting setup in the field under
account in the field of integration "Project" you can put a no check of dimension in the box under account.
5. Click OK button.
Cost Accounting Journals
Overview
In cost accounting there are two possibilities to make postings and create posted entries with them. On the one hand, you can manually produce data over journals like in the general ledger and create entries with the posting of these cost accounting journals. The term cost accounting journals is to be understood here as a general term for all journals that exists in cost accounting. They are cost journals, performance journals, and cost allocation journals. When posting in cost accounting you have to enter a cost account as an allocation. Other allocations in cost accounting can be made to a department, project, or Sub-Account. The postings can be cost postings, revenue postings, or transfer postings. The detailed procedures are described in other parts of this chapter. On the other hand, based on periodic cost results in cost accounting, you can automatically transfer postings from the general ledger. In doing this, cost ledger entries are created based on G/L entries and G/L Account / Cost Account-Cross Reference described in the section "Chart of Cost Accounts" in the chapter "Setup of the Master Data". In these cost ledger entries, G/L entry allocations regarding department, project, and Sub-Account are carried over into appropriate fields. The exact procedure is described in the section "Transferring Primary Postings from the G/L" in the chapter "Working with the Cost Accounting."
Filling in and Posting Journals
What you have to observe when filling out journals individually depends on the journal type. This section explains the general structure of the journals and gives instructions that apply to all journals. A cost accounting journal, like a G/L journal, consists of three levels: the journal template, the journal name, and the journal lines.
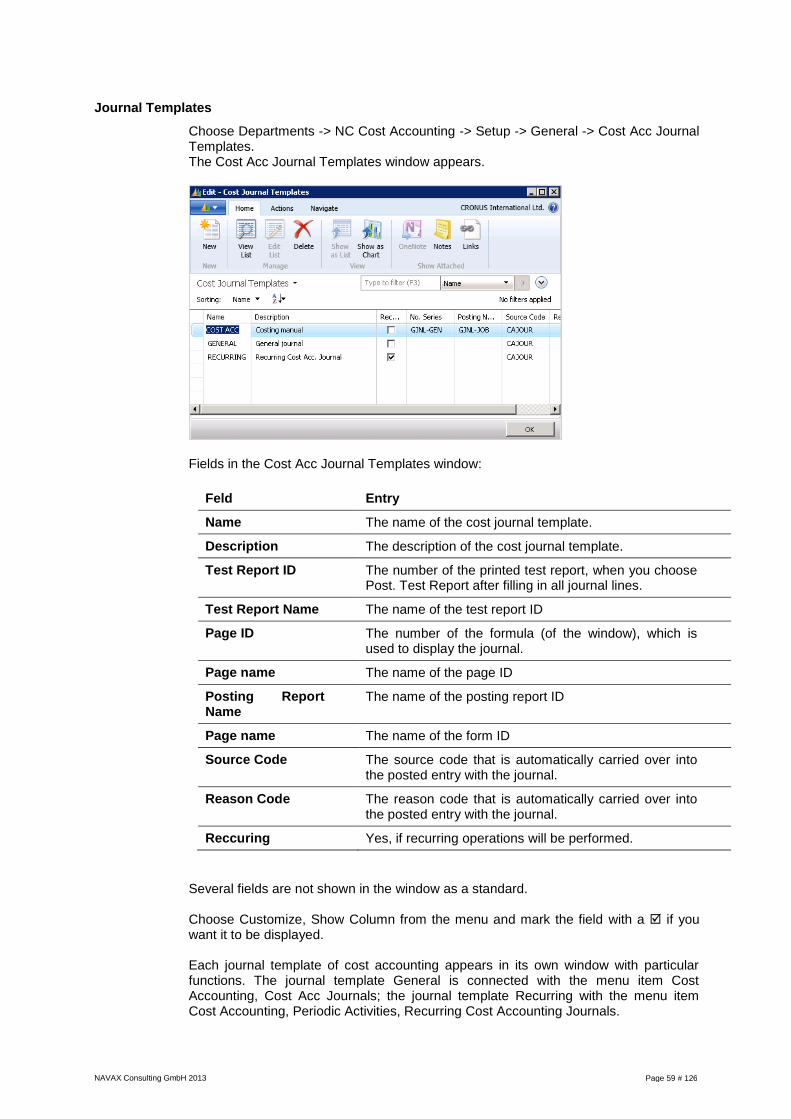
NAVAX Consulting GmbH 2013
Page 59 # 126
Journal Templates
Choose Departments -> NC Cost Accounting -> Setup -> General -> Cost Acc Journal Templates.
The Cost Acc Journal Templates window appears.
Fields in the Cost Acc Journal Templates window:
Feld Entry
Name The name of the cost journal template.
Description The description of the cost journal template.
Test Report ID The number of the printed test report, when you choose Post. Test Report after filling in all journal lines.
Test Report Name The name of the test report ID
Page ID The number of the formula (of the window), which is used to display the journal.
Page name The name of the page ID
Posting Report Name
The name of the posting report ID
Page name The name of the form ID
Source Code The source code that is automatically carried over into the posted entry with the journal.
Reason Code The reason code that is automatically carried over into the posted entry with the journal.
Reccuring Yes, if recurring operations will be performed.
Several fields are not shown in the window as a standard. Choose Customize, Show Column from the menu and mark the field with a if you want it to be displayed.
Each journal template of cost accounting appears in its own window with particular functions. The journal template General is connected with the menu item Cost Accounting, Cost Acc Journals; the journal template Recurring with the menu item Cost Accounting, Periodic Activities, Recurring Cost Accounting Journals.

NAVAX Consulting GmbH 2013
Page 60 # 126
Journal Names
On the second level, you can set up one or more journal names for a journal template. A journal name is an individual journal that was created in a journal template. The data of the respective journal template apply for all journal names of this template. In order to add a journal name for a cost journal of the template General, proceed as follows: 1. Choose Departments -> NC Cost Accounting -> Tasks -> Cost Journals. The
Cost Journal window appears.
2. Click in the Batch Name field on the AssistButton. The Cost Acc Journal Name
List window appears. You then have an overview of all journal names available for this journal template.
3. Fill in the fields according to the following guidelines:
Field Entry
Name The cost journal name.
Description A description of the cost journal name.
Reason Code The reason code, which is automatically carried over into the posted entry over the journal names. If a reason code was set up in the journal template, this will be automatically carried over into the journal name; however, it can be changed as needed.
No. Series This field contains the code of the number series of that is used to book.-leaf rows in this book.-sheet document numbers to assign
Posting No.
Series
This field contains the code of the number series that is used to the post, by posting this book.-sheet which assign document numbers.
If you have to set up more journals of one type, you can add different names for one journal template. This procedure is the same for all journals. Carry out steps 1 to 5, or 4 and 5 described above.
NAVAX Consulting GmbH 2013
Page 61 # 126
Journal Lines
The posting data of the journal name have to be carried over into the journal lines. You can add as many lines as you like under a journal name. The data entered in a journal can be changed so long as it is found in the journal. The cost ledger entries, which cannot be changed, are created while posting a journal.
Posting a Cost Journal
In order to post a cost journal, choose the menu item Posting, Post. Confirm the message which follows with Yes. Before posting, a test of the journal lines takes place. If an error is found at while testing, a corresponding message appears. If the process is cancelled, no lines will be posted from the journal. In this case you have to correct the errors and start posting once again. After the page is successfully posted, a corresponding message appears. Click on the OK button in order to confirm the message. After posting, the journal lines will be deleted, it then refers to a recurring journal. You can learn more about recurring journals in the section "Recurring Transactions" of this chapter. The cost ledger entries created at posting are available in various views. The chapter "Working with Cost Accounting" describes the procedure of displaying cost ledger entries.
Posting Reports
You can print a report when posting. To do this, choose Posting, Post and Print. The report is chosen in the field Posting Report ID of the Cost Acc Journal Templates window. You can also print or display a test report on the screen before posting with the menu item Posting, Test Report. In the test report all journal lines are displayed with errors or missing data, which you have to correct before posting. Printing out a test report is not completely necessary. If you would like to post a journal with errors, however, you will get an error message for each error and you have to continually start the process once again.
Cost Journals
Overview
You can post manually to cost accounts with various allocations in the cost journals. The allocations relevant for cost accounting are the cost accounting dimensions: department, project, and Sub-Account. The postings can be cost postings, revenue postings, or transfer postings. The cost journals help produce and post additional and calculated costs (calculated values) or correction postings (transfer between individual allocations) in cost accounting. Postings to cost accounts in cost journals can be made with various allocations (department, project, and sub-allocation). Postings in cost accounting journals do not apply to primary postings of the general ledger. The cost journals allow you to produce and post by type: cost postings, revenue postings, or transfer postings.

NAVAX Consulting GmbH 2013
Page 62 # 126
A balance test, in the sense of a debit and credit posting balanced by amount, is only necessary with the type transfer posting.
Filling In and Posting Cost Journals
If you would like to fill in and post a cost journal, proceed as follows:
1. Choose Departments -> NC Cost Accounting -> Tasks -> Cost Journals. The Cost Journal window appears.
2. Fill in the necessary fields of the lines according to the following guideline. As a
standard, several fields are not shown in the window. Choose Customize, Choose Column from the menu and activate the field with a if you want it to be displayed.
Field Entry
Posting Date Enter T if the application should use today’s date, or W if it should use the work date. You can also use any date you prefer.
Document No. No data entry is necessary; the number is automatically carried over from the system, if you have already filled in a document number in an above line. The suggested document number can be overridden.
Type One of the options displayed in the drop-down arrow. You only need to fill in the beginning letters of the desired option: C (Costs), R (Revenue), or T (Transfer).
Cost Account No. The number of the cost account to which the entry should be posted. You can fill in the code directly or click on the AssistButton in order to view the hart of cost accounts. Click on the desired cost account and finally on the OK button.

NAVAX Consulting GmbH 2013
Page 63 # 126
Department Code The code of the department to which the entry should be posted. You can directly fill in the code or click on the AssistButton in order to view the chart of departments. Click on the desired department and finally on the OK button.
Project Code You can fill in the project code for the posting line. You can enter the project code for the posting line. You can enter the code directly or click on the AssistButton to view the chart of projects. Click on the desired project and finally on the OK button.
Description A text that describes the corresponding document.
Amount The amount to be posted. Costs are filled in without signs. A minus sign has to appear before revenues.
Sub-Account No. Enter the appropriate number for a Sub-Account. You can enter the code directly or click on the AssistButton in order to view the Sub-Account list. Click on the desired subaccount and finally on the OK button.
Unit of Measure Code
You can fill in a unit of measure code for the posting line. If you have chosen a work type code in the Work Type Code field, then the unit of measure code, which is assigned to this work type code, is automatically carried over.
Quantity Enter which quantity of the chosen work type should be allocated in the corresponding unit of measure.
Unit Amount You can fill in an allocation price per unit for a work type. From the quantity price emerges the corresponding amount of the posting line.
Work Type Code You can fill in a work type code for a definable performance type.
Cancellation Set a if the current posting is a cancellation. The amount at cost postings must be negative and at revenue postings positive.
Importing External Data into a Cost Accounting spreadsheet.
In some cases is necessary to import Cost Data for Cost Accounting from external data sources (systems). In such cases You can use „Data Import“ function.
1. Click on the Cost Journal window on Actions-> Import Cost Journal. Window
„Import“ will open.

NAVAX Consulting GmbH 2013
Page 64 # 126
2. Enter the File Name which consists the Cost data and push „Open“
Note: File format has to match following sequence:
Posting Date Document No. Cost Account No. Department Code Project Code Section Code Sub-Account No. Description Amount Variable Costs % Reason Code
Following screenshot shows example of valid data source file.

NAVAX Consulting GmbH 2013
Page 65 # 126
Performance Journals
Overview
The performance journals are a part of the internal allocation. Within the frame of department accounting, performance journals have the task of allocating costs from subsidiary departments or performance primary departments according to their demands through different departments. In the frame of project accounting they help the source allocation of department performances to projects. Each department or project has to be debited that is calculated based on the transfer prices and the completed performance assessed to work type quantities. This also applies for crediting the performing organization unit. For these posting procedures, cost accounting provides the performance journal for fast production and posting to allocated performances. Over a performance journal you can post individual credits and debits to different allocations. The construction is conceived such that all request fields for the performance-drawn allocation of costs between departments and projects can be carried over into a posting line. Transfer prices added to the departments will be automatically carried over into the journal lines just as the cost accounts added in the work types for credit and debit.
Filling In and Posting Performance Journals
If you would like to fill in and post a performance journal, proceed as follows:
1. Choose Departments -> NC Cost Accounting -> Tasks -> Performance Journals. The Performance Journal window appears.
2. Fill in the necessary fields according to the following guideline:

NAVAX Consulting GmbH 2013
Page 66 # 126
Field Entry
Posting Date Enter a “T” if the application should use today’s date or a W for the work date. You can also use any date you prefer.
Document No. No data entry is necessary; the number is automatically carried over from the system, if you have already filled in a document number in an above line.
Department Code Debit The code of the department, which should be debited with the posting amount. You can fill in the code directly or click on the AssistButton in order to view the chart of departments. Click on the desired department and finally on the OK button.
Department Code Credit The code of the department that should be credited with the posting amount. You can fill in the code directly or click on the AssistButton in order to view the chart of departments. Click on the desired department and finally on the OK button.
Work Type Code The code of the work type, which should be drawn at the posting. You can enter the code directly or click on the AssistButton in order to view the work type list. Click on the desired work type and finally on the OK button. If there is a transfer price added at a department for the work type code, then it will be automatically carried over into the journal.
Unit of Measure The unit of measure, which is assigned to the chosen work type. This field is automatically filled in when you choose the work type.
Cost Acc. No. Debit The number of the cost account, which should be debited with the posting amount. You can fill in the code directly or click on the AssistButton in order to view the chart of cost accounts. Click on the desired cost account and finally on the OK button.
Cost Acc. No. Credit The number of the cost account, which should be credited with the posting amount. You can fill in the code directly or click on the AssistButton in order to view the chart of cost accounts. Click on the desired cost account and finally on the OK button.
Project Code Debit The code of the project, which should be debited with the posting amount. You can fill in the code directly or click on the AssistButton in order to view the chart of projects. Click on the desired project and finally on the OK button.
Project Code Credit The code of the project, which should be credited with the posting amount. You can directly fill in the code or click on the AssistButton in order to view the chart of projects. Click on the desired project and finally on the OK button.
Sub-Account No. Credit The number of the Sub-Account, which should be debited with the posting amount. You can fill in the code directly or click on the AssistButton in order to view the subaccount list. Click on the desired Sub-Account and finally on the OK button.
Sub-Account No. Debit The number of the Sub-Account, which should be credited with the posting amount. You can fill in the code directly or click on the AssistButton in order to view the subaccount list. Click on the desired Sub-Account and finally on the OK button.
Description Enter a posting text.
Quantity Enter the quantity of the chosen work type that should be allocated in the corresponding unit of measure.

NAVAX Consulting GmbH 2013
Page 67 # 126
Price Enter the transfer price per unit. In the case that you have added a transfer price, which corresponds to the current combination from the department to be credited and the work type, this field is automatically filled in. (You can learn more about this topic in the section "Transfer Prices" in the chapter "Setup of the Master Data".)
Amount The amount to be posted.
Cancellation Enter a if the current posting is a cancellation. A minus sign has to appear before the amount.
Recurring Transactions
If you have to repeatedly post the same or similar transactions, you can use the recurring transaction functions. These functions simplify the process of posting fixed and variable amounts. The functions for recurring transactions are found in the recurring journals. A recurring journal is a journal with special fields for recurring transactions. The journal lines of a recurring journal are not deleted after the posting; instead they remain unchanged or only slightly changed. In cost accounting there are recurring cost, performance, and transfer journals. The function of the recurring journals is described in the following example. Further information about recurring transfer journals may be found in the section "Recurring Transfer Journals" of the chapter "Transferring in Cost Accounting".
Special Fields in Recurring Journals
To open a recurring journal, choose Departments -> NC Cost Accounting -> Periodic Activities -> Recurring Cost Journals. The Recurring Cost Journal window appears.
It contains several fields that are not contained in usual cost journals and several standard fields for which particular rules apply:

NAVAX Consulting GmbH 2013
Page 68 # 126
Field Entry
Recurring Method Establishes how the entries are handled from one posting process to the next. The following options are available:
Fixed: The amount entered in this field is maintained after the posting.
Variable: The amount entered in this field is deleted after the posting.
Recurring Frequency It is specified here how often the entry will be posted. Enter a date formula containing a number and a letter. It should consist of D (day), W (week), M (month), Q (quarter), Y (year), WD weekday) or C (current), i.e. 2W = 2 weeks, 1Q = 1 quarter.
The formula specifies the next date that appears in the field Posting Date after the posting. For example, if you enter 1M and the date in the field Posting Date is 09/15/98, then the date will be changed after the posting of the journal to 10/15/98. If you would always like to post a certain entry on the last day of the month, you post the first entry on whatever last day of a month you like and enter the formula 1M+CM. With this formula the date is correctly calculated independent of the number of days of the respective month.
Posting Date Specify whether a posting line can be posted. If the date is after the work date, then the line cannot be posted when you choose Posting->Post. However, you can enter an incorrect date in order to set up individual journal lines for a later posting.
Document No. Identifies a document. You can enter a document number or a code that is updated at each posting of the journal line. During the posting process the document number is copied into the corresponding field of the cost ledger entry. You can enter the code alone or together with a text.
During posting, the code is converted into the corresponding text (see the following table): Code Result
%1 The number of the current day in the month
%2 The current calendar week
%3 The number of the current month
%4 The name of the current month
%5 The name of the current accounting period
The number or name is determined by the date entered in the field Posting Date. If you would like to call up all rental cost entries (R + the number of the month), then enter in the field Document No. the value R%3. If you post the journal line in the month of June, for example, the entry R6 appears for the chosen cost ledger entry in the appropriate field Document No.
Description Description of the entry. You can enter a fixed text, a code combined with a text, or only a code.

NAVAX Consulting GmbH 2013
Page 69 # 126
Chapter 5
Working with the Cost Accounting Tasks
This chapter:
Cost Ledger Entries
Cost Account Schedules
Evaluating Cost Ledger Entries
Closing a Fiscal Year
Cost Ledger Entries Compression
Allocation

NAVAX Consulting GmbH 2013
Page 70 # 126
Searching for Cost Ledger Entries
Searching for Documents
As in all entry windows, the Navigate function in the cost accounting menu is available for searching in cost accounting just as in the general ledger. With this function you can search for all entries that were posted with the same document number or under the same date. The document number can either be a number entered in a cost accounting journal or the document number of a G/L-transfer (the document number of the G/L posting during individual postings). To work with the Navigate function, proceed as follows:
1. Choose Departments -> NC Cost Accounting -> History -> Navigate. The Navigate
window appears.
2. In the General FastTab, you can enter a filter in the fields Document No. and Posting Date to find entries. If you do not add a filter, all entries and documents in the system will be found and displayed.
3. The External FastTab is not relevant in cost accounting.
4. Click Find. The records within the filter are counted and a list of cost accounts and documents found are displayed along with their numbers.
5. Click on a line with the table name Cost ledger Entry and then on the Show button in order to display individual cost ledger entries within the filter. The Cost Ledger Entry window appears. If you have carried out the Navigate function without a filter, you will get the for example following results:

NAVAX Consulting GmbH 2013
Page 71 # 126
If the cost ledger entry accrues from a G/L-transfer, i.e. if G/L entries exist in the general ledger, then you can display them. To do this, choose Entry -> General Ledger in the Cost Ledger Entry window. You can also use the Navigate function in entry windows. The process is the same in all entry windows. For example, choose Cost Accounting -> Chart of Cost Accounts -> Cost Account, and Ledger Entries. The Cost Ledger Entry window appears with a filter to the cost ledger entry of the current cost account, i.e. of the cost account in the chart of cost accounts on which the cursor appears. Choose Navigate. The records for the current document number and the current posting date are counted and displayed as explained above.

NAVAX Consulting GmbH 2013
Page 72 # 126
Cost Accounting Schedules
There are various procedures to prepare evaluations for the dimensions of cost accounting (based on posted cost ledger entries). You can carry out simple calculations in the chart of cost accounts by using a field filter or FlowFilter. You can find more information about using filters in the "Introduction" chapter of the user handbook of the Microsoft Dynamics NAV standard application. You can use the cost accounting schedule for more than just extensive evaluations and calculations. The explanations in this section apply in the same way for cost accounts, departments, projects, and with certain restrictions, also for Sub-Accounts. The term cost accounting schedule is a general term for the schedules of the cost accounting dimensions. The following section discusses and shows model evaluations for cost accounts. Cost accounting schedules are made for evaluations, which cannot be directly displayed over the chart of cost accounts or the posting lists for a cost account. You can use a cost account schedule for calculating partial sums for a group of cost accounts. These partial sums can be contained in further sum totals and again later in other totals. With a cost account schedule, you can create individual reports to compressed cost postings in cost accounting without using the report designer. You can create as many cost account schedules as you like with different names. Therefore it is possible to form various types of reports and print at any time as needed with the current numerical data or make changes without a much effort. The other level of the schedules, in particular the department, project, and Sub-Account schedules, are addressed in the "NaviCalc" chapter of this manual.
Creating Cost Account Schedules
To create cost account schedules, or display an existing one, proceed as follows:
1. Choose Cost Accounting -> Analysis & Reporting -> Cost Account Schedule. The
Cost Account Schedule window appears.

NAVAX Consulting GmbH 2013
Page 73 # 126
2. Click in the Name field on the drop-down arrow p in order to display the existing cost account schedules. The Cost Account Schedule Names window appears.
3. Choose the schedule name, which you would like to display or work with and click OK.
Choose in this example the cost account schedule RESULT. You will then get the
above-mentioned picture. You can find further explanations of this cost account schedule below in the sub-section "Examples" of this section.
If you would like to set up a new schedule name, choose New from the menu bar.
4. Set up a line in the cost account schedule for each cost account and for each total
amount that should be contained in the calculation. Fill in the fields of the individual lines according to the following guideline:
Field Entry
Row No. A code (consisting of numbers or letters), which identifies the schedule line. The code can be used later to identify the row accounts.
Description A text, which explains the line, e.g. total material costs.
Totaling Type Press the AssistButton to decide how the next field shall be filled-in/presented:
Account total: The cost account number (or an interval of cost account numbers) of the type cost account.
Total Accounts: The cost account number of the type total or end-total.
Row Accounts: A code or an interval of codes, which were set up in the Row No. field. Totaling of individual row lines can be carried out here without having to define repeated account totals.
G1-Total: A code that relates to the field Group 1 of the cost account.
G2-Total: A code that relates to the field Group 2 of the cost account.
G3-Total: A code that relates to the field Group 3 of the cost account. The same up to G8.
Totaling Enter the numbers of the cost accounts or the codes of the cost account schedule rows whose cost ledger entries will be totaled when the cost account schedule

NAVAX Consulting GmbH 2013
Page 74 # 126
is printed out. You can enter more numbers or codes of two various types. With the sign (..) you can determine an interval:
Example: With the entry 6110..6669 the cost accounts 6110 to and including 6669 are chosen. With the symbol (|) you determine individual cost accounts or rows:
Example: For the entry with A1|A3, all entries with the row codes A1 or A3 will be totaled (the symbol & is not allowed where there are no entries, which both row codes possess).
If you use numerals as well as letters for row numbers, you have to be aware of the rules for sorting sequences in Microsoft Dynamics NAV. For example, if the rows are called A1, A2, 3A, 4A, B1, and B2, you enter the interval A1..A4; the rows B1 and B2 are then contained in rows when they are sorted in the following sequence: A1, A2, B1, B2, 3A, and 4A. You can find further information for sorting sequence in the "Introduction" manual of the Microsoft Dynamics NAV standard application.
The row number of a schedule line where a totaling takes place cannot be recorded into a totaling.
New Page Activate this field with a if you would like to insert a page break after the cost account schedule line at the printing.
5. Choose Print in order to print the cost account schedule or to display it on the
screen. The request window of the Cost Account Schedule report appears.
In the Cost Account Schedule Name FastTab you can enter in the Name field a filter for the names of the cost account schedules that you would like to print out. The field is filled in with the names of the cost account schedule from which you have called up the report. You can manually change the entry.

NAVAX Consulting GmbH 2013
Page 75 # 126
In the Cost Account Schedule Line FastTab you can set filters in the fields Date Filter, Department Filter and Project Filter, which will be used for each schedule line at the calculation of the amounts to be printed out.
Copying Cost Accounts into a Cost Account Schedule
In order to transfer cost accounts directly from the chart of cost accounts into a cost account schedule, proceed as follows: In order to transfer cost accounts directly from the chart of cost accounts into a cost account schedule, proceed as follows:
1. Choose Departments -> NC Cost Accounting -> Periodic Activities -> Cost
Account Schedule. Choose Functions -> Insert Cost Accounts..., in order to insert a cost account into the cost account schedule. The Chart of Cost Accounts window appears.
2. The Chart of Cost Accounts window is used as a copy template. If you do not
want to transfer all cost accounts, then you can limit the selection of the cost accounts in this window by using field filters or table filters.
3. Select individual lines with a mouse click or choose Edit, Select All from the menu
bar.
Evaluating Cost Ledger Entries
Each time you make a posting to cost accounts with a particular allocation in cost accounting (relating to departments, projects, or Sub-Accounts) it can be made manually with one of the journals or at the G/L- transfer by job. Cost ledger entries are then created. These entries can be displayed and evaluated at various places.
Entering a Cost Account
Choose Departments -> NC Cost Accounting -> History -> Cost Accounting Register -> Cost Ledger Entry. The Cost Ledger Entry window appears with a filter to the updated cost account. If you choose the cost account 61100 in the demo company, you get the following results:
In the cost ledger entry window, only entries of the cost accounts of the type Account are displayed, i.e. the cost accounts to which you can post.

NAVAX Consulting GmbH 2013
Page 76 # 126
Entries of all Cost Accounts
In order to display the entries of all cost accounts at the same time, choose the menu item View, Show All. The filter to the number of the cost account is then removed.
Displaying Balances
Instead of displaying individual entries, you can also view the balances of the postings for the four dimensions of cost accounting. The balance is the total of the amounts of several entries with the filter to this cost accounting dimension, e.g. for the cost account considered. The number of the entries drawn can be condensed with a date filter. There are three various types of balances. The fields displayed are defined as follows:
Field Entry
Balance The total of all entries. No date filter can be set for this.
Balance at Date The total of all entries up to and including a particular date. The date filter may contain an end date (e.g. ..08/04/07).
Net Change The total of all entries within a particular period. No date filter with start and end dates (e.g. 04/01/99..30.04.07) can be used; it can only be one single date (e.g. 04/15/07).
Chart of Cost Accounts Window
Choose Role Center -> Chart of Cost Accounts.
The Chart of Cost Accounts window appears. In this window the fields Net Change and Balance are directly displayed for all cost accounts. In the window chart of cost accounts you can call up more windows that show the balances for all cost accounts (to do this choose Cost Account Balance) or the balances for an individual cost account (choose Cost Account).
Displaying Net Changes for all Cost Accounts
To display net changes of an individual period for all cost accounts, proceed as follows:
1. Choose Role Center -> Chart of Cost Accounts -> Navigate -> Cost Account
Balance. The Cost Account Balance window appears:
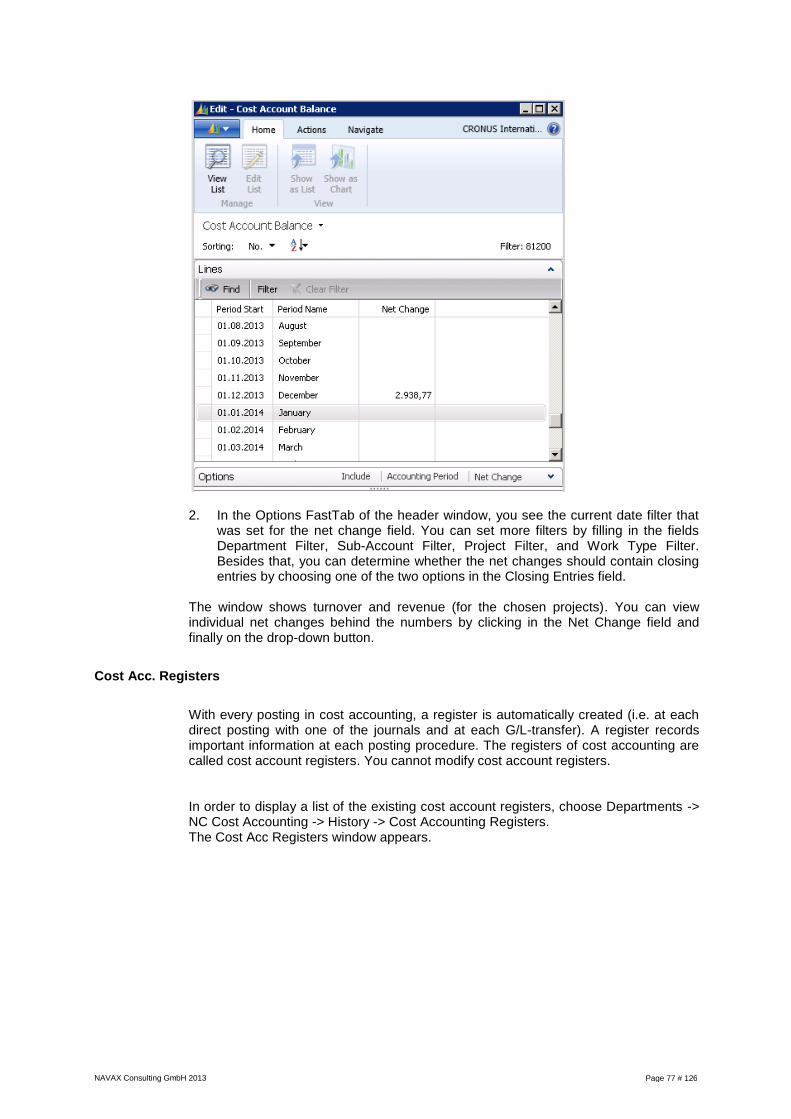
NAVAX Consulting GmbH 2013
Page 77 # 126
2. In the Options FastTab of the header window, you see the current date filter that was set for the net change field. You can set more filters by filling in the fields Department Filter, Sub-Account Filter, Project Filter, and Work Type Filter. Besides that, you can determine whether the net changes should contain closing entries by choosing one of the two options in the Closing Entries field.
The window shows turnover and revenue (for the chosen projects). You can view individual net changes behind the numbers by clicking in the Net Change field and finally on the drop-down button.
Cost Acc. Registers
With every posting in cost accounting, a register is automatically created (i.e. at each direct posting with one of the journals and at each G/L-transfer). A register records important information at each posting procedure. The registers of cost accounting are called cost account registers. You cannot modify cost account registers.
In order to display a list of the existing cost account registers, choose Departments -> NC Cost Accounting -> History -> Cost Accounting Registers. The Cost Acc Registers window appears.

NAVAX Consulting GmbH 2013
Page 78 # 126
Field Entry
No. This field contains the number of the register. This number is unique.
Type This choice field has the options: (blank), G/L-Transfer, Cost Allocation, Performance, Date Compression. It contains information about the type of procedure that was recorded in the register.
Cancellation Posting
This field contains a if the register was created with a cancellation posting of a different register. (see below "Canceling Cost Acc. Registers").
Creation Date This field contains the date when the register was set up.
User ID This field contains the user ID of the person who created the register with his/her postings.
Source Code This field contains the source code of the register.
Journal Batch Name
This field contains the journal name from which the register was created.
From Entry No. This field contains the entry number of the first cost ledger entry that was recorded in this register.
To Entry No. This field contains the entry number of the last cost ledger entry that was recorded in this register.
From Source Entry No.
See the description below.
To Source Entry No.
See the description below.
From Source Date See the description below.
To Source Date See the description below.
Cancelled This field contains a if the register was cancelled (see below the sub-section "Canceling Cost Acc. Registers").
Cancelled by Entry No.
If the register was cancelled, then this field contains the register number of the cancellation posting.
Posting Time (sec) This field contains the total time in seconds for all postings that are recorded in this register.

NAVAX Consulting GmbH 2013
Page 79 # 126
Cost Ledger Entries
In order to display the individual entries that were created at the recorded postings, choose Departments -> NC Cost Accounting -> History -> Cost Accounting Register -> Cost Ledger Entry. The Cost Ledger Entry window appears with a filter to the cost ledger entries recorded in the current cost accounting register.
Source Entries
If you choose Register, Source Entry then you get the various information according to the type of the transaction that was recorded in the corresponding register. If the transaction was a G/L-transfer, then the G/L entry window appears and is valid: From Source Entry No. = 1 and To Source Entry No. = entry number of the last G/L entry that was found before the G/L transfer. Be aware that the entry number is generally not the entry number of the last G/L entry that was transferred at the G/L-transfer. At the time of the transfer a filter is set regarding the posting date. If the transaction was a cost allocation, then the cost ledger entry window appears in this and the following cases and is valid: From Source Entry No. = 1 and To Source Entry No. = entry number of the last cost ledger entry that was found before the cost allocation. Be aware that this entry number is generally not the entry number of the last cost ledger entry that went into the cost allocation. At the apportionment, a row of filters are set regarding date fields and cost accounting dimensions (see the chapter "Cost Allocations in Cost Accounting"). If the transaction was a performance posting, then the fields From Source Entry No. and To Source Entry No. will not be filled out. If the transaction was a date compression, then they apply: From Source Entry No. = 0 and To Source Entry No. = entry number of the last cost ledger entry that was found before the date compression. Be aware that this entry number is generally not the entry number of the last cost ledger entry that went into the compression. That is the case if you have set a date filter for the compression whose end date is not your work date and postings have taken place between the end date and the work date (see also below the section "Compressing Cost Ledger Entries"). You find the information about this date filter in the fields From Source Date and To Source Date.

NAVAX Consulting GmbH 2013
Page 80 # 126
If the transaction was a different posting (type = none), then the fields From Source Entry No. and To Source Entry No. will not be filled out. If the transaction was a cancellation posting, then the area of the cost ledger entry is added; see the next sub-section "Canceling Cost Acc. Registers".
Canceling Cost Acc. Registers
You can cancel an entire cost accounting register. In this case all postings that were recorded in this register are cancelled. In order to cancel a cost accounting register, proceed as follows:
1. Place the cursor in the Cost Acc Registers window on the line with the Cost Acc.
Journal that you want to cancel, or choose the line with a mouse click. Choose in this example the cost accounting register with the number 1.
2. Choose Departments -> NC Cost Accounting -> History -> Cost Accounting Registers -> Actions -> Cancellation…. The request window of the Cost Acc Register Cancellation batch job appears.
3. In the Options register, you can enter a number for the cancellation in the
Document No field. This document number is written in the cost ledger entry created with the cancellation.
4. Click on the OK button and confirm the message window with Yes. At the cancellation, a cost ledger entry is created to each cost ledger entry of the export register that balances these, i.e. a cost ledger entry with the same compression, but opposite amount. All cost ledger entries created with the cancellation have a document number that was filled in during the course of the cancellation. The source entries of the cancellation register are the entries recorded in the export register, i.e. what applies: From Entry No. in the export register = From Source Entry Entry No. in the cancellation
5. register; To Entry No. in the export register = To Source Entry Entry No. in the cancellation journal.

NAVAX Consulting GmbH 2013
Page 81 # 126
Closing a fiscal Year
At the end of a fiscal year, several organizational tasks have to be completed. In order to close the fiscal year in cost accounting, you have to first close the fiscal year in the general ledger; carry out the necessary closing postings; and transfer the year’s results into the balance accounts, i.e. close the income statement or the balances.
Closing Cost Accounting
The closing of the balances always takes place by department, project, and Sub-Account, i.e. for each cost account an entry is created per combination of department, project, and Sub-Account, which closes the balance at zero. The posting date of this balance entry (closing entries) is the closing date of the closed fiscal year. In order to close the cost accounting, proceed as follows:
1. Choose Departments -> NC Cost Accounting -> Periodic Activities -> Fiscal Year
-> Cost Accounting Close. The request window of the batch job Cost Accounting Close appears.
Field Entry
Fiscal Year Endig Date The ending date of the closed fiscal year. This field has to be filled in.
Cost Acc. Journal Templ.
The journal template from which the closing entries should be posted. The posting has to be manually completed after the closing of the batch job, i.e. the batch job does not yet create the balance entries.
Cost Acc. Journal Name The journal from which the closing entries should be posted (if you have set up more than one cost accounting journal for this template).
Document No. Here you can manually fill in the Document No.
Postingdescription The posting text for the cost ledger entries.
2. Click on the OK button in order to start the batch job. The batch job runs with all cost accounts. It creates a balance posting line for each cost account for each combination of department, project, and Sub-Account in the chosen cost accounting journal.

NAVAX Consulting GmbH 2013
Page 82 # 126
3. After the batch job is finished, you choose the cost accounting journal where the lines were recorded at the posting of the closing entries. All functions are described in the chapter "Cost Accounting Journals."
Cost Ledger Entries compression
Ongoing work with the cost accounting by Microsoft Dynamics NAV, the number of entries in the system is growing steadily. In Microsoft Dynamics NAV, it is not possible to delete a post for you. But, in the cost accounting as well as in the Microsoft Dynamics NAV standard application, can a date compression of unneeded items (i.e. here cost items) to perform. Thus they take up much less space in the database. A date compression a number of cost items that fall within certain filters are summarized (regarding you compare the explanations controlling dimensions and date, to below), to a new budget line; The amount and quantity in the new budget line fields arise by summation of these fields for all old cost items that lie within the used filter. The old cost items are deleted after compression. The compression is therefore not reversible. Summarizes only cost items that match those in the assignment with regard to the cost accounting dimensions, i.e. the entries in the fields type of costs., cost job code, cost carrier code, SubAccount No.., areas and work type code of the summarized cost items, must be identical.
To compress budget line, follow these steps: 1. Click Departments -> NC Cost Accounting -> Date Compression -> Cost Ledger
Entries.
2. The Date Compression window appears.
3. The FastTab options can perform some settings for the date compression.
In the start date box, you specify the first day which is to be included in the compression. Is the start date is left blank, the compression starts with the first budget line. In the end date box enter last day, which is to be included in the compression. You must specify an end date for the compression. All cost items are compressed, whose posting date is between start date (inclusive) and end date (inclusive). If you want to compress all cost items of 2008 so, then you must start date = January and end date December = 31.12.08 type. In the period length field, you set the period in which the compression will take place. Click the AssistButton to display the available options:
Note: The date compressions remove information from the individual items. Therefore, you must always make a backup of the database before you compress items. Only post to a closed fiscal year can be compressed.

NAVAX Consulting GmbH 2013
Page 83 # 126
Option Entries are compressed
Day Which have the same posting date; i.e. all costs entries that match in the assignment and have the same date, are combined into a post.
Week Which have same booking week; i.e. all cost items that match those in the posting and posting date is, in the same calendar week are combined into one entry.
Month Which have same booking month.
Quarter Which have the same booking quarter.
Year Which have the same business and calendar year.
Period the same period have
4. If you want to compress the cost items of the year 2008 to a cost item per
account, per month, then must select in addition the month for the date filter described.
In the booking entry text field, you can enter a free booking entry text for the budget line of the date compression. The DateCompressed entry is proposed, this entry can be changed manually. The booking entry text is written in the text of the cost items generated during the date compression field.
5. Click OK to start the batch processing. Confirm the message window that appears with Yes.
Every date compression is logged in a journal. For one, the new transactions are logged as usual cost accounting journal. On the other hand, it creates its own date compression journal for every date compression.
You can find the date compression journals in Departments -> NC Cost Accounting -> History -> Cost Accounting Register.
Delete Empty Costing Accounting Registers
Cost entries will be deleted during date compression. Therefore, the logged cost entries are no longer available for the cost accounting journal of the compression period. You can delete cost accounting journal where the logged cost entries are no longer available, batch processing. To do this, proceed as follows: Choose Departments -> NC Cost Accounting -> Data Deletion -> Delete Empty Costing Accounting Registers.

NAVAX Consulting GmbH 2013
Page 84 # 126
1. In the FastTab “Cost Accounting Register” You can enter a filter for “Creation
Date” field. Only Cost Accounting Register entries with creation date within this filter will be deleted. If you want to delete the budget line of the year 2009 as described above have compressed and the corresponding empty cost accounting journals, enter the filter 01.01.09..31.12.09.
2. Click the button OK to start the batch processing. Confirm the message window that appears with Yes.
Budget
In Microsoft Dynamics NAV, it is not possible to delete posted entries. But, in cost accounting as well as in the Microsoft Dynamics NAV standard application, it is possible to compress unnecessary entries (e.g. cost budget entries). Saving database space. A date compression, a number of cost budget entries that are within a certain filter, be combined into a new budget line; the amount and quantity in the new costs budget line item fields arise by summation of these fields for all old cost budget items that lie within the used filter. The old cost budget entries are deleted after compression. The compression is therefore not reversible. Compress budget line, follow these steps:
1. Choose Departments -> NC Cost Accounting -> Date Compression -> Cost
Budget Entries.
The Date Compression window appears.
Note: The date compressions remove information from the individual entries. Therefore, you must perform always make a backup of the database before you compress items. Only post to a closed fiscal year can be compressed..

NAVAX Consulting GmbH 2013
Page 85 # 126
2. The procedure for the date compression of the cost budget entries matches the compress in the section cost budget entries in this chapter described procedure for the date compression of cost entries.
3. Cost budget entries in the FastTab you must additionally select the budget to compress. You can also restrict the compression of the budget with a cost type filter. The next steps must be edited analog to the date compression of cost entries.
Cost allocation in Cost Accounting
Overview
Cost allocations are a part of the internal performance transfer. In cost accounting you have the option to transfer costs from one cost accounting dimension to another cost accounting dimension. Examples of this are the cost transfer of one department to another department (transfer subsidiary department to main department), or from departments to projects. You have the choice of various cost allocation methods with which you can apportion the costs of a transferring cost accounting dimension to receiving cost accounting dimensions in one or several steps. The transferring cost accounting dimension is credited with a posting with a particular allocation. The receiving cost accounting dimension is debited with postings with a corresponding allocation. Be aware that with cost allocations the cost accounting dimensions (cost account, department, and project) can be debited or credited. Sub-Accounts are not considered a dimension of cost accounting.
Structure of a Cost Allocation
Cost allocations are produced and posted in cost accounting over cost allocation journals. A cost allocation consists of two elements:
Cost Allocation Lines
The cost allocation lines establish which cost accounts and which departments (and future projects) are supposed to be credited for which period and for which amount. Those cost accounting dimensions that are credited at the cost allocation with a posting are identified with the Credit entry in the name field, e.g. Department Code Credit. Those cost accounting dimensions that are used at the calculation of the amount to be apportioned are identified with the Base text in the field name, e.g.

NAVAX Consulting GmbH 2013
Page 86 # 126
Department Code Base. You must also enter each cost allocation line by which cost allocation method the amount should be apportioned.
Cost Allocation Target Lines
The cost allocation targets establish which departments, cost accounts, and future projects are to be debited with which amounts. Those cost accounting dimensions that are debited at the cost allocation with a posting are identified with the Debit text in the field name, e.g. Department Code Debit.
Cost Allocation Methods
The amount of the credit depends on the chosen cost allocation methods. You have the choice of three various cost allocation methods.
Fixed Ratio: At the cost allocation by fixed ratio the costs of a department are apportioned to different departments or projects in defined relationships. Each debited cost accounting dimension contains a defined percentage of the amount to be apportioned. Load Capacity (Amount): At the cost allocation by load capacity (amount) the costs of a department are apportioned in ratio to different departments, which correspond to the relationships of the costs posted to these departments (or other departments chosen). Those cost accounting dimensions that will be used for the calculation of the load capacity are identified with the Relation entry in the field name, e.g. Relational Department Code. The department to be debited with the highest costs to relational cost accounts in the relational period will be debited in this case the most with costs from the cost allocation; those with the lowest costs within the set relational filter the least. Load Capacity (Quantity): At the cost allocation by load capacity (quantity) the costs of a department will be apportioned in ratios to different departments that correspond to the ratios of the quantities already posted to these departments (or other chosen departments). With this cost allocation method, a work type filter and a code must be entered to which the quantity postings refer. The following diagram shows in an overview the relationship between the four types of cost accounting dimensions that go into the cost allocation: Allocation by Fixed Ratio The following diagrams illustrate in a simple example how the accumulated costs to the department, i.e. 1 are apportioned to the departments i.e. 2, 3, and 4 if various cost allocation methods are used.
Cost allocation by fixed ratio; the allocation ratio 1:2:2 is manually set.

NAVAX Consulting GmbH 2013
Page 87 # 126
Allocation by Load Capacity (Quantity)
The allocation ratio 1:4:3 is calculated from the accumulated primary costs.

NAVAX Consulting GmbH 2013
Page 88 # 126
Allocation by Loaded Capacity (Quantity):
The allocation ratio of 1:2:3 is calculated from the work type „Number of Employees“.
Relational Base
Depending of requirements, in frames of cost calculations the allocation can be defined for actual and budget data. Described procedure can be used in both cases. In Cost Accounting, the basis for allocation is Cost Allocation Journal Template. In order to call up the cost allocation journal templates, choose Role Center -> Departments -> NC Cost Accounting -> Setup -> General -> Cost Allocation Jnl. Templates. You have the choice between two types: General Allocation Journal Template with this type creates Allocation Journal for Actual values. In frames of closing month operation such allocation has impact on actual income of cost centers, cost objects, Sub-Accounts and areas.
Budget
Allocation Journal Template with this type creates Allocation Journal for Budget values. This Allocation Journal can be used in frames of budget procedure. For budget allocations, in analogy to the actual allocations, single budgets are created. If you call Setup -> General -> Allocation Journal Template following window
appears:

NAVAX Consulting GmbH 2013
Page 89 # 126
Second row represents recurring Budget Allocation Journal Template, because in field Type option Budget has been chosen.
Cost Allocation Base The cost allocation by load capacity during actual cost allocations can be defined with two different value dimensions for the relational base. Fluctuations between budgeted and posted base values for the cost allocation can be balanced. In the standard cost allocations there is the option between two value dimensions: Cost Ledger Entries At a cost allocation by load capacity (amount or quantity) the option Cost Ledger Entry can be selected as Ledger Entry Type Base. In this case the relational dimension of the target is calculated from posted actual values within the selected filter. Cost Ledger Budget Entries
At cost allocation by load capacity (amount or quantity) the option Cost Budget Ledger Entry can be selected as Ledger Entry Type Base. In this case the relational dimension of the target is calculated from budget values of a budget within the selected filter. General Posting Types
In cost accounting Calculated Cost Allocations can be defined. You can choose between the General Posting Type Stat. % or the posting type Stat. Amount. The Standard Cost Allocations is defined with the posting type Cost Allocation. During a percentage calculated cost allocation the cost allocation amount is determined with multiplication of the accumulated base amount with the percentage. If the option Stat. Amount is chosen, the cost allocation amount corresponds to the value in the field Stat. Amount. A counter entry can only be created for cost allocations Stat. % with the posting type Stat. %. The following diagram shows the percentage calculated cost allocation as an example. 50% of the costs accumulated from i.e. department 1 should be apportioned to the departments i.e. 2, 3, and 4. A statistical counter entry is created.
Keep in mind that the calculated cost allocations also correspond with credit postings not the standard cost allocations. Particular base and relational bases are not tested to determine whether cost allocations were previously posted within the same date range.
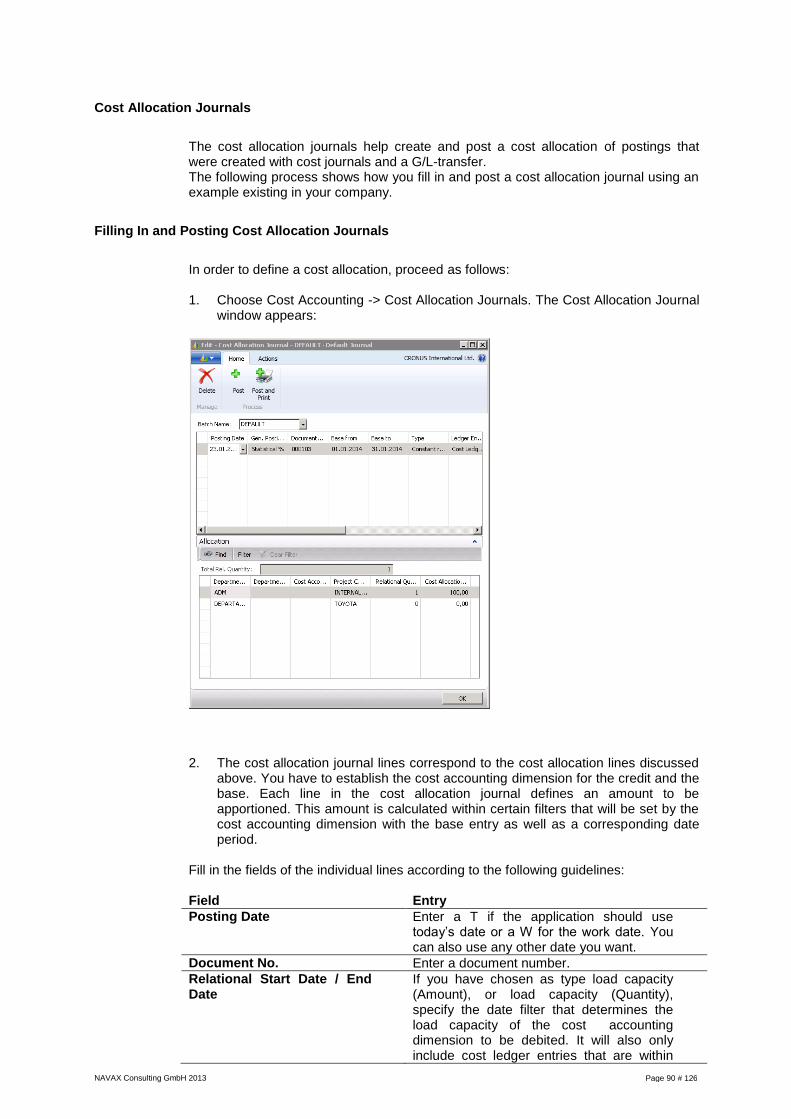
NAVAX Consulting GmbH 2013
Page 90 # 126
Cost Allocation Journals
The cost allocation journals help create and post a cost allocation of postings that were created with cost journals and a G/L-transfer. The following process shows how you fill in and post a cost allocation journal using an example existing in your company.
Filling In and Posting Cost Allocation Journals
In order to define a cost allocation, proceed as follows:
1. Choose Cost Accounting -> Cost Allocation Journals. The Cost Allocation Journal
window appears:
2. The cost allocation journal lines correspond to the cost allocation lines discussed above. You have to establish the cost accounting dimension for the credit and the base. Each line in the cost allocation journal defines an amount to be apportioned. This amount is calculated within certain filters that will be set by the cost accounting dimension with the base entry as well as a corresponding date period.
Fill in the fields of the individual lines according to the following guidelines:
Field Entry
Posting Date Enter a T if the application should use today’s date or a W for the work date. You can also use any other date you want.
Document No. Enter a document number.
Relational Start Date / End Date
If you have chosen as type load capacity (Amount), or load capacity (Quantity), specify the date filter that determines the load capacity of the cost accounting dimension to be debited. It will also only include cost ledger entries that are within

NAVAX Consulting GmbH 2013
Page 91 # 126
this date filter.
Base From / Base To The date interval of the cost ledger entries from which the amount to be apportioned is calculated. It will only include cost ledger entries that are within this date filter.
Type Enter the cost allocation type. You can choose one of the options displayed under the drop-down button: Fixed Ratio, load capacity (Amount) or load capacity (Quantity).
Posting Type Enter the posting type of the cost allocation. The posting type controls the credit posting and the calculation of the calculated values. You can choose one of the options in the drop-down button: Cost Allocations, Statistical % or Statistical Amount.
Stat. % You can only fill in this field if you have chosen the posting type Statistical %. You enter the percentage that should be multiplied with the base amount.
Stat.Amount You can only fill in this field if you have chosen the posting type Statistical Amount. You enter a fixed amount to be apportioned.
Stat.Counterentry Mark a if a counter-entry should be created at posting type Statistical %.
Work Type Filter You can only fill in this field if you have chosen the type load capacity (Quantity). You enter the code of the work type that should be included at the calculation of the load capacity in the cost allocation targets. You may enter a filter. It is possible to draw from an area of work types for the calculation. Only work types with the same code will be entered.
You can enter the code directly or click on the AssistButton in order to view the work type list. Click on the desired work type and finally on the OK button. An apportionment price is left for the work type at a department so this is automatically transferred into the journal.
Ledger Entry Type Base Enter the source of the target base. You can choose one of the options by clicking on the drop-down arrow: Cost Ledger Entry, Cost Budget Ledger Entry.
Cost Budget Name Base The cost or quantity budget that should be used to calculate the target amount. You can only enter a budget if you have chosen the type Load Capacity (Quantity) or Load Capacity (Amount) and Cost Budget Ledger Entry as ledger entry type base.
Department Code Base The department for which the apportionment amount should be calculated.
Cost Account No. Base The cost accounts for which the apportionment amount should be calculated. You can enter a filter.
Project Code Base The project for which the apportionment amount should be calculated. This field can be filled in as needed.
Sub-Account No. Base The Sub-Account for which the

NAVAX Consulting GmbH 2013
Page 92 # 126
apportionment amount should be calculated. This field can be filled in as needed.
Description Enter whatever posting text you like.
Department Code Credit Department that should be credited. In this field the contents of the Department Code Base field are suggested.
Cost Account No. Credit Cost account that should be credited. In this field the contents of the Cost Account Number Base field are suggested.
Project Code Credit Project that should be credited. In this field the contents of the Project Code Base field are suggested. This field can be filled in as needed.
Sub-Account Code Credit Sub-Account that should be credited. In this field the contents of the field Sub-Account No. base is suggested. You can enter a code directly or click on the AssistButton to view the Sub-Account list. Click on the Sub-Account number desired and finally on the OK button. This field can be filled in as needed.
In the next step you have to specify how the allocation amount is to be allocated, i.e. which ratios to which cost accounting dimensions.
3. Choose Targets. The Cost Allocation Targets window appears.
4. The cost allocation journal target lines correspond to the cost allocation targets discussed above. You have to specify the cost accounting dimensions for the debit and the relation.

NAVAX Consulting GmbH 2013
Page 93 # 126
In the example of the demo data base, a cost allocation journal target was set up for each sales department. Fill in the fields of the individual lines according to the following guidelines:
Field Entry
Department Code Debit Department that should be debited.
Project Code Debit Project that should be debited. This field can be filled in as needed.
Sub-Account Debit Sub-Account that should be debited. This field can be filled in as needed.
Cost Account No. Debit Cost account that should be debited.
Relational Quantity Contains the relational quantity of the allocation line that is set in ratio with the other allocation lines. From here on the value in the field Cost Allocation% is calculated. If you have chosen in the corresponding cost allocation journal line Fixed Ratio as type, you can manually enter a relational quantity. For example, if you would like to allocate 5,000 m2 in the ratio 2:3, enter in the first target line the relational quantity 2,000. In the next target line enter the value 3,000. These two lines will be weighted at the debit posting with the ratio 2:3. This field serves no purpose in a cost allocation by load capacity and you do not have to fill it in.
Cost Allocation % No entry.
The percentage of this target line of the apportionment amount. It will automatically be calculated from the entries of the field Relational Quantity.
Department Code Relation Department whose cost ledger entries go into the calculation of the target ratios at the cost allocation by load capacity. In this field the contents of the Department Code Debit field are suggested.
Project Code Relation Project whose cost ledger entries go into the calculation of the target ratios at cost allocation by load capacity. In this field the contents of the Project Code Debit field are suggested. This field can be filled in as needed.
Sub-Account Relation Sub-Account whose cost ledger entries go into the calculation of the target ratios at cost allocation by load capacity. The contents of the Sub-Account No. Base field are suggested. This field can be filled in as needed.
Relational Cost Account Cost accounts whose cost ledger entries go into the calculation of the allocation ratios. You can enter a filter.
5. Create a cost allocation target for each cost accounting dimension that should be
debited at allocation of the current cost allocation line.

NAVAX Consulting GmbH 2013
Page 94 # 126
6. Create a cost allocation line and corresponding cost allocation target for each cost accounting dimension that should be credited at the current cost allocation by repeating steps 2 to 4.
7. If you have set up the cost allocation journal you can post it. To do this, choose
Posting -> Post. You can also view a test report on the screen or print it. Choose Posting -> Test Report. If you would like to print a report during the posting, choose Posting -> Post and Print.
8. While posting the cost allocation, a row of cost ledger entries is created that you
can view afterwards. Learn more about the available options in the chapter "Working with Cost Accounting". If you use the posting type Cost Allocation or have set a x in the Right Stat. Counter entry field, then a credit posting will be created for each cost allocation line whose compression is given with the credit entry through the cost accounting dimensions of the fields. The system respectively creates a cost ledger entry with the following effect: Cost Account No. = Cost Account No. Credit, Department Code = Department Code Credit, Project Code = Project Code Credit, Amount = Totaled Amount within the set base filter.
For each cost allocation target a debit posting is created whose allocation is given with the cost accounting dimensions of the field with the debit entry.
The system respectively creates a cost ledger entry with the following effect: Cost Account No. = Cost Account No. Debit, Department Code = Department Debit, Project Code = Project Code Debit.
Budget Cost allocations
Cost allocation journals also help you record and post cost allocations from budget cost allocations. During budget cost allocation, postings that were created in the cost budgets and quantity budgets are included. The following process explains how to fill in and post a cost allocation journal at budget cost allocation. Budget cost allocations can be defined in connection with cost allocation journal templates of the type Budget Cost Allocation. Be aware that budget cost allocations can be used for multiple simulation purposes. There is no test to determine whether previously allocated entries in a budget can be allocated once again.
Recording Budget Cost Allocations
You can use the same fields for defining budget cost allocations in the cost allocation journals as for the actual cost allocations. Therefore, the only fields described here are those that are exclusively necessary for budget cost allocation. The process in the Cost Allocation Journal Target window is identical to the actual cost allocation. To define a budget cost allocation, proceed as follows:
1. Choose Departments -> NC Cost Accounting -> Budget Cost Allocation Journals.
The Budget Cost Allocation Journal window appears. Be sure that the Type Budget Cost Allocation of the assigned cost allocation journal template was chosen.
2. In the cost allocation journal lines, you have to establish the budget dimensions for
the credit and the base. Each line in the cost allocation journal defines an amount to be allocated. This amount is calculated within certain filters that are set through the budget dimensions with the Base entry as well as a corresponding date period.

NAVAX Consulting GmbH 2013
Page 95 # 126
Fill in the fields of the individual lines for a budget cost allocation according to the following table:
Feld Eingabe
Cost Budget Name Base The cost or quantity budget, which for the calculation des The cost or quantity budget that is supposed to be used for calculating the target amount. You can only enter a budget if you have chosen the type Load Capacity (Quantity) or Load Capacity (Amount) and as entry type base Cost Budget Ledger Entry.
Cost Budget Ledger Relation
You can only fill in this field if you are recording budget cost allocations. The contents of the field Cost Budget Name Base are suggested. You enter the code of the cost or quantity budget for calculating the target ratios. You can enter the code directly or click on the AssistButton to view the budget list. Click on the desired budget and finally on the OK button.
Cost Budget Name Credit You can only fill in this field if you are recording budget cost allocations. The contents of the field Cost Budget Name Base are suggested. You enter the code of the budget that should be credited corresponding to the filters of the base filter.
Cost Budget Name Debit You can only fill in this field if you are recording cost budget allocations. The contents of the field Cost Budget Name Base is suggested. You enter the code of the budget that should be debited according to the filters of the base filter.
3. If you have set up the cost allocation journal, you can post it. To do this, choose
Posting -> Post. Before the posting, you can also view a test report on the screen, or else print it out. In this case, choose Posting -> Test Report. If you would like to print the report while posting it, choose Posting -> Post and Print. You can learn more about this in the section "Filling in and Posting of a Journal" in the chapter "Cost Accounting Journals."
Recurring Cost Allocation Journals
In many cases you will periodically allocate costs in recurring time intervals based on defined structures. You can then use the cost allocation functions for recurring transactions that you find in the recurring cost allocation journals. If you want to work with recurring cost allocation journals, proceed as follows:
1. Choose Departments -> NC Cost Accounting -> Periodic Activities -> Recurring
Cost Allocation Journals. The Recurring Cost Allocation Jnl. window appears.

NAVAX Consulting GmbH 2013
Page 96 # 126
Recurring cost allocation journals essentially contain the same special fields as in the other recurring journals of cost accounting. However, there are the following exceptions:
Field Function
Recurring Frequency Based on the date formula in this field the entry in the Posting Date field will be newly calculated in the recurring cost allocation journals.

NAVAX Consulting GmbH 2013
Page 97 # 126
Chapter 6
Budgets
This Chapter:
Budgets
Cost Budget Journal

NAVAX Consulting GmbH 2013
Page 98 # 126
Overview
The cost accounting module offers several ways to plan costs and performances, i.e. to create and administer amount and quantity budgets. Both budget types can be entered, filtered, and administered in reference to all cost accounting dimensions. You can set up budget values for all cost accounts depending on department, project, and Sub-Account. The dependency of the budget values for individual cost accounts from the other cost accounting dimensions can be combined as you like. For example, you can enter the budget for a department differentiated only by cost accounts, or also additionally differentiated by project. The administration and maintenance of quantity budgets are identical to those for amount budgets. One difference is that you have to enter a work type and a unit in quantity budgets. Quantity budgets help control work type quantities and work type performances. Budget values can be entered and administered based on time periods. Beginning with an approximate budgeting based on yearly values, administration is possible up to a precise budgeting based on daily values. Therefore, set up budgets can also be allocated later from longer to shorter periods. For each period endless budgets are possible for costs and quantities. Therefore, you can plan multiple and parallel budgets. This is supported by the module’s ability to copy budgets and to change constant factors.

NAVAX Consulting GmbH 2013
Page 99 # 126
Setting up and administering Budgets
Setting Up a Budget The following section describes how you set up new budgets, or view and work with an existing budget. The necessary steps are explained in the examples. Quantity budgets handled quite similarly; the differences are shown in the section "Quantity Budgets" in this chapter.
In order to set up a new budget or to display or edit an existing budget, proceed as follows: Structure of the Budget Window:
1. Choose Departments -> NC Cost Accounting -> Cost Acc Budgets. The Cost Acc Budget by Period window appears.
The budget window contains the following elements: - the Budget Header (the Options register contains fields for defining filters like options for the entry and display of amounts); - the left hand columns (contain the chart of cost accounts); - the right hand columns (contain the budgeted amounts by period); - the Interval and Amount buttons; - the Menu and Help buttons. The left and right hand columns are separated by a bold vertical line. Each column has its own horizontal scroll bar.
Note: You should become exactly with the structure and the budget window options familiar before entering budget data. These options affect not only the display of the amount, but also the amount of recording (when entering in the budget window)

NAVAX Consulting GmbH 2013
Page 100 # 126
Budget Header
1. Click in the budget header in the Budget Name field on the AssistButton
The Cost Budget Names window appears.
In this window, choose the name of the budget you would like to enter, display, or edit. Instructions for the setup of new budget names are in the section "Multiple Budgets" in this chapter. For example, choose the budget named DEFAULT.
You can also specify in this window which filter concerning the cost accounting dimensions department, project, and Sub-Account the budget should allow. The filters are controlled with entries in the fields Department Filter, Project Filter, and Sub-Account Filter. Instructions about the use of filters for budgets are in the section "Partial Budgets" in this chapter. The chosen DEFAULT budget is a department budget, therefore, in this case the Department field is filled in with a . The other fields are blank, i.e. the DEFAULT budget allows no filter concerning projects and subaccounts. If you have chosen a budget that allows no filter regarding department, project, and Sub-Account, then you can enter no budget amounts if you have entered something in the budget header in the fields Department Filter, Project Filter or Sub-Account filter. In the Rounding Factor field, you choose the entry and display method for the amounts.
Left-hand columns: The left columns contain the chart of cost accounts. Here you can apply table filters. Right Columns In the right-hand columns the budget is entered and displayed. Each column shows a particular period. The period is stated with the interval button found in the window. This window area is divided into lines. Each line shows a cost account. In order to show a budget amount in one of the columns to the right, the application calculates the total based on the cost ledger entry of the respective cost account. Only those entries will be included whose codes correspond with the fields Budget, Department Filter, Project Filter and Sub-Account Filter. Choosing Appropriate Precision Before entering budget amounts you have to choose a time interval. It is important to choose the highest possible precision (i.e. the shortest interval) that is necessary for

NAVAX Consulting GmbH 2013
Page 101 # 126
the budget. For example, if you choose 31 (month) and afterwards change to 12 (year), all monthly amounts will be added to a yearly amount. This process cannot be reversed. For example, if you choose the time interval 12 (year), enter an amount, and afterwards change over to month, the total amount will appear in the month of January. In general, all amounts are recorded for the begin date (the first date) of the chosen period.
If you want to allocate these amounts to a smaller period by entering budget amounts for one period, you can do this manually with a batch job. You can learn more about the allocation of budgets in the sub-section "Allocating Budgets" of the section "Copying and Allocating Budgets" in this chapter.
Changing Budget Amounts
In order to change a budget amount, write over the old one with the new one. At each amount change a cost budget entry is created. You can view the budget entries contained in the displayed amount by clicking on the dropdown button found to the right of the field. The Cost Budget Ledger Entry window appears.
The cost budget entries, the current cost account, and the current period in this window are displayed (if you have clicked the Net Change button) with a filter to the current budget (and eventually with other filters that will be set in the budget header).
Multiple Budgets
If it is necessary to have several budgets for the same periods you can add these under various names. First you have to set up the budget names to be used. After you have chosen the desired budget names in the Budget Filter field you can enter the budget numbers. The budget name to all corresponding budget entries appears. Setting Up New Budget Names In order to set up a new budget name, proceed as follows:
1. Choose Cost Accounting -> Cost Acc Budgets. The Cost Acc. Budget by Period
window appears.

NAVAX Consulting GmbH 2013
Page 102 # 126
Choose “New” from the menu in order to enter the new name. Enter the new name in the Name field and the description of the budget in the Description field. If you would like to set up an alternative department budget, for example, enter in the field Name ALT1 and in the field Description Alternative Budget. Specify in this field which filter should apply to the budget regarding the cost accounting dimensions department, project, and Sub-Account. Fill in the alternative department budget ALT1 with a in the field Department. Click on the budget name and then the OK button. Then only those entries will be displayed that contain the budget names defined in the Budget Filter field. The window is blank because the budget name was set up that way and still contains no entries that meet the specifications of the filter. You can now enter budget amounts for the new budget. Be aware of the points described in the sub-section "Setting up a Budget" of the section "Setting up and Administering Budgets".
Copying Budgets You can copy existing budgets in cost accounting into other budgets. You have a list of options for filtering the old (existing) budget and new (target) budget. In order to copy budget entries, you have to specify:
- Existing Budget: Should the cost budget entries to be copied be filtered, i.e. should
all entries be copied or only those chosen.
- Target Budget: Which data in the copied cost budget entries should change in view of the existing cost budget entries. You can modify budget name, cost account number, department code, project code, Sub-Account number, date, and budget amounts.

NAVAX Consulting GmbH 2013
Page 103 # 126
In the FastTab, you can set options which filters are for the cost of the new budget heading and whether to change the budget values as compared to the initial budget by a fixed factor. Fill in the fields as follows:
Field Entry
Budget name Enter a name originating from the cost budget name window.
Cost Account No.
Enter a cost account number, unless one or more budget items in a cost element are copied.
Department Code
Enter a department code from the department code window.
Project Code Enter a project code from the project code window.
Sub-Account Code
Enter a Sub-Account code from Sub-Account window.
Section Code Enter a section code from section code window.
Data Change Formula
Enter a date formula. It must consist of a number and a letter, and specifies how the date specifying of the item change. You can use the following characters: D (day), W (week), M (month), Q (quarter), J (year). Example: 2W = 2 weeks; 1Q = 1 quarter. The new items are dated based on the date of the old post and the date formula. So the date is associated with, for example, a post dated 17.11.10 and date formula 1Y17.11.11.
Budget Factor Enter a factor with which the budget values of the initial budget are to be multiplied to obtain the budget values of the target budget. By default, 1 is proposed, i.e. the budget values do not change when you copy.

NAVAX Consulting GmbH 2013
Page 104 # 126
Budget Filter When copying, sure that the required filters for the budget you want to copy (initial budget), are compatible with the required filters of the budget in which you want to copy (target budget). You cannot copy, for example, a budget that requires that you specify of a cost center, in a budget that does not require the specification of a cost center or not allowed. On the other hand, a budget without any filter can be copied at any time in a budget that requires the filter.
Budget Comparison
The amounts budgeted by you (target) with the actual amounts, (is) to compare the screen, have two views available.
Balance/Budget-Comparison for all Cost Accounts in one Period
To compare the actual posted amounts with the budget amounts for all cost accounts within one period, proceed as follows:
1. Choose Departments -> NC Cost Accounting -> Cost Budgets -> Cost Budget ->
Cost Balance/Budget. The window Cost Balance/Budget appears
.
2. The window balance/budget cost appears.

NAVAX Consulting GmbH 2013
Page 105 # 126
3. In the header of the window in the Options register, choose in the Budget Filter field the name of the budget you want to compare. In the fields Date Filter, Department Filter, Project Filter, and Sub-Account Filter you can set more filters for the budget comparison. Besides that, you can determine whether the net changes should contain closing entries by choosing one of the two options in the Closing Entries field.
4. Use the buttons at the bottom of the window to choose the period length and the calculation method of the amounts (Net Change or Balance at Date).
5. 6. The chart of cost accounts will be displayed in the lines of the window; each line
represents a cost account. Here you can use the table filter. The number of the current cost account is in the first column; the name is in the second column. The third column displays the balance of all postings to this cost account within the period. If you click on the Balance field and then on the dropdown arrow, the Cost Ledger Entries window appears. All entries are displayed that go into the calculation of the balance.
The fourth column displays the amount budgeted for this cost account within the period. If you click on the Budgeted Amount field and then on the drop-down arrow, the Cost Budget Entries window appear. All entries that go into the calculation of the budgeted amount are displayed. The fifth column displays which percentage of the budgeted amount makes up the current balance.
Balance/Budget-Comparison for a Cost Account in Several Periods
To compare actual posted amounts with budgeted amounts for a cost account within several periods, proceed as follows:
1. Choose Departments -> NC Cost Accounting -> Cost Acc Budgets, Cost Account
-> Balance/Budget. The Cost Account Balance/Budget window appears.

NAVAX Consulting GmbH 2013
Page 106 # 126
In the header of the Options register, choose in the Budget Filter field the name of the budget you want to compare. In the fields Date Filter, Department Filter, Project Filter, and Sub-Account Filter you can set more filters for the budget comparison. Besides that, you can determine whether the net changes should contain closing entries by choosing one of the two options in the Closing Entries field. Use the buttons at the bottom of the window to choose the period length and the calculation method of the amounts (Net Change or Balance at Date).

NAVAX Consulting GmbH 2013
Page 107 # 126
2. The periods will be displayed in the lines of the window. You can use table filters.
The first column contains the beginning of the period; the second column contains the period name. The third column contains the balance of all postings to this cost account within the period. If you click on the Balance field and then on the dropdown arrow, the Cost Ledger Entries window appears. All entries that go into the calculation of the balance are displayed.
The fourth column displays the budgeted amount for this cost account within the period. If you click on the Budgeted Amount field and then on the drop-down arrow,, the Cost Budget Entries window appears. All entries appearing here go into the calculation of the budgeted amount. The fifth column displays the Balance/Budget %, or the percentage of the budgeted amount the current balance makes up.
Quantity Budgets
You can administer amount budgets as well as quantity budgets in cost accounting. The procedure for administering and maintaining quantity budgets corresponds with the procedure described above for amount budgets. The main difference is that for quantity budgets you have to state a work type and a unit to which this budget draws. For a given work type with its unit, budget values can only be entered for such cost accounts to which this unit code is assigned in the cost account card. You can enter quantity budgets for each cost account for only one unit.
Setting Up Quantity Budgets
To set up quantity budgets, proceed as follows:
Choose Role Center -> Cost Quantity Budget. The Quantity Budget by Period window appears.
Carry out steps 1 to 5 as described above in the section "Setting Up and Administering Budgets" for the amount budgets. Be aware that in the Options register the additional field Work Type Filter is available.

NAVAX Consulting GmbH 2013
Page 108 # 126
Cost Budget Journals
The cost budget journals help record and post budget values. You can budget quantities by work type as well as by costs, by revenues, or by each cost account for departments, for projects, and for Sub-Accounts. The cost budget journals offer an alternative view of the information displayed in the budget windows. The following explains the general process for filling in and posting cost budget ledger journals.
Filling In and Posting Cost Budget Ledger Journals
1. Choose Departments -> NC Cost Accounting -> Tasks -> Cost Budget Journals.
The Cost Budget Journal window appears.
2. Click in the Cost Budget Journal window in the Cost Budget Name field on the AssistButton. The Cost Budget Names window appears. In this window, choose the name of the budget that you would like to edit. You can find tips for the setup of new budget names in the section "Multiple Budgets" in this chapter.
3. The cost budget journal lines help record value and quantity sizes for individual budgets. You can enter budget values for all cost accounts depending on departments, projects, and Sub-Accounts.
Fill in the fields of the individual lines according to the following table:
Field Entry
Type Enter whether the cost budget journal line should overwrite an existing budget value or be added to this one. You can choose an option from the drop-down box: Total, Additive.
Period Type Before you enter the budget amounts you must choose a time interval. It is important that you select the highest precision, i.e. the shortest interval, which is necessary for the budget. You can choose an option from the drop-down box: Day, Week, Month, Quarter, or Year.
Date Select a period filter from the options in the Period Type field. You can enter the code directly or click on the AssistButton to show the period list. Click on the desired period and finally on the OK button.

NAVAX Consulting GmbH 2013
Page 109 # 126
Cost Account No Cost account to which to budget. You can enter a filter. You can enter the code directly or click on the AssistButton to show the chart of cost accounts. Click on the desired cost account and finally on the OK button.
Department Code Department to which to budget. You can enter a filter. You can enter the code directly or click on the AssistButton to show the chart of cost accounts. Click on the desired department code and finally on the OK button.
Project Code Project to which to budget. You can enter a filter. You can enter the code directly or click on the AssistButton to show the chart of cost accounts. Click on the desired project code and finally on the OK button.
Sub-Account Code Sub-Account to which to budget. You can enter a filter. You can enter the code directly or click on the AssistButton to show the chart of cost accounts. Click on the desired subaccount and finally on the OK button.
Work Type Code You have to fill in this field if you want to budget quantity sizes. You can enter a filter. You can enter the code directly or click on the AssistButton to show the chart of cost accounts. Click on the desired work type and finally on the OK button.
Amount The budget amount to be posted. Costs are entered without signs. A minus sign must appear before revenues.
Quantity Enter which quantity of the selected work type should be budgeted in the corresponding unit.
4. Create a cost budget journal line for each cost accounting dimension that you
want to budget within the chosen budgets and date intervals.
5. If you have set up the cost budget journal, you can create cost budget ledger entries. Choose Posting -> Post. Before the posting you can also view a test report on the screen. To do this, choose Posting -> Test Report. You can learn more in the section "Filling in and Posting Journals" in the chapter "Cost Accounting Journals".
At the posting of cost budget journals, a row of cost budget ledger entries is created, which you can view afterwards. You can learn more about the various options in the section "Setting up and Administering Budgets" in this chapter.

NAVAX Consulting GmbH 2013
Page 110 # 126
Chapter 7
Calculatory Fixed Assets
This Chapter:
Fixed Assests

NAVAX Consulting GmbH 2013
Page 111 # 126
Overview
The takeover of the calculated depreciation is used to compute the depreciation in cost accounting, regardless of the depreciation in the financial accounting and directly take over from the fixed asset accounting to cost accounting In order to use calculatory depreciation, as first you should to create in FA module second depreciation book for all necessary FA. Then the depreciation postings are performed separately for each depreciation book e.g. commercial law depreciation and cost accounting depreciation are separated and calculated on different basis. Cost account can be defined by FA posting group, which are used for identify of FA postings. All FA accounts assigned to FA ledger entries are applied in transfer using the function „Calculatory Depr. - Transfer“ as cost entries on corresponding cost account in Cost Accounting module.
Fixed Asset Setup
1. Choose Departments -> NC Cost Accounting -> Setup -> Cost Accounting Setup.
2. The Cost Accounting Setup window appears.
3. In the „Fixed Asset“ FastTab, enter the name of the "Calculatory depr. book",
which contain the calculated depreciation postings.

NAVAX Consulting GmbH 2013
Page 112 # 126
In next step it is necessary to assign Fixed Asset to cost account.
4. To do this, choose Departments -> Financial Management -> Administration ->
FA Posting Groups. 5. The FA Posting Groups window appears.
The next step is to import of FA posting into Cost Accounting as cost accounting entries. To do that, follow steps from next section.
Transfer of cost-accounting depreciation
To do this, choose Role Center -> Activities -> Calculatory Depreciation – Transfer; system will open transfer window.
1. In the Options Fastab, you can make following setup:
Using „Posting Date From“ and „Posting Date To“ fields You can set the date filter for Fixed Assed entries which will be applied to Cost accounting. These fields are by default filled with start and end date of current month. Both of fields are mandatory.
2. In the reason code field, you can select an appropriate reason code.
3. Click on OK to start the transfer.

NAVAX Consulting GmbH 2013
Page 113 # 126
Entries from FA books are transferred into Cost Accounting Journal and automatically posted. The procedure is the same as for direct posting through Cost Accounting Journal so e.g. the same data validation rules are used. Bookings from FA accounting i.e. each FA entry, is taken only once into Cost Accounting. Each transferred FA entry is marked in a field „Cost Ledger entry No.“ of „FA Ledger Entries“ window and vice versa each cost entry in the window „Cost Ledger entries“ the field „FA Entry No.“ is filled by FA ledger entry number. If you enter a date which was already used e.g. date range that already was transferred; only unmarked entries will be transferred. Thus, follow-up posting from FA accounting can be transferred later.

NAVAX Consulting GmbH 2013
Page 114 # 126
Chapter 8 Navi Calc
This Chapter:
NaviCalc

NAVAX Consulting GmbH 2013
Page 115 # 126
Overview
The NaviCalc module allows flexible reporting of all cost accounting dimensions used interdependently, i.e. cost accounts, departments, projects, and Sub-Accounts. It allows the connection and reporting of different schedules of cost accounting in a reporting matrix. Spread sheets can also be used in this reporting matrix (i.e. calculations by means of a simple formula editor). The reports of the NaviCalc module, like those of the schedule and reports, are based on cost accounting entries. NaviCalc can also be used with report building blocks of cost accounting.
Construction of a NaviCalc
A NaviCalc consists of a NaviCalc header, NaviCalc lines, as well as line and column schedules. You have to add a NaviCalc for each report.
NaviCalc-Header In the NaviCalc header you describe the NaviCalc and make several basic settings that should apply for the report, or calculation. - You establish the reporting period, i.e. you define in which period the posting date of the entries that you would like to report should exist. - You choose the types of the schedules used, i.e. you define which cost accounting dimensions should be displayed in the lines and the columns of the reporting matrix. Therefore, you determine which cost accounting dimension will be reported and displayed depending on the cost accounting dimension. - You can set more filters for the report regarding the cost accounting dimension. For example, you can block out particular departments. Schedules Just as with line and column schedules of the reporting matrix, you can combine all added schedules for all dimensions of cost accounting with each other, i.e. cost account schedule, department schedule, project schedule, and Sub-Account schedule (you can learn more about cost accounting schedules in the section "Cost Accounting Schedules" in the chapter "Working with Cost Accounting." You can also set up schedules for the chosen schedule types, i.e. individually for this NaviCalc. The following diagram illustrates the matrix schedule constructed with line schedule and column schedule.
Each line of the line schedule creates a report of a line (position) of the corresponding schedule in the printout. Therefore, the report will be filtered exactly so that it asserts the corresponding schedule. For example, you choose a cost account schedule, like a line schedule, so that a cost account line is printed for each position of the cost account schedule in the NaviCalc. A special feature, however, allows one to insert within each line not only a value (as in the cost schedule), but also various columns.

NAVAX Consulting GmbH 2013
Page 116 # 126
Another line type (Formula) is available in the NaviCalc line schedule for editing. The individual line schedule lines can also be linked to one another with basic operations of arithmetic. Each column corresponds to a line (position) of the underlying column schedule. For example, you choose a department schedule, like a column schedule, so that a column is printed for each position of the corresponding department schedule. This combination of lines and columns creates a matrix (similar to a spread sheet). In each cell of this matrix, there is a value that corresponds to its allocation of the respective line and column. In our example, the value that was posted to the respective cost account as well as to the respective department will be printed. The basis of this report is that the cost entries can contain all four possible allocations (cost account, department, project, and Sub-Account). The NaviCalc works as a filter to the cost ledger entries. When values are calculated only those cost ledger entries will be included that fall within the filter defined with the line schedule as well as the column schedule. Date filters and other eventual set filters additionally apply.
NaviCalc-Lines
With the usual cost accounting schedule you can report and portray actual costs (based on cost ledger entries) of a cost dimension. With the NaviCalc described in the above example, you have the option of combining these schedules and reporting the actual costs of two cost dimensions. With NaviCalc you can acquire and combine, or work with, more information from cost accounting. This information is stated in actual quantities, budgeted costs, and budgeted quantities. The NaviCalc lines assist you with this information. In the NaviCalc lines you define which information should be calculated from the entries. You can reference back to two tables: the cost ledger entries give you information about actual values (amounts and quantities); the cost budget entries give you information about budgeted values (amounts and quantities). You can edit and link the contained values with each other using a simple formula editor and the four fundamental operations (+, -, *, /). Please note: You must add at least one NaviCalc line for each NaviCalc. Also for the simplified case shown above, in which only actual costs are calculated, a NaviCalc line must be added to report the actual costs. Every additional NaviCalc line that you add in the NaviCalc card classifies the columns corresponding to the printout. The following diagram portrays the extended report matrix, which will be constructed with a line schedule, a column schedule, and NaviCalc lines (in this diagram two NaviCalc lines are displayed.
Note: You must create at least one NaviCalc row for each NaviCalc. Is only for the above simplified case, in which costs are calculated must be applied to a NaviCalc line for the evaluation is the cost

NAVAX Consulting GmbH 2013
Page 117 # 126
For each combination of a line and column of the chosen schedules, you now get more values from the calculation. You get a value for each defined NaviCalc line. Each cell of the reporting matrix is defined by the combination of a schedule line, a schedule column, and a NaviCalc line. Each cell, therefore each value in the reporting matrix, depends on three parameters: The schedule line, the schedule column and the NaviCalc line. You can also think of the results of the NaviCalc calculation as a three dimensional reporting matrix. Two dimensions are defined by the schedules; the third is defined with the NaviCalc lines. When the results are displayed onscreen, or printed, the third dimension of the matrix has to be displayed in the form of additional columns.
NaviCalc Entries The NaviCalc calculates just like a conventional report. The results are based on the posted entries from cost accounting. The results of the reporting are saved with a NaviCalc but in its own entry table (NaviCalc entries). Therefore, they are available for printing of NaviCalc as well as for whatever organizational report or export in an external program, for example Excel spread sheets. This increases the speed of printing when the values are calculated just before the first printing of the NaviCalc. Later versions can then be printed significantly faster. Other applications that can run on the Windows operating system are also considerably simplified with this principle.

NAVAX Consulting GmbH 2013
Page 118 # 126
NaviCalc Set Up
In order to set up a NaviCalc, proceed as follows:
1. Choose Departments -> NC Cost Accounting -> Analysis & Reporting -> NaviCalc The NaviCalc Card field appears.
2. Choose Edit, Insert New from the menu bar, or press F3. If you press the Enter-key or click with the mouse on the NaviCalc card, then the number will be automatically filled in. If you click in the No. field, then you can manually fill in the number. You can change a previously filled-in number by entering a new number and confirming with Yes in the message window that follows. Changing a number can take a little time.
3. In the Text field you can enter a descriptive text for the NaviCalc. This text will be
copied into the Search Description field and can be manually changed there.
4. In the Group field you can enter a freely defined code for the grouping of the NaviCalc. You can use this grouping for filtering and finding as well as for copying or printing a NaviCalc.
5. The fields Begin Date and End Date help you determine the date filter for the cost ledger entries that will be included in the calculation of the NaviCalc results. These will be copied into the NaviCalc lines.
6. In the Line Schedule Type field you determine the type of the line schedules. You have the options Cost Account, Department, Project, and Sub-Account. If you click on the AssistButton of the Line Schedule Name field, you get a list of the added schedules of the chosen type.
7. Choose a schedule name by clicking OK. You can view the added line schedule. Choose NaviCalc, Line Schedule. The NaviCalc Line Schedule window appears.

NAVAX Consulting GmbH 2013
Page 119 # 126
The added schedules can still be edited individually in this field for this NaviCalc. You can also manually add the column schedule for the NaviCalc without referencing back to an existing schedule of the type chosen. Now fill in the Calculation register:
8. In the Calculation register, you may set a series of filters for the entries for the
NaviCalc reports. Enter the corresponding codes in the fields Cost Account Filter, Department Filter, Project Filter, Sub-Account Filter, and Work Type Filter. You can set a filter here only for those fields in the cost ledger entries that are not already filtered with the chosen schedules. For example, if you have chosen as line schedule type Cost Account and as column schedule type Department, then you can only enter filters for project, Sub-Account, and work type.
9. Edit the NaviCalc lines in the next step. Fill in the fields according to the following guidelines:
Field Fill in Entry
FastTab: General
Number This field contains the number of the NaviCalc. You can insert a new NaviCalc by choosing the menu Insert New. You can either automatically fill in the number based on the last established NaviCalc number in the cost accounting data with Enter or insert it manually.
Description In this field you can enter a description of the NaviCalc.
Group In this field you can enter a classification, or grouping, of the NaviCalc. The field can be used for filtering and finding.
Begin Date, End Date In both of these fields you enter a suggestion for the date filter for reporting the NaviCalc. Begin-Date and End-Date define the date range within which the cost ledger entries and cost budget entries exist that will be included for the schedule reporting (eventually with additional filters). This

NAVAX Consulting GmbH 2013
Page 120 # 126
value is transferred into the lines and can be edited there.
Search Description The contents of the Description field are suggested in this field. You can manually change the search description.
Calculated No entry. This field shows whether the NaviCalc was already calculated. A calculated NaviCalc can no longer be changed.
Line Schedule Type This field is an option field. You have the options Cost Account, Department, Project, or Sub-Account. Depending on the option, you define a cost account, department, project, or Sub-Account schedule as a line schedule in the next Column Schedule Name field.
Line Schema Name You can enter the name of an existing schema of the selected Lines schema in this field. If you do not fill in this field, you must create the schema manually lines.
Line Schedule Name In this field you can enter the name of a previously added schedule of the chosen line schedule type. If you do not fill in this field, you have to manually add the line schedule.
Column Schema Name You can enter the name of an existing schema of the selected Column schema in this field. If you do not fill in this field, you must create the column schema manually.
FastTab Calculation
Cost Account Filter
Department Filter
Project Filter
Sub-Account Filter
Work Type Filter
In this field you can enter filters for the NaviCalc report. It will then include only those cost ledger entries that exist within this filter. You can enter filters only for fields that were not already chosen with the line and column schedules.
10. Choose Calculate, Calculate and confirm the following message window with Yes.
The calculation can take a little while depending upon the filters set and the size of the schedules used.
11. After the calculation process has finished, a will appear in the Calculated field. A calculated NaviCalc cannot be changed again. However, you can cancel a calculated NaviCalc. See the sub-section "Canceling a NaviCalc" in this chapter. After the cancellation the NaviCalc can then be changed and calculated once again.
12. After the NaviCalc is calculated, you can either view the resulting report directly on the screen or print it out. This procedure is described in the next section "Working with NaviCalc."

NAVAX Consulting GmbH 2013
Page 121 # 126
Inserting Comments to a NaviCalc
You can assign comments to a NaviCalc. Choose NaviCalc, Comments. The Comments window appears:
You can enter as many comment lines as you like for each NaviCalc. You can optionally fill in a date for each text line produced. If comments are made to a NaviCalc, a pencil icon appears on the NaviCalc card to the right next to the No. field.
Working with NaviCalc
This section describes a number of functions that you can use when working with the module NaviCalc and that make it easier for you to work.
Viewing the NaviCalc Results on the Screen
Two options are available for viewing the results on the screen.
1. Choose NC Cost Accounting -> Analysis & Reporting -> NaviCalc. The NaviCalc
Card window appears.
2. 2. Choose NaviCalc, Result. The NaviCalc Result Page window appears:
In the left part of the window you see the chosen line schedule. In the right part you see a column for each added NaviCalc line combined with each column element of the chosen column schedules. To page to the right you can use the scroll bar.

NAVAX Consulting GmbH 2013
Page 122 # 126
Printing a NaviCalc
Cost accounting makes a standard report available to print out the results of a calculated NaviCalc. Proceed as follows:
1. Choose Cost Accounting -> Periodic Activities -> NaviCalc. The NaviCalc Card
window appears.
2. Choose Print... The Print NaviCalc report request window appears.
3. In the No. field in the NaviCalc Header register, you can add a filter for the NaviCalc to be printed out. This field contains the number of the NaviCalc from which you call up the report. The entry can be changed manually.
4. In the Options register, you can control the printout of the NaviCalc results. In the
field Maximum Number of Cell Results per Line enter the maximum number of results that can be printed to one line. You can print out a maximum of 3,4,5, or 6 results per line; the report suggests 6. If the descriptions or texts in your column schedule or your NaviCalc lines are very extensive, then you have to choose a smaller number in order to print them out completely. This field absolutely has to be filled out.
If you want to print a new page for each column of your column schedules, enter a in the New Page per Column field.
5. Finally, choose Print or Preview to print out the report or to view it on the screen.

NAVAX Consulting GmbH 2013
Page 123 # 126
Canceling a NaviCalc
If you have calculated a NaviCalc then you can no longer make changes. A calculated NaviCalc is designated with a in the Calculated field in the General register of the NaviCalc card. In order to be able to edit a calculated NaviCalc, you first have to cancel it. Choose Calculate, Cancel and click Yes in the message window that follows. With the cancellation all NaviCalc entries created to this NaviCalc will be deleted.
On the one hand, you can use the cancellation function for NaviCalc in order to eventually correct accumulated mistakes. On the other hand, you can modify and re-use an existing, calculated NaviCalc if you no longer need the previous results in the form of NaviCalc entries, i.e. if you no longer need the results on the screen or for export into another system.

NAVAX Consulting GmbH 2013
Page 124 # 126
Copying a NaviCalc
If you would like to re-use the structure of an existing NaviCalc without making changes to the original NaviCalc and thus erasing the resulting entries, you can copy the NaviCalc. In order to copy an existing NaviCalc, proceed as follows:
1. Choose Functions -> Copy NaviCalc. The request window of the batch job Copy
NaviCalc appears.
2. In the NaviCalc Header register, you can set filters for the fields No., Search Description, and Begin Date to determine the range of the NaviCalc to be copied. You can copy groups from NaviCalc with corresponding entries.
3. In the Options register, you can enter a date formula respectively in the fields Date Change Formula 'From Date' and Date Change Formula 'To Date.' With this information, the corresponding fields of the new NaviCalc will be calculated from the fields From Date and To Date of the NaviCalc.
If you copy one or more NaviCalcs, then their numbers will be automatically assigned based on the last NaviCalc number left in the cost accounting setup in the No. field.
NaviCalc export to Excel Batch processing to Excel exp. is used to export a NaviCalc in an Excel workbook. After you have exported a NaviCalc to Excel, you can use the Excel features to create, for example, presentations.
1. In the NaviCalc window, Action -> Functions -> Export to Excel to open the request
form.

NAVAX Consulting GmbH 2013
Page 125 # 126
2. Click OK button to export the data to Excel.
Alternatively you can export to Excel data divided by cost centers. To perform it call function „NaviCalc to Excel (by cost centers)” to open the request form.
Batch Calculation If you have to carry out very extensive reports, and therefore have to post many NaviCalc evaluations, e.g. within the procedures of your monthly closing, then you can let these processes be completed with a batch job without having to individually start the calculation process for each NaviCalc.

NAVAX Consulting GmbH 2013
Page 126 # 126
In order to calculate a series of NaviCalcs by batch job, proceed as follows:
1. Choose Calculate, Calculate Batch in the NaviCalc Card window. The request
window of the batch job Calculate NaviCalc Batch appears.
2. In the NaviCalc Header register, you can set filers for the fields No., Search Description and Report Group in order to filter the range of the NaviCalc to be calculated.
3. Click on OK to start the batch calculation.
4. At the end of the calculation process you get message window of how many
NaviCalc evaluations of those within the set filter could be successfully calculated.