navigation menu, image gallery, media and audio · wordpress will now create your navigation menu....
TRANSCRIPT

1
ITEC321 - Administering Web-based Content Management System
Navigation Menu, Image
Gallery, Media and Audio

2
NAVIGATION MENUS
Navigation Menus, or simply Menus, are a WordPress theme feature which allows users to
create navigation menus by using built-in Menu Editor located in WordPress admin area
under Appearance » Menus.
Navigation menus allow theme designers to let users create custom menus of their own.
The default menu will just list current WordPress Pages. WordPress supports multiple
menus so a theme can have support for more than one navigational menu (e.g. header and
footer menus). Users can add posts, pages, and custom links to a menu using drag and
drop functionality. Users can also add CSS classes to their menu items and change their
appearance by adding custom styles.
Users can use widgets to display custom navigation menus in other areas of their
WordPress sites such as sidebars, and footer areas.
What is: Primary Menu
A Primary Menu is the main menu selected as primary menu in the WordPress Menu Editor.
A WordPress theme may support single or multiple navigational menus at different locations
in theme. These menus can be edited using the built in WordPress Menu Editor located
at Appearance » Menu.
Most WordPress themes have menu locations that users can edit, filling each menu with
their own items. However, if a user does not edit the menus, most themes list pages as the
menu items by default. The purpose of a primary menu .is to allow Themes to use more

3
than one menu on a site (e.g. one in the header, one in the footer). It also allows users to
save menus and switch between the menus they have created.
Create Navigation Menus
Navigation menus allow your users to browse different pages or sections on your website.
WordPress comes with a powerful navigation menu system, and your WordPress theme
utilizes this system to display menus.
In order to create navigation menu, first, you need to visit Appearance » Menus page.
Then enter a name for your navigation menu and click on the create menu button.

4
WordPress will now create your navigation menu. But it will be empty at the moment.
Next, you need to select the pages you want to display in your menu and then click on add
to menu button.
You will notice your selected pages filling the empty area of your navigation menu. You can
move them up and down to rearrange their position in the menu.

5
Now you need to select a display location. These locations are defined by your WordPress
theme. Usually, most WordPress themes have a primary menu that appears on top.
Finally, click on the save menu button to store your navigation menu. You can now visit
your website to see the menu in action.
6
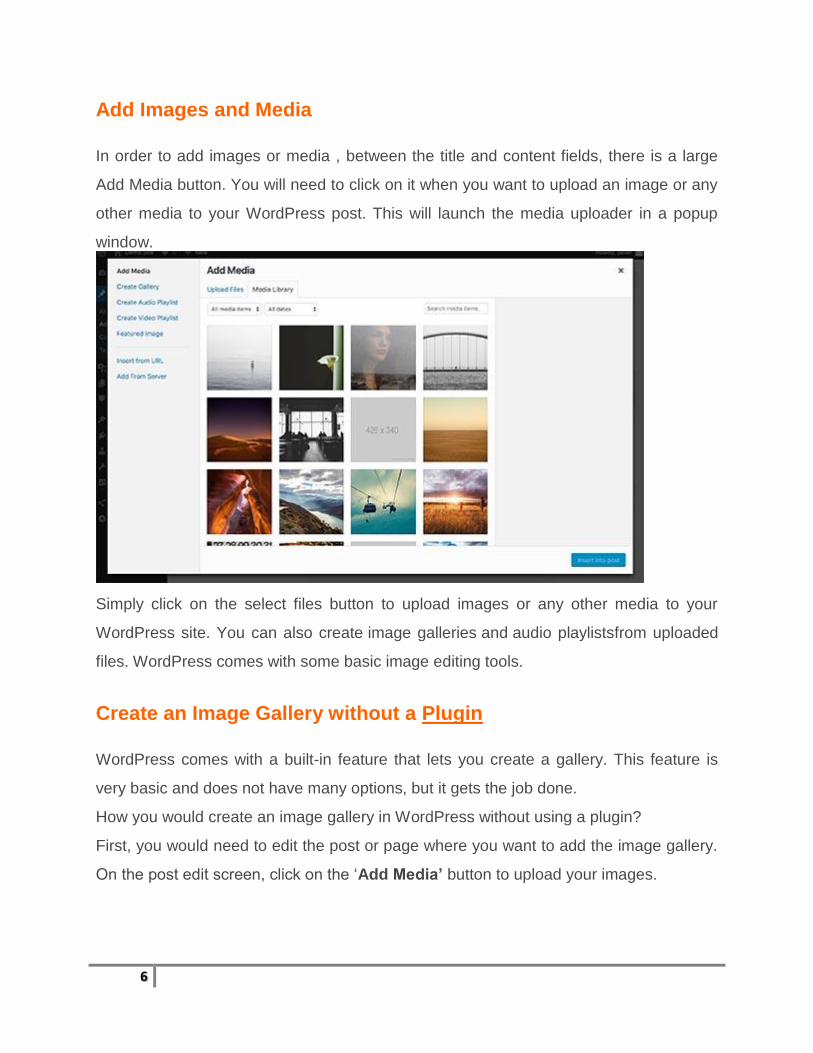
Add Images and Media
In order to add images or media , between the title and content fields, there is a large
Add Media button. You will need to click on it when you want to upload an image or any
other media to your WordPress post. This will launch the media uploader in a popup
window.
Simply click on the select files button to upload images or any other media to your
WordPress site. You can also create image galleries and audio playlistsfrom uploaded
files. WordPress comes with some basic image editing tools.
Create an Image Gallery without a Plugin
WordPress comes with a built-in feature that lets you create a gallery. This feature is
very basic and does not have many options, but it gets the job done.
How you would create an image gallery in WordPress without using a plugin?
First, you would need to edit the post or page where you want to add the image gallery.
On the post edit screen, click on the ‘Add Media’ button to upload your images.

7
This will bring up the WordPress media uploader where you can click on ‘Select files’
button to upload your photos. You can also select photos you have previously uploaded
from media library.
After uploading and selecting your images click on the create gallery link from the left
column..
Next, you need to click on the ‘Create a new gallery’ button.

8
Media uploader will now show your selected images with gallery settings. You can add
captions to each image in your gallery.
You can also select how you want the images to be linked, number of columns, and
image size to use in gallery.

9
Once you are done, you can click on the ‘Insert gallery’ button.
This will close the media uploader popup, and you will be able to see your image gallery
in post editor.
You can now save or publish the post/page, and visit your website to see your image
gallery in action.

10
However, if you create image galleries regularly, then you will soon notice that it lacks
certain important features.
For example, your images will open in a new page and users will have to click on the
back button to view the gallery again. It is not fully mobile-responsive, and your gallery’s
appearance depends on your theme. In most cases you get just one very generic style.
Last but not least, you can’t organize your galleries into albums, tag your images, etc.
Crop, Rotate, Scale, and Flip Images
First thing you need to do is upload your image. You can add it while you are writing a
post or by going to the Media » Add New tab.

11
Then once your image is uploaded, you just need to click on the little button that says
Edit Image.

12
You will be taken to an screen that looks like this:
Just select the area you want to crop. Or click on the rotate / flipping icon. You can click
to scale. You can even crop based on ratio.

13
AUDIO FILE
Supported Audio File Formats in WordPress
WordPress uses HTML5 audio tag to embed audio files. It is compatible with most
modern devices and works particularly well for mobile devices. HTML5 audio tag
supports MP3, OGG, and WAV file formats.
MP3 is the most commonly used and widely supported format for audio files, and we
recommend you to use it whenever possible.
Adding a Single Audio File in WordPress
Adding a single audio file or music track to any WordPress post or page is very easy.
Simply click on the add media button on the post edit screen.
Next, a media uploader popup will appear on your screen. You need to click on the
upload file button to select and upload your audio file. Once it’s uploaded, you need to
click on insert into post button.
WordPress will insert your audio file in the post. If you are using the visual post editor,
then you will be able to see the file embedded into your post. If you are using the text
editor, then you will see the audio shortcode.

14
You can continue editing your post, or save and publish it. Once published, you can
preview your post where you will see your audio file embedded like this.
Another easier way to add a single audio file is to upload the file to the media library.
After that simply copy the file URL and paste it in the visual editor.
WordPress will automatically embed the URL for you. This is similar to how you embed
videos in WordPress where you just paste the URL of a YouTube video and WordPress
automatically embeds it.

15
Adding Audio Playlist in WordPress
Just like image galleries, you can also add audio playlists to your WordPress posts
using the media uploader. Simply click on the add media button to upload your audio
files. After uploading your audio files, you need to select the files you want to include in
the playlist and then click on create new playlist link in the left hand column.
You can now drag and drop to rearrange songs in the playlist. You can also enable the
display of track name, artist name, and image. This information is embedded with your
MP3 file’s IDT meta tags and is automatically displayed by WordPress.

16
Once you are done, simply click on the insert audio playlist button. Your playlist will be
added to your post, and you will be able to see it in visual editor. You can now save
your post and preview your playlist.

17
Editing Meta Information of Audio Files in WordPress
WordPress can automatically get the meta information from your MP3 file. However, if
your file does not have any meta information, or you would like to change it, then you
can do so in the media uploader.
Click on the Add Media button to launch the media uploader. You can upload your
audio file or if you have already uploaded the audio file, then click on it in the Media
Library.
Once the audio file is selected, you will notice the attachment details column on the
right. This is where you can provide track title, artist name, album name, caption and
short description for the track. This information will be displayed in the playlists and on
single attachment pages.
If the audio file you uploaded has an embedded image to be used as album cover, then
this image will be automatically extracted by WordPress. It will be stored in your media
library and will be used when this track is added to a playlist.

18
However, if your audio file does not have a cover image, then you can edit the file in
WordPress and upload an image. Simply go to Media » Library select the file you want
to edit and click on the edit link below it.
If you are viewing the media library in grid view, then clicking on the audio file will open
a popup. You can click on the Edit more details link at the bottom of the popup to edit
the file.
You will now reach the edit media page, where you can not only edit all the meta
information for your audio file, but you can also upload a featured image. This image will
then be used when the audio file is added to a playlist.

19
Adding Audio Files and Playlists to Sidebar Widgets
By default WordPress does not automatically embeds audio file URLs. First we need to
enable automatic embedding for text widgets, and then we need to enable shortcodes.
Simply paste this code in your theme’s functions.php file or a site-specific plugin.
1
2
3
add_filter( 'widget_text', array( $wp_embed, 'run_shortcode' ), 8 ); add_filter( 'widget_text', array( $wp_embed, 'autoembed'), 8 ); add_filter( 'widget_text', 'do_shortcode');
Now you can upload a file to the media library and copy its URL. Add a text widget to
WordPress sidebar and paste the URL inside it.
WordPress will automatically embed the URL into media player to play your audio file.
To add a playlist, you will need to use shortcode [playlist] with the IDs of media files
you want to include into the playlist.
First you will need to upload the audio files you want to include in the playlist by
visiting Media » Add New.

20
Now you need to edit each audio file you want to add in the playlist. Simply click on the
edit link below the file in media library or click on edit more details link if you are viewing
media library in the grid view.
On the Edit Media page, you will get the media file ID below the title field.
Now that you have the IDs of the file you want to add into the playlist, you can use the
shortcode like this:
[playlist ids="14,24,36"]
Don’t forget to replace the ids with your own file IDs. You can use this shortcode in a
text widget. This is how it looked on our test site:
