n339 unit ii (iv) update 2017 - nursing 339
TRANSCRIPT

1
LOS ANGELES HARBOR COLLEGE Associate Degree Registered Nursing Program
NURSING 339 Nursing Process and Practice in the care of
the Gerontologic Patient
UNIT II
Intravenous Instructional Unit
E. Moore

2
LOS ANGELES HARBOR COLLEGE Associate Degree Registered Nursing Program
NURSING 339: NURSING PROCESS AND PRACTICE IN THE CARE OF THE
GERONTOLOGIC PATIENT
UNIT II – Intravenous Instructional Unit Description: In this instructional unit the student will be achieving objectives related to the basic concepts and principles of venipuncture and building upon the basic intravenous therapy concepts already learned. It includes techniques of peripheral venipuncture, complications, principles of equipment selection and clinical application. It offers additional considerations for the gerontolocal patient. Estimated Time of Achievement : 8 hours
Objectives Course Content Learning Activities After appropriate study of assigned resources, participation in lecture/discussion and appropriate observation and practice the nursing student will be able to: 1. Identify the anatomy and
physiology of venipuncture sites.
2. Analyze factors to be considered in choosing a site for venipuncture.
3. Distinguish the selection of appropriate needle gauge and length to use in venipuncture.
4. Practice techniques that ensure a comfortable venipuncture.
5. Demonstrate a preliminary assessment of a patient prior to venipuncture [sclerosed veins, bruises, hematomas, diagnosis and activity orders, purpose of venipuncture, handedness (right or left), solutions, blood transfusions, and so forth].
6. Examine common complications of peripheral IV therapy, associated signs and symptoms and interventions.
7. Compare alternate techniques used in venipuncture in the older adult patient.
An overview will be given that includes but is not limited to: ♦ Initiating IV therapy ♦ Care and maintenance of
a peripherally inserted central catheter
♦ Regulating Intravenous Flow Rate
♦ Changing a peripheral intravenous dressing
♦ Changing IV solutions – composition and use of commonly prescribed crystalloid solutions
♦ Changing infusion tubing ♦ Discontinuing peripheral
Intravenous access ♦ Caring for Central
Vascular Access Devices ♦ Discussion of conditions
requiring IV therapy ♦ An explanation of how to
prepare the patient, family, and/or significant other for IV therapy
♦ Factors that increase the risk of complications from IV therapy
♦ Individualized outcomes for patients requiring IV therapy
♦ Techniques used to
Resources: Readings: Perry & Potter, (2012). Clinical Nursing Skills & Techniques, 8th ed., Elsevier Mosby: PA. Chapter 28. Media resources: Audiovisual:
♦ IV Therapy Internet:
♦ http://evolve.elsevier.com/Perry/skills - Weblinks - Video clips - Mosby’s Nursing Skills Video
Exercises
Instructional Methods: ♦ Lecture ♦ Skill demonstration ♦ Audio/visual devices ♦ IV Simulation Arms
Learning Support Services:
♦ Campus library ♦ Learning Resource Center ♦ Nursing Learning Lab ♦ Internet ♦ Simulation
3
8. Demonstrate venipuncture by inserting an intravenous needle or cannula using aseptic techniques and standard precautions.
9. Identify when to change various types of IV tubing and principals related to rotation of IV sight.
10. Demonstrate post-venipuncture procedures, i.e. securing IV site, safe disposal of equipment and documentation of procedure.
prevent transmission of infection for a patient receiving IV therapy
IV therapy: ♦ Initiating IV therapy – MD
orders, choosing a site, choosing equipment, veins that are most commonly used, considerations that must be taken into account
♦ Specific considerations for the geriatric population, home care population, and long term care population
♦ Insertion technique ♦ Regulation of IV flow rate ♦ Changing of IV solutions ♦ Changing of IV tubing ♦ Changing of IV dressings ♦ Discontinuing a
peripheral IV ♦ Common types of
vascular access devices (VADs) and their care and maintenance.
♦ Complications of VAD’s. ♦ Educational needs of
patients with VADs. ♦ Evidenced based practice
trends.
Handouts: ♦ IV Insertion Guidelines ♦ Intravenous Insertion Competencies –
checklist Evaluation: The student will be evaluated and graded in the following ways, for this learning experience: 1. Psychomotor skills will be evaluated through Peer Evaluation using a mannequin (IV arm). The peer evaluation mastery process will be conducted using the
checklist of IV Insertion competencies developed from the instruction unit IV Insertion Guidelines. The evaluation process includes selecting appropriate equipment, assessing a need for venipuncture, choosing an appropriate site, inserting and securing the IV catheter.
2. A written 20-point multiple choice and / or
fill-in test at the end of the instructional unit will be used to evaluate cognitive knowledge. The test will consist of theoretical concepts from lecture, self practice / tutorial activities, and viewing of the venipuncture audiovisual video.

4
Nursing 339 – IV INSERTION GUIDELINES
1. AFFECTIVE DOMAIN – MENTAL PREPARATION • Use relaxation techniques to calm self before the procedure if needed. • Believe in yourself and project confidence. • State, “I am here to start your IV.” Do not use statements such as, “I am going to
try to start an IV.” • Assess patient for needle phobia. Symptoms before the procedure include
tachycardia and elevated blood pressure. After insertion, bradycardia, hypotension, pallor, diaphoresis and syncope. Reassure the patient with a calm tone and keep needle out of sight until the last minute. Use topical anesthetics if available at your facility.
2. EQUIPMENT • Tourniquet • Gloves • Prepping agent (2% chlorhexidine, 70% alcohol, providone-iodine) according to
agency policy • IV solution with attached, primed tubing or flush syringes • Appropriate pump, IV pole • Transparent semi, permeable dressing • 1” non allergenic tape • Sterile 2 x 2 gauze pad

5
• Appropriate IV catheter (gauge appropriate to type of infusion used). • Use smallest gauge possible. Use:
♦ 18-20 gauge for hypertonic or isotonic solutions with additives ♦ 18-20 gauge for blood administration ♦ 22-24 gauge for pediatrics ♦ 22 gauge for fragile veins of the elderly

6
Size Color Recommended Use 14G Orange In massive trauma situations 16G Gray Trauma, surgeries, or multiple large volume infusions 18G Green Blood transfusion, or large volume infusions 20G Pink Multi purpose IV; for medications, hydration, and routine therapies 22G Blue Most chemo infusions; patients with small veins, elderly or pediatric
patients 24G Yellow Very fragile veins; elderly or pediatric patients
3. CHOOSING AN APPROPRIATE SITE • A suitable vein should feel relatively smooth and pliable. • Do not select a vein that feels hard or rope like. • Don’t insert over a valve or at the y-junction of a vein. • Palpation without visualization of a vein is a possibility (some hospitals use vein
locator equipment such as transilluminator lights or ultrasound machines). • Start with distal veins and work proximally. • Try to use non-dominant hand/arm. • Position hand lower than the heart for several minutes. • Ask the client to open and close the fist. This causes venous filling. • Gently tap or flick the vein to release histamine, which will cause vessel dilation. • Do not slap the vein as this can cause contraction of the vein. • If veins are not prominent, apply warm towels to extremity for ten minutes. • Stay away from the joints (such as the wrist and elbow). • Avoid red, bruised, or swollen veins. Avoid veins near previously infected areas
and near sites of recently discontinued sites. • Choose the best lowest (distal) vein. Perform venipuncture distally with each
subsequent puncture proximal to previous puncture and alternate arms. • Avoid veins too small for cannula size. • Consider client preference for catheter placement (activity level and condition). • Consider using a blood pressure cuff instead of a tourniquet in frail elderly
patients or those who veins easily blow. Invert the tubing so it is pointing away from your work area. Fill to fit snugly but not impeding the arterial flow.

7

8
4. INSERTION OF CATHETER • Explain procedure to client before start of procedure. • Assess for allergies. • Wash hands. • Apply tourniquet 6-8 inches above venipuncture site • The tourniquet should be placed tightly enough to slow venous flow but not too
tight to prevent arterial flow. That way you still have blood freely coming into the area but resistance on the way out causing the veins to engorge. You should still be able to palpate a radial pulse.
• Apply gloves • Cleanse site with prepping solution from the center outward. Air dry. • Pull the skin firmly below the insertion site to stabilize the vein and prevent
“rolling” of the vein. • Position the tip of the over the needle (ONC) catheter, bevel up, over the
selected vein at a 20-40 degree angle. For older clients or those with more superficial veins, use a 5-15 degree angle.

9
• Tell the client that they will feel a sharp, quick stick. • Puncture the skin and vein using a direct or indirect approach.
10
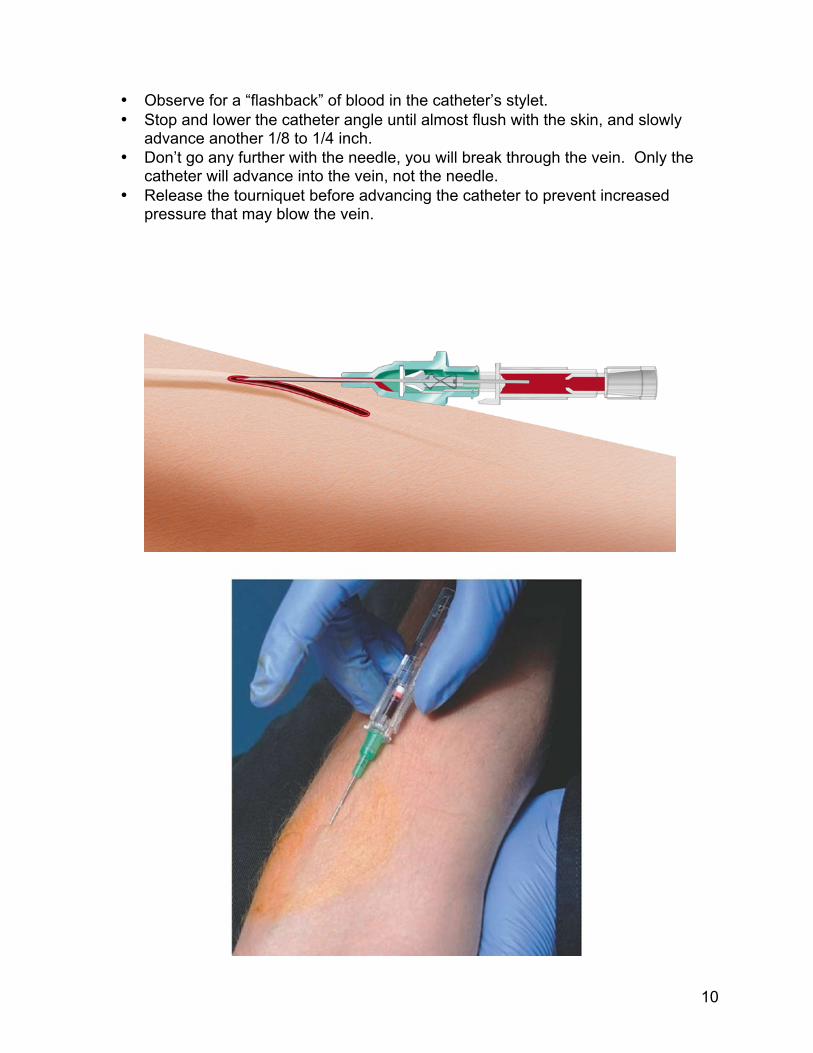
• Observe for a “flashback” of blood in the catheter’s stylet. • Stop and lower the catheter angle until almost flush with the skin, and slowly
advance another 1/8 to 1/4 inch. • Don’t go any further with the needle, you will break through the vein. Only the
catheter will advance into the vein, not the needle. • Release the tourniquet before advancing the catheter to prevent increased
pressure that may blow the vein.

11
• Push the catheter off the stylet and into the vein. • Once the catheter is fully advanced, apply pressure with the index finger of the
non-dominant hand, 3 cm above the insertion site to compress the vein (this will prevent blood flowing out). Remove the stylet.
• Using sterile technique, connect primed IV tubing or saline lock adapter. • Start IV fluid or saline flush slowly as a rush of fluids may blow the vein. • If you feel resistance discontinue the procedure. • Only 2 attempts at venipuncture are recommended.
5. SECURING THE IV CATHETER • Prepare tape and dressing according to hospital policy. • Tape should never be placed directly over insertion site. • Dressing and taping should allow easy visual inspection and early recognition of
infiltration and phlebitis.
6. DOCUMENTATION • Include date, time, type and gauge of needle and initials on IV label placed on
patient’s skin (check hospital policy). • Document date and time of venipuncture. • Type and gauge of needle and catheter. • Location of the insertion site, use anatomical names of veins. • Reason for initiation or change. • Number of attempts. • Type and flow rate of IV solution. • Any adverse reactions and interventions taken to correct them. • Patient teaching and evidence of patient understanding. • How the patient tolerated the procedure. • Your signature. • Hospitals have protocols for replacement of IV catheters, which is generally
every 72-96 hours.
7. GERONTOLOGIC PRINCIPLES • Use the smallest gauge catheter or needle possible. • Avoid the back of the hand on dominant arm (interferes with performance of
ADL’s). • Use minimal or no tourniquet pressure. • If tourniquet used, apply carefully so you are not pinching the skin. • Consider use of an inverted blood pressure cuff to avoid injury. • Apply firm traction below insertion site for vein stability. • Use 5-15 degree angle of insertion (veins are superficial). • Use minimal tape to secure site (to prevent tissue tears).