n1mm use at cmara field · pdf file•band setup •qso logging ... setup score window...
TRANSCRIPT
N1MM Logger Use for CMARA Field Day
•N1MM Overview •Software Installation •Hardware / Software Setup •Database Setup •Contest Log Setup •Band Setup •QSO logging •Log Consolidation and Submittal •User Support •Summary •Quick Sheet at Last Page of Presentation
By Terry G. Glagowski / W1TR updated 2013-06-21 18:42

N1MM Overview • Totally FREE ! (no license fee)
• Runs on Windows 2000, XP, Vista, Win7 (32 or 64 bit) (no Win95 or Win98)
• Does NOT run on other operating systems (MAC, Linux)
• Nearly ALL Versions are compatible with one another (same file format)
• Supports almost EVERY contest
• Used by nearly ALL big-time contesters (and small timers)
• Actively Supported, User Groups
• Stand-Alone operation (no connection to radio required)
• Automatic Computer-Aided-Transceiver (CAT) control available
• CW Keyer with PTT (keyboard window CTRL-K)
• Voice Keyer with PTT (prerecorded phonetics & messages)
• Interface to MMTTY, MMVARI, FLDIGI, and other software
• Export to ADIF and Cabrillo Format, Import from ADIF
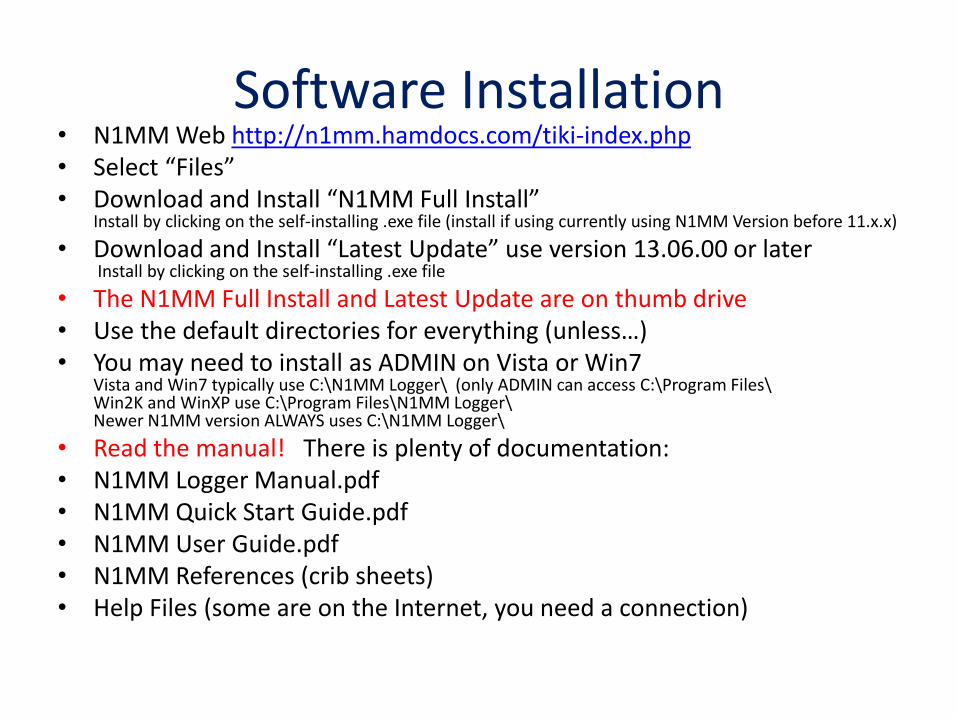
Software Installation • N1MM Web http://n1mm.hamdocs.com/tiki-index.php • Select “Files” • Download and Install “N1MM Full Install”
Install by clicking on the self-installing .exe file (install if using currently using N1MM Version before 11.x.x)
• Download and Install “Latest Update” use version 13.06.00 or later Install by clicking on the self-installing .exe file
• The N1MM Full Install and Latest Update are on thumb drive • Use the default directories for everything (unless…) • You may need to install as ADMIN on Vista or Win7
Vista and Win7 typically use C:\N1MM Logger\ (only ADMIN can access C:\Program Files\ Win2K and WinXP use C:\Program Files\N1MM Logger\ Newer N1MM version ALWAYS uses C:\N1MM Logger\
• Read the manual! There is plenty of documentation: • N1MM Logger Manual.pdf • N1MM Quick Start Guide.pdf • N1MM User Guide.pdf • N1MM References (crib sheets) • Help Files (some are on the Internet, you need a connection)

Hardware / Software Setup (1)
• Set the Computer Local Time / Zone (Eastern Daylight Time) The N1MM Logger knows how to do UTC / GMT / Zulu time in the log Listen to WWV on 2.5, 5.0, 10.0, 15.0, 20.0 MHz or CHU on 3.330, 7.850, 14.670 MHz Extremely Important to DO !!!, Otherwise Log Data Will Be Garbage, NO WAY to FIX!
• Config / Configure Ports, Telenet Address, Other Select NONE for all ports if no CAT control or CW/PTT control Use of CAT control, CW keying, Digital Voice Keyer is discussed in Extra Topics (CAT Control NOT NECESSARY)
• Config / Change Your Station Data See following slides for information to enter here NOTE: This information CAN be corrected by Log Master during Log Consolidation and Submittal but please try to get it right in the beginning
• Screenshots Follow Showing How to Do It!

Hardware / Software Setup (2) Set Computer Clock
• Click on Desktop Clock (lower right of desktop)
• Set the Date (local time)
• Set the Time (local time)
• Set the Time Zone (eastern daylight time)
• Internet Time Will Not Work (no internet)

Hardware / Software Setup (3) Set Computer Clock
WinXP Win7

N1MM Main Window
When you start N1MM, the Main Window opens.
Close ALL other N1MM windows (for now).
Select the File Menu Item to create a new database and new log.

New Database Select: New Database

Setup New Database Filename 1) Name the database approximately as shown.
2) Change the band(s) and mode(s) accordingly.
3) Remember the Name of the Database (*.MDB) and Folder.
4) You will need to copy the *.MDB file to the thumb drive after Field Day

Remember Where Log Database Is
• Remember the Log Database File Name (*.MDB) (Write it Down for the Team on Your Band)
• Remember the Log Database Folder Name (Write it Down for the Team on Your Band)
• You Will Need to Copy the Log Database (*.MDB) To the Thumb Drive at End of Field Day

Setup New Log in Database Select: New Log in Database

Setup FD Contest Log Log Type=FD, Operator Category=MULTI-OP, Band=ALL, Power=LOW, Mode=MIXED, Station=FIXED
Assisted=NON-ASSISTED, Xmitter Category=UNLIMITED, Sent Exchange=7A WMA, Operators=W1BIM

Setup Station Data (1) From N1MM Main Window, select Config / Change Your Station Data

Setup Station Data (2) Setup Station Data as Shown, Log-Master will Check This

Hardware / Software Setup (1) From the N1MM Main Window, Select Config /
Configure Ports, Mode Control, Audio, Other

Hardware / Software Setup (2) Use Hardware Tab, Set ALL Ports to NONE, uncheck ALL boxes.
Use of CAT control, CW /PTT/FSK is beyond the scope of this presentation.
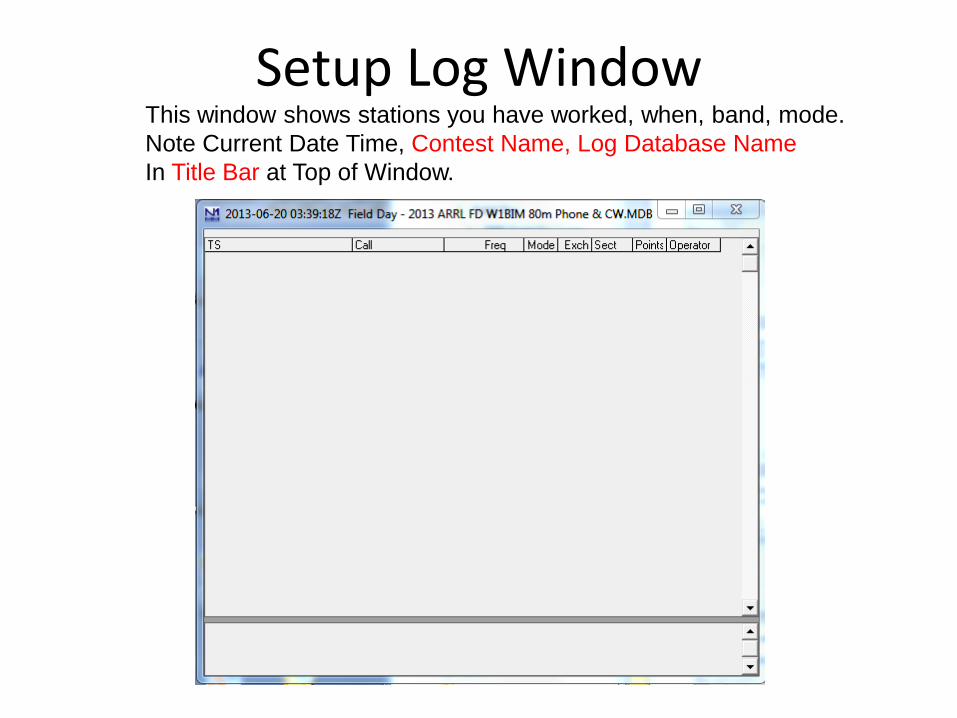
Setup Log Window This window shows stations you have worked, when, band, mode.
Note Current Date Time, Contest Name, Log Database Name
In Title Bar at Top of Window.

Setup Multipliers Window This window will show you which ARRL sections you have worked
on which bands phone and CW.
Select the Sect Radio Button at the Bottom.
BUT… ARRL FD doesn’t have multipliers, just if you are interested.
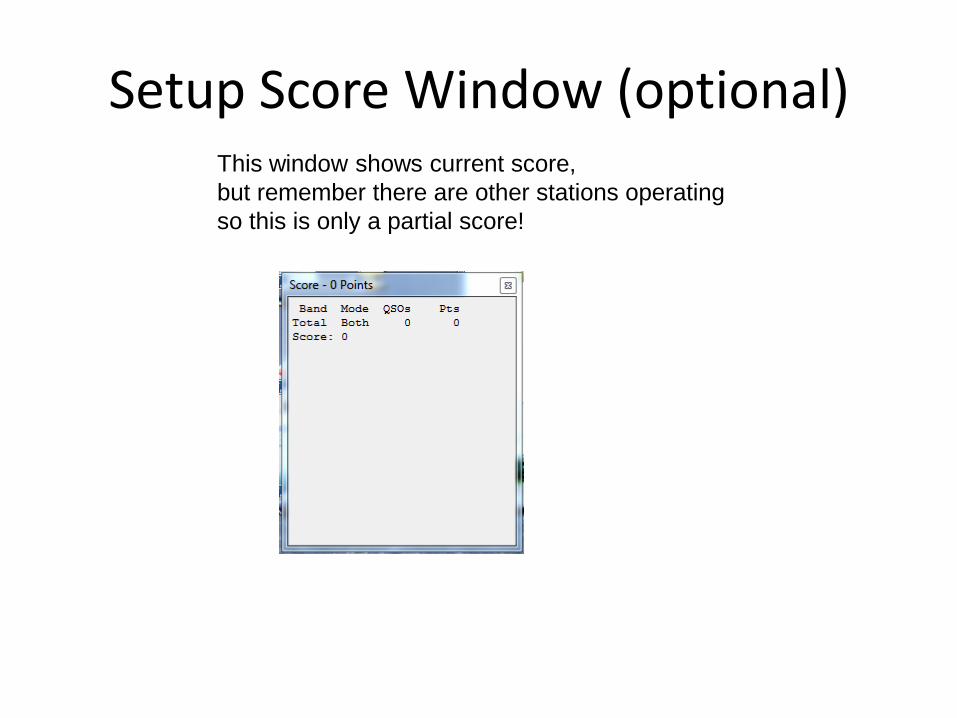
Setup Score Window (optional) This window shows current score,
but remember there are other stations operating
so this is only a partial score!

Setup Other N1MM Windows • Setup Log Window
• Setup Multipliers Window (optional)
• Setup Score Summary (optional)
In the N1MM Main Window, select Windows Menu Item

Restarting N1MM Mid Contest • If the Generator Goes Out,
or Station (Computer) is Shut Down Normally…
• N1MM should REMEMBER what Database and Log it is using and restart OK.
• After Restart, or Changing Operators Check for Correct Database and Log Names
• The Database and Log Name Appear at the Title Bar at the TOP of the Log Window
• IF NOT Correct: – File / Open Database instead of New Database
– File / Open Log in Database instead of New Database

Band Setup
• Set Frequency Type Frequency in KHz (e.g. 3550) into callsign field Extremely Important to DO !!!, Otherwise Log Data Will Be Garbage
• Set Mode Type Mode (e.g. CW, USB, LSB, AM, FM, RTTY, PSK31) into callsign field Extremely Important to DO !!!, Otherwise Log Data Will Be Garbage
• Very Important to Set These Two Items It is possible to correct all other items later except: Date/Time Freq Mode
Use the N1MM Main Window to set Frequency and Mode

Frequency Setup
To Set or Change Frequency:
type the Frequency in KHz in the Callsign Field (left).
Use a typical Phone or CW Frequency, but N1MM only needs to know the Band.
NO NEED to CHANGE this as you tune up and down the band.
Note: the Title Bar of the Main Window will reflect the change

Mode Setup
To Set or Change Mode:
type the Mode (CW, USB, LSB, AM, FM, RTTY, PSK31) into the Callsign Field (left).
Note: the Title Bar of the Main Window will reflect the change
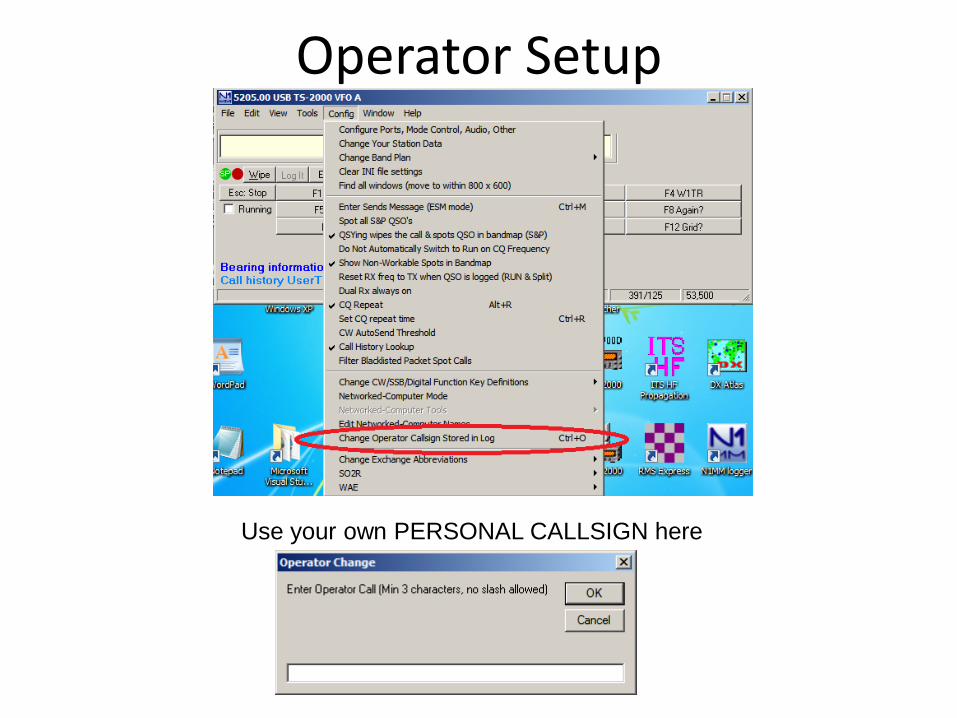
Operator Setup
Use your own PERSONAL CALLSIGN here

QSO Logging (1)
• Enter
– Callsign
– Class
– Section
– New This Year – Ontario is no longer ON ARRL made 4 sections out of Ontario (ON): ONE, ONN, ONS, GTA (Greater Toronto Area)
• Dupes will be Indicated

QSO Logging (2)
Note: the LOG is empty to start.
To log W1TR 1A CT, type the information as follows:

QSO Logging (3)
Note: We already worked W1TR, that station is IN THE LOG.
If we try to LOG him again, same band, same mode,
the DUPE! message will show.
N1MM handles dupes OK by not scoring them.
If the other station insists, work him anyway, don’t waste time arguing!
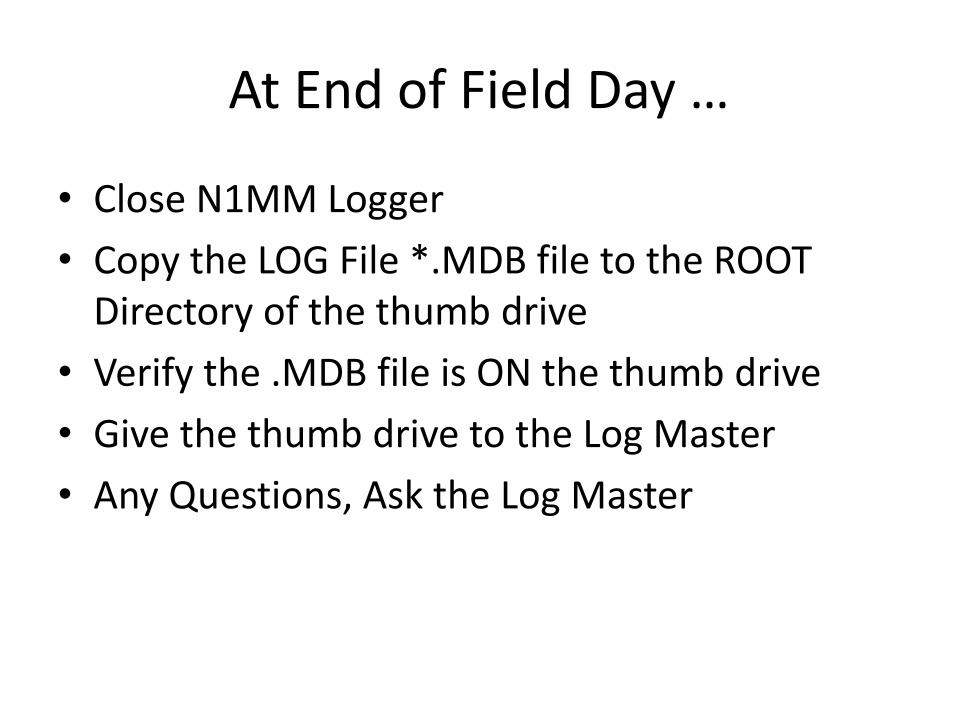
At End of Field Day …
• Close N1MM Logger
• Copy the LOG File *.MDB file to the ROOT Directory of the thumb drive
• Verify the .MDB file is ON the thumb drive
• Give the thumb drive to the Log Master
• Any Questions, Ask the Log Master

Log Consolidation and Submittal This is what the Log Master will do to submit FD Logs to ARRL:
1) ALL thumb drives will be collected from Band Chiefs
2) MDB files will be loaded into N1MM for each band/mode
3) ADIF files will be created for each band/mode
4) ALL ADIF files will be imported and consolidated into a single log
5) Consolidate log will be exported to Cabrillo format for ARRL submission

User Support
• N1MM Web http://n1mm.hamdocs.com/tiki-index.php Home source of information about N1MM, downloads, documentation, etc.
• N1MM Email User Groups http://n1mm.hamdocs.com/tiki-index.php?page=Overview#N1MM_Logger_Discussion_Groups Get notification of bugs and hints & kinks on how to use N1MM Post questions, comments, and report BUGS to the developers
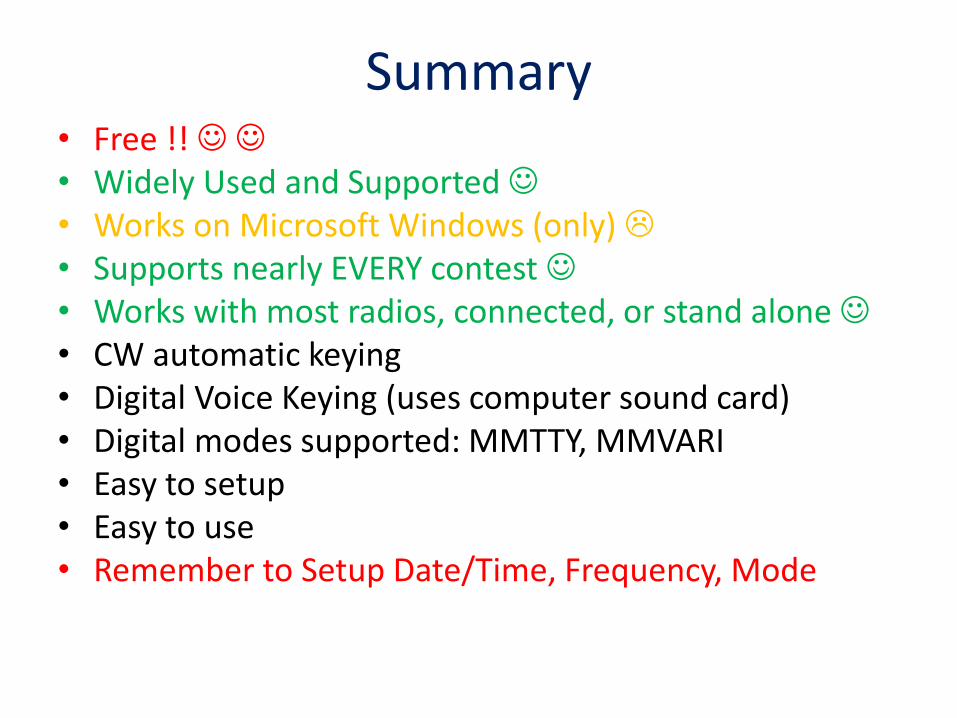
Summary • Free !! • Widely Used and Supported • Works on Microsoft Windows (only) • Supports nearly EVERY contest • Works with most radios, connected, or stand alone • CW automatic keying • Digital Voice Keying (uses computer sound card) • Digital modes supported: MMTTY, MMVARI • Easy to setup • Easy to use • Remember to Setup Date/Time, Frequency, Mode

Extra Topics
• W1TR Go-Kit Diagram
• CAT Control
• CW Keying
• Digital Voice Keying (DVK)
• Audio Files
• Audacity Audio Editor
• Digital Modes (RTTY, PSK, Etc.)

W1TR Go-Kit Diagram
RJ-45 to
mini-phono
12 vdc Power Supply
RigBlaster USB
NetBook or LapTop
Computer
Keyer Paddle
Headset with Boom
Microphone
Portable XCVR
(IC-7000)
Automatic Antenne Tuner
Unit (ATU)
AT-7000 / IT-100
Carrying Case
110 vac Power Strip
Antenna System

CAT Control • USB or RS-232 to CI-V translator to Rig (ICOM)
• RS-232 directly to Rig (Kenwood)
• RS-232 to TTL converter to Rig (Yaesu)
• USB to RS-232 converter may be needed Most USB to RS-232 converters work OK for CAT control (maybe NOT for PTT, CW, FSK RTTY)
• CAT Control Monitors Rig Data (freq, mode)
• CAT Control Can Control Rig Data (freq, mode)
• Other items can be Monitored / Controlled Mic Gain, CW Speed, RF Gain (depends on RIG)

CW Keying • RS-232 or LPT used
• USB to RS-232 may be needed
• RS-232 DTR for CW Keying
• RS-232 RTS for PTT
• RS-232 TXD for RTTY FSK
• Need RS-232 (± 12 vdc) to TTL (0/+5 vdc) Level Converter (RigBlaster Provides This)
• Function Key Macros Automatically Send CW
• Ctrl-K Keyboard Window Eliminates Need for Keyer Paddle Most Operators Keep the Keyer Paddle Anyway, Just In Case !!

Digital Voice Keying
• Use Computer Sound Card
• Computer Mic to Rig Speaker Output
• Computer Speaker Out to Rig Mic Input
• Isolation Transformer for Both (RigBlaster Provides This)
• All Modulation and Demodulation in Software (Digital Modes)

Digital Modes Equipment Interconnect
RS-232 to TTL Signal Level Converter Circuit
2n3906
IC-7000 RigBlasterPnP CAT DiagramIC-7000 RigBlasterPnP CAT Diagram.vsd Revised 6/22/2010 12:07 AM
IC-7000
RigBlaster
PnP
NetBook
Computer
So
un
d
Ca
rd
CW (DTR)
PTT (RTS)
USB
COM5
Audio Out
Audio In
Line In
Audio Out
CA
TD
ata
Ja
ck
US
B
spkr
Mic / PTTU
SB
HU
B
USB to
RS-232
RS-232
to TTL
FS
K
PT
T
USB
COM6
KE
Y
FSK (TXD)
PTT (RTS)
KEY (DTR)
C-IV
2.2K ohm
RS-232TTL
CA
T A
DD
R 7
0h
19
20
0 b
au
d
Software:
WinXP
N1MM Logger
MMTTY
MMVARI
EXTFSK
HRD
Audacity

Audio Files
• Pre-Recorded Messages (CQ, This Is…, etc)
• Letters (Phonetics) and Numbers, Pieced Together
• N1MM can play back messages as defined in macro files associated with program function keys (Function Keys)
• N1MM can play back internal data items Like callsign of other station, your callsign, signal report, contest exchange, using letter phonetics and numbers pieced together
• It is possible to work a phone contest without ever saying a word into the microphone
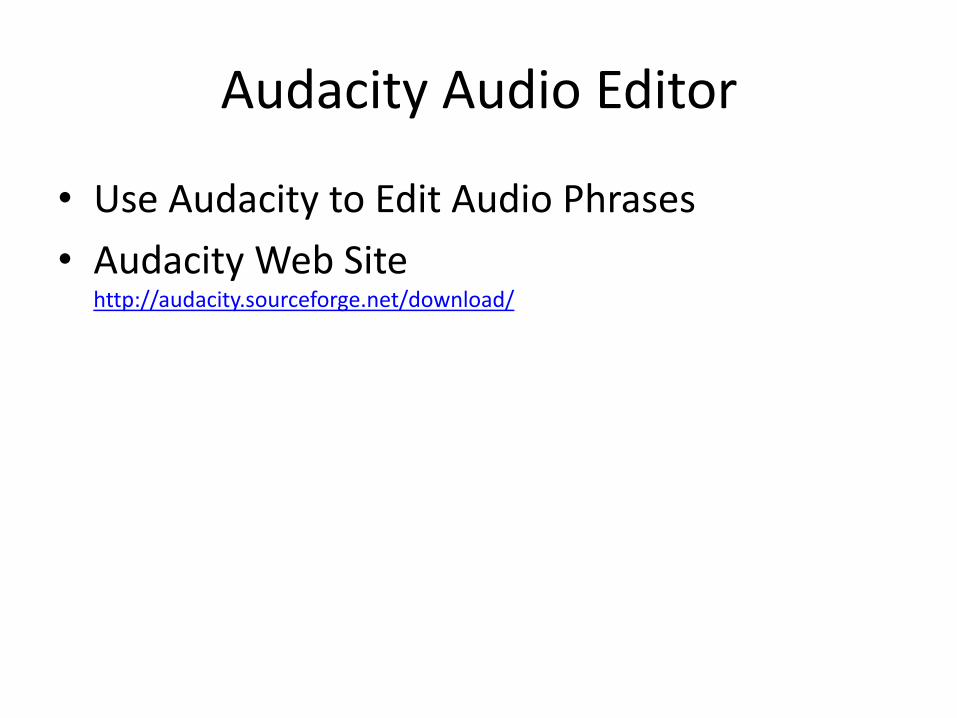
Audacity Audio Editor
• Use Audacity to Edit Audio Phrases
• Audacity Web Site http://audacity.sourceforge.net/download/

Digital Modes (RTTY, PSK, Etc.)
• N1MM does NOT do Digital Modes by Itself
• N1MM works with MMTTY for RTTY (FSK) Use of USB to Serial Device for FSK MAY need EXTFSK driver (software)
• N1MM works with MMVARI for Digital Modes
• N1MM works with FLDIGI for Digital Modes
• MM HamSoft WEB Site http://mmhamsoft.amateur-radio.ca/

N1MM Quick Sheet • Set Date/Time on Computer to WWV (2.5,5,10,15,20 MHz)
CHU on 3.330, 7.850, 14.670 MHz
• Install N1MM Software (Full Install then Recent Version)
• Create New Database …\2013 ARRL FD W1BIM 20m SSB.MDB
• Create New Contest
– Contest Type FD – Start Date 2012-06-23
– Op Category Multi-Multi
– Power LOW
– Exchange 7A WMA
– Set Station Info (see Slide #9) (Can be done by Log Master later) station callsign W1BIM
• Set Operator Callsign (KB1VUA, etc) not to be confused with station callsign
• Set Frequency in KHz (e.g. 3550, 3850) use typical CW or SSB freq accordingly
• Set Mode (USB, LSB, CW, AM, FM)
• Enter QSO: Callsign, Class, Section while logging
• Remember ON (Ontario) is now ONN, ONE, ONS, GTA starting Fall 2012
• Edit or Quick Edit to fix Errors
• Delete to Remove QSOs