myetherwallet set up tutorialsynergygoldgroup.com/wp-content/uploads/2018/03/myethere...the purpose...
TRANSCRIPT
MyEtherWallet Set Up Tutorial By Taylor Richey
The purpose of this tutorial
The purpose of this tutorial is to help new or old Karatbars members set up
a currency wallet to store KaratBank Coins. If you register your wallet using
this tutorial your digital currency wallet will be free to set up. It takes just a
few minutes! This tutorial's primary focuses are simplicity and assurity.
What will you need? In order to ensure that your keys are not stolen, it is best to have one of the
following devoted external storage devices:
• USB drive
• SD card
• External Hard drive
Second you will need a place to PASTE various components into a text
document. If you have a Gmail or outlook account you can use online text
editing software for free through your email account.
Why use MyEtherWallet? We chose MyEtherWallet for this tutorial because it's free to use, it's open
source technology, and it's a client-side interface. The wallet allows you to
directly interact with the blockchain while remaining 100% in control of your
personal funds.
How to Create your MyEthereum Wallet
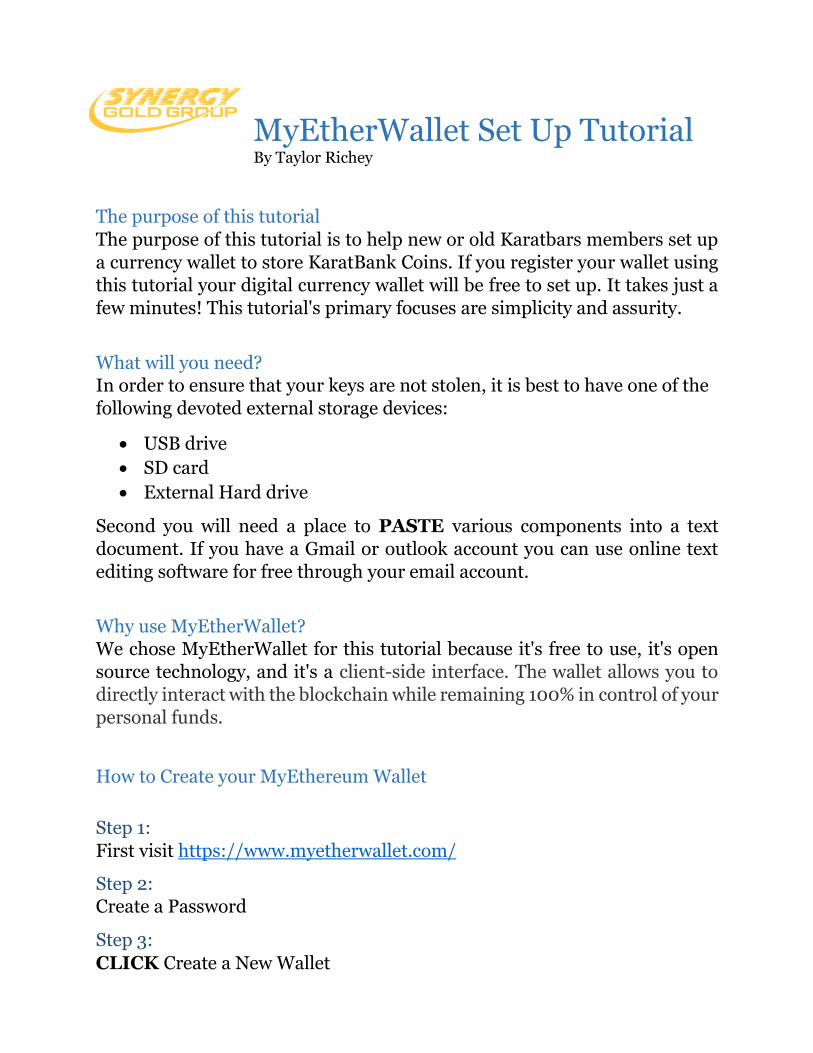
Step 1:
First visit https://www.myetherwallet.com/
Step 2: Create a Password
Step 3:
CLICK Create a New Wallet
Step 4:
PASTE your newly created password into your text document.
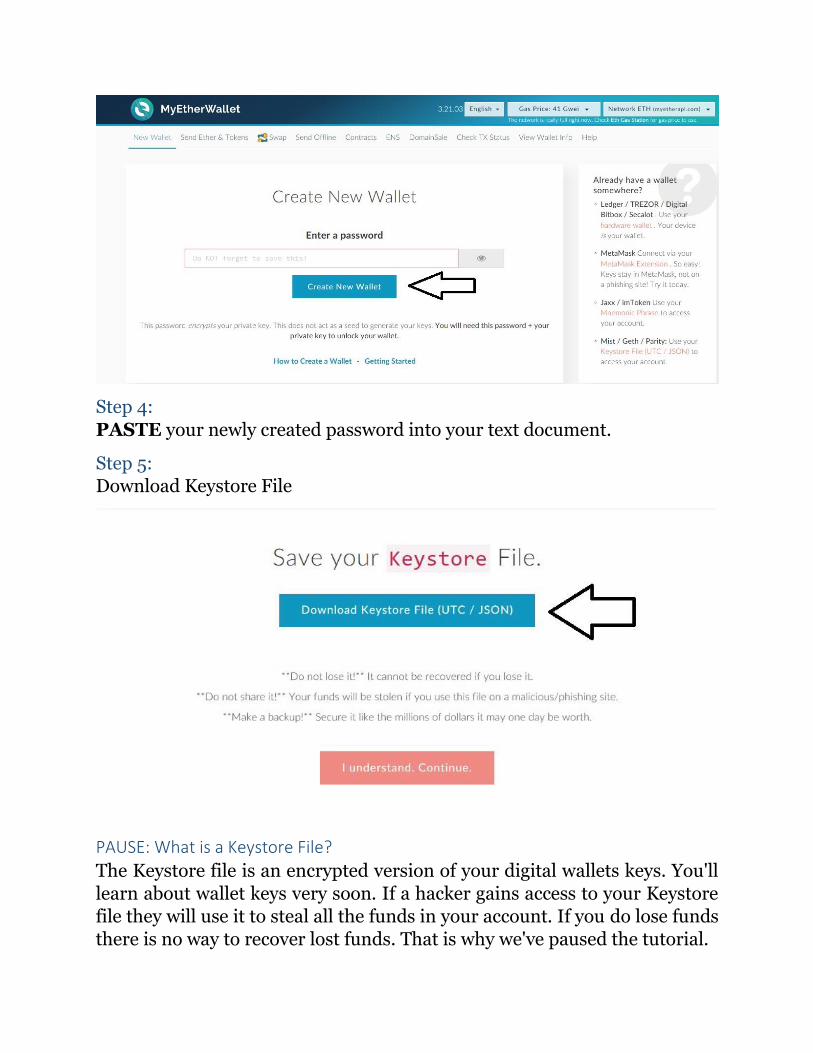
Step 5: Download Keystore File
PAUSE: What is a Keystore File?
The Keystore file is an encrypted version of your digital wallets keys. You'll
learn about wallet keys very soon. If a hacker gains access to your Keystore
file they will use it to steal all the funds in your account. If you do lose funds
there is no way to recover lost funds. That is why we've paused the tutorial.
Security and backing up your keys and keystore file is such an important part
of this tutorial. The Keystore file can never be recovered if you lose it, so
follow along closely.
Step 6:
After clicking download Keystore File, locate the file in your downloads
folder or respective directory location! Next RIGHT CLICK on the file then
click COPY. After copying the file, PASTE the file onto your USB drive, SD
card, or external storage device.
Step 7:
Double check your external storage device to make sure you've successfully
copied and pasted your Keystore file onto your device.
Step 8:
After you're 100% sure the copy was successful, once again locate the original
downloaded file. Delete it from your personal computer. This ensures that if
your personal device is hacked, they will not have access to your Keystore
file! If the file remains on your computer and you are hacked, said malicous
actor in a matter of seconds can clear all funds in your wallet.
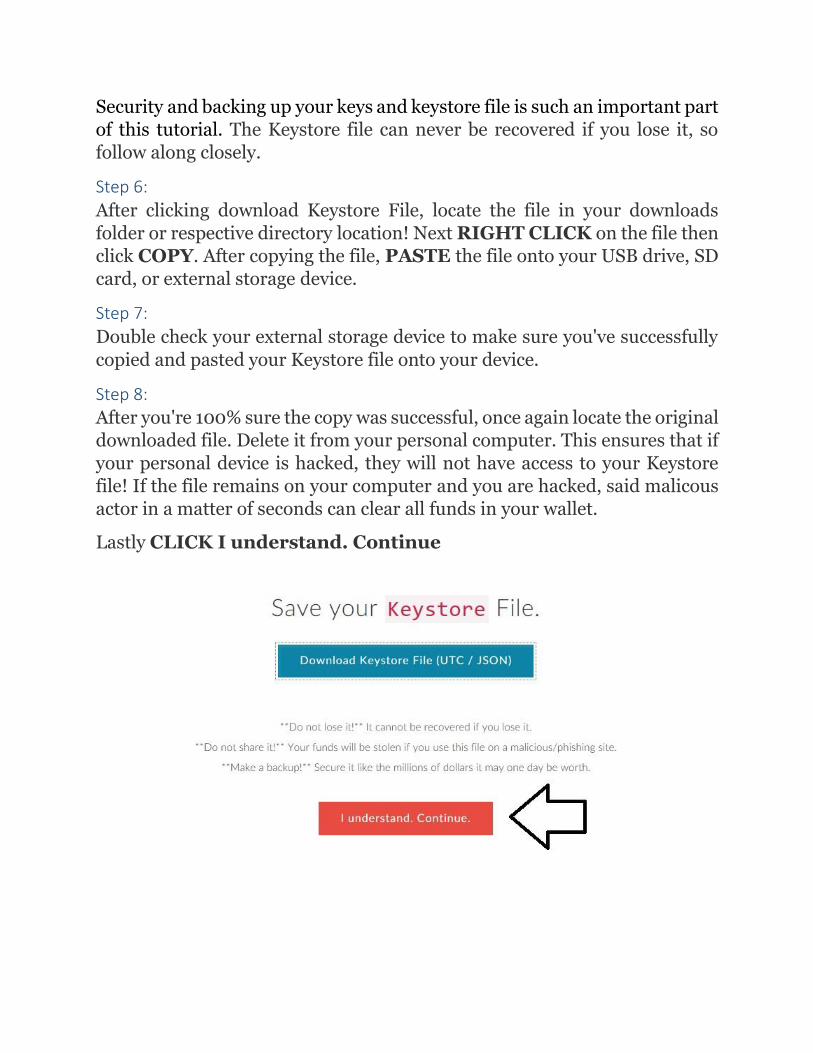
Lastly CLICK I understand. Continue

Step 9:
Next in the space where you clicked download Keystore file, you will see your
private key displayed. Highlight your entire private key, then right click and
COPY it.
Step 10:
PASTE the private key into your word document below your password.
Don't forget to label it as your private key!
Step 11:
Double check to make sure that the copy of your private key in your text
document is the exact same as the one on the MyEtherWallet website.
PAUSE: WHAT ARE PUBLIC AND PRIVATE KEYS?
Private Key vs. Public Key
Public Key
Your public key is the key you use to send and receive funds. This is the key you share with other people when you want them to send you coins. Please
note Public in Public key, it is okay to share your public key with other people.
If someone has your public key and they do not have your private key they
cannot access your funds. If someone says they need your private key to send
funds to your public key. It is almost certainly a scam.
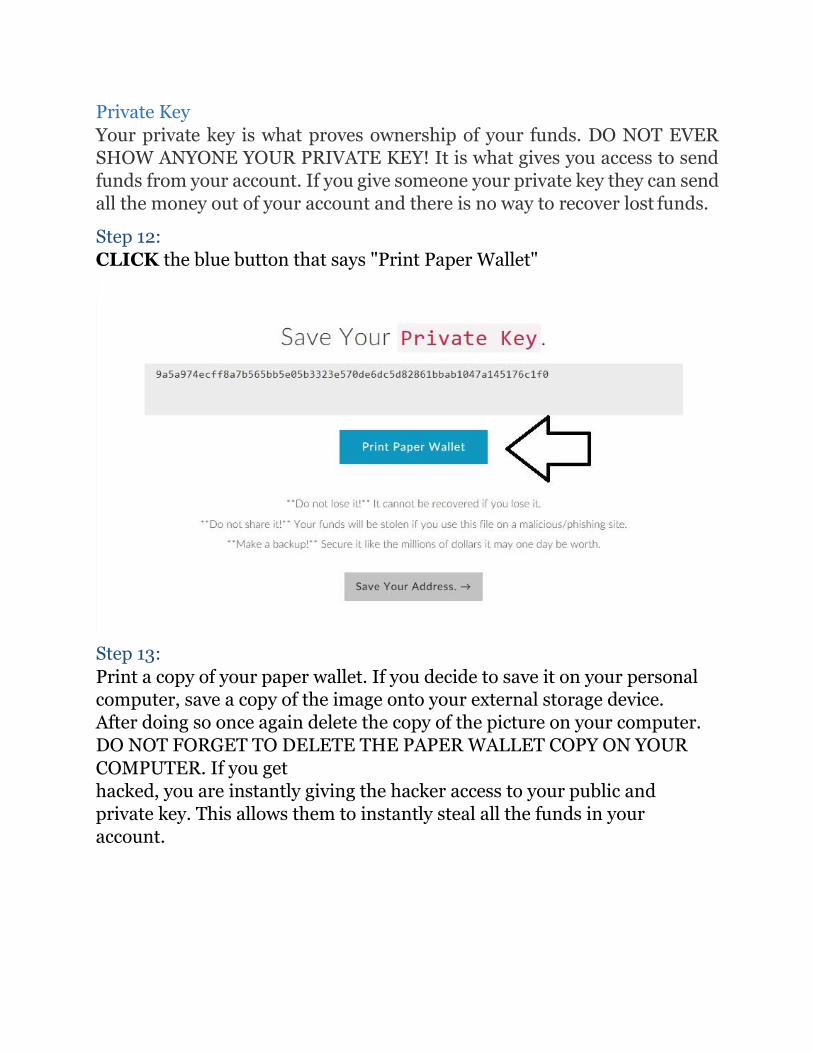
Private Key
Your private key is what proves ownership of your funds. DO NOT EVER SHOW ANYONE YOUR PRIVATE KEY! It is what gives you access to send
funds from your account. If you give someone your private key they can send
all the money out of your account and there is no way to recover lost funds.
Step 12:
CLICK the blue button that says "Print Paper Wallet"
Step 13:
Print a copy of your paper wallet. If you decide to save it on your personal computer, save a copy of the image onto your external storage device.
After doing so once again delete the copy of the picture on your computer.
DO NOT FORGET TO DELETE THE PAPER WALLET COPY ON YOUR
COMPUTER. If you get
hacked, you are instantly giving the hacker access to your public and
private key. This allows them to instantly steal all the funds in your
account.
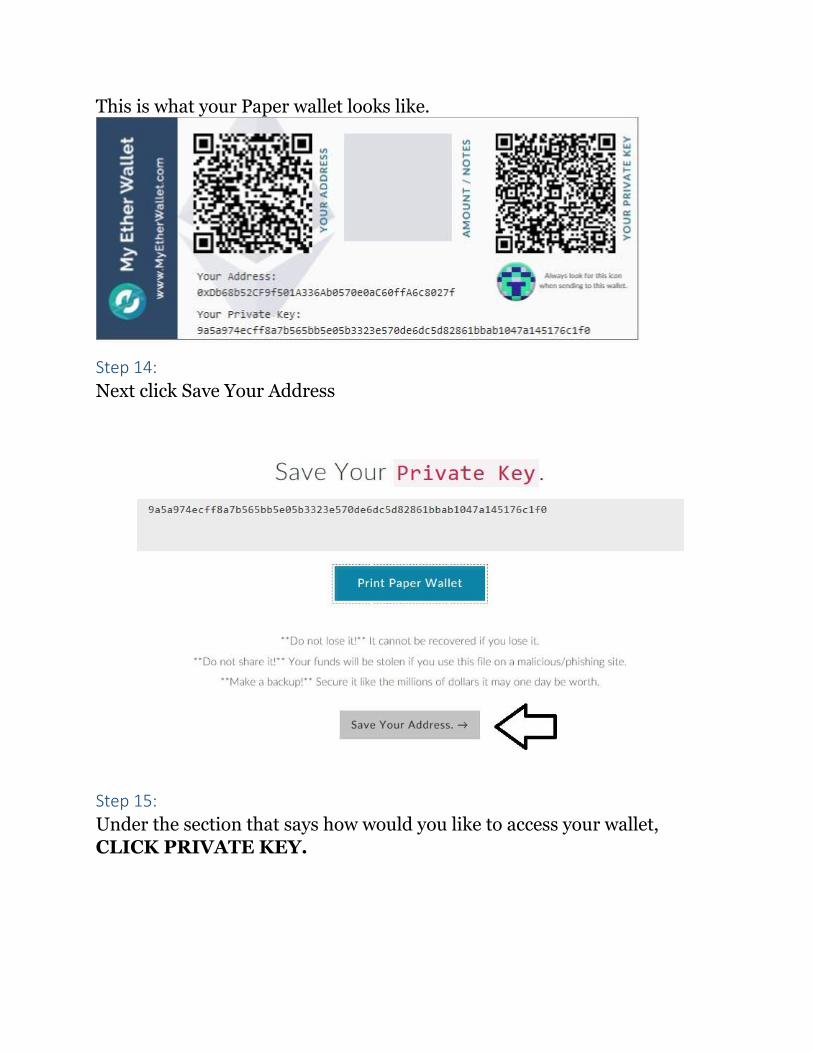
This is what your Paper wallet looks like.
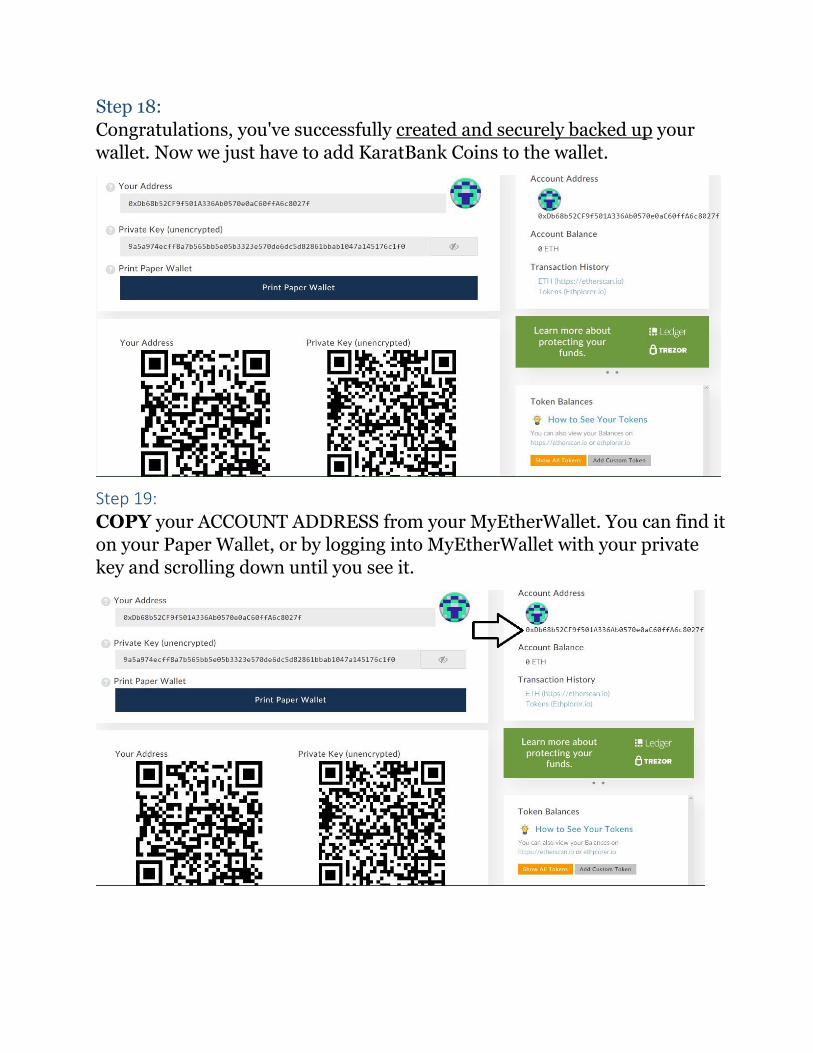
Step 14:
Next click Save Your Address
Step 15:
Under the section that says how would you like to access your wallet,
CLICK PRIVATE KEY.

Step 16:
COPY your private key from your text document.
Step 17:
PASTE your private key into the form and CLICK the blue unlock button.
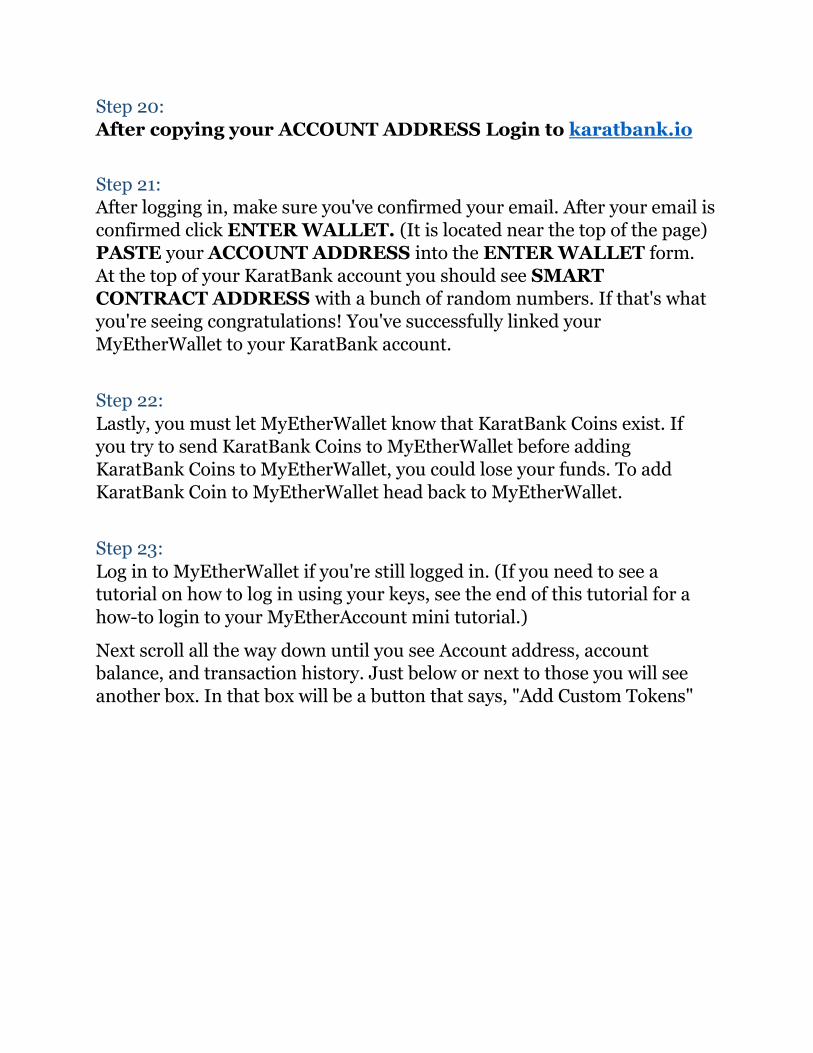
Step 18:
Congratulations, you've successfully created and securely backed up your
wallet. Now we just have to add KaratBank Coins to the wallet.
Step 19:
COPY your ACCOUNT ADDRESS from your MyEtherWallet. You can find it
on your Paper Wallet, or by logging into MyEtherWallet with your private
key and scrolling down until you see it.
Step 20:
After copying your ACCOUNT ADDRESS Login to karatbank.io
Step 21:
After logging in, make sure you've confirmed your email. After your email is
confirmed click ENTER WALLET. (It is located near the top of the page)
PASTE your ACCOUNT ADDRESS into the ENTER WALLET form.
At the top of your KaratBank account you should see SMART
CONTRACT ADDRESS with a bunch of random numbers. If that's what
you're seeing congratulations! You've successfully linked your
MyEtherWallet to your KaratBank account.
Step 22:
Lastly, you must let MyEtherWallet know that KaratBank Coins exist. If
you try to send KaratBank Coins to MyEtherWallet before adding
KaratBank Coins to MyEtherWallet, you could lose your funds. To add
KaratBank Coin to MyEtherWallet head back to MyEtherWallet.
Step 23:
Log in to MyEtherWallet if you're still logged in. (If you need to see a tutorial on how to log in using your keys, see the end of this tutorial for a
how-to login to your MyEtherAccount mini tutorial.)
Next scroll all the way down until you see Account address, account balance, and transaction history. Just below or next to those you will see
another box. In that box will be a button that says, "Add Custom Tokens"
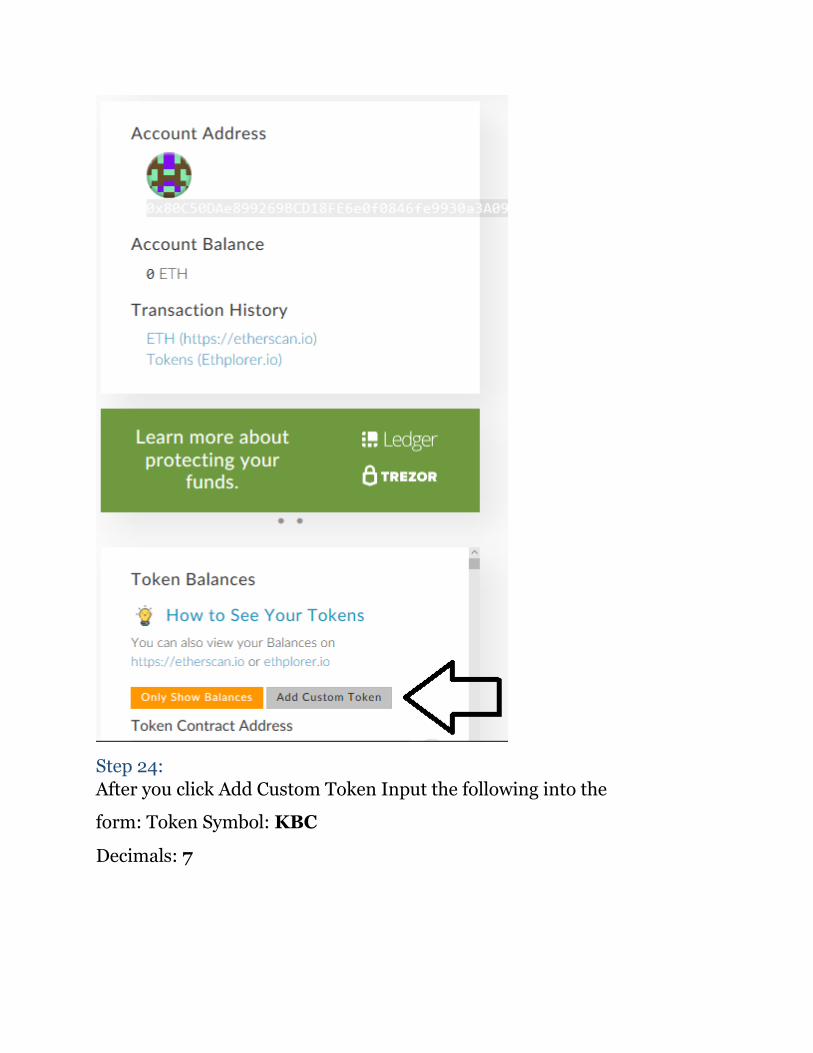
Step 24:
After you click Add Custom Token Input the following into the
form: Token Symbol: KBC
Decimals: 7
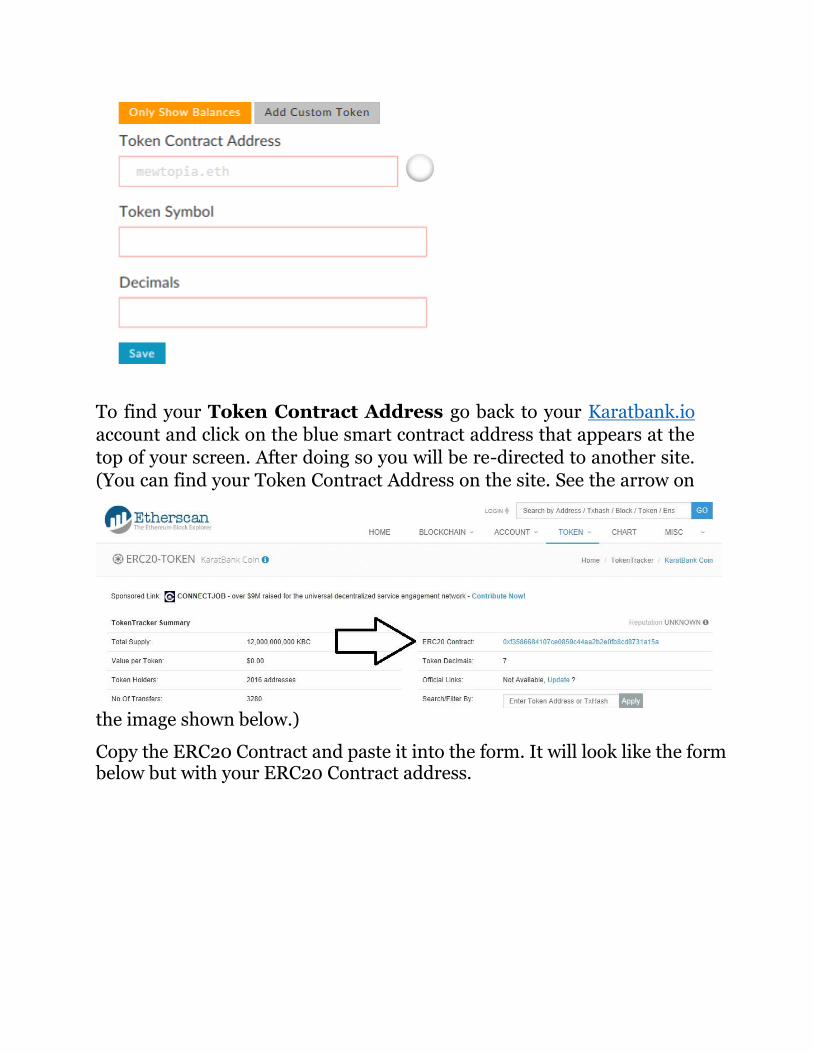
To find your Token Contract Address go back to your Karatbank.io
account and click on the blue smart contract address that appears at the
top of your screen. After doing so you will be re-directed to another site.
(You can find your Token Contract Address on the site. See the arrow on
the image shown below.)
Copy the ERC20 Contract and paste it into the form. It will look like the form below but with your ERC20 Contract address.
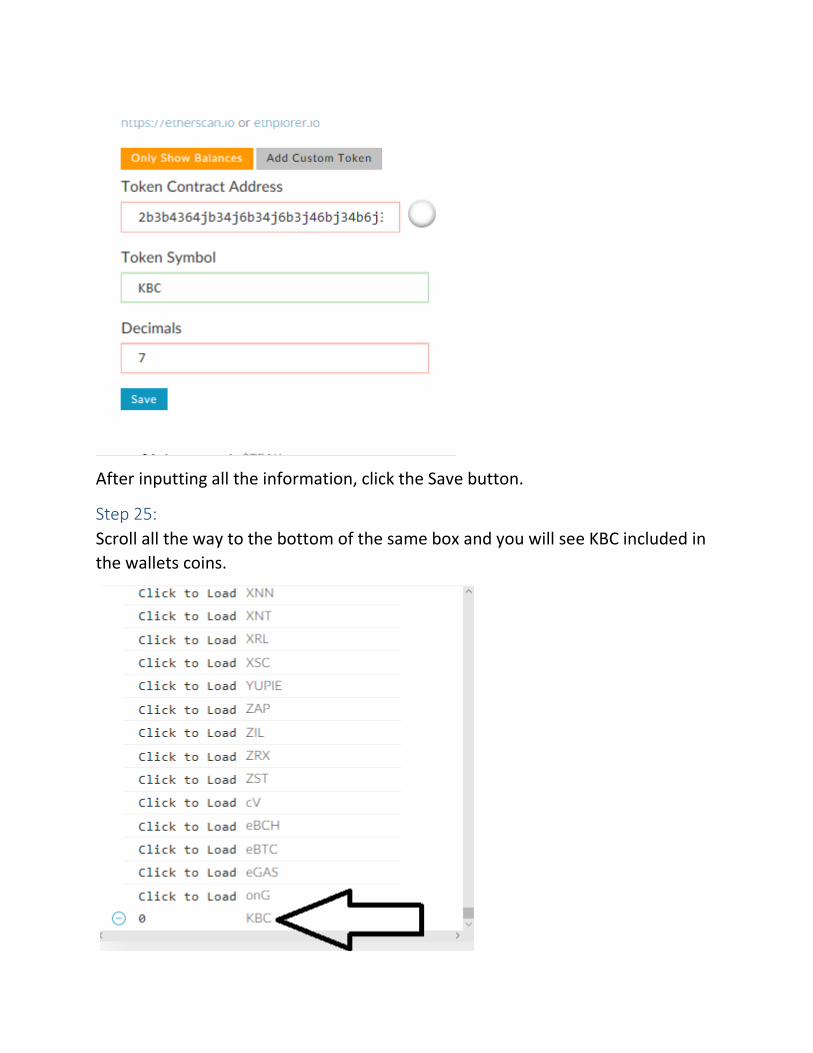
After inputting all the information, click the Save button.
Step 25:
Scroll all the way to the bottom of the same box and you will see KBC included in
the wallets coins.
MyEtherWallet mini Login Tutorial and Protocol
Step 1:
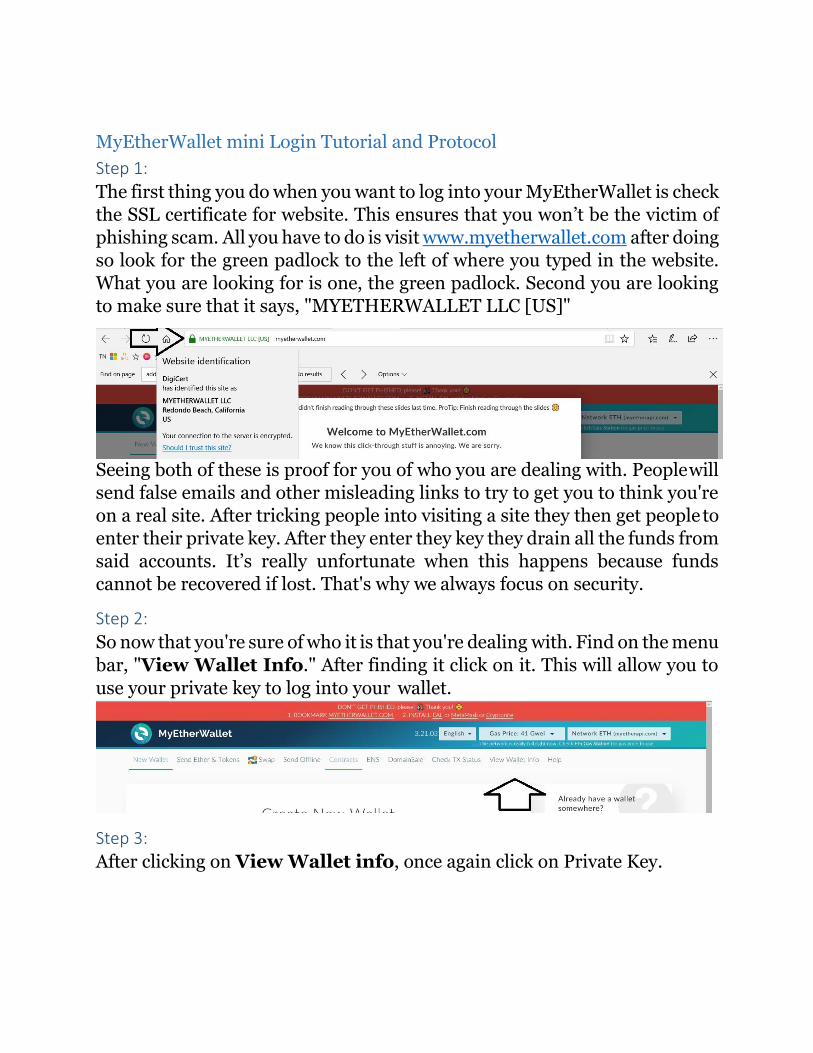
The first thing you do when you want to log into your MyEtherWallet is check
the SSL certificate for website. This ensures that you won’t be the victim of
phishing scam. All you have to do is visit www.myetherwallet.com after doing
so look for the green padlock to the left of where you typed in the website.
What you are looking for is one, the green padlock. Second you are looking
to make sure that it says, "MYETHERWALLET LLC [US]"
Seeing both of these is proof for you of who you are dealing with. People will
send false emails and other misleading links to try to get you to think you're
on a real site. After tricking people into visiting a site they then get people to
enter their private key. After they enter they key they drain all the funds from
said accounts. It’s really unfortunate when this happens because funds
cannot be recovered if lost. That's why we always focus on security.
Step 2:
So now that you're sure of who it is that you're dealing with. Find on the menu
bar, "View Wallet Info." After finding it click on it. This will allow you to
use your private key to log into your wallet.
Step 3:
After clicking on View Wallet info, once again click on Private Key.
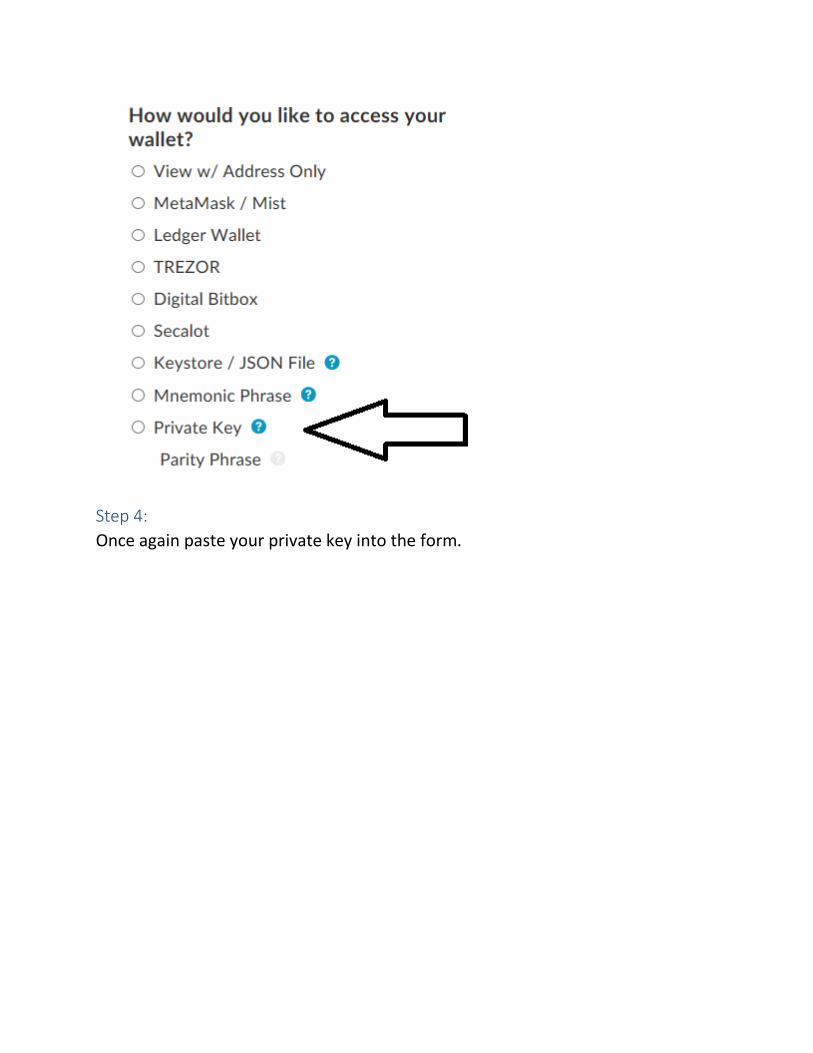
Step 4:
Once again paste your private key into the form.
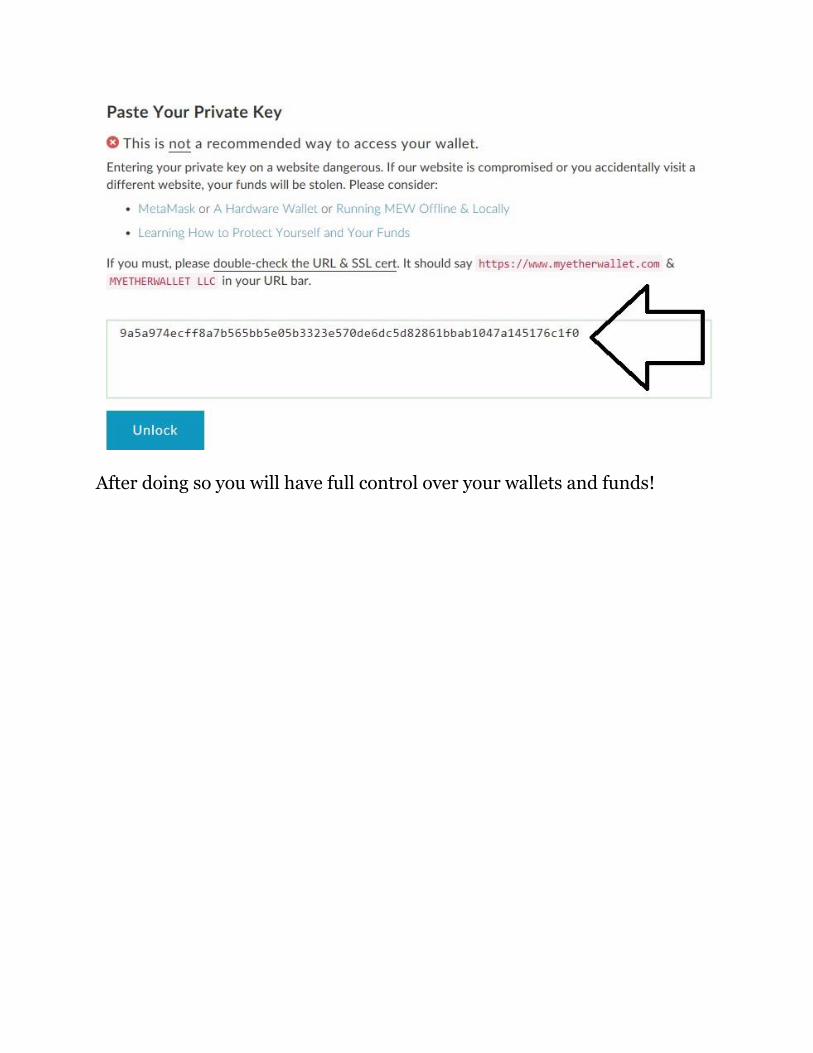
After doing so you will have full control over your wallets and funds!