my sewing workbook - … filepresser feet a presser foot is a removable attachment that works with...
TRANSCRIPT

MYSEWING
WORKBOOK

Anatomy of a Sewing MachineComputerized Sewing Machine * Bernina 215
www.teacherspayteachers.com/Store/Ready-Set-Sewing-Class
5
4
3
2
1
7
6
8
9
10
11
12
1314 15
16
1718
19
23
20
2122
24
25
26
27
19. Needle Position Button20. LCD Screen21. Buttonhole Stitch22. Needle Stop Up/Down23. Stitch Length Button24. Sewing Table Pin25. Feed-Dog Drop26. Foot Control Plug-in27. Reverse Button
1. Bobbin Cover2. Needle Plate3. Presser Foot4. Needle Clamp5. Check Spring6. Thread Take-Up Lever7. Bobbin Pre-Tension8. Thread Tension Path9. Thread Guide
10. Thread Tension Adjustment11. Sewing machine Handle12. Stitch Selection Buttons13. Bobbin Winder14. Supplementary Thread Guide15. Spool Pin16. Bobbin Winder stop17. Handwheel18. Stitch Width Button

Anatomy of a Sewing MachineMechanical Sewing Machine * Bernina 1008
www.teacherspayteachers.com/Store/Ready-Set-Sewing-Class
15141312111098
16
17181920
2122
23/2724
25
26
76
5
4
3
2
1
19. Needle Position Knob20. Handwheel Clutch Release21. Buttonhole Knob22. Light Switch23. Stitch Length Knob24. Sewing Table Pin25. Feed-Dog Drop26. Foot Control Plug-in27. Reverse Lever
1. Bobbin Cover2. Needle Plate3. Presser Foot4. Needle Clamp5. Check Spring6. Thread Take-Up Lever7. Bobbin Pre-Tension8. Thread Tension Path9. Thread Guide
10. Thread Tension Adjustment11. Sewing machine Handle12. Stitch Selection Lever13. Bobbin Winder14. Supplementary Thread Guide15. Spool Pin16. Bobbin Winder stop17. Handwheel18. Stitch Width Knob

Presser FeetA Presser foot is a removable attachment that works with the feed-dogs to hold fabric flat as the fabric is fed through the machine and stitched. Many different presser feet are available that aid in different techniques.
Feed-dogsNeedle Plate
Presser Foot SolePresser Foot Toes
Shank
Needle Bar Clamp
The Most common used presser feet.
Anatomy of The Presser Foot.
www.teacherspayteachers.com/Store/Ready-Set-Sewing-Class
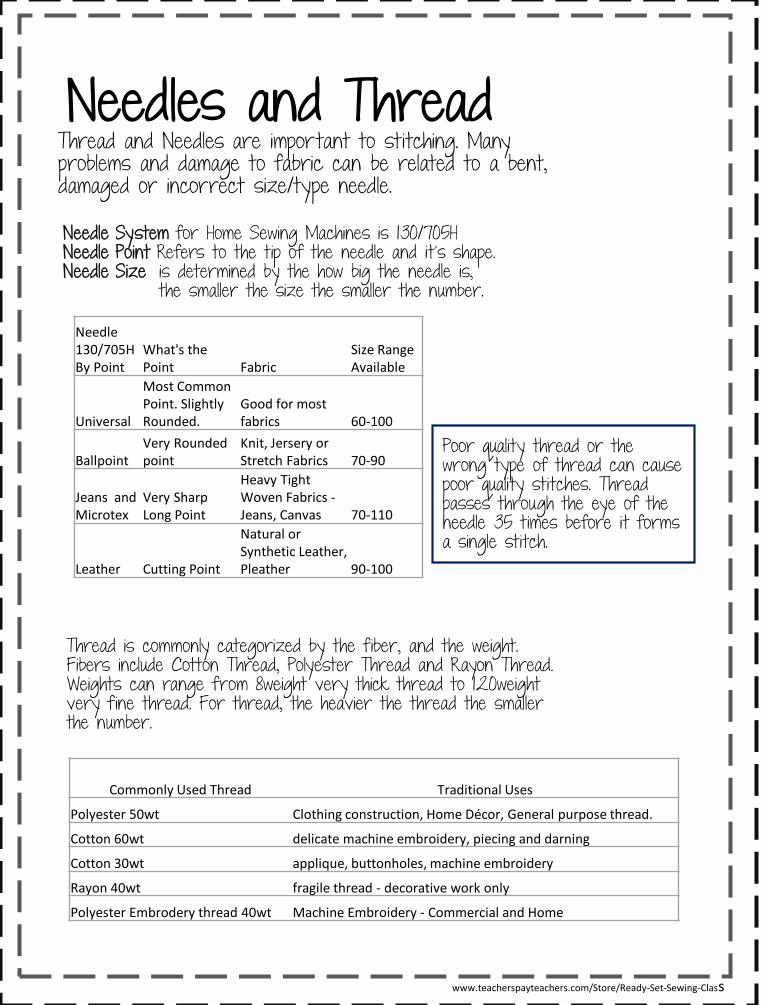
Needles and ThreadThread and Needles are important to stitching. Many problems and damage to fabric can be related to a bent, damaged or incorrect size/type needle.
Needle System for Home Sewing Machines is 130/705HNeedle Point Refers to the tip of the needle and it’s shape.Needle Size is determined by the how big the needle is,
the smaller the size the smaller the number.
Poor quality thread or the wrong type of thread can cause poor quality stitches. Thread passes through the eye of the needle 35 times before it forms a single stitch.
Thread is commonly categorized by the fiber, and the weight. Fibers include Cotton Thread, Polyester Thread and Rayon Thread. Weights can range from 8weight very thick thread to 120weight very fine thread. For thread, the heavier the thread the smaller the number.
Commonly Used Thread Traditional Uses
Polyester 50wt Clothing construction, Home Décor, General purpose thread.
Cotton 60wt delicate machine embroidery, piecing and darning
Cotton 30wt applique, buttonholes, machine embroidery
Rayon 40wt fragile thread - decorative work only
Polyester Embrodery thread 40wt Machine Embroidery - Commercial and Home
Needle 130/705H By Point
What's the Point Fabric
Size Range Available
Universal
Most Common Point. Slightly Rounded.
Good for most fabrics 60-100
BallpointVery Rounded point
Knit, Jersery or Stretch Fabrics 70-90
Jeans and Microtex
Very Sharp Long Point
Heavy Tight Woven Fabrics -Jeans, Canvas 70-110
Leather Cutting Point
Natural or Synthetic Leather, Pleather 90-100
www.teacherspayteachers.com/Store/Ready-Set-Sewing-Class

Practice -Sewing With ControlSew on the lines w/o thread – Go slow. Be mindful. Don’t miss!
www.teacherspayteachers.com/Store/Ready-Set-Sewing-Class

Straight Stitch Seam1/4” Seam * 5/8” Seam * 2” Seam
Fabric Two 5” square Medium Weight Cotton
Needle Universal 80/12
Thread 50 Weight Polyester
Presser Foot Regular Sewing Foot and Quarter inch foot
Stitch Straight Stich * Stitch Length 2.5mm & Stitch Width 0
Needle Position Center
Directions:Find 5/8” engraved/marked guide line on the needle plate
Place Fabric wrong sides together and align them with engraved line. Sew.
Attach the seam guide. Sew 2” on the other side.
Find the marked ¼” seam line or attach the quarter inch foot. Alignfabric edge on engraved line or the edge of presser foot. Sew.
Terms to know: SeamSeam GuideNeedle Plate Stitch Length Stitch Width
Review Techniques: Finding Needle Plate MakingsChanging Stitch Width, Changing Stitch Length, Locating the Needle PositionGuiding the fabricLowering the presser foot
Notes:
www.teacherspayteachers.com/Store/Ready-Set-Sewing-Class

Straight Stitch SeamMy Sample
www.teacherspayteachers.com/Store/Ready-Set-Sewing-Classwww.teacherspayteachers.com/Store/Ready-Set-Sewing-Class

Secure StitchingUsing the Reverse Sewing lever
Fabric Two 5” square Medium Weight Cotton
Needle Universal 80/12
Thread 50 Weight Polyester
Presser Foot Regular Sewing Foot
Stitch Straight Stich * Stitch Length 2.5mm & Stitch Width 0
Needle Position Center
Directions:Find 5/8” engraved/marked guide line on the needle plate.
Place Fabric wrong sides together and align them with engraved line.Sew towards you 5 stitches, stop.
Push the reverse lever or button. Hold in place as you begin to sew backwards. Continue to beginning stitch. Release. Sew forward.
Continue sewing to the end of the fabric. Stop. Activate reverse. Sew 5 stitches. Stop and release. Continue to end and stop. Practice again on other side of fabric.
Terms to know:Right Side of Fabric Wrong Side of Fabric. Backstitch
Review Techniques: 5/8” seamActivating the reverse button or lever
Notes:
www.teacherspayteachers.com/Store/Ready-Set-Sewing-Class

Secure StitchingMy Sample
www.teacherspayteachers.com/Store/Ready-Set-Sewing-Classwww.teacherspayteachers.com/Store/Ready-Set-Sewing-Class

Turning CornersPivot with needle stopped down in fabric
Fabric Two 5” square Medium Weight Cotton
Needle Universal 80/12
Thread 50 Weight Polyester
Presser Foot Regular Sewing Foot and Quarter inch foot
Stitch Straight Stich * Stitch Length 2.5mm & Stitch Width 0
Needle Position Center
Directions:Place fabric WST under the presser foot with the top edge even with the horizontal line of the top of the needle plate. The right side of fabric is on the 5/8” marking.
Engage needle down function. If not available, turn handwheel towards you until needle is in fabric.
Sew until the bottom edge of fabrictouches the front of the horizontal line of the needle plate. Stop
Pivot and continue sewing. Repeat at all corners.
Terms to know: Needle stop UpNeedle Stop DownWST – Wrong sides togetherRST – Right sides together
Review Techniques: Pivoting fabric with needle in the down positon. Selecting your needle stop function or turning the handwheel.
Notes:
www.teacherspayteachers.com/Store/Ready-Set-Sewing-Class
Turning CornersMy Sample
www.teacherspayteachers.com/Store/Ready-Set-Sewing-Classwww.teacherspayteachers.com/Store/Ready-Set-Sewing-Class
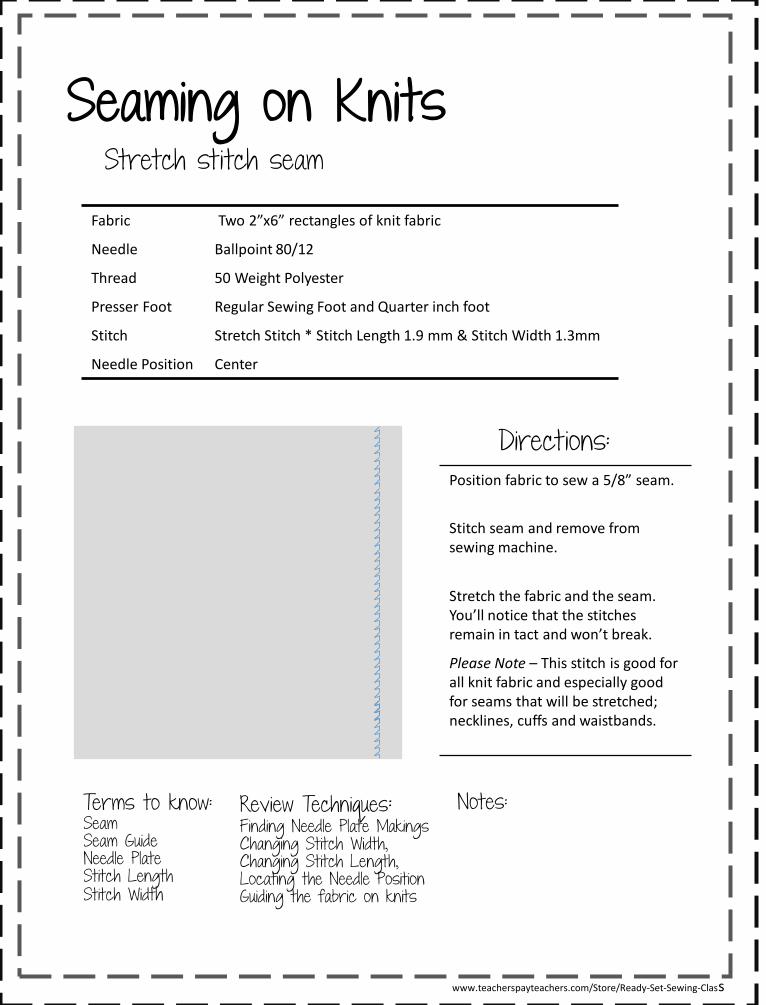
Seaming on KnitsStretch stitch seam
Fabric Two 2”x6” rectangles of knit fabric
Needle Ballpoint 80/12
Thread 50 Weight Polyester
Presser Foot Regular Sewing Foot and Quarter inch foot
Stitch Stretch Stitch * Stitch Length 1.9 mm & Stitch Width 1.3mm
Needle Position Center
Directions:Position fabric to sew a 5/8” seam.
Stitch seam and remove from sewing machine.
Stretch the fabric and the seam. You’ll notice that the stitches remain in tact and won’t break.
Please Note – This stitch is good for all knit fabric and especially good for seams that will be stretched; necklines, cuffs and waistbands.
Terms to know: SeamSeam GuideNeedle Plate Stitch Length Stitch Width
Review Techniques: Finding Needle Plate MakingsChanging Stitch Width, Changing Stitch Length, Locating the Needle PositionGuiding the fabric on knits
Notes:
www.teacherspayteachers.com/Store/Ready-Set-Sewing-Class

Seaming on KnitsMy Sample
www.teacherspayteachers.com/Store/Ready-Set-Sewing-Classwww.teacherspayteachers.com/Store/Ready-Set-Sewing-Class

Edge StitchingSewing over the Edge with a zig-zag
Fabric Two 5” square Medium Weight Cotton
Needle Universal 80/12
Thread 50 Weight Polyester
Presser Foot Regular Sewing Foot
Stitch Zig-Zag Stitch * Stitch Length 2mm Stitch width 4mm
Needle Position Far Right (if possible)
Directions:Select the zig zag stitch. Guide the fabric under the inside ‘toe’ of the presser foot.
On the zig (first stroke of the stitch) the needle should be in the fabric. On the zag (next stroke of the stitch) the needle should be off the edge of the fabric.
The fabric should lie flat.
Using too long of a stitch length or too wide a stitch length will cause the fabric to roll.
Terms to know: Presser foot: Shank & toe
Review Techniques: Adjusting stitch lengthAdjusting stitch widthAdjusting needle position.
Notes:
www.teacherspayteachers.com/Store/Ready-Set-Sewing-Class

Edge StitchingMy Sample
www.teacherspayteachers.com/Store/Ready-Set-Sewing-Classwww.teacherspayteachers.com/Store/Ready-Set-Sewing-Class

Overlock StitchingProfessionally Finishing raw edges
Fabric Two 5” square cotton knit fabric
Needle Ballpoint 80/12
Thread 50 Weight Polyester
Presser Foot Overlock Presser foot.
Stitch Vari-Overlock Stitch * Stitch Length 2mm & Stitch Width 5.5mm
Needle Position Center
Directions:Select the Vari-Overlock Stitch
Guide the raw edges of the fabric under the pin of the presser foot.
Please Note: The stitches are formed over the pin on the innerright of the presser foot. This supports the stitch and prevents the stitch from collapsing.
The end result is the seam will have a professional enclosed stitch that will lay flat and be somewhat elastic.
Terms to know: Vari-OverlockOverlock Presser footRaw Edge
Review Techniques: Using an overlock foot.Selecting vari-overlock stitch.
Notes:
www.teacherspayteachers.com/Store/Ready-Set-Sewing-Class

Overlock StitchingMy Sample
www.teacherspayteachers.com/Store/Ready-Set-Sewing-Classwww.teacherspayteachers.com/Store/Ready-Set-Sewing-Class

TopstitchingTriple Straight Stitch
Fabric 5” square Medium Weight denim
Needle Jeans 90/14
Thread 50 Weight Polyester
Presser Foot Regular Sewing Foot or Straight Stitch Foot
Stitch Straight Stich * Stitch Length 2.5mm and Stitch Width 0mm Triple stitch * Stitch Length 4mm & Stitch Width 0
Needle Position Center
Directions:WST seam the denim with 5/8” seam.
Finger press seam open. Select the Triple stitch. With Right-Side up, place the edge or ditch of the seam under the presser foot. The edge of the presser foot will rest along the edge of the seam.
Starting at the top of the seam, stitch the length of the fabric.
Continue on the other side of the seam.
Terms to know: Finger PressDitch (in seams)Edge Stitch
Review Techniques: Selecting the triple stitchAdjusting stitch lengthInserting needles. Guiding fabric under presser foot.
Notes:
www.teacherspayteachers.com/Store/Ready-Set-Sewing-Class

TopstitchingMy Sample
www.teacherspayteachers.com/Store/Ready-Set-Sewing-Classwww.teacherspayteachers.com/Store/Ready-Set-Sewing-Class

Jeans HemHemming Jeans with a Triple stitch
Fabric 5” square Denim fabric.
Needle Jeans 90/14
Thread 50 Weight Polyester
Presser Foot Regular Sewing Foot
Stitch Triple Stitch * Stitch Length 4mm & Stitch Width is 0
Needle Position Center
Directions:Turn up the edge of the fabric twice each time about 1/2” or 3/8” and press.
Using the edge of the presser foot, topstitch about 1/8” from the upper edge of the hem.
Please Note: It is easier to sew towards the gradual incline of the seam rather than the thickest part.
When using the triple stitch you do not need to use ‘jeans thread’ or heavy weight thread. The stitches are secure because each stitch is three stitches.
Terms to know: Jeans HemPress Vs. Iron
Review Techniques: Sewing over thick fabricSewing over an incline.Pressing Techniques
Notes:
www.teacherspayteachers.com/Store/Ready-Set-Sewing-Class

Jeans HemMy Sample
www.teacherspayteachers.com/Store/Ready-Set-Sewing-Classwww.teacherspayteachers.com/Store/Ready-Set-Sewing-Class

Blind HemHandpicked hem for skirts of dress pants
Fabric 6” square heavy flannel
Needle Universal 80/12
Thread 50 Weight Polyester
Presser Foot Blind hem foot.
Stitch Blind Hem Stitch * Stitch Length 2.4mm & Stitch Width 3.5mm
Needle Position Far Right
Directions:Turn hem 1” along one of the 6”edge and press. Turn up 1” again.
Fold the hem toward the right sideof the fabric so the fabric fold is almost even with the top edge of the hem.
Place fabric under foot with eh fold to the left of the blade on the foot.
The zig-zag of the stitch should catch the fold. Adjust the stitch width so the needle barely bites the fold.
Terms to know: Blindhem stitchBlindhem Presser Foot
Review Techniques: Adjusting Stitch widthPressing Folding for blind hem.
Notes:
www.teacherspayteachers.com/Store/Ready-Set-Sewing-Class

Blind HemMy Sample
www.teacherspayteachers.com/Store/Ready-Set-Sewing-Classwww.teacherspayteachers.com/Store/Ready-Set-Sewing-Class
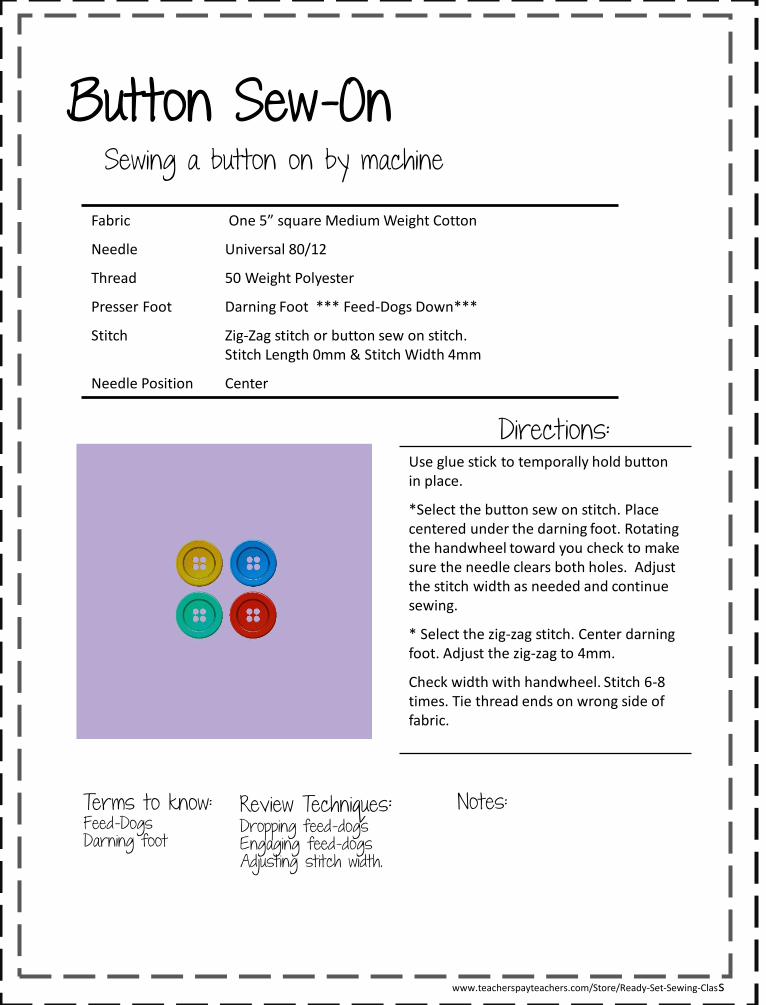
Button Sew-OnSewing a button on by machine
Fabric One 5” square Medium Weight Cotton
Needle Universal 80/12
Thread 50 Weight Polyester
Presser Foot Darning Foot *** Feed-Dogs Down***
Stitch Zig-Zag stitch or button sew on stitch.Stitch Length 0mm & Stitch Width 4mm
Needle Position Center
Directions:Use glue stick to temporally hold button in place.
*Select the button sew on stitch. Place centered under the darning foot. Rotating the handwheel toward you check to make sure the needle clears both holes. Adjust the stitch width as needed and continue sewing.
* Select the zig-zag stitch. Center darning foot. Adjust the zig-zag to 4mm.
Check width with handwheel. Stitch 6-8 times. Tie thread ends on wrong side of fabric.
Terms to know: Feed-DogsDarning foot
Review Techniques: Dropping feed-dogsEngaging feed-dogsAdjusting stitch width.
Notes:
www.teacherspayteachers.com/Store/Ready-Set-Sewing-Class
Button Sew-OnMy Sample
www.teacherspayteachers.com/Store/Ready-Set-Sewing-Classwww.teacherspayteachers.com/Store/Ready-Set-Sewing-Class
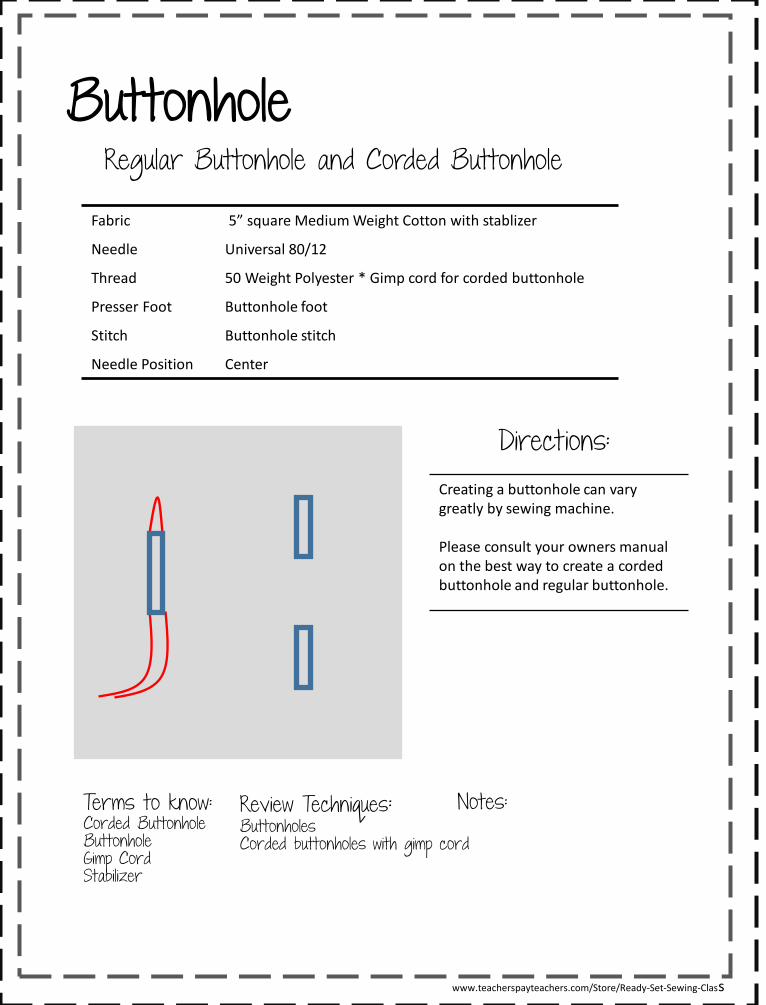
ButtonholeRegular Buttonhole and Corded Buttonhole
Fabric 5” square Medium Weight Cotton with stablizer
Needle Universal 80/12
Thread 50 Weight Polyester * Gimp cord for corded buttonhole
Presser Foot Buttonhole foot
Stitch Buttonhole stitch
Needle Position Center
Directions:
Terms to know: Corded ButtonholeButtonholeGimp CordStabilizer
Review Techniques: ButtonholesCorded buttonholes with gimp cord
Notes:
Creating a buttonhole can vary greatly by sewing machine.
Please consult your owners manual on the best way to create a corded buttonhole and regular buttonhole.
www.teacherspayteachers.com/Store/Ready-Set-Sewing-Class

ButtonholeMy Sample
www.teacherspayteachers.com/Store/Ready-Set-Sewing-Classwww.teacherspayteachers.com/Store/Ready-Set-Sewing-Class

Exposed ZipperPutting in an exposed Zipper
Fabric Four 7” square Medium Weight Cotton
Needle Universal 80/12
Thread 50 Weight Polyester
Presser Foot Zipper foot
Stitch Straight Stich * Stitch Length 2.5mm & Stitch Width 0
Needle Position Left or right
Directions:Attach zipper foot. Either adjust theneedle position or adjust the presser foot so you are able to sew very close to the zipper teeth.
Layer fabric on one side of the zipper raw edges and zipper tape together. Layer top fabric and bottom fabric RST. Pin layers together.
Sew the length, moving zipper pull as needed.
Repeat for other side. Topstitch on both sides of zipper for decorative detail and for durability.
Terms to know: Pin baste
Review Techniques: Adjusting needle positionAdjusting presser footPin bastingtopstitching
Notes:
www.teacherspayteachers.com/Store/Ready-Set-Sewing-Class

Exposed ZipperMy Sample
www.teacherspayteachers.com/Store/Ready-Set-Sewing-Classwww.teacherspayteachers.com/Store/Ready-Set-Sewing-Class

AppliqueBlanket Stitch Applique
Fabric One 5” square Medium Weight Cotton One prepared applique
Needle Microtex 70/10
Thread 50 Weight Polyester
Presser Foot Open toe foot
Stitch Blanket Stitch * Stitch Length 2.6mm & Stitch Width 2.3mm
Needle Position Center/far Right
Directions:Fuse Shape to fabric and attach open toe presser foot.
Select a blanket stitch. Stitch alongthe outer edge of the fused shape.
The straight potion of the blanket stitch will fall on the raw edge of the shape. The points will be inside the applique shape.
Please Note: Going slow and frequently pivoting with needle down in fabric will make applique easier.
Terms to know: Blanket StitchSatin stitch appliqueAppliqueFusible Web
Review Techniques: Pivot with needle downBlanket stitchStitch control
Notes:
www.teacherspayteachers.com/Store/Ready-Set-Sewing-Class
AppliqueMy Sample
www.teacherspayteachers.com/Store/Ready-Set-Sewing-Classwww.teacherspayteachers.com/Store/Ready-Set-Sewing-Class

Basting StitchFor temporary hold
Fabric Two 5” square Medium Weight Cotton
Needle Universal 80/12
Thread 50 Weight Polyester
Presser Foot Regular Sewing
Stitch Straight Stich * Stitch Length 5.5mm & Stitch Width 0
Needle Position Center
Directions:
Lengthen your stitch to the longest it will go.
Loosen your upper tension to 3.
Seam at 5/8” as normal.
Please Note: Stitch will be loose and will come apart. This is only meant for temporary hold. Handle with care.
Terms to know: Thread TensionUpper TensionBaste
Review Techniques: Adjusting Upper TensionBasting a Seam
Notes:
www.teacherspayteachers.com/Store/Ready-Set-Sewing-Class
Basting StitchMy Sample
www.teacherspayteachers.com/Store/Ready-Set-Sewing-Classwww.teacherspayteachers.com/Store/Ready-Set-Sewing-Class
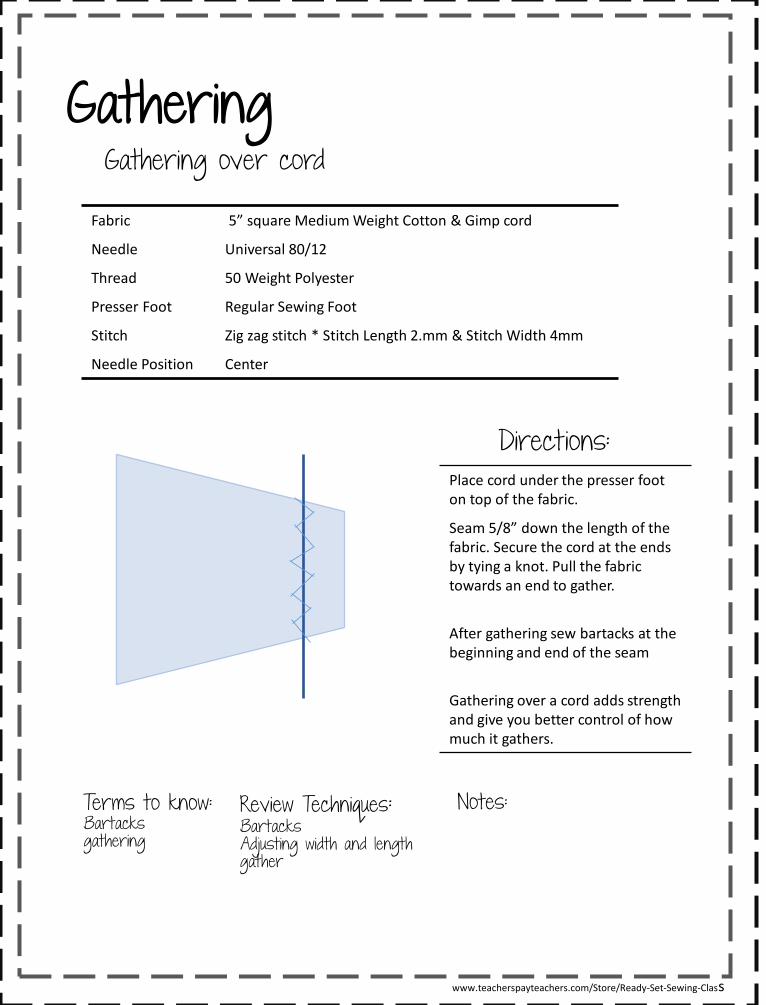
GatheringGathering over cord
Fabric 5” square Medium Weight Cotton & Gimp cord
Needle Universal 80/12
Thread 50 Weight Polyester
Presser Foot Regular Sewing Foot
Stitch Zig zag stitch * Stitch Length 2.mm & Stitch Width 4mm
Needle Position Center
Directions:Place cord under the presser foot on top of the fabric.
Seam 5/8” down the length of the fabric. Secure the cord at the ends by tying a knot. Pull the fabric towards an end to gather.
After gathering sew bartacks at the beginning and end of the seam
Gathering over a cord adds strength and give you better control of how much it gathers.
Terms to know: Bartacksgathering
Review Techniques: BartacksAdjusting width and lengthgather
Notes:
www.teacherspayteachers.com/Store/Ready-Set-Sewing-Class

GatheringMy Sample
www.teacherspayteachers.com/Store/Ready-Set-Sewing-Classwww.teacherspayteachers.com/Store/Ready-Set-Sewing-Class
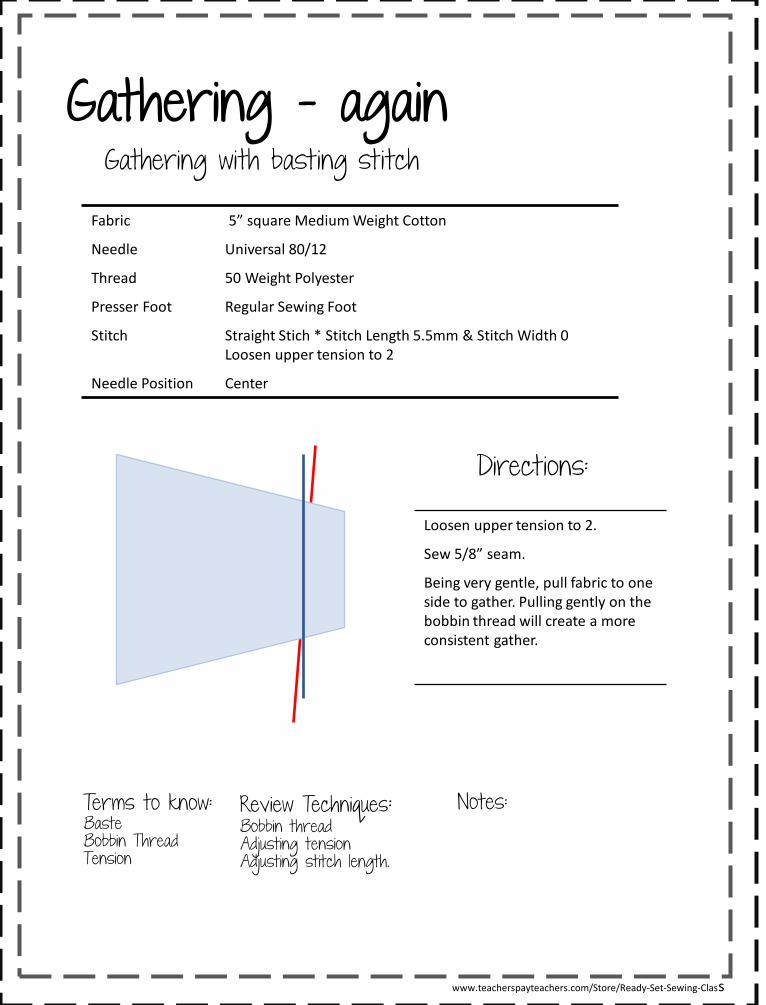
Gathering - againGathering with basting stitch
Fabric 5” square Medium Weight Cotton
Needle Universal 80/12
Thread 50 Weight Polyester
Presser Foot Regular Sewing Foot
Stitch Straight Stich * Stitch Length 5.5mm & Stitch Width 0Loosen upper tension to 2
Needle Position Center
Directions:
Loosen upper tension to 2.
Sew 5/8” seam.
Being very gentle, pull fabric to one side to gather. Pulling gently on the bobbin thread will create a more consistent gather.
Terms to know: BasteBobbin ThreadTension
Review Techniques: Bobbin threadAdjusting tension Adjusting stitch length.
Notes:
www.teacherspayteachers.com/Store/Ready-Set-Sewing-Class
Gathering - againMy Sample
www.teacherspayteachers.com/Store/Ready-Set-Sewing-Classwww.teacherspayteachers.com/Store/Ready-Set-Sewing-Class

Glossary of Sewing TermsCommon Terms used in sewingApplique A surface embellishment made by sewing a cut piece of fabric to another piece of fabric.
BackstitchStrong stitch that doubles back on the last stitch. This technique is perfect for securing seams and mending
Bartack A short reinforcement of threads used in areas that are subject to wear/stress
Baste Temporary long stitches that are used to hold fabric in place before the final stitching.
Blanket Stitch
Also known as the buttonhole stitch. This stitch is used for adding a decorative finish to a fabric edge.
Blind Hem Stitch
The sewing technique were the formation of the stitch is few and widely spaced across the hem of the garment. The thread is nearly invisible to the naked eye.
Clean FinishThe technique used to finish a raw edge. This can mean a variety of different finishing techniques; overlock stitch, edge finish, zig-zag.
Finger Press Creating a crease in fabric by using the heat and force of your fingertips.
Gathering Stitch
A long straight stitch that's used to pull fabric together to create a smaller surface area of fabric. This is used in garment construction and to create ruffles.
Hem The finished edge of the bottom of a garment.
Tension The amount of pressure on your thread as it passes through the sewing machine tension disks.
PivotA technique where you change your stitching direction and create an angle point in the stitching line.
Press Using an iron to heat set the fabric flat.
Raw Edge The unfinished or cut edge of the fabric.
Right Side This is commonly referred to as the side of the fabric where the design is most visible.
Seam The line where two pieces of fabric are joined together with stitches.
Seam Allowance
The fabric between a stitching line and the raw edge.
Stitch Length
The Length of stitch determined by the movement of the feed dogs. This can be adjusted on most sewing machines
Stitch WidthThe horizontal width of a stitch. Any stitch that has width will cause the needle bar to move horizontally. This can be adjusted on most sewing machines.
Straight Stitch
The most basic stitch that produces a single row of straight even stitches. 99% of all sewing is done with a straight stitch.
Top StitchThis is machine stitches done on a garment for either a decorative effect or for more functional reasons.
Triple StitchThis is a straight stitch that is programed to sew over each stitch three times. This creates a thicker, more secure stitch.
Wrong Side The side of the fabric that is distinctly opposite of the printed side.
Zip Zag Stitch
Commonly used 'Z' shaped machine stitch. This stitch is used commonly to finish an edge, sew on knits, or for decorative effect.
www.teacherspayteachers.com/Store/Ready-Set-Sewing-Class