my personal assistant a degree thesis - upcommons · 2020-02-12 · my personal assistant a degree...
TRANSCRIPT
My Personal Assistant
A Degree Thesis
Submitted to the Faculty of the
Escola Tècnica d'Enginyeria de Telecomunicació de
Barcelona
Universitat Politècnica de Catalunya
by
Melvin Carles Tong González
In partial fulfilment
of the requirements for the degree in
ENGINYERIA DE SISTEMES ELECRÒNICS
Advisor: Sergi Bermejo
Barcelona, May 2016

1
Abstract
This thesis shows the design and implementation of a personal assistant as those found
in our mobile devices, e.g. “Okey Google”, “Siri” or “Cortana”. The basic idea of this
project is to create and develop an exclusive and personal “hands-free” domestic robot
that is always actively listening, i.e. a personal assistant designed for making a user's life
easier. A Personal Assistant implemented on an open source platform such as a
“Raspberry Pi” capable of retrieving the current time, set alarms, forecast next day's
weather, or review events and previously set reminders. To make it as interactive as
possible, some technologies relying on computer vision are used to track the user while it
is asking something like taking a photo. Several empirical results of the working system
has been obtained to characterize some of the weaknesses and limitations involving the
state-of-the-art personal assistant as we can find in the existing commercial products or
those prototypes under current development.
2
Resum
Aquesta tesis mostra el disseny i la implementació d’un assistent personal com els que podem trobar en els nostres dispositius mòbils, per exemple, “Okey Google”, “Siri” o “Cortana”. La idea bàsica d’aquest projecte es crear i desenvolupar un robot domèstic exclusiu i personal que actuï com a mans lliures que estigui contínuament escoltant, en altres paraules, un assistent personal designat per fer-nos la vida més fàcil. Un assistent implementat en una plataforma de codi obert com por ser una “Raspberry Pi” capaç de retornar-nos l’hora actual, configurar alarmes, donar-nos la previsió del tems per l’endemà, revisar o crear esdeveniments en el nostre calendari personal, així com crear recordatoris. Per fer l’assistent el més interactiu possible, algunes tecnologies que depenen del reconeixement d’imatge s'utilitzen per seguir a l’usuari amb la càmera mentre aquet està demanant alguna cosa com fer una foto. Alguns resultats empírics han sigut obtinguts per poder caracteritzar algun dels punts febles i limitacions que comporta desenvolupar un assistent personal com el que podem trobar en el mercat avui en dia o que estan en ple desenvolupament.

3
Resumen
Esta tesis muestra el diseño e implementación de un asistente personal como los que podemos encontrar en nuestros dispositivos móviles, por ejemplo, “Okey Google”, “Siri” o “Cortana”. La idea básica de este proyecto es crear y desarrollar un robot doméstico exclusivo y personal que actúe como un manos libres que este continuamente escuchando, en otras palabras, un asistente personal diseñado para hacernos la vida más fácil. Un asistente implementado en una plataforma de código abierto como puede ser una “Raspberry Pi” capaz de retornarnos la hora actual, configurar alarmas, darnos la previsión del tiempo de mañana, revisar o crear eventos en nuestro calendario, así como crear recordatorios. Para hacer el asistente lo más interactivo posible, algunas tecnologías de reconocimiento de imagen son usadas para seguir al usuario con la cámara mientras este está pidiendo algo como hacer una foto. Algunos resultados empíricos han sido extraídos para poder caracterizar alguno de los puntos débiles y limitaciones que comporta desarrollar un asistente personal como los que podemos encontrar en el mercado hoy en día o que están en pleno desarrollo.

4
Acknowledgements
I would like to thank my thesis advisor, Sergi Bermejo for his support and advice
throughout the whole project.
Moreover, I thank Arnau Prat for introducing me to the Python programming language.
5
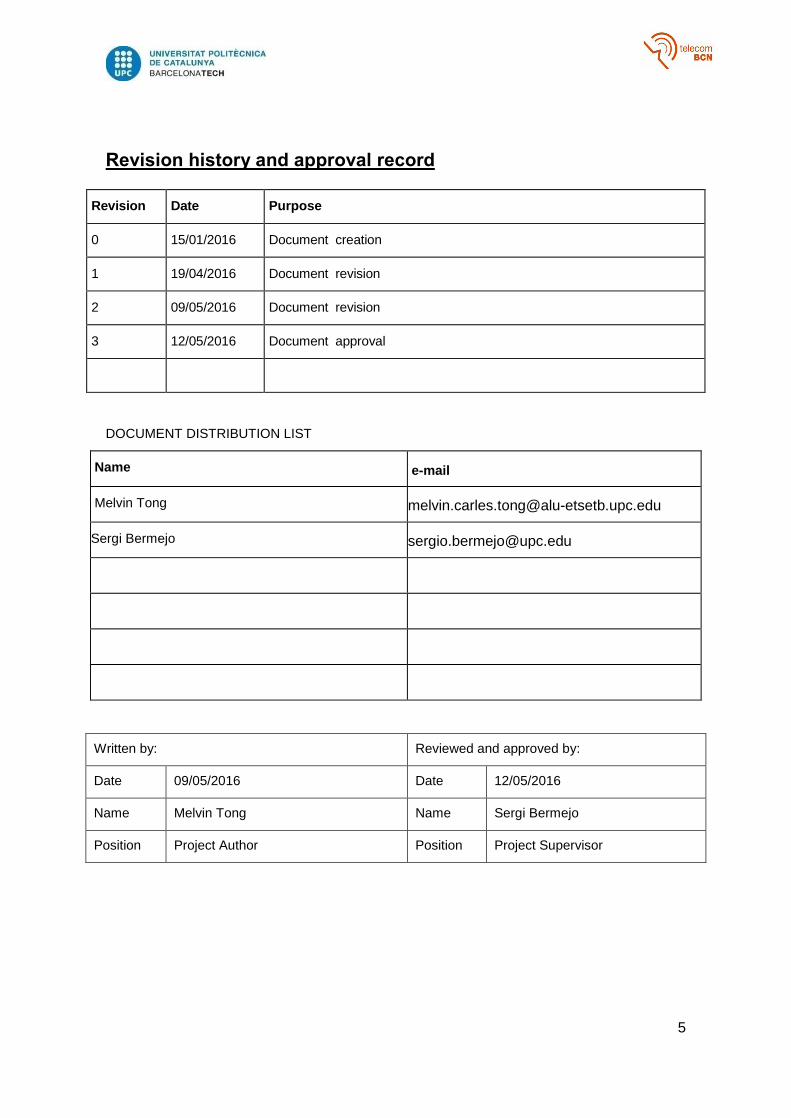
Revision history and approval record
Revision Date Purpose
0 15/01/2016 Document creation
1 19/04/2016 Document revision
2 09/05/2016 Document revision
3 12/05/2016 Document approval
DOCUMENT DISTRIBUTION LIST
Name e-mail
Melvin Tong [email protected]
Sergi Bermejo [email protected]
Written by: Reviewed and approved by:
Date 09/05/2016 Date 12/05/2016
Name Melvin Tong Name Sergi Bermejo
Position Project Author Position Project Supervisor
6
Table of contents
Abstract ............................................................................................................................ 1
Resum .............................................................................................................................. 2
Resumen .......................................................................................................................... 3
Acknowledgements .......................................................................................................... 4
Revision history and approval record ................................................................................ 5
Table of contents .............................................................................................................. 6
List of Figures ................................................................................................................... 8
List of Tables: ................................................................................................................... 9
1. Introduction .............................................................................................................. 10
1.1. Motivation and objectives ................................................................................. 10
1.2. Requirements and specifications ...................................................................... 11
1.3. Work plan ......................................................................................................... 11
2. State of the art of the technology used or applied in this thesis: ............................... 12
3. Methodology / project development: ........................................................................ 13
3.1. Software Architecture ....................................................................................... 13
3.2. Voice Processing .............................................................................................. 14
3.2.1. Passive Listener ........................................................................................ 14
3.2.2. Speech to Text .......................................................................................... 15
3.2.3. Text to Speech .......................................................................................... 15
3.3. Modules ............................................................................................................ 16
3.3.1. Time & Date .............................................................................................. 17
3.3.2. Alarm & Timer ........................................................................................... 17
3.3.3. Jokes ......................................................................................................... 17
3.3.4. Google Events & Reminders ..................................................................... 17
3.3.5. Play Music ................................................................................................. 21
3.3.6. Take Photo ................................................................................................ 21
3.3.7. Dropbox ..................................................................................................... 21
3.3.8. Computational Knowledge Engine ............................................................. 22
3.4. Tracking Module ............................................................................................... 22
3.4.1. Computer Vision Algorithms applied .......................................................... 22
3.4.1.1. HaarCascade Algorithm .......................................................................... 22
3.4.1.2. Lucas-Kanade Algorithm ......................................................................... 23
7
3.4.2. Tracking implementation ........................................................................... 25
3.5. Raspberry Pi implementation and Clustering .................................................... 30
4. Results .................................................................................................................... 31
4.1. System analysis ............................................................................................... 31
4.2. Tracking analysis .............................................................................................. 33
5. Budget ..................................................................................................................... 38
6. Conclusions and future development: ...................................................................... 39
Bibliography: ................................................................................................................... 41
Appendices: .................................................................................................................... 42
Glossary ......................................................................................................................... 48
8
List of Figures
Figure 1. Software architecture ....................................................................................... 13
Figure 2. Passive Listener Diagram ................................................................................ 14
Figure 3. Modules Structure ............................................................................................ 16
Figure 4. OAuth 2.0 protocol ........................................................................................... 18
Figure 5. Haar features ................................................................................................... 23
Figure 6. Tracking Algorithm. Implementation Flow. ....................................................... 25
Figure 7. HaarCascade Algorithm applied. ..................................................................... 26
Figure 8. False Positive HaarCascade Algorithm ............................................................ 27
Figure 9. Lucas-Kanade Algorithm Applied ..................................................................... 28
Figure 10. Lucas-Kanade discarded points. .................................................................... 29
Figure 11. STT timings ................................................................................................... 32
Figure 12. Tracking time with PC .................................................................................... 34
Figure 13. Tracking time with Raspberry Pi .................................................................... 34
Figure 14. Tracking Accuracy Rate ................................................................................. 35
Figure 15. Raspberry Pi Clustering Timing ..................................................................... 36
Figure 16. Comparison Timings Raspberry Pi & PC ....................................................... 37

9
List of Tables:
Table 1. Voice Commands symbols ................................................................................ 19
Table 2. Voice text sent to Google API ........................................................................... 32
Table 3. Cost of prototype .............................................................................................. 38
Table 4. Cost of tools for development. .......................................................................... 38
Table 5. Cost of software engineer and hours of work. ................................................... 38
10
1. Introduction
1.1. Motivation and objectives
Increasingly, we have at our disposal many new technologies available to everyone.
In turn, low-cost programmable hardware is widely used by a large group of people and
that can be programmed relatively easily from an environment already developed like
“Raspian” OS in the Raspberry Pi.
There are also a lot of tools and APIs provided on the internet that enable the
performance of a lot of many functionalities as well as provide personal information on
different platforms such as Google personal information or other data.
This project arises from the idea of developing a robot based on open source code
having in mind the above considerations, which could be modified and extended or
further developed by a large community of software developers. Such an intelligent
system will be based on some existing intelligent personal assistants like “Siri” (from
Apple) or “Cortana” (from Windows) with the main idea being that this robot can be
customized by any developer belonging to any community to meet their particular needs
using all the existent tools available on the internet. In this way, it could be personalized
depending on the particular user to include new and more powerful features and adapting
(or even removing) the pre-existing ones.
Hence, the basic idea is to develop a portable robot providing: 1) a scalable
hardware platform that is easy to use for a large developer’s community, and 2) a robotic
behaviour program implementing some basic functionality to meet an intelligent real-time
response.
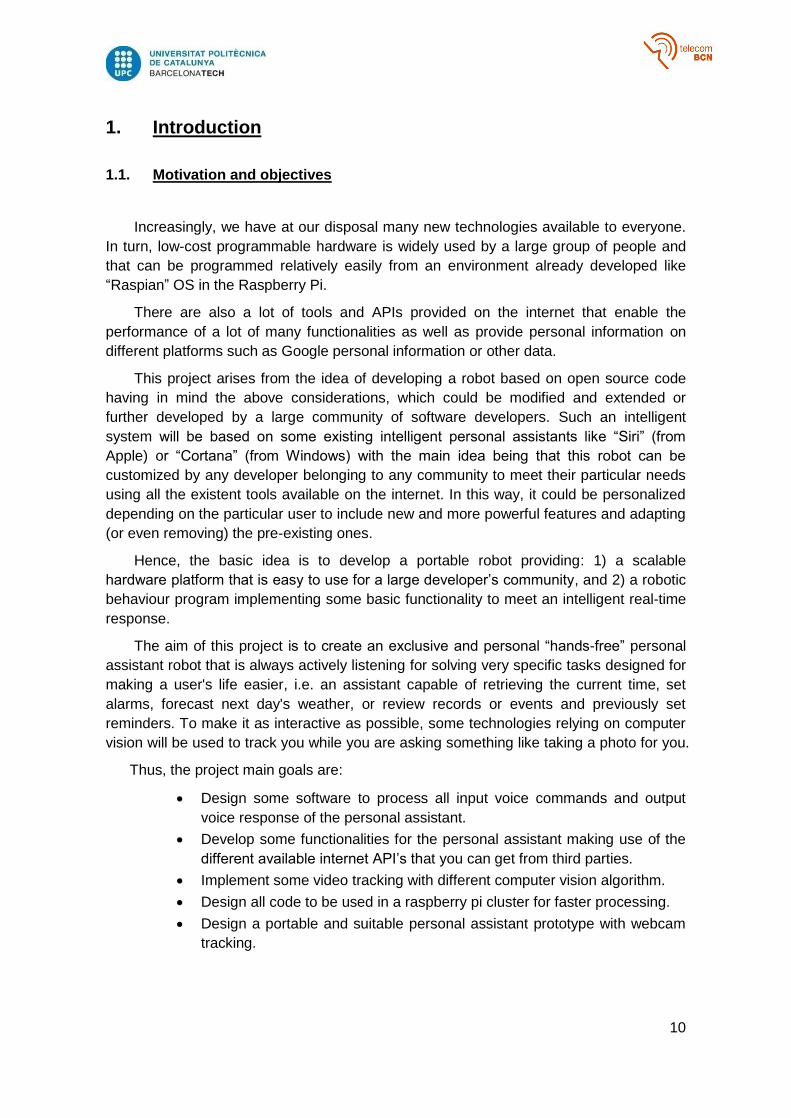
The aim of this project is to create an exclusive and personal “hands-free” personal
assistant robot that is always actively listening for solving very specific tasks designed for
making a user's life easier, i.e. an assistant capable of retrieving the current time, set
alarms, forecast next day's weather, or review records or events and previously set
reminders. To make it as interactive as possible, some technologies relying on computer
vision will be used to track you while you are asking something like taking a photo for you.
Thus, the project main goals are:
Design some software to process all input voice commands and output
voice response of the personal assistant.
Develop some functionalities for the personal assistant making use of the
different available internet API’s that you can get from third parties.
Implement some video tracking with different computer vision algorithm.
Design all code to be used in a raspberry pi cluster for faster processing.
Design a portable and suitable personal assistant prototype with webcam
tracking.
11
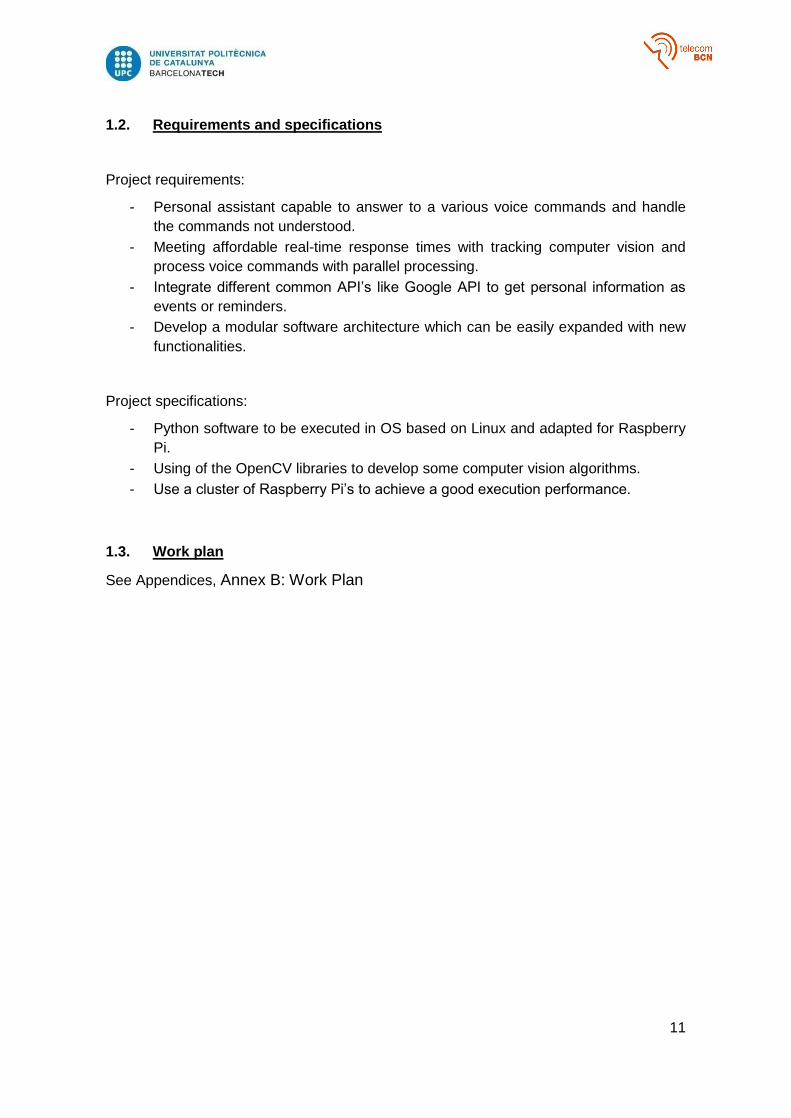
1.2. Requirements and specifications
Project requirements:
- Personal assistant capable to answer to a various voice commands and handle
the commands not understood.
- Meeting affordable real-time response times with tracking computer vision and
process voice commands with parallel processing.
- Integrate different common API’s like Google API to get personal information as
events or reminders.
- Develop a modular software architecture which can be easily expanded with new
functionalities.
Project specifications:
- Python software to be executed in OS based on Linux and adapted for Raspberry
Pi.
- Using of the OpenCV libraries to develop some computer vision algorithms.
- Use a cluster of Raspberry Pi’s to achieve a good execution performance.
1.3. Work plan
See Appendices, Annex B: Work Plan

12
2. State of the art of the technology used or applied in this
thesis:
Who does not remember that annoying Microsoft Office paperclip called “Clippit”?
Currently, amazing technological breakthroughs in speech recognition, natural language
processing and synthesis, machine learning and artificial intelligence mean that the age
of AI-based assistance is now upon us.
This results in an increase of a large array impressive personal AI assistants from
large corporations like “Siri” (by Apple), “Google Now” (by Google) or “Cortana” (by
Windows). They are truly capable of helping us to deal with life's tasks such as managing
our schedules, request for some specific things that depend on the corresponding
assistant and its platform where it is running or even helping us write our latest blog posts.
Inside the voice recognition field and voice synthesis, we can find some tools that are
offered by companies like Google or some others that are more focussed on this concrete
field such as “Nuance” [1], “Acapela” [2] or “Ivona” [3] where you can hire their services to
be used in web pages or mobile applications. One example of this potential technology
are “ili” [7], a gadget currently under development that allows you to recognise your voice
at real time and synthesize some translated voice. A wearable translator that breaks the
language barriers.
This project is more focussed on a personal assistant. Besides the large corporations
as we mentioned above, that make use of a mobile phone as a platform for their personal
assistant, we can find others like “Amy” [8]. This one for example is like a “schedules
meeting” assistant. When you want to meet with someone, “Amy” will send an email to
the person for you by looking at your preferences. They would then discuss and specify a
date with the other person.
Some other personal assistants more similar to our project could be “Jasper” [9]. An
open source personal assistant controlled with command voice that is executed on a
Raspberry Pi. They have different functionalities like check email, or the weather or even
“Facebook” notifications. Non-open source assistants could be “Cubic” [10] or “Echo” [11]
from “Amazon”.
An advanced personal assistant that looks like our project could be “Jibo” [12] that is
under development. This one is like an intelligent social robot that allows receiving
calendar events, asking something that could be asked as in “Siri” or keep some
conversations or suggest certain things depending of your preferences. The main
difference in respect to “Jasper” is that it has a camera capable of tracking you and if you
request it takes a photo for you.
Aside from these technological advances that make an intelligent Personal Assistant
possible, there is the facility to access personal and private data on the different social
networks or internet accounts making use of API’s that the large companies give out at
the disposal of software developers. Depending on your preferences, you can get
notifications on social networks as “Facebook”, “Twitter”, “LinkedIn”, “Instagram” or even
get music on your “Spotify” account. All this advantages make the availability of
necessary personal information easier for a personal assistant.
13
3. Methodology / project development:
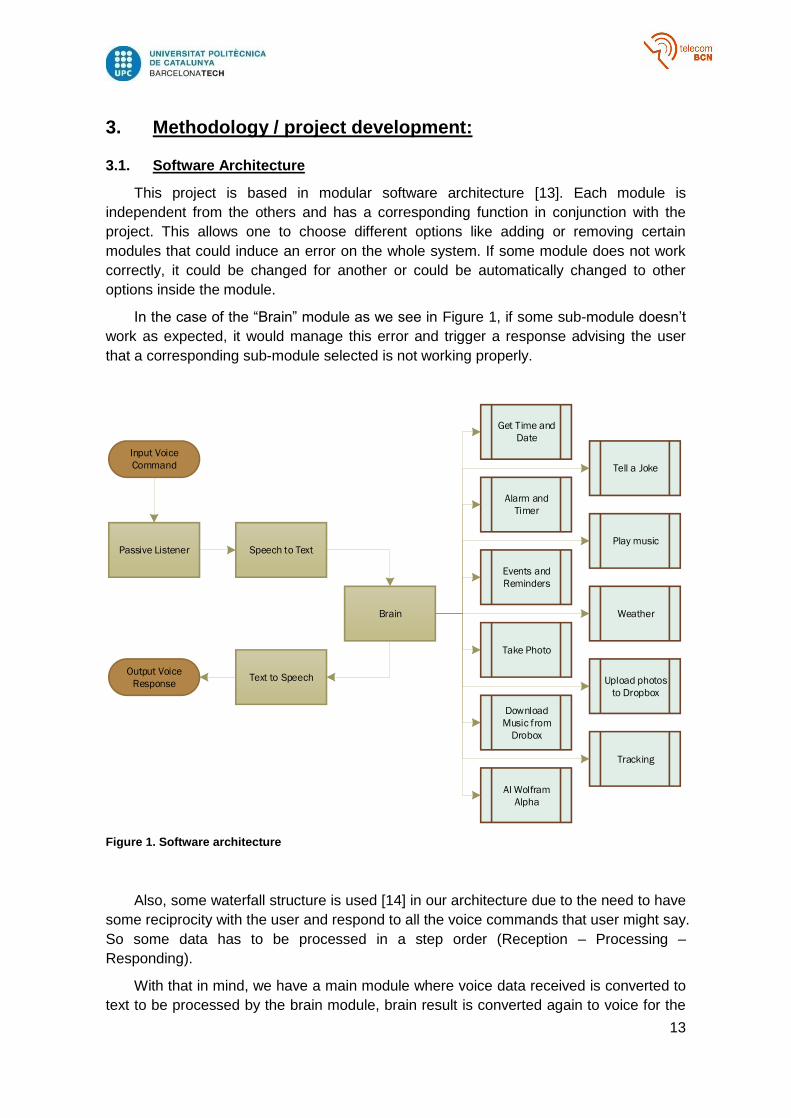
3.1. Software Architecture
This project is based in modular software architecture [13]. Each module is
independent from the others and has a corresponding function in conjunction with the
project. This allows one to choose different options like adding or removing certain
modules that could induce an error on the whole system. If some module does not work
correctly, it could be changed for another or could be automatically changed to other
options inside the module.
In the case of the “Brain” module as we see in Figure 1, if some sub-module doesn’t
work as expected, it would manage this error and trigger a response advising the user
that a corresponding sub-module selected is not working properly.
Input Voice
Command
Speech to Text
Brain
Get Time and
Date
Tell a Joke
Play music
Events and
Reminders
Weather
Text to SpeechOutput Voice
Response
Take Photo
Passive Listener
Upload photos
to Dropbox
Download
Music from
Drobox
Tracking
Alarm and
Timer
AI Wolfram
Alpha
Figure 1. Software architecture
Also, some waterfall structure is used [14] in our architecture due to the need to have
some reciprocity with the user and respond to all the voice commands that user might say.
So some data has to be processed in a step order (Reception – Processing –
Responding).
With that in mind, we have a main module where voice data received is converted to
text to be processed by the brain module, brain result is converted again to voice for the
14
user interaction. Therefore, brain module will call on some sub-module depending of the
user voice command.
3.2. Voice Processing
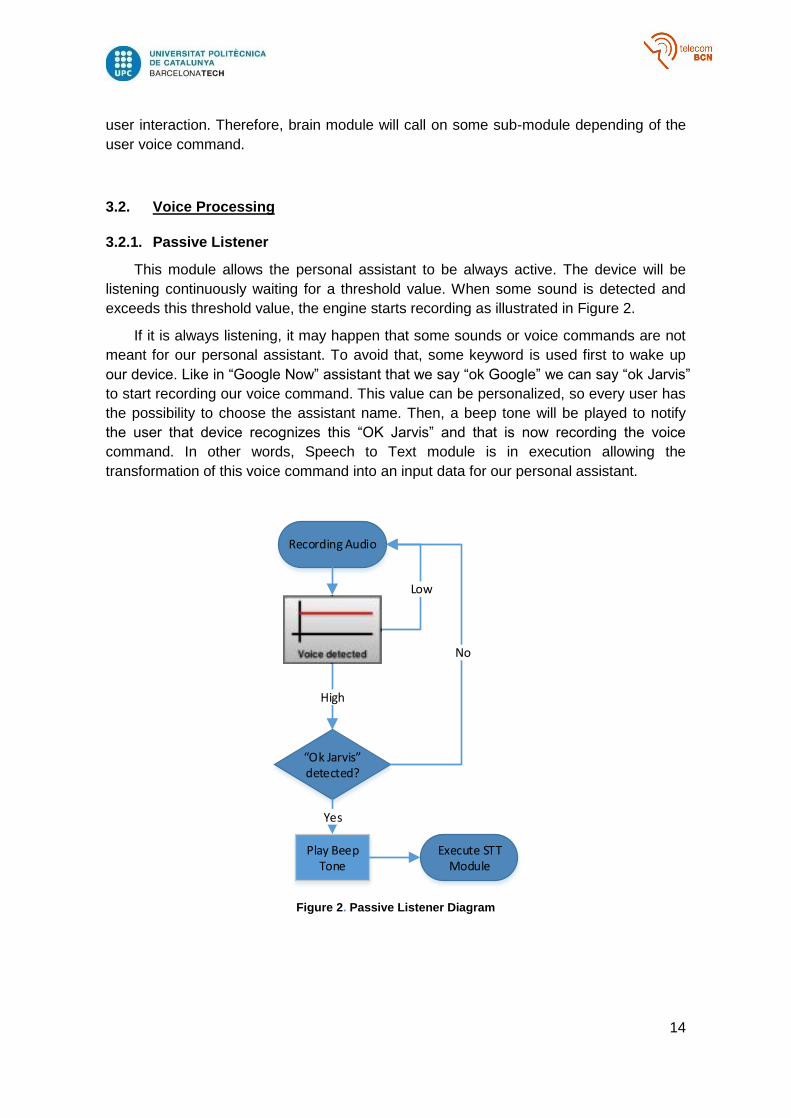
3.2.1. Passive Listener
This module allows the personal assistant to be always active. The device will be
listening continuously waiting for a threshold value. When some sound is detected and
exceeds this threshold value, the engine starts recording as illustrated in Figure 2.
If it is always listening, it may happen that some sounds or voice commands are not
meant for our personal assistant. To avoid that, some keyword is used first to wake up
our device. Like in “Google Now” assistant that we say “ok Google” we can say “ok Jarvis”
to start recording our voice command. This value can be personalized, so every user has
the possibility to choose the assistant name. Then, a beep tone will be played to notify
the user that device recognizes this “OK Jarvis” and that is now recording the voice
command. In other words, Speech to Text module is in execution allowing the
transformation of this voice command into an input data for our personal assistant.
Recording Audio
High
Low
“Ok Jarvis” detected?
No
Yes
Execute STT Module
Play Beep Tone
Figure 2. Passive Listener Diagram
15
3.2.2. Speech to Text
The STT module it is used to convert all audio commands in text to be processed by
Brain module. Audio is recorded until a silence is detected. Then audio file is converted to
a specific audio format specified in [6].
In our case, FLAC audio format was first used. Then, some Google changes in the
API functionality forced the audio format to change to 16-bit PCM (Sample Encoding: 16-
bit Signed Integer PCM, Sample Rate: 1600 bits). Some other inconveniences of Google
services are that Speech to Text API is orientated to be used in web development as we
can see in [18]. In consequence only web development support from Google is provided.
After getting the correct audio file, this is sent to the Google servers through URL HTTP
Request method. Although some inconveniences can be observed, formats or services
accessed via URL can be deprecated in the future for Google services. There could be
some limitations that restrict to only 15 seconds of audio that can be sent via this method.
As a consequence, this voice command won’t be processed and transformed into text
data.
Some important header parameters that the device must have are the language to
transcript the audio file, output format response and some Google API key. Output format
to retrieve data is formatted in “JSON” in our case, due to the parsing facility. This format
allows retrieving data in a multidimensional array that could be easily accessible for
python environment. In the case of Google API key, to use their services, it can be
generated and retrieved from the Google developer portal [16].
3.2.3. Text to Speech
The TTS module is used to convert some text generated by the device as an output
response to some artificial synthetized voice that user can understand.
With STT, this module tried to use Google services. Google Translator can
synthetize some text to audio voice. Using this attribute, text was converted to audio
speech via URL request, but due to some changes relatively recently in Google policy, a
captcha request is received instead of audio file due to an automatic https request. Some
solutions were posted on the internet, such as adding some parameters to URL. However,
they only can avoid this captcha request up to a certain extent.
Accordingly, the alternative was to use a PYTTSX [5] engine for python. Again, some
new problems were found: response audio was cut before finishing after this engine was
called twice. Seems like the problem was when this engine was used repeatedly in a loop.
Then this alternative does not work as it should be expected for our project. Since
PYTTSX is a wrapper based on “eSpeak” [4] driver for Linux platform, this engine was
used directly instead.
Then, with “eSpeak” engine, the audio file that is generated is stored in a temporal
file that is played and later on, deleted. Some parameters could be personalized, such as
pitch or speed of the voice. Enough features for this project.

16
3.3. Modules
When data is transformed in the STT module to some input data that our assistant
can manage, this data is sent to a general processing module. This module is called
“Brain” module and is in charge of analysing and distributing the corresponding command
to the corresponding sub-module that manages and carries out with the user command.
For that, some keywords should be used in the user commands. i.e., if the user says
-“Tell me a joke Jarvis”-, we can identify the “joke” keyword. With this keyword identified,
“Brain” module will pass to the “Joke” sub-module the user command and in
consequence, the processing of this command. This sub-module will process some
response using Raspberry Pi functionalities or some API’s or internet resources. We can
see all this process in Figure 3.
Input dataPassive Listener
Module
Speech recognized?
Yes
Brain.think(text)
NoNo input data
END
Keyword: “calendar”
Keyword: “joke”
No Keyword recognized
Calendar.think(text)
Joke.think(text)
Wolfram.think(text)
Output Data
Assistant Main Module Brain Module
Speech To Text Module
Text To Speech Module
Result & Response data
Figure 3. Modules Structure
It may happen that no keyword is recognized. As is illustrated in Figure 3, “Wolfram
Alpha” API will manage this. This sub-module will be explained further down.
Thanks to the modular architecture, “Brain” module could be executed directly for
debugging tests allowing the executing of some text commands through some terminal
console. This interdependency between modules allows it to test every single sub-module
and disable it if is necessary, i.e. if is not working correctly. Some important modules are
explained below.

17
3.3.1. Time & Date
This sub-module gets the time and the current date that is set in the OS with the use
of “time” and “date” keywords.
3.3.2. Alarm & Timer
This sub-module allows setting certain alarms by the use of some asynchronous
handlers called signals that are woken up after a certain time. That allows this module to
set and manage alarms and timers. The only difference is that in the case of an alarm the
interval time between the alarm and the current time is calculated to set the signal.
To set an alarm is important to use the keywords “set” and “alarm at XX”.
“Set alarm at 20:00.”
“Can you set an alarm at 8 pm?”
Also alarm can be deleted using “delete” keyword in the command order.
“Delete alarm.”
In the case of an alarm, the time when the alarm is going to set off can be retrieved
by using the “alarm” keyword and none of the other keywords previously used “set” and
“delete”.
“Tell me when the alarm is going to ring.”
Timer can accept data in seconds, minutes and hours. As same as alarm, it uses “set”
followed by “timer” keywords.
“Set timer of 10 seconds.”
“Set timer of 1 minute.”
”Set timer of 10 minutes.”
“Set timer of 2 hours.”
Again, timer can be deleted and retrieved using the same procedures as alarm
command orders.
“Delete timer.”
“When the timer is going to ring?”
3.3.3. Jokes
This sub-module reads some file called “jokes.txt” where it gets randomly one of the
jokes that are stored. “Joke” keyword has to be in the user command in order to get one
random joke. E.g. “Tell me a joke”.
3.3.4. Google Events & Reminders
This sub-module is something different from the others because it depends
completely on Google API’s. Some advantages are that the calendar that we use in our
personal assistant for events and reminders is the same as we have in the mobile phone
18
in the case that our OS is Android. That means that if we create some event using our
personal assistant, this change will be reflected in our Google calendar and therefore in
our phone, allowing the interconnectivity between our phone and our personal assistant.
Likewise, if we create some new event on the phone, this could be retrieved by the
personal assistant.
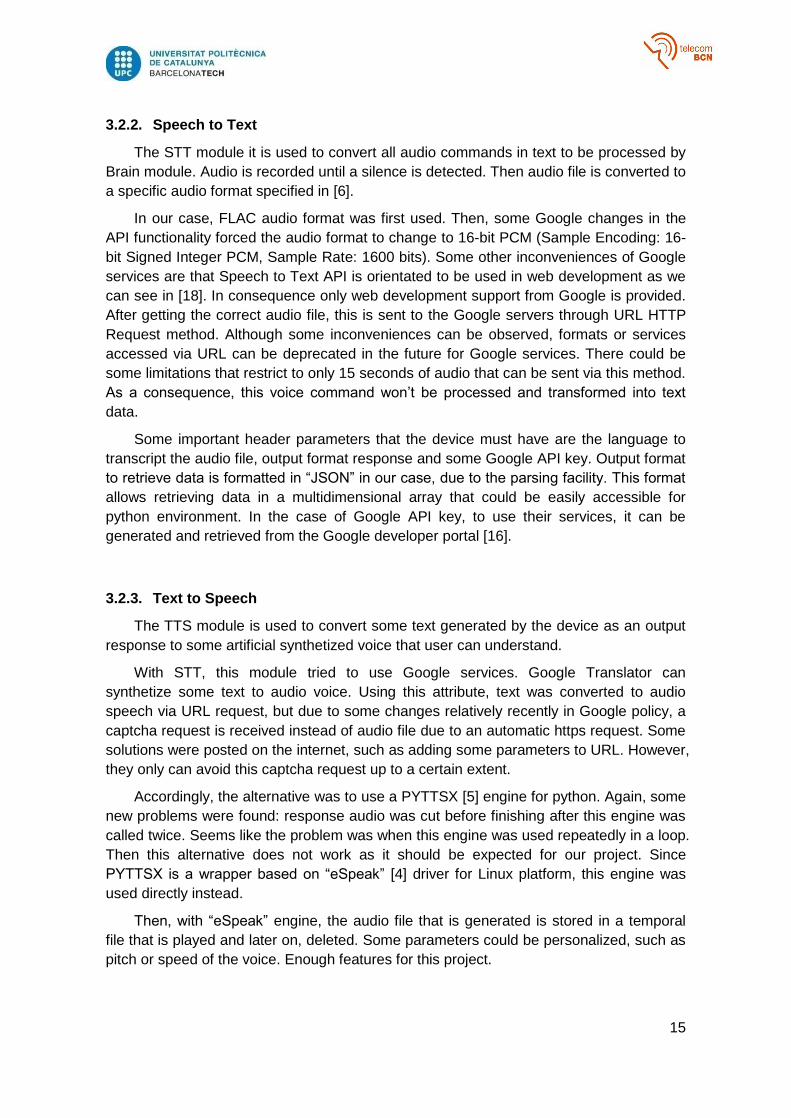
Some inconvenience that this sub-module presents is that to get personal user data,
the personal assistant has to pass through some security measures and protocols as
defined in [17]. In the case of Google, it uses OAuth 2.0 protocol for authentication and
authorization.
Personal
Assistant
Servers
Request Token
Authorization Code
Exchange Code for token
Token Response
Use Token to call Google API
User Login & Consent
Figure 4. OAuth 2.0 protocol
In this flowchart we can see how the application, in our case the personal assistant,
tries to get an authorisation and authentication to personal user data using OAuth 2.0
protocol. This protocol is triggered only the first time to get the corresponding tokens to
be used in calendar data request.
As we can see in Figure 4, the first step, application tries to get some Authorization
code. In this process, the default browser will be opened and redirect to a Google URL
where the user should allow the application giving permissions to access private user
data. Having done that, the application gets this authorization code together with some
other OAuth 2.0 credentials generated in the portal of Google Developers [16] and
exchanges it for some tokens that are stored in a file called “calendar.dat”. Two tokens
are stored, the main is used to retrieve data from calendar API, and the other one is to
refresh the main token because this main token expires every some certain time or
certain access. Then, if main token is expired, protocol gets another token without the
19
user having to re-authenticate and re-provide permission to the application each time this
main token has expired.
Every time the application wants to access to calendar data, some data is mandatory.
API key extracted from portal of Google Developer [16]. Required for the use of
Calendar API.
Token generated with OAuth 2.0 to have access to the user personal data.
Calendar ID that is going to use. This can be retrieved in the option of calendar
configuration.
Calendar of reminders and calendar of events has the same functionality but is
stored in different calendars, allowing the user to configure the corresponding calendar to
their own preferences. i.e. In calendar for events set some parameter to notify some
event one hour before.
The functionalities that the Calendar module has are to create, retrieve and delete
some event or reminders. In the case of creating a calendar event or reminder; some
checks are performed before and after the creation of the calendar entry. First, checks if
the entry is already created, and after ensures that the entry is created correctly and
there has not been any kind of error in the connection between the server and the
personal assistant. The same happens to delete command.
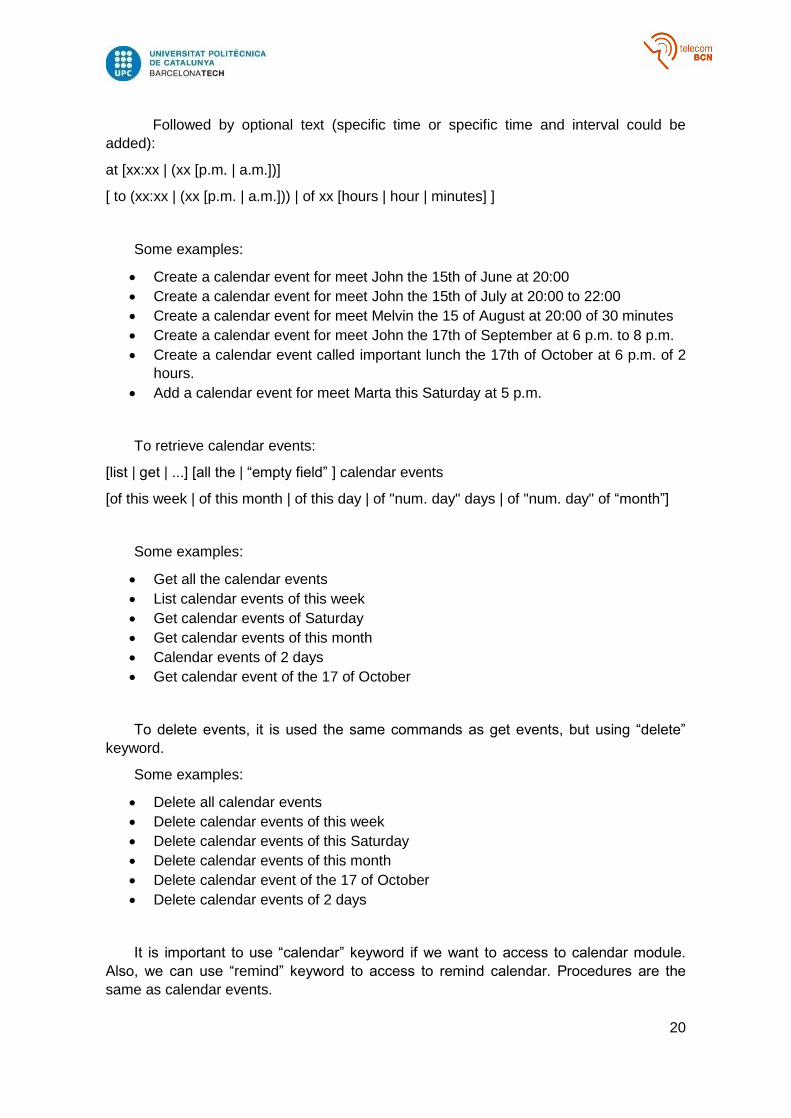
To execute this module, some important and mandatory data should be present. Due
to the complexity of the voice commands of this module, some symbols are used to
determine the different options in the voice commands.
Symbol Meaning
[ … ] Text can have different possibilities. Only one text inside this aggrupation is
valid. This possibilities are separated with OR operator.
( … ) Aggrupation of text.
“ … “ Not fixed text. Possibilities are explained in the text inside.
| OR operator.
xx Represents hours or minutes
Table 1. Voice Commands symbols
For create a calendar event some first text command is mandatory:
[create a | add a | new] calendar event [called | for] “name of the event”
[for the | the | this] [(["num day"th | "num day"] of “name of month”) | “day of the week”]
20
Followed by optional text (specific time or specific time and interval could be
added):
at [xx:xx | (xx [p.m. | a.m.])]
[ to (xx:xx | (xx [p.m. | a.m.])) | of xx [hours | hour | minutes] ]
Some examples:
Create a calendar event for meet John the 15th of June at 20:00
Create a calendar event for meet John the 15th of July at 20:00 to 22:00
Create a calendar event for meet Melvin the 15 of August at 20:00 of 30 minutes
Create a calendar event for meet John the 17th of September at 6 p.m. to 8 p.m.
Create a calendar event called important lunch the 17th of October at 6 p.m. of 2
hours.
Add a calendar event for meet Marta this Saturday at 5 p.m.
To retrieve calendar events:
[list | get | ...] [all the | “empty field” ] calendar events
[of this week | of this month | of this day | of "num. day" days | of "num. day" of “month”]
Some examples:
Get all the calendar events
List calendar events of this week
Get calendar events of Saturday
Get calendar events of this month
Calendar events of 2 days
Get calendar event of the 17 of October
To delete events, it is used the same commands as get events, but using “delete”
keyword.
Some examples:
Delete all calendar events
Delete calendar events of this week
Delete calendar events of this Saturday
Delete calendar events of this month
Delete calendar event of the 17 of October
Delete calendar events of 2 days
It is important to use “calendar” keyword if we want to access to calendar module.
Also, we can use “remind” keyword to access to remind calendar. Procedures are the
same as calendar events.
21
In the case of add a reminder; we will use “remind me to”. e.g. “Remind me to take
my umbrella this Friday“.
In the other cases, to retrieve or delete some reminders, “calendar events” keyword
in calendar events voice commands should be replaced by “reminders” keyword. E.g.
“Get reminders of this Friday”.
An important consideration is that currently google STT, is not able to recognize
properly time in digital format. i.e. “20:00”. Therefore, analogic format is also implemented.
i.e. “8 p.m.”
3.3.5. Play Music
This sub-module allows user to play all the music of the playlist with “play music”
keyword. This music is no other than the music stored in the personal assistant that is
downloaded from Dropbox. To stop the music, personal assistant only needs to hear
“music” keyword to stop.
3.3.6. Take Photo
When personal assistant is woken up, this means that camera is activated, user can
instruct personal assistant to take a photo with “take photo” keyword, while this one is
tracking user face. A shutter sound will be played to notify the user that photo was taken.
3.3.7. Dropbox
To facilitate the manipulation of files such music or images taken by the personal
assistant, Dropbox API is used. According to Dropbox portal developer [20], to make calls
to the API, an access token needs to be generated through App Console in the portal
developer. With this token (i.e. an API key), a python object can be instanced. This
object is linked to the Dropbox account and allows personal assistant to retrieve or
upload files. To use this sub-module, keyword “Dropbox” should be present in voice
command.
Download Music
User can create a playlist in Dropbox and using “download” keyword can retrieve all
the music in the corresponding “Music” folder in Dropbox. E.g. “Download music from
Dropbox”. Also, all the music that was in the personal assistant is deleted and replaced
with the one downloaded. Therefore, it replaces all the current playlist to the current
playlist set in Dropbox.
Upload Images
In the case where a user takes some photos, all photos are stored internally in the
personal assistant. To make the retrieval of the photos easier, the user can upload these

22
photos to the Dropbox account with “upload” keyword. E.g. “Upload photos to Dropbox”.
These photos will be stored in “DCIM” folder in Dropbox.
3.3.8. Computational Knowledge Engine
In the case that none of the keywords are recognized, the user command is sent to
Wolfram Alpha API [19]. Wolfram Alpha is an engine for computing answers and
providing knowledge. So in our system, it acts as an artificial intelligence that tries to
answer all the other user commands that our system cannot manage. Again, a token is
needed to use the corresponding API.
Some examples that Wolfram can manage:
The weather for tomorrow in Barcelona?
How much is 1 + 1?
What is the capital of Spain?
How much is 1 € in dollars?
How much is 1 kilometre in meters?
3.4. Tracking Module
The Tracking module is also one of the “Brain” sub-modules but is treated differently.
In this module, some background thread will be running independently from the main
program flow of our assistant.
This module is responsible for the camera functionality. To activate the tracking
module, a "wake up" keyword will be used. This will activate the camera of our personal
assistant, allowing it to capture image frames which will be analysed later. From this
analysis, the tracking module will be able to determinate the face position and therefore
be able to track it. For the prototype in Raspberry Pi platform, some PWM signals will be
sent to the servos of the pan tilt that are holding the camera to enable the camera to be
always focused on the person that it is trying to track.
To stop the tracking, we just need to use the “sleep” keyword.
3.4.1. Computer Vision Algorithms applied
To analyse the captures of this camera and to estimate the position of the user face
two computer vision algorithms are used. One is mainly used to detect the user face and
the other one to track the face in case the face is lost by the first algorithm.
3.4.1.1. HaarCascade Algorithm
Also known as Viola Jones, this algorithm is an effective in object using Haar
features-based cascade classifiers proposed by Paul Viola and Michael Jones in [23] and
improved by Rainer Lienhart [24].
23
Basically, this algorithm in object detection consists of some matrix convolutions with
some “haar features” to the image to extract edges and some other features to recognize
the object. Therefore, some previous training is required, using a lot of positive and
negative images. In our case, with some face images and non-face images in order to
extract some features corresponding to the object to be detected.
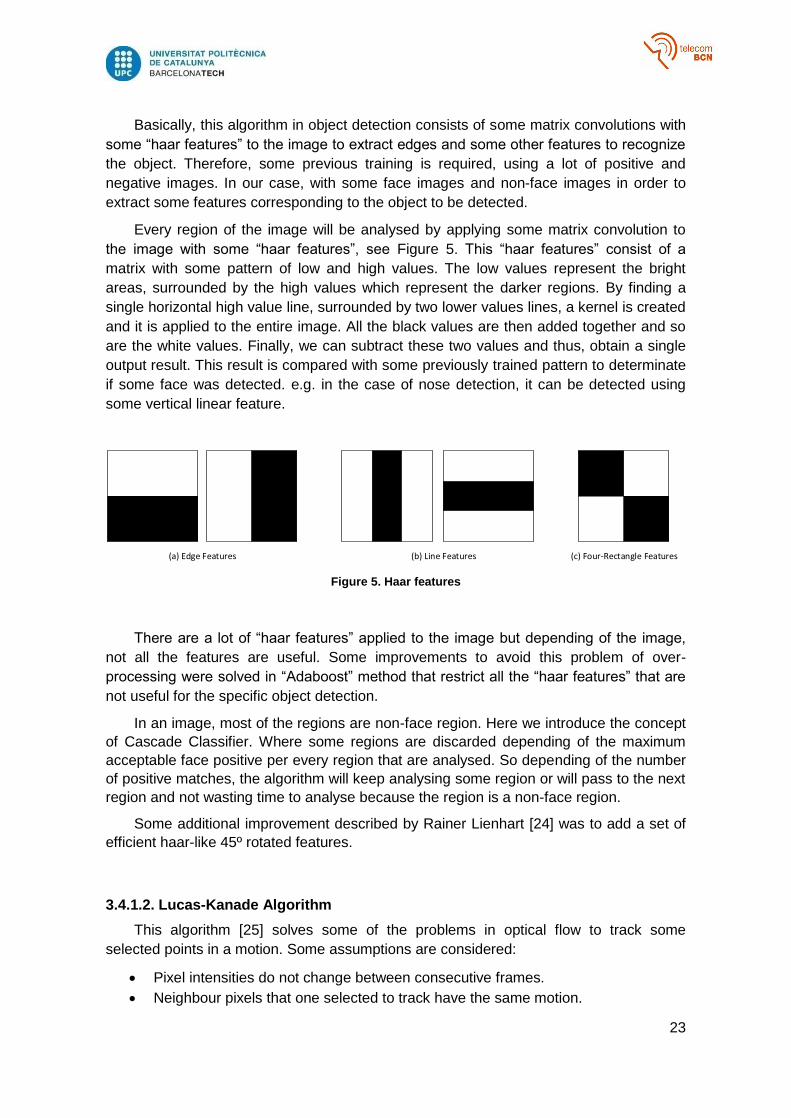
Every region of the image will be analysed by applying some matrix convolution to
the image with some “haar features”, see Figure 5. This “haar features” consist of a
matrix with some pattern of low and high values. The low values represent the bright
areas, surrounded by the high values which represent the darker regions. By finding a
single horizontal high value line, surrounded by two lower values lines, a kernel is created
and it is applied to the entire image. All the black values are then added together and so
are the white values. Finally, we can subtract these two values and thus, obtain a single
output result. This result is compared with some previously trained pattern to determinate
if some face was detected. e.g. in the case of nose detection, it can be detected using
some vertical linear feature.
(a) Edge Features (b) Line Features (c) Four-Rectangle Features
Figure 5. Haar features
There are a lot of “haar features” applied to the image but depending of the image,
not all the features are useful. Some improvements to avoid this problem of over-
processing were solved in “Adaboost” method that restrict all the “haar features” that are
not useful for the specific object detection.
In an image, most of the regions are non-face region. Here we introduce the concept
of Cascade Classifier. Where some regions are discarded depending of the maximum
acceptable face positive per every region that are analysed. So depending of the number
of positive matches, the algorithm will keep analysing some region or will pass to the next
region and not wasting time to analyse because the region is a non-face region.
Some additional improvement described by Rainer Lienhart [24] was to add a set of
efficient haar-like 45º rotated features.
3.4.1.2. Lucas-Kanade Algorithm
This algorithm [25] solves some of the problems in optical flow to track some
selected points in a motion. Some assumptions are considered:
Pixel intensities do not change between consecutive frames.
Neighbour pixels that one selected to track have the same motion.

24
Considering a pixel 𝐼(𝑥, 𝑦, 𝑡) in the first frame if the pixels are the same and they
have the same intensity we can consider:
𝐼(𝑥, 𝑦, 𝑡) = 𝐼(𝑥 + 𝑑𝑥, 𝑦 + 𝑑𝑦, 𝑡 + 𝑑𝑡) (1)
Defining the function of the displaced pixel using Taylor series we have:
𝐼(𝑥 + 𝑑𝑥, 𝑦 + 𝑑𝑦, 𝑡 + 𝑑𝑡) = 𝐼(𝑥, 𝑦, 𝑡) + 𝛿𝐼
𝛿𝑥𝑑𝑥 +
𝛿𝐼
𝛿𝑦𝑑𝑦 +
𝛿𝐼
𝛿𝑡𝑑𝑡 + ⋯ (2)
Considering the assumption of above not taking into account terms of higher degree,
we obtain:
𝛿𝐼
𝛿𝑥𝑑𝑥 +
𝛿𝐼
𝛿𝑦𝑑𝑦 +
𝛿𝐼
𝛿𝑡𝑑𝑡 = 0 (3)
If we divide the equation (3) by dt we obtain what is known as an optical flow
equation:
𝐼𝑥𝑢 + 𝐼𝑦𝑣 + 𝐼𝑡 = 0 (4)
Where 𝐼𝑥 and 𝐼𝑦 are image gradients, same as 𝐼𝑡 along time. And (𝑢, 𝑣) are optical
flow vectors which are unknown:
𝐼𝑥 = 𝛿𝐼
𝛿𝑥, 𝐼𝑦 =
𝛿𝐼
𝛿𝑦, 𝐼𝑡 =
𝛿𝐼
𝛿𝑡
𝑢 = 𝑑𝑥
𝑑𝑡, 𝑣 =
𝑑𝑦
𝑑𝑡
(5)
Lucas-Kanade algorithm [26] takes the assumption that neighbour pixels have similar
motion. With that, this algorithm takes a 3x3 patch around this pixel to obtain 9 equations
to get the optical flow vectors.
These assumptions could fail in large motions. In that case, a pyramidal
implementation is applied [28], where small motions are removed and large motions
becomes small motions.
To get the correct pixels to track Shi-Tomasi corner detector [27] is applied to extract
the most relevant points. These relevant points are none other than the different
25
intensities of its neighbour points) In other words, object corners. This allows a good track
of this point with the Lucas-Kanade algorithm which gets neighbour pixels of the current
point.
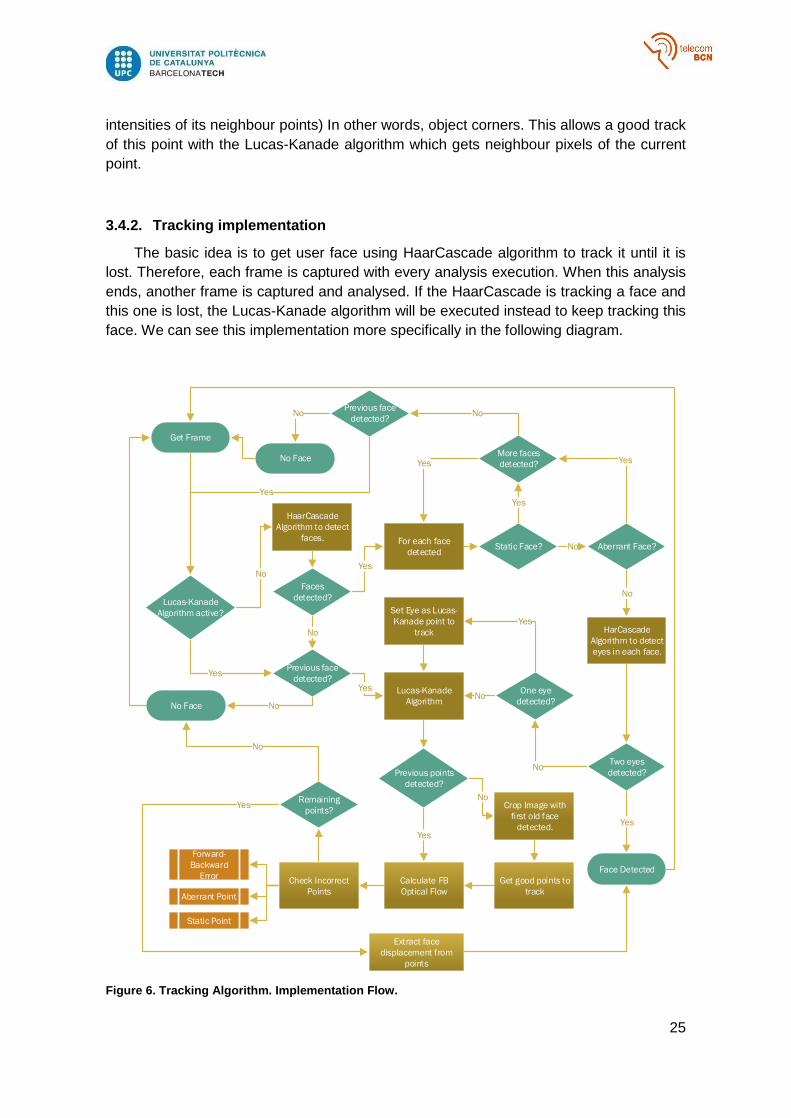
3.4.2. Tracking implementation
The basic idea is to get user face using HaarCascade algorithm to track it until it is
lost. Therefore, each frame is captured with every analysis execution. When this analysis
ends, another frame is captured and analysed. If the HaarCascade is tracking a face and
this one is lost, the Lucas-Kanade algorithm will be executed instead to keep tracking this
face. We can see this implementation more specifically in the following diagram.
Get Frame
HaarCascade
Algorithm to detect
faces.
Faces
detected?
No
Previous face
detected?
Aberrant Face?
No
HarCascade
Algorithm to detect
eyes in each face.
Yes
For each face
detected
More faces
detected? YesYes
Two eyes
detected?
Yes
Face Detected
Lucas-Kanade
Algorithm
Yes
NoNo Face
Previous points
detected?
NoCrop Image with
first old face
detected.
Get good points to
track
Calculate FB
Optical Flow
Set Eye as Lucas-
Kanade point to
track
One eye
detected?No
Yes
Check Incorrect
Points
Forward-
Backward
Error
Aberrant Point
Static Point
Remaining
points?
No
Yes
Yes
No
Lucas-Kanade
Algorithm active?
Yes
No
Extract face
displacement from
points
Static Face? No
Yes
Previous face
detected?No
Yes
No
No Face
Figure 6. Tracking Algorithm. Implementation Flow.
26
HaarCascade Implementation
When frame is captured and Lucas-Canade Algorithm is not active, HaarCascade
algorithm is executed in order to find some frontal faces. Then, a list of possible
candidates is retrieved. This module only allows the tracking of one face, therefore only
the first match of a correct face will be tracked. For each face, some analysis is
performed until a correct face is found.
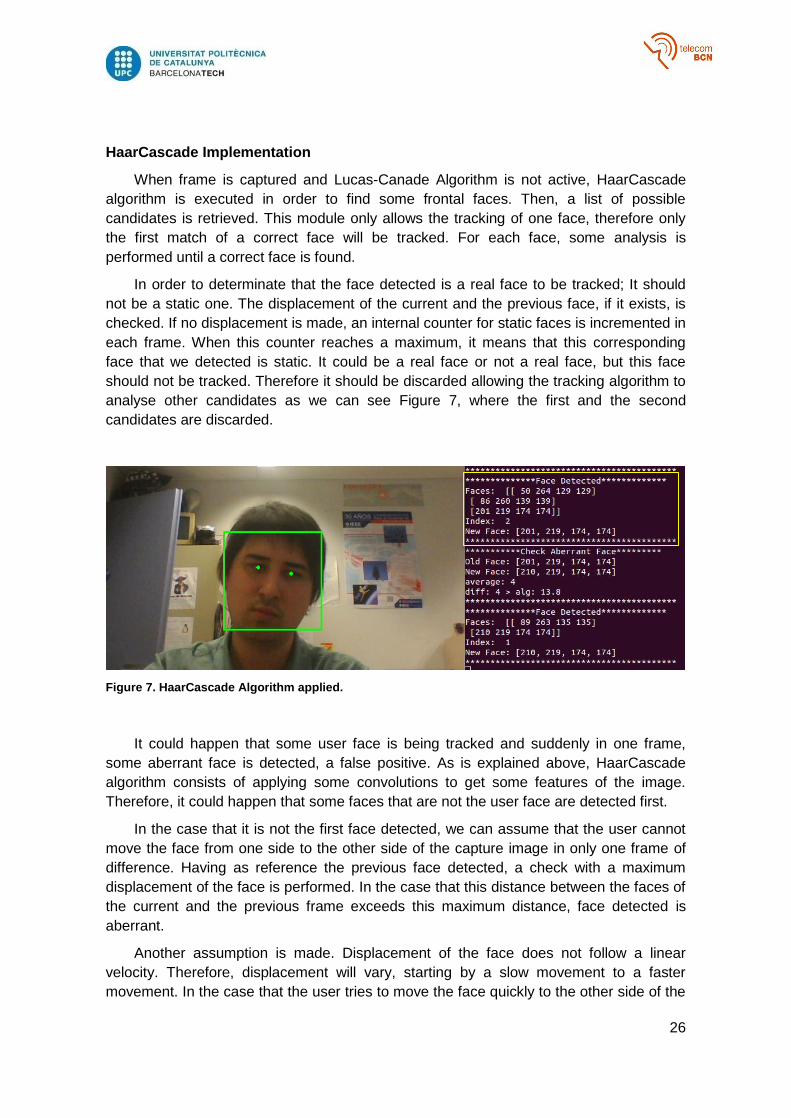
In order to determinate that the face detected is a real face to be tracked; It should
not be a static one. The displacement of the current and the previous face, if it exists, is
checked. If no displacement is made, an internal counter for static faces is incremented in
each frame. When this counter reaches a maximum, it means that this corresponding
face that we detected is static. It could be a real face or not a real face, but this face
should not be tracked. Therefore it should be discarded allowing the tracking algorithm to
analyse other candidates as we can see Figure 7, where the first and the second
candidates are discarded.
Figure 7. HaarCascade Algorithm applied.
It could happen that some user face is being tracked and suddenly in one frame,
some aberrant face is detected, a false positive. As is explained above, HaarCascade
algorithm consists of applying some convolutions to get some features of the image.
Therefore, it could happen that some faces that are not the user face are detected first.
In the case that it is not the first face detected, we can assume that the user cannot
move the face from one side to the other side of the capture image in only one frame of
difference. Having as reference the previous face detected, a check with a maximum
displacement of the face is performed. In the case that this distance between the faces of
the current and the previous frame exceeds this maximum distance, face detected is
aberrant.
Another assumption is made. Displacement of the face does not follow a linear
velocity. Therefore, displacement will vary, starting by a slow movement to a faster
movement. In the case that the user tries to move the face quickly to the other side of the

27
capture image, an adaptive average is calculated in each frame to recalibrate this
maximum displacement that it can perform on the user between frames captured by the
camera. This operation follows the following equation:
∆휀 = 𝐸 + 𝛼∆𝑑 + 𝛿 (6)
Where:
∆휀: Maximum distance that the face of the previous frame can be displaced with
respect to the current face without being rejected as an aberrant face.
𝐸: Adaptive distance error. This value is updated on every frame with the previous
displacement.
𝛼 : Tolerance factor.
∆𝑑 : Displacement between previous and current face.
𝛿 : Minimum distance accepted. This value is important in the case that no
previous image is captured.
In the case where displacement between the current face and the previous image
exceeds this value, the current face is rejected.
Figure 8. False Positive HaarCascade Algorithm
For each candidate, the image is cropped from the current frame and analyzed
applying HaarCascade algorithm to find the eyes of the face. This particular analysis
avoids the problems such as the one illustrated in Figure 8, where some false face is
detected. Different cases are possible:
When two eyes are found. It means that the current candidate is a real face. Then
the module stores this face as the previous face and gets the next frame.
When no eye is detected. It means that the real face is not detected.
When some eye points are detected and the number of eyes detected are not two.
In this last particular case, the current candidate is only considered a real face if
there was a previous face detected. This is because it is assumed that there was a real
face being tracked and somehow, some eye is lost due to the inclination or rotation of the
face.
28
To avoid the complete loss of the face, Lucas-Kanade algorithm is activated in this
particular case and the left eye point that was detected will be used in this algorithm as
good points to track.
In the case that non-eyes are detected, i.e. face is lost, and there are some face
detected in the previous frame, Lucas-Kanade algorithm also activated with non-points to
track.
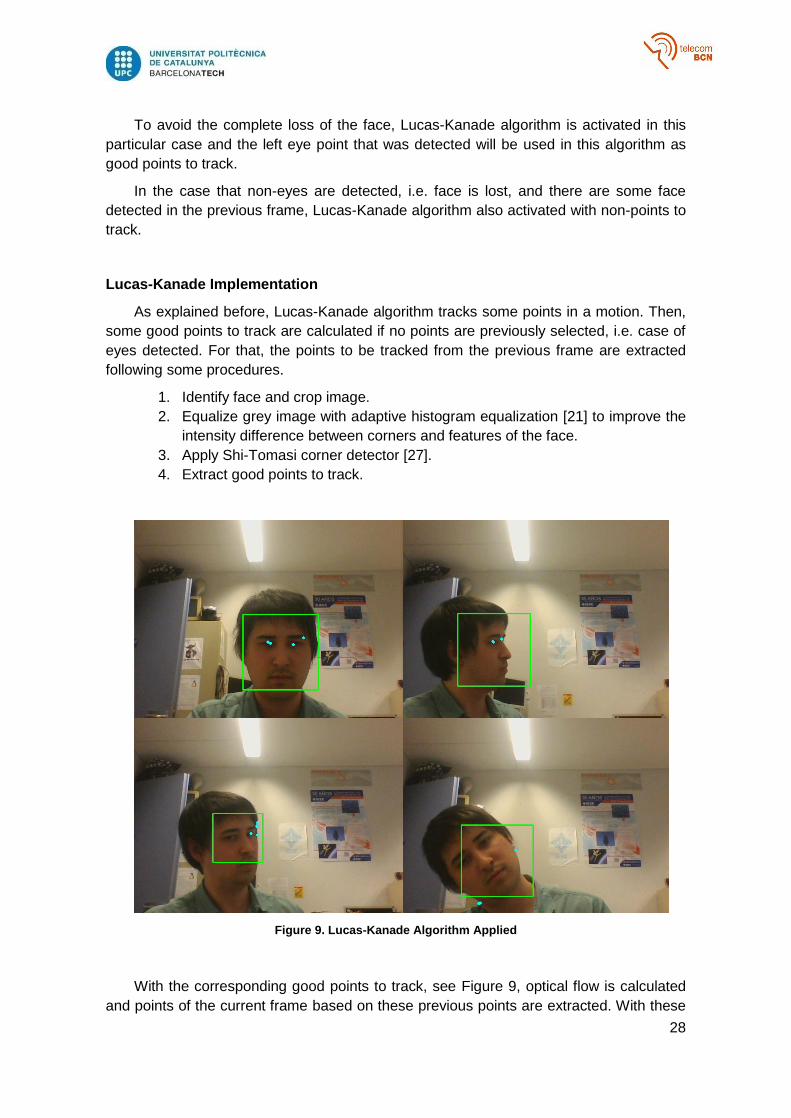
Lucas-Kanade Implementation
As explained before, Lucas-Kanade algorithm tracks some points in a motion. Then,
some good points to track are calculated if no points are previously selected, i.e. case of
eyes detected. For that, the points to be tracked from the previous frame are extracted
following some procedures.
1. Identify face and crop image.
2. Equalize grey image with adaptive histogram equalization [21] to improve the
intensity difference between corners and features of the face.
3. Apply Shi-Tomasi corner detector [27].
4. Extract good points to track.
Figure 9. Lucas-Kanade Algorithm Applied
With the corresponding good points to track, see Figure 9, optical flow is calculated
and points of the current frame based on these previous points are extracted. With these
29
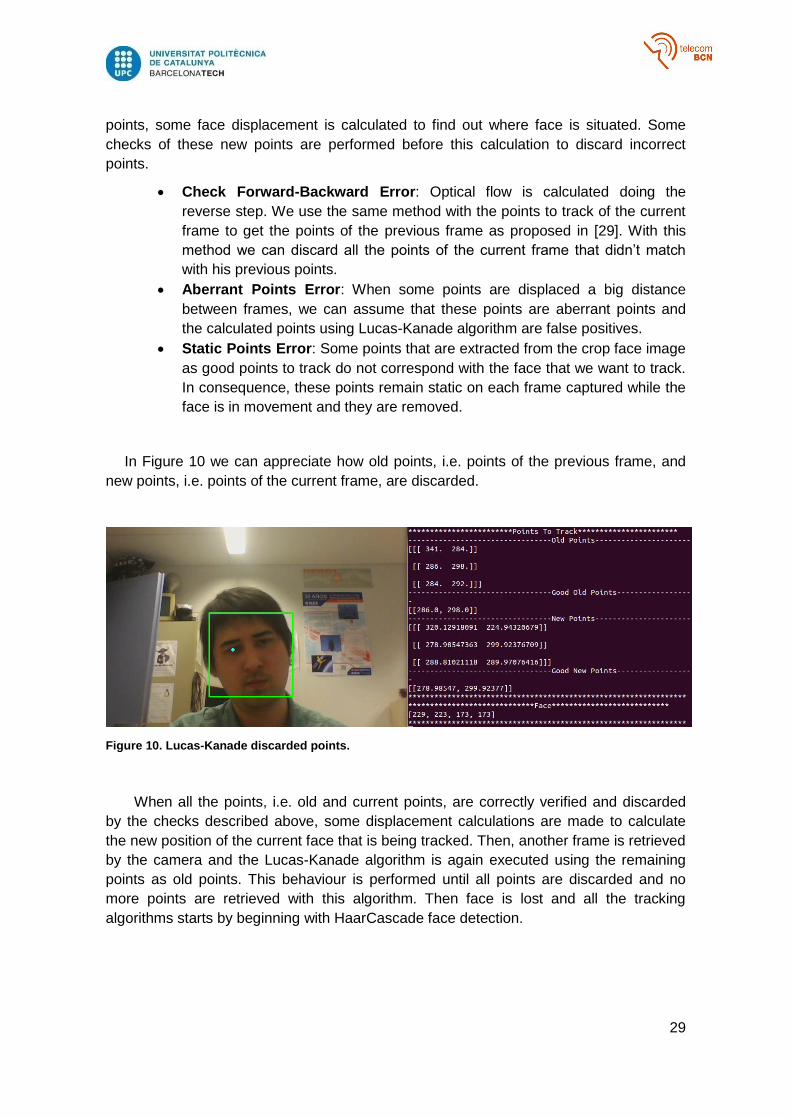
points, some face displacement is calculated to find out where face is situated. Some
checks of these new points are performed before this calculation to discard incorrect
points.
Check Forward-Backward Error: Optical flow is calculated doing the
reverse step. We use the same method with the points to track of the current
frame to get the points of the previous frame as proposed in [29]. With this
method we can discard all the points of the current frame that didn’t match
with his previous points.
Aberrant Points Error: When some points are displaced a big distance
between frames, we can assume that these points are aberrant points and
the calculated points using Lucas-Kanade algorithm are false positives.
Static Points Error: Some points that are extracted from the crop face image
as good points to track do not correspond with the face that we want to track.
In consequence, these points remain static on each frame captured while the
face is in movement and they are removed.
In Figure 10 we can appreciate how old points, i.e. points of the previous frame, and
new points, i.e. points of the current frame, are discarded.
Figure 10. Lucas-Kanade discarded points.
When all the points, i.e. old and current points, are correctly verified and discarded
by the checks described above, some displacement calculations are made to calculate
the new position of the current face that is being tracked. Then, another frame is retrieved
by the camera and the Lucas-Kanade algorithm is again executed using the remaining
points as old points. This behaviour is performed until all points are discarded and no
more points are retrieved with this algorithm. Then face is lost and all the tracking
algorithms starts by beginning with HaarCascade face detection.
30
3.5. Raspberry Pi implementation and Clustering
All implementation and functionalities are designed to work with Linux and have
Raspberry Pi compatibility. Hence, development was performed in a computer with Linux.
However, a lot of configurations and packages were installed in Raspberry Pi in order to
set a correct environment where the assistant is going to be executed.
Some limitations due to the hardware and data processing capabilities of the
Raspberry Pi affect considerably the performance of the personal assistant. In the case of
the tracking implementation, a lot of calculations are made. In real situations, Raspberry
Pi is not capable of doing these calculations fast enough. Hence, the camera cannot
follow the normal movement of the user face. Additionally, improvements for better
performance in face recognition and extra processing to reject incorrect faces make this
tracking execution slower.
Raspberry Pi Clusters
Clustering and parallel computing are introduced in order to reduce the latency in
data processing. The basic idea is to distribute data to process into different Raspberry Pi
clusters or nodes that are interconnected via Ethernet.
As we know, each Raspberry Pi can be accessed via SSH. This allows the user to
access a remote machine through network with some user login and password. The first
concept is that in data sharing and parallel calculation, the machine, (i.e. Raspberry Pi) is
not capable of introducing a login and password. In consequence, some pre-
configurations should be made. SSH protocol allows the connection to some machine
using RSA authentication keys. Then, for each machine, RSA public and private keys are
generated and the public key is then shared with the corresponding machine that you
want to have access to and stored in “~/.ssh/authorized_keys” file allowing an automatic
authentication to enable data sharing without user authorization.
MPI stands for Messaging Passing Interface and it is a language-independent
message-passing communication protocol that allows data sharing between different
code-executions in different machines. There are two different implementations of MPI
that can be used in Raspberry Pi, OpenMPI and MPIH [30]. Hence, there are two
possibilities to run our code. The easy way will be to install MPI4PY [32] that corresponds
to OpenMPI adapted with some python API’s that we can use inside the python code. Or
install first MPIH and then MPI4PY. This last option can have a lot of conflicts if we do not
select correctly the MPI engine because OpenMPI is also installed with the python API’s
which conflicts with the current and installed MPIH. A work-around has to be made
instead to select the corresponding MPI to use [31].
With the MPI already installed we can use this python API’s [33] to execute certain
codes depending of which node code is executing. Some aspects that must be met in
order to make the parallel computation work are that both route and file must be the same
in each node (aka machine). With this requisite accomplished, we can execute the python
code from a machine that we shall call master node.
The basic idea of performing a parallel computation is to create some codes that are
adapted to perform some action depending of the node that is executing this code. In
31
such case, we have some input data from the master node, i.e. frame with face to track.
This input data is only received by the master node and is distributed to the secondary
nodes by this master node. Then, these secondary nodes will process this data; perform
some calculations or whatever needs to be done, with the advantage that this
computation can be done in parallel. After that, the data is returned to master node.
For our tracking algorithm we have some computer vision algorithms that are applied.
Only HaarCascade algorithm with parallel processing is applied in this project because it
is the one that spends most of the resources of the Raspberry Pi. HaarCascade applies
some matrix convolutions as we explained in section 3.4.1.1 and for convenience, these
convolutions can be applied only in some section of the entire frame. With that in mind,
the image is split in half. One of them sends it to the secondary node to analyse this half
frame and try to recognize some face while the other half is processed in the master node.
At the end of the processing, the secondary node sends its result to the master node and
the master node continues the tracking flow. This allows the master node to reduce the
resource load distributing this data to process.
Prototype
For Raspberry Pi prototype, some peripherals are added:
Microphone
Speakers
Camera
In the case of the camera, it is subjected by a pan tilt which in turn has some servos
that control the direction where the camera is pointing. These servos are controlled by
PWM signals, allowing the Raspberry Pi to track the user face. PWM signals are
periodical square signals, which mean that these signals depend mostly on a stable
processor frequency. To achieve this, an Arduino is used to keep PWM signals with no
variations. This decision is made because the PWM signals generated in the Raspberry
Pi are unstable due to the high processing in other sections like voice passive listener or
tracking algorithm. Then an order via serial is sent to Arduino and this updates its PWM
signals that are transmitted constantly to stabilize the servos.
4. Results
4.1. System analysis
Some limitations in the capacity of our system to interact with the user with a quick
response are expected. The personal assistant has a considerable dependence on
external API’s and services such Google or Wolfram. The main bottleneck of this
interaction speed is given by the Google STT subsystem responsible for the voice order
recognition.

32
Figure 11. STT timings
As we can see in Figure 11, it takes on average, one second. Although in some
occasions or depending on the internet connection or Google service, it can take up to 8
seconds. Some considerations to take into account is that the timing is very dependent
on the weight of the audio sent to the Google servers. Meaning that if our voice order
command is too long, the personal assistant will take a longer time to process this order.
An important and extra timing is observed when the Wolfram Alpha is triggered - about
five extra seconds.
In terms of voice command successfully transformed into text data, some limitations
are observed in Table 2.
Voice order send Text data received
My name is Melvin
my name is mel
my name is marry
my name is may
my name is mel b
my name is matt
my name is mail
my name is mary
put the keys on the car
ssundee
dickie's on
lucky's on
would the keystone
food vacuum
put the keys in the car
the keys in the car
the keys in the
put the keys in the car Table 2. Voice text sent to Google API
0
1
2
3
4
5
6
7
8
9
10
1 2 3 4 5 6 7 8 9 10 11 12 13 14 15 16 17 18 19 20 21 22
Pro
cess
ing
Tim
e [
s]
Voice Order [n]
Speech To Text Latency
STT Latency
33
In the first voice text we can observe that Google API is not capable of transcribing a
personal name that is not in its dictionary, so to speak. It is assumed that Google has a
work-around for this capability, where it learns and it takes in mind all the names of the
contact list of the phone, where Google API is normally used.
Some other details observed are those where it seems Google STT engine analyses
the syntax of the sentence to perform better transcriptions. This concept is demonstrated
in Table 2, where the third voice text is more correct than the second one and therefore it
is transcribed correctly, unlike the second one. The crop that can be seen at the start and
end of the text transcription could be caused by the recorded voice which is too limited in
the audio file and not enough pause or silence audio at the beginning is recorded.
All this concepts and limitations observed in Table 2 can be applied to the passive
listener module where it uses this Google STT API. Some tests of passive listener
performance with ten samples are analysed.
Case of “Okay Google”: Rate of 70% successfully detected.
Case of “Okay Jarvis”: Rate of 0% successfully detected. As we explained earlier,
difficulties are observed in cases of personal names.
Case of “Okay”: Rate of 100% successfully detected. The simpler the word, the
easier it is to recognize.
Again, some troubles are found if the “Okay” word is not said slowly. A previous
process of sound detection and threshold value is processed first (see section 3.2.1).
This can be the cause of the limitation where this word is not recorded if is said faster.
4.2. Tracking analysis
Some data of performance and latency, in the case of the tracking module, are
extracted. This module is executed in a computer (with i7 processor) and also in the
Raspberry Pi 2 to analyse and compare this data. Data from 50 consecutive frames are
extracted.
As we can imagine, the Raspberry Pi processing capabilities are more reduced than
the computer. This can affect all the performance of the tracking functionality. Then, if the
processing between the frames captured by the camera is not fast enough, the tracking
module will not be able to track the user face correctly. HaarCascade processing, Lucas-
Kanade processing and HaarCascade are only implemented for face i.e. without eye
recognition analysis (see section 3.4.2).

34
Figure 12. Tracking time with PC
Thanks to the processing speed of the computer, we can see a little difference
between the processing times in different computer vision algorithms. This in practice is
translated into a smoother track of the user face.
Figure 13. Tracking time with Raspberry Pi
On the other hand, the Raspberry Pi doesn’t have enough processing capacity and a
large difference in terms of latency appears in the different algorithms. In this specific
analysis it is expected that there will be a higher consumption of resources in the
HaarCascade due the large calculations than the Lucas-Kanade (see section 3.4.1),
which affects seriously the performance of the tracking module.
0
0,02
0,04
0,06
0,08
0,1
0,12
1 11 21 31 41
Pro
cess
ing
Tim
e [
s]
Frames [n]
Tracking in PC
HaarCascadePC
Lucas-Kanade PC
0
0,2
0,4
0,6
0,8
1
1,2
1,4
1 11 21 31 41
Pro
cess
ing
Tim
e [
s]
Frames [n]
Tracking in Raspberry Pi
HaarCascadeRP
Lucas-Kanade RP
35
If we compare the data from Figure 13 with the data extracted from the computer, we
can see that the time needed in the processing of one frame in the Raspberry Pi is about
one second. This will cause the tracker module to be incapable of following the user face
correctly. Even if the face is static, due to the complexity of the calculations, the
Raspberry Pi is not able to have a good performance as computer. In the following figure
we can see this difference in performance, i.e. rates of accuracy.
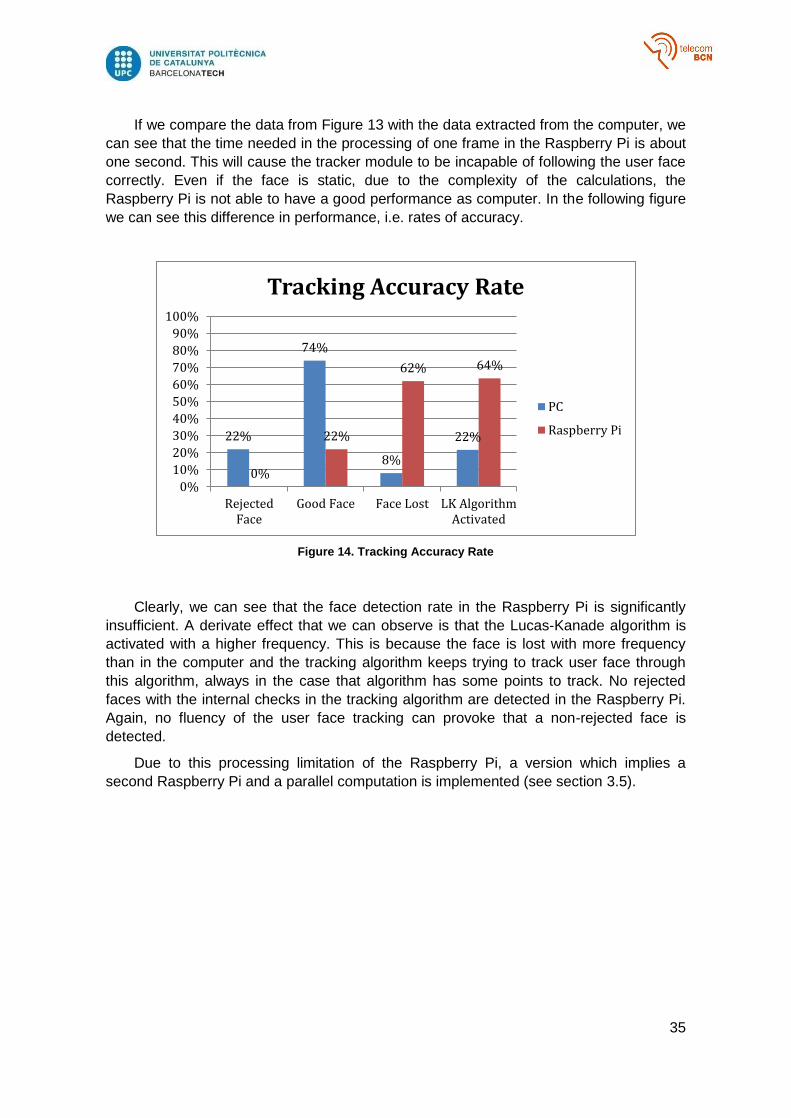
Figure 14. Tracking Accuracy Rate
Clearly, we can see that the face detection rate in the Raspberry Pi is significantly
insufficient. A derivate effect that we can observe is that the Lucas-Kanade algorithm is
activated with a higher frequency. This is because the face is lost with more frequency
than in the computer and the tracking algorithm keeps trying to track user face through
this algorithm, always in the case that algorithm has some points to track. No rejected
faces with the internal checks in the tracking algorithm are detected in the Raspberry Pi.
Again, no fluency of the user face tracking can provoke that a non-rejected face is
detected.
Due to this processing limitation of the Raspberry Pi, a version which implies a
second Raspberry Pi and a parallel computation is implemented (see section 3.5).
22%
74%
8%
22%
0%
22%
62% 64%
0%
10%
20%
30%
40%
50%
60%
70%
80%
90%
100%
RejectedFace
Good Face Face Lost LK AlgorithmActivated
Tracking Accuracy Rate
PC
Raspberry Pi
36
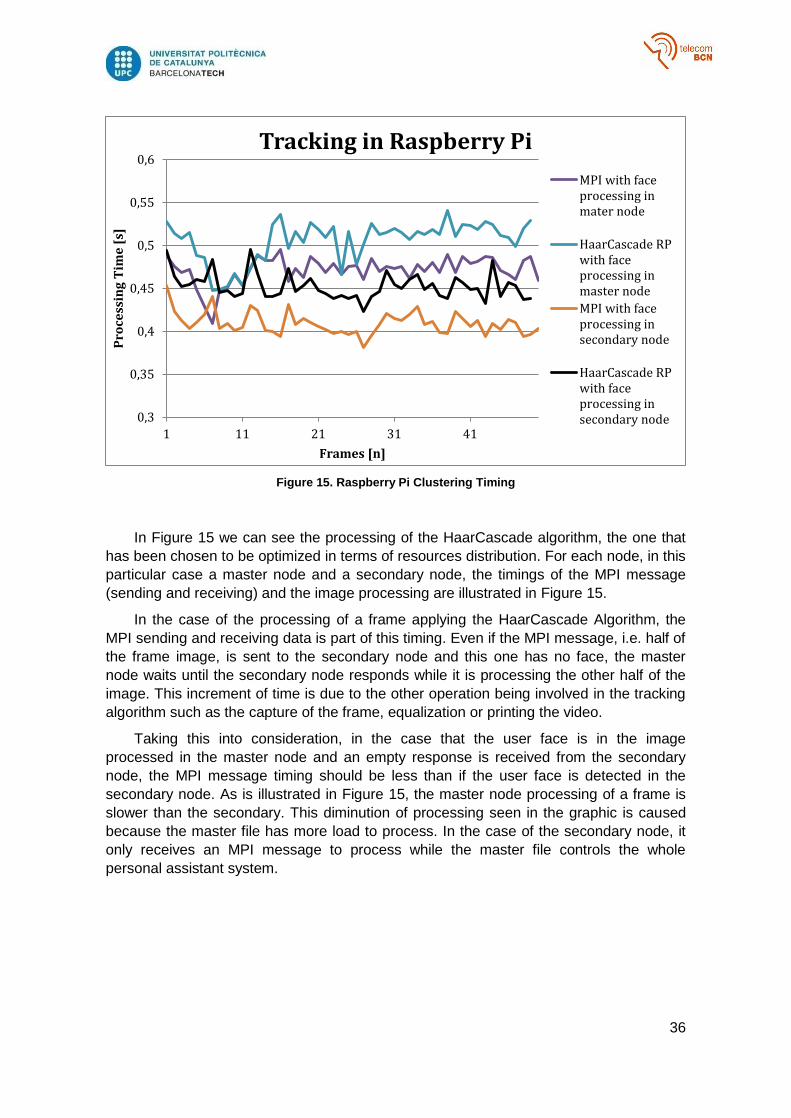
Figure 15. Raspberry Pi Clustering Timing
In Figure 15 we can see the processing of the HaarCascade algorithm, the one that
has been chosen to be optimized in terms of resources distribution. For each node, in this
particular case a master node and a secondary node, the timings of the MPI message
(sending and receiving) and the image processing are illustrated in Figure 15.
In the case of the processing of a frame applying the HaarCascade Algorithm, the
MPI sending and receiving data is part of this timing. Even if the MPI message, i.e. half of
the frame image, is sent to the secondary node and this one has no face, the master
node waits until the secondary node responds while it is processing the other half of the
image. This increment of time is due to the other operation being involved in the tracking
algorithm such as the capture of the frame, equalization or printing the video.
Taking this into consideration, in the case that the user face is in the image
processed in the master node and an empty response is received from the secondary
node, the MPI message timing should be less than if the user face is detected in the
secondary node. As is illustrated in Figure 15, the master node processing of a frame is
slower than the secondary. This diminution of processing seen in the graphic is caused
because the master file has more load to process. In the case of the secondary node, it
only receives an MPI message to process while the master file controls the whole
personal assistant system.
0,3
0,35
0,4
0,45
0,5
0,55
0,6
1 11 21 31 41
Pro
cess
ing
Tim
e [
s]
Frames [n]
Tracking in Raspberry Pi
MPI with faceprocessing inmater node
HaarCascade RPwith faceprocessing inmaster node
MPI with faceprocessing insecondary node
HaarCascade RPwith faceprocessing insecondary node
37
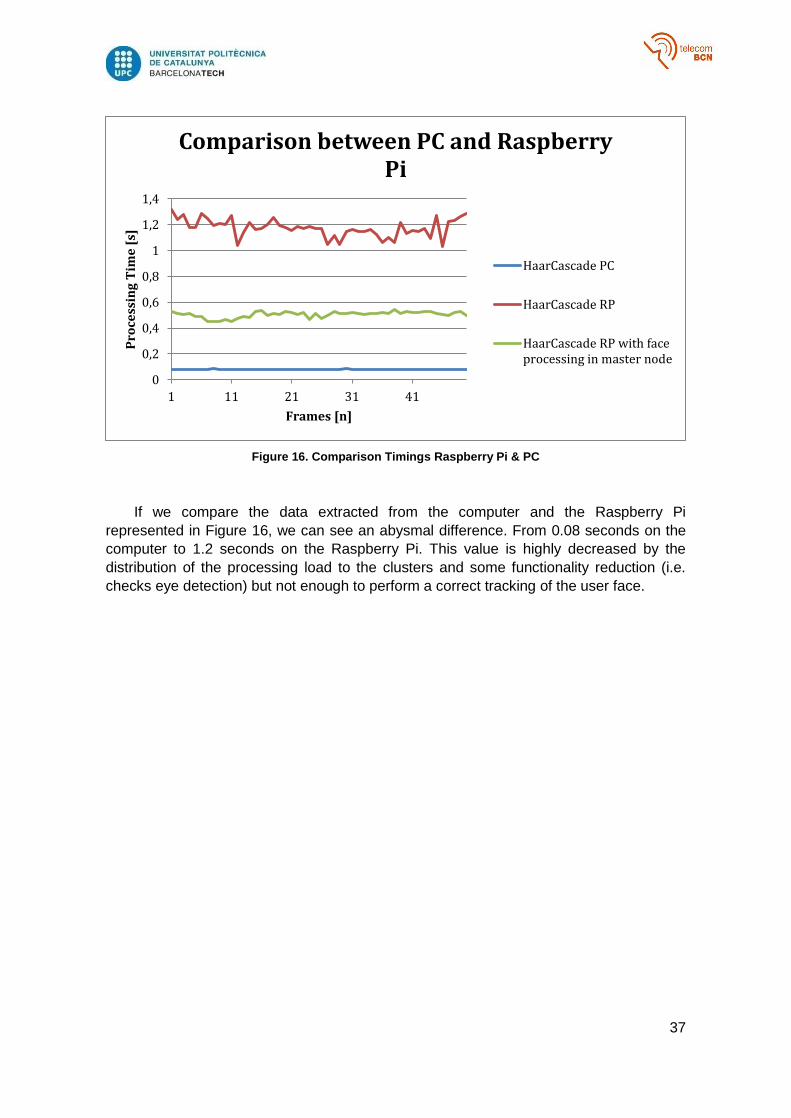
Figure 16. Comparison Timings Raspberry Pi & PC
If we compare the data extracted from the computer and the Raspberry Pi
represented in Figure 16, we can see an abysmal difference. From 0.08 seconds on the
computer to 1.2 seconds on the Raspberry Pi. This value is highly decreased by the
distribution of the processing load to the clusters and some functionality reduction (i.e.
checks eye detection) but not enough to perform a correct tracking of the user face.
0
0,2
0,4
0,6
0,8
1
1,2
1,4
1 11 21 31 41
Pro
cess
ing
Tim
e [
s]
Frames [n]
Comparison between PC and Raspberry Pi
HaarCascade PC
HaarCascade RP
HaarCascade RP with faceprocessing in master node
38
5. Budget
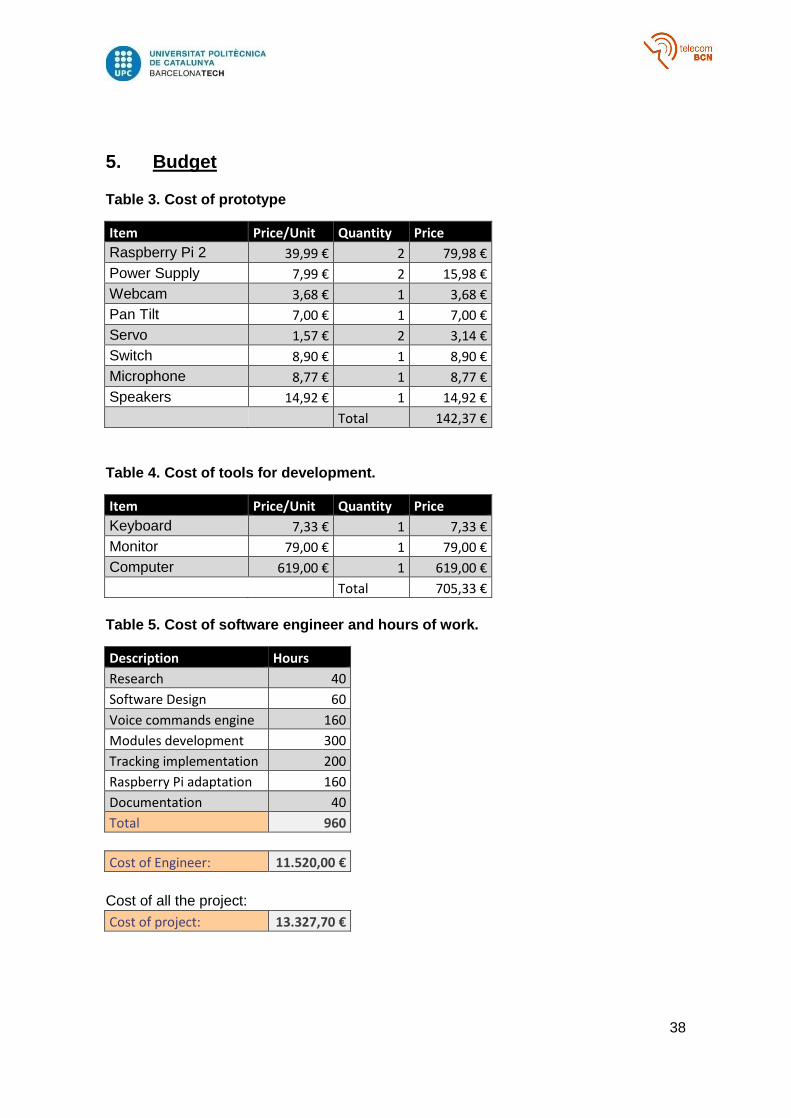
Table 3. Cost of prototype
Item Price/Unit Quantity Price
Raspberry Pi 2 39,99 € 2 79,98 €
Power Supply 7,99 € 2 15,98 €
Webcam 3,68 € 1 3,68 €
Pan Tilt 7,00 € 1 7,00 €
Servo 1,57 € 2 3,14 €
Switch 8,90 € 1 8,90 €
Microphone 8,77 € 1 8,77 €
Speakers 14,92 € 1 14,92 €
Total 142,37 €
Table 4. Cost of tools for development.
Item Price/Unit Quantity Price
Keyboard 7,33 € 1 7,33 €
Monitor 79,00 € 1 79,00 €
Computer 619,00 € 1 619,00 €
Total 705,33 €
Table 5. Cost of software engineer and hours of work.
Description Hours
Research 40
Software Design 60
Voice commands engine 160
Modules development 300
Tracking implementation 200
Raspberry Pi adaptation 160
Documentation 40
Total 960
Cost of Engineer: 11.520,00 €
Cost of all the project:
Cost of project: 13.327,70 €

39
6. Conclusions and future development:
This thesis presents the work conducted on the design and development of a
personal assistant. Chapter 3.1 provides an overview of the personal assistant software
architecture and its subsystems. Chapter 3.2 presents the voice processing subsystem of
the project and main engine to process input and output data to interact with the user.
Chapter 3.3 explains in detail the modules implemented in our personal assistant.
Chapter 3.4 provides information and implementation of one of the main modules of the
personal assistant consisting in the tracking user face. Chapter 3.5 presents the
implementation in a Raspberry Pi 2. Finally some performance results of the system were
shown in section 4.
A personal assistant with the sufficient capability to interact with the user and with
enough intelligence to respond to all the user demands implies the use of different
complex subsystems perfectly intertwined. Therefore, the best and the most practical
solution is to use external tools and facilities that can be found on the internet. Although,
some subsystems are essential for the personal assistant and should be improved as
best as possible so that it does not become a bottleneck. If a corresponding essential
subsystem depends on an external source (e.g. Speech to text engine), it is
indispensable to have some other subsystem alternatives to be triggered off in case the
main subsystem stops working.
With more interaction with personal data, the more like a personal assistant it will be.
Starting with this concept, the assistant needs or should have the capabilities to access to
all the possible data that user manage in his different internet accounts or social networks.
Hence, some interface for the user is needed, (e.g. web page) where user can provide
access to his private data. An important fact to keep in mind and the most important
consideration about the current personal assistant is that the external tools and facilities,
social networks and others update constantly their privacy policy and API’s according to
what was observed in section 3.2.3 with Google API’s. Therefore, some software
developer team needs to be constantly updating some products that could be in the
market. In this case, source code must be modular and with the possibility of being
updated.
In the particular case of voice recognition, the more extensive the voice command,
the harder it is to interpret. Some solutions to be aware of is to apply the same concept of
modular structure in command voice order step by step. This solution is currently being
applied in smart watch with Google android OS where a reminder is taken in three steps:
reminder order, about what and where or when.
The OS takes charge of processing each voice command and ask for subsequent
data. If we compare this idea to the ones implemented in reminder and calendar module
of our personal assistant (see section 3.3.4) it will take away a lot of complexity in voice
command parsing and it will make the module more robust against incorrect data coming
from STT engine (aka Speech To Text engine).
In a more selected and specific case observed in section 4, the incorrect data coming
in this case from Google API STT engine is commonly produced mainly by the use of
personal names and incorrect syntax of the sentence. Considering specific characteristics
of our STT engine, some deductions can be drawn, like use “Okey Google” or just simply
“Okey” instead of “Okey Jarvis” to wake up our personal assistant.
40
Some negative characteristic of command orders using speech recognition are that
the commands can be quite varied. Some solutions could be a personalization of these
commands through a user interface. This idea is also implemented on the market as the
modular idea, where “Samsung” company allows you to configure the activation
command personalized for your corresponding voice. Some other aspects to take into
account are the possibility to control the personal assistant also with some hardware such
a pair of buttons. Some problems are found when some music is played. In this specific
case, the music cannot be stopped without a voice command order and this one was not
detected properly due to this music.
On the other hand, tracking implementation in a Raspberry Pi has a negative result
due to the current processing limitation of the hardware. Alternatives and solutions
proposed in this document such as the use of Raspberry Pi clusters are not close enough
to an affordable real time tracking where a fluent, smooth and continuous tracking of the
user face is provided by the personal assistant.
Future extensions and improvements related to this particular module would be to
resize the user face detection field depending of the proximity of the user to the personal
assistant. This is important because user face size captured by the camera in each frame
vary in function of the distance between the user and the personal assistant. A new
dimension variable can be added to adapt this face detection field size by the use of
some proximity sensors such as ultrasonic or infrared sensors.

41
Bibliography:
[1] “Nuance Speech Recognition” [Online] Available: http://www.nuance.com
[2] “Acapela Speech Synthesizer ” [Online] Available: http://www.acapela-group.com/
[3] “Ivona Speech Synthesizer” [Online] Available: https://www.ivona.com/
[4] “eSpeak open source Speech Synthesizer” [Online] Available: http://espeak.sourceforge.net/
[5] “pyttsx, wrapper for TTS synthesis” [Online] Available: https://pyttsx.readthedocs.org
[6] “Google STT API from URL” [Online] Available: https://github.com/gillesdemey/google-speech-v2
[7] “Wearable Translator” [Online] Available: http://www.iamili.com/
[8] “Amy Personal Assistant” [Online] Available: https://x.ai/
[9] “Jasper Personal Assistant” [Online] Available: http://jasperproject.github.io/
[10] “Cubic Personal Assistant” [Online] Available: https://www.indiegogo.com/projects/cubic-your-personal-ai-with-personality--2
[11] “Echo, Amazon Personal Assistant” [Online] Available: http://www.amazon.com/Amazon-SK705DI-Echo/dp/B00X4WHP5E/
[12] “Jibo Personal Assistant” [Online] Available: https://www.jibo.com/
[13] “Modular Programming” [Online] Available: https://en.wikipedia.org/wiki/Modular_programming
[14] “Waterfall Model” [Online] Available: https://en.wikipedia.org/wiki/Waterfall_model
[15] “Python” [Online] Available: https://docs.python.org/2.7/
[16] “Google API’s” [Online] Available: https://console.developers.google.com
[17] “Google OAuth 2.0” [Online] Available: https://developers.google.com/identity/protocols/OAuth2
[18] “Web Speech API” [Online] Available: https://www.google.com/intl/en/chrome/demos/speech.html
[19] “Wolfram Alpha Cloud” [Online] Available: https://develop.wolframcloud.com
[20] “Dropbox API” [Online] Available: https://www.dropbox.com/developers
[21] “Histogram Equalization in OpenCV” [Online] Available: http://docs.opencv.org/master/d5/daf/tutorial_py_histogram_equalization.html
[22] “Face detection using Haar Cascade” [Online] Aviable: http://opencv-python-tutroals.readthedocs.org/en/latest/py_tutorials/py_objdetect/py_face_detection/py_face_detection.html
[23] Paul Viola and Michael J. Jones. “Rapid Object Detection using a Boosted Cascade of Simple Features”. IEEE CVPR, 2001.
[24] Rainer Lienhart and Jochen Maydt. “An Extended Set of Haar-like Features for Rapid Object Detection”. IEEE ICIP 2002, Vol. 1, pp. 900-903, Sep. 2002.
[25] “Lucas-Kanade Optical Flow Method” [Online] Available: http://opencv-python-tutroals.readthedocs.org/en/latest/py_tutorials/py_video/py_lucas_kanade/py_lucas_kanade.html
[26] Bruce D. Lucas and Takeo Kanade. An Iterative Image Registration Technique with an Application to Stereo Vision. International Joint Conference on Artificial Intelligence, pages 674–679, 1981.
[27] J. Shi and C. Tomasi "Good Features to Track". 9th IEEE Conference on Computer Vision and Pattern Recognition. June 1994.
[28] Jean-Yves Bouguet, “Pyramidal Implementation of the Lucas Kanade Feature Tracker Description of the algorithm”, Intel Corporation Microprocessor Research Labs.
[29] Zdenek Kalal, Krystian Mikolajczyk, Jiri Matas, “Forward-Backward Error: Automatic Detection of Tracking Failures”. International Conference on Pattern Recognition, August, 2010, Istambul, Turkey.
[30] Andrew K. Dennis, “Raspberry Pi Super Cluster”, Build your own parallel-computing cluster using Raspberry Pi in the comfort of your home. ISBN 978-1-78328-619-5. November 2013.
[31] “Installing MPI for Python on a Raspberry Pi Cluster” [Online] Available: http://thenewstack.io/installing-mpi-python-raspberry-pi-cluster-runs-docker/
[32] Lisandro Dalcin. “MPI for Python”, Release 2.0.0, October 18, 2015
[33] “Python doc.” [Online] Available: http://pythonhosted.org/mpi4py/apiref/index.html

42
Appendices:
Annex A: Voice commands list example:
What time is it?
What day are we?
Tell me the date on which we are.
Set alarm at 20:00.
Can you set an alarm at 8 pm?
Delete alarm.
Tell me when the alarm is going to ring.
Set timer of 10 seconds.
Set timer of 1 minute.
Set timer of 10 minutes.
Set timer of 2 hours.
Delete timer.
When the timer is going to ring?
Tell me a joke.
Play some music.
Stop music.
Download music from Dropbox.
Take a photo.
Upload photos to Dropbox.
Create a calendar event for meet Marta the 15th of October at 20:00 to
22:00.
Create a calendar event for meet Marta the 15th of October at 20:00 of 30
minutes.
Create a calendar event for meet Marta the 15th of October at 20:00.
Create a calendar event for meet Marta the 15 of October at 20:00.
Create a calendar event for meet Marta the 17th of October at 6 p.m. to 8
p.m.
Create a calendar event called my lunch the 17th of October at 6 p.m. of 2
hours.
Add a calendar event for meet Marta this Saturday at 5 p.m.
New calendar event called holidays this Sunday.
Get all the calendar events.
List calendar events of this week.
Get calendar events of Saturday.
Get calendar events of this month.
Calendar events of 2 days.
Get calendar event of the 17 of October.
Delete all calendar events.
Delete calendar events of this week.
Delete calendar events of this Saturday.

43
Delete calendar events of this month.
Delete calendar event of the 17 of October.
Delete calendar events of 2 days.
Remind me to meet Marta the 15th of October at 20:00 to 22:00.
Remind me to meet Melvin the 15th of October at 20:00 of 30 minutes.
Remind me to meet Marta the 15th of October at 20:00.
Remind me to meet Marta the 15 of October at 20:00.
Remind me to meet Marta the 17th of October at 6 p.m. to 8 p.m.
Remind me to get some stuff the 17th of October at 6 p.m. of 2 hours.
Remind me to buy some stuff this Sunday.
Get all the reminders.
List reminders of this week.
Get reminders of Saturday.
Get reminders of this month.
Get reminders of 2 days.
Get reminders of the 17 of October.
Delete all reminders.
Delete reminders of this week.
Delete reminders of this Saturday.
Delete reminders of this month.
Delete reminders of the 17 of October.
Delete reminders of 2 days.
The weather for tomorrow in Barcelona?
How much is 1 + 1?
What is the capital of Spain?
How much is 1 € in Dollars?
How much is 1 Kilometres in meters?
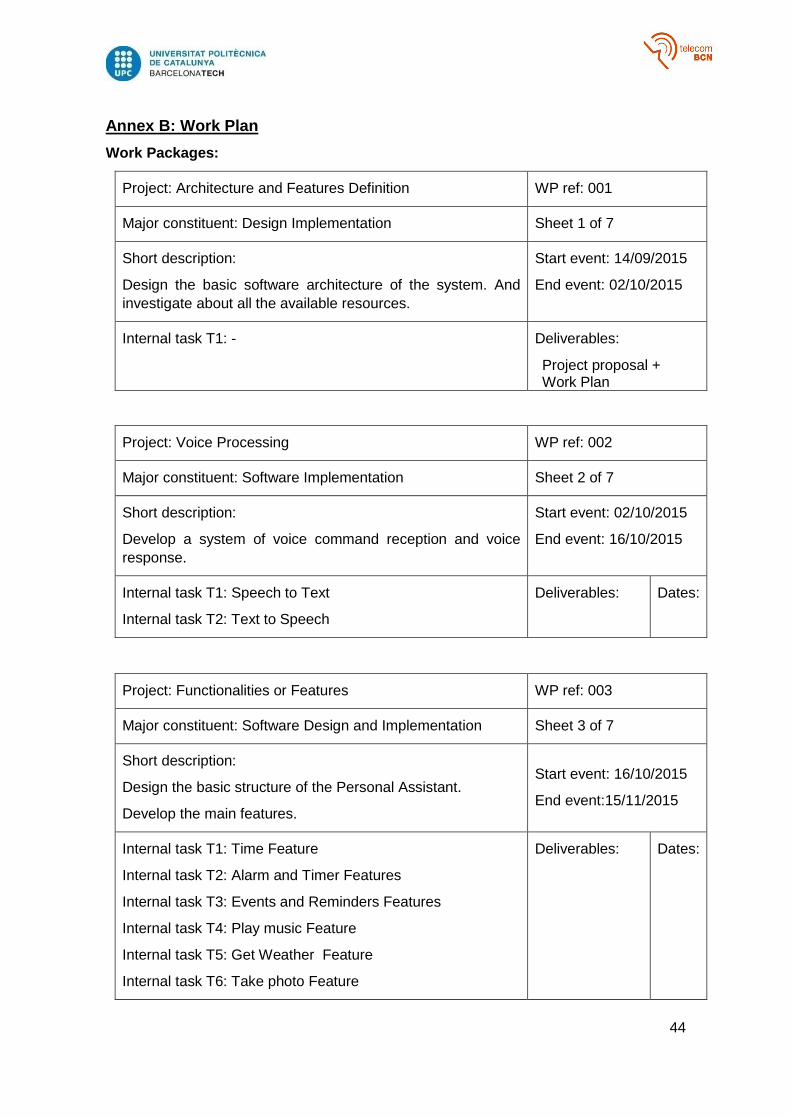
44
Annex B: Work Plan
Work Packages:
Project: Architecture and Features Definition WP ref: 001
Major constituent: Design Implementation Sheet 1 of 7
Short description:
Design the basic software architecture of the system. And
investigate about all the available resources.
Start event: 14/09/2015
End event: 02/10/2015
Internal task T1: -
Deliverables:
Project proposal + Work Plan
Project: Voice Processing WP ref: 002
Major constituent: Software Implementation Sheet 2 of 7
Short description:
Develop a system of voice command reception and voice
response.
Start event: 02/10/2015
End event: 16/10/2015
Internal task T1: Speech to Text
Internal task T2: Text to Speech
Deliverables: Dates:
Project: Functionalities or Features WP ref: 003
Major constituent: Software Design and Implementation Sheet 3 of 7
Short description:
Design the basic structure of the Personal Assistant.
Develop the main features.
Start event: 16/10/2015
End event:15/11/2015
Internal task T1: Time Feature
Internal task T2: Alarm and Timer Features
Internal task T3: Events and Reminders Features
Internal task T4: Play music Feature
Internal task T5: Get Weather Feature
Internal task T6: Take photo Feature
Deliverables: Dates:

45
Project: Tracking and Computer Vision WP ref: 004
Major constituent: Software Implementation Sheet 4 of 7
Short description:
Develop a tracking system with Computer Vision using
OpenCV.
Start event: 14/11/2015
End event: 20/12/2015
Internal task T1: Algorithm haarCascade implementation
Internal task T2: Algorithm Lucas-Kanade implementation.
Deliverables:
Project Critical Review
Project: Code adaptation and Improvements WP ref: 005
Major constituent: Software Implementation Sheet 5 of 7
Short description:
Improve tracking algorithm against false positives. Adapt the
code to a portable robot based on Raspberry Pi.
Also improve and achieve a kind of real-time processing to
be an interactive personal assistant.
Start event: 21/12/2015
End event: 20/02/2016
Internal task T1: Tracking improvements.
Internal task T2: Code adaptation for Raspberry Pi.
Internal task T3: Evaluate real-time or fast processing using
Raspberry Pi clusters.
Deliverables: Dates:
Project: Robot Prototype WP ref: 006
Major constituent: Software Implementation Sheet 6 of 7
Short description:
Design and Implement a prototype. A structure with servos
and webcam, peripherals and some sensors.
Start event: 21/02/2016
End event: 17/03/2016
Internal task T1: Structure parts and webcam Tracking.
Internal task T2: Peripherals implementation.
Deliverables:
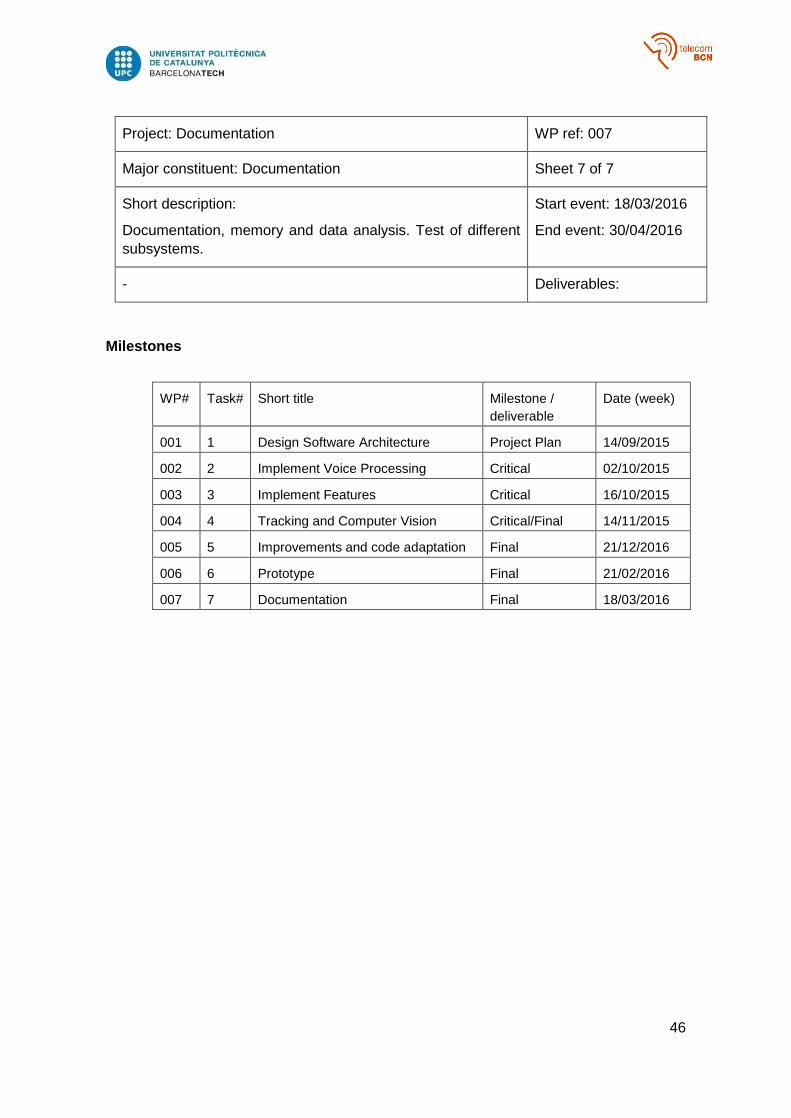
46
Project: Documentation WP ref: 007
Major constituent: Documentation Sheet 7 of 7
Short description:
Documentation, memory and data analysis. Test of different
subsystems.
Start event: 18/03/2016
End event: 30/04/2016
- Deliverables:
Milestones
WP# Task# Short title Milestone /
deliverable
Date (week)
001 1 Design Software Architecture Project Plan 14/09/2015
002 2 Implement Voice Processing Critical 02/10/2015
003 3 Implement Features Critical 16/10/2015
004 4 Tracking and Computer Vision Critical/Final 14/11/2015
005 5 Improvements and code adaptation Final 21/12/2016
006 6 Prototype Final 21/02/2016
007 7 Documentation Final 18/03/2016
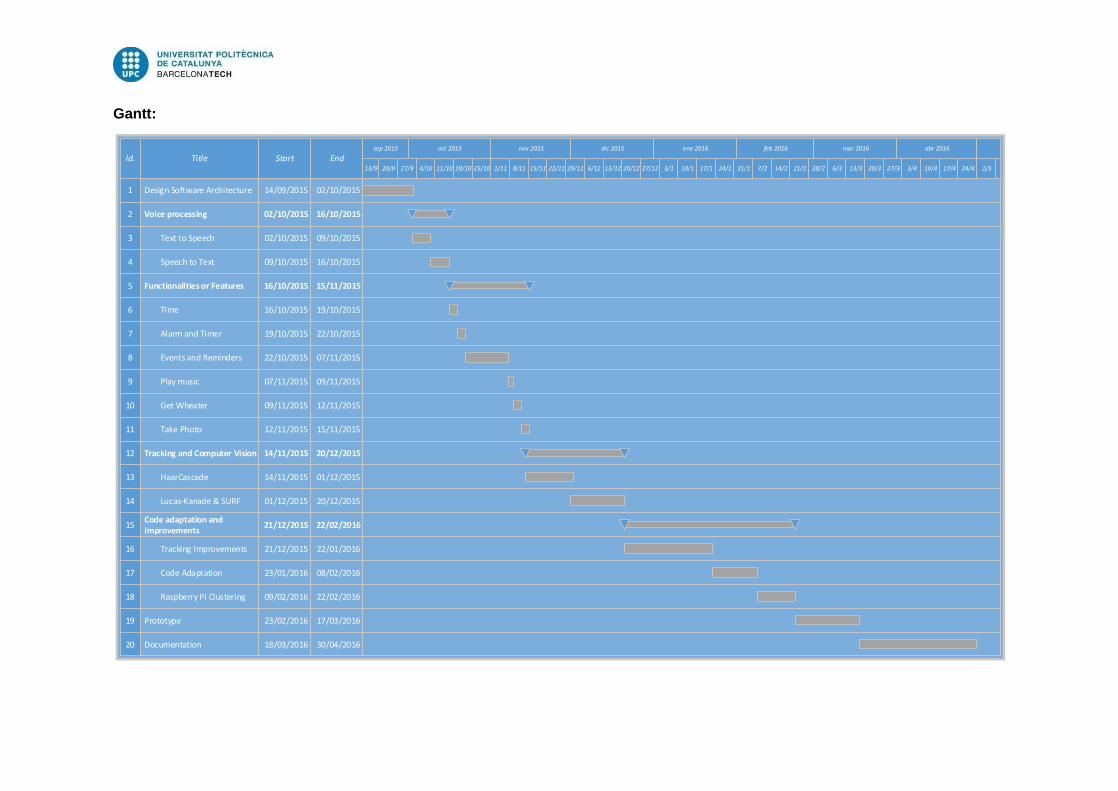
Gantt:
Id. Title Start Endnov 2015sep 2015 oct 2015 dic 2015
8/111/11 20/1220/9 18/1011/10 29/1115/1127/9 25/1013/9 6/124/10 13/1222/11
2 16/10/201502/10/2015Voice processing
5 15/11/201516/10/2015Functionalities or Features
12 20/12/201514/11/2015Tracking and Computer Vision
15 22/02/201621/12/2015Code adaptation and Improvements
19 17/03/201623/02/2016Prototype
6
4
3 09/10/201502/10/2015Text to Speech
16/10/201509/10/2015Speech to Text
1 02/10/201514/09/2015Design Software Architecture
11
10
9
7
8
13
14
19/10/201516/10/2015Time
22/10/201519/10/2015Alarm and Timer
07/11/201522/10/2015Events and Reminders
09/11/201507/11/2015Play music
12/11/201509/11/2015Get Wheater
15/11/201512/11/2015Take Photo
01/12/201514/11/2015HaarCascade
20/12/201501/12/2015Lucas-Kanade & SURF
17
18
08/02/201623/01/2016Code Adaptation
22/02/201609/02/2016Raspberry Pi Clustering
ene 2016 feb 2016 mar 2016
27/12 3/1 10/1 17/1 24/1 31/1 7/2 14/2 21/2 28/2 6/3 13/3 20/3
abr 2016
27/3
16 22/01/201621/12/2015Tracking Improvements
20 30/04/201618/03/2016Documentation
3/4 10/4 17/4 24/4 1/5

Glossary
AI Artificial Intelligence
API Application Programming Interface
FLAC Free Lossless Audio Codec
GPIO General Purpose Input Output
HTTP HyperText Transfer Protocol
JSON JavaScript Object Notation
MPI Message Passing Interface
OS Operating System
PCM Pulse Code Modulation
PWM Pulse Width Modulation
SSH Secure SHell
STT Speech To Text
TTS Text To Speech
URL Uniform Resource Locator