my machine - nespresso usa | coffee & espresso ... first read the safety precautions to avoid...
TRANSCRIPT
My Machine
EN 4-19
6926_UM_LATTISSIMA_PREMIUM_Z2C.indb 1-2 25.03.14 10:51
A B C
1012
11
6
9
21
8
7
5
4
3
13
24
19
20
21
22
23
14 18
15 17
16
25
2827
26 29
31
25
3034
33
32
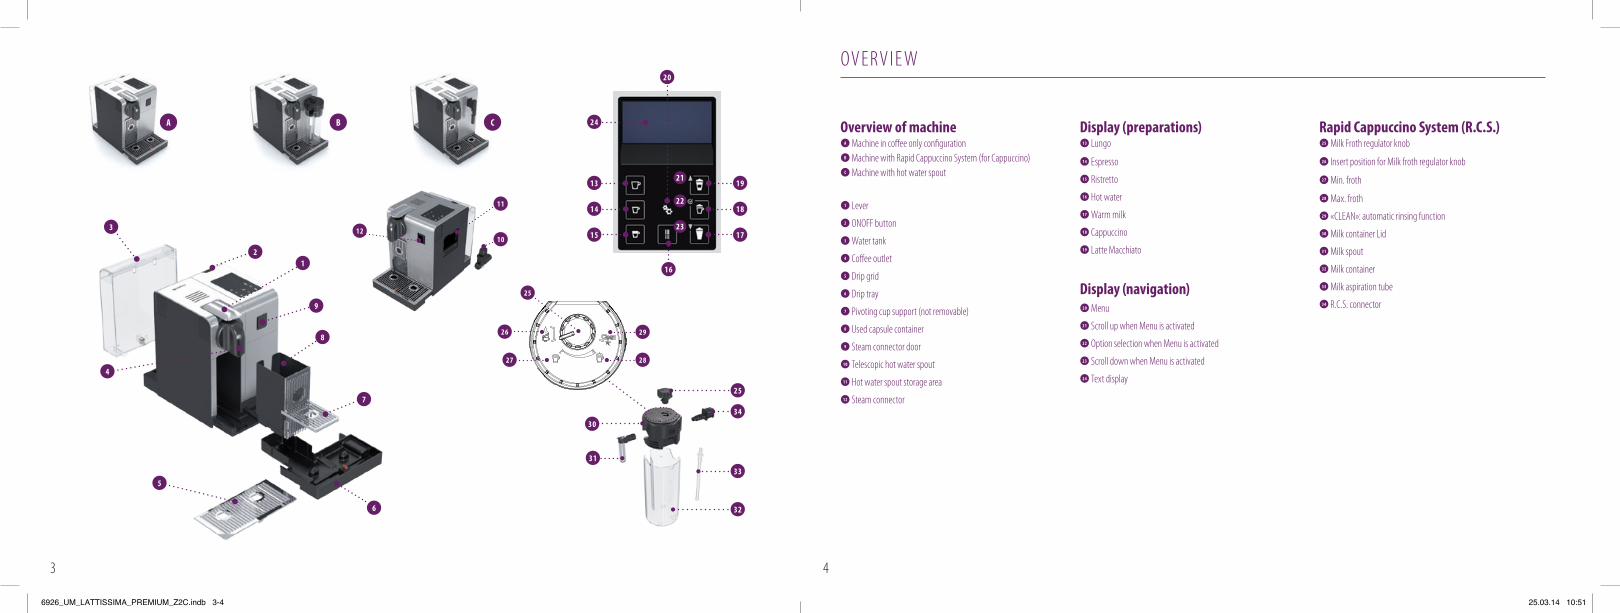
OV E RV I E W
Display (preparations) 13 Lungo14 Espresso15 Ristretto16 Hot water17 Warm milk18 Cappuccino19 Latte Macchiato
Display (navigation)20 Menu21 Scroll up when Menu is activated22 Option selection when Menu is activated23 Scroll down when Menu is activated24 Text display
Rapid Cappuccino System (R.C.S.) 25 Milk Froth regulator knob26 Insert position for Milk froth regulator knob27 Min. froth28 Max. froth29 «CLEAN»: automatic rinsing function30 Milk container Lid31 Milk spout32 Milk container33 Milk aspiration tube34 R.C.S. connector
Overview of machine A Machine in coffee only configuration B Machine with Rapid Cappuccino System (for Cappuccino) C Machine with hot water spout
1 Lever2 ONOFF button3 Water tank4 Coffee outlet5 Drip grid6 Drip tray7 Pivoting cup support (not removable)8 Used capsule container9 Steam connector door
10 Telescopic hot water spout11 Hot water spout storage area12 Steam connector
43
6926_UM_LATTISSIMA_PREMIUM_Z2C.indb 3-4 25.03.14 10:51
EN
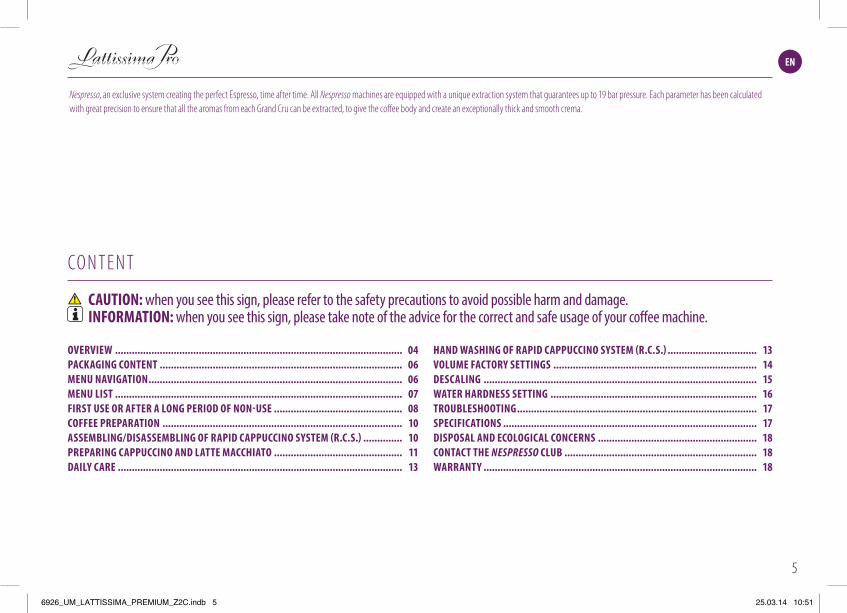
CO N T E N T
Nespresso, an exclusive system creating the perfect Espresso, time after time. All Nespresso machines are equipped with a unique extraction system that guarantees up to 19 bar pressure. Each parameter has been calculated with great precision to ensure that all the aromas from each Grand Cru can be extracted, to give the coffee body and create an exceptionally thick and smooth crema.
HAND wASHiNg Of RApiD CAppuCCiNO SyStEm (R.C.S.) ................................VOlumE fACtORy SEttiNgS .........................................................................DESCAliNg ..................................................................................................wAtER HARDNESS SEttiNg ..........................................................................tROuBlESHOOtiNg ......................................................................................SpECifiCAtiONS ...........................................................................................DiSpOSAl AND ECOlOgiCAl CONCERNS .........................................................CONtACt tHE Nespresso CluB .....................................................................wARRANty ..................................................................................................
OVERViEw .......................................................................................................pACkAgiNg CONtENt .......................................................................................mENu NAVigAtiON ...........................................................................................mENu liSt .......................................................................................................fiRSt uSE OR AftER A lONg pERiOD Of NON-uSE ..............................................COffEE pREpARAtiON ......................................................................................ASSEmBliNg/DiSASSEmBliNg Of RApiD CAppuCCiNO SyStEm (R.C.S.) ..............pREpARiNg CAppuCCiNO AND lAttE mACCHiAtO ..............................................DAily CARE ......................................................................................................
1314151617 17 18 1818
CAutiON: when you see this sign, please refer to the safety precautions to avoid possible harm and damage. iNfORmAtiON: when you see this sign, please take note of the advice for the correct and safe usage of your coffee machine.
040606070810101113
5
6926_UM_LATTISSIMA_PREMIUM_Z2C.indb 5 25.03.14 10:51

EN SAFETY PRECAUTIONS ............................................................................. 2 FR CONSIGNES DE SECURITE ......................................................................... 4 DE SICHERHEITSHINWEISE ........................................................................... 7 IT PRECAUZIONI DI SICUREZZA .................................................................... 10 ES PRECAUCIONES DE SEGURIDAD ................................................................ 12 PT MEDIDAS DE SEGURANÇA......................................................................... 15 NL VEILIGHEIDSMAATREGELEN ..................................................................... 18 GR ΜΈΤΡΑ ΑΣΦΑΛΈΙΑΣ .................................................................................. 20 HU BIZTONSÁGI ELŐÍRÁSOK .......................................................................... 22 CZ BEZPEČNOSTNÍ POKYNY .......................................................................... 25 PL ZASADY BEZPIECZEŃSTWA ....................................................................... 28 RU МЕРЫ ПРЕДОСТОРОЖНОСТИ ................................................................. 31
EN SAFETY PRECAUTIONS ............................................................................. 2 FR CONSIGNES DE SECURITE ......................................................................... 4 DE SICHERHEITSHINWEISE ........................................................................... 7 IT PRECAUZIONI DI SICUREZZA .................................................................... 10 ES PRECAUCIONES DE SEGURIDAD ................................................................ 12 PT MEDIDAS DE SEGURANÇA......................................................................... 15 NL VEILIGHEIDSMAATREGELEN ..................................................................... 18 GR ΜΈΤΡΑ ΑΣΦΑΛΈΙΑΣ .................................................................................. 20 HU BIZTONSÁGI ELŐÍRÁSOK .......................................................................... 22 CZ BEZPEČNOSTNÍ POKYNY .......................................................................... 25 PL ZASADY BEZPIECZEŃSTWA ....................................................................... 28 RU МЕРЫ ПРЕДОСТОРОЖНОСТИ ................................................................. 31
ENEN
M E N U N AV I G AT I O N
PAC k AG I N G CO N T E N T
Coffee machine «Welcome to Nespresso folder»User manual Safety Instructions Capsules set
Enter the Menu list Press shortly symbol
Browse options Press symbol
Select option Press symbol
Exit from the Menu list Scroll to [ExIT] option and select. Or press symbol for more than 2 seconds.
Exit from option and return to Menu list Scroll to [ExIT] option and select. Or quickly press symbol.
M E N U L I S T
1 Select this option to set your preferred language. Follow machine screen instructions.
2 Select this option once the descaling alert appears on the display. Refer to page 15. You will be guided throughout the descaling process.
3 Select this option to set the water hardness level at your location. Use the water hardness sticker provided to determine it. This will optimize the descaling frequency. Refer to page 16.
4 Select this option to set the time after which the machine switches off automatically. (Possible options are 9 minutes, 30 minutes, 2 hours, 8 hours). Follow machine screen instructions.
5 Select this option to reset all parameters of the machine to factory settings.
6 Select this option to empty the water inside the machine in case you need to send it for repair or before a long period of non use. Follow machine screen instructions. You will not be able to use the machine for 10 minutes after this process.
7 Select this option to program the volume of your beverages (coffee cups, hot water and milk based preparations). Follow machine screen instructions. In addition, you can reset all the beverages volumes to factory settings as well.
8 Select this option to get access of all machines settings at a glance.
9 Select this option to check the overall status of your machine. The consumption statistics are available either from the first use (absolute) or since the last descaling (relative). The serial number of machine is provided as well.
10 Select this option to get the best advice on how to get optimal milk froth quality day after day. The internet link is provided to know more about this feature. For more information on this feature, click on the provided link.
11 Exit from the menu list and return to machine ready mode.
language
descaling
water hardness
auto power off
factory settings
empty fluid system
volume progr.
settings info
maintenance
help
exit
1
2
3
4
5
6
7
8
9
10
11
76
6926_UM_LATTISSIMA_PREMIUM_Z2C.indb 6-7 25.03.14 10:51

max
SET LANGUAGE
to continue
LANGUAGEActual value : EN
New value : [ ] to select
05
max
SET LANGUAGE
to continue
LANGUAGEActual value : EN
New value : [ ] to select
05
max
SET LANGUAGE
to continue
LANGUAGEActual value : EN
New value : [ ] to select
05
max
SET LANGUAGE
to continue
LANGUAGEActual value : EN
New value : [ ] to select
05
max
SET LANGUAGE
to continue
LANGUAGEActual value : EN
New value : [ ] to select
05
max
SET LANGUAGE
to continue
LANGUAGEActual value : EN
New value : [ ] to select
05
max
SET LANGUAGE
to continue
LANGUAGEActual value : EN
New value : [ ] to select
05
max
First read the safety precautions to avoid risks of fatal electrical shock and fire
Remove the plastic films from grid, lever and machine panels.
Remove the water tank, drip tray, and capsule container. Adjust the cable length and store the excess in the cable guide under the machine.
Put the machine in upright position, plug machine into mains.
The water tank can be carried by its cover.
Rinse the water tank before filling with potable water up to maximum level.
Insert the hot water spout. Switch machine ON
Set your preferred language.Press to continue.
SET LANGUAGE
to continue
Select your language by scrolling the options using up/down arrow. Press to confirm.
LANGUAGE
Actual value : EN
New value : [ ]
to select
Coffee preparation
x3x3
110 ml
40 ml
25 ml
05 06
4°15”
Assembling / disassembling of Rapid Cappuccino system (R.C.S)
07
ENEN F I R S T U S E O R A F T E R A LO N G P E R I O D O F N O N - U S E
CAutiON: first read the safety precautions to avoid risks of fatal electrical shock and fire.
1. Remove the water tank, drip tray, and capsule container. Adjust the cable length and store the excess in the cable guide under the machine.
5. Insert the hot water spout. Switch machine ON.
2. Put the machine in upright position, plug machine into mains.
6. SET LANGUAGE: set your preferred language. Press to continue.
3. The water tank can be carried by its cover.
7. LANGUAGE: select your language by scrolling the options using arrow. Press
to confirm.
4. Rinse the water tank before filling with fresh potable water up to maximum level.
F I R S T U S E O R A F T E R A LO N G P E R I O D O F N O N - U S E
iNfORmAtiON: machines are fully tested after being produced. Some traces of coffee powder could be found in rinsing water.
11. Disassemble the Rapid Cappuccino System (R.C.S.) and clean all components in the upper level of your dishwasher. In case a dishwasher is not available, refer to section Hand washing of Rapid Cappuccino System (R.C.S.).
iNfORmAtiON: refer to section Assembling/Disassembling of Rapid Cappuccino System.
10. Rinsing: repeat three times through the hot water spout. Once finished, remove it and store it back in the storage area located on the machine right side. Close the steam connector door.
9. Rinsing: place a container under coffee outlet and press the lungo button. Repeat three times.
8. Once symbol is pressed, machine heats up.
98
6926_UM_LATTISSIMA_PREMIUM_Z2C.indb 8-9 25.03.14 10:51
max
First read the safety precautions to avoid risks of fatal electrical shock and fire
Remove the plastic films from grid, lever and machine panels.
Remove the water tank, drip tray, and capsule container. Adjust the cable length and store the excess in the cable guide under the machine.
Put the machine in upright position, plug machine into mains.
The water tank can be carried by its cover.
Rinse the water tank before filling with potable water up to maximum level.
Insert the hot water spout. Switch machine ON
Set your preferred language.Press to continue.
SET LANGUAGE
to continue
Select your language by scrolling the options using up/down arrow. Press to confirm.
LANGUAGE
Actual value : EN
New value : [ ]
to select
Coffee preparation
x3x3
110 ml
40 ml
25 ml
05 06
4°15”
Assembling / disassembling of Rapid Cappuccino system (R.C.S)
07
4°15”
Assembling / disassembling of Rapid Cappuccino system (R.C.S)
07
4°15”
Assembling / disassembling of Rapid Cappuccino system (R.C.S)
07
4°15”
Assembling / disassembling of Rapid Cappuccino system (R.C.S)
07
4°15”
Assembling / disassembling of Rapid Cappuccino system (R.C.S)
07
Preparing Cappuccino and Latte Macchiato
4°
i When the milk container is empty, before refilling, thoroughly rinse it and the milk aspiration tube with potable water.
Close the milk container. Open the steam connector door by sliding it to the right. Connect the Rapid Cappuccino System to the machine.
15”
+LATTE MACCHIATO
Clean
15”
i
Remove Rapid Cappuccino System connector by unlocking it from (sign ) to (sign) and pulling it off
Remove the milk container lid and unplug milk aspiration tube.
Remove the milk froth regulator knob by turning it until and pulling it up.
Remove the milk spout by pulling it off.
1 2 3 4
Assembling / disassembling of Rapid Cappuccino system (R.C.S)
RINSE MILK SYSTEM
07 08
ENEN CO F F E E P R E PA R AT I O N
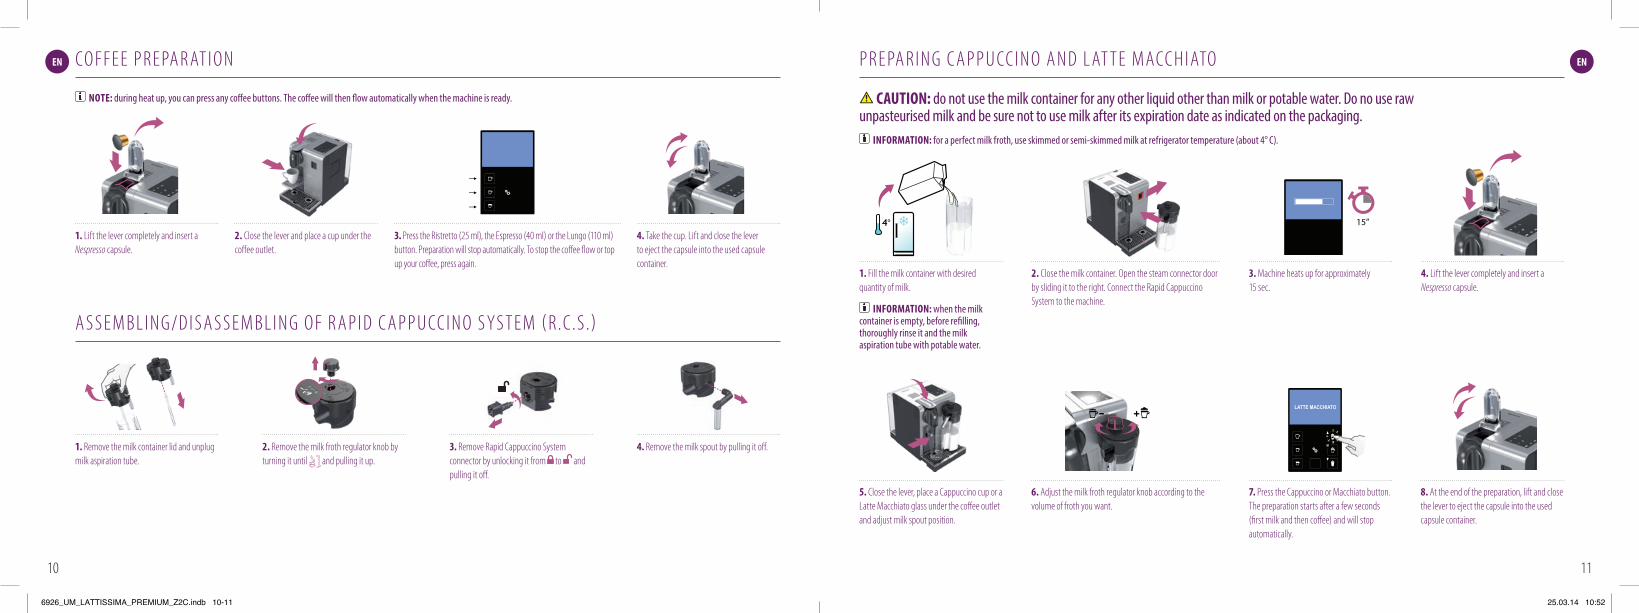
A S S E M b L I N G/D I S A S S E M b L I N G O F R A P I D C A P P U CC I N O S YS T E M ( R.C.S .)
1. Lift the lever completely and insert a Nespresso capsule.
2. Close the lever and place a cup under the coffee outlet.
3. Press the Ristretto (25 ml), the Espresso (40 ml) or the Lungo (110 ml) button. Preparation will stop automatically. To stop the coffee flow or top up your coffee, press again.
4. Take the cup. Lift and close the lever to eject the capsule into the used capsule container.
1. Remove the milk container lid and unplug milk aspiration tube.
4. Remove the milk spout by pulling it off. 2. Remove the milk froth regulator knob by turning it until and pulling it up.
3. Remove Rapid Cappuccino System connector by unlocking it from to and pulling it off.
P R E PA R I N G C A P P U CC I N O A N D L AT T E MACC H I ATO
1. Fill the milk container with desired quantity of milk.
2. Close the milk container. Open the steam connector door by sliding it to the right. Connect the Rapid Cappuccino System to the machine.
3. Machine heats up for approximately 15 sec.
4. Lift the lever completely and insert a Nespresso capsule.
CAutiON: do not use the milk container for any other liquid other than milk or potable water. Do no use raw unpasteurised milk and be sure not to use milk after its expiration date as indicated on the packaging.
iNfORmAtiON: for a perfect milk froth, use skimmed or semi-skimmed milk at refrigerator temperature (about 4° C).
iNfORmAtiON: when the milk container is empty, before refilling, thoroughly rinse it and the milk aspiration tube with potable water.
NOtE: during heat up, you can press any coffee buttons. The coffee will then flow automatically when the machine is ready.
5. Close the lever, place a Cappuccino cup or a Latte Macchiato glass under the coffee outlet and adjust milk spout position.
6. Adjust the milk froth regulator knob according to the volume of froth you want.
7. Press the Cappuccino or Macchiato button. The preparation starts after a few seconds (first milk and then coffee) and will stop automatically.
8. At the end of the preparation, lift and close the lever to eject the capsule into the used capsule container.
1110
6926_UM_LATTISSIMA_PREMIUM_Z2C.indb 10-11 25.03.14 10:52

Preparing Cappuccino and Latte Macchiato
4°
i When the milk container is empty, before refilling, thoroughly rinse it and the milk aspiration tube with potable water.
Close the milk container. Open the steam connector door by sliding it to the right. Connect the Rapid Cappuccino System to the machine.
15”
+LATTE MACCHIATO
Clean
15”
i
Remove Rapid Cappuccino System connector by unlocking it from (sign ) to (sign) and pulling it off
Remove the milk container lid and unplug milk aspiration tube.
Remove the milk froth regulator knob by turning it until and pulling it up.
Remove the milk spout by pulling it off.
1 2 3 4
Assembling / disassembling of Rapid Cappuccino system (R.C.S)
RINSE MILK SYSTEM
07 08
PRESS to confirm.The discaling agent flows alternately trough the coffee outlet, hot water nozzle and drip tray.
Descaling
Descaling process: Empty the drip tray and the used capsules container.
Rinsing process: Empty the drip tray and the used capsules container.
Refer to safety precautions
+100 ml500 ml
1 2 3
5 7 8
4
6
Lift and close the lever to eject any capsule in the used capsule container.
Descaling process: Fill water tank with 100 ml of Nespresso descaling agent and 500ml water.
Descaling process: Insert the hot water spout.
Enter the Menu, browse the options and select DESCALING. You will be guided throughout the whole process. Follow machine display instructions.
Descaling process: Place one container of minimum 1 litre under both the coffee outlet and the hot water spout.
4°
Volume factory settings
LANGUAGE
DESCALING
WATER HARDNESS
09 10
ENEN P R E PA R I N G C A P P U CC I N O A N D L AT T E MACC H I ATO
iNfORmAtiON: rinse the milk system after each use.
9. Place a container under milk spout. 10. Rotate the milk regulator knob in «CLEAN» position. Milk system rinsing process starts and hot water combined with steam flows through the milk spout.
11. Rinsing process lasts approximately 15 sec. and stops automatically.
12. Once rinsing has finished, turn the milk froth regulator knob back in milk position.
13. Disconnect the R.C.S. from machine and place it immediately in the refrigerator. Close the machine steam connector door.
15. And clean all components in the upper side of your dishwasher. In case a dishwasher is not available, refer to section Hand washing of Rapid Cappuccino System (R.C.S.). iNfORmAtiON: refer to section «Assembling/
Disassembling of Rapid Cappuccino system (R.C.S.)».
CAutiON: this milk should not be kept for more than 2 days in the refrigerator. In the case the milk container is kept outside refrigerator for longer than 2 hours, disassemble the R.C.S. and clean all components (refer to dishwashing or hand washing recommendations).
14. Every two days, disassemble the Rapid Cappuccino System.
2. Lift and close the lever to eject the capsule into the used capsule container. Place a container under coffee outlet and press the Lungo button to rinse. Clean the coffee outlet with a clean damp cloth.
3. Rinse away carefully any dirt residue on the hot water spout under potable water. Clean it with a clean damp cloth.
1. Disassemble the Rapid Cappuccino System. Refer to section «Assembling/Disassembling of Rapid Cappuccino system (R.C.S)».
2. Rinse away carefully any milk residue with potable water.
3. Soak all components in warm water (approximately 40° C) together with soap detergent for at least 30 minutes.
4. Rinse with potable water and dry them with a clean damp cloth.
DA I LY C A R E
iNfORmAtiON: do not use any strong cleaning agent or solvent cleaner. Use a clean damp cloth and mild cleaning agent to clean the surface of the machine. Do not put any machine components in dishwasher, except the Rapid Cappuccino System components.
H A N D WA S H I N G O F R A P I D C A P P U CC I N O S YS T E M ( R.C.S .)
iNfORmAtiON: when a dishwasher is not available, the R.C.S. components can be washed manually. In that case, the procedure must be performed daily for a maximum efficiency.
1. Remove drip tray, capsule container. Empty and rinse. Remove water tank. Empty, rinse it before filling with fresh potable water.
1312
6926_UM_LATTISSIMA_PREMIUM_Z2C.indb 12-13 25.03.14 10:52

PRESS to confirm.The discaling agent flows alternately trough the coffee outlet, hot water nozzle and drip tray.
Descaling
Descaling process: Empty the drip tray and the used capsules container.
Rinsing process: Empty the drip tray and the used capsules container.
Refer to safety precautions
+100 ml500 ml
1 2 3
5 7 8
4
6
Lift and close the lever to eject any capsule in the used capsule container.
Descaling process: Fill water tank with 100 ml of Nespresso descaling agent and 500ml water.
Descaling process: Insert the hot water spout.
Enter the Menu, browse the options and select DESCALING. You will be guided throughout the whole process. Follow machine display instructions.
Descaling process: Place one container of minimum 1 litre under both the coffee outlet and the hot water spout.
4°
Volume factory settings
LANGUAGE
DESCALING
WATER HARDNESS
09 10
+100 ml500 ml
10
+100 ml500 ml
10
+100 ml500 ml
10
+100 ml500 ml
10
+100 ml500 ml
10
+100 ml500 ml
10
+100 ml500 ml
10
+100 ml500 ml
10
ENEN
NOtE: *the milk froth volume depends on the kind of milk that is used, its temperature and the position of the milk regulator knob.
NOtE: we recommend you to keep factory settings for Ristretto, Espresso and Lungo to ensure the best in cup results for each of our coffee varieties.
Water volume can be programmed from 50 to 400 ml. Milk volume can be programmed from 30 to 200 ml. Coffee volume can be progammed from 25 to 200 ml.
VO LUM E FAC TO RY S E T T I N G S
Ristretto 25 ml
Cappuccino Milk*: 50 ml/Coffee: 40 ml
Lungo 110 ml
Latte Macchiato Milk*: 150 ml/Coffee: 40 ml
Espresso 40 ml Hot water 125 ml
Warm milk* 120 ml
CAutiON: if coffee volumes higher than 150 ml are programmed: let the machine cool down for 5 minutes before making the next coffee. Risk of overheating!
D E S C A L I N G
1. Lift and close the lever to eject any capsule in the used capsule container.
2. Enter the Menu, browse the options and select [DESCALING]. You will be guided throughout the whole process. Follow machine display instructions.
CAutiON: refer to safety precautions.
7. Press to confirm. The descaling agent flows alternately trough the coffee outlet, hot water nozzle and drip tray.
5. Descaling process: insert the hot water spout.
6. Descaling process: place one container of minimum 1 litre under both the coffee outlet and the hot water spout.
3. Descaling process: empty the drip tray and the used capsules container.
4. Descaling process: fill water tank with 100 ml of Nespresso descaling agent and 500ml of potable water.
8. Rinsing process: empty the drip tray and the used capsules container. Rinse with potable water.
1514
6926_UM_LATTISSIMA_PREMIUM_Z2C.indb 14-15 25.03.14 10:52
max
1”
1
2
3
4
5
11
max
1”
1
2
3
4
5
11
max
1”
1
2
3
4
5
11
max
1”
1
2
3
4
5
11
max
1”
1
2
3
4
5
11
max
1”
1
2
3
4
5
11
max
1”
1
2
3
4
5
11
max
1”
1
2
3
4
5
11
ENEN D E S C A L I N G
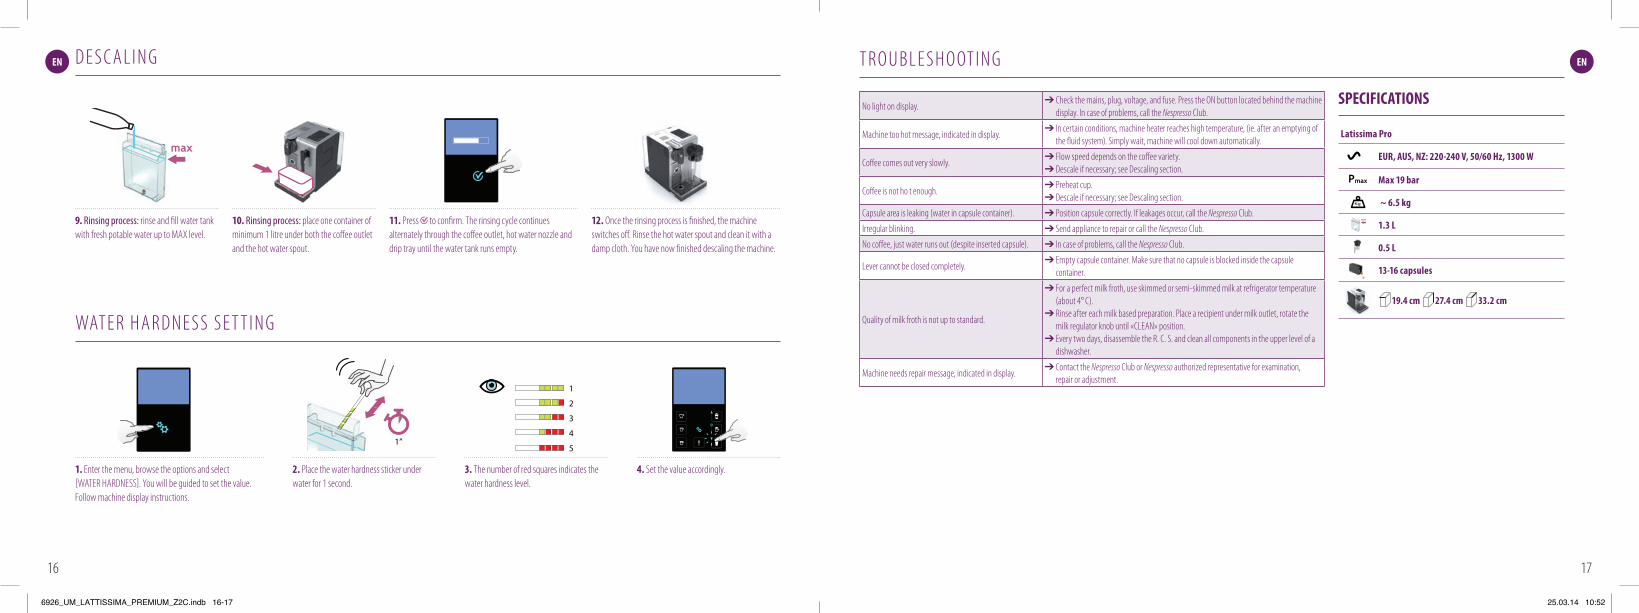
2. Place the water hardness sticker under water for 1 second.
11. Press to confirm. The rinsing cycle continues alternately through the coffee outlet, hot water nozzle and drip tray until the water tank runs empty.
3. The number of red squares indicates the water hardness level.
12. Once the rinsing process is finished, the machine switches off. Rinse the hot water spout and clean it with a damp cloth. You have now finished descaling the machine.
4. Set the value accordingly.
WAT E R H A R D N E S S S E T T I N G
1. Enter the menu, browse the options and select [WATER HARDNESS]. You will be guided to set the value. Follow machine display instructions.
9. Rinsing process: rinse and fill water tank with fresh potable water up to MAx level.
10. Rinsing process: place one container of minimum 1 litre under both the coffee outlet and the hot water spout.
T R O U b L E S H O OT I N G
No light on display.➔ Check the mains, plug, voltage, and fuse. Press the ON button located behind the machine
display. In case of problems, call the Nespresso Club.
Machine too hot message, indicated in display.➔ In certain conditions, machine heater reaches high temperature, (ie. after an emptying of
the fluid system). Simply wait, machine will cool down automatically.
Coffee comes out very slowly.➔ Flow speed depends on the coffee variety.➔ Descale if necessary; see Descaling section.
Coffee is not ho t enough.➔ Preheat cup.➔ Descale if necessary; see Descaling section.
Capsule area is leaking (water in capsule container). ➔ Position capsule correctly. If leakages occur, call the Nespresso Club.
Irregular blinking. ➔ Send appliance to repair or call the Nespresso Club.
No coffee, just water runs out (despite inserted capsule). ➔ In case of problems, call the Nespresso Club.
Lever cannot be closed completely.➔ Empty capsule container. Make sure that no capsule is blocked inside the capsule
container.
Quality of milk froth is not up to standard.
➔ For a perfect milk froth, use skimmed or semi-skimmed milk at refrigerator temperature (about 4° C).
➔ Rinse after each milk based preparation. Place a recipient under milk outlet, rotate the milk regulator knob until «CLEAN» position.
➔ Every two days, disassemble the R. C. S. and clean all components in the upper level of a dishwasher.
Machine needs repair message, indicated in display.➔ Contact the Nespresso Club or Nespresso authorized representative for examination,
repair or adjustment.
latissima proEUR,AUS,NZ: 220240 V, 50/60 Hz, 1300 W
US/CA: 120 V, 60 Hz, 1200 W
19 bar
6.5 kg
1,38 litre
500 ml
13-16 capsules
l=19,4 cm . L=33,2 cm . h=27,4 cm
Troubleshooting
Contact the Nespressso Club
For any additional information, in case of problems or simply to seek advise, call the Nespresso Club. Contact details of the Nespresso Club can be found in the 'Welcome to Nespresso' folder in your machine box or at nespresso.com
No light on displayCheck the mains, plug, voltage, and fuse. In case of problems, call the Nespresso Club.
Coffee comes out very slowly.Flow speed depends on the coffee variety.Perform a self check of the machine. Enter the menu list and select Maintenance. Follow instruction
Coffee is not hot enough.Preheat cup.Perform a self check of the machine. Enter the menu list and select Maintenance. Follow instruction
Capsule area is leaking (water in capsule container). Position capsule correctly. If leakages occur, call the Nespresso Club.
Irregular blinking.Send appliance to repair or call the Nespresso Club.
No coffee, just water runs out (despite inserted capsule).In case of problems, call the Nespresso Club.
Lever cannot be closed completelyEmpty capsule container. Make sure that no capsule is blocked inside the capsule container.
Quality of milk froth is not up to standard1) For a perfect milk froth, use skimmed or semi-skimmed milk at refrigerator temperature (about 4° C)2) Rinse after each milk based preparation. Place a recipient under milk outlet, rotate the milk regulator knob until “CLEAN” position.3) Every two days, disassemble the R. C. S. and clean all components in the upper level of a dishwasher
Warranty
Delonghi warrants this product against defects in materials and workmanship for a period of two years from the date of purchase. During this period, Delonghi will either repair or replace, at its discretion, any defective product at no charge to the owner. Replacement products or repaired parts will be guaranteed for only the unexpired portion of the original warranty or six months, whichever is greater. This limited warranty does not apply to any defect resulting from accident, misuse, improper maintenance, or normal wear and tear. Any defect resulting from the usage of non genuine Nespresso capsules will not be covered by this warranty. Except to the extent allowed by applicable law, the terms of this limited warranty do not exclude, restrictor modify, and are in addition to, the mandatory statutory rights applicable to the sale of the product to you. If you believe your product is defective, contact Nespresso for instructions on where to send or bring it for repair. Please visit our website at nespresso.com to discover more about Nespresso
Specifications
Pmax
Once the rinsing process is finished, the machine switches off. Clean the machine using a damp cloth. You have now finished descaling the machine.
9 10 11 12Rinsing process Rinse and fill water with fresh potable water up to MAX level.
Rinsing process Place one container of minimum 1 litre under both the coffee outlet and the hot water spout.
PRESS to confirm.The rinsing cycle continues trough the coffee outlet, hot water spout and drip tray until the water tank is empty.
Water hardness setting
1
programmed buttons blinks 3 times: water hardness is seti
1”2 3 4
1
2
3
4
5
Place the water hardness sticker under water for 1 second.
The number of red squares indicates the water harness level.
Set the value accordinglyEnter the menu, browse the options and select WATER HARDNESS.You will be guided to set the value.Follow machine display instructions.
max
max
Kg
11 12
EuR, AuS, NZ: 220-240 V, 50/60 Hz, 1300 wEUR,AUS,NZ: 220240 V, 50/60 Hz, 1300 W
US/CA: 120 V, 60 Hz, 1200 W
19 bar
6.5 kg
1,38 litre
500 ml
13-16 capsules
l=19,4 cm . L=33,2 cm . h=27,4 cm
Troubleshooting
Contact the Nespressso Club
For any additional information, in case of problems or simply to seek advise, call the Nespresso Club. Contact details of the Nespresso Club can be found in the 'Welcome to Nespresso' folder in your machine box or at nespresso.com
No light on displayCheck the mains, plug, voltage, and fuse. In case of problems, call the Nespresso Club.
Coffee comes out very slowly.Flow speed depends on the coffee variety.Perform a self check of the machine. Enter the menu list and select Maintenance. Follow instruction
Coffee is not hot enough.Preheat cup.Perform a self check of the machine. Enter the menu list and select Maintenance. Follow instruction
Capsule area is leaking (water in capsule container). Position capsule correctly. If leakages occur, call the Nespresso Club.
Irregular blinking.Send appliance to repair or call the Nespresso Club.
No coffee, just water runs out (despite inserted capsule).In case of problems, call the Nespresso Club.
Lever cannot be closed completelyEmpty capsule container. Make sure that no capsule is blocked inside the capsule container.
Quality of milk froth is not up to standard1) For a perfect milk froth, use skimmed or semi-skimmed milk at refrigerator temperature (about 4° C)2) Rinse after each milk based preparation. Place a recipient under milk outlet, rotate the milk regulator knob until “CLEAN” position.3) Every two days, disassemble the R. C. S. and clean all components in the upper level of a dishwasher
Warranty
Delonghi warrants this product against defects in materials and workmanship for a period of two years from the date of purchase. During this period, Delonghi will either repair or replace, at its discretion, any defective product at no charge to the owner. Replacement products or repaired parts will be guaranteed for only the unexpired portion of the original warranty or six months, whichever is greater. This limited warranty does not apply to any defect resulting from accident, misuse, improper maintenance, or normal wear and tear. Any defect resulting from the usage of non genuine Nespresso capsules will not be covered by this warranty. Except to the extent allowed by applicable law, the terms of this limited warranty do not exclude, restrictor modify, and are in addition to, the mandatory statutory rights applicable to the sale of the product to you. If you believe your product is defective, contact Nespresso for instructions on where to send or bring it for repair. Please visit our website at nespresso.com to discover more about Nespresso
Specifications
Pmax
Once the rinsing process is finished, the machine switches off. Clean the machine using a damp cloth. You have now finished descaling the machine.
9 10 11 12Rinsing process Rinse and fill water with fresh potable water up to MAX level.
Rinsing process Place one container of minimum 1 litre under both the coffee outlet and the hot water spout.
PRESS to confirm.The rinsing cycle continues trough the coffee outlet, hot water spout and drip tray until the water tank is empty.
Water hardness setting
1
programmed buttons blinks 3 times: water hardness is seti
1”2 3 4
1
2
3
4
5
Place the water hardness sticker under water for 1 second.
The number of red squares indicates the water harness level.
Set the value accordinglyEnter the menu, browse the options and select WATER HARDNESS.You will be guided to set the value.Follow machine display instructions.
max
max
Kg
11 12
max 19 bar
EUR,AUS,NZ: 220240 V, 50/60 Hz, 1300 W
US/CA: 120 V, 60 Hz, 1200 W
19 bar
6.5 kg
1,38 litre
500 ml
13-16 capsules
l=19,4 cm . L=33,2 cm . h=27,4 cm
Troubleshooting
Contact the Nespressso Club
For any additional information, in case of problems or simply to seek advise, call the Nespresso Club. Contact details of the Nespresso Club can be found in the 'Welcome to Nespresso' folder in your machine box or at nespresso.com
No light on displayCheck the mains, plug, voltage, and fuse. In case of problems, call the Nespresso Club.
Coffee comes out very slowly.Flow speed depends on the coffee variety.Perform a self check of the machine. Enter the menu list and select Maintenance. Follow instruction
Coffee is not hot enough.Preheat cup.Perform a self check of the machine. Enter the menu list and select Maintenance. Follow instruction
Capsule area is leaking (water in capsule container). Position capsule correctly. If leakages occur, call the Nespresso Club.
Irregular blinking.Send appliance to repair or call the Nespresso Club.
No coffee, just water runs out (despite inserted capsule).In case of problems, call the Nespresso Club.
Lever cannot be closed completelyEmpty capsule container. Make sure that no capsule is blocked inside the capsule container.
Quality of milk froth is not up to standard1) For a perfect milk froth, use skimmed or semi-skimmed milk at refrigerator temperature (about 4° C)2) Rinse after each milk based preparation. Place a recipient under milk outlet, rotate the milk regulator knob until “CLEAN” position.3) Every two days, disassemble the R. C. S. and clean all components in the upper level of a dishwasher
Warranty
Delonghi warrants this product against defects in materials and workmanship for a period of two years from the date of purchase. During this period, Delonghi will either repair or replace, at its discretion, any defective product at no charge to the owner. Replacement products or repaired parts will be guaranteed for only the unexpired portion of the original warranty or six months, whichever is greater. This limited warranty does not apply to any defect resulting from accident, misuse, improper maintenance, or normal wear and tear. Any defect resulting from the usage of non genuine Nespresso capsules will not be covered by this warranty. Except to the extent allowed by applicable law, the terms of this limited warranty do not exclude, restrictor modify, and are in addition to, the mandatory statutory rights applicable to the sale of the product to you. If you believe your product is defective, contact Nespresso for instructions on where to send or bring it for repair. Please visit our website at nespresso.com to discover more about Nespresso
Specifications
Pmax
Once the rinsing process is finished, the machine switches off. Clean the machine using a damp cloth. You have now finished descaling the machine.
9 10 11 12Rinsing process Rinse and fill water with fresh potable water up to MAX level.
Rinsing process Place one container of minimum 1 litre under both the coffee outlet and the hot water spout.
PRESS to confirm.The rinsing cycle continues trough the coffee outlet, hot water spout and drip tray until the water tank is empty.
Water hardness setting
1
programmed buttons blinks 3 times: water hardness is seti
1”2 3 4
1
2
3
4
5
Place the water hardness sticker under water for 1 second.
The number of red squares indicates the water harness level.
Set the value accordinglyEnter the menu, browse the options and select WATER HARDNESS.You will be guided to set the value.Follow machine display instructions.
max
max
Kg
11 12
~ 6.5 kg
1.3 l
0.5 l
13-16 capsules
19.4 cm 27.4 cm 33.2 cm
SpECifiCAtiONS
1716
6926_UM_LATTISSIMA_PREMIUM_Z2C.indb 16-17 25.03.14 10:52

ENEN
For any additional information, in case of problems or simply to seek advise, call the Nespresso Club. Contact details of the Nespresso Club can be found in the «Welcome to Nespresso» folder in your machine box or at nespresso.com
CO N TAC T T H E NESPRESSO C LU b
WA R R A N T Y
D I S P O S A L A N D E CO LO G I C A L CO N C E R N S
Disposal and Environmental protection Your appliance contains valuable materials that can be recovered or recycled. Separation of the remaining waste materials into different types facilitates the recycling of valuable raw material. Leave the appliance at a collection point. You can obtain information on disposal from your local authorities.
Nespresso warrants this product against defects in materials and workmanship for a period of 2 years. The warranty period begins on the date of purchase and Nespresso requires presentation of the original proof of purchaseto ascertain the date. During the warranty period, Nespresso will either repair or replace, at its discretion, any defective product at no charge to the owner. Replacement products or repaired parts will be warranted only for theunexpired portion of the original warranty or six months, whichever is greater. This limited warranty does not apply to any defect resulting from negligence, accident, misuse, or any other reason beyond Nespresso’s reasonablecontrol, including but not limited to: normal wear and tear, negligence or failure to follow the product instructions, improper or inadequate maintenance, calcium deposits or descaling, connection to improper power supply,unauthorized product modification or repair, use for commercial purposes, fire, lightning, flood or other external causes. This warranty is valid only in the country of purchase or in such other countries where Nespresso sells andservices the same model with identical technical specifications. Warranty service outside the country of purchase is limited to the terms and conditions of the corresponding warranty in the country of service. Should the costof repairs or replacement not be covered by this warranty, Nespresso will advise the owner and the cost shall be charged to the owner. This limited warranty shall be the full extent of Nespresso’s liability however caused. Exceptto the extent allowed by applicable law, the terms of this limited warranty do not exclude, restrict or modify the mandatory statutory rights applicable to the sale of this product and are in addition to those rights. The limitedwarranty applies only to this single-branded Nespresso products. Products marked with both the Nespresso brand and another producer are governed exclusively by the warranty provided by that other producer. If you believeyour product is defective, contact Nespresso for instructions on how to proceed with a repair. Any defect or dysfunction resulting from the use of non-genuine Nespresso capsules will be not covered by this warranty. Please visit our website at www.nespresso.com for contact details.
1918
6926_UM_LATTISSIMA_PREMIUM_Z2C.indb 18-19 25.03.14 10:52
ILIL
.Nespresso לקבלת מידע נוסף, במקרה של תקלה או לייעוץ, נא להתקשר למועדון www.nespresso.co.il שבתוך אריזת המכונה ובאתר «Nespresso-את פרטי ההתקשרות ניתן למצוא בערכת «ברוך הבא ל
Nespresso צרו קשר עם מועדון
אחריות
מיחזור וחשיבה אקולוגיתרישוי והגנה על הסביבה
מוצר זה מכיל חומרים בעלי ערך שיכולים לשמש למיחזור נוסף. הפרדה של חומרי הפסולת שנותרו לסוגים שונים מאפשרת מחזור של חומר גלם שונים.
.Nespresso אנא העבר את המכונה לאתר פסולת ייעודי או לאנשי שירות הלקוחות המוסמכים במועדון
Nespresso תהיה אחראית לכל פגם בחומר ובטיב העבודה למשך שנה אחת מתאריך הרכישה. תקופת האחריות תחל מיום ההרשמה במועדון והצגת מסמך הוכחת קניה מקורי לצורך אימות התאריך בו בוצעה הרכישה. בתקופת האחריות Nespresso תתקן או תחליף כל מוצר פגום על פי שיקול דעתה ובהתאם לחוק בישראל. האחריות על
מוצרים שהוחלפו או חלקים מתוקנים, תהיה למשך הזמן הנותר לתקופת האחריות המקורית או שישה חודשים, הזמן הארוך מביניהם. אחריות מוגבלת זו, אינה מכסה פגם הנוצר עקב תאונה, הזנחה, שימוש שגוי, אי הקפדה על הוראות ההפעלה, בלאי ושבר, שימוש מסחרי, שימוש במתח או בזרם החורג מהנקוב על המוצר, שינוי
תוואי המוצר ללא אישור, שריפה, ברק, שיטפון או סיבות חיצוניות אחרות. שירותי האחריות מחוץ למדינה בה נרכש המכשיר מוגבלים לתנאים ולהגדרות של המדינה בה מבוקש שירות עבור המכשיר. במקרה שהתיקון או ההחלפה לא יהיו מכוסים על ידי האחריות, Nespresso תציג ללקוח את עלות החיוב לתיקון על מנת שיוכל להחליט האם הוא מעוניין בתיקון. פרט להיקף שמתיר החוק, התנאים לאחריות מוגבלת זו, אינם שוללים, אינם מגבילים או משנים את הזכויות החוקיות התקפות בעת מכירת
מוצר זה והם נוספים לזכויות אלו. האחריות המוגבלת תקפה רק לגבי המותג Nespresso. אם אתם סבורים שהמוצר פגום, צרו קשר עם מועדון Nespresso על מנת לעדכן את דרכי ההתקשרות לאיסוף והחזרת המכשיר. כל נזק או פגם שיגרם משימוש בקפסולות שאינן יוצרו בלעדית על ידי חברת Nespresso לא יהיו מכוסים על ידי האחריות. אנא
בקרו באתר www.nespresso.co.il לפרטים נוספים.
19 18
6926_UM_LATTISSIMA_PREMIUM_Z2C.indb 5-6 25.03.14 10:52

max
1”
1
2
3
4
5
11
max
1”
1
2
3
4
5
11
max
1”
1
2
3
4
5
11
max
1”
1
2
3
4
5
11
max
1”
1
2
3
4
5
11
max
1”
1
2
3
4
5
11
max
1”
1
2
3
4
5
11
max
1”
1
2
3
4
5
11
ILIL
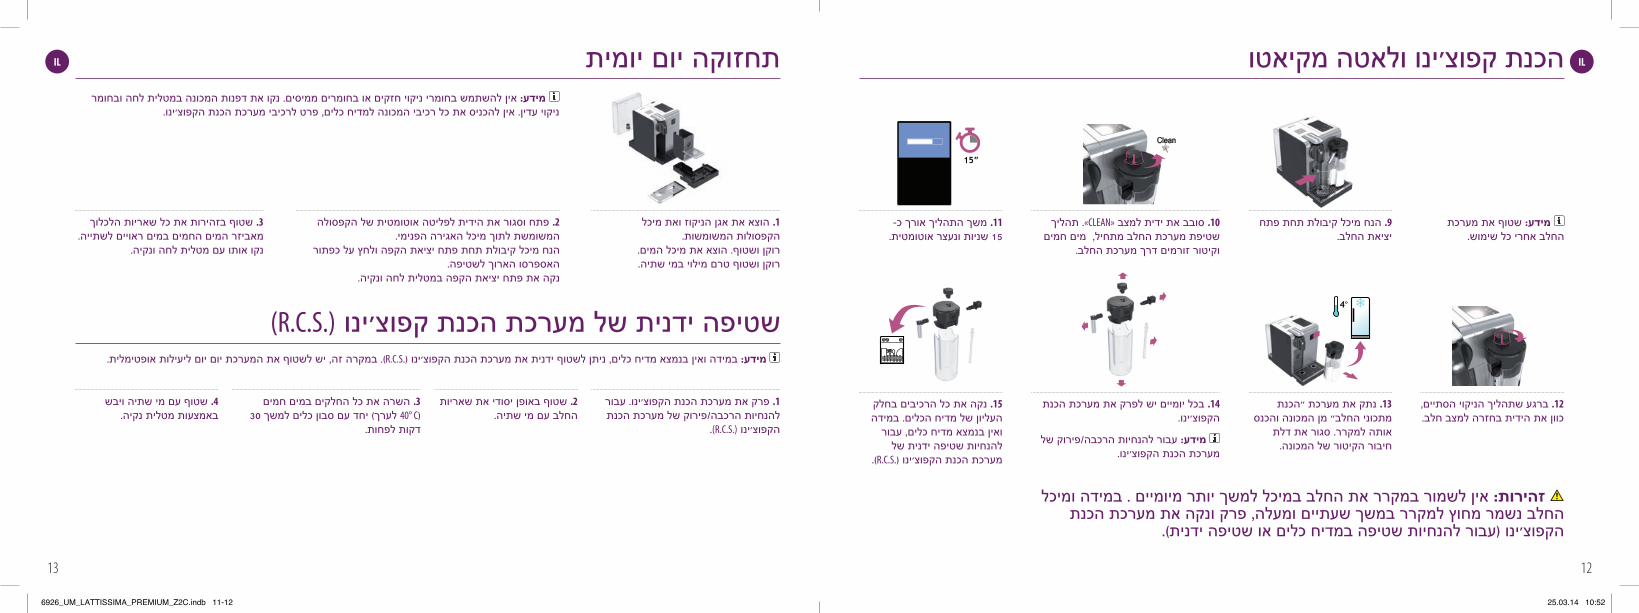
2. הנח את מקלון בדיקת קשיות המים במים למשך שניה אחת.
11. לחצו לאישור. תהליך השטיפה מתבצע על ידי זרימת המים במקביל דרך
פתח יציאת הקפה, אביזר המים החמים ואגן הניקוז.
3. מספר הקוביות האדומות אשר יופיע על המקלון יצביע על רמת
קשיות המים.
12. ברגע שתהליך השטיפה מסתיים, המכונה תיכבה באופן אוטומטי. שטוף את אביזר המים החמים ונקה במטלית לחה.
תהליך ניקוי האבנית הסתיים.
4. הגדר את רמת קשיות המים בהתאמה.
הגדרות קשיות מים
1. כנס לתפריט, בחר באפשרות קשיות מים ]הגדרות קשיות מים[. תקבל הנחיות להגדרת מידת קשיות המים. עקוב אחר
ההנחיות המופיעות.
9. תהליך השטיפה: שטוף את מיכל המים ומלא במי שתיה עד
לקו המקסימום.
10. תהליך השטיפה: הנח מיכל של 1 ליטר לפחות מתחת לפתח
יציאת הקפה ומתחת לאביזר המים החמים.
בדוק את אספקת המתח, התקע, סיווג המתח והנתיך. לחץ על כפתור ההדלקה )ON( הממוקם בחלק האחורי של המכונה.
.Nespresso במקרה של בעיה, פנה למועדוןנורית הצג אינה דולקת.
במקרים מסויימים, חום המכונה מגיע לטמפרטורה גבוהה )כמו בתהליך ריקון המערכת(. אנא המתן, המכונה תתקרר באופן
אוטומטי ותחזור לשימוש.
התראה כי המכונה חמה מידי מופיעה על הצג.
מהירות הזרימה תלויה בסוג הקפה. אם יש צורך בהסרת אבנית; ראה סעיף הסרת אבנית.
הקפה זורם באיטיות רבה.
חמם את הספל מראש. אם יש צורך בהסרת אבנית; ראה סעיף הסרת אבנית.
הקפה אינו חם דיו.
מקם את הקפסולה כראוי. .Nespresso מקרה של דליפה חוזרת, פנה למועדון
דליפה באזור הקפסולה )מים במיכל הקפסולה(.
.Nespresso הבהוב לא סדיר. פנה למועדון
צור קשר עם מועדון Nespresso לבדיקה.אין יציאה של קפה אלא רק של מים )אף על
פי שהוכנסה קפסולה(.
רוקן את מיכל הקפסולות המשומשות.וודא כי אין קפסולה תקועה במערכת החליטה.
ידית ההרמה אינה נסגרת כהלכה.
לקצף חלב מושלם, מומלץ להשתמש בחלב 3% בטמפרטורת מקרר )כ-4 מעלות צלזיוס(.
שטוף לאחר כל הכנה של מתכון חלב. הנח כלי קיבולת תחת פתח .»CLEAN« יציאת החלב סובב את הידית למצב ניקוי
בכל יומיים יש לפרק את מערכת הכנת הקפוצ'ינו ולנקות את כל חלקיה במדף העליון של מדיח הכלים.
איכות קצף החלב אינה משביעת רצון.
התראת תיקון המכונה מופיעה על הצג. צור קשר עם מועדון Nespresso לבדיקה.
latissima pro
EuR, AuS, NZ: 220-240 V, 50/60 Hz, 1300 wEUR,AUS,NZ: 220240 V, 50/60 Hz, 1300 W
US/CA: 120 V, 60 Hz, 1200 W
19 bar
6.5 kg
1,38 litre
500 ml
13-16 capsules
l=19,4 cm . L=33,2 cm . h=27,4 cm
Troubleshooting
Contact the Nespressso Club
For any additional information, in case of problems or simply to seek advise, call the Nespresso Club. Contact details of the Nespresso Club can be found in the 'Welcome to Nespresso' folder in your machine box or at nespresso.com
No light on displayCheck the mains, plug, voltage, and fuse. In case of problems, call the Nespresso Club.
Coffee comes out very slowly.Flow speed depends on the coffee variety.Perform a self check of the machine. Enter the menu list and select Maintenance. Follow instruction
Coffee is not hot enough.Preheat cup.Perform a self check of the machine. Enter the menu list and select Maintenance. Follow instruction
Capsule area is leaking (water in capsule container). Position capsule correctly. If leakages occur, call the Nespresso Club.
Irregular blinking.Send appliance to repair or call the Nespresso Club.
No coffee, just water runs out (despite inserted capsule).In case of problems, call the Nespresso Club.
Lever cannot be closed completelyEmpty capsule container. Make sure that no capsule is blocked inside the capsule container.
Quality of milk froth is not up to standard1) For a perfect milk froth, use skimmed or semi-skimmed milk at refrigerator temperature (about 4° C)2) Rinse after each milk based preparation. Place a recipient under milk outlet, rotate the milk regulator knob until “CLEAN” position.3) Every two days, disassemble the R. C. S. and clean all components in the upper level of a dishwasher
Warranty
Delonghi warrants this product against defects in materials and workmanship for a period of two years from the date of purchase. During this period, Delonghi will either repair or replace, at its discretion, any defective product at no charge to the owner. Replacement products or repaired parts will be guaranteed for only the unexpired portion of the original warranty or six months, whichever is greater. This limited warranty does not apply to any defect resulting from accident, misuse, improper maintenance, or normal wear and tear. Any defect resulting from the usage of non genuine Nespresso capsules will not be covered by this warranty. Except to the extent allowed by applicable law, the terms of this limited warranty do not exclude, restrictor modify, and are in addition to, the mandatory statutory rights applicable to the sale of the product to you. If you believe your product is defective, contact Nespresso for instructions on where to send or bring it for repair. Please visit our website at nespresso.com to discover more about Nespresso
Specifications
Pmax
Once the rinsing process is finished, the machine switches off. Clean the machine using a damp cloth. You have now finished descaling the machine.
9 10 11 12Rinsing process Rinse and fill water with fresh potable water up to MAX level.
Rinsing process Place one container of minimum 1 litre under both the coffee outlet and the hot water spout.
PRESS to confirm.The rinsing cycle continues trough the coffee outlet, hot water spout and drip tray until the water tank is empty.
Water hardness setting
1
programmed buttons blinks 3 times: water hardness is seti
1”2 3 4
1
2
3
4
5
Place the water hardness sticker under water for 1 second.
The number of red squares indicates the water harness level.
Set the value accordinglyEnter the menu, browse the options and select WATER HARDNESS.You will be guided to set the value.Follow machine display instructions.
max
max
Kg
11 12
19 בר
EUR,AUS,NZ: 220240 V, 50/60 Hz, 1300 W
US/CA: 120 V, 60 Hz, 1200 W
19 bar
6.5 kg
1,38 litre
500 ml
13-16 capsules
l=19,4 cm . L=33,2 cm . h=27,4 cm
Troubleshooting
Contact the Nespressso Club
For any additional information, in case of problems or simply to seek advise, call the Nespresso Club. Contact details of the Nespresso Club can be found in the 'Welcome to Nespresso' folder in your machine box or at nespresso.com
No light on displayCheck the mains, plug, voltage, and fuse. In case of problems, call the Nespresso Club.
Coffee comes out very slowly.Flow speed depends on the coffee variety.Perform a self check of the machine. Enter the menu list and select Maintenance. Follow instruction
Coffee is not hot enough.Preheat cup.Perform a self check of the machine. Enter the menu list and select Maintenance. Follow instruction
Capsule area is leaking (water in capsule container). Position capsule correctly. If leakages occur, call the Nespresso Club.
Irregular blinking.Send appliance to repair or call the Nespresso Club.
No coffee, just water runs out (despite inserted capsule).In case of problems, call the Nespresso Club.
Lever cannot be closed completelyEmpty capsule container. Make sure that no capsule is blocked inside the capsule container.
Quality of milk froth is not up to standard1) For a perfect milk froth, use skimmed or semi-skimmed milk at refrigerator temperature (about 4° C)2) Rinse after each milk based preparation. Place a recipient under milk outlet, rotate the milk regulator knob until “CLEAN” position.3) Every two days, disassemble the R. C. S. and clean all components in the upper level of a dishwasher
Warranty
Delonghi warrants this product against defects in materials and workmanship for a period of two years from the date of purchase. During this period, Delonghi will either repair or replace, at its discretion, any defective product at no charge to the owner. Replacement products or repaired parts will be guaranteed for only the unexpired portion of the original warranty or six months, whichever is greater. This limited warranty does not apply to any defect resulting from accident, misuse, improper maintenance, or normal wear and tear. Any defect resulting from the usage of non genuine Nespresso capsules will not be covered by this warranty. Except to the extent allowed by applicable law, the terms of this limited warranty do not exclude, restrictor modify, and are in addition to, the mandatory statutory rights applicable to the sale of the product to you. If you believe your product is defective, contact Nespresso for instructions on where to send or bring it for repair. Please visit our website at nespresso.com to discover more about Nespresso
Specifications
Pmax
Once the rinsing process is finished, the machine switches off. Clean the machine using a damp cloth. You have now finished descaling the machine.
9 10 11 12Rinsing process Rinse and fill water with fresh potable water up to MAX level.
Rinsing process Place one container of minimum 1 litre under both the coffee outlet and the hot water spout.
PRESS to confirm.The rinsing cycle continues trough the coffee outlet, hot water spout and drip tray until the water tank is empty.
Water hardness setting
1
programmed buttons blinks 3 times: water hardness is seti
1”2 3 4
1
2
3
4
5
Place the water hardness sticker under water for 1 second.
The number of red squares indicates the water harness level.
Set the value accordinglyEnter the menu, browse the options and select WATER HARDNESS.You will be guided to set the value.Follow machine display instructions.
max
max
Kg
11 12
6.5 ק"ג
EUR,AUS,NZ: 220240 V, 50/60 Hz, 1300 W
US/CA: 120 V, 60 Hz, 1200 W
19 bar
6.5 kg
1,38 litre
500 ml
13-16 capsules
l=19,4 cm . L=33,2 cm . h=27,4 cm
Troubleshooting
Contact the Nespressso Club
For any additional information, in case of problems or simply to seek advise, call the Nespresso Club. Contact details of the Nespresso Club can be found in the 'Welcome to Nespresso' folder in your machine box or at nespresso.com
No light on displayCheck the mains, plug, voltage, and fuse. In case of problems, call the Nespresso Club.
Coffee comes out very slowly.Flow speed depends on the coffee variety.Perform a self check of the machine. Enter the menu list and select Maintenance. Follow instruction
Coffee is not hot enough.Preheat cup.Perform a self check of the machine. Enter the menu list and select Maintenance. Follow instruction
Capsule area is leaking (water in capsule container). Position capsule correctly. If leakages occur, call the Nespresso Club.
Irregular blinking.Send appliance to repair or call the Nespresso Club.
No coffee, just water runs out (despite inserted capsule).In case of problems, call the Nespresso Club.
Lever cannot be closed completelyEmpty capsule container. Make sure that no capsule is blocked inside the capsule container.
Quality of milk froth is not up to standard1) For a perfect milk froth, use skimmed or semi-skimmed milk at refrigerator temperature (about 4° C)2) Rinse after each milk based preparation. Place a recipient under milk outlet, rotate the milk regulator knob until “CLEAN” position.3) Every two days, disassemble the R. C. S. and clean all components in the upper level of a dishwasher
Warranty
Delonghi warrants this product against defects in materials and workmanship for a period of two years from the date of purchase. During this period, Delonghi will either repair or replace, at its discretion, any defective product at no charge to the owner. Replacement products or repaired parts will be guaranteed for only the unexpired portion of the original warranty or six months, whichever is greater. This limited warranty does not apply to any defect resulting from accident, misuse, improper maintenance, or normal wear and tear. Any defect resulting from the usage of non genuine Nespresso capsules will not be covered by this warranty. Except to the extent allowed by applicable law, the terms of this limited warranty do not exclude, restrictor modify, and are in addition to, the mandatory statutory rights applicable to the sale of the product to you. If you believe your product is defective, contact Nespresso for instructions on where to send or bring it for repair. Please visit our website at nespresso.com to discover more about Nespresso
Specifications
Pmax
Once the rinsing process is finished, the machine switches off. Clean the machine using a damp cloth. You have now finished descaling the machine.
9 10 11 12Rinsing process Rinse and fill water with fresh potable water up to MAX level.
Rinsing process Place one container of minimum 1 litre under both the coffee outlet and the hot water spout.
PRESS to confirm.The rinsing cycle continues trough the coffee outlet, hot water spout and drip tray until the water tank is empty.
Water hardness setting
1
programmed buttons blinks 3 times: water hardness is seti
1”2 3 4
1
2
3
4
5
Place the water hardness sticker under water for 1 second.
The number of red squares indicates the water harness level.
Set the value accordinglyEnter the menu, browse the options and select WATER HARDNESS.You will be guided to set the value.Follow machine display instructions.
max
max
Kg
11 12
1.3 ליטר
0.5 ליטר
13-16 קפסולות
33.2 ס"מ, 19.4 ס"מ, 27.4 ס"מ
מפרט
תפעול תקלותניקוי אבנית
17 16
6926_UM_LATTISSIMA_PREMIUM_Z2C.indb 7-8 25.03.14 10:52

+100 ml500 ml
10
+100 ml500 ml
10
+100 ml500 ml
10
+100 ml500 ml
10
+100 ml500 ml
10
+100 ml500 ml
10
+100 ml500 ml
10
+100 ml500 ml
10
ILIL
הערות: *גובה קצף החלב תלוי בסוג החלב, הטמפרטורה ומצב וסט החלב.
הערות: אנו ממליצים לכם לשמור על הגדרות היצרן לכמויות הריסטרטו, אספרסו ולונגו כדי להבטיח את התוצאה הטובה ביותר בספל הקפה לכל מגוון
התערובות.
ניתן לתכנת את גובה המים מ 50 מ"ל ועד 400 מ"ל.ניתן לתכנת את כמות החלב מ 30 מ"ל ועד 200 מ"ל.ניתן לתכנת את כמות הקפה מ 25 מ"ל ועד 200 מ"ל.
הגדרות יצרן למתכוני הקפה
ריסטרטו 25 מ"ל
קפוצ'ינו *חלב: 50 מ"ל/קפה: 40 מ"ל
אספרסו ארוך 110 מ"ל
לאטה מקיאטו *חלב: 150 מ"ל/קפה: 40 מ"ל
מים חמים 125 מ"לאספרסו 40 מ"ל
חלב חם 120 מ"ל
ניקוי אבנית
1. פתח וסגור את הידית לפליטה אוטומטית של הקפסולה
המשומשת לתוך מיכל הקפסולות המשומשות.
2. כנס לתפריט, בחר באפשרות ניקוי אבנית ]ניקוי אבנית[. תקבל הנחיות להגדרת
מידת קשיות המים. עקוב אחר ההנחיות המופיעות.
זהירות: ראה כללי בטיחות. משך תהליך ניקוי האבנית כ- 25 דקות
7. לחצו לאישור. נוזל ניקוי האבנית יזרום במקביל דרך פתח יציאת הקפה, אביזר
המים החמים ואגן הניקוז. יש להמתין עד שהתהליך יושלם.
5. תהליך ניקוי האבנית: הכנס את אביזר המים החמים.
6. תהליך ניקוי האבנית: הנח מיכל של 1 ליטר לפחות מתחת לפתח יציאת הקפה
ומתחת לאביזר המים החמים.
3. תהליך ניקוי האבנית: רוקן את אגן הניקוז ואת מיכל הקפסולות המשומשות.
4. תהליך ניקוי האבנית: מלא את מיכל המים ב-100 מ"ל
Nespresso של מסיר האבנית של וב-500 מ"ל מים.
8. תהליך השטיפה: רוקן את אגן הניקוז ואת מיכל הקפסולות
המשומשות. שטוף במי שתיה.
זהירות: אם כמות הקפה שתוכנתה גבוה מ 150 מ"ל: יש לתת למכונה להתקרר במשך 5 דקות לפני
הוצאת הקפה הבא. סכנה של התחממות יתר!
15 14
6926_UM_LATTISSIMA_PREMIUM_Z2C.indb 9-10 25.03.14 10:52
Preparing Cappuccino and Latte Macchiato
4°
i When the milk container is empty, before refilling, thoroughly rinse it and the milk aspiration tube with potable water.
Close the milk container. Open the steam connector door by sliding it to the right. Connect the Rapid Cappuccino System to the machine.
15”
+LATTE MACCHIATO
Clean
15”
i
Remove Rapid Cappuccino System connector by unlocking it from (sign ) to (sign) and pulling it off
Remove the milk container lid and unplug milk aspiration tube.
Remove the milk froth regulator knob by turning it until and pulling it up.
Remove the milk spout by pulling it off.
1 2 3 4
Assembling / disassembling of Rapid Cappuccino system (R.C.S)
RINSE MILK SYSTEM
07 08
PRESS to confirm.The discaling agent flows alternately trough the coffee outlet, hot water nozzle and drip tray.
Descaling
Descaling process: Empty the drip tray and the used capsules container.
Rinsing process: Empty the drip tray and the used capsules container.
Refer to safety precautions
+100 ml500 ml
1 2 3
5 7 8
4
6
Lift and close the lever to eject any capsule in the used capsule container.
Descaling process: Fill water tank with 100 ml of Nespresso descaling agent and 500ml water.
Descaling process: Insert the hot water spout.
Enter the Menu, browse the options and select DESCALING. You will be guided throughout the whole process. Follow machine display instructions.
Descaling process: Place one container of minimum 1 litre under both the coffee outlet and the hot water spout.
4°
Volume factory settings
LANGUAGE
DESCALING
WATER HARDNESS
09 10
ILIL הכנת קפוצ'ינו ולאטה מקיאטו
מידע: שטוף את מערכת החלב אחרי כל שימוש.
9. הנח מיכל קיבולת תחת פתח יציאת החלב.
10. סובב את ידית למצב «CLEAN». תהליך שטיפת מערכת החלב מתחיל, מים חמים
וקיטור זורמים דרך מערכת החלב.
11. משך התהליך אורך כ- 15 שניות ונעצר אוטומטית.
12. ברגע שתהליך הניקוי הסתיים, כוון את הידית בחזרה למצב חלב.
13. נתק את מערכת "הכנת מתכוני החלב" מן המכונה והכנס
אותה למקרר. סגור את דלת חיבור הקיטור של המכונה.
15. נקה את כל הרכיבים בחלק העליון של מדיח הכלים. במידה
ואין בנמצא מדיח כלים, עבור להנחיות שטיפה ידנית של
.)R.C.S.( מערכת הכנת הקפוצ'ינו
מידע: עבור להנחיות הרכבה/פירוק של מערכת הכנת הקפוצ'ינו.
זהירות: אין לשמור במקרר את החלב במיכל למשך יותר מיומיים . במידה ומיכל החלב נשמר מחוץ למקרר במשך שעתיים ומעלה, פרק ונקה את מערכת הכנת
הקפוצ'ינו )עבור להנחיות שטיפה במדיח כלים או שטיפה ידנית(.
14. בכל יומיים יש לפרק את מערכת הכנת הקפוצ'ינו.
2. פתח וסגור את הידית לפליטה אוטומטית של הקפסולה המשומשת לתוך מיכל האגירה הפנימי.
הנח מיכל קיבולת תחת פתח יציאת הקפה ולחץ על כפתור האספרסו הארוך לשטיפה.
נקה את פתח יציאת הקפה במטלית לחה ונקיה.
3. שטוף בזהירות את כל שאריות הלכלוך מאביזר המים החמים במים ראויים לשתייה.
נקו אותו עם מטלית לחה ונקיה.
1. פרק את מערכת הכנת הקפוצ'ינו. עבור להנחיות הרכבה/פירוק של מערכת הכנת
.(R.C.S.) הקפוצ'ינו
2. שטוף באופן יסודי את שאריות החלב עם מי שתיה.
3. השרה את כל החלקים במים חמים )C 40° לערך( יחד עם סבון כלים למשך 30
דקות לפחות.
4. שטוף עם מי שתיה ויבש באמצעות מטלית נקיה.
תחזוקה יום יומית מידע: אין להשתמש בחומרי ניקוי חזקים או בחומרים ממיסים. נקו את דפנות המכונה במטלית לחה ובחומר
ניקוי עדין. אין להכניס את כל רכיבי המכונה למדיח כלים, פרט לרכיבי מערכת הכנת הקפוצ'ינו.
(R.C.S.) שטיפה ידנית של מערכת הכנת קפוצ'ינו מידע: במידה ואין בנמצא מדיח כלים, ניתן לשטוף ידנית את מערכת הכנת הקפוצ'ינו ).R.C.S(. במקרה זה, יש לשטוף את המערכת יום יום ליעילות אופטימלית.
1. הוצא את אגן הניקוז ואת מיכל הקפסולות המשומשות.
רוקן ושטוף. הוצא את מיכל המים.
רוקן ושטוף טרם מילוי במי שתיה.
13 12
6926_UM_LATTISSIMA_PREMIUM_Z2C.indb 11-12 25.03.14 10:52

max
First read the safety precautions to avoid risks of fatal electrical shock and fire
Remove the plastic films from grid, lever and machine panels.
Remove the water tank, drip tray, and capsule container. Adjust the cable length and store the excess in the cable guide under the machine.
Put the machine in upright position, plug machine into mains.
The water tank can be carried by its cover.
Rinse the water tank before filling with potable water up to maximum level.
Insert the hot water spout. Switch machine ON
Set your preferred language.Press to continue.
SET LANGUAGE
to continue
Select your language by scrolling the options using up/down arrow. Press to confirm.
LANGUAGE
Actual value : EN
New value : [ ]
to select
Coffee preparation
x3x3
110 ml
40 ml
25 ml
05 06
4°15”
Assembling / disassembling of Rapid Cappuccino system (R.C.S)
07
4°15”
Assembling / disassembling of Rapid Cappuccino system (R.C.S)
07
4°15”
Assembling / disassembling of Rapid Cappuccino system (R.C.S)
07
4°15”
Assembling / disassembling of Rapid Cappuccino system (R.C.S)
07
4°15”
Assembling / disassembling of Rapid Cappuccino system (R.C.S)
07
Preparing Cappuccino and Latte Macchiato
4°
i When the milk container is empty, before refilling, thoroughly rinse it and the milk aspiration tube with potable water.
Close the milk container. Open the steam connector door by sliding it to the right. Connect the Rapid Cappuccino System to the machine.
15”
+LATTE MACCHIATO
Clean
15”
i
Remove Rapid Cappuccino System connector by unlocking it from (sign ) to (sign) and pulling it off
Remove the milk container lid and unplug milk aspiration tube.
Remove the milk froth regulator knob by turning it until and pulling it up.
Remove the milk spout by pulling it off.
1 2 3 4
Assembling / disassembling of Rapid Cappuccino system (R.C.S)
RINSE MILK SYSTEM
07 08
ILIL
פירוק/הרכבה של מערכת הכנת הקפוצ'ינו
1. הרם את ידית והכנס קפסולת .Nespresso
2. סגור את הידית והנח ספל מתחת לפתח יציאת הקפה.
3. לחץ על כפתור ספל ריסטרטו )25 מ"ל(, אספרסו )40 מ"ל( או אספרסו ארוך )110 מ"ל(. הכנת הקפה
תיעצר אוטומטית. כדי להפסיק באופן ידני יש ללחוץ שוב על הכפתור.
4. קח את הספל. פתח וסגור את הידית לפליטה אוטומטית של
הקפסולה המשומשת לתוך מיכל האגירה הפנימי.
1. הסר את מכסה מיכל החלב ונתק את צינורית שאיבת החלב.
4. הסר את פיית החלב על-ידי משיכתה כלפי חוץ.
2. הסר את כפתור הוויסות של קצף החלב על-ידי סיבובו עד ל
ומשוך כלפי מעלה.
3. הסר את מחבר מיכל החלב על-ידי שחרורו מ ל- ומשיכתו
כלפי חוץ.
שימו לב: בזמן התחממות המכונה, ניתן לבחור את ספל הקפה המועדף עליך.זרימת הקפה תחל אוטומטית ברגע שמכונת הקפת תיהיה מוכנה.
1. מלא את מיכל החלב בכמות החלב הרצויה.
2. סגור את מיכל החלב. פתח את דלת חיבור הקיטור על-ידי הסטתה לימין.
חבר את מערכת הכנת הקפוצ'ינו למכונה.
3. המכונה מתחממת ומוכנה לשימוש תוך 15 שניות.
4. הרם את הידית במלואה והכנס .Nespresso קפסולת
זהירות: אין להשתמש במיכל החלב לנוזלים אחרים מלבד חלב או מי שתיה. אין להשתמש בחלב שאינו מפוסטר או חלב שפג תוקף כפי שמצוין על גבי האריזה.
מידע: לקצף חלב מושלם, מומלץ להשתמש בחלב 3% בטמפרטורת מקרר )כ-4 מעלות צלזיוס(.
מידע: כאשר המיכל מתרוקן ולפני מילויו מחדש, שטוף אותו במים ביסודיות )מומלץ לפחות
פעם ביומיים(.
5. סגור את הידית, הנח ספל קפוצ'ינו או ספל לאטה מקיאטו
מתחת לפתח יציאת הקפה וכוון את צינורית החלב.
6. כוון את ווסת הקצף בהתאם לכמות הקצף הרצויה.
7. לחץ על לחצן הקפוצ'ינו או המקיאטו. ההכנה מתחילה לאחר מספר שניות )ראשית ייצא החלב
ולאחר מכן הקפה( ונפסקת אוטומטית.
8. בסיום ההכנה, הרם את הידית על מנת לפלוט את הקפסולה
המשומשת. לאחר מכן סגור את הידית.
הכנת קפוצ'ינו ולאטה מקיאטוהכנת קפה
11 10
6926_UM_LATTISSIMA_PREMIUM_Z2C.indb 13-14 25.03.14 10:52

max
SET LANGUAGE
to continue
LANGUAGEActual value : EN
New value : [ ] to select
05
max
SET LANGUAGE
to continue
LANGUAGEActual value : EN
New value : [ ] to select
05
max
SET LANGUAGE
to continue
LANGUAGEActual value : EN
New value : [ ] to select
05
max
SET LANGUAGE
to continue
LANGUAGEActual value : EN
New value : [ ] to select
05
max
SET LANGUAGE
to continue
LANGUAGEActual value : EN
New value : [ ] to select
05
max
SET LANGUAGE
to continue
LANGUAGEActual value : EN
New value : [ ] to select
05
max
SET LANGUAGE
to continue
LANGUAGEActual value : EN
New value : [ ] to select
05
max
First read the safety precautions to avoid risks of fatal electrical shock and fire
Remove the plastic films from grid, lever and machine panels.
Remove the water tank, drip tray, and capsule container. Adjust the cable length and store the excess in the cable guide under the machine.
Put the machine in upright position, plug machine into mains.
The water tank can be carried by its cover.
Rinse the water tank before filling with potable water up to maximum level.
Insert the hot water spout. Switch machine ON
Set your preferred language.Press to continue.
SET LANGUAGE
to continue
Select your language by scrolling the options using up/down arrow. Press to confirm.
LANGUAGE
Actual value : EN
New value : [ ]
to select
Coffee preparation
x3x3
110 ml
40 ml
25 ml
05 06
4°15”
Assembling / disassembling of Rapid Cappuccino system (R.C.S)
07
ILIL
זהירות: קרא ומלא אחר הוראות הבטיחות במלואן כדי למנוע פגיעה ונזק אפשריים.
1. הסר את מיכל המים, אגן הניקוז ואת מיכל אגירת הקפסולות. התאם את אורך הכבל
באמצעות מיקום האיחסון שמתחת למכונה.
5. הכנס את אביזר המים החמים. הדלק את המכונה.
2. הנח את המכונה במצב אנכי, חבר אותה לשקע
החשמל שבקיר.
SET LANGUAGE .6: בחר את השפה המועדפת עליך. לחץ
להמשך.
3. ניתן לשאת את מיכל המים באמצעות המכסה.
LANGUAGE .7: בחר את השפה המועדפת עליך על ידי גלילת
. לחץ לאישור. האפשרויות
4. יש לשטוף את מיכל המים לפני מילויו במים טריים עד למפלס המקסימום.
8. ברגע לחיצה על האייקון המכונה תתחמם.
מידע: המכונות עוברות בדיקה מלאה לאחר הייצור ועלולות להכיל שאריות מים.
מידע: עבור להנחיות הרכבה/פירוק של מערכת הכנת הקפוצ'ינו.
10. שטיפה: לחץ על כפתור המים החמים. חזור על הפעולה שלוש פעמים. בסיום התהליך, הסר ואחסן
את האביזר בתא האחסון בצד המכונה. סגור את דלת חיבור הקיטור.
9. שטיפה: הנח מיכל קיבול תחת פתח יציאת הקפה ולחץ על כפתור האספרסו הארוך. חזור 3 פעמים.
שימוש ראשון לאחר תקופה ארוכה שבמהלכה המכשיר לא הופעלשימוש ראשון לאחר תקופה ארוכה שבמהלכה המכשיר לא הופעל
11. פרק את מערכת הכנת הקפוצ'ינו ).R.C.S( נקה את כל הרכיבים בחלק העליון של מדיח הכלים.
במידה ואין בנמצא מדיח כלים, עבור להנחיות שטיפה .)R.C.S.( ידנית של מערכת הכנת הקפוצ'ינו
9 8
6926_UM_LATTISSIMA_PREMIUM_Z2C.indb 15-16 25.03.14 10:52

EN SAFETY PRECAUTIONS ............................................................................. 2 FR CONSIGNES DE SECURITE ......................................................................... 4 DE SICHERHEITSHINWEISE ........................................................................... 7 IT PRECAUZIONI DI SICUREZZA .................................................................... 10 ES PRECAUCIONES DE SEGURIDAD ................................................................ 12 PT MEDIDAS DE SEGURANÇA......................................................................... 15 NL VEILIGHEIDSMAATREGELEN ..................................................................... 18 GR ΜΈΤΡΑ ΑΣΦΑΛΈΙΑΣ .................................................................................. 20 HU BIZTONSÁGI ELŐÍRÁSOK .......................................................................... 22 CZ BEZPEČNOSTNÍ POKYNY .......................................................................... 25 PL ZASADY BEZPIECZEŃSTWA ....................................................................... 28 RU МЕРЫ ПРЕДОСТОРОЖНОСТИ ................................................................. 31
EN SAFETY PRECAUTIONS ............................................................................. 2 FR CONSIGNES DE SECURITE ......................................................................... 4 DE SICHERHEITSHINWEISE ........................................................................... 7 IT PRECAUZIONI DI SICUREZZA .................................................................... 10 ES PRECAUCIONES DE SEGURIDAD ................................................................ 12 PT MEDIDAS DE SEGURANÇA......................................................................... 15 NL VEILIGHEIDSMAATREGELEN ..................................................................... 18 GR ΜΈΤΡΑ ΑΣΦΑΛΈΙΑΣ .................................................................................. 20 HU BIZTONSÁGI ELŐÍRÁSOK .......................................................................... 22 CZ BEZPEČNOSTNÍ POKYNY .......................................................................... 25 PL ZASADY BEZPIECZEŃSTWA ....................................................................... 28 RU МЕРЫ ПРЕДОСТОРОЖНОСТИ ................................................................. 31
ILIL
בחר באפשרות זו להגדרת השפה המועדפת עליך. עקוב אחר ההוראות המופיעות במסך. 1
בחר באופציה זו כאשר התראת ניקוי אבנית מופיעה. עבור לעמוד 15. הנחיות ינתנו בתהליך ניקוי האבנית. 2
בחר באופציה זו להגדרת רמת קשיות המים. השתמש במקלון לקביעת רמת קשיות המים. לטובת קביעת תדירות אופטימלית לתהליך ניקוי האבנית. עבור לעמוד 16.
3
בחר באפשרות זו להגדרת זמן כיבוי אוטומטי. האפשרויות הן: 9 דקות, 30 דקות, שעתיים, 8 שעות. עקוב אחר ההוראות המופיעות במסך.
4
בחר באופציה זו על מנת להחזיר את המכונה להגדרות יצרן. 5
בחר באפשרות זו לריקון המים בתוך המכונה לפני שליחה לתיקון או לפני תקופה ארוכה של חוסר שימוש.עקוב אחר ההוראות המופיעות במסך. לאחר סיום התהליך המכונה תיהיה חסומה לשימוש למשך 10 דקות.
6
בחר באפשרות זו לתכנות כמות. עקוב אחר הוראות המופיעות במסך. בנוסף, תוכל להחזיר את כיוונון הכמות להגדרות יצרן.
7
בחר באפשרות זו לקבלת גישה להגדרות מכונה מהירות. 8
בחר באפשרות זו לבדיקה כוללת של מצב המכונה. נתוני צריכת הקפסולות מופיעים מהשימוש הראשון או מהניקוי האבנית האחרון. קבלת מספר הסידורי של המכונה.
9
בחר באפשרות זו לקבל עצות איך להנות מאיכות חלב מוקצף אופטימלי יום אחרי יום.הלינק האינטרנטי קיים כדי שתוכל לדעת עוד על תכונה זו.
10
צא מממצב תפריט וחזור למצב הכן. 11
שפה
ניקוי אבנית
קשיות מים
כיבוי אוטומטי
הגדרות יצרן
ריקון המערכת
תכנות כמות
הגדרות
תחזוקה
עזרה
יציאה
1
2
3
4
5
6
7
8
9
10
11
בחר אפשרות. לחץ על כפתור
אופציות בחירה. לחצני ניווט
הכנס למצב תפריט. לחיצה קצרה על האייקון
צא ממצב בחירה לתפריט הראשי
גלול לאפשרויות ובחר [יציאה] או לחץ על . האייקון
צא ממצב תפריט
גלול לאפשרויות ובחר [יציאה] או לחץ על האייקון למשך 2 שניות.
תפריטתוכן האריזה
ניווט בתפריט
«Nespresso ערכת «ברוך הבא ל ערכת 16 קפסולות הוראות בטיחות הוראות הפעלה מכונת הקפה
7 6
6926_UM_LATTISSIMA_PREMIUM_Z2C.indb 17-18 25.03.14 10:52
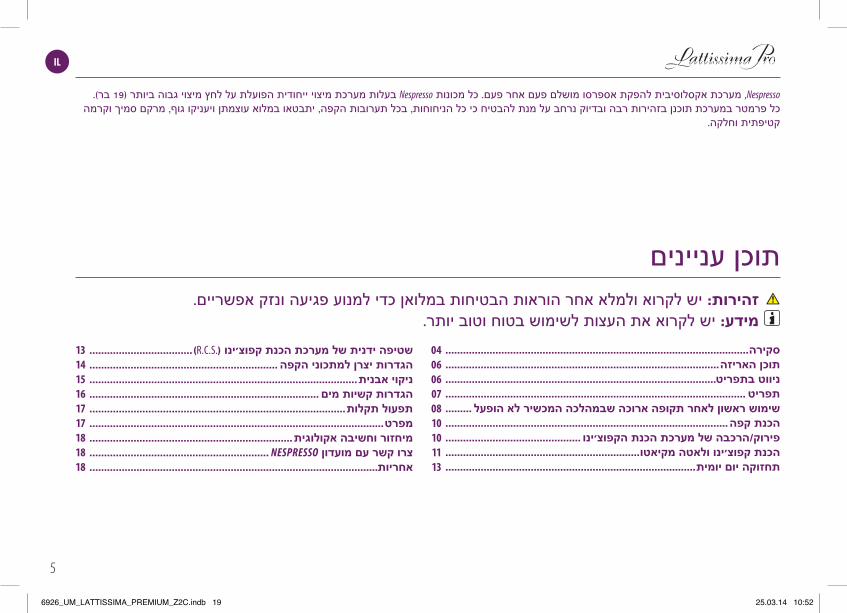
IL
...................................)R.C.S.( שטיפה ידנית של מערכת הכנת קפוצ'ינו
................................................................ הגדרות יצרן למתכוני הקפה
ניקוי אבנית...........................................................................................
.............................................................................. הגדרות קשיות מים
תפעול תקלות.......................................................................................
מפרט....................................................................................................
מיחזור וחשיבה אקולוגית.....................................................................
............................................................. Nespresso צרו קשר עם מועדון
אחריות..................................................................................................
1314151617 17 18 18 18
סקירה.......................................................................................................
תוכן האריזה.............................................................................................
ניווט בתפריט............................................................................................
...................................................................................................... תפריט
......... שימוש ראשון לאחר תקופה ארוכה שבמהלכה המכשיר לא הופעל
................................................................................................ הכנת קפה
.............................................. פירוק/הרכבה של מערכת הכנת הקפוצ'ינו
הכנת קפוצ'ינו ולאטה מקיאטו..................................................................
תחזוקה יום יומית.....................................................................................
040606070810101113
תוכן עניינים
זהירות: יש לקרוא ולמלא אחר הוראות הבטיחות במלואן כדי למנוע פגיעה ונזק אפשריים. מידע: יש לקרוא את העצות לשימוש בטוח וטוב יותר.
Nespresso, מערכת אקסלוסיבית להפקת אספרסו מושלם פעם אחר פעם. כל מכונות Nespresso בעלות מערכת מיצוי ייחודית הפועלת על לחץ מיצוי גבוה ביותר )19 בר(. כל פרמטר במערכת תוכנן בזהירות רבה ובדיוק נרחב על מנת להבטיח כי כל הניחוחות, בכל תערובות הקפה, יתבטאו במלוא עוצמתן ויעניקו גוף, מרקם סמיך וקרמה
קטיפתית וחלקה.
5
6926_UM_LATTISSIMA_PREMIUM_Z2C.indb 19 25.03.14 10:52
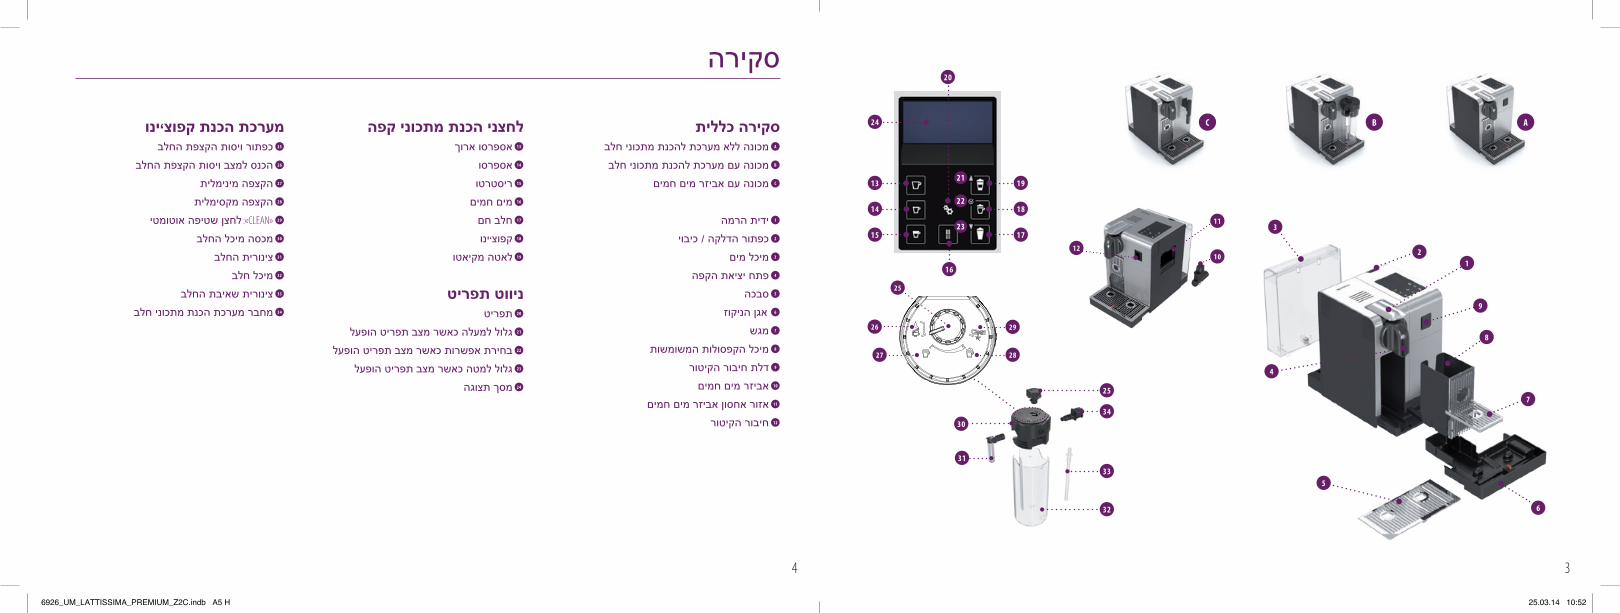
ABC
1012
11
6
9
21
8
7
5
4
3
13
24
19
20
21
22
23
14 18
15 17
16
25
2827
26 29
31
25
3034
33
32
לחצני הכנת מתכוני קפה13 אספרסו ארוך
14 אספרסו
15 ריסטרטו
16 מים חמים
17 חלב חם
18 קפוצ’ינו
19 לאטה מקיאטו
ניווט תפריט20 תפריט
21 גלול למעלה כאשר מצב תפריט הופעל
22 בחירת אפשרות כאשר מצב תפריט הופעל
23 גלול למטה כאשר מצב תפריט הופעל
24 מסך תצוגה
מערכת הכנת קפוצ’ינו25 כפתור ויסות הקצפת החלב
26 הכנס למצב ויסות הקצפת החלב
27 הקצפה מינימלית
28 הקצפה מקסימלית
CLEAN» 29»: לחצן שטיפה אוטומטי
30 מכסה מיכל החלב
31 צינורית החלב
32 מיכל חלב
33 צינורית שאיבת החלב
34 מחבר מערכת הכנת מתכוני חלב
סקירה כלליתA מכונה ללא מערכת להכנת מתכוני חלב
B מכונה עם מערכת להכנת מתכוני חלב
C מכונה עם אביזר מים חמים
1 ידית הרמה
2 כפתור הדלקה / כיבוי
3 מיכל מים
4 פתח יציאת הקפה
5 סבכה
6 אגן הניקוז
7 מגש
8 מיכל הקפסולות המשומשות
9 דלת חיבור הקיטור
10 אביזר מים חמים
11 אזור אחסון אביזר מים חמים
12 חיבור הקיטור
סקירה
4 3
6926_UM_LATTISSIMA_PREMIUM_Z2C.indb A5 H 25.03.14 10:52

19 - 4 IL
My Machine
6926_UM_LATTISSIMA_PREMIUM_Z2C.indb A5 H 25.03.14 10:52