my diy simple drainback solar hot water...
TRANSCRIPT

My DIY Solar Hot Water Drainback System Pat Bonanno Warwick, Rhode Island Email: [email protected]
Below is a description and some construction pictures of my simple drainback solar hot
water system.
I used as many used items as I could find to put my system together, however my solar hot
water collectors are new, purchased from www.HouseNeeds.com who by the way, has
everything you could possibly want at very reasonable prices when it comes to solar as well as
complete heating systems, pex tubing, pumps, controllers, you name it.. they have it. Great
people to deal with too. Ask for Gary should you decide to purchase there.
Back to Collectors:
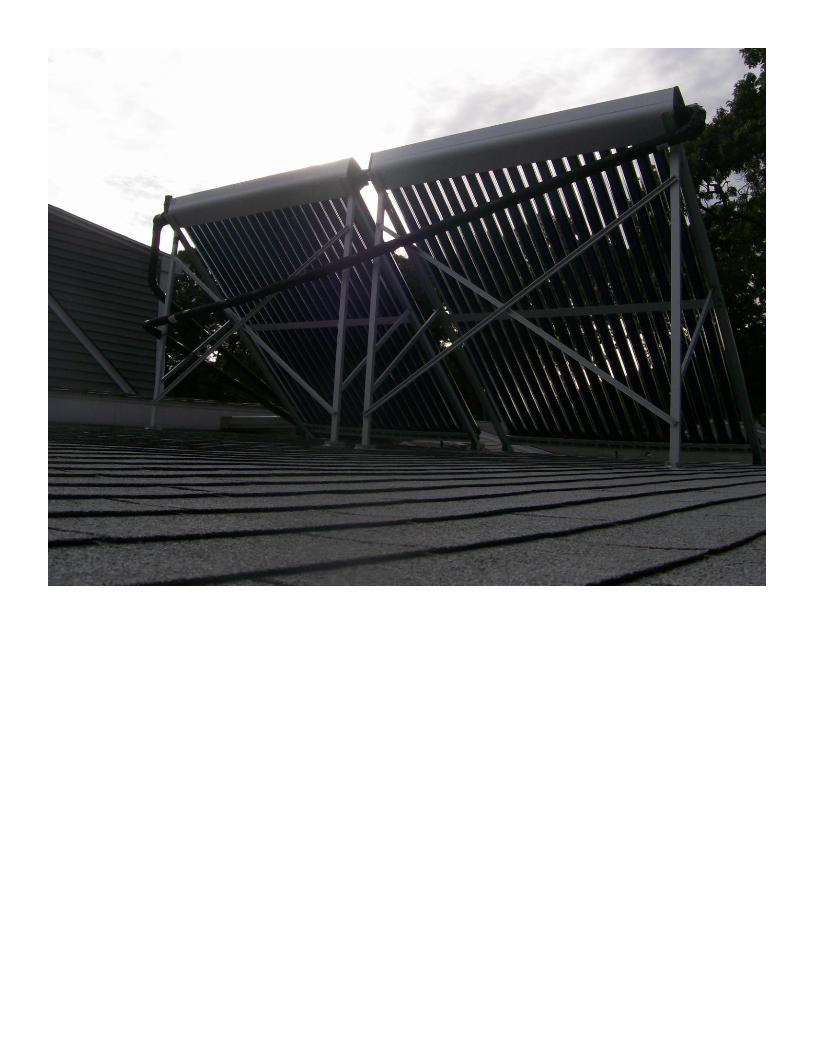
Anyway… I purchased and installed 2 – New Evacuated Tube Collectors. Each collector
consists of 20 Tubes.
Solar Controller:
My controller is a Resol which allows me to setup multiple configurations/combinations of
tanks, collectors and various sensors, etc. – Example: If you wanted to install 2 collectors
facing South and run them to a certain time in the day then have those SHUT DOWN and 2
other WEST FACING collectors kick in ‘later in the day’ and run their own individual circulator
pump you can do that if you wish with this Resol Controller. You can also hook the controller
to your computer, install some software and see/monitor your system readings not just from
home but from ‘out of state’ while you are on vacation in the tropics. Ho Ho! Pretty cool. (Now
if I could only hit the lottery or win a trip to the tropics?)
Storage Tanks and Type:
For hot water storage tanks I picked up a used 6 gallon electric hot water heater for the
drainback tank, a used 45 gallon superstor stainless steel tank for heat distribution and a used
33 gallon Phase III tank (also stainless steel) for domestic hot water use.
Why Drainback System?
There are no expansion tanks, pressure relief valves, no glycol/antifreeze necessary with a
drainback system and sloppy, ugly copper soldering is permittable because there is ‘never’ any
pressure in the system during operation. About the only time you would see/hear any kind of
volcano eruptions ‘resembling pressure’ would be in the top of your drainback tank as red hot
solar collector water returns to the tank. That’s about it, and the hot water dumping into your
drainback tank never proposes a problem. After the water returns which only takes about 5 to
10 seconds there is no water left outside in the collectors to ‘freeze’ so you are good to go.

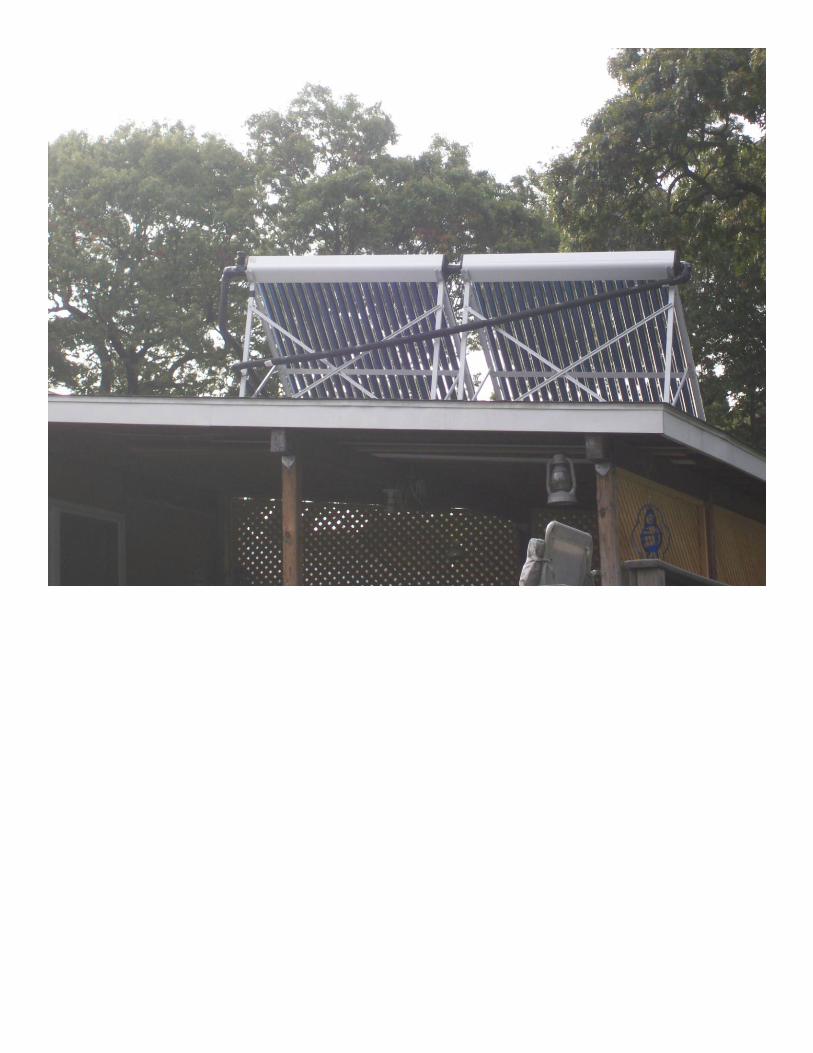
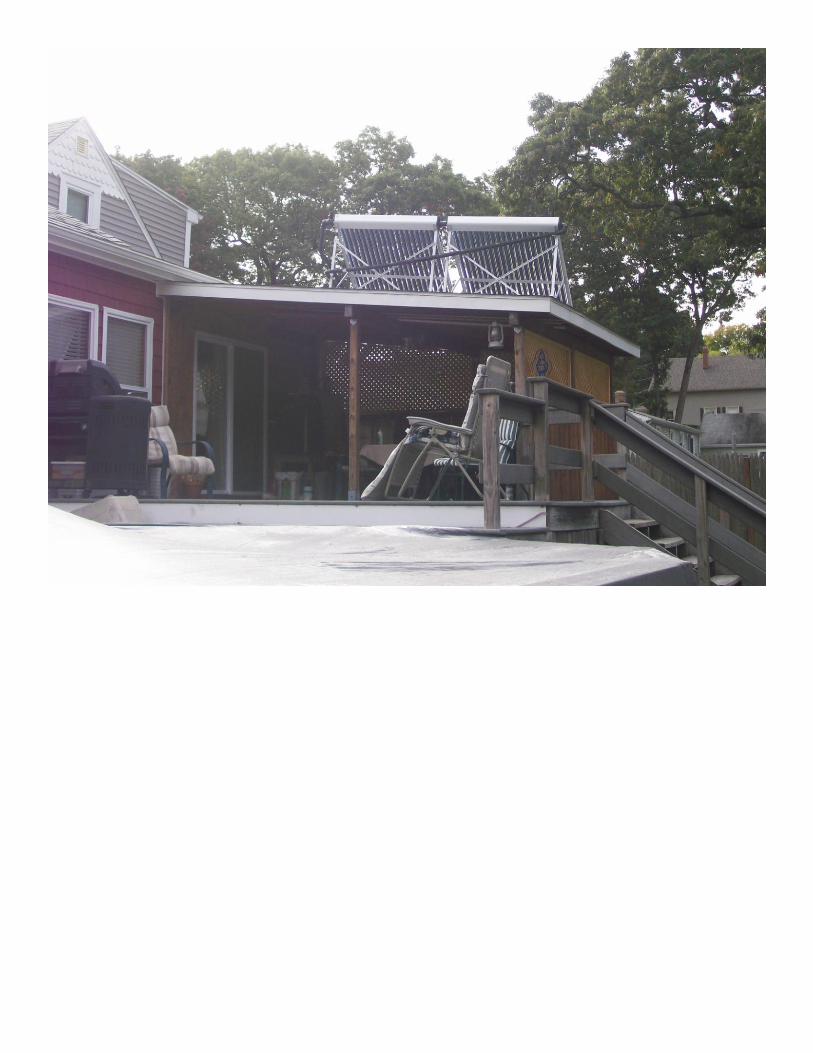
Evacuated Tube Collector Location:
My collectors WERE mounted on the ground next to the house which worked fine there but
decided recently to move them up to a roof over my deck for additional sunshine during the
winter days.
So how does it work?
When the solar collector pump shuts down, solar heated water drains back to the 6 gallon
tank in my basement which is mounted on TOP of the 45 gallon Superstor tank. When the
water drains out of the 6 gallon drainback tank I installed a copper Y there allowing the hot
water to split off and divert into the 2 individual hot water storage tanks at the same time. So
basically, both storage tanks get heated during the day at the same time.
Tank #1 – 33 gallons of stored solar heated water.
The 33 gallon tank for domestic hot water use is directed straight to my Quietside Tankless
Water Heater (cold water IN piping) so instead of ground water entering my Tankless domestic
hot water heater at 55 degrees I am bringing in solar heated water at temps in the range of 90
to 127 degrees. When hot water is called for at the faucets or shower head solar heated water
passes ‘thru’ my tankless domestic hot water heater on route to the showers but the propane
burner inside the tankless hardly ‘ever’ turns on while hot water is being used. Just amazing.
2nd Tank – 45 extra gallons of stored solar heated water.
The 45 gallon storage tank of extra solar heated water is used for heat distribution. I SCORED a
used 14 ft Runtal (STEEL) Radiator and installed it in the largest room in my house. I then
installed a Taco variable speed pump on the 45 gallon tank and have that water being pumped
out to the radiator (using Pex tubing) to assist in heating the house. All Pex tubing to/from the
radiator is heavily insulated. I’m finding that if I run the heat distribution pump steady the tank
temp will drop a steady 6 degrees per/hr so what I did is I put the system on a timer which
allows me to run the pump in ½ hour increments. ½ hr ON … ½ hr OFF which ended up working
out perfectly for my situation here.
The Runtal radiator is made of ‘steel’ so shutting the heat distribution pump off after ½ hr
allows the radiator to radiate heat into the room off the hot steel. About the time the radiator
begins to cool, the pump turns on and sends more hot water out to the radiator to repeat the
process.
I have the Taco pump send hot water to the radiator starting around 6:30pm each evening and
run (On/Off) to about 10:30pm then shut down till 4:30am in the morning at which time it
comes ON/OFF in ½ hr increments again to around 7:30am. By that time the water temp in the

heat distribution tank has dropped to about 83 degrees so it just sits idle waiting for the SUN
to come up, heat the tanks and repeat the process all over again.
Turning Radiator On/Off/Cloudy Days etc:
To control the heat distribution to the radiator from upstairs I installed a thermostat in the
room with the Runtal radiator allowing me to shut the pump/timer system down in the event
there is not enough stored hot water for heat distribution on cloudy days. (In the near future, I
plan on installing a sensor of some type on the heat distribution storage tank (down in the
basement) in order for me to ‘monitor the tank temp’ from upstairs in my house so I don’t
have to go into the basement to see if I have hot enough water to use for heating purposes.)
A few PICTURES during construction.
My work station in the basement..

One of my very first soldered elbows..
As you can see.. I can’t solder worth a
CRAP but ya know what!
It doesn’t have to be pretty just as long
as it doesn’t leak right!
I used squeeze clamps to hold the pipes in
place for soldering. Sure made things a lot
easier..

It’s hard to see in this blurry picture but as I
practiced with the soldering.. they actually
started to look a little better..
Here’s some pictures of the supply/return ¾
copper tubing going out thru the side of my
house from the basement… All pipes will be
insulated before I’m done.

I first mounted the 2 evac tube collectors on the GROUND next
to my house however later I moved them to the roof as you’ll
see below in the other pictures near the end.
This is the supply/return ¾ pipes attached to
floor joists. If you look behind the elbows
you’ll see where they go out thru the side of
the house. The hole openings around the
pipe are sealed with high heat furnace type
silicone. Take a look at next picture to see
the silicone..

Now on to the basement to work on getting the 2 water tanks positioned and connected..
This is the rack that holds the evacuated
tubes which will be mounted on the roof or
right there where you see it on the ground
bolted to 8 x 8 pressure treated.
If you look inside the yellow/orange circle
you’ll see where the ¾ Supply/Return
copper pipes come out of the basement.
Later on after moving the collectors I ran
these 2 pipes on up to the roof above..
This is a close up of the supply/return
coming outside the house from the
basement..

Here’s the 2 tanks in place but not finished
with copper piping yet. Nothing is soldered
yet. You can see the pump is not hooked up
yet nor is there any piping connected to the
top of the pump. The Taco pump you see in
the picture was later changed out to a
Grundfos circulator with a much better
HEAD pressure because I later moved my
collectors up to the roof. Drainback tank sits
on a platform on top of the used 45 gallon
Superstor storage tank.
I’ll be installing a Y fitting just below the
drainback tank which will allow me to split
the returning hot water into 2 individual
storage tanks.
1 will be used for domestic hot water use
and the other storage tank will be used for
heat distribution.
I will install ball cock shut off valves above
and below the pumps and tanks for easy
removal of pumps, tanks etc..
2 x 4 / plywood
platform I built
so drainback
tank isn’t sitting
directly on top
of 45 gallon
tank.
Taco variable speed pump was changed
out with a Grundfos HIGH HEAD
PRESSURE pump. Taco was installed on
45 gallon Superstor tank for use in heat
distribution to Runtal radiator.
Ball valves are
ins talled
above/below
pumps and
tanks.
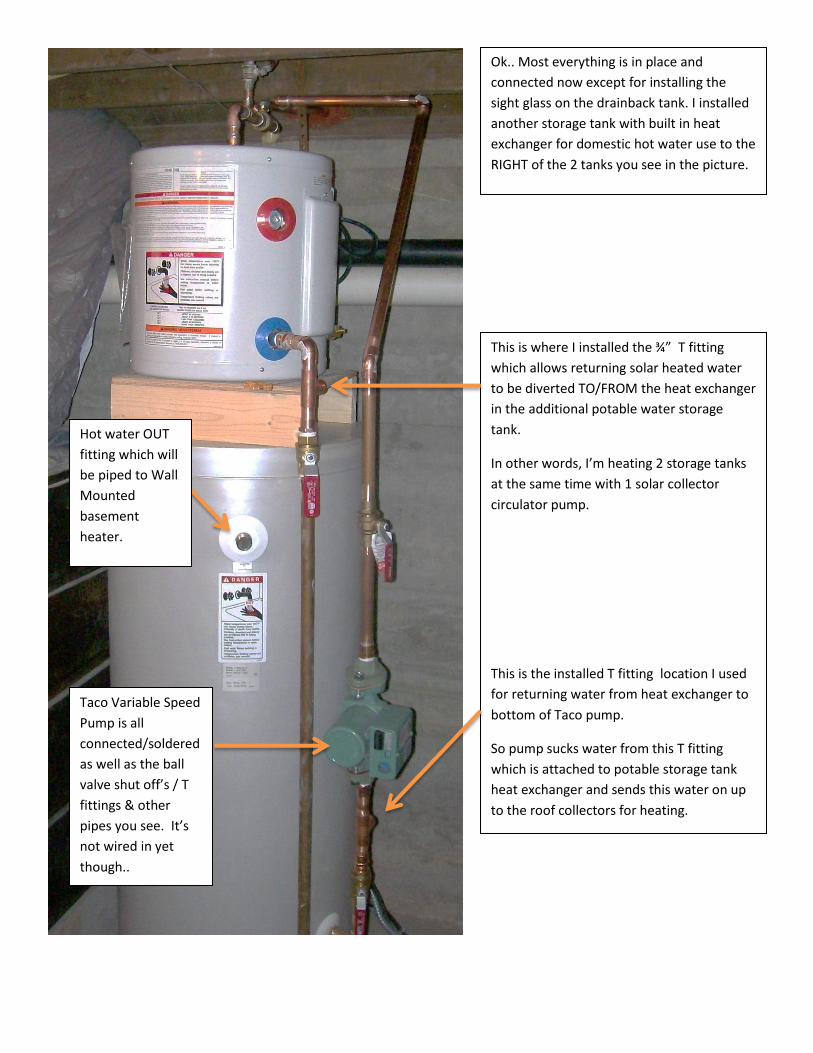
Ok.. Most everything is in place and
connected now except for installing the
sight glass on the drainback tank. I installed
another storage tank with built in heat
exchanger for domestic hot water use to the
RIGHT of the 2 tanks you see in the picture.
This is where I installed the ¾” T fitting
which allows returning solar heated water
to be diverted TO/FROM the heat exchanger
in the additional potable water storage
tank.
In other words, I’m heating 2 storage tanks
at the same time with 1 solar collector
circulator pump.
This is the installed T fitting location I used
for returning water from heat exchanger to
bottom of Taco pump.
So pump sucks water from this T fitting
which is attached to potable storage tank
heat exchanger and sends this water on up
to the roof collectors for heating.
Hot water OUT
fitting which will
be piped to Wall
Mounted
basement
heater.
Taco Variable Speed
Pump is all
connected/soldered
as well as the ball
valve shut off’s / T
fittings & other
pipes you see. It’s
not wired in yet
though..

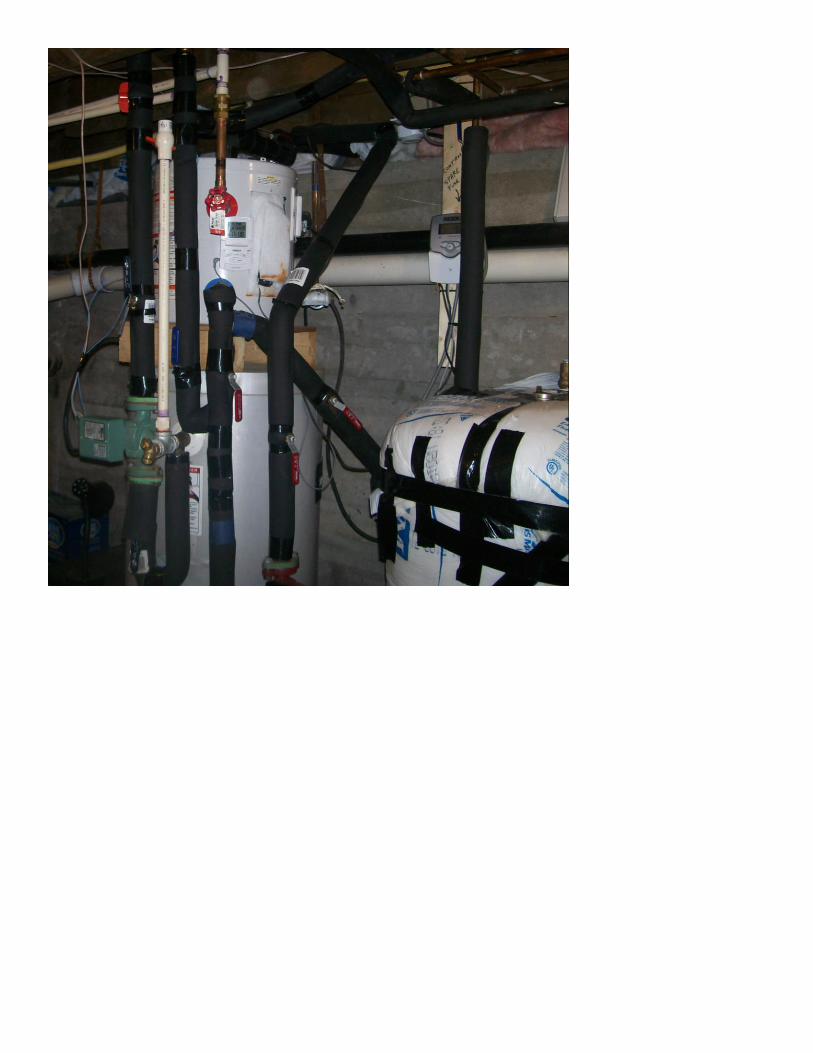
This is a picture of the drainback tank and 45 gallon Superstor storage tank used for heat distribution. Sight glass has been installed here on small drainback tank… There’s a larger picture of this below.. This small brass pump was removed and replaced with the green Taco variable speed pump you see in the picture for use in circulating hot water out to a Runtal 14 ft. used radiator.

Drainback tank and sight glass. As I was earlier, the brown brass pump was removed and I installed the green Taco pump in it’s place. A Grundfos high head pressure pump was installed where ‘green Taco’ is now to make sure I had enough head pressure to pump up to roof collectors. The green Taco variable speed pump is now all wired in HERE instead of the brown pump.
This is the supply line to
Runtal Radiator.
The RETURN hot water from Radiator returns HERE into
this pipe just below ball cock valve, which allows me to
have a closed loop heating system.
Water from
Radiator returns
here.

Additional Information and Performance
Be aware of VERY HIGH STAGNATION TEMPS:
I used ¾ copper piping TO/FROM collectors in order for water to drainback easily and also
because of extremely HOT WATER returning from collectors during summer season.
My tanks reach maximum set temps by 10:30am to 12:30 noon in the summer months causing
circulator pump to shut down via Resol Solar Controller. From that point on in the day
stagnation temps in collectors can reach over 300 degrees during summer months so I chose
to use ‘copper’ on my supply/return lines. I honestly believe anything else other then copper
will go bad/warp or melt with high 300+ degree temps running thru them..
PICTURES OF COMPLETED TANKS/HOOKUPS IN BASEMENT AND COLLECTORS ARE BELOW.