my book duo
TRANSCRIPT

My Book™ DuoDesktop RAID StorageUser Manual

Accessing Online SupportVisit our product support website at support.wdc.com and choose from these topics:
▪ Registration – Register your WD product to get the latest updates and special offers at: register.wdc.com▪ Downloads –Download software and updates for your WD product at: support.wdc.com/downloads▪ Email Support – Get technical and other support through email at: support.wdc.com/support▪ Warranty & RMA Services – Get warranty, product replacement (RMA), RMA status, accessories, and data
recovery information at: support.wdc.com/warranty▪ Knowledge Base – Search by keyword, phrase, or answer ID at: support.wdc.com/knowledgebase▪ WD Community – Share your thoughts and connect with other WD users at: community.wdc.com▪ Phone Support – Get phone numbers for contacting support by region at: support.wdc.com

Table of Contents
_________
Accessing Online Support.................................................................................ii
_________
1 About Your WD Storage Device....................................................................1Features............................................................................................................................. 1
Retail Box Contents.......................................................................................................... 1
Operating System Compatibility....................................................................................2
File System........................................................................................................................2
Physical Description.........................................................................................................2Front LED..............................................................................................................................3Power Button....................................................................................................................... 4USB™ Connectors................................................................................................................ 4Kensington® Security Slot.................................................................................................. 4Power Connector & Power Adapter.................................................................................. 4
Registering Your WD Product........................................................................................ 5
Handling Precautions.......................................................................................................5
_________
2 Getting Started..............................................................................................6Connecting the Device....................................................................................................6
_________
3 WD Discovery Software................................................................................ 7Installing WD Discovery Software.................................................................................. 7
WD Discovery Software – App & Device Access.......................................................... 8
WD Discovery Software – Import Data from a Cloud Service..................................... 8
Checking for Software Updates..................................................................................... 9
Firmware Update............................................................................................................. 9
_________
4 WD Backup™ Software..................................................................................11How the Backup Function Works.................................................................................. 11
Backing Up to a WD Device.......................................................................................... 12
Backing Up to a Cloud Service......................................................................................13
How the Restore Function Works.................................................................................14
Restoring Files.................................................................................................................14
View & Edit a Backup Plan............................................................................................. 15
_________
My Book DuoUser Manual
i

5 WD Security Software................................................................................. 16Password Protecting the Device...................................................................................16
Unlocking the Device..................................................................................................... 17With WD Security Software.............................................................................................. 17
Changing Your Password...............................................................................................17
Disable the Device Lock Feature...................................................................................18
Five Invalid Password Attempts.................................................................................... 18
_________
6 WD Drive Utilities Software.........................................................................19Diagnose – Checking Drive Health................................................................................19
RAID Management.......................................................................................................... 19RAID Status........................................................................................................................ 20Disk Status.......................................................................................................................... 21RAID Configuration............................................................................................................ 21
Settings........................................................................................................................... 22Sleep Timer........................................................................................................................22LED Settings.......................................................................................................................23
Drive Erase......................................................................................................................23
_________
7 Acronis® True Image™ WD Edition..............................................................25Download and Install..................................................................................................... 25
How to install Acronis True Image WD Edition on a Windows PC.............................. 25Performing a Backup..................................................................................................... 25
Performing a backup using Acronis True Image WD Edition Software........................25Performing Recovery..................................................................................................... 25
Restoring an image backup from Acronis True Image WD Edition Software..............26
_________
8 Troubleshooting.......................................................................................... 27Replacing a Drive........................................................................................................... 27
Removing........................................................................................................................... 27Adding................................................................................................................................28
SES Driver - What is it?.................................................................................................. 29
_________
9 Knowledge Base and FAQ..........................................................................30Frequently Asked Questions.........................................................................................30
Uninstalling the WD Software – Windows......................................................................30Uninstalling the WD Software – macOS..........................................................................30
WD Knowledge Base Articles.......................................................................................30WD Discovery Software Online User Guide....................................................................30WD Discovery Software Solutions and Troubleshooting.............................................. 30How to Partition and Format a WD Drive on Windows and macOS.............................31
My Book DuoUser Manual
ii
How to Physically Connect or Disconnect a WD External Drive................................... 31Problems Booting a PC with an External USB Drive Connected................................... 31Windows or macOS Cannot Find My Drive..................................................................... 31Explanation of exFAT......................................................................................................... 31Where to Download Software.......................................................................................... 31How To Get an RMA To Replace a Defective Product, or Obtain a Power Supply
or USB Cable for a WD product..................................................................................31Other Knowledge Base Articles....................................................................................32
Apple® Time Machine® Backup....................................................................................... 32Microsoft® Windows® Backup......................................................................................... 32
_________
10 Compliance and Warranty Information................................................... 33Regulatory Compliance.................................................................................................33
FCC Class B Information................................................................................................... 33ICES-003/NMB-003 Statement........................................................................................ 33Safety Compliance............................................................................................................ 33CE Compliance For Europe.............................................................................................. 34
Environmental Compliance (China)..............................................................................34
Warranty Information.................................................................................................... 34Obtaining Service..............................................................................................................34Limited Warranty...............................................................................................................35Warranty Information (Australia/New Zealand).............................................................35Obtaining Service..............................................................................................................36Warranty............................................................................................................................ 36
GNU General Public License (“GPL”)............................................................................ 37
My Book DuoUser Manual
iii
1 About Your WD Storage Device
The My Book™ Duo drive has massive capacity ideal for storing photos, videos,documents and music. It’s super-fast thanks to WD Red™ drives inside and use ofthe USB Type-C™ port. That USB Type-C port with all cables included makes ituniversally compatible (supports USB 3.1 Gen 1/3.0/2.0). Two USB Type-A hub portsdeliver flexibility for additional accessories.
▪ Features▪ Retail Box Contents▪ Operating System Compatibility▪ File System Information▪ Physical Description▪ Registering Your WD Product▪ Handling Precautions
FeaturesMassive Capacity — Free up valuable space on all your computers. Store and back upyour photo, video and music collections, and important documents in one reliableplace.
RAID-0 Ready Out of the Box — Ready to perform at maximum speed and capacity indefault mode, RAID-0. Reconfigure the drive to RAID-1 for redundancy (datamirroring), or use it as two independent drives (JBOD) with the included WD DriveUtilities™ software.
RAID Optimized WD Red™ Drives — The My Book™ Duo drive comes with RAID-optimized WD Red™ drives inside to deliver high-speed, quality storage to rely on.RAID-optimized firmware is perfect for two-disk array systems with automanagement of drive operations to help ensure read/write cycle data integrity.
USB 3.1 Gen 1-Ready, USB 3.0 Compatibility — Compatible with USB 3.1 Gen 1 and USB3.0, the My Book™ Duo drive works to deliver high-speed connectivity no matterthe interface. Includes both USB Type-C™ to Type-C and Type-C to Type-A cables.
USB 3.0 Hub Ports — The My Book™ Duo drive can serve as a quasi-docking stationwith 2x USB 3.0 Type-A hub ports for accessories, including additional storage,keyboard and mouse, card readers, USBs, or phone sync and charge.
256-bit AES Hardware Encryption and Password Protection — The My Book™ Duo drivecomes with 256-bit AES Hardware Encryption with WD Security™ software built into help keep private content secure. Set a personalized password to activatehardware encryption and data protection.
Retail Box ContentsYour My Book Duo retail box includes the following items:
▪ My Book Duo two-bay storage unit, with WD Discovery™, WD Backup™,WD Drive Utilities™, and WD Security™ software installation files.
▪ USB™ 3.1 Gen-1 Type-C™to Type-C™ Cable▪ USB™ 3.1 Gen-1 Type-C™ to Type-A Cable
About Your WD Storage Device
My Book DuoUser Manual
1

▪ Disk Replacement Tool▪ AC to DC Power Adapter▪ Quick Install Guide▪ Drive Replacement Guide
Operating System CompatibilityThe My Book Duo device, along with the following software: WD Discovery, WDBackup1, WD Security, and WD Drive Utilities, are compatible with these operatingsystems:
Table 1.1
Windows® macOS™ / OS X®
Windows 7 OS X Maverick – 10.9
Windows 8.x OS X Yosemite – 10.10
Windows 10 OS X El Capitan – 10.11
macOS Sierra – 10.12
Compatibility can vary, depending on hardware configuration and operatingsystem. For highest performance and reliability, always install the latest updates.
File SystemThe My Book Duo device is pre-formatted as a single NTFS partition forcompatibility with all supported Windows operating systems. This file system canbe reformatted for compatibility with other operating systems. See the followingreferences for modifying the partition and Format type:
▪ Drive Erase and Format▪ Answer ID 3865 | How to partition and format a WD drive without the WD Drive
Utilities software
Physical DescriptionThe My Book Duo device has a single front LED that shows the various conditionsfor Device Power and Device Activity. It also includes a rear-facing power buttonand various connectors that are illustrated in Figure 1.1.
1 WD Backup software is not compatible with any version of macOS or OS X.
About Your WD Storage Device
My Book DuoUser Manual
2
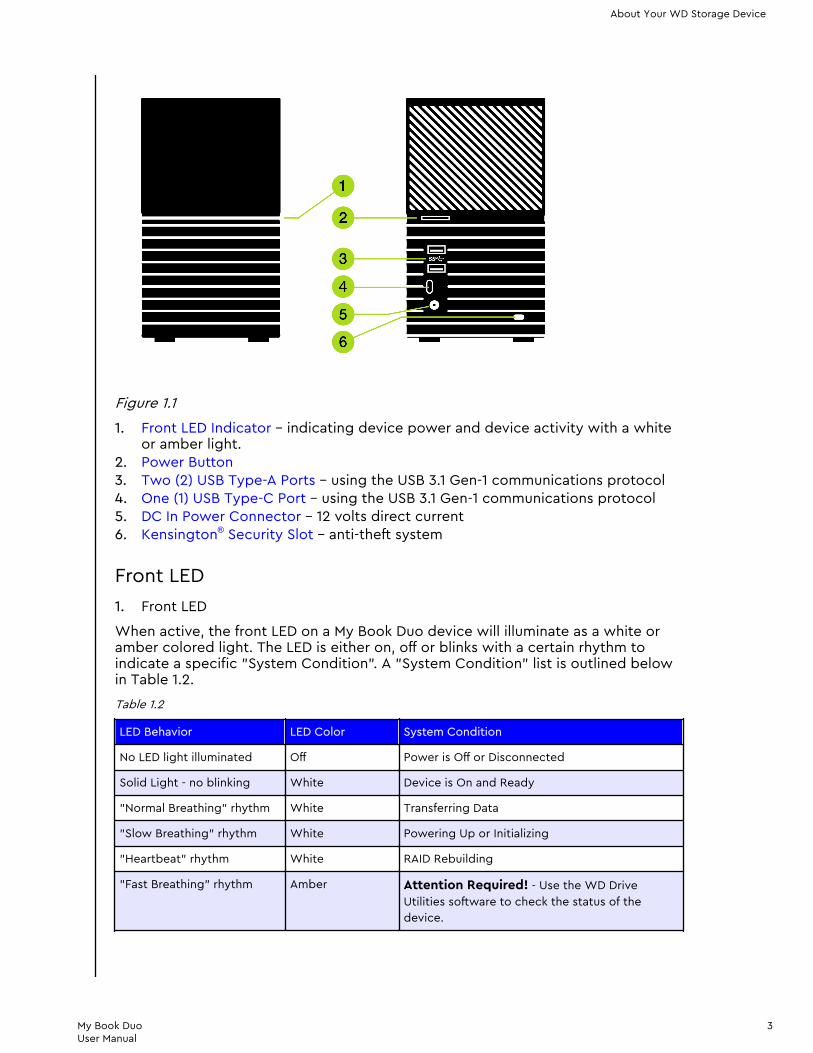
Figure 1.1
1. Front LED Indicator – indicating device power and device activity with a whiteor amber light.
2. Power Button3. Two (2) USB Type-A Ports – using the USB 3.1 Gen-1 communications protocol4. One (1) USB Type-C Port – using the USB 3.1 Gen-1 communications protocol5. DC In Power Connector – 12 volts direct current6. Kensington® Security Slot – anti-theft system
Front LED1. Front LED
When active, the front LED on a My Book Duo device will illuminate as a white oramber colored light. The LED is either on, off or blinks with a certain rhythm toindicate a specific "System Condition". A "System Condition" list is outlined belowin Table 1.2.
Table 1.2
LED Behavior LED Color System Condition
No LED light illuminated Off Power is Off or Disconnected
Solid Light - no blinking White Device is On and Ready
"Normal Breathing" rhythm White Transferring Data
"Slow Breathing" rhythm White Powering Up or Initializing
"Heartbeat" rhythm White RAID Rebuilding
"Fast Breathing" rhythm Amber Attention Required! - Use the WD DriveUtilities software to check the status of thedevice.
About Your WD Storage Device
My Book DuoUser Manual
3
Power ButtonThe My Book Duo device has a rear-facing power button with the following powerrelated functions:
Table 1.3
Power ButtonFunction
Device Operation
Press Once System will stop all services, clear cache and shut down gracefully.
Press and Holdfor 4 Seconds
When the power button is pressed and held for at least four seconds, the systemwill force a shut down without any consideration for gracefully stopping servicesor clearing cache.
USB™ ConnectorsThe My Book Duo device has three (3) USB connectors, which are consolidated intothe following two functions:
1. Two (2) USB 3.1 Gen-1 Type-A Connectors – These two Type-A USB connectorsform a USB hub for connecting other USB devices to the My Book Duo externalstorage device.
2. One (1) USB 3.1 Gen-1 Type-C Connector – This is the main USB interface toconnect the device to a host, such as a desktop computer or notebookcomputer.
Kensington® Security SlotAs part of an anti-theft system, the Kensington® security slot accepts a standardKensington security cable (sold separately). For more information about theKensington security slot, the Kensington Security System, and available Kensingtonproducts, visit www.kensington.com.
Power Connector & Power AdapterThe My Book Duo device has a standard 5.5 mm DC coaxial power connector with a2.5 mm pin. Depending on the storage capacity of the unit, the power adapter willbe rated for 36 watts or 48 watts. The two different power adapters are listedbelow and are packaged with the appropriate model.
▪ 12 TB Capacity and Below: 12 volts, 3 amp (36 watt) wall-wart style power adapter.▪ 16 TB Capacity and Above: 12 volts, 4 amp (48 watt) universal power adapter with
a separate AC power cord. This power adapter is backwards compatible with MyBook Duo units that are 12 TB or less in capacity.
Note: If the My Book Duo device model was originally 12 TB in capacity or less, and the drives areupgraded to increase the capacity beyond 12 TB, the power adapter must be updated to thespecified 12 volt, 4 amp (48 watt) unit. An updated power adapter can be obtained through WDSupport. Reference: Knowledge Base Answer ID 8.
About Your WD Storage Device
My Book DuoUser Manual
4
Registering Your WD ProductAlways register your WD product to get the latest updates and special offers. Youcan easily register your device using the WD Discovery software. Another way is toregister online at register.wdc.com.
Handling PrecautionsWD products are precision instruments and must be handled with care duringunpacking and installation. A WD device may be damaged by rough handling,shock, or vibration. Always observe the following precautions when unpacking andinstalling your external storage device:
▪ Do not drop or jolt the device.▪ Do not move the device during activity.▪ Do not use this product as a portable device.▪ To allow proper ventilation, do not block any of the enclosure’s air slots.▪ Always use this device with the specified power supply unit.
About Your WD Storage Device
My Book DuoUser Manual
5
2 Getting Started
Getting started with a My Book Duo device includes physically connecting thedevice to power and to a computer system, then installing the WD Discoverysoftware.
Figure 2.1
Connecting the DeviceBefore you begin, make sure your computer system is turned on with your operating systemfully loaded and ready for hardware and software installation. Then continue with thefollowing steps.
1. Connect the included power supply unit to your My Book Duo device andpower-on the unit as is illustrated in Figure 2.1.
2. Connect the My Book Duo device to your computer system with the includedUSB Type-C cable or the USB Type-C to USB Type-A cable.a. The USB Type-C connector on the cable should be connected to the My
Book Duo device. The other end of the cable (Type-A or Type-C) should beconnected to the computer system.
b. If a Found New Hardware screen appears, click Cancel to close it. The WDDiscovery software installs the proper driver for your device.
3. Now that the device is physically connected to power, and connected to yourcomputer system via USB, continue with the software setup portion of thisprocess by using the WD Discovery software and the steps outlined in the nextsection of this user manual.
Getting Started
My Book DuoUser Manual
6

3 WD Discovery Software
▪ Installing the WD Discovery Software▪ WD Discovery Software – App & Device Access▪ WD Discovery Software – Import Data from a Cloud Service▪ Checking for Software Updates▪ Device Firmware Updates
The WD Discovery software is a collection of software tools that includes WDBackup™, WD Drive Utilities, and WD Security software. (WD Backup software is notavailable for macOS / OS X.) The WD Discovery software is a tray application –once installed a small icon appears in the Windows system tray in the lower right-hand corner of the screen. When the tray icon is selected, the WD Discoverysoftware menu opens. For macOS / OS X use Launchpad to access the WDDiscovery software after it has been installed.
Online References:
▪ WD Discovery Online User Guide▪ WD Discovery Solutions and Troubleshooting
Figure 3.1
The top menu for the WD Discovery software is illustrated above in Figure 3.1. Thismenu bar is used to gain access to these functions:
▪ Devices – this lists all currently connected and available WD devices.▪ Apps – this lists all of the apps available through the WD Discovery software. This
includes WD Backup, WD Drive Utilities, WD Security software and third-partysoftware.
▪ Megaphone Icon – this icon provides an area for you to provide feedback to WDregarding the WD Discovery software experience.
▪ Three-Line Collapsed Menu Icon – this icon represents a collapsed menu. Whenexpanded, it gives various options such as the Preferences for updating the WDDiscovery software and the option to quit the app.
Installing WD Discovery SoftwareThe WD Discovery software can be installed from your device or you can downloadit from the WD support website: support.wdc.com
1. Double-click WD Discovery.exe.2. Click Install Now.3. The WD Discovery software installation process may prompt for a system
restart. Restart the system if so directed.4. Install applications and updates as needed.
WD Discovery Software
My Book DuoUser Manual
7

The WD Discovery software displays a list of connected devices, available softwaredownloads, update messages, and a link for registering your device. If you have notyet registered your device, do this now through the WD Discovery software.
WD Discovery Software – App & Device AccessBy default for a Windows operating system, the WD Discovery software is visible inthe system tray. A single Click of this system tray icon will open the WD Discoverysoftware menu. You can also Double-Click the desktop icon to open the samemenu. For macOS / OS X use Launchpad to open the WD Discovery software.
From the WD Discovery software top menu, Click Apps to download the followingtools for your device:
▪ WD Backup software – allows you to setup and manage a backup plan, orrestore from a backup plan. This is a separate application that can bedownloaded, installed, and updated through the WD Discovery software menu.The WD Backup software is not available for macOS / OS X.
▪ WD Security software – allows you to password protect the content on your WDdevice. This is a separate application that can be downloaded, installed, andupdated through the WD Discovery software menu.
▪ WD Drive Utilities software – monitors and manages the health of your WDdevice. This includes managing or changing the disk configuration and filesystem. The WD Drive Utilities software automatically installs when the WDDiscovery software is installed on the computer system.
WD Discovery Software – Import Data from a CloudServiceAs a separate function from the WD Backup software, the WD Discovery software allowsyou to import data (or backup data) from an existing cloud service, such as Dropbox™,Google Drive™, OneDrive™, Facebook™ and Instagram™ to the My Book Duo device. This WDDiscovery software feature is the opposite of the WD Backup software, which backs up datato a cloud service.
Note: Cloud account registration may be required. Cloud services may be changed, terminated orinterrupted at any time and may vary by country.
Prerequisite: To import data with the WD Discovery software make sure you already havean active cloud service account for the service you want to import, then follow these steps:
1. Open the WD Discovery software.2. Click Devices on the top menu.3. Under "CONNECTED DEVICES" is the option "Import Data". Click the Import
button.4. When prompted to sign-in to cloud storage or social media, Click the Continue
button.5. Select the desired cloud service to import.6. When prompted to do so, sign-in to the service.7. The WD Discovery software will ask for permission to access the data located
with your cloud service. Click Allow to continue.8. Choose the storage location or target from the list of devices displayed.
WD Discovery Software
My Book DuoUser Manual
8

9. If the storage location is locked, Click the Unlock button and continue with Step9a, otherwise go to Step 10.a. Clicking the Unlock button will open the WD Security software dialog box
so that a password can be entered to unlock the device. Note: This will alsoclose the WD Discovery software, but not the import process.
b. Enter your password in the Password field and Click Unlock Drive.c. Click Close on the WD Security software dialog box.d. Reopen the WD Discovery software and Select the storage device that you
just unlocked.10. On the WD Discovery software menu, the cloud service you selected will now
display with the current import (backup) status, such as "Import completed".11. The import process through the WD Discovery software has completed. This is
not a scheduled backup.
Checking for Software UpdatesWD Backup / WD Security / WD Drive Utilities – Updates to WD Backup, WD Security,and WD Drive Utilities software are made available through the WD Discoverysoftware. If an update is available, it will be listed with the installed software on theWD Discovery software list of installed Apps. Follow the steps below.
1. Open the WD Discovery software.2. On the top menu, Click Apps.3. If an update is available, it will be listed with the installed software noted on the
WD Discovery software list of installed Apps. Click the Update selection underthe Open button.
4. Follow the on-screen prompts and allow the update process to complete.
WD Discovery – The update process for WD Discovery software is different. If anupdate is available, a notification will briefly display, then dock itself under thesection "NOTIFICATIONS". To update the WD Discovery software, follow thesesteps:
1. Open the WD Discovery software.2. On the top menu, Click the three-line collapsed menu icon in the upper right-hand
corner. This three-line collapsed menu is illustrated at the beginning of thischapter.
3. Click Preferences.4. Under the the section "CURRENT VERSION" Click the Update button.
▪ If the Update button does not appear, then there is no update available foryour installation of WD Discovery.
▪ Additionally, the version number of the WD Discovery software is displayedin this section and it will look similar to this: "WD Discovery 1.3.247". Theseries of numbers for your version will be different.
5. This will install the WD Discovery software update.
Firmware UpdateFirmware updates for the My Book Duo device are done through the WD Discoverysoftware. Install the WD Discovery software, if this has not yet been done - Installing the WD Discovery Software.
WD Discovery Software
My Book DuoUser Manual
9
Firmware updates are pushed to your device through the WD Discovery software,thus they cannot be done manually. When a new firmware is available, this willbecome available under the "NOTIFICATIONS" section of the WD Discoverysoftware menu. To continue with this process, follow these steps:
1. Open the WD Discovery software.2. Click Devices on the top menu bar.3. Under the section "NOTIFICATIONS" will be a message that a firmware update
is available.
▪ You may have to Click the down arrow (v) that is to the right of the heading"NOTIFICATIONS" and then scroll down on the the WD Discovery softwaremenu to see the notification.
4. Click the word here highlighted in the firmware update message.5. This will launch the FirmewareUpdater.exe file. The operating system may
request a confirmation to execute this file. Select Yes if you agree.
Note: If multiple Direct Attached Storage (DAS, e.g. My Book Duo, My Passport) devices areconnected to the computer system and powered-on, the Firmware Update will not inform youwhich product(s) require the firmware update.
6. Carefully follow the on-screen instructions provided during the firmware updateprocess. This will include disconnecting each DAS device connected to thecomputer system, then plugging in one at a time and have theFirmwareUpdater scan the device to verify if it is the recipient for the firmwareupdate. The scan process is executed each time the Rescan button is selected.
7. Accept the License Agreement8. Follow the on-screen instructions.9. Click Exit when the process has completed.
WD Discovery Software
My Book DuoUser Manual
10
4 WD Backup™ Software
The WD Backup software is a scheduled backup application that automaticallybacks up the files that you select on the schedule that you specify. The WD Backupsoftware includes these functions:
▪ How the Backup Function Works
◦ Backing Up to a WD Device◦ Backing Up to a Cloud Service
▪ How the Restore Function Works
◦ Restoring Files
Note: The WD Backup software is designed for compatible Windows operating systems and is notcompatible with macOS or OS X.
How the Backup Function WorksWhen you create a backup plan, you specify the backup:
▪ Target – this is the external storage location where you will copy your files forbackup protection. The backup target can be any supported:
◦ External storage device◦ Cloud service account
▪ Source – these are the computer files and folders that you want to copy to thebackup target for backup protection. The backup source can be any:
◦ Internal hard drive or hard drive partition◦ External storage drive◦ Supported cloud service account
▪ Schedule – the time of day, which day(s) of week, and which week(s) of themonth that you want to run the backup.
When you click Start Backup after creating a backup plan, the WD Backup softwarecopies all of the specified backup source files and folders to the specified backuptarget. Then, on the schedule you specified, the WD Backup software automaticallybacks up any:
▪ New file that was created in or copied to a backup-protected device or folder▪ Existing backup-protected file that was changed
This protection is automatic – the WD Backup software does it for you without anyaction on your part. Just leave the backup source and target devices connected toyour computer.
Note: Whenever you disconnect and reconnect a backup target or source device, the WD Backupsoftware rescans the backup source device for new or changed files and resumes automatic backupprotection according to the schedule.
Excluded Files – The WD Backup software will not back up its own backup plan orfiles that have specific:
▪ Attributes: reparsePoint, temporary
WD Backup™ Software
My Book DuoUser Manual
11

▪ Names: \AppData\Roaming\Microsoft\Windows, [CommonApplicationData]\Western Digital\, [CommonApplicationData]\Microsoft\Windows\Caches\,config.msi, MSOCache, ntuser.dat, ntuser.ini, [RecycleBin], $recycle.bin, recycler,[Root]\Drivers\, [Root]\Temp\, System Volume Information, .WD Hidden Items,[Windows]
▪ Extensions: .ds_store, .temp, .tmp, .wdsync▪ Start value: ~▪ End values: desktop.ini, .dropbox, .dropbox.attr, hiberfil.sys, -journal,
pagefile.sys, thumbs.db
Backing Up to a WD DeviceFollow these steps to configure a backup plan through the WD Backup software:
1. Open the WD Backup software.2. Click the Backup icon on the top menu.3. Then Click the Add Backup Plan button on the bottom menu.4. The "Select your WD storage device or cloud service" dialog box shows all of
the hardware devices and cloud service accounts that you can use for a backuptarget device.
5. Select the device that you want to use as your backup target or destination.a. If you have more than three available devices, use the left- and right-scroll
buttons to see them all.b. To backup to Dropbox or a Cloud Service account, go to the Section:
Backing Up to a Cloud Service, otherwise continue with the next Step.6. Click Next to display the "Setup Complete" dialog box.
Note: If you receive the message: "No writable partition found" follow these four sub-stepsbefore continuing with Step 7:
1. Click Unlock...2. Click Yes to allow WD Drive Unlock.exe to execute.3. Enter the password to unlock the device and Click Unlock Drive.4. The message "Your drive is now unlocked" will appear. Click Exit and continue with Step 7.
7. Click Edit Schedule. This will open a box providing options for the backup to runHourly, Daily, or Monthly. Select the desired option.a. Hourly: This schedule type has no options and will back up hourly.b. Daily: This provides options to select the day(s) of the week to perform this
back up plan and at what time this should start.c. Monthly: This provides options for selecting which week(s) of the month and
what day(s) of the week a back up plan should execute, plus at what time itshould start.
8. Click Edit Files to choose which files to back up. By default, only the usersDocuments are part of the back up plan. This can be modfied under thecategories: Libraries or My Computer. Select the desired option.a. Libraries: This option allows you to select which Libraries to back up, such
as CameraRoll, Documents, Music, Pictures, SavedPictures, and Videos.b. My Computer: This option allows you to select all applicable files or to be
more selective.9. Click Start Backup to initiate the backup plan and to exit WD Backup.
WD Backup™ Software
My Book DuoUser Manual
12
Backing Up to a Cloud ServiceFollow these steps to have the WD Backup software use a cloud service as a back updestination.
Prerequisite: Setup and configure the cloud service you want to use as your backupdestination, such as Dropbox®, before continuing with this process.
1. Open the WD Backup software.2. Click the Backup icon on the top menu.3. Click the Add Backup Plan button on the bottom menu.4. The "Select your WD storage device or cloud service" dialog box shows all of
the hardware devices and cloud service accounts that you can use for a backuptarget device.
5. Click the Dropbox option and then Click Next.
Note: If you receive the message: "No writable partition found" follow these four sub-stepsbefore continuing with Step 6:
1. Click Unlock...2. Click Yes to allow WD Drive Unlock.exe to execute.3. Enter the password to unlock the device and Click Unlock Drive.4. The message "Your drive is now unlocked" will appear. Click Exit and continue with Step
6.
6. On the Connect to Dropbox dialog box Click Sign In. The WD Backup softwareinitiates a connection request on your behalf and uses your Web browser toaccess the Dropbox website.a. On the Dropbox website, if you have not configured your account to
remember your login credentials, type your email address and passwordand click Sign In to see the connection request from the WD Backupsoftware.
b. Click Allow to accept the connection request.c. You will be presented with a lengthy alpha-numeric code. Click and copy
this code.d. Close or minimize the browser window that opened for this task.e. Paste the code into the Authorization Code field on the Connect to Dropbox
dialog box.f. Click Finish.
7. This will open a new dialog box, which allows you to schedule the back up andselect the files to back up.
8. Click Edit Schedule. This will open a box providing options for the backup to runHourly, Daily, or Monthly. Select the desired option.a. Hourly: This schedule type has no options and will back up hourly.b. Daily: This provides options to select the day(s) of the week to perform this
back up plan and at what time this should start.c. Monthly: This provides options for selecting which week(s) of the month and
what day(s) of the week a back up plan should execute, plus at what time itshould start.
9. Click Edit Files to choose which files to back up. By default, only the usersDocuments are part of the back up plan. This can be modfied under thecategories: Libraries or My Computer. Select the desired option.a. Libraries: This option allows you to select which Libraries to back up, such
as CameraRoll, Documents, Music, Pictures, SavedPictures, and Videos.
WD Backup™ Software
My Book DuoUser Manual
13

b. My Computer: This option allows you to select all applicable files or to bemore selective.
10. After the Edit Schedule and Edit Files process, Click Start Backup. The back upplan will execute.
11. Click Close to exit the WD Backup software.
How the Restore Function WorksThe WD Backup software makes it easy for you to restore backed up files from your backuptarget device to either:
▪ Their original locations on the backup source device▪ Any other location you select
Restore is generally a four-step process:
1. Select the backup target device and the scheduled backup that has the filesyou want to restore.
2. Select the location where you want to restore the files.3. Specify what you want to restore – either individual files and folders, or
everything.4. Restore the files.
Restoring FilesTo restore files using the WD Backup software, follow these steps:
1. Open the WD Backup software.2. Click the Restore icon on the top menu. This will open the "Restore a backup"
dialog box.3. If you have more than one backup target device connected to your computer,
Click to select the one that has the backup files you want to restore.a. Any Cloud Service used as a back up location through the WD Backup
software will be included in this list.4. When asked, "Where do you want to restore your files?" select one of the
options listed: Original Location or Select Location.a. Original Location: This will restore the files to the original location. If this
option is selected, continue with Step 5.b. Select Location: Use this option if you choose to restore the backup to a
location other than the original location.
▪ If Select Location is chosen, then Click Browse....▪ Use the folder structure view of your computer to navigate to the new
restore location.▪ Once the new restore location is selected, Click Select Folder.▪ This will take you back to the "Restore a backup" dialog box. Next, Click
the Select Files to Restore... button.5. By default, all the files that are backed up will be selected for a restore. If you
choose this option, continue with Step 7.6. Alternatively, specific files and folders can be selected for the restore process.
Use the folder structure to make the desired selection.7. Click Restore.
WD Backup™ Software
My Book DuoUser Manual
14
8. The "Restore in Progress" idicator will display. When the restore process hassuccessfully completed, Click Close.
9. To end this process, Click Close on the "Restore Files" dialog box.10. Click Close to exit the WD Backup software.
View & Edit a Backup PlanAn existing Backup Plan can be viewed, modified, or deleted by following thesesteps:
1. Open the WD Backup software.2. Click the Backup icon on the top menu bar.3. This will display the "Current backup plan" list. Click the Backup Plan that you
want to modify.
Note: Any Backup Plan that is listed as "Offline" means that the connected device used duringthe Add Backup Plan process is not detected. This may happen if you erase a drive ordisconnect a device. To eliminate the Offline status, you may need to reconnect the device oruse the "Delete Backup Plan" function.
4. After selecting the Backup Plan you want to modify, use the Edit Schedule andEdit Files buttons to make your modifications.
▪ If you do not want to make modifications to the selected Backup Plan butwant to delete the selected Backup Plan instead, Click the Delete Backup Planbutton.
5. If you do not want to make modifications to a Backup Plan, Delete a BackupPlan, or you want to close the WD Backup software, Click the Close button.
WD Backup™ Software
My Book DuoUser Manual
15

5 WD Security Software
Use this section to enable or disable password protection for your device throughthe following processes.
▪ Password Protecting the Device▪ Unlocking the Device▪ Changing Your Password▪ Disable the Device Lock Feature▪ Five Invalid Password Attempts
Password Protecting the DeviceA password can be used to lock and unlock your device. Depending on your location4, usinga password may encrypt your data.
Warning! The software uses your password to electronically lock and unlock your drive. If youforget your password, you will not be able to access the data that is on your drive or write new datato it. You will have to erase the drive before you can use it again.
To enable password protection, follow these steps:
1. Open the WD Security software.2. If you have more than one supported drive connected to your computer, select
the one that you want to create a password for.3. Read the warning about the possibility of data loss if you forget your password.4. Type your password in the Password box, using up to 25 characters.5. Retype your password in the Verify Password box.6. Type a hint to help remember your password in the Password Hint box.7. Select the Enable auto unlock for this computer... check box if you want the
WD Security software to remember your password for the selected device onthis computer.
8. Click Set Password to save your password.9. After successfully enabling password protection, the message "Security is
enabled on this drive." will appear. Click Close.
Note: After creating a password, the device remains unlocked for as long as you continue yourcurrent work session. Then the software:
▪ Locks the device when you shut down your computer or disconnect your device. Sleepmode locks the device if power to the USB port is off.
▪ Requires you to type your password to unlock the device when you restart your computer orreconnect your device, UNLESS you selected the Enable auto unlock for this computer...check box when you created your password
10. Once a password is set, the WD Security software screen becomes the "EDITSECURITY SETTINGS" screen. Use the next section of this user manual to editthe security settings or to unlock the device.
2 Not all of Western Digital's products contain active data encryption. For some markets,like Russia, the encryption is disabled and cannot be enabled by the end user.
WD Security Software
My Book DuoUser Manual
16
Unlocking the DeviceAfter you have created a password to keep others from accessing the files on yourdevice, unless you selected the "Enable auto unlock for this computer..." check box,you will have to type your password to unlock the device whenever:
▪ You shut down and restart your computer▪ You disconnect and reconnect the drive to your computer▪ Your computer exits the sleep mode
You will have to do this even if you do not have the software installed on yourcomputer.
With WD Security SoftwareTo unlock the device with the WD Security software, follow these steps:
1. Open the WD Security software.2. If the device is locked with a password, the WD Security software will open
with the "UNLOCK DRIVE" dialog box.a. If the WD Security software opens with the "EDIT SECURITY SETTINGS"
dialog box instead of the "UNLOCK DRIVE" dialog box, your device iscurrently not locked (or has not been locked with the WD Securitysoftware) and you do not need to continue with these steps.
3. Enter your password and Click Unlock Drive.4. If the password authentication is successful, the WD Security software will
display the "EDIT SECURITY SETTINGS" screen.
Changing Your Password1. Open the WD Security software.2. Unlock the WD device.
a. If the device is locked with a password, the WD Security software will openwith the "UNLOCK DRIVE" dialog box. Enter the appropriate password tounlock the device.
b. If the WD Security software opens with the "EDIT SECURITY SETTINGS"dialog box instead of the "UNLOCK DRIVE" dialog box, your device iscurrently not locked; continue with Step 3.
3. Click the Change password radio button and then Click Update Security Settings.4. If you have more than one supported device connected to your computer,
select the one with the password that you want to change to display the Editsecurity settings dialog.
5. On the "EDIT SECURITY SETTINGS" dialog box, select the Change passwordoption to display the change password dialog.
6. On the change password dialog box:a. Type your current password in the Current Password box.b. Type your new password in the New Password box, using up to 25
characters.c. Retype your new password in the Verify Password box.d. Type a hint to help remember your new password in the Password Hint box.
WD Security Software
My Book DuoUser Manual
17

e. Select or clear the Enable auto unlock for this computer... check box to signifywhether you want the software to remember your new password for theselected drive on this computer.
f. Click Update Security Settings.
Note: After changing a password, the drive remains unlocked for as long as you continueyour current work session. Then the WD Security software:
▪ Locks the drive when you shut down your computer, disconnect your device, or yourcomputer goes into the sleep mode.
▪ Requires you to type your password to unlock the drive when you restart yourcomputer or reconnect your device, UNLESS you selected the Enable auto unlock forthis computer... check box when you changed your password.
Disable the Device Lock Feature1. Open the WD Security software.2. If you have more than one supported drive connected to your computer, select
the one with the password that you want to remove to display the "EDITSECURITY SETTINGS" dialog box.
3. On the "EDIT SECURITY SETTINGS" dialog box, the Remove password option isselected by default.
4. Type your password in the Password box.5. Click Update Security Settings.6. A message will open confirming that the password has been removed.
Five Invalid Password AttemptsAfter five invalid attempts to unlock your WD device through the WD Security software, youhave two options:
▪ Disconnect the device from the computer system, then reconnect the device to thecomputer system and attempt to unlock the unit with an acceptable password.
▪ Erase the drive – this process will erase all data from the device, including the passwordand it will unlock the device. If you choose this option, go to the WD Drive Utilities Software - Drive Erase section.
WD Security Software
My Book DuoUser Manual
18

6 WD Drive Utilities Software
The WD Drive Utilities software makes it easy to manage and customize a WDexternal device or an internal WD hard drive for the best possible performance. Thisutility includes these categories:
▪ Diagnose – Run diagnostics and status checks to make sure your device isworking properly.
▪ RAID Management – Check RAID status for diagnostic purposes and to modifythe current RAID configuration.
▪ Settings – This section includes a Sleep Timer which reduces power to yourdevice during extended periods of inactivity to conserve power and extend thelife of the unit. It also includes a LED Settings that allows the front-facing LED tobe disabled or enabled.
▪ Drive Erase – Erase all of the data on the device and re-format the device witheither the exFAT, NTFS, or HFS+J file system.
Diagnose – Checking Drive HealthThe WD Drive Utilities software provides three diagnostic tools to help make sure that yourdrive is performing well. Run the following tests if you are concerned that your drive is notoperating properly:
▪ Drive Status Check – The drive status check is a failure-prediction function thatcontinuously monitors key internal performance attributes of the drive. A detectedincrease in drive temperature, noise, or read/write errors, for example, can provide anindication that the drive is approaching a serious failure condition. With advancedwarning, you could take precautionary measures, like moving your data to another drive,before a failure occurs. The result of a Drive Status Check is a pass or fail evaluation ofthe drive’s condition.
▪ Quick Drive Test – Your device has a built-in Data Lifeguard™ diagnostic utility that testsfor error conditions. The Quick Drive Test checks the drive for major performanceproblems. The result of a Quick Drive Test is a pass or fail evaluation of the drive’scondition.
▪ Complete Drive Test – The most comprehensive diagnostic test is the Complete DriveTest. It tests every sector for error conditions and compensates for these errors asrequired.
To run any of these tests, follow these steps:
1. Open the WD Drive Utilities software.2. If you have more than one supported WD device connected to your computer,
select the one that you want to check.3. Click Diagnose on the top menu bar, then select one of the following tests:
▪ Run Drive Status Check▪ Run Quick Drive Test▪ Run Complete Drive Test
RAID ManagementUnder RAID Management, the following tools are available:
▪ RAID Status
WD Drive Utilities Software
My Book DuoUser Manual
19

▪ Disk Status▪ RAID Configuration
The My Book Duo device supports the following disk configurations:
Table 6.1
Supported Storage Mode 1 Disk 2 Disks
Stripe (RAID 0) No Yes (Default Setup)
Mirror (RAID 1) No Yes
Individual Drives (JBOD) Yes Yes
RAID StatusFollow these steps to get the current status for the RAID configuration:
1. Open the WD Drive Utilities software.2. If you have more than one supported device connected to your computer,
select the one that you want to set.3. Click RAID Management on the top menu.4. If not already highlighted, Click the RAID Status option. This will display "RAID
Status".
RAID Status – use the following table to understand the different values for RAIDStatus:
Table 6.2
RAID Status Description Solution
Cannot AccessData
The RAID disk array has errors and yourdata is not accessible.
Check Disk Status for errors. If a drivehas errors, replace the drive. OnlineSupport
Data LossDetected
The RAID disk array contains errors andthe drives have corrupted data.
Check Disk Status for errors. If a drivehas errors, replace the drive. OnlineSupport
Degraded The RAID disk array is degraded butyour data is still accessible.
Install a supported WD drive andrebuild the RAID disk array.
Healthy The RAID disk array is healthy. Yourdata is accessible.
No action is currently required.
Not Configured No RAID disk array has been created.Either one or both drives are new.
Either rebuild the array or build a newRAID array.
Rebuild Failed The RAID disk array could not berebuilt but your data is still accessible.
Try rebuilding the array again. Also,check Disk Status for a faulty drive.
Rebuilding (n%) The RAID disk array is rebuilding butyour data is still accessible.
Allow the RAID array rebuild process tocomplete.
Unknown The RAID configuration is unknown. Click the Configuration option tocreate a new RAID disk array orreinstall the original drives.
WD Drive Utilities Software
My Book DuoUser Manual
20

Disk StatusFollow these steps to get the current status for Disk 1 and Disk 2:
1. Open the WD Drive Utilities software.2. If you have more than one supported device connected to your computer,
select the one that you want to view.3. Click RAID Management on the top menu.4. If not already highlighted, Click the RAID Status option. This will display "Disk 1
Status" and "Disk 2 Status".
Drive 1 Status and Drive 2 Status – use the following table to understand the differentvalues for drive status:
Table 6.3
Drive Status Description Solution
Drive NotSupported
The drive model is not supported. Replace the drive with a supportedproduct. Online Support
Empty There is no drive installed, but nonewas expected.
You can add a drive to expand thedevice storage capacity.
Failed The drive has failed. Replace this drive immediately. OnlineSupport
ID Mismatch The drive metadata information doesnot match its serial number; most likelycorrupted metadata.
Create a new RAID disk array.
InsufficientCapacity
The drive you installed has insufficientcapacity to be part of the mirroredRAID disk array.
Insert a drive with sufficient capacity.You could also use the smallercapacity drive to create a new RAIDdisk array of smaller capacity, but thatwould erase all of your data.
Missing The expected drive is not installed. Insert the drive that was part of theoriginal RAID configuration.Alternatively, you can rebuild theprevious RAID array, or create a newRAID array (which will erase your data).
New Drive The installed drive has not beenconfigured.
Click the Configuration option andreconfigure the RAID disk array.
Online The drive is healthy and part of theRAID disk array.
No action is currently required.
Rebuilding The drive is the target disk of therebuild operation and that rebuildoperation is still in progress.
Allow the rebuild process to complete.
RAID Configuration
Caution! Modifying the RAID configuration will erase all data on the device! Do not continue withthis process if you do not want the data on your WD device erased. Changing the deviceconfiguration also removes your password. If you use a password to protect your device, you will
WD Drive Utilities Software
My Book DuoUser Manual
21

need to re-create it after changing the device configuration. See “Password Protecting the Device”for these instructions.
The RAID configuration for your WD device can be modified to satisfy different storagecriteria that include these RAID Levels: RAID 0, RAID 1, and JBOD. Use the following steps tomodify the RAID configuration:
1. Open the WD Drive Utilities software.2. If you have more than one supported device connected to your computer,
select the one that you want to set.3. Click RAID Management on the top menu.4. Click Configuration on the RAID Management menu.5. The first item listed is the "Current Configuration". Below this are the
configuration options: Stripe (RAID 0), Mirror (RAID 1), and Individual Drives(JBOD). Click the radio button next to the option you want to use.
6. Next, enter a new Volume Name in the Volume Name field or use the namecurrently populated in this field.a. If you select the Stripe (RAID 0) or Mirror (RAID 1) option, there will only be
one Volume Name field.b. If you select the Individual Drives (JBOD) option, you will have two (2)
Volume Name fields, one for Drive 1 and one for Drive 2. You may enter anew Volume Name for each field or use the name provided.
7. Select the "Format" for each Volume made available to you, this could be oneor two.a. For Windows the Format options are: NTFS and exFAT.b. For macOS / OS X the Format options are: HFS+J and exFAT
8. After selecting the disk configuration, entering a new volume name(s), andselecting the Format type(s), Click the check box confirming you understandthat this process permanently erases all the data on the drive.
9. If you choose to cancel this process, Click Close. Otherwise continue with thenext step.
10. Click the Configure button.11. During this process, the operating system may prompt you to execute the WD
Quick Formatter.exe file. Click Yes to continue.12. This process will take several minutes since the RAID configuration is changing
and the drives are being re-formatted.13. When the process has completed, the RAID Management menu will reappear
with the new "Current Configuration". A confirmation message dialog box mayappear information that the process has completed. If this box appears, ClickClose button on the box.
14. Click Close to close the WD Drive Utilities software.
Settings
Sleep TimerUnder the section Settings is the Sleep Timer. The Sleep Timer turns off the power to yourdevice after a certain period of inactivity to conserve power and minimize long-term wearon the device. To enable or disable this feature, follow these steps:
1. Open the WD Drive Utilities software.
WD Drive Utilities Software
My Book DuoUser Manual
22
2. If you have more than one supported device connected to your computer,select the one that you want to set.
3. Click Settings on the top menu.4. On the Sleep Timer portion of the Settings dialog box, Click the ON/OFF toggle
button to enable or disable this feature.a. If enabling this feature, Select the time limit for sleep activity to begin from
the Select Time drop-down menu.5. Click Close to close the WD Drive Utilities software.
LED SettingsUnder the section Settings is the LED Settings feature. This allows you to disable or enablethe LED indicator on the front of the WD device. If the LED is disabled and the deviceencounters an error, it will automatically enable the LED so that it can indicate that there isan issue with the unit. To enable or disable this feature, follow these steps:
1. Open the WD Drive Utilities software.2. If you have more than one supported device connected to your computer,
select the one that you want to set.3. Click Settings on the top menu.4. On the LED Settings portion of the Settings dialog box, Click the ON/OFF
toggle button to enable or disable this feature.5. After Clicking the ON/OFF toggle button, a confirmation message dialog box
will open. Click Close on this confirmation message dialog box.a. The ON/OFF toggle button will not be in the new position to indicate the
new setting until after you close the confirmation message dialog box.6. Click Close to close the WD Drive Utilities software.
Drive EraseCaution! Erasing your device deletes all data! This includes the WD software and all of the supportfiles and utilities that were included with the unit. However, this will not uninstall any of the WD toolsyou are currently using. You can download these to restore your device to its original configurationafter erasing it through the WD Software and Downloads Page.
The Drive Erase function is twofold, it will erase the drive and reformat the drive.The format process can be changed with this utility between NTFS, exFAT and HFS+J. It is best to use the NTFS Format when a drive or device is connected to acomputer system running a Windows operating system and HFS+J when connectedto a computer system running a macOS / OS X operating system.
1. Open the WD Drive Utilities software.2. If you have more than one supported device connected to your computer,
select the one that you want to erase.
▪ If the device is locked, you will be prompted to enter the password tounlock it.
Note: If five password attempts to unlock the device have failed, you will see the message 5Incorrect Attempts. The option to enter a password will not be presented. Continue withStep 3.
3. Click the Drive Erase option on the top menu.4. Enter a new volume name in the Volume Name field.
WD Drive Utilities Software
My Book DuoUser Manual
23
5. Select either the NTFS, exFAT or HFS+J (on a Mac system only) Format type.6. Caution! This process will erase all data on the selected device. If you choose to
continue, Click the checkbox next to the "I understand" disclaimer.7. Click Erase Drive.8. Your operating system may prompt you to run the WD Quick Formatter.exe file.
If you want to erase your drive, approve this request.9. The WD Drive Utilities software will display a status for the drive erase process.
When it has completed, it will inform you that the "Drive is erased."
Refer to our Knowledge Base Articles for help with partitioning and formatting thedevice without the WD Drive Utilities software.
WD Drive Utilities Software
My Book DuoUser Manual
24

7 Acronis® True Image™ WD Edition
Western Digital makes available Acronis True Image WD Edition – a special versionof Acronis True Image for WD customers.
Acronis True Image WD Edition can clone drives, backup the operating system,applications, settings and all of your data, while also securely wiping anyconfidential data you no longer need. Acronis True Image WD Edition provides youwith all the essential tools you need to recover your computer system should adisaster occur, such as losing data, accidentally deleting critical files or folders, or acomplete hard disk crash.
Note: Acronis True Image WD Edition Software is only made available through the WD SupportDownloads and Software page. The version of Acronis True Image available through the WDDiscovery software is not the WD Edition and is a pay-only item sold by Acronis. As a WD customeryou have a choice to use the free Acronis True Image WD Edition or to purchase the Acronis TrueImage software from Acronis.
Download and InstallDownload the Acronis True Image WD Edition Software from the WD Software Downloads page: https://support.wdc.com/downloads.aspx
How to install Acronis True Image WD Edition on a WindowsPC• Answer ID 10444 | How to install Acronis True Image WD Edition on a Windows PC
…………
Performing a BackupThis article answers how Acronis True Image WD Edition can be used to backupdata from a computer system to a My Book Duo device.
Performing a backup using Acronis True Image WD EditionSoftware• Answer ID 3689 | Performing a backup using Acronis True Image WD EditionSoftware
…………
Performing RecoveryThis article answers how Acronis True Image WD Edition can be used to recoverdata to a computer system from a Image Backup on a My Book Duo device.
Acronis® True Image™ WD Edition
My Book DuoUser Manual
25

Restoring an image backup from Acronis True Image WDEdition Software• Answer ID 18196 | How to restore an image backup from Acronis True Image WDEdition Software
…………
Acronis® True Image™ WD Edition
My Book DuoUser Manual
26

8 Troubleshooting
If you have problems installing or using this product, refer to this troubleshootingsection or visit our support website at http://support.wdc.com and search ourknowledge base for more help.
Replacing a DriveThe My Book Duo device is user serviceable. You have the option to upgrade andreplace the drives in the device. If the entire device is faulty, it can be returned toWD as a complete unit.
Warning! The hardware for a My Book Duo device does not support the hot-swap functionwhen removing or adding a drive. Power down the unit before removing or adding a drive. Failure tofollow this instruction may damage your drive or device, and may void your warranty.
Note: If the My Book Duo device model was originally 12 TB in capacity or less, and the drives areupgraded to increase the capacity beyond 12 TB, the power adapter must be updated to thespecified 12 volt, 4 amp (48 watt) unit. An updated power adapter can be obtained through WDSupport. Reference: Knowledge Base Answer ID 8.
RemovingIf your My Book Duo device still contains the drive you want to replace, you mustfirst remove it before you can insert the new one.
Troubleshooting
My Book DuoUser Manual
27
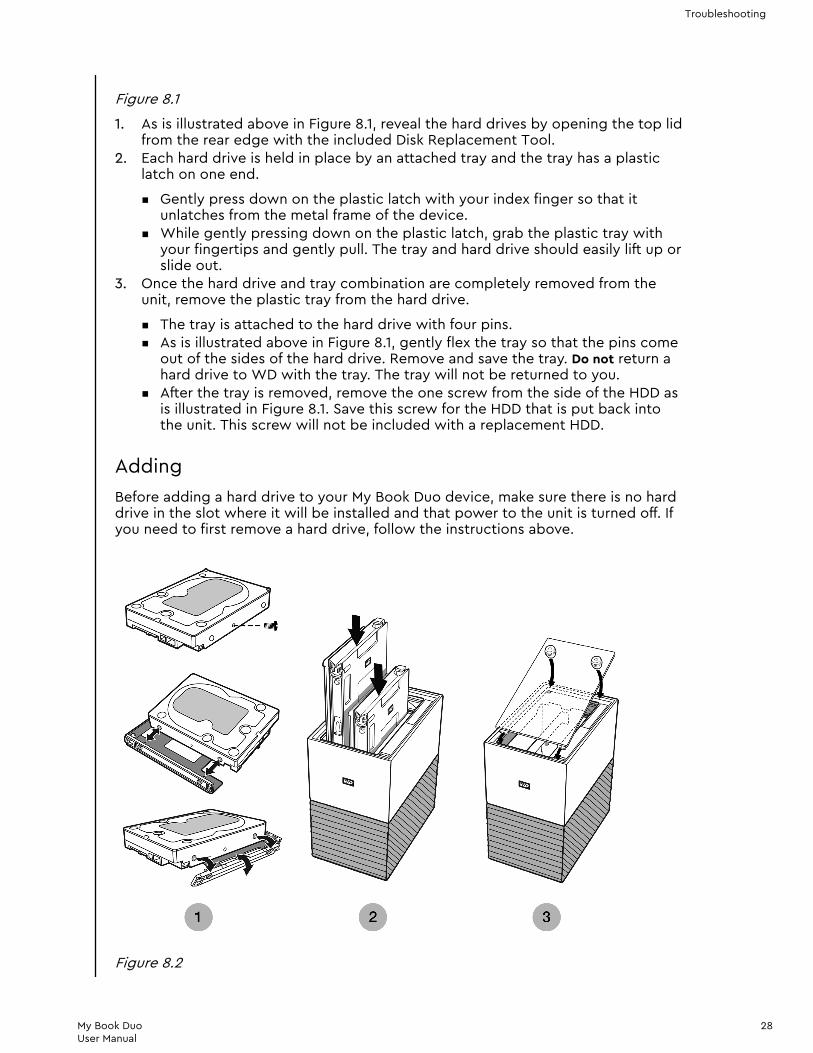
Figure 8.1
1. As is illustrated above in Figure 8.1, reveal the hard drives by opening the top lidfrom the rear edge with the included Disk Replacement Tool.
2. Each hard drive is held in place by an attached tray and the tray has a plasticlatch on one end.
▪ Gently press down on the plastic latch with your index finger so that itunlatches from the metal frame of the device.
▪ While gently pressing down on the plastic latch, grab the plastic tray withyour fingertips and gently pull. The tray and hard drive should easily lift up orslide out.
3. Once the hard drive and tray combination are completely removed from theunit, remove the plastic tray from the hard drive.
▪ The tray is attached to the hard drive with four pins.▪ As is illustrated above in Figure 8.1, gently flex the tray so that the pins come
out of the sides of the hard drive. Remove and save the tray. Do not return ahard drive to WD with the tray. The tray will not be returned to you.
▪ After the tray is removed, remove the one screw from the side of the HDD asis illustrated in Figure 8.1. Save this screw for the HDD that is put back intothe unit. This screw will not be included with a replacement HDD.
AddingBefore adding a hard drive to your My Book Duo device, make sure there is no harddrive in the slot where it will be installed and that power to the unit is turned off. Ifyou need to first remove a hard drive, follow the instructions above.
Figure 8.2
Troubleshooting
My Book DuoUser Manual
28
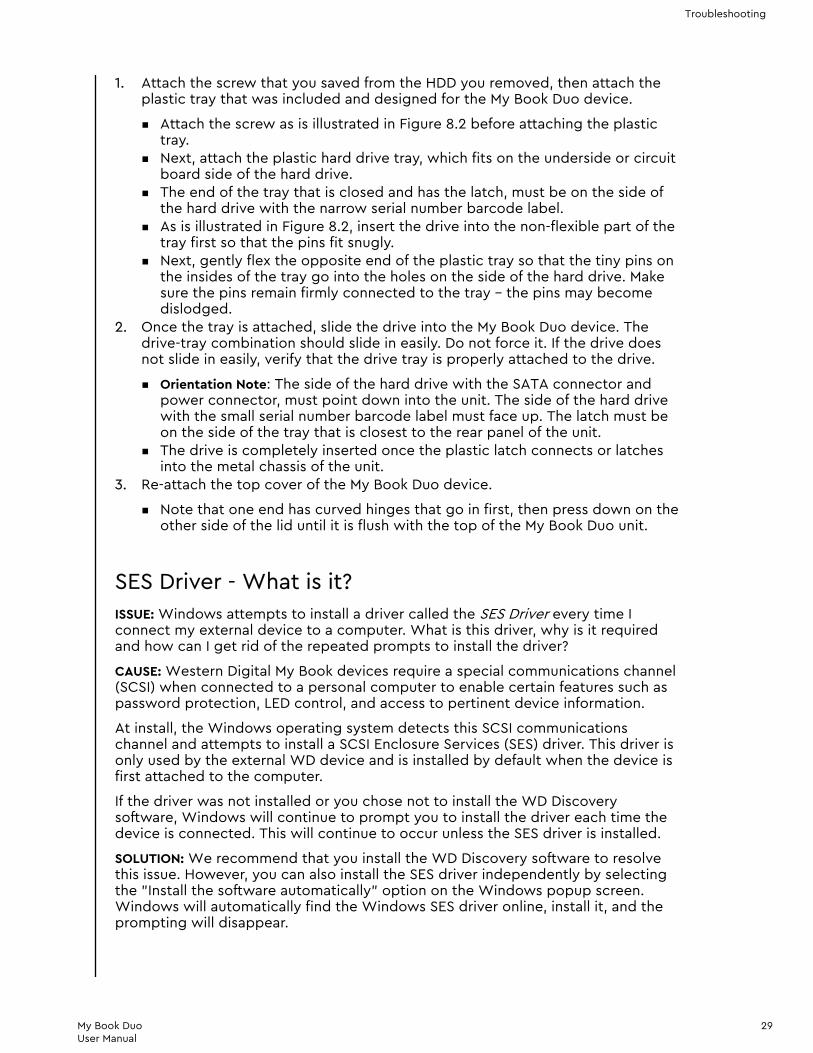
1. Attach the screw that you saved from the HDD you removed, then attach theplastic tray that was included and designed for the My Book Duo device.
▪ Attach the screw as is illustrated in Figure 8.2 before attaching the plastictray.
▪ Next, attach the plastic hard drive tray, which fits on the underside or circuitboard side of the hard drive.
▪ The end of the tray that is closed and has the latch, must be on the side ofthe hard drive with the narrow serial number barcode label.
▪ As is illustrated in Figure 8.2, insert the drive into the non-flexible part of thetray first so that the pins fit snugly.
▪ Next, gently flex the opposite end of the plastic tray so that the tiny pins onthe insides of the tray go into the holes on the side of the hard drive. Makesure the pins remain firmly connected to the tray – the pins may becomedislodged.
2. Once the tray is attached, slide the drive into the My Book Duo device. Thedrive-tray combination should slide in easily. Do not force it. If the drive doesnot slide in easily, verify that the drive tray is properly attached to the drive.
▪ Orientation Note: The side of the hard drive with the SATA connector andpower connector, must point down into the unit. The side of the hard drivewith the small serial number barcode label must face up. The latch must beon the side of the tray that is closest to the rear panel of the unit.
▪ The drive is completely inserted once the plastic latch connects or latchesinto the metal chassis of the unit.
3. Re-attach the top cover of the My Book Duo device.
▪ Note that one end has curved hinges that go in first, then press down on theother side of the lid until it is flush with the top of the My Book Duo unit.
SES Driver - What is it?ISSUE: Windows attempts to install a driver called the SES Driver every time Iconnect my external device to a computer. What is this driver, why is it requiredand how can I get rid of the repeated prompts to install the driver?
CAUSE: Western Digital My Book devices require a special communications channel(SCSI) when connected to a personal computer to enable certain features such aspassword protection, LED control, and access to pertinent device information.
At install, the Windows operating system detects this SCSI communicationschannel and attempts to install a SCSI Enclosure Services (SES) driver. This driver isonly used by the external WD device and is installed by default when the device isfirst attached to the computer.
If the driver was not installed or you chose not to install the WD Discoverysoftware, Windows will continue to prompt you to install the driver each time thedevice is connected. This will continue to occur unless the SES driver is installed.
SOLUTION: We recommend that you install the WD Discovery software to resolvethis issue. However, you can also install the SES driver independently by selectingthe "Install the software automatically" option on the Windows popup screen.Windows will automatically find the Windows SES driver online, install it, and theprompting will disappear.
Troubleshooting
My Book DuoUser Manual
29

9 Knowledge Base and FAQ
The following sections include helpful tips and knowledge base articles from WDand other sources for your WD product.
Frequently Asked Questions
Uninstalling the WD Software – WindowsUse the Windows Add or Remove Programs function to uninstall the WD software from yourcomputer.
1. Go to the Control Panel.2. Select Programs and Features category; in some versions of Windows, this is
called simply "Programs".3. Choose the program you want to remove, then click Uninstall.
a. When the WD Discovery software is uninstalled, the WD Drive Utilitiessoftware is automatically uninstalled.
4. When prompted with an "Are you sure..." question, click Yes.
Uninstalling the WD Software – macOSUse Finder to uninstall the WD software from your computer.
1. Open Finder and go to Applications.2. Select the WD Software you want to uninstall and drag the icon to the trash
bin.a. When the WD Discovery software is uninstalled, the WD Drive Utilities
software is automatically uninstalled.3. When prompted with an Uninstall dialog box, click Uninstall.
WD Knowledge Base ArticlesAll WD Knowledge Base references listed below can be viewed at: support.wdc.com/knowledgebase. Enter the below listed Answer ID in the searchfield. You can also Click on the Answer ID listed below for a direct link.
WD Discovery Software Online User Guide• Answer ID 17312 | WD Discovery Online User Guide
…………
WD Discovery Software Solutions and Troubleshooting• Answer ID 19506 | WD Discovery Software Solutions and Troubleshooting
…………
Knowledge Base and FAQ
My Book DuoUser Manual
30

How to Partition and Format a WD Drive on Windows andmacOS• Answer ID 3865 | How to partition and format a WD drive on Windows andmacOS
…………
How to Physically Connect or Disconnect a WD External Drive• | Answer ID 5316 | How to physically connect, disconnect, and install a WDexternal drive on a Windows PC or Mac.
…………
Problems Booting a PC with an External USB Drive Connected• Answer ID 1201 | Problems booting a PC with an external USB drive connected
…………
Windows or macOS Cannot Find My Drive• Answer ID 14925 | Windows or macOS cannot find my drive
…………
Explanation of exFAT• Answer ID 3849 | Explanation of exFAT
…………
Where to Download Software• Answer ID 7 | Where to download software, utilities, firmware updates, anddrivers for WD products
…………
How To Get an RMA To Replace a Defective Product, or Obtaina Power Supply or USB Cable for a WD product• Answer ID 8 | This answer explains how to create an RMA (Return MerchandiseAuthorization) to replace a defective product with Western Digital, or obtain apower supply or interface cable for a WD product.
…………
Knowledge Base and FAQ
My Book DuoUser Manual
31

Other Knowledge Base Articles
Apple® Time Machine® BackupTime Machine is the built-in backup feature of your Mac. Use the followinginstructions from Apple for using this tool:
• HT 201250 | Use Time Machine to backup or restore your Mac
…………
Microsoft® Windows® BackupThe step-by-step instructions for the Windows back up and restore process variesbased on the version of the Windows operating system you have installed. Use thefollowing Microsoft Article to access these instructions:
• Article ID: 17127 | Back up and restore your PC
…………
Knowledge Base and FAQ
My Book DuoUser Manual
32

10 Compliance and Warranty Information
This appendix includes the following topics:
Regulatory Compliance
Environmental Compliance (China)
Warranty Information
GNU General Public License (“GPL”)
Regulatory Compliance
FCC Class B InformationOperation of this device is subject to the following conditions:
▪ This device may not cause harmful interference.▪ This device must accept any interference received, including interference that
may cause undesired operation.
This device has been tested and found to comply with the limits for a Class B digitaldevice, pursuant to Part 15 of the FCC Rules. These limits are designed to providereasonable protection against harmful interference in a residential installation. Thisdevice generates, uses, and can radiate radio frequency energy and, if not installedand used in accordance with the instructions, may cause harmful interference toradio or television reception. However, there is no guarantee that interference willnot occur in a particular installation. If this equipment does cause harmfulinterference to radio or television reception, which can be determined by turningthe equipment off and on, you are encouraged to try to correct the interference byone or more of the following measures:
▪ Reorient or relocate the receiving antenna.▪ Increase the separation between the equipment and the receiver.▪ Connect the equipment into an outlet on a circuit different from that to which
the receiver is connected.▪ Consult the dealer or an experienced radio/television technician for help.
Any changes or modifications not expressly approved by WD could void yourauthority to operate this device.
ICES-003/NMB-003 StatementCet appareil numérique de la classe B est conforme à la norme NMB-003 duCanada.
This device complies with Canadian ICES-003 Class B.
Safety ComplianceApproved for US and Canada. CAN/CSA-C22.2 No. 60950-1, UL 60950-1: Safety ofInformation Technology Equipment.
Compliance and Warranty Information
My Book DuoUser Manual
33

Approuvé pour les Etats-Unis et le Canada. CAN/CSA-C22.2 No. 60950-1, UL60950-1: Sûreté d'équipement de technologie de l'information.
CE Compliance For EuropeMarking by the CE symbol indicates compliance of this system to the applicableCouncil Directives of the European Union, including the EMC Directive (2014/30/EU), the Low Voltage Directive (2014/35/EU), ErP Directive (2009/125/EC), andRoHS Directive (2011/65/Eu). A “Declaration of Conformity” in accordance with theapplicable directives has been made and is on file at Western Digital Europe.
Environmental Compliance (China)
Warranty Information
Obtaining ServiceWD values your business and always attempts to provide you the very best ofservice. Should you encounter any problem, please give us an opportunity toaddress it before returning this Product. Most technical support questions can beanswered through our knowledge base or e-mail support service at http://support.wdc.com. If the answer is not available or, if you prefer, pleasecontact WD at the applicable telephone number shown in the front of thisdocument. If you wish to make a claim, you should initially contact the dealer fromwhom you originally purchased the Product. If you are unable to contact the dealerfrom whom you originally purchased the Product, please visit our product supportWeb site at http://support.wdc.com for information on how to obtain service or aReturn Material Authorization (RMA). If it is determined that the Product may bedefective, you will be given an RMA number and instructions for Product return. Anunauthorized return (i.e., one for which an RMA number has not been issued) will bereturned to you at your expense. Authorized returns must be shipped in anapproved shipping container, prepaid and insured, to the address provided withyour RMA number. If following receipt of a qualifying claim under this warranty, WDor the dealer from whom you originally purchased the Product determines that
Compliance and Warranty Information
My Book DuoUser Manual
34
your claim is valid, WD or such dealer shall, at its discretion, either repair or replacethe Product with an equivalent or better Product or refund the cost of the Productto you. You are responsible for any expenses associated with a claim under thiswarranty. The benefits provided to you under this warranty are in addition to otherrights and remedies available to you under the Australian Competition andConsumer Act or the New Zealand Consumer Guarantees Act. Your original box andpackaging materials should be kept for storing or shipping your WD product. Toconclusively establish the period of warranty, check the warranty expiration (serialnumber required) via http://support.wdc.com.
Limited WarrantyWD warrants that the Product, in the course of its normal use, will for the termdefined below, be free from defects in material and workmanship and will conformto WD’s specification therefor. The term of your limited warranty depends on thecountry in which your Product was purchased. The term of your limited warranty isfor 3 years in the North, South and Central America region, 3 years in the Europe,the Middle East and Africa region, and 3 years in the Asia Pacific region, unlessotherwise required by law. The term of your limited warranty period shallcommence on the purchase date appearing on your purchase receipt. WD may atits discretion make extended warranties available for purchase. WD shall have noliability for any Product returned if WD determines that the Product was stolenfrom WD or that the asserted defect a) is not present, b) cannot reasonably berectified because of damage occurring before WD receives the Product, or c) isattributable to misuse, improper installation, alteration (including removing orobliterating labels and opening or removing external enclosures, including themounting frame, unless the product is on the list of limited user-serviceableproducts and the specific alteration is within the scope of the applicableinstructions, as found at http://support.wd.com), accident or mishandling while inthe possession of someone other than WD. Subject to the limitations specifiedabove, your sole and exclusive warranty shall be, during the period of warrantyspecified above and at WD’s option, the repair or replacement of the Product withan equivalent or better Product. The foregoing warranty of WD shall extend torepaired or replaced Products for the balance of the applicable period of theoriginal warranty or ninety (90) days from the date of shipment of a repaired orreplaced Product, whichever is longer.
The foregoing limited warranty is WD's sole warranty and is applicable only toproducts sold as new. The remedies provided herein are in lieu of a) any and allother remedies and warranties, whether expressed, implied or statutory, includingbut not limited to, any implied warranty of merchantability or fitness for a particularpurpose, and b) any and all obligations and liabilities of WD for damages including,but not limited to accidental, consequential, or special damages, or any financialloss, lost profits or expenses, or lost data arising out of or in connection with thepurchase, use, or performance of the Product, even if WD has been advised of thepossibility of such damages. In the United States, some states do not allowexclusion or limitations of incidental or consequential damages, so the limitationsabove may not apply to you. This warranty gives you specific legal rights, and youmay also have other rights which vary from state to state.
Warranty Information (Australia/New Zealand)Nothing in this warranty modifies or excludes your legal rights under the AustralianCompetition and Consumer Act or the New Zealand Consumer Guarantees Act.
Compliance and Warranty Information
My Book DuoUser Manual
35

This warranty identifies WD’s preferred approach to resolving warranty claimswhich is likely to be quick and simple for all parties.
No other warranties either express or implied by law, including but not limited tothose contained in the Sale of Goods Act, are made with respect to the Product. Ifyou purchased your Product in New Zealand for the purposes of a business, youacknowledge and agree that the New Zealand Consumer Guarantees Act does notapply. In Australia, our goods come with guarantees that cannot be excluded underthe Australian Consumer Law. You are entitled to a replacement or refund for amajor failure and compensation for any other reasonably foreseeable loss ordamage. You are also entitled to have the goods repaired or replaced if goods failto be of acceptable quality and the failure does not amount to a major failure. Whatconstitutes a major failure is set out in the Australian Consumer Law.
Obtaining ServiceWD values your business and always attempts to provide you the very best ofservice. Should you encounter any problem, please give us an opportunity toaddress it before returning this Product. Most technical support questions can beanswered through our knowledge base or e-mail support service at http://support.wdc.com. If the answer is not available or, if you prefer, pleasecontact WD at the applicable telephone number shown in the front of thisdocument. If you wish to make a claim, you should initially contact the dealer fromwhom you originally purchased the Product. If you are unable to contact the dealerfrom whom you originally purchased the Product, please visit our product supportWeb site at http://support.wdc.com for information on how to obtain service or aReturn Material Authorization (RMA). If it is determined that the Product may bedefective, you will be given an RMA number and instructions for Product return. Anunauthorized return (i.e., one for which an RMA number has not been issued) will bereturned to you at your expense. Authorized returns must be shipped in anapproved shipping container, prepaid and insured, to the address provided withyour RMA number. If following receipt of a qualifying claim under this warranty, WDor the dealer from whom you originally purchased the Product determines thatyour claim is valid, WD or such dealer shall, at its discretion, either repair or replacethe Product with an equivalent or better Product or refund the cost of the Productto you. You are responsible for any expenses associated with a claim under thiswarranty. The benefits provided to you under this warranty are in addition to otherrights and remedies available to you under the Australian Competition andConsumer Act or the New Zealand Consumer Guarantees Act. Your original box andpackaging materials should be kept for storing or shipping your WD product. Toconclusively establish the period of warranty, check the warranty expiration (serialnumber required) via http://support.wdc.com.
WarrantyWD warrants that the Product, in the course of its normal use, will for the termdefined below, be free from defects in material and workmanship and will conformto WD’s specifications. The term of your warranty is 3 years in Australia and NewZealand, unless otherwise required by law. The term of your warranty period shallcommence on the purchase date appearing on your purchase receipt from anauthorized distributor or authorized reseller. Proof of purchase shall be required tobe eligible for this warranty and to establish the commencement date of thiswarranty. Warranty service will not be provided unless the Product is returned toan authorized distributor, authorized reseller or regional WD return center wherethe Product was first shipped by WD. WD may at its discretion make extended
Compliance and Warranty Information
My Book DuoUser Manual
36

warranties available for purchase. WD shall have no liability for any Productreturned if WD determines that the Product was (i) not purchased from anauthorized distributor or authorized reseller, (ii) not used in accordance with WDspecifications and instructions, (iii) not used for its intended function, or (iv) stolenfrom WD, or that the asserted defect a) is not present, b) cannot reasonably berectified because of damage occurring before WD receives the Product, or c) isattributable to misuse, improper installation, alteration (including removing orobliterating labels and opening or removing external enclosures, including themounting frame, unless the product is on the list of limited user-serviceableproducts and the specific alteration is within the scope of the applicableinstructions, as found at http://support.wdc.com), accident or mishandling while inthe possession of someone other than WD.
PRODUCTS ARE COMPLEX AND FRAGILE ITEMS THAT MAY OCCASSIONALY FAILDUE TO (A) EXTERNAL CAUSES, INCLUDING WITHOUT LIMITATION, MISHANDLING,EXPOSURE TO HEAT, COLD, AND HUMIDITY, AND POWER FAILURES, OR (B)INTERNAL FAULTS . SUCH FAILURES CAN RESULT IN THE LOSS, CORRUPTION,DELETION ALTERATION OF DATA. NOTE THAT YOU SHALL BE RESPONSIBLE FORTHE LOSS, CORRUPTION, DELETION OR ALTERATION OF DATA HOWSOEVERCAUSED, AND FOR BACKING UPAND PROTECTING DATA AGAINST LOSS,CORRUPTION, DELETION OR ALTERATION. YOU AGREE TO CONTINUALLY BACK UPALL DATA ON THE PRODUCT, AND TO COMPLETE A BACKUP PRIOR TO SEEKINGANY GENERAL SERVICE AND TECHNICAL SUPPORT FROM WD.
In Australia, if the Product is not of a kind ordinarily acquired for personal, domesticor household use or consumption, provided it is fair and reasonable to do so, WDlimits its liability to replacement of the Product or supply of equivalent or betterProduct.
This warranty shall extend to repaired or replaced Products for the balance of theapplicable period of the original warranty or ninety (90) days from the date ofshipment of a repaired or replaced Product, whichever is longer. This warranty isWD’s sole manufacturer’s warranty and is applicable only to Products sold as new.
GNU General Public License (“GPL”)Firmware incorporated into this product may include third party copyrightedsoftware licensed under the GPL or Lesser General Public License (“LGPL”)(collectively, “GPL Software”) and not Western Digital’s End User LicenseAgreement. In accordance with the GPL, if applicable: 1) the source code for theGPL Software may be downloaded at no charge from http://support.wdc.com orobtained on CD for a nominal charge from http://support.wdc.com or by callingCustomer Support within three years of the date of purchase; 2) you may re-use, re-distribute, and modify the GPL Software; 3) with respect solely to the GPL Software,no warranty is provided, to the extent permitted by applicable law; and 4) a copyof the GPL is included herewith, may be obtained at http://www.gnu.org, and mayalso be found at http://support.wdc.com.
Modification of or tampering with the Software, including but not limited to anyOpen Source Software, is solely at your own risk. Western Digital is not responsiblefor any such modification or tampering. Western Digital will not support anyproduct in which you have or have attempted to modify the Software supplied byWestern Digital.
Compliance and Warranty Information
My Book DuoUser Manual
37
Index
A
About My Book Duo 1About Restoring with WD Backup 14About WD Backup 11Accessories - Cables and Power Supply Units 31Acronis True Image WD Edition 25Acronis True Image WD Edition - Download 25Acronis True Image WD Edition - Install 25Acronis True Image WD Edition - Performing aBackup 25Acronis True Image WD Edition - Restoring from aImage Backup 26
B
Backup to Cloud Service 13Backuping Up Files 12Box Contents 1
C
China RoHS, environmental compliance 34Compliance, regulatory 33Connecting the My Book Duo 6
D
Disconnect a WD External Device 31Disk Status 21Download Software 31
E
Environmental compliance, China RoHS 34Erasing a WD Drive 23Explanation of exFAT 31
F
FAQ 30FCC Class B information 33File System 2Firmware Update 9Frequently Asked Questions 30Front LED Description 3
G
Getting Started 6GNU general public license 37GPL software 37
H
Handling Precautions 5
I
ICES-003/NMB-003 compliance 33
K
KB 10444 25KB 1201 31KB 14925 31KB 18196 26KB 3689 25KB 3849 31KB 3865 31KB 5316 31KB 7 31KB 8 - Replace a WD Product 31Kensington Security Slot 4Knowledge Base 30
L
Limited warranty 35Lock the Device 16
O
Obtaining Service 34, 36Operating System Compatibility 2
P
Package Contents 1Partition and Format 31Password Protecting the Device 16Power Adapter 4Power Button Description 4Power Connector 4Power Supply Unit 4Problems Booting After Connecting USB Device 31Product Features 1Product Registration 5
R
RAID Configuration 21RAID Status 20Regulatory compliance 33Replace a WD Product 31Replacing a Drive 27Restore with WD Backup 14RMA 31
S
Safety compliance 33Service 36SES Driver Message 29
My Book DuoUser Manual
38
Sleep Timer 22Software Updates 9Software, GPL 37
U
Uninstalling WD Software - macOS 30Uninstalling WD Software - Windows 30USB 3.1 Gen-1 4USB Connectors 4
W
Warranty information 36Warranty Information 34, 35WD Backup - Edit Backup Plan 15WD Discovery 7WD Discovery Online User Guide 30WD Discovery Solutions and Troubleshooting 30WD Drive Utilities - Disk Status 21WD Drive Utilities - Drive Erase 23WD Drive Utilities - LED Settings 23WD Drive Utilities - RAID Configuration 21WD Drive Utilities - RAID Management 19WD Drive Utilities - RAID Status 20WD Drive Utilities - Sleep Timer 22WD Security - Change Password 17WD Security - Disable Device Lock 18WD Security - Unlock Device 17Welcome to My Book Duo 1Windows or macOS Cannot Find My Drive 31
My Book DuoUser Manual
39

WD, the WD logo, My Book, WD Backup, WD Discovery, WD Drive Utilities and WDSecurity are registered trademarks or trademarks of Western Digital Corporation orits affiliates in the U.S. and/or other countries. All other marks are the property oftheir respective owners. Pictures shown may vary from actual product. Productspecifications subject to change without notice. Acronis and True Image areregistered trademarks or trademarks of Acronis International GmbH. Kensington is atrademark of ACCO Brands Corporation and its Subsidiaries. Google Drive is atrademark of Google Inc. Apple, Mac, OS X, macOS and Time Machine aretrademarks of Apple Inc., registered in the U.S. and other countries. Dropbox is atrademark of Dropbox, Inc. Facebook and Instagram are trademarks of Facebook,Inc. Microsoft, OneDrive and Windows are either registered trademarks ortrademarks of Microsoft Corporation in the United States and/or other countries.USB, USB SuperSpeed, and USB Type-C are trademarks or registered trademarks ofthe USB Implementers Forum, Inc. As used for storage capacity, one gigabyte (GB)= one billion bytes and one terabyte (TB) = one trillion bytes. Total accessiblecapacity varies depending on operating environment.
© 2017 Western Digital Corporation or its affiliates. All rights reserved.Western Digital3355 Michelson Drive, Suite 100Irvine, California 92612 U.S.A
4779-705166-A00