mx-k1/mx-k3 - jvc usa - productsresources.jvc.com/resources/00/00/98/20942ien.pdf · mx-k1/mx-k3...
TRANSCRIPT

For Customer Use:Enter below the Model No. and SerialNo. which are located either on therear, bottom or side of the cabinet.Retain this information for future refer-ence.
Model No.
Serial No.
INSTRUCTIONS
LVT0686-001B[J]
COMPACT COMPONENT SYSTEM
MX-K1/MX-K3
ACTIVEBASS EX.
COMPACT COMPONENT SYSTEM MX-K1
STANDBY/ONSTANDBY
PHONES
REPEAT PROGRAM RANDOM /STOP REC START DUBBINGREC START CD
CLOCK/TIMER
TAPEA/B
DISC SKIP
EJECT
PLAYA REC/PLAY B
CD CONTROL
CD 1
AU
X
FM/A
M
CD
TAP
E
CD 2
CD 3
CD-R/RW PLAYBACK
VCD NUMBERRETURNPBC
MAXMIN
MIC MICVOL
CANCEL SET
1 BIT DUAL D/ACONVERTER
PRESET
TUNNIG
/ DEMO
COMPU PLAY CONTROL
ACTIVE BASS EXTENSION
FULL - LOGIC CONTROL CD SYNCHRO RECORDING
EJECT
RO
C
K
CLASSIC
POP
VOLUME
3-CDPLAY & EXCHANGE
SOUNDMODE
RM-SMXK3A REMOTE CONTROL
1 2 3
4 5 6
7 8 9
10 +10 FM MODE FM /AM
AUX
SLEEP
STANDBY/ON
CD1 CD2 CD3 CD
SOUNDMODE
ACTIVEBASS EX.
FADEMUTING
VOLUME
1
1
PROGRAM/RANDOM REPEAT TAPE A/B TAPE
1 1
1 1 1
1
1
1
COMPU PLAYCONTROL
ACTIVEBASS EX.
COMPACT COMPONENT SYSTEM MX-K3
STANDBY/ONSTANDBY
PHONES
REPEAT PROGRAM RANDOM /STOP REC START DUBBINGREC START CD
CLOCK/TIMER
TAPEA/B
DISC SKIP
EJECT
PLAYA REC/PLAY B
CD CONTROL
CD 1
AU
X
FM/A
M
CD
TAP
E
CD 2
CD 3
CD-R/RW PLAYBACK
VCD NUMBERRETURNPBC
MAXMIN
MIC MICVOL
CANCEL SET
1 BIT DUAL D/ACONVERTER
PRESET
TUNNIG
/ DEMO
COMPU PLAY CONTROL
ACTIVE BASS EXTENSION
FULL - LOGIC CONTROL CD SYNCHRO RECORDING
EJECT
RO
C
K
CLASSIC
POP
VOLUME
3-CDPLAY & EXCHANGE
SOUNDMODE
RM-SMXK3A REMOTE CONTROL
1 2 3
4 5 6
7 8 9
10 +10 FM MODE FM /AM
AUX
SLEEP
STANDBY/ON
CD1 CD2 CD3 CD
SOUNDMODE
ACTIVEBASS EX.
FADEMUTING
VOLUME
1
1
PROGRAM/RANDOM REPEAT TAPE A/B TAPE
1 1
1 1 1
1
1
1
COMPU PLAYCONTROL
CA-MXK1
CA-MXK3
SP-MXK1
SP-MXK3
SP-MXK1
SP-MXK3
Consists of CA-MXK1Consists of CA-MXK1Consists of CA-MXK1Consists of CA-MXK1and SP-MXK1and SP-MXK1and SP-MXK1and SP-MXK1
Consists of CA-MXK3Consists of CA-MXK3Consists of CA-MXK3Consists of CA-MXK3and SP-MXK3and SP-MXK3and SP-MXK3and SP-MXK3
Cover.fm Page 1 Wednesday, January 31, 2001 2:42 PM

G-1
Warnings, Cautions and Others
For U.S.A.
This equipment has been tested andfound to comply with the limits for a ClassB digital device, pursuant to Part 15 of theFCC Rules. These limits are designed toprovide reasonable protection againstharmful interference in a residential instal-lation. This equipment generates, uses,and can radiate radio frequency energyand, if not installed and used in accord-ance with the instructions, may causeharmful interference to radio communica-tions. However, there is no guarantee thatinterference will not occur in a particularinstallation. If this equipment does causeharmful interference to radio or televisionreception, which can be determined byturning the equipment off and on, the useris encouraged to try to correct the interfer-ence by one or more of the followingmeasures:
– Reorient or relocate the receivingantenna.
– Increase the separation between theequipment and receiver.
– Connect the equipment into an outlet ona circuit different from that to which thereceiver is connected.
– Consult the dealer or an experiencedradio/TV technician for help.
The lightning flash with arrowhead symbol, withinan equilateral triangle is intended to alert the userto the presence of uninsulated “dangerous voltage”within the product’s enclosure that may be of suffi-cient magnitude to constitute a risk of electric shockto persons.
The exclamation point within an equilateral triangleis intended to alert the user to the presence ofimportant operating and maintenance (servicing)instructions in the literature accompanying theappliance.
CAUTIONRISK OF ELECTRIC
SHOCK
CAUTION: TO REDUCE THE RISK OF ELECTRIC SHOCK DO NOT REMOVE COVER (OR BACK)
NO USER SERVICEABLE PARTS INSIDE REFER SERVICING TO QUALIFIED SERVICE PERSONNEL.
WARNING: TO REDUCE THE RISK OF FIRE ORELECTRIC SHOCK, DO NOT EXPOSE THISAPPLIANCE TO RAIN OR MOISTURE.
Warning.fm Page 1 Wednesday, January 31, 2001 2:43 PM

G-2
1.CLASS 1 LASER PRODUCT2.DANGER: Invisible laser radiation when open and inter-
lock failed or defeated. Avoid direct exposure to beam.3.CAUTION: Do not open the top cover. There are no user
serviceable parts inside the unit; leave all servicing to qualitied service personnel.
CAUTIONTo reduce the risk of electrical shocks, fire, etc.:1.Do not remove screws, covers or cabinet.2.Do not expose this appliance to rain or moisture.
CAUTION1.Do not block the ventilation openings or holes.
(If the ventilation openings or holes are blocked by a newspaper or cloth, etc., the heat may not be able to get out.)
2.Do not place any naked flame sources, such as lighted candles, on the apparatus.
3.When discarding batteries, environmental problems must be considered and local rules or laws governing the dis-posal of these batteries must be followed strictly.
4.Do not use this apparatus in a bathroom or places with water. Also do not place any containers filled with water or liquids (such as cosmetics or medicines, flower vases, potted plants, cups, etc.) on top of this apparatus.
Caution — POWER switch!Disconnect the mains plug to shut the power offcompletely. The POWER switch in any positiondoes not disconnect the mains line. The power canbe remote controlled.
Warning.fm Page 2 Wednesday, January 31, 2001 2:43 PM
1
Eng
lish
Eng
lish
Eng
lish
Eng
lish
Eng
lish
Eng
lish
Eng
lish
IntroductionThank you for purchasing the JVC Compact Component System.We hope it will be a valued addition to your home, giving you years of enjoyment.Be sure to read this instruction manual carefully before operating your new stereo system.In it you will find all the information you need to set up and use the system.If you have a query that is not answered by the manual, please contact your dealer.
FeaturesHere are some of the things that make your System both powerful and simple to use.
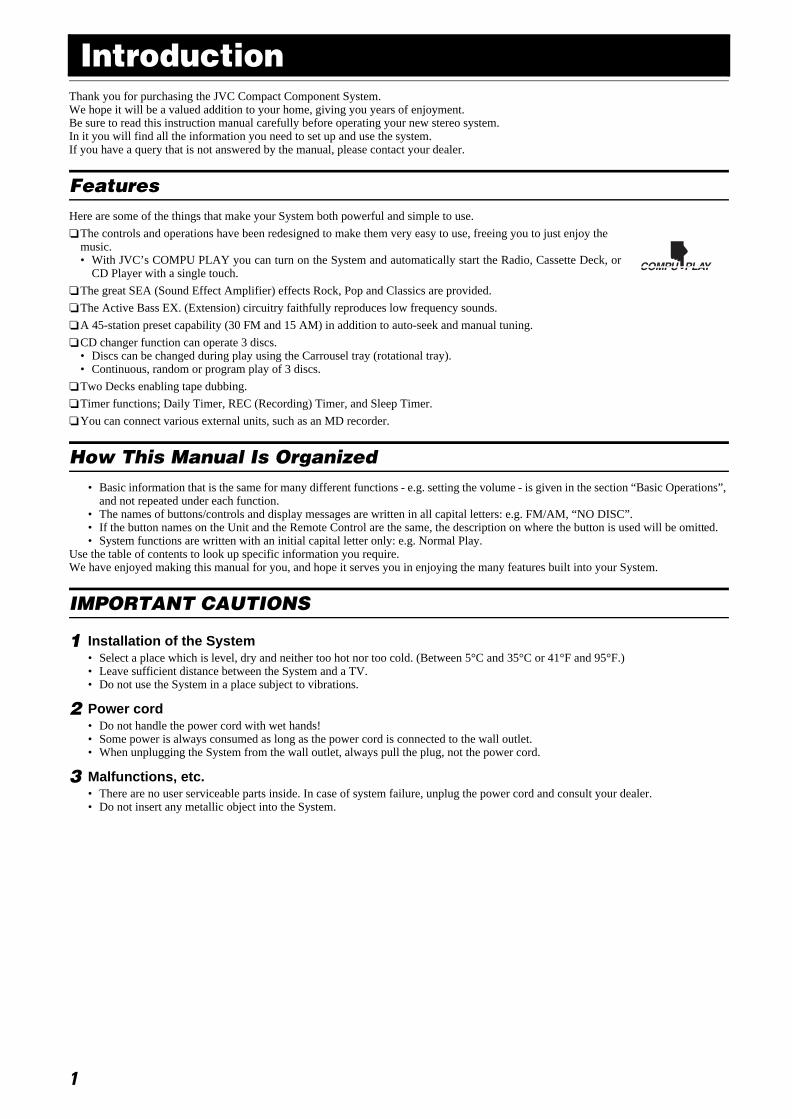
The controls and operations have been redesigned to make them very easy to use, freeing you to just enjoy the music.• With JVC’s COMPU PLAY you can turn on the System and automatically start the Radio, Cassette Deck, or
CD Player with a single touch.
The great SEA (Sound Effect Amplifier) effects Rock, Pop and Classics are provided.
The Active Bass EX. (Extension) circuitry faithfully reproduces low frequency sounds.
A 45-station preset capability (30 FM and 15 AM) in addition to auto-seek and manual tuning.
CD changer function can operate 3 discs.• Discs can be changed during play using the Carrousel tray (rotational tray).• Continuous, random or program play of 3 discs.
Two Decks enabling tape dubbing.
Timer functions; Daily Timer, REC (Recording) Timer, and Sleep Timer.
You can connect various external units, such as an MD recorder.
How This Manual Is Organized• Basic information that is the same for many different functions - e.g. setting the volume - is given in the section “Basic Operations”,
and not repeated under each function.• The names of buttons/controls and display messages are written in all capital letters: e.g. FM/AM, “NO DISC”.• If the button names on the Unit and the Remote Control are the same, the description on where the button is used will be omitted.• System functions are written with an initial capital letter only: e.g. Normal Play.
Use the table of contents to look up specific information you require.We have enjoyed making this manual for you, and hope it serves you in enjoying the many features built into your System.
IMPORTANT CAUTIONS
1 Installation of the System• Select a place which is level, dry and neither too hot nor too cold. (Between 5°C and 35°C or 41°F and 95°F.)• Leave sufficient distance between the System and a TV.• Do not use the System in a place subject to vibrations.
2 Power cord• Do not handle the power cord with wet hands!• Some power is always consumed as long as the power cord is connected to the wall outlet.• When unplugging the System from the wall outlet, always pull the plug, not the power cord.
3 Malfunctions, etc.• There are no user serviceable parts inside. In case of system failure, unplug the power cord and consult your dealer.• Do not insert any metallic object into the System.
MX-K1(J).book Page 1 Wednesday, January 31, 2001 2:44 PM
2
English
English
English
English
English
English
English
Table of ContentsIntroduction ................................................................................................................... 1
Features.................................................................................................................................................... 1How This Manual Is Organized............................................................................................................... 1IMPORTANT CAUTIONS..................................................................................................................... 1
Table of Contents ..........................................................................................................2Getting Started ..............................................................................................................3
Accessories .............................................................................................................................................. 3How To Put Batteries In the Remote Control.......................................................................................... 3Using the Remote Control ....................................................................................................................... 3Connecting the FM Antenna.................................................................................................................... 4Connecting the AM Antenna................................................................................................................... 5Connecting the Speakers ......................................................................................................................... 5Connecting External Equipment.............................................................................................................. 6Connecting to the Wall Outlet ................................................................................................................. 6DEMO Mode ........................................................................................................................................... 6COMPU Play........................................................................................................................................... 6
Basic Operations...........................................................................................................7Turning the Power On and Off ................................................................................................................ 7Adjusting the Volume.............................................................................................................................. 7Fade-out Muting (FADE MUTING) ....................................................................................................... 8Reinforcing the Bass Sound (ACTIVE BASS EX.)................................................................................ 8Selecting the Sound Mode (SOUND MODE)......................................................................................... 8Entering the Number with the Remote Control (Numeric Keys)............................................................ 8
Using the Tuner .............................................................................................................9Tuning In a Station .................................................................................................................................. 9Presetting Stations ................................................................................................................................. 10To Change the FM Reception Mode ..................................................................................................... 10
Using the CD Player ....................................................................................................11To Load CDs ......................................................................................................................................... 12To Unload CDs...................................................................................................................................... 12Basics of Using the CD Player-Normal Play......................................................................................... 13Programming the Playing Order of the Tracks...................................................................................... 14Random Play.......................................................................................................................................... 15Repeating Tracks ................................................................................................................................... 15Tray Lock Function ............................................................................................................................... 15
Using the Cassette Deck (Listening to a Tape) ........................................................16Playing a Tape ....................................................................................................................................... 16
Using the Cassette Deck (Recording) ......................................................................17Standard Recording ............................................................................................................................... 18CD Synchro Recording.......................................................................................................................... 18Tape to Tape Recording (DUBBING)................................................................................................... 18
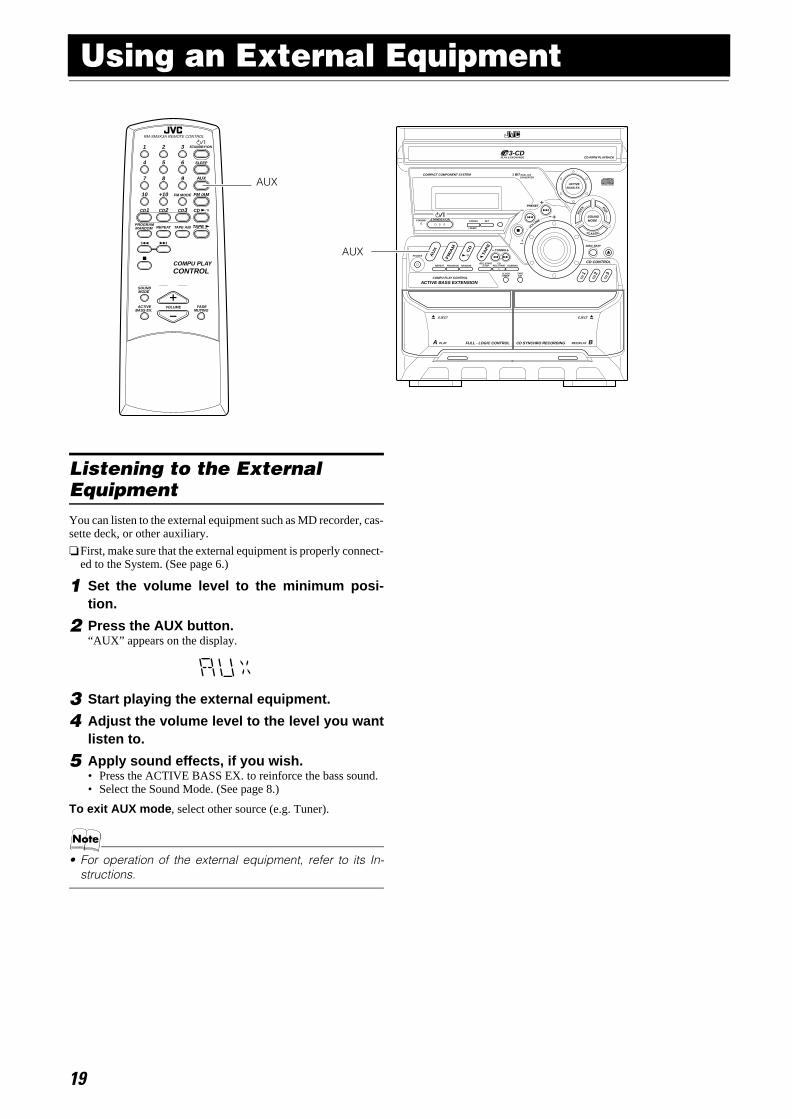
Using an External Equipment ....................................................................................19Listening to the External Equipment ..................................................................................................... 19
Using the Timers .........................................................................................................20Setting the Clock ................................................................................................................................... 20Setting the Daily Timer ......................................................................................................................... 21Setting the REC (Recording) Timer ...................................................................................................... 22Setting the SLEEP Timer ...................................................................................................................... 24Timer Priority ........................................................................................................................................ 24
Care And Maintenance................................................................................................25Troubleshooting ..........................................................................................................26Specifications ...............................................................................................Back cover
MX-K1(J).book Page 2 Wednesday, January 31, 2001 2:44 PM
3
Eng
lish
Eng
lish
Eng
lish
Eng
lish
Eng
lish
Eng
lish
Eng
lish
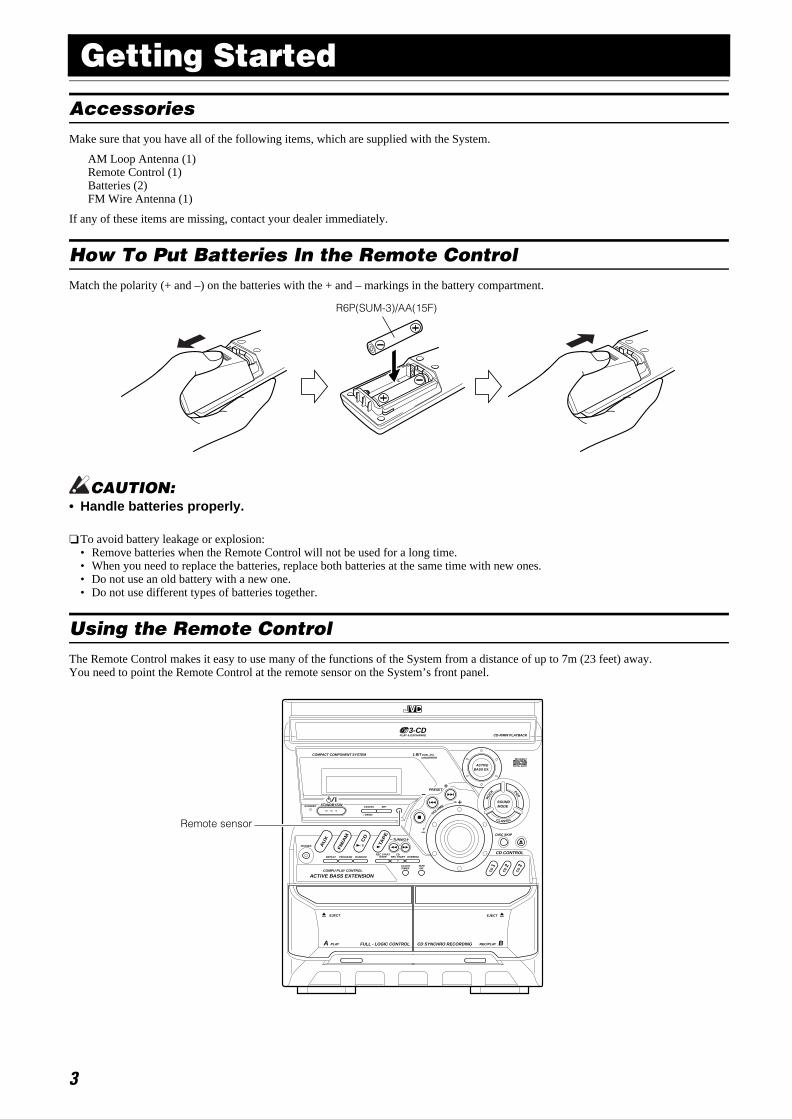
Getting StartedAccessoriesMake sure that you have all of the following items, which are supplied with the System.
AM Loop Antenna (1)Remote Control (1)Batteries (2)FM Wire Antenna (1)
If any of these items are missing, contact your dealer immediately.
How To Put Batteries In the Remote ControlMatch the polarity (+ and –) on the batteries with the + and – markings in the battery compartment.
CAUTION:• Handle batteries properly.
To avoid battery leakage or explosion:• Remove batteries when the Remote Control will not be used for a long time.• When you need to replace the batteries, replace both batteries at the same time with new ones.• Do not use an old battery with a new one.• Do not use different types of batteries together.
Using the Remote ControlThe Remote Control makes it easy to use many of the functions of the System from a distance of up to 7m (23 feet) away.You need to point the Remote Control at the remote sensor on the System’s front panel.
R6P(SUM-3)/AA(15F)
ACTIVEBASS EX.
COMPACT COMPONENT SYSTEM
STANDBY/ONSTANDBY
PHONES
REPEAT PROGRAM RANDOM /STOP REC START DUBBINGREC START CD
CLOCK/TIMER
TAPEA/B
DISC SKIP
EJECT
PLAYA REC/PLAY B
CD CONTROL
CD
1
AU
X
FM
/AM
CD
TAP
E
CD
2
CD
3
SOUNDMODE
CD-R/RW PLAYBACK
VCD NUMBERRETURNPBC
MAXMIN
MIC MICVOL
CANCEL SET
1 BIT DUAL D/ACONVERTER
PRESET
TUNNIG
/ DEMO
COMPU PLAY CONTROL
ACTIVE BASS EXTENSION
FULL - LOGIC CONTROL CD SYNCHRO RECORDING
EJECT
RO
CK
CLASSIC
POP
VOLUME
3-CDPLAY & EXCHANGE
Remote sensor
MX-K1(J).book Page 3 Wednesday, January 31, 2001 2:44 PM
4
Getting Started
English
English
English
English
English
English
English
CAUTION:• Make all connections before plugging the System into an AC power outlet.
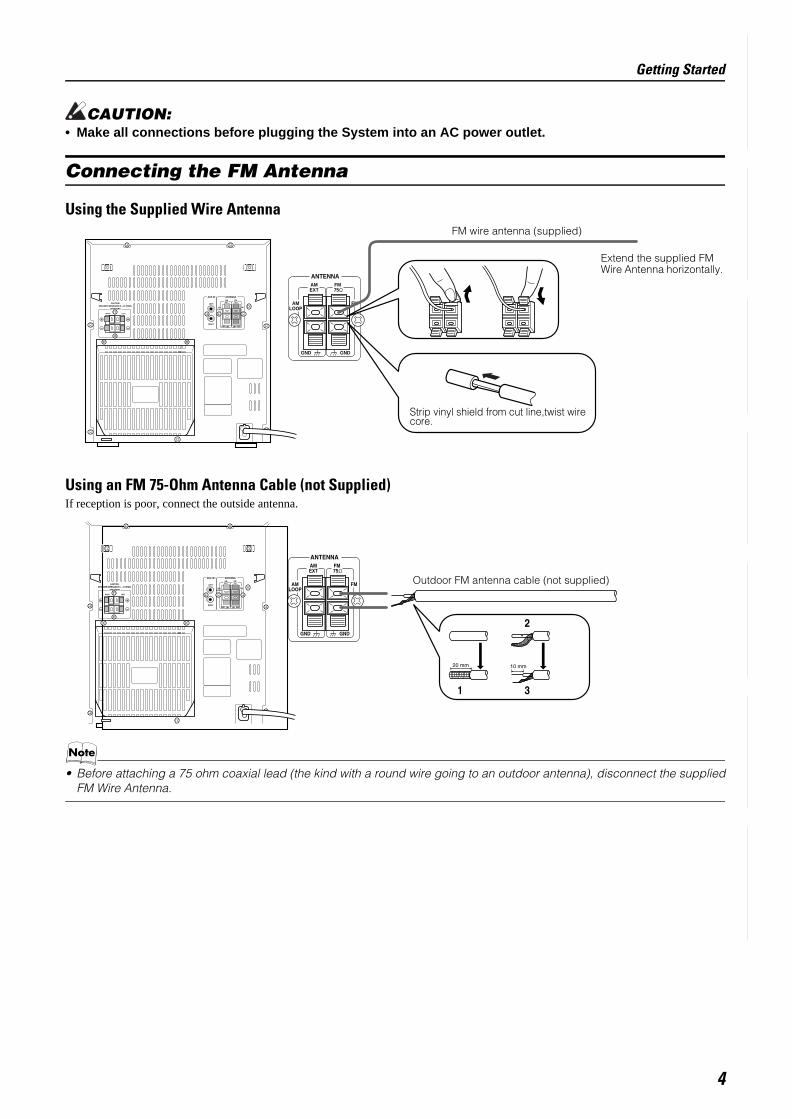
Connecting the FM Antenna
Using the Supplied Wire Antenna
Using an FM 75-Ohm Antenna Cable (not Supplied)If reception is poor, connect the outside antenna.
• Before attaching a 75 ohm coaxial lead (the kind with a round wire going to an outdoor antenna), disconnect the suppliedFM Wire Antenna.
ANTENNA
AMLOOP
FM
AMEXT
FM75
GND GND
RIGHT
LEFT
AUX IN ANTENNA
AMLOOP
FM
AMEXT
FM75
GND GND
LEFT
CAUTION:SPEAKER IMPEDANCE 6 16 OHMS.
SPEAKERS
RIGHT
FM wire antenna (supplied)
Extend the supplied FM Wire Antenna horizontally.
Strip vinyl shield from cut line,twist wire core.
Outdoor FM antenna cable (not supplied)
MX-K1(J).book Page 4 Wednesday, January 31, 2001 2:44 PM

5
Getting Started
Eng
lish
Eng
lish
Eng
lish
Eng
lish
Eng
lish
Eng
lish
Eng
lish
Connecting the AM Antenna
Rear Panel of the Unit
• Even when connecting an outside AM antenna, keep the indoor AM loop connected.
CAUTIONS:• To avoid noise, keep antennas away from the System, the connecting cord and the AC power cord.• Use speakers with the correct impedance only. The correct impedance is indicated on the rear panel.
Connecting the Speakers1. Open each of the terminals to connect the speaker wire leads.2. Connect the speaker cords between the Speaker terminals of the Unit and the terminals of the Speakers.
Connect the red (+) and black (–) terminals of the right side speaker to the red (+) and black (–) terminals marked RIGHT on the System.Connect the red (+) and black (–) terminals of the left side speaker to the red (+) and black (–) terminals marked LEFT on the System.
3. Close each of the terminals to securely connect the cords.
CAUTION:• A TV may display irregular colors if located near the speakers. If this happens, set the speakers away
from the TV.
ANTENNA
AMLOOP
FM
AMEXT
FM75
GND GND
RIGHT
LEFT
AUX IN ANTENNA
AMLOOP
FM
AMEXT
FM75
GND GND
LEFT
CAUTION:SPEAKER IMPEDANCE 6 16 OHMS.
SPEAKERS
RIGHT
AM loop antenna (Supplied)
Turn the loop until you have the best reception.
Attach the AM loop to its base by snapping the tabs on the loop into the slot in the base.
AM antenna wire (not supplied) If reception is poor, connect the outside antenna.
LEFT
CAUTION:SPEAKER IMPEDANCE 6 16 OHMS.
SPEAKERS
RIGHT
Right side (rear view) Left side (rear view)
BlackBlack
Red Red
MX-K1(J).book Page 5 Wednesday, January 31, 2001 2:44 PM

6
Getting Started
English
English
English
English
English
English
EnglishConnecting External Equipment
Connect a signal cord (not supplied) between the System’s AUX-IN terminals and the output terminals of the external MD recorder, tapedeck, etc.You can then listen to the external source through the System.
Connecting to the Wall OutletPlug the AC power cord into the wall outlet.Now, your System is at your command!
DEMO ModeWhen the System is connected to the wall outlet, a DEMO mode displaying some of the system’s features automatically starts.
To turn the DEMO display off, press any of the operation buttons. The DEMO display automatically stops.To turn the DEMO display on, press the DEMO button on the Unit for more than 2 seconds.
• The DEMO display will automatically turn on again if no button operation is made for 2minutes. To cancel this auto DEMOdisplay function, press the CANCEL button on the Unit during DEMO display.
COMPU PlayJVC’s COMPU PLAY feature lets you control the most frequently used System functions with a single touch.With One Touch Operation you can play a CD, a tape, turn on the radio, or listen to an external equipment with a single press of the playbutton for that function. One Touch Operation turns the power on for you, then starts the function you have specified. If the System is notready (no CD or tape in place), the System still powers on so you can insert a CD or tape.How One Touch Operation works in each case is explained in the section dealing with that function.The COMPU PLAY buttons are:
On the UnitCD 6 buttonFM/AM buttonTAPE 3 buttonAUX buttonCD1, CD2 and CD 3 buttonsCD Open/Close 0 button
On the Remote ControlCD 6 buttonFM/AM buttonTAPE 3 buttonAUX buttonCD1, CD2 and CD 3 buttons
RIGHT
LEFT
AUX INSignal cord (not supplied)
Pin-plug x 2Pin-plug x 2
MD recorder, tape deck, etc. (not supplied)
CANCEL
/ DEMO (For 2 seconds)
MX-K1(J).book Page 6 Wednesday, January 31, 2001 2:44 PM

7
Eng
lish
Eng
lish
Eng
lish
Eng
lish
Eng
lish
Eng
lish
Eng
lish
Basic Operations)
Turning the Power On and Off
Turning the System On
1 Press the %_ button.
The display comes on and “WELCOME” is displayed once.The STANDBY indicator goes out.The System comes on ready to continue in the mode it was inwhen the power was last turned off.• For example, if the last thing you were doing was listening
to a CD, you are now ready to listen to a CD again. If youwish, you can change to another source.
• If you were listening to the Tuner last, the Tuner comes onplaying the station it was last set to.
Turning the System Off
1 Press the % button again.
“GOOD BYE” is displayed and the display goes out, exceptfor the clock display. The STANDBY indicator lights up. (Thedisplay is dimmed.)• Some power is always consumed even though power is
turned off (called Standby mode).
• To switch off the System completely, unplug the AC powercord from the wall outlet. When you unplug the AC powercord, the clock will be reset to AM 12:00 immediately.
Adjusting the VolumeTurn the VOLUME control on the Unit clockwise to increase thevolume or turn it counterclockwise to decrease the volume.Press the VOLUME + button on the Remote Control to increasethe volume or press the VOLUME – button to decrease the vol-ume.
You can set the volume level to MIN, 1-31, or MAX.
CAUTION:• DO NOT turn on the System and/or start playing
any source without first setting the VOLUMEcontrol to minimum, as a sudden blast of soundcould damage your hearing, speakers and/orheadphones.
For private listeningConnect a pair of headphones to the PHONES jack. No soundcomes out of the speakers.Be sure to turn down the volume before connecting or putting onheadphones.
RM-SMXK3A REMOTE CONTROL
1 2 3
4 5 6
7 8 9
10 +10 FM MODE FM /AM
AUX
SLEEP
STANDBY/ON
CD1 CD2 CD3 CD
SOUNDMODE
ACTIVEBASS EX.
FADEMUTING
VOLUME
1
1
PROGRAM/RANDOM REPEAT TAPE A/B TAPE
1 1
1 1 1
1
1
1
COMPU PLAYCONTROL
SOUND MODE
ACTIVE BASS EX.
VOLUME +,–
FADE MUTING
Numeric keys
%ACTIVE
BASS EX.
COMPACT COMPONENT SYSTEM
STANDBY/ONSTANDBY
PHONES
REPEAT PROGRAM RANDOM /STOP REC START DUBBINGREC START CD
CLOCK/TIMER
TAPEA/B
DISC SKIP
EJECT
PLAYA REC/PLAY B
CD CONTROL
CD
1
AU
X
FM
/AM
CD
TAP
E
CD
2
CD
3
SOUNDMODE
CD-R/RW PLAYBACK
VCD NUMBERRETURNPBC
MAXMIN
MIC MICVOL
CANCEL SET
1 BIT DUAL D/ACONVERTER
PRESET
TUNNIG
/ DEMO
COMPU PLAY CONTROL
ACTIVE BASS EXTENSION
FULL - LOGIC CONTROL CD SYNCHRO RECORDING
EJECT
RO
CK
CLASSIC
POP
VOLUME
3-CDPLAY & EXCHANGE
Display
STANDBY indicator
PHONES
ACTIVE BASS EX
%
SOUND MODE
VOLUME
* When the System is in use, the display shows other items as well.For simplicity, we show here only the items described in this section.
BASSS.MODE
BASS indicatorSound Mode indicator
Various information
Level bar Status bar (Indicates various statuses.)
STANDBY STANDBY/ON STANDBY/ON
or
STANDBY STANDBY/ON STANDBY/ON
or
MX-K1(J).book Page 7 Wednesday, January 31, 2001 2:44 PM
8
Basic Operations
English
English
English
English
English
English
EnglishFade-out Muting (FADE MUTING)
You can mute the output with one touch operation.
To mute the output , press the FADE MUTING button on theRemote Control. The output is faded out.To release muting , press the FADE MUTING button onceagain. The output is faded in to the previous level.• After Fade-out Muting, turning the VOLUME control on the
unit or pressing the VOLUME button on the Remote Controlwill increase the volume from MIN. setting.
Reinforcing the Bass Sound(ACTIVE BASS EX.)The richness and fullness of the bass sound is maintained regard-less of how low you set the volume.You can use this effect only for playback.
To get the effect , press the ACTIVE BASS EX. (Extension)button.The “BASS” indicator lights up and “ACTIVE BASS EXTEN-SION” appears on the display.To cancel the effect , press the button again.The “BASS” indicator goes out and “OFF” appears on the display.
Selecting the Sound Mode(SOUND MODE)You can select one of 3 SEA (Sound Effect Amplifier) modes.You can use this effect only for playback.
On the UnitTo get the effect , press one of the Sound Mode buttons, ROCK,POP, or CLASSIC.The selected Sound Mode name “ROCK”, “POP”, or “CLASSIC”appears on the display. The “S.MODE” indicator also lights up onthe display.To cancel the effect , press the currently selected mode buttonagain.When the effect is canceled, the “S.MODE” indicator goes out. For example, if the current Sound Mode is ROCK, press theROCK button again. “FLAT” appears on the display, showing thatno sound effect is applied.
ROCK Boosts low and high frequencies. Good foracoustic music.
POP Good for vocal music.CLASSIC Set for wide and dynamic sound stereo
systems.FLAT No sound effect applies.
On the Remote ControlPress the SOUND MODE button until Sound Mode you want ap-pears on the display.The “S.MODE” indicator lights up on the display.Each time you press the button, the Sound Mode changes as fol-lows:
ROCK = POP = CLASSIC = FLAT = (back to the beginning)
To cancel the effect, press the SOUND MODE button until“FLAT” appears on the display.The “S.MODE” indicator goes out.
Entering the Number with theRemote Control (Numeric Keys)You will use the number keys on the Remote Control to enter num-bers for presetting stations, recalling the preset stations, or pro-gramming the playing tracks on CDs.How to enter the number with the number keys is explained here.
Examples:• To enter number 5, press 5.• To enter number 15, press +10, then 5.• To enter number 20, press +10, then 10.• To enter number 25, press +10, +10, then 5.
MX-K1(J).book Page 8 Wednesday, January 31, 2001 2:44 PM

9
Eng
lish
Eng
lish
Eng
lish
Eng
lish
Eng
lish
Eng
lish
Eng
lish
Using the Tuner
You can listen to FM and AM stations. Stations can be tuned inmanually, automatically, or from preset memory storage.
Before listening to the radio:• Make sure that both the FM and AM antennas are correctly
connected. (See pages 4 and 5).
One Touch RadioJust press the FM/AM button to turn on the System and start play-ing the station you were last tuned to.
You can switch from any other sound source to the radio bypressing the FM/AM button.
Tuning In a Station
1 Press the FM/AM button.The Band and Frequency you were last tuned to appear on thedisplay.(If the last station was selected using the preset number, thepreset number appears first.)Each time you press the button, the band alternates betweenFM and AM.
2 Select a station using one of the followingmethods.
• Manual TuningBriefly press the 22 or ¡ button on the Unit to movefrom frequency to frequency until you find the station youwant.
OR• Auto Tuning
If you hold down the 22 or ¡ button on the Unit for 0.5second or more and then release it, the frequency changesdown, or up, automatically until a station is found.
OR• Preset Tuning (Possible only after presetting sta-
tions)Preset tuning using the Unit:Select the preset number you want, using the 4 or ¢button.
Example:Press the ¢ button until the preset number “P-12” appearson the display. After 2 seconds, the display will show thepreset number’s band and frequency.
Preset tuning using the Remote Control:Enter the preset number you want to recall using the numer-ic keys. See “Entering the Number with the Remote Con-trol” on page 8.
Example:Press +10, then 2 to recall the preset number 12. After 2 sec-onds, the display will show the preset number’s band andfrequency.
RM-SMXK3A REMOTE CONTROL
1 2 3
4 5 6
7 8 9
10 +10 FM MODE FM /AM
AUX
SLEEP
STANDBY/ON
CD1 CD2 CD3 CD
SOUNDMODE
ACTIVEBASS EX.
FADEMUTING
VOLUME
1
1
PROGRAM/RANDOM REPEAT TAPE A/B TAPE
1 1
1 1 1
1
1
1
COMPU PLAYCONTROL
FM MODE
Numeric keys
ACTIVEBASS EX.
COMPACT COMPONENT SYSTEM
STANDBY/ONSTANDBY
PHONES
REPEAT PROGRAM RANDOM /STOP REC START DUBBINGREC START CD
CLOCK/TIMER
TAPEA/B
DISC SKIP
EJECT
PLAYA REC/PLAY B
CD CONTROL
CD
1
AU
X
FM
/AM
CD
TAP
E
CD
2
CD
3
SOUNDMODE
CD-R/RW PLAYBACK
VCD NUMBERRETURNPBC
MAXMIN
MIC MICVOL
CANCEL SET
1 BIT DUAL D/ACONVERTER
PRESET
TUNNIG
/ DEMO
COMPU PLAY CONTROL
ACTIVE BASS EXTENSION
FULL - LOGIC CONTROL CD SYNCHRO RECORDING
EJECT
RO
CK
CLASSIC
POP
VOLUME
3-CDPLAY & EXCHANGE
SET
¡
* When the System is in use, the display shows other items as well.For simplicity, we show here only the items described in this section.
kHz MHz
MONOST
1
Band display, Frequency display, Preset channel
FM mode indicators
FM/AM
FM/AM
22
¢
4
FM
/AM
FM /AM
(on the Unit) (on the Remote Control)
or
PRESET
kHz MHz
or (After 2 seconds)
MX-K1(J).book Page 9 Wednesday, January 31, 2001 2:44 PM

10
Using the Tuner
English
English
English
English
English
English
English
• In AM broadcast, reception sensitivity will be changed byturning the AM loop antenna. Turn the AM loop antennafor best reception.
Presetting StationsYou can preset up to 30 FM stations and up to 15 AM stations.
• Preset numbers may have been set to factory test fre-quencies prior to shipment. This is not a malfunction. Youcan preset the stations you want into memory by followingone of the presetting methods below.
• During presetting stations, if no button operation is madefor 5 seconds, the display returns to the band/frequencydisplay. In this case, repeat steps from the beginning.
Using the Unit
1 Select a band by pressing the FM/AM button.
2 Press the 22 or ¡ button to tune in astation.
3 Press the SET button.“SET” will blink for 5 seconds.
4 Press the 4 or ¢ button to select thepreset number.¢: Increases the preset number by 1. 4: Decreases the preset number by 1.
5 Press the SET button.“STORED” appears and, after 2 seconds, the display returns tothe band/frequency display.
6 Repeat above steps 1 to 5 for each stationyou want to store in memory with a presetnumber.
To change the preset stations , repeat the same steps asabove.
• In step 4, you can select the preset number using the nu-meric keys on the Remote Control. See “Entering theNumber with the Remote Control” on page 8.
CAUTION:• Even if the System is unplugged or if the power
failure occurs, the preset stations will be storedfor a few days. However, in case the preset sta-tions are erased, you will need to preset the sta-tions again.
To Change the FM ReceptionModeWhen you are tuned in to an FM stereo broadcast, the “ST (Ster-eo)” indicator lights up and you can hear stereo effects.If an FM stereo broadcast is hard to receive or noisy, you can selectMonaural mode. Reception improves, but you lose stereo effect.
Press the FM MODE button on the Remote Control sothat the “MONO” indicator lights up on the display.
To restore the stereo effect , press the FM MODE button onthe Remote Control so that the “MONO” indicator goes off.
SET SET
FM
/AM TUNNIG
or
FM=30, AM=15
When changing the Band
FM MODE
ST MONO
MX-K1(J).book Page 10 Wednesday, January 31, 2001 2:44 PM
11
Eng
lish
Eng
lish
Eng
lish
Eng
lish
Eng
lish
Eng
lish
Eng
lish
Using the CD Player)
The CD Player has the rotational disc tray that can accommodate3 CDs.You can use Normal, Program, Random, or Repeat Play.
Here are the basic things you need to know to play CDs and locatethe different tracks on them.
About the Disc Indicator
The Disc indicator consists of the following three kinds of indica-tors:
RM-SMXK3A REMOTE CONTROL
1 2 3
4 5 6
7 8 9
10 +10 FM MODE FM /AM
AUX
SLEEP
STANDBY/ON
CD1 CD2 CD3 CD
SOUNDMODE
ACTIVEBASS EX.
FADEMUTING
VOLUME
1
1
PROGRAM/RANDOM REPEAT TAPE A/B TAPE
1 1
1 1 1
1
1
1
COMPU PLAYCONTROL
CD 6
Numeric keys
ACTIVEBASS EX.
COMPACT COMPONENT SYSTEM
STANDBY/ONSTANDBY
PHONES
REPEAT PROGRAM RANDOM /STOP REC START DUBBINGREC START CD
CLOCK/TIMER
TAPEA/B
DISC SKIP
EJECT
PLAYA REC/PLAY B
CD CONTROL
CD
1
AU
X
FM
/AM
CD
TAP
E
CD
2
CD
3
SOUNDMODE
CD-R/RW PLAYBACK
VCD NUMBERRETURNPBC
MAXMIN
MIC MICVOL
CANCEL SET
1 BIT DUAL D/ACONVERTER
PRESET
TUNNIG
/ DEMO
COMPU PLAY CONTROL
ACTIVE BASS EXTENSION
FULL - LOGIC CONTROL CD SYNCHRO RECORDING
EJECT
RO
CK
CLASSIC
POP
VOLUME
3-CDPLAY & EXCHANGE
SET
¡
* When the System is in use, the display shows other items as well.For simplicity, we show here only the items described in this section.
PRGM REPEATRANDOM ALL1CD
1 2 3
Track number, Playing time, Program number, etc.
Play mode indicator
CD1-CD3
CANCEL
22
¢4
PROGRAM/RANDOM
4
REPEAT¢
7
7
DISC SKIPCD Open/Close 0
CD1-CD3
CD 6
Disc indicators
Repeat indicator
Normal Play: Can continuously play all the tracks on allthe CDs.
Program Play: Can play all the programmed tracks on allthe CDs in the programmed order.
Random Play: Can play all the tracks on all the CDs in ran-dom order.
Repeat Play: Can repeat all the tracks on all the CDs, thetracks on one of the CDs, or just one oftracks on one CD.
Disc Number indicator: Lights all the time.Selected Disc indicator: Lights for the currently selected
disc number. Even if no disc isloaded for the selected discnumber, the indicator lights up.
1Selected Disc indicator
Disc Number indicator
Disc Rotation indicator
Disc Rotation indicator: Runs when the selected CD isplaying or paused. This indicatorgoes out if a CD is not loaded forthe selected disc number. Oncethe tray is ejected, the Disc Rota-tion indicators for all disc num-bers are lit. Then, when the emptydisc number is selected with theCD1-CD3 button or DISC SKIPbutton, the Disc Rotation indica-tor for the disc number goes out.
MX-K1(J).book Page 11 Wednesday, January 31, 2001 2:44 PM
12
Using the CD Player
English
English
English
English
English
English
EnglishExample of indication:
One Touch PlayThe power comes on, and operations are done automatically.
By pressing the CD 6 button, the System will come on, and ifa CD is loaded for the disc number that was lastly selected, itwill start playing from the first track.
By pressing the CD1-CD3 button, the System will come on, andif a CD is already loaded for the selected disc number, it willstart play from the first track.• If no CD is loaded for the selected disc number, the next disc
number will be automatically selected.
To Load CDs
1 Press the CD Open/Close 0 button on theUnit to open the tray.
2 Place a CD, with its label side up, onto thetray.Be sure that the CD is securely seated on the disc tray.
3 Press the DISC SKIP button on the Unit andplace the next CD.When you press the button, the tray turns for the next CD.
4 Repeat step 3 for the last CD.
5 Press the CD Open/Close 0 button on theUnit.The tray is closed.
When you use an 8 cm (3'') CD, place it on the inner circle of thetray.
You can load CDs while listening to the other source.
When power is turned off with the tray opened, the tray is auto-matically closed.
If the CD cannot be read correctly (because it is scratched, forexample), “ 0 0:00” appears on the display.
To Unload CDsTake out the CD as shown below.
1 Press the CD Open/Close 0 button on theUnit to open the tray.
2 Remove the CD, then press the DISC SKIPbutton on the Unit.The tray turns for the next CD.
3 Repeat step 2 to remove all the CDs.
4 Press the CD Open/Close 0 button on theUnit to close the tray.
You can remove CDs while listening to the other source.
1 2 3 1 2 3
When CD door has ejected once and then CD-1 is pressed. (DISC1 is selected)
Shows that this disc number is selected.
When DISC2 is selected
Shows that this disc number is selected.CD-2 is pressed.
Disc loaded
Disc 2 is just unloaded
Disc loaded Disc loaded Disc loaded
No disc
With the label side up
MX-K1(J).book Page 12 Wednesday, January 31, 2001 2:44 PM

13
Using the CD Player
Eng
lish
Eng
lish
Eng
lish
Eng
lish
Eng
lish
Eng
lish
Eng
lish
Basics of Using the CD Player-Normal Play
To Play CDs
1 Load CDs.
2 Press one of the Disc button (CD1-CD3) youwant to play.The selected disc number (e.g. “CD-1” ) appears on the dis-play.The first track of the selected CD begins playing. When thefirst CD finishes playing, the next and the third CDs are con-tinuously played back.When the last CD has finished playing, the CD Player auto-matically stops.
Examples:CD1 = CD2 = CD3 = (stop)CD2 = CD3 = CD1 = (stop)
You can start to play the currently selected disc by simply press-ing the CD 6 button.
While playing the CD, the following will appear on the display.
• When the Disc button (CD1-CD3) is pressed with the trayopened, the tray is closed and the selected CD automaticallybegins playing.
To stop playing the CD , press the 7 button. The following in-formation for the CD is displayed.
To stop playing and remove the CD , press the CD Open/Close 0 button on the Unit.To pause , press the CD 6 button. The playing time indicationblinks on the display.To cancel pause , press the CD 6 button again. Play continuesfrom the point where it was paused.
Tips: Playing back the CD using the DISC SKIP buttonYou can also play the CDs using the DISC SKIP button. Each timeyou press the button, the next CD is automatically played back. Ifthe next disc tray is empty, the disc tray is automatically skipped.Once the presence of CDs is detected, the empty disc tray is auto-matically skipped from the next time.
To Select a TrackDuring playback (using the 4 or ¢ button):Briefly press the 4 or ¢ button to select the track you want toplay.By pressing the button, you can skip to the next track or skip backto the previous track. • The selected track starts playing.• Press the ¢ button once to skip to the beginning of the next
track.• Press the 4 button to skip to the beginning of the current
track. Press twice quickly to skip to the beginning of the previ-ous track.
In Stop mode (using the 4 or ¢ button):By briefly pressing the 4 or ¢ button, the CD Player operatesin the same way as during playback, except the following points.• The buttons are effective only for the currently selected CD.
Using the numeric keys on the Remote Control:Using the numeric keys, you can directly select the track on thecurrently selected CD.• The selected track starts playing.For example, press +10, then 5 to play back the track number 15.See “Entering the Number with the Remote Control” on page 8.
Search PlayHolding down the following buttons, during playback, will fastforward/backwards the CD so you can quickly find a particularpassage in the track you are listening to. • 22 or ¡ button on the Unit• 4 or ¢ button on the Remote Control
1 2 3
Track number Elapsed playing time
CD is playing.
1 2 3
1 2 3
Total track number Total playing time
Track number Playing time
After 5 seconds
MX-K1(J).book Page 13 Wednesday, January 31, 2001 2:44 PM
14
Using the CD Player
English
English
English
English
English
English
EnglishProgramming the Playing Order
of the TracksYou can program the playing order of the tracks on all the CDs.Note that you can only make a program when the CD Player isstopped.
You can program up to 32 tracks in any desired order includingthe same tracks.
To Make a Program
1 Load CDs
2 In Stop mode, set the CD Player in ProgramPlay mode.
On the UnitPress the PROGRAM button to light the “PRGM” indicator on thedisplay.At the same time, “PROGRAM” appears on the display. On the Remote ControlPress the PROGRAM/RANDOM button until “PROGRAM” ap-pears on the display. The “PRGM” indicator also lights up on the display.Each time you press the button, the display changes as follows:PROGRAM = RANDOM = Blank display (Normal Play) =(back to the beginning)• If a program is already made, the last step of the program will
be displayed.
3 Press one of the Disc button (CD1-CD3) toselect the CD you want to program.The display will change to the Program Entry display.
4 Select the track you want to program.Using the UnitPress the 4 or ¢ button to select the track, then press the SETbutton within 5 seconds.The program order number will be assigned from P-1.
Using the Remote ControlPress the numeric keys to directly enter the track number. Then,the program order number will be assigned from P-1.• To delete the current program step, press the CANCEL button
on the Unit.
5 Repeat steps 3 and 4 to program other trackson the same CD or the other CD.
6 To play the program, Press the CD 6 but-ton. For details, see “To Play the Program You Have Made” men-tioned below.
To delete all the tracks in the program , while the CD Playeris stopped, press the 7 button. Turing off the System will also de-lete them.To Modify the Program , while the CD Player is stopped, pressthe CANCEL button, the last track in the program is deleted. Toadd new tracks to the end of the program, repeat above steps 3 and4.
• If you try to program a track number that does not existson the CD, your entry will be ignored.
• If you try to program the 33rd track, “FULL” appears onthe display.
To Play the Program You Have MadePress the CD 6 button.The System plays the tracks in the order you have programmedthem.• To use Repeat Play for Program Play, press the REPEAT but-
ton to select “ALL” or “1” before starting playback. For details,see “Repeating Tracks” on page 15.
You can skip to a particular program track by pressing the 4
or ¢ button during Program Play.
To stop playing, press the 7 button once. If you press the 7 but-ton, while the CD Player is stopped, the program is deleted.
To Exit and Re-enter Program PlayThe program you have made is stored in memory. So, you can exitProgram Play temporarily or re-enter Program Play unless you de-lete the program.To exit the program mode once , while the CD Player isstopped, press the PROGRAM button on the Unit or the PRO-GRAM/RANDOM button on the Remote Control to light off the“PRGM” indicator.To re-enter Program Play mode , press the same button untilthe “PRGM” indicator lights up again.
CD
1
CD1
Disc number Track number
or
PRESET
SET
Disc number Track number
Program order number
or
MX-K1(J).book Page 14 Wednesday, January 31, 2001 2:44 PM

15
Using the CD Player
Eng
lish
Eng
lish
Eng
lish
Eng
lish
Eng
lish
Eng
lish
Eng
lish
Random PlayThe tracks of all the CDs will play in no special order when youuse this mode.• To use Repeat Play for Random Play, press the REPEAT but-
ton to select “ALL” or “1” before starting playback. For details,see “Repeating Tracks”mentioned below.
1 In Stop mode, set the CD Player in RandomPlay mode.
On the UnitPress the RANDOM button to light the “RANDOM” indicator. At the same time, “RANDOM” appears on the display.On the Remote ControlPress the PROGRAM/RANDOM button until the “RANDOM”appears on the display. The “RANDOM” indicator also lights up on the display.Each time you press the button, the display changes as follows:PROGRAM = RANDOM = Blank display (Normal Play) =(back to the beginning)
2 Press the CD 6 button.The tracks on all the CDs are played in random order.
• In “99RANDOM” display, 99 changes between 01 and 99,which shows the serial number of the tracks for Random Play.
To stop playing , press the 7 button.To skip a track during playback , press the ¢ button tojump to the next track in the random sequence.To exit Random Play mode , while the CD Player is stopped,press the RANDOM button on the Unit or the PROGRAM/RAN-DOM button on the Remote Control again to light off the “RAN-DOM” indicator. Normal Play resumes.
Repeating TracksYou can repeat all tracks or individual track, as many times as youlike.Press the REPEAT button.The Repeat indicator changes with each press of the button, as fol-lows:ALL= 1CD = 1 = Blank display = (back to the beginning)
To stop playing , press the 7 button. Opening the tray by press-ing the CD Open/Close 0 button on the Unit or changing thesource to the other (e.g. Tuner) will also stop playing.To exit Repeat mode , press the REPEAT button until the Re-peat indicator on the display goes out.
Repeat mode remains in effect during the following Play Modechanging:
Tray Lock FunctionIn order to safely keep the CD in the CD Player, the tray can beelectronically locked. When the electronic lock is on, the tray cannot be opened even ifthe CD Open/Close 0 button on the Unit is pressed.
Locking the Tray
1 Turn on the System and enter CD mode.
2 While pressing down the 7 button, press theCD Open/Close 0 button on the Unit.“LOCKED” appears on the display.
• If you try to open the tray by pressing the 0 button,“LOCKED” appears on the display to let you know that the trayhas been locked.
Unlocking the TrayRepeat above steps 1 and 2.“UNLOCKED” appears on the display.
Now, you can use the tray normally.
REPEAT ALL: In Normal Play mode, repeats all the tracks onall the CDs.In Program Play mode, repeats all the tracks inthe program.In Random Play mode, repeats all the tracks onall the CDs in random order.
REPEAT 1CD: Repeats all tracks on one CD. (Selectable inNormal Play only)
REPEAT 1: Repeats one track.
a. PROGRAM PLAY MODEÔNORMAL PLAY MODEb. RANDOM PLAY MODE ÔNORMAL PLAY MODEc. PROGRAM PLAY MODEÔRANDOM PLAY MODE
MX-K1(J).book Page 15 Wednesday, January 31, 2001 2:44 PM

16
English
English
English
English
English
English
English
Using the Cassette Deck (Listening to a Tape)
The Cassette Deck allows you to play, record, and dub audio tapes.
Listening to type I tape is suitable for this Cassette Deck.
The use of tapes longer than 120 minutes is not rec-ommended, since characteristic deterioration mayoccur and these tapes easily jam in the pinch-rollersand the capstans.
One Touch PlayBy pressing the TAPE 3 button, the System will come on, and ifa tape is in the deck, it will start to play. If no tape is loaded, “NOTAPE” appears on the display, the System will come on and waitfor you to insert a tape, or select another function.
Playing a TapeYou can use either Deck A or Deck B at a time for playback.
1 Press the 0 EJECT part for the deck youwant to use.
2 When the cassette holder opens, put a cas-sette in, with the exposed part of the tapedown, toward the base of the Unit.The tape will travel from the left to right.
• If the cassette holder does not open, turn the System off,then back on and press the 0 EJECT part again.
3 Close the cassette holder gently.When both Deck A and Deck B contain a tape, the last deck tohave a tape inserted is selected. The selected Deck is shown by the Deck indicator “A” or “B”.For example, when the Deck A is selected, the Deck indicator“A” lights up.• To change the deck, press the TAPE A/B button. Each time
you press the button, Deck A or Deck B is alternatelyselected.
4 Press the TAPE 3 button.The Tape indicator (3) blinks on the display and the tape isplayed back. The Cassette Deck automatically stops when one side of thetape has finished playing.
To stop playing , press the 7 button.To remove the tape , stop the tape, and press the 0 EJECT partto open the Cassette Holder.
To Fast-Wind A TapeDuring playback or in Stop mode, press the ¡ (FF) button tofast-wind the tape onto the right side of the cassette without play-ing.During playback or in Stop mode, press the 22 (REW) button tofast-wind the tape onto the left side of the cassette without playing.During fast-winding the tape, the Tape indicator (3) goes out.• The Cassette Deck automatically stops when one side of the
tape has finished playing.
RM-SMXK3A REMOTE CONTROL
1 2 3
4 5 6
7 8 9
10 +10 FM MODE FM /AM
AUX
SLEEP
STANDBY/ON
CD1 CD2 CD3 CD
SOUNDMODE
ACTIVEBASS EX.
FADEMUTING
VOLUME
1
1
PROGRAM/RANDOM REPEAT TAPE A/B TAPE
1 1
1 1 1
1
1
1
COMPU PLAYCONTROL
TAPE A/B
ACTIVEBASS EX.
COMPACT COMPONENT SYSTEM
STANDBY/ONSTANDBY
PHONES
REPEAT PROGRAM RANDOM /STOP REC START DUBBINGREC START CD
CLOCK/TIMER
TAPEA/B
DISC SKIP
EJECT
PLAYA REC/PLAY B
CD CONTROL
CD
1
AU
X
FM
/AM
CD
TAP
E
CD
2
CD
3
SOUNDMODE
CD-R/RW PLAYBACK
VCD NUMBERRETURNPBC
MAXMIN
MIC MICVOL
CANCEL SET
1 BIT DUAL D/ACONVERTER
PRESET
TUNNIG
/ DEMO
COMPU PLAY CONTROL
ACTIVE BASS EXTENSION
FULL - LOGIC CONTROL CD SYNCHRO RECORDING
EJECT
RO
CK
CLASSIC
POP
VOLUME
3-CDPLAY & EXCHANGE
¡
* When the System is in use, the display shows other items as well.For simplicity, we show here only the items described in this section.
BA
22
4
TAPE 3¢
7
7
TAPE A/B
TAPE 3
Deck indicators
3: Tape indicator
0 EJECT (Deck B)
0 EJECT (Deck A)
Tape travelling direction
MX-K1(J).book Page 16 Wednesday, January 31, 2001 2:44 PM

17
Eng
lish
Eng
lish
Eng
lish
Eng
lish
Eng
lish
Eng
lish
Eng
lish
Using the Cassette Deck (Recording)
Recording onto a cassette from any of the sound sources is simple.Just place a tape in Deck B, have the source ready, make one ortwo settings, and you’re ready to record. For each source, the pro-cedure is a little bit different so we explain each separately. Butfirst, here are a few things to make your recordings better.
Things To Know Before You Start Recording It may be unlawful to record or play back copyrighted
material without the consent of the copyright owner. The recording level, which is the volume at which the new tape
is being made, is automatically set correctly, so it is not affectedby the VOLUME Control on the System. Also, it is not affectedby adjusting the sound effects. Thus, during recording, you canadjust the sound you are actually listening to without affectingthe recording level.
Two small tabs on the back of the cassette tape, one for side Aand one for side B, can be removed to prevent accidental erasureor recording.
To record on a cassette with the tabs removed, you must coverthe holes with adhesive tape first.
Type I tape can be used for recording.
• At the start and end of cassette tapes, there is leader tapewhich cannot be recorded onto. Thus, when recordingCDs, radio broadcasts, etc., wind on the leader tape firstto ensure getting the beginning of the recording.
CAUTION:• If a recording you make has excessive noise or
static, the Unit may have been too close to a TVwhich was on during the recording. Either turnoff the TV or increase the distance between theTV and the Unit.
RM-SMXK3A REMOTE CONTROL
1 2 3
4 5 6
7 8 9
10 +10 FM MODE FM /AM
AUX
SLEEP
STANDBY/ON
CD1 CD2 CD3 CD
SOUNDMODE
ACTIVEBASS EX.
FADEMUTING
VOLUME
1
1
PROGRAM/RANDOM REPEAT TAPE A/B TAPE
1 1
1 1 1
1
1
1
COMPU PLAYCONTROL
TAPE A/B
ACTIVEBASS EX.
COMPACT COMPONENT SYSTEM
STANDBY/ONSTANDBY
PHONES
REPEAT PROGRAM RANDOM /STOP REC START DUBBINGREC START CD
CLOCK/TIMER
TAPEA/B
DISC SKIP
EJECT
PLAYA REC/PLAY B
CD CONTROL
CD
1
AU
X
FM
/AM
CD
TAP
E
CD
2
CD
3
SOUNDMODE
CD-R/RW PLAYBACK
VCD NUMBERRETURNPBC
MAXMIN
MIC MICVOL
CANCEL SET
1 BIT DUAL D/ACONVERTER
PRESET
TUNNIG
/ DEMO
COMPU PLAY CONTROL
ACTIVE BASS EXTENSION
FULL - LOGIC CONTROL CD SYNCHRO RECORDING
EJECT
RO
CK
CLASSIC
POP
VOLUME
3-CDPLAY & EXCHANGE
* When the System is in use, the display shows other items as well.For simplicity, we show here only the items described in this section.
RECB
A
4
TAPE 3¢
7
7
TAPE A/B
DUBBING
Deck indicators
3: Tape indicator
0 EJECT (Deck B)
0 EJECT (Deck A)
TAPE 3
PROGRAMREC START/STOP
CD REC START
REC indicator
Adhesive tape
MX-K1(J).book Page 17 Wednesday, January 31, 2001 2:44 PM

18
Using the Cassette Deck (Recording)
English
English
English
English
English
English
EnglishStandard Recording
This is the basic method for recording any source. The System alsohas special ways for recording CD to tape, and tape to tape, whichsave you time and effort, as well as give you some special effects.However, when you need to add a selection to a tape you havemade, or are combining selections from several sources on onetape, use the method described below; just substitute the sourceyou want into this procedure, such as a tape in Deck A, a CD, orthe Tuner. You can also record from an external equipment withthis procedure.
To Record Any Sound Source to TapeFollow these steps to record from any sound source onto a tape inDeck B.
1 Insert a blank or erasable tape into the DeckB and wind past the tape leader.
2 Prepare the source, by, for example, tuningin a radio station, loading CDs, or turning onconnected equipment.• For CD recording, see “CD Synchro Recording” mentioned
below.• For dubbing, see “Tape to Tape Recording (Dubbing)”
described below.
3 Press the REC START/STOP button on theUnit.The “REC” indicator lights up and the System begins record-ing.The Tape indicator (3) blinks on the display. • If the tab of the cassette tape on the Deck B is removed to
prevent erasure or recording, "NO REC" will appear on thedisplay.
To stop during recording , press the REC START/STOP but-ton on the Unit, or press the 7 button.
Recording an AM Station to Tape (Beat Cut)When recording an AM broadcast, beats may be produced whichare not heard when listening to the broadcast. If this happens, pressthe PROGRAM button on the Unit to eliminate the beats.
1 Set to AM station and start recording.
2 Press the PROGRAM button on the Unit toeliminate the beats.Each time you press the button, the display changes as shownbelow:CUT 1= CUT 2 = (back to the beginning)
CD Synchro RecordingEverything on the CD goes onto the tape in the order it is on theCD, or according to the order you have set in a program.
1 Prepare CDs. (See page 12.) Press the CD1-3 button (that you want to make recording), andthen press the 7 button.• If you want to record specific tracks only, you need to pro-
gram the tracks beforehand. (See page 14.)
2 Insert a blank or erasable tape into the DeckB and wind past the tape leader.
3 Press the CD REC START button on the Unit.“CD REC” appears on the display and the “REC” indicatorlights up. Then, the System begins CD Synchro Recording andthe tracks on the CD are recorded on the tape.When recording is finished, “CD REC FINISHED” scrolls onthe display and the CD Player and Cassette Deck stop.
• If the tab of the cassette tape on the Deck B is removed toprevent erasure or recording, "NO REC" will appear on thedisplay.
• After the CD Player has played the entire CD or all the pro-grammed tracks, the tape automatically stops.
To stop at any time during the recording process , pressthe REC START/STOP button on the Unit or the 7 button. “CDREC FINISHED” scrolls on the display and the CD Player andCassette Deck stop.
• When making SLEEP timer settings while doing CD Syn-chro recording, set enough time to allow for the CD to fin-ish playing, otherwise the power will go off beforerecording is completed.
• For CD Synchro Recording using more than one CD, usea blank tape. If you use a prerecorded tape, prerecordedmaterial may not be erased between the tracks wheredisc change is made.
Tape to Tape Recording (DUB-BING)Recording from one tape to another is called dubbing.You can dub tapes simply, with just a single button.
1 Press the TAPE 3333 button, and then press the button.
2 Insert the source cassette you want to copyfrom into Deck A for playback.
3 Insert a blank or erasable cassette you wantto copy onto into Deck B for recording.
4 Press the TAPE DUBBING button on the Unit.Deck A and Deck B will start simultaneously and the "REC"indicator lights up.During dubbing, the Deck indicators "A" and "B" light up al-ternately.• If no tape is inserted into Deck A, "NO TAPE" will appear
on the display.• If no tape is inserted into Deck B, "NO TAPE" will appear
on the display.
To stop dubbing , press the REC START/STOP button on theUnit or the 7 button.
• During dubbing, you can hear sound effects through thespeakers or headphones. However, the sound is dubbedwithout sound effects.
Tape travelling direction
REC STARTCD
(When finished)
MX-K1(J).book Page 18 Wednesday, January 31, 2001 2:44 PM
19
Eng
lish
Eng
lish
Eng
lish
Eng
lish
Eng
lish
Eng
lish
Eng
lish
Using an External Equipment
Listening to the External EquipmentYou can listen to the external equipment such as MD recorder, cas-sette deck, or other auxiliary.
First, make sure that the external equipment is properly connect-ed to the System. (See page 6.)
1 Set the volume level to the minimum posi-tion.
2 Press the AUX button.“AUX” appears on the display.
3 Start playing the external equipment.
4 Adjust the volume level to the level you wantlisten to.
5 Apply sound effects, if you wish.• Press the ACTIVE BASS EX. to reinforce the bass sound.• Select the Sound Mode. (See page 8.)
To exit AUX mode , select other source (e.g. Tuner).
• For operation of the external equipment, refer to its In-structions.
RM-SMXK3A REMOTE CONTROL
1 2 3
4 5 6
7 8 9
10 +10 FM MODE FM /AM
AUX
SLEEP
STANDBY/ON
CD1 CD2 CD3 CD
SOUNDMODE
ACTIVEBASS EX.
FADEMUTING
VOLUME
1
1
PROGRAM/RANDOM REPEAT TAPE A/B TAPE
1 1
1 1 1
1
1
1
COMPU PLAYCONTROL
ACTIVEBASS EX.
COMPACT COMPONENT SYSTEM
STANDBY/ONSTANDBY
PHONES
REPEAT PROGRAM RANDOM /STOP REC START DUBBINGREC START CD
CLOCK/TIMER
TAPEA/B
DISC SKIP
EJECT
PLAYA REC/PLAY B
CD CONTROL
CD
1
AU
X
FM
/AM
CD
TAP
E
CD
2
CD
3
SOUNDMODE
CD-R/RW PLAYBACK
VCD NUMBERRETURNPBC
MAXMIN
MIC MICVOL
CANCEL SET
1 BIT DUAL D/ACONVERTER
PRESET
TUNNIG
/ DEMO
COMPU PLAY CONTROL
ACTIVE BASS EXTENSION
FULL - LOGIC CONTROL CD SYNCHRO RECORDING
EJECT
RO
CK
CLASSIC
POP
VOLUME
3-CDPLAY & EXCHANGE
AUX
AUX
MX-K1(J).book Page 19 Wednesday, January 31, 2001 2:44 PM
20
English
English
English
English
English
English
English
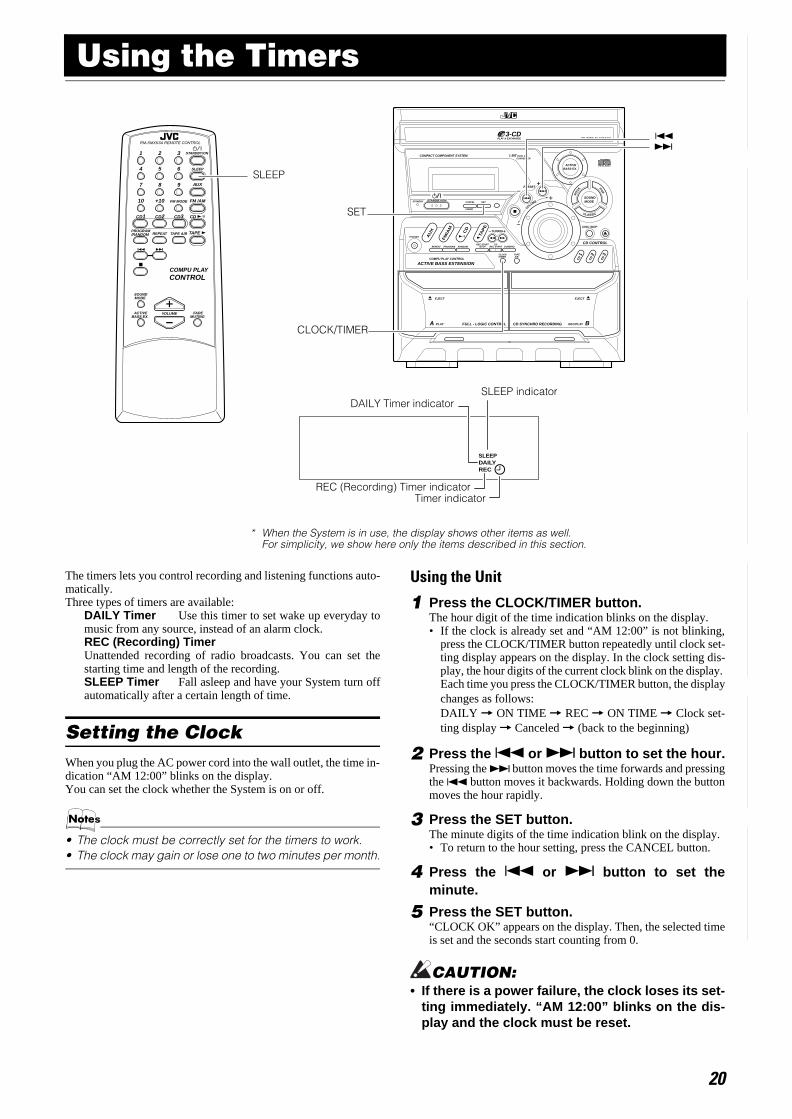
Using the Timers
The timers lets you control recording and listening functions auto-matically. Three types of timers are available:
DAILY Timer Use this timer to set wake up everyday tomusic from any source, instead of an alarm clock. REC (Recording) TimerUnattended recording of radio broadcasts. You can set thestarting time and length of the recording. SLEEP Timer Fall asleep and have your System turn offautomatically after a certain length of time.
Setting the ClockWhen you plug the AC power cord into the wall outlet, the time in-dication “AM 12:00” blinks on the display.You can set the clock whether the System is on or off.
• The clock must be correctly set for the timers to work.• The clock may gain or lose one to two minutes per month.
Using the Unit
1 Press the CLOCK/TIMER button.The hour digit of the time indication blinks on the display.• If the clock is already set and “AM 12:00” is not blinking,
press the CLOCK/TIMER button repeatedly until clock set-ting display appears on the display. In the clock setting dis-play, the hour digits of the current clock blink on the display. Each time you press the CLOCK/TIMER button, the displaychanges as follows:DAILY = ON TIME = REC = ON TIME = Clock set-ting display = Canceled = (back to the beginning)
2 Press the 4 or ¢ button to set the hour.Pressing the ¢ button moves the time forwards and pressingthe 4 button moves it backwards. Holding down the buttonmoves the hour rapidly.
3 Press the SET button.The minute digits of the time indication blink on the display.• To return to the hour setting, press the CANCEL button.
4 Press the 4 or ¢ button to set theminute.
5 Press the SET button.“CLOCK OK” appears on the display. Then, the selected timeis set and the seconds start counting from 0.
CAUTION:• If there is a power failure, the clock loses its set-
ting immediately. “AM 12:00” blinks on the dis-play and the clock must be reset.
RM-SMXK3A REMOTE CONTROL
1 2 3
4 5 6
7 8 9
10 +10 FM MODE FM /AM
AUX
SLEEP
STANDBY/ON
CD1 CD2 CD3 CD
SOUNDMODE
ACTIVEBASS EX.
FADEMUTING
VOLUME
1
1
PROGRAM/RANDOM REPEAT TAPE A/B TAPE
1 1
1 1 1
1
1
1
COMPU PLAYCONTROL
ACTIVEBASS EX.
COMPACT COMPONENT SYSTEM
STANDBY/ONSTANDBY
PHONES
REPEAT PROGRAM RANDOM /STOP REC START DUBBINGREC START CD
CLOCK/TIMER
TAPEA/B
DISC SKIP
EJECT
PLAYA REC/PLAY B
CD CONTROL
CD
1
AU
X
FM
/AM
CD
TAP
E
CD
2
CD
3
SOUNDMODE
CD-R/RW PLAYBACK
VCD NUMBERRETURNPBC
MAXMIN
MIC MICVOL
CANCEL SET
1 BIT DUAL D/ACONVERTER
PRESET
TUNNIG
/ DEMO
COMPU PLAY CONTROL
ACTIVE BASS EXTENSION
FULL - LOGIC CONTROL CD SYNCHRO RECORDING
EJECT
RO
CK
CLASSIC
POP
VOLUME
3-CDPLAY & EXCHANGE
¢
* When the System is in use, the display shows other items as well.For simplicity, we show here only the items described in this section.
SLEEPDAILYREC
4
SLEEP
SET
SLEEP indicator
REC (Recording) Timer indicator
CLOCK/TIMER
DAILY Timer indicator
Timer indicator
MX-K1(J).book Page 20 Wednesday, January 31, 2001 2:44 PM

21
Using the Timers
Eng
lish
Eng
lish
Eng
lish
Eng
lish
Eng
lish
Eng
lish
Eng
lish
Setting the Daily TimerOnce you have set the Daily Timer, the timer will be activated atthe same time every day. The Timer indicator ( ) on the display shows that the Daily Tim-er you have set is in effect.You can set the Daily Timer whether the System is turned on oroff.
• Perform each setting within 30 seconds. Otherwise, set-ting will be cleared and the procedure must be repeatedfrom the beginning.
• If you have made a mistake while setting the timer, pressthe CANCEL button on the Unit. However, this does not al-ways cancel the current setting. If the CANCEL buttondoes not work, press the CLOCK/TIMER button on theUnit repeatedly until the display returns to the original dis-play, and start from the first step.
Using the Unit
1 Press the % button to turn on the System.
2 Press the CLOCK/TIMER button until “ONTIME” immediately after “DAILY” appears onthe display.At this time, “DAILY” indicator blinks and the Timer indica-tor ( ) lights up on the display.Each time you press the button, the display changes as follows:DAILY = ON TIME* = REC = ON TIME = Clock settingdisplay = Canceled = (back to the beginning)
* : This item should be selected for the Daily Timer setting.
After 2 seconds, the System enters ON-time setting mode. The cur-rent ON time appears on the display and the hour digits blink.
3 Setting the ON time (Example: AM 10:15).1. Press the ¢ or 4 button to set the hour you want the
System to come on, then press the SET button. The minute digits of the ON time blink on the display.Pressing the ¢ button moves the time forwards and press-ing the 4 button moves it backwards. Holding down the button moves the time rapidly.
2. Press the ¢ or 4 button to set the minute, then press theSET button.
“OFF TIME” appears for 2 seconds, and the System entersOFF-time setting mode. The current OFF time appears onthe display, and the hour digits blink.
4 Setting the OFF time (Example: PM 1:30).1. Press the ¢ or 4 button to set the hour you want the
System to come on, then press the SET button. The minute digits of the ON time blink on the display.
2. Press the ¢ or 4 button to set the minute, then press theSET button.
The System enter Music Source Selecting mode and “TUN-ER FM” appears on the display.
5 Selecting the music source.Press the ¢ or 4 button to select the music source youwant to listen to, then press the SET button.Each time you press the ¢ or 4 button, the display chang-es as shown below:TUNER FM = TUNER AM = – CD – – – = TAPE = AUX= (back to the beginning)According to the music source you have selected, the next op-eration differs.
DAILY
DAILY
After 2 seconds
DAILY
TUNER FM: Tunes in to the specified preset FM station.TUNER AM: Tunes in to the specified preset AM station.– CD – – –: Plays the specified track on the specified CD.TAPE: Plays a tape in the selected Deck (A or B).AUX: Plays an external source.
DAILY
DAILY
DAILY
After 2 seconds
DAILY
DAILY
DAILY
MX-K1(J).book Page 21 Wednesday, January 31, 2001 2:44 PM

22
Using the Timers
English
English
English
English
English
English
EnglishPreparation for each music source:
Perform the following operation according to the music sourceyou have selected. Then, the System enters Volume Settingmode.• When selecting TUNER FM or TUNER AM:
Press the ¢ or 4 button to select the preset stationnumber, then press the SET button.
• When selecting – CD – – –:
1. Press the ¢ or 4 button to select the disc number, thenpress the SET button.Each time you press the button the disc number changes asfollows:– CD – – – = 1CD – – –= 2CD – – – = 3CD – – – = (backto the beginning)
2. Press the ¢ or 4 button to select the track number, thenpress the SET button.For example: 2CD – 12 (Disc number 2, Track number 12)
• When selecting TAPE:Be sure that the Deck indicator (“A” or “B”) is lit for thetape you want to play.
• When selecting AUX:Prepare the external equipment so that it will turn on at theON time set by the System.To allow this, the equipment should have the timer function.
6 Setting the volume level.Press the ¢ or 4 button to select the volume level.VOL – – – : The current volume level will be used.VOL-5, -10, or -15 : When the timer is turned on, the Volumewill be automatically set to the selected level.
7 Press the SET button.The timer setting is completed, and the “DAILY” indicatorstops blinking and remains lit. Each setting you have made ap-pears on the display in the order of ON time, OFF time, musicsource and volume. Then, the display returns to the display be-fore you set the Timer.
8 Press the %%%% button to turn off the System.The Timer indicator ( ) and “DAILY” indicator are lit on thedisplay, showing that the Daily Timer is set to on.
To change the timer setting , repeat the setting procedure fromthe beginning.
When the timer ON-time comes:The following operation will be automatically repeated every day.• When the timer ON-time comes, and the System automatically
turns on. The music source you have set is played. The Timerindicator ( ) blinks during timer operation.
• When the timer OFF-time comes, “OFF” blinks on the displayjust before the OFF-time and the System automatically turnsoff. Then, the Timer indicator ( ) remains lit on the display.
• If the System is already on when the timer ON-timecomes, the Daily Timer does not work.
Turning the Daily Timer On and Off Once you have set the Daily Timer, it is stored in memory. So, theDaily Timer will be activated at the same time every day until it iscanceled.
To cancel the Daily Timer temporarily:
1 Press the CLOCK/TIMER button on the Unitrepeatedly until the “DAILY” appears on thedisplay.
2 Press the CANCEL button on the Unit.The “DAILY” indicator goes out and “OFF” appears on thedisplay.The Timer indicator ( ) and “DAILY” indicator go out andthe Daily Timer is canceled temporarily.
To activate the cancelled Daily Timer:
1 Press the CLOCK/TIMER button on the Unitrepeatedly until the “DAILY” appears on thedisplay.The “DAILY” indicator also blinks on the dispaly.
2 Press the SET button on the Unit.The “DAILY” indicator remains lit and the Timer indicator( ) light up on the display. Each setting already made ap-pears on the display in the order of ON time, OFF time, musicsource and volume, and then the display returns to the originaldisplay.
CAUTION:• If the System is unplugged, or a power failure oc-
curs, the timer setting will be lost in a few days.You will need to reset the clock first, then thetimer.
Setting the REC (Recording) TimerWith the Recording Timer, you can make a tape of a radio broad-cast automatically whether or not you are home.
• You can set the REC Timer whether the System is on oroff.
• The volume level is automatically set to MIN when RECTimer is used.
• Perform each setting within 35 seconds. Otherwise, set-ting will be cleared and the procedure must be repeatedfrom the beginning.
• If you have made a mistake while setting the timer, pressthe CANCEL button on the Unit. However, this does not al-ways cancel the current setting. If the CANCEL buttondoes not work, press the CLOCK/TIMER button on theUnit repeatedly until the display returns to the original dis-play, and start from the first step.
DAILY
MX-K1(J).book Page 22 Wednesday, January 31, 2001 2:44 PM

23
Using the Timers
Eng
lish
Eng
lish
Eng
lish
Eng
lish
Eng
lish
Eng
lish
Eng
lish
Using the UnitYou can set the time in the same way as for setting the Daily Tim-er.
1 Insert a blank or erasable tape into the DeckB and wind past the tape leader.
2 Press the CLOCK/TIMER button until “ONTIME” immediately after “REC” appears onthe display.Then, the "REC" indicator blinks on the display.Each time you press the button, the display changes as follows:DAILY = ON TIME = REC = ON TIME* = Clock settingdisplay = Canceled = (back to the beginning)
* : This item should be selected for the REC Timer setting.
After 2 seconds, the System enters ON-time setting mode. The cur-rent ON time appears on the display and the hour digits blink.
3 Setting the ON time you want the System toturn on.1. Press the 4 or ¢ button to set the hour, then press the
SET button.
2. Press the 4 or ¢ button to set the minute, then press theSET button.
“OFF TIME” appears for 2 seconds, and the System entersOFF-time setting mode. The current OFF time appears on thedisplay, and the hour digits blink.
4 Setting the OFF time you want the System toturn off.1. Press the 4 or ¢ button to set the hour, then press the
SET button.
2. Press the 4 or ¢ button to set the minute, then press theSET button.
The System enter Preset Station Entering mode.
5 Select the preset station for recording.1. Press the 4 or ¢ button to set the band (TUNER FM or
TUNER AM), then press the SET button.
2. Press the 4 or ¢ button to set the preset number, thenpress the SET button.
The REC indicator stops blinking and remains lit.• Each setting you have made appears on the display in the order
of ON time, OFF time, radio band and the preset number.
6 Press the %%%% button to turn off the System, ifnecessary.
To change the timer setting , repeat the setting procedure fromthe beginning.
When the timer ON-time comes:• When the timer ON-time comes, the System automatically
turns on. The station you have set is played. The Timer indica-tor ( ) blinks during timer operation.To stop timer recording, press the 7 button.
• When the timer OFF-time comes, “OFF” blinks on the displayjust before the OFF-time and the System automatically turnsoff.
• The REC Timer works even if the System is turned on.
Turning the REC (Recording) Timer On and OffOnce you have set the REC Timer to record a source, the timer set-ting is stored in memory. So, though the REC Timer turns off onceit is used, you can recall it at any time.
To cancel the REC Timer temporarily:
1 Press the CLOCK/TIMER button on the Unitrepeatedly until “REC” appears on the dis-play.
2 Press the CANCEL button on the Unit.“OFF” appears and the “REC” indicator goes out.
To activate the cancelled REC Timer:
1 Press the CLOCK/TIMER button on the Unitrepeatedly until “REC” appears on the dis-play. The “REC” indicator also blinks on the display.
2 Press the SET button on the Unit.The “REC” indicator remains lit. Each setting already madeappears on the display in the order of ON time, OFF time, andthe preset number, and then the display returns to the originaldisplay.
CAUTION:• If the System is unplugged, or a power failure oc-
curs, the timer setting will be lost in a few days.You will need to reset the clock first, then thetimer.
REC
REC
After 2 seconds
MX-K1(J).book Page 23 Wednesday, January 31, 2001 2:44 PM

24
Using the Timers
English
English
English
English
English
English
EnglishSetting the SLEEP Timer
Use the Sleep Timer to turn the System off after a certain numberof minutes when it is playing. By setting the Sleep Timer, you canfall asleep to music and know that your System will turn off by it-self rather than play all night.• You can only set the Sleep Timer when the System is on.
Using the Remote Control
1 During playback a source, press the SLEEPbutton.The “SLEEP” indicator starts blinking on the display.
2 Set the length of time you want the source toplay before shutting off.Each time you press the SLEEP button, the time length chang-es as follows:10 = 20 = 30 = 60 = 90 = 120 = Cancelled = (back tothe beginning)
3 Wait for 5 seconds.The “SLEEP” indicator stops blinking and remains lit, and thedisplay returns to the original one before setting the SleepTimer.The System is now set to turn off after the number of minutesyou have set.
To Confirm the Sleep Time:When the SLEEP button on the Remote Control is pressed, the re-maining sleep time is displayed. Wait until the display returns tothe original display.To Cancel the SLEEP Timer Setting:Press the SLEEP button on the Remote Control until the “SLEEP”indicator goes out on the display.• Turning off the System also cancels the SLEEP Timer.
Timer PrioritySince each timer can be set independently, you may wonder whathappens if the settings overlap. Here are the priorities for each tim-er:
The REC Timer always has priority. This means that: • If other timer is set to come on during a time when the REC
Timer is operating, the other timer just won’t come on at all,so you will always get the entire program on a tape.
• If the REC Timer is set to come on while other timer is oper-ating, the other timer will turn off just before the REC Timeris set to turn on, and the REC Timer will then take over.
The SLEEP Timer has the least priority. This means that if theSLEEP Timer is set while DAILY Timer is operating, theSLEEP Timer settings are cancelled. However, if DAILY Timeris set to come on while the SLEEP Timer is operating, theSLEEP Timer setting will be cancelled and the System will usethe settings from the DAILY Timer.
Example 1
Example 2
SLEEP
22:00 22:30 23:00
REC Timer
SLEEP Timer
SettingON OFF
OFF
ON OFF
22:00 22:30
Operation
REC Timer
SLEEP Timer
The REC Timer has priorty.
22:00 22:30 23:0021:30
REC Timer
DAILY Timer
SettingON OFF
OFF
ON OFF
22:3021:30
Operation
REC Timer
DAILY Timer
The REC Timer has priorty.
ON
MX-K1(J).book Page 24 Wednesday, January 31, 2001 2:44 PM

25
Eng
lish
Eng
lish
Eng
lish
Eng
lish
Eng
lish
Eng
lish
Eng
lish
Care And MaintenanceHandle your CDs and tapes carefully, and they will last a longtime.
Compact Discs
CAUTION:• Do not use any solvent (for example, conven-
tional record cleaner, spray thinner, benzine,etc.) to clean a CD.
General Notes
In general, you will have the best performance by keeping yourCDs and the mechanism clean.• Store CDs in their cases, and keep them in cabinets or on
shelves.• Keep the System’s Top Cover closed when not in use.
Moisture Condensation
Cassette Tapes
Cassette Deck• If the heads, capstans, and pinch-rollers of the Cassette Deck
become dirty, the following will occur:- Loss of sound quality- Discontinuous sound- Fading- Incomplete erasure- Difficulty recording
• Clean the heads, capstans, and pinch-rollers using a cottonswab moistened with alcohol.
• If the heads become magnetized, the Unit will produce noise orlose high frequencies.
• To demagnetize the heads, turn off the Unit, and use a headdemagnetizer (available at electronics and record shops).
• Only CDs bearing this mark can be usedwith this System. However, continueduse of irregular shape CDs (heart-shape,octagonal, etc.) can damage the System.
• Remove the CD from its case by holdingit at the edges while pressing the case’scenter hole lightly.
• Do not touch the shiny surface of theCD, or bend the CD.
• Put the CD back in its case after use toprevent warping.
• Be careful not to scratch the surface ofthe CD when placing it back in the case.
• Avoid exposure to direct sunlight, tem-perature extremes, and moisture.
• A dirty CD may not play correctly. If aCD does become dirty, wipe it with asoft cloth in a straight line from center toedge.
Moisture may condense on the lens insidethe System in the following cases:• After turning on heating in the room.• In a damp room.• If the System is brought directly from a
cold to a warm place.Should this occur, the System may mal-function. In this case, leave the Systemturned on for a few hours until the moistureevaporates, unplug the AC power cord, andthen plug it in again.
• If the tape is loose in its cassette, take upthe slack by inserting a pencil in one ofthe reels and rotating.
• If the tape is loose, it may get stretched,cut, or caught in the cassette.
• Do not touch the tape surface.
• Do not store the tape:- In dusty places- In direct sunlight or heat- In moist areas- On a TV or speaker- Near a magnet
Heads
Pinch-rollerCapstan
MX-K1(J).book Page 25 Wednesday, January 31, 2001 2:44 PM

26
English
English
English
English
English
English
English
Troubleshooting• If you are having a problem with your System, check this list for a possible solution before calling for service.• If you cannot solve the problem from the hints given here, or the System has been physically damaged, call a qualified person, such as
your dealer, for service.
Symptom Possible Cause Action
No sound is heard. • Connections are incorrect, or loose.
• Headphones are connected.
• Check all connections and make cor-rections. (See pages 4 to 6.)
• Disconnect the headphones.
Poor radio reception • The antenna is disconnected.• The AM Loop Antenna is too close
to the System.• The FM Wire Antenna is not prop-
erly extended and positioned.
• Reconnect the antenna securely.• Change the position and direction of
the AM Loop Antenna.• Extend FM Wire Antenna to the best
reception position.
The disc tray does not open. • The AC power cord is not plugged in.• Tray is locked.
• Plug the AC power cord.• Unlock the tray. (See page 15)
The CD skips. The CD is dirty or scratched. Clean or replace the CD. (See page 25)
The CD does not play. The CD is upside down. Put the CD in with the label side up.
The cassette holder cannot be opened. During tape playing, the power cordwas unplugged.
Plug in the power cord, and turn on theSystem.
Unable to record. Cassette record protect tabs are re-moved.
Cover holes on back edge of cassettewith tape.
Unable to operate the Remote Control. • The path between the Remote Con-trol and the sensor on the Unit isblocked.
• The batteries have lost their charge.
• Remove the obstruction.
• Replace the batteries.
Operations are disabled. The built-in microprocessor has mal-functioned due to external electrical in-terference.
Unplug the System then plug it back in.
MX-K1(J).book Page 26 Wednesday, January 31, 2001 2:44 PM

27
Eng
lish
Eng
lish
Eng
lish
Eng
lish
Eng
lish
Eng
lish
Eng
lish
Sophisticated electronic products may require occasional service. Just as quality is a keyword in the engineering and production ofthe wide array of JVC products, service is the key to maintaining the high level of performance for which JVC is world famous. TheJVC service and engineering organization stands behind our products.
NATIONAL HEADQUARTERSJVC SERVICE & ENGINEERING COMPANY OF AMERICA
DIVISION OF JVC AMERICAS CORP.1700 Valley RoadWayne, NJ 07470
QUALITY SERVICE
HOW TO LOCATE YOUR JVC SERVICE CENTERTOLL FREE : 1-800-537-5722http://www.jvcservice.com
Dear customer:In order to receive the most satisfaction from your purchase, read the instruction booklet before operating the unit. In the event that repairis necessary, or for the address nearest your location, please refer to the factory service center list below or within the Continental UnitedStates, Call 1-800-537-5722 for your authorized servicer. Remember to retain your Bill of Sale for Warranty Service.
–JVC
JVC SERVICE & ENGINEERINGCOMPANY OF AMERICA
DIVISION OF JVC AMERICAS CORP.
FACTORY SERVICE CENTER LOCATIONS
10 New Maple AvenuePine Brook, NJ 07058-9641(973) 396-1000
5665 Corporate AvenueCypress, CA 90630-0024(714) 229-8011
13 Cummings ParkWoburn, MA 01801(781) 376-9100
705 Enterprise StreetAurora, IL 60504-8149(630) 851-7855
10700 Hammerly, Suite 110Houston, TX 77043(713) 935-9331
890 Dubuque AvenueSouth San Francisco, CA 94080-1804(650) 871-2666
1500 Lakes ParkwayLawrenceville, GA 30243-5857(770) 339-2582
2969 Mapunapuna PlaceHonolulu, HI 96819-2040(808) 833-5828
8192 State Road 84Davie, FL 33324(954) 472-1960
(1099)
If you ship the product • • •
Pack your JVC unit in the original carton or one of equivalentsize and strength. Enclose, with the unit, a letter stating theproblem or symptom that exists and also a copy of the receiptor bill of sale you received when you purchased your JVC unit.Print your home return address on the outside and the insideof the carton. Send to the appropriate JVC Factory ServiceCenter as listed above.
CAUTION
To prevent electrical shock, do not open the cabinet. No userserviceable parts inside.Refer servicing to qualified service personnel.
Don’t service it yourself.
ACCESSORIESTo purchase accessories for your JVC product, you may contact your local JVC Dealer.Or from the 48 Continental United States call toll free : 800-882-2345
BT-51001-4
MX-K1(J).book Page 27 Wednesday, January 31, 2001 2:44 PM

28
English
English
English
English
English
English
English
LIMITED WARRANTY AUDIO-1
JVC COMPANY OF AMERICA warrants this product and all parts thereof, except as set forth below ONLY TO THEORIGINAL
PURCHASER AT RETAIL to be FREE FROM DEFECTIVE MATERIAL AND WORKMANSHIP from the date of original retailpurchase for the period as shown below. (“The Warranty Period.”)
THIS LIMITED WARRANTY IS VALID ONLY IN THE FIFTY(50) UNITED STATES, THE DISTRICT OF COLUMBIA AND INCOMMONWEALTH OF PUERTO RICO.
WHAT WE WILL DO:If this product is found to be defective, JVC will repair or replace defective parts at no charge to the original owner. Such
repair and replacement services shall be rendered by JVC during normal business hours at JVC authorized servicecenters. Parts used for replacement are warranted only for the remainder of the Warranty Period. All products and partsthereof may be brought to a JVC authorized service center on a carry-in basis except for Television sets having a screensize 25 inches and above which are covered on an in-home basis.
WHAT YOU MUST DO FOR WARRANTY SERVICE:Return your product to a JVC authorized service center with a copy of your bill of sale. For your nearest JVC authorized
service center, please call toll free: (800)537-5722.If service is not available locally, box the product carefully, preferably in the original carton, and ship, insured, with a copy ofyour bill of sale plus and letter of explanation of the problem to the nearest JVC Factory Service Center, the name andlocation of which will be given to you by the toll-free number.If you have any questions concerning your JVC Product, please contact our Customer Relations Department.
WHAT IS NOT COVERED:This limited warranty provided by JVC does not cover:1. Products which have been subject to abuse, accident, alteration, modification, tampering, negligence, misuse, faulty
installation, lack of reasonable care, or if repaired or serviced by anyone other than a service facility authorized by JVCto render such service, or if affixed to any attachment not provided with the products, or if the model number or serialnumber has been altered, tampered with, defaced or removed;
2. Initial installation and installation and removal for repair;
3. Operational adjustments covered in the Owner’s Manual, normal maintenance, video and audio head cleaning;
4. Damage that occurs in shipment, due to act of God, and cosmetic damage;
5. Signal reception problems and failures due to line power surge;
6. Video Pick-up Tubes/CCD Image Sensor, Cartridge, Stylus(Needle) are covered for 90 days from the date of purchase;
7. Accessories;
8. Batteries (except the Rechargeable Batteries are covered for 90 days from the date of purchase);
There are no express warranties except as listed above.
THE DURATION OF ANY IMPLIED WARRANTIES, INCLUDING THE IMPLIED WARRANTY OF MARCHANTABILITY, ISLIMITED TO THE DURATION OF THE EXPRESS WARRANTY HEREIN.
JVC SHALL NOT BE LIABLE FOR THE LOSS OF USE OF THE PRODUCT, INCONVENIENCE, LOSS OR ANY OTHERDAMAGES, WHETHER DIRECT, INCIDENTAL OR CONSEQUENTIAL (INCLUDING, WITHOUT LIMITATION, DAMAGETO TAPES, RECORDS OR DISCS) RESULTING FROM THE USE OF THIS PRODUCT, OR ARISING OUT OF ANYBREACH OF THIS WARRANTY. ALL EXPRESS AND IMPLIED WARRANTIES, INCLUDING THE WARRANTIES OFMERCHANTABILITY AND FITNESS FOR PARTICULAR PURPOSE, ARE LIMITED TO THE WARRANTY PERIOD SETFORTH ABOVE.
Some states do not allow the exclusion of incidental or consequential damages or limitations on how long an impliedwarranty last, so these limitations or exclusions may not apply to you. This warranty gives you specific legal rights and youmay also have other rights which vary from state to state.
JVC COMPANY OF AMERICA 1700 Valley RoadDIVISION OF JVC AMERICAS CORP. Wayne, NJ 07470
REFURBISHED PRODUCTS CARRY A SEPARATE WARRANTY, THIS WARRANTY DOES NOT APPLY. FOR DETAILS OFREFURBISHED PRO DUCT WARRANTY, PLEASE REFER TO THE REFURBISHED PRODUCT WARRANTY INFORMATIONPACKAGED WITH EACH REFURBISHED PRODUCT.
For customer use:
Enter below the Model No. and Serial No. which is located either on the rear, bottom or side of the cabinet. Retain thisinformation for future reference.
Model No.: Serial No.:
Purchase date: Name of dealer:
PARTS LABOR1YR 1YR
MX-K1(J).book Page 28 Wednesday, January 31, 2001 2:44 PM
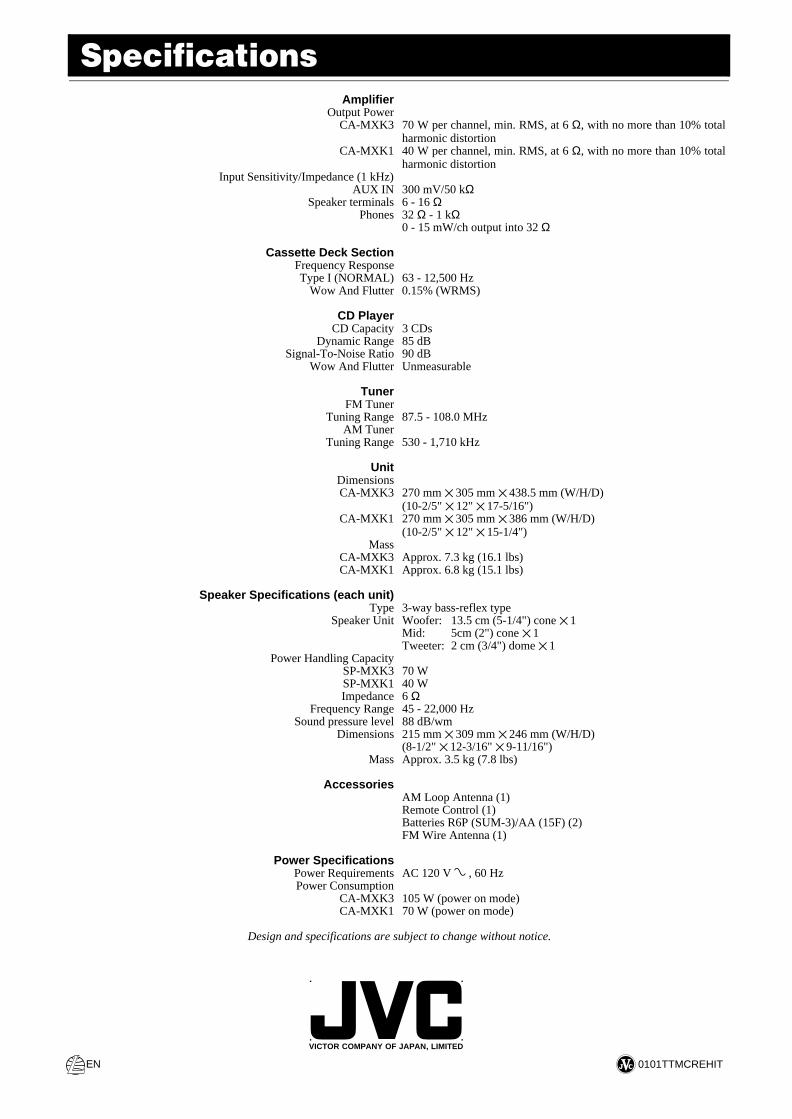
0101TTMCREHITEN
VICTOR COMPANY OF JAPAN, LIMITED
SpecificationsAmplifier
Output PowerCA-MXK3 70 W per channel, min. RMS, at 6 Ω, with no more than 10% total
harmonic distortionCA-MXK1 40 W per channel, min. RMS, at 6 Ω, with no more than 10% total
harmonic distortion Input Sensitivity/Impedance (1 kHz)
AUX IN 300 mV/50 kΩSpeaker terminals 6 - 16 Ω
Phones 32 Ω - 1 kΩ0 - 15 mW/ch output into 32 Ω
Cassette Deck SectionFrequency ResponseType I (NORMAL) 63 - 12,500 Hz
Wow And Flutter 0.15% (WRMS)
CD PlayerCD Capacity 3 CDs
Dynamic Range 85 dBSignal-To-Noise Ratio 90 dB
Wow And Flutter Unmeasurable
TunerFM Tuner
Tuning Range 87.5 - 108.0 MHzAM Tuner
Tuning Range 530 - 1,710 kHz
UnitDimensionsCA-MXK3 270 mm 305 mm 438.5 mm (W/H/D)
(10-2/5" 12" 17-5/16")CA-MXK1 270 mm 305 mm 386 mm (W/H/D)
(10-2/5" 12" 15-1/4")Mass
CA-MXK3 Approx. 7.3 kg (16.1 lbs)CA-MXK1 Approx. 6.8 kg (15.1 lbs)
Speaker Specifications (each unit)Type 3-way bass-reflex type
Speaker Unit Woofer: 13.5 cm (5-1/4") cone 1Mid: 5cm (2") cone 1Tweeter: 2 cm (3/4") dome 1
Power Handling CapacitySP-MXK3 70 WSP-MXK1 40 WImpedance 6 Ω
Frequency Range 45 - 22,000 HzSound pressure level 88 dB/wm
Dimensions 215 mm 309 mm 246 mm (W/H/D)(8-1/2" 12-3/16" 9-11/16")
Mass Approx. 3.5 kg (7.8 lbs)
AccessoriesAM Loop Antenna (1)Remote Control (1)Batteries R6P (SUM-3)/AA (15F) (2)FM Wire Antenna (1)
Power SpecificationsPower Requirements AC 120 V Ó , 60 Hz Power Consumption
CA-MXK3 105 W (power on mode)CA-MXK1 70 W (power on mode)
Design and specifications are subject to change without notice.
Cover4only.fm Page 1 Wednesday, January 31, 2001 2:43 PM