mx conference tables - knoll
TRANSCRIPT
Islands Collection by Knoll ® Installation Instruction
Islands Collection by Knoll ® October 2, 2020
Part Number: 6TD00062Sheet 1
6td00062_1_hardware.ai
A G
H J K L M N
B C D E F
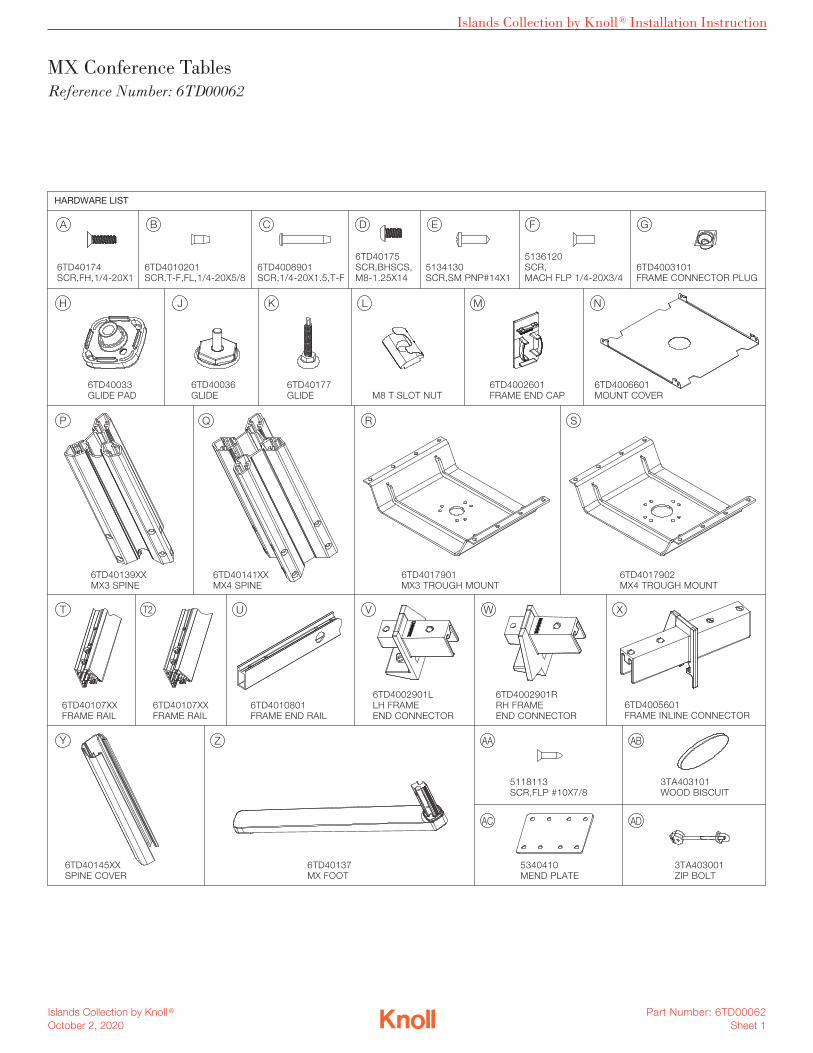
HARDWARE LIST
6TD40139XX MX3 SPINE
6TD40141XX MX4 SPINE
6TD4017901 MX3 TROUGH MOUNT
6TD4017902 MX4 TROUGH MOUNT
6TD4006601 MOUNT COVER
6TD40174 SCR,FH,1/4-20X1
6TD4010201 SCR,T-F,FL,1/4-20X5/8
6TD4008901 SCR,1/4-20X1.5,T-F
6TD40175 SCR,BHSCS,M8-1.25X14
5134130 SCR,SM PNP#14X1
6TD4003101 FRAME CONNECTOR PLUG
5136120 SCR,MACH FLP 1/4-20X3/4
6TD40033 GLIDE PAD
6TD40036 GLIDE
6TD40177 GLIDE M8 T SLOT NUT
6TD4002601 FRAME END CAP
P Q R S
T
Y
T2
AA AB
AC AD
U
Z
V W X
6TD40107XX FRAME RAIL
6TD4010801 FRAME END RAIL
6TD4002901L LH FRAME END CONNECTOR
6TD4002901R RH FRAME END CONNECTOR
6TD4005601 FRAME INLINE CONNECTOR
6TD40107XX FRAME RAIL
6TD40145XX SPINE COVER
6TD40137 MX FOOT
5118113 SCR,FLP #10X7/8
3TA403101 WOOD BISCUIT
5340410 MEND PLATE
3TA403001 ZIP BOLT
MX Conference Tables Reference Number: 6TD00062

Islands Collection by Knoll ® Installation Instruction
Islands Collection by Knoll ® October 2, 2020
Part Number: 6TD00062Sheet 2
MX Conference Tables Reference Number: 6TD00062
STEPS:
1. Assembly of MX-Base(Fig. 1)
1.1 Align the glide pad, item (H), to the end of foot, item (Z), and secure into place using 2 (B) screws.
1.2 Assemble the leveller, item (J), into the threaded hole of the foot, item (Z).
1.3 Align and insert the tenon of foot, item (Z), into the one of the opening of spine, item (P) or (Q), and secure into place using 4 (A) screws.
Start all 4 fasteners (2-3 threads) then follow Fig. 1A for tightening sequence.
1.4 Repeat 1.1, 1.2, 1.3 for all 3 or 4 feet.
1.5 Reorient the leg assembly so that the glide pad is facing downwards and the open end is facing up.
1.6 Align trough mount, item (R) or (S) with spine, item (P) or (Q), and secure into place using 6 or 8 (C) screws. Criss-cross tightening sequence should be used.
1.7 Repeat all above steps to assemble all remaining bases.
6td00062_1.ai
Fig. 1
Y
P
A
C R
Z
KH
B
J
1
3
2
4

Islands Collection by Knoll ® Installation Instruction
Islands Collection by Knoll ® October 2, 2020
Part Number: 6TD00062Sheet 3
MX Conference Tables Reference Number: 6TD00062
2. Assembly of table frame(Fig. 2 and Fig. 3)
2.1 Orient the frame rail, item (T), as per Fig. 2A and Fig. 2C.
Note: Skip to step 2.4 for all tables less than or equal to 120" width.
2.2 Align frame inline connector, item (X), with the left end of the frame rail, item (T), and secure Into place using 2 (G) and 2 (F) screw. Detail (D) for reference.
2.3 Align the right end of second frame rail, item (T2), with your assembly and secure into place using 2 (G) plug and 2 (F) screw.
Repeat step 2.2 and 2.3 for the second frame rail.
2.4 Align the LH frame end connector, item (V), with left end of frame rail, item (T), and secure into place using 1 (G) plug and 1 (F) screw.
2.5 Align the RH frame end connector, item (W), with right end of frame rail, item (T), and secure into place using 1 (G) plug and 1 (F) screw.
2.6 Repeat 2.4, 2.5, for second frame rail.
2.7 Align left end of first assembled rail with provided hole of frame end rail, item (U), and secure into place using 1 (F) screw.
2.8 Align right end of second assembled rail with provided hole of frame end rail, item (U), and secure into place using 1 (F) screw.
2.9 Repeat 2.7, 2.8 for attaching second frame end rail, item (U).
2.10 Align and press in all 4 frame end caps, item (M), into each end of frame end rails, item (U).
6td00062_2.ai
RAILS ASSEMBLY MATRIX - TABLES WIDER THAN 120" TABLE WIDTH
T T2FRAME RAIL 1 QTY FRAME RAIL 2 QTY
132" 6TD4010703 2 6TD4010709 2144" 6TD4010705 2 6TD4010709 2156" 6TD4010708 2 6TD4010709 2180" 6TD4010708 2 6TD4010702 2216" 6TD4010710 2 6TD4010708 2
Fig. 3
Fig. 2
T
V
M
U
F
W
G
F
W
X
F
G
T2
T

Islands Collection by Knoll ® Installation Instruction
Islands Collection by Knoll ® October 2, 2020
Part Number: 6TD00062Sheet 4
MX Conference Tables Reference Number: 6TD00062
3. Assembly / joining individualworksurfaces together(Fig. 4 and Fig. 5)
Note: Step 3 is only for tables wider than 120".
3.1 Ray worksurfaces upside down on a soft non scratching surface, rectilinear worksurfaces shown for example.
3.2 Insert 4 wood biscuits (AB) into available slots on one of worksurface (see Fig. 4).
3.3 Align other worksurface and push them together ensuring the wood biscuits are aligning.
3.4 Insert 4 zip bolts, item (AD), into available slots, as per Fig. 5, and tighten using hex key. Make sure top of worksurface should be flush aligned.
3.5 Center and align 2 mend plates, item (AC), into available routed areas, attach each plate to the worksurface using 8 (AA) screws.
6td00062_3.ai
Fig. 5
Fig. 4
AD
AC
AA
AB

Islands Collection by Knoll ® Installation Instruction
Islands Collection by Knoll ® October 2, 2020
Part Number: 6TD00062Sheet 5
MX Conference Tables Reference Number: 6TD00062
6td00062_4.ai
6td00062_5.ai
"X" DIMENSION FROM EDGE OF TROUGH TO END OF RAIL FRAME (FIG. 8)
TOP SHAPEDEPTH/WIDTH 96 108 120 132 144 156 180 216
TROUGH WIDTH 68 80 92 104 116 128 152 188
RT - RACETRACK
48 5 5 5 5 8 5 5 554 5 8 8 8 8 8 8 860 - 11 11 11 11 8 11 11
ALL OTHER TOP SHAPES
48 5 8 8 11 11 8 11 1154 5 8 8 11 11 8 11 1160 - 8 8 11 11 8 11 11
X X
X X
Fig. 7
Fig. 8
Fig. 6
L
D
E
4. Installation of assembled table frame with worksurface (Fig. 6)
4.1 Lay worksurface upside down on a soft non scratching surface, rectilinear worksurface shown for example.
4.2 Center and align holes of assembled table frame over provided pilot holes and attach using (E) screw. Screw (E) quantity will vary depending on frame rail (T) size. Use all provided pilot holes.
5. Installation of base with table frame (Fig. 7 and Fig. 8)
5.1 Orient the assembled top as per Fig. 5.
5.2 Insert 8 T slot nuts, item (L), into frame rail, item (T). As per Fig. 7.
5.3 Orient and align assembled base with t slot nuts and secure into place using 8 (D) screws.
Before tightening screws, maintain distance (X) as per given chart. Fig. 8
5.4 Repeat 5.2 and 5.3 for second/third base.

Islands Collection by Knoll ® Installation Instruction
Islands Collection by Knoll ® October 2, 2020
Part Number: 6TD00062Sheet 6
MX Conference Tables Reference Number: 6TD00062
6td00062_6.ai
Fig. 10
Fig. 9
N
Complete assembled table
6. Installation of mount cover (Fig. 9 and Fig. 10)
6.1 Orient the mount cover, item (N), as per Fig. 9.
6.2 Slide and center mount cover, item (N), into space above trough mount.
6.3 Slide cover back and forth slightly to engage tabs with trough mount.
6.4 Repeat 6.1, 6.2, 6.3 to install second/third mount cover.