mv series gas engine / diesel fired - ramteq mvg series.pdf · 10 180-00410-01 power plate 1 11...
TRANSCRIPT

R E A D T H I S M A N U A LThis manual contains important information for the use and safe opera-tion of your RAMTEQ® machine. FAILURE TO READ THIS MANUAL ANDFOLLOW ITS INSTRUCTIONS PRIOR TO OPERATING OR ATTEMPTINGANY SERVICE OR MAINTENANCE PROCEDURE COULD RESULT INSERIOUS INJURY OR DEATH TO YOU OR OTHER PERSONS; ALSODAMAGE TO THE MACHINE OR TO OTHER PROPERTY.
OMV Series
Gas Engine / Diesel Fired
RAMTEQ®
n n n n

RAMTEQ®
n n n n
n
n
n
n
n
n
n
n
n
n
n
n
n
n
NOTICEInformation in this operator’s manual is subject to change without notice.
RAMTEQ SHALL NOT BE LIABLE FOR TECHNICAL OR EDITORIAL ERRORS OR OMISSIONS CONTAINED HEREIN. This operator’s manualcontains information protected by copyright. No part of this operator’s manual may be photocopied or reproduced in any form withoutprior written consent from RAMTEQ.
© RAMTEQ, 2007All rights reserved.
INCLUDED PARTS
• Pallet• Packing Material• Outer Box• Pressure Washer Machine• Operator’s Manual• Wand / Trigger Gun• Nozzles 0º, 15º, 25º, 40º
• Hose 3/8” X 50’• QC Hose Fittings
INSPECTIONCarefully unpack your new RAMTEQ equipment by removing the shrinkwrap & banding from pallet. Remove the pressure washer from the pal-let and check for any physical damage that may have occurred duringshipment. Check for all parts specified and shown in figure 1.
RAMTEQ®
n n n n
n DO NOT operate this machine in areas where open flames are not permitted. DO NOT store oruse combustible materials on or near this machine. Use this equipment only in well ventilatedareas. Failure to follow this warning may cause carbon monoxide build up, fire or explosion, andpossible injury or death.
n DO NOT fill gasoline tank while engine is running. Allow engine to cool before refueling. Shouldgasoline be spilled, move the machine away from the area of the spill. Do not attempt to restartthe machine until the gasoline has fully evaporated.
n DO NOT operate engine if air cleaner or cover directly over the carburetor air intake is removed.
n DO NOT touch hot mufflers, cylinders or fins, as contact may cause burns
n DO NOT operate this machine while under the influence of alcohol, drugs or while fatigued.
n DO NOT direct discharge stream at yourself or others. Risk of injection or injury may occur.Never put your hand or fingers over the spray tip. Do not try to stop or deflect leaks with yourhand or body. Always face nozzle and wand to the ground when testing.
n DO NOT operate this machine WITHOUT wearing protective Eye Wear. Gloves, Hard Hat, Mask,Ear Plugs & Steel Toe Work Boots are also recommended, DO NOT wear loose clothing. Keepyour body and clothing clear of the engine and discharge stream when the machine is running.
n DO NOT tie back or block trigger gun in OPEN position. Never leave the pressure washerunattended once you have started it. If you leave, shut down machine completely.
n DO NOT overreach or stand on an unstable support while operating this machine. Maintaingood footing and balance.
n DO NOT permit this machine to run while unattended or for extended periods of time withtrigger gun closed. Damage to pump may occur.
n DO NOT operate this machine in an unsafe manner or around unsupervised children. Keep allother personnel clear while operating this machine. This product should only be operated bytrained personnel.
n DO NOT alter original factory settings prior to operating this machine. Risk of injury to yourself orother persons may occur.
n DO NOT remove hoses, guns, nozzles or any components while this machine is still hot or whileit is running.
n DO NOT attempt to service this machine before reading the service manual.
n DO NOT use water with a temperature over 140 degrees Fahrenheit
n DO NOT put diesel fuel in to a gasoline tank or gasoline into a diesel tank. Observe correctmarkings on fuel tanks before filling.
n DO NOT operate this machine without knowing how to stop and bleed water pressures. Know allcontrols before using this machine.
n DO NOT spray caustic, acids or abrasive fluids through this machine.
n DO NOT permit water to freeze inside this machine. Pump and plumbing damage may occur.
n Use only recommended RAMTEQ™ parts when servicing this machine.
n RAMTEQ™ will not be held liable for any unauthorized modifications made to thismachine. Any such action will void the warranty.
n When connecting battery, ensure that the RED battery cable is connected to the POSITIVE poleon the battery and the BLACK is connected to the NEGATIVE pole on the battery
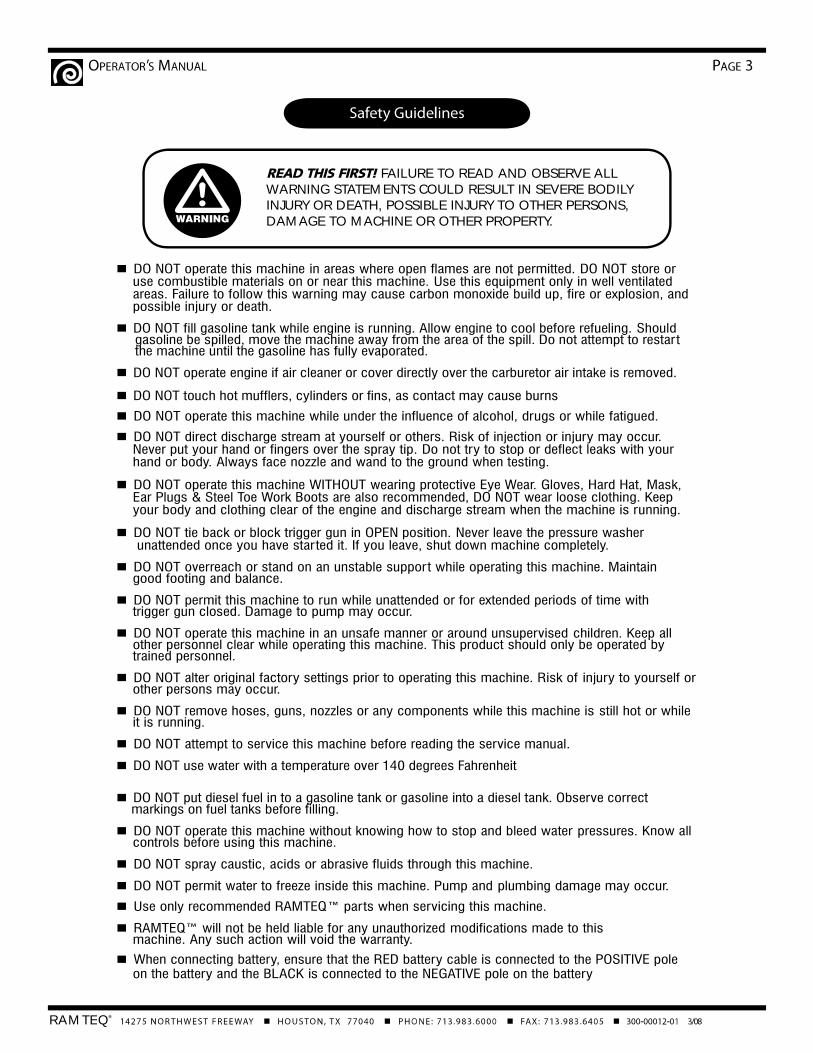
FAILURE TO READ AND OBSERVE ALLWARNING STATEMENTS COULD RESULT IN SEVERE BODILYINJURY OR DEATH, POSSIBLE INJURY TO OTHER PERSONS,DAMAGE TO MACHINE OR OTHER PROPERTY.

RAMTEQ®
n n n n
MAINTENANCE PRECAUTIONS
n Do not permit acidic, caustic or abrasive fluids to be pumped through system.
n Periodically clean detergent inlet screen. This will ensure proper flow of water to the pump.
n High mineral content in water may adversely affect your machine and may require the use of a water softenerto ensure proper operation.
n NEVER run the pump dry under any circumtances. Doing so will cause extreme damage to the pump.
HEAT EXCHANGER COIL MAINTENANCEn Hard water conditions may eventually cause clogging in the heat exchanger coil if left unattended.
Scale deposits will compromise the heating efficiency and produce an unsafe condition over time.It may be necessary to descale coil.
n Scale buildup from certain detergents may eventually clog up the heat exchanger coil causing anunsafe condition. Use only recommended detergents for better cleaning efficiency.
n Black carbon deposits that collect on the outside wall of the heat exchanger coil may be a result ofusing a poor grade of fuel or improper burner operation. Heating fuel should be void of water andsediments to eliminate the possibility of sooting and compromising the efficiency of the coil.
FAILURE TO MAINTAIN HEAT EXCHANGER COIL MAYRESULT IN A STEAM EXPLOSION WHICH MAY CAUSESERIOUS INJURY OR DEATH.
MOVING, STORAGE
n Place machine in covered area when not in use to protect from elements. Protect machine fromfreezing in cold temperatures by storing in a heated location.
ENGINE MAINTENANCE
n Refer to Engine Manual.
WINTERIZING
n Non-float Tank Machines: To protect the machine from freezing temperatures whilestoring or transporting, connect short length of garden hose (approximately 3 ft.) towater inlet connection on machine. Remove the pressure nozzle from the wand andinsert the short garden hose end into a container of antifreeze. Place the wand into theantifreeze container and start engine, running machine until antifreeze appears from theend of the wand. Turn engine “OFF” and replace pressure nozzle. Coil up hose andmove machine to storage area.
RAMTEQ®
n n n n
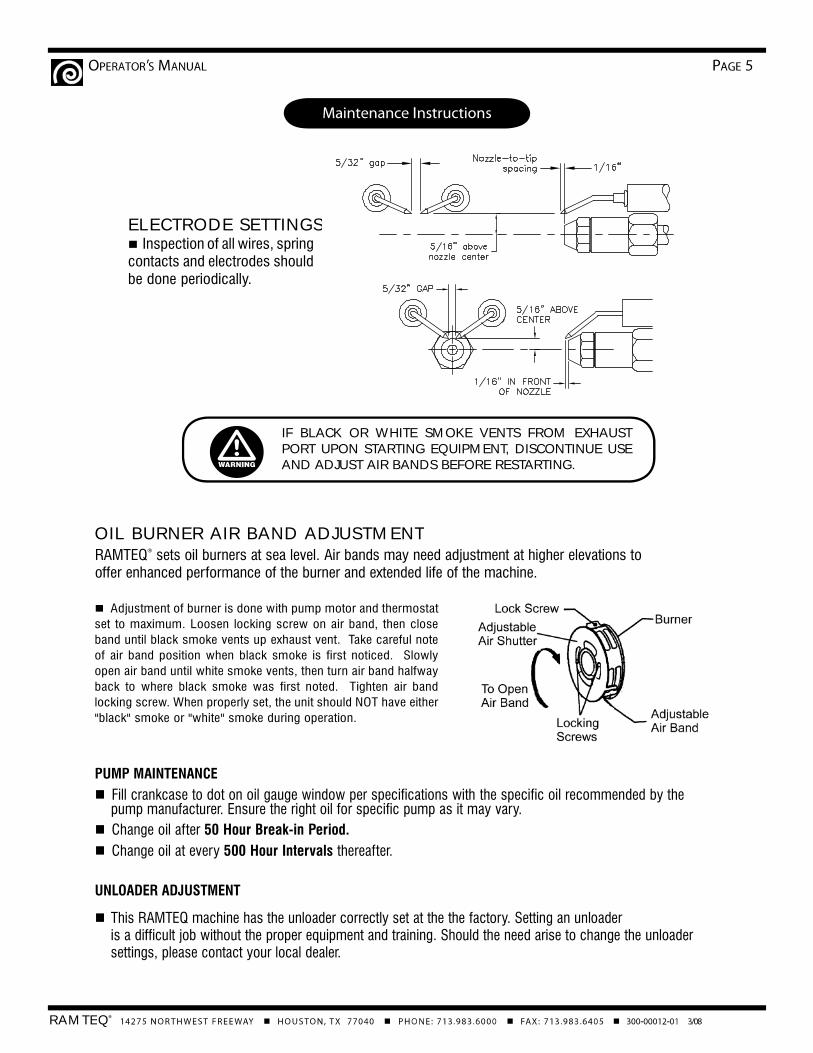
ELECTRODE SETTINGSn Inspection of all wires, springcontacts and electrodes shouldbe done periodically.
OIL BURNER AIR BAND ADJUSTMENTRAMTEQ
®
sets oil burners at sea level. Air bands may need adjustment at higher elevations tooffer enhanced performance of the burner and extended life of the machine.
n Adjustment of burner is done with pump motor and thermostat
set to maximum. Loosen locking screw on air band, then close
band until black smoke vents up exhaust vent. Take careful note
of air band position when black smoke is first noticed. Slowly
open air band until white smoke vents, then turn air band halfway
back to where black smoke was first noted. Tighten air band
locking screw. When properly set, the unit should NOT have either
"black" smoke or "white" smoke during operation.
IF BLACK OR WHITE SMOKE VENTS FROM EXHAUSTPORT UPON STARTING EQUIPMENT, DISCONTINUE USEAND ADJUST AIR BANDS BEFORE RESTARTING.
PUMP MAINTENANCE
n Fill crankcase to dot on oil gauge window per specifications with the specific oil recommended by thepump manufacturer. Ensure the right oil for specific pump as it may vary.
n Change oil after 50 Hour Break-in Period.
n Change oil at every 500 Hour Intervals thereafter.
UNLOADER ADJUSTMENT
n This RAMTEQ machine has the unloader correctly set at the the factory. Setting an unloaderis a difficult job without the proper equipment and training. Should the need arise to change the unloadersettings, please contact your local dealer.
RAMTEQ®
n n n n
LOCATION GUIDELINES
n Locate the machine on a solid and level surface so that engine and pump crankcase oil lubricate components properly.Avoid areas where water can build up in the working area. Possible injury may result.
n Locate the machine in a well-ventilated area and away from flammable materials or fumes. Be sure ventilation warningsare observed. Keep pressure washer at least 18” away from flammable materials.
n Locate the machine so the operator has easy access to the jetter/pressure washer and its controls. Locate the machineso that it is protected from external damage.
n To prevent damage and excessive hose wear, locate the unit so that the hose does not cross traffic areas.
STARTING THE MACHINE
Following the steps below will insure successful operation:
n Read this manual completely before attempting to start the machine.
n Check the fuel tank and fill with a good grade of gasoline (87 octane minimum) for gas engines and a high quality dieselfuel for diesel engines.
n Check the engine oil level and fill with appropriate oil.
n Check the pump oil level and fill with SAE 30w non-detergent oil if needed.
n Pull trigger on gun until a steady stream of water comes out the nozzle. This purges any air in the system.
n Slide fuel switch to the RIGHT and slide choke switch to the LEFT (closed position).
n Turn ON/OFF switch (on engine) to “ON”.
n Open water flow to reduce back pressure in pump. (Back pressure can overpower electric starter, preventing ignition.)
n Turn key to start gas engine and allow RPM to develop.
n Check for leaks in the system and cycle trigger gun to insure bypass is adjusted correctly. Repair any leaks and correctunloader adjustment if needed. Turn off machine before attempting any repairs.
STOPPING THE MACHINE
n Turn engine to “OFF”.
n Pull gun trigger to release water pressure from system.
n Disconnect wand & gun assembly.
n Wind up pressure hose.
CAUTIONn Always wear protective safety gear, such as, but not limited to, rain coat or coveralls, rubber boots, face shield or
goggles, gloves and hearing protection.
n Do not run the machine for more than two minutes with water flow shut off (by-pass mode). This will overheat the jetter and could cause personal injury.
n Do not run hot water thru this pump. Hot water will damage the pump, and will void the warranty.
RAMTEQ®
n n n n
12
SeeControl Boxon page 10
3
45
6
78
9
10
11
12
14
15
36See
PlumbingDiagram
on page 12
SeePlumbingDiagram
on page 12
13
1617
18 1920
21
22
27
28
26
25
23
24
29
30
31
35
34
33
32

RAMTEQ®
n n n n
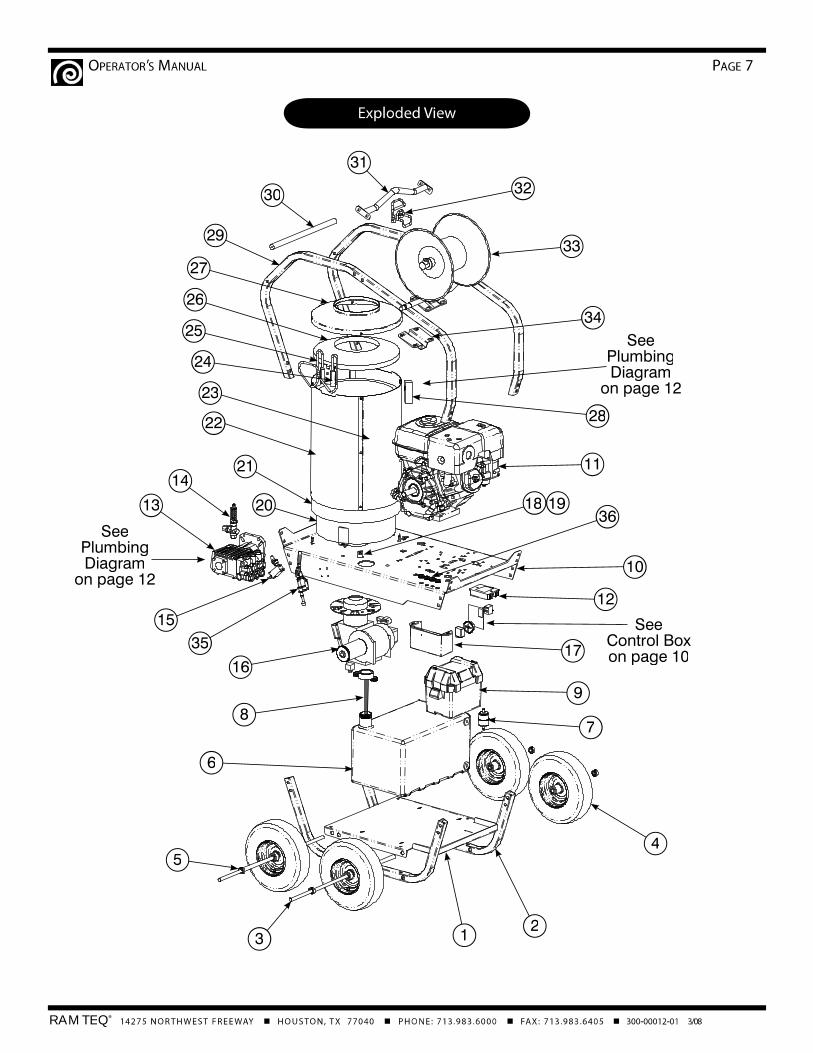
1 180-00411-01 Base 12 180-00412-01 Frame, Lower 23 175-00001-05 Axle, SS,5/8"x 30" 24 170-00015-01 Wheel, pneu,12", tubetype, 1 pc hub, 5/8 brg 45 516-00001-01 Bushing, Wheel Collar, 5/8" 46 190-00002-04 Tank, fuel, 9 gal, black, ID0104H 17 577-00002-01 Filter, fuel, inline 18 140-00001-01 Cap, fuel guage, diesel, black, one way vent 19 590-00003-01 Tray, Battery, vented, black, w/hdwr, 9082-1 1
10 180-00410-01 Power Plate 111 206-00004-04 Engine, gas, 13.0HP, Honda GX390KQNR6 112 210-00001-04 Regulator, for 11/13HP Honda engine 113 220-00114-01 Pump, Comet ZWD4040G 114 230-00011-02 Unloader, Pulsar#3HP, without knob 115 574-00002-01 Pressure switch, GP#YPRESSWITCH 116 250-00005-04 Burner assy, oil, ADC-13.5V, #RTQ202, w/ign 117 180-00430-01 Closeout, Controls 118 180-00153-01 Tab, burner plate 419 508-00002-01 Nut, SP, Cage, 1/4-20, .064-.105 420 155-00002-02 Coil, medium, diesel fired 121 191-00006-01 Insulation, blanket, 1", 24"wide, 4# 49 IN22 180-00424-01 Shell, Removable, 16", Round 123 180-00423-01 Shell, Stationary, 16", Round 124 180-00132-01 Bracket,Cord Holder 125 180-00133-01 Cord Holder, Bent wire, chrome plate 126 191-00009-01 Insulation, cap, 16"x8" 127 180-00425-01 Cap, 16", Round Shell 128 185-00001-01 Manifold, outlet 129 180-00413-01 Frame, Upper 130 180-00428-01 Handle, Treaded Rod 131 180-00418-01 Lifting Bar Assy 132 180-00429-01 Wand Holder, wire 133 595-00038-01 Hose Reel 134 180-00426-01 Bracket, Hose Reel Mounting 135 171-00001-01 Brake Assy 136 567-00001-01 Grommet,nozzle holder 4
NOT SHOWN439-00003-12 Cable, batt,w/terms, black, 25" 1439-00003-13 Cable, batt, w/terms, red, 42" 1457-00002-01 Boot, red insulator, B&S 281223 1591-00001-02 Battery 12v, Group U1,230 Crank Amps 1270-00001-01 Nozzle, water, #3.5, 0 degr, quickconn 1270-00001-02 Nozzle, water, #3.5, 15 degr, quickconn 1270-00001-03 Nozzle, water, #3.5, 25 degr, quickconn 1270-00001-04 Nozzle, water, #3.5, 40 degr, quickconn 1

RAMTEQ®
n n n n
1 21699UF 254-00002-02 DC Motor2 2140401 253-00004-01 Blower Wheel3 21405 254-00001-11 Coupling4 31231U 259-00006-01 Air Guide5 5874BKU 259-00007-01 Burner Housing - Black6 5151501 259-00005-01 Air Band7 3494 259-00008-01 Air Shutter 8 Slot8 21807 252-00014-01 Cord Set9 218440ZU 251-00002-03 Pump (CleanCut)
10 21877U 252-00010-01 Tube assembly11 21754U 252-00007-01 12 volt Coil12 3666 252-00013-01 Escutcheon plate spline nut13 3493 252-00012-01 Escutcheon plate14 5700 258-00006-01 Electrode kit15 7492 252-00009-01 Cad cell detector16 51411 252-00011-01 Ignitor gasketr kit17 51776U 252-00005-02 Ignitor w/ICB18 Specify Air tube assemblies19 31802 256-00002-01 Flange mounting gasket20 7435U 252-00005-01 Ignitor only21 51663 252-00006-01 Ignitor Control Board22 245-00007-14 Burner Nozzle, 1.75, 90A
1
23
4
5
6
789
10
17
13
12
15
21
16
20
14
18
19
11
22

RAMTEQ®
n n n n
1 573-00001-01 Thermostat Assembly 12 450-00001-01 Rocker Switch 13 305-00040-03 Label, Controls 14 567-00018-01 Grommet,11/16"ID,M2766 25 455-00001-01 Rectifier,GBPC2506 16 455-00002-01 Relay, 12V, VF441F11, Omron#G8JN1C7TMFDC12 17 180-00430-01 Closeout, Controls 18 454-00003-01 Fuse Holder 19 453-00005-01 Fuse, 25A, ATC-25 1
1
41
5
6
7
2
3
1 265-00002-01 Dual lance,8107-1101,Comet 15*,43"SS 12 275-00001-01 Gun,BE, 85.202.108 13 552-00003-03 QC plug,sp,3/8",nptf 14 554-00006-02 QC coupler socket,brs,1/4",nptm 15 270-00038-01 Nozzle,water,SS,1/4, soap,#40,15 degr 16 284-00007-02 Hose assy,50',4000PSI@250F,swivel 17 552-00004-03 QC plug,sp,3/8",nptf 18 554-00007-03 QC coupler socket,brs,3/8",nptf 1
1
2
3
4
5
8
7 6
See page 8for nozzles
8 9
RAMTEQ®
n n n n
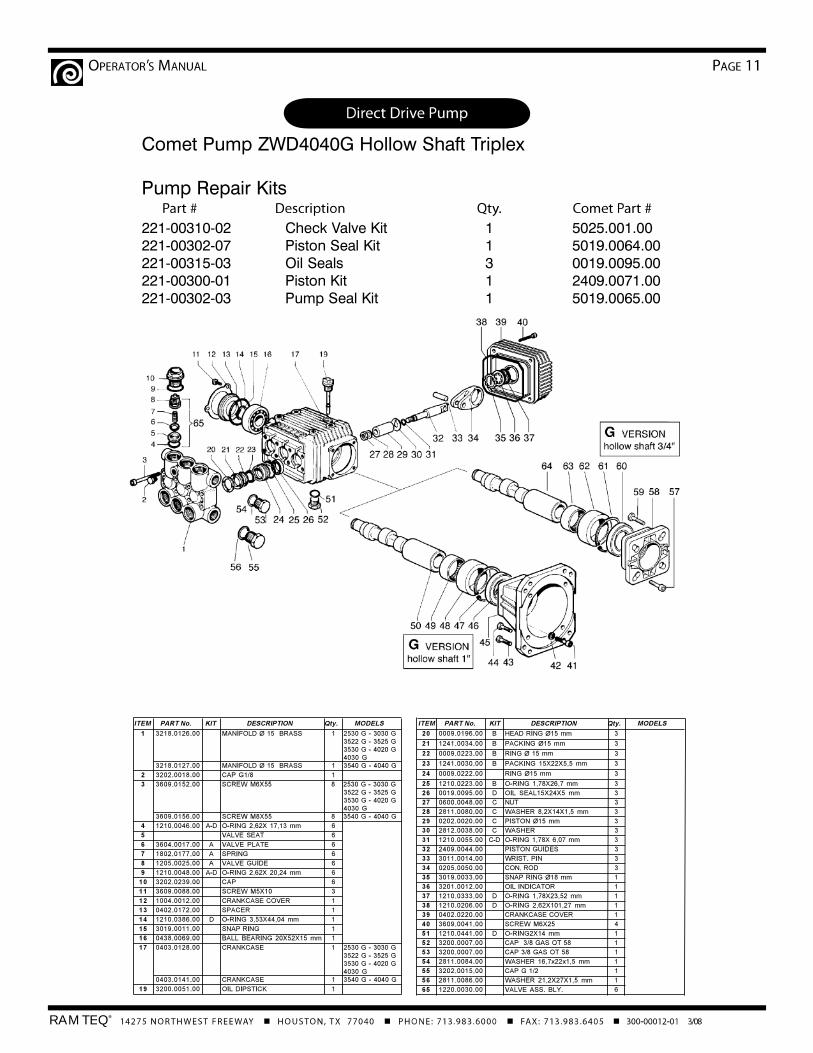
Comet Pump ZWD4040G Hollow Shaft Triplex
Pump Repair Kits
221-00310-02 Check Valve Kit 1 5025.001.00221-00302-07 Piston Seal Kit 1 5019.0064.00221-00315-03 Oil Seals 3 0019.0095.00221-00300-01 Piston Kit 1 2409.0071.00221-00302-03 Pump Seal Kit 1 5019.0065.00
RAMTEQ®
n n n n
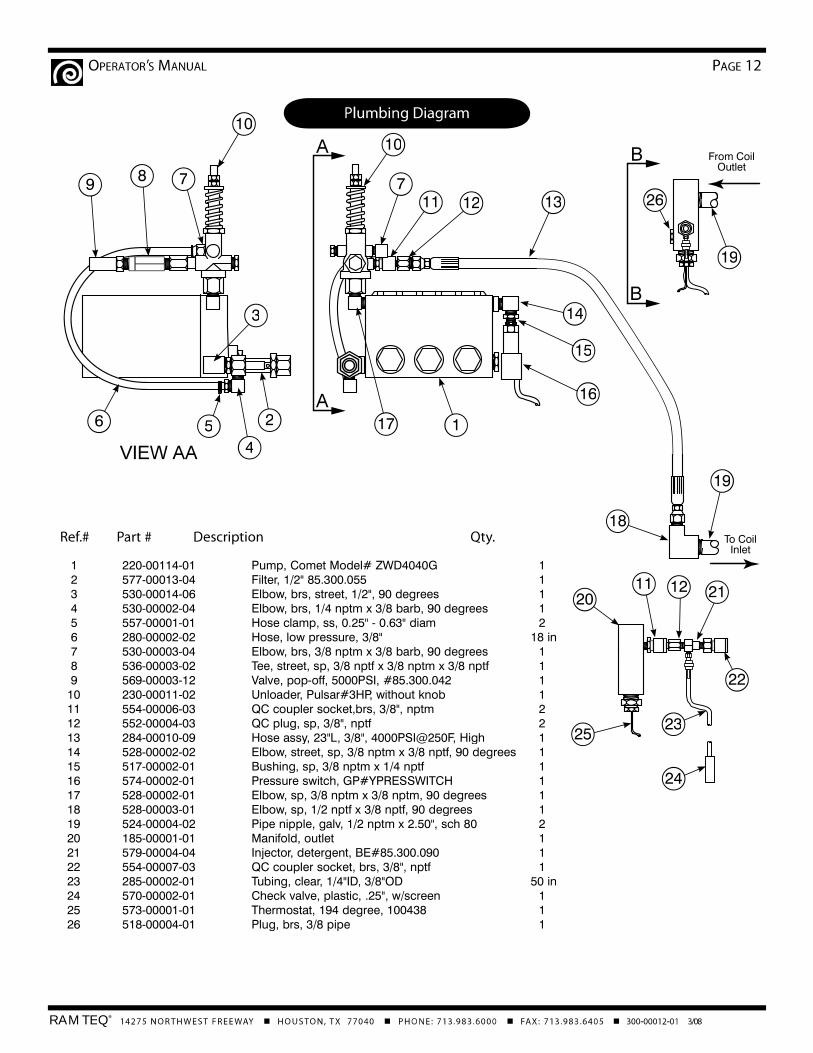
1 220-00114-01 Pump, Comet Model# ZWD4040G 12 577-00013-04 Filter, 1/2" 85.300.055 13 530-00014-06 Elbow, brs, street, 1/2", 90 degrees 14 530-00002-04 Elbow, brs, 1/4 nptm x 3/8 barb, 90 degrees 15 557-00001-01 Hose clamp, ss, 0.25" - 0.63" diam 26 280-00002-02 Hose, low pressure, 3/8" 18 in7 530-00003-04 Elbow, brs, 3/8 nptm x 3/8 barb, 90 degrees 18 536-00003-02 Tee, street, sp, 3/8 nptf x 3/8 nptm x 3/8 nptf 19 569-00003-12 Valve, pop-off, 5000PSI, #85.300.042 1
10 230-00011-02 Unloader, Pulsar#3HP, without knob 111 554-00006-03 QC coupler socket,brs, 3/8", nptm 212 552-00004-03 QC plug, sp, 3/8", nptf 213 284-00010-09 Hose assy, 23"L, 3/8", 4000PSI@250F, High 114 528-00002-02 Elbow, street, sp, 3/8 nptm x 3/8 nptf, 90 degrees 115 517-00002-01 Bushing, sp, 3/8 nptm x 1/4 nptf 116 574-00002-01 Pressure switch, GP#YPRESSWITCH 117 528-00002-01 Elbow, sp, 3/8 nptm x 3/8 nptm, 90 degrees 118 528-00003-01 Elbow, sp, 1/2 nptf x 3/8 nptf, 90 degrees 119 524-00004-02 Pipe nipple, galv, 1/2 nptm x 2.50", sch 80 220 185-00001-01 Manifold, outlet 121 579-00004-04 Injector, detergent, BE#85.300.090 122 554-00007-03 QC coupler socket, brs, 3/8", nptf 123 285-00002-01 Tubing, clear, 1/4"ID, 3/8"OD 50 in24 570-00002-01 Check valve, plastic, .25", w/screen 125 573-00001-01 Thermostat, 194 degree, 100438 126 518-00004-01 Plug, brs, 3/8 pipe 1
12
4
3
6
98 7
10
10
11 12 13
17
14
15
16
7
20
22
25
11 12 21
23
24
18
19
26
19
From CoilOutlet
To CoilInlet
5
RAMTEQ®
n n n n

RAMTEQ®
n n n n
Low Water Pressure Insufficient water source Check hose size/water sourceOld or incorrect nozzle Replace nozzlePlumbing or hose leak Tighten, repair or replace leakObstruction in spray nozzle Clean or replace nozzleUnloader valve worn Replace unloaderPump valves dirty or worn Clean or replace packing/valves
No Chemical Flow Detergent valve closed Open detergent valveLow detergent level Fill detergent containerChemical screen dirty Clean detergent screen
Burner Not Igniting No fuel Fill fuel tank with proper fuelBurner switch turned off Turn burner switch onThermostat set too low Reset thermostatClogged fuel filter Replace fuel filterDefective pressure switch Replace pressure switchClogged burner nozzle Replace burner nozzleFuel pump malfunction Replace fuel pump
Excessive Burner Smoke Improper fuel being used Use Diesel #1/#2 or KeroseneWater contamination in fuel Drain fuel and replace with newImproper air band adjustment Readjust air band/altitudeLow fuel pressure Adjust to specificationsAir leaks in fuel lines Check for air leaks or bubblesSoot on coils/burner assembly Clean coils/burner assemblyDirty burner nozzle Clean or replace burner nozzle
Pressure Relief Valve Leaks Nozzle is dirty Clean or replace nozzleDefective relief valve Replace relief valveUnloader adjusted incorrectly Adjust unloader valveRestriction on discharge hose Remove nozzle and flush lineScale restricting flow in coil Clean coil
Engine Will Not Start Throttle lever off Turn throttle lever to "on" positionNo fuel in engine Fill fuel tank if neededBad fuel or wrong fuel in engine Check to ensure correct fuel in tankWorn, foul, or dirty spark plug(s) Check spark plugsPressure bulid up in pump Squeeze trigger on gun
Engine Runs Rough/No Power Low oil level Check oil level, fill if neededDirty air filter Check and replace air filter if neededBad fuel or wrong fuel in engine Check to ensure correct fuel in tankWorn, foul, or dirty spark plug(s) Check spark plugsOverchoking Open choke fully and crank engine
Pump Noisy Air in suction line Check inlet water fittingsPump valves dirty Clean/replace pump valvesCheck valve springs worn Replace check valvesIncoming water too hot Reduce temperature/ambient
Water In Oil High humidity environment Change oil frequentlyOil seal worn Check and replace oil sealPlunger packing worn Check and replace packing
Water Dripping/Pump Plunger packing is worn Install new packing kitPlunger retainer oil ring worn Replace oil ringCracked ceramics Replace ceramics
Fluctuating Pressure Valves worn Replace with valve kitDirt or blockage in valves Clean or replace valvePump sucking air Check water/detergent supplyWorn plunger packing Replace packing kit
Pump Head Overheating Extended period in bypass Pull trigger gun for water flow
problem cause action
RAMTEQ®
n n n n
WARRANTYMANUFACTURER LIMITED WARRANTY
ENGINESHonda GX Series Engines; TWO years from date of purchase Honda will repair or replace any manufacturerdefect at their expense. To be handled by Honda Service Centers. See owners Manual for details.
PUMPSPump manufacturers offer a "one and five" limited warranty on tri-plex ceramic plunger type pumps, from dateof purchase.The body, head and power train of the pump is warranted for 5 years from date of purchase againstmanufacturer defects. See owners manual for details.The valves, packings and "o"rings are warranted for oneyear from date of purchase against manufacturer defects. See owner's manual for details. NOTE - Over HeatedPumps void all warranties.
LIMITATION OF LIABILITYRAMTEQ and Equipment Manufacturer liability for special, incidental, or consequential damages is expresslydisclaimed. In no event shall any liability exceed the purchase price of the product in question.The warrantycontained herein is in lieu of all other warranties express or implied, including any implied warranty of fitnessfor particular purpose.
NOTE - It is understood that a manufacturers limited warranty pertains to equipment used in it's prescribedmanner, without abuse, and does not include wear and tear.
NOTE - All freight charges incurred from manufacturer's warranty situations are the responsibility of the cus-tomer.
Specifications, Warranties and Pricing are subject to change without notice.
*Refund does not include shipping/handling fees. No refund will be given for installation kits. Customer isresponsible for lost or misdirected packages. It is recommended that the customer insure the package for itsfull retail value. This warranty does not cover or include any damage as a result of acts of God, improperinstallation, alteration, negligence or abuse.