mute menu sourceall-weather media controller with 3" display owner’s manual mute source menu...
TRANSCRIPT

M T X . C O M
AWMC3ALL-WEATHER MEDIA CONTROLLER WITH 3" DISPLAY
OWNER’S MANUAL
MUTE
SOURCE
MENU
Song Title
BLUETOOTH 11:00PM
ArtistAlbum
23/25
3:08

M T X . C O M2
IMPORTANT NOTICEIf you have any questions regarding wire routing in a vehicle, please contact MTX Technical Support at 1-800-225-5689.
When connecting power and ground wires ensure that the red power wire is fused at the point where it is connected to the vehicle’s battery. Failure to do so can result in damage to the vehicle if a short circuit develops between the vehicle connection point and the product.
PRODUCT INFORMATIONModel #Serial #Dealer’s NameDate of Purchase
IN THE BOX• All-Weather Media Controller• Mounting Plate• U-Shape Mounting Bracket• (4) M3.5 x 30MM Machine Screws• (4) M4 Hex Nuts
INTRODUCTIONThank you for purchasing this MTX Audio all-weather media controller that is designed to work with most Bluetooth® enabled devices including iPhone® and Android® smartphones and tablets. This easy to install and use head unit is capable of transforming your Bluetooth® enabled mobile device into the center of your vehicle’s audio system. Congratulations and enjoy the ultimate audio experience with MTX!
FEATURES• 3" Full Color TFT Display• SiriusXM-Ready™ (SiriusXM Connect Vehicle Tuner and Subscription Sold Separately) • AM / FM / WB Tuner• Bluetooth® Audio Streaming• Internal4x50WattPowerAmplifier• AUX Input• USB Charging • iPhone® - Unit Will Charge and Play Music Through USB* • Android® - Unit Will Charge, but Will Not Play Music Through USB • Unit Will Play Music and Display Album Artwork Using a USB Memory Stick (.mp3)• Weather Resistant (IP66)• Selectable EQ• 2 Sets of Preouts (Front / Rear)• Backlit Control Buttons
*Made for iPhone 5s, iPhone SE, iPhone 6, iPhone 6 Plus, iPhone 6s, iPhone 6s Plus, iPhone 7, iPhone 7 Plus

M T X . C O M 3
WIRE CONNECTION
POWER AND SPEAKER CONNECTION
20A 123456789101112
SXM(SiriusXM Connect Tuner Sold Separately)
Black
AUX In
Grey
Line Out (Front)
Brown
Line Out (Rear)
Antenna
DIN
USB
Power / Speaker Connector
20A 123456789101112
SXM(SiriusXM Connect Tuner Sold Separately)
Black
AUX In
Grey
Line Out (Front)
Brown
Line Out (Rear)
Antenna
DIN
USB
Power / Speaker Connector
Pin # Wire Color WireDefinition
111261
White / BlackWhiteGreen / BlackGreen
Front Left Speaker (-)Front Left Speaker (+)Rear Left Speaker (-)Rear Left Speaker (+)
5498
GreyGrey / BlackPurplePurple / Black
Front Right Speaker (+)Front Right Speaker (-)Rear Right Speaker (+)Rear Right Speaker (-)
2 Blue Remote Output
7
10 Yellow Battery (Fuse 20A)
3 Black Ground

M T X . C O M4
INSTALLATIONMounting (Using Mounting Plate)Tomounttheunit,findaflatsurfacewithadequateclearancebehinditthatprovidesenoughroomforthe unit and all it’s necessary wiring.• Once a mounting location has been determined, cut a circular hole 3" (77mm) in diameter.• After the hole is cut, slide the unit and wiring through the hole. A piece of self adhesive EVA foam is supplied in order to create a water resistant seal. This may be placed on the back side of the unit if desired.• Slide the mounting plate over the backside of the unit and secure with the supplied screws.• Press on the trim bezel to the front side of the unit.• Plug in all wiring harnesses and cables. Refer to the wiring diagram for wire harness connection types.
Mounting (Using U Shape Bracket)Tomounttheunit,findaflatsurfacewithadequateclearancebehinditthatprovidesenoughroomforthe unit and all it’s necessary wiring.• Once a mounting location has been determined, cut a circular hole 3" (77mm) in diameter.• After the hole is cut, slide the unit and wiring through the hole. A piece of self adhesive EVA foam is supplied in order to create a water resistant seal. This may be placed on the back side of the unit if desired.• Slide the U bracket over the two studs on the back of the unit. Tighten down with supplied nuts.• Press on the trim bezel to the front side of the unit.• Plug in all wiring harnesses and cables. Refer to the wiring diagram for wire harness connection types.
Trim Bezel
Panel
Nuts
U Shape Bracket
Source Unit
Mounting Plate
Source Unit
Trim BezelMounting Screws
Panel
Trim Bezel
Panel
Nuts
U Shape Bracket
Source Unit
Mounting Plate
Source Unit
Trim BezelMounting Screws
Panel
M T X . C O M 5
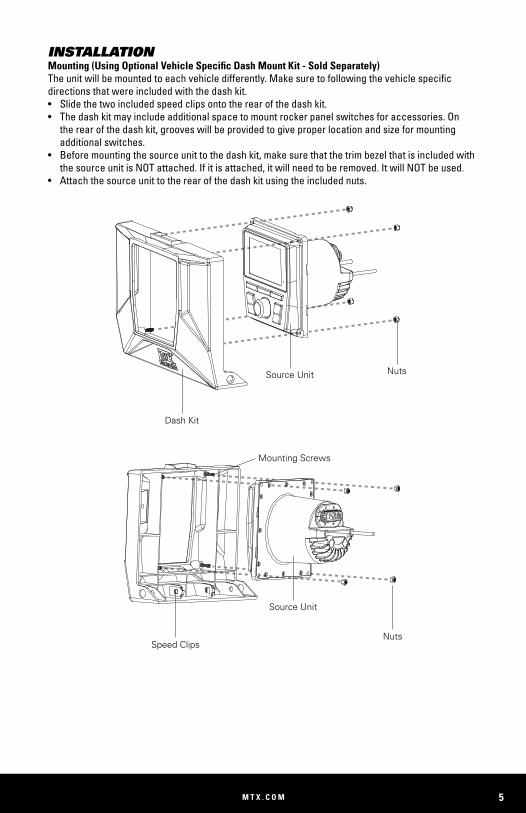
INSTALLATIONMounting (Using Optional Vehicle Specific Dash Mount Kit - Sold Separately)Theunitwillbemountedtoeachvehicledifferently.Makesuretofollowingthevehiclespecificdirections that were included with the dash kit. • Slide the two included speed clips onto the rear of the dash kit.• The dash kit may include additional space to mount rocker panel switches for accessories. On the rear of the dash kit, grooves will be provided to give proper location and size for mounting additional switches.• Before mounting the source unit to the dash kit, make sure that the trim bezel that is included with the source unit is NOT attached. If it is attached, it will need to be removed. It will NOT be used.• Attach the source unit to the rear of the dash kit using the included nuts.
Speed Clips
Dash Kit
Mounting Screws
Nuts
Nuts
Source Unit
Source Unit

M T X . C O M6
CONTROLS
1. Power Button ( ) - This push button (On / Off) supplies power to the head unit.
2. Volume / Function Control Knob - Rotate knob to set values and control volume. Press and hold knobfor3secondstoaccessEQmenuandconfirmfunctionvalues.
3. Source Button - This push button switches between audio sources. Use the Function Control Knob (2)tochangeandconfirmselections.
4. Mute Button - This push button mutes the audio.
5. Menu Button - This push button accesses the Radio / Bluetooth® / Sirius XM settings. Hold the Menu button to access the General settings. Tap the Menu button while in a menu to exit the current menu.
6. Previous / Next Buttons ( / ) - These push buttons switch between the previous and next tracks and radio stations.
7. Play / Pause Button ( ) - This push button will play and pause the audio. While in FM / AM / Sirius XM mode, the push button will access the FM1 / FM2 / FM3 / AM1 / AM2 / SXM1 / SXM2 / SXM3 bands.
8. LCD Display
MUTE
SOURCE
MENU
Song Title
BLUETOOTH 11:00PM
ArtistAlbum
23/25
3:08
1
8
66
54 2
7
3MUTE
SOURCE
MENU
Song Title
BLUETOOTH 11:00PM
ArtistAlbum
23/25
3:08
MUTE
SOURCE
MENU
Song Title
BLUETOOTH 11:00PM
ArtistAlbum
23/25
3:08
MUTE
SOURCE
MENU
Song Title
BLUETOOTH 11:00PM
ArtistAlbum
23/25
3:08
MUTE
SOURCE
MENU
Song Title
BLUETOOTH 11:00PM
ArtistAlbum
23/25
3:08

M T X . C O M 7
GENERAL OPERATIONSSwitching On and OffPress Power Button ( ) to turn the device On. Hold Power Button ( ) to turn the device Off.
Operating ModePress Source Button to switch between radio reception (AM / FM / WB / SXM), audio input (AUX), USB and Bluetooth® audio streaming (BT MUSIC). Rotate the VOL knob to change selections and press VOL knob to enter operating mode.
VolumeRotate VOL knob to set the volume.
Sound SettingsHold VOL knob for 3 seconds to enter EQ.EQ options: • Rotate VOL knob to select a between a variety of preset modes (Custom, Classic, Jazz, Rock, Pop, Optimal). In Custom mode, press the VOL knob to select the frequency band (it will be highlighted). Rotate the knob to adjust the level, to the desired amount. Too much boost will cause distortion.• PressMenuButtontoconfirm.
MutePress the Mute Button to mute the audio output. Press the mute button again to unmute the audio.
General Setting• Hold Menu Button for 2 seconds to access the General Settings. • Rotate VOL knob to the option to be selected. Press the VOL knob to enter.1. ClockMode-RotateVOLknobtoswitchbetween12Hand24H.PressVOLknobtoconfirm.2. Clock Adjust - Hours and Minutes can be selected by rotating the VOL knob. Pressing the VOL knob will select the HR or MIN and the value can then be changed by rotating the knob. Pressing theknobwillconfirmthesetting.PresstheMenuButtontoexitfromclocksettings.3. Back Light - Rotate VOL knob to Back Light. Press VOL knob to enter. Rotate VOL knob right to switch between Low / Mid / High / Auto lighting.4. FadeandBalance-RotateVOLknobtoFadeorBalanceandpresstoconfirm.RotateVOLknobto adjust.PressingtheVOLknobasecondtimeconfirmssettingandswitchestotheothersetting (fade/balance). Rotating the knob adjusts the second setting. Press the Menu Button to exit.5. EQ - Press VOL knob. Rotate VOL knob to EQ Setup. Press VOL knob to enter. Rotate VOL knob to selectavarietyofpresetmodes.PressVOLknobtoconfirm.PresstheMenuButtontoexittheEQ setup.6. Version - Rotate VOL knob to Version. Press VOL knob to view the current DVD Version and MCU Version. 7. Factory Reset - Rotate VOL knob to Factory Reset. Press VOL knob to select. Rotate to YES or NO. Press VOL knob on YES to reset to factory default.• Press the Menu Button to exit General Menu.
MUTE
SOURCE
MENU
Song Title
BLUETOOTH 11:00PM
ArtistAlbum
23/25
3:08
MUTE
SOURCE
MENU
Song Title
BLUETOOTH 11:00PM
ArtistAlbum
23/25
3:08

M T X . C O M8
RADIO FUNCTIONSSelecting Radio Band• Press Source Button and rotate VOL knob. • Press VOL knob to select radio band. • Select FM or AM band.
Automatic or Manual Search Frequencies• Press and hold the Previous / Next Buttons ( / ) to start automatic station search. The search stops when a station is found.• PressthePrevious/NextButtons(/)brieflytochangethefrequencyuntilthedesired frequency is set.
Storing Frequencies (6 Presets per FM/AM Band)• Press Menu Button to enter FM Settings. Rotate VOL knob to select Save Presets. Press the VOLknobtoconfirm.Alistofpresetswillbeshown.RotateVOLknobtothedesiredpreset.Press the VOL knob to enter the preset. Note: Press Play / Pause Button ( ) to select FM1 / FM2 / FM3 or AM1 / AM2.
Recalling Frequencies• Press Menu Button to enter FM Settings. Rotate VOL knob to select Presets. • Press the VOL knob. A list of presets will be displayed.• Rotate the VOL knob to the desired preset. Press the VOL knob to switch to the selected preset.• FM Band - Press Menu Button, and rotate to FM band. Press VOL knob to select. FM1, FM2, FM3 or AM1, AM2 will be displayed. Rotate the VOL knob to the desired selection and press the VOL knob to select.• Auto Store - Press Menu Button and rotate to Auto Store. Press VOL knob to select. The radio will scan and save the 6 strongest stations into the preset memory.• Stereo - Press Menu Button and rotate to Stereo. Press VOL knob to select. On / Off will be displayed to turn stereo tuning ON or OFF.
MUTE
SOURCE
MENU
Song Title
BLUETOOTH 11:00PM
ArtistAlbum
23/25
3:08
MUTE
SOURCE
MENU
Song Title
BLUETOOTH 11:00PM
ArtistAlbum
23/25
3:08
MUTE
SOURCE
MENU
Song Title
BLUETOOTH 11:00PM
ArtistAlbum
23/25
3:08
MUTE
SOURCE
MENU
Song Title
BLUETOOTH 11:00PM
ArtistAlbum
23/25
3:08
MUTE
SOURCE
MENU
Song Title
BLUETOOTH 11:00PM
ArtistAlbum
23/25
3:08

M T X . C O M 9
RADIO FUNCTIONSLocal• Press Menu Button to enter FM Settings. • Press VOL knob and rotate to select Local. • Press VOL knob and rotate to select Local ON / OFF. Note: Only stations with good reception quality will be played under the Local setting.
Select USA / Europe Area Frequencies• Press Menu Button to enter FM Settings.• Press VOL knob and rotate to select Radio Region.• Press VOL knob and rotate to select USA / Europe Frequencies.
SiriusXM® OPERATIONOnly SiriusXM® brings you more of what you love to listen to, all in one place. Get over 140 channels, including commercial- free music plus the best sports, news, talk, comedy and entertainment. Welcome to the world of satellite radio. A SiriusXM® Vehicle Tuner and Subscription are required. For more information, visit www.siriusxm.com.
After installing your SiriusXM® Connect Vehicle Tuner and antenna, power on your AWMC3 and select SiriusXM® mode. You should be able to hear the SiriusXM® preview channel on Channel 1. If you cannot hear the preview channel, please check the installation instructions to make sure your SiriusXM® Connect tuner is properly installed.
Afteryoucanhearthepreviewchannel,tunetoChannel0tofindtheRadioIDofyourtuner.Inaddition, the Radio ID is located on the bottom of the SiriusXM® Connect Vehicle Tuner and its packaging. You will need this number to activate your subscription. Write the number down for reference.
Note: the SiriusXM® Radio ID does not include the letters I, O, S or F.
In the USA, you can activate online or by calling SiriusXM® Listener care: • Visit www.siriusxm.com/activatenow • Call SiriusXM® Listener Care at 1-866-635-2349
For Canadian Subscriptions, please contact:• Visit www.siriusxm.ca/activatexm• Call XM customer Care at 1-877-438-9677

M T X . C O M10
SiriusXM® OPERATIONSelecting SiriusXM• Press the Source Button and rotate VOL knob.• Press VOL knob to select SXM mode.Note: If there is no SiriusXM® Tuner connected this mode will be skipped. Please connect your SiriusXM® Tuner to the SiriusXM® port located at the back of the unit.
Manual Channel SelectionPressthePrevious/NextButtons(/)brieflytochangethechanneluntilthedesiredchannelis set.
Rapid Channel BrowsingPress and hold the Previous / Next Buttons ( / ) buttons to enter Rapid Channel Browsing mode. When the button is released, the LCD will show the information of the last channel. The current channel will automatically play after 3 seconds.
Direct TuningHold the Play / Pause Button ( ) for 3 seconds. Rotate the VOL knob to enter each station digit. After all 3 digits are input, the radio will directly tune to the desired station.
Category ListTo access the Category Selection mode, press the Menu Button to enter SXM Settings. Select Category List. Rotate the VOL knob to select a desired category.
Band of Presets SelectionIn SiriusXM mode, short press the Play / Pause Button ( ) to change the band of presets. The current band of presets will change in the following order: SXM1 – SXM2 – SXM3. Each band can hold up to six preset channels, for a total of eighteen preset channels.
User ResetIn SiriusXM mode, press the Menu Button and rotate the VOL knob to scroll down to SXM FACTORY DEFAULT.PresstheVOLknobtoconfirmintheSXMSetupmenu.Thiswillrestoretheproducttothefactory default condition. This includes, but is not limited to Last Channel Tuned, Restore Presets/Favorites to Factory Settings, etc. This will not affect any of the other AWMC3 settings, only the SiriusXM® settings and presets.
Add Preset ChannelIn SiriusXM mode, press the Menu Button to enter SXM Setup menu. Rotate the VOL knob to SAVE PRESETSandpresstheknobtoconfirm.SixpresetchannelsperbandcanbestoredinthePresetMenu, for a total of eighteen preset channels. Rotate the VOL knob to select the desired stored preset number(1-6)andpresstheknobtoconfirm.TheSXMmaininterfacewillreturnanddisplay1/2/3/4 / 5 / 6 on the screen.
Recall Preset ChannelIn SiriusXM mode, the preset channels can be stored. Press the Menu Button to enter SXM Settings menu. Rotate the VOL knob to PRESETS and press the knob to recall the channel.
MUTE
SOURCE
MENU
Song Title
BLUETOOTH 11:00PM
ArtistAlbum
23/25
3:08
MUTE
SOURCE
MENU
Song Title
BLUETOOTH 11:00PM
ArtistAlbum
23/25
3:08MUTE
SOURCE
MENU
Song Title
BLUETOOTH 11:00PM
ArtistAlbum
23/25
3:08
MUTE
SOURCE
MENU
Song Title
BLUETOOTH 11:00PM
ArtistAlbum
23/25
3:08
MUTE
SOURCE
MENU
Song Title
BLUETOOTH 11:00PM
ArtistAlbum
23/25
3:08
MUTE
SOURCE
MENU
Song Title
BLUETOOTH 11:00PM
ArtistAlbum
23/25
3:08

M T X . C O M 11
SiriusXM® OPERATIONParental ControlSiriusXM® channels can be locked, and will need a pass code to access. The default code is “5220”. If the pass code is forgotten, simply run the SXM Factory Default to reset the pass code.GUIDE ON HOW TO ENTER THE CODE USING THE VOLUME BUTTON:Whenthefirstcharacterisflashing,turntherotaryknobtoselectnumber5andpresstoenter.Whenthesecondcharacterflashes,usethesameoperationtoselecttherestofthecharacters“2”,”2”,”0”.Presstherotaryknobtoconfirm.
Temporary UnlockA locked channel can be temporarily unlocked by entering the lock code. When tuning to a locked channel, a prompt will appear giving the option to enter the lock code. Entering the lock code will unlock all locked channels until the head unit is powered off. Once powered back on, all locked channels will return to their previous locked state.
To Change the CodeA custom lock code can be created by accessing Manage Lock Code in the SXM Settings menu. Pressing the VOL knob will start this process. The current code will be requested to allow a new code to be created that will lock or unlock channels.
Troubleshooting
Advisory Name Recommended Description
Check Antenna The radio has detected a fault with the SiriusXM® antenna. The antenna cable may be either disconnected or damaged.
Verify that the antenna cable is connected to the SiriusXM® Connect Vehicle Tuner.
Inspect the antenna cable for damage and kinks. Replace the antenna if the cable is damaged.
SiriusXM® products are available at your local car audio retailer or online at www.shop.siriusxm.com.
Check Tuner The radio is having difficulty communicating with the SiriusXM® Connect Vehicle Tuner. The tuner may be disconnected or damaged.
Verify that the SiriusXM® Connect Vehicle Tuner cable is securely connected to the radio.
No Signal The SiriusXM® Connect Vehicle Tuner is having difficulty receiving the SiriusXM® satellite signal.
Verify that your vehicle is outdoors with a clear view of the sky.
Verify that the SiriusXM® magnetic mount antenna is mounted on a metal surface on the outside of the vehicle.
Move the SiriusXM® antenna away from any obstructions.
Inspect the antenna cable for damage and kinks.
Consult the SiriusXM® Connect Vehicle tuner installation manual for more information on antenna installation. Replace the antenna if the cable is damaged. SiriusXM® products are available at your local car audio retailer or online at www.shop.siriusxm.com.

M T X . C O M12
SiriusXM® OPERATIONTroubleshooting (cont)
Subscription Updated The radio has detected a change in your SiriusXM® subscription status. Press any button to clear the message.
In the U.S.A., visit www.siriusxm.com or call 1- 866- 635- 2349 if you have questions about your subscription. In Canada, visit www.siriusxm.ca or call 1- 877- 438- 9677 if you have questions about your subscription.
Channel Unavailable The channel that you have requested is not a valid SiriusXM® channel or the channel that you were listening to is no longer available. You may also see this message briefly when first connecting a new SiriusXM® Connect Vehicle tuner.
Visit www.siriusxm.com for more information about the SiriusXM channel lineup.
Channel Unsubscribed The channel that you have requested is not included in your SiriusXM® subscription package or the channel that you were listening to is no longer included in your SiriusXM® subscription package.
In the U.S.A., visit www.siriusxm.com or call 1-866-635-2349 if you have questions about your subscription package or would like to subscribe to this channel. In Canada, visit www.siriusxm.ca or call 1-877-438-9677.
Channel Locked The channel that you have requested is Locked by the radio Parental Control feature. See the section on Parental Control, page 11 for more information on the Parental Control feature and how to access locked channels.
No Content TuneScan is not available. Perform the operation with another preset channel.
M T X . C O M 13
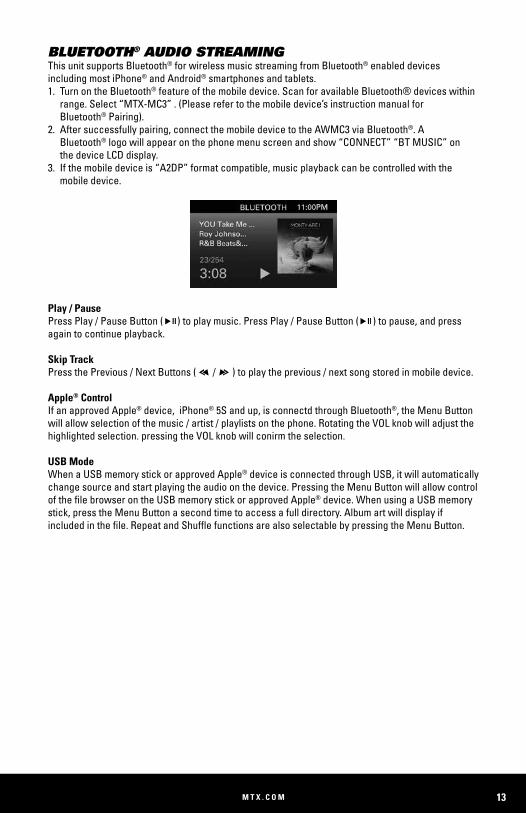
BLUETOOTH® AUDIO STREAMINGThis unit supports Bluetooth® for wireless music streaming from Bluetooth® enabled devices including most iPhone® and Android® smartphones and tablets. 1. Turn on the Bluetooth® feature of the mobile device. Scan for available Bluetooth® devices within range. Select “MTX-MC3” . (Please refer to the mobile device’s instruction manual for Bluetooth® Pairing).2. After successfully pairing, connect the mobile device to the AWMC3 via Bluetooth®. A Bluetooth® logo will appear on the phone menu screen and show “CONNECT” “BT MUSIC” on the device LCD display.3. If the mobile device is “A2DP” format compatible, music playback can be controlled with the mobile device.
Play / PausePress Play / Pause Button ( ) to play music. Press Play / Pause Button ( ) to pause, and press again to continue playback.
Skip TrackPress the Previous / Next Buttons ( / ) to play the previous / next song stored in mobile device.
Apple® ControlIf an approved Apple® device, iPhone® 5S and up, is connectd through Bluetooth®, the Menu Button will allow selection of the music / artist / playlists on the phone. Rotating the VOL knob will adjust the highlighted selection. pressing the VOL knob will conirm the selection.
USB ModeWhen a USB memory stick or approved Apple® device is connected through USB, it will automatically change source and start playing the audio on the device. Pressing the Menu Button will allow control ofthefilebrowserontheUSBmemorystickorapprovedApple® device. When using a USB memory stick, press the Menu Button a second time to access a full directory. Album art will display if includedinthefile.RepeatandShufflefunctionsarealsoselectablebypressingtheMenuButton.
MUTE
SOURCE
MENU
Song Title
BLUETOOTH 11:00PM
ArtistAlbum
23/25
3:08
MUTE
SOURCE
MENU
Song Title
BLUETOOTH 11:00PM
ArtistAlbum
23/25
3:08MUTE
SOURCE
MENU
Song Title
BLUETOOTH 11:00PM
ArtistAlbum
23/25
3:08
MUTE
SOURCE
MENU
Song Title
BLUETOOTH 11:00PM
ArtistAlbum
23/25
3:08
M T X . C O M14
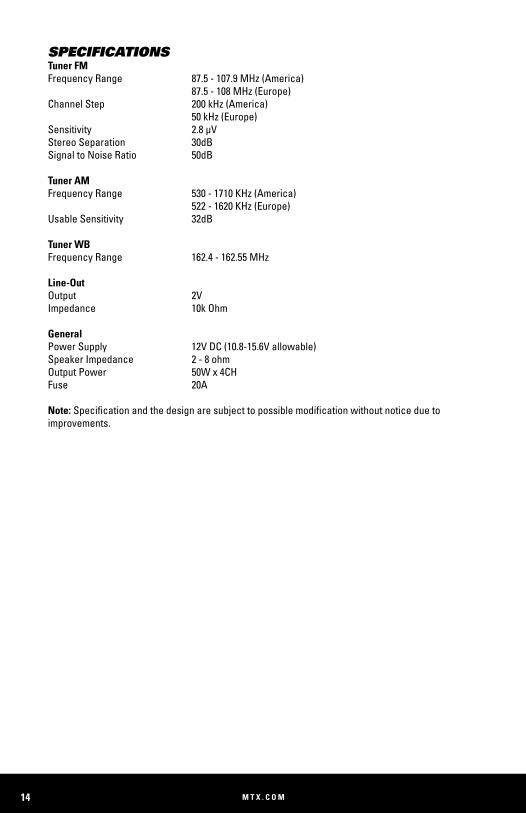
SPECIFICATIONSTuner FMFrequency Range 87.5 - 107.9 MHz (America) 87.5 - 108 MHz (Europe)Channel Step 200 kHz (America) 50 kHz (Europe)Sensitivity 2.8 μVStereo Separation 30dBSignal to Noise Ratio 50dB
Tuner AMFrequency Range 530 - 1710 KHz (America) 522 - 1620 KHz (Europe)Usable Sensitivity 32dB
Tuner WBFrequency Range 162.4 - 162.55 MHz
Line-OutOutput 2VImpedance 10k Ohm
GeneralPower Supply 12V DC (10.8-15.6V allowable)Speaker Impedance 2 - 8 ohmOutput Power 50W x 4CHFuse 20A
Note: Specificationandthedesignaresubjecttopossiblemodificationwithoutnoticeduetoimprovements.

M T X . C O M 15
NOTES:

M T X . C O M16
This equipment has been tested and found to comply with the limits for a Class B digital device, pursuant to Part 15 of the FCC rules. These limits are designed to provide reasonable protection against harmful interference in a residential installation. This equipment generates, uses, and can radiate radio frequency energy and, if not installed and used in accordance with the instructions, may cause harmful interference to radio communications. However, this is no guarantee that interference will not occur in a particular installation. If this equipment does cause harmful interference to radio or television reception, which can be determined by turning the equipment off and on, you are encouraged to try to correct the interference by one or more of the following measures:
• Reorient or relocate the receiving antenna.• Increase the separation between the equipment and receiver.• Connect the equipment to an outlet on a different circuit than the one to which the receiver is connected.• Consult the dealer or an experienced radio/TV technician for help.
Changes or modifications not expressly approved by Mitek Corporation could void the user’s authority to operate this equipment. This device complies with part 15 of the FCC Rules. Operation is subject to the following two conditions: (1) This device may not cause harmful interference, and (2) this device must accept any interference received, including interference that may cause undesired operation
© 2017 Mitek Corporation. All rights reserved. MTX is a trademark of Mitek Corporation. Designed and Engineered in the U.S.A. Apple and iPhone are registered trademarks of Apple Inc. Android is a trademark of Google Inc. Sirius, XM and all related marks and logos are trademarks of Sirius XM Radio, Inc. Bluetooth is a registered trademark of Bluetooth SIG. All rights reserved. All other trademarks cited herein are the property of their respective owners.
Due to continual product development, all specifications are subject to change without notice.
MTX Audio, 4545 East Baseline Rd. Phoenix, AZ 85042 U.S.A. 1-800-225-5689
MTX005460 RevF 7/17 • 21A10617 • AW0015490